1
DIGITAL COAX USER MANUAL
Thank you for buying FlatWire. This high-performance system enriches
the audio and aesthetic quality of all environments. FlatWire can be painted
to greatly reduce the visibility of wire on your wall, or completely hidden
with mesh tape, concealing compound (mud) & paint. Please read all
instructions before initiating your installation.
Please visit www.FlatWireReady.com for additional products, FAQs
and technical assistance.
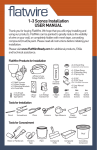
FlatWire Products Required for Installation
x 10 or 20 feet
of PWR Series:1
Pair FlatWire
x1 Custom
Terminator
(2 pieces)
RCA Patch
Cord
x1 1 foot
x1 2 foot
x2
Digital Coax
Wall Box
x2 Digital
Coax Wall Box
Backplate
x12 Flat
Head
Screw
x1 DVD
x1 Spray
Adhesive
x1 Mesh
Tape
x1 User
Manual
Tools for Installation
Pencil
Screwdriver
Pliers
Scissors
Tape Measure
Plastic
Smoother
Level
Tools for Concealment
‘Mud’
Roller or Paintbrush
Painter’s
Tape
Paint
Compound
Knife
Compound
Tray
Concealing
Compound
Important Safety Instructions
SAVE THESE INSTRUCTIONS
INSTRUCTIONS PERTAINING TO A RISK OF FIRE, OR INJURY
IMPORTANT SAFETY INSTRUCTIONS
→
→
Read all instructions.
Do not install this surround sound system in a moist or wet location.
Hazards & Warning For FlatWire Ready® Spray Adhesive:
DANGER:
→
→
→
→
→
→
→
EXTREMELY FLAMMABLE
LIQUID AND VAPOR.
VAPORS MAY CAUSE FLASH FIRES.
CONTENTS UNDER PRESSURE.
VAPORS HARMFUL. CAUSES EYE IRRITATION.
HARMFUL OR FATAL IF SWALLOWED.
KEEP OUT OF REACH OF CHILDREN. DO NOT TAKE INTERNALLY
DANGER: CONTAINS HEXANE (110-54-3), ACETONE (67-64-1), XYLENE
(1330-20-7), METHYL ETHYL KETONE (78-93-3), PROPANE (74-98-6) AND
ISOBUTANE (75-28-5). Causes eye, skin, nose, throat and respiratory tract
irritation. Vapor harmful. May affect the brain or nervous system causing
dizziness, headache, nausea or unconsciousness. Prolonged exposure to
skin may cause dermatitis. May be harmful if absorbed through the skin.
Prolonged vapor inhalation may result in severe physical injuries. Hexane
exposure can cause peripheral nerve damage to arms and legs, which may
be permanent. May be toxic to blood, liver, kidneys and reproductive system.
PRECAUTIONARY MEASURES FOR USE, HANDLING, STORAGE AND
DISPOSAL: Vapors may ignite explosively. Vapors may cause a flash fire.
Prevent buildup of vapors by providing fresh air such that chemical odors can
not be detected during use and while drying. Open all windows and doors.
Keep away from heat, sparks and open flames. DO NOT smoke. Vapors may
travel long distances to a source of ignition and flash back. Extinguish all
flames and pilot lights, and turn off stoves, heaters, electric motors, burners
and other sources of ignition and static electricity. Disconnect all appliances
during use and until all vapors are gone. Vapors are heavier than air and will
collect in low areas. Check all low areas (basements, sumps etc.) for vapor
before entering. DO NOT breathe vapors. Odor is not an adequate warning for
hazardous conditions. If you experience eye watering, headache or dizziness
or if air monitoring demonstrates vapor levels that are above applicable
2
FlatWire Ready® Spray Adhesive
Cautionary Information Continued
limits, wear an appropriate, properly fitted respirator during use and after
application. Follow respirator manufacturer’s directions for respirator use.
DO NOT get in eyes, on skin or clothing. Wear appropriate gloves to prevent
skin contact (neoprene or nitrile). Wear goggles or protective glasses with
side shields. Wash thoroughly after handling. DO NOT use or store in direct
sunlight. DO NOT expose to heat or store at temperatures above 120ºF. Store
away from stoves and radiators. Exposure to heat or prolonged exposure to
direct sunlight may cause bursting of the can. DO NOT puncture or incinerate
(burn) can. Close container after use. See Material Safety Data Sheet for
additional information. For a Material Safety Data Sheet contact your supplier
or visit www.flatwireready.com.
FIRST AID:
EYE CONTACT: Flush immediately with large amounts of water for at least 15
minutes and get medical attention immediately.
SKIN CONTACT: Wash thoroughly with soap and water.
INHALATION: If you experience difficulty breathing, leave the area to
obtain fresh air. If continued difficulty is experienced, get medical attention
immediately.
INGESTION: DO NOT INDUCE VOMITING. Call physician immediately.
CALL 1-800-327-3874 IF IRRITATION OR COMPLICATIONS ARISE FROM
ANY OF THE ABOVE ROUTES OF EXPOSURE (U.S. and Canada).
CALL 1-800-535-5053 FOR CHEMICAL EMERGENCIES such as SPILLS,
LEAKS, FIRE, EXPOSURE OR ACCIDENT.
3
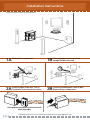
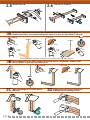
Installation Instructions
Plan the location of your system elements
1A: Mark path to components
Measure path to ensure you have
1B:enough
FlatWire on hand.
Connect Digital Coax wire: TOP of
2A: Terminator
faces away from surface
Connect provided patch cords to Wall
2B:Boxes
and your components
Place powered subwoofer in front of electrical
outlet, if possible.
4
Follow Directions for Use & Cautionary Instructions on Spray Adhesive can.
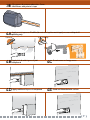
2C: Test Digital Coax FlatWire
Attach one Wall Box to mounting
2D:surface
with 4 screws
Pan Head
Screw
Attach Wall Box backplate to surface
2E: with
2 screws
patch cords and non2F: Disconnect
mounted Wall Box
Pan Head
Screw
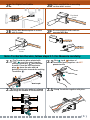
Note: To shorten the wire, follow steps 2.1-2.6. Measure carefully.
The Terminator piece printed with
: Click top & bottom of
2.1:“TOP”
must face away from the
2.2
Terminator gently together - do NOT
existing Terminator , and sit below
penetrate wire
A
A
C
{
the wire. Place the 2nd Terminator
piece B above the wire with tab
pointing along wire towards the existing
Terminator C .
C
B
B
B
A
New Length
A
Check that the wire pattern is aligned
2.3:through
the window of Terminator tab
2.4: Clamp Terminator together with pliers
5
2.5: Break away tab
2.6: Trim excess FlatWire
Shake can. Spray adhesive to path for concealment with joint compound, or spray
3A: FlatWire
directly for concealment with paint. Spray 8’ or less at a time. Wait 60 seconds.
If
mudding
If painting
then
then
3B
WAIT
SEC
Follow Directions for Use & Cautionary Instructions on Spray Adhesive can.
: Spray Adhesive into the folds and wait 60 seconds before completing a folded corner.
Press FlatWire to path with smoothing tools
If
mudding
then
If painting
then
WAIT
SEC
Apply sweeping pressure with plastic
in wire and attach 2nd wall box
3C:smoother
3D:&Plugbackplate
to mounting surface
Pan Head
Screw
6
Disconnect & remove subwoofer: Cover
3E: Wall
Boxes with painter’s tape
Apply mesh tape over FlatWire (do not overlap the mesh tape), or cover with paint if
4A: painting
only
If painting
If
then
Apply thin & wide layers of joint
4B:compound
mudding
then
4C: Sand uneven or lumpy areas
4D: Apply additional layers of compound 4E: Sand until blended with surface
7
4F: Paint
4G: Reconnect system elements and enjoy!
WAIT
Please visit www.FlatWireReady.com for Tips & Tricks as well as FAQs
about the product installation.
8
Troubleshooting: Tips & Tricks
→
→
→
→
→
→
→
→
→
→
Clean surfaces of dirt and loose particles
Work in sections 8 feet or less when adhering FlatWire to surfaces.
Minimize folds as possible.
Spray adhesive into folds to avoid air bubbles.
Don’t install FlatWire where you intend to hang pictures.
Run FlatWire adjacent to molding or trim.
Insert under chair rail as possible, & when FlatWire runs over chair rail, do not use
compound on the chair rail - only paint the FlatWire.
Avoid layering runs of FlatWire, when possible.
Consider using textured paint.
Use a flexible plastic wallpaper smoothing tool for professional results.
For Further Installation Tips & Tricks or Helpful Suggestions, call:
1-888-FLATWIRE
9
Southwire Company
One Southwire Drive
Carrollton, Georgia 30119
www.FlatWireReady.com