1
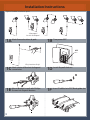
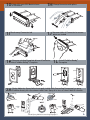
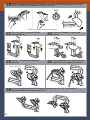
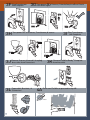
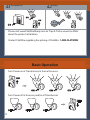
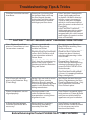
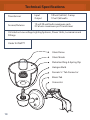
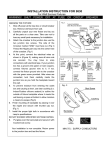
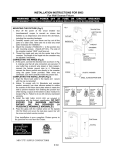
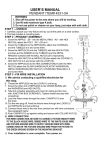
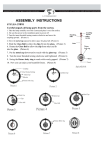
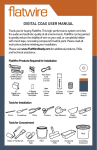
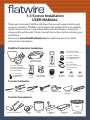
1-3 Sconce Installation
USER MANUAL
Thank you for buying FlatWire. We hope that you will enjoy installing and
using our products. FlatWire can be painted to greatly reduce the visibility
of wire on your wall, or completely hidden with mesh tape, concealing
compound (mud) & paint. Please read all instructions before initiating your
installation.
Please visit www.FlatWireReady.com for additional products, FAQs
and technical assistance.
FlatWire Products for Installation
x0-3 Check Ring
Included with certain Sconces
x1-3 Glass Dome
x1-3 Retention Ring
x1-3 Spring Clip
x25 feet of Low
Voltage FlatWire
x1-3 Wall Sconces
x1-3 Glass Shades
x1-3 Mounting Brackets
x2-6 Finial Nuts
x1-3 20 watt
Halogen Bulbs
Type Q20T3
x2-5 CPC
x2-5 CPC Back
x1 Spray
Adhesive
x1Face
Plate
x1
Low Voltage
Transformer
x1 Mesh
Tape
CPC + CPC Back= Connector
x1 User Manual
x1 DVD
x2-6
Drywall
Anchors
x2-6
Phillips
Screws
x2-6
Slotted
Screws
Tools for Installation
Pencil
Screwdrivers
Pliers
Scissors
Tape Measure
Plastic
Smoother
Level
Tools for Concealment
‘Mud’
Roller or Paintbrush
Painter’s
Tape
Paint
Compound
Knife
Compound
Tray
Concealing
Compound
Important Safety Instructions
SAVE THESE INSTRUCTIONS
INSTRUCTIONS PERTAINING TO A RISK OF FIRE, OR INJURY
IMPORTANT SAFETY INSTRUCTIONS
→→
→→
→→
→→
→→
→→
→→
→→
→→
→→
→→
→→
→→
→→
→→
→→
→→
Read all instructions.
Do not conceal or extend exposed conductors through a building wall.
Do not install this system in wet locations.
To reduce the risk of fire and burns, do not install this lighting system where the
exposed bare conductors can be shorted or contact any conductive materials.
To reduce the risk of fire and overheating, make sure all connections are tight.
Do not install any luminaire closer than 6 inches (15.25 cm) from any curtain, or
similar combustible materials.
Turn off electrical power before modifying the lighting system in any way.
Lighted lamp is HOT!
WARNING – To reduce the risk of FIRE OR INJURY: Turn off power and allow to
cool before replacing lamp.
Lamp gets HOT quickly! Contact only switch/plug when turning on.
Do not touch hot lens, guard, or enclosure.
Keep lamp away from materials that may burn.
Do not touch the lamp at any time. Use a soft cloth. Oil from skin may damage
lamp.
Do not operate the luminaire with a missing or damaged shield.
Do not install this sconce lighting system in a moist or wet location.
Only wall sconces approved for use with the FlatWire system may be installed.
Fixtures must be FlatWire Ready®.
Load the circuit of the transformer to no more than 60 watts.
Hazards & Warning For FlatWire Ready® Spray Adhesive:
DANGER:
→→
→→
→→
→→
→→
→→
→→
1
EXTREMELY FLAMMABLE
LIQUID AND VAPOR.
VAPORS MAY CAUSE FLASH FIRES.
CONTENTS UNDER PRESSURE.
VAPORS HARMFUL. CAUSES EYE IRRITATION.
HARMFUL OR FATAL IF SWALLOWED.
KEEP OUT OF REACH OF CHILDREN. DO NOT TAKE INTERNALLY
FlatWire Ready® Spray Adhesive
Cautionary Information Continued
DANGER: CONTAINS HEXANE (110-54-3), ACETONE (67-64-1), XYLENE (133020-7), METHYL ETHYL KETONE (78-93-3), PROPANE (74-98-6) AND ISOBUTANE
(75-28-5). Causes eye, skin, nose, throat and respiratory tract irritation. Vapor
harmful. May affect the brain or nervous system causing dizziness, headache,
nausea or unconsciousness. Prolonged exposure to skin may cause dermatitis. May
be harmful if absorbed through the skin. Prolonged vapor inhalation may result in
severe physical injuries. Hexane exposure can cause peripheral nerve damage to
arms and legs, which may be permanent. May be toxic to blood, liver, kidneys and
reproductive system.
PRECAUTIONARY MEASURES FOR USE, HANDLING, STORAGE AND DISPOSAL:
Vapors may ignite explosively. Vapors may cause a flash fire. Prevent buildup of
vapors by providing fresh air such that chemical odors can not be detected during
use and while drying. Open all windows and doors. Keep away from heat, sparks
and open flames. DO NOT smoke. Vapors may travel long distances to a source of
ignition and flash back. Extinguish all flames and pilot lights, and turn off stoves,
heaters, electric motors, burners and other sources of ignition and static electricity.
Disconnect all appliances during use and until all vapors are gone. Vapors are
heavier than air and will collect in low areas. Check all low areas (basements,
sumps etc.) for vapor before entering. DO NOT breathe vapors. Odor is not an
adequate warning for hazardous conditions. If you experience eye watering,
headache or dizziness or if air monitoring demonstrates vapor levels that are above
applicable limits, wear an appropriate, properly fitted respirator during use and
after application. Follow respirator manufacturer’s directions for respirator use. DO
NOT get in eyes, on skin or clothing. Wear appropriate gloves to prevent skin contact
(neoprene or nitrile). Wear goggles or protective glasses with side shields. Wash
thoroughly after handling. DO NOT use or store in direct sunlight. DO NOT expose to
heat or store at temperatures above 120ºF. Store away from stoves and radiators.
Exposure to heat or prolonged exposure to direct sunlight may cause bursting of
the can. DO NOT puncture or incinerate (burn) can. Close container after use. See
Material Safety Data Sheet for additional information. For a Material Safety Data
Sheet contact your supplier or visit www.flatwireready.com.
FIRST AID: EYE CONTACT: Flush immediately with large amounts of water for at
least 15 minutes and get medical attention immediately.
SKIN CONTACT: Wash thoroughly with soap and water.
INHALATION: If you experience difficulty breathing, leave the area to obtain fresh air.
If continued difficulty is experienced, get medical attention immediately.
INGESTION: DO NOT INDUCE VOMITING. Call physician immediately.
CALL 1-800-327-3874 IF IRRITATION OR COMPLICATIONS ARISE FROM ANY OF
THE ABOVE ROUTES OF EXPOSURE (U.S. and Canada).
CALL 1-800-535-5053 FOR CHEMICAL EMERGENCIES such as SPILLS, LEAKS,
FIRE, EXPOSURE OR ACCIDENT.
2
Installation Instructions
Typical FlatWire installation paths
*See page 6
for this technique*
1A: Mark Sconce locations & path
1B: Turn power OFF
OFF
*Dry Locations Only*
Mark center of Bracket & diagonal
1C:screw
holes
1D: Install Drywall Anchors
Mount Bracket to wall with Phillips
1E: Screws
into Drywall Anchors
1F: Insert FlatWire into CPC Back guide slot
3
CPC onto CPC Back to form
1G:aSlide
Connector
1H: Clamp Connector with pliers
1I: Break away Connector tab
sides of Connector to ensure
1J: Squeeze
parts are locked
Remove existing Faceplate & insert Connector
FlatWire Ready
1K:into
FlatWire Ready Faceplate
1L: Install
Faceplate
®
®
Shake Adhesive. Spray Adhesive to path to hide with Concealing Compound, or spray
2A: FlatWire
directly for concealment with Paint. Spray 8’ or less at a time. Wait 60 seconds.
If
mudding
then
If painting
then
6”
WAIT
6”
SEC
*Read Spray Adhesive warning on page 1*
4
When changing the direction of FlatWire, crease each fold, and spray Adhesive into the
2B:crease.
Wait 60 seconds and press firmly on the fold.
WAIT
6”
SEC
2C
*Read Spray Adhesive warning on page 1*
: Press FlatWire to path with Plastic
Smoothing tool
Leave 6” of loose wire looped over
2E: Bracket
Remove air bubbles & unwanted
2D:creases
Clamp Connector onto FlatWire loop &
3A: repeat
1H-1J for additional sconces
*Don’t cut wire*
or
or
Continue to 2nd and 3rd Wall Sconce by repeating steps 2A - 3B. Cut FlatWire 6”
3B:beyond
2nd Bracket & repeat steps 1F-1J.
5
Alternative Installation: Clamp Connector to center of wire length, adhere the right & left wire length to
the surface, & clamp Connectors to ends of wire.
*Read Spray Adhesive warning on page 1*
Remove Retention Ring, & insert Halogen Bulb. Do not touch bulb with bare skin. Replace
3C:Glass
Shade. Tighten Retention Ring & Glass Dome to secure Shade.
*Keep Protective Barrier in Place*
*Caution - Risk of Fire*
*Max 20 watt*
3D: Plug brass tabs into Connector, & mount to wall
Tighten Finial Nuts
3E: securely
*Use only with Southwire Add-a-Light* System*
6
3H: Turn
ONatatSconces,
source,
transformer,
& sconces:
Transformer
: Turnpower
power ON
Transformer,
& source.
Check
check
that fixture
3F: Plug
into Faceplate
3G
that fixture
lights lights
ON
ON
ON
3H: Turn power OFF at Sconces, Transformer, & source
3I: PlugintoTransformer
Faceplate
OFF
OFF
OFF
Remove FlatWire Ready Faceplate
Sconces from wall, & unplug
3K:from
the outlet
3J: Remove
brass tabs from Connectors
®
outlet, Brackets, &
3L: Tape
Connectors
4A: Paint over FlatWire or proceed to step 4B
If painting
then
7
4B: Apply Wesh Tape over FlatWire (do not overlap the Mesh Tape)
If
mudding
then
Apply thin & wide layers of Concealing
4C:Compound
4D: Sand uneven or lumpy areas
4E: Apply additional layers of Compound
4F: Sand until blended with surface
4G: Paint
4H: Attach Sconces & Transformer
8
4J: Enjoy!
4I: Turn power on
ON
ON
ON
Please visit www.FlatWireReady.com for Tips & Tricks as well as FAQs
about the product installation.
Contact FlatWire regarding the splicing of FlatWire: 1-888-FLATWIRE
Basic Operation
Turn Power on at Transformer, & then at Sconces.
ON
ON
ON
ON
Turn Power off at Sconces, and/or at Transformer.
OFF
OFF
9
OFF
OFF
Troubleshooting: Tips & Tricks
Finial Nut cannot be removed
from Base.
Sometimes the locking fluid
for the Base Studs wicks up
the Stud threads thereby
locking the Finial Nut in place
and not allowing its removal
with finger pressure alone.
If the Finial Nut is hexagonal in
shape, lightly apply pressure
in counter-clockwise direction
with the correct size wrench/
socket or with pliers wrapped
with dish-cloth around teeth of
pliers (to protect surface finish of
Finial Nut).
If the Finial Nut is spherical,
lightly apply pressure in counter
clockwise direction with pliers
wrapped with dish-cloth around
teeth of pliers (to protect surface
finish of Finial Nut).
*** CAUTION*** DO NOT REMOVE SAFETY WARNING FROM FIXTURE!
Glass Shade will not fit into
place in Fixture Base or is not
secure when mounted.
Fixture is provided with
Retention Ring already
installed on Socket.
Be sure to remove Retention
Ring PRIOR to installing Glass
Shade on Socket.
Engineering design sometimes
causes Glass Shade to only fit
in one orientation relative to
Fixture Base.
Rotate the Glass Shade until
it drops into place. If desired,
relocate safety warnings inside
Glass Shade.
Flash from the manufacturing
process may cause thread
interference with the Retention
Ring and Socket.
Remove Glass Shade and
install ONLY the Retention Ring
allowing the Retention Ring to
move the FULL EXTENT of the
Socket threads.
If you have purchased multiple
sconces, try swapping Retention
Rings among them.
Glass Dome will not fit into
place on the Retention Ring
(Check Ring).
Spring Clips are used to secure
the Glass Dome onto the
Retention Ring. It is possible
that too many Spring Clips were
applied to the Retention Ring
during manufacture.
See if there are more than one
Spring Clips between the Glass
Dome and Retention Ring. Only
one is required to secure the
Glass Dome in place.
Fixture components are not
aligned properly.
Package contents can
settle and vibrate during
transportation causing minor
alignment issues.
Once Fixture is mounted, lightly
twist portions of Fixture by hand
until you are satisfied with the
appearance of your installation.
Is Plastic Washer between
Finial Nut and Fixture Base
necessary?
Plastic washer is to protect
Fixture Base from being
marred by Finial Nut.
Once Fixture is mounted the
plastic washer can be discarded
as it is not necessary to the
function of the fixture.
Before Returning this Product PLEASE CALL: 1-888-FLATWIRE
10
Technical Specifications
Transformer
Input
Output
120 volt | 60 Hz | .5 amp
12 volt | 60 watts
Sconce/Fixtures
12 volt 20 watt bulb maximum each
3 Fixtures maximum per Transformer
UL listed as Low-voltage Lighting Systems, Power Units, Luminaires and
Fittings
Under E-254977
Glass Dome
Glass Shade
Retention Ring & Spring Clip
Halogen Bulb
Female 1/4” Tab Connector
Brass Tab
Connector
13