1
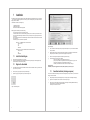
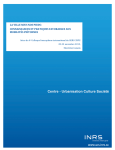
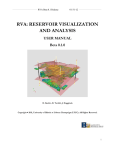
MANUAL 1.5
Manual 1.5 Version 3
quick start
step 1: open the setup panel on the button in the lower right corner
step 2: drag and drop the .elastik file in the setup up panel. For more information see page 5
step 3: choose soundbank and sound via the pulldown menu
step 4: to activate "sync to host" click on the sync button (s)
Attention: The file "soundbank.elastik" will have a different name, depending on your product.
For example, if you own "Electro ID", your soundbank will be named "Electro ID.elastik"
In any case you can recognize the soundbank by its extension ".elastik"
2
ELASTIK MANUAL 1.5
1 INSTALLATION
1.1 INSTALL THE ELASTIK ENGINE
1.2 REGISTER THE SOUNDBANK
1.3 SOUNDBANK ACTIVATION (CHALLENGE RESPONSE)
4
4
4
5
2 OVERVIEW – AT A GLANCE
2.1 THE INTERFACE
2.2 THE MOST IMPORTANT SHORTCUTS
2.2.1 Opening the Keyboard Menu:
2.2.2 Copy Sample(s)
2.2.3 Mute Sample Selection
2.2.4 Multiple Selections
2.2.5 Fine-tuning the Controls
7
7
8
8
8
8
8
8
3 LOADING, PLAYING AND BOUNCING SAMPLES
3.1 LOADING SAMPLES
3.2 PLAYBACK
3.2.1 Trigger Play Mode in the Standalone Version
3.3 BOUNCING & EXPORT
9
9
9
9
10
4 TEMPO SYNCHRONIZATION
10
5 CREATING USER PRESETS
5.1 BASIC METHOD
5.2 SAVING AND OPENING
5.3 KEYBOARD SWAP BUTTON
11
11
11
12
6 SAMPLE SETTINGS
6.1 BASICS
6.1.1 Volume
6.1.2 Panorama
6.1.3 Assigning Output
6.1.4 Loop on/off
6.1.5 Reverse (Direction)
6.2 TEMPO AND PITCH
6.2.1 Tempo
6.2.2 Pitch
6.2.2.1 Fine-tuning Pitch
6.2.3 Algorithm Selection
6.3 LOOPEYE
6.3.1 Changing the Start and End Points
6.3.2 Setting the Grid for the Start and Stop controls
6.3.3 Locking the Start and End Controls
6.3.4 Follow MIDI Button
6.4 MULTI TOOL AREA (FILTER /ENVELOPE / MAP-MODE)
6.4.1 Filter
6.4.2 Envelope
6.4.3 Map Mode
6.4.3.1 Slice Map:
6.4.3.2 Chromatic Map:
12
12
12
12
12
12
12
13
13
13
13
13
14
14
14
14
15
15
15
16
16
16
16
7 HARDWARE CONTROLLER ASSIGNMENT (AUTOMATION)
16
8 SETUP PAGE
8.1 SOUNDBANKS
8.2 RENDER CACHE
8.3 ELASTIK ALGORITHM
8.3.1 Fast
8.3.2 Pro
8.4 COLOR
18
18
18
18
18
19
19
9 CREDITS
9.1 CREDITS ELASTIK ENGINE
19
19
3
1
Installation
The Elastik engine works with the multi-soundbank concept. Different soundbanks from the Elastik product series (e.g. 60s a GoGo,
…) are managed by a single Elastik engine interface, so when you purchase a new Elastik product you don’t have to reinstall the
engine, just the new soundbank.
The installation is undertaken in the following steps:
2.1 Install the Elastik engine
2.2 Register the soundbank
2.3 Activate the soundbank with challenge response
Before you begin the installation, please have the following:
• Have your serial number ready. This is found on the inlay card.
• You will need internet access to activate via the challenge response system. It is not necessary to have internet access on
the computer where the Elastik engine is installed. You can also request the response key using the computer of someone
else you know.
• We recommend using the latest version of the Elastik engine. Please visit our website at www.ueberschall.com to download
the current version.
• Ensure that your system meets the minimum requirements:
Mac OS X 10.4, 512 MB RAM minimum, G4 500 MHz minimum
• RTAS (7.0 or later)
• AU
• VST
• Stand Alone
Windows, XP SP2, Vista 32, 512 MB RAM minimum, Pentium 800 MHz minimum
• RTAS (7.0 or later)
• VST
• Stand Alone
1.1
a)
b)
Install the Elastik Engine
Place the DVD in the appropriate drive on your computer.
On the DVD you will find folders for the platform and subfolders for the supported ports. Open the file appropriate to your
system and follow the instructions in the setup dialog.
1.2
Register the Soundbank
a)
The soundbank file is located in the folder “Soundbank” of the DVD. It has the file extension “elastik”. Copy this file to a folder
of your choice on your hard drive.
b)
Now start your host program (sequencer) and open the Elastik engine.
c)
Open the setup page by clicking on the Setup icon on the bottom right corner.
Figure 02 Setup Page
d)
Click on the "add" button. A Finder (Mac) or an Explorer (PC) window will open, which you can use to find the soundbank
file on your hard drive.
e)
After selecting the soundbank, a window opens with the license requirements for this soundbank. Please read the text
through carefully. The soundbank may only be used after accepting the license requirements.
f)
After a successful assignment the path to the soundbank file appears in the display.
g)
the first column shows you the status of your soundbank
• licensed: your soundbank is successful registered and can be used
• grace period: your soundbank is not registered but works until the grace period of e.g. 8 days is over
• not licensed: your soundbank is not registered and the grace period is over
• undefined: your soundbank has been moved. Double click on the path to reassign it.
Alternative method:
Soundbanks (*.elastik) can be dragged from the the Finder (Mac) or Explorer (PC) into the setup panel.
1.3
Soundbank activation (challenge response)
In order to use the soundbank in the Elastik engine, activation via the challenge response system is necessary. Of course, this does
not apply to the demo-soundbanks.
a)
After registering a soundbank, a special identifying code for your computer appears in the “Challenge Code” display.
b)
Copy this code to the clipboard or make careful note of the code on a piece of paper.
c)
On the internet, go to the web page: http://www.ueberschall.com and navigate to the heading USER AREA. Select "My
products" from the submenu and click on "Register New Product".
If necessary create a new user account first.
Figure 01 soundbank registration
4
5
2 Overview – At a Glance
In this short overview only the most important functions will be described, as a quick introduction.
2.1 The Interface
The interface is so constructed that most of the functions are very intuitive. However, you should be aware of the following:
• All display fields are also entry fields or else contain menus. They become visible by clicking or dragging with the mouse.
• Some functions or menus are only accessible by holding the CTRL or ALT key down while clicking with the mouse.
• Changes in the entry fields and elements are effective on the sample currently selected on the keyboard. However, it is
possible to select more than one thing and thus change several samples simultaneously.
8
3
2
10
5
4
12
Figure 03 Elastik Website
d)
Enter the serial number into the field. The serial number is found on the inner right side of the DVD case
e)
Enter the challenge code from the clipboard or enter it manually from your paper note into the “challenge code” field.
f)
After confirming you will receive the response key. Copy this into the clipboard or make written
note of it.
g)
Now open the Elastik engine again. Enter the response key into the appropriate field on the setup page.
h)
After confirming with the OK button the setup page will close.
i)
The activated soundbank will now appear in the menu structure of the Elastik engine.
j)
If the soundbank does not appear, repeat steps a) through i). If this does not work, please contact Support via the Support
form on the website http://www.ueberschall.com
9
13
11
14
7
15
6
1
Figure 04 Interface
(1) Setup Button opens the Setup Page. The soundbanks (*.elastik) are installed here and activated with the challenge response
system.
(2) Presets to load soundbanks and their programs (factory presets) via a pulldown menu.
(3) Global Master Tempo and synchronization of the engine. By clicking on the “S” the master tempo is synchronized to the host
sequencer tempo. All the currently-mapped samples of the preset keyboard are converted to this tempo.
(4) Tempo of the Currently-Selected Sample. As a default setting the sample which was just loaded onto the lower keyboard is played
in its original tempo. This tempo can be read here. An individual value can also be entered in the field, such as half or double tempo.
(5) Pitch of the Currently-Selected Sample. By pressing the button and moving the mouse in the “semi” field, the pitch of the sample
can be changed by +/-12 semitones. Fine-tuning is similarly possible in the “fine” field.
(6) Keyboard Layout C1-B3. After loading one of the factory presets the related samples are automatically mapped onto the lower
keyboard, beginning with the key C1. The sounds can be played directly by mouse click or via an external MIDI keyboard. Other
functions, such as bouncing a sample, can be called when holding the CTRL key. (See the shortcut list below)
(7) Keyboard Layout C4-B6. This keyboard area is conceived for the creation of individualized keyboard layouts (user presets). To
do this, hold the ALT key down and drag a sample from the lower keyboard (C1 – B3) onto any key on the upper keyboard. These
loops will then be converted automatically to the current tempo of the host sequencer.
6
7
(8) Loopeye with Start and End Controls. Loopeye presents the currently selected/played sample in a circular waveform. On the
outer ring the start and end controls are located, which can be moved by dragging with the mouse to have only segments of the
loop played. By double-clicking on the Loopeye you can couple or uncouple the two controls.
3 Loading, Playing and Bouncing Samples
(9) In the “snap” field, the grid for the start and end controls is set.
3.1 Loading Samples
(10) Save/Load Button to save and load the presets (user presets) you have created. By holding the CTRL key, a menu will appear.
By clicking in the right side of the preset display and holding the mouse key, a menu opens for navigating through the soundbanks.
On the highest level, the soundbanks which are already installed are always shown. By following the triangles with the mouse, the
folders and subfolders of the corresponding library are opened.
(11) Multi Tool Area. By holding the mouse button on the display a selection menu appears, in which the following tools are available:
• Filter
• Envelope
• Map
By selecting the lowest level, the samples are mapped onto the keys of the lower keyboard in the basic settings. This folder is the
so-called factory preset. The samples are mapped in ascending order starting from key C1.
(12) TimeStretch and Pitch Algorithms can be selected individually here for each sample.
(13) Output Assignment. This function is only available in the plugin version. It allows you to root different sounds through different
mixing channels without opening another Elastik plugin.
(14) Trigger Play Mode Button. This button is only available in the standalone version and allows the simultaneous playback of
samples by means of triggers.
(15) Keyboard Swap Button. This button swaps the keyboard mappings of the upper and lower keyboard. Great for users with short
keyboards.
2.2 The Most Important Shortcuts
2.2.1 Opening the Keyboard Menu:
Open a menu with the following functions:
• copy settings
• apply settings (pitch / envelope / volume / panorama / filter / all )
• reset loop to original
• bounce loop (original / modified)
• clear keyboard
• clear preset
SHORTCUT MAC
SHORTCUT PC
: CTRL + Click on a keyboard key
: Right mouse click on a keyboard key
2.2.2 Copy Sample(s)
Copy a sample to another key
SHORTCUT MAC+PC : ALT + Click on a keyboard key and drag
2.2.3 Mute Sample Selection
Select a sample without it being played. This could be advantageous if you are looking for another sample while another is playing.
SHORTCUT MAC+PC : ALT + click on a keyboard key:
2.2.4 Multiple Selections
Multiple selection of several keys one after another:
SHORTCUT MAC+PC : SHIFT + click on keyboard key(s)
Multiple selection of single, selected keys:
SHORTCUT MAC
SHORTCUT PC
: APPLE + click on keyboard key(s)
: CTRL + click on keyboard key(s
2.2.5 Fine-tuning the Controls
Fine tuning all controls:
SHORTCUT MAC+PC : SHIFT + move the controls with the mouse.
8
Figure 05 Factory Presets
3.2 Playback
A sample can be played in several different ways:
a) on an externally attached MIDI keyboard
b) via MIDI notes which have been placed in the matrix editor of the sequencer
c) by clicking the mouse and holding the button on a keyboard key in the interface
The standalone version also has the “Trigger Play Mode” that is activated with the buttons to the left of the keyboard.
Tip: If you click on a key while simultaneously pressing the ALT key, the sample will only be shown, not played. This is advantageous
when loops are already being played and you need to search for others.
3.2.1 Trigger Play Mode in the Standalone Version
Thanks to the trigger play mode, several samples can be played concurrently in the standalone version simply by using the mouse.
By clicking on the Play button the keyboard functions according to the trigger principle: by clicking on a key which has a loop loaded,
the loop is played endlessly. By again clicking on the key, the loop stops playing. To stop all loops, click again on the Play button.
Trigger Synchronization
If a second loop is triggered, it will first be started synchronized with the first loop. It is synchronized according to the count time
set in the “Snap” field.
For example, if the value in the first loop is 1/1, then the second loop triggered won’t begin until the first loop; comes to the count
time of “1”.
9
5 Creating User Presets
A user preset is an individualized compilation of samples from the factory presets. The settings of the samples are also saved in
the user presets. The upper keyboard (C4 to B6) is reserved for the creation of user presets.
Figure 06 Trigger Play Button
3.3 Bouncing & Export
One or more samples can be saved as WAV files in a directory on your hard drive. This procedure is known as “bouncing.” A popup
menu for this is called by holding the CTRL key and clicking with the mouse on a keyboard key (MAC) or right mouse click (PC).
Within the menu choose either
• “bounce loop original” or
• “bounce loop modified”
Figure 09 User Preset
The following method is recommended for the creation of a user preset:
5.1 Basic Method
to save either the original sample or the modified sample.
First load a factory preset onto the lower keyboard (C1 to B3) and find a sample for the user preset.
Alternatively you can easily drag and drop the samples out of Elastik by holding down the ALT-Button and drag them out of the
player.
Then, by holding the ALT key and Drag&Drop, copy the sample onto any key on the upper keyboard (C4 to B6).
It is also possible to copy several selected samples at once. The samples are mapped in order, starting at the target key and
ascending to the right.
To select more than one sample at a time, click on the samples while holding down the SHIFT key (for several samples listed together)
or with the APPLE key (MAC) / CTRL key (PC) for any single samples within the list.
IMPORTANT!
During the copy, the samples will automatically be synchronized to the master tempo (upper right next to the preset display). This
tempo is normally the host sequencer tempo, which should be set once at the beginning of a project. (See the chapter “Tempo
Synchronization.”)
In the standalone version an individualized tempo can be entered in the upper right master tempo field.
Tip: By clicking on the display “filter” the “map” tool can be selected for automatic mapping. (see the chapter “Multi Tool Area”) Here
the modes “slice map” and “chromatic map” can be selected. With these you can quickly and efficiently create interesting user
presets out of a single sample.
5.2 Saving and Opening
Figure 07 bounce loop
4 Tempo Synchronization
After selecting a factory preset, all the samples will initially be played in their original tempo. This tempo is shown in the field “bpm.”
To play all the samples in the tempo set in the host sequencer, click in the master tempo field (in the upper right next to the preset
display) on the “S” button. The samples of this preset will then be converted to the host sequencer’s tempo.
To the left of the preset selection display is an icon for saving and loading user presets. When this icon is clicked for the first time
after opening the Elastic engine, a “Save as” dialog is opened to set the storage location and name of the user preset. Subsequent
clicking on the icon will save the current settings with this name. For other options regarding the saving and loading of user presets,
hold the CTRL key while clicking on the icon. The following menu will be opened:
• save as...
• new preset...
• open preset...
The order of the conversion begins with the C1 and ascends. Depending on the speed of the computer, the conversion almost occurs
in real-time. The progress of the conversion can be read in the red progress bar underneath the keyboard. In the default setting all
rhythmic samples will be converted with the “Drum” algorithm, all others with the “Tonal” mode.
By selecting a new preset, the synchronization with the host is deactivated, so that you can hear the samples in their original tempo.
Hearing the samples in the original tempo is important because it allows you to get a feel for the different ways you could use it.
Figure 10 Save Menu
Under “save as…” you can set the preset name and location of the current user preset. If this has already been done once, you
only have to click on the icon to save the current settings to the same file.
By clicking on “new preset…” the current keyboard layout (upper and lower keyboards) is erased so that a new preset can be created.
With “open preset...” you can reload a saved preset.
The extension for a user preset is “*.elt”.
Figure 08 Tempo Synchronization
10
11
5.3 Keyboard Swap Button
6.2 Tempo and Pitch
To the left next to the lower keyboard is the “Keyboard Swap Button.” By clicking on this button with the mouse the mappings of
the upper and lower keyboards can be exchanged. This permits moving the user preset onto the keyboard area C1 to B3, which
can be useful for users who have a short hardware keyboard.
Figure 12 Tempo & Pitch Section
6.2.1 Tempo
Figure 11 Keyboard Swap Button
6 Sample Settings
6.1 Basics
6.1.1 Volume
With the horizontal control “vol” underneath the preset display you can control the volume for one or several selected samples. All
samples are created at -3.1 dB to prevent overcorrection.
6.1.2 Panorama
As was described in the chapter “Tempo Synchronization with the Host” all samples are first played in the original tempo after being
opened. The tempo of a sample can be changed independently from the master tempo by changing the value in the “bpm” field.
By double-clicking you can directly enter a value. Alternatively, the value can be changed by dragging with the mouse while holding
the button.
Tip: To make a multi-voice chord out of a voice, it is worthwhile to slightly vary the tempi of the single vocal loops. For example,
the tempo values can be exactly entered two positions after the decimal point.
6.2.2 Pitch
The pitch of a sample can be changed +12 to -12 semitones by entering the value in the “semi” field. By double-clicking you can
enter a value directly. Alternatively the value can be set by dragging the mouse with the button held.
6.2.2.1 Fine-tuning Pitch
A finer setting than semitones is possible via the “fine” field. Here you can change the pitch by +50 cents to -50 cents. The entry is
done either through double-clicking or by dragging with the mouse button held.
Directly beneath the volume control is the “pan” control, with which you can set the panorama for one or more selected samples.
6.2.3 Algorithm Selection
6.1.3 Assigning Output
Conversion of tempo and pitch is done through the mode set in the “algorithm” field. The pre-selected mode for a sample can be
changed by clicking on the field. Depending on the basic mode selected in setup there are two (Fast) or four (Pro) modes from which
to choose:
In the “Output” field you can assign the audio output channels of the computer or audio hardware for the sample. In the original
setting all samples are assigned to “Output 1+2.” By holding the mouse button on this field you can open a selection menu in which
any further channels can be assigned.
6.1.4 Loop on/off
By clicking on the button “Loop On/Off” you can set the playback mode of the currently selected sample:
With “Loop On” the sample will play infinitely when triggered. With “Loop Off” set the sample will play only once.
6.1.5 Reverse (Direction)
You can play a sample backwards with the reverse button. Switching can take place in real-time during playback, which allows for
interesting effects.
The function can be automated in a menu by holding the CTRL key and clicking on the icon with the brackets. The automation is
described in the chapter “Control with MIDI Controller.”
Basic mode: Fast (default setting, quick conversion)
• Tonal
• Drum
• Solo1 = Tonal
• Solo2 = Tonal
Basic mode: Pro (conversion time about twice as long as Fast, higher quality)
• Tonal
• Drum
• Solo1
• Solo2
The “Drum” mode retains a better retention of the transients than the “Tonal” mode.
Mode “Solo1” has very high retention of formatting characteristics and is good to use in such examples as vocals which will need
to have their pitch changed.
Mode “Solo2” is conceived for monophonic material, such as bass lines, whereby the retention of the formant is not as important.
12
13
6.3 Loopeye
Tip: When the controls are locked the playback area can also be changed by dragging within the Loopeye with the mouse button
held down. Thus it is not necessary to grab the controls themselves directly.
The Loopeye shows the currently selected (played) sample. In contrast to the classic linear representation the wave form of the
sample is shown in a circle, whereby the transition of the loop-end to loop-start is controllable.
6.3.4 Follow MIDI Button
In the middle of the Loopeye is the “Follow MIDI” button. When the button is activated (default) the waveform of the currently selected
sample is shown. If the button is deactivated, the last shown waveform is retained. This could be useful if several loops are triggered
while running, but you only want to adjust the start and end controls of a particular loop in real-time.
Figure 13 Loopeye & Snap
Figure 16 Follow MIDI Button
6.3.1 Changing the Start and End Points
6.4 Multi Tool Area (Filter /Envelope / Map-Mode)
The Start and End controls are found on the outer ring of the loop. The controls can be dragged by holding the mouse button, so
that only segments of the loop are played.
The lower area of the entry fields is divided with a line. In the default setting the display shows the setting “filter” as well as further
buttons and controls (cut and res). This area is the so-called “Multi Tool Area.” By holding the mouse button on the display “filter” a
selection menu opens with the following tools from which to choose:
6.3.2 Setting the Grid for the Start and Stop controls
The grid for the controls is activated in the “snap” field. In addition to the standard grids, such as 1/1, •, etc., granular grids for “field
experiments” are also selectable. Grain 1 is very short and increases to Grain 5.
• Filter
• Envelope
• Map
After selecting one of these tools the buttons, controls and display fields of this area change to conform to the functions of the tools.
The exact formula for the grain grid is:
Grain 1 -> x = 1 ... Grain 5 -> x = 5
Angle = 512 * x / (loopSampleCount / 360.0)
6.3.3 Locking the Start and End Controls
By double-clicking on the Loopeye the two controls are locked, so that moving the start control will also move the end control. This
locking is shown in color on the controls.
Figure 17 Multi Tool
6.4.1 Filter
The filter is activated in the On/Off switch. By clicking the mouse in the “type” field the operation of the filter can be chosen. The
following operations can be used:
Figure 14 Loopeye unlocked
14
Figure 15 Loopeye locked
• high
• low
• band
• notch
15
In the “slope” field you can choose the steepness of the filter in the area from 12 dB to 72dB. Using the controls directly beneath
you can set the cutoff frequency and the resonance. These two controls can be set via hardware dials and can be thereby automated.
The assignment is done through popup menus, which are opened by clicking on the square brackets to the right of the controls.
By clicking the mouse on this icon, the assignment menu opens:
6.4.2 Envelope
The attack and release of the selected samples can be set using the controls.
Tip: Set the release to 0.75 and start a loop multiple times to get a very nice delay effect.
6.4.3 Map Mode
This tool allows a sample on the lower keyboard to be automatically mapped to the upper keyboard in different ways:
Figure 20 Assignment Menu
The assignment for the start and end controls can be done directly on the controllers or in the lower right side of the Loopeye.
The order for assignment is as follows:
Figure 18 Map Tool
6.4.3.1 Slice Map:
Through this copy technique from the lower to the upper keyboard, the sample is divided into slices. The slices correspond to the
chosen grid. These slices are mapped in ascending order from the left target key. The slices can now be triggered individually in
the MIDI editor one after another. By moving the MIDI notes new rhythmic variants are created from a drum loop. All other settings
of the selected sample, such as volume, panorama, filters, etc., are passed to the slices.
Tip: When you bounce a slice as “modified” the individual slices are saved as consecutively numbered WAV files.
• Hold the CTRL key and click on the “parentheses icon” with the mouse
• A menu opens with eight parameters to choose from
• Choose a parameter
• Close menu by releasing the mouse button and the CTRL key
• Reopen the menu
• The parameter is now assigned
• Select the entry “learn MIDI”
• Turn a hardware MIDI dial (e.g. Mod wheel)
• The hardware MIDI controller is now assigned to the corresponding entry element
6.4.3.2 Chromatic Map:
Here the copy of the sample from the lower to the upper keyboard occurs in semitone steps. For example, if you copy a loop onto
the C5 key it is mapped 12 semitones below and 12 semitones above. This allows polyphonic sets including chords to be produced.
All other settings of the selected sample, such as volume, panorama, filters, etc., are passed to the slices.
Figure 21 Assigned Controller
7 Hardware Controller Assignment (Automation)
It is possible to set different entry elements to the same parameter. That way with one controller you could simultaneously change
the values for Filter – Resonance and Filter – CutOff-Frequency.
The following entry elements can be assigned to the hardware controller:
To remove the assignment, do the following steps:
• vol (Volume)
• pan ( Panorama)
• direction (Reverse)
• cut (Filter - CutOff Frequency)
• res (Filter-Resonance)
• att ( Envelope-Attack)
• rel ( Envelope- Release)
• Start and End Control (Loopeye Position)
After the assignment these can be changed manually or via the sequencer automation. All changes can be carried out even during
sample playback!
After each of these entry elements an icon is depicted.
• Hold the CTRL key and click the mouse on the “parentheses icon”
• The menu opens
• Choose the entry “forget MIDI”
• Release the mouse button and the CTRL key to close the menu
• Reopen the menu
• By selecting the parameter the assignment will be deleted
Note: The hardware controller assignment can be done for multiple samples by selecting several samples.
Tip: Here’s how to make an interesting choir variant of a single vocal sample:
First lock the start and end controls of the sample by double-clicking on the controls. Then create several pitched samples on the
user preset keyboard by using the “chromatic map” function. Now select all of the generated samples and assign them to a hardware
control. By playing several samples together as a chord and moving the start and end controls at the same time, you can quickly
achieve new variations. This procedure is of course possible with other sample material.
Figure 19 “Parentheses Icon”
16
17
8 Setup Page
You can open the setup page by clicking on the icon to the right of the keyboard:
8.3.2 Pro
The “Pro” mode requires about twice as much conversion time and achieves higher-quality conversion results as “Fast” mode. With
this setting the sub-modes “Solo1” and “Solo2” are active.
8.4 Color
The color of the engine can be changed by clicking on the “Color” field. The following colors are available:
Figure 22 Setup
• Blue
• Green
• Red
• Yellow
9 Credits
9.1 CREDITS ELASTIK ENGINE
Super Vision
Uwe Kinast
Concept & Ideas
Uwe Kinast
Bassim Aziz-Safi
Michael Dommes
Time & Pitch algorithm
by
z-plane development / www.zplane.de
GUI Interface
Murat Kahriman / www.reklame-haus.de
Manual
Michael Dommes
Wenzel Mehnert
Translation
Ed Senechal
Figure 23 Setup Page
Special Thanks to
Carsten, Uwe, Hakan, Bassim
8.1 Soundbanks
In the upper part of the setup page the installation and activation of the soundbanks is carried out, which is explained in detail in
the “Installation” chapter.
8.2 Render Cache
All samples that have already been converted are stored in the so-called “render cache” so that they need not be recalculated if
they should be used again.
By clicking on the “Set” button a directory can be selected for the cache. By default, a standard folder is created under User > My
Documents. With the “clear” button the cached files can be erased, if desired. The field “Cache Size” shows the currently-used
storage space. The maximum size of this cache is set in the field “Max. Cache Size”. It is recommended to set “Max. Cache Size”
to between 500 MB and 1 GB for the fastest response time. Of course you can also set it to higher values.
8.3 Elastik Algorithm
This entry field is for setting primary algorithm mode, “Pro” or “Fast”.
8.3.1 Fast
The default algorithm is “Fast”. This setting delivers very good results for most situations. In “Fast” mode only the sub-modes “Tonal”
and “Drum” are active, which can be selected on the main page. Choosing “Solo1” or “Solo2” will use “Tonal” instead.
18
19