1
HiRO 2.4GHz Wireless
Keyboard, Mouse,& Touchpad
User's Manual
Be sure to carefully read this User's Manual for the proper use and
keep it for future reference.
Thank you for choosing HiRO 2.4GHz Wireless Keyboard,
Mouse,& Touchpad. This genuinely palm-sized 3-in-1 device has
four (4) function including standard American QWERTY keyboard,
Laser mouse, Multi-touchpad and Presentation control. With our
superb 2.4GHz technology, the wireless control distance is up to 70
meters (line of sight) with extreme low power consumption. Please
read through this manual and then start enjoying the marvel and
convenience this device brings at home, office or on travel.
©2011 All rights reserved.
F EDERAL C OMMUNICATION S C OMMISSION
Low Battery Indication and Charge Battery
1. Low battery indication
When battery power is detected at low capacity, press any key,
button or touchpad of keyboard mouse, its red indication LED will
light up to remind you battery power is low. Please charge the
battery soon to have a stable performance.
2. Charge battery
Connect supplied battery charging cable between this product and
the USB port in your PC to charge the battery. During charging, red
LED will regularly blink and when the battery is fully charged, the
red LED will off.
Note Battery charging time depends on remaining battery power, operation
condition and working environment etc. Besides, the rechargeable battery
has a certain life of charging cycles and when you find charging time
becomes extra longer, you may need to replace with new rechargeable
battery.
RoHS
This device complies with Part 15 of the FCC Rules. Operation is subject to the following two
conditions : (1) this device may not cause harmful interference, and (2) this device must
accept any interference received, including interference that may cause undesired operation.
NOTE
This equipment has been tested and found to comply with the limits for a Class B digital
device, pursuant to Part 15 of the FCC Rules. These limits are designed to provide
reasonable protection against harmful interference in a residential installation. This
equipment generates, uses and can radiated radio frequency energy and, if not installed
and used in accordance with the instructions, may cause harmful interference to radio
communications. However, there is no guarantee that interference will not occur in a
particular installation If this equipment does cause harmful interference to radio or
television reception, which can be determined by turning the equipment off and on, the user
is encouraged to try to correct the interference by one or more of the following measures:
- Reorient or relocate the receiving antenna.
- Increase the separation between the equipment and receiver.
- Connect the equipment into an outlet on a circuit different from that to which the receiver
is connected.
- Consult the dealer or an experienced radio/TV technician for help.
Changes or modifications not expressly approved by the party responsible for compliance
could void the user's authority to operate the equipment.
EU D ECLARATION OF C ONFORMITY
This product: is carrying the CE-Mark in accordance with the related European Directives.
Trademarks
Windows are registered trademark of Microsoft Corporation.
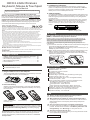
Package Contents
Connection port for
battery charging cable
ID Pairing
Note No need to conduct ID pairing whenever you want to use this
product, UNLESS following operation situation.
Battery power is normal and keyboard mouse and USB receiver is
within connection distance but the product cannot be operated OR
when you want to use plural of this product at the same time.
You need to conduct ID pairing with following two (2) steps to shun
interference:
(1) Click the ID Link button on USB receiver and its red LED will light up
and enter into 20-second ID pairing stand-by time.
Note If pressing again the ID Link button during 20-second stand-by time, ID
pairing action will be discontinued.
(2) Within the 20-second stand-by time, press the pairing button in the
battery chamber of keyboard mouse until the red LED of USB
receiver becomes blinking for 3 times which means the ID pairing
has been successfully done.
1. HiRO 2.4GHz Wireless Keyboard, Mouse,& Touchpad.... X1
2. USB Receiver (Embedded onto the battery cover) ................ X1
3. BL-5C Rechargeable Battery........................................ X1
4. Mini USB Charging Cable............................................. X1
5. User's Manual............................................................. X1
(1)
(2)
System Requirements
Windows® 2000 / XP / Vista™ / 7
An available USB port in PC
Specifications
Getting Started
1. Plug the USB receiver to PC USB port
Take out the USB receiver embedded onto the battery cover and
plug the USB receiver to your PC USB port.
1
2
1
Steps of taking out USB receiver
2
Steps of inserting USB receiver
2. Insert the battery
Slightly press and slide the battery cover and insert the battery
firmly with the correct polarity. Replace the battery cover firmly
back into place.
Frequency : 2400 ~ 2483 MHz
Channel number : 16
ID number per Channel : 65,535
Modulation : GFSK
Antenna type : PCB track
Wireless range : Up to 230 feet (70 meters) (line of sight)
Working voltage : DC 3.0V ~ 3.8V
Battery : BL-5C 850mA-hour Li-Ion rechargeable battery
Transmission power : 1mW
Power consumption / Battery continuous operation hours :
Standby(Non-operation) : 0.4mA / 2125 hours
Keyboard mode : 1mA / 850 hours
Touchpad mode : 10mA / 85 hours
Laser mouse & Touchpad mode : 30mA / 28.3 hours
Weight : About 92 grams (including battery and receiver)
Dimension : Approx. 116 (L) x 56 (W) x 19.8 (H) mm
Operation temperature : 0°C(32°F)~60°C(140°F)
Operation humidity : 10%~85% RH
FAQ
Q1. Need to install software before using this product?
A: No need. This is Plug-and-Play product.
Slightly press and slide
the battery cover
Insert the battery
Replace the battery
cover
Special notice
Before 1st time use, please connect the battery charging cable
to charge the battery about 2 hours. See the introduction of “Low
Battery Indication and Charge Battery” for battery charging.
Now you can start to use HiRO 2.4GHz Wireless Keyboard, Mouse,
& Touchpad. Please note that the default mode of computer mouse is
at Multi-Touchpad. For details of mouse mode change and other
function and operation, please read the introduction of “Function
and Operation”.
Q2. Why sometimes touchpad can not be operated smoothly?
A: Touchpad is quite sensitive about moistness. In order to have a
stable performance on touchpad, please always keep touch
finger(s) dry.
Q3. Can not control laser mouse, touchpad and keyboard
A: It may be caused by low battery or interference by other 2.4GHz
product. Please see introductions “Low Battery Indication and
Charge Battery” and “ID Pairing” to verify and resolve.
Q4. Possible to know the mouse dpi?
A: It is no way to know mouse dpi and you can only feel laser mouse
move speed after selected dpi.
Patent Pending
2.Laser mouse (Match with blue indication LED)
Function and Operation
Front view
Blue, Green and Red
indication LED
Left mouse button
Right mouse button
Mouse mode change
button
When switch to Laser mouse mode, not only main / left / right mouse
but also part of multi-touchpad function can be used.
Function
Mouse mode
change
Operation
(1) Press and hold this button until blue and green
LEDs both light up (PS : It may look like white LED)
to turn off mouse function. Click this button to
activate mouse function with the default mode
of Multi-touchpad.
Note 1~2 seconds is needed to activate touchpad
function from mouse off mode
Note Keyboard function is still available even mouse
function is turned off.
Multi-touchpad
Caps
Hot keys for Media
playing control
En ter
Del
Ta b
!
@
1
Keys with blue
print
~
Q
(2) When the mouse function is activated, click the
button to switch modes between Laser mouse
and Multi-touchpad.
Back
Es c
PrtSc
#
2
`W
3
{
$
}
E
%
4
R
6
]
[
T
7
Y
U
I
S
D
F
G
H
J
Z
X
C
V
B
N
M
K
<
Fn
Space
Rear view
9
0
O
P
+
=
A
Shift
8
"
'
)
(
*
&
^
5
L
>
,
Alt
:
;
?
.
Keys with white
print on upper row
Keys with white
print on center
Ctrl
Blue indication
LED
Light up when mouse or touchpad is under use
Cursor move
See Fig 1
Left mouse click
Note At Laser mouse mode, left click function can be
operated by above either way
See Fig 2 and Fig 6
Right mouse click See Fig 3
See Fig 4 and Fig 8
Mouse drag
Note At Laser mouse mode, drag function can be operated
Laser mouse sensor
by above either way
See Fig 9
Note Two (2) fingers simultaneously slides (or one finger
puts on touchpad while the other finger slides) up or down
on touchpad.
Scroll
Images of Laser mouse operation
Mouse dpi
selection
Press and hold “Fn” key and then click the mouse
mode change button to change mouse dpi among
1700, 2500 and 3400
Note This dpi selection function is only available at Laser
mouse mode. Default dpi is 3400. Take out and insert
battery again, mouse dpi will return to default figure.
3.Multi-touchpad (Match with green indication LED)
Move cursor
(Fig 1)
Left click
(Fig 2)
Right click
(Fig 3)
Drag : Press left
mouse and
move (Fig 4)
When you switch to Multi-touchpad mode, not only touchpad but also
left / right mouse buttons can be used.
Function
Operation
Images of Multi-touchpad operation
Move cursor
(Fig 5)
Left click : One
finger tap (Fig 6)
Right click: Three
fingers tap
simultaneously
(Fig 7)
Drag :
Tap-and-slide
(Fig 8)
Mouse mode change
Please refer to the “Mouse mode change” at
the introduction “2. Laser mouse”
Green indication LED
Light up when touchpad is under use
Cursor move
See Fig 5
See Fig 2 and Fig 6
Left mouse click
Note At Multi-touchpad mode, left click function can
be operated by above either way
Right mouse click
Note At Multi-touchpad mode, right click function can
be operated by above either way.
Mouse drag
See Fig 8
Scroll
Note Two (2) fingers simultaneously slides (or one
finger puts on touchpad while the other finger slides)
up or down on touchpad.
See Fig 3 and Fig 7
See Fig 9
Scroll (Fig 9)
4.Presentation control device
1.QWERTY keyboard
QWERTY keyboard function is always available no matter the
computer mouse is set at Laser mouse mode or Multi-touchpad
mode or even mouse function is turned off.
Key print
Function and Operation
White print on
key center
White print on
upper row
Press and hold “Shift” key and then press the key
to have print function
Blue printing
character
Press and hold “Fn” key, then press the key to
have print function
Directly press the key to have print function
F1~F10 function Press and hold “Fn” key, then press the numeral
(numeral key 1~10)
key 1~10 to have F1~F10 function
Media playing
control hot keys
When at Media playing application, directly press
the key to have print function
Note 4 arc-shape keys around “Enter” key i.e.
“
” have the same function as 4 arrow keys
i.e. “
” on PC keyboard.
Note 1 The “Alt” key is normal “Alt” function, not “Alt Gr” function. You can press
"Ctrl+Alt" together to have "Alt Gr" function.
Note 2 Only 8 keys including " Back ", "Del", 4 arc-shape keys “
”, "
" and
"
"have repeated function when they are press-and-hold.
Use this product at PowerPoint slide show as wireless presentation
remote. Turn to the slide page of PowerPoint file you want to present
and let it at slide start screen (i.e. full screen). Use following keys
and buttons to enjoy a wireless and my-pace slide show.
Key or button Function and Operation
Fn + 5
Press and hold Fn, then press the numeral key "5"
to have "F5" function to start the slide show
Click this key to exit slide show
Left mouse button
Click any of left button or key to go to next slide
or
or
or
Click either key to go to previous slide
B key
Click this key to show black screen; click again
to come back
W key
Click this key to show white screen; click again
to come back
PrtSc
PrtSc
Tab + Alt
Press and hold “Alt” key and then click “ Ta b ” key
to cruise all opened files one by one. When
cruising at the file you want to switch, just
release 2 keys and file will be switched. Use the
same process to other file or return to slide show
Doc No.: EB-C1040-201