1
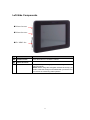
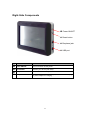
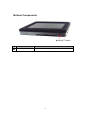
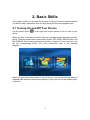
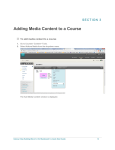
User’s Manual in English English Version R02 Oct. 2007 Trademarks All brand and product names are trademarks or registered trademarks of their respective companies. Note The information in this manual is subject to change without notice. Before You Start ※ Precautions and Notices ※ For your own safety, do not operate the controls of the product while driving. ※ Use this product prudently. The product is intended to be used only as a navigation aid. It is not for precise measurement of direction, distance, location or topography. ※ The calculated route is for reference only. It is the user’s responsibility to follow the traffic signs and local regulations along the roads. ※ When you get off the car, do not leave your device on the dashboard that is subject to direct sunlight. The overheating of the battery can cause malfunction and/or danger. ※ GPS is operated by the United States government, which is solely responsible for the performance of GPS. Any change to the GPS system can affect the accuracy of all GPS equipments. ※ GPS satellite signals cannot pass through solid materials (except glass). When you are inside a tunnel or building, GPS positioning is not available. ※ A minimum of 4 GPS satellite signals is needed to determine current GPS position. Signal reception can be affected by situations such as bad weather or dense overhead obstacles (e.g. trees and tall buildings). ※ The wireless devices might interfere the reception of satellite signals and cause the reception of the signal to be unstable. For better signal reception, it is recommended that you use a car antenna (option). ※ A car holder is needed when using the device in a car. It is recommended that you place the device in an appropriate place, so as not to obstruct the driver’s view, or deployment of airbags. ※ When battery run out, the device will automatically turn off the power. So, when plug-in the car charger or power adaptor, please reset the ON/OFF switch to re-initiate the device. ※ Overview GPS Navigation Features ※ Electronic maps with roads, freeways, highways, railways, rivers, lakes, points of interest, etc. ※ GPS positioning ※ Optimal route calculation and trip plan ※ Friendly and efficient navigation with turn-by-turn, voice, and visual guidance 2 ※ Various ways for searching a location on the map - Using a known address - Using a POI (point of interest) - Using Favorites (personal stored locations) - Using History (previous destinations) ※ Recording and playback of journeys ※ Viewing modes for different needs and situations: - 2D or 3D - Daytime or nighttime view - Turn-by-turn view of the route - Driving direction of the route Other Features ※ Music Player: playing music. ※ Photo Viewer ※ Movie Player: playing movies in Wmv. Asf. format About this Manual This manual is divided into four major parts: ※ Part I “Basic Operations” tells you how to get your device running and customize system settings. ※ Part II “Media” introduces Music Player, Photo Viewer, Video Player.,etc . ※ How to use the navigation? Please see Navigation Manual attached to the package and CD. 3 Part I. Basic Operations Part I guides you through the process of getting your device running, familiarizes you with the external components, and tells you how to customize system settings 4 1. Getting Started This chapter tells you step by step how to perform the initial startup and introduces you to the external components of your device. 1.1 Setting the ON/OFF Switch The ON/OFF switch should be set to the ON position for normal operation. CAUTION: Always leave the ON/OFF switch in the ON position for normal operation. Reset On / Off Switch 5 1.2 Connecting to AC Power and Charging the Battery Fully charge the battery before using your device for the first time. 1. Connect the adapter cable to the left side of your device. 2. Plug the AC adapter (optional) into a wall outlet. ※ The charge indicator glows red twinkle when charging is in progress. Do not disconnect your device from AC power until the battery is fully charged. This will take a couple of hours. 6 1.3 Using Your Device in a Vehicle A car holder and a car charger are supplied with your device. Using the Car Holder ※CAUTION: 1.Select an appropriate location for the car holder. Never place the holder where the driver’s field of vision is blocked. 2.If the car’s windshield is tinted with a reflective coating, an external antenna (optional) may be needed to route the antenna to the top of the car through a window. When closing the car window, be careful not to pinch the antenna cable. (Cars with an anti-jam window design may automatically leave adequate space as needed.) Ps. Subject to varied configurations, the car holders might be different. The car holder consists of a bracket and a dashboard stand. Use the car holder to mount your device in a vehicle. 7 Connecting the Car Charger The car charger supplies power to your device when you are using the device in a car. ※CAUTION : To protect your device against sudden surges in current, connect the car charger only after the car engine has been started. 1.Connect one end of the car charger to the power connector of your device. 2.Connect the other end to the cigarette lighter in the car to power and charge your device. 8 1.4 Understanding Hardware Features NOTE: Depending upon the specific model purchased, the color of your device may not exactly match the device shown in this manual. Front Components n Charge indicator Ref n Component Charge Indicator Description Battery Full – Green (Static) Battery in charging -- Red (Static) 9 Back Components o External Antenna Connector n Speaker Ref n Y Component Description Speaker Sends out music, sounds and voice. External Antenna Connector This connector (under rubber dust cover) allows use of an optional external antenna with magnetic mount, which may be positioned on top of the car for better signal reception in areas with poor reception. 10 Left-Side Components nVolume increase oVolume decrease pSD / MMC slot Ref n Y Z Component Description Volume Increase Press the button to increase the volume Volume Decrease Press the button to decrease the volume SD/MMC Slot Accepts a SD (Secure Digital)card for accessing data such as maps and music. NOTE: Before using GPS navigation software and maps, you need to insert the storage card included with your device. Do not remove the card during GPS operation. 11 Right-Side Components n Power ON/OFF o Reset button p Earphone jack q USB port Ref n o p q Component Description Power ON/OFF Turn on and turn off the power. Reset button Restarts your device (soft reset). Headphone Connector Connects to stereo headphones. USB port Use the USB port to connect to pc, or connect to a USB plug of power adaptor for charging. 12 Bottom Components n ON/OFF Switch Ref n Component ON/OFF Switch Description The main power / battery cut off switch 13 2. Basic Skills This chapter guides you through the process of using your device and familiarizes you with the basic operations such as using the stylus pen and navigation pad.. 2.1 Turning On and Off Your Device Use the power button device. on the right side of your device to turn on and off your When you turn on the device for the first time, the Main screen appears as shown below. There are three buttons on the Main screen: SETTINGS, NAVIGATION, and MULTIMEDIA. Each button represents a function or feature. To use a function, just tap the corresponding button. (For more information, refer to the following chapters.) When you press the power button to turn off the unit, your device actually enters a suspend state and the system stops operating. Once you turn on the system again, it resumes. 14 2.2 Operating Your Device To operate your device, use the hardware buttons and/or the stylus pen. Using Hardware Buttons Button Name Description Power On/Off Turns on and off the LCD panel, and enter to suspend mode. Volume Volume Increase Volume Volume Decrease 15 3. System Settings Your device is supplied with default settings. You may also customize the settings to suit your personal needs. Once you change settings, your new settings will remain until either you change them again, or until battery cut off switch is turned off and then back on again, which resets the unit to factory defaults. 3.1 Using System Settings Tap the SETTINGS button on the Main screen. 16 3.2 Backlight 1. Tap SETTINGS on the Main screen to enter the backlight setting as shown below. Setting the backlight level Tap the button to increase the backlight level, and tap the decrease the backlight level. to 3.3 Calibration You can calibrate the touch screen if it is not responding accurately. If screen loses alignment, please calibrate the screen to get back to normal display. 1. 2. Tap SETTINGS on the Main screen. Tap the Calibration button on the screen as shown below. 17 3. Tap and hold the center of the target. 4. When the target moves to another position, tap and hold at the center of the new target. Repeat each time to complete the calibration process. 5. When completed, tap anywhere on the screen. 18 Part II. Media Part II introduces Music, Photo Viewer, Video Player., etc 19 Using Media Tap the Meida button on the Main screen as shown below. The Media screen contains three buttons as shown below. The following sections describe the funciton of each icon. 20 4. Using Music Player This chapter introduces you how to play music files with your device The Music Player program turns your device into a music player. It features: ※ Playback of all music files ※ Basic playback controls such as play, pause, stop, next and previous ※ Playback includes single selection playback, repeat, single repeat, normal sequence and random sequence. ※ Play list support 4.1 Starting and Exiting Music Player Tap Music Player on the Media screen to switch to the program. The control panel will appear on the screen. You can now easily control the music player by tapping the control buttons. 21 To exit the program, just tap in the bottom-right corner of the screen. 4.2 Preparing Music Files for Your Device With the card reader, you can easily copy music files from your computer to a storage card. The Music Player can detect music files in all folders of a storage card. 22 4.3 Playing Music Files 1. Tap the Music Player button on the Main screen to switch to the program 2. To start the playback, tap as described later. to control the playback, use the control buttons ※NOTE: When files are added to the play list, the play list is automatically saved when you exit Music Player. 3. To exit the program, tap the Main menu. at the control bar of the screen. You will return to 23 4.4 Music Playback Control You can control the Music Player via control buttons. See the table below for details: Control button Name Description Play /Pause Play/ Pause the playback. Previous Move to the previous file. Next Volume Repeat all Random playback Play List Exit Move to the next file. Change the volume by dragging the slider. Repeat all Sampling playback in random order Open play list. Exit Music Player 4.5 Using Play List Once the music player is open, by default the system will automatically load all music files in the play list. You also can create your own play list for further use, follow the instructions below: 1. To create your own play list in Music Player, tap the play list which shows the current play list. 24 on the control bar to enter 2. To add a song to the play list, tap the file you wish to add to the play list on the screen and tap 3. . When the list is done, tap Remove one song from your play list. Choose a song that you wish to delete on the screen and tap 4. . Then tap to confirm the song you delete. Remove all files from your play list. Tap removed. Then tap 5. to confirm the list you creat. and all files in your play list will be to confirm the list you delete. on the toolbar. To return to the control panel, tap 25 5. Using Photo Player This chapter tells you how to play Photo files using your device The Photo Player program turns your device into a Photo player. It features: ※ Playback of JPEG files ※ Basic playback controls such as the picture with zoom in/out, rotation in full screen. ※ Playback includes single selection playback, repeat, single repeat, sampling playback, normal sequence and random sequence. ※ You may browse through the pictures in different modes, file explore mode, thumbnail mode, full screen mode and slide show mode. 5.1 Starting and Exiting Photo Player Tap Video Player on the Media screen to switch to the program. 5.2 Photo View Program The control panel will appear on the screen. You can now easily control the Photo player by tapping the control buttons. 26 Preview/Select Previous page To exit the program, just tap Full screen Next page Exit in the bottom-right corner of the toolbar. 5.3 Preparing Photo Files for Your Device With the card reader, you can easily copy Photo files from your computer to a storage card. The Photo Player can detect Photo files in all folders of a storage card. 27 5.4 Photo Playback Control You can control the Photo Player via control buttons. See the table below for details: Control Button Name Description Play Play slide show Previous Back to previous page Next Forward to next page Exit Exit the program Zoon in Zoom in the photo Zoom out Zoom out the photo 28 6. Using Video Player This chapter tells you how to play Video files by your device The Video Player program turns your device into a Video player. It features: ※ Playback of WMV, ASF files ※ Basic playback controls such as play, pause, stop, next and previous ※ Playback includes single selection playback, repeat, single repeat, sampling playback, normal sequence and random sequence. ※ Play list support 6.1 Starting and Exiting Video Player Tap Video Player on the Main screen to switch to the program. The control panel will appear on the screen. You can now easily control the Video player by tapping the control buttons. 29 To exit the program, just tap in the control bar of the screen. 6.2 Preparing Video Files for Your Device With the card reader, you can easily copy Video files from your computer to a storage card. The Video Player can detect Video files in all folders of a storage card. 6.3 Playing Video Files 1. 2. Tap the Video Player button on the Main screen to switch to the program The functions of control buttons as described following. ※NOTE: When files are added to the play list, the play list is automatically updated when you exit Video Player. 30 6.4 Video Playback Control You can control the Video Player via control buttons. See the table below for details: Control Button Name Description Play/ Pause Play/ Pause the playback. Previous Move to the previous file. Next Move to the next file. Volume Change the volume by dragging the slider. Play List Open play list. Exit Exit Video Player 6.5 Using Play List Once the Video player is open, by default the system will automatically load all Video files in the play list. You also can create your own play list in your device. 1. To create your own play list in Video Player, tap the video list. 31 on the control bar to enter 2. To add a video file to the play list, tap the file you wish to add to the play list on the screen and tap creat. . When the list is done, tap to confirm the list you 3. Remove one video file from your play list. Choose the file you wish to delete and tap . When the list is done, tap to confirm the list you creat. 4. Remove all files from your play list. Tap removed. icon. All files in your play list will be on the toolbar. 5. To return to the control panel, tap 32