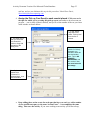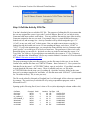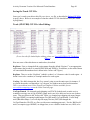
1
Activity Generator User’s Manual Version 4, 2007 Table of Contents About this Manual........................................................................................................................... 4 Overview: What does this program DO?.................................................................................... 5 Installation................................................................................................................................... 6 Quick Start Guide: I hate reading manuals! How can I get started, QUICKLY?...................... 6 Details on Generating Activities................................................................................................. 9 Choose Activity File ............................................................................................................. 10 Other functions available from the main screen: .................................................................. 12 Convert all the switches in a route to Manual........................................................... 12 Restore a route’s switches to their original state ...................................................... 12 Convert all the signals in a route to Permissive........................................................ 12 Restore a route’s signals to their original state ......................................................... 12 Set Location of ShapeView Program........................................................................ 13 Create and Modify Activity Creation Template ....................................................... 13 Customize Activity Screen. ...................................................................................................... 13 • Maximum Total Cars to Handle ................................................................................... 14 • Maximum cars to pick up from any single industry ..................................................... 14 • Maximum cars to set out at any single industry siding................................................. 15 • Activity Start Hour........................................................................................................ 15 • Check Here for Sequential Pickups/Setouts ................................................................. 15 • Select route (path) ......................................................................................................... 15 • No AI Traffic Checkbox ............................................................................................... 15 • Activity Ending............................................................................................................. 15 • Maximum Cars to Add to Player Consist ..................................................................... 15 • Force all Industry tracks selected for pickup, to pickup all cars on track..................... 16 • Allow pickups from source tracks in one region to be set out in a different region..... 16 • Allow pickups from source tracks in one region to be set out in that same region ...... 16 • Choose your Source Tracks .......................................................................................... 16 • Work Tracks: Check the regions or spurs you’d like to work (pick up and set out cars) 16 • Optional: Choose Destination Tracks. .......................................................................... 17 • Check to view/print the Work Order using Notepad. ................................................... 17 Command buttons ................................................................................................................. 17 • Ok - Generate an Activity ......................................................................................... 17 • View Activity Info File............................................................................................. 17 • Change Engines ........................................................................................................ 17 • Set Railcar Fill .......................................................................................................... 17 • Save Settings............................................................................................................. 18 • Load Saved Settings.................................................................................................. 18 • Cancel ....................................................................................................................... 18 Activity Generator Version 4 for Microsoft Train Simulator Page 2 Changing your Locomotive Consist ......................................................................................... 19 Adding Locomotives to the Player Consist .......................................................................... 19 Removing locomotives ......................................................................................................... 19 Flip Direction ........................................................................................................................ 20 View Selected Unit ............................................................................................................... 20 Last Car in Consist................................................................................................................ 20 Set Railcar Fill. ......................................................................................................................... 20 • How Many Railcars Should be Added to the Activity ................................................. 21 • Place cars on Industry tracks that won’t be worked ..................................................... 21 • Place cars on Yard tracks that won’t be worked........................................................... 21 • Place cars on Yard tracks that WILL be worked .......................................................... 21 • Allow car placement in Regions that won’t be worked................................................ 22 • Maximum number of cars to add per track................................................................... 22 Generating a new activity ......................................................................................................... 22 Printing a Work Order .......................................................................................................... 22 Running the activity.............................................................................................................. 23 Distributing Activities you Generate .................................................................................... 23 Note on files and naming .................................................................................................. 24 Problem with packaging some activities........................................................................... 24 Q&A:......................................................................................................................................... 25 Saving Activities you Generate to Run them Again:................................................................ 28 Activity Templates, Routes and Downloads Needed ............................................................... 28 Known Issue with Activity Generator version 4 or later, and some earlier templates. ............ 28 PART TWO: Creating your own Activity Generator Templates ................................................. 30 Step 1: Create the Activity Creation Template .act File (using the Activity Editor)............... 30 1. Place cars on the industry spurs and yard tracks........................................................... 30 IMPORTANT -- Note on placing cars on spurs: .............................................................. 31 2. Place some other cars, of a type that will be delivered to the industries, somewhere in the activity file ...................................................................................................................... 33 3. Create a new ‘Action’ Event......................................................................................... 34 4. Assign the Pick up Cars Event to each consist placed.................................................. 35 5. Multiple Paths (optional) .............................................................................................. 36 Step 2: Create the Activity .CSV File....................................................................................... 36 Step 3: Edit the Activity CSV File............................................................................................ 39 Editing the “CarType” information ...................................................................................... 40 Possible Car Types............................................................................................................ 40 Loads and Empties, and more specific car typing. ....................................................... 40 Blank UID’s in the Activity CSV File.................................................................................. 41 Saving the CSV File.............................................................................................................. 41 Step 4: Create & Edit the Track CSV File................................................................................ 43 Editing the Track CSV File................................................................................................... 44 Track (SWLTDB) CSV File Before Editing: ................................................................... 44 RegName........................................................................................................................... 45 RegNum ............................................................................................................................ 45 CarCap .............................................................................................................................. 46 CarTypeWanted ................................................................................................................ 46 Activity Generator Version 4 for Microsoft Train Simulator Page 3 CarTypeShipped ............................................................................................................... 47 AG4 Design note........................................................................................................... 47 TrkLength ......................................................................................................................... 47 TrkType............................................................................................................................. 47 Saving the Track CSV File ............................................................................................... 49 Track (SWLTDB) CSV File After Editing....................................................................... 49 Step 5: Setting the Order in which each Region is reached for each Path in the Template...... 50 If you’ve designed an activity that gives the player a choice of multiple paths and/or starting points, and the route you’re working with has some switches that can’t be manually operated (as is the case with the majority of routes), or signals that the player will need to navigate through (and you don’t want to require the player to use the “...... 50 You can tell Activity Generator which regions will be accessible for each possible path the player might select when generating an activity using the Activity Template you created, and the order in which the regions will be reached. Doing this is easier to use than you might think!........................................................................................................ 50 Click the Set Regions worked and order reached for paths button....................................... 51 The “Path Region Order” Dialog, new for AG4................................................................... 52 Description of the Set Path Region Order controls........................................................... 53 Select Path to Edit......................................................................................................... 53 Copy From .................................................................................................................... 53 Maximum Length of Player Train at Path Start............................................................ 54 All Regions in this Template ........................................................................................ 54 Tracks in the Region, and car capacity of each ............................................................ 54 Add................................................................................................................................ 54 Remove ......................................................................................................................... 55 Remove All ................................................................................................................... 55 Save Changes to this Path ............................................................................................. 55 Regions Reached via this Path, in Order ...................................................................... 55 Save All to File (.pro) ................................................................................................... 55 Exit................................................................................................................................ 55 Step 6: Set the Car Types that can be used when “Any” Car Type is called for. ..................... 56 Step 7: Distributing the Templates you Create. ........................................................................ 57 Using WinZip to Package your Templates. .......................................................................... 57 Your Rights as a Licensed Activity Generator User............................................................. 60 Adding a Template Guide for your users.............................................................................. 61 Activity Template Creation – Tutorial, Process and Insights ................................................... 61 Template Design Caveats ......................................................................................................... 66 Designing Templates for Routes with Signals and Dispatcher-Controlled Switches........... 67 New for Version 4......................................................................................................................... 68 Credits/Acknowledgements .......................................................................................................... 70 Activity Generator Version 4 for Microsoft Train Simulator Page 4 About this Manual. This manual is an Electronic Document. What that means is, while you can print it out to read or refer to it, it works better when viewed on a computer screen using Adobe Acrobat™. That’s because there are hyperlinks throughout this manual, similar to a typical “Help” file, that you can click on to jump to the sections mentioned instead of having to find the pages or look them up. For example, clicking on any topic in the Table of Contents above will take you directly to that topic in this document. Activity Generator Version 4 for Microsoft Train Simulator Page 5 PART ONE: Using Activity Generator to Create Activities Overview: What does this program DO? Activity Generator creates freight activities for Microsoft Train Simulator™ 1 (MSTS), using Activity Templates available at www.skylinecomputing.com and other sites. This improves the “replayability” of MSTS, and greatly enhances what you can do with each route you have. A few clicks of the mouse, and you have a new through freight or switching activity, complete with printable work orders. And you don’t even need to use the MSTS “Activity Editor”! Use Activity Generator to generate an activity and work order, run the activity, then use the generator again to generate a new activity. You’ll have different pick ups and setouts (and different weather, season and locomotives, too if you’d like). You can print and save the generated work orders (switch lists) also. If you’re a “casual user” of MSTS, to get the most out of the Activity Generator program, you’ll need to download Activity Generator “activity creation templates”: activity (.act) files which also come with two “.csv1” files used to tell the program what kinds of cars are on the spurs, what type of car should go to each spur (and how many), etc. These are posted on the Skyline Computing web site (www.skylinecomputing.com) and some are available at www.train-sim.com. This program does not modify the Train Simulator™ program in any way, nor does it change any of your existing Train Simulator™ files. You can also create your own “activity creation templates” for routes for which these aren’t yet available. This does however require the use of the MSTS Activity Editor™. You can start with an existing activity, or create your own template from scratch. Once you’ve created a template, you will be able to create an endless variety of freight/switching activities with just a few clicks of the mouse. The procedure for doing this, including specific screens from the MSTS Activity Editor™, is detailed in this manual in the section entitled “Creating Your Own Activity Creation Templates”. There are also a number of free tutorial videos demonstrating how to do this, on the Video Tutorials page at www.skylinecomputing.com A function is included which will generate the two “.csv” files the program needs for each Activity Generator “activity creation template”. “AG4” in this manual refers to Activity Generator Version 4, the latest full version. To see a list of enhancements included with AG4, see “New for Version 4” near the end of this manual. Activity Template Designers’ note: Activity Generator includes a button that will convert all the switches in any route from automatic (dispatcher/AI) control, to manual (player) control. With this feature virtually any route can be used with Activity Generator. 1 A “.csv” file is a file ending in .csv, which is a specially formatted text file in which pieces of information (data fields) are separated by commas. Microsoft Excel™ is an excellent editor and viewer for these types of files, although any program capable of reading a text file, such as Notepad™ can open and edit these files also. Activity Generator Version 4 for Microsoft Train Simulator Page 6 Installation Installing this program is straightforward, since it comes with a setup program (Setup.exe). Here’s the complete “step by step”. 1. Since you’re reading this, you’ve most likely already unzipped the zip file, “AG1-6.zip”. If not, unzip it to any folder … just be sure you can remember where you put it! 2. Double-click the setup program, which may appear in your folder as “setup”, or “setup.exe” (depending on your Windows file display settings). 3. Follow the on-screen instructions. You may need to restart your computer after installation completes. 4. Go back to www.skylinecomputing.com, “Templates” page, and then download and install the activity creation templates for the routes you have. Just unzip them and then double-click the.exe files that were embedded in the .zip files (Note: It won’t do you any good to install these files for routes you DON’T have … wait until you acquire the route before you install templates for it. Otherwise you’ll just end up with extra files and folders which may get overwritten when/if you DO install the route.) 5. If you have trouble, there is a Tutorial Video on how to install the program on the Video Tutorials page of the www.skylinecomputing.com web site. Quick Start Guide: I hate reading manuals! How can I get started, QUICKLY? First, follow the installation instructions in the preceding section to install the program and activity creation templates (which you’ll need to download) for the routes you have. Then, to generate a new activity: • Click your “Start” button, then “Programs”, then “Activity Generator” to launch the program. • When the program starts, click “Choose Activity (CSV) File” to select the activity creation template which you’d like to use to generate your new activity. o (Example: To create an activity for the default Marias Pass route, browse to your \Train Simulator\Routes\USA2\ACTIVITIES folder and select the file “SWLACTMP1_KAL_CF_WFTemplate.csv”. Double-click the file name, or, click the file name and then click the “Open” button.) See Choose Activity CSV File for details. • The “Generate Activity” button will become active. Click it! Activity Generator Version 4 for Microsoft Train Simulator Page 7 • The “customize your activity” screen comes up. If you see a “Select Route (path)” drop down box, use it to choose the path you’d like to drive and where you’ll start – for instance, “Kalispell to Columbia Falls”. Some Activity Creation Templates will have only one path – with those, this drop-down won’t appear. • Determine if your template is an AG3 or earlier template, or an AG4 or later template. On the Generate an Activity Screen you’ll see either: • If this is an AG3 or earlier template • If this is an AG4 or later template. • The simplest start is to start with cars already in your train. To start with a train already built, enter the number of cars you want your train to start with, in the “Maximum cars in starting player train” box: • For AG4 or later templates, the suggested maximum appears in green to the right. Here, it’s 20 cars. • Also enter the maximum train length in the “Maximum Cars to Handle” box (or accept the default of 25): • • There are three list boxes on the right: “Choose your Source Tracks”, “Check the Regions or Spurs you’d Like to Work”, and “Destination Tracks”. To build a through freight, which will have setouts only at the end of the run (your activity will end after setting out your train on those tracks), select one or more “Destination Tracks” by clicking the “+” to expand the region and checking the box next to the tracks you’d like to work. See Figure 6, choosing spurs to work for details on how to do this. • If you’d like to start out by building your train in a yard first, select one or more source tracks in the region where the path you selected starts. If you do select source tracks, the cars that make up your train will come from those tracks, as well as cars originally in your train. If the template you’re using is an AG4 template, the regions will appear in order in the list boxes, and all your pickups will always be set out at tracks you will reach later in the route. However, if the template is an AG3 or earlier template, check a map of the route and make sure you choose Source Tracks at the beginning of where your path will start, if you use this option. • If you want to do some switching along the way, then in the “Check the Regions or Spurs you’d Like to Work” box, check the tracks you might want to do pickups and/or setouts on. • If you’d like the cars you pick up along the way to be set out at a track at the end of the run, click one or more tracks in the “Destination Tracks” box. If the template was created for AG3 or earlier, be careful to check only Destination Tracks that will be Activity Generator Version 4 for Microsoft Train Simulator Page 8 reached at the end of the run – check a map if necessary. For AG4 or later templates the program will take care of this for you. • (Optional): Choose the season, weather and/or start time by clicking the appropriate buttons, and/or change the locomotives you’ll drive by clicking the “Change Engines” button. • (Optional): For an activity with more complex switching and more randomization, uncheck the box next to “Check here for Sequential Pickups/Setouts.” • Click the “OK – Generate Activity” button: • Start MSTS, go to the route you used (for example “Marias Pass”), and find the activity named “SLG-MP1_KAL_CF_WFTemplate”. Choose that activity, and enjoy! • Ending the activity: Since you used the default Activity Ending, “Last Pickup”, when you’ve completed all your pickups and setouts, the activity you generated will end automatically. If this was a through freight, the activity will end after setting out all your cars on the destination track or tracks you chose. • If you want to run this activity again, with different pickups and setouts, just follow these same steps again, and when you re-run the same activity starting with “SLG-“, the work order will be different! AG saves the templates you’ve opened in a drop-down box on the main screen, so it is easy to run your favorite templates again and again. • To generate activities for more routes, download and install more “Activity Generator” Activity Creation Templates, which can be found on the “Templates” page at www.skylinecomputing.com . Please join our (free) Forum and suggest routes for which you’d like us to create Activity Generation Templates. • NOTE ON TEMPLATES: Some templates have been tested to work correctly with this latest version of Activity Generator, but some haven’t (see the “Templates” page – it indicates which templates are “certified” for SLG v 2.0 or later – which includes Activity Generator v 4.0 -- and which aren’t.) There is only one issue you might have in using templates that haven’t been tested/certified for version 2 or later: you may get an error message in MSTS when starting the activity: “Objects begin in collision, which is prohibited”. If this happens you can often fix the problem by adjusting the “fill world” slider as described in Set Railcar Fill. and/or by lowering the “Maximum to pick up from any single siding” setting to 1 or 2 cars and generating the activity again. Please use the forum to let us know which templates, not yet certified, work ok with the new versions, and which don’t (and if possible what problems you noted) so we can keep the list up to date! • That’s it! If you do want to learn more about what all the settings and controls do, and how to further customize your activities to your liking, read on! Activity Generator Version 4 for Microsoft Train Simulator Page 9 Details on Generating Activities You have just finished installing this program, and would like to generate a new activity. Here’s the detailed “step by step” with some explanation: Launch the program by clicking “Start”, “Programs” then “MSTS Activity Generator.” You’ll see the screen below: You can press this arrow to see other templates you’ve opened before. As soon as you click on one, it will be opened and the Generate Activity button will be enabled. Figure 1: The starting screen. Notice that the top button is active, but the second button, “Generate Activity” is “grayed out”, or inactive: you can’t click on it (yet!) Activity Generator Version 4 for Microsoft Train Simulator Page 10 Choose Activity File. When you click this button, a file open screen like the one below will come up. Open your Train Simulator folder (by clicking on it and then clicking the “Open” button, or by double clicking on it – this is how all files are opened in the following screens. Next open the route you want to create an activity for. In our example, let’s first open “USA2”, the default Marias Pass route. Your “Routes” folder will most likely have different routes listed. Double-click “USA2”, shown here, to open the default Marias Pass route. Figure 2 – Choose the Route and Activity to use as a basis Activity Generator Version 4 for Microsoft Train Simulator Page 11 Once there, open the “Activities” folder: Figure 3 – Finding/Opening the Route’s Activities Folder Figure 4 – Activity Templates (CSV Files) in the Marias Pass “ACTIVITIES” folder In that folder, you’ll find some “.csv” files, such as “SWLACTMP1_WestboundTemplate.csv”. Note: If you DON’T see any files like the ones shown above, that means you don’t have an Activity Generator template for that route. Visit the Templates page at www.skylinecomputing.com to see if there is a template there for the route you want. Select that file by double clicking it, or clicking on it once and then clicking the “Open” button. You’ll see a couple of message boxes telling you how many cars were located and how many tracks, etc. -just click “OK” on both. This simply confirms that you had a good file read. As you might infer from the name, “SWLACTMP1_WestboundTemplate.csv” is set up to enable you to generate Westbound freight activities (“SWL” means “Switchlist”, all the csv template Activity Generator Version 4 for Microsoft Train Simulator Page 12 files start with that; ACT means “Activity” … there’s also a TRK, or “Track” csv file for every activity creation template). Other functions available from the main screen: Convert all the switches in a route to Manual. This function works with any route, whether it’s an Activity Generator template, or not. If you find yourself unable to throw a switch that you need to throw (usually this means the switch is a dispatcher-controlled, or “AI” switch, rather than a “manual” switch), you can click this button to convert all the switches in a given route (you choose the route) to manual (user operable) mode. Note that the visual appearance of the switches will NOT be changed – you may have noticed switch stands or levers next to all your manual switches. Pressing this button will not add those levers to the simulation but you WILL be able to throw the switches, using the “G” key to throw the switch in front of your locomotive, or “Shift-G” to throw the switch behind your train. Restore a route’s switches to their original state: Convert all the signals in a route to Permissive. This button can be a bit dangerous. It will allow you to pass any signal displaying red, without ending the activity. But, SO CAN THE AI TRAFFIC! So if you’re using this feature and generating an activity using Activity Generator, it’s best to check the box “Check here to generate an activity with NO AI traffic.” Unless the AI traffic runs on a different track, or all the main line is double-tracked, etc. If you run into a red signal you can’t pass and need to, you can save the activity, exit, use ActivityGenerator to convert the signals to permissive, and then load the saved activity, and the signals will be changed. One caveat: sometimes if you are already looking at the red signal, when you convert and reload the signal still won’t be permissive. You’ll know it’s been converted because the track monitor (press F4 to see it) will say “STOP_AND_PROCEED” instead of “STOP”. If that happens, change direction (throw the reverser) and move slightly until you’re looking at a different signal in the monitor. Then when you reverse back to your original direction, the signal will have changed. This is because sometimes when saving activities MSTS will save the state of the signal as well. This move causes MSTS to recalculate the signal state. o Some Activity Creation Templates for Activity Generator may require you to use this function. Why do we have this? You may have found yourself unable to back up to pick up your train, or get into or out of a spur you need to switch, because pressing “tab” to ask the dispatcher for permission to pass a red signal sometimes results in the dispatcher saying “permission denied”. So you’re stuck and can’t complete the activity. This feature, coupled with the “convert all the switches in a route to Manual” feature, will make nearly EVERY route “Activity Generator Friendly” and will allow users to explore routes and create and complete “open ended” and freeform activities, as with the “Explore a Route” function, except you can have railcars and engines in the simulation to pick up, set out, and generally interact with. You can also use this feature for any activities (not just those created by Activity Generator) in case you get stuck behind a red signal. Again though, be mindful of opposing AI traffic. Restore a route’s signals to their original state: Once you’ve finished the activity in which you needed to pass one or more red signals, or better yet, once you’ve passed the signal or signals you needed to pass, it’s best to use this function to restore the signals to their original state (permissive signals remain permissive but Absolute signals go back to being Absolute) so you can run other activities that may have complex AI traffic, etc. Simply save the activity, exit, restore the signals, then re-load and the signals will function normally. Pressing the “convert all switches in a route to manual” button MAY have a detrimental effect on AI traffic on the route in some activities. So it’s best to restore the switches back to their original state when you don’t NEED them to be manual, for instance when you’re running a through train rather than a switching activity. This button enables you to convert the route’s switches back to their original design. Switches in the route that were originally manually operable, will still be manually operable, while switches that were originally dispatcher-controlled, will once again be dispatcher controlled. Activity Generator Version 4 for Microsoft Train Simulator Page 13 Set Location of ShapeView Program. If you have installed Paul Gausden’s great freeware “Shape View™“ program (available at www.train-sim.com and http://steam4me.railpage.org.au/trainsim/index.html among other sites), use this button to tell Activity Generator where the “ShapeView” program was installed on your machine (usually C:\Program Files\Shape Viewer”). Just find the “sview.exe” program and double-click it, or click it once and then click “Open” to tell Activity Generator where this program can be found on your computer. Create and Modify Activity Creation Templates. If you haven’t been able to find an Activity Creation Template to generate activities for a route you’re interested in, you can create your own. This is a bit more complex than simply generating activities though. See PART TWO: Creating your own Activity Generator Templates, to learn how to create your own templates. Once you’ve selected an Activity Template, either by the method shown here, or by using the drop-down box at the top of the screen to select a template you’ve opened before, you’ll be back to the main screen of Figure 1, except, the “Generate Activity” choice will no longer be grayed out. Go ahead and click on it and you’ll get the “Customize Activity Screen” on the next page: Customize Activity Screen. Activity Generator Version 4 for Microsoft Train Simulator Page 14 Here is where you select the tracks from which cars to be set out later will originate. If you start with cars already in your train, you don’t have to select any tracks here. If you do select tracks here, be sure they are at the START of the path you’ll be driving. This drop-down will only appear if the activity designer set up the activity with multiple possible paths. Otherwise, nothing will be displayed here. Destination Tracks. Cars you pick up at Work tracks along the way, or cars in your initial train, will be set out at any destination tracks you select here. Figure 4 This button only appears if the template designer included a special rft file. Designers see the section on “Adding a Template Guide” This is the “Choose Regions or Spurs to work” list box. Select at least one region to work in. Click the “+” boxes to the left to see the individual spurs in a region. The “Customize Your Activity” screen is the “control panel” you use to tell the Activity Generator about the specifics of the activity you want to create. Here is a detail of every control and setting on this screen: • • Maximum Total Cars to Handle: Enter a number greater than 0. The program will search all available spurs attempting to locate this many cars to pick up (total), OR, if you are generating a through train, this will be the length of your total train. You must enter at least “1” here – in which case you’ll have a 1 car train: or 1 pickup or 1 setout, or 1 car in a train to set out at the end. Maximum cars to pick up from any single industry: Enter the maximum number of cars you’d want to pick up at any single industry – the initial Source tracks don’t use Activity Generator Version 4 for Microsoft Train Simulator • • • • • • • Page 15 this number, just industry tracks. Setting this to a low number, such as 1, will cause the program to generate a work order with many spurs to work, in order to attempt to find all the requested cars. Setting to a high number will potentially pull more cars from each spur. There's no danger in setting this too high, the program will never call for more cars to be picked up than can fit on a spur. Remember that the actual number to be picked up will be a random number, between 0 and this many cars to pick up on any given siding/spur. Maximum cars to set out at any single industry siding. Zero will cause the program to generate an activity with no setouts, only pickups. Enter any number, again the program will never call for setting out more cars than the siding can hold. This does not apply to the Destination tracks though -- setouts will only be limited by the capacity of the tracks for Destination Tracks. Activity Start Hour. Initially the default start hour chosen by the template designer is shown here. You can change this to any hour you like. Use 24 hour “military” or European time – 11 am is entered as 11, 12 noon is entered as 12, 1 pm is 13, midnight is 0. You don’t enter minutes, just the hour. The start time of the activity will be changed to the time you select, and all AI traffic will be adjusted accordingly. Check Here for Sequential Pickups/Setouts (less randomization):: When this box is checked, when you work an industry track, you will be asked to pick up a certain number of cars, but those cars will be in order. I.e. you may be asked to pick up the first, second and third cars. This is what you’d expect if you were just switching a commodity, such as a coal plant, so it’s actually more prototypical for some types of switching. On the other hand if simple mode is NOT checked, you may be required to pick up the first, 5th and 8th cars on that spur – which is also realistic for certain types of industries. I’ve even seen railroads do this with a Corn Syrup transloading plant! If you check the box the switching will be a little simpler in that each cut will generally consist of cars in sequence. If you don’t check the box you’ll be more likely to have your initial pickups scattered over multiple yard tracks, and industry pickups could be any cars on the track (they aren’t guaranteed to be sequential) (some templates override this setting). Select route (path): This will be visible only if the activity designer set up more than one possible path (usually to give multiple starting points for an activity). Choose the 'path', which basically controls your starting point and the direction your locomotives will be facing. You aren't required to follow any certain path to complete the activity however. No AI Traffic Checkbox: If the activity you're working with has AI traffic, and that traffic is interfering with your ability to get to the spurs you need, check this box to generate an activity with no AI traffic. Also if you used the “Convert all the signals in a route to Permissive” function then checking this box is highly recommended. It can also be helpful if you’ve checked the “Convert all the switches in a route to manual” box for the route for which you’re about to create an activity. If the original activity didn't have any AI traffic to begin with, this box will have no effect. Activity Ending. Check “last pickup” for an activity that will end as soon as the last car scheduled for pickup or setout is worked. Check “reach 20 MPH” for an activity that will end after all pickups and setouts are completed, and then the train reaches 20 MPH in the FORWARD DIRECTION (note that if you’re using your front coupler and pulling in reverse you may never be able to reach 20 MPH). Finally check “assemble train” for the program to create a new task, to put together a train of all the cars you picked up, anywhere you like. So you can run to the end of the path, or into a yard, and put together the train, to end the activity. Maximum Cars to Add to Player Consist. This is a new feature. If cars are to be set out at industry or destination tracks, they can either come from Yard tracks, or, from the original train (the “Player Consist”). When a number greater than zero is entered in this box, setouts will first come from the initial train. The program will build your train based on the cars to be set out later. If there are more setouts scheduled than the number entered in this box, the remaining setouts will come from Yard tracks. So, if you want to start without doing any switching at the beginning of the activity, set this number higher than the maximum number of cars to pick up and set out. If you want to build your own train from the initial “source tracks”, set this box to 0. Activity Generator Version 4 for Microsoft Train Simulator • • Page 16 Caution: this feature MAY get you into trouble if you use it with AG3 or earlier templates. With some templates or paths, the start of the path is in an engine shed, or somewhere else where there isn’t room for a train behind the locomotives. To be sure, if the activity template designer hasn’t provided documentation letting you know which paths are ok for starting with a train in tow, it’s best to first generate an activity with a given path, using the default maximum of 0 (zero) cars. Then if you see plenty of room for a train behind your starting point, you can either run the activity you just generated, or exit it and regenerate, this time adding cars to the initial train. Force all Industry tracks selected for pickup, to pickup all cars on track (subject to user limits). This is designed to simulate unit operations such as coal, lumber and often grain. When the program selects a track to work, it will schedule every car on that track for pickup, subject to the “maximum pickups per track” limit you set. So assuming that the total number of cars to pick up and set out, and the total cars to pick up on each track, are high enough, then when a spur is scheduled to be worked all of the cars on that spur will be picked up. If unchecked, a random number of cars will be selected for pickup, and setout, on each track. Note: the activity template designer may already have set certain tracks to function in this way. Checking this box causes this rule to be applied to EVERY track worked, not just the tracks the designer set up as “unit commodity” tracks (if any). • Allow pickups from source tracks in one region to be set out in a different region. This box is only visible for AG3 or earlier templates. It is checked by default. It will permit the program to schedule pickups from “Source Tracks” you select in one region, to be set out in a different region. • • • Allow pickups from source tracks in one region to be set out in that same region. This box is only visible with AG4 or later templates. By default it is NOT checked. Because some regions can be quite long, it is possible that you might select a ‘Source’ track that you’ll reach AFTER the tracks on which you’d have to set out your pickups on. Unless you’re running a ‘turn’ (out and back run) this can pose a problem. So it’s safer, with multi-region paths, to pickup up cars in one region, but set them out in a later region. Checking this box will override this default behavior and allow pickups in a given region to be scheduled for setout in that same region. Choose your Source Tracks. Use this to select the tracks from which your train will be built, to be set out at industry tracks later. All cars to be set out at the industry tracks you choose to work or destination tracks at the end of your run will either come from these “source tracks”, or your initial train (if you entered a number greater than 0 into the “Maximum Cars to Add to Player Consist” box). You should try and select tracks towards the beginning of your route/path. Click on the “+” symbol to the left of a region name to expand the list and show all the spurs in that region; click the “-“ symbol to collapse the list so your screen isn’t as cluttered. See Figure 6 – Using the Track Selection Boxes. Click the box to the left of a Region Name to select all the spurs in that region OR, check the boxes next to individual spurs if desired. You can check as many spurs as you’d like. Checking a spur doesn’t GUARANTEE that the program will schedule a pickup on that track to be set out later – only that this spur will be included in the list of possible spurs from which your initial train will be built. For AG3 or older templates, spurs are listed alphabetically within each region, except, yard tracks are listed first in both boxes. But for AG4 or later templates, the regions are listed in the order in which they will be passed, for any given path. The individual spurs within the regions, however, are only in alphabetical order. It is usually more prototypical for your train to originate from “Yard” tracks, but that isn’t required. Realism note: AG will place any type of car that needs to be set out later, on the Source tracks you select. So, for maximum realism you probably should not select industry-specific spurs, such as a coal mine or oil loader, as “Source” tracks. Just more generic team tracks, yard tracks, etc. Note: the source tracks you select will not be used if you set the “Maximum cars to add to player consist”, above, to a number high enough that all cars to be set out can come from the initial train. Work Tracks: Check the regions or spurs you’d like to work (pick up and set out cars): This box works the same as “Choose your Source Tracks” above, except Activity Generator Version 4 for Microsoft Train Simulator • • Page 17 this is where you choose which industry tracks you’ll work. For through freights, don’t check any spurs in this list box. These will be the tracks where you’ll make pickups and/or setouts. Any cars to be set out will either come from the “Source Tracks” you selected in the box above, or, from your initial train. Click on the “+” symbol to the left of a region name to expand that list and show all the spurs in that region; click the “-“ symbol to collapse the list so your screen isn’t as cluttered. Click the box to the left of a Region Name to select it all the spurs in that region for possible pickups or setouts; OR, check the boxes next to individual spurs if desired. See Figure 6 – Using the Track Selection Boxes. You can check as many spurs as you’d like. Checking a spur doesn’t GUARANTEE that the program will schedule a pickup or setout at that spur – only that this spur will be included in the list of possible spurs where work might be scheduled. For AG3 or earlier templates, the regions in this box, also, appear in alphabetical order, and for AG4 or later templates, the regions appear in the order reached for each path. So for shorter runs, call for work in regions near the top of the box. The choice of regions and spurs doesn’t have any effect on where the player will start the activity: this is controlled by the route/path selected or set by the template designer. Again yard tracks are listed first, mainly so you can skip them if you’ve used them for “source” tracks. In this version of the program there is no special significance to “yard” tracks other than being listed first. You can pick up or set out cars from/to yard tracks the same as any other industry spurs. This is a change from previous versions. Optional: Choose Destination Tracks. AG will schedule the cars you picked up at the ‘Work’ tracks you selected, to be set out later at one or more of these tracks. You need to select destination tracks that you will reach at the end of your planned run. With AG4 and later templates this is fairly easy, because the regions are listed in order in all the selection windows. With AG3 and earlier templates, you will need to consult a map to ensure that you will actually reach these tracks at or towards the end and thus be able to set out your Work pickups there. Also, if you don’t have any Work pickups, or have fewer than the “Maximum Total Cars to Handle” setting, cars from the initial player train, or cars from the Source tracks, will be scheduled by AG to be set out at these Destination tracks. So to create a through train, you can start with cars in your initial train, select ONLY destination tracks to work, and your train will be scheduled to run to the destination track(s) you selected and the activity will end when the cars in the train are set out on those tracks. Or to begin by assembling a train, you could set the “Initial player train length” to 0 or a number less than the “Maximum Total Cars to Handle” and add some source tracks, in which case, your train will be assembled from cars found on those source tracks. Realism note: since any kind of car picked up along the run will be set out at these Destination tracks, it is more prototypical to select team tracks, yard tracks or other more generic tracks rather than a coal mine or oil loader, for example. Check to view/print the Work Order using Notepad. Checking this box will bring up the work order as soon as it’s created, using Notepad (available on all versions of Microsoft Windows), for you to view or print. This is the default. Uncheck it if you have problems with Notepad launching. Command buttons • Ok - Generate an Activity will generate a new activity, based on your settings, starting with the text "SLG-". For example if the original activity name was "Kalispell Switcher", then the name of the generated activity will be "SLG-Kalispell Switcher." The original activity file will NOT be changed in any way. To run the generated activity, start MSTS and open the activity starting with "SLG". Press 'Cancel' if you don’t wish to generate a new activity at this time. • View Activity Info File. This button is not always visible, it only appears if the template author included a special readme or documentation file. • Change Engines. Allows you to select the player locomotive consist, and add a caboose at the end of the generated train. • Set Railcar Fill: This will bring up a second screen that allows you to set how many additional railcars will be placed in the simulation to make it appear more realistic, like a working, busy railroad. The more railcars that are placed though, the greater impact you may see on your Activity Generator Version 4 for Microsoft Train Simulator Page 18 frame rates. If you don’t click this and make any adjustments, the default will usually be ok. However if you want more cars in your “world”, or fewer (maybe because of frame rate problems or because it’s a little-used branch line), click this box to control how many (or whether ANY) railcars (other than the ones you’ll be picking up or setting out) are added to the simulation, and where they might be added. • Save Settings. Saves all the settings you made on this screen, to a file name of your choosing, so you can reload them and not have to re-enter all the information when generating another similar activity. • Load Saved Settings. Grayed out unless you have previously saved some settings for this template. Allows you to call up previously saved settings for a template. Once you’ve loaded the settings, you can change them on the “Generate” screen to your heart’s content. • Cancel. Exit this screen without generating an activity. Clicking the “+” to the left of a region name expands the list so you can see each spur in that region. The “+” then becomes a “-“, which you can click to collapse the list again. Figure 6 – Using the Track Selection Boxes Click in each of these boxes, to tell the program to include that region or siding when generating the work order. Activity Generator Version 4 for Microsoft Train Simulator Page 19 Changing your Locomotive Consist Click the “Change Engines” button. The following screen appears: This is the default player consist for this activity. You can keep this, or remove some or all of the items in it by highlighting an item and using the “Remove” button. Here is a list of all locomotives available (not stored) for you to choose from. View the unit you’ve highlighted in the box above. View the unit you’ve selected in the “last car” box. Last Car box: select a car that will go at the end of the train AG builds (optional). Figure 8 – Changing the Player Consist (mainly the locomotives) In the list box on the left are all the drivable locomotives currently installed on your hard drive, listed in alphabetical order (EXCEPT, any that have been “stored” using TrainStore™.) To choose an engine to use in the activity you’re about to generate, simply highlight the engine in the box on the left (by clicking on it), then click the “Add” button. This adds it to the end of the “Player Consist” list on the right. You can eliminate items from the “Player Consist for this Activity” box by clicking on a line in that box and then clicking the “Remove” button. Or start from scratch by clicking “Remove All”. Adding Locomotives to the Player Consist: The Add button puts the name of the engine highlighted in the left window, into the window on the right side of the screen, after any other items already in that window. The box on the right shows the engines that will make up the locomotive consist in the activity that will be generated. Note that some locomotive names are followed by “-*”. These are “driveable” locomotives. The program requires that the FIRST locomotive in the consist be a driveable locomotive. Others can be AI locos, “trailing units”, etc. Removing locomotives. If you’d like to change your mind and remove a locomotive from the locomotive consist, or, delete locomotives in the original default consist before you get started, click the locomotive name you want to remove in the right-hand window, then click the Activity Generator Version 4 for Microsoft Train Simulator Page 20 “Remove” button. Or to start from scratch and remove all the locomotives from the player driveable consist, click “Remove All”. Flip Direction. Click this button to cause the engine to face in the direction opposite to the initial direction of travel. (“Å in the window means the engine will be facing “forward”). View Selected Unit. If you have Paul Gausden’s “Shape View™” program installed and used the button on the main screen to tell Activity Generator where this program is located, then, when you have a locomotive highlighted (selected) in the left-hand screen, you can click this button to see a 3-D rendering of that locomotive. This can help with selecting the engines to drive. Last Car in Consist. Because ActivityGenerator may add freight cars after the units selected in the “Player Consist” box, you may wish to select a specific car that will always be placed at the end of the player train, regardless of whether or not the program adds cars to the player train. Use this drop down box to do that. Simply scroll through a list – all rolling stock not stored will appear in the list. You can select a car, then click the small “View Selected->” button to view it (as above, this works if you have Paul Gausden’s “Shape View™ program installed). This feature is mainly included to allow you to add a caboose at the end of any train, or for modern runs, to add a “Fred” if available. But you can place any car at the end of the train – even a passenger car for “mixed train” operations. Set Railcar Fill. This will bring up a second screen that allows you to set how many additional railcars will be placed in the simulation to make it appear more realistic, like a working, busy railroad. The more railcars that are placed though, the greater impact you may see on your frame rates. If you don’t click this and make any adjustments, the default will usually be ok. However if you want more cars in your “world”, or fewer (maybe because of frame rate problems or because it’s a little-used branch line), click this button to control how many (or whether ANY) railcars (other than the ones you’ll be picking up or setting out) are added to the simulation, and where they might be added. Also this “filling” process can cause an error when starting MSTS, “Objects begin in collision, which is prohibited”, especially when used with templates that haven’t been tested/certified for Activity Generator version 2.0 or later. See yellow boxes below (next page): Activity Generator Version 4 for Microsoft Train Simulator Page 21 If you get an "Objects Begin in Collision" error when you start an activity, generate a new activity, but first set this slider all the way to the left (to “Don’t add any railcars”) Another alternative, if you want to have the program fill the "world" with at least SOME railcars, is to try lower settings here, perhaps just 1 or 2 cars. • • • • How Many Railcars Should be Added to the Activity? (slider): This slider controls how many total railcars will be added to the activity you generate, over and above those that Activity Generator placed on tracks for you to work. The program will examine all the spurs available to place cars on (based on your other settings, described below) and add up the capacity of each. If the slider is all the way to the right (maximum), the program will try to add as many as will fit, based on your other settings, up to a maximum of 500 (when you start getting to 600 or more cars the sim begins to have problems, including sound problems and “Send/Don’t Send”. The increments are in fifths, so the #4 position will add 4/5 of the cars that could possibly be added, the third position will add three fifths, etc. If the slider is set all the way to the left, NO cars, other than those on industry tracks where you’ll work and the cars in yard tracks you need to pick up, will be added. All cars added via this screen are for scenic/realism purposes and aren’t included in the work order. Place cars on Industry tracks that won’t be worked. Cars are automatically placed on all the industry tracks that WILL be worked, sometimes (depending on randomization and whether or not “simple mode” was checked”) more than need to be picked up on that siding/spur. Checking this box also places cars on other Industry tracks where you don’t have any pickups or setouts scheduled, for purposes of scenic enhancement/realism. Place cars on Yard tracks that won’t be worked. This causes the program to place extra cars on other yard tracks, not the tracks you’ll be picking up cars from. It can have an effect on the activity though, in that it’s possible that this will give you less room to store cars while switching – so it might make the activity more challenging, but most likely will simply add to the feeling of a working/busy yard. Place cars on Yard tracks that WILL be worked: This will add more cars to the Activity Generator Version 4 for Microsoft Train Simulator • • Page 22 yard tracks where pickups are called for. If you don’t check this box, then the only cars placed on a yard track you’re working, will be the ones you need to pick up. This one WILL impact your activity, it can make the switching a little more challenging bu making the cuts of cars longer than just what you need to pick up. It’s still mainly a scenic enhancement though. Allow car placement in Regions that won’t be worked: If you’ll only be traveling in the regions that you’ve checked to work, then there’s no reason to check this box. If however you may pass through other regions but won’t have work in them, checking this box will cause those regions to possibly have cars on their Industry or Yard tracks (depending on the other check box settings) so the world you drive through doesn’t look “barren”. It’s important to note that even if you do check this box, only the regions you CAN travel through/to will have cars added to them (based on the path you selected. New in AG4: for AG4 templates, this is the default, but, AG4 only fills those regions you’ll actually run through, based on the location of the first and last regions you’ve checked to work. For through trains AG4 will fill tracks in regions from the starting region, to the last region reached (typically, the region where the destination tracks are located). Maximum number of cars to add per track: To keep the program from placing long strings of cars on long yard tracks, thus negatively (and usually needlessly) impacting frame rates, it’s best to set some limit here. Enter any number between 1 and 99. The program will never add more cars than can fit on the track (and will typically leave room for at least one more car). Generating a new activity. Once you’re back to the “Customize your Activity” screen, simply click “OK – Generate Activity.” A “File-Save” dialog will pop up. You can simply click the “Save” button to save the new activity using the default file name. Or pick a name you’d like to use. Printing a Work Order. If you’d like a printed switch list or work order, or would simply like to view the generated work order as soon as the program finishes creating it, simply check the box “Check here to open your work order with Notepad when switch list generation is complete.” After you press “OK – Generate Activity”, the work order will appear on screen, loaded into Notepad. If you don’t like the work order, simply close the window, and press “Ok” again to generate a new work order! Note: if the template you used to generate the activity is an AG3 or earlier template, then the printable workorder, AND the work order you’ll see on the screen when you press “F11”, has regions in alphabetical order. But if the template used was an AG4 or later template, the regions will appear in the order in which they are reached along the selected path. On the following page is an example of a portion of the printed switch list from an activity created using the “GN Hi-Line” template, for Michael Stephan’s GN Hi-Line route: Activity Generator Version 4 for Microsoft Train Simulator Page 23 Running the activity. Now for the fun part! Start MSTS, and find the generated activity you just created. If you created an activity for the “Westbound Template” in the Marias (USA2) route, then when you select the “Marias” route from the MSTS “Drive a Train” screen, you’ll see the original activity template (don’t use that one), PLUS a new activity called “SLGWestbound Template” (or the new name you selected when you saved the file). All the activities created by the Activity Generator will default to start with the letters “SLG-” unless you manually select a different name when saving. Simply select the activity, and run it! Distributing Activities you Generate. As a licensed Activity Generator user, you may freely distribute any and all activities you create using the Activity Generator program, for free, or for profit. We only ask that the following credit be included in your distribution documentation: “All or part of this activity was created using Steve Davis’ ‘Activity Generator’ Activity Creation Utility for MSTS. For more information on this tool, please visit www.skylinecomputing.com”. Activity Generator Version 4 for Microsoft Train Simulator Page 24 To package your activities for distribution, you can simply use the Activity Packager utility that comes with Microsoft™’s Activity Editor tool. When doing this, be sure and open the activity you GENERATED, NOT the “template” activity you started from! For example, if you generated an activity called “SLG-MP1_Columbia Falls to Kalispell”, don’t open the “MP1_KAL_CF_WF_Template.act” file and package that. Rather, open “SLG-MP1_Columbia Falls to Kalispell” (the name of the activity you created/generated). When you send out the “.apk” file that the program generates, it will include all the paths, services, traffic, consists and the activity file you created, the same as an activity you created the “traditional” way. You can also use “RouteRiter™” to package the activity, just as you would any other activity. If you are sending out a number of activities based on the same activity template, it’s best to let your end-users know that they’ll see some file overwrite warnings. They can say “yes” or “no” to these, it really doesn’t matter. The reason for the warnings is, there are a number of template files that will be shared amongst all the activities you generate from a given template. This is actually a good thing, because it minimizes the number of unique files installed on the user’s hard drive, helping control “hard drive bloat”. Note on files and naming: When you generate a new activity using the Activity Generator, the program will ask you for a file name to use when saving it. The default name, which is the template name with “SLG-“ at the front of it, is perfectly fine. But if you’re planning to distribute your activity to others, you may want to use a more descriptive name. When you change the name in the “Save As” dialog (after pressing “OK – Generate the Activity”), this will cause the Activity Generator to create a new activity, using that new name. Renaming enables you to create multiple activities from the same activity template, without over-writing the original one. Problem with packaging some activities: We have found that when attempting to package activities using Microsoft™’s Activity Editor tool, the “.apk” files created by the Activity Package function in the Activity Editor for certain routes are not usable. This isn’t a Activity Generator bug or issue, the problem occurs even when Microsoft’s tools are used to create and package the activity. One route we’ve seen this problem with is 3DTS’s Cajon Pass route. Activities for routes like this, whether created by Microsoft™’s Activity Editor tool, OR the Activity Generator, can still be distributed. However doing this requires finding all the files used in the activity, and zipping them into a single “.zip” file for installation on the end user’s drive. The process is no different for Activity Generator created activities. Just make sure you zip up all the needed files. If you have RouteRiter™, it will do this for you, under “Activities/Stock”. Zipping is preferred because some end users are unable to get the Microsoft Activity Unpackager to work correctly. For more information on how to use WinZip™ to package and distribute activities and templates you might create, see Using WinZip to Package Your Templates. Activity Generator Version 4 for Microsoft Train Simulator Page 25 Q&A: Q: How can I create a “Through Freight” activity without any switching in it? A: Enter the length you want your train to be in the “Maximum Cars to Pick Up and Set Out at All Industry spurs. If you want to build your train at the beginning, select some “Source” tracks in the top right list box. If you want to start with your train already assembled, do not select any Source tracks, but be sure to enter the number of cars you want your train to be, into the “Maximum Cars in Starting Player Train” box. Q: Will I get a whole bunch of activity files on my disk from running this program? A: No – unless you WANT to. Each time you run the Activity Generator for a given activity, it over-writes the last generated activity for that same activity template, unless you choose to use a name other than the default name the program suggests. The generated activities will all have the prefix “SLG –“ (unless you manually override this when saving). Q: Does this program modify any MSTS files or activity files written by others? A: No. The program will read an existing activity generation template, but when generating a new activity, the program creates NEW files. NO MSTS files or third party files are changed by this program. Q: What files are created when I run the Activity Generator (when I press the “OK – Generate Activity”)? A: Possibly as many as five (5) files. One .act (activity) file, with the same name as the original activity file that the generated activity was based on except with an “SLG” in front of the name (unless you chose to rename the file when prompted for the file name). This file will be saved into the route’s “\ACTIVITIES” folder. For example, if you generated an activity based on “MP1_WF_KAL_CFTemplate.act” the activity file generated will be named SLG-MP1_WF_KAL_CF.act”. Notice that the word “template” is dropped. Then two “WORKORDER” files are generated. One is a .csv file that you can open, print or edit using a spreadsheet program such as Microsoft Excel™, and the other is a text file which can be printed directly, or read, edited and printed by any text editor such as Notepad™ or Wordpad™. These two files don’t “do” anything. They’re just for you to read and/or print. These files will be saved in the route’s “\ACTIVITIES” folder. Often (if the consist or path were changed) a new “Service” file (.srv in the route’s \SERVICES folder) and a new consist file (.con in TRAINS\CONSISTS), both prefixed by “SLG-“ and the name of the activity you generated, will also be generated. Q: Can this program cause problems with MSTS? Activity Generator Version 4 for Microsoft Train Simulator Page 26 A: Although this program is provided “as is” without warranty and we can’t state unequivocally that it will have no impact on your computer or your MSTS installation, there is really no way this could impact your system or MSTS. The program reads some MSTS files, and doesn’t modify any of them. The only files it creates are .CSV files for reading and printing (which aren’t special and can be read by any text editor such as Notepad or Wordpad), and it creates a new activity (.act) file, and sometimes a new service (.srv) and consist (.con) file. Those filenames will start with the text “SLG-“ if you stick with the default naming suggested by the program when saving. We’ve had no reports of problems with MSTS caused by this program although quite a few copies of our program have been sold. Q: I don’t trust you. What can I do if this program DOES cause a problem with MSTS, or, if after generating a new activity file, now my MSTS, or the route, will no longer open? Or I get the dreaded “Send/Don’t Send to Microsoft” message, or my brother gets mad at me for messing with his computer? A: If for any reason you suspect MSTS problems, or have problems loading MSTS after you’ve generated an activity, you can delete the SLG-??????.act file you just generated (the ???? means “any text can go here … it will be the name of the original activity file you used to generate this activity from unless you saved using a new name). Also you may need to delete an SLG-????.srv file if any (in the route’s \SERVICES folder) and one or more consist files, SLG-????.con, in your \TRAINS\CONSISTS folder. Your MSTS setup and files will then be exactly as they were before you generated the activity. If you wish to get rid of all the activity, service and consist files that this program generated, simply delete every file in the route’s ACTIVITIES and SERVICES folders starting in “SLG-“ and ending in “act” or “srv”, and delete every file in TRAINS\CONSISTS beginning with “SLG-“. To get rid of EVERY file that this program has ever created, delete everything ending with .csv, and all files starting with “WORKORDER”. Q: How do I uninstall this program? A: Easy. Just go to your Windows Control Panel, “Add/Remove Programs”, find “Activity Generator”, click it, and select “Remove”. The program and all references to it will be completely removed. Q: I have an activity I really like, and would like to use this program to create new switch lists for that activity, so I can run it again and again with different work orders, weather, etc. How can I set up this activity to use with the Activity Generator program? A: You’ll have to create an Activity Generator Template from that activity (or you can create these from scratch of course). Read the section in this manual entitled “Creating and Modifying Activities to Work with Activity Generator”. Q: Why are there sometimes separate templates for Westbound vs. Eastbound activities, such as with the Marias Pass (USA2) route? Activity Generator Version 4 for Microsoft Train Simulator Page 27 A: Not all routes will need this. In the case of the default Marias route (and many others), many switches cannot be operated manually (they’re “dispatcher-controlled”), and certain spur switches off the main line are facing the wrong way to be serviced by, say, a westbound train. Since the player can’t manually operate all the main line crossovers, it isn’t possible to run around cars picked up with the front coupler, except in yards. Because of this, spurs that can’t be serviced by a westbound train were deleted (by the activity designer) from the westbound “TRK” (Track) CSV file, so the Activity Generator won’t ever schedule any pickups or setouts on these spurs when generating a westbound activity. Same thing (in reverse) for the eastbound activity template. In the case of Marias Pass, and local work on most other US Class 1 long haul mainlines, this is actually prototypical: the railroad won’t want to tie up the main line with a lot of runarounds, etc., and will generally schedule local freights in both directions, so each can service only trailing-point switches in the direction of normal travel. Also the AI traffic is often different in the “Westbound” and “Eastbound” activity generation templates so as not to interfere with the path you’ll be driving. Q: I ran the Activity Generator, and it generated an activity that was impossible to complete successfully! Is there a bug in the program? When will it be fixed? A: As with any computer program, there is a chance that useless results will be generated if meaningless or conflicting information is entered. This is much more likely to happen with pre-AG4 templates. With all the settings available to the user (selecting the player path and starting point, tracks to service, and especially allowing the program to pick cars from one region to be set out in another (see Check here to allow Setouts to come from Yard Tracks in different regions than the Industry Track being serviced, it is possible that you might select a siding for work that you can’t get to in the order needed. The best advice in this case is, “know your route!” Maps of many of the routes for which templates have been created (and, in fact, most available routes) can be downloaded at www.train-sim.com (and often other sites). If you are able to select spurs you can’t reach to work, this is a problem with the template, not Activity Generator. Please contact the author of that template for help or questions. Also you can solve many problems by using the “Convert all Switches in a Route to Manual” button on the route. And if you just can’t get permission to pass a red signal, use the “Convert all Signals to Permissive” button. Q: I followed the directions above and I can reach all the spurs I need to, but the ORDER of the setouts is “messed up”: I start in Kalispell, but along the way I have to set out some cars I don’t have yet, which I’ll need to pick up in Whitefish! But once I run all the way to Whitefish, I can’t get back to Kalispell. No joy! A: This can happen if you are running a pre-AG4 template and checked the Check here to allow Setouts to come from Yard Tracks in different regions than the Industry Track being serviced check box, AND checked yard tracks in regions other than the region you started out in. We recommend that unless you really know the route, or you’ll be running a “Turn” (where you run out and back”, you select source tracks ONLY in the region where you’ll be starting out. Or start with all the cars already in your initial train, by Activity Generator Version 4 for Microsoft Train Simulator Page 28 setting the “Maximum Cars to Add to Player Consist” to a number equal or greater to your “Maximum cars to pickup/setout at all industry spurs” setting. Q: What’s in those files the program needs to read? A: The program reads in two CSV files. One tells the program what all the spur names are, what region each spur is in, how many cars the spur should hold, and what type of car the industry served by this spur receives and ships out. The other csv file tells the program about all the cars in this activity: where they are currently located, and what their numbers (such as “32887-0), types (tank car, covered hopper car, box car, etc.) and descriptions (i.e. “ORW 40’ box car”) are. In addition, for AG4 and later templates, there may be a “.ctp” file that controls what types of cars can be placed on spurs calling for cars of “Any” type, and a “.pro” (path region order) file that sets the order in which regions are reached along each path you can choose to run on. Saving Activities you Generate to Run them Again: 1. Rename the activity .act file to something else, such as “NECSouthboundFreight.act”. Also rename the WORKORDER files. 2. Use the Activity Packager utility in Microsoft’s Activity Editor, or zip up the activity files using RouteRiter™ or a similar program. This will preserve the consist, service and other files which ActivityMaster generated as part of this activity. 3. When you want to run the activity again, unpackage it or unzip it. This will overwrite any of the files you’ve generated since then, so you’ll have your activity fully restored and ready to run. Activity Templates, Routes and Downloads Needed Check the “Templates” page on www.skylinecomputing.com to find and download Activity Creation Templates for routes that you have. You can create your own “Activity Generator friendly” activities for routes not listed below, by following the steps in the next section, or, check www.skylinecomputing.com, www.trainsim.com and www.avsim.com periodically for new “AG” activity creation templates. Known Issue with Activity Generator version 4 or later, and some earlier templates. Some templates have been tested to work correctly with this latest version of Activity Generator, but some haven’t yet. See the “Templates” page at www.skylinecomputing.com – it indicates which templates have been tested or “certified” for SLG v 2.0 and AG3.0 or later, and which haven’t been. The list will be updated as new templates are created or tested to work with Version 2 and later versions including this latest version. Activity Generator will correctly run Activity Generator Version 4 for Microsoft Train Simulator Page 29 all SwitchList Generator 2 and later templates, but SwitchList Generator 2 (which is no longer supported) will not necessarily run all AG 3 and later templates to their full advantage. There is only one issue you might have in using templates that haven’t been tested/certified for this version or SLG version 2 or later: you may get an error message in MSTS when starting the activity: “Objects begin in collision, which is prohibited”. If this happens you can often fix the problem by adjusting the “Fill World” slider as described in Set Railcar Fill. and/or by lowering the “Maximum to pick up from any single siding” setting to 1 or 2 cars and generating the activity again. Activity Generator Version 4 for Microsoft Train Simulator Page 30 PART TWO: Creating your own Activity Generator Templates Ok, you’ve run all the Activity Generator template activities you can get your hands on (or, maybe there isn’t one posted for a route you like), and now you want to create your own template for Activity Generator so you can generate activities for a route for which templates aren’t yet available. This is the place to start! The good news is that Activity Generator comes with utilities to create the “CSV” files and other support files you need to do this. The bad news is, for best results you’ll need to do some editing of these CSV files, and some use of Microsoft’s Activity Editor is required. If you learn better by a live demonstration, we have a series of free Video Tutorials that show how to create Activity Generator Activity Creation Templates, on the Video Tutorials page at www.skylinecomputing.com Step 1: Create the Activity Creation Template .act File (using the Activity Editor) Activity Generator needs to read an MSTS activity file (.act file) to generate two .csv files, which in turn provide the information needed for the program to generate activities. You could use an existing activity as the template. However for all of the sidings to be eligible to be called on by the user for pickups, there must be at least one car on each siding, and there must be a “Pick up cars” event for at least one car on each spur that you would ever want the player to be able to work. Usually, there won’t be. So I recommend that even if you’ll be basing your activity creation template on an existing activity, you first copy the activity file (.act), either directly in Windows, or by opening it in the Activity Editor, and then using “File|Save As” to save the activity with another name. I use the word “template” in the names of all activities that I will use as the basis to generate other activities using Activity Generator. This way when the user sees a “Template” activity in the activities list for a given route, the user will know not to run that activity (the template is used only to GENERATE actual activities). Whether you’re copying an existing activity file, or creating one from scratch, here are the steps to follow in the activity editor: 1. Place cars on the industry spurs and yard tracks. In earlier versions of Activity Generator, you had to place the types of cars in the spur which that industry might be expected to ship, on each spur. This is no longer required. You can just place any type of car in any spur, and later, edit the activity TDB file to tell Activity Generator what types of cars the industry wants to receive, and what types of cars the industry ships out. Placing the cars on the spurs serves several purposes: a. It provides a “marker” which shows Activity Generator where cars to be picked up are to be placed. Note that since Activity Generator actually places cars on spurs and adds cars to the “world”, where you place the “marker car” (or string of cars) is important. The head car should be placed near to the end of the spur, and facing in a direction so that cars added behind that car, and won’t fill the spur past Activity Generator Version 4 for Microsoft Train Simulator Page 31 the limit of the track. Activity Generator can’t place any cars on a spur for the player to pick up unless at least one of these “marker” cars is placed on the spur. b. If you fill the spur with cars, Activity Generator can use the number of cars placed on each spur to estimate how many cars will fit on the spur. However, with Activity Generator version 4, it’s usually easier to place just one car on each spur. Activity Generator can calculate the spur lengths for you. Also you can adjust the calculated lengths later by manually editing the track .csv file, as described later, to tell Activity Generator the maximum number of cars to place on that spur for pickup or allow for setout. Note: with some large routes, filling all the spurs with a lot of cars can cause errors after you save the Activity file in MSTS Activity Editor and then try and reload it. Important: You don’t have to place cars in ALL the spurs, but you should try and get most of them if you ever want the player to have a pickup from a given spur. If you don’t place a car (as a “marker”) in a spur, Activity Generator will be able to call for SETOUTS to but not PICKUPS from that spur. Note that when the activity is generated, Activity Generator may or may not actually place one or more cars on the spurs where you’ve placed these “markers” when creating your template – it will depend on whether work is being called for at that spur, and how the end user of your template has set the “fill world” settings when generating the activity, as described in Set Railcar Fill. IMPORTANT -- Note on placing cars on spurs: To place cars on spurs as markers, you open the MSTS Activity Editor, find the spur you want to place one or more cars on. Hold down the right mouse button and move your mouse towards you, or away from you, to zoom in and out on the track diagram to better locate and isolate the spurs. When you’ve found the spur on which you’d like to place one or more cars, right-click on that spur. From the pop-up menu that comes up, choose “Place Consist”. You can then place any consist you want on the track. I usually create a single-car consist to use to place as a marker, and name it just “1” so it always comes up first in the list of consists to choose from. You can change the type of cars actually placed on the track after placing the consists, by rightclicking on the car and selecting “Properties” from the pop-up menu. Now you can change the type of car, and the number of cars, on that spur. You can also use “change direction” to flip the car you placed to facing the other way. With AG4 it isn’t necessary to change the car types, except, SOMEWHERE in your template you need to place an “example” of at least one of each type of car that any of your industries will ship out or receive. More on this in the section on editing the activity .csv file. Important: When placing cars, if you intend to sometimes have the program fill the whole spur with cars, be sure and place the car towards one or the other end of the spur, and face the rear of the car into the spur. Then even if you place only one car, and the program fills with more cars, it won’t fill past the limits of the spur, and thus Activity Generator Version 4 for Microsoft Train Simulator Page 32 cause the MSTS error “Objects in World Begin in Collision” when loading. Here’s an example: Figure 9: Two cars on a spur that could hold perhaps three. Rear coupler, where additional cars will be added. Front of consist Note from Figure 9 above that on the Ozark Hd Wd spur there is probably only room for two cars, three at most. Figure 10: Placing just one car so that the maximum number of cars can be added behind that car for pickup by the player. Good placement: ok to add up to 2 cars to this coupler. Above, we’ve placed one car at an end. So if one, or even two, cars are added behind this car by the program for the player to pick up, the cars still won’t run off the end of the spur. Also note that MSTS will number the cars beginning with the one you placed. So for example if this is “32787”, the car you see will get the number “32787-0” and cars behind it will be numbered “32787-1”, “32787-2” etc. This can be a consideration because when using sequential pickups, the program, if calling for 1 car when 3 were placed there, will call for the pickup of “32787-0” first. So if you place the car at the other end, it will work, but the player doing the pickups will have a little more work, always having to pick up the whole cut, then drop trailing cars such as “32787-1” and “32787-2”, if present, back in the spur. Activity Generator Version 4 for Microsoft Train Simulator Page 33 Figure 11: Poor placement: some of the spur is “wasted”, reducing capacity for pickups. Not the best placement: one car can fit behind this coupler, but if two cars are added, one will start off the track (derailed). In Figure 11, the car is placed in the middle of the spur. So if you set the capacity of this spur to three cars, and the program fills the spur with three cars, then the last car will run off the track, causing the error “Objects in the World Begin in Collision” when the activity is loaded in MSTS. Figure 12: Worst case placement of a car on a spur. Even a single car placed behind this coupler will start off the track, resulting in an error. Figure 12 above is an example of the worst placement choice. Even though this spur could hold at least 2 cars, probably 3, only one car can ever be placed here. You would need to set the capacity to 1. That’s because ANY car added behind this car, will be hanging off the track, starting the activity “derailed”. Note that it’s ok to place a car on EITHER end – what we’re concerned with here is the DIRECTION THE COUPLER FACES. Since cars will be added behind the coupler. If cars are placed on a spur such that some run off the track, THIS WILL CAUSE MSTS TO FAIL WHEN THE ACTIVITY IS STARTED, WITH THE MESSAGE “OBJECTS BEGIN IN COLLISION, WHICH IS PROHIBITED”. 2. Place some other cars, of a type that will be delivered to the industries, somewhere in the activity file. These will be the cars that will be chosen to be set out at the industries in the region. The purpose of this is to give Activity Activity Generator Version 4 for Microsoft Train Simulator Page 34 Generator “examples” of the types of cars to be set out at the industry tracks, if they are different from the cars already sitting in those industry tracks: for example if all your coal mines have loaded coal cars in them, you would place one or more empty coal cars somewhere in the activity, so you can name them, perhaps “CLMT” (for Coal, Empty) in the car CSV file. That way when you set the track CSV file so the “CarTypeWanted” at the coal plant is “CLMT”, Activity Generator will be able to find an example of that car type to place in a source track somewhere, or in the player train. DON’T FORGET to place at least one “marker” car in any yard tracks or other tracks that the user may want to choose to get cars to be set out later at the industry tracks! Remember, Activity Generator can’t place cars on a track, whether for pickup, or later setout, unless you place at least one “marker car” on that track, as described in this section: 3. Create a new ‘Action’ Event. View the Action Event window in the Activity Editor (click “View” then “Action Events”) and click “New” to create a new Action event, “Pick Up Cars”, for one of the cars on each spur. Don’t worry: the player won’t actually have to pick up one car on every spur! This is simply a marker used to help the Activity Generator generate the cars CSV file telling the program about the cars on the route, and where they are. Click on “New” in the Action Events Window as shown below: Click the “New” button to create a new Action Event (“Pick up cars”) Designer’s note: I was unable to determine from the coordinate system used in the activity .act file, which track a car was on. For example, in an activity file, a car sitting at a spur is listed like this: Wagon ( WagonData ( Ctn40ftb_e Ctn-40ft-Boxcars ) UiD ( 0 ) ) ) ) Direction ( 0 ) ID ( 32808 ) Tile ( -11263 13980 820.16 -482.912 ) Now, it’s pretty clear here that this is a 40 foot box car. But if someone reading this manual can tell me how to discern which siding is located at these coordinates, please e- Activity Generator Version 4 for Microsoft Train Simulator Page 35 mail me, and we can eliminate this step in this procedure! Email Steve Davis, [email protected] 4. Assign the Pick up Cars Event to each consist placed. Click on a car in the spur for which you’re creating this pick up event (remember to do at least one car per spur … one is really all that’s needed), and you’ll see the number of the car you chose in the window as shown below: 2. The action event after you select the car, shows this number, along with the name of the siding, here. 1. In the “Action” drop down here, select “Pick up cars” from the list of actions. Note: In previous versions of Activity Generator you needed to enter the Consist Number here. This is NO LONGER NECESSARY with this version! You can now leave this box empty. It really doesn’t matter what “Outcome” is selected here. Just use the default. • Keep adding these action events for each spur that has a car on it, or, add a number of cars on different spurs, to the same “Action Event” – it accomplishes the same thing. Then save the activity. If you were working on an activity you’d like to keep, Activity Generator Version 4 for Microsoft Train Simulator Page 36 save this version of the activity with a different name, preferably one that indicates that this was designed to be used as a “seed”, or template, for the Activity Generator, such as “Template”. 5. Multiple Paths (optional). If you wish to provide multiple choices of starting points or paths for your users, here’s how to do it. Edit the “Player Service”. Under “Path”, click the “New” button. When using multiple paths, each path name, INCLUDING the default path you save with the activity, MUST start with the activity name, then be followed by a description that the player will understand (you can keep the original path, unaltered, but just with a different name, by clicking the “Use as Template” button instead of the “New” button.) This naming convention enables the Activity Generator to locate all the paths that have been set up to work with this activity. Example: If the activity name is “Marias Kalispell”, then each path name you create should be prefixed with that EXACT TEXT (it’s best to use cut and paste to do this. In the Activity Editor, highlight the text you want to copy by clicking your left mouse button and holding the button down while you drag over all the text to copy, then press the control key, along with the letter “C”, or, “ctrl-C”. Next, find the spot where you want to paste the new text, click your left mouse button there, and press ctrl-V to paste). Path names in this case would be “Marias KalispellKalispell to Columbia Falls”, “Marias KalispellColumbia Falls to Kalispell”, Marias KaliespellKalispell to WhiteFish”, etc. When the path list comes up on the choice list presented to the users (as shown in the first section of this manual), the activity name will be STRIPPED from the display. So the users will only see the “Kalispell to Columbia Falls”, “Kalispell to Whitefish”, etc. Step 2: Create the Activity .CSV File The first step in creating the necessary CSV file is the easiest part: the Activity Generator includes a utility to create the file from a properly edited activity file (as set up in Step 1). Activity Generator Version 4 for Microsoft Train Simulator Page 37 AFTER you’ve created, or modified an activity file to provide the needed information (see Step 1), click this button to bring up the next screen. Activity Generator Version 4 for Microsoft Train Simulator Page 38 Next the Create and Modify Activity Templates screen comes up: You create an Activity CSV file, one of two CSV files used by the Activity Generator to generate new activities, by first clicking on “Create an Activity CSV File from an Activity (.act) File.” If you’ve already created (and perhaps edited) an activity CSV file, and you want to create a Track CSV file, you can go to the previous screen and select “Choose an Activity CSV File” to load this file. You’ll see an error message about there not being a Track .csv file but you can ignore that this time – you’re about to create it! Once you’ve done either of these things, the “Create a Track CSV File” button will be enabled. Remember, you need to complete Step 1, editing the activity .act file, before you attempt to create the Activity CSV file, or the operation will fail. Provided that the activity file was set up correctly, you’ll see a message box like the one below: Activity Generator Version 4 for Microsoft Train Simulator Page 39 Step 3: Edit the Activity CSV File. You don’t absolutely have to edit this CSV file. The purpose of editing this file is to ensure that the cars are assigned the correct “type codes” (such as Hopper, Box car, etc.) to help Activity Generator build more realistic work orders. You may want to fine tune the type codes Activity Generator assigned to the cars you used. For example, there is a visual difference between a loaded coal car, and an empty one. Activity Generator will by default assign the type “CL” (“Coal”) to any cars with “coal” in their names. But you might want to improve on this, by perhaps leaving the loaded coal cars as CL but renaming the empty coal cars to “CLMT” or “CLX”. If you’re the impatient type, you can take the chance that the Activity Generator made good “guesses” as to what type of car each car found was. The good news is, there isn’t really that much editing you need to do. Just look over the cars in the list and enter the correct “Car Type Code” for each car. Or just edit those cars marked by the system as “U” (for “Unknown type”), and check the “MatchErrors” file for any consists without a Location or UiD as described in “Blank UiDs in the Activity CSV File”. The pop-up message in the preceding step gave you the file name (in this case, it was for the Canton route, and the file name was “SWLACTCanton – Start Canton.csv”). Now you need to find that file (in the route’s “ACTIVITIES” folder), open it, and edit it. If you didn’t remember or write down the file name, don’t worry. There is probably only one .csv file in the ACTIVITIES folder for the route you’re working on. Open the Activities folder for the route that you’re creating a template for, and find a .csv file that starts with “SWLACT” (which stands for “Switchlist Activity” file, in case you care). The file can be edited by Notepad or Wordpad, but it’s a little tough: all the values are separated by commas. The easiest way to edit this file is by using a spreadsheet program, such as Microsoft Excel™. Opening up this file using Excel, here’s what we’ll see (after adjusting the column widths a bit): CarDescr Ctn-Hop-f Ctn-Hop-f ns_coalcar_fl Ctn-Gondola_f Wonderacf Wonderacf nw161696 Consist# 32770 32770 32770 32770 32786 32786 32788 Car# 0 1 2 3 0 1 0 Location 30 30 30 30 98 98 92 CarType HP HP CL G U U BX UiD 2147614720 2147614721 2147614722 2147614723 2148663296 2148663297 2148794368 Activity Generator Version 4 for Microsoft Train Simulator Page 40 Editing the “CarType” information. Now we’ve seen these “Wonder ACF” cars, and they’re covered hopper cars. So enter “CVH” (or whatever you choose to use to identify a covered hopper car) in place of “U” in the “Car Type” column. When you save this file, be sure and save it as a .csv file, NOT as an Excel Worksheet. See saving csv files. Possible Car Types: Here’s a listing of some of the car types that are used by default – the types are assigned automatically based on the name of the given car, from a database of common names that ships with the program. You can create your own car types also. Just remember what codes you used and be consistent within your activity CSV file! HP CL G BX F L T LG W F CMT RFR Hopper cars Coal Gondola Box car Flat Lumber (finished incl gyp board & beam cars) Tank car Logs Woodchip Flat Cement/lime Reefer Note for advanced users: the list above came from a file called “cartypes.csv” which is stored in your “Program Files\SwitchlistGenerator” folder. The first column is a “key”: if the name of the car contains the key text, then the car is assigned the type code in the second row. Note that more than one keyword can map to the same car type code. A car with the word “chem” in its name, and a car with the phrase “tank” in its name, both map to type “T” for “Tank car”. The program stops searching on the first match it finds. The third column isn’t used, it’s just to help us poor humans to remember what the codes mean. If you add types to your .csv file, then when the program searches using “Create and Activity CSV File”, it will look for the new types you created also But this isn’t necessary to add new types to templates you create.. Loads and Empties, and more specific car typing. For those cars where a “load” is obviously different than an “empty”, such as lumber beam cars, log flats, and coal or other open hoppers, if you want your activities to be the most realistic, you should probably define your own types, to differentiate between loads and empties. Also you will probably want to name covered hoppers differently than open hoppers, and perhaps even grain covered hoppers differently than, say, chemical, cement or plastic hoppers. This is all done by editing the “cars” .csv file as described here. Here are some examples/ideas. You are free to use any naming nomenclature you’d like, as long as you’re consistent within your own template. Different Activity Generation Templates can use different naming schemes. Activity Generator Version 4 for Microsoft Train Simulator GRN CVH CL or CLLD CLMT STL W WMT L LMT LG LGMT FMT GMT SCRP Page 41 Grain Covered Hopper (other than grain) Loaded coal or other open hopper Empty coal or other open hopper Coiled or other steel load Loaded wood chip cars Empty wood chip cars Loaded lumber beam cars Empty lumber beam cars Loaded log cars Empty log cars Empty flat (other than log) Empty gondola car Gondola loaded with scrap metal You can expand on this as much as you want, even to the point of loaded or empty box cars, grain cars, etc. as you wish. You can differentiate by types of loads, so only gravel hoppers or gondolas are placed at gravel pits, with empties delivered, etc. It’s up to you. Blank UID’s in the Activity CSV File: When you create an activity CSV File from an activity file, it’s possible that there may be some cars/consists that the program couldn’t find the spur for. If this happens, you’ll get an error message, and another CSV file with the name of the template you used, followed by the word “MatchErrors” will be created and saved in the same “Activities” folder”. The file looks like this when opened using Excel™ or a similar spreadsheet program: US2WoodChipper US2WoodChipper 32768 32768 0 1 This may be by design: perhaps you placed some rolling stock, or locomotives, on the route for “decoration” purposes, and you don’t expect the user to pick up those cars or engines. Or these cars are in areas that your paths will never reach, and you simply didn’t want to go to the trouble of deleting them from the activity template. If that’s the case, simply ignore this file. If, however, some of these are cars you meant for the player to pick up, then this means that you didn’t assign a “Pickup” Action Event for the consist that the car is in. See Setting Pickup Action Events for more information on how to do this. If this is the case, you should go back into the Activity Editor, find the consist in question, and assign a Pickup activity to a car in that consist, as described in Step 1. Then repeat Step 2. Saving the CSV File: If you used a spreadsheet program like Excel to edit the .csv file, you’ll need to save the file you edited as a .csv, and NOT as an Excel “Worksheet” or other format. Here’s how: Activity Generator Version 4 for Microsoft Train Simulator Page 42 Note that the “Save as type” is Comma delimited, or .csv. When you press the “Save” button, you may see what looks like an error message, as shown below: Don’t worry about the error message. It just means you are CORRECTLY saving this file as a .csv file rather than as an Excel .xls file, which is the preferred format for Excel.. Click “Yes” to proceed and keep the file as a .csv file. Activity Generator Version 4 for Microsoft Train Simulator Page 43 Step 4: Create & Edit the Track CSV File. After you create the Activity CSV file (or load an activity CSV file from the main screen) the “Create a Track CSV File” button becomes active (it’s no longer grayed out). It could be though that you exited the program so you could edit the Activity CSV File, and now that you have a polished Activity CSV File, you’re ready to create the Track CSV. No problem, the “Load Activity CSV File” button (the one on the MAIN SCREEN) can be used to load it. Simply press this button and browse to the SWLACT file you edited. You’ll see an error message saying that the Track database file (SWLTDB) couldn’t be found, but in this case, that’s ok: you’re about to create that file! To actually create the Track CSV file, just click the “Create a Track CSV File” button. The reason you need the activity file to be created and edited first, is that the program uses the information stored in that file (about the types of cars sitting on each spur, and how many cars are there) to determine what type of car should go in each spur, and how many cars the spur will accommodate. After you click the button, open your MSTS Routes folder, select the route the activity .csv and .act files are located in (the route you’re creating a template for), and click the name of the .tdb file (if the last file you opened was an Activity file, you’ll need to click the “Up One Level” button to get to the correct folder. A .tdb file is the Track Database file for an MSTS route. Activity Generator Version 4 for Microsoft Train Simulator Page 44 Important Note: the actual track database (.tdb) file is NOT modified by this procedure. All that happens is that a new SWLTDB<template name>. CSV file is created. When the procedure completes (in a second or two), you’ll see a dialog like this: Editing the Track CSV File. Now it’s time to edit the track .csv file. Open the file, found in the route’s ACTIVITIES folder, exactly as you did the Activity .csv file. The track file, viewed here in Excel, looks like this before it’s been edited (partial file shown below): Track (SWLTDB) CSV File Before Editing: (To see how this file looks after editing, please see Track (SWLTDB) CSV File After Editing.) The program made some judgments as to what type of car each spur will accept based on the type of car placed in the spur when the MSTS activity file was created in step 1. It also determined how many cars will fit in each siding, based on the distance between the “siding markers” set by the route designer. Some editing here can make a big difference in the quality of the work orders that the Activity Generator creates. If you just placed the same type of car in each spur, say, a box car, then you will DEFINITELY want to edit this file to tell Activity Generator (AG) what type of car to ship to that spur, and what type of car ships out that spur. The columns you edit in this file are the RegName, RegNum, CarCap, CARTYPEWANTED, TrkType anc CARTYPESHIPPED columns. Activity Generator Version 4 for Microsoft Train Simulator Page 45 RegName: the is the name of the “region” that this spur is located in2. By default, when the track CSV file is created, every spur is assigned to “Region 1”. This can work ok for small routes or activities with limited paths (for example the run is always from a yard to a particular town, and Activity Generator is only being used to select which spurs are to be serviced, and which cars picked up/set out in that town). If used for larger routes, such as Marias Pass, Ohio Rail, etc. you will likely end up with work orders encompassing the whole route, such as, cars to be picked up in Whitefish Yard, and set out in Kalispell, Essex, and Cutbank (for example), with pickups in those towns and others. This can make for a very long activity, or where branch lines are present, an activity that is impossible to create. If you use regions, you can give the player more choices when generating the activity using your template. A good practice is to create a “region” for each town that has several spurs to service, and include smaller towns and lone spurs near that town, in the same region. Note for AG4: now that the regions reached in a path are stored in the .pro file, there is no practical limit to the number of regions you can have. See Step 5: Setting the Path Region Order for more information on the Path Region Order (.pro) file. It is preferable to have multiple, small regions because the regions will appear in order in the Activity Generation screen and on the printed work orders. To take the Marias example, you might name the region near Whitefish, including the entire yard, “Whitefish”, the town of Columbia Falls and it’s yard “Columbia Falls”, the yard in Kalispell and all the spurs up and down the branch “Kalispell”, etc. You can have as many or as few regions as you like. There should be a region for every path start point. So if one of your possible player paths will start in Kalispell, there should be a Kalispell region. For more on creating multiple player paths, see Multiple Paths. For regions where paths will start, it is best to keep the regions small, consisting only or primarily of yard tracks where trains will be built from. As a guide to the user as to which tracks to use as “Source Tracks” when starting in a given region, it helps to have at least one track designated as a “yard” track (TrkType set to “Y”) in each region. It isn’t required though. Hint: when placing tracks in to regions, it can be helpful to sort this list alphabetically by track name first, then go through the route in the route editor from one end to the other, finding each spur in the list and assigning it to a region as you go. That’s the way I do it when creating my templates. Also I’ll either delete tracks that will never be worked, or assign them to “Region 1” and don’t include “Region 1” in the regions that can be worked for any of the paths. RegNum: this is a number or single letter associated with each region you create. Every track in the same region should have the same RegNum number or letter, and no two regions should have the same region number. When doing this, since you’ve just finished naming the regions, it helps to sort the list by region name, then track name. Then simply go through and set the “RegNum” column for all tracks in the first region in the list to “1”, set the RegNum column for all the tracks in the second region to “2”, etc. Or choose letters that make sense to you. Sorting the list first will ensure that you assign all tracks in the same region the same “RegNum”, and that you don’t accidentally use the same number for two different regions. 2 I need to acknowledge German programmer Ulrich Milde. Ulrich developed the first work order generating program for MSTS that I’ve seen, known as “RaWoWin”. He introduced the concept of regions, which I’ve adopted in this program. Activity Generator Version 4 for Microsoft Train Simulator Page 46 CarCap: this is the maximum number of cars that can be delivered to this spur. It’s not important that you count cars and make sure you account for every car that could possibly fit. If you checked the “Automatically calculate siding lengths” the program will do a pretty good job of figuring this out for you, but some adjustments may be needed if particularly long (such as Auto racks) or particularly short (such as cement hoppers) cars will be placed on or delivered to the spur. So it doesn’t hurt to give this a quick look and make sure that the lengths make sense based on how long the sidings really are. If you DIDN’T check this box, the siding length will be based on the number of cars you placed in the spur when creating the activity .act file. If you set this number too high, your users may generate work orders that the player can’t complete, or worse yet, get an “Activity Begins with Objects in Collision” error as the program places more cars on each spur than will actually fit. So it’s better to err on the low side on this. CarTypeWanted: this is initially set based on the type of car that is currently sitting in the siding. But you are free to change this to reflect the types of cars that would be received by this industry or at this spur. New for AG4: You can call for multiple types of cars to be shipped to a single spur now. To do this, separate the car types by hyphens (-), no spaces. For example, for a spur at a chemical plant that could receive either tank cars or covered hoppers, you could enter T-CVH into this column for this spur. In some cases (because the car type wasn’t known, or there weren’t any cars in the siding in the .act file), the CarTypeWanted was set to “A” for “Any”. This is the default when the type of car wanted can’t be determined by the program. If left unedited, this track will be set to accept any type of car. That will we ok, but you may end up with hopper cars in strange places. Edit the car type if you know it. Enter “A” if you WANT the spur to accept any kind of car, for example, for an auxiliary or yard track. You can limit the car types Activity Generator will use when placing cars of type “A” or “Any”, see Step 6: Setting ‘Any’ Car Types. Also if you’ve edited the car types in the SWLACT csv file to create different types of cars for loads and empties (see “Step 3: Edit the Activity CSV File”), then you should set the CarTypeWanted to the “opposite” of what’s sitting there now ( “CarTypeShipped” will indicate the type of car that’s sitting there now)). For example let’s say this is a lumber mill that ships loaded lumber (beam) cars and accepts empty beam cars. First, you may have placed a loaded lumber car on that spur (because that’s the type of car this industry will ship out) – or perhaps you just placed a box car there. Assuming you coded loaded lumber cars as “L” and empty lumber (or beam) cars as “LMT”, the “CarTypeWanted” and “CarTypeShipped” for this spur (the lumber mill) will be set by Activity Generator to “L” since that’s what’s there now. Or, if you were creating a template for AG4 and did it the “easy” way – just placing any type of car on each spur to use as a marker without regard to type, you should change the CarTypeWanted to the type of car that should be delivered to this industry. For this lumber mill, you might want to deliver empty beam cars, empty wood chip cars, and maybe even empty box cars to the spur. Assuming this is what you want to do, you would change the CarTypeWanted to “LMT-WMT-BX” so that Activity Generator will call for Lumber Empties (empty beam cars), Empty Woodchip hoppers, and box cars to be set out at this spur. Do NOT include the quote marks. Activity Generator Version 4 for Microsoft Train Simulator Page 47 CarTypeShipped: This is new for AG4 templates and is set, by the template author, in the exact same way as the CarTypeWanted. Often it will be the opposite type of car from the CarTypeWanted. Given the example above of a spur which receives empty lumber beam cars, empty Woodchip cars and Box cars, you would set the CarTypeShipped to “L-W-BX” (do NOT include the quote marks) so that Activity Generator will place loaded lumber beam cars, loaded woodchip cars, and box cars on this spur and call for pickup of those types of cars if the user elects to work this spur. Again, initially this is set to whatever car type was originally placed in that spur in the MSTS activity (.act) file. If you already placed a loaded lumber beam car in the .act file, then by default the CarTypeShipped will indicate that a car of type “L” is to be shipped. AG4 note: AG4 will never place multiple hyphen-separated car types in the CarTypeWanted or CarTypeShipped columns, even if you as the template designer placed multiple different car types on those spurs. It simply goes by the type of the first car in any consist. If you placed a marker car, say a box car, in the spur, you’ll need to set BOTH the CarTypeWanted and the CarTypeShipped to the appropriate type. AG4 Design note: This feature was added at the request of our template authors. While it may seem like additional trouble to separately set the CarTypeWanted and CarTypeShipped boxes, it turns out that it usually makes template creation easier. The reason is, often while test running our templates, we’ll deliver a car to a given spur that we THOUGHT was a certain type of industry (based on the name of the spur) but actually it needs a different type of car than we thought. To fix this under previous versions, the actual activity file had to be modified (replacing the car sitting in the spur now, with a car of the corrected type), then the SWLACT file had to be modified to reflect the corrected car type sitting in that spur, then finally the SWLTDB file was changed to reflect the corrected car type to be delivered to that spur. Now, with AG4, to change the car type delivered to a spur, and the car type picked up at a spur, you need ONLY edit the “CarTypeWanted” and “CarTypeShipped” columns for that spur in the one file, the SWLTDB file. TrkLength: You don’t edit this. It shows you how long the spur is in meters – or more accurately, the distance in meters between the two siding markers by the route designer. This can help you to adjust the “CarCap” based on the type of car that will go there and the average length of those cars. TrkType: By default, all tracks are assigned the type code “I” for “Industry” tracks, unless the name has the word “Yard” or “Interchange” in it, in which case the type “Y” is assigned. With AG4 and later, there is a new track type code, track type ‘X’. If a track is assigned type ‘X’, Activity Generator will place cars on this track (depending on the user’s “World Fill” settings) but will never call for pickups from or setouts to this track. This is useful for double track main lines where there are spurs on the opposite side/in the opposite direction the player will be running, which can’t be reached or worked via your path, but you don’t want all those spurs to look unprototypically empty. Another track type you can use is track type “Y” for “Yard” tracks. The primary use of this track type in Activity Generator is to mark those tracks close to where each path in a region will start, as “Yard” tracks, and also to serve as a guide to players as to the appropriate tracks to use as ‘Source Tracks’ from which to build their train. These tracks will appear first in the list of tracks in the “Select Source Tracks” and “Select Industry Tracks to Service” boxes. But it isn’t necessary to set any “Yard” tracks in order for the template to Activity Generator Version 4 for Microsoft Train Simulator Page 48 generate good activities. With the regions appearing in order in selection screens and work orders, any Yard tracks will appear at the beginning of track lists with the region, with other Industry tracks being listed in alphabetical order. Activity Generator Version 4 for Microsoft Train Simulator Page 49 Saving the Track CSV File: Once you’ve made your edits to this file, save it as a .csv file, as described in Saving CSV Files in step 3 above. Below is an example of what the edited CSV file should look like (now sorted by RegName): Track (SWLTDB) CSV File After Editing: (To see how this file looked before editing, please see Track (SWLTDB) CSV File Before Editing.) Here are some of the edits that were made above, described. RegName. First we changed all the region names from the default “Region 1” to an appropriate region name (the list above is sorted by REGION and THEN by Track name, so the tracks shown are somewhat different than what’s shown in the “before edit” figure.) RegNum. Then we set the “RegNum” (which is a short 1 or 2 character code for each region – it doesn’t have to be a number) to a unique number for each region. CarCap. We didn’t change this, but if we weren’t going to use the entire spur, for instance, if we placed the marker car somewhere “up” the spur, we might want to decrease this number. This is covered best in our Video Tutorial on Template Creation available free at www.skylinecomputing.com on the Video Tutorials page. CarTypeWanted. We changed tracks shipping out STOCK (loaded stock or cattle cars) to wanting (receiving) cars of type STKMT (empty stock cars) to be delivered to (set out at) those spurs. Also, not shown in the “before edit” figure, we changed cars shipping out empty hopper cars (type HPMT) to wanting loaded hopper cars (HP) under CarTypeWanted. For the shop track (Blackfoot Shops 1) we will ship out empty flat cars (FMT) but changed the CarTypeWanted to CRATE, or a flat car with crates containing parts on it. For the “BM Ore In” track, ore empties (type OREMT) are shipped out, so we called for loaded ore cars, ORE, to be Activity Generator Version 4 for Microsoft Train Simulator Page 50 delivered. These are the smaller hopper cars often used during the era modeled on the GN HiLine route to haul ore, also known as “Ortner” cars. CarTypeShipped. When we created the activity (.act) file using the MSTS Activity Editor, we went to the trouble of placing appropriate car types on each spur. So the CarTypeShipped column was already correct in this case. However if a generic “marker” car, such as a box car, were placed on the spur instead, then you’d need to also update this to indicate the car type shipped by each spur. Also if more than one car type will be shipped out of this spur, you’d want to update this to reflect the multiple types that might be shipped. TrkType. I didn’t edit this yet – I need to! The Stockyard is not really a “Yard” track, it should probably be type “I” for Industry. The Blackfoot Yard tracks (1, 2 and 3) are correctly identified as “Yard” tracks. Since the user can select any cars as “Source” tracks via the Generate Activity screen, this isn’t all that important, but it can be helpful in pointing the user to a suggested track to use as a “source” track (track from which cars will be picked up to be set out later at Industry/Work tracks), and also these always appear at the top of the workorders and track selection lists within their given regions. Step 5: Setting the Order in which each Region is reached for each Path in the Template. If you’ve designed an activity that gives the player a choice of multiple paths and/or starting points, and the route you’re working with has some switches that can’t be manually operated (as is the case with the majority of routes), or signals that the player will need to navigate through (and you don’t want to require the player to use the “Convert all Switches to Manual” or “Convert all Signals to Permissive” because you’d like to have some AI traffic or simply want a more prototypical experience), you will want to use this function. This way, you can prevent the users from “getting into trouble” and generating activities that call for pickups, and setouts, on spurs they can’t reach (because the path doesn’t go there!) It also makes the work orders (on screen and printed) easier to understand because all the regions will appear on the workorder, and Generate Activity screen, in the order in which they are reached. For all but unsignaled routes with all manual switches, doing this is HIGHLY recommended. And for templates I’ve written for unsignaled routes such as the Frisco Ft. Smith and A&O Sub, I have also used regions, just to help the player make intelligent decisions about the spurs to work and basically present a less “confusing” and cluttered experience. You can tell Activity Generator which regions will be accessible for each possible path the player might select when generating an activity using the Activity Template you created, and the order in which the regions will be reached. Doing this is easier to use than you might think! Activity Generator Version 4 for Microsoft Train Simulator Page 51 Click the Set Regions worked and order reached for paths button: This button brings up a screen that allows you to select which of the car types defined in your template can be placed where car type “A”, “Any”, is called for. Click this button to bring up the screen used to set which regions a player can reach along each possible route you’ve given them to choose from. Activity Generator Version 4 for Microsoft Train Simulator Page 52 The “Path Region Order” Dialog, new for AG4: As the instruction below says, first select a path using this drop down box. You will set which regions are reached, in what order, for that path. If you will copy this from another path, select the path to copy from using this box. This is a list of all the regions you have set up in your template. Above is what the “Edit Path Region Order” screen looks like when no path has been selected in the “Select Path to Edit” box. This is what you’ll see when this screen first comes up. Many of the options are grayed out until a path has been selected. Activity Generator Version 4 for Microsoft Train Simulator Page 53 The Conrad – Valier Turn path has been selected to edit. Tracks in Region: Shows tracks in each region and their capacities. Informational only. Description of the Set Path Region Order controls: Select Path to Edit. Click the arrow to the right of the entry box to drop down a list of all the paths you have associated with your template. When you click on any path, the “Regions reached via this path, in order” box (far right, light green) will either be cleared (if you are setting this for the first time), or, will display the regions that you’ve told AG4 the player will reach, in the order they are reached, when running down that path. You can click different paths here just to review or see what you’ve set up for each one. If you make changes to the “Regions Reached”, either by adding or removing some, and haven’t clicked the “Save Changes to this Path” button, you will see a warning asking if you want to change the path and save the changes, change the path and discard the changes, or stay with the same path. This is just to prevent you from losing any work you’ve done simply because you forgot to click the “Save Changes to this Path” button. Note when updating older templates: previous versions of Activity Generator indicate what regions were reached via each path (but not the order in which they were reached) by adding the region abbreviations to each path name. Since in this example I was updating my existing GNHi-Line template, the “Conrad – Valier Turn” shows up as “Conrad – Valier [4 V]”. ‘4’ was the RegNum for Conrad in that template, and ‘V’ was the RegNum for Valier. You can ignore this. Copy From. This can be a real time saver. For paths that will traverse many of the same regions (and just have different starting points), I first set up the Path Region Order for the very Activity Generator Version 4 for Microsoft Train Simulator Page 54 longest path. In the case of the GN Hi-Line, I set up the Path Region Order for Whitefish to Havre first (for those familiar with the default Marias Pass route, Havre isn’t on that route, it’s even further east than Shelby, the eastern-most town on that route). It took a while to add regions one at a time to the “Regions Reached by This Path” box. But once I’d done that and saved it, it was easier to set up other, shorter paths. For instance I had a path that started at Conkelly and also could go all the way to Havre. So I simply copied from the “Whitefish – Havre” route first. Next I removed Whitefish and Columbia Falls from the beginning of the list (using the ‘Remove’ button, discussed below) and saved that. I did the same thing for other paths which started further to the east, such as paths starting at Glacier, Blackfoot, Cut Bank, etc. Maximum Length of Player Train at Path Start. To ensure users of your templates don’t create trains that are too long to fit on the spur where the path starts, causing MSTS load errors and the dreaded “Send/Don’t Send” message, AG4 now enforces the starting Player Train Length in the “Generate Activity” screen. This number defaults to 0. If, as is often the case, it is safe for the player to start with a train already built, enter the number of cars that can safely fit (but not more than 99) at the start point. This will NOT mean that players will always start with cars in their trains when running your templates – that is up to them, and the default when generating activities is still 0 cars. What it DOES do is prevent players from starting activities with more cars than will fit, as may be the case when, say, the path starts in an engine shed, etc. MSTS note: When placing cars in the player train, UNLIKE when adding cars to spurs for pickup or setout, MSTS builds from the rear. So wherever you have set the player path start point is where the LAST car or locomotive in the player consist (train) will be. Other cars/locomotives will be FORWARD OF THAT POINT. It is important to keep this in mind. All Regions in this Template. This displays all of the regions you set up (when editing the Track CSV file) for this template. If you click on a region, the center box, “Tracks in Region, and Car Capacity” will show you the various tracks that are in that region, what type each is, and how many cars that track will hold. This is for information only. Once you have selected a region by clicking on it, you can add it to the END of the list of regions reached via this path (as shown in the “Regions Reached via this Path, in Order” box) by clicking on the “Add” button. As a shortcut, instead of clicking on a region name and then clicking the ‘Add” button, you can simply double-click on a region name in this box and that will also add that region to the end of the list of Regions Reached via this Path. Tracks in the Region, and car capacity of each. Right now this was included for no good reason, purely for informational purposes. In the future I may add the ability to edit the track information by double-clicking on a specific track, instead of having to edit the SWLTDB file. In that case AG4 would also show the CarTypeShipped and CarTypeWanted. Add. Adds the region currently selected in the “All Regions in this Template” box, to the end of the list of “Regions Reached via this Path. Note that a region can be added to the list more than once. This is mainly used in the case of a “Turn”, or an out-and-back run. To set this up correctly, just get out a map or look at the MSTS Activity Editor, and visualize yourself running a train along your path. Which regions would be reached by such a train, in which order? Simply add regions to the “Regions Reached via this Path, in Order” box by using the “Add” button, in the order they would be reached. Activity Generator Version 4 for Microsoft Train Simulator Page 55 Remove. Removes the region currently selected in the “Regions Reached via this Path” box, from that list. Does not actually remove or delete the region itself. Remove All. Removes all of the regions currently displayed in the “Regions Reached via this Path” box (basically, clears the box. Again, this does not actually remove or delete any of the regions. This is used to start from scratch if you would like. Save Changes to this Path. Clicking this will save the region order for this path, and the “Maximum Length of Train at Path Start” value you entered (if any), into temporary storage for this path. It does NOT write your changes to the disk file, but it will prevent you from losing those changes when you use the “Select Path to Edit” box to select a different path to work on. Regions Reached via this Path, in Order. This list indicates which regions can be reached as a player travels along the currently selected path, in the order in which they will be reached. You build this list, using the “Add” and “Remove” buttons described above. Note that in this case, the region named “Conrad” is listed twice. This is not an error! Because this path is a “turn”, meaning that the player train can run out to a certain point, and then return to the point of origination, I listed Conrad both as the region reached first, and the region reached twice (basically, I added it twice). Because of this, if the player were to set some tracks in Conrad as Destination tracks, any cars picked up at industries along the way, could be scheduled to be set out upon return to Conrad. Additionally, the player could designate one or more source tracks in Valier, and those cars could then be set out in Conrad or Valier. Save All to File (.pro). This will save ALL the changes you’ve made to ALL paths thus far, to a “Path Region Order” file with the same name as your template activity (.act) file, except with the extension “.pro”. Since with large routes and/or complex templates it can take a while to set all of the regions reached by each path in order, you can always save this as a “work in progress” and then reload it later to make further adjustments or additions. Also, you can ADD more paths in the MSTS Activity Editor, even AFTER you have created this .pro file. When you reload the file later, you will see those new paths in the “Select Path to Edit” dropdown box (of course those paths will not yet have any regions or player train start lengths associated with them!). The settings you made that relate to the paths you already had, will still be there. Exit. This allows you to exit the Set Path Region Order screen without saving any of the changes you made since you last pressed the “Save to .pro File” button. You will be warned if you press this that changes will be lost, and given another chance to save the changes, exit without saving, or return to editing. Activity Generator Version 4 for Microsoft Train Simulator Page 56 Step 6: Set the Car Types that can be used when “Any” Car Type is called for. When you press the “Set Car Types to be used as ‘Any’ in a Template” button from the Create and Modify Activity Templates screen, you’ll see a screen such as the one above. This is a completely OPTIONAL step, you do not have to use this screen to create a working template. This is used only if there are some car types that are highly specialized, which you placed in your template, but which you DON’T want AG to place in the ‘world’ as scenery, or have in yard tracks or the initial player train. One example would be specialized cars for a steel mill such as hot metal cars. You might want to place these in the steel mill and call for them to be picked up from and set out to various spurs in the mill. But it would not be prototypical to see these types of cars scattered about in yard tracks etc. Another similar example would be passenger cars. Some routes have a coach yard or some passenger switching. You can support that by creating various passenger car types – maybe PBAG (for baggage cars) and PASS for example so players can do some work making up passenger trains. But again you usually wouldn’t want to see those cars scattered throughout yards, or in player freight trains. So you basically use this screen to LIMIT the car types that AG will use freely. Because of this, to keep you from having to check nearly every box (since in most cases you’ll want AG to place most of the car types, to give the greatest variety), there is a “Check All” button that will check all of the boxes for you. Then just click on the checkbox for any cars you DON’T want AG to place freely onto trains, in yards, etc. (this will turn off the check mark or “clear” the check box). Activity Generator Version 4 for Microsoft Train Simulator Page 57 In the list above we have a car type WHL, which is a flat car with train wheelsets on it. If we didn’t want to see this car in basic freight trains, we’d uncheck that box. When you’re finished making changes, just click “Save and Exit”. Or click “Exit” to discard any changes you’ve made. Saving this creates a file with the same name as your template activity .act file, except with the extension “.ctp” for CarTyPe. Note to advanced users: The list of car types is built from the SWLACT Activity CSV file. If you edit that file and add more car types to that CSV file after setting the usable car types and saving them, no problem. Those new car types will appear in the list of car types in this window, the next time you access this screen. By the same token, if you DELETE any car types, those types will not appear in the list the next time this screen is loaded. By default any new car types will NOT be checked as “ok to use”. Step 7: Distributing the Templates you Create. Creating Activity Creation Templates for others to use can be more rewarding than simply creating a single activity, or even a series of activities, since the user can use your template over and over again to create entirely new activities, for virtually endless replayability! So, how do you distribute an Activity Template you created? It’s fairly simple. First, you need to either use the Activity Packager found in Microsoft™’s Activity Editor, or use a program such as RouteRiter™, or your favorite installer, to collect up all the files related to the template you created. See the section in this manual on “Distributing Activities” earlier in this manual for details on what files these are and how to do this. It’s important to note that THIS PART OF THE PROCESS IS NO DIFFERENT THAN WHAT YOU’D NEED TO DO TO DISTRIBUTE ANY ACTIVITY YOU MIGHT CREATE, USING MICROSOFT’S ACTIVITY EDITOR TOOL. Now for the part that IS different from what you’d do to distribute a ‘traditional” MSTS activity you created: you also need to distribute the two activity .csv files, and the .pro and .ctp file, if any. These should be saved into the user’s \ACTIVITIES\ folder in the appropriate route folder. One of the .csv file names will start with “SWLACT”, the other will start with “SWLTDB”. These files, which you’ve created by following the steps outlined in this section, supply the information that the Activity Generator needs to generate new activities from the activity template .act file you created. If you created multiple paths for your template, you will also need to add all the possible player paths you created. All will be in the \Paths folder and will have the template name within the file name. This is because MSTS only associates a single player path with each activity. Using WinZip to Package your Templates. If you use WinZip™ to create the.zip files you will use to distribute the templates you create, you can add all the files you need, all at once, by using the “Add With Wildcards” function. Here’s how it’s done, step by step., Activity Generator Version 4 for Microsoft Train Simulator Page 58 First, create a new .zip file with the name of your template. In this case I called the file “GNHiLineTemplate.zip”, and open that file in WinZip. You’ll see a screen like the one below (I’m using WinZip “Classic” interface, NOT the so-called ‘easy’ interface which is too difficult/complicated for me to do this sort of work with): Click the “Add” button to add files to that .zip file. You’ll see a dialog box like this: Add drop-down: sets where the files you will add will come from. Folder Up button. Now use the “Add” drop-down, or the Folder Up button, to the folder where you have Train Simulator installed. Activity Generator Version 4 for Microsoft Train Simulator Page 59 You should see something like this: Next, in the “File name” box, type an asterisk (*), to match anything, followed by letters that will be common to all of your template files, followed by *.* (to match all remaining characters and file extensions/types.) For example, the GNHiLine template has two “sub-templates” in it: an Eastbound (EB) and a Westbound (WB) version (that works best for signaled routes with AI traffic). So in the File name” box I entered “*GNHLMain*.*”. Why didn’t I include the word “Template”? Because with two templates, GNHLMainEBTemplate and GNHLMainWBTemplate, you wouldn’t catch all those files. Why did I name my temlate GNHLMain? Who knows, just a choice I made. So now the ‘Add’ dialog in WinZip™ looks like this: File name box. To create the template zip file, click “Add with wildcards” (the * symbol) not simply “Add, which only adds the selected file or folder. Be sure to check the Include subfolders box. Activity Generator Version 4 for Microsoft Train Simulator Page 60 Be sure to check the “Include subfolders” check box so all the subfolders in which the various files are stored (\CONSISTS, \PATHS, \ACTIVITIES, \SERVICES etc. etc.) are included (it isn’t always checked by default). Then click the “Add with wildcards” (NOT the “Add”) button. After clicking, you’ll see that all the myriad files and folders associated with an MSTS Activity, and an AG Template, were added to this zip file, along with their path names RELATIVE TO THE TRAIN SIMULATOR FOLDER. I start within the Train Simulator folder so the paths will be relative to that folder, not the C:\Drive (for example), because many MSTS users put Train Simulator in folders other than the default \Program Files\Microsoft Games folder. Below is a truncated shot of the .zip file: Important note: for this technique to work, AND to be sure you always know which files are associated with your template, I am very careful to ALWAYS include the same “Core Text” in all names I create when in the MSTS Activity Editor. For example here, every path, service, player service, consist, etc. had the text “GNHLMain” in their names. Your Rights as a Licensed Activity Generator User. As a licensed Activity Generator user, you may freely distribute any and all activity templates you create using the Activity Generator program, for free, or for profit. We only ask that the following credit be included in your distribution documentation: Activity Generator Version 4 for Microsoft Train Simulator Page 61 “This is an Activity Generator template file. You will need to have Steve Davis’ ‘Activity Generator’ Activity Creation Utility for MSTS installed to use this template to create your own activities. For more information on this utility for MSTS, please visit www.skylinecomputing.com Adding a Template Guide for your users. It can be very helpful to include documentation, hints, and advice to those who will use your template to generate activities. This can be especially helpful for letting users know when it’s ok to add cars to the initial consist (some starting points may be in an engine shed, etc., where there is no room to add cars behind the engines). To do this, just use any word processor, such as Wordpad included free with Windows™, or, Microsoft Word™. Whichever editor you choose, be sure and save the file as type “rtf”, which stands for “Rich Text Format”. This is a standard text format that supports multiple fonts, bold and italics, and basic word processing functions. Save the file with the same name as the activity template file, except the extension (last three letters) must be “.rtf”. For example, for the template “NEC_CSXNB.act”, I created a file named “NEC_CSXNB.rtf”. Save this file into the route’s \ACTIVITIES folder. Doing this will not only cause AG to enable the “View Activity Info File” button, but using this naming convention and saving in the \ACTIVITIES folder will ensure that the .zip file you create, if you created a zip file as described in “Using WinZip to Distribute your Templates”, will include this file and place it in the correct place when the user unzips it. When an .rtf file with the same name as the template .act file is present in the route’s \ACTIVITIES folder, a button will appear on the user’s “Customize Your Activity” screen, entitled “View Activity Info File.” (Go to the section on “Customize Your Activity” to see what this button looks like when it displays.) When the user clicks on this button, your .rtf file will be displayed. Activity Template Creation – Tutorial, Process and Insights Here are the steps I took to create the GN HiLine Template (Great Northern over Marias Pass in the 1950’s, by Michael Stephan for Activity Generator: • I took a look at the types of sidings in the route and determined whether the rolling stock supplied with the route, or the default rolling stock, would be enough to create a good template. In this case I decided it wasn’t: the default rolling stock is too modern for the era modeled by Michael Stephan. While I like to minimize downloads to enable as many people as possible to enjoy the templates I create, in this case there were quite a few downloads Michael required for the activities he created for his route. I figured most people downloading the route would also run those activities and download the rolling stock, so I felt safe using some of that stock. I came up with a subset of that rolling stock for my template (not all of it is required for the template). Plus there were one or two Activity Generator Version 4 for Microsoft Train Simulator Page 62 pieces of rolling stock that were not included, that I felt would be important to a realistic representation of this route, such as a loaded woodchip car. o Note: since I also have Activity Master, and I don’t want to create templates that require too many downloads, I’ll often use the bare minimum of rolling stock, one or two of each “type” of car. The end user can always use Activity Master to replace the base rolling stock in the template, with his/her favorites, adding variet or to model a certain era. For more information on the Activity Master utility, please see the Activity Master page on our web site at www.skylinecomputing.com For this template though I did require quite a few downloads. To make this easier on those who might want to use this template, I zipped up a rolling stock file, making sure first that all the rolling stock I zipped was either freeware allowing unlimited distribution, or, that I got the creator’s permission to redistribute it. Since these templates are all free most designers of rolling stock are ready to give permission to redistribute it. I’ve run into a few who don’t like it, and I always honor their wishes. • I created a new activity in the Activity Editor, named “GNHLMainEBTemplate.act” • I right-clicked on most of the spurs that a player could reach and used “Place Consist”. I created a single car consist with only one box car in it, which I named “1 x box”. I put that single car consist on nearly every spur and yard track (but NOT passing sidings) to use as a “marker” for AG to use when placing cars. On a couple of long yard tracks in Whitefish Yard I created long consists with every piece of rolling stock I would need to be available in the template. For example I placed about 10 different box cars on a single track. The important thing here is to make sure that at least one of every possible type of car that a player might need to set out at an industry track, or pick up from an industry track, was placed somewhere in the “world”, either on a yard track, or an industry track. When placing the consists, I was careful to observe the “facing” of the consist so if more cars were added behind it (up to the capacity I set for the track), they wouldn’t run off the end of the track (see the note on car placement in this manual). • I went to View|Action Events and added a pick up event for each consist I placed (you may prefer to add the pick up event as soon as you place the consist – that works just as well and is just a matter of your preference. I am still hopeful that one day I’ll figure out a way to eliminate this step). • I then added in some more cars, where the player wouldn’t ever be running, including locomotives on a helper spur for example, for “decoration” (“eye candy”) as well as some types of cars the player wouldn’t switch, such as passenger cars sitting near a station. You might do this with cabooses also. The only difference is, I DIDN’T assign a pick up event to these cars or engines, so in effect Activity Generator wouldn’t “know” they were there (these cars will appear in the “MatchErrors” file but not in the final CSV file.) • I created an initial path in the Activity Editor from one end of the route (Whitefish) to the other (Havre, which is east of Shelby, the east end of the default “Marias Pass” route) and routed it past as many trailing point spurs (spurs that can be reached/worked using the rear coupler rather than the front) as possible. I named this path the same as the activity (“GNHLMainEBTemplate.act”) plus a description of the path, so the full path name became “GNHLMainEBTemplateWhitefish to Havre”. I used this naming method Activity Generator Version 4 for Microsoft Train Simulator Page 63 because I planned on creating multiple paths for the player to choose from, and to do that, every path must start with the same text, i.e. in this case “GNHLMainEBTemplate”. This is how the program “knows” what paths are available for the player to select from when using Activity Generator to generate activities. o Hint: The player doesn’t need to run all the way to the end of a path for the activity to end. The path should be long enough to get the player to all the spurs that he/she might choose to work. It’s ok if the path runs off the end of the territory. The player basically sets the ending by choosing the spurs to work and the ending mode, including perhaps ‘Destination Tracks’. So I didn’t necessarily intend for a player to run all the way from Whitefish to Havre, although they COULD if desired. If the player wanted to work Whitefish to Conkelly, or Blackfoot, the player would still choose the “Whitefish to Havre” path, but only call for work between Whitefish and Conkelly or Blackfoot. The idea was, this would be the primary eastbound path a player would use if starting at the westmost origination point (Whitefish yard) and head east. Choosing the “path” is a lot like setting the start point and “heading towards” settings on the familiar MSTS “Explore a Route” screen. Of course AG adds a workorder (if desired), cars on the spurs, and AI traffic (if included by the template designer). o Hint: I didn’t mind the long path name, since when Activity Generator displays the path for the user to select, the part of the path name that matches the activity name will be stripped from the text displayed. So instead of seeing “MP1_EastboundTemplateWhitefish to Shelby” in the drop-down box, the player will only see “Whitefish to Shelby” in the “Choose Path” drop-down box. • I created some more paths, using the “use as template” feature in the Activity Editor Path edit function (which gives you a new path based on the name of the current path, saving typing or cutting & pasting). These were the same as the first path except that they started at different points. Doing this made naming the additional paths easy: I kept the same name for the most of the path except changed the originating region name. So for example my next path was “GNHLMainEBTemplateConkelly to Havre”. Remember, the path name needs to begin with the activity template name in order for Activity Generator to show this path as a possible choice for the user. o Hint: Another advantage to using a long distance path as a template for a shorter one, was so that I could make each path exactly the same, except for the starting point. This was necessary so that any AI traffic paths I created would be sure not to run into ANY of the player paths. When using the AE path editor’s “use as template” feature, you can keep choosing the “exits” that result in only one line being displayed on the route diagram, thus ensuring that all your paths, though they have different starting points, traverse the same route. • I created paths and services for AI traffic, usually going in the opposite direction from the player service. I used the “VCR tool” (see a reference on using Microsoft’s Activity Editor) to preview the meets. This doesn’t always work because it’s impossible to predict what switching work the program will call for, but it can be very helpful: if you see problems even in testing mode with the VCR tool, it is virtually guaranteed that there will be problems when generating and running actual activities. Activity Generator Version 4 for Microsoft Train Simulator 3 Page 64 • I then saved the activity, exited the activity editor, and started Activity Generator. I chose “Create CSV Files for Activities”, and then “Create an Activity CSV File from an .act File”. I chose the activity I’d just saved, “GNHLMainEBTemplate.act”. I edited the Activity CSV File as described in the “Edit an Activity CSV File” section of this manual, so that each car was assigned the proper car type. • Instead of going on to immediately create the track CSV file, I exited the Activity Generator and opened the Activity CSV file, “GNHLMainEBTemplate.csv3”, for editing. I looked for any rolling stock that was missing matching location information (see Dealing with Blank UiDs in an Activity .csv file.). I checked the “match errors” file to be certain that no cars that I’d intended for the user to be able to pick up, were listed there. If there were some important cars that I wanted the player to be able to pick up, that had no UiD or Location, that meant that I had forgotten to assign a Pick Up Cars action event to that car. Usually, the first time I tried to create the Activity CSV file, I found a few instances where I forgot to do this for some of the consists. Oops! So I then opened the activity file and added action events for those consists that didn’t have them, then I again used “Create an Activity CSV File” to make a new CSV File. See Adding Pick Up Action Events for consists. • Once I had a CSV file that had all the cars I wanted in it, I looked through that same file and updated the car type codes. I first looked for any cars for which Activity Generator assigned the letter “U” as the “type”, which means the car is an “Unknown” type. I then went through those and filled in the “CarType” column in the CSV file with a code for the car, such as “HP” for a car I knew was a hopper car. See Editing Car Types in the CSV in Step 1. • I next looked through the CSV file for cars that needed to be described as loaded or empty. I used Microsoft Excel™ to sort by Car Description so all like cars would be grouped together. For example, all the lumber “beam” cars were coded by default as type “L”. I coded the empty cars as “LMT” and left the loads coded as type “L”. Now Activity Generator will know the difference between a load and an empty and not place an empty where a load needs to go. I did the same for other car types for which this was important. • Now that I had a good Activity CSV, file, I ran the Activity Generator again and used “Choose Activity CSV File” to load the file I’d just edited. I got a “good load” message for the “activity” CSV file, followed by an error message, stating that the associated “Track csv file could not be found.” Of course it couldn’t be found: we’re now about to create it! (so disregard this error message in this case!) After loading the Activity CSV, I clicked “Create CSV Files for Activities”, and then clicked “Create a Track CSV File from a Route’s .tdb File”. • I found “GN_Hi-Line.tdb” in the \ROUTES\GN_Hi-Line folder (the Track Database file) and selected it to open. There will always be just one .tdb file in each route folder. I checked the “automatically calculate siding lengths” box. The two comma separated value (csv) files the program creates and uses to generate activities are prefixed with two somewhat cryptic looking acronyms. One file name always begins with “SWLACT”. This is an acronym for “Activity Generator Activity Template (csv) file)”. The other starts with “SWLTDB”, which stands for “Activity Generator Track Database file”. Activity Generator Version 4 for Microsoft Train Simulator 4 Page 65 • I exited Activity Generator, and opened the track .csv file that the program created using Microsoft Excel™. • I took a look at the “car capacity” that Activity Master assigned to each spur, and adjusted it as necessary. See Editing the Track CSV File. • Although Activity Generator no longer restricts the player to sourcing setouts from cars designated as “Yard” tracks, there IS some value to designating tracks as “Yard” tracks (code “Y”). Yard tracks are always listed first in the “select source tracks” or “select tracks to work” list boxes within each region. This helps guide users as to which tracks in a region are appropriate to use as yard tracks – for instance a spur servicing an Oil Transloader probably wouldn’t be – it would only ship out tank cars. So I assigned some tacks as “yard tracks” at the point in each region where each of the player paths would start, to make it easier for the player to identify which tracks to use as “source tracks” when beginning the run. This is done simply by entering the letter “Y” into the “track type” column in place of the letter “I”. This is entirely optional though: you need not define any tracks as “Yard” tracks for players to be able to generate activities from your template. If you don’t though the player may have difficulty figuring out where to get the initial pickups from4. • Since I mostly just placed box cars in the .act file to save effort, most of the spurs had their CarTypeWanted set to type “BX”. So I edited the “CARTYPEWANTED” and “CARTYPESHIPPED” columns to reflect the cars that needed to be delivered to or shipped out of each spur (if it wasn’t a box car). I also made sure to differentiate loads vs. empties where appropriate. So if the CARTYPEWANTED was going to be an empty lumber car (LMT), then I’d set the CARTYPESHIPPED to a loaded lumber car (L), as appropriate to the industry (in this case a lumber mill). • For yard tracks, it’s important to set the capacity but the type (CARTYPEWANTED) is not important. You can use the “A” type for any, or if it’s a log for coal cars, lumber cars, etc., you might use that type so when the tracks are used by the player as “Industry” rather than “Yard” tracks, those types of cars will be sitting there. When tracks are used as “Source” tracks, the program will automatically place cars on those tracks as needed to be set out at the industries to be serviced. • Hint: When I created the “GNHLMainWBTemplate”, I adjusted the region starting points to reflect the east-most point in each region, rather than the west-most point as I’d done for the EB template. If I hadn’t done this, I would have ended up with a player train starting at the west end of each region and heading westbound from there, meaning, they would be unable to work the region they started in! Also we’d have yard tracks at the ends of regions rather than the beginning, which would be very confusing to the player since the “yard” tracks are listed first in the listing of spurs to work in each region. Doing this wasn’t as hard as it sounds. All that had to be changed was which spur had the letter “Y” for track type, and the region names (and numbers) for some of the tracks. In a future version we will add a function to allow the template designers to set which region each path starts in. Then, the “yard” tracks in that region will be selected by default as “source” tracks when the path is selected. In the meantime users need to figure out which region each path starts in by the name of the path, or from reading the supplied documentation. Activity Generator Version 4 for Microsoft Train Simulator Page 66 • Next, for each template (EB and WB), I set the “Path Region Order” using the “Set Path Region Order” screen, to control which regions the player would reach, and in what order, while traversing each path. • I then set up which car types could be used as “Any” car types, so that some passenger coaches and MOW rolling stock such as burro cranes etc. wouldn’t be added to player trains or placed in yards gratuitously (I excluded those from cars that I allowed AG to use as type “Any” for each template. I used the “Set Car Types to use as Any” function to accomplish this. • Next I created some activities and ran them, to make sure they could be completed successfully, and that I didn’t run head on into any AI traffic or face red signals that wouldn’t change. Just like designing any other activity in that regard! (Of course the player COULD use the “convert all switches to manual” or “convert all signals to permissive” features to get around this. As a template designer you should point out the need for the player to do this in your readme or docs). • Shortcut for creating multiple templates for the same route: You may find yourself making two (or more) activity templates for the same route, perhaps an “eastbound” and a “westbound” version as I did with Marias Pass, so the work can progress in a linear path that the player can follow. If you’re like me, you really don’t enjoy going in and assigning all those “Pick Up Events”, or placing cars in spurs, twice! If so, you can create ONE “master template” FIRST, which has pickups and setouts for every spur that can be reached when traveling either eastbound, OR westbound. Then, open the CSV file that the program creates, and delete all spurs from the template that will become your eastbound template, that a player running eastbound couldn’t reach, OR set the TrkType to track type “X” (meaning place railcars there for scenic purposes only but don’t call for setouts from them. Then rename the .csv file to something you’ll remember, such as “GNHLMainEBTemplate.csv”. Copy and rename the master .act file also so you’ll have a new one named the same as the .csv (except without the “SWLTDB” prefix!), i.e., “GNHLMainEBTemplate.act”. Next, go back to the original master file csv file, and this time delete all the spurs that a westbound player can’t reach using the westbound path(s) you set up (or again set the TrkType for those to track type ‘X’), and save that file with yet another name, such as “GNHLMainWBTemplate.csv”, also copying the original .act file, again, to be named the same as the new .csv except without the “SWLTDB” prefix, i.e. (perhaps) “GNHLMainWBTemplate.act”. Finally copy and rename the SWLACT files in a similar manner. The activity (act) file name and the CSV file names MUST be the same, except for the SWLTDB and SWLACT prefixes, for Activity Generator to be able to open the correct activity file when the player selects the CSV file to use as a template in generating new activities. Template Design Caveats Some routes, such as the default Northeast Corridor route (USA1 route), do not have any switches the player can operate manually. In order to design activities for routes like this, you’ll need to instruct your end-users to use the “Convert all Switches to Manual” button before Activity Generator Version 4 for Microsoft Train Simulator Page 67 running activities generated from your template, so they can throw the switches and do setouts and pickups. With Activity Generator version 4 there is now almost no route for which Activity Generator can’t generate activities! The only exceptions are routes where the sidings/spurs haven’t been named, or the siding markers are so close together that there isn’t room for any railcars there. Even these things can be fixed by some relatively simple adjustments to the route file. You should get the original route author’s permission before doing this though. Many routes have some switches which can be thrown manually, and some that can’t. The “NEC4” route, and the default Marias Pass (USA2) are like this, as is “Ohio Rail” and 3dTrainStuff™’s Tehachapi Pass II route. Crossovers on the main line, and sometimes, branch lines or spurs off the main line, use “automatic” or “dispatcher-controlled” switches (which are actually controlled by the path the designer creates), whereas switches inside industrial areas can be manually thrown. With routes like this you have two choices: 1. Instruct your users to convert all the switches to manual, allowing you and other players greater freedom of movement. This is the easiest procedure but you may have conflicts with AI traffic, especially if you or another player take a switch onto the path of an oncoming AI train! Also, you won’t be able to distribute the activities you create to users who don’t have Activity Generator, since they can’t convert the switches to manual without this program (you can of course distribute the template you create, freely, to all Activity Generator users). 2. Create specific paths to get you or the player through the switches and signals into an area where the switches can be controlled. This is explained in greater detail below. Designing Templates for Routes with Signals and Dispatcher-Controlled Switches When creating paths for routes with some automatic switches, you should begin the path in a yard, where the player can move freely and pick up any cars called for by the generated work order to assemble the starting train. Then the path will take the player to a branch or industrial park where the player can once again operate the switches manually, and perform whatever work Activity Generator calls for. Another challenge for the designer is AI traffic and the signaling system. Some of the signal scripts are fairly good, and the player can make it through moderate traffic. In other cases you can end up with head-on meets on single-track mainline (known as “cornfield meets”), signals that never clear (turn green), etc. Whereas with a traditional “scripted” activity the designer can carefully time all of the AI traffic to mesh with the player’s run (as long as the player keeps strictly to the designed path and completes the work within the timeframe expected by the designer!), the “freeform” nature of Activity Generator generated activities makes it difficult if not impossible to solve AI meet problems by timing. It’s safest to keep AI traffic out of activities where the player might be able to start just about anywhere and go just about anywhere. For designers who like a lot of AI traffic, I’d recommend designing activities with a specific start point and destination in mind, with AI traffic to complement that. If there will be multiple paths for the player to choose from, they should usually all be in the same direction, just with different starting and end points. If you would like to provide entirely different paths for Activity Generator Version 4 for Microsoft Train Simulator Page 68 the player, it’s best to design separate activity templates, each with it’s own path and AI traffic pattern. Also AI traffic should be avoided if the user will need to use the “Convert all Signals to Permissive” function to get to some spurs where work is to be done, unless those spurs will be away from where the AI traffic will run. New for Version 4 New SWLTDB file format: o Stores both siding marker (track) numbers for each spur (solves problem with track numbers in SWLACT and SWLTDB files sometimes not matching) o Field for CarTypeWanted (as always) PLUS new field CarTypeShipped (so these can be changed simply by changing the SWLACT file without a need to edit the activity .act file). It no longer matters what type of car is sitting in each spur in the .act file, so templates can be created by simply placing the same type of car, perhaps a box car, in every spur if desired. o Fields allow for multiple car types (wanted or shipped), hyphen (-) delimited (so a spur could accept, say, covered hoppers and/or tank cars, or any combination of cars, and ship out the same or different cars.) Improved error checking/handling. Improved “World Fill”. For pre-AG4 templates, checks the path name selected and if the name of a region appears in that path name, that region will be filled with railcars in accordance with user’s Fill World settings. For AG4 or later templates, the program now examines the regions checked for work, and fills the starting region, plus all regions reached between the starting region and the last region marked for work. This functionality is enabled by the user by checking the “Add cars to regions not worked” check box, which is now checked by default in V4. New track selection window in Activity Generation Screen: Destination track(s). o These tracks provide a destination where cars picked up at "Industry" tracks (online shippers/customers) will be scheduled to be set out. Also this new track type facilitates creation of Through Train activities with no switching enroute. If the player elects to start with cars already in the train, then selects ONLY destination tracks, the activity generated will have no pickups, and will end when the player sets out the cars in the original train on the track or tracks selected as “Destination Tracks.” o Automatically calculates capacity of selected destination tracks as they are selected by the user, and displays the total at the bottom of the “Generate” screen to aid in determining how long a train may actually be generated. o Depending on capacity of those tracks, all industry pickups will go to that track or tracks o If there aren't enough industry pickups to satisfy the "total pickups" then yard track pickups will be added to go to the destination track New track type (i.e. not Y or I or U) for template designers, just for world fill: X. Pickups/setouts will never be scheduled for these tracks, and they won’t appear in the track Activity Generator Version 4 for Microsoft Train Simulator Page 69 selection list boxes. They are ONLY used for world fill. This would be useful to place cars on the "other side of the tracks" for double track routes or for spurs that can only be used for facing point setouts which are passed by a train but may not be schedulable for work by the template designer. Users can now save all the input and selections made on the “Generate Activity” screen in a new “.ags” (Activity Generation Settings) file. This enables users to reload previously saved settings for a given template. So if all the source tracks, industry tracks, number of pickups, etc., can be reloaded and another activity can be generated using all the same settings. This could be useful if you generated an activity but don't like the work order you got, the length of the train, the amount of fill, etc., and would like to generate the same activity again. It will also be helpful for template designers testing their templates. Once the settings were loaded users can make changes before pressing the "Generate" button, or, generate with exactly the same settings. A new “Path-Region Order” (.pro) file has been created to be associated with each template file. Template designers have a new screen that creates this file which controls, for each path, the order in which each region is reached. Regions can be entered twice into the list, if they are reached twice, as with a “turn”. By using this new list, the program can check to be sure that cars picked up on a given source or industry track will only be scheduled for setout at an industry or destination track reached later in the run. Also, workorders will print (and appear on the F11 screen) in the order that in which the regions will be reached along the selected path – more user-friendly for those running activities generated from templates, especially if a map isn’t handy. It can also be useful for users who like to block their trains at the start based on the order in which the work will be done. Template designers can set a “max cars in initial player train” for each path. This will help the program to ensure that users don’t start with trains that can’t fit at each path’s start point. This is stored in the “Path Region Order” file for each path. For templates that have a Path Region Order file the warning about starting with cars in a player train (in AG) will go away, but the maximum number will be limited to the maximum set here by the template author. Since trains build from the rear in most cases the max can likely be 99, but in some cases there won't be this much room. This will enable users to SAFELY start with a train already built, up to a length determined by the template author. A new file type, “*.ctp” (“CarTyPe), also with the same name as the template itself, and a new input screen, enables template designers to narrow down which types of cars will be placed on any spurs that call for cars of type “A” or “Any”. So if there are some special cars in the template, perhaps a Burro Crane, passenger cars in a coach yard, etc, these types of cars can be precluded from showing up in yards and other places except where they were specifically placed or called for. Template authors can now set the typical car length in meters for siding length calculations (but still provide 28 M default too). The program now stores the last 20 template files that the user has opened in the “slg.ini” file. Once at least one file has been successfully opened, a new drop-down box appears at the top of the main screen. If the drop-down arrow is clicked, the previously loaded template files will be displayed, and clicking on one will load it without further searching for the file. The “Generate Activity” button will then be enabled ready to generate. Incremental upgrade path for template authors. Each of the new file types (“Cartype for ‘Any” or .ctp, Path-Region Order file .pro, and the new format SWLTDB file with added Activity Generator Version 4 for Microsoft Train Simulator Page 70 columns) can be added alone to any template. AG4 searches for these files individually, it doesn’t require that all of them be present. So, a template author could upgrade a template to enable multiple car types to be set out or picked up on certain industry spurs, or the author could add a “Path Region Order” file to get the regions to appear in order, etc., and distribute an updated template with just those files. AG4 is NOT an “All or Nothing” proposition! Backward compatibility: All AG3 and SLG2 templates (anything that ran in AG3) will run equally well in AG4, and will have a few additional options and features, such as the use of Destination Tracks. Paths are no longer renamed with region codes in brackets, i.e. Tulsa-Claremore [T S C]. These sometimes caused MSTS errors if there were too many regions in a path. Credits/Acknowledgements This program and manual were written by Steve Davis, [email protected] Many thanks to the hard working Beta Test Team and template authors who have suggested new features and options for Activity Generator – AG4 is borne out of the inut of these users, and more. Norman Beveridge Denis Gionet Peter Laier Moe Smith Craig Koepke Dave Flagg Ed Hawkins And special thanks to Rich Garber and Joe Smith (“Joe Bandit”) for their help, support, suggestions and inspiration.