1
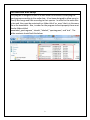
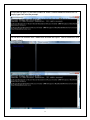
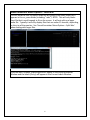
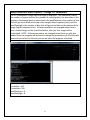
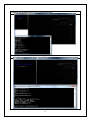
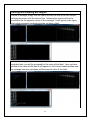
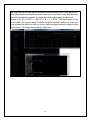
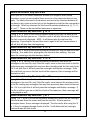
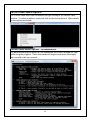
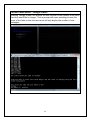
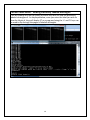
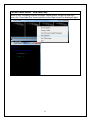
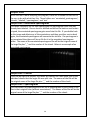
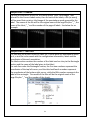
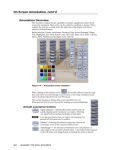
Sound Annotator
User Guide
Table of Contents:
Introduction and Setup
Starting the Program
Sound Annotator Menu Options
Documentation
Loading a File
Splitting a File
Changing FFT Parameters
Delete Files
Quit
Creating and Labeling Rectangles
Sound Annotator Key Shortcuts
Current Labels Menu Options
Chang a Label
Viewing Previously Labeled Rectangles
View Label Key
Save Tiled Images
Current Labels Key Shortcuts
Output Files
1
Page 2
Page 3
Page 5
Page 11
Page 13
Page 14
Page 19
Page 20
Introduction and Setup
This program is designed to take in a wav audio file and assist in analyzing the
spectrograms according to the audio data. It has been designed to allow users to
classify bird songs and calls according to their species. In order for the audio files
to be read, they must be contained in a folder titled ‘src_wavs’ that is in the same
file as the executable. Also, in order for the program to work properly there must
also be folders titled:
‘annotated_spectrograms’, ‘chunks’, ‘labeled’, ‘spectrograms’, and ‘text’. The
folder contents should look like below:
2
Starting the Program
To begin the program, first locate the file path that the executable (.exe) file is in
and copy it. (Note: You may double click on the executable file, but then when
you are prompted for filenames you will be unable to paste in the names of files
and will have to type them in manually instead.)
Then, open a command window and ‘cd’ to that file path as in the first line of the
Command Prompt below.
3
To run the file type ‘d’ and tab in order to select ‘DualWindowAnnotator.exe’ or
simply type that into the prompt.
The file will the execute and 2 additional window will open: Sound Annotator and
Current Labels.
4
Sound Annotator Menu Options
The Sound Annotator Menu can be obtained by right clicking in the Sound
Annotator window. To select an option, simply left click on the choice desired.
More details on the options are below.
Sound Annotator Menu Options - Documentation
The documentation gives details on the commands within each window for help
while using the program. These commands will be gone over more thoroughly
later on within this user manual.
5
Sound Annotator Menu Options – Load Wav
This will allow the user to load an audio file by typing in the name exactly as it
appears in the src_wavs folder (including “.wav”). NOTE: This will only load a
short file that is small enough to fit on the screen. It will not split up a larger
audio file. Typically it will only display files that are under 15 seconds, depending
on the size of the monitor. See ‘Sound Annotator Menu Options – Split Wav’
when dealing with larger files.
Once the wav is loaded, a spectrogram will appear in the Sound Annotator
Window and the labels (if any) will appear in the Current Labels Window.
6
Sound Annotator Menu Options – Split Wav
This will allow the user to split an audio file by typing in the name exactly as it
appears in the src_wavs folder and indicating the size (in seconds) of the chunks
that it will be split into. If the size is too large, than it will ask for a smaller size.
It may take a while to split the file, depending on its size, but when it has finished
it will display the first chunk of the split file.
7
Sound Annotator Menu Options – Change FFT Parameters
The FFT parameters change how the image is displayed. The frameSize is twice
the number of spectrum bins (the number of vertical pixels), the frameStep is the
number of horizontal pixels in each chunk, the bandPassLow is the number of bins
that will get set to black at the top of the image (lower frequency bins), and the
bandPassHigh is the number of bins that will get set to black at the bottom of the
image (higher frequency bins). If these parameters are changed when there is
only a loaded image on the Sound Annotator, than just that image will be
redisplayed. NOTE: If these parameters are changed when there is a split wav
loaded, than the program will proceed to change the parameters of all of the split
wavs and return back to the wav you are on when the program is finished.
Default values for the FFT parameters are (pictured as above):
FrameSize = 512
FrameStep = 256
bandPassLow = 8
bandPassHigh = 0
8
Changing the FrameSize to 1024 is pictured below.
Changing the FrameStep to 512 from original image is pictured below.
9
Sound Annotator Menu Options – Delete Files
This function was mainly for testing purposes. It deletes all of the files in these
folders: chunks, text, annotated_spectrograms, spectrograms, and labeled. This
is not to be used when analyzing files.
Sound Annotator Menu Options – Quit
This will quit the program. If you quit when analyzing a file that has been split,
you will have to re-split the wav if you restart the program. However, the
rectangles will be preserved as long as the text files remain for each chunk.
10
Creating and Labeling Rectangles
To draw a rectangle, simply click on a point that will be one of the four corners
and drag the mouse until the desired size. Releasing the mouse will set the
coordinates for the opposite corner of the rectangle. It will appear to be a gray
color which represents rectangles that do not have a label.
To label a rectangle, press one of the number keys. If this is the first time you are
using that label, you will be prompted for the name of the label. Once you have
entered in the name of the label it will appear on the Current Labels window and
the rectangle that was just drawn will become the color of the label.
11
Starting from left to right on the keyboard the labels begin with 1 and go up to =,
after those labels are used then those same keys in the same order may be used
but with the shift key applied. So the order of the labels goes (as depicted
below): 1 2 3 4 5 6 7 8 9 0 - = ! @ # $ % ^ & *( ) _ + NOTE: The labels work in only
in this order. You cannot apply 2 before you have applied 1 and so on. Once you
have created the label you can use it over and over again without having to enter
in the name. To change the name of a label see: .
12
Sound Annotator Key Shortcuts
When you are in the Sound Annotator window (this happens when Sound
Annotator is your current window) there are a set of key shortcuts that you can
apply. The labels discussed in the previous section are key shortcuts because all
you have to do is press a certain key on the keyboard in order for the command to
go through. Other key shortcuts for the Sound Annotator window are: ‘g’, ‘h’, ‘n’,
‘b’, and ‘j’. These can be used either lowercase or uppercase.
Sound Annotator Key Shortcuts: ‘g’ or ‘G’
Typing ‘g’ or ‘G’ while in the Sound Annotator window will play the audio to the
specific wav file that you are on. If the file is split it will play the chunk of the wav
file that is currently displayed. NOTE: It will always play the clip from the
beginning. If you stop the clip and then start it again it will not resume where it
left off, but will play from the beginning.
Sound Annotator Key Shortcuts: ‘h’ or ‘H’
Typing ‘h’ or ‘H’ while in the Sound Annotator window will stop the audio file that
is playing. If no audio file is playing then the shortcut does nothing. See note
above for resuming a clip that has been halted.
Sound Annotator Key Shortcuts: ‘n’ or ‘N’
Typing ‘n’ or ‘N’ while in the Sound Annotator window will save all of the
rectangles to the text file, and, if the file is split, move to the next chunk in the file
redisplaying any rectangles that may have been already saved for that next chunk.
If it is not split than it will only save the rectangles and display a message. If the
file is split but you are on the last chunk of the sequence, than a message will be
displayed as well.
Sound Annotator Key Shortcuts: ‘b’ or ‘B’
Typing ‘b’ or ‘B’ while in the Sound Annotator window will save all of the
rectangles to the text file, and, if the file is split, move back to the previous chunk
in the file, loading any rectangles that may have previously been saved to the text
file. If it is not split than it will only save the rectangles and display a message. If
the file is split but you are on the first chunk of the sequence, than a message will
be displayed as well.
Sound Annotator Key Shortcuts: ‘j’ or ‘J’
Typing ‘j’ or ‘J’ while in the Sound Annotator window will delete the last rectangle
that was drawn from the screen and from the text file. If there were no
rectangles drawn, than a message is displayed. This also works after using the ‘b’
or ‘n’ keys to navigate through chunks of a file. It will delete the last rectangle
that was drawn for that chunk.
13
Current Label Menu Options
The Current Label Menu can be obtained by right clicking in the Current Lable
window. To select an option, simply left click on the choice desired. More details
on the options are below.
Current Labels Menu Options - Documentation
The documentation gives details on the commands within each window for help
while using the program. These commands will be gone over more thoroughly
later on within this user manual.
14
Current Labels Menu - Change a Label
Selecting ‘Change a Label’ will prompt the user to enter in the number of the label
that they would like to change. Then a prompt will come up asking to reset the
count of the label so that the new count will only display the number of new
rectangles.
15
Current Labels Menu - Viewing Previously Labeled Rectangles
This will prompt the user to choose the label they wish to view the previously
labeled rectangles of. As displayed below, once you enter the label you wish to
view the labels of, they will display 27 on a page and using the ‘n’ and ‘b’ keys can
be used to flip through the pages of labeled rectangles.
16
Current Labels Menu - View Label Key
When in the ‘Previously labeled rectangle’ menu option, to see the label key,
select the ‘View Label Key’ menu option and the label key will be displayed again.
17
Current Labels Menu - Save Tiled Images
This will saved the pages of tiled images in the ‘labeled’ file.
Current Labels Menu – Quit
This will quit the program. Note: In order to save the tiled images, you must
select Save Tiled Images before quitting the program; otherwise you will not be
able to save the tiled images.
18
Current Labels Key Shortcuts
When you are in the Current Labels window (this happens when Current Labels is
your current window) there are a set of key shortcuts that you can apply similar
to when you are in the Sound Annotator window. However, these labels are used
only to browse through the widows of the annotations of the previously labeled
spectrograms.
Current Labels Key Shortcuts: ‘n’ or ‘N’
Typing ‘n’ or ‘N’ while in the Current Labels window will only execute after the
previous annotations are displayed using the ‘View previously labeled rectangles’
menu option. If there have been more than 27 rectangles labeled then they will
be displayed on more than one page and typing the ‘n’ or ‘N’ key will flip to the
next page of labeled rectangles.
Current Labels Key Shortcuts: ‘b’ or ‘B’
Typing ‘b’ or ‘B’ while in the Current Labels window will only execute after the
previous annotations are displayed using the ‘View previously labeled rectangles’
menu option. It allows to flip back through the pages of labeled rectangles.
19
Output Files
When the user is done analyzing the program, there are a number of files left for
the user to do with what they like. These folders are: ‘annotated_spectrograms’,
‘chunks’, ‘labeled’, ‘spectrograms’, and ‘text’
Output Files – Annotated Spectrograms
This folder contains a file for each spectrogram or spectrogram chunk that has
already been labeled. Once a chunk is labeled and either the back or nest button
is typed, the annotated spectrogram gets saved into this file. If you double back
on the image and delete any of the annotations and then go either next or back
again, the annotated spectrogram will overwrite the old one. If a spectrogram is
not annotated then there will be no file for it in the annotated spectrogram
folder. The name of the annotated spectrogram file will be the original name of
the large file plus “_” and the number of the chunk. Below is an example of an
annotated spectrogram.
Output Files – Chunks
If the file was split into chunks, this folder will contain the .wav audio clips of the
individual chunks that the larger file was split into. The names of the file will be
the original name of the large file plus “_” and the number of the chunk.
Output Files – Spectrograms
This file contains the spectrogram of the file or spectrograms of the chunks of the
files in their original form (without annotations). The names of the file will be the
original name of the large file plus “_” and the number of the chunk.
20
Output Files – Labeled
If during the execution of the file, the menu option “Save Tiled Images” was
selected in the Current Labels menu, then for each of the labels, a file (or many)
will be saved that contain a tiled image of the annotations made grouped by the
label. The names of the file will be the original name of the large file plus “_”, the
name of the label, “_” and the number of the page of labels. See below for an
example.
Output Files – Text Files
For each wav file or each chunk of a wav file, if there were any annotations saved
on it, a text file is also saved with the configuration information, labels and the
coordinates of the each annotation.
The labels section contains the number of the label used as a key to the Rectangle
section and the name of the label given to that label.
For each line under the Rectangles section, the first two numbers represent the
coordinates of the top left corner, and the third and fourth numbers represent
the coordinates of the bottom right corner, while the fifth number represents the
label of the rectangle. The names of the files will be the original name of the
large file plus “_” and the number of the chunk.
21