1
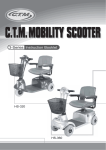
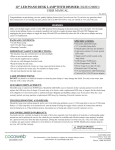
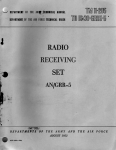
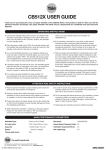
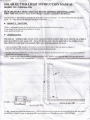
SOLAR GUTTER LIGHT INSTRUCTION MANUAL
MODEL NO.: YH0416A-PIR
1
READ THE INSTRUCTIONS CAR.EFULLY BEFORE ASSEMBLY AND INSTALLATION.
FIRST TIME USE: Remove the protective film from the solar panel before the first use.
Tum the switch to "ON" position,And place the lamp under sunshine for at
of lamp may run out during the long time transportation .)
least
3 to 4 hours before first time use. (The
power
O
PROPUCT FEATURES
l.Solar
rechargeable energy for led lighting,Green and environmentally and power saving.
2.Auto charge in day time and auto lighting in the night.
3.Easy install and widely use .
O
INSTRUCTIONS:
This unit has intelligent light control switch, automatic control products daily work, when the ray of light is
more than 100LUX,solar panels will charge the battery. And nhen the night falls or ray of light is lower
than 100-10LUX,this lamp will automatic light, no need human operate any more.
1. Turn the switch to
"QN" position. The srvitch is located at the bottom base of the solar panel.
Charge the solar product by placing it under direct sun-.hine for at
le
as
Figure (1).
.
2 The light will work automatically once the ss-itch is in "ON" position. It will automatically charge under direct 5r,nshine in
the day time and illuminate at night.
NOTE: In order to veriff that the knob is correctly switched t0 "ON" position. cover the solar panel with your hand and the
Figure
(1)
Switch (0N/0FF)
has human body induction motion sensor rvith less than 60 times one night,after the inductisn it gives full light, each 45
seconds later , it turns to energy saving mode. (the induction distant is 6=SM,induction angle is 90 for full lighQ
3 .it
Dia o3*8rmn self
tapping screws
Dia s3*25nrn sel
tapping
screws
Alum Mounting bracket
Figure
Q)
Figure (3)
h
Two wavs Product installation:
O
first elected
a perfect installation position, insert the alum bracket
to fix the backet in to lamp. And with M5*30mm
into gap in the lamp (as Figure 3) ,with 3*8 screws
thunb screws to secure fx
the bracket in the gutter.
3*25
O First selected a perfect instaliation position, insert the alum bracket into gap in the lamp (as Figure 2) use
gutter
frx
the
particles
to
bracket
on
secure
screws
scre\\'s . scre\\'s to fix the bracket and lamp. 3*25mm Expansion
.
to ensure that the product works rvell, every 3 months need to cleaning the dust on the solar
panels, make solar panels daylighting effect is better, ensure the solar panel charge the battery every day.
Product maintenance:
The service life Of the product: The service life of the product design, the service life of the solar panels for
5
years, the light source for 5 years, the controller for 5 yean, lithium battery for 1.5 l'ears! the machine senice life for
five years.
o
nlpoRtrrr:
in an area where it can get directsunlight.
2. Select an outdoor location away from other light source at night such as street lights. It may cause the product not
to turn on automatically at night.
3. Duration of light depends on solar product's level of sunshine exposure, geographical locations, weather
conditions and the hours of daylight.
1. Install the solar product
r
I
MAINTENANCE. TROUBLE SHOOTING A\1) BATTERY REPLACEMIM
1. In order to ensure the normal maintenance work,clean up the dust on the solar panels every 3 months.
2. If solar product does not light up after it has been used for around 8 - 12 months, replace the rechargeable
batteries as they may be weak or worn out. (Lithium battery lpcs "A,A" 3.7v 800 Mah, Lithium battery or same
equivalent type as recommended must be used)"
3. Exercise caution when replacing batteries. Loosen the fours crews in lamp
corners
it carefully ,replace
the old battery with a new one. Battery must be recycled or disposed of properly, don't dispose batteries in fire or
trash. Contact your town or city's recycling center to find out how to properly dispose batteries.
and open
Made in China