1
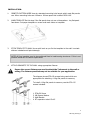
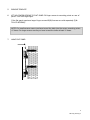
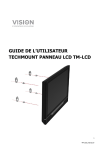
TM-LCD FLAT-PANEL TECHMOUNT OWNERS MANUAL 1 TM-LCD_manual_en www.visionaudiovisual.com/techmount/tm-lcd 2 TM-LCD_manual_en DECLARATION OF CONFORMITY Where applicable Vision products are certified and comply with all known local regulations to a ‘CB Certification’ standard. Vision commits to ensure all products are fully compliant with all applicable certification standards for sale in the EU and other participating countries. The product described in this owner manual is in compliance with RoHS (EU directive 2002/95/EC), and WEEE (EU directive 2002/96/EC) standards. This product should be returned to the place of purchase at the end of its useful life for recycling. WARNINGS During installation take care to adhere to workplace health and safety laws: Attach the bracket to a rated load-bearing structure. Ensure the correct fixtures are used to attach the Techmount to the wall or ceiling. The fixtures provided may not be suitable for your application. Do not cut or drill any parts above head height. This should all be done using the correct safety equipment at floor level. Avoid overstretching which might result in the ladder tipping over. SWL (safe working load): 4 x 12.5kg = 50kg Ensure it is installed in an appropriate place – for example not obstructing an emergency exit. Check stability after installation. Installation must be done by a specialist audio-visual installer Allow 500mm x 500mm space around the bracket. Avoid installing in a moist environment, or in direct sunshine, or near corrosive gas or liquid. Routing of cables through the bracket must comply with local regulations. ENSURE POWER CABLE IS NOT TWISTED, SQUEEZED, OR SHEARED! All products are designed and imported into the EU by ‘Vision’ who is wholly owned by ‘Azlan Logistics Ltd.’, Registered in England Nr. 04625566 at Lion House, 4 Pioneer Business Park, Clifton Moor, York, YO30 4GH. WEEE Registration: GD0046SY DECLARATION OF ORIGIN All Vision products are made in the People’s Republic of China (PRC). 3 TM-LCD_manual_en CONTENTS 4 x Wall Bracket (Zamak3, Painted Silver) 4 x M4×12 Finger Bolts (Q235, Nickle plated, strength grade: 4.8) 4 × ST8×50 Screws (Strength grade: 4.8, Zinc plating) 4 x M8 square washers (SPCC 1.5mm, Zinc plating) 4 × RT expansion tube 6.5×45 (HDPE) 4 × ST4×25 Cross-recessed Pan-head Self-tapping Screws (Strength grade: 4.8, Nickle plated) 4 x M4 square washers (SPCC 1.5mm, Zinc plating) 4 × RT expansive tube 4×30 (HDPE) 1 x Large Paper Template 1 x Small Paper Template 1 x Spirit Level with plastic clip Optional Additional Bolt Kit (available separately): 4 x M5×12 Finger Bolts (Q235, Nickle plated) 4 x M6×14 Finger Bolts (Q235, Nickle plated) 4 x M8×16 Finger Bolts (Q235, Nickle plated) 4 TM-LCD_manual_en INSTALLATION: 1. IDENTIFY PATTERN USED Vesa is a standard mounting hole layout which most flat panels use. When mounting holes are 100mm x 100mm apart this is called ‘VESA 100’. 2. MARK TEMPLATE Do this step if the flat panel does not use a Vesa pattern. Lay flat-panel face-down. Put paper template on screen and mark holes on template. 3. STICK TEMPLATE TO WALL Use a spirit level as you fix the template to the wall. Low-tack stickers included avoid paint damage. NOTE: All four brackets need to be positioned fixed to load-bearing structures. If this is not possible wood can be used to span studs. 4. ATTACH BRACKETS TO THE WALL using appropriate fixtures. Ensure the correct fixtures are used to attach the Techmount to the wall or ceiling. The fixtures provided may not be suitable for your application. The diagram shows ST8×50 screws being used which are appropriate for attaching >10kg flat panels to masonry. To install <10kg flat panels to masonry use the ST4×25 screws included. 1. 2. 3. 4. ST8×50 Screw M8 Square Washer Wall Bracket RT expansion tube 6.5×45 5 TM-LCD_manual_en 5. REMOVE TEMPLATE 6. ATTACH FINGER SCREWS TO FLAT PANEL Fit finger screws to mounting points on rear of panel. Turn until finger-tight. If the flat panel requires a larger finger screws M5/6/8 screws are sold separately (P/N: TM-LCD SCREWS). NOTE: For small screens ensure you have turned the bolts into the screen mounting points >5 times. For large screens ensure you have turned the bolts at least 10 times. 7. HANG FLAT PANEL 6 TM-LCD_manual_en SPECIFICATIONS INDIVIDUAL BRACKET DIMENSIONS: 56 x 36 x 10mm WEIGHT: 310g SAFE WORKING LOAD 4 x 12.5kg = 50kg COLOUR Aluminium WARRANTY This product comes with a 2-year return to base warranty, effective from the date of purchase. This warranty applies only to the original purchaser and is not transferable. For the avoidance of doubt, this will be taken from the information held by the appointed national distributor at the point of sale. The liability of the manufacturer and its appointed service company is limited to the cost of repair and or replacement of the faulty unit under warranty, except for death or injury (EU85/374/EEC). This warranty protects you against the following: Faulty welds resulting in the product not safely performing its task within the recommended SWL (safe working load). Poor finishing resulting in the product not being able to be assembled. External corrosion if identified within 24 hours of purchase. Some parts of the product are not powder-coated or painted so light corrosion may develop over time. This is normal and does not adversely affect the load-bearing capability of the product, therefore it is not covered in this warranty. If you find you do have a problem with this product, you should contact the AV reseller you purchased this product from. The original purchaser is responsible for shipment of the product to the manufacturer’s appointed service centre for repair. We will endeavour to return repaired units within 5 working days, however this may not always be possible in which case it will be returned as soon as practically possible. This warranty does not protect this product against faults caused by abuse, misuse, or incorrect installation which might be caused by ignoring the guidelines set out in this manual. If failure is not covered by this warranty, the owner will be given the option to pay for labour and parts to repair the unit at the service company’s standard rate. LEGAL DISCLAIMER: Because we are committed to improving our products, the details above may change without prior warning. This User Manual is published without warranty and any improvements or changes to the User Manual necessitated by typographical errors, inaccuracies of current information, or improvements to programs and/or equipment, may be made at any time and without notice. Such changes will be incorporated into new editions of the User Manual. 7 TM-LCD_manual_en