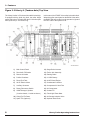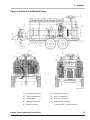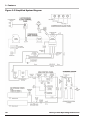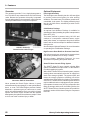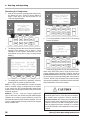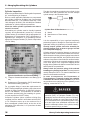
1
Liberty Trailer
Mobile Breathing Air Systems Operating Instructions
IMPORTANT SAFETY INSTRUCTIONS
To reduce the risk of fire, electrical shock, injury to
persons, or damage when using this equipment, follow
basic precautions including the following:
1. Read and follow ALL user instructions and
recommended procedures and safety precautions
as provided in this manual. Failure to do so could
result in serious injury or death.
2. Read and follow all DANGER, WARNING, and
CAUTION statements in this instruction. Failure to
do so could result in serious injury or death. These
statements use the following pattern:
DANGER
Danger is used to indicate the presence of a hazard
that will cause severe personal injury, death, or substantial equipment damage if the warning is ignored.
WARNING
Warning is used to indicate the presence of a hazard
which may cause severe personal injury or substantial component damage if the warning is ignored.
CAUTION
Caution is used to indicate the presence of a hazard
which can cause minor personal injury or component
damage if the warning is ignored.
NOTE
Notes are used to notify the operator of installation, operation, or maintenance information that is
important but not hazard-related.
3. Do not operate this equipment while under the
influence of drugs, alcohol, or any medications
or substances which may affect vision, dexterity,
or judgment. Users of this equipment must be in
good physical and mental health in order to operate
safely. Do not use this equipment when fatigue
prevents safe operation. Stay alert when operating
this equipment. Inattention or carelessness while
operating this equipment may result in serious injury
or death.
4. Training is required before use of this equipment.
Improper use may result in serious injury or
death. Improper use includes, but is not limited
to, use without adequate training, disregard of the
warnings and instructions contained herein, use of
the equipment for purposes not included in these
instructions, and failure to inspect and maintain the
equipment.
5. All electrical connections shall be installed by a
qualified electrician in accordance with applicable
electrical codes and shall include proper grounding
of the equipment.
6. All service must be performed by qualified trained
technicians. When servicing, disconnect power from
the equipment and follow all necessary Lock-Out/
Tag-Out procedures and safety procedures.
7. Hot surfaces can cause serious injury. Allow the
equipment to cool before servicing.
8. Establish a schedule for performing routine
maintenance as outlined in these instructions.
9. Refer to the Material Safety Data Sheet (MSDS) for
instructions on the safe handling of any chemicals
used in the maintenance or servicing of this
equipment.
10. Before towing the trailer, be sure all accessory
equipment is properly stowed and all covers and
doors are closed and secure.
11. Follow all applicable codes and laws when towing
the trailer. Be sure all trailer towing equipment is
operational and in good condition.
12. Follow all use and safety guidelines for parking
and using the trailer including proper location,
adequate clearances above and around the trailer,
and securing the wheels before beginning use of
the trailer.
13. Moving parts can cause serious injury. Be sure all
guards and covers are in place and secure before
starting the unit.
14. Never operate the Diesel Engine indoors, in partly
enclosed areas like open garages, or near open
windows, doors, or vents. The Diesel Engine
produces Carbon Monoxide, a poisonous gas you
cannot see or smell, which can reach hazardous
levels very quickly. Always operate the Diesel
Engine outside with the exhaust blowing away from
places where there are people. Failure to do so can
result in serious injury or death.
15. High pressure air is dangerous. Handle the high
pressure air connections and hoses with care to
prevent serious injury or death.
16. The air produced by this equipment must be
recertified periodically as meeting CGA Grade D or
better breathing quality air. Regular recertification
to this standard is the responsibility of the user.
17. If you have any questions or concerns regarding the
installation, use, or maintenance of this equipment,
contact your authorized SCOTT dealer or distributor,
or contact SCOTT at 1-800-247-7257 (or 704-2918300 outside the continental United States) or visit
our web site at www.scottsafety.com.
SAVE THESE INSTRUCTIONS.
Liberty Trailer Operating Instructions
Limited Warranty
SCOTT SAFETY
Limited Warranty on
Scott LIBERTY TRAILER Breathing Air Compressor and Fill Station System Products
Scott Technologies, Inc. d/b/a Scott Safety (SCOTT), warrants its LIBERTY TRAILER BREATHING AIR
COMPRESSOR AND FILL STATION SYSTEM PRODUCTS to be free from defects in workmanship
and materials for a period of two (2) years from the date of original manufacture by SCOTT. This
warranty applies to all components of these products except expendable components such as oil or oil
filters. SCOTT’s obligation under this warranty is limited to replacement or repair (at SCOTT’s option)
of these products when shown to be defective in either workmanship or materials.
Only SCOTT personnel or, when directed by SCOTT, SCOTT authorized agents are permitted to
perform warranty obligations. This warranty does not apply to defects or damage caused by repairs
of or alterations to the LIBERTY TRAILER BREATHING AIR COMPRESSOR AND FILL STATION
SYSTEM PRODUCTS made by owner or any third party unless expressly permitted by SCOTT product
manuals or by written authorization from SCOTT. To obtain performance under this warranty, and as
a condition precedent to any duty of SCOTT, the purchaser must present such products to SCOTT, a
SCOTT authorized distributor, or a SCOTT authorized service center. Any product returned to SCOTT
shall be sent FOB destination to Scott Safety (Attn. Warranty Claim Department) 4320 Goldmine Road,
Monroe, NC 28111.
This warranty does not apply to any malfunction of or damage to these products resulting from accident,
alteration, misuse, or abuse, which includes and is not limited to failure to perform preventative
maintenance recommended by SCOTT.
THIS WARRANTY IS MADE IN LIEU OF ALL OTHER WARRANTIES, EXPRESSED OR IMPLIED,
INCLUDING, BUT NOT LIMITED TO, ANY IMPLIED WARRANTY OF MERCHANTABILITY OR
FITNESS FOR A PARTICULAR PURPOSE. IN ADDITION, SCOTT EXPRESSLY DISCLAIMS
ANY LIABILITY FOR SPECIAL, INCIDENTAL, OR CONSEQUENTIAL DAMAGES IN ANY WAY
CONNECTED WITH THE SALE OR USE OF SCOTT SAFETY PRODUCTS AND NO OTHER FIRM,
OR PERSON IS AUTHORIZED TO ASSUME SUCH LIABILITY.
Liberty Trailer Operating Instructions
SCOTT P/N 595132-01 REV E 7/12
1 - Contents
IMPORTANT SAFETY INSTRUCTIONS................i
Warranty................................................................ii
1 - Contents........................................................... 1
Safety Notations...............................................2
2 - Introduction.......................................................3
Safety Labels...................................................3
Reporting Safety Defects.................................4
Additional Information......................................4
Routine Maintenance.......................................4
3 - Features............................................................5
General............................................................5
System Operation............................................5
Liberty Trailer Illustrations................................6
Compressor...................................................11
Diesel Engine.................................................11
Electric Motor.................................................11
Air Storage System........................................11
RevolveAir Fill Station....................................11
Purification System........................................12
Generator.......................................................12
Optional Equipment.......................................12
Flood Light Assembly..................................12
Cold Weather Package...............................12
High Pressure Hose Reel............................12
Smart Fill™ Auto Cascade Filling System...12
4 - Starting and Operating the Liberty System.....15
Working with Compressed Air........................15
Positioning the Unit for Operation..................16
Pre-Operation Checks...................................16
Operation of the Compressor.........................22
Main Control Panel........................................22
Diesel Engine Control Panel..........................23
Using Diesel Engine Power...........................24
Using Electric Power......................................25
Operating the Compressor.............................26
Compressor Stage Readings......................28
Information Button.......................................29
Service Notifications....................................29
System Tolerances and Overrides..............30
Use of the Purge.........................................30
Overrides.....................................................31
System Shutdown.......................................32
Liberty Trailer Operating Instructions
5 - Charging Breathing Air Cylinders....................35
Cylinder Inspection........................................36
Fill Pressure Adjustment................................37
Cylinder Mounting and Charging...................39
Cylinder Charging........................................40
Alternate Charging Procedure.......................42
Manually Charging Storage Cylinders...........42
6 - Additional Features.........................................43
Low Pressure Air Supply Operation...............43
Auxiliary Generator Operation.......................44
Flood Light Installation and Operation...........45
Raising the Flood Light Tower.....................46
Cold Weather Package..................................47
High Pressure Hose Reel..............................48
7 - Operator Maintenance Checks.......................51
Service Schedules.........................................51
Condensate Container...................................52
Battery............................................................53
Belts...............................................................53
Clutch Adjustment Procedure........................55
Manually Activating the Air Clutch..................55
Remote Air Intake Valve.................................56
Check Trailer Tires.........................................56
8 - System Administrator Responsibilities............57
Modify System Settings.................................57
Perform System Service................................58
Calibrate the CO Monitor...............................59
9 - Towing the Liberty System Trailer...................61
Towing Pre-Checks........................................61
Brake Actuator Systems.................................62
Hitching the Trailer.........................................63
General Towing Guidelines............................64
Unhitching the Trailer.....................................64
Trailer Lifting Eyes/Tie Downs.......................64
Tire Safety Information...................................65
10 - Index.............................................................79
Maintenance Record............................................82
List of Figures
Figure 3-1 Liberty I (Single Axle) Top View.............6
Figure 3-2 Liberty I Additional Views......................7
Figure 3-3 Liberty II (Tandem Axle) Top View.........8
Figure 3-5 Simplified System Diagram.................10
Figure 8-1 Trailer Hitch and Actuator....................59
1
Safety Notations
The following types of safety notations are used
throughout this manual:
Observe all safety notations. Failure to observe safety
Danger is used to indicate the presence of a hazard
that will cause severe personal injury, death, or substantial equipment damage if the warning is ignored.
Warning is used to indicate the presence of a hazard
which may cause severe personal injury or substantial component damage if the warning is ignored.
Caution is used to indicate the presence of a hazard
which can cause minor personal injury or component
damage if the warning is ignored.
NOTE
Notes are used to notify the operator of installation, operation, or maintenance information that is
important but not hazard-related.
notations could cause damage to the equipment, or may
result in serious injury or death.
© 2012 SCOTT Safety. SCOTT, the SCOTT SAFETY Logo, Scott Health and Safety, LIBERTY Trailer and Smart
Fill are registered and/or unregistered marks of Scott Technologies, Inc. or its affiliates.
2
Liberty Trailer Operating Instructions
Liberty Trailer Operating Instructions
2 - Introduction
Congratulations on purchasing a SCOTT Safety Liberty
Trailer mobile breathing air system. This manual provides
instructions for the safe operation of your equipment.
The Liberty Trailer mobile breathing air system is intended for use in charging breathing air cylinders. The
system is designed to purify air to meet and exceed
recognized breathing air standards as specified by the
Compressed Gas Association (CGA G- 7.1) and National
Fire Protection Association (NFPA 1989).
Both an electric motor and a diesel engine are provided
to power the compressor. Electric power is suitable for
indoor use such as fire stations or hangers. Diesel power
must only be used outdoors where sufficient ventilation
is available.
Federal, State and local codes mandate many safety
precautions and procedures for the handling and
production of breathable air. Consult State and local
occupational health and industrial safety ordinances for
additional requirements.
Before initial operation, this equipment must be set
up and checked by a SCOTT Safety authorized service technician. Do not operate if the equipment has
not been prepared by a SCOTT authorized service
technician. Use of this equipment without proper set
up may result in serious personal injury, death, or
permanent equipment damage.
Training is required before use of this equipment.
Improper use of this equipment may result in serious injury or death. Improper use includes, but is not
limited to, use without adequate training, disregard
of the warnings and instructions contained herein
and failure to inspect and maintain this equipment.
Safety Labels
Note the safety labels that are affixed to certain
components of the unit as a reminder of important safety
precautions. Always read and understand all safety labels
prior to operating the unit. Safety labels should never be
removed, defaced, or covered.
IMPORTANT
Follow ALL recommended procedures and
safety precautions as provided in this manual.
Read and follow all safety labels on the unit.
ALWAYS follow all Federal, State and local codes for
set-up and use of this equipment. Failure to adhere
to Federal, State and local codes during set-up and
use of this equipment may permanently damage the
equipment and could cause serious injury or death
to the user.
Liberty Trailer Operating Instructions
3
2 - Introduction
Reporting Safety Defects
If you believe that your vehicle has a defect which could
cause a crash or could cause injury or death, you should
immediately inform the National Highway Traffic Safety
Administration (NHTSA) in addition to notifying SCOTT
Safety.
If NHTSA receives similar complaints, it may open an
investigation, and if it finds that a safety defect exists
in a group of vehicles, it may order a recall and remedy
campaign. However, NHTSA cannot become involved in
individual problems between you, your dealer, or SCOTT
Technologies.
To contact NHTSA, you may either call the Vehicle
Safety Hotline toll-free at 1-888-327-4236 (TTY: 1-800424-9153); go to http://www.safercar.gov; or write to:
Administrator – NHTSA
US Department of Transportation,
1200 New Jersey Avenue SE
Washington, DC 20590.
You can also obtain other information about motor vehicle
safety from http://www.safercar.gov.
Routine Maintenance
The reliable operation of this equipment depends on
proper care and routine maintenance.
The operator must be trained by an authorized SCOTT
Safety technician in the proper operation of the
mobile breathing air system. The operator must read,
understand, and adhere to all safety precautions and
pre-operation tasks as described in this manual.
All scheduled maintenance beyond the scope of this
manual must be noted by the operator to be performed
by a SCOTT trained and certified service technician. A
Maintenance Record page is provided in this instruction.
When ordering spare parts, note the compressor system
serial number. This information will avoid delays and
the possibility of incorrect parts being provided. The
breathing air system serial number is stamped on the
system identification tag. If needed, the compressor
serial number is stamped on a metal plate attached to
the crankcase of the compressor.
To order replacement components, call 1-800-247-7257
or contact an authorized SCOTT Safety distributor.
DO NOT operate this unit if it has been involved in
an accident, unless the compressor system and the
entire trailer has been thoroughly inspected by a
SCOTT certified service technician. Use of damaged
equipment without proper repair and inspection will
void the warranty, and may result in serious personal
injury, death, or permanent equipment damage.
Additional Information
If you have any questions or concerns regarding use
of this equipment, contact your authorized SCOTT
distributor, or contact SCOTT at 1-800-247-7257 (or
704-291-8300 outside the continental United States) or
visit our web site at www.scottsafety.com.
4
Compressor System Serial Number
Liberty Trailer Operating Instructions
Liberty Trailer Operating Instructions
3 - Features
General
System Operation
The Liberty mobile breathing air system is a selfcontained, trailer-mounted breathing air system. The
Liberty Trailer models have similar features with respect
to equipment operation, controls and overall assembly. All
are equipped with a diesel engine and an electric motor
to power a four-stage, reciprocating air compressor. The
compressor is designed for continuous operation, and
is available with maximum system pressure of 6000 psi.
The trailer is available with a single-axle (Liberty I)
or double-axle (Liberty II). The Liberty II includes two
additional ASME storage cylinders and an optional
overhead compartment to hold breathing air cylinders.
The standard Liberty Trailer trailer is equipped with
hydraulic surge brakes. Additional options include electric
brakes, a high pressure hose reel, a flood light assembly,
and a Cold Weather Package for operation in cold
temperatures, as well as other special purpose features.
The production of high-pressure breathing air can be
divided into four categories:
Compression - accomplished by a multi-stage
compressor assembly.
Purification - accomplished by mechanical filtration and
chemical purification.
Storage - accomplished in ASME storage cylinders.
Handling and Charging - accomplished with equipment
used to connect and fill the breathing air cylinders.
The compressor is powered with either an electric motor
or a diesel engine. Electric power is suitable for inside
use, such as in fire stations or hangers; diesel power
must only be used outdoors. Power is delivered to the
compressor via vee-belts and an air-actuated clutch.
Air is compressed to the maximum system pressure
in four stages. Compressed air then passes through a
series of purification filters to maintain CGA Grade D/E
breathing air. Regular certification of the breathing air
quality is the responsibility of the user.
After the air has been compressed and purified, it is
directed either to the ASME storage cylinders, or the
breathing air cylinders, depending on control panel
settings.
The moisture traps are automatically drained after every
15 minutes of compressor operation. The condensate
discharge is directed to a container that must be manually
drained after several hours of operation.
When the discharge pressure reaches the maximum
preset level, the compressor is unloaded. The moisture
traps open, and the compressor continues to run without
compressing air for two (2) minutes.
Prior to stopping, the compressor automatically drains
all accumulated moisture while it cools down, preventing
compression cylinder rust. This also provides for an
unloaded compressor restart.
The compressor system can be run in AUTO or MANUAL
mode as selected via the control panel. In AUTO mode,
the compressor automatically restarts when storage
pressure drops approximately 500 psi below the
maximum system pressure. When in MANUAL mode, the
compressor stops after purging and must be restarted
manually.
Liberty Trailer Operating Instructions
5
3 - Features
Liberty Trailer Illustrations
Figure 3-1 Liberty I (Single Axle) Top View
The Liberty I trailer is 76 inches wide and 90 inches high.
If equipped with the pintle ring hitch (as shown), the trailer
length equals 174 inches. The trailer with the 2-5/16 ball
coupler hitch is 176 inches long.
In this manual, the FRONT of the trailer is the trailer hitch.
When facing the control panel on the BACK of the trailer,
the RIGHT side of the trailer is to the operator’s right and
the LEFT side to the operator’s left.
1) Main Control Panel
11) Surge Brake Actuator
2) RevolveAir Fill Station
12) Trailer Jack Assembly
3) Remote Air Intake
13) Parking Brake
4) Purifier Chambers
14) 12 VDC Battery
5) Diesel Fuel Tank
15) 44 HP Diesel Engine
6) 20 HP Electric Motor
16) Condensate Container
7) Auxiliary Generator
17) Compressor Air Inlet Filter
8) Rotary Disconnect Switch
18) Air Compressor
9) Lifting Eye/Tie Down
19) Air Storage Isolation Valve
10) Spare Tire (Optional)
20) Coolant Fill
21) Flood Light Tower Mast
22) ASME Storage Cylinders (2)
6
Liberty Trailer Operating Instructions
3 - Features
Figure 3-2 Liberty I Additional Views
1) Parking Brake
6) ASME Storage Cylinders (2)
2) Trailer Jack Assembly
7) Spare Tire (Optional)
3) Surge Brake Actuator
8) Main Control Panel
4) Flood Light Tower (Optional)
9) RevolveAir Fill Station
5) Remote Air Intake
Liberty Trailer Operating Instructions
7
3 - Features
Figure 3-3 Liberty II (Tandem Axle) Top View
The Liberty II trailer is 76 inches wide and 90 inches high.
If equipped with the pintle ring hitch, the trailer length
equals 192 inches. The trailer with the 2-5/16 ball coupler
hitch (as shown) is 194 inches long.
8
In this manual, the FRONT of the trailer is the trailer hitch.
When facing the control panel on the BACK of the trailer,
the RIGHT side of the trailer is to the operator’s right and
the LEFT side to the operator’s left.
1) Main Control Panel
12) Surge Brake Actuator
2) RevolveAir Fill Station
13) Trailer Jack Assembly
3) Remote Air Intake
14) Parking Brake
4) Purifier Chambers
15) 12 VDC Battery
5) Diesel Fuel Tank
16) 44 HP Diesel Engine
6) 20 HP Electric Motor
17) Condensate Container
7) Auxiliary Generator
18) Compressor Air Inlet Filter
8) Rotary Disconnect Switch
19) Air Compressor
9) ASME Storage Cylinders
20) Coolant Fill
21) Flood Light Tower Mast
(3 under chassis, 1 inside enclosure)
10) Lifting Eye/Tie Down
22) Air Storage Isolation Valve
11) Spare Tire (Optional)
23) Optional Hose Reels
Liberty Trailer Operating Instructions
3 - Features
Figure 3-4 Liberty II Additional Views
1) Top Storage (Optional)
6) Surge Brake Actuator
2) Trailer Jack Assembly
7) Spare Tire (Optional)
3) Parking Brake
8) RevolveAir Fill Station
4) Flood Light Assembly
9) ASME Storage Cylinders
5) Remote Air Intake
Liberty Trailer Operating Instructions
(3 under chassis, 1 inside enclosure)
9
3 - Features
Figure 3-5 Simplified System Diagram
10
Liberty Trailer Operating Instructions
3 - Features
Compressor
Purification System
The Liberty Trailer mobile breathing air system is
equipped with a heavy-duty, four-stage, air-cooled
compressor. Stage and discharge pressures are
indicated on the compressor gauge panel. An aircirculating fan mounted on the flywheel is used to blow
cooling air through the four stage air coolers and over
the compressor head cooling fins.
Air passing through the air coolers serves to lower the
air temperature to increase compressor efficiency and
condense and remove water and oil vapor between
stages prior to entering the purification system.
Moisture separators continuously remove moisture from
the compressor intercooler and aftercooler air circuits.
During normal operation, the dump solenoid valves are
activated automatically every 15 minutes.
The condensate container collects the moisture drained
from the moisture separators. The operator must empty
the container after every 10 hours of operation.
The breathing air purification system is rated for 6000
psi working pressure to purify up to 84,000 SCF of air
per chemical cartridge set (based on 70°F (21°C) inlet
temperature). The system purifies the pressurized
breathing air using a series of filters and desiccant driers
to remove airborne foreign particles, oil, and moisture,
and chemical catalysts to neutralize chemicals and odors
prior to the air entering the storage cylinders.
Diesel Engine
The 4-cylinder, liquid-cooled diesel engine is rated at 44
maximum HP at 3000 RPM, and is powered by a 12 volt
DC starter generator and battery. The engine powers
the compressor via an air-actuated clutch and vee-belts.
Engine controls are located on the main control panel,
and include a keyed start switch, indicators for charging,
oil pressure, glow plug, and safety shut down. Never
operate the Diesel Engine indoors, in partly enclosed
areas like open garages, or near open windows, doors,
or vents. The Diesel Engine produces Carbon Monoxide,
a poisonous gas you cannot see or smell, which can
reach hazardous levels very quickly. Always operate the
Diesel Engine outdoors with the exhaust blowing away
from places where there are people. Failure to do so can
result in serious injury or death.
Two of the Four Air Purifiers
Air Storage System
The air storage system on the Liberty I consists of two
ASME storage cylinders, while the Liberty II includes four
ASME storage cylinders. Each cylinder has the capacity
to store 454 standard cubic feet (SCF) at 5000 psi, or
525 SCF at 6000 psi. These cylinders do not require
hydrostatic testing.
The SCOTT Smart Fill auto cascade cylinder filling
system is available as an option ONLY on the LIBERTY
II mobile breathing air system.
Electric Motor
An electric induction motor also powers the compressor.
The motor is available as 208, 230, 380, or 460 VAC,
3-phase, with either 50 or 60 Hz operation and requires
60 amps service at 208–230 VAC. All electrical supply
wiring must be performed by a qualified electrician and
conform to the National Electric Code, and must comply
with all State and local codes and regulations including
proper grounding of the equipment.
ASME Storage Cylinders (Liberty I)
Liberty Trailer Operating Instructions
11
3 - Features
Generator
Optional Equipment
The generator provides 7.2 kw, single-phase power to
four 120 VAC/15 amp outlets and one 220 VAC/30 amp
outlet. Because the generator drive pulley is separate
from the pulleys that run the compressor, electrical power
can be provided without running the compressor.
Flood Light Assembly
The flood light tower assembly has four 300 watt lights
to provide on-the-scene lighting for safer working
conditions. The tower has a 15‑foot above ground reach,
controllable via air power. The lighting assembly plugs
into the 120 VAC socket, activated by a switch on the
control panel.
Cold Weather Package
120V AC Outlets (2)
Located on the trailer tongue
An optional Cold Weather Package is available for
operating the Liberty breathing air system in temperatures
below 40°F (4°C).
The heater element is powered using 120 VAC and
consists of a compressor crankcase heater, engine
water jacket heater, a compressor dump block blanket
heater, and an enclosure drape for additional insulation
during service.
See the chapter “Optional Features” for more information
on operating the Cold Weather Package.
High Pressure Hose Reel/Low Pressure Hose Reel
The high-pressure hose reel and the low-pressure hose
reel are only available on the Liberty II models.
See the chapter “Additional Features” for more
information on operating the optional hose reel.
Smart Fill Auto Cascade Filling System
Generator 220V AC Connection
Never operate the Diesel Engine indoors, in partly
enclosed areas like open garages, or near open windows,
doors, or vents. The Diesel Engine produces Carbon
Monoxide, a poisonous gas you cannot see or smell,
which can reach hazardous levels very quickly. Always
operate the Diesel Engine outside with the exhaust
blowing away from places where there are people. Failure
to do so can result in serious injury or death.
12
The SCOTT Smart Fill auto cascade cylinder filling
system is available as an option ONLY on the LIBERTY
II mobile breathing air system.
With a SCOTT Smart Fill Auto Cascade system, pressure
sensing valves automatically select the air supply from
each of the storage cylinders. The system opens and
closes the storage cylinders to efficiently use all the
available air to fill the SCBA air cylinders. The operation
of the SCOTT Smart Fill Auto Cascade system does not
require additional tasks or adjustments by the operator.
If the operator chooses to turn OFF the compressor after
filling the storage and then fill the SCBA cylinders, the
SCOTT Smart Fill Auto Cascade system will provide the
maximum number of fills before turning the compressor
back ON.
Liberty Trailer Operating Instructions
3 - Features
RevolveAir Fill Station
The RevolveAir Fill Station consists of a total containment
chamber, a turntable with four charging adapters, a flow
control valve (throttle), an interlock safety valve, and two
bleed valves.
The charging chamber is designed to protect the operator
in case of a cylinder failure. If a cylinder ruptures, the
chamber vents release expanded air through the bottom
grating.
RevolveAir Fill Station
Liberty Trailer Operating Instructions
13
3 - Features
NOTES
14
Liberty Trailer Operating Instructions
Liberty Trailer Operating Instructions
4 - Starting and Operating the Liberty System
Introduction
Working with Compressed Air
The operator of the Liberty Mobile Breathing Air System
must be fully trained before operating the equipment.
The operator is responsible for:
High-pressure air can be dangerous.
•
•
•
NEVER adjust a safety relief valve. The valve is installed
to prevent overloading the air compressor and related
system components. Interfering with this setting can
result in serious damage or injury.
Proper positioning of the trailer before use,
Pre-Operational Checks,
Safe operation of the compressor including checking
all installed system monitors (such as CO or dew
point),
•
Reporting any service notices for routine maintenance
or any notices for out-of-tolerance conditions,
•
Responding properly to any out-of-tolerance
conditions that may occur,
•
Proper shutdown of the equipment and preparation
for transport.
The operator must be trained in charging breathing
air cylinder as well as the hazards of working with
compressed air.
The System Administrator who has the responsibility for
setup and maintenance of this equipment must inform
the operator what features have been ENABLED and
are available to the operator including System Overrides.
NEVER tighten, loosen, or adjust any type of fitting that
is under pressure.
NEVER perform any service on this equipment unless the
electric power is switched OFF at the main terminal, the
diesel engine is turned OFF and cooled, the compressor
is completely stopped, and all residual air pressure has
been released from the system. Follow the recommendations of the OSHA Lock Out/Tag Out procedures or your
organization’s safety procedures.
NEVER pass in front of an air outlet when compressed air
is being released. High pressure air could cause injury.
NEVER attempt to straighten or reuse bent tubes or
utilize any damaged fittings.
NEVER charge a breathing apparatus or ASME storage
cylinder beyond the rated working pressure.
NEVER fill a breathing air cylinder that has not been
inspected according to this instruction and verified to be
acceptable for filling.
REMEMBER - Compressed air can kill. Treat it with
respect.
Training is required before use of this equipment.
Improper use of this equipment may result in serious injury or death. Improper use includes, but is not
limited to, use without adequate training, disregard
of the warnings and instructions contained herein
and failure to inspect and maintain this equipment.
Liberty Trailer Operating Instructions
The misuse of compressed air can cause severe
injury or death. Take every precaution in the use
of compressed air. Always remember to release all
residual air pressure from the compressor system
before repairing or doing maintenance work.
15
4 - Starting and Operating
Positioning the Unit for Operation
1. Locate the unit in an area upwind from any
airborne contaminants (smoke, exhaust,
dust, chemical vapors, etc.). A contaminated
atmosphere places an abnormal load on the air inlet
filter, purifiers, and compressor, which will result in
compressor wear and additional maintenance.
When operating outdoors with the diesel engine,
locate the unit away from any overhead obstacles
that could interfere with the Remote Air Intake when
it is extended.
Also locate the unit away from possible sources of
air contamination such as smoke or exhaust from
another vehicle. Excessive contaminants in the air
may result in more rapid depletion of the filtration
system or could cause an increase in critical
contaminants like Carbon Monoxide.
For Diesel operation, DO NOT locate the trailer
indoors, in partly enclosed areas like open garages,
or near open windows, doors, or vents where the
exhaust from the engine will create a hazard.
1) Remote Air Intake (Extended)
Never operate the Diesel Engine indoors, in partly
enclosed areas like open garages, or near open windows, doors, or vents. The Diesel Engine produces
Carbon Monoxide, a poisonous gas you cannot see
or smell, which can reach hazardous levels very
quickly. Always operate the Diesel Engine outside
with the exhaust directed away from places where
there are people. Failure to do so can result in serious injury or death.
A tower cover bag with retainer strap is provided
to protect the air inlet/flood light tower from dirt
and moisture when not in use. This cover must be
removed before operating the compressor system
to permit air to flow into the air intake.
When operating indoors with the electric power, it is
not necessary to extend the remote air intake, but it
is still necessary to remove the tower cover.
2. Position the unit on level ground, with a
maximum 15° tilt level from any direction. Use
the crank on the trailer jack assembly to adjust the
front-to-back tilt level.
3. Always apply the parking brake (handle down) and
chock the trailer wheels when the unit is in operation.
2) Access Doors Closed and Secured
Before raising the remote air inlet/flood light tower,
ALWAYS check for any overhead obstructions
(power lines, tree limbs, etc.). Failure to do so may
result in damage to the unit and/or personal injury.
Relocate the trailer if necessary.
16
Never allow the compressor to operate at a tilt level
higher than 15° from any direction. At levels outside
this range, compressor oil will not distribute properly,
resulting in serious damage to the compressor and
its components.
Liberty Trailer Operating Instructions
4 - Starting and Operating
Parking Brake On
(Lever Down and Locked)
Always apply the parking brake and chock the trailer
wheels while performing pre-operation checks and
while the unit is in operation. If the trailer begins to
roll unexpectedly, serious personal injury, death, and
permanent damage to equipment can result.
Liberty Trailer Operating Instructions
17
4 - Starting and Operating
Pre-Operation Checks
NOTE
Perform all pre-operation checks prior to starting or
transporting the unit. Also see the Operator Maintenance Checks section of this instruction.
1. Check the engine oil level.
Check engine oil level prior to each use. Remove the
dipstick and check the oil level as indicated. Replenish
as necessary.
The grade of oil depends on atmospheric conditions:
• SAE 40, above 68°F (20°C)
• SAE 20, from 32°F (0°C) to 68°F (20°C)
• SAE 10, from -4°F (-20°C) to 32°F (0°C)
• SAE 5, below -4°F (-20°C)
NEVER perform service on this equipment unless the
electric power is switched OFF at the main terminal,
the diesel engine is turned OFF, the compressor is
completely stopped, and all residual air pressure has
been released from the system. Follow the recommendations of your safety procedures or the OSHA
Lock Out/Tag Out procedures.
1) Engine oil fill
2) Engine oil dipstick
All scheduled maintenance beyond the scope of
this manual must be performed ONLY by a SCOTT
trained and certified service technician. Unauthorized maintenance or service without proper training
can void the warranty, lead to permanent equipment
damage, and/or serious personal injury.
2. Check the engine coolant level.
Ensure that the coolant covers the core tubes. Replenish
with 50/50 ethylene glycol and water mixture.
Periodically check the engine radiator for dust buildup,
insects, or other debris.
Use a brush or low pressure air (under 30 psi) to dislodge
any debris between the fins.
Consult the manufacturer’s material safety data
sheets (MSDS) for any chemicals or fluids used in
the operation of this equipment. Failure to do so
may result in exposure to toxic chemicals leading
to serious personal injury.
1) Engine Coolant Fill
2) Radiator Fins
18
Liberty Trailer Operating Instructions
4 - Starting and Operating
3. Check the Diesel Engine fuel level.
The fuel gauge is located on the left side of the unit when
facing the main control panel.
Keep diesel fuel away from heat, sparks, flames, or
other sources of ignition while filling the tank. DO
NOT fill the fuel tank while the engine is running, or
when it is hot. DO NOT overfill the tank. ALWAYS
wipe up any fuel spills. Diesel fuel is a flammable
liquid. Failure to follow this warning can lead to serious personal injury and/or equipment damage.
Fuel Gauge
The fuel tank fill cap is located on the right side of the
unit. To replenish fuel, remove the fuel filler cap and fill
the fuel tank with standard diesel motor fuel.
DO NOT FILL when the engine is hot.
Fuel Fill
4. Check the compressor oil level.
Check the compressor oil level prior to each use. Remove
the oil fill cap and check the oil level reading on the
dipstick. Replenish as necessary, using only Anderol
500 oil or XL-700 oil, available from your local SCOTT
Safety distributor.
USE OF APPROVED COMPRESSOR LUBRICATING OIL
For compressor lubricating oil, SCOTT Safety
recommends the use of either of the following:
• ANDEROL 5001
• XL-700 2
1) Compressor Oil Fill (dipstick)
2) Compressor Oil Drain Cap
Use diesel fuel ONLY. Gasoline or other liquid fuel
in the diesel engine will cause serious damage to
engine components and to the fuel system.
1
2
Do not operate the compressor without lubricant, or
with inadequate or excessive lubricant. Failure to
lubricate properly can cause components to lock up
and lead to permanent equipment damage.
ANDEROL 500 is a registered trademark of ANDEROL, Inc., East Hanover, NJ.
XL-700 is a registered trademark of Ingersoll-Rand Company, Montvale, NJ
Liberty Trailer Operating Instructions
Pre-Operation Checks
Continued on the next page...
19
4 - Starting and Operating
Pre-Operation Checks Continued...
5. Check the oil level in the clutch oil reservoir.
To replenish clutch oil, twist off the oil reservoir. Fill
with Air Tool Oil (SCOTT P/N AB311128) and replace
the reservoir.
6. Check the condition of the trailer tires and
pressure rating.
Optimum operating tire pressure is as follows:
LIBERTY I (two wheels)
80 psi
LIBERTY II (four wheels)
65 psi.
Clutch Lubricant Reservoir
Always replace the access screen and close the access
doors before starting the compressor to protect users
from the moving parts of the compressor and engine.
Tire Air Pressure Check - See Item 6
Screen shown in proper position during
compressor operation
Verify that the tires and rims are correct for the trailer:
LIBERTY I (two wheels)
LT 245/75 R16
LIBERTY II (four wheels)
ST 225/75 R15
Replacement tires must be the same size and load
rating as the original equipment.
The rims must be the original alloy rims supplied with
the trailer or SCOTT approved replacements. Do not
substitute rims or tires for the original equipment.
Periodically check the torque of the wheel lug nuts.
The torque should be set to 85 foot-pounds. Use the
lug nut tightening pattern below when checking the
torque and when replacing a wheel after tire repair.
ALWAYS keep the unit screen in place and the access doors closed during compressor operation.
The compressor and engine contain fast-moving
parts that can cause serious personal injury if they
disengage or are obstructed.
Wheel Lug Nut Tightening Pattern
20
Liberty Trailer Operating Instructions
4 - Starting and Operating
NOTES
Liberty Trailer Operating Instructions
21
4 - Starting and Operating
Operation of the Compressor System
A 4-cylinder diesel engine serves as the primary source
of power for the compressor system. The system also
includes an electric induction motor that can operate the
compressor without the diesel engine. The next sections
discuss preparation for use with diesel or electric. Operation of the compressor system is much the same for both
regardless of the power source.
The operator must never leave the LIBERTY Mobile
Breathing Air System unattended while the compressor
system is operating or in use.
Hearing protection may be required when using the
LIBERTY Trailer compressor system for extended periods of time. Refer to the personal safety guidelines or
requirements of your organization.
NEVER leave the mobile breathing air system unattended while the compressor is in use. A SCOTT
trained and certified operator must monitor the system gauges at all times and take immediate action
to guard against equipment failure. This equipment
is intended for providing breathable air to save lives.
Failure to monitor the system may lead to permanent
equipment damage, serious personal injury or death.
Hearing protection may be required when using the
LIBERTY Trailer compressor system for extended
periods of time. Refer to the personal safety guidelines or requirements of your organization. Exposure
to high sound levels may cause temporary or permanent hearing loss in some individuals.
22
Main Control Panel
The main control panel is located at the rear of the unit
above the charge chamber, accessible via the control
panel access door. The control panel contains controls
for operating the system and for regulating breathing air
cylinder charging.
Follow the directions on the X4 Controller display
screens. You will be instructed to either press one of the
buttons on the keypad (START, OPERATE, PURGE, etc.)
or one of the Function buttons directly below a selection
on the display (F1, F2, or F3).
Before operating the Liberty mobile breathing air system,
the operator must be familiar with the location and function of all controls and gauges on the main control panel.
A label on the back of the control panel access door
provides summarized instructions for operation. The
operator must be trained in the use of the Liberty mobile
breathing air system. The operator must also read and
understand all procedures included in this manual prior
to operating the mobile breathing air system.
During operation, the X4 Controller will display service
notices regarding required service activities such as
Compressor Service or replacement of the Purifying
Filters. The operator is responsible for notifying the System Administrator of any messages or alerts regarding
service or maintenance requirements.
Training is required before use of this equipment.
Improper use of this equipment may result in serious injury or death. Improper use includes, but is not
limited to, use without adequate training, disregard
of the warnings and instructions contained herein
and failure to inspect and maintain this equipment.
Liberty Trailer Operating Instructions
4 - Starting and Operating
7
8
1
10
4
11
14
5
2
3
12
6
9
13
15
Main Control Panel
1)Diesel Engine Control Panel
9) Emergency Shutdown
2)Diesel Engine Hour meter
10) Compressor Pressure Gauge
3) Generator Switch
11) Fill Pressure Regulator
4) Generator Voltmeter
12) Storage Cylinder Pressure Gauge
5) Flood Light Switch
13) Breathing Air Cylinder Pressure Gauge
6) Tower Control
14) Fill Control Valve
7) Mode Selector Switch
15) Auxiliary Air Outlet
8) X4 Controller
Diesel Engine Control Panel
2
The diesel engine control panel is located on the upper
left corner of the main control panel. The indicator lights
on the top of the control panel provide warnings for various engine operating conditions.
1) Engine Key
2) Low Fuel Warning Light (not used)
3
4
5
6
7
8
9
3) Warning for Indicator Light Failure
4) Low Engine Oil Pressure Warning Light
5) High Engine Temperature Warning Light
10
6) Alternator Warning Light
7) Auxiliary Shut Down (not used)
8) Glow Plug
1
9) Inlet Air Restriction Warning Light
10) Auxiliary Shut Down (not used)
Diesel Engine Control Panel
Liberty Trailer Operating Instructions
23
4 - Starting and Operating
Using Diesel Engine Power
1. Follow the instructions in “Pre-Operation Checks”
and “Positioning the Unit for Operation.”
2. Open the right side trailer door and locate the Rotary
Disconnect Switch at the right front corner of the
trailer. Turn the Rotary Disconnect Switch to the
“OFF” position. Close the trailer door.
Before starting the compressor with the diesel engine, ALWAYS remove the air inlet cover bag and
fully extend the remote air inlet above the diesel
engine fumes. Failure to do so will contaminate compressor air and deteriorate the purification system.
Raising the Remote Air Inlet/Flood Light Tower
1. Before raising the tower, look for any overhead
obstructions (power lines, tree limbs, etc.). Relocate
the trailer if necessary.
3. Standing at the main control panel, turn the mode
selector switch toward ENGINE.
Mode Selector
Before raising the remote air inlet/flood light tower,
ALWAYS check for any overhead obstructions
(power lines, tree limbs, etc.). Failure to do so may
result in damage to the unit and/or serious injury or
death. Relocate the trailer if necessary.
2. If the optional Flood Light for the Air Intake Tower
is installed, refer to the complete Flood Light
Installation and Operation section of Chapter 6 –
Additional Features in this instruction.
3. Remove the air inlet cover bag.
4. Loosen the five (5) tower mast screws.
5. Pull out on the Tower Control knob on the main
control panel. Turn the knob slowly (clockwise) to
raise the tower. Stop turning the knob when the
desired height is reached.
Emergency
Shutdown Button
4. Turn the red Emergency Shutdown button clockwise
to verify that it is released (popped out).
5. Turn the ignition key to the pre-start position. Wait for
the glow plug light to go out.
6. Turn the ignition key to START.
7. If the engine does not start initially, turn the key back
to the OFF position, repeat steps 5 and 6.
8. Release the ignition key switch when the engine
starts.
9. Let the engine idle for 2 or 3 minutes before operating
the compressor. The X4 Controller will go through its
System Boot for 15 seconds.
10. Before starting the compressor with the diesel engine,
ALWAYS REMOVE THE AIR INLET COVER BAG
AND FULLY EXTEND THE REMOTE AIR INLET
ABOVE THE DIESEL ENGINE FUMES. Failure to
do so will contaminate compressor air and deteriorate
the purification system. Refer to the following section.
24
6. When the flood lights are not in use, and the diesel
engine is OFF, be sure to lower the flood light tower
before moving the trailer. To lower, turn the control
knob FULLY (counterclockwise).
PROCEED TO THE
“OPERATING THE COMPRESSOR”
SECTION OF THIS INSTRUCTION...
Liberty Trailer Operating Instructions
4 - Starting and Operating
Using Electric Power
1. Follow the instructions in “Pre-Operation Checks”
and “Positioning the Unit for Operation.”
2. Connect a suitable electrical power source to the
power input. See the label at the input connector or
the System Identification Tag for the required power
source.
4. Open the right side trailer door and locate the Rotary
Disconnect Switch at the right front corner of the
trailer. Turn the Rotary Disconnect Switch to the
“ON” position. Close the trailer door.
5. Standing at the main control panel, turn the power
mode selector switch on the instrument panel toward
ELECTRIC.
AC Power Input for electric motor power
Mode Selector
3. Turn the external power source ON (wall-mounted
switch).
Be sure that the input electrical power supply is
correct for the Liberty System to be powered. All
electrical supply wiring must be performed by a
qualified electrician and conform to the National
Electric Code, and must comply with all State and
local codes and regulations including proper grounding of the equipment. Verify that the power supply
connector matches the receptacle on the Liberty
unit and is correct voltage, amperage, and phase
for the specific requirements of the trailer. Verify the
correct compressor rotation before operation. Use
of incorrect electrical power input may permanently
damage the equipment and could cause serious
injury or death to the user.
Emergency
Shutdown Button
6. Turn the red Emergency Shutdown button clockwise
to verify that it is released (popped out).
7. The X4 Controller will go through its System Boot
for 15 seconds.
8. Verify the correct compressor rotation before
operation. Rotation should be counterclockwise
when facing the compressor fan. See the arrows on
the compressor belt guard. If the rotation is incorrect,
DO NOT use the power source until the phasing has
been modified by a certified electrical technician.
After modification, recheck the rotation.
PROCEED TO THE
“OPERATING THE COMPRESSOR”
SECTION OF THIS INSTRUCTION...
Liberty Trailer Operating Instructions
25
4 - Starting and Operating
Operating the Compressor
1. After the X4 Controller completes the system boot,
the display will say, “Press F2 Button Below to
Begin.” Press the F2 key directly below the X4
Controller digital display.
Select Compressor
Control Mode
Condition = NORMAL
AUTO
MANUAL
SCOTT Health &
Safety
800-247-7257
PRESS F2 BUTTON
BELOW TO BEGIN
4. For normal operation, select AUTO. The following
screen will appear:
2. The display will show the current Service Due dates
and say, “Push Operate, Info, or Service.” Press
OPERATE on the keypad. (Remember, you can
press BACK at any time to return to the previous
display.)
Air Sample Due
01/18/07
CO Cal Due
3/18/07
Purifier HRS REM49
PUSH
OPERATE, INFO, OR SERVICE
3. The display will read AUTO or MANUAL. Select by
pressing the key below the desired mode:
AUTO - F1 Key - recommended for “on-site” operation
when a constant supply of compressed air is needed.
In this mode, the unit will automatically restart when
system pressure drops approximately 500 psi below the
maximum pressure.
MANUAL - F3 Key - used for a single compression
cycle. In this mode, the unit will bring the ASME storage
cylinders up to maximum system pressure, but will not
automatically restart as the pressure is depleted. The unit
must be restarted when storage pressure has dropped
below a usable level.
26
Auto Mode
Press
Start Button to turn
Compressor ON
Press the START button to turn the compressor ON.
When using ELECTRIC power, verify the correct compressor rotation before operation. Rotation should be
counterclockwise when facing the compressor fan. See
the arrows on the compressor belt guard. If the rotation is
incorrect, DO NOT use the power source until the phasing has been modified by a certified electrical technician.
After modification, recheck the rotation.
When powering the compressor with the external
electrical power source, verify the correct compressor rotation before operation. Rotation should be
counterclockwise when facing the compressor fan.
See the arrows on the compressor belt guard. If the
rotation is incorrect, DO NOT use the power source
until the phasing has been modified by a certified
electrical technician. After modification, recheck the
rotation.
Liberty Trailer Operating Instructions
4 - Starting and Operating
The X4 Controller display will show the compressor discharge temperature (°F), carbon monoxide concentration
(CO), and dew point level (DP) of the discharge air. Refer
to the System Tolerances and Overrides section on
Page 28. If any of the Compressor Operating Parameters
are out-of-tolerance, run a Purge cycle as instructed in
the Use of the Purge section of this instruction.
T = 104° CO = 0
DP = -94°F
Condition = Normal
Compressor will Stop when
Storage is Full
5. Continue to monitor the unit during operation, noting
the Compressor Pressure and Storage Pressure
gauge readings. Also monitor the Compressor
Stage Gauge Readings as instructed on Page 26
of this instruction.
When the system pressure reaches approximately
2500 psi, adjust the Flow Control to obtain a 50/50
(red/green) reading. This provides the correct
sample flow rate to the carbon monoxide monitor
and dew point monitor.
T = 104° CO = 0
To verify that the moisture separators are operating
properly, press the DRAIN button on the controller.
This will activate a fifteen (15) second drain cycle to
remove condensation from the moisture separators.
Check the Compressor Stage Gauges to verify
that they all drop pressure and recover pressure
simultaneously.
The compressor will automatically activate a fifteensecond drain cycle at regular intervals to remove
condensation. However, a manual fifteen-second
drain cycle can be activated at any time by pressing
the DRAIN button on the controller.
Pressing STOP will activate a cool-down cycle and
stop the compressor.
6. Observe the X4 Controller display for system
condition warnings.
NOTE
The X4 Controller will shut down the compressor
if operational tolerances exceed factory-set limits.
See the “System Tolerances and Overrides” section
of this instruction.
7. When the system reaches maximum pressure,
the compressor will run in a cool-down cycle for 2
minutes. During this time, the compressor will run
unloaded while draining the moisture separators,
and cooling down the compressor stages. After the
cool-down cycle, the compressor will stop.
If you are using the diesel power, the clutch will
deactivate to stop the compressor. The engine will
drop down to idle speed. (If the generator switch is
ON, the engine will continue at running speed).
DP = -94°F
Condition = Normal
Compressor will Stop when
Storage is Full
1
Operating the Compressor
continued on the next page...
2
1) Flow Control Dial
2) Air Flow Adjustment Eye
Liberty Trailer Operating Instructions
27
4 - Starting and Operating
Operating the Compressor Continued...
8. If the X4 Controller is in AUTO mode, the compressor
will restart when pressure drops approximately 500
psi below maximum system pressure.
If the storage pressure was already FULL when
the system was started, the display will say
“Storage Full” and the compressor will still restart
automatically when the pressure drops.
If you are using the diesel power in the AUTO mode,
the compressor will only restart if the engine is still
running.
NEVER attempt to perform service inside the trailer
while the compressor system is in use in the AUTO
mode. When the compressor system is in the AUTO
mode, the compressor will restart when the storage
pressure drops approximately 500 psi below maximum pressure. This can happen at any time without
warning. Failure to observe this warning could result
in serious injury or death.
Operational Checks
The operator must monitor the mobile breathing air
system at all times during operation. See the sections “Compressor Stage Gauge Readings” and
“System Tolerances and Overrides.”
If all Compressor Operating Parameters are in
tolerance, the system is ready to fill breathing air cylinders.
Proceed to Chapter 5 “Charging Breathing Air Cylinders.”
Compressor Stage Gauge Readings
Each of the four compression stages operates in a specific range of pressure to build to the maximum output
pressure. The compressor stage gauges are located on
the front of the compressor inside the system enclosure.
The operator must check these gauges periodically while
the compressor is running to verify that the compressor
is operating properly. Each stage is equipped with a
suitable pressure relief safety valve designed to protect
the compressor.
1
2
3
4
5
1) First Stage Pressure Gauge
2) Second Stage Pressure Gauge
3) Third Stage Pressure Gauge
4) Fourth Stage Pressure Gauge
5) Purifier Coalescer Gauge
Note the following stage pressure readings when the
compressor reaches its maximum pressure.
6000 psi compressor:
First Stage Pressure Second Stage Pressure
Third Stage Pressure
Fourth Stage Pressure
Purifier Pressure
40 - 48 psi
240 - 260 psi
1000 - 1175 psi
6000 psi
6000 psi
If system pressure is not building properly, check all
four pressure gauge readings on the Compressor Stage
Pressure Panel and the fifth Purifier Coalescer pressure
gauge. If any gauge does not reach its pressure reading,
notify your SCOTT authorized service technician.
During a fifteen-second drain cycle or a two (2) minute
cool-down cycle, the five gauges should all drop pressure
simultaneously. If any one gauge does not drop along
with the others, notify your SCOTT authorized service
technician.
After a fifteen-second drain cycle, or an automatic restart,
all five gauges should return to their stage pressures
together.
28
Liberty Trailer Operating Instructions
4 - Starting and Operating
Information Button
Service Notifications
After initial system boot, the operator may press the INFO
button on the X4 Controller to access current Run Time
and Schedule information for the compressor system.
The system will light the SERVICE light on the X4 Controller panel when one of the service requirements is
due. The operator should report any approaching service
requirements to the System Administrator in a timely
manner so that the necessary service can be scheduled
and performed.
NOTE
The INFO function is not available when the compressor is operating.
1. Power up the system (using either the diesel or
electric power).
2. After the X4 Controller completes the system boot,
the display will say, “Press F2 Button Below to
Begin.” Press the F2 key directly below the X4
Controller digital display.
3. The display will show the current Service Due dates
and say, “Push Operate, Info, or Service.” Press
INFO on the keypad. (Remember, you can press
BACK at any time to return to the previous display.)
Compressor Run Time
HRS / MIN
39 / 14
NEXT
EXIT
4. Press the F1 button under NEXT to see the available
screens. The sequence of displays is as follows:
• Total Hours of Compressor Run Time, HRS / MIN,
• Output Air Temp / CO Level / Dew Point,
• Hour Meter HRS / MIN,
• Hours Remaining on Purifier Filters, HRS / MIN,
• Air Sample Due MM/DD/YY,
• CO Sensor Installation Date, MM/DD/YY,
• DP Sensor Installation Date, MM/DD/YY,
• Time Remaining for Compressor Service, HRS,
• Carbon Monoxide Calibration Due, MM/DD/YY
After the complete sequence, select REPEAT to start the
sequence, or EXIT.
Service Due
Air Sample 01/18/07
CO Cal 03/18/07
Purifier HRS REM 48
The X4 Controller tracks the primary Service intervals for
several important service functions including:
• Total Hours of operation time,
• Hours since last compressor service*,
• Hours remaining on Purifier Filters*,
• When the next Air Sample is due*,
• When the next Carbon Monoxide Calibration is due*.
*The system will light the SERVICE light on the X4
Controller panel when one of these service requirements is due.
The operator must report any Service Due notifications
to the System Administrator in a timely manner so that
the necessary service can be scheduled and performed.
Refer to the Service Schedule section of Chapter 7,
OPERATOR MAINTENANCE CHECKS, for details of the
service activities required at prescribed service intervals.
Operating the Compressor
continued on the next page...
Liberty Trailer Operating Instructions
29
4 - Starting and Operating
Operating the Compressor Continued...
System Tolerances and Overrides
The X4 Controller monitors certain system conditions
during compressor operation including the following:
• Compressor oil level or pressure is measured within
the compressor,
• Compressor discharge air temperature (°F) is
measure at the final stage outlet of the compressor,
• Carbon Monoxide (CO) is measured after the final
air purifier,
• Dew Point level (DP) is measured after the final air
purifier.
The system will alarm if conditions approach out-oftolerance limits, and will subsequently shutdown the
compressor when the limits are exceeded. When the
compressor shuts down, the diesel engine will continue
to run at a slow idle.
Compressor Operating Parameters
Parameter
Alarm
Shutdown
Override
Maximum
Air temperature (°F)
470°495°
Dew Point–DP (°F)
-64°-55°
-10°
Carbon Monoxide (CO)
4 ppm
30 ppm
6 ppm
550°
These are the factory pre-set alarm and shutdown set
points. Other set points may be programmed by the
System Administrator.
An out-of-tolerance condition indicates a problem or
potential problem with the compressor system that must
be checked and corrected as soon as possible.
• Low compressor oil level or pressure indicates
insufficient oil to operate the compressor.
• High compressor discharge air temperature may
indicate a high ambient air temperature condition OR
a cooling or lubrication problem in the compressor.
Determine the cause of the problem as soon as
possible.
• High CO may indicate the presence of a source of
vehicle exhaust in proximity to the compressor air
intake.
• High dew point may indicate moisture accumulation
in the air intake, residual moisture in the system
from non-use of the compressor, a problem with the
condensation drain system, or a need to replace the
purification filters.
The X4 Controller displays readings for the discharge
outlet temperature, the CO level, and the dew point while
the compressor is running. The operator must watch
these readings for indications that conditions may approach out-of-tolerance levels. The system PURGE can
be used at any time and may correct some temporary
out-of-tolerance conditions.
30
When the readings reach ALARM levels, the operator
has the option to Purge the suspect air which may correct the problem, or to keep operating the compressor.
When the readings reach the SHUTDOWN levels, the
operator must select OVERRIDE to continue producing
air for a limited time. Again, use of the PURGE may correct some temporary out-of-tolerance conditions and
prevent another Shutdown warning.
The Overrides should only be used in emergency situations where there is a compelling reason to continue
producing breathing air, such as to save a life. The
Override capability must be ENABLED by the System
Administrator who has the responsibility for maintenance
of this equipment.
Use of the Purge
When the CO or dew point readings approach or reach
a shutdown, the Purge function can be used to expel
suspect air after the air purifiers before it goes into the
storage cylinders.
To activate the Purge cycle, press the PURGE button on
the X4 Controller keypad and follow the instructions on
the display. The Purge light on the panel will go on and
the air in the purifiers will be vented to the atmosphere.
Press the Purge Button to begin
the Purifier Purge
Cycle
The display will continue to show CO and dew point levels
and will let you know when they are back in an acceptable range. The Purge cycle will NOT end automatically
unless the CO AND the dew point levels are below the
alarm levels. You must press the STOP button and follow
the instructions on the display to end the Purge cycle and
return to normal operation.
The operator must continue to watch the CO, dew point,
and temperature readings for indications that conditions
may again approach or reach out-of-tolerance levels.
NOTE
DO NOT use the Purge Cycle to attempt to “dry out” the air
when the dew point readings are already out of tolerance.
Liberty Trailer Operating Instructions
4 - Starting and Operating
Overrides
The X4 Controller also includes limited shutdown override
capability for high dew point, high air temperature, high
carbon monoxide levels, and low oil level or pressure.
Override allows the system to continue running out-oftolerance up to a maximum preset tolerance, or for one
hour, whichever occurs first. The OVERRIDE capability
is password protected and may be ENABLED or DISABLED as determined by the System Administrator who
has the responsibility for maintenance of this equipment.
Condition + Shutdown
(out of tolerance)
Press OVERRIDE
or BACK Button
If the Override capability is ENABLED, press the OVERRIDE key on the X4 Controller to engage the override
during a shutdown condition. As long as the maximum
preset tolerance is not reached, the override will stay in
effect for one (1) hour. After the one hour, the system will
again go into a shutdown condition.
NOTE
Once the OVERRIDE key is pressed, the Override
will stay in effect for the full hour even if the compressor is restarted.
The operator may again press the OVERRIDE key for
an additional one hour of operation. After three (3) hours
in the override condition, the override capability will be
DISABLED and the password is required to re-enable
the override capability.
The operator must be trained as to whether the override
capability is ENABLED and how to use it.
ONLY use the system override capability in the event
of an extreme emergency, or to save a life. During
an override condition, the operator must monitor the
system at all times. Operating the system beyond
factory-set parameters may lead to irreparable component damage, and/or personal injury in the case
of system failure.
Operating the Compressor
continued on the next page...
Liberty Trailer Operating Instructions
31
4 - Starting and Operating
Operating the Compressor Continued...
System Shutdown
Always allow the compressor to fully charge the
storage system, unload and cool-down before final
shutdown. Failure to do so can lead to premature
wear and/or damage to the compressor and its
components.
1. Allow the compressor to fully charge the storage
system, go through its cool-down cycle, and stop.
2. Turn the selector switch OFF. Depending on which
mode of operation you were using, this will:
a) Cut off power to the electric motor
b) Shut down the diesel engine.
4. Lower the remote air inlet tower by turning the Tower
Control knob counterclockwise.
DO NOT move the unit with the remote air inlet/flood
light tower extended. The extended tower may be
damaged, leading to potential equipment failure or
serious personal injury.
5. If the flood light tower is in use, be sure to turn off
the flood light toggle switch. Step on the unit rear
bumper to reach above the control panel and unplug
the power cord.
Exercise caution when stepping on the rear bumper
to access the flood light tower. To avoid the risk of
falling, make sure the trailer park brake is ON and
the wheels are chocked. DO NOT step on fenders
or climb onto the trailer higher than the bumper. Use
extra caution during icy or wet conditions. Failure
to follow this warning can lead to personal injury or
damage to the equipment.
3. If using diesel power, also turn the ignition switch
OFF.
4. If in use, turn the generator toggle switch OFF.
6. Loosen the flood light T-handle clamp located just
below the tower assembly. Holding the flood light
assembly, remove the safety pin. Remove the flood
light assembly from the unit and stow in the front
of the unit. For more information, refer “Flood Light
Installation and Operation” in Chapter 6.
7. At the fill station, install the charge adapter seal caps
and hand-tighten the bleed valve.
1) Charge Adapters
2) Bleed Valve
32
Liberty Trailer Operating Instructions
4 - Starting and Operating
8. Lock the charging chamber door by operating the
handle on the right side of the chamber (YELLOW
lock bars showing).
Charging Chamber Locked
(YELLOW bar visible around door)
Use caution when rotating the turntable. Catching
fingers, hands, hair, articles of clothing, or other
objects in the door may result in personal injury or
damage to the fill station.
9. Close the main control panel door above the fill
station.
10. Close and secure all the latches on the side
access doors and on any optional storage (on
the LIBERTY II). Some models have a TWO
position rubber strap latches. USE THE STRAP
SECOND POSITION TO SECURE THE DOORS
FOR HIGHWAY DRIVING.
11. If using external electrical power:
a) Turn OFF the external power source (wallmounted switch).
b) Disconnect the power source connection from the
front of the trailer and stow the power cable.
12. Before towing or moving the trailer, remove the
wheel chocks, raise the trailer jack assembly,
remove the wheel, and release the parking brake by
raising the handle. Refer to the towing instructions
in Chapter 8 of this manual.
Liberty Trailer Operating Instructions
Emergency Shutdown
In case of emergency, push in the red Emergency Shutdown button. This will automatically
stop the compressor. The diesel engine will
idle down if the generator switch is OFF, or will
maintain generator speed if the generator switch
is ON. The engine will continue to run until the
ignition key is turned OFF. The compressor
will be locked out and unavailable for four (4)
minutes after the Emergency Shutdown button
is pushed.
Emergency Shutdown Button
Use of the Emergency Shutdown button will stop
the compressor immediately without the benefits
of a two minute cool-down cycle. In the Emergency
Shutdown mode, the compressor will be locked out
and unavailable for four (4) minutes. Repeated use
of the Emergency Shutdown will result in residual
moisture in the system which may result in serious
damage to the equipment.
33
4 - Starting and Operating
NOTES
34
Liberty Trailer Operating Instructions
Liberty Trailer Operating Instructions
5 - Charging Breathing Air Cylinders
The process for charging breathing air cylinders includes:
•
Cylinder Inspection
•
Fill Pressure Adjustment
•
Cylinder Mounting and Charging
Refer to the guidelines listed in ”Working with Compressed
Air,” at the beginning of Chapter 4.
If any air leak is noted, or the Liberty Trailer mobile
breathing air system does not operate as described
in this manual, immediately terminate use of the
equipment and consult with a certified service technician before proceeding. Use of malfunctioning
equipment may create circumstances resulting in
serious personal injury or death.
Do not refill any cylinder that is damaged or not within
the prescribed hydrostatic test date as determined
by the appropriate US Department of Transportation
(DOT) specification or the applicable DOT exemption or in accordance with the appropriate Transport
Canada (TC) Permit of Equivalent Level of Safety.
Damaged cylinders may suddenly leak or rupture if
charged with compressed air. Failure to inspect for
damage and to empty the air from damaged cylinders
may result in personal injury or death.
When charging more than one breathing air cylinder
together, charge only cylinders that have the same
pressure rating. Failure to follow this instruction can
result in cylinder failure and lead to equipment damage, serious personal injury, or death.
In certain circumstances, the Department of Transportation (DOT) or Transport Canada (TC) may
establish a maximum fill rate for particular cylinders.
NEVER fill cylinders at a rate higher than the DOT
or TC restrictions for the cylinders being filled. Filling
at a rate higher than established restrictions may
result in catastrophic failure of the cylinder, leading
to serious personal injury or death.
When charging 75 minute 5500 PSI cylinders, there
must be NO cylinders mounted on the outside of the
RevolveAir door.
When charging any other size cylinder, there must
be NO 75 minute 5500 PSI cylinders mounted on the
outside of the RevolveAir door.
Failure to obey these warnings may result in serious
injury or death.
Air pressure increases as temperature increases.
When charging cylinders in temperatures below
freezing (32°F/0°C), frequently check air pressure
and release excess pressure as the cylinder warms
to normal room temperature. Failure to do so will
cause cylinders to be in an overcharge condition,
increasing the risk of cylinder failure and leading to
personal injury or death.
Liberty Trailer Operating Instructions
35
5 - Charging Breathing Air Cylinders
Cylinder Inspection
Refer to the guidelines listed in ”Working with Compressed
Air,” at the beginning of Chapter 4.
Refer to current applicable publications on compressed
gas cylinder inspection available from Compressed
Gas Association Inc., 1725 Jefferson Davis Hwy., Suite
1004, Arlington, VA 22202, (703-412-0900) for a detailed
explanation of cylinder inspection procedures.
Check the latest cylinder hydrostatic test date to
ensure it is current.
All breathing air cylinders must be visually inspected
regularly and hydrostatically tested by a licensed
cylinder retester in accordance with the appropriate US
Department of Transportation (DOT) specification or
applicable DOT exemption, or in accordance with the
appropriate Transport Canada (TC) Permit of Equivalent
Level of Safety.
The date of manufacture marked on the cylinder is also
the date of the first hydrostatic test. See the example
cylinder stamp in the illustration below.
Cylinder Date of Manufacture
1)Month
2) Manufacturer or Tester stamp
3)Year
2) Department of Transportation (DOT) Identification
and Pressure Rating (4500 psi)
It is the responsibility of your organized respiratory
protection program to arrange for visual inspection and
hydrostatic testing of cylinders by a licensed retester.
Visually inspect cylinder and valve assembly for
physical damage such as dents or gouges in metal
or in composite wrapping.
Cylinders which show physical damage or exposure to
high heat or flame, such as paint turned brown or black,
decals charred or missing, pressure gauge lens melted or
elastomeric bumper distorted, and cylinders which show
evidence of exposure to chemicals such as discoloration,
cracks in the cylinder or the composite wrapping, peeling
of the outer layers of the composite wrapping and/or
bulging of the cylinder wall, shall be removed from service
and emptied of compressed air.
Always check the pressure rating of the selected
breathing air cylinder(s) to be filled. The rated pressure
usually follows the DOT or TC material identification as
shown in the illustration at the left.
In some circumstances, the Department of
Transportation or Transport Canada may establish
a maximum fill rate for certain cylinders. If you have
any questions as to restrictions on the cylinders you are
charging, contact the DOT or TC.
For a complete listing of retest date requirements for
SCOTT Safety breathing air cylinders, refer to the current
revision of Safety Precautions for AIR-PAK Cylinders,
SCOTT P/N 89080-01. This publication is included in
the literature provided with your breathing air system,
or upon request from SCOTT Safety.
Composite cylinders (those cylinders utilizing fiber
overwrap) must be tested in accordance with the DOT
or TC exemption status up to the maximum life of
fiber overwrapped cylinders which, at the time of the
publication of this instruction, is 15 years from the date
of manufacture.
In certain circumstances, the Department of Transportation (DOT) or Transport Canada (TC) may
establish a maximum fill rate for particular cylinders.
NEVER fill cylinders at a rate higher than the DOT
or TC restrictions for the cylinders being filled. Filling
at a rate higher than established restrictions may
result in catastrophic failure of the cylinder, leading
to serious personal injury or death.
Cylinder Identification and Pressure Rating
1) Transport Canada Identification and Rating (310
bar)
36
Liberty Trailer Operating Instructions
5 - Charging Breathing Air Cylinders
Fill Pressure Adjustment
If the cylinder is not damaged, and the hydrostatic test
date is current, proceed to charge the cylinder. The first
step is to set the target fill pressure for the cylinder(s) as
instructed in this section.
If storage pressure is too low, allow the compressor
system to continue to charge the storage cylinders.
If necessary, refer to “Manually Charging Storage
Cylinders” at the end of this chapter.
4. Unlock the fragmentation chamber door lock
by operating the handle on the right side of the
chamber.
NEVER MIX RATINGS! When charging more than
one breathing air cylinder together, charge only cylinders that have the same pressure rating. Failure
to follow this instruction can result in failure of the
cylinder or cylinder valve, and can lead to equipment
damage, serious personal injury, or death.
1. Check the pressure rating of the selected breathing
air cylinder(s). See “Cylinder Inspection” on page
32.
2. When charging more than one cylinder, verify
that all cylinders are of the same pressure rating.
If they are different, sort them by their rating, and
only charge cylinders together that have the same
rating. NEVER MIX RATINGS.
3. Observe the Storage Cylinder Pressure Gauge.
Verify that the compressor or storage pressure is
equal to, or slightly greater than, the fill pressure of
the selected breathing air cylinder.
Charging Chamber Unlocked
(YELLOW lock bars NOT showing)
5. Close the Fill Control Valve by turning the valve fully
clockwise.
6.
Turn the Fill Pressure Regulator fully counterclockwise
until the Breathing Air Cylinder Pressure Gauge
reads zero (0).
Continued on the next page...
1) Fill Control Valve
2) Fill Pressure Regulator
3) Storage Cylinder Pressure Gauge
Liberty Trailer Operating Instructions
37
5 - Charging Breathing Air Cylinders
NEVER use a wrench or other tool to tighten the
bleed valves or cylinder adapters. Excessive force
will damage the sealing surfaces and result in cylinder leakage.
7. Close both bleed valves on the fill station “finger tight”
(one bleed valve on each side of the fragmentation
chamber door). DO NOT use tools to tighten.
1) Fill Control Valve
2) Fill Pressure Regulator
1) Charge Adapters
2) Bleed Valve
8. Make sure all four of the cylinder charge adapters are
closed and secure (two on each side of the chamber
door). Hand-tighten, turning counterclockwise. DO
NOT use tools.
9. Close the charging chamber and lock with the
operating handle (YELLOW locking bars appearing
around the turntable).
10. Open the Fill Control valve 1/8 to 1/2 turn
counterclockwise.
Charging Chamber Locked
(YELLOW bar visible around door)
38
Liberty Trailer Operating Instructions
5 - Charging Breathing Air Cylinders
11. Slowly turn the Fill Pressure Regulator knob
clockwise until the Breathing Air Cylinder Gauge
shows the target maximum fill pressure for the
selected breathing air cylinder(s). Make sure that the
pressure used to charge the cylinder is not higher
than the pressure rating on the cylinder.
Cylinder Mounting and Charging
The following method fills breathing air cylinders using
the stored air until the breathing air cylinder and storage
pressure balance. Then the compressor automatically
completes filling the cylinder to the pre-selected pressure.
NOTE
Always adjust the Fill Pressure Regulator on the
“pressure rise.” If the fill pressure is accidentally
set too high and must be reduced, first turn the
knob counterclockwise to at least 500 psi below the
desired setting. Turn the knob again clockwise to
ensure an accurate fill pressure setting.
1) Charge Adapters
2) Bleed Valve
Never set the fill pressure higher than the maximum
pressure rating for the breathing air cylinders to be
filled. Filling breathing air cylinders beyond their
maximum pressure rating may result in serious
damage to the cylinder or cylinder valve. A damaged cylinder may rupture, and can cause serious
personal injury or death.
1. Slowly open the bleed valve to vent any residual
pressure. When all air stops escaping, hand-tighten
the bleed valve. DO NOT use tools to tighten.
2. Remove one of the adapter caps and attach a cylinder
to the charge adapter. Turn counterclockwise to
tighten. Hand-tighten the connector. DO NOT use
tools to tighten.
3. To charge two cylinders, remove the plug from the
other charge adapter and mount the second cylinder.
Hand-tighten the charge adapter.
NOTE
Never leave an unused charge adapter open. When
charging only one cylinder, verify that the cap is
secure on the unused adapter.
4. Open the valves located on the top of the mounted
cylinders.
Continued on the next page...
Liberty Trailer Operating Instructions
39
5 - Charging Breathing Air Cylinders
Cylinder Charging Continued...
5. Open the charging chamber door lock with the
handle on the right side of the chamber (YELLOW
lock bars NOT showing).
Practice caution when rotating the turntable. Catching fingers, hands, hair, articles of clothing, or other
objects in the door may result in personal injury or
damage to the fill station.
6. Rotate the turntable 180° until it clicks into position.
NEVER fill cylinders at a rate higher than the rate
established by your respiratory protection program
or, in certain circumstances, the DOT or TC. Scott
recommends that the flow rate not exceed 1500
PSIG/Minute for most cylinder and valve assemblies.
Filling at too high a rate may result in catastrophic
failure of the cylinder, leading to serious personal
injury or death.
9. SCOTT recommends a fill rate of 1500 psi/
minute unless otherwise specified by the cylinder
manufacturer, the DOT or TC, or your respiratory
protection program. At this fill rate, a 4500 psi rated
cylinder will charge in approximately 3 to 3-1/2
minutes.
Adjust the fill rate as follows:
a) Slowly turn the Fill Control Valve counterclockwise
to increase the rate at which the cylinders are
filled.
b) Watch the pressure reading on the Breathing
Air Cylinder Gauge.
c) If the fill rate is too high, turn the Fill Control Valve
fully clockwise to decrease the flow, then slowly
turn the Fill Control Valve counterclockwise to
adjust to the proper rate.
d) Once fill pressure and fill rate are set for
charging cylinders of the same pressure
rating, these settings should not be changed.
However, the fill rate adjustment may need to be
readjusted as the supply pressure may change.
Rotating the RevolveAir Turntable
7. Close and lock the charging chamber door. The door
is locked when the YELLOW bar is visible above the
door frame.
8. The cylinders will immediately begin charging.
Check the Breathing Air Cylinder Gauge on the
main control panel for the pressure reading of the
cylinders being charged.
40
Liberty Trailer Operating Instructions
5 - Charging Breathing Air Cylinders
NEVER use a wrench or other tool to tighten the
bleed valves or cylinder adapters. Excessive force
will damage the sealing surfaces and result in cylinder leakage.
10. While the breathing air cylinders are being filled
inside the charge chamber, mount the second set
of cylinders on the rigid adapters on the outside
of the charge chamber. Be sure to hand-tighten
the bleed valve and to open the breathing air
cylinder valve(s).
Remove the charged breathing air cylinders as follows:
12. Use the chamber lock handle to release the turntable
to access the breathing air cylinders.
13. Close the cylinder valves on the mounted breathing
air cylinders.
14. Slowly open the bleed valve to vent the air lines to
the cylinders. If the air does not stop venting, verify
that the cylinder valves are closed.
15. Hold the cylinder in place and turn the charge
adapter clockwise to remove the cylinder. Handle
the charged cylinder carefully.
16. After all breathing air cylinders are charged, allow the
compressor to continue running to refill the storage
system.
17. Replace the charge adapter plug.
NOTE
High pressure charging causes a rise in cylinder
temperature. As the cylinder cools, the pressure
gauge will show a decrease in pressure. This is
normal. After cooling, cylinders may be placed back
in the fill station and “topped off” to full pressure.
Bleed Valve
11. When the Breathing Air Cylinder pressure gauge
reaches the pre-set charge pressure, open the
chamber lock with the operating handle. This will
automatically stop the cylinder charging process.
Liberty Trailer Operating Instructions
41
5 - Charging Breathing Air Cylinders
Alternate Charging Procedure
Charging Breathing Air Cylinders directly from the
compressor:
If the storage tanks are not adequately charged to fill
breathing air cylinders, the breathing air cylinders will
be charged directly from the compressor.
1. Begin the cylinder charging process in this chapter,
beginning with “Cylinder Inspection.”
2. When the breathing air cylinders are fully charged,
allow the system to replenish the storage tanks.
42
Liberty Trailer Operating Instructions
Liberty Trailer Operating Instructions
6 - Operation of Liberty System - Additional Features
Low Pressure Air Supply Operation
The auxiliary low pressure outlets located at the front of
the trailer may be used to supply respirators or pneumatic
tools.
Always follow the guidelines in this section regarding
auxiliary air outlet use.
Refer to “Working with Compressed Air” in Chapter 4
before operating the low pressure air supply. Read and
follow all guidelines included in these sections.
NEVER use hoses to supply respirator air if they
have been used to supply air to pneumatic tools.
The pneumatic tool hoses may be contaminated
with lubricant making them unsuitable for supplying
breathing air.
NOTE
The low pressure air supply is breathing air quality
and is NOT lubricated.
Refer to the user instructions for the supplied air
respirators and/or pneumatic tools before use.
If the low pressure air supply outlets are used for
pneumatic tools, DO NOT use the outlets to supply
respirators unless the outlets are cleaned and the
air quality from the outlets is verified as acceptable
according to ANSI/CGA specification G-7.1, Grade
D or better. Lubricants from the pneumatic tools or
tool air lines may contaminate the low pressure air
supply outlets for breathing air usage which can
result in serious injury or death to respirator users.
If the Liberty breathing air system is used to supply
air for pneumatic tools, the air supply must still be
maintained to breathing air standard. Lubrication for
the pneumatic tools must be added after the auxiliary
low pressure outlets. Failure to follow this precaution may contaminate air supply, which can result in
personal injury or death.
Low Pressure Air Supply
Liberty Trailer Operating Instructions
43
6 - Additional Features
Auxiliary Generator Operation
The generator provides power to one (1) 220 VAC singlephase, 30-amp socket and four (4) 120 VAC singlephase, 15-amp sockets. The 220 VAC socket is mounted
on the back of the generator; the 120 VAC sockets are
located on the remote panel above the trailer tongue.
The generator can be used for the flood light assembly,
additional portable lighting or for electric power tools.
To use the generator, start the engine according to
the Starting and Operating section of this manual in
Chapter 4. To activate the generator, turn the generator
toggle switch to the ON position.
When the engine is ON and the compressor is running,
the generator is ON and the power outlets are active
regardless of the generator switch setting. When the
DO NOT overload the generator. The generator is
intended for loads like power hand tools and additional lighting. Check the voltage and amperage
requirements for the loads being powered to verify
that the loads will not exceed the power output of the
generator. Do not use the generator to power a fixed
installation or to supply power to another vehicle.
Operation of the generator for unintended uses may
result in damage to the generator or the loads, and
may lead to serious injury or death.
Generator Voltmeter (top) and Toggle Switch
The power output of the generator is dependent on
the speed of the engine. If the engine speed does
not remain constant for any reason, damage may
occur to the generator and/or the loads. Do not use
the generator to power equipment which may be
sensitive to voltage or frequency (Hz) fluctuations.
Operation of the generator for unintended uses may
result in damage to the generator or the loads, and
may lead to serious injury or death.
generator switch is ON and the compressor is not
running, the engine will maintain the proper speed to
run the generator and to power the outlets. When the
generator switch is OFF, the engine will idle when the
compressor clutch disengages.
Generator Operation Check
Monitor the generator voltmeter while the generator
is in operation. The voltage reading should be close
to 120 V. If the reading drops below 115 VAC, the
generator may be overloaded. Check the loads being powered by the generator. If the voltage drops
below 115 VAC, OR rises above 129 VAC with
acceptable loads, there may be a problem with the
engine speed. In this case, turn OFF the generator
and have the system checked by a SCOTT certified
repair technician.
Do not use the power outlets when the generator
switch is OFF. The outlets will not remain powered
if the engine idles down when the compressor clutch
disengages. Failure to follow this instruction may
lead to equipment or component damage due to an
interrupted power supply.
44
Liberty Trailer Operating Instructions
6 - Additional Features
Flood Light Installation and Operation
IMPORTANT
If using the optional flood light, install the unit BEFORE starting the compressor. Follow all instructions included in this section.
The flood light assembly is stored in the front of the
compressor system enclosure, suspended from a metal
beam above the battery.
To install the flood light assembly:
1. Apply the parking brake (handle down) and chock
the trailer wheels.
2. Support the flood light assembly and remove the
safety pin from the beam.
3. To gain access to the light tower, step up on the unit
rear bumper above the control panel.
4. Slide the light assembly into the light tower mast.
Insert the safety pin.
Flood Light Assembly Installed
1) Flood Light Assembly
2) Tower Mast Screws (Total of 5)
3) Flood Light Power Cord
4) Safety Pin
Exercise caution when stepping on the rear bumper
to access the flood light tower. To avoid the risk of
falling, make sure the trailer park brake is ON and
the wheels are chocked. DO NOT step on fenders
or climb onto the trailer higher than the bumper. Use
extra caution during icy or wet conditions. Failure
to follow this warning can lead to personal injury or
damage to the equipment.
5) T-Handle Clamp
5. Tighten the tower’s T-handle clamp located just
below the tower assembly.
6. Loosen the five (5) tower mast screws.
7. Connect the flood light power cord.
Flood Light Assembly Storage
1) Flood Light Assembly
2) Safety Pin
Floodlight lamps become very hot when in use. DO
NOT touch the floodlights, place flammable material
over the floodlights, or store floodlights during or
immediately after use. Allow lights to cool down
before handling. Failure to follow this warning can
lead to damage to the equipment, personal injury,
or death.
Liberty Trailer Operating Instructions
Continued on the next page...
45
6 - Additional Features
Flood Light Operation Continued...
8. Standing at the main control panel with the engine
running, turn ON the generator switch. Then turn
ON the flood light toggle switch.
DO NOT raise the flood light assembly unless the
parking brake is ON (handle down), trailer wheels
are chocked, the diesel engine is turned OFF and
the compressor is completely stopped. The compressor and engine contain moving parts that can
cause serious personal injury, death, or permanent
equipment damage if they accidentally engage or
are obstructed.
Before raising the remote air inlet/flood light tower,
ALWAYS check for any overhead obstructions
(power lines, tree limbs, etc.). Failure to do so may
result in damage to the unit and/or serious injury or
death. Relocate the trailer if necessary.
Flood Light Switch (top)
and Generator Switch
Raising the Remote Air Inlet/Flood Light Tower
1. Before raising the tower, look for any overhead
obstructions (power lines, tree limbs, etc.). Relocate
the trailer if necessary.
DO NOT move the unit with the remote air inlet/
flood light tower extended. The extended tower may
be damaged during transport, leading to potential
equipment failure.
2. Loosen the five (5) tower mast screws.
3. Pull out on the Tower Control knob on the main
control panel. Turn the knob slowly (clockwise) to
raise the tower. Stop turning the knob when the
desired height is reached.
4. When the flood lights are not in use, and the diesel
engine is OFF, be sure to lower the flood light tower
before moving the trailer. To lower, turn the control
knob FULLY (counterclockwise).
Tower Control Knob
46
Liberty Trailer Operating Instructions
6 - Additional Features
Cold Weather Package
The Liberty Trailer mobile breathing air system may be
equipped with an optional cold weather package for
operating in temperatures below 40°F (4°C).
The heater element should be activated prior to starting
the engine or the compressor. To activate the heater,
connect a 120 VAC power source to the 3-phase heater
receptacle, located on the front sub-panel above the
trailer tongue.
For best results, allow the heater to operate overnight
before starting the engine or compressor.
The drape may be used for additional insulation while the
engine and compressor are running or while transporting
the trailer. However, only extend or adjust the drape while
the compressor or engine are NOT in operation. Unroll
the drape and use the locking tabs to position the drape
against the enclosure grating.
120 VAC Heater Receptacle
(Actual Location May Vary)
Do not extend or adjust the drape while the compressor, engine, or motor are in operation. ALWAYS
keep the unit screen in place and the access doors
closed during compressor operation. The compressor and engine contain fast-moving parts that can
cause serious personal injury if they disengage or
are obstructed.
Air pressure increases as temperature increases.
When charging cylinders in temperatures below
freezing (32°F/0°C), frequently check air pressure
and release excess pressure as the cylinder warms
to normal room temperature. Failure to do so will
cause cylinders to be in an overcharge condition,
increasing the risk of cylinder failure and leading to
personal injury or death.
Heater Drape Extended
Heater Drape Locking Tab
Liberty Trailer Operating Instructions
47
6 - Additional Features
High Pressure Hose Reel
Available as Liberty II option only.
There must be at least two people operating the hose
reel assembly, one to monitor the hose reel control panel,
while the other manages the hose reel connection and
breathing air supply hose.
At the hose reel control panel:
1. Verify that the ASME storage cylinders are at
an optimal pressure for intended use of the high
pressure hose.
2. On the fill control assembly, verify that the Bleed
Valve and the Fill Control Valve are both closed.
3. On the Hose Reel Control panel, open the Fill Supply
Valve. Use the Pressure Regulator to set the output
pressure suitable for the high pressure air receiver.
ALWAYS make sure that the auxiliary air outlet is connected with suitable high pressure hose or piping to
a suitable receiver or apparatus designed to accept
a high pressure air source. Inappropriate use of this
equipment may cause equipment damage or failure,
and can lead to serious personal injury.
NEVER use the Fill Control Assembly to charge an
SCBA air cylinder while the SCBA is being worn
unless there is a compelling reason to assume the
risk of injury is there is a component failure during
the filling process.
NEVER use the Fill Control Assembly to charge an
SCBA air cylinder while the SCBA is being worn in
an atmosphere that is IDLH (Immediately Dangerous
to Life or Health) where the respirator is required to
support life.
NEVER use the Fill Control Assembly to charge an
SCBA air cylinder while the SCBA is being worn if
the SCBA or the cylinder is known or suspected of
having been dropped, exposed to direct flame impingement, or damaged in any way.
Failure to observe these warnings may result in serious injury or death
Hose Reel Control Panel
1) Hose Reel
2) Fill Supply Valve
3) Pressure Regulator
4) Regulated Pressure Gauge
5) Hose Reel Rewind Button
Keep hands and other objects clear from the hose
reel during operation. Never operate the hose reel
with the protective guard removed. Moving parts on
the reel can crush extremities and cause serious
personal injury.
48
Liberty Trailer Operating Instructions
6 - Additional Features
At the fill control assembly:
1. Verify that the air receiver is suitable for breathing
air at the pressure to be supplied.
2. Extend the hose to reach the air receiver using care
to keep the Charge Adapter clean and protected
from damage.
5. To supply high pressure breathing air to the receiver,
SLOWLY turn the Fill Control Valve on the Fill
Control Assembly. Monitor the gauge until it reaches
the intended maximum pressure required.
6. When finished, completely close the Fill Control
Valve and the valve on the receiver.
7. To remove the receiver, first open the bleed valve.
When air stops escaping, remove the receiver from
the adapter.
1)
2)
3)
4)
Fill Control Assembly
Fill Control Valve
Regulated Pressure Gauge
Bleed Valve
Charge Adapter
(CGA 702 shown, others are available)
Exercise caution when handling the Fill Control Assembly. Do not drop or drag the Fill Control Assembly.
Keep dirt and moisture away from the outlet and the
threads of the charge adapter. If the Fill Control Assembly or high pressure hose is damaged, DO NOT
USE. Have the equipment repaired by a SCOTT
certified service technician. Failure to follow this
warning can result in further equipment damage, or
may cause personal injury or death.
Always keep the Charge Adapter covered and
protected from dirt and damage until ready for use.
Any contamination on the Charge Adapter could be
transferred to the breathing air supply. Contamination
of the breathing air supply could lead to in serious
injury or death.
Rewinding the High Pressure Hose
1. Verify that the fill control assembly is completely
detached from the receiver or apparatus.
2. Push the red REWIND button on the control panel.
The hose reel should automatically turn, rolling in
the extended hose.
Keep hands and other objects clear from the hose
reel during operation. Never operate the hose reel
with the protective guard removed. Moving parts on
the reel can crush extremities and cause serious
personal injury.
3. Attach the receiver to the Charge Adapter on the Fill
Control Assembly.
4. Open the valve on the receiver. The Regulated
Pressure Gauge on the Fill Control Assembly will
register the existing pressure in the receiver.
Liberty Trailer Operating Instructions
49
6 - Additional Features
NOTES
50
Liberty Trailer Operating Instructions
Liberty Trailer Operating Instructions
7 - Operator Maintenance Checks
Operator Maintenance Checks
Service Schedules
To ensure reliability of the system, the operator is
responsible for observing the unit during operation and
performing necessary maintenance checks as described
in this section.
Maintenance and service procedures for the Liberty
Trailer breathing air system must be performed by a
SCOTT trained and certified service technician. The
operator is responsible for monitoring the compressor
run time and notifying the System Administrator when the
intervals of fifty (50) and one hundred (100) hours occur.
The compressor run time and service due information
is available from the X4 Controller using the Information
Button (INFO) as described in Chapter 4, STARTING
AND OPERATING.
After every fifty (50) hours of compressor running time,
the following maintenance should be performed by a
trained technician:
– Replace the Air Purifier elements
– Change the break-in compressor oil (perform
subsequent oil changes every one hundred (100)
hours of compressor run time)
– Check the tightness of all major fasteners including
Head Bolts, valve retainers, mounting bolts, etc.
After every one hundred (100) hours of compressor
running time, the following maintenance should be
performed by a trained technician:
– Replace the air intake filter element
– Change the engine crankcase oil
– Check the Auto Drain system
– Check all other engine and auxiliary systems (clutch
adjustments, etc.)
The air quality produced by the LIBERTY System should
be checked regularly at the following intervals:
Every thirty (30) days:
– Calibrate the carbon Monoxide Monitor using
SCOTT Test Kit P/N AB16-0533.
– Take an air sample to verify air quality meets or
exceeds CGA Grade E breathing air.
An air sample is required after any service to the
system that effects the breathing air path, that is, from
the air purifier filters on. For example, changing the air
filters would require taking an air sample. To maintain
compliance, some regulatory standards require an air
sample taken BEFORE (one (1) week maximum) and
AFTER purifier service.
Other major compressor maintenance is required at
specific time intervals depending on the make and model
of the compressor. The operator should keep the System
Administrator informed as to the total compressor run
time so these maintenance tasks can be scheduled.
Do not perform maintenance tasks beyond the
scope of this manual unless authorized as a SCOTT
trained and certified service technician. Performing
service procedures without proper training may lead
to permanent equipment damage or personal injury.
The operator should perform the following checks each
time the LIBERTY System is used or, at least once a
week:
WITH THE SYSTEM OFF:
–
Check all Fluid levels (compressor oil, engine oil,
coolant, etc.)
–
Check the Belt condition and tension
–
Check the Tire pressure
–
Check for loose components
–
Check the Remote Air Intake tower drain valve
WITH THE SYSTEM RUNNING:
–
Run the compressor system to operating temperature
(approximately 30 minutes) and verify operation of
the auto drain operation
If the system fails to pass any of the tests within this
manual, DO NOT USE. Remove from service and tag
for repair by authorized personnel.
NOTE
SCOTT recommends that the compressor system
should be operated for at least thirty (30) minutes
once a week to maintain optimum performance and
to identify any problems.
Liberty Trailer Operating Instructions
51
7 - Operator Maintenance Checks
Condensate Container
NEVER perform service on this equipment unless the
electric power is switched OFF at the main terminal,
the diesel engine is turned OFF, the compressor is
completely stopped, and all residual air pressure has
been released from the system. Follow the recommendations of your safety procedures or the OSHA
Lock Out/Tag Out procedures.
Always apply the parking brake and chock the trailer
wheels while performing maintenance checks. If the
trailer begins to roll unexpectedly, severe personal
injury, death, or permanent damage to equipment
can result.
If operating the compressor for an extended period
of time, be aware of the level of condensate in the
condensate container. The condensate container should
be drained every 10 hours of operation.
1. Remove the container from under the compressor
frame and pour condensate out from the hose
connection spout.
2. Dispose of condensate according to hazardous
waste regulations.
3. Replace the container and reconnect the hose
connection spout.
Compressor condensate contains lubricating oil
and/or substances which must be disposed of in
accordance with local, State, and Federal laws and
regulations.
Condensate Container
52
Liberty Trailer Operating Instructions
7 - Operator Maintenance Checks
Battery
Always wear eye protection when working around
batteries to prevent the risk of personal injury due to
explosion or contact with sulfuric acid.
Batteries may contain explosive gases. When servicing batteries, do not smoke or work near sparks or
flames, to avoid the risk of personal injury.
ALWAYS disconnect the battery cables as instructed
before charging the battery. Never boost or charge
the battery with the cables connected. Failure to
follow this instruction may lead to damage to the
computerized controller.
NOTE
The battery is automatically recharged by the system during normal operation. However, the battery
may need recharging if the diesel engine or electrical power is not used for a long period of time.
1. To charge the battery, disconnect the battery prior
to charging. Disconnect the GROUND cable first.
2. Disconnect the positive cable.
3. Charge the battery using a standard 12 Volt
automotive battery charger. Follow the instructions
provided with the battery charger.
Contact a SCOTT certified and trained technician for
battery service and maintenance.
Belts
Check the tension and condition of all belts including the
compressor, engine and generator belts. Belts should be
flexible when applying pressure to the center of the span
length, to deflect 5/16 to 3/8 inch from normal position.
Contact a SCOTT certified and trained technician for
drive belt service and maintenance.
Ensure that the positive and negative leads are properly
connected and that the terminals are free from corrosion.
Compressor Drive Belt
1) Positive Cable
2) Negative Cable
Liberty Trailer Operating Instructions
53
7 - Operator Maintenance Checks
Clutch Adjustment Procedure
When diesel engine power is used, an air-actuated clutch
provides power to the compressor. The air pressure is
drawn from the air storage cylinders. The clutch circuit
is designed to operate at 115 to 120 psi, maintained by
a low air pressure regulator located behind the clutch
control panel, on the left-hand side of the unit when facing
the main control panel.
In colder climates (40°F/4°C or colder), the clutch may
disengage as air pressure is decreased. Adjust the low
air pressure valve regulator to increase the clutch air
supply. Do not exceed 120 psi.
The clutch may engage too quickly and make a
“screeching” noise during engagement. Adjust the Clutch
Throttle Valve for smooth engagement. The valve is set
with a slotted screw with a lock nut. The factory setting
is 1½ turns Open. Loosen the lock nut and adjust the
screw with a flat blade screwdriver. Re-tighten the lock
nut when finished.
Air Pressure Valve
(behind panel)
Throttle
Valve
Clutch Adjustment
If adjusting the pressure regulator cannot attain adequate
pressure for operation, contact a SCOTT certified service
technician for assistance.
54
Manually Activating the Air Clutch
When using diesel engine power, the required air
pressure for clutch operation is normally drawn from
air in the ASME storage cylinders. The clutch will not
operate if stored air pressure is too low. In this case, an
alternate method is to activate the clutch using air supply
of a charged breathing air cylinder.
NOTE
This procedure only works with a breathing air
cylinder which both receives AND expels air from
the CGA fitting. Cylinders with valves that can only
receive breathing air through the CGA fitting will not
work for this procedure.
Before performing this procedure, ensure that the
breathing air cylinder to be used has been inspected
according to the “Cylinder Inspection” procedure
(Chapter 5).
1. At the fill station, remove one of the adapter
caps and attach a charged cylinder to the charge
adapter. Hand-tighten the connector, turning
counterclockwise. DO NOT use tools.
2. Verify that the cap is secure on the unused adapter.
3. Hand-tighten the bleed valve and open the breathing
air cylinder valve, located on the top of the mounted
cylinder.
4. Open the charging chamber door by operating the
handle on the right side of the chamber. Rotate the
turntable 180° until it clicks into position.
Practice caution when rotating the turntable. Catching fingers, hands, hair, articles of clothing, or other
objects in the door may result in personal injury or
damage to the fill station.
5. Close and lock the chamber door. The door is locked
when the YELLOW bar is visible above the door
frame.
Liberty Trailer Operating Instructions
7 - Operator Maintenance Checks
Remote Air Intake Valve
6. Open the Fill Control valve on the control panel.
The remote air intake located on the tower assembly
receives a certain degree of moisture from the ambient
air depending on precipitation and humidity levels.
1) Fill Control Valve
2) Fill Pressure Regulator
7. If air is heard escaping from the Fill Pressure
Regulator, turn the knob clockwise until the leaking
stops.
8. When the low air pressure is fully charged
(approximately 120 psi), start the engine and
operate the system in a normal manner. Refer to
the starting and operating procedure in Chapter 4.
Allow the ASME storage receivers to reach 300 to
500 psi before removing the breathing air cylinder.
9. Close the breathing air cylinder valve.
10. SLOWLY open the bleed valve approximately 1/8
to 1/4 turn.
11. When air has stopped escaping, turn the charge
adapter clockwise to release the cylinder.
12. Recharge the breathing air cylinder according to
Chapter 5, “Charging Breathing Air Cylinders.”
13. Allow the storage system to fully recharge before
shutting down.
Remote Air Intake Drain Valve
Drain this valve daily if operating the unit in rainy or
humid conditions.
The valve is accessible from the rear of the unit, below
the main control panel.
Always apply the parking brake and chock the trailer
wheels while performing maintenance checks. If the
trailer begins to roll unexpectedly, severe personal
injury, death, or permanent damage to equipment
can result.
Liberty Trailer Operating Instructions
55
7 - Operator Maintenance Checks
NOTES
Check the Trailer Tires
Optimum operating tire pressure is as follows:
LIBERTY I (two wheels)
80 psi
LIBERTY II (four wheels)
65 psi.
Tire Air Pressure Check - See Item 6
Verify that the tires and rims are correct for the trailer:
LIBERTY I (two wheels)
LT 245/75 R16
LIBERTY II (four wheels)
ST 225/75 R15
Replacement tires must be the same size and load
rating as the original equipment.
The rims must be the original alloy rims supplied with
the trailer or SCOTT approved replacements. Do not
substitute rims or tires for the original equipment.
Periodically check the torque of the wheel lug nuts.
The torque should be set to 85 foot-pounds. Use the
lug nut tightening pattern below when checking the
torque and when replacing a wheel after tire repair.
Wheel Lug Nut Tightening Pattern
56
Liberty Trailer Operating Instructions
Liberty Trailer Operating Instructions
8 - System Administrator Responsibilities
The System Administrator who has responsibility for this
equipment has certain responsibilities and tasks beyond
the normal Operator Maintenance. Access to these is
protected by a USER PASSWORD in the X4 Controller.
The responsibilities and tasks include:
5. You will be asked to enter the USER PASSWORD.
The display will show a “1” above F1, a “2” above
F2, and a “3” above F3.
To Modify System Settings:
Modify
System
Settings
– Changing the USER PASSWORD
– Enabling or Disabling the Override function
Perform
System
Service
To Perform System Service:
– Recording the date of an approved Breathing Air
Sample
– Calibrating the Carbon Monoxide (CO) monitor.
The System Administrator must be thoroughly familiar
with starting and operating the Breathing Air Compressor
system according to the Operator’s Instructions provided
with the system.
These tasks can only be accessed when the compressor
system is powered up but the compressor itself is not
running.
Follow the prompts on the display screen for each
operation . Remember, you can press BACK at any time
to return to the previous display.
Modify System Settings
USER PASSWORD and OVERRIDE Feature
To Change the USER PASSWORD
1. Power up the LIBERTY Trailer using either the Diesel
Power or Electric Power according to the STARTING
AND OPERATING section of this instruction.
2. After the X4 Controller completes the system boot,
the display will say, “Press F2 Button Below to
Begin.” Press the F2 key directly below the X4
Controller digital display.
3. The display will show the current Service Due dates
and say, “Push Operate, Info, or Service.” Press
SERVICE on the keypad. (Remember, you can
press BACK at any time to return to the previous
display.)
4. Select “Modify System Settings” (F1).
Liberty Trailer Operating Instructions
The factory installed password is 111111. To enter
this, press the F1 button six times. (If you enter
the wrong password, the display will say, “Invalid
Password – Wait for five seconds and reenter
password.”)
6. The display will say, “CHANGE USER PASSWORD?”
Select YES (F1 button). If you select NO (F3 button),
you will proceed to the OVERRIDE FEATURE below.
7. Enter a six digit number made up of 1’s, 2’s, and/or
3’s by pressing the F1, F2, and/or F3 buttons below
the display. (Keep a record of your new password
in a safe place.) When finished, press the START
button on the keypad.
8. The display will ask you to reenter the new password
and press the START button on the keypad again.
If the second entry matches the first, the display
will say, “PASSWORD WAS SUCCESSFULLY
CHANGED – PRESS CONTINUE. You will proceed
to the OVERRIDE Feature below.
Modify System Settings
continued on next page...
57
8 - System Administrator Responsibilities
Modify System Settings continued...
Overrides
The OVERRIDE capability is password protected and
may be DISABLED or ENABLED as determined by the
System Administrator who has the responsibility for maintenance of this equipment. The X4 Controller includes
limited shutdown override capability for high dew point,
high air temperature, high carbon monoxide levels, and
low oil level or pressure. Override allows the operator
to continue running the system in an out-of-tolerance
condition up to a maximum preset tolerance, or for one
hour, whichever occurs first.
The System Administrator must decide whether to DISABLE or ENABLE the Override function.
Disabling the Override function assures the System Administrator that the breathing air produced by the system
will always fall within the established limits.
Enabling the Override function permits the Operator to
continue producing breathing air in the event of a life
threatening emergency where breathing air is required
and it is determined to accept the associated risks.
ONLY use the system override capability in the event
of an extreme emergency, or to save a life. During
an override condition, the operator must monitor the
system at all times. Operating the system beyond
factory-set parameters may lead to irreparable component damage, and/or personal injury in the case
of system failure.
The operator must be trained as to whether the Override
capability is DISABLED or ENABLED. If the Override is
ENABLED, the Operator must be trained in its use.
To Enable/Disable the OVERRIDE Feature
1. After Password section, the display will tell you
whether the OVERRIDE Feature is ENABLED or
DISABLED, and ask you if you want to change
the setting. The factory default setting is for the
OVERRIDE Feature to be DISABLED.
2. If you select YES (F1 button) the setting will be
switched to the opposite setting: from ENABLED
to DISABLED, or from DISABLED to ENABLED.
3. If you select NO (F3 button), the setting will stay as
it was originally displayed.
4. The X4 Controller will exit the Modify System
Settings and return the display to the start-up screen
that says SCOTT Safety, 800-247-7257, CONTINUE
as when first starting the compressor system.
Perform System Service
Record Air Sample Date and Calibrate the CO
Monitor
To Record the Current Air Sample Date
1. Power up the LIBERTY Trailer using either the Diesel
Power or Electric Power according to the STARTING
AND OPERATING section of this instruction.
2. After the X4 Controller completes the system boot,
the display will say, “Press F2 Button Below to
Begin.” Press the F2 key directly below the X4
Controller digital display.
3. The display will show the current Service Due dates
and say, “Push Operate, Info, or Service.” Press
SERVICE on the keypad. (Remember, you can
press BACK at any time to return to the previous
display.)
4. Select “Perform System Service” (F3).
Modify
System
Settings
58
Perform
System
Service
Liberty Trailer Operating Instructions
8 - System Administrator Responsibilities
5. You will be asked to enter the USER PASSWORD.
The display will show a “1” above F1, a “2” above F2,
and a “3” above F3. The factory installed password is
111111. To enter this, press the F1 button six times. If
you have changed the password already, enter your
new password. (If you enter the wrong password,
the display will say, “Invalid Password – Wait for five
seconds and reenter password.”)
6. The display will say, “Was an Air Sample Taken
Since the Last Compressor Operation?” Select
YES (F1 button) if an air sample has been taken
and certified to meet the breathing air requirements
for your respiratory protection program. This will
automatically set the current date as the air sample
service date.
7. If you select NO (F3 button), you will proceed to the
CO Calibration procedure below.
Follow the CARBON MONOXIDE Calibration procedure carefully. Improper calibration of the CARBON
MONOXIDE MONITOR could result in operating the
system outside the applicable standards or codes
which may lead to serious injury or death.
THREAD THE HOSE CONNECTION CAREFULLY
ONTO THE CALIBRATION PORT. DO NOT CROSS
THREAD OR FORCE WHICH MAY CAUSE DAMAGE TO THE CONNECTOR AND RESULT IN INACCURATE CALIBRATION.
Connect 0 PPM CO
Adjust Flow to 50/50
Level on Indicator
Next
1
2
3
1) Calibration Port
To Calibrate the Carbon Monoxide (CO) Monitor
1. After the Air Sample section, the display will ask you
if a CO Calibration is to be performed at this time.
For this, you must have the SCOTT CO Calibration
Kit, P/N AB16-0533.
2. If you select YES (F1 button), you will be prompted
to perform the steps of the CO Calibration using the
0 PPM CO (Zero Gas) and 20 PPM CO calibration
gas cylinders from the Calibration Kit.
a) Remove the dust cap from the Calibration Port
on the X4 Control Panel. Connect the 0 PPM CO
(Zero Gas) Cylinder to the Calibration Port and
OPEN the cylinder valve.
2) Flow Control Dial
3) Air Flow Adjustment Eye
b) Adjust the Flow Meter to 50/50 with the Flow
Control knob and select NEXT (F2 button).
c) The display will ask, “If Flow Indicator is at 50/50
Level, Press CAL Button.” Select CAL (F2 button).
d) Display will read, “0 PPM Calibration in Process,
Time Remaining XX Seconds.” This process will
take 60 seconds. When prompted for the next
step, CLOSE the Zero Gas cylinder valve and
disconnect the cylinder from the Calibration Port.
Perform System Service
Calibrating the CO Monitor
continued on the next page...
Liberty Trailer Operating Instructions
59
8 - System Administrator Responsibilities
Perform System Service
Calibrating the CO Monitor Continued...
e) Connect the 20 PPM CO Cylinder to the
Calibration Port on the X4 Control Panel and
OPEN the cylinder valve.
THREAD THE HOSE CONNECTION CAREFULLY
ONTO THE CALIBRATION PORT. DO NOT CROSS
THREAD OR FORCE WHICH MAY CAUSE DAMAGE TO THE CONNECTOR AND RESULT IN INACCURATE CALIBRATION.
j)
Select DONE (F2 button). The X4 Controller will
exit the Perform System Service and return the
display to the start-up screen that says SCOTT
Safety, 800-247-7257, CONTINUE as when first
starting the compressor system.
3. If you select NO (F3 button) to the CO Calibration,
the X4 Controller will exit the Perform System
Service and return the display to the start-up screen
that says SCOTT Safety, 800-247-7257, CONTINUE
as when first starting the compressor system.
Connect 20 PPM CO
Adjust Flow to 50/50
Level on Indicator
Next
1
2
3
1) Calibration Port
2) Flow Control Dial
3) Air Flow Adjustment Eye
f) Adjust the Flow Meter to 50/50 with the Flow
Control knob and select NEXT (F2 button).
g) The display will ask, “If Flow Indicator is at 50/50
Level, Press CAL Button.” Select CAL (F2 button).
h) Display will read, “20 PPM Calibration in Process,
Time Remaining XX Seconds.” This process will
take 60 seconds.
i) After the 60 seconds, the display will read,
“Calibration Complete – DONE.” Close the 20
PPM CO cylinder valve and disconnect the
cylinder from the Calibration Port. Replace the
dust cap on the Calibration Port.
60
Liberty Trailer Operating Instructions
Liberty Trailer Operating Instructions
9 - Towing the Liberty Trailer
Figure 9-1 Trailer Hitch and Actuator
(with Pintle Ring Hitch shown)
1) Tow Vehicle
2) Brake Actuator
3) Tow Hitch
4) Safety Chains
5
Break-Away Cable
6) Break-Away Switch
7) Brake Power Cable
8) Trailer Jack Crank
9) Parking Brake
Towing Pre-Checks
Verify that the Shutdown tasks have been performed
according to the OPERATING THE COMPRESSOR
section of this instruction...
Refer to the Tire Safety Information part of this section
for additional information about tires and trailer safety.
Verify your vehicle’s GVWR. Verify that the towing
vehicle is rated equal or greater than the trailer Gross
Vehicle Weight Rating (GVWR).
The Liberty I single-axle trailer is capable of being towed
by any vehicle rated for 6,000 lbs or more. The Liberty II
tandem axle can be towed by vehicles rated for 8,000 lbs
or more.
The Liberty Trailers are available with either a 2‑5/16 inch
ball coupler or 3 inch pintle ring hitch. In either case, the
towing vehicle must have at least a Class IV hitch.
Check the condition of the trailer tires. Check pressure
on both trailer tires and the spare tire. Verify adequate
tire tread and that the lug nuts are tight.
Optimum operating tire pressure is as follows:
LIBERTY I (two wheels)
80 psi
LIBERTY II (four wheels)
65 psi.
Liberty Trailer Operating Instructions
Before towing, verify that the trailer brakes, parking
brake, and brake actuator are operating correctly.
IMPORTANT
Prior to using the brake actuator, carefully review
and understand the guidelines in the brake actuator
operators manual provided with your unit.
Check that the actuator brake fluid reservoir is threequarters full of DOT-3 or DOT-4 brake fluid. Do not
allow brake fluid to contact painted surfaces since it will
damage the finish. Wipe any spills immediately and wash
the area with water. Check for fluid leaks and have the
system repaired as needed. Examine the actuator for
wear, corrosion, or other damage. Have the brake system
repaired as needed.
Verify that the brake lights are operating properly.
Before towing, raise the trailer jack assembly and
remove the wheel. The trailer jack assembly is used
to support the trailer only during operation and must be
raised, and the wheel removed, for towing; refer to the
instructions provided in this chapter.
61
9 - Towing the Liberty Trailer
Brake Actuator Systems
NOTE
Brake actuator models may be mechanically or
battery-powered depending upon selected options.
Before operating the brake actuator, review carefully the brake actuator operation manual provided
with your unit.
DO NOT power wash the actuator unit. Internal corrosion may result and cause brake failure, which can
result in severe personal injury or death. Care should
be taken to protect the unit from direct spray when
washing the trailer.
Hitching the Trailer to a Tow Vehicle
The Liberty Trailers are available with either a 2‑5/16 inch
ball coupler or 3 inch pintle ring hitch. In either case, the
towing vehicle the towing vehicle must have at least a
Class IV hitch.
Mechanical Brake Actuator
1) Mechanical Brake Actuator
2) Break-Away Switch
3) Break-Away Cable
NEVER use a vehicle with insufficient towing capacity or a hitch that does not meet at least Class
IV requirements. Using a vehicle or hitch with an
inadequate rating increases the risk of hitch failure,
leading to potential equipment damage, severe
personal injury or death.
4) Brake Fluid Reservoir
Standard features with either hitch include safety chains
with hooks, DOT lighting and connector, reflectors,
electric brakes, break-away switch, mechanical parking
brake, fenders, rear bumper, and front lift jack.
Battery-Powered Brake Actuator
1) Brake Actuator
6) Bleeder Dust Cap
2) Actuator Battery
3) Break-Away Cable
4) Break-Away Switch
7) Output Port
8) Battery Connection
5) Brake Fluid Fill
62
Liberty Trailer Operating Instructions
9 - Towing the Liberty Trailer
Hitching the Trailer
1. While preparing the unit for towing, set the trailer
parking brake and chock the wheels to keep the
trailer from rolling.
2. Roll up the insulating drape blanket. Stow the flood
light assembly and external power cord.
3. Close all access panels including the control panel
door. The side access panels use rubber strap
latches with two settings. Use the tighter setting for
highway driving.
4. Confirm that the towing vehicle and towing hitch are
correctly rated to tow the trailer and that the trailer
hitch is properly and securely attached to the tow
vehicle.
5. Attach the trailer to the tow vehicle. The hitch
must be installed so that the trailer tongue is level
(horizontal) when coupled to the tow vehicle.
7. Attach the actuator’s break-away cable securely to
the tow vehicle at one of the safety chain connection
points (NOT TO THE SAFETY CHAIN).
8. Check that the break-away switch and cable are
positioned properly. If the switch is not set properly
due to the cable being pulled during use, it MUST
be reset before towing. The break-away system
should only be engaged if both the tow hitch and
safety chains have failed.
9. Connect the power cable to the tow vehicle power
source. Check the operation of all tail lights on the
trailer.
10. Perform a final inspection to ensure that all items
on the unit are secure and prepared for transit.
11. Turn the trailer jack crank to raise the front wheel.
Pull out the retaining pin and remove the wheel.
Stow the wheel for transport.
12. Remove the wheel chocks and disengage the
parking brake.
Do not allow anyone to stand between the trailer and
the towing vehicle when attaching the trailer hitch.
Failure to follow this warning can lead to severe
personal injury.
6. The trailer is equipped with safety chains that must
be attached to the tow vehicle’s hitch. Crisscross the
chains under the trailer tongue as shown in Figure
8-1. If the tow vehicle does not provide safety chain
connection points, have appropriate ones added by
a reputable hitch installer.
SAFETY CHAINS ARE REQUIRED to be installed
when towing the Liberty unit. Attach the safety chains
as instructed in this manual to guard against personal
injury, death, or equipment damage in the event of
separation from the tow vehicle.
Be sure that the safety chains are short enough so
that the break-away cable is NOT engaged if the
trailer separates from the vehicle. The safety chains
must not drag on the ground, but should be long
enough to allow for tight turns.
Liberty Trailer Operating Instructions
1
Trailer Jack Crank
2
Trailer Jack and Wheel Pin
Continued on the next page...
63
9 - Towing the Liberty Trailer
General Towing Guidelines
Trailer Lifting Eyes/Tie Downs
Maintain safe towing speed. Always drive at a safe
speed relative to conditions and ensure your speed is slow
enough to allow for emergency braking. Recommended
maximum safe speed for towing is 55 mph.
The trailer assembly is fitted with lifting eyes/tie downs
on each corner. The eyelets are suitable for use as tiedowns during shipping in a container or via tractor trailer.
Avoid loose gravel, rocks and holes when towing.
They can be dangerous for equipment operation or
movement.
Do not use the trailer to transport anything except as
designed. Use the optional SCBA storage rack on the
LIBERTY II only for that purpose.
DO NOT use the trailer to transport anything except
as designed. Optional SCBA storage is to be used
only for that purpose. Overloading the trailer with
other equipment or material may result in brake or
tire failure, which can result in serious injury or death.
Unhitching the Trailer
NEVER use the lifting eyes/tie downs to tow the
Liberty Trailer assembly. Use these fittings only to lift
the unit with a crane, or to tie down the unit during
transport. Using these fittings for any other purpose
can cause serious personal injury or permanent
equipment damage.
Lifting the trailer with the four eyelets may only be done
in a vertical direction with the use of spreader bars to
maintain a vertical pull on the eyelets. It is not acceptable
to lift the unit without spreader bars. The eyelets are not
suitable for lifting from a single apex. Attach a properly
rated hook or clevis to each eyelet.
1. Apply the trailer parking brake and chock the wheels.
2. Lower the trailer jack assembly. Replace the wheel
and secure with the retaining pin.
3. Disconnect the power cable from the vehicle’s towing
device. Secure the power cable to the trailer frame.
4. Remove the tow hitch from the trailer hook.
5. Remove the chains and break-away cable from the
towing vehicle and secure them to the trailer frame.
Trailer Lifting Eye/Tie Down
64
Liberty Trailer Operating Instructions
9 - Towing the Liberty Trailer
Tire Safety Information
This portion of the User’s Manual contains tire safety information as required
by 49 CFR 575.6.
Section 1.1 contains “Steps for Determining Correct Load Limit - Trailer”.
Section 1.2 contains “Steps for Determining Correct Load Limit – Tow Vehicle”.
Section 1.3 contains a Glossary of Tire Terminology, including “cold inflation
pressure”, “maximum inflation pressure”, “recommended inflation pressure”,
and other non-technical terms.
Section 1.4 contains information from the NHTSA brochure entitled “Tire Safety
– Everything Rides On It”.
This brochure, as well as the preceding subsections, describes the following
items:
– Tire labeling, including a description and explanation of each marking on
the tires, and information about the DOT Tire Identification Number (TIN).
– Recommended tire inflation pressure, including a description and
explanation of:
A. Cold inflation pressure.
B. Vehicle Placard and location on the vehicle.
C. Adverse safety consequences of under inflation (including tire failure).
D. Measuring and adjusting air pressure for proper inflation.
–
Tire Care, including maintenance and safety practices.
–
Vehicle load limits, including a description and explanation of the following
items:
A. Locating and understanding the load limit information, total load capacity,
and cargo capacity.
B. Calculating total and cargo capacities with varying seating configurations
including quantitative examples showing / illustrating how the vehicles
cargo and luggage capacity decreases as combined number and size of
occupants’ increases. This item is also discussed in Section 3.
C. Determining compatibility of tire and vehicle load capabilities.
D. Adverse safety consequences of overloading on handling and stopping on
tires.
Liberty Trailer Operating Instructions
65
9 - Towing the Liberty Trailer
1.1. Steps for Determining Correct Load Limit – Trailer
Determining the load limits of a trailer includes more than understanding the
load limits of the tires alone. On all trailers there is a Federal certification/VIN
label that is located on the forward half of the left (road) side of the unit. This
certification/VIN label will indicate the trailer’s Gross Vehicle Weight Rating
(GVWR). This is the most weight the fully loaded trailer can weigh. It will also
provide the Gross Axle Weight Rating (GAWR). This is the most a particular axle
can weigh. If there are multiple axles, the GAWR of each axle will be provided.
If your trailer has a GVWR of 10,000 pounds or less, there is a vehicle placard
located in the same location as the certification label described above. This
placard provides tire and loading information. In addition, this placard will show
a statement regarding maximum cargo capacity. Cargo can be added to the
trailer, up to the maximum weight specified on the placard. The combined weight
of the cargo is provided as a single number. In any case, remember: the total
weight of a fully loaded trailer can not exceed the stated GVWR.
For trailers with living quarters installed, the weight of water and propane
also need to be considered. The weight of fully filled propane containers is
considered part of the weight of the trailer before it is loaded with cargo, and is
not considered part of the disposable cargo load. Water however, is a disposable
cargo weight and is treated as such. If there is a fresh water storage tank of 100
gallons, this tank when filled would weigh about 800 pounds. If more cargo is
being transported, water can be off-loaded to keep the total amount of cargo
added to the vehicle within the limits of the GVWR so as not to overload the
vehicle. Understanding this flexibility will allow you, the owner, to make choices
that fit your travel needs.
When loading your cargo, be sure it is distributed evenly to prevent overloading
front to back and side to side. Heavy items should be placed low and as close
to the axle positions as reasonable. Too many items on one side may overload
a tire. The best way to know the actual weight of the vehicle is to weigh it at a
public scale. Talk to your dealer to discuss the weighing methods needed to
capture the various weights related to the trailer. This would include the weight
empty or unloaded, weights per axle, wheel, hitch or king-pin, and total weight.
Excessive loads and/or under inflation cause tire overloading and, as a result,
abnormal tire flexing occurs. This situation can generate an excessive amount
of heat within the tire. Excessive heat may lead to tire failure. It is the air
pressure that enables a tire to support the load, so proper inflation is critical.
The proper air pressure may be found on the certification/VIN label and/or on
the Tire Placard. This value should never exceed the maximum cold inflation
pressure stamped on the tire.
Steps for Determining Correct Load Limit – Trailer
Continued on following page...
66
Liberty Trailer Operating Instructions
9 - Towing the Liberty Trailer
Steps for Determining Correct Load Limit – Trailer Continued...
1.1.1
Trailers 10,000 Pounds GVWR or Less
1. Locate the statement, “The weight of cargo should never exceed XXX kg
or XXX lbs.,” on your vehicle’s placard. See figure 1-1.
2. This figure equals the available amount of cargo and luggage load capacity.
3. Determine the combined weight of luggage and cargo being loaded on
the vehicle. That weight may not safely exceed the available cargo and
luggage load capacity.
The trailer’s placard refers to the Tire Information Placard attached adjacent to
or near the trailer’s VIN (Certification) label at the left front of the trailer.
1.1.2 Trailers Over 10,000 Pounds GVWR
(Note: These trailers are not required to have a tire information placard
on the vehicle)
1. Determine the empty weight of your trailer by weighing the trailer using a
public scale or other means. This step does not have to be repeated.
2. Locate the GVWR (Gross Vehicle Weight Rating) of the trailer on your
trailer’s VIN (Certification) label.
3. Subtract the empty weight of your trailer from the GVWR stated on the VIN
label. That weight is the maximum available cargo capacity of the trailer
and may not be safely exceeded.
1.2. Steps for Determining Correct Load Limit – Tow Vehicle
1. Locate the statement, “The combined weight of occupants and cargo should
never exceed XXX lbs.,” on your vehicle’s placard.
2. Determine the combined weight of the driver and passengers who will be
riding in your vehicle.
3. Subtract the combined weight of the driver and passengers from XXX
kilograms or XXX pounds.
4. The resulting figure equals the available amount of cargo and luggage
capacity. For example, if the “XXX” amount equals 1400 lbs. and there will
be five 150 lb. passengers in your vehicle, the amount of available cargo
and luggage capacity is 650 lbs. (1400-750 (5 x 150) = 650 lbs.).
5. Determine the combined weight of luggage and cargo being loaded on
the vehicle. That weight may not safely exceed the available cargo and
luggage capacity calculated in Step # 4.
6. If your vehicle will be towing a trailer, load from your trailer will be transferred
to your vehicle. Consult the tow vehicle’s manual to determine how this
weight transfer reduces the available cargo and luggage capacity of your
vehicle.
Tire Safety Information
Continued on following page...
Liberty Trailer Operating Instructions
67
9 - Towing the Liberty Trailer
Tire Safety Information Continued...
1.3 Glossary Of Tire Terminology
Accessory weight
The combined weight (in excess of those standard items which may be replaced)
of automatic transmission, power steering, power brakes, power windows,
power seats, radio and heater, to the extent that these items are available as
factory-installed equipment (whether installed or not).
Bead
The part of the tire that is made of steel wires, wrapped or reinforced by ply
cords and that is shaped to fit the rim.
Bead separation
This is the breakdown of the bond between components in the bead.
Bias ply tire
A pneumatic tire in which the ply cords that extend to the beads are laid at
alternate angles substantially less than 90 degrees to the centerline of the tread.
Carcass
The tire structure, except tread and sidewall rubber which, when inflated, bears
the load.
Chunking
The breaking away of pieces of the tread or sidewall.
Cold inflation pressure
The pressure in the tire before you drive.
Cord
The strands forming the plies in the tire.
Cord separation
The parting of cords from adjacent rubber compounds.
Cracking
Any parting within the tread, sidewall, or inner liner of the tire extending to cord
material.
CT
A pneumatic tire with an inverted flange tire and rim system in which the rim
is designed with rim flanges pointed radially inward and the tire is designed to
fit on the underside of the rim in a manner that encloses the rim flanges inside
the air cavity of the tire.
Curb weight
The weight of a motor vehicle with standard equipment including the maximum
capacity of fuel, oil, and coolant, and, if so equipped, air conditioning and
additional weight optional engine.
Extra load tire
A tire designed to operate at higher loads and at higher inflation pressures than
the corresponding standard tire.
Groove
The space between two adjacent tread ribs.
Gross Axle Weight Rating
The maximum weight that any axle can support, as published on the Certification
/ VIN label on the front left side of the trailer. Actual weight determined by
weighing each axle on a public scale, with the trailer attached to the towing
vehicle.
Gross Vehicle Weight Rating
The maximum weight of the fully loaded trailer, as published on the Certification
/ VIN label. Actual weight determined by weighing trailer on a public scale,
without being attached to the towing vehicle.
Glossary Of Tire Terminology
Continued on following page...
68
Liberty Trailer Operating Instructions
9 - Towing the Liberty Trailer
Glossary Of Tire Terminology Continued...
Hitch Weight
The downward force exerted on the hitch ball by the trailer coupler.
Innerliner
The layer(s) forming the inside surface of a tubeless tire that contains the
inflating medium within the tire.
Innerliner separation
The parting of the innerliner from cord material in the carcass.
Intended outboard sidewall
The sidewall that contains a white-wall, bears white lettering or bears
manufacturer, brand, and/or model name molding that is higher or deeper than
the same molding on the other sidewall of the tire or the outward facing sidewall
of an asymmetrical tire that has a particular side that must always face outward
when mounted on a vehicle.
Light truck (LT) tire
A tire designated by its manufacturer as primarily intended for use on lightweight
trucks or multipurpose passenger vehicles.
Load rating
The maximum load that a tire is rated to carry for a given inflation pressure.
Maximum load rating
The load rating for a tire at the maximum permissible inflation pressure for that
tire.
Maximum permissible inflation pressure
The maximum cold inflation pressure to which a tire may be inflated.
Maximum loaded vehicle weight
The sum of curb weight, accessory weight, vehicle capacity weight, and
production options weight.
Measuring rim
The rim on which a tire is fitted for physical dimension requirements.
Pin Weight
The downward force applied to the 5th wheel or gooseneck ball, by the trailer
kingpin or gooseneck coupler.
Non-pneumatic rim
A mechanical device which, when a non-pneumatic tire assembly incorporates
a wheel, supports the tire, and attaches, either integrally or separably, to the
wheel center member and upon which the tire is attached.
Non-pneumatic spare tire assembly
A non-pneumatic tire assembly intended for temporary use in place of one of
the pneumatic tires and rims that are fitted to a passenger car in compliance
with the requirements of this standard.
Non-pneumatic tire
A mechanical device which transmits, either directly or through a wheel or wheel
center member, the vertical load and tractive forces from the roadway to the
vehicle, generates the tractive forces that provide the directional control of the
vehicle and does not rely on the containment of any gas or fluid for providing
those functions.
Glossary Of Tire Terminology
Continued on following page...
Liberty Trailer Operating Instructions
69
9 - Towing the Liberty Trailer
Glossary Of Tire Terminology Continued...
Non-pneumatic tire assembly
A non-pneumatic tire, alone or in combination with a wheel or wheel center
member, which can be mounted on a vehicle.
Normal occupant weight
This means 68 kilograms (150 lbs.) times the number of occupants specified
in the second column of Table I of 49 CFR 571.110.
Occupant distribution
The distribution of occupants in a vehicle as specified in the third column of
Table I of 49 CFR 571.110.
Open splice
Any parting at any junction of tread, sidewall, or innerliner that extends to cord
material.
Outer diameter
The overall diameter of an inflated new tire.
Overall width
The linear distance between the exteriors of the sidewalls of an inflated tire,
including elevations due to labeling, decorations, or protective bands or ribs.
Ply
A layer of rubber-coated parallel cords.
Ply separation
A parting of rubber compound between adjacent plies.
Pneumatic tire
A mechanical device made of rubber, chemicals, fabric and steel or other
materials, that, when mounted on an automotive wheel, provides the traction
and contains the gas or fluid that sustains the load.
Production options weight
The combined weight of those installed regular production options weighing over
2.3 kilograms (5 lbs.) in excess of those standard items which they replace, not
previously considered in curb weight or accessory weight, including heavy duty
brakes, ride levelers, roof rack, heavy duty battery, and special trim.
Radial ply tire
A pneumatic tire in which the ply cords that extend to the beads are laid at
substantially 90 degrees to the centerline of the tread.
Recommended inflation pressure
This is the inflation pressure provided by the vehicle manufacturer on the Tire
Information label and on the Certification / VIN tag.
Reinforced tire
A tire designed to operate at higher loads and at higher inflation pressures than
the corresponding standard tire.
Rim
A metal support for a tire or a tire and tube assembly upon which the tire beads
are seated.
Rim diameter
This means the nominal diameter of the bead seat.
Rim size designation
This means the rim diameter and width.
Rim type designation
This means the industry of manufacturer’s designation for a rim by style or code.
70
Glossary Of Tire Terminology
Continued on following page...
Liberty Trailer Operating Instructions
9 - Towing the Liberty Trailer
Glossary Of Tire Terminology Continued...
Rim width
This means the nominal distance between rim flanges.
Section width
The linear distance between the exteriors of the sidewalls of an inflated tire,
excluding elevations due to labeling, decoration, or protective bands. Sidewall
That portion of a tire between the tread and bead.
Sidewall separation
The parting of the rubber compound from the cord material in the sidewall.
Special Trailer (ST) tire
The “ST” is an indication the tire is for trailer use only.
Test rim
The rim on which a tire is fitted for testing, and may be any rim listed as
appropriate for use with that tire.
Tread
That portion of a tire that comes into contact with the road.
Tread rib
A tread section running circumferentially around a tire.
Tread separation
Pulling away of the tread from the tire carcass.
Treadwear indicators (TWI)
The projections within the principal grooves designed to give a visual indication
of the degrees of wear of the tread.
Vehicle capacity weight
The rated cargo and luggage load plus 68 kilograms (150 lbs.) times the vehicle’s
designated seating capacity.
Vehicle maximum load on the tire
The load on an individual tire that is determined by distributing to each axle its
share of the maximum loaded vehicle weight and dividing by two.
Vehicle normal load on the tire
The load on an individual tire that is determined by distributing to each axle
its share of the curb weight, accessory weight, and normal occupant weight
(distributed in accordance with Table I of CRF 49 571.110) and dividing by 2.
Weather side
The surface area of the rim not covered by the inflated tire.
Wheel center member
In the case of a non-pneumatic tire assembly incorporating a wheel, a mechanical
device which attaches, either integrally or separably, to the non-pneumatic rim
and provides the connection between the non-pneumatic rim and the vehicle;
or, in the case of a non-pneumatic tire assembly not incorporating a wheel, a
mechanical device which attaches, either integrally or separably, to the nonpneumatic tire and provides the connection between tire and the vehicle.
Wheel-holding fixture
The fixture used to hold the wheel and tire assembly securely during testing.
Tire Safety Information
Continued on following page...
Liberty Trailer Operating Instructions
71
9 - Towing the Liberty Trailer
1.4 Tire Safety – Everything Rides On It
The National Highway Traffic Safety Administration (NHTSA) has published a
brochure (DOT HS 809 361) that discusses all aspects of Tire Safety, as required
by CFR 575.6. This brochure is reproduced in part below. It can be obtained
and downloaded from NHTSA, free of charge, from the following web site:
http://www.nhtsa.dot.gov/cars/rules/TireSafety/ridesonit/tires_index.html
Studies of tire safety show that maintaining proper tire pressure, observing tire
and vehicle load limits (not carrying more weight in your vehicle than your tires
or vehicle can safely handle), avoiding road hazards, and inspecting tires for
cuts, slashes, and other irregularities are the most important things you can do
to avoid tire failure, such as tread separation or blowout and flat tires. These
actions, along with other care and maintenance activities, can also:
– Improve vehicle handling
– Help protect you and others from avoidable breakdowns and accidents
– Improve fuel economy
– Increase the life of your tires.
This booklet presents a comprehensive overview of tire safety, including
information on the following topics:
– Basic tire maintenance
– Uniform Tire Quality Grading System
– Fundamental characteristics of tires
– Tire safety tips.
Use this information to make tire safety a regular part of your vehicle
maintenance routine. Recognize that the time you spend is minimal compared
with the inconvenience and safety consequences of a flat tire or other tire failure.
Tire Safety Information
Continued on following page...
72
Liberty Trailer Operating Instructions
9 - Towing the Liberty Trailer
1.5 Safety First – Basic Tire Maintenance
Properly maintained tires improve the steering, stopping, traction, and loadcarrying capability of your vehicle. Under inflated tires and overloaded vehicles
are a major cause of tire failure. Therefore, as mentioned above, to avoid flat
tires and other types of tire failure, you should maintain proper tire pressure,
observe tire and vehicle load limits, avoid road hazards, and regularly inspect
your tires.
1.5.1. Finding Your Vehicle’s Recommended Tire Pressure and
Load Limits
Tire information placards and vehicle certification labels contain information on
tires and load limits. These labels indicate the vehicle manufacturer’s information
including:
– Recommended tire size
– Recommended tire inflation pressure
– Vehicle capacity weight (VCW–the maximum occupant and cargo weight
a vehicle is designed to carry)
– Front and rear gross axle weight ratings (GAWR– the maximum weight the
axle systems are designed to carry).
Both placards and certification labels are permanently attached to the trailer
near the left front.
1.5.2. Understanding Tire Pressure and Load Limits
Tire inflation pressure is the level of air in the tire that provides it with loadcarrying capacity and affects the overall performance of the vehicle. The
tire inflation pressure is a number that indicates the amount of air pressure–
measured in pounds per square inch (psi)–a tire requires to be properly inflated.
(You will also find this number on the vehicle information placard expressed in
kilopascals (kpa), which is the metric measure used internationally.)
Manufacturers of passenger vehicles and light trucks determine this number
based on the vehicle’s design load limit, that is, the greatest amount of weight
a vehicle can safely carry and the vehicle’s tire size. The proper tire pressure
for your vehicle is referred to as the “recommended cold inflation pressure.”
(As you will read below, it is difficult to obtain the recommended tire pressure
if your tires are not cold.)
Because tires are designed to be used on more than one type of vehicle, tire
manufacturers list the “maximum permissible inflation pressure” on the tire
sidewall. This number is the greatest amount of air pressure that should ever
be put in the tire under normal driving conditions.
Safety First – Basic Tire Maintenance
Continued on following page...
Liberty Trailer Operating Instructions
73
9 - Towing the Liberty Trailer
Safety First – Basic Tire Maintenance Continued...
1.5.3. Checking tire Pressure
It is important to check your vehicle’s tire pressure at least once a month for
the following reasons:
·
·
·
Most tires may naturally lose air over time.
Tires can lose air suddenly if you drive over a pothole or other object or if
you strike the curb when parking.
With radial tires, it is usually not possible to determine under inflation by
visual inspection.
For convenience, purchase a tire pressure gauge to keep in your vehicle. Gauges
can be purchased at tire dealerships, auto supply stores, and other retail outlets.
The recommended tire inflation pressure that vehicle manufacturers provide
reflects the proper psi when a tire is cold. The term cold does not relate to the
outside temperature. Rather, a cold tire is one that has not been driven on for
at least three hours. When you drive, your tires get warmer, causing the air
pressure within them to increase. Therefore, to get an accurate tire pressure
reading, you must measure tire pressure when the tires are cold or compensate
for the extra pressure in warm tires.
1.5.4. Steps for Maintaining Proper Tire Pressure
–
–
–
–
–
–
Step 1: Locate the recommended tire pressure on the vehicle’s tire
information placard, certification label, or in the owner’s manual.
Step 2: Record the tire pressure of all tires.
Step 3: If the tire pressure is too high in any of the tires, slowly release air
by gently pressing on the tire valve stem with the edge of your tire gauge
until you get to the correct pressure.
Step 4: If the tire pressure is too low, note the difference between the
measured tire pressure and the correct tire pressure. These “missing”
pounds of pressure are what you will need to add.
Step 5: At a service station, add the missing pounds of air pressure to each
tire that is under inflated.
Step 6: Check all the tires to make sure they have the same air pressure
(except in cases in which the front and rear tires are supposed to have
different amounts of pressure).
If you have been driving your vehicle and think that a tire is under inflated, fill
it to the recommended cold inflation pressure indicated on your vehicle’s tire
information placard or certification label. While your tire may still be slightly
under inflated due to the extra pounds of pressure in the warm tire, it is safer
to drive with air pressure that is slightly lower than the vehicle manufacturer’s
recommended cold inflation pressure than to drive with a significantly under
inflated tire. Since this is a temporary fix, don’t forget to recheck and adjust the
tire’s pressure when you can obtain a cold reading.
Safety First – Basic Tire Maintenance
Continued on following page...
74
Liberty Trailer Operating Instructions
9 - Towing the Liberty Trailer
Safety First – Basic Tire Maintenance Continued...
1.5.5. Tire Size
To maintain tire safety, purchase new tires that are the same size as the vehicle’s
original tires or another size recommended by the manufacturer. Look at the
tire information placard, the owner’s manual, or the sidewall of the tire you are
replacing to find this information. If you have any doubt about the correct size
to choose, consult with the tire dealer.
1.5.6. Tire Tread
The tire tread provides the gripping action and traction that prevent your vehicle
from slipping or sliding, especially when the road is wet or icy. In general, tires
are not safe and should be replaced when the tread is worn down to 1/16 of an
inch. Tires have built-in treadwear indicators that let you know when it is time
to replace your tires. These indicators are raised sections spaced intermittently
in the bottom of the tread grooves. When they appear “even” with the outside
of the tread, it is time to replace your tires. Another method for checking tread
depth is to place a penny in the tread with Lincoln’s head upside down and
facing you. If you can see the top of Lincoln’s head, you are ready for new tires.
1.5.7. Tire Balance and Wheel Alignment
To avoid vibration or shaking of the vehicle when a tire rotates, the tire must
be properly balanced. This balance is achieved by positioning weights on the
wheel to counterbalance heavy spots on the wheel-and-tire assembly. A wheel
alignment adjusts the angles of the wheels so that they are positioned correctly
relative to the vehicle’s frame. This adjustment maximizes the life of your tires.
These adjustments require special equipment and should be performed by a
qualified technician.
1.5.8. Tire Repair
The proper repair of a punctured tire requires a plug for the hole and a patch
for the area inside the tire that surrounds the puncture hole. Punctures through
the tread can be repaired if they are not too large, but punctures to the sidewall
should not be repaired. Tires must be removed from the rim to be properly
inspected before being plugged and patched.
Safety First – Basic Tire Maintenance
Continued on following page...
Liberty Trailer Operating Instructions
75
9 - Towing the Liberty Trailer
Safety First – Basic Tire Maintenance Continued...
1.5.9. Tire Fundamentals
Federal law requires tire manufacturers to place standardized information on the
sidewall of all tires. This information identifies and describes the fundamental
characteristics of the tire and also provides a tire identification number for safety
standard certification and in case of a recall.
1.5.9.1 Information on Passenger Vehicle Tires
Please refer to the following diagram:
P
The “P” indicates the tire is for passenger vehicles.
Next number
This three-digit number gives the width in millimeters of the
tire from sidewall edge to sidewall edge. In general, the larger
the number, the wider the tire.
Next number
This two-digit number, known as the aspect ratio, gives the
tire’s ratio of height to width. Numbers of 70 or lower indicate
a short sidewall for improved steering response and better
overall handling on dry pavement.
R
The “R” stands for radial. Radial ply construction of tires has
been the industry standard for the past 20 years.
Next number
This two-digit number is the wheel or rim diameter in inches. If you change your
wheel size, you will have to purchase new tires to match the new wheel diameter.
Next number
This two- or three-digit number is the tire’s load index. It is a measurement of
how much weight each tire can support. You may find this information in your
owner’s manual. If not, contact a local tire dealer. Note: You may not find this
information on all tires because it is not required by law.
M+S
The “M+S” or “M/S” indicates that the tire has some mud and snow capability.
Most radial tires have these markings; hence, they have some mud and snow
capability.
Speed Rating
The speed rating denotes the speed at which a tire is designed to be driven for
extended periods of time. The ratings range from 99 miles per hour (mph) to
186 mph. These ratings are listed below. Note: You may not find this information
on all tires because it is not required by law.
Safety First – Basic Tire Maintenance
Continued on following page...
76
Liberty Trailer Operating Instructions
9 - Towing the Liberty Trailer
Safety First – Basic Tire Maintenance Continued...
Speed Rating
Letter Rating
Q
R
S
T
U
H
VAC
W
Y
99 mph
106 mph
112 mph
118 mph
124 mph
130 mph
149 mph
168* mph
186* mph
* For tires with a maximum speed capability over 149 mph, tire manufacturers
sometimes use the letters ZR. For those with a maximum speed capability over
186 mph, tire manufacturers always use the letters ZR.
U.S. DOT Tire Identification Number
This begins with the letters “DOT” and indicates that the tire meets all federal
standards. The next two numbers or letters are the plant code where it was
manufactured, and the last four numbers represent the week and year the tire
was built. For example, the numbers 3197 means the 31st week of 1997. The
other numbers are marketing codes used at the manufacturer’s discretion.
This information is used to contact consumers if a tire defect requires a recall.
Tire Ply Composition and Materials Used
The number of plies indicates the number of layers of rubber-coated fabric in
the tire. In general, the greater the number of plies, the more weight a tire can
support. Tire manufacturers also must indicate the materials in the tire, which
include steel, nylon, polyester, and others.
Maximum Load Rating
This number indicates the maximum load in kilograms and pounds that can be
carried by the tire.
Maximum Permissible Inflation Pressure
This number is the greatest amount of air pressure that should ever be put in
the tire under normal driving conditions.
1.5.9.2.
UTQGS Information
Treadwear Number
This number indicates the tire’s wear rate. The higher the treadwear number is,
the longer it should take for the tread to wear down. For example, a tire graded
400 should last twice as long as a tire graded 200.
Traction Letter
This letter indicates a tire’s ability to stop on wet pavement. A higher graded
tire should allow you to stop your car on wet roads in a shorter distance than a
tire with a lower grade. Traction is graded from highest to lowest as “AA”,”A”,
“B”, and “C”.
Temperature Letter
This letter indicates a tire’s resistance to heat. The temperature grade is for a
tire that is inflated properly and not overloaded. Excessive speed, under inflation
or excessive loading, either separately or in combination, can cause heat buildup and possible tire failure. From highest to lowest, a tire’s resistance to heat
is graded as “A”, “B”, or “C”.
Safety First – Basic Tire Maintenance
Continued on following page...
Liberty Trailer Operating Instructions
77
9 - Towing the Liberty Trailer
Safety First – Basic Tire Maintenance Continued...
1.5.9.3 Additional Information on Light Truck Tires
Tires for light trucks have other markings besides those
found on the sidewalls of passenger tires. Please refer to
the following diagram:
LT
The “LT” indicates the tire is for light trucks or trailers.
ST
An “ST” is an indication the tire is for trailer use only.
Max. Load Dual kg (lbs) at kPa (psi) Cold
This information indicates the maximum load and tire
pressure when the tire is used as a dual, that is, when four
tires are put on each rear axle (a total of six or more tires
on the vehicle).
Max. Load Single kg (lbs) at kPa (psi) Cold
This information indicates the maximum load and tire
pressure when the tire is used as a single.
Load Range
This information identifies the tire’s load-carrying capabilities
and its inflation limits.
1.6 Tire Safety Tips
Preventing Tire Damage
–
Slow down if you have to go over a pothole or other object in the road.
–
Do not run over curbs or other foreign objects in the roadway, and try
not to strike the curb when parking.
Tire Safety Checklist
–
Check tire pressure regularly (at least once a month), including the
spare.
–
Inspect tires for uneven wear patterns on the tread, cracks, foreign
objects, or other signs of wear or trauma.
–
Remove bits of glass and foreign objects wedged in the tread.
–
Make sure your tire valves have valve caps.
–
Check tire pressure before going on a long trip.
–
Do not overload your vehicle. Check the Tire Information and Loading
Placard or User’s Manual for the maximum recommended load for the vehicle.
78
Liberty Trailer Operating Instructions
Liberty Trailer Operating Instructions
10 - Index
A
Additional Features 43
Air supply
low pressure 43
storage 11
Analog hour meter, engine
location 23
ASME storage cylinders
description 11
Auxiliary air outlet
location 43
operation 43
B
Brake actuator 62
Breathing air cylinders
charging 35
filling from compressor 42
inspection 36
pressure rating 37
C
Carbon monoxide monitor
flow control 27
Charging chamber
locked 38
unlocked 37
Clutch
troubleshooting 54
Cold weather package
description 12, 47
Compressor
correct rotation, checking 26
description 11
oil level 19
serial number 4
Compressor pressure gauge
location 23
Compressor system
description 5
features 5
maximum tilt level 16
operating procedures 15
operation
AUTO or MANUAL mode 26
Liberty Trailer Operating Instructions
C
Compressor system (cont.)
preparing for operation 18
shutdown 32
starting the compressor
diesel engine power 24
electric power 25
Controller, X4
location 23
maintenance interval, checking 29
INFO button 29
operation 26
system run time, checking 29
Coolant
checking 18
Customer Service
contact information 4
D
Diesel engine
description 11
operation 24
E
Electric motor
description 11
operation 25
Emergency shutdown/reset button
location 23
operation 24, 33
Engine Control Panel 23
glow plug 23
indicator lights 23
Engine, diesel
coolant 18
description 11
fuel level 18
hour meter 23
oil level 17
operation 24
Engine key
location 23
Engine start control panel
location 23
79
10 - Index
F
L
Features 5, 43
Fill control valve
location 23
Fill pressure regulator
location 23
Flood light assembly
description 12
installation 45
operation 45
storage 45
Flood light switch
location 23
Flood light tower control
location 23
Fuel level 18
Low oil pressure
shut down light 23
warning light 23
Low pressure air supply
operation 43
G
Gauges
breathing air cylinder pressure 23
compressor pressure 23
compressor stage gauges 28
fuel level 18
storage cylinder pressure gauge 23, 37
Generator
operation 44
Generator switch
location 23
Generator voltmeter
location 23
Glow plug
location 23
GVWR 61
M
Maintenance checks
operator maintenance procedures 51
Maintenance procedures
battery 53
belts 53
clutch adjustment 55
condensate container 52
remote air intake valve 55
Manual control valve
operation 42
Mode selector switch
location 23
O
Oil level, engine
checking 19
Operating guidelines
pre-operating checks 18
system tolerances and overrides 30
working with compressed air 15
Options
cold weather package 12
flood light assembly 12
high-pressure hose reel 12
Smart Fill™ Auto Cascade Filling System 12
H
P
High pressure hose reel
description 12
operation 48
High temperature shut down light
location 23
Parts
ordering 4
Pre-operation checks 18
Precautions. See also Safety Notations
compressed air 15
L
R
Liberty I
features 5
illustration, top view 6
illustrations, additional views 7
Liberty II
illustration, top view 8, 10
illustrations, additional views 9
RevolveAir Fill Station
description 13
operation 32, 37
80
S
Safety
labels 3
working with compressed air 15
Safety labels 3
Safety notations 2
Storage cylinder pressure gauge
location 23, 37
Liberty Trailer Operating Instructions
10 - Index
S
Storage cylinders, ASME
description 11
System tolerances and overrides 30
System Administrator Responsibilities
Modify System Settings
57
Perform System Service
58
Calibrate the CO Monitor
59
57
T
Tires
checking 56
maintenance 56
Tire Safety Information
65
Towing
brake actuator 62
GVWR 61
hitching the trailer 63
safety chain installation 63
Towing procedures 61
Trailer
hitching 63
lifting 64
safety chains 63
tie down 65
towing 61
unhitching the tow vehicle 64
Trailer jack assembly
operation 63
Trailer lifting eyes
description 64
V
Valves
air storage isolation valve 6
charge adapter bleed valve 31, 38, 39
fill control valve 23
remote air intake valve 55
storage refill manual control valve 42
X
X4 Controller
location 23
maintenance interval, checking 29
INFO button 29
operation 26
system run time, checking 29
Liberty Trailer Operating Instructions
81
Maintenance Record
82
Liberty Trailer Operating Instructions
SCOTT SAFETY
Monroe Corporate Center
PO Box 569
Monroe, NC 28111
Telephone 1-800-247-7257
Fax (704) 291-8330
www.scottsafety.com
P/N 595132-01 REV F 03/14
Printed in USA
© 2012 SCOTT Safety.
SCOTT, the SCOTT SAFETY Logo, Scott Health and Safety, LIBERTY Trailer and Smart Fill are registered and/or unregistered
marks of Scott Technologies, Inc. or its affiliates.