1
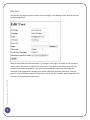
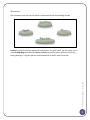
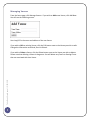
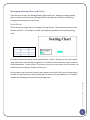
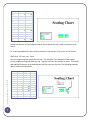
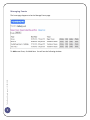
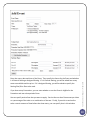
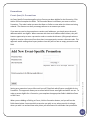
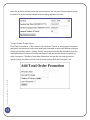
TicketPeak User Manual
WWW.TICKETPEAK.COM
TicketPeak User Manual
Contents
INTRODUCTION ........................................................................................................................ 2
CONVENTIONS USED ................................................................................................................. 2
EDIT USER .............................................................................................................................. 3
STRUCTURE ............................................................................................................................. 4
MANAGING VENUES ................................................................................................................. 5
MANAGING SEATING PLANS AND PRICES ...................................................................................... 6
EXCEL SHEET........................................................................................................................ 6
MULTIPLE PRICES PER SEAT .................................................................................................... 7
ADDING SEATING PLANS/PRICES ............................................................................................. 8
UPDATING, DELETING, VIEWING SEATING PLANS ........................................................................ 8
MANAGING EVENTS ................................................................................................................. 9
PROMOTIONS ........................................................................................................................ 12
EVENT-SPECIFIC PROMOTIONS .............................................................................................. 12
TOTAL ORDER PROMOTIONS................................................................................................. 13
SALES................................................................................................................................... 14
TicketPeak User Manual | 9/28/2010
BOX OFFICE SALES .............................................................................................................. 14
1
ONLINE SALES .................................................................................................................... 14
SETUP CUSTOMIZATIONS ......................................................................................................... 15
SUPPORT .............................................................................................................................. 15
Introduction
Congratulations on establishing a TicketPeak account. Our mission is to provide an accurate
and reliable ticketing system at the lowest possible cost. This manual outlines everything you
need to know to use TicketPeak. Note that if you are more of a video person than a document
person, you can view the video demonstrations on ticketpeak.com/demonstration.php.
Conventions Used
When this manual refers to the Home Screen, it is referring to the screen you get when you first
sign in. This happens to be the Manage Events screen.
TicketPeak User Manual | 9/28/2010
As we are continuously adding new functionality to the system, there may be functions and
features available on the system that are not described in this manual, and the screens shown
in this manual may not match the screens on the actual system.
2
Edit User
You can edit any aspect of your account. Once you sign in, click Manage Users, and you will see
the following screen:
TicketPeak User Manual | 9/28/2010
Most of these fields are self-explanatory. The image is your logo. It is shown on the top left of
most screens. The reason to identify the time zone is if you wish to end online sales a certain
amount of time before showtime – the system must know your timezone. The credit card
merchant is the organization handling your online credit card payment processing. And the
login ID is the information required to send the order there. (For example, with standard PayPal
accounts, this is usually the login email.)
3
Structure
The information you put into TicketPeak is structured around the following entities:
TicketPeak User Manual | 9/28/2010
Venues are specific locations where Events take place. For each Venue, you can assign one or
more Seating Maps and associated Prices. Events are specific shows, performances or any
other gatherings. They take place at a Venue and with a specific Seat/Prices plan.
4
Managing Venues
From the home page, click Manage Venues. If you wish to Add a new Venue, click Add New.
You will see the following screen:
You simply fill in the name and address of the new Venue.
If you wish to Edit an existing Venue, click the Edit button next to the Venue you wish to edit.
Change the information as desired, then hit Submit.
TicketPeak User Manual | 9/28/2010
If you wish to Delete a Venue, click the Delete button next to the Venue you wish to delete.
Please note that deleting a Venue is dangerous. You will delete any Events or Seating Charts
that are associated with that Venue.
5
Managing Seating Plans and Prices
From the home screen, click Manage Seating Plans and Prices. Adding or changing seating
plans and seat prices is done by uploading an Excel spreadsheet that depicts the seating
arrangement and the price of each seat.
Excel Sheet
The Excel sheet is simple, but is a bit lengthy for large Venues. There are three columns: Row,
Number and Price. For example, consider the following spreadsheet and resulting seating
chart:
row
A
A
A
number
1
2
3
price
20
20
20
This sheet shows one row with three seats (basically, a sofa!). Obviously, a real Venue would
never have such a small seating arrangement. It is used here for to demonstrate the structure
of the spreadsheet. On the system, if you were to hover your cursor over one of the seats, you
would see the row and seat number and the price.
TicketPeak User Manual | 9/28/2010
You can add as many rows and as many seat numbers as you wish. Also, you can leave spaces
for aisles or anything else by simply leaving the cells next to the row label blank. For example,
consider the following sheet and resulting seating chart:
6
Row
A
A
A
A
A
A
B
B
B
B
B
B
Number Price
1
20
2
20
3
20
4
5
1
2
3
20
20
10
10
10
4
5
10
10
Notice that there is an aisle between seats 3 and 4. Notice also that row B is priced less than
row A.
So, create spreadsheet for the entire set of seats in this manner, then save it as CSV format.
Multiple Prices per Seat
TicketPeak User Manual | 9/28/2010
You can assign more than one price to a seat – for example, if you wanted to have regular
pricing, student pricing and senior pricing. Any seat can have any number of prices. You simply
add additional columns in the spreadsheet with the new sets of prices. The following example
adds a Student pricing column.
7
Row
A
A
A
A
A
A
B
B
B
B
B
B
Number Regular Student
1
20
12
2
20
12
3
20
12
4
5
1
2
3
20
20
10
10
10
12
12
7
7
7
4
5
10
10
7
7
Adding Seating Plans /Prices
To Add a new Seating Plan/Prices, click Add New on the Manage Seating Plans and Prices
screen. You will get the following window
Use the Browse button to get the Excel CSV file from your hard drive. Each Seating chart must
be associated with a Venue, so use the dropdown list to select the Venue. Then click Upload.
Updating, Deleting, Viewing Seating Plans
TicketPeak User Manual | 9/28/2010
If you wish to upload a more current version of a seating plan, choose Update, and select and
upload the new version. This is useful, for example, if you wish to keep the same seating
structure but update some prices. Click Delete to delete a Seating Plan and View to see a
Seating Plan. Be careful about deleting! Any Event that uses that Seating Plan will also be
deleted!
8
Managing Events
The home page happens to be the Manage Events page.
TicketPeak User Manual | 9/28/2010
To Add a new Event, click Add New. You will see the following window:
9
If you have set up Promotions, you can state whether or not the Event is eligible for the
Promotion and over what period of time.
You can specify service fees that you want to apply. Service fees can be a flat amount per ticket
or a percentage of the order or a combination of the two. Finally, if you wish to end online
sales a certain amount of time before the show starts, you can specify that in this window.
TicketPeak User Manual | 9/28/2010
Enter the name, date and time of the Event. Then specify the Venue for the Event and whether
it is General Seating or Assigned Seating. If it is General Seating, you will be asked how many
seats are available and the price. If it is Assigned Seating, you will be asked to specify the
Seating Plan/Price Plan to be used.
10
You can Edit the Event by clicking Edit and changing whatever information you wish to change.
Finally, you can Delete an Event. Again, be very careful about deleting! Once the Event is
deleted, it and all associated data such as sales are gone forever.
TicketPeak User Manual | 9/28/2010
The last button for each Event is a toggle switch to make the Event Hidden or Public. Choose
Hidden for Events that you are setting up but for which you are not ready to sell tickets.
11
Promotions
Event-Specific Promotions
An Event-Specific Promotion applies only to Events you deem eligible for the Promotion. Click
Add or Edit and complete the fields. The Promotion Name is whatever you want to call the
Promotion. The code is what you want the Buyer or Seller to enter when the tickets are being
ordered. The discount can be a percentage amount or an amount per order.
Setting up a promotion has no effect until you tell TicketPeak which Events are eligible for the
Promotion. This approach allows you to control which Events are eligible and which are not. To
make an event eligible for a Promotion, you complete the appropriate fields in Add New Event
or Edit Event.
When you are Adding or Editing an Event, click the Promotion button, and you will see the
fields shown below. You state which promotion you wish to run, when you wish it to begin,
when you wish it to end and how many ticket you will allow to be sold under that promotion.
TicketPeak User Manual | 9/28/2010
If you want to restrict the promotion to certain email addresses, you simply enter the email
addresses which are eligible. When someone with that email address orders tickets, they will
have an opportunity to enter a promotion code to receive the discount. (Only people who are
eligible to receive a discount will see that there is an opportunity to enter a discount code. This
approach avoids making other buyers jealous since they will not see an empty promotion code
field.
12
Note that an Event can have more than one promotion, but only one of those promotions can
be used on an order to avoid multiple discounts being applied to an order.
TicketPeak User Manual | 9/28/2010
Total Order Promotions
Total Order Promotion is a “Buy X tickets; Get Y discount” format. In setting up the Promotion,
you specify the quantity of tickets that need to be purchased to receive the discount and what
the percent discount will be. Clicking “Active” means that any order that includes at least the
specified number of tickets will receive the discount, and the discount will be in addition to
other Promotions. Therefore, Total Order Promotions are typically not used to promote
specific events, but rather the entire set of Events in place while the Promotion is on.
13
Sales
Box Office Sales
To sell tickets at the box office or by phone, click on Tickets next to the show you want. The
Seat Map will pop up. You can use it to see what seats are available and to select seats for the
order. Click the seats you wish to select, enter the buyer’s information and click Order Selected
Tickets, and follow the on-screen instructions. At the end of the transaction, you will have the
opportunity to print the tickets.
If you wish to return a seat, simply hit Tickets for the Event in question, click on the sold seat
that you wish to return, and answer “OK” to the warning.
Online Sales
TicketPeak User Manual | 9/28/2010
To sell tickets online, put a link to your TicketPeak URL on your website. When a buyer clicks it,
he or she will go to your TicketPeak space. If the Event has been set up Assigned Seating – User
Selected, the user will have the opportunity to select his or her own seats. If the Event was
designated Assigned Seating – System assigned, the system will assign the best available seats.
If the Event is General Admission, no seat map will be shown. The buyer simply identifies the
number of seats they desire. The buyer clicks Order Selected Seats and is taken to your Credit
Card Merchant Account for processing. Once paid, the buyer will be sent an email specifying
the show and seats purchased.
14
Setup Customizations
You can customize the ordering and fulfillment process. At the Home page, click Setup. Here,
you can specify the questions you want to ask during the order process, and you can specify
what you want the confirmation email to say to the buyer.
Support
TicketPeak User Manual | 9/28/2010
Help is just a phone call away. Please call 877-525-1574.
15