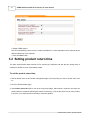
1
X-RMA add-on module
for X-Cart 4.1.12
User Manual
© 2009 Ruslan R. Fazliev. All rights reserved.
Company website: www.x-cart.com
Revision date: 10.03.2009
X-RMA add-on module
for X-Cart 4.1.12
User Manual
© 2009 Ruslan R. Fazliev. All rights reserved.
This User Manual is intended for X-RMA add-on module for
X-Cart v. 4.1.12. It covers most of the areas of the add-on
module's installation and use and is applicable for both
X-Cart GOLD and X-Cart PRO versions.
X-RMA add-on module for X-Cart 4.1.12. User manual.
© 2009 Ruslan R. Fazliev. All rights reserved.
All rights reserved. No part of this work may be reproduced in any form or by any means without the expressed written
permission of the copyright owner.
Products that are referred to in this document may be either trademarks and/or registered trademarks of the respective
owners. The publisher and the author make no claim to these trademarks.
While every precaution has been taken in the preparation of this document, the publisher and the author assume no
responsibility for errors or omissions, or for damages resulting from the use of information contained in this document or
from the use of programs and source code that may accompany it. In no event shall the publisher and the author be
liable for any loss of profit or any other commercial damage caused or alleged to have been caused directly or indirectly
by this document.
Printed: 10.03.2009
Contents
I
Table of Contents
..................................................................................................1
1 General Information
2 Installing and..................................................................................................3
uninstalling X-RMA
2.1 System requirements
........................................................................................................................................... 3
2.2 Installing X-RMA
........................................................................................................................................... 3
2.3 Uninstalling X-RMA
........................................................................................................................................... 4
3 Admin zone ..................................................................................................5
3.1 Enabling and...........................................................................................................................................
configuring X-RMA
5
3.2 Setting product
return time
...........................................................................................................................................
6
3.3 Managing return
requests
...........................................................................................................................................
7
3.4 Adding/Modifying
reasons for returns
...........................................................................................................................................
11
3.5 Adding/Modifying
actions
...........................................................................................................................................
12
..................................................................................................13
4 Customer zone
4.1 Creating return
requests
...........................................................................................................................................
13
4.2 Managing previously
placed return requests
...........................................................................................................................................
15
Thank you for choosing X-Cart software solutions!
© 2009 Ruslan R. Fazliev. All rights reserved.
General Information
1
1 General Information
X-RMA module is an optional add-on for X-Cart shopping cart software. Designed for your customers’
convenience, this module is a powerful means to automate product returns process.
X-RMA (Return Merchandise Authorization) module is created to facilitate the procedure of returning the
products, which may be very annoying if you do not have a tool to deal with it.
X-RMA organizes the process and prevents both you and your customers from negative experience and
endless email correspondence.
X-RMA enables convenient and quick product return procedure management.
The key features of this module include:
· Individual return period for each product
· Automatic generation of a Return Slip
· Option to issue a credit for future purchases
· Configurable Return reasons
· Email notifications about return authorization
X-RMA is a reliable and up-to-date solution that makes your business competitive.
You can purchase it at www.x-cart.com.
© 2009 Ruslan R. Fazliev. All rights reserved.
Installing and uninstalling X-RMA
3
2 Installing and uninstalling X-RMA
Find out the system requirements for X-RMA:
§ System Requirements
Learn to install and uninstall X-RMA:
§ Installing X-RMA
§ Uninstalling X-RMA
2.1 System requirements
For successful installation and work of the module you need an already installed X-Cart GOLD or PRO
4.1.12. The version of the X-RMA module being installed must correspond to the version of your X-Cart (the
main software unit onto which the module is being added).
2.2 Installing X-RMA
To install the module you have to perform the following actions:
1. Download the module distributive (x-rma-x.y.z.tgz, where x,y,z are the numbers of the module version)
from File area/Software distributives
2. Uncompress the x-rma-x.y.z.tgz file and copy the files to X-Cart directory.
Note: Please make sure you keep the directory structure during unpacking and uploading, otherwise some necessary files can be
overwritten!
3. Run in the browser the installation script http://www.yourhost.com/xcart_dir/install-xrma.php
4. Enter your authentication code, accept the conditions of the License Agreement and click “Next”.
Note:
Auth code is a special authentication code that protects your X-Cart installation. Such a code was issued to you
when you first installed your X-Cart-based store. If you do not remember your Auth code, you can look it up in X-Cart's file
include/install.php or in the 'Summary' section of your store's Admin zone.
5. Installation script will copy the files and make all the necessary changes in the database.
6. After Module Installation is completed you need to log in as admin and setup the module:
• enable RMA from the Modules section.
© 2009 Ruslan R. Fazliev. All rights reserved.
4
X-RMA add-on module for X-Cart 4.1.12. User manual.
X-Cart Gold and Pro module installations do not differ.
2.3 Uninstalling X-RMA
To uninstall X-RMA, do the following:
1. Launch the Installation Wizard (Point your browser at the location of your store with the addition of /
install-xrma.php)
2. At the first step of the Installation Wizard (Step 1: License agreement), select the 'Un-install the
module' radio button.
3. Click the Next button.
4. The Installation Wizard will remove the module files and deactivate the module (Step 2: Uninstalling
the module). Click Next to proceed.
5. Step 3: Uninstallation complete is the final step of the uninstallation process. It notifies you that the
module has been successfully uninstalled.
Important: After uninstalling X-RMA, be sure to remove the module distribution package from your web directory.
© 2009 Ruslan R. Fazliev. All rights reserved.
Admin zone
5
3 Admin zone
Find out how X-RMA can be activated and configured:
§ Enabling and Configuring X-RMA
Learn how to set product return time:
§ Setting product return time
Find out about ways to manage return requests:
§ Managing return requests
Learn how you can add and modify reasons for returns:
§ Adding/Modifying reasons for returns
Learn to add and modify actions:
§ Adding/Modifying actions
3.1 Enabling and configuring X-RMA
Enabling X-RMA
After X-RMA add-on module is installed, you need to log into the Admin area of your store and enable it:
1. Go
to
the
'Modules'
section
of
the
store's
administration
back-end
(Administration
menu->Modules).
2. In the list of modules and add-ons, find the name 'RMA' and select the check box opposite it.
3. Click the Update button at the bottom of the list.
Configuring X-RMA
After activation, the add-on module needs to be configured:
1. Go to the section 'General settings/Modules options->RMA options':
© 2009 Ruslan R. Fazliev. All rights reserved.
6
X-RMA add-on module for X-Cart 4.1.12. User manual.
2. Adjust X-RMA options:
Use the corresponding check boxes to enable notifications to orders department and customer about
different statuses of return requests.
3. Click the 'Save' button.
3.2 Setting product return time
The store admin decides what products can be returned by customers and sets the time during which a
customer is allowed to return a purchased product.
To set the product return time:
1. Use the Search form on the Product management page to find a product you want to set the return time
for.
2. Go to the Product details page.
3. Use Product return time field to set up the time period (days), within which a customer can return the
product with the comments indicating the reason for returning. If you set the return time of some product
to 0 (zero), your customers will not be able to return this product.
© 2009 Ruslan R. Fazliev. All rights reserved.
Admin zone
7
Picture 1: Setting the product return time
4. Click on Save to apply the changes.
3.3 Managing return requests
Once RMA module is enabled, the Returns link appears in the Management menu. By clicking on Returns
you access the admin zone Returns section. You can use the Search form located here to search for return
requests placed by your customers.
Select the necessary period and click on Search. The Return ID and Statuses fields help you to find the
necessary return request quicker.
The Returns list will be displayed, where you can modify/delete/update the existing return requests.
The STATUS column displays the current status of the return requests.
When a new request is placed by a customer, it gets the status Return requested. The admin is supposed
to process the request by updating its status.
To update the return request status:
1. In the Returns list locate the return request, the status of which you want to update.
© 2009 Ruslan R. Fazliev. All rights reserved.
8
X-RMA add-on module for X-Cart 4.1.12. User manual.
2. Select the appropriate status from the Status select box:
Return authorized
Return declined
Return completed
Removed by customer
3. Click on Update.
Note.
If a return request is deleted by the customer, Removed by customer status is set to this return request
automatically.
Sometimes it may be necessary to modify the details of an already placed request.
To modify an existing return request:
1. Do one of the following:
· Select the check box next to the return request you would like to modify and click on Modify.
· Click on the return ID link of the request you would like to modify.
The return Modify form opens.
Picture 4: Modify form.
2. Change the reason and/or action, selected by the customer, or edit the text in the Comment field, if
necessary.
3. Select the return status from the Status drop-down list.
4. Click on Modify to save the changes.
© 2009 Ruslan R. Fazliev. All rights reserved.
Admin zone
9
You can use the Returns list link to go back to the returns management page.
When the admin changes the status of a return request to Return authorized or Return completed, the
Create link appears in the CREDIT STATUS column of this return request.
Picture 5: Creation of credit is allowed for the return RMA#3 after its status has been changed to ‘Return authorized’
(‘Create’ link appeared in the CREDIT STATUS column)
Clicking on the Create link allows you to issue a credit to the customer who requested the return.
The Credit status is changed to Created.
© 2009 Ruslan R. Fazliev. All rights reserved.
10
X-RMA add-on module for X-Cart 4.1.12. User manual.
Picture 6: Credit has been created for RMA#3 return request (‘Create’ link has changed to ‘Created’).
When you create a credit, your customer gets a Gift Certificate for the sum of his return which he can use to
purchase other things in your store. The number of this GC is automatically sent to the customer’s e-mail
address. You can click the Created link to view the details of the issued GC:
Picture 7: GC details (can be seen after you click the Created link).
Note: please be aware that when a return request receives a Return authorized or Return completed status, it is not automatically
reflected in the "Quantity in stock (items)" of the product. If you approve a return request, you will need to edit the quantity in stock
manually if and when the product is returned.
© 2009 Ruslan R. Fazliev. All rights reserved.
Admin zone
11
To delete an existing return request:
1. In the Returns list, select the check box next to the return request you want to remove.
2. Click on Delete selected.
3.4 Adding/Modifying reasons for returns
Adding/Modifying reasons for returns
We included with the module a few pre-set reasons for which a customer might want to return the products
sent to him (like ‘Wrong item ordered’ or ‘Damaged during shipping”, etc). Every time a customer creates a
return request, he has to choose one of these reasons to explain why the return is requested. If necessary,
you can modify the reasons we provided, or you can add reasons of your own which are specific for your
store.
To add new reasons for returns or to modify the existing ones, select Add/Modify reasons from the
Returns section menu.
To add a new reason:
1. Fill in the New reason field.
2. Click on Update. The new reason will be added to the list.
Picture 8: Adding reasons
© 2009 Ruslan R. Fazliev. All rights reserved.
12
X-RMA add-on module for X-Cart 4.1.12. User manual.
To delete a reason click on Delete next to the reason you want to remove.
3.5 Adding/Modifying actions
Adding/Modifying actions
An action is what a customer would like you to do when he requests a return. For example, he might want
you to give him a credit for future purchases at your store, or to repair the broken item and send it back to
him, etc.
Select Add/Modify actions in the Returns section menu.
To add an action:
1. Fill in the New action field.
2. Click on Update.
Picture 9: Adding actions
To delete an existing action click on Delete next to the action you want to remove.
© 2009 Ruslan R. Fazliev. All rights reserved.
Customer zone
13
4 Customer zone
Find out how to create return requests:
§ Creating return requests
Learn about the ways to manage previously placed return requests:
§ Managing previously placed return requests
4.1 Creating return requests
To create a product return request
1. Select Orders history from Your cart menu.
2. Search for the order you would like to create a return request for.
3. Click on its number or status, and the Order details page opens.
4. Scroll down to the Create return request form.
Note. A customer can create return requests only for products the product return time of which is greater than 0 (zero). If you do
not see the Create return request form on the Order details page, the creation of the return request is impossible. It means that
either the return time of the products in your order is 0 (zero), or the time during which the return request could be placed expired.
5. Set the amount of the product(s) you want to return.
6. Select the reason for returning.
7. Select the action you would like the store administration to do for you.
8. Leave your comments, if necessary.
9. Click on Create.
© 2009 Ruslan R. Fazliev. All rights reserved.
14
X-RMA add-on module for X-Cart 4.1.12. User manual.
Picture 10: Create return request form.
After the return request has been successfully created, the confirming notification appears at the top of the
page.
The new request is added to the Returns list. To view the list of his return requests, a customer needs to
click on Returns in Your cart menu. The current status of each request in the list is shown in the Status
column.
© 2009 Ruslan R. Fazliev. All rights reserved.
Customer zone
15
Picture 11: Return request status.
A customer gets an e-mail notification when his return request is authorized.
4.2 Managing previously placed return requests
You can modify/delete the return requests previously placed by you via the Returns item in Your cart menu.
To modify an existing return request:
1. Click on Returns in Your cart menu. The return search form appears.
© 2009 Ruslan R. Fazliev. All rights reserved.
16
X-RMA add-on module for X-Cart 4.1.12. User manual.
Picture 12: Return search form.
2. Use this form to find the return request you would like to modify. The search results will be displayed in
the form of a list.
Picture 13: Returns list
3. Do one of the following:
· Select the check box next to the return request you would like to modify and click on Modify.
· Click on the return ID link of the request you would like to modify.
The return Modify form opens.
© 2009 Ruslan R. Fazliev. All rights reserved.
Customer zone
Picture 14: Modify form.
4. Select the reason for returning the product.
5. Select an action from the drop-down list.
6. Add your comments if necessary.
7. Click on Modify.
Note. To print the return slip, click on Print Return slip.
To delete an existing return request:
1. Search for the necessary return request in the Returns section.
2. In the Returns list, select the check box next to the request you would like to remove.
3. Click on Delete selected.
© 2009 Ruslan R. Fazliev. All rights reserved.
17
X-RMA add-on module for X-Cart 4.1.12. User manual.
© 2009 Ruslan R. Fazliev. All rights reserved.
Printed: 10.03.2009