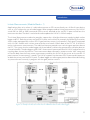
1
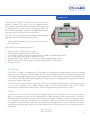
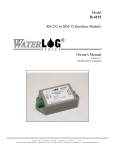
OWNERS MANUAL
V1.3
H-4161
SDI-12 TO 4-20MA INTERFACE
D70 0915
CONTENTS & WARRANTY
This user manual is a guide for the H-4161 Interface Module.. For more information, updated manuals,
brochures, technical notes, and supporting software on the H4161, please refer to
waterlog.com or contact your sales representative.
For additional assistance, please contact us at +1.435.753.2212 or [email protected]
Chapter 1: Introduction........................................................................................2
Description...............................................................................................................3
Display.......................................................................................................................3
Connectors...............................................................................................................4
Monitor SDI-12 Communication............................................................................4
Initiate Measurements.............................................................................................5
Chapter 2: Installation and Maintenance..........................................................6
Making Power and SDI-12 Connections................................................................7
Making the 4-20mA Connections..........................................................................7
Programming the H-4161.......................................................................................8
Programming the Sensor Address.........................................................................8
Programming the Max and Min data setpoints....................................................8
Programming the Module Mode setting...............................................................8
Programming the Monitored Address Setting.....................................................8
Programming the Monitored Parameter Setting..................................................9
Programming the AutoScan Address Setting.......................................................9
Programming the AutoScan Command Setting ................................................9
Programming the Measure Rate Setting...............................................................9
Testing with Module Mode = 0 (Monitor)..............................................................9
Testing with Module Mode = 1 (Initiate)................................................................1
Transparent Mode.................................................................................................12
Chapter 3: SDI-12 Command & Response Protocol....................................13
Command Summary..............................................................................................14
Measure Command...............................................................................................15
Concurrent Measurement Command.................................................................17
Send Data Command............................................................................................18
Send Acknowledge Command............................................................................18
Initiate Verify Command........................................................................................19
Send Identification Command..............................................................................19
Change Sensor Address Command....................................................................20
Extended Set_Current_Stage Command............................................................21
Extended Set_Milliamp Command......................................................................21
Extended Read/Write Max ..................................................................................22
Extended Read/Write Module Mode..................................................................23
Extended Set Transparent Mode.........................................................................24
Extended Read/Write Monitored Address.........................................................24
Extended Read/Write AutoScan...........................................................................25
Extended Read/Write AutoScan Address...........................................................26
Extended Read/Write Measure Rate...................................................................27
Extended “XTEST”..................................................................................................28
Extended “XHELP”.................................................................................................28
Appendix A: Specifications...............................................................................29
Contents & Warranty
“WATERLOG™ PRODUCTS MANUFACTURED BY YELLOW SPRINGS INSTRUMENTS CO., INC. are
warranted by Yellow Springs Instruments Co., Inc. (“YSI”) to be free from defects in materials and
workmanship under normal use and service for twelve (12) months from date of shipment unless
otherwise specified in the corresponding YSI pricelist or product manual.
WaterLOG™ products not manufactured, but that are re-sold by YSI, are warranted only to the
limits extended by the original manufacturer. Batteries, desiccant, and other consumables have
no warranty. YSI’s obligation under this warranty is limited to repairing or replacing (YSI’s option)
defective products,which shall be the sole and exclusive remedy under this warranty.
The customer shall assume all costs of removing, reinstalling, and shipping defective products to YSI.
YSI will return such products by surface carrier prepaid within the continental United States of America.
To all other locations, YSI will return such products best way CIP (Port of Entry) INCOTERM® 2010,
prepaid. This warranty shall not apply to any products which have been subjected to modification,
misuse, neglect, improper service, accidents of nature, or shipping damage. This warranty is in lieu
of all other warranties, expressed or implied. The warranty for installation services performed by YSI
such as programming to customer specifications, electrical connections to products manufactured by
YSI, and product specific training, is part of YSI’s product warranty. YSI EXPRESSLY DISCLAIMS AND
EXCLUDES ANY IMPLIED WARRANTIES OF MERCHANTABILITY OR FITNESS FOR A PARTICULAR
PURPOSE. YSI is not liable for any special, indirect, incidental, and/or consequential damages.”
A complete TERMS AND CONDITIONS OF SALE can be viewed at:
http://www.ysi.com/terms-and-conditions.php
1
01 /
2
INTRODUCTION
Introduction
The WaterLOG H-4161 is an SDI-12 to two-wire 4-20mA
interface module. The H-4161 can be programmed to
either monitor communications between a data logger and
its attached sensors or to initiate measurements by itself.
The measurement data is scaled as needed and output to a
precision two-wire 4-20mA current transmitter.
The “SDI-12 Serial Digital Interface” is ideal for data logging
applications with the following requirements:
•
Battery powered operation with minimal current drain
• Low system cost
The H-4161 has the following features:
•
•
•
•
•
•
•
Precision 16-bit 4-20mA current output
1000V output isolation from the SDI-12 bus
Can monitor the SDI-12 bus for a specified sensor address and data parameter
Can initiate measurements to an attached sensor
Programmable “Max” and “Min” data set points for automatic data scaling
Manual “set” of the 4-20mA output using an extended SDI-12 command
Two SDI-12 ports
Description
The H-4161 includes a microprocessor, LCD display, 16-bit digital-to-analog converter, precision voltage
reference and a 4-20mA current transmitter. The SDI-12 and 4-20mA sections are isolated from each other
with a high voltage digital opto-coupler. Data collected from the SDI-12 bus is scaled by the microprocessor
into a 16-bit value and loaded into the digital-to-analog converter. The digital-to analog converter directly
controls the current transmitter.
The H-4161 has two SDI-12 ports. The primary SDI-12 port provides data monitoring and communication
with the H-4161 device itself. When programmed to initiate measurements, the H-4161 makes
measurements and collects the data from a sensor connected to the auxiliary SDI-12 port.
Display
The H-4161 has a 2-line x 16-character Liquid Crystal Display (LCD) which shows the current measurement
data. Line-1 displays the most recently captured SDI-12 data parameter. If the sensor buffer is invalid (no
data captured or the previous measurement failed) the message “no data” is shown instead of a number.
Line-2 displays the current setting of the 4-20mA output. Note: the mA value is the desired loop current
setting which the microprocessor loads into the digital to analog converter. If the 4-20mA loop is open,
or insufficient loop voltage is present the actual loop current may be zero or may not match the value on
the display.
SDI = xxx.xx ft Iout = xx.xx mA
3
INTRODUCTION
The character on the right hand side of Line-1 is an activity “spinner”. Every time a measurement is captured
or initiated, the spinner changes (rotates). This indicator shows measurements are being made even if the
measurement data is static (not changing).
Connectors
The H-4161 has a 5-terminal connector for making +12V and SDI-12 connections. The primary SDI-12
terminal is connected to the data logger and it’s attached sensors. If the H-4161 is to initiate measurements,
the auxSDI-12 terminal is connected to the SDI-12 sensor to be monitored. The 2-terminal connector is for
making connections to the 4-20mA loop.
Monitor SDI-12 Communications (Module Mode = 0)
During normal operation the data recorder sends commands to one or more SDI-12 sensors and
subsequently collects data from the sensors. As a “data monitor”, the H-4161 passively monitors the
communication between the data recorder and its SDI-12 sensors. The H-4161 waits for, and collects a
specified data parameter from a specified sensor. The data is scaled and used to update the H-4161’s
4-20mA output. In this mode, the H-4161 monitors, but does not transmit data to the SDI-12 bus. The data
recorder must initiate any sensor measurements.
The data recorder can also communicate with the H-4161 directly as a normal SDI-12 “sensor”. Using
extended SDI-12 commands, the data recorder/user can manually set the 4-20mA output, observe the last
data collected or configure the H-4161.
4
Figure 2: The H-4161 monitors the SDI-12 bus
for a selected parameter
Introduction
Initiate Measurements (Module Mode = 1)
Applications often arise where it is desired to connect an SDI sensor directly to a 4-20mA input device
such as a PLC without the use of a data logger. When programmed to initiate measurements, the H-4161
sends 0M! (or 0M1 to 0M9) commands to the sensor attached to the auxSDI-12 port and collects the
measurement data. The data is scaled and used to update the H-4161’s 4-20mA output.
The Initiate Measurement mode also provides support for a hybrid architecture employing both a data
logger and PLC. Both the primary and auxSDI-12 ports can be used. For example, the following illustration
shows a dam equipped with sixteen SDI-12 gate position sensors (inclinometers). Each gate is equipped
with a H-4161 module wich initiates measurements and sends 4-20mA data to the PLC. All 16 channels
make simultaneous measurements. The radial architecture provides near real-time gate position data to
the PLC. The system also has a data logger which periodically collects the gate position and other data on
a timed schedule. The data logger sends “aM!” measurement commands to each H-4161 and collects the
resulting data, channel-by-channel. The measurement data collected in response to the “aM!” command
will be the data from the most recent measurement made by the H-4161 to the sensor on the auxSDI-12
port (no actual “measurement” is made). The H-4161 supports simultaneous SDI-12 commands/responses
on both the primary and auxSDI-12 ports. The data logger can collect gate position data without disturbing
any measurements currently in progress with the gate position sensors.
Figure 3: Example architecture with sixteen 4-20mA channels and a data logger.
5
02 /
6
INSTALLATION AND
MAINTENANCE
Installation and Maintenance
The enclosure and connectors are not weather tight. The H-4161 must be installed in a protected location or a
weather tight enclosure. The enclosure has a 5-terminal connector for making power and SDI-12 connections
and a 2-terminal connector for connecting the 4-20mA output connections. The connectors can be detached
while making the connections.
Caution:
Remove all power from the unit before making any connections.
Before beginning the installation take a minute to plan out your station grounding and wiring scheme.
Making Power and SDI-12 Connections
Connect the +12V and GND terminals to a 12V power source. If the H-4161 is to be used to Monitor,
connect the primary SDI-12 data terminal to the SDI-12 bus between your data logger and its sensors. If
the H-4161 is to be used to Initiate, connect the auxSDI-12 terminal to the sensor to be monitored. The
sensor address of the sensor connected to the auxSDI-12 terminal should be “0” (this can be changed
by editing the AutoScan address). The sensor address must be set before connecting the sensor to the
H-4161.
Making the 4-20mA connections
The H-4161 has a 2-wire “self powered” current loop transmitter. Current loop sensors output a current
rather than a voltage. The 4-20mA output will drive standard industrial telemetry and process control
instrumentation. Use shielded twisted-pair cable and take precautions to protect the wiring from noise
and interference. Your loop power source, loop receiver and the H-4161’s output should all be connected
in series. The loop power supply must be sufficient to maintain 5.5V to 35V across the H-4161s output
terminals, in addition to whatever voltage is needed to maintain 20mA across the loop receiver and
interconnect wiring. The gauge station +12.0V SDI-12 power source will work if the resistance of your
loop receiver and wiring is less than 250 ohms.
5.5V +(250 Ω*20mA)=10.5V
• Make certain their is 5.5 to 35V across the 4-20mA output terminals.
• Make certain the H-4161 is receiving +12V power from the SDI-12 data bus.
• Use shielded, twisted-pair cables for the 4-20mA connections in noisy environments.
Note: The SDI-12 logic and the 4-20mA interface are isolated from each other by digital optical isolators.
The SDI-12 logic is powered from the +12V input terminal, the 4-20mA circuitry is self-powered from
the 4-m0mA loop. When the H-4161 is first powered up, the output current is set to 4.0mA. It remains at
4.0mA until the first successful data collection sequence. If the loop power is disconnected or is applied
after the SDI-12 side is powered up, the data in the digital-to-analog converter will be undefined. When
the loop power is restored, the 4-20mA output will be at an unknown value. Once a fresh SDI-12 data
collection is made, the digital-to-analog converter will be loaded with new valid data.
Caution: Some Programmable Logic Controllers and telemetry devices “multiplex” their 4-20mA inputs
such that the current loop(s) are momentarily opened as the controller makes it measurement scan. The
H-4161 will NOT work with equipment of this type because the optically isolated transmitter in the H-4161
will loose its current setting whenever the loop is momentarily opened.
7
INSTALLATION & MAINTENANCE
Programming the H-4161
The H-4161 comes from the factory with the following settings:
H-4161 device address
0
Max setpoint:20.00
Min setpoint:4.00
Monitored Address:Z
Monitored Parameter:1
AutoScan Address:0
AutoScan Command:0 (0M!)
Module Mode:0 (monitor)
Measurement Rate:0 (seconds)
These setups are stored in Flash memory within the H-4161 and will not be lost if the power is removed.
The extended commands for changing these settings are described in detail in Chapter 3.
Programming the Sensor Address
The H-4161 comes from the factory with its sensor address set to “0”. If more than one sensor is to be
connected to the SDI-12 bus, make certain each sensor has a unique sensor address, including any H-4161
modules. The H-4161 is not a traditional sensor and does not ‘make measurements’. However, to facilitate
programming the H-4161 it must have a unique address.
Programming the Max and Min data setpoints
Captured SDI-12 data is scaled into 4-20mA units using the programmable Max and Min data setpoints.
This feature makes it easy to setup the H-4161 for your application. For example, if you are monitoring
stream stage which could be up to 10 feet, program the Max setpoint to 10.00. Perhaps the stream never
falls below 5 feet and you would like to narrow the dynamic range of the 4-20mA output for more resolution.
In this case program the Min setpoint to 5.00. A captured SDI-12 data value of 5.00 will produce a 4.0 mA
output and data value of 10.00 will produce 20.0mA. If the stage rises above 10.0 feet the output will
clamp at 20mA or if the stage falls below 5 feet the output will clamp at 4.0mA. The extended commands
to examine or change the Min and Max values are explained in Chapter 3.
Programming the Module Mode setting
The H-4161 can either “monitor” SDI-12 communication between a data logger and its sensors, or “initiate”
measurements to a dedicated sensor connected to the auxSDI-12 terminal. The H-4161 comes from the
factory with Module Mode = 0 (monitor). The extended commands to examine or change the Module
Mode are explained in Chapter 3.
Programming the Monitored Address setting
As a data monitor, the H-4161 passively monitors communication between the data recorder and its SDI12 sensors. The H-4161 waits for, and collects data from a specified sensor. The data recorder must initiate
any sensor measurements. The H-4161 comes from the factory with the Monitored Address = Z. If you wish
8 to monitor data from another sensor, you must change the monitored address to the desired value.
Installation and Maintenance
This setting is not used if Module Mode = 1 (initiate). The extended commands to examine or change the
Monitored Address are explained in Chapter 3.
Programming the Monitored Parameter setting
Each SDI-12 sensor can make up to nine separate measurements or “parameters”. The data recorder
collects the measurement data using “aD0!” - “aD9!” commands. The Monitored Parameter setting controls
which of the nine data parameters is to be m onitored by the H-4161. The H-4161 also monitors the data
sent in response to the new concurrent SDI-12 V1.2 “aR0” data collection commands. The H-4161 comes
from the factory with Monitored Parameter = 1. This setting should work with most sensors. The extended
commands to examine or change the Monitored Paramter are explained in Chapter 3.
Programming the AutoScan Address setting
When the Module Mode = 1 (initiate), the H-4161 actively initiates measurements and collects the response
from the sensor attached to the auxSDI port. The H-4161 normally issues an “0M!” command to the auxSDI
port. If desired, the H-4161 can be programmed to issue other addresses such as “2M!”. The extended
commands to examine or change the AutoScan Address are explained in Chapter 3.
Programming the AutoScan Command setting
When the Module Mode = 1 (initiate), the H-4161 actively initiates measurements and collects the
response from the sensor attached to the auxSDI port. The H-4161 normally issues an “aM!” command
to the auxSDI port. If desired, the H-4161 can be programmed to issue other commands such as “aM1!”
(“aM1” to “aM9!”). The extended commands to examine or change the AutoScan Command are explained
in Chapter 3.
Programming the Measure Rate setting
When Module Mode = 1 (initiate), the H-4161 initiates measurements to the sensor attached to the auxSDI
port. The measurement interval is controlled by the Measure Rate setting. If the Measure Rate is set to a
value less than the time it takes to make the actual measurement, measurements will be made back-toback, as fast as possible. The H-4161 comes from the factory with Measure Rate = 0 (seconds). This setting
is not used if Module Mode = 0 (monitor).
Testing with Module Mode = 0 (monitor)
Use the following procedure to verify your H-4161 is working properly. These tests will also help you
understand how the H-4161 works.
1. Make the connections to the SDI-12 input and the 4-20mA output. Connect the sensor to be monitored to
your data logger. Your loop power source, loop receiver and the H-4161’s output should all be connected
in series. In addition, temporariliy connect a current meter in series with the 4-20mA loop.
• Make certain there is 5.5 to 35V across the 4-20mA output terminals.
• Make certain the H-4161 is receiving +12V power from the SDI-12 data bus.
9
INSTALLATION & MAINTENANCE
Use the transparent SDI-12 mode of your data recorder to issue and m onitor the following SDI-12
commands:
2. Check to see if you can communicate with the H-4161.
Issue a “0I!” Identify Command
The H-4161 should respond with : “012
DAAH-4161001S#000000V10<CR><LF>”
3. Check to see if the H-4161’s self-test is ok.
Issue a “0V!” Verify command.
The H-4161 should respond with : 00011<CR><LF>
Issue a “0D0” command to collect the data.
The H-4161 should respond with: 0+1<CR><LF>
4. Check to see if the H-4161’s 4-20mA output is working by using the “Set Milliamp” command.
Issue a “0XSM10.0!” command.
The H-4161 should respond with: I-Out=10.0<CR><LF>
This sets the H-4161s output to 10.0mA
Check to see if the current meter you installed in Step 1 shows 10.0 mA flowing in the loop.
Experiment with different current settings using the XSMnnn command. make certain your loop
works at the 4.0 and 20.0 mA endpoints.
Next, check to see if the H-4161 can successfully capture sensor data from your SDI-12 sensor and scale
it into 4-20mA.
5. Program the Max and Min setpoint as needed for your application, set the Monitored Address setting
as needed. In these examples, the address of the sensor to be monitored is “Z”. Experiment with the
“aXSCSddd” comand to make certain your Max and Min settings are correct.
6. Issue a “ZM!” measurement command to cause your SDI-12 sensor to make a measurement. Your sensor
should respond with Ztttnn<CR><LF>
Where: a
is the SDI-12 sensor address
ttt
is the three digit integer specifying the maximum time, in seconds the sensor will take to complete the command and have data available in its buffer.
n
is a single digit integer specifying the number of values that will be placed in the data buffer
7. Issue an “ZD0!” command to collect data from your SDI-12 sensor. The H-4161 monitors and captures
the response. Your SDI-12 sensor should respond with “Z+nnn.n<CR><LF>” or similar.
8. Issue a “0M!” command to “measure” the data value collected by the H-4161. The H-4161 should
respond with: 00001<CR><LF>
10
9. Issue a “0D0!” command to collect the captured data value from the H-4161. The H-4161 should
respond with: 0+nnn.nn<CR><LF>
Installation and Maintenance
+nnn.nn is the data value captured from your sensor by the H-4161, this value should match the data value
measured by your sensor in Step 7. The value must be between the Min and Max set point settings of the
H-4161 or the output will be clamped at either 4.0mA or 20mA respectively.
Use the following equation to calculate the current which should be output by the H-4161. Compare
this value with the reading displayed by the current meter installed in Step 1. Note, if the loop power is
removed or applied after the data collection sequence of Step 7 was completed, the output of the H-4161
will be a random current value until a new measurement sequence is performed.
OutputmA =(Xdata -MIN)(
16
) +4mA
MAX-MIN
Where: Xdata=nnn.nn as measured by your sensor
MAX = the Max setpoint of the H-4161
MIN = the Min setpoint of the H-4161
Testing with Module Mode = 1 (initiate)
Use the following procedure to verify your H-4161 is working properly. These tests will also help you
understand how the H-4161 works.
1. Make the connections to the +12V power and the 4-20mA output. Connect the sensor to be monitored
to the auxSDI-12 port. Make certain the address of this sensor is “0”. If you wish to experiment with the
measure rate or other settings, connect a data logger to the primary SDI-12 data port. Your loop power
source, loop receiver and the H-4161’s output should all be connected in series. In addition, temporarily
connect a current meter in series with the 4-20mA loop.
• Make certain there is 5.5 to 35V across the 4-20mA output terminals.
• Make certain the H-4161 is receiving +12V power from the SDI-12 data bus.
Use the Transparent SDI-12 mode of your data recorder to issue and monitor the following SDI-12
commands.
1. Set Module Mode = 1(See Chapter 3).
2. Program the Max and Min setpoint as needed for your application, set the Monitored Parameter setting
as needed.
3. Check to see if the H-4161’s 4-20mA output is working by using the “Set Milliamp” command.
Issue a “0XSM10.0!” command.
The H-4161 should respond with: I-out=10.0<CR><LF>
This sets the H-4161s output to 10.0mA. Check to see if the current meter you installed in Step 1
shows 10.0 mA flowing in the loop.
Note: your setting will soon be overwritten when the next initiated measurement is made.
11
INSTALLATION & MAINTENANCE
Experiment with different current settings using the XSMnnn command. Make certain your loop works at
the 4.0 and 20.0mA endpoints. Experiment with the “aXSCSddd” command to make certain your Max and
Min settings are correct.
4. The H-4161 should be making measurements to the sensor attached to the auxSDI-12 port in a tight
loop. Check the 4-20mA output for the expected response.
5. Change the Measure Rate as needed. Check for the expected response with an oscilloscope or other
means to detect when a measurement is initiated.
Transparent Mode
When the Module Mode = 1 (Initiate), the H-4161 actively initiates measurements and collects the response
from the sensor attached to the auxSDI port. During setup and testing it may be useful for the user to
access the sensor attached to the auxSDI port without changing the wiring or connectors. When activated
(see Chapter 3), the Transparent mode causes the H-4161 to stop making measurements on the auxSDI
port and to make a virtual connection between the primary and auxSDI ports. While the Transparent Mode
is active, all communication to/from the H-4161’s address is passed thru to the auxSDI port. The “aM!”,
“aD0!” and other internal commands of the H-4161 are disabled and the H-4161 is essentially replaced
by the sensor attached to the auxSDI port. The Transparent Mode is automatically deactivated when the
H-4161 detects an access to any sensor address other than its own.
Note: the sensor address character of each command is forced to “0” by the H-4161 before being
forwarded to the auxSDI port.
12
03 /
SDI-12 COMMAND &
RESPONSE PROTOCOL
13
SDI-12 COMMAND & RESPONSE
This is a brief description of the Serial Digital Interface (SDI-12) Command and Response Protocol used by
the WaterLOG Series Model H-4161 sensor. Included is a description of the commands and data format
supported by the H-4161.
Refer to the document “A SERIAL DIGITAL INTERFACE STANDARD FOR HYDROLOGIC AND ENVIRONMENTAL
SENSORS.” verion 1.2 April 12, 1996 coordinated by the SDI-12 Support Group, 135 East Center, Logan, Utah.
During normal communication, the data recorder sends an address together with a command to the H-4161
SDI-12 interface. The H-4161 then replies with a “response”. In the following descriptions, SDI-12 commands
and responses are enclosed in quotes. The SDI-12 address and the command/response terminators are
defined as follows:
“a”
Is the sensor address. The following ASCII Characters are valid addresses: “0-9”, “A
Z”, “a-z”, “*”, “?”. Sensors will be initially programmed at the factory with the address
of “0” for use in single sensor systems. Addresses “1 to 9” and “A to Z” or “a to z”
can be used for additional sensors connected to the same SDI-12 bus. Address “*”
and “?” are “wild card” addresses which select any sensor, regardless of its actual
address.
“!”
“<cr><lf>”
Is the last character of a common block.
Are carriage return (0D) hex and line feed (0A) hex characters. They are the last two
characters of a response block.
Notes:
• All commands/responses are upper-case printable ASCII characters.
• Commands must be terminated with a “!” character.
• Responses are terminated with <cr><lf> characters.
• The command string must be transmitted in a contiguous block with no gaps of more than 1.66 milliseconds
between characters.
Command Summary
The H-4161 supports the following SDI-12 commands:
Standard Commands:
aM! Make measurement
aM1! Make special measurement
aD0! Send Data
aV!Verify
aI!
Send identification
a!
Send Acknowledge
aAn! Change Address
14
SDI-12 Command & Response
Extended Commands:
aXTEST!
Displays the current module settings
aXHELP!
Displays the supported commands
aXRMM!
Read Module Mode (0=Monitor, 1=Initiate)
aXWMMn! Write Module Mode (0=Monitor, 1=Initiate)
aXRMA!
Read Monitored Address (0-9, A-Z, a-z)
aXWMAn! Write Monitored Address (0-9, A-Z, a-z)
aXRMP!
Read Monitored Parameter (1 to 9)
aXWRMPn! Write Monitored Parameter (1 to 9)
aXRAA!
Read AutoScan address (0 to 9)
aXWRAAn! Write AutoScan address (0 to 9)
aXRAC!
Read AutoScan command setting (0 to 9)
aXWRACn! Write AutoScan command setting (0 to 9)
aXRAMR!
Read Measure Rate (seconds)
aXWMRdd! Write Measure Rate (seconds)
aXSTM!
Set Transparent Mode
aXRIH!
Read High (max) data value for 20.0mA
aXWIHdd! Write High (max) data value for 20.0mA
aXRIL!
Read Low (min) data value for 4.0mA
aXWILdd! Write Low (min) data value for 4.0mA
aXSCSdd! Set Current Stage (for testing 4-20mA)
aXSMdd!
Set Milliamp output (for testing 4-20mA)
Factory Use Only:
aXXSDACdd!Set the DAC to dd counts (for testing 4-20mA)
aXSCL!
Set Calibration Low (DAC=0x04000)
aXSCH!
Set Calibration High (DAC=0x18000)
aXRCL!
Read DAC Calibration Low
aXWCLdd! Write DAC Calibration Low
aXRCH!
Read DAC Calibration High
aXWCHdd! Write DAC Calibration High
Measure Command
The H-4161 is not a normal SDI-12 sensor and does not make sensor “measurements”. Instead, the Measure
command copies the most recently captured SDI-12 data parameter. If the module mode is “Monitor”, the aM!
can be used to read the most recent data the H-4161 has captured. If the module mode is “Initiate”, the aM!
command reads the most recent measurement made on the auxSDI port.
Data values generated in response to this command are stored in the sensors buffer for subsequent collection
using “D” commands. The data will be retained in the sensor until another “M”, “C” or “V” command is executed.
Command
Response Description
“aM!”“atttn<cr><lf>”Initiate Measurement
15
SDI-12 COMMAND & RESPONSE
Where:
a
is the sensor address (“0-9”, “A-Z”, “a-z”, “*”, “?”)
is an upper-case ASCII Character
M
ttt
is a three digit integer (000-999) specifying the maximum time, in seconds, the sensor will take
to complete the command and have measurement data available in its buffer.
n
is a single digit integer (0-9) specifying the number of values that will be placed in the data
buffer. If “n” is zero (0), no data will be available using subsequent “D” commands.
Upon completion of the measurement, a service request “a<cr><lf>” may be sent to the data recorder
indicating the sensor data is ready. The data recorder may wake the sensor with a break and collect the data
any time after the service request is received or the specified processing time has elapsed.
The aM! command takes 0 seconds to complete and places 1 value in the sensor buffer, no service request
is sent.
Example of an H-4161 “aM!” command:
Command Response Time
Values
Description
“aM!”“a0001<cr><lf>”
0 sec1Make measurement
Subsequent Command
Response
“aD0”a+AA.AAA<cr><lf>
Where:
AA.AAA = Most recent measurement (feet, inches, meters, etc.)
The “aM1!” command is similar to the “aM!” command, however it places additional information in the sensor
buffer. If a data parameter has not been captured, the message “no data” is placed in the sensor buffer.
During debug and testing this feature is useful for determining if the H-4161 is properly and reliably capturing
the monitored parameter. The recommended test procedure is to configure the data logger to make a H-4161
“aM1!” measurement at the completion of the sensor scan. Configure the data logger to record both the
captured measurement and the calculated (desired) mA parameters. During the sensor scan the data logger
first initiates a measurement and collects measurement data from the sensor being monitored. The H-4161
independently captures and processes the monitored parameter. At the completion of the sensor scan the
data logger issues an “aM1!” command to the H-4161 and collects the response. The captured parameter
value should always match the data value the data logger previously collected from the sensor. Examine the
logged data to make certain the data is being captured and processed into the proper mA setting.
16
SDI-12 Command & Response
Example of an H-4161 “aM1!” command:
Command Response Time
Values
Description
“aM!”“a0014<cr><lf>”
1 sec4Make measurement
Subsequent Command
Response
“aD0”a+AA.AAA+BB.BBB+CC.CC+DD.DD<cr><lf>
Where:
AA.AAA BB.BB
CC.CC
DD.DD
= Most recent measurement (feet, inches, meters, etc.)
= Calculated (desired) mA setting for this measurement
= Current Min (low) data setting (see “aXRIL!” command)
= Current Max (high) data setting (see “aXRIH!” command)
Concurrent Measurement Command
This is a new command for the Version 1.2 SDI-12 Specification. A concurrent measurement is one which
occurs while the other SDI-12 sensors on the bus are also taking measurements. This command is similar to
the “aM!” command, however, the nn field has an extra digit and the sensor does not issue a service request
when it has completed the measurement. Communicating with other sensors will NOT abort a concurrent
measurement. Data values generated in response to this command are stored in the sensors buffer for
subsequent collection using “D” commands. The data will be retained in the sensor until another “M”, “C” or
“V” command is executed.
Command
Response Description
“aC!”“atttnn<cr><lf>”
Initiate Measurement
Where:
a
is the sensor address (“0-9”, “A-Z”, “a-z”, “*”, “?”)
is an upper-case ASCII Character
C
ttt
is a three digit integer (000-999) specifying the maximum time, in seconds, the sensor will take
to complete the command and have measurement data available in its buffer.
nn
is a two digit integer (00-99) specifying the number of values that will be placed in the data
buffer. If “n” is zero (0), no data will be available using subsequent “D” commands.
The data recorder may wake the sensor with a break and collect the data anytime after the specified processing
time has elapsed.
17
SDI-12 COMMAND & RESPONSE
Send Data Command
The Send Data command returns sensor data generated as the result of previous “aM!”, “aC!”, or “aV!”
commands. Values returned will be sent in 33 characters or less. The sensor’s data buffer will not be altered
by this command.
Command
Response
“aD0!”“apd.d<cr><lf>”
Where:
a
is the sensor address (“0-9”, “A-Z”, “a-z”, “*”, “?”)
are upper-case ASCII characters
D0
p
d.d
is a polarity sign (+ or -)
represents numeric digits before and/or after the decimal. A decimal may be used in any
position in the value after the polarity sign. If a decimal is not used, it will be assumed to be after
the last digit.
For example: +3.29 +23.5 -25.45 +300
If the “aD0!” returns no data (“a<cr><lf>” only), it means that no measurement data is available (or the
measurement was aborted) and a new “M” command must be sent. If the module mode is “MONITOR”, an
“a<cr><lf>” response indicates no measurement has been captured. If the module mode is “INITIATE”, an
“a<cr><lf>” response indicates the most recent measurement on the AuxSDI port has failed.
Example of an H-4161 “aD0!” command:
Previous Command Response
“aM!”“a0001<cr><lf>”
Subsequent Command
Response
“aD0”a+AA.AAA<cr><lf>
Where:
AA.AAA = Most recent measurement (feet, inches, meters, etc.)
Send Acknowledge Command
The Send Acknowledge Command returns a simple status response which includes the address of the sensor.
Any measurement data in the sensor’s buffer is not disturbed.
Command
Response
“a!”“a<cr><lf>”
Where:
a
18
is the sensor address (“0-9”, “A-Z”, “a-z”, “*”, “?”)
SDI-12 Command & Response
Initiate Verify Command
The Verify Command causes a verify sequence to be performed. The result of this command is similar to the
“aM!” command except that the values generated are fixed test data and the result of diagnostic checksum
tests. The data generated in response to this command is placed in the sensor’s buffer for subsequent
collection using “D” commands. The data will be retained in the sensor until another “M”, “C”, or “V” command
is executed.
Command
“aV!”
Response
“atttn<cr><lf>”
Description
Initiate verify sequence
Where:
a
is the sensor address (“0-9”, “A-Z”, “a-z”, “*”, “?”)
is an upper-case ASCII Character
V
ttt
is a three digit integer (000-999) specifying the maximum time, in seconds, the sensor will take
to complete the command and have measurement data available in its buffer.
n
is a single digit integer (0-9) specifying the number of values that will be placed in the data
buffer. If “n” is zero (0), no data will be available using subsequent “D” commands.
Example of a “aV!” command:
Command Response Time
Values
Description
“aV!”
“a0014<cr><lf>”
1 sec
4
Return fixed data and
diagnostic data for testing purposes
Subsequent Command
Response
“aD0”a+123.456+78.9+x+y<cr><lf>
KeyDescriptionUnits
+123.456
Fixed test data
+78.9
Fixed test data
x
Memory checksum 0-65535
y
ROM checksum test 0 = Failed, 1 = Passed
Send Identification Command
The Send Identification Command responds with sensor vendor, model, and version data. Any measurement
data in the sensor’s buffer is not disturbed.
Command
Response
“aI!”“allccccccccmmmmmmvvvxx...xx<cr><lf>”
Where:
a
is the sensor address (“0-9”, “A-Z”, “a-z”, “*”, “?”)
19
SDI-12 COMMAND & RESPONSE
I
is an upper-case ASCII character
ll
is the SDI-12 version compatibility level, e.g. version 1.2 is represented as “12”.
cccccccc
is an 8 character vendor identification to be specified by the vendor and usually in the
form of a company name or its abbreviation.
mmmmmm is a 6 character field specifying the sensor model number.
vvv
xx...xx
is a 3 character field specifying the sensor version number.
is an optional field of up to a maximum of 13 characters to be used for serial number or
other specific sensor information not relevant to operation of the data recorder.
Example of a “aI!” command:
“a12DAAH-4161vvvS#nnnnnnVkkk<cr><lf>”
H-4161 implementation of the optional 13 character field:
S#nnnnnnVkkk (12 bytes total)
Where:
“nnnnnn
“kkk”
is a six character sensor serial number
is a three digit sensor firmware revision level
Change Sensor Address Command
The Change Sensor Address Command allows the sensor address to be changed. The address is stored in
non-volatile Flash memory within the sensor. The H-4161 will not respond if the command was invalid, the
address was out of range, or the Flash programming operation failed.
Command
Response Description
“aAn!”“n<cr><lf>”Change sensor address
Where:
a
is the current (old) sensor address (“0-9”, “A-Z”, “a-z”, “*”, “?”). An ASCII “*” may be used
as a “wild card” address if the current address is unknown and only one sensor is
connected to the bus.
A
is an upper-case ASCII character
n
is the new sensor address to be programmed (“0-9”, “A-Z”).
NOTE: To verify the new address, use the “Identify Command”
20
SDI-12 Command & Response
Example of a “Change Sensor Address” command:
Command
“aA2!”
Response
Description
“2<cr><lf>” Change sensor address to “2”
Extended Set_Current_Stage Command (for testing the 4-20mA output)
During installation and testing it is convenient to force set the H-4161’s output to a particular value. The
“aXSCSddd” command allows the user to force the current measurement data (Stage) to a particular setting.
The H-4161 processes the ddd value using the current Max and Min settings and updates the 4-20mA output.
Both the Stage and mA output values are printed on the LCD display. The H-4161 comes from the factory with
the Max set to 20.00 and the Min to 4.00. With these settings the value ddd is conveniently the same as what
the output current (in milliamps) will be. For example, if an “aXSCS10.0!” is issued, the output current will be
10.0mA. The data value must be between the current Max and Min settings or the output will be clamped at
4.00mA or 20.0mA.
This command is useful for testing the max and min settings over the dynamic range of your SDI-12 sensor.
For example: if Max=10.0 and Min=0.0, an “aXSCS5.0 will set the output current to 12.0mA.
Note: if the module mode is INITIATE, the output setting will be overwritten when the H-4161 initiates a
measurement on the auxSDI port.
Example of a H-4161 Extended “Set Current Stage” command:
Command Response
“aXSCS2.3!” “Stage_F=2.3<cr><lf>
Description
Set the Stage to 2.3
Extended Set_Milliamp Command (for testing the 4-20mA output)
During installation and testing it is convenient to force set the H-4161’s output to a particular value. The
“aXSMddd” command allows the user to force the output to a particular milliamp setting. The value is not
processed with the module’s Max and Min settings. For example: “aXSCS5.0 will set the output current to
5.0mA, regardless of the Max or Min settings.
Note: if the module mode is INITIATE, the output setting will be overwritten when the H-4161 initiates a
measurement on the auxSDI port.
Example of a H-4161 Extended “Set Milliamp” command:
Command
“aXSM5.6!”
Response
“I-Out=5.6mA<cr><lf>
Description
Set the output to 5.6 milliamps
21
SDI-12 COMMAND & RESPONSE
Extended Read/Write Max (High) and Read/Write Min (Low)
The H-4161 processes the captured SDI-12 data witth a linear mx+b equation to scale the data into values
between 4.0 and 20.00 suitable for the 4-20mA output. The slope(m) and offset (b) terms are automatically
computed using user programmable Max and Min settings. This makes it easy to scale the measurement data
into the proper 4-20mA output. These four commands allow the user to read or write the current Max or Min
settings. The settings are stored in non-volatile flash memory. Once the new max or min value is written to
the flash memory, a copy is sent to the sensor data buffer for verification. This data can be viewed by using a
subsequent “D” command. To verify these settings any other time, usee the “XRIH” or “XRIL” commands. This
command takes 1 second to complete and places 1 value in the data buffer.
Command
“aXRIH!”
“aXRIL!”
“aXWIHddd!”
“aXWILddd!”
Where:
a
XRIH
XRIL
XWIH
XWIL
ddd
Response
“a0011<cr><lf>”
“a0011<cr><lf>”
“a0011<cr><lf>”
“a0011<cr><lf>”
Description
Read current max (high) data setting
Read current min (low) data setting
Write max (high) data setting
Write min (low) data setting
is the sensor address (“0-9”, “A-Z”, “a-z”, “*”, “?”).
are upper case characters.
are upper case characters.
are upper case characters.
are upper case characters.
is the new max or min value (For example: 20.0, 195)
Example of a H-4161 Extended Read High (max) command:
Command
"aXRIH!"
Response
"a0011<cr><lf>"
Time
1 sec
Command "aD0!"
Response
"a+50.0<cr><lf>"
Description
Max is 50.
Values
1
Description
Read Max
Example of a H-4161 Extended Write High (max) command:
22
Command
“aXWIH1.234!”
Response
"a0011<cr><lf>"
Time
1 sec
Command "aD0!"
Response Description
"a+1.234<cr><lf>" Max is 1.234
Values
1
Description
Write Max
SDI-12 Command & Response
Extended Read Module Mode Max (High) and Read Module Mode Min (Low)
The H-4161 operates in one of two modes: MONITOR or INITIATE. When the Module Mode =0 (monitor),
the H-4161 passively monitors the communication between the data recorder and it’s SDI-12 sensors. The
H-4161 waits for, and collects a specified data parameter from a specified sensor. The data is scaled and used
to set the H-4161’s 4-20mA output. When the Module Mode =1 (initiate), the H-4161 actively initiates measu
rements and collects the response from the sensor attached to the auxSDI port. The specified data parameter
is scaled and used to set the H-4161’s 4-20mA output.
These two commands allow the user to examine or change the Module Mode. The H-4161 comes from the
factory with Module Mode = 0 (monitor). The Module Mode stored in non-volatile Flash memory. Once a new
value is written to the Flash memory, a copy is sent to the sensor data buffer for verification. This setting can
be viewed by using a subsequent “D” command. To verify this setting any other time, use the “XRMM”
command. This command takes 1 second to complete and places 1 value in the data buffer.
Command
“aXRMM!”
“aXWMMn!” Where:
Response
“a0011<cr><lf>”
“a0011<cr><lf>” a
XRMM
XWMM
n
Description
Read current module mode
Write the module mode
is the sensor address (“0-9”, “A-Z”, “a-z”, “*”, “?”).
are upper case characters.
are upper case characters.
0 = MONITOR, 1=INITIATE
Example of a H-4161 Extended Read Module Mode command:
Command
“aXRMM!” Response
“a0011<cr><lf>” Time
1 sec Values
1
Description
Read module mode
Command “aD0!” Response
“a+0<cr><lf>” Description
Module Mode is MONITOR
Example of a H-4161 Extended Write High (max) command:
Command
“aXWMM1!” Response
“a0011<cr><lf>”
Time
Values
1 sec 1
Description
Write module mode
Command “aD0!” Response
“a+1<cr><lf>” Description
Module Mode is INITIATE
23
SDI-12 COMMAND & RESPONSE
Extended Set Transparent Mode command
When the Module Mode = 1 (Initiate), the H-4161 actively initiates measurements and collects the response
from the sensor attached to the auxSDI port. During setup and testing it may be useful for the user to access
the sensor attached to the auxSDI port without changing the wiring or connectors. When activated, the
Transparent mode causes the H-4161 to stop making measurements on the auxSDI port and to make a virtual
connection between the primary and auxSDI ports. While the Transparent Mode is active , all communication
to/from the H-4161’s address is passed thru to the auxSDI port. The “aM!”, “aD0!” and other internal commands
of the H-4161 are disabled and the H-4161 is essentially replaced by the sensor attached to the auxSDI port..
The Transparent Mode is automatically deactivated when the H-4161 detects an access to any sensor address
other than its own. Note: the sensor address character of each command is forced to “0” by the H-4161 before
being forwarded to the auxSDI port.
Example of H-4161 Extended Set Transparent Mode Command
Command
"aXSTM!"
Response
"aTransparent mode ON<cr><lf>"
Description
Transparent mode is active
Extended Read/Write Monitored Address and Read/Write Monitored Parameter
As a data monitor, the H-4161 passively monitors the communication between the data recorder and it’s SDI12 sensors. The H-4161 waits for, and collects a specified data parameter from a specified sensor. The data
is scaled and used to set the H-4161’s 4-20mA output. These four commands allow the user to examine or
set the sensor address and the sensor data parameter to be monitored. At the factory the monitored address
is set to “Z” and the monitored parameter is set to “1”. For example: with these settings if a data recorder
collects data from sensor “Z” with a “ZD0” command and the sensor transmits Z+123.4+24.3<cr><lf>, the
value 123.4 will be captured by the H-4161. Note: the monitored address setting is not used if Module Mode
= 1 (initiate).
Do not set the Monitored Address to the same address as the H-4161’s address. The address and parameter
settings are stored in non-volatile Flash memory. Once a new value is written to the Flash memory, a copy is
sent to the sensor data buffer for verification. This setting can be viewed by using a subsequent “D” command.
To verify these settings any other time, use the “XRMA” or “XRMP” commands. This command takes 1 sec
ond to complete and places 1 value in the data buffer.
24
SDI-12 Command & Response
Command
“aXRMA!”
“aXRMP!”
“aXWMAn!”
“aXWMPn!”
Where:
Response
“a0011<cr><lf>”
“a0011<cr><lf>”
“a0011<cr><lf>”
“a0011<cr><lf>”
a
XRMA
XRMP
XWMA
XWMP
n
Description
Read current monitored address
Read current monitored parameter
Write current monitored address
Write current monitored parameter
is the sensor address (“0-9”, “A-Z”, “a-z”, “*”, “?”).
are upper case characters.
are upper case characters.
are upper case characters.
are upper case characters.
is the new address or paramete
Example of a H-4161 Extended Read Monitored Address command:
Command
“aXRMA!”
Response
“a0011<cr><lf>”
Time
1 sec
Values
1
Description
Read monitored address
Command “aD0!” Response
“a+Z<cr><lf>” Description
Monitored address = Z
Example of a H-4161 Extended Write Monitored Address command:
Command
“aXWMA5!”
Response
“a0011<cr><lf>”
Time
1 sec
Values
1
Command “aD0!” Response
“a+5<cr><lf>” Description
Monitored address = 5
Description
Write monitored address
Extended Read/Write AutoScan Command
When the Module Mode =1 (initiate), the H-4161 actively initiates measurements and collects the response
from the sensor attached to the auxSDI port. These two commands allow the user to select which “M”
command is sent by the H-4161 when it initiates a measurement ( “0M!”, “0M1!”, “0M2!” etc.) . The H-4161
comes from the factory with this setting set to “0” (“0M!”). Only the settings “0” to “9” are valid:
0 = 0M! (default)
1 = 0M1!
2 = 0M2!
3 = 0M3!
4 = 0M4!
5 = 0M5!
6 = 0M6!
7 = 0M7!
8 = 0M8!
9 = 0M9
25
SDI-12 COMMAND & RESPONSE
This setting stored in non-volatile Flash memory. Once a new value is written to the Flash memory, a copy is
sent to the sensor data buffer for verification. This setting can be viewed by using a subsequent “D” command.
To verify this setting any other time, use the “XRAC” command. This command takes 1 second to complete
and places 1 value in the data buffer.
CommandResponseDescription
“aXRAC!”
“a0011<cr><lf>”
Read current AutoScan command setting
“aXWACn!”
“a0011<cr><lf>”
Write current AutoScan command setting
Where:
a
XRAC
XWAC
n
is the sensor address (“0-9”, “A-Z”, “a-z”, “*”, “?”).
are upper case characters.
are upper case characters.
is the new parameter
Example of a H-4161 Extended Read AutoScan Command:
Command
“aXRAC!” Response
“a0011<cr><lf>” Time
1 sec Values
1 Description
Read AutoScan setting
Command “aD0!” Response
“a+0<cr><lf>” Description
Command will be “0M!”
Example of a H-4161 Extended Write AutoScan Command:
Command
“aXWAC2!”
Response
“a0011<cr><lf>”
Time
1 sec
Values
1
Description
Write AutoScan setting
Command “aD0!” Response
“a+2<cr><lf>” Description
Command will be “0M2!”
Extended Read/Write AutoScan Address Command
When the Module Mode =1 (initiate), the H-4161 actively initiates measurements and collects the response
from the sensor attached to the auxSDI port. These two commands allow the user to select which sensor
address is sent by the H-4161 when it initiates a measurement ( “aM!”, “aM1!”, “aM2!” etc.) . The H-4161 comes
from the factory with this setting set to “0” (“0M!”).
This setting stored in non-volatile Flash memory. Once a new value is written to the Flash memory, a copy is
sent to the sensor data buffer for verification. This setting can be viewed by using a subsequent “D” command.
To verify this set ting any other time, use the “XRAA”
command. This command takes 1 second to complete and places 1 value in the data buffer.
Command
“aXRAA!”
“aXWAAn!”
26
Response
“a0011<cr><lf>”
“a0011<cr><lf>”
Description
Read current AutoScan address setting
Write current AutoScan address setting
SDI-12 Command & Response
Where:
a
XRAA
XWAA
n
is the sensor address (“0-9”, “A-Z”, “a-z”, “*”, “?”).
are upper case characters.
are upper case characters.
is the new parameter
Example of a H-4161 Read AutoScan Address Command:
Command
“aXRAA!”
Response
“a0011<cr><lf>”
Command “aD0!” Response
“a+0<cr><lf>” Time
1 sec
Values
1
Description
Read AutoScan address setting
Description
Command will be “0M!”
Example of a H-4161 Extended Write AutoScan Address Command:
Command
“aXWAA2!”
Response
“a0011<cr><lf>”
Time
1 sec
Values
1
Description
Write AutoScan address setting
Command “aD0!” Response
“a+2<cr><lf>” Description
Command will be “2M!”
Extended Read/Write Measure Rate Commands
When Module Mode = 1 (initiate), the H-4161 initiates measurements to the sensor attached to the auxSDI
port. The measurement interval is controlled by the Measure Rate setting. These two command allows the
user to examine or change the Measure Rate setting. If the Measure Rate is set to a value less than the time
it takes to make the actual measurement, measurements will be made back-to-back, as fast as possible. At
the factory the Measure Rate is set to zero. (seconds). The Measure Rate setting is stored in non-volatile
Flash memory. Once a new value is written to the Flash memory, a copy is sent to the sensor data buffer for
verification. This setting can be viewed by using a subsequent “D” command. To verify this setting any other
time, use the “XRMR” command. This command takes 1 second to complete and places 1 value in the data
buffer.
Command
“aXRMR!”
“aXWMRnn!”
Where:
a
XRMR
XWMR
nn
Response
“a0011<cr><lf>”
“a0011<cr><lf>”
Description
Read current measurement rate (seconds)
Write measurement rate (seconds)
is the sensor address (“0-9”, “A-Z”, “a-z”, “*”, “?”).
are upper case characters.
are upper case characters..
is the new measurement rate (seconds)
27
SDI-12 COMMAND & RESPONSE
Example of a H-4161 Read Measure Rate Command:
Command
“aXRMR!”
Response
“a0011<cr><lf>”
Time
1 sec
Values
1
Description
Read Measure Rate
Command “aD0!”
Response
“a+0.<cr><lf>”
Description
Measure Rate = 0 seconds
Example of a H-4161 Extended Write Measure Rate Command:
Command
“aXWMR5!”
Response
“a0011<cr><lf>”
Time
1 sec
Values
1
Description
Write Measure Rate
Command “aD0!”
Response
“a+5<cr><lf>” Description
Measure Rate = 5.0 seconds”
Extended “XTEST”
This command is used for installation and testing and requires the use of a H-4191 Sidekick interface and a PC.
This command causes the H-4161 to display a listing of the H-4161’s current settings. This is not compliant
with the SDI-12 specification and is not used with data loggers.
An example of an “XTEST” printout is shown below:
H-4611 Settings:
Module Mode = MONITOR
Monitored Address = Z
Monitored Parameter = 1
AutoScan Address = 0
AutoScan Command = 0
Measure Rate (sec)= 0
Max data (@20mA) = 20.0
Min data (@4mA) = 4.0
Extended “XHELP”
This command is used for installation and testing and requires the use of a H-4191 Sidekick interface and
a PC. This command causes the H-4161 to display a listing of the supported SDI-12 commands. This is not
compliant with the SDI-12 specification and is not used with data loggers.
28
SDI-12 Command & Response
Appendix A: Specifications
4-20mA Current Transmitter
Type:
2-wire, loop powered
Isolation:
1000V r.m.s min
Loop Voltage:
5.5V min, 35V max (4 to 20mA)
Resolution:
16-bits
Non-linearity:
±0.01% of FS max
Offset drift:
±25ppm of FS/ ° C max
Range:
0.35mA to 24mA
Power Requirements
Voltage Input:
Surge Protection:
Supply Current:
Sleep mode
Active
9 to 16 Volts DC
Built in, 1.5 KVA
2.1 mA typ
8.0mA typ
SDI-12 Ports
Baud Rate:
1200
Protocol:
SDI-12, 7-bit even parity,
1 stop bit
Output Voltage Levels:
Minimum high level: 3.5 volts
Maximum low level: 0.8 volts
Response Time
SDI-12 measurement sequence:
aM!:
0-seconds, 1-parameter
all other:
1, second, 1-parameter
LCD Display
Type:
Operating Temperature:
Storage Temperature:
2-line x 16-character, reflective
-0° C to +50° C
-20° C to +60° C
Environmental
Operating Temperature:
Storage Temperature:
Humidity:
-20° C to +50° C
-20° C to +60° C
Non condensing
Mechanical
Material:
ABS plastic
Size
3.75”L x 2.65”W
x 1.25”D
Connections
+12V, SDI-12, AuxSDI:
5-position plug-in
terminal strip,
Phoenix Combicon™
(provided)
4-20mA:
2-position plug-in
terminal strip,
Phoenix Combicon™
(provided)
The WATERLOG® H-4161 is warranted against
defects in materials and workmanship for one
year from date of shipment.
Notes
Specifications subject to change without prior
notice due to ongoing commitment to product
testing and improvement.
Operating Modes
Monitor:
Monitor the SDI-12 port for “aD0!” commands, update the 4-20mA output.
Initiate:
Initiate measurements on the AuxSDI port, update the 4-20ma output, data is available via “aM!”
on the primary SDI-12 port
Transparent:
SDI-12 and AuxSDI ports are connected together
29
Xylem
1) The tissue in plants that brings water upward from the roots;
2) a leading global water technology company.
We’re 12,000 people unified in a common purpose: creating innovative solutions
to meet our world’s water needs. Developing new technologies that will improve
the way water is used, conserved, and re-used in the future is central to our work.
We move, treat, analyze, and return water to the environment, and we help people
use water efficiently, in their homes, buildings, factories and farms. In more than
150 countries, we have strong, long-standing relationships with customers who
know us for our powerful combination of leading product brands and applications
expertise, backed by a legacy of innovation.
For more information on how Xylem can help you, go to www.xyleminc.com
YSI Incorporated
1700/1725 Brannum Lane
Yellow Springs, Ohio, 45387, USA
Request a Quote
Tel:
Email:
+1.435.753.2212
[email protected]
Internet:
www.waterlog.com
Place an Order
Tel:
Email:
+1.937.767.7241
[email protected]
Customer Support
Tel:
© 2015 Xylem, Inc. D70 0915
+1.937.767.2772