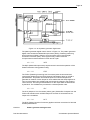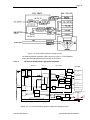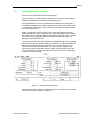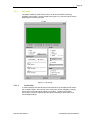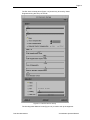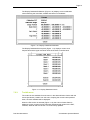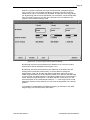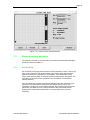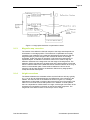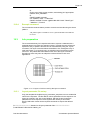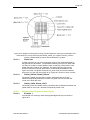
1
Vectorbeam Series
Vectorbeam Operator Manual
CONFIDENTIAL
Part number: 878275
Vectorbeam Series
Vectorbeam Operator Manual
Abstract
This document describes the operating procedures for Vistec Vectorbeam series
systems. This version of the manual is for VMS-based workstations
Please read the important safety information on page 1
All reasonable steps have been taken to ensure that this publication is correct and
complete, but should any user be in doubt about any detail, clarification may be sought
from Vistec Lithography Ltd, or their accredited representative. The information in this
document is subject to change without notice and should not be construed as a
commitment by Vistec Lithography Ltd.
Vistec accepts no responsibility for any errors that may appear in this document.
Copyright © 2006 Vistec Lithography Ltd, Cambridge, England
All rights reserved. The contents of this publication may not be reproduced in any form,
or communicated to a third party without prior written permission of Vistec.
“Vectorbeam” is a trademark of Vistec. All other referenced trademarks are the property
of their respective owners.
Part Number: 878275
Date: 18 Nov 2005
Issue: 3.1 draft
Software Version: EMMA v6.38
Author: P Hoyle
Printed in England.
This document is originally written in English.
Corrections and changes to this manual should be forwarded by email to:[email protected], Giving full details of the changes required.
Vistec Lithography Ltd
PO Box 87
515 Coldhams Lane
Cambridge, CB1 3XE. UK
Tel +44 (0) 1223 411123
Fax +44 (0) 1223 211310
Page i
Table of Contents
Preface and safety information .................................................................. 1
1.
2.
3.
Vectorbeam Series systems .............................................................. 5
1.1.
Vectorbeam system overview.............................................................................. 5
1.2.
Plinth .................................................................................................................... 6
1.2.1. Stage ...................................................................................................... 6
1.2.2. Substrate load system............................................................................ 7
1.3.
Electronics crates................................................................................................. 8
1.3.1. Control electronics rack 1....................................................................... 8
1.3.2. Control electronics rack 2....................................................................... 8
1.4.
Electronics cabinets ............................................................................................. 9
1.4.1. Cabinet A................................................................................................ 9
1.4.2. Cabinet B................................................................................................ 9
1.5.
Stand alone EHT cabinet................................................................................... 10
1.6.
Power supplies................................................................................................... 11
1.7.
Operator console ............................................................................................... 11
1.8.
Temperature control water baths....................................................................... 12
1.8.1. VB5....................................................................................................... 12
1.8.2. VB6....................................................................................................... 12
1.9.
Compressed air supply ...................................................................................... 13
1.10.
Meaning of labels found on machine components ............................................ 13
1.10.1. Labels on all Vectorbeam machines .................................................. 13
1.10.2. Labels only found on machines with wafer loading automation......... 15
Optical system.................................................................................. 17
2.1.
Beam production / gun....................................................................................... 18
2.2.
Spot formation.................................................................................................... 19
2.2.1. Gun aligner........................................................................................... 19
2.2.2. Apertures.............................................................................................. 19
2.2.3. Lenses for TFE gun.............................................................................. 19
2.2.4. Beam blanking...................................................................................... 19
2.2.5. Fine focus coil ...................................................................................... 20
2.2.6. Stigmator coil........................................................................................ 20
2.3.
Beam deflection ................................................................................................. 20
2.4.
Imaging .............................................................................................................. 21
Vacuum system................................................................................ 23
3.1.
Conversion of different pressure units ............................................................... 23
3.2.
Principles of operation ....................................................................................... 23
3.3.
TFE column vacuum system ............................................................................. 24
3.4.
VB5 vacuum system .......................................................................................... 24
3.5.
VB6 vacuum system .......................................................................................... 25
3.6.
Vacuum controller (PICS or Brooks control)...................................................... 25
3.7.
Vacuum control panel ........................................................................................ 25
3.7.1. VB5 FEG vacuum control panel........................................................... 26
3.7.2. VB5 mimic panel key............................................................................ 26
3.7.3. VB6 FEG with 2 roughing pumps vacuum control panel ..................... 28
Part number: 878275
Vectorbeam Series Vectorbeam Operator Manual
Page ii
3.7.4.
3.7.5.
3.7.6.
3.7.7.
3.7.8.
3.7.9.
3.7.10.
3.7.11.
3.7.12.
3.7.13.
3.7.14.
4.
VB6 FEG with 1 roughing pump and no bypass vacuum control panel29
VB6 FEG with 1 roughing pump vacuum control panel ....................... 30
VB6 mimic panel key............................................................................ 30
Vent system button............................................................................... 32
Pump system button............................................................................. 32
Airlock vent button................................................................................ 32
Airlock full vent button ........................................................................ 32
Airlock pump button............................................................................ 32
Bakeout button ................................................................................... 32
Bakeout reset button .......................................................................... 32
Reset button ....................................................................................... 32
3.8.
PICS and Brooks power up and reboot actions................................................. 33
3.8.1. VB5....................................................................................................... 33
3.8.2. VB6....................................................................................................... 34
3.9.
Vacuum system start up .................................................................................... 35
3.10.
Vacuum system shut down................................................................................ 35
3.11.
Vacuum system monitoring ............................................................................... 35
3.11.1. Stage Gauges..................................................................................... 35
3.11.2. Vacuum gauges ................................................................................. 35
3.11.3. Logicals .............................................................................................. 35
Computer system............................................................................. 37
4.1.
Pattern data preparation computer .................................................................... 37
4.2.
Operator terminal ............................................................................................... 37
4.3.
Computer controlled subsystems ...................................................................... 38
4.3.1. Pattern generator ................................................................................. 38
4.3.2. Stage Controller ................................................................................... 42
4.3.3. On-axis controller ................................................................................. 42
4.3.4. PICs controller...................................................................................... 42
4.3.5. Logging in to the subsystem controllers............................................... 42
5.
Machine start up from cold............................................................ 43
6.
Machine shut down ......................................................................... 45
7.
Emma control software .................................................................. 47
8.
7.1.
Hints................................................................................................................... 47
7.2.
Emma windows overview .................................................................................. 48
7.2.1. Set menu .............................................................................................. 50
7.2.2. Display menu........................................................................................ 54
7.2.3. Toolkit menu......................................................................................... 57
7.3.
Emma directory structure................................................................................... 60
7.4.
Emma help......................................................................................................... 60
Job control ....................................................................................... 61
8.1.
DCL commands ................................................................................................. 61
8.2.
Emma commands .............................................................................................. 61
8.3.
Supplied job files................................................................................................ 61
8.4.
Job file creation.................................................................................................. 61
8.5.
Job file examples ............................................................................................... 62
8.6.
Running jobfiles ................................................................................................. 62
8.7.
Stopping jobfiles................................................................................................. 62
Part number: 878275
Vectorbeam Series Vectorbeam Operator Manual
Page iii
8.7.1.
8.7.2.
8.7.3.
9.
10.
During DCL command execution ......................................................... 62
During Emma command execution ...................................................... 62
Notes on CTRL-C and CTRL-Y............................................................ 62
8.8.
OpenVMS tips.................................................................................................... 63
8.8.1. Recommended tasks to avoid user hang ups...................................... 63
8.8.2. Recommendation ................................................................................. 64
8.9.
Logicals.............................................................................................................. 64
8.9.1. Useful logicals ...................................................................................... 64
8.10.
Creating compiled jobfiles.................................................................................. 64
Corrections....................................................................................... 67
9.1.
Corrections for absolute accuracy ..................................................................... 67
9.1.1. Stage mapping - absolute mode .......................................................... 67
9.1.2. Beam error feedback (BEF) correction ................................................ 67
9.1.3. Magnetic map correction ...................................................................... 68
9.1.4. Height corrections ................................................................................ 68
9.1.5. Yaw correction (18-bit and 20-bit VB6 only) ........................................ 69
9.1.6. Deflection field corrections ................................................................... 70
9.1.7. Shift, scale and rotation corrections for fine focus ............................... 71
9.2.
Corrections for matching.................................................................................... 71
9.2.1. Direct write correction........................................................................... 71
9.2.2. Stage mapping - machine mode .......................................................... 71
9.2.3. Stepper lens correction ........................................................................ 71
Height meter .................................................................................... 73
10.1.
Height meter tables............................................................................................ 73
10.1.1. Table choice ....................................................................................... 73
10.1.2. Table selection in Emma .................................................................... 74
10.2.
Height meter calibration..................................................................................... 74
10.3.
Height meter readings ....................................................................................... 75
10.4.
Height meter timing............................................................................................ 75
10.5.
Height meter warnings and error messages...................................................... 76
10.6.
Height meter offsets........................................................................................... 76
10.6.1. Resist thickness compensation .......................................................... 76
10.6.2. Height meter offset effect on stitch accuracy ..................................... 77
10.6.3. Sign of offset....................................................................................... 77
10.6.4. Setting the height meter offset ........................................................... 77
10.7.
Fine tuning the height-dependent field scaling .................................................. 79
10.8.
Fine tuning the height-dependent field rotation ................................................. 80
10.9.
Heightmeter early read ...................................................................................... 82
10.10. Height map readings by jobfile .......................................................................... 82
10.11. Height map mode............................................................................................... 82
10.11.1. Real-time mode ................................................................................ 82
10.11.2. Height-map mode............................................................................. 82
10.12. Height map calibration ....................................................................................... 82
10.13. Mini height map (18-bit and 20-bit pattern generators only).............................. 83
10.13.1. Height identifiers............................................................................... 83
10.13.2. Creating a mini height map .............................................................. 84
10.13.3. Mini height map use -with standard layout parameter file template. 85
11.
Mark locate ...................................................................................... 87
11.1.
Review of principles ........................................................................................... 87
Part number: 878275
Vectorbeam Series Vectorbeam Operator Manual
Page iv
11.2.
Designing alignment marks for direct write registration..................................... 88
11.2.1. Mark type............................................................................................ 88
11.2.2. Mark size ............................................................................................ 88
11.2.3. Mark positioning ................................................................................. 89
11.2.4. Mark contrast...................................................................................... 90
11.3.
Mark locate algorithms....................................................................................... 90
11.4.
Definition of parameters for mark location......................................................... 91
11.4.1. Syntax................................................................................................. 91
11.4.2. Choosing geometry parameters ......................................................... 91
11.4.3. Choosing signal parameters............................................................... 92
11.4.4. Choosing scan parameters ................................................................ 94
11.5.
Mark location command..................................................................................... 95
11.6.
Mark administration functions ............................................................................ 95
11.7.
Diagnostic output of the mark locate function.................................................... 95
11.8.
Pit locate algorithm ............................................................................................ 96
11.8.1. Spiral search....................................................................................... 96
11.8.2. Bisection search ................................................................................. 96
11.8.3. Fine search......................................................................................... 97
11.9.
Edge locate algorithm ........................................................................................ 98
11.9.1. Coarse search .................................................................................... 98
11.9.2. Fine search......................................................................................... 99
11.10. Cross locate algorithm ..................................................................................... 100
11.10.1. Raster search ................................................................................. 100
11.10.2. Fine search..................................................................................... 101
11.11. Actions if the mark locate consistently fails to find the mark ........................... 104
12.
13.
Databases........................................................................................ 105
12.1.
Database structure........................................................................................... 105
12.2.
Database parameters ...................................................................................... 105
12.2.1. Header for all databases .................................................................. 105
12.2.2. Total database.................................................................................. 106
12.2.3. Top level partial databases .............................................................. 106
12.2.4. Bottom level partial databases ......................................................... 107
12.3.
Database saving .............................................................................................. 111
12.4.
Database loading ............................................................................................. 111
12.5.
Database management ................................................................................... 111
12.5.1. Recommended scheme ................................................................... 112
12.5.2. Basic database generation............................................................... 112
12.5.3. Field corrections database generation ............................................. 113
12.5.4. Beam database generation .............................................................. 113
12.5.5. Magnetic map database generation................................................. 113
12.6.
Database selection prior to exposure .............................................................. 114
12.7.
Deflection-field corrections confidence check ................................................. 114
12.8.
Calib.com ......................................................................................................... 114
Exposure dose ................................................................................ 117
13.1.1.
13.1.2.
13.1.3.
13.1.4.
13.1.5.
13.1.6.
13.1.7.
Part number: 878275
Area dose ......................................................................................... 117
Line dose .......................................................................................... 117
Point dose......................................................................................... 117
Resist sensitivity parameter ............................................................. 117
Clocks............................................................................................... 118
Beam current .................................................................................... 118
Exposure grid ................................................................................... 119
Vectorbeam Series Vectorbeam Operator Manual
Page v
14.
15.
16.
13.2.
Dose controller................................................................................................. 119
13.2.1. Dose controller band set up ............................................................. 119
13.2.2. Update of pattern generator frequencies on exposure .................... 120
13.2.3. VMS logicals..................................................................................... 120
13.3.
Exposing proximity corrected patterns............................................................. 121
13.3.1. Dose controller operation with proximity corrected patterns ............ 121
13.3.2. Proximity correction.......................................................................... 121
13.3.3. Transferring dose distribution to the VB........................................... 122
13.3.4. Notes for CATS converter users ...................................................... 123
13.3.5. Notes for Caprox converter users .................................................... 124
13.3.6. Example clockfile.............................................................................. 125
13.3.7. Exposing proximity corrected patterns ............................................. 125
Detectors......................................................................................... 127
14.1.
Beam current meter ......................................................................................... 127
14.2.
Photomultiplier backscatter detector................................................................ 127
14.3.
4-quadrant P-N junction backscatter detector ................................................. 127
14.4.
Transmission detector ..................................................................................... 128
Machine set ups ............................................................................. 131
15.1.
Temperature control......................................................................................... 131
15.2.
Temperature measurement ............................................................................. 131
15.2.1. Location of temperature measurement sensors............................... 131
15.2.2. Obtaining temperature readings....................................................... 131
15.2.3. Temperature set up .......................................................................... 132
15.3.
Changing the beam accelerating voltage (kV)................................................. 132
15.3.1. Choosing the beam accelerating voltage ......................................... 132
15.3.2. Important notes before increasing the beam accelerating voltage (kV)133
15.3.3. Conditioning the gun ........................................................................ 133
15.3.4. Setting the EHT ................................................................................ 133
15.3.5. Set up for operation.......................................................................... 133
15.4.
Final lens 3 (C3) set up.................................................................................... 134
15.5.
Stigmator balance set up ................................................................................. 134
15.5.1. Setups affected by stigmator balance .............................................. 134
15.6.
Conjugate blanking set up ............................................................................... 134
15.6.1. Lens C3 setup .................................................................................. 135
15.7.
Magnetic map calibration................................................................................. 136
15.7.1. Calibration jobfile .............................................................................. 137
15.8.
Demagnification and spot table calibration...................................................... 138
15.8.1. Demagnification table....................................................................... 138
15.8.2. Spot table ......................................................................................... 138
15.9.
Stage mapping modes..................................................................................... 139
15.9.1. Absolute stage map mode set up..................................................... 139
15.9.2. Entering stage map coefficients ....................................................... 142
15.9.3. Display stage map coefficients......................................................... 142
15.9.4. Machine stage map mode set up ..................................................... 142
15.9.5. Select stage map mode.................................................................... 143
Substrate loading and unloading ................................................. 145
16.1.
Systems with the Brooks handling option........................................................ 145
16.2.
Systems with the single chuck or 10-chuck airlock handling option................ 145
16.2.1. VB5................................................................................................... 145
16.2.2. VB6................................................................................................... 145
Part number: 878275
Vectorbeam Series Vectorbeam Operator Manual
Page vi
17.
18.
16.3.
Alignment of substrate for direct write ............................................................. 146
16.3.1. Measuring the rotation...................................................................... 146
16.3.2. Adjusting the rotation........................................................................ 146
16.4.
Holder loading/unloading in/from airlock ......................................................... 146
16.4.1. VB5................................................................................................... 146
16.4.2. VB6 single holder airlock.................................................................. 146
16.4.3. VB6 ten holder airlock ...................................................................... 147
16.5.
Holder loading/unloading on/from stage.......................................................... 148
16.5.1. VB5................................................................................................... 148
16.5.2. VB6................................................................................................... 149
16.5.3. Stopping a substrate transfer ........................................................... 149
16.5.4. Holder initialisation / sequence......................................................... 149
16.5.5. Holder parameters............................................................................ 150
16.5.6. Setting up the holder parameters ..................................................... 151
16.5.7. Datum target layout .......................................................................... 152
16.5.8. Datum mark contamination .............................................................. 154
16.5.9. Holder position table “caspos”.......................................................... 155
Job-specific machine set-ups ........................................................ 157
17.1.
Gun alignment.................................................................................................. 157
17.1.1. Coarse gun alignment HR and UHR final lens................................. 157
17.1.2. Fine gun alignment........................................................................... 157
17.1.3. Automatic.......................................................................................... 160
17.1.4. Setups affected by gun alignment.................................................... 160
17.2.
Video gain and backoff set up ......................................................................... 160
17.2.1. Manual gain and backoff adjustment ............................................... 161
17.2.2. Automatic gain and backoff adjustment ........................................... 161
17.2.3. Video Calibration for UHR machines ............................................... 162
17.3.
Final aperture................................................................................................... 163
17.3.1. Final aperture selection .................................................................... 163
17.3.2. Final aperture alignment................................................................... 163
17.3.3. Defining the aperture adjustment mechanism positions .................. 164
17.3.4. Controlling the automatic aperture adjustment mechanism............. 164
17.4.
Focusing the beam .......................................................................................... 165
17.4.1. Manual focus and stigmation adjustment......................................... 165
17.4.2. Automatic focus and stigmation adjustment..................................... 166
17.4.3. Debugging problems with automatic focus/stigmation adjustment .. 168
17.4.4. Correct fine focus value on datum for conjugate blanking ............... 168
17.4.5. qadjust field ...................................................................................... 169
17.4.6. How the fine focus setting and adjust field combine to drive the fine focus
169
17.5.
Beam current measurement ............................................................................ 170
17.6.
Beam diameter measurement ......................................................................... 170
17.6.1. Background ...................................................................................... 170
17.6.2. Display diameter............................................................................... 170
17.6.3. Mark slope calibration ...................................................................... 172
17.7.
Beam current adjustment................................................................................. 173
17.7.1. Automatic.......................................................................................... 173
17.7.2. Manual.............................................................................................. 173
17.8.
Beam diameter adjustment.............................................................................. 174
17.8.1. Automatic.......................................................................................... 174
17.8.2. Manual.............................................................................................. 174
17.9.
Theoretical tables of on-axis beam diameters and beam currents.................. 175
17.9.1. FEG with HR final lens ..................................................................... 175
17.9.2. FEG with UHR final lens................................................................... 176
Calibration ..................................................................................... 177
Part number: 878275
Vectorbeam Series Vectorbeam Operator Manual
Page vii
18.1.
Overview .......................................................................................................... 177
18.2.
Fullcal............................................................................................................... 178
18.3.
Jobcal............................................................................................................... 178
18.4.
Interpretation of jobcal/fullcal on-axis calibrations ........................................... 178
18.4.1. Correction coefficients...................................................................... 178
18.4.2. Residual coefficient errors................................................................ 179
18.4.3. Correction errors (nm) ...................................................................... 179
18.4.4. Main field calibration......................................................................... 179
18.4.5. Subfield calibration ........................................................................... 179
18.4.6. Beam error feedback calibration ...................................................... 180
18.4.7. Stigmation calibration ....................................................................... 180
18.5.
Interpretation of fullcal deflection field correction calibrations ......................... 181
18.5.1. Field focus and stigmation................................................................ 182
18.5.2. Main field distortion .......................................................................... 182
18.5.3. Sub field distortion............................................................................ 182
18.5.4. Beam error feedback distortion ........................................................ 182
18.6.
Jobcal and fullcal errors and warnings ............................................................ 182
18.6.1. Additional warnings .......................................................................... 182
18.6.2. Additional errors ............................................................................... 182
18.7.
Checking deflection-field corrections ............................................................... 183
18.7.1. Field focus and stigmation................................................................ 183
18.7.2. Mainfield distortion ........................................................................... 183
18.7.3. Subfield distortion............................................................................. 183
18.7.4. Beam error feedback distortion ........................................................ 183
18.8.
Fine tuning deflection-field corrections ............................................................ 184
18.8.1. Field focus and stigmation................................................................ 184
18.8.2. Mainfield distortion ........................................................................... 184
18.8.3. Subfield distortion............................................................................. 185
18.8.4. Beam error feedback distortion ........................................................ 185
18.9.
Calibration offsets ............................................................................................ 185
18.9.1. 16-bit machines ................................................................................ 186
18.9.2. 18-bit and 20-bit machines ............................................................... 186
18.10. Stepper lens calibration ................................................................................... 187
18.10.1. Stepper lens calibration substrate .................................................. 188
18.10.2. Stepper lens map calibration.......................................................... 188
18.10.3. Checking the calibration ................................................................. 189
18.10.4. Use of lens maps............................................................................ 190
18.10.5. Further notes on using the stepper lens correction........................ 190
19.
Exposing a substrate ..................................................................... 193
19.1.
Pattern data preparation .................................................................................. 193
19.1.1. Pattern data conversion and processing software ........................... 193
19.1.2. Setting pattern file attributes on DEC computer............................... 198
19.1.3. Pattern generator resolution............................................................. 199
19.1.4. Choosing the pattern generator resolution / maximum fieldsize ...... 199
19.1.5. Block height and width ..................................................................... 202
19.1.6. Choosing the blocksize .................................................................... 205
19.1.7. Subfield fracturing ............................................................................ 207
19.1.8. Choosing the subfields ..................................................................... 208
19.1.9. Beamstep size and VRU .................................................................. 210
19.1.10. Choosing the spot size / beamstep size......................................... 211
19.1.11. Pattern generator grid snapping..................................................... 211
19.1.12. Choosing the pattern limits............................................................. 213
19.1.13. Negative biasing ............................................................................. 214
19.1.14. Examples........................................................................................ 214
19.2.
Drift removal using ontime ............................................................................... 215
19.2.1. Ontime function ................................................................................ 216
Part number: 878275
Vectorbeam Series Vectorbeam Operator Manual
Page viii
19.2.2.
19.2.3.
19.2.4.
20.
21.
22.
Resetting the datum / co-ordinate system origin.............................. 216
Example jobfile ................................................................................. 216
Example command........................................................................... 218
19.3.
Job preparation ................................................................................................ 218
19.3.1. Layout parameter file set up............................................................. 218
19.3.2. Check that the required writing frequency is within range ............... 221
19.4.
Machine preparation ........................................................................................ 222
19.4.1. Machine parameter configuration..................................................... 222
19.4.2. Load holder on stage........................................................................ 222
19.4.3. Confidence checks ........................................................................... 222
19.5.
Expose (finally!) ............................................................................................... 223
19.5.1. Interrupting exposure ....................................................................... 223
19.5.2. Wlvd.com.......................................................................................... 223
19.6.
Nested layouts ................................................................................................. 229
19.6.1. Top level layout parameter file ......................................................... 229
19.6.2. Second level layout parameter file ................................................... 230
Direct write alignment .................................................................. 231
20.1.
Direct write alignment methods ....................................................................... 231
20.1.1. Global alignment .............................................................................. 232
20.1.2. Die-by-die alignment ........................................................................ 232
20.1.3. Direct alignment commands on the VB............................................ 232
20.2.
A general direct write alignment method for regular rectangular arrays.......... 233
20.2.1. Global alignment .............................................................................. 233
20.2.2. Die-by-die alignment ........................................................................ 234
20.3.
Layout definition for regular rectangular alignment mark arrays ..................... 234
20.3.1. Global alignment mark layout........................................................... 234
20.3.2. Simple global alignment mark layout ............................................... 235
20.3.3. Automatic global alignment .............................................................. 236
20.3.4. Die alignment mark layout................................................................ 237
20.4.
Pattern data preparation .................................................................................. 237
20.5.
Job preparation ................................................................................................ 238
20.5.1. Layout parameter file set up............................................................. 238
20.6.
Machine preparation for direct write ................................................................ 241
20.7.
Substrate preparation for direct write............................................................... 241
20.8.
Expose ! ........................................................................................................... 241
Remote operation .......................................................................... 243
21.1.
Checking status remotely ................................................................................ 243
21.2.
Obtaining the “oper” control prompt................................................................. 243
21.3.
Login without using second license ................................................................. 244
21.4.
Batch queue operation..................................................................................... 244
21.5.
Re-booting the subsystems remotely .............................................................. 244
21.5.1. Pattern generator ............................................................................. 244
21.5.2. Stage ................................................................................................ 244
21.5.3. EO .................................................................................................... 245
Logfiles and logging ...................................................................... 247
22.1.
Emma logging .................................................................................................. 247
22.1.1. File.................................................................................................... 247
22.1.2. DECTerm.......................................................................................... 247
22.2.
Notes on OpenVMS logging ............................................................................ 247
Part number: 878275
Vectorbeam Series Vectorbeam Operator Manual
Page ix
22.2.1.
22.2.2.
22.2.3.
DECTerm logging during batch queue operation............................. 248
DECTerm logging using the SET HOST command ......................... 248
DECTerm logging using the “Options” menu ................................... 248
23.
Creating scanning electron image files ....................................... 249
24.
Advanced operation ...................................................................... 251
24.1.
Calculating throughput..................................................................................... 251
24.1.1. Beam on time ................................................................................... 251
24.1.2. Mainfield deflector settling time ........................................................ 251
24.1.3. Subfield deflector settling time ......................................................... 252
24.1.4. Shape synchronisation time ............................................................. 252
24.1.5. Stage movement time ...................................................................... 252
24.1.6. Stage settling time ............................................................................ 252
24.1.7. Heightmeter time .............................................................................. 252
24.1.8. Data processing time........................................................................ 253
24.1.9. Die-by-die alignment time................................................................. 253
24.2.
Displaying and setting the settling times ......................................................... 253
24.2.1. Mainfield deflector settling times ...................................................... 253
24.2.2. Subfield deflector settling time ......................................................... 254
24.2.3. Stage settling time ............................................................................ 255
24.3.
Under- or overlapping mainfields (sparse tiling) .............................................. 256
24.4.
Random field placement (sparse tiling) ........................................................... 256
24.5.
Selectable field correction interpolations ......................................................... 257
24.6.
Optimising throughput...................................................................................... 257
24.6.1. Increasing current and spot size ...................................................... 257
24.6.2. Reducing command processing times ............................................. 257
24.7.
Pattern sleeving ............................................................................................... 258
24.8.
Fieldsize adjustment resolution ....................................................................... 258
24.8.1. 16-bit pattern generator.................................................................... 258
24.8.2. 18-bit pattern generator.................................................................... 259
24.8.3. 20-bit pattern generator.................................................................... 259
24.9.
Grating generator............................................................................................. 259
24.9.1. Defining the grating .......................................................................... 260
24.9.2. Displaying grating definition ............................................................. 262
24.9.3. Clearing grating definition................................................................. 262
24.9.4. Selecting the algorithmic grating generation .................................... 262
24.9.5. Defining the order of the shapes ...................................................... 262
24.10. Shape erosion.................................................................................................. 263
24.10.1. “normal” option ............................................................................... 264
24.10.2. “Nodiscard” option .......................................................................... 264
24.10.3. None or Noerode option ................................................................. 265
24.11. Zero-dimension shapes ................................................................................... 266
24.12. Algorithmic programming................................................................................. 266
25.
Routine maintenance and servicing ............................................ 267
26.
Diagnostics ..................................................................................... 268
27.
Recovery from exception conditions ........................................... 269
27.1.
Job control window locks up ............................................................................ 269
27.2.
Top half of the screen goes black.................................................................... 269
27.3.
VAX/Alpha screen locks up ............................................................................. 269
Part number: 878275
Vectorbeam Series Vectorbeam Operator Manual
Page x
27.4.
Height meter error recovery............................................................................. 269
27.5.
Subfield calibration error.................................................................................. 270
27.6.
Errors and warnings message list with suggested recoveries......................... 271
27.6.1. Jobfile automatic recovery................................................................ 271
27.6.2. Subsystem errors ............................................................................. 272
27.6.3. Emma information messages........................................................... 272
27.6.4. Emma error messages ..................................................................... 272
27.6.5. Emma error numbers ....................................................................... 283
27.6.6. Pattern generator error messages ................................................... 289
27.6.7. Stage error messages ...................................................................... 294
27.6.8. EO error messages .......................................................................... 298
Part number: 878275
Vectorbeam Series Vectorbeam Operator Manual
Page 1
Preface and safety information
The purpose of this manual is to provide comprehensive information to enable an
operator to use Vectorbeam Series lithography systems in the most efficient manner. The
manual “VB6 with autoloader operator manual” part number 893148 covers the Brooks
handling option”.
This document is part of a full set of documentation available for users and supplied
during installation. It should be used in conjunction with the Vectorbeam Command Set
Manual (878274) (EMMA commands), the VB6 Process Module Controller (PMC)
Operator Manual for machines with Brooks handling (893157), the Machine Managers
Guide (892813), the Acceptance test and Operator Jobfiles User Manual (892777), the
Jobfile standards (892815), the Manual procedures for obtaining Demag tables (892878),
the Demag Tables (892894), the VB6 Pre Installation guide (878215). Documentation on
VMS and DCL is supplied on CD by HP Compaq with the computer.
The manuals are available in PDF- generally being supplied on CD.
This document covers topics very roughly in the order in which they would be
encountered if an operator were faced with the Vectorbeam in a powered-off state. Crossreferencing between chapters ensures that topics, which may be encountered at several
different sequences of operation are covered only once.
This version relates only to Emma release version given on the Abstract page at the front
of this manual. This version relates only to PICs version 11 and Applications Jobfiles
release V02.04.
WARNING – IMPORTANT SAFETY INFORMATION
If this equipment is operated in a manner not specified by the manufacturer the protection
provided by the equipment may be impaired.
It is impossible to fully predict or list here all the possible safety hazards, which could
occur in using the Vectorbeam. The equipment is designed to minimise any risks if used
as it was intended.
Please be aware of the possible hazards (see below) and follow the instructions in this
manual.
When operating the Vectorbeam in any way not specifically covered by this manual, or in
any way that could present a safety hazard, then please contact your Vistec service
representative.
This manual is aimed at normal operation of the Vectorbeam. I.e. operation by users
based at the operator workstation or machine operations involved with loading
substrates/wafers. It does not cover service operations, which would be carried out by
trained service personnel.
For Technical Service/advice
Contact the local Vistec service engineer,
Or use the worldwide contact telephone number +800 2255 34 22
Part Number:878275
Vectorbeam Operator Manual
Page 2
Additional safety information
(a) Intended use of the vectorbeam and chemical hazards
The Vectorbeam is intended for use:
•
In a clean environment, with environmental control
•
Installed as per the VB6 Pre-installation Instructions (document 878215)
Or, for the VB300 see document 893219, or for ‘AWH’ (Automated handling VB6) systems see
document 893150.
•
As a tool for writing electron beam patterns on substrates, using the ‘base process’ covered below.
The VB is not intended for use with hazardous chemicals and no hazardous chemicals
are used in its operation.
However, it is possible that very small amounts of hazardous chemicals (vapours) could
be generated inside the chamber when the electron beam interacts with some customer
substrates (e.g. resists).
!
Customers must assess the potential hazard from any such process and take
appropriate ventilation precautions, if required.
CAUTION
Base Process – chemicals used
The base process of the VB6 utilises a silicon substrate coated with resist. The resists,
developers and solvents that are utilised in the base process are listed in the table below.
PPE (Personal Protective Equipment) required for using these chemicals are described in
the hazardous substances information chart, manual no 931447. The PPE requirements
in this document must be adhered to when handling the chemicals described in 931447.
The chemicals used in the base process do not produce any hazardous by products when
used in the VB6 tool. Any additional chemicals introduced to the system, should be
assessed by the user for hazardous emissions.
Chemical
NEB22A2 & 31A2E
A5 & A7 PMMA 495
Electron Beam Resist 950 PMMA A11
EBR 9 Ebeam Resist
HSQ Fox(R) - flowable oxide
Chrome etch
LDD26W Developer
Microposit MF-CD-26
IPA Propan-2-ol
Methyl iso butyl Ketone
Acetone
MSDS Number
MSDS_5000911
MSDS_5000844
MSDS_5001283
MSDS_5000903
MSDS_5000919
MSDS_5000416
MSDS_5001119
MSDS_5000907
MSDS_425069
MSDS_425157
MSDS_425138
List of chemicals used in the base process
Contact Vistec for datasheets -MSDS (Material Safety Data Sheet)- if needed for the
above chemicals.
The Vectorbeam is NOT intended for use in an explosive atmosphere.
(b) Potential Hazards and protective measures
The following potential hazards exist with the Vectorbeam (this is not intended as an
exhaustive list, but covers the main hazards):
Part Number:878275
Vectorbeam Operator Manual
Page 3
•
Laser hazard (inside the chamber)
•
X-rays (from the column and chamber)
•
Electrical Shock (any cabinet or cable containing electrical items)
•
Mechanical (moving parts, especially the airlock/loading automation/chamber).
As above, there are protections against all of these hazards in normal operation, via
protective covers and other protections such as interlocks.
These should not be removed or adjusted except by trained service personnel.
WARNING
Never operate the machine with wet or damp hands. Electrical
shock may occur if there is improper grounding or electrical
leakage.
DO NOT operate the machine if protective covers are missing.
WARNING
Sound levels in normal operation do not exceed 70 dBA: no protective measures needed.
(c) Master Power disconnect
The master power disconnect device for the Vectorbeam is located near the Mains switch
unit (MSU) between the power feed from the Uninterruptable Power Supply (UPS) and
the MSU.
(d) Explanation of safety labels and notices
See section “Meaning of labels found on machine components” for an explanatory list of
safety labels that may be found on the Vectorbeam.
In this manual the following kinds of notations are used for safety-related warning
statements:
WARNING
CAUTION
If this hazard is not avoided, there is a possibility of death or injury
resulting.
If this hazard is not avoided, there is a possibility that light or
moderate injury may result. It may also indicate that a possibility
of damage to the equipment may result.
If any warning labels become difficult to read – contact your service representative to
obtain replacements. Labels must be replaced if they become damaged, peeled, or
illegible. See section “Labels on all Vectorbeam machines” in Chapter “Vectorbeam series
systems” for further explanatory information on safety labels.
Part Number:878275
Vectorbeam Operator Manual
Page 5
1.
Vectorbeam Series systems
The Vectorbeam (VB) is typically used to expose integrated circuit pattern data
on a substrate. The substrates generally fall into two categories:
1. A silicon or GaAs wafer.
The circuit pattern may be written on an unpatterned wafer or on a wafer with
previously exposed and processed layers (Direct Writing Operation). The circuit
pattern is transferred directly on to the wafer surface.
2. A mask or reticle.
After the mask making operation the mask or reticle is used in a second
exposure tool (e.g. in a wafer stepper) to replicate the circuit pattern on wafers
using light or X-rays.
Substrates are coated with an electron-beam sensitive resist, which is exposed
with the pattern and subsequently developed. A focused beam of electrons is
used to write the patterns principally by deflection over a limited area of the
substrate known as the main field; a moveable stage supports the substrate
enabling exposure to be made over the range of the stage in field-by-field stepand-expose manner. Several specialised detector systems are used to control
this process including sensors for substrate position (x, y and z), beam current
and beam position.
All user control of the system is provided through an HP Compaq Alpha
workstation. An off-line software capability is used to transform CAD generated
pattern data into a machine-readable format. After job control preparation,
loading of pattern data for a number of substrates and loading of the physical
holder with the substrates the machine will execute the writing process fully
automatically.
For the purpose of this manual beam establishment, spot formation, deflection,
substrate positioning, detection systems, computer, software and support
systems will each be referred to as "system"; each system may contain several
sub-systems. Each sub-system consists of several hardware modules (often
distributed throughout the machine) and/or, a number of supporting modules.
After the beam has been formed and focused it must be moved (scanned) over a
substrate using a beam writing technique. The two basic beam-writing
techniques used in E-Beam lithography systems are raster and vector scanning.
In the raster technique the beam is scanned over the entire chip area and is
turned on and off according to the desired pattern. In the vector technique the
beam is scanned only over the pattern areas requiring exposure and the usual
approach is to compose the pattern from a list of simple shapes such as
rectangles, triangles and parallelograms. Current Vectorbeam Series systems all
use the vectorscan method of pattern generation.
1.1.
Vectorbeam system overview
The Vectorbeam system comprises of the following:
1. Plinth supporting substrate chamber with stage and column.
2. Control electronics racks 1 (CER1)
Part Number:878275
Vectorbeam Operator Manual
Page 6
3. Control electronics racks 1 (CER2)
4. Electronics cabinet A
5. Electronics cabinet B
6. Stand alone EHT cabinet
7. Operator console with operator terminal, printer and video
monitor
8. 3 temperature control water baths (4 for machines with Brooks
handling)
The layout of these components will vary from installation to
installation
1.2.
Plinth
The plinth supports the substrate chamber, airlock and column on a vibration
isolation table.
Figure 1.1: VB6 plinth
1.2.1.
Stage
A motor driven X-Y stage, inside the substrate chamber, carries a holder
containing the substrate to enable its entire surface to be exposed. The limits of
the stage movement are 153 mm x 165 mm for VB6 systems and 127 mm x 127
mm for VB5 systems. A laser interferometer system measures the X-Y position
of the stage accurately and provides the reference X-Y co-ordinate for the
system. This information together with the desired position supplied by the job
control is used in a servo-loop to bring the stage accurately to the desired
position. As the substrate position cannot be controlled to the required precision
by stage movements alone, the difference between final mechanical position and
the desired position is corrected via signal feedback to the main beam deflection
Part Number:878275
Vectorbeam Operator Manual
Page 7
system. This is known as "Beam Error Feedback" (BEF). This function ensures
that the beam is constantly tracking the required substrate location even in the
presence of minor vibration or mechanical drifts.
The stage is driven by air-cooled motors within the main vacuum chamber and
these are protected by several interlocks including loss of cooling air and end of
travel range.
1.2.2.
Substrate load system
Loading of the substrate onto the stage takes place using an intermediate carrier
known as a "holder" or "chuck".
For systems with the single-chuck or 10-chuck airlock handling option, the
substrate is first placed manually in the holder; a range of different sized holders
can be provided to suit standard size wafers and photo plates as well as other
types of substrates. The holder with substrate is placed in the airlock and before
loading the holder on the stage the airlock must be evacuated. The holder is then
put onto the stage by a substrate handler mechanism. Prior to removing a holder
out of the airlock, it is vented to atmospheric pressure with dry filtered nitrogen
rather than air to reduce pump-down times and avoid contamination.
For systems with the Brooks handling option, wafers in standard cassettes are
placed manually onto the load stations. The wafers are taken by the first wafer
handler under automatic control and placed onto a prealigner inside an airlock.
After evacuation of the airlock and prealignment the wafers are taken by a
second wafer handler and placed into a holder on a loading station. The second
handler then picks the holder from the loading station and places in onto the
stage.
Each holder is provided with a target mark array, which is used in several system
calibration routines. Substrates are held against 3 front face reference points,
which are preset to the same height as the target mark array. The substrate can
be "height mapped" in order to relate beam deflection accuracy to the plane of
the substrate.
1.2.2.1.
VB5
There are sapphire discs on the underside of the holders, which sit on sapphire
discs on the stage. In addition there are sapphire discs on the side of the
holders, which are pressed against sapphire discs mounted on the stage by
springs. On VB5 machines the holders are placed in a library, which is in the
airlock chamber. A pneumatic loader arm under microprocessor control, loads or
unloads the holder from the library onto the stage.
1.2.2.2.
VB6
Single-chuck and 10-chuck machines
There are three sapphire balls on the Zerodur mirror block on the stage, which
locate into blocks on the underside of the holder forming a kinematic mounting.
There are also three sapphire balls on the underside of the holder on which the
holder sits in the airlock and pouches. Care must be taken to avoid
contaminating all the mounting blocks and balls. The holders are placed directly
on a table in the airlock. A substrate handler under microprocessor control, loads
and unloads the holders from the airlock onto the stage. The holder may also be
loaded into either of the two stabilisation pouches.
Machines with Brooks handling
There are three sapphire e-chucks on the Zerodur mirror block on the stage,
which electrostatically clamp the metal plated underside of the holder. There are
Part Number:878275
Vectorbeam Operator Manual
Page 8
also three pins on the underside of the holder on which the holder sits in the
airlock, CAM and the pouches. Care must be taken to avoid contaminating all the
surfaces. The holders never leave the vacuum during normal operation. A robot
in the transport module loads and unloads the holders from CAM onto the stage.
1.3.
Electronics crates
1.3.1.
Control electronics rack 1
The control electronics rack 1 (CER 1), shown in Figure 1.2, contains the plinth
interlock control system (PICS). This diagram is illustrative only - it is only
accurate for machines with an HR final lens and without Brooks handling.
Vacuum Monitor Pcb
MAINS PANEL
C
PIRANNI
C
PENNIN
ION PUMP
GENMARK CONTROLLER
AUX PCB
AUX PSU TRAY
PHOTOMULTIPLIER PSU
C
C
PICS
C
KS 40
C
ION
PUMP
ION PUMP
PSR CRATE
Fibre-optic I/F Pcb
MAINS DIST'N
TC
TC
C
ION PUMP
ION
PUMP
Figure 1.2: Control electronics rack 1.
1.3.2.
Control electronics rack 2
The control electronics rack 2 (CER 2), shown in Figure 1.3 contains the pattern
generator analogue (PGA) crate, the electron optics (EO) crate, the column
control unit (CCU) and the column control unit power supplies.
Part Number:878275
Vectorbeam Operator Manual
ELECTRON OPTICS
CRATE
POWER
RACK
GSC
LD
LD
LD
LD C3
Align
SPAR
EI Link
x SCAN pre
Y SCAN pre
EB
Ext SCAN
VIDEO
SCAN
EO i/f
EO
Test Fine
SGA/FW
Page 9
COLUMN CONTROL
UNIT
PGA Cooling
FOCUS &
SPAR
SPAR
X HS
Y HS
PGA-2
Y MAIN DRIVE
PGA
X MAIN DRIVE
5
FAN
PGA-1
x MAIN DAC
Y MAIN DAC
C0
+24
C3
-24v
C2
1.
7
C1
MAINS INPUT
COLUMN CONTROL
UNIT PSU
Figure 1.3: Control electronics rack 2.
1.4.
Electronics cabinets
The cabinets satisfy the following requirements:
1.4.1.
•
They accommodate standard sub-racks (19 inch)
•
Airflow is provided to prevent temperature rise in the cabinets
•
Standard mains distribution with facilities for filtering and mains
voltage stabilisation are available (the latter is optional).
Cabinet A
Cabinet A contains the On-axis controller, the laser height meter electronics, the
image processor (IP) crate, the stage controller crate, the stage motor drive
controller and the interferometer electronics. See Figure 1.4.
1.4.2.
Cabinet B
Cabinet B contains the pattern generator digital crate (PGD). See Figure 1.4.
Part Number:878275
Vectorbeam Operator Manual
Page 10
Figure 1.4: Electronic cabinets A and B.
1.5.
Stand alone EHT cabinet
The stand alone EHT (SAEHT) cabinet (Figure 1.5) contain all the power
supplies for the gun.
Part Number:878275
Vectorbeam Operator Manual
Page 11
Hotbox containing:
Filament supply
Suppressor supply
Extractor supply
Lens 1 supply
Rack containing from left to right:
PSU
SAEHT microprocessor
Gun supply controller
Gun controller interface
Gun supply driver
PSU
Hotbox controller
100 kV supply controller
100 kV supply (Bertan)
Figure 1.5: Stand-alone EHT supply.
1.6.
Power supplies
The stabilised power supplies deliver output voltages independent of mains
fluctuations (within the mains tolerances). The power supplies switch off in case
of output current or voltage exceeding specified limits. The computer
automatically checks the presence of the output voltage of most of the power
supplies.
1.7.
Operator console
Video monitor
The video monitor, located on the operator console, is used mainly to display the
SEM image when the machine is in SEM mode. The video monitor also displays
graphical and other information produced by the video processor electronics.
Part Number:878275
Vectorbeam Operator Manual
Page 12
1.8.
Temperature control water baths
The cooling water is kept at constant temperature in a closed system and is used
to stabilise the temperature of:
•
the electron optical lenses
•
the reference circuits in the electronics rack
•
the stage suspension
•
the turbo vacuum pumps
On systems with HR final lenses without Brooks handling, three circulator
temperature control (chiller) baths are provided for this purpose. An extra bath is
added with Brooks handling and a further bath is added for the UHR final lens.
1.8.1.
VB5
1.8.2.
VB6
The temperature control system for VB6-HR without Brooks handling is shown in
Figure 1.6.
Figure 1.6: Temperature control system for VB6 with 10-chuck airlock.
Bath 1 controls the temperature of the chamber lid, the column and the laser.
The flow meter is mounted on the crane side of the plinth and the three circuits
should be balanced to give equal flow of between 0.7 and 1.3 l/min.
Part Number:878275
Vectorbeam Operator Manual
Page 13
Bath 2 controls the temperature of the airlock, substrate handler, side pouches,
chamber floor and turbo pumps. The flow meter is mounted on the front side of
the plinth and the three circuits should be balanced to give equal flow between 1
and 1.3 l/min.
Bath 3 controls the temperature of the pattern generator analogue crate. The
flow meter is mounted on the front side of control electronics rack 2 (CER2).
Bath 4 controls the temperature of the deflection coil
Bath 5 controls the temperature of the Brooks Transport Module.
1.9.
Compressed air supply
The Vectorbeam system requires a compressed air supply:
•
For the pneumatic system to operate the valves.
•
For the vibration damping system. This system, mounted under
the electron optical column, reduces the effect of floor vibrations
on column functions.
•
For cooling the beam blanker, the stage motors and the
deflection coils.
When the column, chamber or airlock is vented, it is filled with dry, clean nitrogen
to prevent dust, contamination and water vapour from entering the system.
1.10.
Meaning of labels found on machine components
This table shows the labels that may be found on machine components. The
meanings are explained next to the label and the precautions that an operator
must take (to avoid the hazard) are also given where necessary. Note that some
detailed precautions that are only relevant to service engineers are not shown
here, as they are beyond the scope of this table.
1.10.1.
Labels on all Vectorbeam machines
Symbols that do not have a warning triangle are usually just for information, not
hazard warnings.
Warning: risk of electric shock
Caution: risk of danger.
Consult manual for details
Possible hazard during service
operations
-refer to service manual.
No hazard in normal operation
Part Number:878275
Vectorbeam Operator Manual
Page 14
Self explanatory
Self explanatory
Possible hazard during service
operations
-refer to service manual.
No hazard in normal operation
Self explanatory
Possible hazard during service
operations
-refer to service manual.
No hazard in normal operation
Possible hazard during service
operations [bakeout]
No hazard in normal operation.
Protective conductor terminal- do not
disconnect any lead connected to this.
Earth (ground) terminal
Frame or chassis terminal
Part Number:878275
Vectorbeam Operator Manual
Page 15
Accessible Functional Earth (Equipotentiality
On (Supply)
Off (Supply)
Warning: Electro Static Discharge
(ESD) sensitive – service engineers
take precautions.
1.10.2.
Labels only found on machines with wafer loading automation
The machine should not be operated (with
beam) if this label is visible.
Self explanatory
Self explanatory
Part Number:878275
Vectorbeam Operator Manual
Page 17
2.
Optical system
The purpose of the optical system is to provide, at the substrate, an electron
beam of suitable energy having a constant known appropriate diameter and scan
the beam in a precise pattern. The optical system uses a thermal field emission
cathode and there are two configurations: one with a high-resolution (HR) final
lens (see Figure 2.1) and one with an ultra-high-resolution lens (UHR) (see
Figure 2.2).
Figure 2.1: HR column optics.
Part Number:878275
Vectorbeam Operator Manual
Page 18
Figure 2.2: UHR column optics.
2.1.
Beam production / gun
The electron beam used to write the pattern is generated in an electron gun by a
cathode emission process. This is a thermally assisted field emission source
(TFE). Electrode structures are used to control the emission process and form
the beam. The electrons are then accelerated to the operating beam energy by
an electric field and pass through the anode of the electron gun assembly.
The cathode used for TFE in the Vectorbeam is heated ZrO coated tungsten. An
electrode, known as the suppressor, surrounds the cathode apart from the
cathode tip to suppress emission from the cathode shank. A high electric field
strength is produced between the tip and an electrode, known as the extractor.
Part Number:878275
Vectorbeam Operator Manual
Page 19
Electrons, which are thermally exited to higher energy levels within the cathode
may then be accelerated out of the cathode surface. This is called Schottky
emission and results in a "virtual" source of a few nm in size. The electrons are
accelerated towards and pass through the extractor. A further electrode between
the extractor and the anode used for focusing the beam. The beam is then finally
accelerated towards the anode. The gun can focus the beam over a range of
distances below the anode.
The high-tension supply delivers -20 kV to -100 kV to the cathode of the electron
gun. In addition it provides the suppressor bias voltage and the filament current.
Safety interlock circuits inhibit the operation of the gun in poor vacuum or when
the gun is mechanically removed from the emission chamber.
2.2.
Spot formation
2.2.1.
Gun aligner
The electron beam that emerges from the gun passes through two sets of
magnetic deflection coils, which can tilt and shift the beam to align it to the
electron optical axis of the following lenses.
2.2.2.
Apertures
The beam divergence is limited by intermediate apertures at various positions
down the column. The final aperture is used to define the final beam
convergence angle to the substrate. On systems with the HR final lens, an
adjustable final aperture blade positioned within the lens is provided that
accommodates four apertures on a VB5 and six apertures on a VB6. On systems
with the UHR final lens, an adjustable final aperture blade positioned between
the 2nd and final lens is provided. On HR machines and early UHR machines the
apertures are selected and adjusted manually using the knobs on the outside of
the column. On later UHR machines the apertures are selected and adjusted
automatically using motors. The beam convergence angle affects both the final
spot size and the current density of the final spot at the substrate surface. A
range of different sized apertures enables the spot size and current density to be
optimised. The minimum spot size achievable partly depends on the size of the
final aperture selected.
2.2.3.
Lenses for TFE gun
The column for a TFE gun has two magnetic lenses and one electrostatic lens.
The electrostatic lens C1 is made up of the firing unit and further electrodes in
the gun. The next lens the beam encounters is a magnetic condenser lens C2. A
zoom lens function is formed by C1 and C2. The focus point of C2 is constant.
This enables the beam diameter at the substrate to be adjusted while holding the
focus and current density almost constant. It also enables the conjugate blanking
condition to be held for all currents. The final (objective) lens C3 provides the
main focus of the beam on the substrate. There are two options for the final lens:
high resolution (HR) and ultra high resolution (UHR). The distance from the
principle plane of the HR lens to the substrate is about 42 mm and the distance
for the UHR lens is about 35.4 mm. The magnetic lenses are temperature
controlled by circulating water.
2.2.4.
Beam blanking
The beam may be switched on and off by the electrostatic beam blanker system
within the column. It is driven automatically during pattern writing but may also
be operated manually or by job file control.
Part Number:878275
Vectorbeam Operator Manual
Page 20
In the 'on' condition the beam is not deflected by the beam blanker. In the 'off'
condition the beam is deflected away from the optical axis and is stopped on an
intermediate aperture.
A lens before the beam blanking plates creates a focal point (cross-over) of the
electron beam in the electrical centre of the plates. With this configuration the
position of the spot in the substrate plane is independent of the voltage between
the beam blanker plates up to the point when the beam is turned off. This
prevents the occurrence of blanking tails in the resist image as the beam is
turned off or on. This technique is known as "conjugate plane” blanking.
2.2.5.
Fine focus coil
Within the final lens a fine focus coil is used to
2.2.6.
•
accurately focus the beam on the substrate (static)
•
correct focus for height variations (static)
•
enable high speed focus corrections for the deflected beam
(dynamic).
Stigmator coil
A stigmator coil assembly (double quadruple) is used to compensate any
astigmatism of the beam.
The astigmatism of the beam is compensated by diagonal and axial stigmator
coils. These coils are used for:
• a static correction (optimum for non deflected beam)
• a correction for the deflected beam (dynamic stigmator
correction)
2.3.
Beam deflection
The deflection unit assembly is located between the condenser lenses and the
final lens. This consists of sets of magnetic coils, which create deflection fields
transverse to the beam axis in orthogonal pairs (X and Y axis deflection). In
order to cover a sizeable area of the substrate at high speed whilst maintaining
high accuracy, the assembly has two separate magnetic coil systems:
•
Main deflection (double lever deflection)
•
Subfield deflection (single lever deflection with HR lens and
double lever deflection with UHR lens)
(This unit is sometimes referred to as the trapezium or “trap”
deflection)
It is possible to adjust (automatically calibrate) the size of the main and subfield
deflection in order to optimise the resolution of the main and subfield deflection
system according to different application requirements.
The range of the subfield deflector is calibrated to be 1/64 of the main field
range. The main field pattern is therefore divided into an array of 64 x 64
subfields, this is performed in real time by the pattern generator hardware.
Part Number:878275
Vectorbeam Operator Manual
Page 21
During pattern writing pattern information is read from the Operator Terminal disk
and processed by the pattern generator unit. The pattern generator generates
the analogue drive signals, which drive the main and subfield deflectors.
Correction systems compensate for lens and deflection errors and assure
compatibility of the main and subfield deflection with the stage co-ordinate
system.
The main deflection system positions the beam to the centre of a subfield and
each subfield is addressed sequentially as the pattern is written. Main deflection
is specified by the main deflection addresses provided by the pattern generator.
In order to meet the accuracy requirements of the system this also generates
corrections (gain, rotation, keystone) to be summed into the main deflection
signal. Such corrections are generated digitally prior to conversion to the
analogue scan signals.
The subfield deflection system positions the beam within the subfield and also
deflects the beam at high speed during the writing of pattern shapes. The pattern
generator provides these signals. Data to correct the position of the beam within
the subfield is also generated by the pattern generator system.
2.4.
Imaging
The object under the beam is imaged by scanning the beam and varying the
image brightness with a detector signal. Normally the BSE detector signal is
used as the image signal. The BSE detector on HR machines consists of 4
scintillators and photomultipliers and on UHR machines a PN junction. The
magnification of the SEM image may be varied (corresponding to changing the
amplitude of the scanning signal to the main deflector). Image averaging and
further video functions are also available. The image is displayed on the video
monitor.
Part Number:878275
Vectorbeam Operator Manual
Page 23
3.
Vacuum system
3.1.
Conversion of different pressure units
As an aid to comparing pressures reported using different pressure units:
1. In the British system, pressure is usually measured in pounds per
square inch (PSI)
2. In international usage, pressure is usually measured in kilograms per
square centimetres, or in atmospheres
3. In the international metric system (SI), pressure is usually measured
in newtons per square meter also called Pascal with abreviation Pa.
4. The pressure exerted by 1 mm Hg has been defined as 1 Torr, after
the physicist Evangelista Torricelli.
5. 750 Torr = 1000 mbar=100,000 Pa
6. The unit atmosphere (atm) is defined as a pressure of 1.03323 kg/sq.
cm (14.696 lb./sq. in), which, in terms of the conventional mercury
barometer, corresponds to 760 mm (29.921 in) of mercury
(abbreviated mm Hg).
7. 1 atm = 760 Torr = 1013 mbar=101,300 Pa = 1.03323 kg/sq. cm=
14.696 lb./sq. in
3.2.
Principles of operation
Ultra high vacuum is needed in the gun to avoid damage to the cathode and in
the column and chamber to minimise the risk of collision of electrons with
residual gas molecules. The airlock is used to enable the operator to load/unload
substrates. It enables fast substrate exchange by maintaining vacuum in the
column, gun and main chambers.
The pressure required in the gun emission chamber is lower than that required
elsewhere. The pressure in the gun can be maintained at a lower pressure than
in the column section below by the use of differential pumping. The gun is
pumped by an ion pump and isolated from the column section beneath it by an
aperture, which restricts the amount of gas flow. In addition, UHV techniques to
reduce the amount of gas being emitted into the chamber are used wherever
possible. These include the use of copper knife-edge seals and a bake-out cycle.
During bake out, the hot inside surfaces of the emission chamber release gas
molecules much more quickly than at room temperature and they are removed
by pumping. After cooling outgassing from the emission chamber falls to much
lower level than before bake out.
Three types of pumps are provided to evacuate from atmospheric pressure to
ultra-high vacuum, these are mechanical pre-vacuum (rotary), turbo-molecular
and ion-getter pumping.
Pre-vacuum pumps are efficient between atmospheric pressure and
-1
approximately 10 Pascal (0.75 x 10 Torr) and evacuation is always initiated with
these pumps. On the VB5 Series three rotary pumps are provided, for the
Part Number:878275
Vectorbeam Operator Manual
Page 24
airlock, the chamber and the emission chamber respectively. On VB6 Series
without Brooks handling a single rotary pumps is provided for the System and
Airlock. On VB6 Series with Brooks handling two rotary pumps are provided for
the VB6 and Brooks handling.
The turbo-molecular pumps are used for pumping between pressures of about
10 Pascal (0.75 x 10⁻¹ Torr) and about 10-4 Pascal (0.75 x 10⁻⁷ Torr). A substrate
chamber-operating vacuum of better than 4 x 10⁻³ Pascal (3 x 10⁻⁵ Torr) is
required. This is achieved in two stages, by first removing most of the gas
molecules with the pre-vacuum pumps until a pressure of 13 Pascal (9.75 x 10⁻²
Torr) is reached and then continuing to remove the remaining gas molecules with
the turbo molecular pumps until the required vacuum is obtained. Both pumps
are switched ON and OFF together. When the turbo molecular pump reaches its
maximum speed the pre-vacuum pump functions as a backing pump. High
capacity turbo-molecular pumps are provided for the airlock and the chamber.
Ion-getter pumps are used for pumping between pressures of about 1 x 10³
Pascal (0.75 x 10⁻⁵ Torr) and about 1 x 10⁻⁸ Pascal (0.75 x 10⁻¹⁰ Torr). These
pumps are used on the gun emission chamber.
The reason for using separate volumes is that total evacuation of the system
requires much longer time than the evacuation of individual volumes. Therefore it
is better to vent only that chamber to which access is required and the low
pressure in the rest of the system is retained.
3.3.
TFE column vacuum system
Section
Normal pressure
Gun emission chamber as measured
with ion pumps 1 and 2
< 1 x 10⁻⁹ Torr (< 2 µA)
Mid-column as measured with ion
pump 3
1 x 10⁻⁷ Torr
Lower-column as measured with ion
pump 4
4 x 10⁻⁷ Torr
A similar bake out procedure is used for TFE source installation and run up but
the temperature used is limited to 180°C. The procedure is somewhat more
detailed due to the UHV requirements of the TFE type sources.
3.4.
VB5 vacuum system
The VB5 vacuum system is divided into three main volumes:
1. The airlock
2. The substrate chamber and lower electron column
3. The column.
Each is separated from the other by pneumatically operated valves. These
volumes may in general, be vented independently with dry nitrogen as
required.
Part Number:878275
Vectorbeam Operator Manual
Page 25
3.5.
VB6 vacuum system
The VB6 vacuum system is divided into three main volumes:
1. The airlock or on machines with Brooks handling the Brooks
transport module (TM) chamber and load aligner (LA) airlock.
2. The storage pouches, substrate chamber and lower electron column
3. The column.
Each is separated from the other by pneumatically operated valves. These
volumes may in general, be vented independently with dry nitrogen as required.
3.6.
Vacuum controller (PICS or Brooks control)
On systems with the single-chuck or 10-chuck handling option, a control system
known as the plinth interlock control system (PICS) controls the vacuum system.
On systems with the Brooks handling option, the CTC control computer controls
the vacuum. In both cases the system functions include:
3.7.
•
The pump-down sequence.
•
Monitoring the pressure sensors on the column. For invalid
conditions an alarm signal is generated and measures are taken
to prevent damage to the column.
•
Bakeout sequence.
•
Co-ordinating the holder loading/unloading.
Vacuum control panel
The vacuum control panel shows a schematic of the vacuum and the holder
load/unload system and has display LEDs to indicate the status of the various
valves, vacuum gauges and the load/unload system (See Figures 3.1, 3.2, 3.3
and 3.4). Also attached to this panel there is a warning buzzer. If an error has
occurred then PICS will indicate where the error took place by flashing the
relevant LED while sounding the buzzer. If a warning (e.g. it is taking longer than
expected to pump to required pressure) has occurred then the LED will flash but
the buzzer will not sound.
Part Number:878275
Vectorbeam Operator Manual
Page 26
3.7.1.
VB5 FEG vacuum control panel
Figure 3.1: VB5 TFE vacuum control panel.
3.7.2.
VB5 mimic panel key
Part Number:878275
•
LEDs above the buttons are lit when the button has been
activated.
•
LED DOOR is lit when the loading chamber door is properly
closed.
•
LED GUN is lit when the emission chamber is properly closed.
•
V1 to V18 are lit when the associated valve is open as seen by
the valve detector.
•
LEDs for rotary pumps (PVP) are lit when the associated PVP is
working.
•
LEDs for turbo pumps are lit when the associated pump is
running.
Vectorbeam Operator Manual
Page 27
3.7.2.1.
•
LEDs for ion pumps (IGP1 - 4) are lit when the associated pump
is working.
•
G1, G3, G4, G5 are lit when the vacuum in the related areas is
better than the required level.
•
LEDs LOADER are lit to show whether the loader arm is
extended or retracted.
•
LEDs COUPL. are lit to show whether the loader arm is coupled
(Y) or uncoupled (N).
•
LED UPS is lit when there is fault with the uninterruptable power
supply.
•
LEDs UP, DOWN and STOP are lit to show whether the cassette
is moving up or down or stopped.
•
LED X-Y is lit when the stage is at the load position.
•
LED HOLD is lit when a holder is in the current cassette position.
•
LED CASS is lit when a cassette is in the airlock.
•
LED PRESS (red) is lit when the compressed air pressure is
insufficient.
•
LED WATER (red) is lit when the water level in the thermostatic
unit is too low.
Modifications to FEG vacuum system
Recent modifications to the column pumping are:
Part Number:878275
•
The gun penning G5 has been removed.
•
The valves V6 and V9 and the nitrogen admit have been
removed.
•
IGP3 is connected directly to the column with no branches.
•
The gun and the IGP4 are connected to the chamber with valves
V17 and V18 for isolation respectively.
•
The airlock vent button has been disconnected. The airlock full
vent must be used.
Vectorbeam Operator Manual
Page 28
3.7.3.
VB6 FEG with 2 roughing pumps vacuum control panel
Figure 3.2: VB6 TFE vacuum control panel.
Part Number:878275
Vectorbeam Operator Manual
Page 29
3.7.4.
VB6 FEG with 1 roughing pump and no bypass vacuum
control panel
Figure 3.3: VB6 FEG with 1 roughing pump and no bypass vacuum control panel.
Part Number:878275
Vectorbeam Operator Manual
Page 30
3.7.5.
VB6 FEG with 1 roughing pump vacuum control panel
Figure 3.4: VB6 FEG with 1 roughing pump vacuum control panel.
3.7.6.
VB6 mimic panel key
Part Number:878275
•
LEDs above the buttons are lit when the button has been
activated.
•
LED DOOR is lit when the loading chamber door is properly
closed.
•
LED GUN LID is lit when the emission chamber is properly
closed.
•
V1 to V18 are lit when the associated valve is open as seen by
the valve detector.
•
LEDs for rotary pumps (PVP) are lit when the associated PVP is
working.
•
LEDs for turbo pumps are lit when the associated pump is
running.
Vectorbeam Operator Manual
Page 31
3.7.6.1.
3.7.6.2.
•
LEDs for ion pumps (IGP1 - 4) are lit when the associated pump
is working.
•
Pe1, Pe2, Pe3, PI1, PI2 and PI3 are lit when the vacuum in the
related areas is better than the required level.
•
LED LOAD is lit when the stage is at the load position.
•
LED STAGE, FRONT POUCH, CRANE POUCH, AIRLOCK,
GENMARK SUBSTRATE HANDLER are lit when there is a
holder in that position.
•
LED FORK SAFE is lit when the Genmark Substrate handler is in
the Fork Safe position.
Warnings
•
LED TRANSPORTER is lit when an error has occurred during
the substrate exchange.
•
LED STAGE is lit when the stage drive is inhibited by the
Genmark Substrate handler not being at the Fork Safe position.
•
LED COMPRESSED AIR (red) is lit when the compressed air is
insufficient.
•
LED COLUMN WATER (red) is lit when the water level in the
thermostatic unit is too low.
•
LED SYSTEM WATER (red) is lit when the water level in the
thermostatic unit is too low.
•
LED UPS is lit when there is fault with the uninterruptable power
supply.
Modifications to FEG vacuum system
Recent modifications to the column pumping are:
•
The gun penning G5 has been removed.
•
The valves V6 and V9 and the nitrogen admit have been
removed.
•
IGP3 is connected directly to the column with no branches.
•
The gun and the IGP4 are connected to the chamber with valves
V17 and V18 for isolation respectively.
Recent modifications to the chamber pumping are:
Part Number:878275
•
The vacuum reservoir has been removed.
•
Valves V12, V19, V20 and V21 have been removed.
•
The turbo bypass pipe has been removed.
•
The airlock vent button has been disconnected. The airlock full
vent must be used.
Vectorbeam Operator Manual
Page 32
3.7.7.
Vent system button
The vent system button requires two presses within 5 seconds before the
command is accepted. When the command has been accepted, the LEDs above
the two vacuum buttons flash for 35 seconds during which time the pump system
button can be pressed to cancel the vent command. The vent system command
can be used at any point to vent the chamber, airlock and, optionally, the gun. If
a bakeout is in progress, then it resets the bakeout before venting. If the ion
pump key switch is in the “vent disable” position, the gun is isolated before the
rest of the system is vented after a ten minute delay to allow the gun to cool in
case the gun is currently switched on. If the key switch is in the “on” (vent
enable) position, the entire system is vented after a one hour delay to allow the
gun to cool in case the gun is currently switched on.
To eliminate unecessary delays, later versions of PICS (VB6 X9.0/VB5
X6.0 and later) only wait 10 minutes before venting the gun and the
operator must wait 60 minutes after switching off the gun before
pressing the vent button.
If the gun has been isolated and the rest of the system vented, but in spite of this
the pressure in the gun has reached atmospheric pressure, then setting the ion
pump key switch to “on” (vent enable) and pressing vent system opens the gun
isolation valve.
3.7.8.
Pump system button
The function of the pump system button is described in the Section “Vacuum
system start up”.
3.7.9.
Airlock vent button
The airlock vent button has been disconnected. The airlock full vent must be
used. The use of the airlock full vent button is described in the Section “holder
loading/unloading in/from airlock”.
3.7.10.
Airlock full vent button
This button requires two presses before the command is accepted. The airlock
full vent button switches off the pump before venting it and the airlock.
3.7.11.
Airlock pump button
The use of the airlock vent button is described in the Section “holder
loading/unloading in/from airlock”.
3.7.12.
Bakeout button
This button requires two presses before the command is accepted. The use of
the bakeout button is described in the Section “bakeout”.
3.7.13.
Bakeout reset button
The use of the bakeout reset button is described in the Section “bakeout”.
3.7.14.
Reset button
The reset button acknowledges any errors or warnings, which may be shown by
the vacuum control panel. The buzzer is deactivated by pressing the button
once. The buzzer is deactivated by pressing the button twice. PICS returns to the
Part Number:878275
Vectorbeam Operator Manual
Page 33
point where it was when the error occurred.
3.8.
PICS and Brooks power up and reboot actions
The PICS microprocessor will boot automatically when powered on, or if the red
or black reset button on the front of the PICS processor card is pressed. PICS
should not normally reset as long as the machine is powered on, as this causes
PICS to set the vacuum system to a safe condition from which it may take
several hours to reach operating conditions. For instructions on starting the
Brooks vacuum control see the VB6 PMC Operator Manual (893157). When
PICS or Brooks has booted, the safe condition is set up by taking the following
actions:
3.8.1.
VB5
The valve V11 requires compressed air to remain closed.
Component
Machine power off
Power on or reboot
Closed
Closed
No change
No change
V5, gun/column isolation valve
Closed
Closed
V7, chamber vent valve
Opened
Closed
V8, airlock vent valve
Opened
Closed
V11, gun roughing isolation valve
* Undefined
* Undefined
V18, column roughing isolation valve
No change
No change
RP1, chamber rotary pump
Off
Stopped
RP2, airlock rotary pump
Off
Stopped
RP3, feedthroughs rotary pump
Off
Stopped
TP1, chamber turbo pump
Off
Stopped
TP2, airlock turbo pump
Off
Stopped
IGPs, all ion pumps
Off
Stopped
Filament
Off
Disabled
EHT
Off
Disabled
G3 and G4, the airlock and chamber
Penning gauges
Off
Disabled
Stage
Off
Set free to move.
V1, feedthrough isolation valve
V4, airlock/chamber isolation valve
* Note that V11 requires compressed air pressure to keep it closed. On power off
and reboot V11 will not be opened deliberately, however the drives to the “open”
Part Number:878275
Vectorbeam Operator Manual
Page 34
inlet and the drive to the “close” inlet will both be switched off. This enables the
valve to leak especially if the chamber is at atmospheric pressure after an
isolated vent. Consequently when switching PICS off, either a full vent must be
done or an isolated vent can be done after arranging an external compressed air
supply on the close line.
When PICS has been restarted it sets the loader arm to coupled and assumes
that the stage is occupied. Then, at the first substrate transfer command or qdisp
air, PICS performs a dummy unload to ensure that the chamber is empty.
3.8.2.
VB6
The valve V17 requires compressed air to remain closed.
Component
Machine power off
Power on or reboot
No change
No change
V5, gun/column isolation valve
Closed
Closed
V7, chamber vent valve
Opened
Closed
V8, airlock vent valve
Opened
Closed
V11, chamber turbo isolation valve
Closed
Closed
V12, airlock turbo isolation valve
Closed
Closed
V17, gun roughing isolation valve
* Undefined
* Undefined
V18, column roughing isolation valve
No change
No change
RP1, chamber rotary pump
Off
Stopped
RP2, airlock rotary pump
Off
Stopped
TP1, chamber turbo pump
Off
Stopped
TP2, airlock turbo pump
Off
Stopped
IGPs, all ion pumps
Off
Stopped
Filament
Off
Disabled
EHT
Off
Disabled
Pe1 and Pe2, the airlock and
chamber Penning gauges
Off
Disabled
Stage
Off
Set free to move.
V4, airlock/chamber isolation valve
The stage MUST be in the load position when the substrate handler, which is
under PICS control, is initialised.
* Note that V17 requires compressed air pressure to keep it closed. On power off
and reboot V17 will not be opened deliberately, however the drives to the “open”
inlet and the drive to the “close” inlet will both be switched off. This enables the
valve to leak especially if the chamber is at atmospheric pressure after an
Part Number:878275
Vectorbeam Operator Manual
Page 35
isolated vent. Consequently when switching PICS off, either a full vent must be
done or an isolated vent can be done after arranging an external compressed air
supply on the close line.
3.9.
Vacuum system start up
Please see “Vectorbeam Customer service procedures" manual - document
number 893116.
3.10.
Vacuum system shut down
Please see “Vectorbeam Customer service procedures" manual - document
number 893116.
3.11.
Vacuum system monitoring
Some of the pressure gauge readings can be displayed in Emma using the
“qdisplay vac” command. For PICS versions X10a (VB6) and V6 (VB5) or later a
choice can be made between the set of gauges read by the stage subsystem
directly or the set read by the stage subsystem from the PICs subsystem. For
previous versions of PICs only the set of gauges read by the stage subsystem
directly can be displayed. In order to select which set of gauges is displayed, the
variable TheGuagesType_g (sic) in SV_CONFIG.VW must be defined. For stage
gauges it is set to 0 and for PICs gauges it is set to 1.
3.11.1.
Stage Gauges
The gauges that can be read directly from the stage processor are as follows:
IGP1, IGP2, IGP3, IPI 1+2, Gun Pe, System Pe, Airlock Pe, Airlock Pi.
3.11.2.
Vacuum gauges
The gauges that can be read (from PICs by the stage processor or by the Brooks
CTC computer) are as follows:
3.11.2.1.
VB5
IGP1, IGP2, IGP3, IGP4, G1, G3, G4
3.11.2.2.
VB6
IGP1, IGP2, IGP3, IGP4, Pi1, Pi2, Pe1, Pe2
3.11.3.
Logicals
Emma defines the logicals VB_VAC_GAUGE_n with the pressure in Torr where
n is a value between 0 and 7.
Part Number:878275
Vectorbeam Operator Manual
Page 37
4.
Computer system
Three levels of computer systems are normally used with the Vectorbeam
system: the pattern data preparation computer, the operator terminal and the
computer controlled subsystems. These computers are all connected via
Ethernet. Figure 4.1 shows the system without the pattern data preparation
computer.
Figure 4.1: Computer system.
4.1.
Pattern data preparation computer
The pattern data preparation computer is normally a PC running Linux.
Previously it was an Alpha station running Open VMS. The CATS and CAPROX
fracturing software runs on this system. Output pattern files are downloaded via
the ethernet to the operator terminal.
4.2.
Operator terminal
An Alpha workstation from HP Compaq is supplied with the machine as the
operator terminal. Virtually all control of the Vectorbeam system is exercised via
this computer. This computer communicates with the pattern generator, electron
optics and stage subsystem microprocessors via Ethernet. Vectorbeam
commands are input at the operator terminal and the appropriate commands are
issued to the subsystems by the program running on the Operator Terminal,
Part Number:878275
Vectorbeam Operator Manual
Page 38
called Emma. During pattern exposure the pattern data are transferred from the
operator terminal to the pattern generator via the ethernet under the control of
Emma.
The workstation consists of:
•
Alpha workstation with system and user hard disks, colour
monitor, CD-ROM drive, tape drive, thinwire ethernet interface,
keyboard, mouse and an optional terminal or modem link. The
specification of each of these components varies from system to
system, due to a continuous upgrade of machines in production
in line with the latest models available.
•
The following software:
•
Two user OpenVMS licence
•
PV-WAVE run time licence
•
TCPWARE TCP/IP run time licence
4.3.
Computer controlled subsystems
4.3.1.
Pattern generator
The pattern generator will be either a 16-, 18- or 20 bit version. 16-bit pattern
generators were produced up to about 2000, 18-bit up to about 2004 and 20-bit
from 2005 onwards.
4.3.1.1.
16-bit pattern generator hardware
The 16-bit pattern generator consists of a crate of digital electronics and a crate
of analogue electronics. The digital part of the pattern generator has a 16-bit
output i.e. the maximum fieldsize is divided into 65536 exels. The maximum
fieldsize is split into 64 subfields in the X and Y directions (4096 in total) and
each subfield contains 1024 exels.
4.3.1.1.1.
Pattern generator digital crate
Part Number:878275
Vectorbeam Operator Manual
Page 39
Figure 4.2: 16-bit pattern generator digital crate.
The pattern generator digital crate is shown in Figure 4.2. The pattern generator
digital crate contains the Master Microprocessor (MUP), Flattening Instancing
Sort Processors (FISPS), Shape to Line Converters (SLCs) and a Digital
Correction Processor (DCP). Some systems may contain PowerPC
microprocessor boards instead of a FISP and SLC pair.
4.3.1.1.1.1
MUP
The MµP (Master Microprocessor) sequences and controls the operation of the
Pattern Generator during pattern writing.
4.3.1.1.2.1
FISP
The FISPs (Flattening Instancing Sort Processors) take the structured and
unstructured shapes from the CFPS (Central Field Pattern Store) on a field or
part field basis. They flatten structured shapes into individual shapes and
generate an instance of each shape for each subfield that the shape appears in.
They sort the shapes into subfield order and output the shapes to the Shape to
Line Converter. The timing and destinations for the output data are determined
by the MUP. The subfields are processed in a boustrophedon order.
4.3.1.1.3.1
SLC
The SLC (Shape to Line Converters) take a (part-) field buffer of shapes from the
FISPs and transform each subfield shape into a series of horizontal lines for
output to the LineWriter.
4.3.1.1.4.1
DCP
The DCP (Digital Correction Processor) applies real-time corrections for field and
subfield perturbations.
4.3.1.1.2.
Pattern generator analogue crate
Part Number:878275
Vectorbeam Operator Manual
Page 40
Figure 4.3: 16-bit pattern generator analogue crate.
The pattern generator analogue crate is shown in Figure 4.3. The amplifiers
driving the sub-field deflectors are mounted on the column.
4.3.1.2.
18-bit and 20-bit pattern generator hardware
PGD Crate
PGP1
PATTERN
FRACTURE
and SORT
PGA CRATE
BANDWIDTH
COLUMN
SUBFIELD
X AMP
PGP2
PATTERN
FRACTURE
and SORT
Y AMP
SHAPEWRITER
SHAPEWRITER
I/F
HS CORRS X
I/F
SUBFIELD DEFLECTION
COILS
MAIN FIELD
DEFLECTION COILS
HS CORRS Y
MAIN DAC X
MAINFIELD
DRIVE X
MAIN DAC Y
MAINFIELD
DRIVE Y
FINAL LENS (C3)
FINE FOCUS
EMMA
CONTROLS
CORRECTIONS
I/F
MUP
MASTER
CPU
FOCUS
& STIG
I/F
STIGMATOR
DOSE
CONTROL
CLOCKS
BSD DETECTOR
DCP
MARK
LOCATE
VIDEO
SEM
VIDEO
HEIGHT SENSOR DATA & CONTROL
VIDEO
INTERFACE
HEAD
AMPLIFIER
HEAD
AMPLIFIER
LASER
HEIGHT
SENSOR
HEIGHT METER
INTERFACE
TRANSMISSION
DETECTOR
Figure 4.4: 18- and 20-bit pattern generator digital and analogue crates.
Part Number:878275
Vectorbeam Operator Manual
Page 41
4.3.1.2.1.
18-bit
The pattern generator consists of a crate of digital electronics and a crate of
analogue electronics. The digital part of the pattern generator has a 18-bit output
i.e. the maximum (main) fieldsize is divided into 262144 exels. The area of the
mainfield, which is covered by the subfields can be selected by the operator in
the form of a square which is centred in the mainfield. This defines the maximum
area, which can be used for exposing patterns. The number of subfields in the X
and Y directions into which this square is divided can be selected by the operator
to be between 25 and 64 inclusive (maximum 4096 in total). Each subfield may
contain a maximum of 16384 exels in the X and Y directions.
4.3.1.2.2.
20-bit
The pattern generator consists of a crate of digital electronics and a crate of
analogue electronics. The digital part of the pattern generator has a 20-bit output
i.e. the maximum (main) fieldsize is divided into 1048576 exels. The 20-bit DAC
is actually 2 18-bit DACs in a compound arrangement. The area of the mainfield,
which is covered by the subfields can be selected by the operator in the form of a
square which is centred in the mainfield. This defines the maximum area, which
can be used for exposing patterns. The number of subfields in the X and Y
directions into which this square is divided is fixed at 64 (4096 in total). Each
subfield contains 16384 exels in the X and Y directions.
4.3.1.2.3.
Pattern generator digital and analogue crates
The pattern generator digital and analogue crates are shown in Figure 4.4. The
pattern generator digital crate contains 4 PowerPC microprocessor boards. One
board functions as the Master Microprocessor (MUP), another board as the
Digital Correction Processor (DCP) and two boards as Pattern Generator
Processors (PGPs), each of which are a combined Flattening Instancing Sort
Processor (FISPS) and Shape to Line Converter (SLC).
4.3.1.2.1.3
MUP
The MµP (Master Microprocessor) sequences and controls the operation of the
Pattern Generator during pattern writing.
4.3.1.2.2.3
PGP
The PGPs (Pattern Generator Processor) each combine FISP and SLC
operations on one board.
The FISP (Flattening Instancing Sort Processors) operation takes the structured
and unstructured shapes from the CFPS (Central Field Pattern Store) on a field
or part field basis. Structured shapes are flattened into individual shapes and an
instance of each shape for each subfield that the shape appears in is generated.
The shapes are sorted into subfield order and output to the Shape to Line
Converter. The timing and destinations for the output data are determined by the
MUP. The subfields are processed in a boustrophedon order.
The SLC (Shape to Line Converter) operation takes a (part-) field buffer of
shapes from the FISPs and places them in the input buffer of the shapewriter.
4.3.1.2.3.3
DCP
The DCP (Digital Correction Processor) applies real-time corrections for field and
subfield perturbations.
Part Number:878275
Vectorbeam Operator Manual
Page 42
The analogue crate transforms the digital scan and correction data into analogue
signals.
4.3.1.3.
16-, 18- and 20-bit pattern generator operation
The pattern generator receives the pattern data from the operator terminal (i.e.
Alpha workstation) sequentially during exposure. The pattern data are stored in
either a FRE format file with extension .FRE or a VEP format file with extension
.VEP file. Such FRE and VEP format files will have been produced by the pattern
converter software (see Section “Pattern data preparation”) and contain the
pattern data fractured and sorted into fields but retaining structure. The pattern
generator transforms these data into individual shapes and fractures and sorts
them into subfields. Exposure occurs by scanning all the shapes within each
subfield with the sub-field deflection coils. The subfields are positioned
sequentially with the main field deflection coil.
4.3.2.
Stage Controller
This microprocessor operates the stage motors, the interferometer and the
temperature measurement. It also links to the bar-code reader (non-Brooks
systems).
4.3.3.
On-axis controller
This 68020 microprocessor is mounted in the IP crate. The IP crate also contains
the video processing boards. The processor operates the video processing for
the monitor to provide an SEM image, the stand-alone EHT supply via an RS232
link from the IP crate, the lenses and the gun alignment via the electron optic
(EO) crate in CER1.
4.3.4.
PICs controller
The PICs controller operates the vacuum pumps and gauges and the Genmark
robot. Communication to this controller is done via the stage processor and a
parallel link.
4.3.5.
Logging in to the subsystem controllers
To login to the MUP, DCP or FISP/ SLC type:
Vb_super> rlogin dcp
And provide the username pgdiag and password espritpg
To login to the stage processor type:
Vb_super> rlogin stage
And provide the username svdiag and password espritsv
To login to the eo processor type:
Vb_super> rlogin oa
And provide the username oadiag and password espritoa
Part Number:878275
Vectorbeam Operator Manual
Page 43
5.
Machine start up from cold
Please see “Vectorbeam Customer service procedures" manual - document
number 893116.
Part Number:878275
Vectorbeam Operator Manual
Page 45
6.
Machine shut down
Please see “Vectorbeam Customer service procedures" manual - document
number 893116.
Part Number:878275
Vectorbeam Operator Manual
Page 47
7.
Emma control software
The primary functions of the Vectorbeam control software Emma are:
• Provision of sophisticated commands to allow fast and accurate
operation of system making full use of its potential.
• Provision of manual override through such features as the joystick
and data display.
• Transmission of the pattern data from the hard disk to the pattern
generator on exposure.
• Provision of test and diagnostic software.
Emma runs on an Alpha station workstation. OpenVMS provides all the
editing facilities for command sequences. There is an interactive command
language shell which is DEC Command Language (DCL) compatible. The
user can use the full line of DCL features to work with the command
sequences for the Vectorbeam.
Emma works with 2 windows on the workstation display, they are:
• The Status Window where the current status of the machine is
continuously updated
• The Job Control Window where:
1. The operator issues commands.
2. Measurements requested, such as height, beam current and
calibration values are displayed. Error messages will also
appear here.
A full style VAX-style "HELP" function is available for all commands and
command parameters. Alternatively refer to the Vectorbeam Command Set
(document no. 878274).
7.1.
Hints
1. <CTRL>C, e.g., means hold down control key and press C.
2. Note that DCL commands are not case sensitive (e.g. DIR is the same as dir).
3. Emma commands, like DCL commands, are not case sensitive. (Commands
issued directly to subsystem processors such as the pattern generator are case
sensitive e.g. stageNextField is not the same as StageNextField.)
4. Emma commands can be written in full or short form (mnemonic).
5. Once a set of qualifiers specifying parameters has been issued with an Emma
command they will remain in force if the command is issued without the
qualifiers.
Part Number:878275
Vectorbeam Operator Manual
Page 48
7.2.
Emma windows overview
When Emma is started two windows will be opened:
The first of these is a “Status Window” where the current status of the system is
displayed, this window is continuously updated (Figure 7.1).
Having started Emma and run the initialisation procedure some information is
immediately available from the Status Window in the menus at the top left corner
i.e. calibrations, pattern data, column conditions, PG and EO conditions as well
as access to the joystick.
Select, for example, with the mouse the "Set" menu and keeping the mouse
button pressed down, slide the arrow down to "Stigmator Balance" then release
the mouse button. A Stigmator Balance adjustment window will appear. The size
of a window may be increased which will elongate the slider bar ranges, so
making manual adjustment finer.
In the bottom section of the Status Window the SEM/FAB button may be pressed
with the mouse to switch between SEM and FAB mode. The Beam On/Beam Off
button switches between Beam on and Beam off. The 'Abort' button may be
selected to abort any of the calibrations, or to abort a pattern exposure, the
'Pause' button may be selected to pause a job file, (it pauses at the end of the
current command). To resume after either an 'Abort' or a 'Pause' it is necessary
to select the 'Continue' button.
Figure 7.1: The Emma Status Window.
The second window to appear on starting Emma is a 'Job Control' window where
all Emma commands are entered. (Figure 7.2)
Part Number:878275
Vectorbeam Operator Manual
Page 49
Figure 7.2: The Emma Job Control Window.
Further terminals may be opened by selecting DECterm from the Session
Manager Applications menu (Figure 7.3).
Figure 7.3: Supervisor DECTerm.
Part Number:878275
Vectorbeam Operator Manual
Page 50
7.2.1.
Set menu
The panels called up under the Set menu can all be cancelled by selecting
CANCEL at the bottom. The Set Image panel (Figure 7.4) may be used to set the
SEM image processing functions.
Figure 7.4: Set image
7.2.1.1.
Cross hairs
In order to display two vertical and two horizontal lines on the SEM screen select
the crosshairs option. The position of the cross hairs can be changed by clicking
with mouse on the lines which appear in this panel. The left mouse button
moves both cross hairs together and the right mouse button allows them to be
moved independently.
Part Number:878275
Vectorbeam Operator Manual
Page 51
The EO Service Setup panel (Figure 7.5) should only be used by Vistec
Engineers during the set up of the VB.
Figure 7.5: Set EO service set up.
The Set Stigmator Balance Panel (Figure 7.6) is used to set up the stigmator
Part Number:878275
Vectorbeam Operator Manual
Page 52
drive electronics to eliminate beam shift
Figure 7.6: Set Stigmator Balance.
The stigmation and the focus may be manually adjusted using the Set Stigmation
Focus Panel (Figure 7.7) by keeping the left mouse button pressed down and
moving the slider bar until the stigmation is satisfactory. Repeat with the other
slider bar.
Figure 7.7: Set Stigmator Focus.
Part Number:878275
Vectorbeam Operator Manual
Page 53
The Set Gun Aligner panel (Figure 7.8) is used to set the gun alignment
manually so that the beam passes down the column. The emission image is
used for finding the beam when it has a large misalignment.
Figure 7.8: Set gun aligner.
The Set Video Level panel can be used to set the video levels manually via the
mouse or select the automatic adjustment.
Figure 7.9: Set video level.
Part Number:878275
Vectorbeam Operator Manual
Page 54
The Set Lens Adjustment panel (Figure 7.10) may be used to set the lenses
manually via the mouse. This method should be used with caution on machines
with TFE cathodes.
Figure 7.10: Set lens adjustment.
7.2.2.
Display menu
Also available from the menu in the STATUS WINDOW is 'Display' information
about a range of parameters that are currently loaded. Select with the mouse
(left button) "Display" from this menu, keeping the mouse button pressed down,
a list of parameters will be displayed, select the subject required then release the
mouse button. After approximately 30 seconds the appropriate panel will appear.
These panels can all be cancelled by selecting Cancel at the bottom.
The Display Column panel (Figure 7.11) displays the drive levels to various
beam forming elements and provides links to the Set panels for adjustment.
Part Number:878275
Vectorbeam Operator Manual
Page 55
Figure 7.11: Display Column.
The Display Database/Column panel (Figure 7.12) displays the drive levels to
various beam forming elements, and these are part of the current database.
Figure 7.12: Display Database/Column.
Part Number:878275
Vectorbeam Operator Manual
Page 56
The Display Database/Pattern panel (Figure 7.13) displays information about the
currently selected pattern file.
Figure 7.13: Display Database/Pattern.
The Display Database/Strategy panel (Figure 7.14) displays information about
the set up of the pattern generator.
Figure 7.14: Display Database/Strategy.
The Display Database/Sensitivity (Figure 7.15) displays current sensitivity
coefficients affecting the main field, subfield and beam error feedback.
Figure 7.15: Display Database / Sensitivity.
Part Number:878275
Vectorbeam Operator Manual
Page 57
The Display Database/Calibration (Figure 7.16) displays current calibration
values affecting the main field, subfield and beam error feedback.
Figure 7.16: Display Database/Calibration.
The Display Database/Clocks panel (Figure 7.17) displays current clock
frequencies and the upper and lower limits of the dose controller band.
Figure 7.17: Display Database/Clocks.
7.2.3.
Toolkit menu
The 'toolkit' is also available from the menu in the Status Window. Select with the
mouse (left button) "toolkit" from this menu, keeping the mouse button pressed
down, the tools available will be displayed.
When the EO monitor is selected (Figure 7.18), the Column Status Panel is
displayed, which contains the Set, Demand and Measured values for the EHT,
Filament, Wehnelt and the Lenses. It is continuously updated.
Part Number:878275
Vectorbeam Operator Manual
Page 58
Figure 7.18: Tool Kit EO Monitor Panel.
When the PG monitor is selected, the Pgmonitor Status Panel is displayed
(Figure 7.19), this displays the progress of the pattern data through the pattern
generator during exposure. It is continuously updated.
Figure 7.19: Tool kit PGMonitor.
Part Number:878275
Vectorbeam Operator Manual
Page 59
When the Joystick is selected, the Joystick Control Panel is displayed (Figure
7.20 or Figure 7.21), this enables the stage to be driven manually, the boxes
labelled Inc X and Inc Y and Mag may be edited, and the size of the stage steps
set. By selecting with the mouse (left button) one of the bars, not the actual slider
bars, the stage will move by the size of the step set in the axis selected. The
joystick is used in SEM scanning mode.
Figure 7.20: Tool kit Joystick Panel (Absolute Mode)
By selecting with the mouse (left button) the 'Relative' icon a second 'Joystick
Control Panel' will be displayed instead (Figure 7.21).
By selecting with the mouse (left button) the slider bar on the side of the grid,
keeping the mouse button pressed down, move the slider to change the
magnification of the grid, and also the SEM magnification relative to the grid.
Select the grid with the mouse and slide the pointer in the direction that the stage
is to be moved. The Stage position is continually updated in the Pos X and Pos Y
boxes. When the required mark etc. is located, selection of the 'Save' icon will
store the position in the 'Saved Stage Position X.. Y.. If the stage is then moved
elsewhere, selection of the 'Restore' icon will move the stage back to the Stored
position.
It is possible to enable/disable the SEM mag tracking by selection of the 'SEM
mag tracking' icon with the mouse, (left button).
Part Number:878275
Vectorbeam Operator Manual
Page 60
Figure 7.21: Toolkit Joystick (Relative Mode).
7.3.
Emma directory structure
The directory structure on the VB is set out in the document Machine Managers
Guide (document no. 892813).
7.4.
Emma help
For access to Emma Help select with the mouse (left button) "Help" in the he top
right corner of the STATUS window keeping the mouse button pressed down,
slide the arrow down to highlight "On Commands", then release the mouse
button. After approximately 30 seconds the Emma help window will appear. The
information is the same as that provided in the Vectorbeam Command Set
manual (878274).
The commands are grouped into general headings to provide a hierarchy from
which the user will be able to quickly find the command they require. For
information, double click on the subject required, then selecting with the mouse
(left button) the slider bar on the right hand side of the Emma help window
keeping the mouse button pressed down, move the slider bar to scroll as
necessary.
Part Number:878275
Vectorbeam Operator Manual
Page 61
8.
Job control
The VB user terminal operating system is VMS from HP Compaq. The Emma
program running on VMS provides a Status Window and a Job Control Window.
The Job Control Window is similar to a normal DECterm in VMS in that it
processes DCL commands. In addition the Job Control Window processes
Emma commands. DCL and Emma commands can be freely intermixed and
command sequences are usually saved in files for repeated use. A knowledge of
both DCL and Emma is therefore required for operating the VB.
8.1.
DCL commands
Refer to the HP Compaq manuals for information about DCL.
8.2.
Emma commands
For details of Emma commands refer to the manual “Emma Vectorbeam
Command Set” part number 878274.
qset register commands
Many variables on the sub-systems can be set using the “qset register”
command – see manual “VB Software Registers” part number 893039.
8.3.
Supplied job files
A number of job files have been written to carry out all common sequences.
These are described in the Acceptance Test and Operator Jobfiles User Manual
part number 892777 and are referred to in this manual. The areas these jobfiles
cover are:
1. Diagnostics
2. Utilities
3. Calibration
4. Expose layout
5. Acceptance tests
8.4.
Job file creation
Although software and job files are supplied to enable many common operations
to be carried out, the user is expected to be able to create job files if necessary
for their particular applications. Editing can be carried out in the Job Control
Window but is usually done in a separate DECTerm so that the machine can be
operated at the same time. To create a spare DECTerm window, select with the
mouse (left button) "Application" in Session Manager Menu at the top left corner
of the Workstation screen, keeping the mouse button pressed down, slide the
arrow down to highlight "DECTerm", then release the mouse button. After a few
seconds a new DECTerm window will appear. File editing can be carried out
Part Number:878275
Vectorbeam Operator Manual
Page 62
while the machine is executing commands - but not the files the machine is
using!
Refer the document “Job file standards” part number 892815 for details of the
rules and tips for writing job files.
8.5.
Job file examples
Job files described in this manual in the Chapters “Exposing a substrate” and
“Direct write alignment” can be used as examples. These job files define and
carry out the exposure of a matrix of dies.
8.6.
Running jobfiles
At the vb_oper prompt type @ followed by the name of the jobfile:
VB_OPER>@my_jobfile.com
8.7.
Stopping jobfiles
8.7.1.
During DCL command execution
1. In the DECTerm running the jobfile type CTRL-C.
2. Enter “stop” at vb_oper prompt
3. Enter “spell” at vb_oper prompt
8.7.2.
During Emma command execution
If an Emma command is being executed such as a pattern exposure or
calibration:
1. Press abort button on Emma status window
2. In the DECTerm running the jobfile type CTRL-C.
3. Press continue button on Emma status window
4. Enter “stop” at vb_oper prompt
5. Enter “spell” at vb_oper prompt
8.7.3.
Notes on CTRL-C and CTRL-Y
Emma is prone to crash on repeated CTRL-C or CTRL-Y. Therefore only press
CTL-C once (not CTRL-Y) and wait for the current command to complete its
execution. This could be several minutes if the machine is for example doing a
mainfield calibration. The “abort” button can be used to stop the current Emma
command. If the jobfile does not terminate after an appropriate time, try CTRL-C
again.
The behaviour of DCL jobfiles when CTRL-C is pressed is also determined by
the current settings in the DCL environment (see DCL documentation or “help
on” and “help set”). This should be explicitly set within each jobfile, for example:
Part Number:878275
Vectorbeam Operator Manual
Page 63
$ SET ON
! enables specified action using ON command
$ ON CONTROL_C THEN GOTO CTRL_EXIT
.
$ CTRL_EXIT:
$ ! Commands to tidy up before exit
.
$ EXIT
Once the jobfile has been stopped, another Emma bug needs to be dealt with.
The mailboxes need to be resynchronised by running
[emma.ctrl.release_version.com]resync.com. There is usually a symbol "SPELL"
defined to do this:
VB_OPER>spell
8.8.
OpenVMS tips
OpenVMS is designed as a multitasking, multi-user operating system capable of
supporting thousands of simultaneous users reliably. Each user is allocated a
portion of the systems resources as decided by the account set up by the
System Manager. For Vectorbeam use an entry-level desktop workstation with
limited but normally adequate resources is used which is licensed for a single
user. However to allow for System Management use two users are normally
allowed on the system at any one time. However the user on the local terminal
can log in to as many accounts as he requires.
This system works well provided applications are allowed to complete their
execution cycles. There are always cases when a program can crash. When this
happens there is no clean exit and system resources will not always be returned
to the account holder.
Typical situations when a program can crash are attempts to access a file
opened for write from a second window. For example CVIEW opening a file,
which is already in use for writing a wafer. Good programming should avoid
such errors but inevitably errors slip through the net for example when the
access to a file used in several program codes is set to write, which is the
default.
8.8.1.
Recommended tasks to avoid user hang ups
The users environment always includes a Session Manager window. This may
be iconised and is recognisable in this state as a key symbol. If this window is
iconised then double click with the left mouse button to bring it up on the screen.
Click on the Session menu heading and then click on Work in Progress...
Typically there will be two or more active tasks in the window for example:•
Window Manager - this should always be present.
•
Calendar - this will depend on the users selection but is normally
included.
Part Number:878275
Vectorbeam Operator Manual
Page 64
Then if the user has opened further applications e.g. Calculator or CVIEW then
these will also appear in this window. If there is no CVIEW window or icon on the
screen but the CVIEW user has quit the program after an X Toolkit warning then
CVIEW remains in the Work in Progress box with the status "Done". This means
it is still using system resources. This situation arises when the user clicks on
"Close" in the X Toolkit.
To remove a task in the Work in Progress window with the "Done" status use the
following operations:1. Open the Work in Progress window.
2. Click once on the "done" task, which will highlight the task line.
3. The boxes at the bottom of the screen now change status.
4. Click on the "Remove Task" button.
8.8.2.
Recommendation
It is advisable to regularly check the "Work in Progress" window and remove any
tasks with the "done" status. This applies to Emma, as this task is left over from
starting Emma and has no further function PROVIDED its status is "done".
8.9.
Logicals
Many logicals are set by Emma as a way of making parameters visible and
readable by jobfiles. They all begin with the prefix vb_.
8.9.1.
8.9.1.1.
Useful logicals
VB_PG_TYPE
This can take the following values:
"16 BIT STANDARD", "18 BIT WIDEFIELD", "20 BIT WIDEFIELD" or "00 UNKNOWN"
This logical is set when an INCM (or INPG or INCM/SYS=PG) is done. The
logical is set only by by versions of Wide-Field Emma dated 20.11.00 or later.
8.10.
Creating compiled jobfiles
Sometimes it can be useful to write jobfiles in C instead of DCL. The following
are required:
1. An ascii editor. This is usually the edt or eve editor under VMS.
2. A C compiler for VMS. Not supplied as standard.
3. emmachk.h and emmachkj.obj. Available in the VB software release
on the tool in the emma$ctrl_com directory.
The C program simply issues standard Emma commands to the mailbox via the
emmachk() function - see emma$ctrl_com:emmachk_example.c, which is
installed on each tool, for an example. The command used in the emmachk
function must be the full form (no mnemonics) without the "q" at the start.
Part Number:878275
Vectorbeam Operator Manual
Page 65
The other 2 functions in emmachk.obj that will be needed are logical_getg and
logical_setg to read and write group logicals respectively. After compiling
my_program, it must be linked with emmachk.obj.
A compiled job is run by:
1. defining a symbol at the VB_OPER prompt as in the following
example: my_program =="$
vb$disk:[vb.users.my_directory]my_program.exe"
2. entering the symbol my_program at the VB_OPER prompt
When calling a compiled jobfile from a command file the line:
$ define/user_mode sys$input sys$command
must precede the line
$ my_program
Part Number:878275
Vectorbeam Operator Manual
Page 67
9.
Corrections
9.1.
Corrections for absolute accuracy
In order to focus and place the beam accurately in an absolute sense on the
substrate various corrections are required. These corrections are described
below.
9.1.1.
Stage mapping - absolute mode
Correction coefficients are applied to the stage to remove inaccuracies in the
measured stage position due to mechanical limitations in the interferometer
mirrors. This enables the positioning of patterns closer to “true grid” - a perfect x
y (Cartesian) coordinate system. Correction coefficients are determined either
from measurements with an appropriate metrology tool of an array of marks
exposed with the VB or from measurements from the VB of an array of marks.
The coefficients are applied to the absolute mode. See Section “Stage mapping
modes”.
9.1.2.
Beam error feedback (BEF) correction
The beam error feedback removes discrepancies between the desired stage
position and the measured stage position. There is typically a discrepancy of a
few microns after each stage move due to mechanical limitations. The laser
interferometer measurements are used to deflect the beam so that it tracks the
stage (see Figure 9.1). The beam error feedback (BEF) range is +/- 20 μm for
both λ/512 and λ/1024 interferometers. The main beam error feedback (BEF)
correction is applied continuously by the hardware, but the fine BEF scaling and
rotation corrections are ONLY applied when pattern writing or mark locating. The
scaling and rotation corrections will not therefore be updated if the BEF changes
at other times (due to e.g. a stage move).
To update the BEF scaling and rotation correction simply execute an on-axis
mark locate (either main or sub-field). The BEF corrections will be updated to the
currently required value regardless of whether the mark locate is successful.
N.B. The /POSM qualifier on a mark locate will move the stage AFTER the mark
locate and this will change the BEF value. This may cause the SEM image to
show the mark as not being exactly on-axis. However, to get around this and
update the BEF corrections, carry out another mark locate without a postmove.
Part Number:878275
Vectorbeam Operator Manual
Page 68
Figure 9.1: Image plane deviation compensation scheme.
9.1.3.
Magnetic map correction
The rotation of the deflection field with respect to the stage axes depends to a
small extent on the stage position. This behaviour is repeatable and is partly
caused by local variations in the magnetic field between the final lens and the
stage and partly by small changes in the mechanical rotation of the stage
superplate. Unless this effect is cancelled, it will cause the misplacement of
exposed shapes. A calibration is therefore carried out in order to align the
deflection field axes to the stage axes over the range of the stage travel. The
deflection field is first aligned to the stage axes at the datum plate by jobcal and
then the relative rotation of the deflection field is measured at each of an array of
marks on the autostitch plate. These relative rotations are known as the
magnetic map and are applied to the deflection field at every stage position
except around the datum plate.
9.1.4.
Height corrections
The distance between the substrate surface and the final lens will vary typically
by +/- 10 µm due to substrate distortion and differences in the mounting in the
holders. The effect of this on the fieldsize is shown in Figure 9.2, creating a
dependence of field scale on height of about 25 nm/mm per micron height. This
effect occurs for both HR and UHR systems but in addition on UHR systems
there is a dependence of field rotation on height, as the angle of the beam to the
substrate has a tangential component as well as the radial component. The
magnitude of this effect is about 16 nm/mm per micron height.
Part Number:878275
Vectorbeam Operator Manual
Page 69
Stage Position
“B”
Stage Position
“A”
Holder
Height Difference
Substrate
F2
F1
Figure 9.2: Effect of changing height on fieldsize. At stage position “A” the fieldsize =F1. At
stage position “B” the fieldsize = F2, which is larger due to the angle of the beam and the
larger height. On UHR systems there is also a change in field rotation.
The height corrections are the adjustments made to the focus point and the field
scaling and rotation (UHR only) to compensate for their dependence on the
height of the substrate (see Figure 9.1). The height corrections are calculated
from the difference in the height meter readings on the calibration mark and on
the substrate. The fine focus setting is adjusted so that the beam remains
focused on the surface of the substrate. However, when the fine focus setting is
varied, the rotation of the deflection field changes and this effect must also be
nulled. The BEF, sub-field and main field deflection calibrations are adjusted so
that deflection distances remain accurate. The error in the deflection calibrations
due to a micron of height change is about 20 nm at the edge of a 1 mm field.
Calibrating the main field deflection using a "QCAL MAIN ... " command resets
the reference values for the height corrections. The height meter reading and the
fine focus setting are taken before calibration of the deflection and saved.
Therefore it is vital that the focus is correct (using the automatic focus and
stigmation facility) at this height before calibrating the deflection. The height
corrections will be reset to the reference height, i.e. zeroed, whenever a "QCAL
MAIN .... /LOAD" command is used.
Jobcal and Fullcal automatically set the focus correctly before
calibrating the deflection.
In addition, height corrections are recalculated only after each stage move during
exposure or after the command QADJUST FIELD is issued. On completion of
pattern writing the height correction will be left set-up for the height of the last
field written.
9.1.5.
Yaw correction (18-bit and 20-bit VB6 only)
The rotation of stage superplate with stage position is known as the yaw. The
yaw at any position is mostly repeatable and is measured and compensated for
by the magnetic map calibration. However any non-repeatable component of
yaw will directly contribute to the placement errors on the substrate. In addition,
the yaw can vary over distances of only a few millimetres and the magnetic map,
which is measured at a grid of points separated by larger distances will not
contain this information. Finally, the magnetic map correction is taken as zero
around the datum plate for all holders, although there might really be an offset in
the rotation at the datum marks of different holders due to a difference in the
positions of the marks of a few millimetres. This offset will lead directly to an
offset in the deflection field rotation.
Part Number:878275
Vectorbeam Operator Manual
Page 70
The VB6 has two interferometer axes measuring the Y position. One measures
the position in line with the point where the electron beam hits the substrate. The
other measures the position a distance of 0.5 inch away and enables changes in
the rotation of the superplate to be measured. The pattern generator reads the
yaw at each stage position.
The yaw is zeroed at position (0,0) when a qmove home command is done. In an
analogous way to the datum offset, the yaw is measured at the datum point
(focus mark) by the holder_table.com jobfile when a new holder is initialised.
This yaw datum must be set on the datum mark used for calibration after a
qMove Home but before any size/alignment calibrations are done. The yaw value
is saved within the DCP and subtracted from all yaw readings before applying a
correction.
A rotation correction to the mainfield, subfield and BEF is made whenever a
qadjust field command is issued (unless scor off/yaw has been selected) which is
equal to the measured yaw minus the yaw offset stored. This yaw correction
deals with the limitations of the magnetic map correction.
The pattern generator will only read the yaw from the stage electronics if the
following line is added to the file WFDCP_CONFIG.VW (only possible if logged
in under the emma username):
G_EnableYawCorrn = 1
The pattern generator will use a zero value of yaw, unless the yaw reading has
been switched on in this way. That is, unless the command QADJUST
YAW/DATUM= ... is used to force in a non-zero value of the yaw datum, the yaw
correction will have no effect.
In addition, the yaw correction is only applied if it has been enabled using the
QSET CORRECTIONS ON/YAW or QSET CORRECTIONS ON/ALL.
The yaw correction is only used by the jobfiles if the logical vb_yaw_enabled is
set to “TRUE” but this is part of the system configuration and should not need to
be changed.
9.1.6.
Deflection field corrections
The focus varies with deflection and the position of the beam does not vary
linearly with the deflector drive. Deflection field corrections remove these focus
and non-linear placement dependencies on the deflection of the beam. These
are:
•
Focus
•
Stigmation
•
Main field distortion (X and Y offsets)
•
Sub-field scaling and rotation
•
BEF scale and rotation
Main field corrections are applied during pattern writing and mark location (main
or sub-field). They are not changed at other times such as in SEM mode.
Part Number:878275
Vectorbeam Operator Manual
Page 71
9.1.7.
Shift, scale and rotation corrections for fine focus
A characteristic of the optical system is the rotation and change in scale of the
deflection field when the fine focus is varied. On 18-bit and 20-bit systems with
the 1.2 mm fieldsize this effect is nulled out explicitly using dedicated correction
coefficients. (On other systems, the effect is compensated for by the mainfield
distortions.)
The beam is aligned to the optical axis of the final lens. Since the mechanical
alignment of the fine focus coil to the optical axis of the final lens has a
significant residual error, the beam does not pass through the centre of the fine
focus coil. This means that the on-axis beam position varies with the fine focus
setting and a correction is applied in the X and Y directions to null this effect.
9.2.
Corrections for matching
Corrections can be applied in order to overlay a pattern accurately on a
substrate, which has already been patterned using another exposure tool.
9.2.1.
Direct write correction
See Chapter “Direct write alignment”.
9.2.2.
Stage mapping - machine mode
This allows more accurate overlay of a pattern on a substrate, which has already
been patterned using an exposure tool whose stage positioning is repeatable but
not accurate in an absolute sense. Correction coefficients are applied to the
stage in machine mode. Correction coefficients can be determined either:
1. From measurements with the VB of an array of marks exposed on
the tool to which it is to be matched. See chapter “Machine set ups”
for further details.
2. From measurements on a metrology tool such as the Leica IPRO.
9.2.3.
Stepper lens correction
This allows more accurate overlay of a pattern on a substrate, which has already
been patterned using a step-and-repeat exposure tool whose imaging system
has repeatable distortions. See chapter “Calibration” for further details.
Part Number:878275
Vectorbeam Operator Manual
Page 73
10.
Height meter
The height meter subsystem measures the distance between the final lens and
the surface of the substrate, as shown in Figure 10.1. This distance is known as
the height. Height measurements are necessary for high accuracy lithography
since changes in height, due to bow or other substrate non-flatness, can
introduce errors, which affect the deflection field size and beam focus (see
Chapter “Corrections). During pattern exposure, height meter measurements are
taken after each stage movement and the required compensations are applied
automatically to maintain high accuracy deflection (see Chapter “Corrections”).
The subsystem comprises an infrared laser beam directed at the substrate
surface and a CCD array detector, which allows the position of the reflected
beam to be measured. An increase in the reading corresponds to an increase in
the separation between the final lens and the substrate.
Final lens
Video
Laser illuminates a spot
on surface of substrate
CCD
Substrate
Laser spot movement as
substrate height changes
Spot position on CCD moves as
substrate height changes.
System converts change in spot
position to change in height.
Figure 10.1: Diagram showing the operation of the heightmeter
10.1.
Height meter tables
The height meter system must cope with the various reflectivities of different
substrates. When a height reading is taken the laser drive and the detector gain
will be varied automatically to provide a suitable signal. Height meter tables
define the ranges over which the laser drive and detector gain can be varied by
the system to obtain a reading, so as to minimise the recovery time when a
reading is taken off the edge of a substrate. The greater the gain adjustment
between readings the longer it takes. The time required to obtain a reading on a
surface after attempting a reading off the edge of the substrate will be relatively
large and can take up to 20 seconds in the worst case. 10 tables are available
arranged in order of ascending maximum and minimum gain. This means that
table 1 will work for the most reflective substrates and table 10 for the least
reflective substrates.
10.1.1.
Table choice
A suitable table must be chosen for each substrate type. The lowest number
table which works reliably should be chosen, to reduce the amount of time
required in the case that a reading is taken on the surface after taking a reading
off the edge of the substrate somewhere during exposure. Working reliably
means that no warnings or errors such as “Laser height sensor reading poor”
Part Number:878275
Vectorbeam Operator Manual
Page 74
occur. If in doubt, a higher table number can always be used at the risk of taking
longer for recovery.
As the height meter must be used to measure both the datum plate and the
substrate, two appropriate height meter tables are used for processing a holder.
Height meter table 7 is reserved for the datum.
The suggested height meter tables for typical substrates are:
Substrate
Bright chrome masks
Dark chrome masks
Si / SiO2
GaAs
SiN
Datum
10.1.2.
Table
1
2
3
4
5
6
7
8
9
10
Table selection in Emma
In order to select a particular table to be used, either specify the table with the
calibrate command or with the display command e.g.:
VB_OPER> QCAL HEIGHT /TAB=7
VB_OPER> QDISPLAY HEIGHT/TAB=7
Once the table has been selected in this way, do not specify the table using the
/tab qualifier with further qdisplay height commands as the command will take
longer. The last table selected will continue to be used for further height meter
commands.
10.2.
Height meter calibration
Each height meter table to be used should be calibrated first. Calibrating the
height meter adjusts the laser drive and detector gain, using a fast search
method, to give the correct signal level. Calibrate the datum plate height meter
table by loading the holder and typing:
VB_OPER> MVSP FM move to the Focus Mark
VB_OPER> QCAL HEIGHT /TAB=7 calibrate the height sensor
Calibrate the appropriate substrate table by loading the holder, moving the stage
to position the surface under the beam and typing:
VB_OPER> QCALIBRATE HEIGHT/TAB=specified height table
The height meter tables for the datum and substrate are calibrated
automatically by the holder sequence (see Section “Holder
initialisation”). The holder sequence should therefore always be run
after loading a holder on the stage.
Part Number:878275
Vectorbeam Operator Manual
Page 75
10.3.
Height meter readings
In order to obtain a height meter reading it should be ensured that the correct
table has been selected (see Section “Table selection in Emma”). When a height
meter reading is taken:
The automatic gain adjustment is turned on (The laser is
permanently on).
The signal level is adjusted automatically in small steps.
A height reading is taken after an integration time together with a
quality assessment (see Section “Height meter warnings and error
messages”). The time required for the reading depends on the
amount of integration required to obtain the correct signal level and
varies from about 20 ms for the brightest substrates upwards.
If the quality assessment shows a signal level outside the correct
range, steps 2 and 3 will be repeated several times.
The final reading will be reported together with the quality
assessment.
The automatic gain adjustment is turned off.
The calibration values are restored whenever the Emma command qdisplay
height/table=# is issued. Otherwise the last laser drive and gain values found for
a height meter readings will be used initially. For this reason after selecting the
correct table, use only the command “qdisplay height” as gradual reflectivity
variations across the substrate will be followed with less time overhead.
When using the real-time height mode it is important that the correct table is
selected each time that the beam is moved from the substrate onto the focus
mark and vice versa.
If the height sensor has been calibrated at the centre of a plate and "HEIGHT
SENSOR AT LIMIT" errors are reported when trying to display heights towards
the edge of the plate, it may be better to calibrate towards the edge of the plate.
When exposing a pattern if the height meter reports an error when
measuring then the last height reading is used. Therefore, if writing
a pattern which starts in a region where the height sensor will not
work, it is important that the last reading (obtained by doing a
successful "QDISP HEIGHT") should be taken as close as possible
to the start of the pattern.
10.4.
Height meter timing
The total time taken for the pattern generator to obtain a reading from height
meter on the most substrates is fairly constant at around 80 ms and is dominated
by communication times. However this time can increase to a few seconds for
two reasons:
1. The change in the signal gain required from one reading to the next is
large. The gain adjustment time depends on the table selected but may be
up to several seconds.
Part Number:878275
Vectorbeam Operator Manual
Page 76
2. The substrate has a low reflectivity requiring larger integration times. In
this case the maximum integration time can approach 1 second.
An error condition, such as reading off the substrate surface, will cause a
long measurement time due to both reasons.
10.5.
Height meter warnings and error messages
The height meter subsystem returns a quality assessment with each reading.
This results in Emma reporting one of the following:
1. Nothing. This implies a good height value.
2. Laser height sensor reading poor.
3. Laser height sensor brightness at limit.
4. Laser height sensor over range
For error recovery suggestions see Section “Emma error messages” in Chapter
“Recovery from exception conditions”.
10.6.
Height meter offsets
Height meter offsets can be applied in order to compensate the for resist
thickness effects and to adjust the field scaling if required. On UHR systems a
height meter offset will also result in a change in field rotation. A more user
friendly way to adjust scale and rotation is to use the calibration offsets (see
Section “Calibration offsets” in Chapter “Calibrations”) and this is the
recommended method.
10.6.1.
Resist thickness compensation
By considering the optics of the heightmeter, an estimate of the position of
measurement relative to the surface of the mask can be made.
The following examines the case of PMMA on 85 nm thick Cr: The wavelength of
the laser diode is about 780 nm. The reflection coefficient from the PMMA
surface is about 0.28. The beam transmitted into the PMMA with relative
intensity 0.72 is reflected from the Cr. The reflection coefficient for this is 0.57
giving a beam with relative intensity 0.41. At the surface of the resist, 28% of this
beam is reflected internally and the relative intensity of the transmitted beam is
then 0.3. This is about the same as the intensity from the surface of the resist.
However, due to refraction in the PMMA the apparent position of the Cr surface
is higher and is about 0.6 of the PMMA thickness below the PMMA surface.
From this it can be seen that the heightmeter will read a height about 0.69 times
the PMMA thickness above the surface of the Cr.
Due to the angle of the beam to the substrate when exposing shapes around the
edges of the field, the sides of the shapes in the resist after development will be
sloped. It is the position of the opening at the bottom of the resist, which
determines where the shapes will be transferred into the substrate. The scale
must be adjusted for the bottom of the resist for accurate stitching and this is
done by applying an offset to the heightmeter table, according to resist thickness,
so that it effectively reads the true height of the substrate surface.
Part Number:878275
Vectorbeam Operator Manual
Page 77
10.6.2.
Height meter offset effect on stitch accuracy
The effect on the fieldsize of the offset is typically small: for an 800 µm field and
0.55 µm resist on Cr the fieldsize will be reduced by 11 nm - see Figure 10.2.
Figure 10.2: Measured dependence of scale stitch error on height meter offset for a 500 μm
blocksize.
For UHR systems there will be a rotation change of 7 nm across the 800 µm field
in addition to the scale change.
10.6.3.
Sign of offset
The heightmeter measures the separation of the substrate from the final lens and
if this measurement is increased by setting a positive offset, the deflection angle
will be reduced to compensate. (If the substrate were truly further away, the
fieldsize would remain the same.) However if an offset is set on table 7, which is
reserved for the datum, jobcal will introduce this offset into the calibrations and
all exposures using any other table will be affected in an opposite sense.
10.6.4.
Setting the height meter offset
The height meter offset can be set either on the MUP or by using the qset reg
command.
10.6.4.1.
Height meter offsets
The height offset can be set by logging into the MUP if using a 16-bit pattern
generator or the DCP if using an 18-bit or 20-bit pattern generator and setting
numbers in a table of offsets for each heightmeter table provided for this
purpose.
10.6.4.1.1.
16-bit pattern generator
VB_SUPER> rlogin MUP
Vectorbeam Pattern Generator - Master.
login :pgdiag
Password:
->
10.6.4.1.2.
18-bit and 20-bit pattern generators
VB_SUPER> rlogin DCP
Vectorbeam Pattern Generator - DCP.
Part Number:878275
Vectorbeam Operator Manual
Page 78
login :pgdiag
Password:
->
10.6.4.1.3.
16-bit, 18-bit and 20-bit pattern generators
To display the current status type:
-> showTableOffsets
Offsets added to Height Sensor output:
Table no. Offset, microns
--------- --------------1 0.000
2 0.000
3 0.000
4 0.000
5 0.000
6 0.000
7 0.000
8 0.000
9 0.000
10 0.000
Mechanism switched off.
Currently using table 7 with offset 0.000
value = 43 = 0x2b = '+'
To set an offset type:
-> setTableOffset 1,0.3
value = 0 = 0x0
The following is also required to set the mechanism on:
-> G_TableOffsetsOn=1
_G_TableOffsetsOn = 0xfab4c8: value = 1 = 0x1
This will give the following:
-> showTableOffsets
Offsets added to Height Sensor output:
Table no. Offset, microns
--------- --------------1 0.300
2 0.000
3 0.000
4 0.000
5 0.000
6 0.000
7 0.000
8 0.000
9 0.000
10 0.000
Currently using table 7 with offset 0.000
value = 43 = 0x2b = '+'
10.6.4.2.
Height meter offset using qset register
Using the qset register command enables automation via jobfiles.
10.6.4.2.1.
16-bit pattern generator
The height meter offset can be set using Emma commands. First use the
following command to select heightmeter table 1 (for example) and to switch the
Part Number:878275
Vectorbeam Operator Manual
Page 79
offsets on (This sets G_TableOffsets = 1 on the MUP):
VB_OPER>qset reg 4 19 1
Next use the following command to set the offset (0.3 um for example) for the
table, which was previously selected:
VB_OPER>qset reg 4 20 0.3
10.6.4.2.2.
18-bit and 20-bit pattern generators
The height meter offset can be set using Emma commands. First use the
following command to select heightmeter table 1 (for example) and to switch the
offsets on (This sets G_TableOffsets = 1 on the MUP):
VB_OPER>qset reg 3 53 1
Next use the following command to set the offset (0.3 um for example) for the
previously selected table:
VB_OPER>qset reg 3 54 0.3
10.7.
Fine tuning the height-dependent field scaling
The dependence of field size on height is calculated by the software from the
geometry of the deflection system i.e. the nominal height of the pivot point above
the substrate. A compensating correction is applied for the difference in height
between the substrate and the calibration height (by default the height
corrections are on). However, due to inaccuracies in the bench calibration of the
heightmeter and non-linearities of the height meter system, the compensation
will not be perfect.
Therefore further coefficients are available to take out any inaccuracies in the
scale for height correction calculation, as shown in the table below. These
coefficients are applied to the height meter reading that is used for the scale for
height correction and calibrated on the basis of measurements on the
Vectorbeam. There are coefficients for a 2nd order polynomial for both X and Y
allowing independent adjustment. These coefficients allow fine tuning of the
scale for height and non-linear scale for height. The constant terms effectively
produce a scale offset but it recommended that the calibration offsets are used
instead (see Section “Calibration offsets” in Chapter “Calibration”).
X
Y
Nominal
value
NonlinearGainConstX
NonlinearGainConstY
0
NonlinearGainScaleX
NonlinearGainScaleY
1.000
NonlinearGainSquareX
NonlinearGainSquareY
0
The use of the coefficients to adjust the height meter reading can be enabled or
disabled using NonlinearGainOn.
In order to access the coefficients on the DCP directly, login to the DCP:
VB_SUPER> rlogin dcp
Part Number:878275
Vectorbeam Operator Manual
Page 80
Vectorbeam Pattern Generator - Master.
login :pgdiag
Password:
->
To display the current value type:
-> (double) NonlinearGainScaleX
To change the current value type, for example:
-> (double) NonlinearGainScaleX = (double) NonlinearGainScaleX
To ensure the values are set when the DCP is rebooted, put them into the
DCP_CONFIG.VW file for 16-bit systems or WFDCP_CONFIG.VW for 18-bit and
20-bit machines.
In order to set and display the coefficients through Emma commands use the
“qset reg” and “qdisplay reg” commands, together with the numbers in the table
below.
X
Register
for 16bit PG
Register
for 18bit and
20-bit
PG
Y
Register
for 16bit PG
Register
for 18bit and
20-bit
PG
NonlinearGainOn
3 30
3 30
NonlinearGainOn
3 30
3 30
NonlinearGainConstX
3 24
3 24
NonlinearGainConstY
3 27
3 27
NonlinearGainScaleX
3 25
3 25
NonlinearGainScaleY
3 28
3 28
NonlinearGainSquareX
3 26
3 26
NonlinearGainSquareY
3 29
3 29
10.8.
Fine tuning the height-dependent field rotation
Only UHR systems have height dependent field rotation. A rotation for height
coefficient is defined and a compensating correction is applied for the difference
in height between the substrate and the calibration height (by default the height
corrections are on). However, due to non-linearities of the height meter system
and differences between X and Y, the compensation will not be perfect.
Therefore further coefficients are available to take out any inaccuracies in the
rotation for height correction, as shown in the table below. These coefficients are
applied to the height meter reading that is used for the rotation for height
correction and calibrated on the basis of measurements on the Vectorbeam.
There are coefficients for a 2nd order polynomial for both X and Y allowing
independent adjustment. These coefficients allow fine tuning of the rotation for
height and non-linear rotation for height. The constant terms effectively produce
a rotation offset but it recommended that the calibration offsets are used instead
(see Section “Calibration offsets” in Chapter “Calibration”).
Part Number:878275
Vectorbeam Operator Manual
Page 81
X
Y
Nominal
value
NonlinearRotConstX
NonlinearRotConstY
0
NonlinearRotScaleX
NonlinearRotScaleY
1.000
NonlinearRotSquareX
NonlinearRotSquareY
0
The use of the coefficients to adjust the height meter reading can be enabled or
disabled using NonlinearRotOn.
In order to access the coefficients on the DCP directly, login to the DCP:
VB_SUPER> rlogin dcp
Vectorbeam Pattern Generator - Master.
login :pgdiag
Password:
->
To display the current value type:
-> (double) NonlinearRotScaleX
To change the current value type, for example:
-> (double) NonlinearRotScaleX = (double) NonlinearRotScaleX
To ensure the values are set when the DCP is rebooted, put them into the
DCP_CONFIG.VW file for 16-bit systems or WFDCP_CONFIG.VW for 18-bit and
20-bit machines.
In order to set and display the coefficients through Emma commands use the
“qset reg” and “qdisplay reg” commands, together with the numbers in the table
below.
X
Register
for 16-bit
PG
Register
for 18-bit
and 20bit PG
Y
Register
for 16-bit
PG
Register
for 18-bit
and 20bit PG
NonlinearRotOn
3 37
3 37
NonlinearRotOn
3 37
3 37
NonlinearRotConstX
3 31
3 31
NonlinearRotConstY
3 34
3 34
NonlinearRotScaleX
3 32
3 32
NonlinearRotScaleY
3 35
3 35
NonlinearRotSquareX
3 33
3 33
NonlinearRotSquareY
3 36
3 36
Part Number:878275
Vectorbeam Operator Manual
Page 82
10.9.
Heightmeter early read
On 18-bit and 20-bit pattern generators the heightmeter is usually configured to
do an early read. This is where a heightmeter reading is started immediately
after a stage move but during the stage settling time. An early read reduces the
time overheads and increases throughput. The early read can be configured on
the DCP by setting the variable as follows:
-> G_ExpectMoveSig = 1
To ensure this value is set when the DCP is rebooted, put it into the
DCP_CONFIG.VW file on 16-bit systems or WFDCP_CONFIG.VW for 18-bit and
20-bit systems.
10.10.
Height map readings by jobfile
A simple height map consisting of a 3x3 matrix of height readings is typed on
screen after measurement by a jobfile. The centre and extent of the map depend
on the substrate parameters defined in the holder sequence. Type:
VB_OPER>@VB$ACCS:acc_plateheight.com
For maximum accuracy, all heights should be within +/- 10 µm and the tilt should
be less than 1 µm/mm.
10.11.
Height map mode
During pattern exposure the height sensor may either be run in real-time mode
or in height-mapped mode.
10.11.1.
Real-time mode
In real-time mode a height meter measurement is taken after every stage move.
This is the usual mode of operation as it is simpler than using a heightmap and
usually gives the maximum accuracy.
To use in real-time mode type:
VB_OPER> QSET HEIGHT /REALTIME
10.11.2.
Height-map mode
In height-map mode a calculated value of the height is obtained from a
previously calibrated height map. This mode of operation is usually only used for
special applications. To use in height-map mode type:
VB_OPER> QSET HEIGHT /HEIGHTMAP
10.12.
Height map calibration
To create a height map, ensure that there is a holder on the stage, and the
appropriate marks are defined. The following command file will create a height
map for the current holder. The height map will need to be tailored to the
individual requirement for each size of substrate.
Part Number:878275
Vectorbeam Operator Manual
Page 83
$ SJOB HEIGHTMAP.COM
$!
$ !Set the height sensor to real-time mode
$QSET HEIGHT/REALTIME
$QSET MODE FAB
$!
$ !Move to stored position m5 (substrate centre)
$MVSP M5
$!
$ !Calibrate the height sensor on the substrate, table 1
$QCAL HEIGHT/TAB=1
$!
$ !Calibrate the height sensor on the datum, table 7
$MVSP FM
$QCAL HEIGHT/TAB=7
$!
$ !Calibrate a heightmap, where FM is the datum position M1 is the
start position (close to the origin [0,0] on the substrate), the step and
repeat for the grid is 9 mm and the number of points in the grid is 9 x
9
$QCAL HEIGHT/MAP FM M1
9/GRID=9/AVERAGE=2/DIAG/TABLE=(DP=7,SUBS=1)
$!
$ !Set the height map OFF in height mapping mode
$QSET HEIGHT/MAP OFF
$!
$ !Calibrate
$JOBCAL
$!
$ !Set the height map ON in height mapping mode
$QSET HEIGHT/MAP ON
10.13.
Mini height map (18-bit and 20-bit pattern generators
only)
A mini height map can be generated prior to exposure and used over a limited
area during exposure instead of realtime height measurements. This is
particularly useful for direct write because:
10.13.1.
•
Height readings can be taken at defined positions on patterned
substrates where the heightmeter readings are not disturbed by the
patterning.
•
The typical size of dies exposed by a stepper (25 x 20 mm) is
suitable for use with a mini map.
•
Height readings can be taken close to each alignment mark during
die-by-die alignment in addition to the mark locate, and this does not
increase the time overheads very much. The increased time to make
up to 4 height readings required for the mini-map may be more than
compensated for by the elimination of time for height readings during
pattern exposure.
Height identifiers
Height identifiers are names defined by the user within Emma to refer to height
readings. Height identifier names can be anything, like position identifier names.
Part Number:878275
Vectorbeam Operator Manual
Page 84
A height identifier can have the same name as a position identifier without
confusion. Height identifiers operate in the same way for heights as position
identifiers do for positions.
They can be created in the following ways:
•
VB_OPER> qset HID <name> <value>
•
VB_OPER> qadjust field/sethid =<name>
(Note that that qadjust field/Hid=<name> forces in the height to be used).
•
VB_OPER>qmove position/sethid=<name> <x pos> <y pos>
•
VB_OPER>qmove SPO/sethid=<name> <position identifier>
•
VB_OPER>qdisplay height/sethid=<name>
The height sensor must be in real-time mode when acquiring the heights for the
map, or they will just be read heights off the previous map!
Height identifiers can be displayed with the command:
VB_OPER> qdisplay HID <name>
This also sets the logicals VB_DHGT_H to the height and VB_HEIGHT to a
string giving the identifier's name plus its height.
10.13.2.
Creating a mini height map
A mini height map can be generated with 1, 2, 3 or 4 height identifiers and the
corresponding position identifiers. The heights and positions must always be
supplied in pairs. 1 pair will fill the entire height map with that one height. If 2
pairs are given a plane will be fitted to them in such a way that it has zero slope
perpendicular to the line joining the points. If 3 pairs are given, a plane is fitted. If
4 pairs are given, a 4-term surface is fitted.
Height readings taken from the mini map far away from the area defined by the
position identifiers will have been produced by extrapolation and are likely to be
inaccurate.
For example, given four position identifiers p1, p2, p3, p4 which define the area
within which a mini height map is to be used:
$ qset height /real
! MUST be in real-time mode
$ mvsp p1 /seth=h1
$ mvsp p2 /seth=h2
$ mvsp p3 /seth=h3
$ mvsp p4 /seth=h4
$ qcal height /minimap /hid=(h1,h2,h3,h4) /pos=(p1,p2,p3,p4)
$ qset height /map on
! Select mapped mode
However, it would be more efficient to acquire the heights whilst acquiring the
Part Number:878275
Vectorbeam Operator Manual
Page 85
mark positions, as that will save driving the stage around the four marks a
second time.
10.13.3.
Mini height map use -with standard layout parameter file
template
The standard layout parameter file template approach to exposing substrates
described in the chapters “Exposing a substrate” and Direct write alignment”
supports the use of mini height maps. The name of the mark definition for the
die-by-die alignment marks (symbol MARKER) should be replaced with:
$ MARKER :== @[directory]jobfile_1.com
which causes the jobfile to be run at each die alignment mark instead of a mark
locate. Jobfile_1.com could look as follows:
$ OPEN/APPEND/SHARE POST$EMMA MAILBOX$EMMA
Set error status code to “success”
$ Error = 1
Locate alignment mark as usual
$ qlocate square O'p3'
If mark locate fails then define observed position to be expected mark position so
that the heightmap is still correct. Also set error status code to “error”
$ if F$TRNLNM("ESTATUS") .NES. "%X00000001"
$ THEN
$
ERROR = 2
$
QMOVE POS 0 0/REL/SPO=O'p3'
$ ENDIF
Offset the position for measuring height relative to the alignment mark in order to
avoid errors in the height reading due to patterned substrate.
$ qmove pos/rel -0.300 0.000
$ qdisplay height
If the height measurement fails then do not change height identifier so that last
valid height is used.
$ If F$TRNLNM("ESTATUS") .EQS. "%X00000001"
$ THEN
$
hgt1 = f$trnlnm("VB_DHGT_H")
$
qset hid h'p3' 'hgt1'
$ ENDIF
Pass error code back to layout program
$ exit 'error'
In addition, the following jobfile (jobfile_2.com) must be called at each layout cell
by defining the following line in the template parameter file:
$ @vb$seq:wlvd_dw.com "@[directory]jobfile_2.com"
Where jobfile_2.com is as follows:
$ OPEN/APPEND/SHARE POST$EMMA MAILBOX$EMMA
$ qcal height /minimap/hid=(h1,h2,h3,h4)/pos=(o1,o2,o3,o4)
$ qset height /map on
$ qexpose pattern/nopostmove
Part Number:878275
Vectorbeam Operator Manual
Page 86
$ qset height /realtime
Part Number:878275
Vectorbeam Operator Manual
Page 87
11.
Mark locate
11.1.
Review of principles
The Vectorbeam Series products have been provided with a versatile capability
to locate a range of registration marks for use in system calibration procedures
and in pattern overlay procedures when two or more exposure levels are
required. The function of the mark locate subsystem is to accurately determine
the position of a mark on the substrate or holder target plate with respect to the
axial position of the beam. This operation requires the electron beam to be
scanned in some manner over the “expected” location of a mark and the
resulting image contrast to be used in an algorithm, which reports the actual
“observed” mark location. The difference between the expected and observed
location provides an error vector value, which can be used in calibration and
alignment routines to apply corrections to cancel any such errors.
Generally the beam scanning over the mark is directly positioned by the control
system software through the main or sub field (trap) deflection systems, whilst
the resulting backscattered electron video signal is amplified and is digitised. The
mark will be distinguishable from the background by a different signal level, and
the contrast at the mark edges can be extracted and related to beam position
and ultimately mark centre location.
The overall XY mark position is found by adding the XY stage position.
Figure 11.1: Collector geometry.
Several forms of mark geometry and image formation are used which generally
can be made compatible with normal semiconductor processing, for example
square metal areas viewed with the backscattered detector.
Marks are normally pre-defined lithographically, in direct write applications as
part of the previous or earlier layers, whilst for calibration, each substrate holder
is provided with a small array of target marks on the holder and at the height of
the nominal writing plane. The marks can be fabricated to yield two forms of
backscattered electron contrast:
1. Material (elemental atomic number) contrast
2. Topographical contrast
Part Number:878275
Vectorbeam Operator Manual
Page 88
Material contrast occurs due to the difference in backscattered electron
coefficients between different elemental materials. The higher the element is in
the periodic table, the larger its backscatter coefficient will be. It is for this reason
that the high-contrast holder-mounted target marks are fabricated in thin gold on
a silicon wafer chip. On process wafers, it is essential that compatible materials
are used which, in the case of silicon, cannot be gold but “high Z” materials from
the refractory elements such as tungsten, can be considered. On GaAs wafers,
gold is typically used for the source/drain electrodes (which may be defined
photo lithographically) and then e-beam lithography is used to define the gate
layer in a mix and match mode.
More typically on silicon wafers a topographical mark structure is formed by an
etching process to yield either an etched trench (or pit) or a raised mesa by
etching a local background area.
TOPOGRAPHICAL
SHALLOW ETCH
PIT (OR MESA)
MATERIAL
W PAD
RESIST
SILICON
V ID E O S IG N A L
VIDEO SIGNAL
Figure 11.2: Mark types and their detector signals.
Figure 11.2 illustrates two types of detector signal, which must be analysed to
locate marks of two different substrates. The majority of marks give a signal as
shown on the right. The signal shown on the left is best analysed by examining
the rate of change of detector level along the scan while the one on the right is
best done by examining the detector levels. The VB mark locate algorithms allow
the user to choose between analysis of detector levels (see Section “pit” type
mark) or analysis of the rate of change of detector levels (see Section “edge”
type mark).
11.2.
Designing alignment marks for direct write
registration
During the design of an alignment mark to enable the alignment of subsequent
layers the following should be taken into account:
11.2.1.
Mark type
The mark locate function may be applied to rectangular, octagonal and circular
marks and crosses with limbs of 1 or more fingers. All these marks may be
brighter or darker than the background.
11.2.2.
Mark size
1. The mark locate function will locate rectangles with sides of length 1 to
120 µm. The mark locate function will locate crosses with any limb length
Part Number:878275
Vectorbeam Operator Manual
Page 89
as long as all four limbs are within the deflection field by a distance given
by CSOFF (see later). Large crosses with limbs of length 1 mm or square
marks with sides of length > 20 µm are used typically for global alignment
as their positions will initially be unknown and a larger target is easier to
find. Square marks with sides of length 4 to 20 µm are used typically for
die-by-die alignment.
2. The mark sides should be long enough so that several scans can be
carried out at different positions along the edge thus reducing the effects
of any edge roughness to an acceptable level.
3. The mark locate function relies on detecting the edges of a mark and so if
point 2 above is met, increasing the mark size does not increase the
accuracy.
4. A large mark size may be useful for faster location if the uncertainty in the
mark position is large. A large area can be scanned more quickly if during
the coarse search if the mark is larger. Large marks are more likely to be
used for global alignment, particularly for the first mark as the uncertainty
in the first mark’s position includes the X and Y substrate insertion error.
11.2.3.
Mark positioning
See also the chapter “Direct write alignment” for further explanation of the layout
of direct write alignment marks.
1. Marks must be isolated from other marks and other features
(including dirt!) by at least twice the uncertainty in their position if
automatic mark locate is to be used. The search range of the mark
locate must take this uncertainty into account. For a direct write
registration using global alignment followed by die-by-die alignment
the following applies:
•
The global alignment marks should ideally be around the perimeter of
the area to be exposed for best accuracy.
•
The uncertainty in the position of the first mark to be found after a
substrate has been loaded will be several tens of microns at best and
may be as much as a few mm. If the uncertainty in the position of the
first mark is more than the maximum coarse search range (200 µm)
then manual global alignment is carried out in SEM mode. It may be
advantageous therefore to place such a mark a relatively large
distance from any sensitive device areas.
•
The uncertainty in the next 2 or 3 marks positions for global
alignment will be much smaller (typically < 100 µm) and depends
mostly on the rotation of the substrate.
•
After a 3 or 4 mark global alignment has been carried out the
machine can move accurately to other marks for die-by-die
alignment. The uncertainty in the position of these marks will be
determined as much by the accuracy in their manufacture as by the
machine operation machine and can be less than 1 µm.
2. The number of die-by-die marks required across the substrate
depends on the accuracy required, the accuracy of manufacture of
the 1st pattern and the distortions introduced in the substrate since
the 1st pattern was manufactured.
Part Number:878275
Vectorbeam Operator Manual
Page 90
3. The minimum separation of marks can be as small as about 4 µm
(measured between the marks’ edges) but only if the uncertainty in
each mark’s position is < 1µm and the fine scan length is 1 µm.
11.2.4.
Mark contrast
The mark contrast should be maximised in order to minimise the amount of
signal averaging required for location and thereby the time. For processing
reasons however this may not be practical and some compromise must be
found. In order to maximise the mark contrast it is important to consider the
following:
Material contrast
• The mark and substrate should have widely separated Z numbers >30 is a
good objective although the system can be made to work with less. The
marks may appear as either bright features on a dark background or dark
features on a bright background. Both types are located in the same way
with the input signal being inverted as necessary.
Topographical contrast from deep marks
• The marks should be as deep as possible (anisotropic etch). The mark
depth must be proportional to the size to obtain this type of contrast and a
depth of greater than 1 µm per 5 µm of width or height is required. In this
case a lower video level is obtained from the “mark” centre than from the
background.
Topographical contrast from shallow marks
• The mark edge step should be very sharp (anisotropic etch) and depth of
at least ~1µm ideally, although the system can work with less. In this case
features exhibit no apparent difference in video level between the “mark”
centre and the background; instead they present a change in contrast as
the beam is scanned across the edges of the feature.
In addition:
• The mark must be stable under exposure by the electron beam.
• Beam scans across the edges should give reasonably sharp transitions
from one level to the other.
• The same form of profile is required in both the X and Y directions.
11.3.
Mark locate algorithms
The detectability and reproducibility of the measured mark position is a complex
subject and, apart from the considerations above, will also depend upon the
beam diameter and current and accelerating voltage used, material types and
thicknesses and can be degraded by various sources of noise. The accuracy of
the mark location will be affected, among other things, by the edge roughness of
the mark. For these reasons the Vectorbeam mark locate algorithms are
provided with a number of user tuning options which with training and experience
enables the user to optimise mark detection accuracy by trade off with mark
detection speed.
The marks may appear as either bright features on a dark background or dark
Part Number:878275
Vectorbeam Operator Manual
Page 91
features on a bright background. They may also be etched topographical
features exhibiting no apparent difference in brightness between the actual
"mark" and the background; instead they present a change in signal level as the
beam is scanned across the edge of the feature.
There are three main mark-locate algorithms implemented at present and these
are known as pit, edge and cross. The pit algorithm will locate rectangular,
octagonal and circular marks by examining the difference in the detector signals
between inside and outside the mark. The edge algorithm will locate rectangular,
octagonal and circular marks by examining the rate of change of the detector
signal when scanning across the mark. The cross locate algorithm will locate
crosses with limbs made up of one or more fingers.
11.4.
Definition of parameters for mark location
There are separate commands to define the parameters for the mark locate and
to start the mark locate function. There are also commands for viewing the list of
defined marks, deleting marks from the list and showing what parameters have
been set.
There are no "boot-up" defaults for the mark locate parameters, or run-time
defaults however all systems will have a selection of marks in the current
database. The user must specify all the relevant parameters as in general there
is simply no way that the system can guess what sort of mark the user wants to
locate.
Standard definitions for the most common mark types present on the datum plate
or used for the acceptance tests are however stored in the file Mark_data.com.
These can be used or modified as required. Other mark descriptions can be
added to the file. Each definition is give a mark name to make operation simpler.
Once defined these are the parameters that are passed to the PG each time a
mark locate is invoked by the mark locate command.
11.4.1.
Syntax
The syntax of the mark definition function is defined in the Vectorbeam
Command Set Manual (878274).
11.4.2.
Choosing geometry parameters
1. The height and the width (H / W) should be set to the actual height and
width of the mark. For crosses these parameters are the distances
between the ends of the vertical and horizontal limbs. For crosses larger
than the maximum height and width which can be set, simply set the
maximum values.
2. The measurement height/width (MH / MW) is typically set to 1 μm. The
minimum value should normally be:
MH / MW = PARA * beam diameter
so that the adjacent scans do not overlap giving better averaging of any
mark edge roughness. The maximum value should be less than the
maximum edge length available. Note that increasing MH / MW beyond the
(edge length/2 - MLEN) may give spurious measurements on an octagonal
mark.
Part Number:878275
Vectorbeam Operator Manual
Page 92
3. The cross offset height and width (OH / OW) should be set to about half
the limb length.
4. The cross limb width (LMBWID) should be set to the actual width. For
crosses with more than 1 finger in each limb, LMBWID should be set to
the finger width.
5. The cross limb separation (LMBSEP) is the distance between adjacent
edges of adjacent fingers.
6. The cross limb lines (LMBLNS) is the number of fingers in each limb. This
is 1 for plain crosses.
7. The mark tolerance (MRKTOL) is typically set to 0.1. This can be reduced
if mark rejection on the basis of mark size is required.
11.4.3.
Choosing signal parameters
1. The minimum contrast (CT) is normally set to 0.1 (10%) for the datum plate
marks and marks with similar contrast. The datum plate mark typically has a
contrast above 0.2 (20%) for normal backoff levels.
The mark contrast is defined as:
(maximum video level – minimum video level) / 255
where the maximum level will correspond to the mark for a bright mark and the
background for a dark mark. The mark contrast can be found by locating a mark
with the /adc qualifier and using the adc_plot.cpr PVWave program to examine
the ADC data (see Section “Diagnostic output of the mark locate function” or
“Acceptance Test and Operator Jobfiles” manual 892777). Figure 11.3 shows an
example plot from this program and the contrast is about 0.35.
Maximum video level = 140
Minimum video level = 50
Figure 11.3: Example plot of mark locate ADC data
Alternatively, the mark contrast can be found by locating with increasing contrast
values until the locate fails. Minimum contrast, CT, should be set to roughly half
the actual mark contrast. However, it can be increased to close to the actual
contrast of the marks, if more immunity from contamination or other nearby
features is required. For low contrast marks, the minimum contrast may be
reduced to 0.05, although the backoff should be decreased first in order to
Part Number:878275
Vectorbeam Operator Manual
Page 93
increase the actual contrast.
2. The rise time (RT), in spite of the name, is a distance and is typically set
between 0.1 μm and 0.5 μm. The rise time will be approximately the sum of the
following:
a) The mark edge sharpness, which is the edge slope multiplied by the thickness
of the mark. This is the distance between where the edge starts and where it
finishes (usually < 0.1 μm).
b) The spot diameter (usually < 0.1 μm)
Reducing the rise time below the sum a) + b) will reduce the contrast seen by the
mark locate algorithm and make the position measurement more noisy.
Increasing the rise time above the sum a) + b) will ensure the best repeatability.
However, the measurement length MLEN must be set larger than the rise time
and so an excessively large rise time will increasing the locate time
unnecessarily. The rise time can be found by locating a mark with the /adc
qualifier and using the adc_plot.cpr PVWave program to examine the ADC data
(see Section “Diagnostic output of the mark locate function” or “Acceptance Test
and Operator Jobfiles” manual 892777). Figure 11.4 shows an example plot from
this program and the rise time is about 0.06 μm.
Start of edge at –2.52 um
End of edge at –2.46 um
Figure 11.4: Example plot of mark locate ADC data
3. The type (BRIGHT DARK) should be set for the contrast obtained from the
mark.
4. The filter (FILTER) is typically set to 16 or 32 for low beam currents giving
noisy signals but 8 for relatively high currents. This parameter along with
OVSAM and LINES is used to reduce the effects of noise on the detector signal.
FILTER should be adjusted so that the repeatability of the mark locate position is
suitable.
5. The locate method LOCATE should be set to either PIT, EDGE or CROSS
(see Sections “Pit locate algorithm”, “Edge locate algorithm” and “Cross locate
algorithm”).
Part Number:878275
Vectorbeam Operator Manual
Page 94
11.4.4.
Choosing scan parameters
1. The oversampling (OVSAM) is typically set to 8 as long as the noise in the
signal is low enough to give reproducible measured positions. Reducing
this value does not significantly reduce the mark locate time. The value
must be increased if the signal is noisy giving a large scatter in the
measured mark position.
2. The number of lines (LINES) is typically 1 as long as the noise in the
signal is low enough to allow detection when the coarse search is carried
out (The number of scans carried out on each edge during the fine search
is PARA * LINES giving greater noise immunity). This means that the
mark locate time can be minimised if coarse searching is carried out. The
number of lines must be increased only if coarse searching fails due to a
noisy signal and OVSAM and FILT are already set to maximum.
3. The scan resolution (SRES) sets the number of PG deflection bits
between adjacent points during the fine scan. A value of 4 means every
fourth bit is used. A value of 1 means every bit is used and gives
maximum resolution. The typical value for 16-bit and 18-bit pattern
generators is 1 and for 20-bit pattern generators is 4. (Alternatively, the
scan resolution can also be set directly in nanometres using the RESN
parameter.)
4. The scan resolution (RESN) sets the distance in nanometres between
adjacent points during the fine scan but only to the nearest PG bit. This
ensures similar signal averaging and mark locate times for different
maximum fieldsizes.
5. The scan resolution (CSRES) sets the number of PG deflection bits
between adjacent points during the coarse scan. A value of 8 means
every eighth bit is used and this is a typical value for 16-bit and 18-bit
pattern generators. A value of 32 is typical for 20-bit pattern generators. A
value of 1 means every bit is used and gives maximum resolution but
maybe unnecessarily slow. (Alternatively, the scan resolution can also be
set directly in nanometres using the RESN parameter.)
6. The scan resolution (CRESN) sets the distance in nanometres between
adjacent points during the coarse scan but only to the nearest PG bit. This
ensures similar signal averaging and mark locate times for different
maximum fieldsizes.
7. The coarse search limit (CSLIM) directly limits the coarse-search length
(CSLEN) for rectangular marks but defines the limit of (CSOFF + CSLEN)
for crosses. This should not be set larger than necessary to avoid long
mark locate times. For example, a coarse search limit of 50 μm is
recommended for the mark locate to initialise the holder on a VB5 which
reflects the reproducibility of zeroing the interferometer.
8. The number of parallel fine scans (PARASCANS) is typically set to 2. This
number must be increased for greater noise immunity only if OVSAM and
FILT are already set to maximum. The number of parallel scans should
however be increased if greater immunity to mark edge roughness is
required.
9. The measurement length (MLEN) is typically set to 0.5 μm for marks with
sharp edges such as the calibration marks on the holders (The mark edge
sharpness is the edge slope multiplied by the thickness of the mark. This
is the distance between where the edge starts and where it finishes).
Some marks with less sharply defined edges may require this parameter
Part Number:878275
Vectorbeam Operator Manual
Page 95
to be increased. The measurement length should be minimised for faster
mark location but its value should be at least the sum of the following:
•
The mark edge sharpness (usually < 0.1 μm)
•
The spot diameter (usually < 0.1 μm)
Note:
•
MLEN must be smaller than the mark width/height or limb width.
•
The rise time (RT) must be smaller than the measurement length.
10.The cross search offset (CSOFF) is the distance in μm by which the
coarse search scan is offset from the cross centre.
11.The coarse search length for crosses (CSLEN) should not be set larger
than necessary to avoid long mark locate times. The CSLEN parameter is
required to set the coarse search length for crosses directly. Due to the
offset for crosses CSOFF, the CSLIM parameter, as applied to crosses,
only places a limit on the total of the offset CSOFF and the coarse search
CSLEN.
11.5.
Mark location command
The mark locate command requires a mark name specifying the parameters to
be used to locate the mark and a name for the position identifier into which the
position will be written. Qualifiers may be used to influence the locate operation.
Refer to the Vectorbeam Command Set Manual (878274) for details of the
syntax and qualifiers.
11.6.
Mark administration functions
Typing "qmark list" on the Emma terminal will display to the user the list of marks
currently stored in the mark database.
Typing "qmark delete mark_type_name" will cause that mark to disappear from
the mark data base.
The qmark show command is used to display the definition of a particular mark.
Type:
VB_OPER> qmark show mark_type_name
Refer to the Vectorbeam Command Set Manual (878274) for details of the
syntax and qualifiers.
11.7.
Diagnostic output of the mark locate function
Once the mark location routine has completed, a value will be returned in the
position identifier specified indicating the centre of the mark. If the location
routine has failed, then an error message indicating the cause of the failure
(where identifiable) will be output, together with the highest contrast reading
observed in the scan.
Part Number:878275
Vectorbeam Operator Manual
Page 96
To obtain a diagnostic plot from a mark locate function, use the qualifier"/adc”
with the mark locate command. The video data sampled during the mark locate
scans are written to the file [vb.dat]adc_dump.dat and may be used directly or
plotted by a PVWave routine. To use the PVWave plot routine, set the default
directory to [vb.wave] and type “wave -r adc_plot".
11.8.
Pit locate algorithm
The pit locate algorithm is useful for marks which produce detector signals as
shown on the right side of Figure 11.2. The pit locate algorithm is separated into
the spiral search, bisection search and fine search. The following diagram shows
how the algorithm switches between these.
Figure 11.5: “Pit” mark locate algorithm search flow diagram
11.8.1.
Spiral search
A spiral search is used to locate marks roughly as quickly as possible. The spiral
search examines points along a spiral path separated by a distance equal to
65% of the marks smallest dimension. Each point is sampled from 1 to 255 times
depending on the mark definition (OVSAM parameter). After sampling each point
the video level is compared with the background video level and if there is
sufficient contrast (CT parameter) the point will be selected as being potentially
on the mark. As soon as a potential point has been found, a bisection search is
carried out at the point. If the bisection search doesn’t find a mark then the spiral
search is resumed.
Mark
detected here
Expected mark
centre position to
start spiral search
Figure 11.6: Diagram showing spiral search for rectangular marks with “pit” algorithm.
11.8.2.
Bisection search
The bisection search finds the edges to within the accuracy specified by the
MLEN parameter and checks that the mark has the correct size. The algorithm
assumes it has found a mark if it finds two edges separated by the height or
width (whichever one is relevant) of the mark and which has suitable edges as
Part Number:878275
Vectorbeam Operator Manual
Page 97
defined by the contrast. If the edges are not found or the mark is not of the
correct size then the spiral search is resumed. If the search is successful the
edge positions are passed to the fine search.
The same search is applied to all horizontal and vertical edges. The video level
at the point found by the spiral search is measured and at a point one mark width
(or height) away. If the video levels are the same for this first comparison the
spiral search is resumed. Otherwise the point half way between the last two
points is measured. If the point has a video level within +/- 25 % of the average
of the mark and background levels then the edge has been found and a fine
search is done. Otherwise the search continues by measuring the point half way
between the last two showing intensities of the mark and background.
11.8.3.
Fine search
Fine search scans are carried out centred on the edge positions found in the
bisection search (If the /fine qualifier is used the fine scans are centred at the
height and width specified. The fine scans are positioned in the other axis. ) If the
fine scans locate the mark then the mark locate routine finishes. If the mark
cannot be located then a bisection search is carried out. If the bisection search
can locate an approximate position, the fine scans are then carried out again at
that position.
The fine scans consist of a series (the number is given by PARASCANS) of
parallel scans (of length MLEN) placed on each of the four expected edges. The
scans are horizontal or vertical as appropriate for vertical and horizontal edges.
These scans are spaced out to cover a length of edge for averaging purposes
(length defined by MH or MW).
If any of the scans fail to find an edge, they are discarded, unless more than half
fail in any particular grid, in which case an error is returned. Once a satisfactory
set of scans on an edge has been gathered a least-squares fit is carried out on
the edge data, to provide an equation describing the edge. The two equations
describing the vertical edges are averaged to give a vertical line in the centre of
the mark and the two describing the horizontal edges are averaged to give a
horizontal line in the centre of the mark. The intersection of the two lines is the
position which is then returned to the user or calling routine.
This behaviour is illustrated in the following diagrams. Although the illustration is
for a square mark, this can easily be adapted to fit an octagon by simply
ensuring that the fine scans are confined to a region that does not encompass
the diagonal edges.
Part Number:878275
Vectorbeam Operator Manual
Page 98
FSLIM = 8µm
MW = 1µm
MLEN
1.5µm
MH = 1µm
Fine Vertical Scans
Fine Horizontal Scans
W = 4µm
Figure 11.7: Diagram showing fine search scans for rectangular marks with “pit” algorithm.
11.9.
Edge locate algorithm
The edge locate algorithm is useful for marks which produce detector signals as
shown on the left side of Figure 11.2. The edge locate algorithm is separated into
a raster search and a fine search.
Figure 11.8: Edge locate algorithm search flow diagram.
11.9.1.
Coarse search
The coarse search scans are in the form of a series of lines of length CSLIM.
The first coarse search scan is horizontal and centred on the expected position
of the mark. If two edges are not found, another parallel scan is performed above
the first. If two edges are still not found, another parallel scan is performed below
the first. The horizontal coarse scans expand out from the expected mark
position, alternately above and below the expected centre until the coarse search
limit (CSLIM) is reached or until a scanned line contains a video profile indicating
the presence of a possible mark. When a horizontal coarse scan succeeds, a
vertical confirmation scan is made. The horizontal coarse scan must contain a
falling and rising edge. It is the position half way between these two edges upon
which the vertical confirmation scan is centred. If the two outer edges in the
Part Number:878275
Vectorbeam Operator Manual
Page 99
vertical scan are consistent with the marker dimensions then another
confirmation horizontal scan is performed. This procedure is for circles and
octagons, which only have well-defined dimensions near the middle of the sides
of the shape. If a vertical confirmation scan fails to confirm the presence of a
mark then the search with the horizontal scans will continue until a mark is
confirmed or the search area is exhausted. A coarse search area exhausted
error will be displayed. If the vertical confirmation scan succeeds then the
position of the possible mark found is passed to the fine scan routine. The
position found by the coarse scans and passed to the fine scans routine is taken
to be the mid point of the successful vertical confirmation scan.
CSLIM = 30µm
H = 4µm
W = 4µm
Coarse Horizontal
Scan
Coarse Vertical
Scan
Figure 11.9: Diagram showing coarse search raster scans for rectangular marks.
11.9.2.
Fine search
When the fine scan routine is invoked it will already have been supplied by the
coarse search with a position, which is a close approximation to the centre of the
mark. It can, therefore, confine its scans to regions in the immediate vicinity of
the expected edge positions. The fine scans do not scan over the central part of
the mark to save time as no additional information is gained. The fine scans
consist of a series of short line scans the centres of which are placed on each of
the four expected edges. The scans are horizontal or vertical for vertical and
horizontal edges respectively. The number of parallel scans is given by the
parameter “parascans”. These scans are in the region defined by MH or MW and
of length MLEN. If any of the scans fail to find an edge, they are discarded,
unless more than half fail in any particular grid, in which case an error is
returned.
Once a satisfactory set of scans on an edge has been gathered a least-squares
fit is carried out on the edge data, to provide an equation describing the edge.
The resulting equations, two describing the vertical edges and two describing the
horizontal edges, are then used to determine the marks centre. This centre
position is then returned to the user or calling routine.
This behaviour is illustrated in the following diagrams. Although the illustration is
for a square mark, this can easily be adapted to fit an octagon by simply
ensuring that the fine scans are confined to a region that does not encompass
the diagonal edges.
Part Number:878275
Vectorbeam Operator Manual
Page 100
FSLIM = 8µm
MW = 1µm
MLEN
1.5µm
MH = 1µm
Fine Vertical Scans
Fine Horizontal Scans
W = 4µm
Figure 11.10: Diagram showing fine search scans for rectangular marks with “edge”
algorithm.
11.10.
Cross locate algorithm
The cross locate algorithm is separated into a raster search and a fine search.
Figure 11.11: Cross locate algorithm search flow diagram.
11.10.1.
Raster search
A raster search is used as a coarse search for crosses. The raster scans consist
of a series of horizontal scans about the expected position, displaced in the
vertical direction by the coarse search offset (CSOFF).
The raster scans expand out from the initial position by an amount equal to 80 %
of the cross height, alternately above and below until the Coarse Search Limit
(CSLIM) is reached or until a scanned line contains a video profile indicating the
presence of one of the cross limbs.
When the horizontal raster scans succeed, giving an x position of the cross
centre, a vertical confirmation scan is made. The vertical confirmation scan is
made at a distance CSOFF away from the cross centre along the expected
Part Number:878275
Vectorbeam Operator Manual
Page 101
position of a horizontal limb. This scan is of length twice the cross height. If
nothing is found then a second attempt is made, but this time the vertical scan is
carried out on the other side of the expected position. If the vertical scans fail to
confirm the presence of the cross then a mark not found error is returned.
If the confirmation scan finds the horizontal limb then two further coarse scans
are made about the bottom and left limbs to measure their positions also. Each
scan checks that the limb width is correct and measures the video levels of the
cross and background and the edge width. The video levels and edge width
values are used to calculate MLEN, RT and CT, which are passed to the fine
search.
The edge positions found by the coarse scans are also passed to the fine search
routine.
CSLIM
CSLEN
CSOFF
H
W
Figure 11.12: Diagram showing coarse search raster scans for cross mark.
11.10.2.
Fine search
If the fine search is performed first (the /fine qualifier was used) then RT, CT and
MLEN are taken from the mark definition otherwise these are supplied by the
raster search.
A series of parallel scans is made about each of the observed edge positions
from the raster search or about the expected positions if no raster search was
done because the /fine qualifier was used. The number of scans is given by
PARASCANS and the length is given by MLEN. The length of edge over which
the scans are spaced out is given by the MH and MW parameters.
If any of the scans fail to find an edge, they are discarded, unless more than half
fail in any particular grid, in which case an error is returned. The fine search
scans are shown in Figure 11.13.
Part Number:878275
Vectorbeam Operator Manual
Page 102
MH
OH
MW
OW
Figure 11.13: Diagram showing fine search scans in red for cross mark.
11.10.2.1.
Default output
For each limb, one point is calculated by averaging all the points along both
outside edges. Two lines are calculated: one line running between the two points
of the vertical limbs and one line running between the two points of the horizontal
limbs. The output position is the intersection of two lines.
11.10.2.2.
Linefit output
Least-squares fitting is carried out on the edge data which gives eight lines
describing the left and right edges of the four limbs. In the case of a cross with
more than one finger in each limb (Figure 11.14) only the outer edges of the
outer fingers are used. The coordinates of the points where the top right lines,
the bottom right lines, the bottom left lines and the top left lines intersect are
calculated, giving four corners of a box. These corners are used to check that the
limb widths are within tolerance. The four equations describing the vertical edges
are averaged to give a vertical line in the centre of the cross and the four
equations describing the horizontal edges are averaged to give a horizontal line
in the centre of the cross. The intersection of the two lines is the position which is
then returned to the user or calling routine.
Note: This method is very susceptible to error caused by irregular limb edges
and MH and MW should be as large as possible.
11.10.2.3.
Stitch output
The stitch qualifier on the mark locate command can be used when the limbs of
a cross are made up of more than one finger - see Figure 11.14.
Part Number:878275
Vectorbeam Operator Manual
Page 103
Figure
11.14: Fine scans for /stitch locate algorithm on a cross with two fingers in each limb.
The cross can be exposed with each “L” at the corner of a different subfield or
mainfield, i.e. a subfield or mainfield boundary bisects the cross vertically and
horizontally. By measuring the separation of the “L” shapes the subfield or
mainfield stitching can be measured.
11.10.2.3.1.
Separation
This is half the distance between lines running along the centres of the fingers in
one limb. This distance is calculated for a point 25% along the cross limb from
the inside corner of the “L”. The effects of a rotation on the mark are eliminated.
Four values are output::
• the separation in X for the two upper “L” shapes
• the separation in Y for the two right “L” shapes
• the separation in X for the two lower “L” shapes
• the separation in Y for the two left “L” shapes
11.10.2.3.2.
Shear
A line running along the centre of each finger is extrapolated to the midpoint of
two “L” shapes. The shear is the distance between these two points. The effects
of a rotation on the mark are eliminated. Four values are output::
• the shear in Y for the two upper “L” shapes
• the shear in X for the two right “L” shapes
• the shear in Y for the two lower “L” shapes
• the shear in Y for the two left “L” shapes
Part Number:878275
Vectorbeam Operator Manual
Page 104
11.11.
Actions if the mark locate consistently fails to find
the mark
If the mark locate has worked previously with a particular mark definition and
substrate then the problem is likely to limited to just the video gain and contrast
settings. Manually adjust the video gain and backoff and retry.
If the mark locate has worked previously with a particular mark definition and
substrate but the beam current has been reduced, the problem is likely to be
limited to too little filtering and oversampling used to eliminate the effects of
noise. The “filter” and “ovsam” values should be increased and the mark locate
retried.
The situation that the mark locate consistently fails to find the mark is
encountered most commonly when trying to locate a new mark type or a mark on
a new substrate. In this case there are several possible causes and actions to
try:
1. In SEM mode, adjust the video backoff and gain manually to give a
good contrast and signal. The bright part of the mark should be fairly close
to the maximum brightness and the dark part of the mark should be fairly
close to completely dark. Retry the mark locate.
2. Check each of the mark locate parameters used and ensure they are
reasonable, as described earlier in this chapter. Retry the mark locate.
3. Centre the mark on the SEM screen using the joystick function.
4. Reduce the minimum contrast level to 5 % temporarily. Retry the mark
locate.
5. Use the diagnostic output of the mark locate function, as described
earlier in this chapter and plot the sampled video data using the PVWave
routine. Examine the plots and see if the edges of the mark can at least be
recognised manually.
6. Increase the amount of filtering and oversampling to reduce the
effects of noise in the video signal.
7. If the “pit” mark locate is being used with no success, try switching to
the “edge” routine.
8. Login to the DCP (see Section “Logging in to the subsystem
controllers” in Chapter “Computer system”), retry the mark locate and
check for more detailed error messages.
Part Number:878275
Vectorbeam Operator Manual
Page 105
12.
Databases
Emma automatically and immediately saves every update to any machine
parameter e.g. calibrations or settings in a reserved filename
esp03_ebeam.dbase in the directory [vb.db]. This file is called a database and is
loaded whenever Emma is restarted thereby restoring the last settings. In
addition, the user may save the same database or part of the database to a userdefined filename and this file may be loaded later to restore the settings of the
machine to a known state.
12.1.
Database structure
There are two levels of partial databases:
1. Top-level partial databases combining individual parameters and bottom
level partial databases.
2. Bottom level partial databases, which only contain individual parameters.
The arrangement is shown in Figure 12.1.
Figure 12.1: Diagram of database structure
12.2.
Database parameters
The individual parameters in the databases are listed in the following sections.
Note:
1. Some of the parameters in the bottom level partial databases appear
in other bottom level partial databases, e.g. EHT in coarse, test and
fine.
2. Many parameters in the total database are not in any partial
database.
12.2.1.
Header for all databases
All databases contain the following in the header:
1. Type of database
2. Database version class X,Y or V
Part Number:878275
Vectorbeam Operator Manual
Page 106
3.
4.
5.
6.
7.
8.
9.
Database version number
Filename at time of saving
Date and time of savingMachine ID
Emma version class
Emma version number
Total length
Optional user text (Any user defined comment can be saved with each
partial database.)
10. Spare space
12.2.2.
Total database
The “total” database contains everything by definition.
12.2.2.1.
Parameters
1. selected pattern name
2. pattern file size
3. Number of pattern fields
4. X Y block size
5. pattern resolution
6. X Y pattern limits
7. VRU
8. Current X Y position in natural coordinates
9. X Y stage load position
10. X Y datum offset
11. Y mainfield pivot point
12. Y subfield pivot point
13. stigmation wobble status
14. invert mode
15. calibrated height map
16. working height map
17. height measurement mode
18. datum height
19. X Y datum position
20. X Y current position in direct write mode.
21. The parameters (mapping order, X Y origins, X Y offsets, X Y scales, X Y
rotations, X Y keystones) for each of the direct write modes (absolute,
relative, wafer, die, general, chip, usr1, usr2, usr3, usr4).
22. holder ID
23. holder name
24. substrate type
25. substrate size
26. platesize
27. centre position
28. FM (focus mark) position
29. DP (datum mark) position
30. FFS (fine focus mark) position
31. GT (gun target) position
32. FC (Faraday cup) position
33. KE (knife edge) position
34. LD (spare) position
35. MM (spare) position
12.2.2.2.
12.2.3.
12.2.3.1.
Partial databases
Top level partial databases
EO
The “EO” partial database contains:
12.2.3.1.1.
Parameters
1. All current values of the parameters as listed for the “coarse” partial
Part Number:878275
Vectorbeam Operator Manual
Page 107
database
2. 8 sets of runup profile parameters (profile number, min. filament
power, max. filament power, min. filament current, max. filament
current, min.filament voltage, max. filament voltage, min. wehnelt
voltage, max. wehnelt voltage, min. wehnelt current, max. wehnelt
current, filament stabilisation drive, filament stabilisation eht, filament
stabilisation wehnelt, filament stabilisation period, EHT at which
runup is valid, EHT overdrive, filament drive step size, filament drive
step interval time, filament normalised drive step, filament ramp end
drive value, EHT drive step size, EHT drive step interval time, EHT
normalised drive step, EHT ramp end drive value, wehnelt drive step
size, wehnelt drive step interval time, wehnelt normalised drive step,
wehnelt ramp end drive value, suppressor drive step size, suppressor
drive step interval time, suppressor normalised drive step,
suppressor ramp end drive value, extractor drive step size, extractor
drive step interval time, extractor normalised drive step, extractor
ramp end drive value, filament rundown dive step size, filament
rundown drive step interval time)
3. Fine focus
4. Axial stigmator setting
5. Diagonal stigmator setting
6. Axial stigmator balance X
7. Axial stigmator balance Y
8. Diagonal stigmator balance X
9. Diagonal stigmator balance Y
10. Detector gain
11. Detector backoff
12. Detectors in use
12.2.3.1.2.
12.2.3.2.
Partial databases
1. The “coarse” beam partial database
2. The “fine” beam partial database
3. The “test” beam partial database
Calib
The “calib” partial database contains the following:
12.2.3.2.1.
Parameters
None
12.2.3.2.2.
12.2.4.
Partial databases
1. The “size_cal” partial database
2. The “dist_cal” partial database
3. The “stig_cal partial database
4. The “mag_cal” partial database
5. The “pos_cal” partial database
Bottom level partial databases
The parameters in each bottom level database are listed below.
12.2.4.1.
General
The “general” partial database contains:
1.
2.
3.
4.
5.
6.
7.
8.
Part Number:878275
mode SEM/FAB
blank status
subfield settling time
acute angle settling time
shape to shape settling time
32 actual clock frequencies
actual min. dose controller frequency
actual max. dose controller frequency
Vectorbeam Operator Manual
Page 108
9. min. dose controller setting (actual frequency, nominal frequency, set
value for dose, set frequency for dose, set area dose, set line dose,
set relative dose)
10. max. dose controller setting (actual frequency, nominal frequency,
set value for dose, set frequency for dose, set area dose, set line
dose, set relative dose)
11. 32 clock dose types (actual frequency, nominal frequency, set value
for dose, set frequency for dose, set area dose, set line dose, set
relative dose)
12. resist sensitivity
13. nominal current
14. actual current
15. inversion strategy
16. sort strategy
17. CFSP strategy
18. writing strategy - not implemented
19. sleeve width - not implemented
12.2.4.2.
Pos_cal
The “pos_cal” partial database contains:
1. The stage mapping coefficients (scale X, scale Y, rotation X, rotation
Y, keystone X, keystone Y, scale linearity X, scale linearity Y, bow X,
bow Y) for all the stage modes (natural, absolute, machine).
2. current stage map mode (natural, absolute, machine)
12.2.4.3.
Mag_cal
The “mag_cal” partial database contains:
1. EHT
2. The magnetic map calibration
12.2.4.4.
Dist_cal
1.
2.
3.
4.
5.
•
•
•
•
•
•
•
6.
•
•
•
•
7.
•
•
•
•
•
•
8.
9.
Part Number:878275
PG resolution
EHT
max. fieldsize
aperture
mainfield field corrections as a function of [subfield index x][subfield
index y]
X Y distortions
X Y scales
X Y rotations
X Y keystones
X Y rate of scale change
X Y rate of rotation change
X Y rate of keystone change
subfield field corrections as a function of [subfield index x][subfield
index y]
X Y scale
X Y rotation
X Y rate of scale change
X Y rate of rotation change
bef field corrections as a function of [subfield index x][subfield index
y]
X Y scale
X Y rotation
X Y keystone
X Y rate of scale change
X Y rate of rotation change
X Y rate of keystone change
date and time of last mainfield field corrections calibration
date and time of last subfield field corrections calibration
Vectorbeam Operator Manual
Page 109
10.
11.
12.
13.
12.2.4.5.
Stig_cal
1.
2.
3.
4.
5.
6.
7.
8.
9.
10.
11.
12.
13.
12.2.4.6.
PG resolution
EHT
Max. fieldsize
aperture
fine focus
axial stigmation
diagonal stigmation
fine focus field corrections as a function of [subfield index x][subfield
index y]
axial and diagonal stigmation field corrections as a function of
[subfield index x][subfield index y]
Time of last focus field corrections calibration
Time of last stigmation field corrections calibration
Accuracy of last focus field corrections calibration
Accuracy of last stigmation field corrections calibration
Size_cal
1.
2.
3.
4.
5.
6.
7.
8.
9.
10.
11.
12.
13.
14.
15.
16.
17.
18.
19.
20.
21.
22.
23.
24.
25.
26.
12.2.4.7.
date and time of last BEF field corrections calibration
Accuracy of last mainfield field corrections calibration
Accuracy of last subfield field corrections calibration
Accuracy of last BEF field corrections calibration
PG resolution
EHT
max. fieldsize
calibration height
EHT at which sensitivities are calibrated
mainfield sensitivity
subfield sensitivity
BEF sensitivity
mainfield pivot point
subfield pivot point
focus for height coefficient
X Y calibration position
rotation for height coefficient
mainfield scaling rotation and keystone
subfield scaling and rotation
BEF scaling and rotation
date and time of last mainfield calibration
date and time of last subfield calibration
date and time of last BEF calibration
date and time of last focus calibration
date and time of last stigmation calibration
accuracy of last mainfield calibration
accuracy of last subfield calibration
accuracy of last BEF calibration
accuracy of last focus calibration
accuracy of last stigmation calibration
Spot
The “spot” partial database contains:
1.
2.
3.
4.
5.
6.
12.2.4.8.
current demagnification table / spot table
3 stored demagnification tables / spot tables
selected spot size
selected beam current
mark slope
EHT
Coarse
1. EHT
2. filament drive
3. filament mode
Part Number:878275
Vectorbeam Operator Manual
Page 110
4.
5.
6.
7.
8.
9.
10.
11.
12.
13.
14.
15.
16.
17.
18.
19.
20.
21.
22.
23.
24.
25.
26.
27.
28.
29.
30.
31.
12.2.4.9.
filament standby
wehnelt drive
wehnelt mode
extractor drive
runup profile number
runup time
gun alignment X
gun alignment Y
gun tilt X
gun tilt Y
lens 0
lens 1
lens 2
lens 3
mid column alignment X
mid column alignment Y
axial stigmator
diagonal stigmator
video gain
video backoff
video target
video background
video mode
video filter
SEM magnification
SEM scan rate
fine focus
spare
fine
The “fine” partial database has the same parameters as the coarse partial
database.
12.2.4.10.
test
The “test” partial database has the same parameters as the coarse partial
database.
12.2.4.11.
Stepper_lens
The “stepper_lens” partial database contains:
1.
2.
3.
4.
Lens map number associated with mode
X Y coordinates of lens map origin in the DW mode
X Y positional limits of validity
All the 5 stepper lens maps (mapping order, X Y positional limits of
validity, X Y positions of DW mapping at measurement, lens map
coefficients)
5. Lens map names
12.2.4.12.
Mark
The “mark” partial database contains the mark locate parameters for mark
definitions 1 to 20.
1. The number of defined marks (max. 20)
2. 20 sets of mark locate parameters (mark name, mark description,
width, height, measurement width, measurement height, offset width,
offset height, limb width, dimension tolerance, limb separation,
number of limbs, rise time, rise time tolerance, contrast, locate
method, mark polarity, filter, fine scan resolution, number of lines,
number of samples, cross coarse search length, cross coarse search
offset, fine scan VRU, mark coarse search limit, mark fine search
limit, coarse scan resolution, number of parallel scans, coarse scan
VRU, mark measurement length)
Part Number:878275
Vectorbeam Operator Manual
Page 111
3. 9 sets of standard mark parameters (X Y position, mode, mark name)
12.2.4.13.
12.3.
Holders
Database saving
The database may contain the total machine settings or selected parts. Optional
text (max. 80 characters) may be specified, such as the field size and the beam
energy, and is stored with the file.
VB_OPER>qfile save <file spec.dbase>[<text>]/total
The facility to save and load selected parts of the database can be very useful. It
can be used to combine constant machine set-ups, such as the magnetic map,
with job-specific set-ups such as the fieldsize-dependent main-field distortions,
e.g.:
VB_OPER>qfile save <file spec> [<text>]/dist_cal
This saves the distortion calibrations section of the database in a named VMS
file.
12.4.
Database loading
The calibrations may be restored either independently or together with the total
database. If the file is not a total database only the appropriate part of the
database is loaded.
VB_OPER>qFILE LOAD <file spec> [/<db-section>]/TOTAL
The user is warned if certain elements of the file being loaded are incompatible
with the present database, such as the field size, calibration sensitivities, pivot
points, the aperture number and the EHT. In this case the database will not be
loaded unless the /OVERRIDE qualifier is specified.
The qualifier ‘/TOTAL’ should be included when saving/loading
whole databases.
12.5.
Database management
The following scheme is recommended although users are of course free to use
different database management. The scheme makes use of the fact that most of
the database consists of machine set-ups that do not change and a few machine
set-ups which are specific to the job (The machine set-ups which do not change
from job to job are, however, likely to change if mechanical work is carried out on
the machine.). The machine set-ups that usually change from job to job are the
field corrections (The field corrections are the main field distortion calibrations,
sub field distortion calibrations and the field focus and stigmation calibrations),
the beam current and magnetic map. These job specific set-ups are also likely to
be used together in different combinations for different jobs e.g. a 10 nA beam
current may be used with several fieldsizes.
Note that a “/total” database also contains further job specific set-ups, such as
the fieldsize, which are adjusted by jobcal or the holder initialisation sequence.
Since these sequences are always run before any job these can be ignored for
the purposes of this scheme.
Part Number:878275
Vectorbeam Operator Manual
Page 112
12.5.1.
Recommended scheme
1. For each beam energy (20, 50 and 100 kV) there should be one
basic total database which contains all the set ups and calibrations
which remain valid until mechanical work is done on the machine. If
ever any of these set ups are changed, the basic database for the
beam energy must be resaved.
2. For each fieldsize in use there should be separate partial databases
each containing only field correction calibrations.
3. For each current in use there should be separate partial databases
each containing only column setting or alternatively a spot table
database can be used.
4. If specific combinations of holders are to be used (see below) then
there should be separate partial databases each containing only
magnetic map calibrations.
After loading the databases, jobcal must be run to adjust parameters such as the
main field scaling and the holder initialisation sequence must be run.
This scheme allows any field corrections, column set up and magnetic map to be
used with the same basic machine set up. Thus it is only necessary to determine
each set-up once rather than several times in all the different combinations. Also
there should not be any confusion as to which database contains valid machine
set-ups. By saving only partial databases with the relevant information, as
described below, it will not be possible to overwrite any other database
parameters when these partial databases are reloaded, independent of whether
the qualifiers are used or not.
12.5.2.
Basic database generation
The set-ups that must be performed to obtain a valid basic database include:
1. the stage load position (vital to avoid possible damage during holder
transfer))
2. the height correction coefficient calibrations
3. the detector calibrations
4. the main field and sub-field sensitivities
5. the pivot points
6. the shape-to-shape settling delay
7. the stage mapping coefficients for absolute mode
8. the stigmator balance
9. the mark locate parameters
10. the demagnification table (optional)
11. the spot table (optional)
12. the stepper lens correction (optional)
Part Number:878275
Vectorbeam Operator Manual
Page 113
13. the magnetic map
The magnetic map calibration may be part of the basic database
only if certain combinations of holders are not used.
On a VB5 using a combination of X-ray mask holders and any other
holders requires separate magnetic maps to be created and saved
as partial databases - see Section “Magnetic map calibration” and
below.
- On a VB6 using a combination of 8 inch wafer holders and any
other holders requires separate magnetic maps to be created and
saved as partial database - see Section “Magnetic map calibration”
and below.
Use the following command to save the database:
VB_OPER> qfile save <filename.dbase>/total 20kV basic database
A suggestion for the filename to make it self explanatory is:
VB_OPER> qfile save 20kv_setup.dbase/total
12.5.3.
Field corrections database generation
To generate the field corrections database for a particular fieldsize the fullcal
routine should be used. When a fullcal has been carried out only the field
corrections should be saved by using the commands:
VB_OPER> qfile save <filename.dist>/dist_cal 20 kV distortion
corrections
VB_OPER> qfile save <filename.stig>/stig_cal 20 kV focus/stig
corrections
12.5.4.
Beam database generation
Set up the beam as described in the Section “Beam current adjustment” or
“Beam diameter adjustment”. When a beam has been set up the current column
conditions should be loaded into one of the three complete column set-ups
(coarse, test or fine) which are available in Emma, using for example:
VB_OPER> sfab/update=test
This column set-up can then be saved, using for example:
VB_OPER> qfile save <filename.test>/test_col 20 kV 30 nm spot
12.5.5.
Magnetic map database generation
If this is required, calibrate the magnetic map as described in the Section
“Magnetic map calibration”. This calibration can then be saved, using for
example:
VB_OPER> qfile save <filename.mag_cal>/mag_cal 20 kV 8in wafer
Part Number:878275
Vectorbeam Operator Manual
Page 114
12.6.
Database selection prior to exposure
To ensure the machine has all the correct parameters loaded prior to any
exposure or job:
1. Load the basic database (See Section “Basic database generation”) for the
beam energy:
VB_OPER>qfile load <filename.dbase>/total
A warning may appear if certain elements of the file to be loaded such as the
field size, calibration sensitivities, pivot points, aperture number and EHT are not
the same as those presently in use. The database will not be loaded unless the
/override qualifier is used. Alternatively set the elements such as the field size to
match the database first.
2. Load the field corrections for the maximum fieldsize to be used from file (If
these are not available see Section “Field corrections database generation” ):
VB_OPER>qfile load <filename.dist>/dist_cal
VB_OPER>qfile load <filename.stig>/stig_cal
3. Load the column settings for the beam current to be used from file (If this is
not available see Section “Beam database generation”):
VB_OPER>qfile load <filename.test>/test_col
4. Restore the settings:
VB_OPER>sfab/restore=test
5. If necessary, load the magnetic map for the holder to be used from file (If this
is not available see Section “Magnetic map database generation”):
VB_OPER>qfile load <filename.mag_cal>/mag_cal
6. Carry out a jobcal.
This scheme will ensure that the correct values are always used and is
particularly useful as Emma does not show what the last loaded database was.
12.7.
Deflection-field corrections confidence check
As a precaution, the deflection-field corrections database, which has been
loaded, should be checked. See Section “Checking deflection-field corrections”
in Chapter “Calibrations”.
12.8.
Calib.com
Many machine set-ups are stored in the file calib.com. This allows easy display
and editing of various parameters. The file vb$seq:calib.com is run during the
Emma start-up sequence and loads these parameters into the machine.
However this file duplicates many of the set-ups, which are saved in the
databases and care should be taken that both are in synchronisation. The only
parameters in calib.com that are not stored in the machine database are:
Part Number:878275
Vectorbeam Operator Manual
Page 115
1. The height meter scaling coefficient and offset
2. The scaling for height coefficients (x and y offset, scaling and
squared terms).
3. The temperature sensor coefficients.
4. Information about the cathode operating point (no parameters are
changed on the machine).
Part Number:878275
Vectorbeam Operator Manual
Page 117
13.
Exposure dose
The exposure dose is controlled by defining the stepping frequency of the pattern
generator between exposure grid points. The pattern generator contains a dose
controller to control the scanning rate of exposure. Usually, however, the
operator wishes to define an appropriate exposure dose for the resist being used
rather than the frequency. Therefore the required frequency is calculated by
Emma when the “qadjust clock” command is issued, using the formulae given
below.
13.1.1.
Area dose
The exposure dose is most often specified is an area dose. This is when the
pattern contains shapes with X and Y dimensions greater than the spot size and
in this case the dose and the frequency are related by:
Dose = Current
13.1.2.
( Frequency × ExposureGrid )
2
(Equation 13.1)
Line dose
A line dose is used when the pattern contains only shapes with either the X or Y
dimension greater than the spot size and the other dimension equal to the spot
size (e.g. single pass lines). In this case the dose and the frequency are related
by:
Dose = Current
13.1.3.
(Frequency × ExposureGrid ) (Equation 13.2)
Point dose
A point dose is used when the pattern contains only shapes with both the X and
Y dimensions equal to the spot size (e.g. dots). The dose and the frequency are
related by:
Dose = Current Frequency
(Equation 13.3)
There is currently no support for defining point doses in Emma and so the user
must set the frequencies based on Equation 13.3 if point doses are to be
specified.
13.1.4.
Resist sensitivity parameter
The resist sensitivity parameter is the exposure dose, which is used for
calculating the clock frequencies (by executing “qadjust clock... ” command)
when the clocks are defined as using a relative dose (“qset dose/rel” command).
This is a commonly used operating set up for exposing proximity corrected
patterns.
For this operating set up it is usual that the resist sensitivity parameter
corresponds to the large-area clearing dose. (The large-area clearing dose refers
to the dose required for an area large enough to receive the maximum exposure
from backscattered electrons.) The large-area clearing dose is always smaller
than the dose required for smaller features. By convention, the large-area
clearing dose is assigned to clock 0 and, for convenience, is assigned a relative
Part Number:878275
Vectorbeam Operator Manual
Page 118
dose of 1.0. Smaller features can be assigned to higher clock numbers with
relative doses greater than 1.0 by the proximity correction software. Usually the
higher the clock number the higher the relative dose.
The same set up can be used for exposing non-proximity corrected patterns. It is
conventional for the pattern converters to assign clock 0 to all shapes when they
are not otherwise defined. As clock 0 is also normally assigned a relative dose of
1.0, the resist sensitivity parameter set will define the dose, which will be used
for exposing the entire pattern.
13.1.5.
Clocks
A clock refers to one of the frequencies supplied by the dose controller. Emma
will allow up to 32 clocks, with numbers from 0 to 31, to be defined anywhere
between the maximum (256000 kHz) and minimum (0.3 kHz) limits of dose
controller hardware. The dose controller 2 board can actually provide any one of
65536 clocks which are spaced at regular intervals of frequency between the
upper and lower limits.
If a pattern file has been produced by a converter and no clocks or doses were
assigned, the clock assignment for each shape will default to clock 0.
13.1.5.1.
Setting clocks
The qset clock command accepts any frequency in the hardware range. The
frequencies are only set in the pattern generator when the qexpose pattern or
qadjust clock commands are issued.
13.1.5.2.
Adjusting clocks
The qadjust clock command is used when defining area or line doses. By typing
the command:
VB_OPER> QADJUST CLOCKS
the frequencies are calculated for clocks to which a dose has been assigned
based on the beam current (see below), the doses and exposure grid (VRU *
resolution ). The frequencies are set in the pattern generator.
13.1.5.3.
Displaying clocks
The qdisplay clock command displays the dose determining parameters and the
frequencies as computed with these parameters. The command also displays
the frequencies, which are set in the pattern generator. If these differ from the
frequencies computed above a warning is printed that the clocks need adjusting.
13.1.6.
Beam current
The beam current used for the qadjust clock command is shown in the Emma
status window and will be the last value produced by any of the following:
1. The measured beam current using qdisplay bcm.
2. The beam current set and measured by qset current using the spot table.
3. The beam current set and measured by qset diameter using the spot
table.
4. The beam current specified for qadjust clock with /curr=... or /bcm
Part Number:878275
Vectorbeam Operator Manual
Page 119
13.1.7.
Exposure grid
The exposure grid size used for the qadjust clock command is the beamstep size
described in Section “Beam step size and VRU” in chapter “Exposing a
substrate”.
13.2.
Dose controller
The dose controller provides a band of exposure frequencies or clocks. All
shapes in a pattern are tagged with a number (clock) in the pattern file, which
defines which one of these frequencies is to be used for exposing that shape. If
no explicit assignments are done in the converter then all shapes are by default
tagged with the same clock 0 and all the pattern is exposed with the same dose.
However each shape can be exposed with a different clock which is useful if
proximity correction is required (see Section “Proximity correction”. The dose
controller provides up to 65536 different frequencies, equally spaced, for use
during the exposure of a single pattern file. The master clock from which the
exposure clocks are generated operates at 1.5 GHz which means a period of
0.67 ns. Therefore the accuracy of any exposure clock will be to the nearest
0.67 ns. The minimum and maximum frequencies of the band will be
automatically set up before the exposure. They should be within a factor of 100
of each other or a warning will be generated. The maximum useable frequency is
25 MHz. There are two methods of defining the minimum and maximum
frequencies:
1. Define the frequencies directly.
2. Define the doses from which the frequencies can be automatically
calculated using Equation 13.1 or 13.2.
13.2.1.
Dose controller band set up
The dose controller band is set up automatically by Emma to cover all required
frequencies both if doses and frequencies have been assigned to clocks in
Emma or if the pattern file contains relative doses. The only instance when the
operator can override this automatic set up is when a pattern contains relative
doses. If this type of pattern is selected (command: qset pattern) the maximum
and minimum relative doses are noted. These values may be changed by the
qset band command if it is issued after the pattern has been selected.
If a range of exposure frequencies, fmin to fmax, is to be defined directly then
type:
VB_OPER> QSET BAND fmin fmax
If a range of area doses dmin to dmax is to be defined then type:
VB_OPER> QSET BAND/ABSOLUTE_DOSE dmin dmax
If a range of line doses dmin to dmax is to be defined then type:
VB_OPER> QSET BAND/LINE_DOSE dmin dmax
These commands will calculate and set the lower and upper frequencies.
Alternatively type:
VB_OPER> QSET BAND/REL drelmin drelmax
Part Number:878275
Vectorbeam Operator Manual
Page 120
This will set the upper and lower frequencies based on the resist sensitivity and
the minimum and maximum relative doses drelmin and drelmax. This is useful if
the resist sensitivity is subsequently varied as the dose controller band will be
adjusted also.
13.2.2.
Update of pattern generator frequencies on exposure
When the qexpose pattern command is issued any frequencies for clocks to
which a dose has been assigned are recalculated. All clock frequencies are
compared with those set in the pattern generator and if any differ the pattern
generator is updated.
Note: This only happens at the start and if an ontime procedure has remeasured
the current during an exposure, the operator must see that a qadjust command is
issued.
13.2.3.
VMS logicals
The following VMS logicals are set in order to allow jobfiles to automate
operation.
13.2.3.1.
VB_ACLK_STATUS
The logical VB_ACLK_STATUS is set to one of the following strings by the
qadjust clock command:
1. “OK. “
2. “WARNING: Clockband too wide, worst dose accuracy x.xx%. “
An actual value in percent is shown in place of the x.xx
3. “ERROR: Frequencies out of range. “
The frequencies are out of hardware range.
4. “Error: Bad parameters. “
One of the dose determining parameters (resist sensitivity, VRU etc) has an
illegal value.
5. “ERROR: Couldn’t set clockband. “
Emma couldn’t communicate with the pattern generator.
6. “ERROR: Couldn’t set clocks. “
Emma couldn’t communicate with the pattern generator.
13.2.3.2.
VB_DCLK_STATUS
The logical VB_DCLK_STATUS is set by qdisplay clocks and qadjust clock to
one of the following strings:
1. “OK. “
2. “WARNING: Clocks need adjusting. “
3. “ERROR: Frequencies out of range. “
The frequencies would be out of hardware range if an attempt were made to set
Part Number:878275
Vectorbeam Operator Manual
Page 121
them in the pattern generator.
4. “ERROR: Bad parameters. “
One of the dose determining parameters (resist sensitivity, VRU etc) has an
illegal value.
13.2.3.3.
VB_BCM
The logical VB_BCM is set by qdisplay bcm to the string
“ Beam current x.xxxxeyyy nA”
where x.xxxxeyyy is the measured value of current.
13.2.3.4.
VB_DBCM
The logical VB_BCM is set by qdisplay bcm to the measured value of current
e.g.
“ 0.5345”
“ 25.2753”
13.3.
Exposing proximity corrected patterns
The VB enables the dose to be varied within a pattern in order to compensate for
the proximity effect (see also Section “Dose controller”). The following steps,
which are described in more detail below, are required:
1. Assign doses to shapes using either a proximity correction
calculation or direct assignment. Both these methods are available in
both Cats and Caprox.
2. Choose either the clockfile or the pattern as the method to transfer
the dose distribution to the machine and convert the pattern
accordingly.
3. Copy the pattern to the machine and expose as normal. A clockfile is
required if the relative doses are not included in the pattern file.
13.3.1.
Dose controller operation with proximity corrected patterns
Any one of the 65536 frequencies supplied by the dose controller will
automatically be selected for each shape during pattern exposure according to
the clock number in the pattern file associated with the shape. The dose is thus
changed from shape to shape. This facility enables compensations to be applied
to correct the proximity effect caused by electron scattering within the resist and
substrate. The large number (65536) of available frequencies spread between
the maximum and minimum frequencies means that the dose interval between
successive frequencies is small compared with the variation required for
proximity correction giving a high accuracy capability.
13.3.2.
Proximity correction
The proximity effect degrades the fidelity of the lithography. The effect has been
studied by many people and the literature should be consulted for details. The
effect can be compensated for by adjusting the doses of the shapes in the
pattern. The required doses for each shape in the pattern can be found by:
Part Number:878275
Vectorbeam Operator Manual
Page 122
1. A theoretical calculation.
2. Measuring exposures.
13.3.2.1.
Theoretical proximity correction calculation
The inter- and intra- proximity effects are calculated from the pattern geometry
and the backscattered electron intensity distribution. Proximity effect calculation
is usually done by the pattern converter and both Caprox and Cats will carry out
proximity correction if the appropriate licenses have been obtained. The relevant
user manual should be consulted for details. If the pattern contains many
shapes, the calculation can take many hours even on a state-of-the-art
workstation.
13.3.2.1.1.
Backscattered electron intensity distribution
The backscattered electron intensity profile can be obtained from either:
1. A Monte Carlo simulation of beam - substrate interactions.
2. A series of dot exposures at different doses followed by an evaluation of
the size of the resulting disc after development.
13.3.2.2.
Empirical proximity correction
A series of exposures is measured and the optimum dose for the various parts of
the pattern is determined. This will become impractical for increasing number of
shapes.
13.3.2.3.
Other techniques
Less complicated, faster but less precise methods of reducing the fidelity loss
from the proximity effect are:
1. Assigning doses to the pattern shapes based on their geometry and a
knowledge of the inter proximity effect. This can be done with the “CFA”
facility in Cats or the “Assign” command in the “Exposure” dialogue under
the “Options” menu in Caprox.
2. Negative biasing with higher doses to obtain the correct dimensions with
higher process latitude.
3. Sleeving shapes for exposure with a small spot size.
13.3.3.
Transferring dose distribution to the VB
When doses have been assigned to shapes in a pattern, either using a proximity
correction calculation or by direct assignment, the dose distribution can be
transferred to the VB in one of the following ways:
1. In a clock file.
2. In the pattern file itself.
13.3.3.1.
Using a clock file
Tag each shape in the pattern file with a clock number, using the facilities in the
converter, and then use a clock file on the VB to define what dose each clock
number stands for. The term “class” used in Caprox is equivalent to clock. Note
that this method only allows up to 32 clocks due to a 32 clock limit in Emma. This
method allows both relative doses and absolute doses to be assigned to different
clocks.
Part Number:878275
Vectorbeam Operator Manual
Page 123
13.3.3.2.
Using a pattern file
Tag each shape in the pattern file with a relative dose using the facilities in the
converter (The converter will output a file which has each shape tagged with a
clock number and in addition, has defined in the pattern file header the maximum
and minimum relative doses that the maximum and minimum clock numbers
represent). For exposure, these relative doses must be transformed into absolute
doses. This is done by defining the resist sensitivity (also known as the base
dose or the large area clearing dose) on the VB as usual and shapes with a
relative dose 1 will be exposed with this dose. When the pattern file is selected
by Emma the dose controller low and high limits are set up automatically based
on the range of relative doses and the resist sensitivity. A check that the pattern
file contains relative doses can be done by verifying that the message “Pattern
has internal clockband consisting of relative doses from .. to ... “ is typed up
when the pattern is selected. Note that although in principle all 65536 different
doses can be used by this method the converter may limit the number of doses.
The 32 clock limit in Emma does not limit the number of clocks which can be
used with this method.
Typically it is more convenient for a theoretically calculated proximity correction
to use method 2 and for an empirically determined proximity correction to use
method 1. This is because a theoretically calculated correction may have a large
number of different doses which would be inconvenient to transfer to a clock file
and an empirically determined correction may require tweaking at the machine
which can be conveniently done with a clockfile.
13.3.4.
Notes for CATS converter users
1. The clocks in both CATS and Emma are numbered starting from 0.
2. The logical TE_CFA must be defined as the .ccfa file before starting
writefile if relative doses are to be included in the pattern file. For example
on VMS systems:
$define te_cfa dka100:[base.users.pattern]pattern.ccfa
On Linux systems first set the TED environment variable to the current working
directory before starting Cats:
$TED=$(pwd)
On Linux systems select the .ccfa file after starting Cats:
Command:cfa
CFA option: $TED/<filename>.ccfa
On Linux systems before using writefile:
TE_CFA = $TED/<filename>.ccfa
export TE_CFA
13.3.4.1.
Proxeco
Define the logical te_cfa as the .pec file before running writefile in order to obtain
the relative doses in the pattern file.
13.3.4.2.
CFA facility
1. CATS CFA facility only supports 256 clocks.
Part Number:878275
Vectorbeam Operator Manual
Page 124
2. In the CATS *.CCFA file remember to list the relative doses first, followed
by the line “VBMINMAX min_relative_dose max_relative_dose” and then
the selection rules e.g.:
1.00
1.06
1.13
1.19
1.25
1.31
1.38
1.46
!
VBMINMAX 1.00 1.46
!
! Rule 0
WIDTH 0 0.07
7
! Rule 1
WIDTH 0.07 0.09
6
! Rule 2
WIDTH 0.09 0.10
5
! Rule 3
WIDTH 0.10 0.11
4
! Rule 4
WIDTH 0.11 0.19
3
! Rule 5
WIDTH 0.19 0.4
2
! Rule 6
WIDTH 0.4 0.6
1
! Rule 7
ALL
0
13.3.5.
Notes for Caprox converter users
1. In order to transfer the dose distribution from the converter to the VB
via the pattern file it is necessary to set the number of dose classes
to 1, select “automatic classification” and leave “reserve default
class” unchecked before starting the formatter. These settings are in
the “Dose class settings” dialogue under “process”/”dose
classification”/”change...”
2. In order to transfer the dose distribution from the converter to the VB
via a clock file, set the number of dose classes to the required
number of dose classes (i.e. greater than 1). Create a clockfile by
looking up the doses of each class in Caprox.
3. The clocks in Caprox are numbered starting from 1 but the clocks in
Emma are numbered starting from 0. This needs to be taken into
account when transferring the dose of each class, as displayed in
Caprox, into a clockfile for the VB.
4. The maximum number of dose classes is 256.
Part Number:878275
Vectorbeam Operator Manual
Page 125
13.3.6.
Example clockfile
A typical clockfile to set up the clocks for a particular pattern is given below. In
order for the file to be executed automatically by WLVD.COM (see chapter
“Exposing a substrate”) it should have the same name as the pattern but with the
extension “.clk” and be in the same directory as the pattern.
$ QSET DOSE/REL 0 1.2
$ QSET DOSE/REL 1 1.23
$ QSET DOSE/REL 2 1.23
$ QSET DOSE/REL 3 1.24
$ QSET DOSE/REL 4 1.26
$ QSET DOSE/REL 5 1.30
$ QSET DOSE/REL 6 1.33
$ QSET DOSE/REL 7 1.35
$ QSET DOSE/REL 8 1.38
$ QSET DOSE/REL 9 1.42
$ QSET DOSE/REL 10 1.45
$ QSET DOSE/REL 11 1.48
$ QSET DOSE/REL 12 1.52
$ QSET DOSE/REL 13 1.57
$ QSET DOSE/REL 14 1.65
$ QSET DOSE/REL 15-31 2.00
18-bit and 20-bit machines running V2005.01 or later can define the VRU to be
associated with a particular clock number and override the default set by “qset
VRU” e.g.:
$ QSET DOSE/REL 0 1.2/VRU=2
13.3.7.
Exposing proximity corrected patterns
The jobfile WLVD.COM allows the exposure of proximity corrected patterns
using either of the alternatives described above (see Section “wlvd.com” in
Chapter “Exposing a substrate”).
13.3.7.1.
Dose distribution transferred by clock file
If a clock file with the same name as the pattern file but with extension .clk is in
the pattern file directory it will be run before pattern exposure. This sets up the
required clocks.
13.3.7.2.
Dose distribution transferred by pattern file
If the pattern file contains relative doses then the dose controller is set up
automatically on selecting the pattern.
Part Number:878275
Vectorbeam Operator Manual
Page 127
14.
Detectors
The detectors provide information about the electron beam (beam current, back
scattered electron signal, etc.). This information is used among other things for
automatic calibration purposes, mark locate, autofocus/stigmation or for
producing an image to be displayed on the video monitor.
The detectors fitted to a Vectorbeam depend on the particular machine
configuration. The following table shows the options.
Machine
type
Beam
current
meter
Photomultiplier
backscatter
detector
4 quadrant PN junction
backscatter
detector
Transmission
detector
VB5
Yes
Yes
No
No
VB6 – HR
Yes
Yes
No
Yes
VB6 - UHR
Yes
No
Yes
Yes
The detectors, apart from the beam current meter, are connected to the video
input and may be selected by the control software Emma using the command
“qset detector”.
14.1.
Beam current meter
The beam current meter consists of a total beam current collection cup (known
as a "Faraday Cup"), which is mounted on the stage on VB6 Systems and on the
holder on VB5 Systems. It has pre-amplifier and range selection electronics that
enable measurement of the beam current from less than 50 pA to more than 200
nA.
14.2.
Photomultiplier backscatter detector
Four scintillators on the ends of light pipes leading to photomultiplier tubes are
mounted at 90 degrees with respect to each other close to point of impact of the
beam on the substrate. They detect back-scattered electrons. Their outputs can
be mixed in any combination, although normally they are summed and this is
done with the following command:
VB_OPER> qset detector PMP1P2P3P4
14.3.
4-quadrant P-N junction backscatter detector
4 P-N junction devices are mounted on the bottom of the UHR final lens around
the beam and detect back-scattered electron detectors. Their outputs can be
mixed in any combination, although normally they are summed and this is done
with the following command:
VB_OPER> qset detector BSB1B2B3B4/BIAS
Where the ‘BIAS’ qualifier is generally needed above 10nA beam current.
Part Number:878275
Vectorbeam Operator Manual
Page 128
14.4.
Transmission detector
A P-N junction device is mounted on the superplate of a VB6 at a position of
approximately X=132 , Y = 5. The device detects electrons transmitted through
the substrate. The detector is a silicon diode type MSX03 with an active area of
10 x 10 mm. The anode of the diode is brought out on connector X6 and the
cathode on connector X7 on the chamber lid. The diode is connected to a
preamplifier mounted on the chamber and the preamplifier output is connected to
an input of the video processor card. To select the transmission detector signal
type:
VB_OPER>QSET DETECTOR TR
This restores the last used preamplifier channel and bias state- see below.
When fully depleted by the application of a reverse bias, the time constant for the
diode junction is about 4 ns. If no bias voltage is applied the time constant could
be 1000 times greater. In addition, with incident currents above 1 nA it is
essential to apply reverse bias otherwise the charge density in the detector
seriously degrades the transient response. It is recommended that the diode is
always used with bias. To select the bias type:
VB_OPER>QSET DETECTOR TR/BIAS
The preamplifier has 4 channels of which channels 1 and 4 are used. Each
channel has four attenuation ranges:
Channel 1: 10X, 30X, 100X, 300X
Channel 4: 100X, 300X, 1000X and 3000X
The desired attenuation can be selected by selecting the appropriate channel
and attenuation:
VB_OPER>QSET DETECTOR TR [T1 | T4]/BIAS/ATTEN=MIN | LOW |
HIGH | MAX
If it is not possible to select detector T4 using this command, this might be due to
a configuration error in the OA_config.vw file. In order to be able to select t1 and
t4 there should be a line:
modint 2, 316, 9
This shows which transmission detectors are available. The final value in modint
2, 316, x is a bit significant value with T1 = 1, T2 = 2, T3 = 4, T4 = 8. To indicate
more than one detector sum their values.
The channel and attenuation should be selected to avoid saturation in the
amplifier chain. The maximum beam currents that can be used are given below.
Part Number:878275
Vectorbeam Operator Manual
Page 129
Attenuation
Max. beam
current at 50 kV
(nA)
Max. beam
current at 100 kV
(nA)
10 X
0.12
0.06
30 X
0.4
0.2
100 X
1.3
0.6
300 X
3.7
1.9
1000 X
10
5
3000 X
25
12.5
The tranmission detector signal has its own gain and backoff levels. Usually the
gain is set up towards 1.0 and the backoff must be adjusted to around the 0.5
level.
The substrate holders are designed so that a knife edge or transmission sample
can be positioned over the detector. This allows spot size measurements to be
made - see Section “Beam diameter measurement”. The system can also give
scanning electron transmission images of transparent samples - see chapter
“Creating scanning electron image files”
Part Number:878275
Vectorbeam Operator Manual
Page 131
15.
Machine set ups
The machine set-ups and calibrations in this chapter will need to be performed
the first time a particular beam accelerating voltage is used. Only relevant setups or calibrations will need to be repeated if mechanical work has been carried
out on the column or stage such as cleaning or height adjustment. If no such
work has been carried out then the routines may need to be performed at an
interval of a few months.
15.1.
Temperature control
In order to obtain specified performance levels, it is vital that the temperatures of
the various machine components, such as the column and stage, are held within
specified limits. This is done by maintaining the machine environment to the
installation site specifications and by the temperature control baths, which
circulate water around the machine.
In order to obtain specified performance levels without long stabilisation times
after loading substrates onto the stage, it is important that the temperatures of
the stage and airlock or Brooks handling system are matched.
15.2.
Temperature measurement
15.2.1.
Location of temperature measurement sensors
15.2.1.1.
VB5
There are no temperature monitors.
15.2.1.2.
VB6 with single or 10-holder airlock
There are temperature monitors on the superplate, on the X stage table, on the Y
stage table, on the Z stage table, in the crane pouch, in the front pouch, in the
airlock, on the ring around the bottom of the column, on the x and y peltiers, on
the x and y motors and in the air space over the plinth.
15.2.1.3.
VB6 with Brooks handling
There are temperature monitors on the superplate, on the X stage table, on the Y
stage table, on the Z stage table, on the ring around the bottom of the column,
on the x and y peltiers, on the x and y motors, in the air space over the plinth, in
the air circulating in the PGA electronics crate and in the air circulating in the
CCU electronics crate
15.2.2.
15.2.2.1.
Obtaining temperature readings
Direct temperature measurement
The temperatures from all the sensors may be displayed directly on screen using
the command:
VB_OPER> DTMP (or QDISP TEMPERATURE)
15.2.2.2.
Background temperature monitoring
The temperatures from all the sensors are read at regular intervals, using the
background temperature monitoring facility, which also writes the data to a file.
This monitoring process is started by selecting “Temperature monitoring” in the
applications menu of the windows manager or by running the jobfile:
Part Number:878275
Vectorbeam Operator Manual
Page 132
VB_OPER>@EMMA$CTRL_COM:TEMPMON.COM
In order to read and plot the data, a PV WAVE compiled procedure must be run
as follows (See also jobfile documentation manual number 892777 for more
detailed information):
VB_SUPER>wave –r temp_monitor
A postscript plot “vb$disk:[vb.results]temp_monitor_dd_mmm.ps” is produced.
15.2.3.
Temperature set up
Ensure that the clean room environmental temperature is stable and set to the
desired temperature (usually 22.0C).
15.2.3.1.
VB5
No procedure yet available.
15.2.3.2.
VB6
Use the background temperature monitoring to assess the control and settings
continuously for a period of 24 hours. If there is significant temperature variation
of the superplate, X stage table, Y stage table, airlock or ring then the stage
temperature control system and the temperature controller set up should be
checked.
Matching temperatures requires storing the holder and substrate at the same
temperature as the airlock stage the substrate and its holder does not change
significantly whether the holder is left in the airlock or on the stage.
15.3.
Changing the beam accelerating voltage (kV)
The VB can be operated at either 20, 50 or 100 kV and the choice of beam
accelerating voltage depends on the application.
15.3.1.
Choosing the beam accelerating voltage
Note:
1. At higher beam accelerating voltages the current density is higher but the
resist sensitivity is lower. These effects cancel each out to the point that
no significant change in beam-on time is obtained at different beam
accelerating voltages for similar spot sizes.
2. Electrons deposit most energy into the substrate at the point they stop.
For very sensitive substrate layers the appropriate beam accelerating
voltage depends on the depth of the layer.
15.3.1.1.
Advantages of lower voltage
1. Larger maximum fieldsize available which enables higher throughput
2. More signal contrast for locating marks.
3. Can obtain more undercut of resist sidewall which aids lift off.
4. Damage ? - see above.
15.3.1.2.
Advantages of higher voltage
1. Smaller spotsize available
Part Number:878275
Vectorbeam Operator Manual
Page 133
2. Higher beam positional stability
3. Backscattered electrons spread out over larger area which can reduce
proximity effect for some patterns.
4. Thicker resist can be exposed with near vertical sidewalls.
5. Damage ? - see above.
15.3.2.
Important notes before increasing the beam accelerating
voltage (kV)
Before increasing the accelerating voltage the following conditions must be met:
1. The pressure in the gun is within the range for operation.
2. If the gun has not been operated at the target voltage since it was last vented
to atmospheric pressure then it will require conditioning (see below).
15.3.3.
Conditioning the gun
It is vital that the gun is conditioned after it has been vented before normal
operation as otherwise a flashover could occur which may destroy the cathode.
This is carried out by the Vistec Engineer.
15.3.4.
Setting the EHT
Set the ramp speed to avoid too rapid changes:
VB_OPER>qset reg 1 28 200
Type the command:
VB_OPER>SEHT 20
15.3.5.
Set up for operation
The following will need to be set up after the beam accelerating voltage has been
changed if valid settings cannot be reloaded by restoring a database:
1. The final lens (C3) current.
2. The conjugate blanking.
3. The beam current.
4. The gun alignment.
5. The final aperture.
6. The magnetic map.
7. Field corrections (Fullcal).
8. The demagnification table.
9. The spot table.
The procedures for these set ups are described in this manual.
Part Number:878275
Vectorbeam Operator Manual
Page 134
15.4.
Final lens 3 (C3) set up
Lens C3 is set up by the Vistec Engineer so that the conjugate blanking condition
is fulfilled. See Section “Conjugate blanking set up”.
15.5.
Stigmator balance set up
Ensure that the final aperture is centred first. In order to adjust the stigmator
balance ensure that there is a holder on the stage and a feature such as the FM
mark (which is a 10 micron octagon) is displayed in SEM mode on the video
monitor. Then type:
VB_OPER>QSET WOBBLE ON AXIAL
The image on the screen will wobble. If there is vertical or horizontal movement,
minimise this by selecting Stigmator Balance in the Set menu (Figure 7.8), and
adjusting the Axial-X and Axial-Y sliders for minimum movement. Then type:
VB_OPER>QSET WOBBLE OFF AXIAL
VB_OPER>QSET WOBBLE ON DIAGONAL
The image on the screen will wobble. If there is movement, minimise this by
selecting Stigmator Balance in the Set menu (Figure 7.8), and adjusting the
Diag-X and Diag-Y sliders for minimum movement.
VB_OPER>QSET WOBBLE OFF DIAGONAL
The stigmator balance should only need to be set up once for each beam
accelerating voltage. These values will not change unless the column
characteristics change. Save the set-up in the appropriate database.
15.5.1.
Setups affected by stigmator balance
Changing the stigmator balance will changed the mainfield distortion corrections
and these will need to be recalibrated using fullcal.
15.6.
Conjugate blanking set up
The beam blanking is conjugate when the beam focal point after the 2nd lens
(C2) is exactly half way along the blanking plates. Conjugate means that there is
no movement of the spot at the substrate as the voltage on the blanking plates is
changed but only a change in current. This is important for eliminating possible
errors in shapes at the points where the beam is blanked and unblanked. Such
error would result in “tails” on each shape at the point where the beam blanks or
unblanks.
The fundamental conjugate blanking setup is done once at installation or after
mechanical work on the column. The current in the 2nd lens (C2) is adjusted to
place the crossover half way along the blanking plates. Beam movement is
minimised while gradually varying the blanking voltage using the potentiometer in
Cabinet B. The beam is focused on the substrate by adjusting lens 3 (C3) so that
the fine focus setting is appropriate for the substrate height. This will normally be
done by the Installation Engineer and the setting of lens 3 (C3) is fixed from this.
The procedure is described under the section “Lens C3 set up” below.
Part Number:878275
Vectorbeam Operator Manual
Page 135
After this fundamental conjugate blanking setup, when the beam current is
changed by adjusting lens 1 (C1), the focus of lens 2 (C2) is restored to the
conjugate point by simply ensuring that the beam is accurately re-focused on the
substrate. Since the lens 3 (C3) value is fixed and the fine focus setting only
takes the substrate height into account, an accurate focus can only be obtained if
the focus of lens 2 (C2) is at the same point as after the fundamental setup, ie
the conjugate blanking point. The procedure to set lens C2 to focus the machine
in this way procedure is described under the section “Focusing the beam” in
Chapter “Job-specific machine setups”.
15.6.1.
Lens C3 setup
The lens 3 (C3) setting is a fundamental setup that is done once at installation or
after mechanical work on the column. It needs to be determined for each beam
energy. Once it has been determined it remains fixed and it should be saved in
the databases for that beam energy. This is necessary to ensure that the
mainfield distortions, subfield distortions, field focus and stigmation corrections
and the magnetic map remain valid. The procedures is as follows:
1. Move to the calibration mark FM.
VB_OPER> mvsp fm
2. Select SEM mode
3. Move a corner of the mark to the centre of the screen using the joystick
(Figure 7.21)
4. Set the magnification to maximum keeping the mark corner centred.
5. Display the height meter reading:
VB_OPER>dhgt/tab=7
6. Multiply the height reading (e.g. 7.5 µm) by the focus for height coefficient
and reverse the sign of the result (The focus for height coefficient can
seen in the “Sensitivity” Panel under the Display menu of the Emma status
window. e.g. 7.5 x 0.0081 = 0.061, reversing the sign of this result gives –
0.061). Set the fine focus to this value
VB_OPER> sfoc -0.061
7. If the mark is a long way out of focus, bring lens 3 to the approximately
correct value based on the sharpness of the mark in the SEM image. This
is best done by displaying the current value by typing:
VB_OPER> dln3
(example result =0.407)
and then varying the value until the best focus is obtained by typing:
VB_OPER> sln3 <value>
(example value = 0.410)
8. Switch the beam blanking operation in Cabinet B to 'Test' mode.
9. Rotate the potentiometer knob RV8 on the front of the beam-blanking unit
in Cabinet B fully anticlockwise and then fully clockwise. The beam will be
fully blanked at one end and fully un-blanked at the other. Confirm this
from the SEM image (it might be necessary to first switch into SEM mode
and then blank the beam using the “beam on/off” button on the Emma
status window.)
Part Number:878275
Vectorbeam Operator Manual
Page 136
10.Rotate RV8 back and forth to find the range where the image brightness
changes from normal to almost completely dark (i.e. almost blanked).
11.If the corner of the mark moves during the preceding step > 0.5 µm then
adjust lens 2 (C2) so that there is no movement of the image between the
two pot positions. This is best done by displaying the current value by
typing:
VB_OPER> dln2
(example result =0.107)
and then varying the value until the best focus is obtained by typing:
VB_OPER> sln2 <value>
(example value = 0.110)
12. Run the automatic fine focus and stigmation adjustment as described in
Section “Automatic fine focus and stigmation adjustment” in Chapter “Job
specific machine setups”.
13.Compare the fine focus value from the preceding step with the value
calculated above. Adjust lens 3 and repeat from the preceding step until
the fine focus values match to within about +/- 0.010.
14.Having found the correct lens 3 value, the beam blanking operation in
Cabinet B should be returned to 'Normal' and the pot returned to its former
value.
15.Save the new fixed value of lens 3 (C3) in the appropriate databases.
15.7.
Magnetic map calibration
On a VB6, a dedicated magnetic map is required for all 8 inch wafer
holders (which have the datum in the corner) and another for all other
holders ( which have the datum in the centre of an edge).
On a VB5 a dedicated magnetic map is required for any holders with
the datum in the corner and another for all holders with the datum in
the centre of an edge.
Read the following carefully for details.
An introduction to the magnetic map correction is described in Chapter
“Corrections”. The rotation of the deflection field, relative to that at the calibration
mark, is measured for an array of points centred approximately about the centre
of the stage. This array is typically 10 x 10 points but may be varied by the
operator. A substrate with an array of alignment marks is used and this is
normally the autostitch plate. The array of alignment marks will not normally
cover the entire range of stage travel as the maximum substrate size will be less
than the entire range of the stage. For the purposes of applying magnetic map
corrections, the stage travel is divided into 64 x 64 cells. The magnetic map
correction for each cell is calculated from a spline fit to the measured data. Such
extrapolation of corrections to positions outside the measurement array will not
be accurate due to the nature of a spline fit. This has the following
consequences:
1. The magnetic map must be calibrated over the area, which will be
exposed.
2. The magnetic map corrections at the calibration mark must be zeroed.
Part Number:878275
Vectorbeam Operator Manual
Page 137
The calibration mark is usually outside the measured array but has, by
definition, zero magnetic map correction. Correction cells in an area
around the calibration mark are zeroed by using a command qualifier such
as:
VB_OPER>QCALIBRATE STAGE /DATUM=RECT=(0,0,125,12.9) / etc.
3. See the Vectorbeam Command Set Manual (878274) for details of these
qualifiers. The area should include the entire datum plate as it is likely that
at a later time a fresh calibration mark on the datum plate will be chosen
when the first has become contaminated. The calibration mark can be
moved in such a way without recalibrating the magnetic map because the
distance between the marks is small and the difference in the corrections
is negligible.
4. Separate magnetic maps are required for using holders on the same
machine, which have the datum plate in different positions. This is
important when using 8-inch wafer holders on the VB6 and NIST type Xray holders on the VB5. These holders have datum plates in different
positions to that used by all other holders including the standard autostitch
plate mask holders normally used for calibrating the magnetic map. The
difference in the calibration mark positions is large (several cm) and the
difference in the corrections may be significant. In this case the user must
generate a suitable “autostitch” target substrate. An appropriate substrate
(an 8 inch wafer or X-ray mask) must be patterned such that an array of
marks with suitable contrast is produced over the entire area to be used
later for exposures. The marks should have a pitch of around 0.5 to 2 mm
as, although measurements are typically carried out every 10 to 20 mm, if
a mark is damaged the VB has the ability to use the nearest neighbour to
complete the calibration. The absolute positioning accuracy of these
marks it not important as long as they are within the mark locate coarse
search range. The magnetic map calibration is then carried out in the
usual way using this substrate. Save the magnetic map (see Section
“Database management”) separately so that it can be used in combination
with any other set-ups.
5. When calibrating the magnetic map, use should be made of the facility to
use neighbouring marks if a particular calibration mark cannot be located.
This will enable the calibration to complete successfully on a less-thanperfect array of marks. Use the qualifier /alt_mark_grid =0.5 for marks on
a 0.5 mm grid.
15.7.1.
Calibration jobfile
The required sequence of commands is contained in the file cal_magmap.com.
1. Locate two marks on the autostitch plate one at about the lower left corner and
one close to the centre of the array of marks for the calibration and store their
positions in the identifiers M1 and M5 respectively.
2. Type:
VB_OPER>@vb$seq:cal_magmap.com
3. Respond to the prompts and the calibration will be carried out. Two iterations
will be performed.
The residual errors of the final measurement should be less than +/0.02 µm/mm (This will contribute a stitch error on a 1 mm field of +/- 20 nm). The
maximum and minimum residual errors are given under the “Observed X/Y
Part Number:878275
Vectorbeam Operator Manual
Page 138
Rotation Statistics” heading.
The magnetic map should be carried out initially for each beam energy to be
used. Once the calibration has been carried out the results should be saved to
the appropriate database to be recalled if required.
15.8.
Demagnification and spot table calibration
In order that the QSET SPOT and QSET CURRENT commands may work, a
demagnification table and a spot table must first be created. The demagnification
table consists of pairs of C1 and C2 settings which cover the range of useful
beam currents, their gun alignment settings and the relative demagnification
factors. The spot table consists of these same parameters with the addition of
beam currents and beam diameters.
The demagnification table calibration is normally performed by Vistec engineers
on delivery and whenever a significant change is made to the column. The
demagnification table does not depend on the age of the source or the final
aperture used. For FEG columns, however, the demagnification table does
depend on the extractor voltage and both the demagnification and spot tables
will need recalibrating if the extractor voltage is changed. Normally the extractor
voltage is fixed for long periods or even the lifetime of the source.
A spot table calibration is carried out when a new electron source is fitted and at
regular intervals if the existing one becomes inaccurate because the source
characteristics change with age. A spot table calibration is required for each final
aperture size.
The spot table is used as a look up table for QSET SPOT and QSET BEAM
CURRENT commands. The C1 and C2 lens settings that correspond to the spot
size or the beam current requested are then set (See Sections “Beam diameter
adjustment” and “Beam current adjustment” .
15.8.1.
Demagnification table
Nominal tables of values for C1 and C2 are given in the document “Default
demagnification Tables for LaB6 and Schottky Columns” part number: 892894.
These should be used as a starting point for manual trimming. The document
“Manual procedures for obtaining demagnification tables on the Vectorbeam”
part number: 892878 should be referred to.
15.8.2.
Spot table
The makespot utility described in document “Manual procedures for obtaining
demagnification tables on the Vectorbeam” part number: 892878 can be used to
generate a manual spot table. Alternatively the qcal spot command can be used.
Before running the QCAL SPOT command:
1. The current demagnification table must be valid.
2. Make sure that the mark position FM (10µm octagon) and the Faraday
cup position FC are defined before running the jobfile. This is usually done
by the holder initialisation sequence.
3. The mark should not be contaminated and should have a small mark
slope to ensure accurate spot size measurements.
4. Make sure that the correct aperture size has been defined:
Part Number:878275
Vectorbeam Operator Manual
Page 139
VB_OPER>QSET APERTURE 800
A jobfile similar to the following should be created and run in order to carry out
the calibration.
$! Spot table calibration job file
$!
$QSET MODE FAB
$MVSP FM
$LOCM FM FM /POSM=FM
$!
$!Adjust the focus and stigmation on the 10 µm octagon mark.
$! The fine focus should be adjusted to be about 0.0
$! This command also sets the parameters to be used throughout the calibration
$QCAL STIG FM/FILT=16/POINTS=8/DACPOS=5/EDGE=5/ACC=0.01
$!
$! Measure the beam diameter on the 10 µm octagon mark.
$! This command sets the parameters to be used throughout the calibration.
$LOCM FM FM /POSM=FM
$QDISP DIA FM/EDGE=5/SQUARE/FILT=16/LINESCANS=1/POINTS=8
$!
$! Calibrate the spot table
$QCAL SPOT FM FM FC FM FM /TABLE=1/DIAG/POINTS=40
$!
$!Calibrate the Mark Slope
$QCAL SLOPE DP DP FC FM FM
$SFAB/RESTORE=FINE
$MVSP FM
$LOCM FM FM /POSM=FM
15.9.
Stage mapping modes
There are three stage modes: natural, absolute and machine. The stage coordinate mapping modes, ABSOLUTE mode and MACHINE mode may be used
to correct the stage for positional errors and various distortions or to match the
stage characteristics of a machine on which a previous (or subsequent) layer of
a multi-layer device has (or will be) written. The mode of the machine when no
correction coefficients have been applied is NATURAL mode.
15.9.1.
Absolute stage map mode set up
The absolute stage map mode allows the movement of the stage to be corrected
for scaling, rotation, keystone, scaling linearity and bow errors. By correcting for
these errors the true grid placement of the stage can be improved considerably.
15.9.1.1.
15.9.1.1.1.
Determining the absolute stage map corrections
Theory
The positions of an array of marks on a substrate, covering the area of stage
travel, is measured by locating the marks (with the beam on axis to avoid any
deflection-field calibration errors). Any measured deviations to the nominal
positions of the marks will be as a result of errors in the positions of the marks on
the substrate combined with errors due to the stage positioning and errors due to
the mark locate accuracy. The errors due to the substrate and the stage can be
separated mathematically if measurements of the grid are carried out with the
substrate at four different rotations: 0, 90, 180 and 270 degrees.
15.9.1.1.2.
Procedure
1. The temperature of the system should be set up and stable.
Part Number:878275
Vectorbeam Operator Manual
Page 140
2. The system should be in a fully calibrated state.
3. Load a substrate with a suitable array of marks e.g. an autostitch plate,
and allow to stabilise.
4. Execute a data collection job file. This job will measure the positions of an
n x n grid of points using mark locate and save the positions to a data file.
The measurements should be done in absolute mode.
5. Repeat the data collection with the substrate at 90 ,180 and 270 degrees
rotations (anticlockwise) from the first rotation. The substrate is removed
from the holder and physically rotated by 90 degrees anticlockwise for
each measurement.
6. Analyse the measurements for each rotation separately. Calculate the
scale, rotation, keystone, bow and scale linearity in both x and y for a best
fit of the measurements to the nominal grid positions. This can be done
with a program such as PVWAVE.
7. The following plots are useful for each rotation to aid analysis and the
elimination of incorrect data:
•
A plot of the data which has been fitted to the nominal grid and has had
the X and Y offsets and the average of X and Y rotations mathematically
removed. This plot shows the fit to the machine grid if substrate insertion
offsets are removed.
•
A plot of the data, which has had the X and Y offsets, individual X and Y
rotations and individual X and Y scales mathematically removed. This
plot shows how the fit to the machine grid could be improved if there
were no substrate insertion offset, scaling or orthogonality errors.
8. Calculate the correction coefficients according to the table below.
9. Add the correction coefficients to the current ones for the absolute mode
and enter into Emma.
Unless there is an absolute length standard available, it is only possible to match
the x and y scaling to each other and rely on the accuracy of the laser
interferometer for absolute length. Therefore for simplicity the method described
here only applies an x scale correction and the y scale is left at 1.0000000. This
effectively sets the Y interferometer to be the reference for absolute length.
Also for simplicity only a y rotation correction is used and the x rotation is left at
0.0000000.
The signs of the coefficients calculated from the data sets for each rotation
reflect the amounts of scale, keystone etc. in the measured data. In order to
correct for the amounts shown an equal and opposite coefficient must be entered
into Emma and this is already taken into account in the equations in the table.
Part Number:878275
Vectorbeam Operator Manual
Page 141
Stage position
distortion
Correction calculation
X scaling correction
=
4
Emma
MPST
coefficient
xs
⎛ S x 0 S x 90 S x180 S x 270 ⎞
+
+
+
⎜
⎟
⎝ S Y 90 SY 0 SY 270 SY 180 ⎠
Y scaling correction
1.0000000
ys
X rotation correction
0.0000000
xr
Y rotation correction
−
X keystone correction
Y keystone correction
(R
x0
+ R y 0 + Rx 90 + R y 90 + R x180 + R y180 + R x 270 + R y 270
)
yr
4
−
( K x 0 + K x 90 + K x180 + K x 270 )
x2xy
4
(K
−
y0
+ K y 90 + K y180 + K y 270
)
y2xy
4
X scaling Linearity
correction
( L + Lx 90 + Lx180 + Lx 270 )
− x0
x2xsq
Y scaling Linearity
correction
(L
−
)
y2ysq
( Bx 0 + Bx 90 + Bx180 + Bx 270 )
x2ysq
X bow correction
4
−
Y bow correction
−
y0
+ Ly 90 + Ly180 + L y 270
4
4
(B
y0
+ B y 90 + B y180 + B y 270
)
y2xsq
4
S x0 is the x scale coefficient for the data for 0 degrees.
R y90 is the y rotation coefficient for the data for 90 degrees.
etc.
NOTES:
1. Scaling - If the measured array is too large then the output is a positive
scaling error coefficient. Uncorrected scaling errors should be small
providing that the temperature control is good.
2. Rotation - Rotation error sense is defined as follows: A positive X-axis
rotation error is an anti-clockwise rotation of the X-axis. A positive Y-axis
rotation error is a clockwise rotation of the Y-axis. Uncorrected rotation
Part Number:878275
Vectorbeam Operator Manual
Page 142
errors will usually be very large as they depend on the mechanical
location of the mask plate in the holder.
3. Orthogonality - orthogonality error is not used in the Stage Position
Correction process. (For our own purposes it is defined here as: { X-axis
rotation } + { Y-axis rotation }) So, an acute angle between the positive
directions of the X and Y axes, gives a positive orthogonality error.
Uncorrected orthogonality error will normally be large and is due to the
orthogonality of the zerodur mirror block. It should, however, be very
consistent.
4. Keystone - Consider the sloping sides of a square with keystone distortion
to be the head of an arrow. Then: A downwards pointing arrow gives a
positive X-Keystone error. A left pointing arrow gives a positive Ykeystone error. Uncorrected Keystone error should be small but could be
introduced by: Variation of magnetic field with stage position, or a
change in temperature of the substrate as the plate is written.
5. Scale Linearity error - This error should be very small but could be
introduced by: Stage pitch, roll or yaw.
6. Bow error - Uncorrected Bow error is due to the bow of the zerodur
mirrors. It should however, be very consistent.
15.9.2.
Entering stage map coefficients
The command qMAP STENTER allows the user to manually enter mapping
coefficients and the mode to which they are to apply. The following jobfile is an
example.
$! Scale and rotation
$ MPST ABS/XS=0.0000018/YR=-0.0000323
$! Keystone
$ MPST ABS/X2XY=0.0000000037/Y2XY=-0.000000003
$! Scale linearity
$ MPST ABS/X2XSQ=-0.0000000119/Y2YSQ=0.000000001
$! Bow
$ MPST ABS/X2YSQ=-0.0000000392/Y2XSQ=-0.0000000087
$! Load the coefficients
$ MVHM
15.9.3.
Display stage map coefficients
The command qDISP MAP enables the user to display the coefficients for an,
optionally specified mode, or the current mode if no mode is supplied.
VB_OPER>qdisp map abs
Current stage mode is NATURAL. Coefficients for ABSOLUTE mode are:- s
SCALE
ROTATION
X SQUARED
XY
Y SQUARED
15.9.4.
X
-0.000014213917000
0.001296107700000
-0.000000007655390
-0.000000002813361
0.000000072221504
Y
-0.000014529809000
-0.001379073780000
-0.000000007075946
-0.000000015719697
0.000000020973950
Machine stage map mode set up
The machine stage map mode allows the movement of the stage to be corrected
Part Number:878275
Vectorbeam Operator Manual
Page 143
for scaling, rotation, keystone, scaling linearity and bow errors so that the stage
matches some other machine. The set-up uses the same procedure as for the
absolute stage map mode set up except that the array of marks must have been
produced on the machine to be matched and the errors from the plate are
extracted and applied.
15.9.5.
Select stage map mode
The command qMAP STMODE enables the user to select the specified mode as
the current mode.
VB_OPER>qmap stmode abs /load
Current stage mode is ABSOLUTE. Coefficients for ABSOLUTE mode are:SCALE
ROTATION
X SQUARED
XY
Y SQUARED
Part Number:878275
X
-0.000014213917000
0.001296107700000
-0.000000007655390
-0.000000002813361
0.000000072221504
Y
-0.000014529809000
-0.001379073780000
-0.000000007075946
-0.000000015719697
0.000000020973950
Vectorbeam Operator Manual
Page 145
16.
Substrate loading and unloading
16.1.
Systems with the Brooks handling option
See the manual “VB6 PMC Operator Manual” 893157.
16.2.
Systems with the single chuck or 10-chuck airlock
handling option
For systems with the single or 10-chuck handling option substrates must be
loaded manually into the holders. Use gloves while handling the holder and
substrate. For mask plates use an earth clip.
16.2.1.
VB5
Attach the appropriate Perspex jig to the base of the substrate exchange tool.
Slide the holder into the substrate exchange tool. Close the Perspex jig down on
the holder and load/unload substrate. Lift up the Perspex jig and remove the
holder.
16.2.2.
VB6
WARNING
Keep fingers clear when operating the pneumatic switch. A pinch
hazard exists when using the loading jig
A loading jig is used for exchanging masks in the holders. The loading jig is
pneumatically operated with two valves, one causes the holder to be clamped to
the jig and the other releases the substrate support springs. The substrate
support springs are released by a universal flat plate, which is pushed up under
the holder. Ensure that the switches on the substrate exchange tool are set to
“holder unclamped” and “substrate clamped”. Place the holder into the substrate
exchange tool.
Warning: The holder clamp must be energised first and released last.
Operate switch to clamp the holder. Operate switch to unclamp the substrate.
Load/unload substrate. Operate switch to clamp the substrate. Operate switch to
unclamp the holder. For mask plates there is an earth clip alignment jig, which
ensures not only that the earth clips are correctly positioned but also provides a
continuity check to ensure that the clips are making contact with the
metallisation.
16.2.2.1.
Piece-part holder
The piece-part holder for the VB6 consists of a metal insert for a 6-inch mask
holder into which a sprung plate with dimensions roughly 140 x 90 mm is built.
The plate has holes at regular intervals into which substrate clips are screwed.
The height of the plate is set using three grub screws - there is no front face
reference. Normally when the sample has been mounted on the plate, a
heightmeter is used to measure the height of the front face of the substrate and
the height of the plate is adjusted so that the substrate matches the height of the
datum plate. The maximum substrate thickness, which can be used is roughly
1.2 mm.
Part Number:878275
Vectorbeam Operator Manual
Page 146
16.3.
Alignment of substrate for direct write
The substrate must be rotated so that the pattern is roughly aligned to the stage
axes if direct write is to be carried out. This is in order for the machine to be able
to place the pattern with the best accuracy and in order to find the global marks
easily (and possibly automatically).
Clamp the substrate to the table on which it sits using the small screw operated
clamps around the outside of the table. These ensure that when the table is
rotated the substrate moves with the table and does not stick to the front face
referencing points.
16.3.1.
Measuring the rotation
Place the holder on the alignment microscope, which is provided for this purpose
and clamp it into position. Focus on the pattern on the substrate. Find a feature
which is repeated across the substrate at intervals in X or Y. Move the stage in
the Y direction to the next feature and observe in the microscope whether the
second feature is shifted to the left or right relative the first (Or move the stage in
the X direction and observe in the microscope whether the second feature is
shifted up or down.). If the relative movement is more than about 3 μm per mm
distance between the two features then an adjustment to the rotation should be
made as described below.
16.3.2.
16.3.2.1.
Adjusting the rotation
VB5
Make an adjustment to the table rotation using a screwdriver on the adjusting
screw on the side of the holder. Measure the rotation of the wafer as described
above. Repeat the adjustment until the rotation is < 3 μm/mm.
16.3.2.2.
VB6
Make an adjustment to the table rotation using the thumb-screw to the side of the
substrate. Measure the rotation of the wafer as described above. Repeat the
adjustment until the rotation is < 3 μm/mm.
16.4.
Holder loading/unloading in/from airlock
Use gloves while handling the holder and substrate.
16.4.1.
VB5
Press “airlock full vent” on vacuum control panel twice in quick succession. The
green vacuum LED will go out. Wait several minutes for the airlock to reach
atmospheric pressure. Lift up the airlock lid and carefully remove the library so
as not to hit the ends of the datum plate mounts on the back of the holders
against the side. By unhooking the arm across the top of the library only the top
half of the library need be removed if desired. The holders can then be removed
or replaced by hand from the library slots.
16.4.2.
VB6 single holder airlock
Press “airlock full vent” on the vacuum control panel twice in quick succession.
The green vacuum LED will go out. Wait several minutes for the airlock to reach
atmospheric pressure. Unscrew airlock door catch, pull out the trolley until it
reaches the mechanical stop and remove or replace the holder. Figure 16.1
shows the orientation of the holder in the airlock.
Part Number:878275
Vectorbeam Operator Manual
Page 147
b
a
c
f
d
e
Airlock Door
Figure 16.1:Diagram showing orientation of holder in single-chuck airlock where ‘a’ indicates
the reference pins, ‘b’ indicates the Faraday cup, ‘c’ indicates the datum plate, ‘d’ indicates
the molybdenum block, ‘e’ indicates the origin of the stage coordinate system and ‘f’ indicates
the wafer flat although the wafer orientation can be varied.
16.4.3.
VB6 ten holder airlock
Press “airlock full vent” on the vacuum control panel twice in quick succession.
The green Pe1 LED will go out. Wait several minutes for the airlock to reach
atmospheric pressure. Make sure the holder trolley is pulled fully back from the
door against the stop, as otherwise the door will not operate. The door, up arrow
and down arrow buttons will light up when atmospheric pressure has been
reached in the airlock (The door will only open when atmospheric pressure has
been reached). The airlock can be moved to the required holder position before
opening the door using the up and down buttons without pressing any interlock
buttons. In order to move the airlock to the required holder position with the door
open, hold in the right hand green interlock button and then press the up arrow
or down arrow button until the correct holder position is shown on the dial.
Pressing the up and down buttons for a short time will nudge the airlock library to
the next position as long as the right hand interlock button is kept depressed.
Press button marked “door” to open the door.
To unload a holder, slide the empty trolley forward until it reaches the
mechanical stop. Push the lever on the trolley to the right to raise the holder off
its feet inside the airlock and with the lever in this position, slide the trolley back.
Release the lever. The holder can now be exchanged from the trolley.
To load a holder, select an empty position in the airlock, open the door, push the
lever on the trolley to the right to raise the holder and slide the trolley with the
holder forward until it reaches the mechanical stop. Release the lever and slide
the trolley back.
Close the airlock door by releasing the door button and pressing both green
interlock buttons (one on the panel next to the door button and one on the front
of the airlock).
Part Number:878275
Vectorbeam Operator Manual
Page 148
16.5.
Holder loading/unloading on/from stage
When the pressure in the airlock is low enough, holders can be transferred to /
from the stage. Figure 6.2 below shows the orientation of the holder on the stage
Main Chamber
Y axis
Mirror block East
e
Crane
X North
axi
South
West
Front
Pouch
Robot
Crane
Pouch
Laser height
sensor Diode
And direction of
laser beam
Airlock
Figure 16.2: Diagram showing the orientation of the holder on the stage.
For ultimate pattern placement accuracy and low drift it may be
necessary to wait for an hour or longer to allow the temperature of the
holder and substrate to stabilise. This time can be reduced by
matching various temperatures (See Section “Temperature control
and set up”).
Find out which positions are occupied by holders and whether the stage is in the
Load Position type:
VB_OPER> QDISPLAY AIRLOCK
The status will then be displayed in the Job Control window. In order to automate
operation with a jobfile a number of holder tracking logicals are defined by Emma
which keep track of which positions are occupied with which holder – see the
Emma Command Set manual for details (part number 878274).
16.5.1.
VB5
To transfer a substrate from one position to another enter in the job control
window:
VB_OPER>QSUBS LOAD<N>
This moves the stage to the load position first and then transfers a substrate
from the <N>th position in the airlock to the stage.
Part Number:878275
Vectorbeam Operator Manual
Page 149
The substrate is transferred back to the <N>th position in the airlock using:
VB_OPER>QSUBS UNLOAD<N>
16.5.2.
16.5.2.1.1.
VB6
Single holder airlock
To transfer a substrate from one position to another enter in the job control
window:
VB_OPER> QSUBSTRATE TRANSFER <SRC> <DEST>
This moves the stage to the load position first and then transfers a substrate
between two positions SRC source position, DEST destination. The positions
are: Airlock (AL), Front Pouch (FP), Crane Pouch (CP) and the Chamber/Stage
(CH)
16.5.2.1.2.
Ten holder airlock
The operation is the same as for the single holder airlock except that any transfer
involving the airlock must specify an airlock position between 1 and 10 as the
third parameter, e.g.:
VB_OPER> QSUBSTRATE TRANSFER AL CH 3
16.5.3.
Stopping a substrate transfer
Control Y and Control C should not be used to abort the qsubstrate transfer /
SUBX command but rather the ABORT button on the Emma Status Window
should be clicked. Remember to also click on the CONTINUE button as
instructed in the OPER window after clicking on the ABORT button. Note that in
general these buttons are dimmed, but once the qsubstrate transfer / SUBX
command has been invoked they become highlighted and available for use.
If a COM-file with a qsubstrate transfer / SUBX is running and needs to be
aborted then the procedure is:
(a) Look at the ABORT button and if it is dimmed then qsubstrate transfer /
SUBX is not currently running in the COM-file, so Control Y /C can be used to
abort the COM-file.
(b) If the ABORT button is highlighted then click on it and then click on
CONTINUE. Wait for qsubstrate transfer / SUBX to respond to clicking these
buttons and for these buttons to become dimmed. Then use control Y / C to
abort the remainder of the COM-file.
Qsubstrate transfer / SUBX responds to control Y /C and stops doing whatever it
happened to be doing, however critical that may be. The holder may be left in an
unknown position and require the system to be vented to be recovered. The
Abort button is less drastic and the qsubstrate transfer / SUBX code checks the
Abort button at uncritical points in the code.
Control Y / C when directed at the COM file allows the current command to
complete and then terminates the COM-file.
16.5.4.
Holder initialisation / sequence
When the holder has been loaded onto the stage, the holder sequence should
be run for that particular holder (See Sections “Holder parameters”, “Setting up
Part Number:878275
Vectorbeam Operator Manual
Page 150
the holder parameters” and “Holder position table ‘caspos’” first).
VB_OPER> H 3
The sequence:
• Defines the positions for the Focus Mark FM, the Faraday Cup FC, the
Gun Target GT, the Datum Point DP, the Fine Focus Mark FFS, the
centre of the substrate, the substrate size and the substrate height meter
table
• Initialises the stage and switches to stage mode absolute
• Calibrates the height meter on the substrate
• Locates the Focus Mark FM and sets the datum offset
• Calibrates the height meter on the datum plate
16.5.5.
Holder parameters
The holder parameters for all holders in use on a machine are kept in the file
Holder_table.com. The file should be edited when using a new holder or when
switching to a new focus mark because the old one is contaminated.
16.5.5.1.
Standard holder parameters for VB5
Holder type
FM position
(mm)
FC position
(mm)
GT position
(mm)
2 inch wafer
3±3 78±3
4±3 78±3
3±3 78±3
3 inch wafer
3±3 78±3
4±3 78±3
3±3 78±3
4 inch wafer
3±3 78±3
4±3 78±3
3±3 78±3
5 inch wafer
3±3 78±3
4±3 78±3
3±3 78±3
6 inch wafer
3±3 78±3
4±3 78±3
3±3 78±3
3inch mask
3±3 78±3
4±3 78±3
3±3 78±3
4 inch mask
3±3 78±3
4±3 78±3
3±3 78±3
5 inch mask
3±3 78±3
4±3 78±3
3±3 78±3
6 inch mask
3±3 78±3
4±3 78±3
3±3 78±3
Part Number:878275
Substrate centre
position (mm)
Vectorbeam Operator Manual
Page 151
16.5.5.2.
Standard holder parameters for VB6
Holder type
FM
position
(mm)
FC
position
(mm)
GT
position
(mm)
Substrate
centre position
(mm)
Transmission
sample
3 inch wafer
78±3 8±2
149±1 6±1
78±3 8±2
Low: 42 60
135±1 6±1
High: 118 130
4 inch wafer
78±3 8±2
149±1 6±1
78±3 8±2
76.5 70
135±1 6±1
5 inch wafer
78±3 8±2
149±1 6±1
78±3 8±2
76.5 80
135±1 6±1
6 inch wafer
78±3 8±2
149±1 6±1
78±3 8±2
76.5 90.5
135±1 6±1
8 inch wafer
7±2 7±2
149±1 6±1
7±2 7±2
76.5 90.5
3inch mask
78±3 8±2
149±1 6±1
78±3 8±2
76.5 63
4 inch mask
78±3 8±2
149±1 6±1
78±3 8±2
76.5 75
135±1 6±1
5 inch mask
78±3 8±2
149±1 6±1
78±3 8±2
76.5 88
135±1 6±1
6 inch mask
78±3 8±2
149±1 6±1
78±3 8±2
76.5 90.5
135±1 6±1
16.5.5.3.
Brooks holder parameters for VB6
Holder type
FM
position
(mm)
FC
position
(mm)
GT
position
(mm)
Substrate
centre position
(mm)
Transmission
sample
5 inch wafer
electrostatic
25±3 4±2
149±1 6±1
25±3 4±2
76.5 90.5
2±1 19±1
6 inch wafer
mechanical
25±3 4±2
149±1 6±1
25±3 4±2
76.5 90.5
135±1 6±1
6 inch wafer
electrostatic
25±3 4±2
149±1 6±1
25±3 4±2
76.5 90.5
2±1 19±1
16.5.6.
Setting up the holder parameters
The positions in the tables above are a rough guide to positions, which must be
entered for each holder in the file holder_table.com in [vb.seq]. To find the
positions for each holder:
1. Load the holder
2. Remove any datum offset by typing:
VB_OPER>mvhm
3. Type :
VB_OPER>mvpo x y
Part Number:878275
Vectorbeam Operator Manual
Page 152
Where x y is the approximate position of FM
4. Switch on SEM mode and using the joystick position the FM mark in
the centre of the screen (see Figure 16.3).
5. Make a note of the position and enter this into the appropriate
position in [vb.seq]holder_table.com under the entry for the particular
holder.
6. Repeat points 3 to 5 for GT, which should be set to any large bright
area of metal (see Figure 16.4).
7. Repeat points 3 to 5 for the marks DP and FFS if they are required.
For VB5s, as the Faraday cup is on the holder, the FC position must
be set up and entered in holder_table.com for each holder.
For VB6s, as the Faraday cup is mounted on the superplate, the FC
position must be defined once only in holder_table.com, in a position
where it will be set whenever a holder is initialised. On a VB6, in order
to see the FC in SEM mode the video gain must be increased and the
SEM magnification decreased to minimum.
Figure 16.3: Photo showing SEM monitor with image of 10 um octagon (FM).
Figure 16.4: Photo showing SEM monitor with image of gun target (GT).
16.5.7.
Datum target layout
The datum target layouts for the various holders are shown below.
Part Number:878275
Vectorbeam Operator Manual
Page 153
16.5.7.1.
VB5
Figure 16.5: VB5 datum target
16.5.7.2.
VB6 excluding 8 inch wafer and scalpel mask holders
Figure 16.6: VB6 datum target
Part Number:878275
Vectorbeam Operator Manual
Page 154
16.5.7.3.
VB6 8 inch wafer and scalpel mask holders
Figure 16.7: VB6 datum target for 8-inch wafer and scalpel holders
16.5.7.4.
Detail of datum marks
Figure 16.8: Detail of datum marks.
16.5.8.
Datum mark contamination
When a mark on the datum is scanned, the electron beam breaks up molecules
of hydrocarbons that are physi-sorbed and mobile on the surface of the datum
plate to form a solid with a high carbon content. In time this deposit affects the
backscattered electrons and becomes visible in the SEM image (see Figure
16.9). It reduces the apparent edge sharpness making calibration and the
adjustment of focus and stigmation less accurate. A simple way to quantify and
monitor this effect is to run the beam diameter measurements with a small
enough beam current so that the result is dominated by the edge sharpness
rather than the spot size. The edge sharpness for all edges should be < 100 nm.
If this is not the case then another mark should be found and defined in the
holder table. Since the horizontal and vertical edges are used for mainfield
calibrations they contaminate more quickly and another indication of
contaminated FM mark is a larger measured diameter on the horizontal and
vertical edges than on the diagonal edges.
Part Number:878275
Vectorbeam Operator Manual
Page 155
Figure 16.9: Contaminated datum mark that should not be used for calibration any longer..
16.5.9.
Holder position table “caspos”
The jobfile caspos.com maintains a 10-position table of holder numbers to give
users a shortcut way of calling the holder initialisation program using the symbol
“H”.
For example for a VB5, the holder number in caspos table position 4 is initialised
by:
VB_OPER>H 4
For a VB6
VB_OPER>H C4
The symbol H is defined as @ VB$SEQ:holder_init. This command file calls the
file caspos.com, which in turn calls the file holder_table.com with the holder
name specified in the caspos table. Therefore holder_table.com must contain the
necessary information about the particular holder to be initialised.
Note that for a VB6, “H” with no C prefix before the holder number calls
holder_init.com, which calls holder_table.com directly and therefore the holder
number must be specified directly.
VB_OPER>H H_0047
The “qdisplay air” command types up a table showing the occupancy of the
airlock positions and on a VB6 with a bar code reader, the table contains the
numbers of the holders in the various airlock positions. However the caspos
table positions are not automatically updated when holders are loaded and
unloaded but this must be done manually if it desired to keep track of which
holder is in which library slot. VB5 and VB6-with-10-chuck-airlock users may it
useful to change the table to keep track of which holder is in which library slot but
this is not necessary. To view the table type:
VB_OPER> caspos
Part Number:878275
Vectorbeam Operator Manual
Page 156
To enter a holder number ### into the table at position #:
VB_OPER:> caspos # H_###
To save the current table to file:
VB_OPER> caspos save
To load the file into table in memory:
VB_OPER> caspos restore
To initialise a holder in table position # (equivalent to H #):
VB_OPER> caspos #
Part Number:878275
Vectorbeam Operator Manual
Page 157
17.
Job-specific machine set-ups
17.1.
Gun alignment
The gun alignment coils are positioned between lens 1 and lens 2 and are used
to adjust both the position the beam from the optic axis and the angle of the
beam to the axis. Correct gun alignment is when wobbling lens 1 and lens 2
produces the minimum change in the observed image position. This corresponds
to the beam passing into lens 2 on axis and parallel to the axis.
17.1.1.
Coarse gun alignment HR and UHR final lens
Coarse gun alignment is required when no SEM image can be obtained.
The procedure is as follows:
1. Load a holder and move to the datum plate - preferably the gun target
area.
VB_OPER> MVSP GT
If the location of the datum plate is not known accurately enough then load
the autostitch plate in a holder and move to the centre of the plate.
2. Select SEM scanning mode:
VB_OPER> SSEM
3. Set Emission Image by clicking in the box on the set gun aligner panel.
(See Figure 7.8).
4. Find the beam by changing tilt and shift on the set gun aligner panel (See
Figure 7.8)
5. Turn Emission Image off by clicking in the box on the set gun aligner
panel.
6. Adjust tilt and shift until the beam is brightest. Disable the auto gain and
auto contrast on the soft front panel, adjust the tilt and shift to increase the
brightness of the SEM image, enable the auto gain to bring the video level
back down. Repeat as necessary. When it is no longer to possible
increase the brightness of the SEM image, the alignment is correct (DO
NOT ALTER THE LENS SETTINGS).
17.1.2.
Fine gun alignment
Fine gun alignment may be required if an SEM image can be obtained (a beam
is already reaching the substrate) but the interval since the last adjustment has
been long enough that drift is significant. Alignment will most likely be necessary
after mechanical work on the column. If the gun alignment is accurately set up,
the same settings can be used for a large range of beam currents.
17.1.2.1.
Fine gun alignment with HR lens
The following manual routine for aligning the gun should be used on machines
with an HR final lens rather than the automatic routine:
Part Number:878275
Vectorbeam Operator Manual
Page 158
1. Align the final aperture using an intermediate beam current.
2. Set up either the largest current, which gives a useable image of the
calibration mark or just the largest current, at which the machine will be
operated. This is because the gun alignment is more sensitive at high
currents and the high current settings can be used at low currents but not
vice versa. The largest current is typically > 200 nA for a 400 um aperture.
Set up the focus and stigmation manually. Use any gun alignment settings
to maximise the current approximately.
3. Observe the SEM image of the datum mark and adjust the magnification
so that the mark covers more than half of the screen. Locate the mark and
move to its position so it is centred on screen.
4. Bring up both the lens adjustment panel and the gun aligner panel in
Emma under "set" menu.
5. Select the lens 2 setting and with the mouse button held down wobble the
lens 2 setting and observe the image. The image should remain at the
same position within a few microns for lens 2 settings, which still give a
recognisable octagon. Return lens 2 to its starting point.
6. If the image moves significantly note the direction of movement while
increasing the lens 2 setting. Make an adjustment to the gun alignment
shift x and shift y settings so as to move the image a few microns in the
same direction.
7. Adjust the gun alignment tilt x and tilt y settings in order to roughly
maximise the brightness of the SEM image.
8. Repeat from step 5 until the shift x and shift y settings have been found
which give no large movement of the image when lens 2 is varied. The
shift x and shift y settings should not be changed after this step.
9. In order to accurately set up the tilt x and tilt y, move to the Faraday cup
and use the measure_curdis.exe program to measure to current
distribution over the field.
VB_OPER>MEASURE_CURDIS 400 1.00 (for VB5)
VB_OPER>MEASURE_CURDIS 400 1.75 (for VB6)
10.Use the calc_curdis.exe program to display the results.
VB_OPER>CALCULATE_CURDIS 400
11.Adjust the gun alignment tilt x and tilt y settings. Instead of using the
sliders, use the command “dgun” to find the current settings and then use
the command “sgun” to apply small changes to the settings.
12.Repeat from step 8 until the tilt settings have been found which give the
best current distribution.
13.These gun alignment settings should be optimum for all beam currents
less than the one that has been used for the set up.
14.Note that the mainfield distortions may need calibrating after adjusting the
gun alignment
Part Number:878275
Vectorbeam Operator Manual
Page 159
17.1.2.2.
Fine gun alignment with UHR lens
Since the final aperture is between lenses 2 and 3 on UHR systems, instead of
between the pole pieces of lens 3, the beam moves relative to the aperture by
relatively large distances when the gun alignment is changed and may be cut off
altogether. Therefore the alignment procedure is done initially without any final
aperture. Another consequence of having the final aperture between lenses 2
and 3 is that the optimum final aperture position can depend on the gun
alignment settings. The goal of the alignment is to enable the beam current to be
changed (using appropriate lens 1 and lens 2 settings as usual) without requiring
the aperture to be realigned. The following procedure should be followed:
1. Make sure the FC position is accurate.
2. Move to FM
3. Remove the final aperture from the beam. On version 1 of the
aperture control mechanism this is done by winding in the Right
Hand dial fully clockwise. This should move to a position where the
aperture plate is completely out of the way. On version 2 of the
aperture control mechanism, move to the largest available aperture,
or to an empty hole if one is available.
4. Slowly increase the Beam current to maximum. Do this by adjusting
lens 1 and lens 2 while all the while aligning the column ONLY
USING THE TILTS (do not touch the shifts at this time). A maximum
beam current of between 300nA - 500nA should be possible. It is
possible at this point to move to the Faraday cup (position identifier
FC) and measure the beam current to find the optimum TILT
positions that give maximum current. Experience has shown that a
lens 2 value of 0.3 gives a fairly focused beam at the maximum
current, so start by setting this and then adjusting lens 1 and the tilts.
5. Once happy the tilts are set, lower the beam current to around 5nA.
6. Reduce the SEM magnification so the image is small on the monitor
by using about X500.
7. Slowly reduce the lens 2 current to 0 while keeping the image on the
SEM monitor. The image will become blurred.
8. This time ONLY USING THE SHIFTS (do not touch the tilts) adjust
the sliders from minimum to maximum and note the slider values at
which point the image starts to disappear. This is the point at which
the beam clips the lens 2 aperture.
9. Set the slider to the centre of these clipped points, this should be the
centre of the aperture. Do this for both X and Y SHIFT sliders. The
image should now be in the centre of the monitor.
10. Increase the lens 2 until the image again becomes focused. The
image SHOULD NOT MOVE. If it does the SHIFT sliders have not
been set correctly and will need adjusting until image movement is
minimal - less than 10nm in X and Y.
11. Now the SHIFTS have been set DO NOT TOUCH THEM.
12. Moving the SHIFTS will have changed the TILT positions for
maximum current so this step will have to be done again.
Part Number:878275
Vectorbeam Operator Manual
Page 160
13. Once the maximum current has again been found by ONLY
ADJUSTING THE TILTS the upper column should now be aligned.
14. It is now just a case of introducing the required final aperture and
aligning it as described in the Section “Final aperture alignment”.
The procedure above should align the column reasonably well. In order to get
the ultimate performance the following further setup should be done to minimise
the change in aperture position with beam current:
1. Find the pairs of lens 1 and lens 2 values which give 1nA and 10nA
beams.
2. Set the 10nA beam, and align the aperture.
3. Change to 1nA beam. Run the align_apert routine, but do not
change the aperture position. Stop the routine after a few
measurements. If the above procedure has been followed, then the
alignment error should be <100nm. You can adjust the shifts a little
to reduce this further.
4. If the X error is negative on going from high to low current, then the X
SHIFT should be adjusted POSITIVE.
5. If the Y error is negative on going from high to low current, then the Y
SHIFT should be adjusted NEGATIVE.
6. Changing the shifts by 0.01 changes the error by about 50nm, so the
changes are quite small.
17.1.3.
Automatic
The Emma command “qadjust gun” was intended to do an automatic gun
alignment but does not work properly. The manual procedures described above
should be used instead.
17.1.4.
Setups affected by gun alignment
Changing the gun alignment will change:
17.2.
•
The focus and stigmation corrections and the mainfield distortion
corrections, which should be recalibrated using fullcal.
•
The shift for fine focus coefficients, which should be recalibrated
using fullcal or jobcal.
•
The stigmator balance, which should be adjusted as described in the
Section “Stigmator balance setup”.
Video gain and backoff set up
The video gain and backoff settings are applied to the signal from the
backscattered electron detectors before being passed to the SEM monitor and
the mark-locate electronics. Mark locate, beam diameter measurements and
automatic focus and stigmation adjustment all require the video gain and backoff
to be set up. The gain affects the brightness. The backoff (often called black
level on other systems) affects the contrast and should be set so that scanning a
mark produces a variation in video signal of at least about 20 % of the total
Part Number:878275
Vectorbeam Operator Manual
Page 161
range. Increasing the contrast further does not usually give significant gains in
accuracy.
The gain and backoff should be set so that all measured points are within the
maximum and minimum limits of the video system. The video signal levels can
be viewed by selecting “graph” in the Set Image panel (Figure 7.4) and for bright
marks the background should be at about 10% of the range above zero or higher
and the mark level should be about 10% of the range below the maximum or
lower. (For dark marks the mark level will low and the background will be high).
Marks with low inherent contrast may not produce the 10% and 90% video levels
for any gain and backoff settings. The video signal may saturate at lower backoff
levels. Saturation is characterised by the lack of noise in the video signal even
with the minimum amount of signal averaging. Set the gain and backoff to give
the maximum contrast without saturation.
When executing a jobcal or a fullcal both the gain and the backoff are set
automatically to give a contrast level of about 70% on the calibration mark. In
other cases and especially when aligning to marks on substrates, as required for
direct write or measuring stitch acceptance tests, the gain level can be adjusted
automatically but the backoff level needs to adjusted manually.
17.2.1.
Manual gain and backoff adjustment
Move the gain and backoff sliders in the Set Video Level panel (Figure 7.9) or
define values directly in the command:
VB_OPER>qset video/gain=0.3/backoff=0.8
17.2.2.
17.2.2.1.
Automatic gain and backoff adjustment
HR machines
There are two functions that automatically adjust the gain called “peak” and
“mean”. There is no function to automatically adjust the backoff.
The video gain can be switched into automatic adjustment mode by typing:
VB_OPER> VID_P
This command switches the machine into SEM mode and selects the automatic
peak level adjustment using the command:
VB_OPER>qset video/vmode=peak/mark=0.8
This command is the same as selecting the peak switch in the Set Video Level
panel (Figure 7.9). Auto peak level will adjust the gain until the peak video level
reaches the value set either in the Set Video Level panel or by the “mark”
command option (usually about 70%-80%). The final level will be affected by the
amount of noise in the signal.
Alternatively, the video gain can be automatically adjusted by switching into SEM
mode and selecting the video mean switch in the Set Video Level panel (Figure
7.9) or by using the command:
VB_OPER>qset video/vmode=mean/bckgrd=0.2
Auto mean level will adjust the gain until the median video level reaches the
value set either in the Set Video Level panel or by the “bckgrd” command option.
This is usually set to about 20-30% for bright marks when the SEM magnification
is such that the background dominates the area on the monitor. The final level is
not affected so much by noise in the signal but does depend strongly on the
Part Number:878275
Vectorbeam Operator Manual
Page 162
SEM magnification. When running automatic mark searches that also do video
adjustments, the SEM magnification will need to be set low enough to ensure
that marks are still in the field of view even if they are not exactly on axis.
By typing:
VB_OPER> VID_H
the automatic video level will be switched off and the manual gain level is set to
that last found by the automatic video level adjustment.
The backoff will need to be manually set to achieve a background level of around
10% or higher.
17.2.2.2.
UHR machines
There is one function that automatically adjusts the gain and backoff together
called “peak”.
The video gain and backoff can be switched into automatic adjustment mode by
typing:
VB_OPER> VID_P
This command switches the machine into SEM mode and selects the automatic
peak level adjustment using the command:
VB_OPER>qset video/vmode=peak/mark=0.8
This command is the same as selecting the peak switch in the Set Video Level
panel (Figure 7.9). Auto peak level will adjust the gain until the peak video level
reaches the value set either in the Set Video Level panel next to the “peak”
option or by the “mark” command option (usually about 70%-80%). It also adjusts
the backoff until the background video level reaches the value set either in the
Set Video Level panel next to the “mean” option or by the “bckgrd” command
option.
17.2.3.
Video Calibration for UHR machines
Machines with a UHR final lens have a silicon 4-quadrant PN-junction
backscattered-electron detector and a video amplifier with 4 coarse gain ranges.
The video amplifier has the complication that it is necessary to adjust the backoff
level as the gain changes. To facilitate rapid changes to gain during routine
operation, an automatic calibration procedure must be run initially that measures
and saves the backoff settings at each of the 4 coarse gain ranges. The
automatic video calibration procedure should be done whenever the beam
current is changed as follows:
With the beam current at the required value, type
VB_OPER>VID_CAL
This moves the stage to the Focus Mark and runs through a sequence of video
measurements. The procedure takes a few minutes and reports when
completed. Once this has been done, a 'QSET VIDEO' command causes the
automatic backoff-tracking software to find an appropriate BACKOFF setting for
the coarse gain range that is in use.
Part Number:878275
Vectorbeam Operator Manual
Page 163
17.3.
Final aperture
A range of final aperture sizes is fitted to the aperture blade. On HR machines
these are typically 200, 300, 400 and 750 μm in size. Due to the position of the
aperture mechanism in the column, the aperture sizes fitted to UHR machines
are 4.7 times smaller than those fitted to HR machines for the same beam
divergence.
17.3.1.
Final aperture selection
See Section “Theoretical tables of beam diameters and beam currents” to
choose the best aperture size for the job.
17.3.1.1.
Manual aperture adjustment mechanism
The final aperture size is selected by moving the aperture blade using the
aperture positioning knobs. The aperture positioning knobs are on the side of the
chamber on HR machines and on the side of the column on UHR machines.
There are four aperture positions on a VB5 and six aperture positions on a VB6
(both HR and UHR).
17.3.1.2.
Automatic aperture adjustment mechanism
The final aperture size may be selected using the command:
VB_OPER>aperture move / num=<number between 1 and 16>
Where the number is a stored preset position.
17.3.2.
Final aperture alignment
The final aperture must be aligned to the optical axis of the Final Lens (lens 3) to
obtain the best resolution. When the aperture is not aligned the smallest spot
size will not be obtained and the position of the beam on the stage will vary with
the Final Lens current. Aligning the aperture is done by varying the current in the
Final Lens around its nominal value and observing and minimising the movement
of a feature on the stage. (Do NOT use QSET WOBBLE ON FFOCUS as this will
align the aperture to the fine focus coil.)
17.3.2.1.
Manual aperture adjustment mechanism
A program has been written to automate this procedure. Move to an alignment
mark and type:
VB_OPER>@VB$SEQ:ALIGN_APERTURE.COM 15 FM FM 0.005
The program measures the mark position at two Final Lens currents and displays
the difference in the positions. Observe the output on the screen and make
adjustments to the aperture positioning knobs until the difference is smaller than
the limit defined on the command line (15 nm).
17.3.2.2.
Automatic aperture adjustment mechanism
A program has been written to automate this procedure. Move to an alignment
mark and type:
VB_OPER>@VB$SEQ:ALIGN_APERTURE.COM 15 FM FM 0.005
The program measures the mark position at two Final Lens currents and displays
the difference in the positions. The aperture positioning will be done
automatically until the difference is smaller than the limit defined on the
command line (15 nm).
Part Number:878275
Vectorbeam Operator Manual
Page 164
17.3.3.
17.3.3.1.
Defining the aperture adjustment mechanism positions
Manual aperture adjustment mechanism
On HR machines the aperture selected can be read from a scale next to the left
knob. On UHR machines the aperture selected and the position can be read
from the micrometers.
17.3.3.2.
Automatic aperture adjustment mechanism
1. Using a combination of the move commands i.e.:
VB_OPER> aperture move [/abs] <position_x> <position_y>
and
VB_OPER> aperture move /rel <distance_x> and <distance_y>
Move the aperture blade to approximately centre an aperture. The distance
between apertures is about 1600 and a move in the positive direction
corresponds to moving from a high number to a low number aperture.
2. Align the aperture, as described above.
3. Store the current position as a present using the command:
VB_OPER> aperture set <number between 1 and 16>
4. The current position and status can be displayed using:
VB_OPER>aperture display
5. The current position, status and all preset positions can be displayed using:
VB_OPER>aperture display / all
17.3.4.
Controlling the automatic aperture adjustment mechanism
1. To initialise (set-up, home and return to last good position) type:
VB_OPER> aperture init
2. To reset initialisation sequences to factory defaults (loses last good position)
type:
VB_OPER> aperture _reset
3. To home axes but not return to stored position type:
VB_OPER> aperture _home
4. To send command direct to controller and view responses type:
VB_OPER> aperture _com “<command>”
Part Number:878275
Vectorbeam Operator Manual
Page 165
17.4.
Focusing the beam
The focus of the beam on the substrate depends on all the settings of all 3
lenses, the fine focus and the height of the substrate. However there is only
correct focus setup consisting of the following:
1. lens 1 is set to give the required beam current
2. lens 2 is set to give conjugate blanking
3. lens 3 is set to focus the beam on a substrate for which height meter
reads 0 um
4. the fine focus is set to take any substrate height deviations from 0 um
into account.
All the procedures to focus the beam described in this section deal with obtaining
the correct lens 2 (C2) value and corresponding fine focus values. Focusing is
carried out by varying the current in lens 2 (C2) and this must give the
appropriate fine focus values for the substrate height. If the beam current has
been changed by adjusting lens 1 or if the fine focus value is not correct then
lens 2 must be adjusted.
The lens 1 (C1) setup must have already been carried out and is dealt with in the
section “Beam current adjustment” in this chapter. The lens 3 (C3) setup must
have already been carried out and is dealt with in the section “Conjugate
blanking setup” in Chapter “Machine setups”. The final aperture should be
aligned and the stigmator balance should be set up before finding the best fine
focus and stigmation values.
Once the beam has been focused using the procedures described here, the
focus on a substrate during exposure is maintained. During jobcal a fine focus
setting and a height meter reading are obtained from the calibration mark and
are saved as a point of reference (by the qcal main command). During pattern
exposure a height meter reading is taken after every stage move and the fine
focus is adjusted based on a known relationship (focus for height calibration) so
that the pattern remains in focus over the entire substrate. The substrate surface
should normally be within +/- 10 µm.
17.4.1.
Manual focus and stigmation adjustment
A manual focus and stigmation adjustment is carried out as follows:
17.4.1.1.
Manual lens 2 (C2) adjustment
Note that when the lens 2 value has been reduced, the current automatically is
set to zero then back to the correct value to ensure that the magnetisation of the
lens is always the same in spite of the hysteresis of the pole pieces. This takes
about 3 seconds.
17.4.1.1.1.
Coarse adjustment
1. Move a feature such as the calibration mark under the lens and select SEM
mode.
2. Set the fine focus value to the value described in the Section “Correct fine
focus value on datum for conjugate blanking”.
3. Adjust lens 2 to bring the feature in focus. This can be done either:
Part Number:878275
Vectorbeam Operator Manual
Page 166
17.4.1.1.2.
•
by using the slider bar in the “lens” panel under the “Set” menu of the
Emma status window, or,
•
by reading the actual lens setting using the command “dln2” and
setting a modified value using the command “sln2 value”.
Fine adjustment
1. Move a feature such as the calibration mark FM under the lens and select
SEM mode.
2. Calculate the required fine focus value, as described in the Section “Correct
fine focus value on datum for conjugate blanking”.
3. Find the fine focus value that actually focuses the beam on the substrate.
4. Adjust lens 2 to eliminate the difference in the fine focus values found in steps
2 and 3 above. Read the actual lens 2 setting using the command “dln2” and set
a modified value using the command “sln2 value”. The direction of change of
lens 2 is then as follows:
•
To reduce the fine focus value that will be needed to focus the beam,
increase the current in lens 2.
•
To increase the fine focus value that is needed to focus the beam,
decrease the current in lens 2.
5. Repeat from step 3 until the difference is within the range described in the
Section “Correct fine focus value on datum for conjugate blanking”.
17.4.1.2.
Manual fine focus and stigmation adjustment
Normally the automatic fine focus and stigmation adjustment will give more
accurate results in less time and so should be used instead of this manual
adjustment.
1. Move a feature, such as the calibration mark, under the lens and select
SEM mode.
2. Adjust the sliders for the fine focus and stigmation to obtain the sharpest
image.
If the fine focus is outside the range described in the Section “Correct fine focus
value on datum for conjugate blanking” then lens 2 (C2) adjustment must be
carried out.
17.4.2.
17.4.2.1.
Automatic focus and stigmation adjustment
Automatic lens 2 (C2) adjustment
Automatic lens 2 adjustment is only possible if the spot table has been
calibrated. If the beam current or spot size has been changed by using either the
“QSET CURRENT” or “QSET DIAMETER” commands the lenses 1 and 2 will be
set up automatically based on the spot table calibration.
If the spot table has not been calibrated then use the manual lens 2 adjustment.
17.4.2.2.
Automatic fine focus adjustment
The “qcal focus” command only uses 1 edge of a mark for adjusting the fine
focus and so unless the stigmation is accurate will not give the correct result.
Therefore use the automatic stigmation adjustment instead, as described in the
Part Number:878275
Vectorbeam Operator Manual
Page 167
following section, unless there is a reason for not doing so (e.g. the spot
roundness is not important but speed is).
An automatic focus adjustment is carried out as follows:
1. Adjust the gain and backoff as described in the section “Video gain and
backoff setup”.
2. If jobcal has not been run since the pattern generator was last rebooted it
might be necessary to set the focus and stigmation algorithm step size
parameter:
VB_OPER>QSET REG 3 17 0.04
And set the focus and stigmation algorithm range parameter:
VB_OPER>QSET REG 3 18 0.4
3. Run the automatic focus adjustment, specifying the mark type (e.g. FM):
VB_OPER>QCAL FOC FM
/DACPOS=3/ACC=0.005/FILT=8/POINTS=8/SCANLENGTH=0.5/LINES
=1
17.4.2.3.
Automatic fine focus and stigmation adjustment
An automatic fine focus and stigmation adjustment is carried out as follows:
1. Adjust the gain and backoff as described in the section “Video gain and
backoff setup”.
2. If jobcal has not been run since the pattern generator was last rebooted it
might be necessary to set the focus and stigmation algorithm step size
parameter:
VB_OPER>QSET REG 3 17 0.04
And set the focus and stigmation algorithm range parameter:
VB_OPER>QSET REG 3 18 0.4
3. Run the automatic stigmation adjustment, specifying the mark type (e.g.
FM):
VB_OPER>QCAL STIG FM
/DACPOS=3/ACC=0.005/FILT=8/POINTS=8/SCANLENGTH=0.5/LINES
=1
This command finds the optimum fine focus and stigmation settings by scanning
the beam across the mark edges and measuring mark edge slope for a range of
settings. The maximum mark edge slope corresponds to the best focus. By
measuring 4 edges at 0, 45, 90 and 135° the stigmator settings are also found.
When the adjustment has finished the results and some statistics are typed on
screen. A description of how the statistics are generated is in the chapter
“Calibration”.
The parameters filter, lines and points to be supplied with the command set the
amount of signal averaging. The optimum amount of averaging for accurate
results is that which results in a repeatability within about +/- 0.0015 fine focus
units. The optimum amount of averaging will vary with beam current, beam
Part Number:878275
Vectorbeam Operator Manual
Page 168
energy and mark contrast.
This automatic fine focus and stigmation adjustment is carried out when jobcal or
fullcal are run. If the fine focus setting after automatic adjustment is outside the
range described in the Section “Correct fine focus value on datum for conjugate
blanking” then lens 2 must be adjusted.
17.4.3.
Debugging problems with automatic focus/stigmation
adjustment
To check and setup the correct operation and parameters for the focus and stig
routines login to the DCP. Type:
->G_Focus = 3
When an automatic focus and stigmation adjustment is run, a plot of “Focus
score” vs. “Focus Value” is drawn as shown below.
Focus waveform centred on -0.103699:
FS : Focus Score - FV : Focus value
Scanning over focus range -0.303699 to 0.096301
FS =24346.000 FV = -0.304. -------------------------------|
FS =45807.000 FV = -0.104. ---------------------------------------------|
FS =23443.000 FV = 0.096. ------------------------------|
Best focus = -0.105759
Iteration 1: Prev val = -0.103699, New val = -0.105759
Focus score is used to determine best focus. The higher the focus score value
the better the focus. The idea is to achieve a good looking peak through
selection of marks and parameters.
Setting G_Debug = 1 will show the accuracy of focus and stigmation values
achieved during each iteration. This can be used after setting the parameters
and tweaking them for optimum repeatability and speed.
NOTE: When finished, make certain all debug modes are disabled by setting
them back to zero. e.g. G_Focus=0 G_Debug = 0.
17.4.4.
Correct fine focus value on datum for conjugate blanking
The fine focus value after focusing on the datum mark must be correct to
maintain conjugate blanking and should be:
Height meter reading x focus-for-height coefficient +/- 0.012 (Equation
17.1)
The focus-for-height coefficient is a negative number and can be read from the
“Sensitivity” panel option in the “Display” menu in the Emma status window. On
18-bit and 20-bit systems it can also be displayed by typing:
VB_OPER>qdisplay reg 3 48
When carrying out a fine focus (and stigmation) adjustment on the datum to
determine whether the fine focus setting is correct for conjugate blanking, any
focus offset due to the last “qadjust field” command must be zeroed. See
following sections for further understanding of this. The focus offset due to any
previous “qadjust field” command is done by issuing the following command:
VB_OPER> qcal main fm/load
Part Number:878275
Vectorbeam Operator Manual
Page 169
This command does not carry out any calibration but simply loads the existing
values and zeroes the focus offset due to the “qadjust field” command.
17.4.5.
qadjust field
The machine will set the focus based on the height meter reading and the focus
for height coefficient when the following command is issued:
VB_OPER> QADJUST FIELD
The amount of fine focus applied due to height difference =
(current height - height recorded at last qcal main) * focus for height coefficient
(Equation 17.2)
It is important that this command is performed before mark locates are to be
performed at a particular position. If the stage position is one where the height
sensor will not operate then the command should either be performed at a
location known to be at a similar height, or a the QADJUST FIELD /HEIGHT= n
form should be used to set the height to the required value.
17.4.6.
How the fine focus setting and adjust field combine to drive
the fine focus
The drive to the fine focus coil is shown schematically in figure 17.1 and is the
sum of:
1. The fine focus setting shown in Emma
2. The value required to compensate for any height difference between
the current position and the reference height recorded at the last
calibration of the main field.
MUP
Focus correction
for height
Focus correction
for Scan Deflection
+
Autofocus
Fine Focus
+
Manual set Finefocus
Lens C3
Figure 17.1: Schematic of fine focus control
Notice that the fine focus setting shown in Emma never changes after afld. The
fine focus setting is only changed when an automatic focus or stigmation
adjustment is carried out. Unlike DLN3 /read, DFOC /read does not show the
actual fine focus current, therefore it is not possible to observe the above
summation.
Part Number:878275
Vectorbeam Operator Manual
Page 170
If it is necessary to expose a focus matrix, all that is required is to
issue the command qset focus ... before each exposure. The fine
focus value should be varied over a suitable range around the value
found at the calibration mark.
17.5.
Beam current measurement
To measure the beam current move the stage to the Faraday cup, select “Beam
on” in the Status Window and enter in the Job Control Window:
VB_OPER>QDISPLAY CURRENT
The beam current will be displayed in the Job Control Window.
A program has been written to carry out these operations. Enter in the Job
Control Window:
VB_OPER>MEA_C
17.6.
Beam diameter measurement
17.6.1.
Background
The beam diameter (full width half maximum) can be measured directly by
scanning the beam across a sharp edge of a feature and noting the distance
between the points at which the detector signal is at 12% and at 88% of the
maximum. A “sharp” edge means one that has a length significantly smaller than
the beam diameter to be measured.
Some of the sharpest edges, which can be made practically, are produced by
anisotropically etching silicon. These may have an edge sharpness of < 20 nm.
By comparison, the best edge sharpness of the metal calibration marks is around
30 nm. If the beam diameter to be measured is similar to the edge sharpness,
the edge sharpness will make a significant contribution to the measured diameter
and the result will not be accurate. This problem can be alleviated by making use
of the fact that the directly measured diameter is the quadrature sum of the
actual diameter and the edge sharpness. If the edge sharpness is known, the
beam diameter can be calculated as follows:
d b = d m2 − d e2 − d n2
where db is the beam diameter, d m is the measured diameter, d e is the edge
sharpness and d n is the noise on the beam position (assumed to be negligible
here).
17.6.2.
Display diameter
The function “qdisplay diameter” measures the beam diameter by the above
method. The distance between the 30% and 70% levels is noted and a factor is
used to give the diameter corresponding to Full Width Half Maximum.
The output shows the direct measurement for each individual edge, the average
Part Number:878275
Vectorbeam Operator Manual
Page 171
of these measurements (uncorrected) and the average of these measurements
corrected for the edge sharpness (corrected).
The parameters FILT, POINT and LINESCANS must be chosen to be large
enough so that noise on the signal does not make the measurement inaccurate.
17.6.2.1.
Measure diameter using metal calibration mark
Measuring the diameter on the calibration mark is relatively quick, can be done
automatically and can be done on any holder. It is limited to spot sizes above
about 30 nm.
1. Move stage to the 10 µm octagonal calibration mark.
2. With a 16-bit pattern generator in order to be able to scan the beam in
small steps to measure the smallest spot sizes more accurately the
pattern generator resolution should be set to a small value. Set the
maximum fieldsize to e.g. 0.16384 mm:
VB_OPER> FLD 0.16384
For the 18-bit and 20-bit pattern generators this is not necessary.
3. Switch to SEM mode and graph mode.
4. Adjust gain and backoff so that the signal from the mark is a little below
the maximum level and the signal from the background is a little above the
zero level.
5. Adjust the focus and stigmation.
6. Type :
VB_OPER>QDISPLAY DIA FM / ALL / LINELENGTH=2 / EDGE=5 /
FILT=16 / POINT=8 / LINESCANS=1
17.6.2.2.
Measure diameter using knife edge
Measuring the diameter using a knife edge is a relatively long procedure, must
be done manually and usually only one holder has a knife edge loaded. It does
however allow spot sizes below 10 nm to be measured.
A fresh knife edge can be made by cleaving a piece of GaAs wafer so as to give
a smooth face normal to the wafer surface. Care must be taken to ensure the
face is smooth, has no damage to the top edge and has little debris on the edge.
The piece must be small enough to mount on the knife edge holder. The edge is
nominally in the same plane as the substrate surface in the holder but because
the knife edge is not front face referenced, the edge may be a few hundred
microns above or below the plane.
1. Load holder containing the knife edge on the stage.
2. With a 16-bit pattern generator in order to be able to scan the beam in
small steps to measure the smallest spot sizes more accurately the
pattern generator resolution should be set to a small value. Set the
maximum fieldsize to e.g. 0.16384 mm :
VB_OPER> FLD 0.16384
3. For the 18-bit and 20-bit pattern generators this is not necessary.
Part Number:878275
Vectorbeam Operator Manual
Page 172
4. Zero the field corrections:
VB_OPER> QCAL MAIN /DIST/INIT/LOAD
VB_OPER> QCAL BEF /DIST/INIT/LOAD
VB_OPER> QCAL STIG /DIST/INIT/LOAD
5. Calibrate the main field and BEF for this fieldsize:
VB_OPER>QCAL MAIN FM
/NOALIGN/COVER=‘F$TRNLMN(“VB_COVER”)’/ITER=2/DIAG
VB_OPER>QCAL BEF FM /NOALIGN/RANGE= 15 /ITER=2/DIAG
6. Move the stage to the knife edge position.
7. Switch to SEM mode.
8. Switch to the transmission detector with the appropriate level of
attenuation (MAX,HIGH,LOW,MIN) and with the bias on to give the
maximum detector bandwidth (see Chapter “Transmission detector”):
VB_OPER>QSET DET TR1/ATT=.../BIAS
9. Adjust gain and backoff so that the signal from the mark is a little below
the maximum level and the signal from the background is a little above the
zero level.
10.Focus on the edge. It may be necessary to adjust lens 2 if the fine focus
range is not enough.
11.Zoom in on particle on the knife edge in SEM mode and adjust the focus
and stigmation manually as accurately as possible with the slider panel
fully stretched.
12.Move the stage a few microns parallel to edge to place the particle off
axis.
13.Type :
VB_OPER>QDISPLAY DIA / A0 / LINELENGTH=2 / EDGE=0 /
FILT=16 / POINTSAMPLES=8 / LINESCANS=1
and record the result. Note that A0 will need to be replaced by A90or A270
for a knife edge parallel to the X axis, requiring scanning parallel to the Y
axis.
14.Switch back to photomultiplier when finished:
VB_OPER>QSET DET PM
17.6.3.
Mark slope calibration
The edge sharpness, discussed above, can be automatically measured by using
the function qcalibrate slope. This function measures the beam diameter at two
different currents and by making use of the relationship below between beam
current I b and the measured beam diameter d m , can calculate the edge
sharpness.
Part Number:878275
Vectorbeam Operator Manual
Page 173
d m2 = kI b + d a2 + d n2 + d e2
where d a is the constant aberration of the optical system, d e is the edge length
and d n is the noise on the beam position. Hence a plot of beam current against
the square of the measured spot size will be a straight line whose gradient
depends on the brightness of the source, with an offset, i.e. a finite spot size at
zero current, determined by the noise (assumed to be negligible here), the
aberrations and the width of the edge.
The function requires a valid spot table so that two currents can be set
automatically. If beam diameter measurements are to be done on the focus mark
type:
VB_OPER>QCALIBRATE SLOPE FM FM FC FM FM
This will calculate the edge length of the focus mark for use with the beam
diameter measurement function so that the “corrected” value will be the true
beam diameter. The function qset slope can used to manually change the edge
length used by the beam diameter measurement if required.
17.7.
Beam current adjustment
17.7.1.
Automatic
Automatic beam current adjustment is only possible if the spot table has been
calibrated. The machine can adjust all the required lenses the gun alignment and
the focus and stigmation to give the desired beam current based on the spot
table calibration. Type:
VB_OPER>QSET CURRENT <current (nA)> <mark name> <mark pos>
/bcm=FC
17.7.2.
Manual
To change the beam current manually
1. Move to the focus mark:
VB_OPER> MVSP FM
2. Switch the beam on, enabling the SEM scanning
VB_OPER> SSEM
3. Using the joystick panel adjust the magnification to display the focus mark.
4. Enable the automatic video gain:
VB_OPER>vid_p
5. Display lens 1 setting (lens 1 is the gun focus voltage):
VB_OPER>DLN1
6. Increase the value of lens 1 a little from that displayed to decrease the beam
current and vice versa. Be careful that the resulting focus voltage does not go
Part Number:878275
Vectorbeam Operator Manual
Page 174
above the extractor voltage as this is likely to induce outgassing in the gun.
VB_OPER>SLN1 <new_value>
7. Adjust the value of lens 2 to bring the focus mark into focus – see section
“Focusing the beam” and in particular “Manual lens 2 adjustment”.
8. Measure the beam current and repeat the procedure until the desired current
is reached. If the beam current drops unexpectedly it may be necessary to adjust
the gun alignment to bring the beam back onto the final aperture. Save the
settings if required (see Section “Databases”).
17.8.
Beam diameter adjustment
17.8.1.
Automatic
The machine can adjust all the required lenses the gun alignment and the focus
and stigmation to give the desired beam diameter based on the spot table
calibration. Type:
VB_OPER>QSET DIAMETER <spot size (nm)> <mark name> <mark
pos>/BCM=FC
17.8.2.
Manual
The beam diameter can be adjusted manually without using the demagnification
table as follows:
1. Create a large spot (60 to 100nm) to ensure that the spot is definitely larger
than the mark slope.
2. Carry out jobcal.
3. Note the average spot size measured on the focus mark:
VB_OPER>QDISPLAY DIA FM / SQUARE / LINELENGTH=2 /
EDGE=5 / FILT=16 / POINT=8 / LINESCANS=1
4. Note the current at this large spotsize : 172 nA (on a 400 µm aperture)
5. If the required spot size is, for example, 40 nm, divide the large spot size by
the smaller one and square the ratio
410 / 40 = 10.25
square the ratio = 105.06
6. Now divide the large current with the squared spotsize ratio and this will give
you approx. the current for a 40 nm spot
172 / 105.06 = 1.637 nA for a 40 nm spot.
This formula can be used for all spot size to current values.
Part Number:878275
Vectorbeam Operator Manual
Page 175
17.9.
Theoretical tables of on-axis beam diameters and
beam currents
The following tables show the on-axis performance of the tool. The HR and UHR
performance on axis is similar. The UHR deflection errors are considerably
smaller than for the HR.
17.9.1.
FEG with HR final lens
The source diameter was assumed to be 30 nm, the emission intensity was
assumed to be 0.5 mA/sr.
17.9.1.1.
20 kV
Beam current
(nA)
Beam
diameter for
100 µm
aperture (nm)
Beam
diameter for
200 µm
aperture (nm)
Beam
diameter for
300 µm
aperture (nm)
Beam
diameter for
400 µm
aperture (nm)
0.1
25
10
9
15
0.5
55
24
16
16
1
80
35
23
20
5
-
88
53
42
10
-
-
86
65
50
-
-
210
160
100
-
-
-
260
17.9.1.2.
50 kV
Beam current
(nA)
Beam
diameter for
100 µm
aperture (nm)
Beam
diameter for
200 µm
aperture (nm)
Beam
diameter for
300 µm
aperture (nm)
Beam
diameter for
400 µm
aperture (nm)
0.1
10
5
5
7
0.5
20
9
7
8
1
31
14
9
9
5
-
33
22
17
10
-
49
33
25
50
-
-
75
58
100
-
-
-
95
Part Number:878275
Vectorbeam Operator Manual
Page 176
17.9.1.3.
100 kV
Beam current
(nA)
Beam
diameter for
100 µm
aperture (nm)
Beam
diameter for
200 µm
aperture (nm)
Beam
diameter for
300 µm
aperture (nm)
Beam
diameter for
400 µm
aperture (nm)
0.1
6
3
3
7
0.5
8
5
4
7
1
10
6
5
7
5
23
15
10
10
10
33
24
16
15
50
90
60
40
30
100
-
-
60
50
17.9.2.
FEG with UHR final lens
The source diameter was assumed to be 30 nm, the emission intensity was
assumed to be 0.5 mA/sr.
17.9.2.1.
100 kV
Beam current
(nA)
Beam
diameter for
50 µm
aperture (nm)
Beam
diameter for
65 µm
aperture (nm)
Beam
diameter for
100 µm
aperture (nm)
1
5
6
15
5
10
8
15
10
15
11
16
50
50
30
27
100
70
53
45
Part Number:878275
Vectorbeam Operator Manual
Page 177
18.
Calibration
18.1.
Overview
The following table lists the calibrations in the order in which they are performed.
Calibration
When is the calibration performed?
How to do?
Height meter
For each substrate
See Section “Height meter
calibration”
Magnetic map
For each beam energy
See Section “Magnetic
map calibration”
After the final lens or stage has
been assembled after servicing
Separate magnetic maps are
required for holders with datum
plates in the corner those with
datum plates centred along an
edge.
Demagnification table
For each beam energy, each time
the column (not gun) has been
assembled after servicing
Vistec engineer
Spot table
For each beam energy, after
selecting a new aperture or after
the source emission has changed.
See Section “Spot table
calibration”
Deflection-field corrections
For each beam energy, after
selecting a new maximum field size
for which no corrections already
exist in a database.
See Section “Fullcal”
Height map
For each substrate if operating in
height map mode
See Section “Height map
calibration”
Shift for fine focus
After changing beam current or at
suitable intervals in order to
compensate for drift.
See Section “Jobcal”
When exposing wafers which have
been exposed on a stepper in direct
write mode
See Section “Stepper lens
calibration”
Height meter table 7
Focus and stigmation
BEF scaling and rotation
Main field scaling, rotation and
keystone
Sub-field scaling and rotation
Stepper lens
Part Number:878275
Vectorbeam Operator Manual
Page 178
18.2.
Fullcal
Fullcal is used in order to calibrate the deflection-field corrections (main field
distortions, sub-field distortions, focus and stigmation corrections, BEF field
distortions). Fullcal uses the same sequence of calibration routines as jobcal to
set up the references, except that in addition three field correction calibrations
are carried out. The BEF distortion corrections are not calibrated. The program
must be run initially for every new field size to be used. Once the calibration has
been carried out the results should be saved to a database to enable them to be
recalled the next time that the field size is required (See Chapter “Databases”).
This removes the need to run the fullcal sequence each time the fieldsize is
changed. The results for the three sets of field corrections remain valid until the
column is disturbed mechanically e.g. for column cleaning. A beam current in
range 2-20 nA should normally be used for fullcal. The program is started by
typing:
VB_OPER>fullcal
18.3.
Jobcal
By locating a calibration mark at different stage positions the translational,
rotational and scale errors of the beam deflection with respect to the stage can
be measured and compensated in order to accurately match beam and stage coordinate schemes. This enables writing of patterns extending over many fields by
stitching them together.
Many parameters relating to the deflection and focusing of the beam will vary
with beam current. In addition various components of the machine are liable to
drift which may affect these parameters significantly after a period of a few
hours. The machine has various calibration routines to calibrate the deflection
and focusing of the beam and these have been sequenced in a program called
jobcal . Jobcal should be carried out after changes in beam current, and at
regular intervals of a few hours. It is also recommended after a new holder has
been loaded on stage. The program is started by typing:
VB_OPER>jobcal
If the main field calibration is done, it is VITAL that first 1) the focus is
set up and 2) a height meter reading is obtained on the mark used.
This is because the reference height for field size and focus is reset.
Jobcal does this automatically
18.4.
Interpretation of jobcal/fullcal on-axis calibrations
The main field, subfield, beam error feedback, focus and stigmation (on-axis)
calibrations are each followed by further measurements, which do not alter the
calibrations, but enable the accuracy of the calibration to be assessed. They
have a similar output format.
18.4.1.
Correction coefficients
The correction coefficients are the (fine) corrections applied after calibration.
Part Number:878275
Vectorbeam Operator Manual
Page 179
18.4.2.
Residual coefficient errors
The residual coefficient errors are measured after completion of the last
calibration iteration. Four measurements are done of the remaining errors in the
calibration and mean and sigma values are calculated. The residual coefficient
error means are the changes that would need to be applied to the correction
coefficients based on these measurements. The residual coefficient error sigma
values show the uncertainty in the means.
18.4.3.
Correction errors (nm)
The correction errors are the same measurements as the residual coefficient
errors except that the results are presented as distances in nm at the corners of
the field being calibrated.
18.4.4.
Main field calibration
An accurate calibration should typically give numbers as in the table below:
Correction
coefficients
Scale
(µm/mm)
Rotation
(µm/mm)
Keystone
(µm/mm2)
mean
mean
mean
X or Y
<10
<10
<10
Residual
coefficient errors
Scale
(µm/mm)
Scale
(µm/mm)
Rotation
(µm/mm)
Rotation
(µm/mm)
Keystone
(µm/mm2)
Keystone
(µm/mm2)
mean
sigma
mean
sigma
mean
sigma
X or Y
<0.01 /
fieldsize
<0.01 /
fieldsize
<0.01 /
fieldsize
<0.01 /
fieldsize
<0.01 /
fieldsize
<0.01 /
fieldsize
Correction errors
Scale
(nm)
Scale
(nm)
Rotation
(nm)
Rotation
(nm)
Keystone
(nm)
Keystone
(nm)
mean
sigma
mean
sigma
mean
sigma
<10
<10
<10
<10
<10
<10
X or Y
18.4.5.
Subfield calibration
An accurate calibration should typically give numbers as in the table below:
Part Number:878275
Vectorbeam Operator Manual
Page 180
Correction
coefficients
Scale
(µm/mm)
Rotation
(µm/mm)
mean
mean
X or Y
<10
<10
Residual
coefficient errors
Scale
(µm/mm)
Scale
(µm/mm)
Rotation
(µm/mm)
Rotation
(µm/mm)
mean
sigma
mean
sigma
X or Y
<0.01 /
sub-fieldsize
<0.01 /
sub-fieldsize
<0.01 /
sub-fieldsize
<0.01 /
sub-fieldsize
Correction errors
Scale (nm)
Scale (nm)
Rotation (nm)
Rotation (nm)
mean
sigma
mean
sigma
<10
<10
<10
<10
X or Y
18.4.6.
Beam error feedback calibration
An accurate calibration should typically give numbers as in the table below:
Correction
coefficients
Scale
(µm/mm)
Rotation
(µm/mm)
mean
mean
X or Y
<10
<10
Residual
coefficient errors
Scale
(µm/mm)
Scale
(µm/mm)
Rotation
(µm/mm)
Rotation
(µm/mm)
mean
sigma
mean
sigma
X or Y
<0.01/
BEF-fieldsize
<0.01/
BEF-fieldsize
<0.01/
BEF-fieldsize
<0.01/
BEF-fieldsize
Correction errors
Scale (nm)
Scale (nm)
Rotation (nm)
Rotation (nm)
mean
sigma
mean
sigma
<10
<10
<10
<10
X or Y
18.4.7.
Stigmation calibration
The results and statistics of the stigmation calibration are compiled as follows:
1. When the autostig completes successfully, the final stig values are entered
into the stig mean value entry in the returned variable. The last four focus values
returned from the 45degree separated scans are averaged to give the final focus
Part Number:878275
Vectorbeam Operator Manual
Page 181
value, which is also entered into the mean focus entry in the returned variable.
The sigma of the four scans is entered into the sigma focus entry. The remaining
sigma entries are cleared to 0.0.
The only way to calculate a sigma for the stigmation values would be to perform
the autostig more than once, which isn't practical.
2. If stig statistics have been requested, the DCP performs another five sets of
four focus scans with 45degrees separation. The mean axial and diagonal errors
are calculated from the differences between the orthoganol focus scans, likewise
with the sigmas. The mean and sigma of focus error is calculated from the
difference between the mean focus value and the result of each focus scan.
3. The final accuracy of the stig calibration is calculated using:
accuracy = (1.0 - (mean_axial + mean_diag)/2.0) * 100.0
4. The stig and focus errors are converted by EMMA into units of nm by
calculating how much the beam diameter changes if the focus is adjusted by the
error value. It does this by comparing the ratio of the aperture radius against the
virtual main pivot to the additional height required to put the beam back into best
focus.
An accurate calibration should typically give numbers as in the table below:
Sampled coefficients
Mean
Sigma
Focus
See Section “Focus”
<0.03
Stigmation
-0.5<x<0.5
0.00
Sampled coefficient
errors
Mean
Sigma
Focus
<0.03
<0.03
Stigmation
<0.03
<0.03
Sampled coefficient
errors (nm)
Mean
Sigma
Focus
<0.3 x spot size
<0.3 x spot size
Stigmation
18.5.
Interpretation of fullcal deflection field correction
calibrations
In contrast to the on-axis calibrations, the field correction calibrations are not
followed by further measurements to assess the accuracy. Fullcal carries out two
iterations for each field correction and the adjustment made on the second
iteration give a measure of how good the calibrations are.
Part Number:878275
Vectorbeam Operator Manual
Page 182
18.5.1.
Field focus and stigmation
Largest observed error for the final iteration of the stigmation should be <0.01.
18.5.2.
Main field distortion
The largest observed error for the second iteration should <20 nm.
18.5.3.
Sub field distortion
The largest observed error for the second iteration should <20 nm.
18.5.4.
Beam error feedback distortion
This is calculated from the main field distortion and so relies on an accurate main
field distortion calibration. Do not use until further notice. Zero any existing
corrections using:
VB_OPER>QCAL BEF/DIST/INIT/LOAD
18.6.
Jobcal and fullcal errors and warnings
Jobcal and fullcal are jobfiles that issue standard Emma commands. If an error
or warning occurs it is likely to be a standard Emma one. There are however a
few additional warnings that jobcal or fullcal may issue.
18.6.1.
Additional warnings
Warnings are issued:
1. If any of the sequence of calibrations is switched off e.g. “warning,
gun alignment switched off. =>No action necessary.
2. If logicals which define parameters for calibrations such as
vb_calibrate_points are out of range. =>The parameter must be
changed.
3. If the fine focus value is not correct for conjugate blanking. =>The
conjugate blanking set-up should be checked.
4. If the datum height is outside of +/- 10 μm or datum tilt is > 1 μm/mm.
=> Action only required if values 3 times these levels.
5. The calibration coefficients are > 10.000. => No action required
unless this was the result of a large sudden change.
6. The final aperture is not centred. =>Centre the aperture
7. The shift for fine focus calibration was not accurate. => Re-run jobcal
and then investigate.
18.6.2.
Additional errors
An error is issued if the maximum fieldsize parameter is not within the machines
range.
Part Number:878275
Vectorbeam Operator Manual
Page 183
18.7.
Checking deflection-field corrections
It is useful to check the field corrections after they have been loaded from a
database or after fullcal if there is any doubt about their accuracy. In order to
check the current field corrections, the calibration commands are used with
/noupdate qualifiers.
18.7.1.
Field focus and stigmation
1. Align final aperture
2. Run jobcal
3. VB_OPER>JOBCAL
4. Adjust the on-axis focus and stigmation as described in the Section
“Automatic focus and stigmation adjustment” in order to define the
parameters which will be used by the next step, for example the /accuracy
value
5. Use Emma command
VB_OPER>QCAL STIG FM
/DIST/NOALIGN/GRID=5/COVER=‘F$TRNLNM(“VB_COVER”)’/DAC
POS=3/NOUPDATE/DIAG
18.7.2.
Mainfield distortion
1. Align final aperture
2. Run jobcal
VB_OPER>JOBCAL
3. Use Emma command
VB_OPER>QCAL MAIN FM
/DIST/NOALIG/GRID=8/COVER=‘F$TRNLNM(“VB_COVER”)’/NOUP
DATE/DIAG
18.7.3.
Subfield distortion
1. Align final aperture
2. Run jobcal
VB_OPER>JOBCAL
3. Use Emma command
VB_OPER>QCAL TRAP FM
/DIST/NOALIG/GRID=8/COVER=‘F$TRNLNM(“VB_COVER”)’/NOUP
DATE/DIAG
18.7.4.
Beam error feedback distortion
Do not use until further notice. Zero any existing corrections using:
VB_OPER>QCAL BEF/DIST/INIT/LOAD
Part Number:878275
Vectorbeam Operator Manual
Page 184
18.8.
Fine tuning deflection-field corrections
It can be useful to fine tune the deflection-field corrections (carry out another
iteration of the calibration) rather than run fullcal to ensure the required accuracy
in a shorter time. This should only be done using exactly the same number of
grid points and the same cover as were used for the original fullcal.
If the fine tuning is done using different grid or cover than for the
original calibrations, the original errors will not be properly corrected.
If the original grid and cover are not known, it is necessary to initialise
the corrections and calibrate from scratch.
18.8.1.
Field focus and stigmation
This should be done before the main field distortions are fine tuned.
1. Align final aperture
2. Run jobcal
VB_OPER>JOBCAL
3. Adjust the on-axis focus and stigmation as described in the Section
“Automatic focus and stigmation adjustment” in order to define the
parameters which will be used by the next step.
4. Calibrate the field focus and stigmation
VB_OPER>QCAL STIG FM
/DIST/NOALIGN/GRID=5/COVER=‘F$TRNLMN(“VB_COVER”)’/DAC
POS=3/ ACC=0.005/ITER=1/DIAG
5. Check the corrections as described in the section “Checking the
deflection-field corrections” above.
6. When satisfactory results have been obtained, save the field focus and
stigmation corrections to the appropriate database - see Chapter
“Databases”
18.8.2.
Mainfield distortion
This should be done after the field focus and stigmation has been fine tuned.
1. Align final aperture.
2. Switch the main field distortions off
VB_OPER> SCOR OFF/MAIN
3. Run jobcal
VB_OPER>JOBCAL
4. Switch the main field distortions on:
VB_OPER>SCOR ON/ALL
Part Number:878275
Vectorbeam Operator Manual
Page 185
5. Calibrate the distortions using the currently set cover. The maximum
distortions on the second iteration should be small.
VB_OPER>QCAL MAIN FM
/DIST/NOALIGN/GRID=8/COVER=‘F$TRNLMN(“VB_COVER”)’/ITER
=2/DIAG
6. Run jobcal
VB_OPER>JOBCAL
7. Check the corrections as described in the section “Checking the
deflection-field corrections” above.
8. When satisfactory results have been obtained, save the distortions to the
appropriate database - see Chapter “Databases”
18.8.3.
Subfield distortion
1. Align final aperture.
2. Run jobcal
VB_OPER>JOBCAL
3. Calibrate the distortions using the currently set cover. The maximum
distortions on the second iteration should be small.
VB_OPER>QCAL TRAP FM
/DIST/NOALIGN/GRID=8/COVER=‘F$TRNLMN(“VB_COVER”)’/ITER
=1/DIAG
4. Run jobcal.
VB_OPER>JOBCAL
5. Check the corrections as described in the section “Checking the
deflection-field corrections” above.
6. When satisfactory results have been obtained, save the subfield
distortions to the appropriate database - see Chapter “Databases”
18.8.4.
Beam error feedback distortion
Do not use until further notice. Zero any existing corrections using:
VB_OPER>QCAL BEF/DIST/INIT/LOAD
18.9.
Calibration offsets
Sometimes the exposed lithography may have consistent mainfield or subfield
errors of several nanometres in size in spite of the usual calibrations having been
done correctly. These can be corrected manually by setting additional empirically
determined calibration offsets.
Part Number:878275
Vectorbeam Operator Manual
Page 186
18.9.1.
18.9.1.1.
16-bit machines
Mainfield scaling offsets
Offsets can be applied to the mainfield X and Y scalings by adding height offsets
to the measured height before the scale for height adjustment is carried out. This
is done with the following commands for X and Y respectively:
VB_OPER> qset register 3 24 <value in microns>
VB_OPER> qset register 3 27 <value in microns>
These commands change the NonLinearGainConst terms of the heightdependent-field scaling described in the Chapter “Height meter”.
The effect of a height offset on scaling can be calculated from the usual scalefor-height dependence of about 20 nm / μm at the edge of a 1 mm field. These
offsets must be removed before mainfield calibration, as otherwise their effect
will be calibrated out, and then re-applied. This is done automatically by jobcal.
18.9.1.2.
Mainfield rotation offsets
Offsets can be applied to the mainfield X and Y rotations by adding height offsets
to the measured height before the rotation for height adjustment is carried out.
This is done with the following commands for X and Y respectively:
VB_OPER> qset register 3 31 <value in microns>
VB_OPER> qset register 3 34 <value in microns>
The effect of a height offset on scale can be calculated from the usual rotationfor-height dependence of about 16 nm / μm at the edge of a 1 mm field. These
offsets must be removed before mainfield calibration, as otherwise their effect
will be calibrated out, and then re-applied. This is done automatically by jobcal.
18.9.1.3.
Subfield scaling offsets
No subfield scaling offsets can be applied.
18.9.2.
18-bit and 20-bit machines
Calibration offsets for the mainfield, BEF, subfield, focus and stigmation are
supported by Emma commands making them easy to enter, control, apply at the
correct time and monitor. These offsets are:
•
Enabled only if they have been switched on using the “qset
corrections on/offsets” command.
•
Automatically never applied during any of the calibrations.
•
Not applied when a “qadjust field” command is executed unless the
qualifier “/offset” is supplied.
•
Applied by default during pattern exposure. Pattern exposure is done
effectively using the qadjust field/offset command at each stage
position.
To display all set calibration offsets type:
VB_OPER> qdisplay offsets
Part Number:878275
Vectorbeam Operator Manual
Page 187
18.9.2.1.
Mainfield
The mainfield scale rotation and keystone calibrations can be offset. For
example to define a –10 ppm scale offset on the X mainfield and a –15 ppm
offset on the Y scale type the following:
VB_OPER> qcalibrate offset main / xscale=-0.000010 / yscale=-0.000015
To clear all mainfield offsets type:
VB_OPER> qcalibrate offset main / init / load
18.9.2.2.
Subfield
The subfield scale and rotation calibrations can be offset. However, any offset on
the mainfield is automatically also applied to the subfield. Therefore only
additional subfield calibration offsets are required to be defined explicitly.
18.10.
Stepper lens calibration
The stepper lens calibration is intended to allow more accurate direct write
alignment when using the VB to expose wafers which have other layers exposed
on a stepper. The lens being mapped is the lens of the optical stepper and not
the VB electron lens. A modern stepper lens has typically 100 nm or less of
distortion in the image which covers typically an area of up to 22x22 mm. The
distortions are non-linear and so cannot be corrected by the standard direct write
mapping, which only deals with 1st order terms. Characteristic stepper field
distortions (lens map) are measured and then reproduced during e-beam
exposure.
The stepper lens map is calibrated from an array of marks on a substrate
exposed by the stepper within a single stepper field. The array must cover the
stepper lens field and will have the characteristic stepper lens distortions. The
array is measured in the VB using the qcal lens command. A private DW
mapping is done using the corner measurements and used to eliminate the linear
terms. From the measurements in the private DW mapped coordinate system, a
pair of two-dimensional polynomials (up to 5th order) are computed which
represent the best approximation to the higher order deviations. Up to five
stepper lens maps can be loaded at any one time but the appropriate one must
be selected for exposure using the qmap lens command.
The success of the technique relies on the ability to measure the true stepper
lens distortions unaffected by other distortions such as the deviations from true
grid of the reticle pattern and the deviations from true grid of the VB. Normally,
the second order deviations from true grid of the VB stage are small enough so
that the absolute stage mapping mode does not have to be set up first. However,
one of the limits of the stepper lens correction is the ability of the VB stage to
maintain any distortion it may have, over the area in which the stepper lens was
calibrated, over its entire range.
If the stepper lens correction is applied to a VB exposure overlaying a stepper
exposure, which consists of four separate chips inside a single stepper field, the
chips will each have different distortions.
The stepper lens correction is designed to apply a correction to the pattern
position in addition to the usual direct write mapping correction. The direct write
mapping is relied on to apply the linear corrections and the stepper lens map is
used to apply additional non-linear corrections. The origin of the non-linear
corrections can be superimposed on the direct write mapping at any stage
position. This enables a direct write mapping to be set up for the whole wafer
Part Number:878275
Vectorbeam Operator Manual
Page 188
and then the stepper lens corrections to placed over each stepper lens field in
turn before exposure. In this way the direct write mapping and the stepper lens
correction remain the same. The stepper lens map origin is in the bottom left
hand corner of the map. The act of placing the lens map origin at a point in the
direct write mapping is referred to as “assigning” the lens map. It may help to
think of physically fixing the lens map to the wafer with its bottom left-hand
corner at the position specified and exposing patterns through it as if it were a
stencil. The assigning and de-assigning of lens maps is done with the qmap lens
command.
18.10.1.
Stepper lens calibration substrate
The patterned substrate used for calibrating should have the following:
1. The pattern should be a regularly spaced grid of identical marks. The grid
must have marks in rectilinear columns and rows but the number of
columns and rows can different and the spacings of the columns and rows
can be different.
2. The grid should at least cover the area in the stepper lens field to be used
later for devices. Ideally the corners of the grid should be as close as
possible to the die-by-die alignment marks, which will be used for the
devices.
3. The maximum number of rows or columns is 17. The minimum number
must be at least 1 more than the mathematical order of the map to
calibrated. The orders available are 3,4 or 5, so a sensible minimum is 6.
In practise it is convenient to use a 17 x 17 grid since 9 x 9 and 5 x 5 grids
can be selected from the 17 x 17 grid by specifying a mark spacing twice
or four times the real value
4. The reticle with the array of marks should be manufactured by the same
route as the device reticles. If the manufacturing process introduces
distortions they must be the same as on the devices.
5. The geometry of the marks must suitable for location by the VB and the
marks should have good contrast when viewed with the VB.
18.10.2.
Stepper lens map calibration
Note:
1. The machine should be fully calibrated.
2. The desired position of the bottom left hand mark in the grid, relative to
the lens map origin, can be set up using the /xorigin and /yorigin qualifiers.
(The lens map origin is the extreme bottom left-hand corner of the optical
exposure.) If the qualifiers are not given qcal lens will assume that the
origin coincides with the centre of the bottom left-hand mark. This is a
slightly dubious assumption since it implies that three quarters of the mark
are beyond the boundary of the reticle are therefore could not have been
exposed optically.
3. The qcal lens command will tolerate a few failed mark locations except:
•
The four marks at the extreme corners of the grid.
•
Two adjacent locations horizontally or vertically when a warning about
holes will be issued.
Part Number:878275
Vectorbeam Operator Manual
Page 189
•
More than 5% of locations fail in which case a warning is issued.
4. If there are any failures it is advisable to correct the problem. The
tolerance is intended to allow the cause of the failure to be found.
The following jobfile shows the use of the stepper lens calibration command for a
15x15 grid.
$ ! Jobfile to calibrate stepper lens correction
$ SJOB CAL_STEPPER_LENS.COM
$ ON CONTROL_C THEN GOTO FINISH
$ ON CONTROL_Y THEN GOTO FINISH
$!
$! Save logfile name and ensure logging is on
$ logfilename = F$TRNLNM("VB_LOGFILE")
$ SLON
$ QSET MODE FAB
$!
$! ********** Create new log file and ensure it's turned on
$ qdisplay comment Redirecting the log for a stepper lens map
$ OPEN/WRITE NEWVERSION MCLOG:STEPPER_LENS.LOG
$ CLOSE NEWVERSION
$ define/group/user/nolog VB_LOGFILE
MCLOG:STEPPER_LENS.LOG
$ SLOF
$ SLON
$!
$ qdisplay comment Started calibrating stepper lens map : 'F$TIME()'
$
$ INQUIRE START "MOVE TO START POSITION (LOWER LEFT
MARK) AND PRESS ENTER"
$ MVRL 0 0/SPO=START
$ DSPO START
$!
$! Initialise map first
$ QCALIBRATE LENS fm fm 1 1/INIT/LOAD
$!
$! Calibrate map
$ QCALIBRATE LENS 10UM_SQUARE_FINE START 1.5 1
/ORDER=5/GRID=15/XORIGIN=0.25/YORIGIN=0.25/REGISTRATIO
N=10UM_SQUARE_COARSE/DESCRIPTION=STEPPER1/DIAG/D
EBUG=2
$!
$ qdisplay comment Finished calibrating stepper lens map :
'F$TIME()'
$!
$ FINISH:
$! ********** Return to original log file
$ DEFINE /GROUP/USER/NOLOG VB_LOGFILE 'logfilename'
$ SLOF
$ SLON
$ EXIT
18.10.3.
Checking the calibration
The procedure for checking a lens map against the calibration substrate is
described in the Emma command set (part no.: 878274). Note that the
underlying direct write mapping must be accurate.
Part Number:878275
Vectorbeam Operator Manual
Page 190
18.10.4.
Use of lens maps
A lens map is used by assigning it to a direct write mapping using the qmap lens
command. The overall accuracy when using the lens map depends equally on
the direct write alignment accuracy and on the stepper lens map accuracy. For
this reason it makes more sense to use die-by-die alignment together with a
stepper lens map rather than global alignment with a stepper lens map. In any
case die-by-die alignment alone would normally be used rather than global
alignment before considering using the stepper lens correction. Note:
1. Die-by-die alignment should be done with no lens map assigned.
2. The stepper lens calibration, done previously, used the outermost 4 marks
of the measured array to create a ‘private’ direct write mapping. This
private mapping was used to eliminate the lower order corrections from
the stepper lens map. Therefore the positions of the die-by-die alignment
marks (relative to the calibration grid origin) should be as close as
possible to the positions of the four corner marks of the grid on the
calibration substrate. This is to avoid any component of the stepper lens
correction finding its way into the die mode.
3. A lens map must always be explicitly assigned to a direct write mapping
after it has been set up. Setting up a direct write mode will automatically
de-assign any lens map that was assigned to it.
4. When the lens map has been assigned, all the area covered by the map
can be exposed.
The following jobfile (called STEPPER_LENS.COM) can be used together with
the die-by-die direct alignment scheme described in the Chapter “Direct write
alignment” by using the line:
$ @VB$SEQ:WLVD_DW.COM @STEPPER_LENS.COM
in the layout parameters file.
$ OPEN/APPEND/SHARE POST$EMMA MAILBOX$EMMA
$ ! Create position identifier for current centre of die in die mode
$ SSPO DIECENTRE 0 0
$!
$ ! Load stepper lens map 1 into die mode
$ qmap lens 1
DIECENTRE/MAP=DIE/XORIGIN=10.875/YORIGIN=10.875
$!
$ ! Move to centre of cell in new coordinate system
$ QMOVE POS/CENTRE 0 0
$!
$! Expose pattern
$ QEXPOSE PAT
$!
$! Deassign stepper lens map
$ QMAP LENS/INIT
18.10.5.
Further notes on using the stepper lens correction
1. The lens maps are conceptually not treated as transforms in their own
right but rather as small additional corrections to a mapping. Therefore if
the current direct write mapping has a lens map assigned to it, qmove pos
will move to the corrected position map, however the position displayed by
Emma will the nominal one. This is also true of the command qmove spo.
If the direct mode of the position symbol has a map assigned to it then the
Part Number:878275
Vectorbeam Operator Manual
Page 191
stage actually moves to the corrected position but the displayed position is
the nominal one. The lens map used is the one assigned to the mapping
mode in the position symbol not the current mode. If the lens map
assignment to that mode has changed since the position symbol was set
up, the new assignment will be used. The commands qmove home and
qmove load always move to the true positions as this is essential to avoid
mechanical damage. Mark location will also return nominal positions
although the position of the beam is corrected. If the stepper map is
accurate therefore, the measured position of a mark in a stepper field will
show no distortion.
2. Lens maps cannot be assigned to absolute direct write mode. This is
because machine calibration is done is absolute mode. A calibration with
a lens map inadvertently assigned is likely to give wrong results so the
possibility has been removed.
3. Lens maps have limited areas of validity. They are valid over the area of
calibration from the location they are assigned to the full area of stage
travel. Outside this area, the extrapolation of the corrections may give
erroneous results.
Part Number:878275
Vectorbeam Operator Manual
Page 193
19.
Exposing a substrate
19.1.
Pattern data preparation
The pattern to be exposed contains shapes that are defined during the device
design stage. The position and size of the shapes are thus usually defined with
no regard to the lithography tool. The shapes are defined in some file format
such as Calma GDSII or SPD or CTXT. Pattern data preparation is the process
of transforming the design tool output file format into a file format that the
machine can expose.
There are two Vistec proprietary formats for Vectorbeams: FRE which was
designed for machines with a 16-bit pattern generator and VEP, which was
designed for machines with 18-bit and 20-bit pattern generators. The 18-bit and
20-bit pattern generators can expose the FRE file format, in addition to the usual
VEP format, for backwards compatibility.
The conversion process also contains essential elements such as taking into
account the fracturing needed to expose the whole pattern using a field-by-field
exposure sequence and breaking up the polygon description of the pattern
supplied by the CAD system into small elementary trapezia. In addition the
process must place the vertices of all shapes on the pattern generator resolution
grid. Parameters such as the pattern generator resolution grid and fieldsize are
chosen in order to obtain the desired best compromise between speed and
fidelity given various limitations of the machine. These limitations include the
coarseness of the pattern generator resolution grid (affecting the amount of grid
snapping), field and subfield stitching errors, the maximum current which can be
focused into a given spot size and the minimum spot size.
The converters typically allow the pattern file to be manipulated using various
“operators” such as overlap removal, scaling, tone reversal, biasing and
mirroring. These manipulations are extremely convenient for microfabrication
regarding respectively double exposure, device scaling, positive/negative resist,
process bias and mask manufacture.
19.1.1.
Pattern data conversion and processing software
In Vistec Vectorbeam Series Systems the converter program is provided by third
party vendors, typically either the CATS software from Synopsys Inc or the
CAPROX software from Sigma-C GmbH. These vendors typically provide
training for the use of their programs and the appropriate manuals should be
referred to when using the programs. Some basic concepts and examples are
however described below.
CATS/CAPROX runs on any DEC VAX or Alpha computer system running
OpenVMS and provides facilities for converting pattern data from various CAD
formats (typically GDSII) to Vectorbeam binary pattern format.
Patterns can be displayed on the high-resolution screen of the user control
computer system and such features as pan, zoom and measure allow inspection
of critical dimensions. Many plotters are supported to generate a hard copy of
the graphical pattern data.
The converter program will produce either a FRE or a VEP format output file to
be used directly on the Vectorbeam.
Part Number:878275
Vectorbeam Operator Manual
Page 194
It is usual to prepare pattern data on a separate computer to avoid using
machine time and then copy the files to the Vectorbeam user terminal. The
pattern data are downloaded from the Vectorbeam operator terminal via the
Ethernet link (transfer speed approximately 200 Kbytes/sec) to the pattern
generator during exposure. The user manuals for these programs should be
referred to for details of operation. The application of the programs to the
Vectorbeam is given below.
19.1.1.1.
19.1.1.1.1.
Notes for Cats users
Format VB | VB20 | VB50 | VB100
To generate files for the Vectorbeam the format must be set to VB, VB20, VB50
or VB100. The format VB is the basic option, which can generate files for use at
any kV and for which the Cats resolution parameter corresponds directly to the
Vectorbeam pattern generator resolution. The formats VB20, VB50 and VB100
decouple the Cats resolution from the Vectorbeam pattern generator resolution
and place limits on resolution, beamstep and the Cats VB resolution parameter
in order to guide the user to choose the correct parameters to match the VB
hardware. The decoupling of the Cats resolution from the Vectorbeam pattern
generator resolution extends the maximum value of Cats resolution by a factor of
32, 128 or 512 for 16-bit, 18-bit or 20-bit pattern generators respectively.
Formats VB20, VB50 or VB100 should be chosen to match the EHT setting on
the VB of 20, 50 or 100 kV respectively.
The default limits in Cats are in the tables below:
Format
VB
Field
(μm)
VB
Max_field
(μm)
Minimum
Resolution
(μm)
Maximum
Resolution
(μm)
Minimum
VB
Resolution
(μm)
Maximum
VB
Resolution
(μm)
Maximum
VRU
Maximum
/ default
field
count
VB
Not
used
Not used
0.002
0.0625
Not used
Not used
32
65504 /
64000
VB20
1024
1024
0.002
0.5
0.002
0.015625
32
65504 /
64000
VB50
819.2
819.2
0.002
0.4
0.002
0.0125
32
65504 /
64000
VB100
589.824
589.824
0.002
0.288
0.002
0.009
32
65504 /
64000
Table 19.1: Default limits for 16-bit machines
Part Number:878275
Vectorbeam Operator Manual
Page 195
Format
VB
Field
(μm)
VB
Max_field
(μm)
Minimum
Resolution
(μm)
Maximum
Resolution
(μm)
Minimum
VB
Resolution
(μm)
Maximum
VB
Resolution
(μm)
Maximum
VRU
Maximum
/ default
field
count
VB
Not
used
Not used
0.0005
0.015625
Not used
Not used
128
262144 /
256000
VB20
1024
1024
0.0005
0.5
0.0005
0.00390625
128
262144 /
256000
VB50
819.2
819.2
0.0005
0.4
0.0005
0.003125
128
262144 /
256000
VB100
589.824
589.824
0.0005
0.288
0.0005
0.00225
128
262144 /
256000
Table 19.2: Default limits for 18-bit machines
Format
VB
Field
(μm)
VB
Max_field
(μm)
Minimum
Resolution
(μm)
Maximum
Resolution
(μm)
Minimum
VB
Resolution
(μm)
Maximum VB
Resolution
(μm)
Maximum
VRU
Maximum
/ default
field
count
VB
Not
used
Not used
0.000125
0.00390625
Not used
Not used
512
1048576
/
1024000
VB20
1024
1024
0.000125
0.5
0.000125
0.0009765625
512
1048576
/
1024000
VB50
819.2
819.2
0.000125
0.4
0.000125
0.00078125
512
1048576
/
1024000
VB100
589.824
589.824
0.000125
0.288
0.000125
0.0005625
512
1048576
/
1024000
Table 19.3: Default limits for 20-bit machines
19.1.1.1.2.
VB ?
The “VB ?” command types up the various VB specific parameters such as VB
Machine, VB Field, VB VRU etc.
19.1.1.1.3.
VB machine
The VB machine must be set to 16, 18 or 20 corresponding to the number of
mainfield bits of the Vectorbeam pattern generator for which the pattern is to be
generated. If the VB Machine is set to 16 the output file format used by the
Writefile will be FRE. If the VB Machine is set to 18, 19 or 20 the output file
format used by Writefile will be VEP.
19.1.1.1.4.
VB field
The VB Field parameter is only used for the VB20, VB50 and VB100 formats and
defines the largest Maximum Fieldsize that can be set on the Vectorbeam
Part Number:878275
Vectorbeam Operator Manual
Page 196
pattern generator. A separate value is maintained for each of the formats VB20,
VB50 and VB100. The default VB field values are shown in Tables 1, 2 and 3
and correspond to standard Vectorbeam pattern generator fieldsize capabilities.
The VB field parameter is used to calculate the maximum VB Resolution and
thereby automatically ensure that VB Resolution is set correctly.
There are many variations of Vectorbeam pattern generator hardware with
different fieldsize ranges and the VB field parameter needs to be set to match
the particular Vectorbeam. The following command can be used to change the
VB Field:
VB Field <value>
Usually, a Cats installation only generates pattern files for one Vectorbeam, so
this setup can be done in the Cats startup file. Once this has been defined for
each kV, as shown below, the format can be changed and the correct value will
always be present.
Format VB20
VB Field <value>
Format VB50
VB Field <value>
Format VB100
VB Field <value>
19.1.1.1.5.
VB Max_field
The VB Max_field parameter is only used for the VB20, VB50 and VB100
formats where it is not used for any calculation but is simply a check on the value
of VB Field. When the VB Field is set larger than VB Max_field a warning is
given but the VB field will be accepted. Therefore the VB Max_field is usually set
to the same value as the VB Field.
The VB Max_field parameter is not the same as the Maximum Fieldsize
parameter on the Vectorbeam.
19.1.1.1.6.
Resolution
The resolution defines the grid to which all shape vertices are snapped in Cats.
For the format VB the Resolution corresponds directly to the VB pattern
generator resolution.
For the formats VB20, VB50 and VB100 the resolution is decoupled from the VB
pattern generator resolution in order to allow larger values. In many cases,
however, the Resolution and VB Resolution will be the same. The VB pattern
generator resolution is given by the VB Resolution parameter in Cats.
For all formats, the limits placed on resolution can be overridden using the
“force” option with the resolution command, as shown below, but this increases
the risk of trying to operate the machine beyond the limits of the hardware.
Resolution 0.0025 force
Part Number:878275
Vectorbeam Operator Manual
Page 197
When using the formats VB20, VB50 or VB100 the VB Field parameter should
be increased rather than using the force option to override the maximum limit.
19.1.1.1.7.
Beamstep
The beamstep defines, for the purposes of pattern conversion only, the exel size
which will be used for exposure. The beamstep size is given by VRU * PG
resolution.
The beamstep parameter can, as an option, be set by the user to an integer
multiple of the Cats resolution. When the user does not define the beamstep, the
default is for it to be the same as the Cats resolution. All shapes will be forced by
Cats to be an integer number of beamsteps in height and width (The shapes are
still placed on the nearest resolution grid point). The split-and-bury technique will
be used on shapes in the input data, which are not an integer number of
beamsteps in size, so that the original defined outline is maintained as well.
This additional data manipulation is one way to ensure the best fidelity in the
exposed pattern as when the pattern generator is operating in “float” mode, it
rounds down shape dimensions to be an integer number of beamsteps in size
and this may change the original defined outline. The other way to obtain similar
fidelity is to select the “split-and-bury” pattern generator mode, which causes the
pattern generator to apply similar algorithms in real time when the VRU > 1.
The ability to use Cats to process the data for beamstep size means that the
results can be viewed and that the amount of work and therefore overhead that
the pattern generator has at exposure time is reduced. The ability to use the
pattern generator to process the data for beamstep size means that the VRU can
be varied at exposure time without re-converting the pattern.
19.1.1.1.8.
VB resolution
The VB resolution is only used for the VB20, VB50 and VB100 formats and is
calculated by Cats as follows:
VB Resolution =
Resolution / (Rounded up to nearest integer (Resolution * 2
VB Machine
/ VB Field))
This automatically results in the maximum VB Resolution and minimum VB VRU
combination, because it enables the largest blocksize to be used which results in
the shortest exposure time. For most patterns there should be no need to define
the VB Resolution directly as long as VB Field is set correctly.
For example, using format VB20 a Resolution of 0.015625 will give VB
Resolution=0.015625 and VB VRU=1 but a Resolution of 0.016 will give
VB_Resolution= 0.008 and VB_VRU=2
For some patterns it may be desirable to use a lower value of VB Resolution for
higher accuracy and resolution and the value can be changed using the
command:
VB Resolution <value>
The Resolution does not need to be a power of 2 multiplied by the VB Resolution
but rather any integer multiple.
19.1.1.1.9.
VB VRU
The VB VRU parameter is only used for the VB20, VB50 and VB100 formats and
Part Number:878275
Vectorbeam Operator Manual
Page 198
is calculated as follows:
VB VRU = Beamstep / VB Resolution
There is no need to set the VB VRU parameter directly, although for some
patterns it may be desirable to use a higher value of VB VRU for higher accuracy
and resolution and the value can be changed using the command:
VB VRU <value>
The VB VRU can take the following values:
•
16-bit machines: 1, 2, 4, 8, 16, 32
•
18-bit machines: 1, 2, 4, 8, 16, 32, 64, 128
•
20-bit machines: 1, 2, 4, 8, 16, 32, 64, 128, 256, 512
The Vectorbeam pattern generator can expose the pattern with any VRU set on
the Vectorbeam, however, best results are obtained when the VRU on the
Vectorbeam is set to VB VRU.
19.1.1.1.10.
Maximum number of shapes in a block
A feature was introduced in version 14:02 of Cats so that if the number of shapes
in a block exceeds a limit, Writefile partitions the data into separate blocks, all at
the same stage position. The need to do this was eliminated with the PowerPC’s
and therefore the default limit of 80,000 shapes should be set higher by setting
the logical as follows:
VB_OPER>define te_max_vb_figures 10000000
19.1.2.
Setting pattern file attributes on DEC computer
The converter software may be running on a workstation not running VMS but an
operating system such as NT. The most straightforward way to transfer the
binary .FRE pattern file to the machine is using FTP in binary mode. This will
result in a file with 512 byte records.
19.1.2.1.
FRE files
Any .FRE file on the VB should have fixed length 2048 byte records. If this is not
the case, the file attributes can be changed using File Definition Language (FDL)
under VMS. The command is:
VB_OPER> exchange/network/fdl=fre.fdl/transfer=convert <input file>
<output file>
or
VB_OPER> convert/fdl=fre.fdl <input file> <output file>
where FDL.FRE is
$ record
$ format fixed
$ size 2048
$ carriage_control none
19.1.2.2.
VEP files
After binary FTP to the machine, the file format should be already correct with
Part Number:878275
Vectorbeam Operator Manual
Page 199
fixed length records of 512 bytes. Otherwise follow the procedure for FRE files
above but substituting “$size 512” in the FDL.FRE
19.1.3.
Pattern generator resolution
The pattern generator resolution grid size is the beam deflection obtained by
changing the pattern generator output by one bit. Defining the pattern generator
resolution also defines the maximum fieldsize and vice versa. The pattern
generator resolution is set by defining the maximum fieldsize in Emma using the
“FLD” command. The factor relating pattern generator resolution and maximum
fieldsize is given below.
19.1.3.1.
16-bit pattern generator
For a 16-bit pattern generator:
Maximum Fieldsize = pattern generator resolution x 65536 (Equation 19.1)
19.1.3.2.
18-bit pattern generator
For an 18-bit pattern generator:
Maximum Fieldsize = pattern generator resolution x 262144 (Equation 19.2)
19.1.3.3.
20-bit pattern generator
For a 20-bit pattern generator:
Maximum Fieldsize = pattern generator resolution x 1048576 (Equation
19.3)
19.1.4.
Choosing the pattern generator resolution / maximum fieldsize
The pattern generator resolution is chosen based on the following
considerations:
1. Minimise the grid snapping that occurs when the shapes in the designed
pattern are placed on the pattern generator resolution grid. (To do this it is
necessary to know the design grid. If you have designed the pattern then
this will be known already. Otherwise the design grid can be determined
by inspecting the shapes making up the pattern. As the shapes are
defined digitally all the vertices will be an integer number of resolution
steps from the origin. The design grid is the maximum resolution step size
for the grid in order that 100% of the shape co-ordinates lie on the grid.
The “ongrid” command in CATS can be used to find the design grid.)
2. Obtain a maximum fieldsize larger than the required blocksize.
See the “examples” section later in this chapter for more information.
19.1.4.1.
Maximum fieldsize / pattern generator resolution ranges
The official guaranteed range of maximum fieldsize and pattern generator
resolution is given in the Sales Specification for the particular machine. The
tables below show typical values.
19.1.4.1.1.
16-bit pattern generator
Part Number:878275
Vectorbeam Operator Manual
Page 200
Max. fieldsize / PG
resolution
20 kV
50 kV
100 kV
Minimum
0.131072 mm / 2 nm
0.131072 mm / 2 nm
0.131072 mm / 2 nm
Maximum
1.024 mm / 15.625
nm
0.8192 mm / 12.5 nm
0.589824 mm / 9 nm
Depending on the hardware it may be possible to use a larger range as shown
below but this is not guaranteed.
Max. fieldsize / PG
resolution
20 kV
50 kV
100 kV
Minimum
0.131072 mm / 2 nm
0.131072 mm / 2 nm
0.131072 mm / 2 nm
Maximum
1.150000 mm / 17.5
nm
0.930000 mm / 14.1
nm
0.65536 mm / 10 nm
In order to obtain the minimum value of maximum fieldsize, it may be necessary
to change the position of links on the X and Y mainfield DAC cards (Link 7 and
link 9 must be fitted) and the following needs to be added to the
[emma.ctrl]dcp_config.vw file:
G_bSmallFldSzInUse = 1;
19.1.4.1.2.
18-bit pattern generator, standard fieldsize with HR or UHR lens
Max. fieldsize / PG
resolution
20 kV
50 kV
100 kV
Minimum
0.131072 mm / 0.5
nm
0.131072 mm / 0.5
nm
0.131072 mm / 0.5
nm
Maximum
1.024 mm / 3.90625
nm
0.8192 mm / 3.125
nm
0.589824 mm / 2.25
nm
Depending on the hardware it may be possible to use a larger range as shown
below but this is not guaranteed.
Max. fieldsize / PG
resolution
20 kV
50 kV
100 kV
Minimum
0.131072 mm / 0.5
nm
0.131072 mm / 0.5
nm
0.131072 mm / 0.5
nm
Maximum
1.150000 mm / 4.387
nm
0.930000 mm / 3.548
nm
0.65536 mm / 2.5 nm
19.1.4.1.3.
18-bit pattern generator, large fieldsize with HR lens
Part Number:878275
Vectorbeam Operator Manual
Page 201
Max. fieldsize / PG
resolution
20 kV
50 kV
100 kV
Minimum
0.16384 mm / 0.625
nm
0.16384 mm / 0.625
nm
0.131072 mm / 0.5
nm
Maximum
1.024 mm / 3.90625
nm
1.310720 mm / 5 nm
0.589824 mm / 2.25
nm
Depending on the hardware it may be possible to use a larger range as shown
below but this is not guaranteed.
Max. fieldsize / PG
resolution
20 kV
50 kV
100 kV
Minimum
0.16384 mm / 0.625
nm
0.16384 mm / 0.625
nm
0.131072 mm / 0.5
nm
Maximum
1.310720 mm / 5 nm
1.310720 mm / 5 nm
0.8192 mm / 3.125
nm
19.1.4.1.4.
18-bit pattern generator, large fieldsize with UHR lens
Max. fieldsize / PG
resolution
20 kV
50 kV
100 kV
Minimum
0.16384 mm / 0.625
nm
0.16384 mm / 0.625
nm
0.131072 mm / 0.5
nm
Maximum
1.310720 mm / 5 nm
1.310720 mm / 5 nm
1.310720 mm / 5 nm
Depending on the hardware it may be possible to use a larger range as shown
below but this is not guaranteed.
Max. fieldsize / PG
resolution
20 kV
50 kV
100 kV
Minimum
0.16384 mm / 0.625
nm
0.16384 mm / 0.625
nm
0.131072 mm / 0.5
nm
Maximum
2.930 mm / 1.12 nm
1.850 mm / 7.06 nm
1.310720 mm / 5 nm
19.1.4.1.5.
20-bit pattern generator with UHR lens
Max. fieldsize / PG
resolution
20 kV
50 kV
100 kV
Minimum
0.16384 mm /
0.15625 nm
0.16384 mm /
0.15625 nm
0.131072 mm / 0.125
nm
Maximum
1.310720 mm / 1.25
nm
1.310720 mm / 1.25
nm
1.310720 mm / 1.25
nm
Part Number:878275
Vectorbeam Operator Manual
Page 202
Depending on the hardware it may be possible to use a larger range as shown
below but this is not guaranteed.
Max. fieldsize / PG
resolution
20 kV
50 kV
100 kV
Minimum
0.16384 mm /
0.15625 nm
0.16384 mm /
0.15625 nm
0.131072 mm / 0.125
nm
Maximum
2.930 mm / 2.79 nm
1.850 mm / 1.76 nm
1.310720 mm / 1.25
nm
19.1.5.
Block height and width
The block height and width are the dimensions of the rectangle centred on the
centre of the deflection field within which the beam may be deflected during
exposure (see Figure 19.1).
Figure 19.1: The block in relation to the maximum fieldsize.
The height and width of the block are defined in the pattern converter and
contained in the pattern file.
19.1.5.1.
16-bit pattern generator additional details on blocksize
The largest blocksize that can be set in the converter for a FRE file is given by:
(largest blocksize in μm) = (Max. Fieldsize) - 32 x (PG resolution) (Equation
19.4)
Expressed in terms of exels:
(largest blocksize in exels) = 216 – 32 = 65504
(Equation 19.5)
The reason not all 216 deflection bits can be used is because the FRE file format
uses unsigned short integers to represent the coordinates of the shapes in
outline format. Such representation is compact but can only define 216 different
numbers. As the shapes are defined in outline format, this limits the number of
Part Number:878275
Vectorbeam Operator Manual
Page 203
exels which can be defined to 216 - 1. As the user can define a VRU of up to 32
at exposure time, the maximum blocksize is limited to 216 - 32 to avoid possible
stitching problems if the blocksize were not an integer number of beamsteps.
The stitching problems arise if shapes at the edge of the block are fractured by
the block boundary to leave shapes smaller than the beamstep (VRU x PG
resolution), as these will be discarded.
19.1.5.2.
18-bit pattern generator additional details on blocksize
19.1.5.2.1.
VEP file
The largest blocksize that can be set in the converter for a VEP file is the
Maximum Fieldsize.
(largest blocksize in μm) = (Max. Fieldsize)
(Equation 19.6)
Expressed in terms of exels:
(largest blocksize in exels) = 218 = 262144
19.1.5.2.2.
(Equation 19.7)
FRE file
When the 18-bit pattern generator exposes a FRE file, an 18-bit physical block is
produced by combining 4 x 4 16-bit logical blocks. The physical blocksize is the
size of the rectangle centred on the centre of the deflection field within which the
beam may deflected during exposure (see Figure 19.2). The logical blocks
correspond to the blocks of the standard 16-bit pattern file. Emma takes care of
combining the appropriate blocks at exposure time.
Figure 19.2: Diagram showing the arrangement of logical blocks and the physical
block.
The logical blocksize is defined in the pattern converter and contained in each
pattern file. The maximum logical blocksize that can be set in the converter for a
FRE file is given by:
(Max. logical blocksize in μm) = (216 - 32) x (PG resolution) (Equation
19.8)
Expressed in terms of exels:
(Max. logical blocksize in exels) = 216 – 32 (Equation 19.9)
Part Number:878275
Vectorbeam Operator Manual
Page 204
This results in:
(Max. physical blocksize in μm) = (218 - 128) x (PG resolution)
(Equation 19.10)
The reason not all 218 deflection bits can be used for a physical block is because
the FRE file format uses unsigned short integers to represent the coordinates of
the shapes in outline format. Such representation is compact but can only define
216 different numbers. As the shapes are defined in outline format, this limits the
number of exels which can be defined in a logical block to 216 - 1. The maximum
logical blocksize is limited to 216 - 32 to avoid possible stitching problems on the
16 bit pattern generator if the blocksize were not an integer number of
beamsteps. As 4 x 4 logical blocks are combined into a physical block, the
physical blocksize is therefore limited to 218 - 128.
19.1.5.3.
20-bit pattern generator additional details on blocksize
19.1.5.3.1.
VEP file
The largest blocksize that can be set in the converter for a VEP file is the
Maximum Fieldsize.
(largest blocksize in μm) = (Max. Fieldsize)
(Equation 19.10)
Expressed in terms of exels:
(largest blocksize in exels) = 220 = 1048576
19.1.5.3.2.
(Equation 19.11)
FRE file
When the 20-bit pattern generator exposes a FRE file, a 20-bit physical block is
produced by combining 16 x 16 16-bit logical blocks. The physical blocksize is
the size of the rectangle centred on the centre of the deflection field within which
the beam may deflected during exposure (see Figure 19.3). The logical blocks
correspond to the blocks of the standard 16-bit pattern file. Emma takes care of
combining the appropriate blocks at exposure time.
Figure 19.3: Diagram showing the arrangement of logical blocks and the physical
block.
The logical blocksize is defined in the pattern converter and contained in each
Part Number:878275
Vectorbeam Operator Manual
Page 205
pattern file. The maximum logical blocksize that can be set in the converter for a
FRE file is given by:
(Max. logical blocksize in μm) = (216 - 32) x (PG resolution) (Equation
19.12)
Expressed in terms of exels:
(Max. logical blocksize in exels) = 216 – 32 (Equation 19.13)
This results in:
(Max. physical blocksize in μm) = (220 - 512) x (PG resolution)
(Equation 19.14)
The reason not all 220 deflection bits can be used for a physical block is because
the FRE file format uses unsigned short integers to represent the coordinates of
the shapes in outline format. Such representation is compact but can only define
216 different numbers. As the shapes are defined in outline format, this limits the
number of exels which can be defined in a logical block to 216 - 1. The maximum
logical blocksize is limited to 216 - 32 to avoid possible stitching problems on the
16 bit pattern generator if the blocksize were not an integer number of
beamsteps. As 16 x 16 logical blocks are combined into a physical block, the
physical blocksize is therefore limited to 220 - 512.
19.1.6.
Choosing the blocksize
The following should be taken into account when choosing the blocksize:
1. The blocksize, which is set in the converter, must be several microns
smaller than the maximum allowed blocksize, to ensure that only the
accurately calibrated part of the deflection field is used for exposure.
The accurately calibrated part of the deflection field is the square
connecting the positions of the centre of the calibration mark when
calibrating the mainfield. When calibrating, the centre of the mark
cannot be placed at the corner of the deflection field, as the outside
edges of the mark would be outside the deflection field and therefore
the mark could not be located. The mark is typically placed within half
the mark’s size of a corner, plus a few microns to allow for scanning
over the edge. For example, using the 10 μm octagon to calibrate
with a maximum fieldsize of 1024 μm and a fine scan length of 3 μm,
the central 1011 μm (=1024 – 13 μm) could be accurately calibrated.
The /cover qualifier for the calibration would have to be set to
1011/1024=0.987.
2. The blocksize for a multi-block pattern is usually chosen to be as
large as possible to maximise the throughput.
3. The blocksize for a multi-block pattern may be set to be considerably
smaller than the maximum in order to use only the centre of the field
where the resolution and accuracy is better.
4. The blocksize for a multi-block pattern may be chosen so that
periodicity of the blocks matches some periodic structure in the
pattern. This can allow the block boundaries to be placed in noncritical areas of the pattern.
5. Due to the normal discard of shapes with height or width smaller than
the beamstep, the blocksize must be an integer number of
Part Number:878275
Vectorbeam Operator Manual
Page 206
beamsteps (VRU * pattern generator resolution) to avoid stitching
errors.
19.1.6.1.
16-bit pattern generator additional details on choosing blocksize
The following additional details should be taken into account when choosing the
blocksize for the 16-bit pattern generator:
1. The blocksize must be within the limits of the hardware. The range of
physical blocksizes is given in the Sales Specification for the
particular machine. The tables below show typical values.
20 kV
50 kV
100 kV
Smallest
128 µm
128 µm
128 µm
Largest
1000 µm
800 µm
560 µm
19.1.6.2.
18-bit pattern generator additional details on choosing blocksize
The blocksize must be within the limits of the hardware. The range of physical
blocksizes is given in the Sales Specification for the particular machine. The
following additional details should be taken into account when choosing the
blocksize for the 18-bit pattern generator:
1. The table below shows typical values for the standard fieldsize pattern
generator with HR final lens
20 kV
50 kV
100 kV
Smallest
128 µm
128 µm
128 µm
Largest
1000 µm
800 µm
560 µm
2. The table below shows typical values for large fieldsize pattern generator
with HR final lens
20 kV
50 kV
100 kV
Smallest
160 µm
160 µm
128 µm
Largest
1000 µm
1300 µm
560 µm
3. The table below shows typical values for large fieldsize pattern generator
with UHR final lens
20 kV
50 kV
100 kV
Smallest
160 µm
160 µm
128 µm
Largest
1000 µm
1300 µm
1300 µm
19.1.6.3.
20-bit pattern generator additional details on choosing blocksize
The blocksize must be within the limits of the hardware. The range of physical
blocksizes is given in the Sales Specification for the particular machine. The
Part Number:878275
Vectorbeam Operator Manual
Page 207
following additional details should be taken into account when choosing the
blocksize for the 20-bit pattern generator:
1. The table below shows typical values.
20 kV
50 kV
100 kV
Smallest
160 µm
160 µm
128 µm
Largest
1000 µm
1300 µm
1300 µm
19.1.7.
Subfield fracturing
The fracturing of the pattern data into subfields is carried out by the pattern
generator at exposure time.
19.1.7.1.
16-bit pattern generator subfield fracturing
The subfields span the maximum fieldsize.
There are 64 x 64 subfields and each subfield contains 1024 bits (1024 * 64 =
65536).
19.1.7.2.
18-bit pattern generator subfield fracturing
Figure 19.4: Diagram showing the arrangement of subfields, Maximum Blocksize and the
pattern blocksize for the 18-bit pattern generator.
The subfields span a square area known as the Maximum Blocksize, whose size
can be set by the operator and which is centred on the field centre. The default
size of the Maximum Blocksize is the Maximum Fieldsize, but the Maximum
Blocksize can be set to be smaller in order to adjust the subfield size. The
Maximum Blocksize must be larger of either the block height or width of any
pattern files to be exposed. If the Maximum Blocksize is less than the default, the
total number of bits spanned by all the subfields will be less than 218.
The number of subfields that span the Maximum Blocksize can be set by the
operator. The maximum number is 64 and this is the default. The smallest
number of subfields that can be set is limited by the maximum subfield deflection
and the Maximum Blocksize. The maximum number of bits in a subfield is 214 =
16384 but with 64 subfields and a maximum blocksize equal to the maximum
fieldsize, only 4096 bits are used.
The command to set, for example, 25 subfields with a Maximum Blocksize of 500
μm is:
VB_OPER> qset block/subfields=25/maximum=0.500
Part Number:878275
Vectorbeam Operator Manual
Page 208
The blocksize must be within the limits of the hardware. The range of physical
blocksizes is given in the Sales Specification for the particular machine.
19.1.7.3.
20-bit pattern generator subfield fracturing
Figure 19.5: Diagram showing the arrangement of subfields, Maximum Blocksize and the
pattern blocksize for the 20-bit pattern generator.
The subfields span a square area known as the Maximum Blocksize, whose size
can be set by the operator and which is centred on the field centre. The default
size of the Maximum Blocksize is the Maximum Fieldsize, but the Maximum
Blocksize can be set to be smaller in order to adjust the subfield size. The
Maximum Blocksize must be larger of either the block height or width of any
pattern files to be exposed. If the Maximum Blocksize is less than the default, the
total number of bits spanned by all the subfields will be less than 220.
The number of subfields that span the Maximum Blocksize can be set by the
operator. The maximum number is 64 and this is the default. The smallest
number of subfields that can be set is limited by the maximum subfield deflection
and the Maximum Blocksize. The maximum number of bits in a subfield is 214 =
16384 and with 64 subfields and a maximum blocksize equal to the maximum
fieldsize, all bits are used.
The command to set, for example, 63 subfields with a Maximum Blocksize of
516.096 μm is:
VB_OPER> qset block/subfields=63/maximum=0.516096
The blocksize must be within the limits of the hardware. The range of physical
blocksizes is given in the Sales Specification for the particular machine.
19.1.8.
19.1.8.1.
Choosing the subfields
16-bit pattern generator
The operator does not have to define any parameters relating to the subfields.
19.1.8.2.
18-bit pattern generator
The operator must define the number of subfields and the maximum blocksize.
The number of subfields and the maximum blocksize are the same in both X and
Y.
The number of the subfields that span the maximum blocksize must be defined
by the operator. The size of a subfield bit is always set to be the same size as a
mainfield bit. The maximum number of subfields is 64 and the default number is
also 64. The minimum number of subfields possible is limited by the maximum
subfield size and the maximum blocksize that must be spanned. The maximum
subfield size has two limits:
Part Number:878275
Vectorbeam Operator Manual
Page 209
1. A bits limit of 214 or 16384 bits.
2. A size limit of 20 µm at 100 kV, 28 µm at 50 kV and 28 µm at 20 kV
For example, 32 subfields with a maximum blocksize of 0.8192 mm and a
Maximum Fieldsize of 0.8192 mm gives a subfield size of 25.6 µm, which is
within the deflection limit, and 262144/32=8192 bits, which is within the bits limit.
Another example would be 25 subfields with a Maximum Blocksize of 0.500 mm
and a Maximum Fieldsize of 0.524288 gives a subfield size of 20 µm and 10000
bits.
The Maximum Blocksize set on the Vectorbeam must be larger or equal to the
pattern block height and width, otherwise the exposure cannot be carried out.
There must be an integer number of bits in each subfield and this means that the
result of dividing the number of bits in the Maximum Blocksize by the number of
subfields must be an integer. Both examples above meet this requirement, but
48 subfields with a maximum blocksize of 0.8192 mm and a maximum fieldsize
of 0.8192 mm would give 5461.33 bits per subfield, which is not allowed.
In summary, the following should be taken into account when choosing the
subfields and the maximum blocksize:
1. There must be an integer number of bits in each subfield.
2. The maximum subfield deflection must not be exceeded.
3. The maximum blocksize must be larger or equal to the physical blocksize
required by the pattern.
4. A larger number of subfields (e.g. 64) may give higher accuracy but will be
slower due to the larger number of subfield changes.
5. The periodicity of the subfields may be matched to periodic sensitive
areas of the pattern to avoid subfield stitch errors occurring in these areas.
19.1.8.3.
20-bit pattern generator
The operator must define the number of subfields and the maximum blocksize.
The number of subfields and the maximum blocksize are the same in both X and
Y.
The number of the subfields that span the maximum blocksize must be defined
by the operator. The size of a subfield bit is always set to be the same size as a
mainfield bit. The maximum number of subfields is 64 and the default number is
also 64. The minimum number of subfields possible is limited by the maximum
subfield size and the maximum blocksize that must be spanned. The maximum
subfield size has two limits:
3. A bits limit of 214 or 16384 bits.
4. A size limit of 20 µm at 100 kV, 28 µm at 50 kV and 28 µm at 20 kV
For example, 64 subfields with a maximum blocksize of 0.8192 mm and a
Maximum Fieldsize of 0.8192 mm gives a subfield size of 12.8 µm, which is
within the deflection limit, and 1048576/64=16384 bits, which is within the bits
limit. Another example would be 32 subfields with a Maximum Blocksize of
0.262144 mm and a Maximum Fieldsize of 0.524288 gives a subfield size of
8.192 µm and 16384 bits.
Part Number:878275
Vectorbeam Operator Manual
Page 210
The Maximum Blocksize set on the Vectorbeam must be larger or equal to the
pattern block height and width, otherwise the exposure cannot be carried out.
There must be an integer number of bits in each subfield and this means that the
result of dividing the number of bits in the Maximum Blocksize by the number of
subfields must be an integer. Both examples above meet this requirement, but
48 subfields with a maximum blocksize of 0.4096 mm and a maximum fieldsize
of 0.8192 mm would give 10922.66 bits per subfield, which is not allowed.
In summary, the following should be taken into account when choosing the
subfields and the maximum blocksize:
6. There must be an integer number of bits in each subfield.
7. The maximum subfield deflection must not be exceeded.
8. The maximum blocksize must be larger or equal to the physical blocksize
required by the pattern.
9. A larger number of subfields (e.g. 64) may give higher accuracy but will be
slower due to the larger number of subfield changes.
The periodicity of the subfields may be matched to periodic sensitive areas of the
pattern to avoid subfield stitch errors occurring in these areas.
19.1.9.
Beamstep size and VRU
The beamstep size is related to the pattern generator resolution by:
Beamstep size = Pattern generator resolution x VRU (Equation
19.15)
where VRU can take the following values:
•
16-bit machines: 1, 2, 4, 8, 16, 32
•
18-bit machines running V2004.02 or earlier: 1, 2, 4, 8, 16, 32, 64, 128
•
18-bit machines running V2005.01 or later: Any integer between 1 and
128
•
20-bit machines running V2004.02 or earlier: 1, 2, 4, 8, 16, 32, 64, 128,
256, 512
•
20-bit machines running V2005.01 or later: Any integer between 1 and
512
Setting the VRU parameter enables the exposure of shapes with spot sizes that
are large compared with pattern generator resolution. Using a large spot size
without the VRU, shapes would be oversized and the required pattern generator
stepping frequency would be high.
Part Number:878275
Vectorbeam Operator Manual
Page 211
Figure 19.6: Effect of setting VRU 2. The black and white discs represent the individual
pattern generator grid points. The black discs represent the points, which are exposed
separated by the beamstep size.
In addition, 18- and 20-bit machines running V2005.01 or later can define a VRU
to be associated with any clock and override the default VRU set using the “qset
VRU” command e.g.:
VB_OPER> qset clock 0 25000 /VRU=2
This gives more flexibility when exposing patterns with both small and large
shapes with a range of doses.
19.1.10.
Choosing the spot size / beamstep size
The spot size and the beamstep size are related by:
Spot size = Beamstep size x A
(Equation 19.16)
where A can be thought of as an “overlap factor”. Typically A is in the range 1 to
1.5 for suitable overlap making the spot size approximately equal to the
beamstep size. If A is too large then the shapes will be too large. If A is too small
then the overlap will be insufficient giving rough edges (stamp effect).
The spot size is related to the minimum dimension in a pattern by:
Beamstep size = minimum dimension / B
(Equation 19.17)
where B can be thought of as a “pattern fidelity factor”. Typically B is taken as 4
or 5. B is chosen based on a compromise between exposure speed and pattern
fidelity. If B is increased (more scans / smaller spot) then the pattern fidelity will
improve, as the corners of shapes will be less rounded. In addition variations in
dose due to proximity effects and variations in the development conditions will
have a smaller effect on the final dimensions. If B is increased (larger spot) the
pattern fidelity will suffer but the exposure time will decrease.
In order to minimise the grid snapping when shapes are made to be an integer
number of beamsteps in size it is necessary to know the design grid. If you have
designed the pattern then this will be known already. Otherwise the design grid
can be determined by inspecting the shapes making up the pattern. As the
shapes are defined digitally all the vertices will be an integer number of
resolution steps from the origin. The design grid is the maximum resolution step
size for the grid in order that 100% of the shape co-ordinates lie on the grid. The
“ongrid” command in CATS can be used to find the design grid.
19.1.11.
Pattern generator grid snapping
The 16-bit, 18-bit and 20-bit pattern generators allow the user to choose the
mode of grid snapping using the command:
Part Number:878275
Vectorbeam Operator Manual
Page 212
VB_OPER>qset pg | nofloat | float | split-and-bury | nosplit
As an example, the results of exposing the shapes shown in Figure 19.7 with the
various options are described below.
Figure 19.7: Converter output for an array of identical squares of size 5*PG resolution points,
with pitch 11*PG resolution points in both X and Y. Nofloat option
The “nofloat” option only works for 16-bit pattern generators and causes 18-bit
and 20-bit pattern generators to operate the “float” option. The “nofloat” option
causes all shape vertices to be snapped to the nearest VRU grid point to the
lower left of the defined positions in the pattern file. The VRU grid is a grid of
points with origin at the lower left corner of the mainfield and separation equal to
the VRU * pattern generator resolution. Figure 19.8 shows the results of using
this option with a VRU of 2 to expose the pattern shown in Figure 19.7.
Figure 19.8: The exposed exels, shown as circles, give squares which alternate between 4
and 6 PG resolution points in size and which alternate between 10 and 12 PG resolution
points in pitch. Both the pitch and size are not correct.Float option
The “float” option causes the lower left shape vertex to be left on the nearest
pattern generator resolution point, with the upper right vertex being an integer
number of beamsteps away. Figure 19.9 shows the results of using this option
with a VRU of 2 to expose the pattern shown in Figure 19.6.
Part Number:878275
Vectorbeam Operator Manual
Page 213
Figure 19.9: The exposed exels, shown as circles, give squares which are 4 PG resolution
points in size and which have a pitch of 11 PG resolution points in pitch. The pitch is correct
but the size is too small.Split-and-bury option
The “split-and-bury” option causes the lower-left and upper-right shape vertices
to be left placed on the nearest pattern generator resolution points. However,
since the shapes are not an integer number of beamsteps in both width and
height, they are split into 4 shapes that are. Figure 19.10 shows the results of
using this option with a VRU of 2 to expose the pattern shown in Figure 19.6.
Figure 19.10: The exposed exels, shown as circles, give squares which are 5 PG resolution
points in size and which have a pitch of 11 PG resolution points in pitch. The pitch and the
size are correct.
The split-and-bury operation can only be switched off by either selecting the
“Nofloat” option or by using the command:
VB_OPER> qset set pg nosplit
19.1.12.
Choosing the pattern limits
The first priority when choosing the pattern limits is obviously to set the limits so
that the entire required pattern is included. However, the choice of the pattern
limits is important for the correct positioning of the pattern on the substrate,
especially in direct write. This is because it is usual to locate either the centre or
the corner of a pattern at a particular stage position using the “qmove pos/centre”
Part Number:878275
Vectorbeam Operator Manual
Page 214
or “qmove pos/corner” commands prior to exposure. The limits may be set to
larger values than those required just to include the pattern so that the centre of
the pattern is at particular position in relation to the shapes. In the direct write
scheme described in the manual using the “layout” command, it is necessary to
note the distance of the centre of the pattern to the lower left corner of the lower
left alignment mark. This will depend on the pattern limits chosen.
19.1.13.
Negative biasing
Negative biasing is a technique that can be applied to improve the fidelity of the
lithography. The technique is to reduce the exposed feature size and to increase
the exposure dose so that the final size of the features in the resist after
development remains the same. Care must be taken that small shapes are not
lost when applying the bias. When this technique is applied to gratings the
defined linewidth may be reduced to the point where single pass lines are
exposed.
The advantages are better process control and a reduced risk of residue in the
centre of shapes due to the larger dose.
The disadvantages are greater pattern processing and exposure times
19.1.14.
Examples
Three examples are described. The first is a case where the design grid is much
larger than the pattern generator resolution grid. The second is a case where the
design grid is about the same as the pattern generator resolution grid and the
third is a case where the design grid is much smaller than the pattern generator
resolution grid.
19.1.14.1.
Example 1
The first example pattern is a grating of size 4.0 x 0.3 mm consisting of lines
across the width with a pitch of 400 nm and a linewidth of 200 nm. As the line
length is a multiple of 200 nm the design grid is 200 nm. The minimum
dimension is also 200 nm. The beam energy is to be 100 kV. The uniform pattern
and good development control allow the use of a beamstep size only half of the
minimum dimension i.e. 100 nm (B=2).
19.1.14.1.1.
No negative bias
The pattern generator grid snapping mode should be set to “float” to enable the
placement to nearest resolution point. The pattern generator resolution must be
a sub-multiple of 100 nm and the largest value within the range for standard
fieldsize machines (see table of maximum fieldsize / pattern generator
resolution) is 8.333 nm (100 / 12 = 8.333).
This gives a maximum fieldsize of 0.546133333 and enables a block height and
width of 500 µm to be used. The block height and width are integer multiple of
lines and so the block boundary will occur at the same position relative to the
lines at each boundary along the grating. In addition there will be no boundary
across the width because the width of 300 µm fits inside the 400 µm block.
19.1.14.1.2.
Using negative bias
A negative bias of 100 nm is applied to the width of the 200 nm lines. This
variation uses the same setup as above. Using an exposure grid of 100 nm the
lines become single pass lines. The dose should be increased to achieve the
200 nm linewidth required.
Note: The linewidth and pitch of gratings are often not integer number of
Part Number:878275
Vectorbeam Operator Manual
Page 215
nanometres and this can give a pattern generator resolution grid size with many
decimal places. In addition, if the grating is defined using the ctxt facility in
CATS, “resolve” may need to be set appropriately.
19.1.14.2.
Example 2
The second example pattern is an array of gates that has been designed on a
grid of 5 nm. The gate width is 100 nm and is the minimum dimension of the
pattern. The beam energy is to be 50 kV.
The pattern generator resolution should be set to 5 nm and the pattern generator
grid snapping mode should be set to “float” to ensure that the gate placement
accuracy is maximised. By choosing a value of B of 5 (equation 19.17) an
exposure grid of 20 nm is the result (VRU of 4) and the minimum dimension is an
integer multiple of this so an exposed gate width of exactly 100 nm can be
carried out.
Actually, more process latitude can be obtained using the technique described in
Section “Negative biasing”. All the features should have a total bias of -20 nm
applied and through an increase in the exposure dose, gate widths of 100 nm
can be obtained.
Alternatively, if less beam-on time is required and the clock frequency is at the
maximum 25 MHz, a larger beamstep will need to be used. The next available
VRU value is 8 giving a beamstep size of 40 nm, which is not a sub-multiple of
the 100 nm linewidth. One solution is to set the pattern generator grid-snapping
mode to “split_and_bury” in order to maintain the defined 100 nm linewidths.
Another solution is to apply the negative bias of –20 nm giving a defined width of
80 nm, which is a sub-multiple of the beamstep size.
19.1.14.3.
Example 3
The third example pattern is a 4 Gbit memory device. The design grid is 1 nm.
The minimum dimension is 180 nm. The beam energy is to be 50 kV.
If a pattern generator resolution grid of 1 nm is chosen to avoid grid snapping
then the maximum fieldsize for a 16-bit pattern generator will be only 65.536 µm.
This would mean a relatively large number of stage moves and an impractically
large job time. Therefore it is usual to set the pattern generator resolution grid to
be larger and accept some grid snapping. By inspection of the pattern (using for
example the “ongrid” command in the CATS converter) a grid can be found in the
range 5 to 12.5 nm for which the amount of grid snapping will be relatively small.
This may well be some integer such as 5 or 10 nm. In this example 5 nm will be
assumed to be optimal. The minimum dimension of 180 nm with B = 4 (Equation
19.14) implies an exposure grid of 45 nm. If the technique of negative biasing is
applied then biasing the pattern by -20 nm gives a minimum dimension of
160 nm and using a VRU of 8 means that the exposure grid size is 40 nm. The
minimum dimension is an exact multiple of the beamstep size which results in
these features being the correct size. Other larger features may be not be an
exact multiple of the beamstep size so either the pattern generator grid-snapping
mode should be set to “split_and_bury” or the beamstep parameter should be
defined at conversion time.
19.2.
Drift removal using ontime
The mechanical and electrical components of the VB are affected by changing
temperature and even 1°C change can have a large effect. This affects the
pattern placement accuracy for exposures that require several hours. The ontime
function can be used to remove the effects of this drift at regular intervals.
Part Number:878275
Vectorbeam Operator Manual
Page 216
The ontime function may be used to execute a command after a specified time
interval. This command can be a single machine command or one to execute a
command file. When the time interval has elapsed, the ontime function interrupts
any current machine activities (in particular pattern exposure) and executes the
command before returning to the original activity. A command is executed only
once by the ontime function and therefore to obtain regular ontime events a
jobfile must be called which issues another “qset ontime” command before it
finishes.
Usually the most important parameters that require resetting are the beam
position and the beam current. However parameters such as the fieldsize
calibration and focus may also need to be reset.
19.2.1.
Ontime function
See Emma command set.
19.2.2.
Resetting the datum / co-ordinate system origin
The coordinate system datum is normally fixed to the position of a calibration
mark. The calibration mark position is defined by the operator, usually in the
holder sequence, and this position must be within the mark locate range. This
position is then not changed as it is the reference. The actual mark position is
found by mark location and the adjust datum command is used to shift the origin
of the coordinate system so that the mark locate position equals the defined
position. This may be done by the following sequence:
VB_OPER>QMOVE FM
VB_OPER>QLOCATE FM OUTPUT/REL
VB_OPER>QDJUST DATUM OUTPUT/REL
Note: Never use QLOCATE FM FM as this overwrites the defined position FM.
19.2.3.
Example jobfile
The example job file below adjusts the datum offset based on the expected and
observed mark positions and then sets up the ontime function to run itself again
after a specified time interval.
$! SDP.COM
$!
$! Adjusts the datum offset based on the expected and observed
mark positions
$! Can use any mark
$!
$! Syntax
$!=======
$! Passed parameters
$! ----------------$! P1 - mark type, mandatory
$! P2 - mark position, mandatory
$! P3 - ontime interval, optional, leave blank if job not to repeat at
intervals
$! Logicals
$!--------$! reset_datum_interval - ontime interval, optional, this logical can be
$! defined as the time interval (format hh:mm:ss) which overrides p3
and allows
Part Number:878275
Vectorbeam Operator Manual
Page 217
$! the time interval to be changed on the fly.
$! Examples
$!--------$! @mcjobs:sdp FM FM 00:00:05 -- job is run every 5 secs at fm
$! @mcjobs:sdp FM FM
-- job is run once only
$!
$ MarkType = p1
$ MarkPos = p2
$ TimeInt = p3
$ IF F$TRNLNM("reset_datum_interval") .NES. ""
$ THEN
$
QDISPLAY COMMENT NOTE THAT THE TIME INTERVAL
FOR SDP WAS SET BY THE LOGICAL
RESET_DATUM_INTERVAL
$
TimeInt=F$TRNLNM("reset_datum_interval")
$ ENDIF
$ emmaerr == ""
$!
$! Remember the initial mode (fab or sem)
$ QDISP MODE
$ OLDMODE = F$TRNLNM("VB_MODE")
$ QSET MODE FAB
$!
$! Remember the initial position
$ QMOVE POS/REL/SPO=SDP_ORIGINAL 0 0
$!
$! Carry out adjustment
$ QMOVE SPO 'MarkPos'
$ QLOCATE 'MarkType' SDP_TEMP /rel
$ STATUS = F$TRNLNM("ESTATUS")
$ IF STATUS .NES. "%X00000001"
$ THEN
$
QDISPLAY COMMENT "The mark could not be located and
no datum offset adjustment has been done"
$
GOTO SKIP_ADJUSTMENT
$ ENDIF
$!
$ REL_POS = F$TRNLNM("SDP_TEMP")
$ QDISPLAY COMMENT The datum offset was adjusted
by'F$ELEMENT(1,":",rel_pos)'
$ QADJUST DATUM SDP_TEMP /REL
$!
$ SKIP_ADJUSTMENT:
$ WRITE SYS$OUTPUT ""
$ QDISP POS /FULL
$ X = f$trnlnm("VB_DCPO_OFF_X")
$ Y = f$trnlnm("VB_DCPO_OFF_Y")
$ XY = f$extract(0,f$locate(".",X)+1,X) +
f$extract(f$locate(".",X)+1,7,X) + " " + f$extract(0,f$locate(".",Y)+1,Y) +
f$extract(f$locate(".",Y)+1,7,Y) + " " + f$time()
$ JOBFILE = F$ELEMENT(1,"]",f$trnlnm("VB_JOBFILE"))
$ JOBFILE = F$ELEMENT(0,".",JOBFILE)
$ IF F$SEARCH("MCLOG:''JOBFILE'_SDP.LOG") .NES. ""
$ THEN
$
OPEN/APPEND SDP MCLOG:'JOBFILE'_SDP.LOG
$
WRITE SDP XY
$
CLOSE SDP
$ ENDIF
Part Number:878275
Vectorbeam Operator Manual
Page 218
$!
$! Now move back to start position, resubmitting job if appropriate
$ MVSP SDP_ORIGINAL
$!
$ QSET MODE 'oldmode'
$ IF TIMEINT .EQS. "" THEN EXIT
$ QSET ONTIME 'TimeInt' "@MCJOBS:SDP.COM" "''MarkType'"
"''MarkPos'" "''TimeInt'"
19.2.4.
Example command
The command to reset the datum position at 30-minute intervals using the above
jobfile is:
VB_OPER>QSET ONTIME 00:30:00 “@MCJOBS:SDP.COM FM FM
00:30:00”
19.3.
Job preparation
The recommended way for inexperienced users to expose a substrate with a
prepared pattern is to follow the sequence below. Typically the user will want to
expose an array of patterns and this can be done efficiently using the “layout”
command. The layout command allows the definition of a rectangular array of
cells (see Figure 19.11) and will carry out a defined set of operations on each
cell in turn. The jobfiles described below make use of the layout command.
Experienced users may want to adapt the routine and files for their own
applications.
Figure 19.11: A layout of cells as used by the layout command.
19.3.1.
Layout parameter file set up
Copy the template file vb$jobs:layout_parameters_template.com to a suitable file
name for the exposure. The file defines various parameters for the exposure of a
layout as symbols in the Job Control Window. Edit the file and change the
parameters to those required. These symbols are used by a second file
WLVD.COM which issues all the required commands to expose the defined
layout .
$! ************************** Header for all layout parameter files ************************
$ ON ERROR THEN GOTO FINISH_ALL
Part Number:878275
Vectorbeam Operator Manual
Page 219
$ ON CONTROL_C THEN GOTO FINISH_ALL
$ ON CONTROL_Y THEN GOTO FINISH_ALL
Defines operation when jobfile is cancelled.
$ TYP 'F$ENVIRONMENT("PROCEDURE")'
Types parameter file so it can be checked.
$ SJOB 'F$ENVIRONMENT("PROCEDURE")'
Types up name of this parameter file in Emma status window. SJOB sets the
logical vb_jobfile which is used later to automatically create a logfile with the
same name as the parameter file
$!**************************** End header *******************************
$ HOLDER
:= H_069K
Defines which holder initialisation sequence is to be carried out. If 999 is given
then no initialisation sequence is carried out.
$ CALIBRATE
:== 1
Determines whether jobcal is carried out. If 0 is given then no jobcal is carried
out unless a beam is defined to be loaded (see below).
$ WORKFILE
:== DEVICE_LAYER_1
Defines the name of the pattern file to be exposed (No .FRE or .VEP extension).
The pattern file must be in the VB$PATS directory.
$ WORKFILE_VRU
== 4
Defines the VRU.
$ STARTDOSE
:== 14
Defines the start dose in µC/cm2.
$ DOSESTEP
:== 1
Defines the dose interval between successive dies if the operator (see below) is
either + or *. If the operator is 0 then each die is exposed with the start dose and
the dosestep is not used.
$ OPERATOR
:== + [cell]
Defines the method of changing the dose within a layout and comprises of two
parts. The first part of the operator can be either 0, + or *. The second part of the
operator is optional (defaults to cell) and can be cell, column or row.
If the first part of the operator is +, the dose for a cell is calculated as startdose +
n*dosestep (dosestep is in µC/cm2) where n depends on the secord part. If the
first part of the operator is *, the dose for cell is calculated as startdose *
dosestepn (dosestep is a number) where n depends on the second part.
If the second part is cell, n is incremented by 1 starting at 0 for each successive
cell in the order in which they are exposed. If the second part is row, n is the (row
number - 1) so that the dose depends on the row number with the startdose
being in row 1. If the second part is column, n is the (column number - 1) so that
the dose depends on the column number with the startdose being in column 1.
$ BEAM
:== 100kv_10nA_300um
Defines the name of the beam to be restored before starting. The database file
with the appropriate column settings must have been saved previously in the
directory “mcdb” with the extension “.test” (mcdb:100kv_10na_300um.test). If
999 is given then no beam is loaded.
$ PITCHINX
Part Number:878275
:== 4
Vectorbeam Operator Manual
Page 220
Defines the pitch in mm in the x direction between dies.
$ PITCHINY
:== 2
Defines the pitch in mm in the y direction between dies.
$ CELLSINX
:== 10
Defines the number of dies in the layout in the x direction.
$ CELLSINY
:== 5
Defines the number of dies in the layout in the y direction.
$ LAYOUTCENTRE
:== 70.000 62.500
Defines the stage position in mm of the centre of the layout of the dies (This is
the only parameter which fixes the relationship between the stage coordinates
and the die co-ordinates on the substrate, even if direct write is used.).
This parameter may be set to RELATIVE instead of an X Y coordinate, in which
case the layout centre is taken as the current position of the stage when the file
WLVD.COM is called. This is useful for nested layouts (see Section “Nested
layouts”).
$ MAINSCAN
:== Serpentine
Defines the order in which the main dies are exposed. This can either be
serpentine or raster.
$ DROPOUTS
== 3
Defines the number of groups of dies to be dropped out (A “dropped out” die
means that the workfile pattern is not exposed at that die). The dropouts are
arranged into separate groups in order to allow different plugins - see below. The
dies belonging to each group must also be defined, as shown below, by defining
the symbols dropoutcells_1 to dropoutcells_n where n is the same as the
number of dropouts.
$ DROPOUTCELLS_1
$ DROPOUTCELLS_2
$ DROPOUTCELLS_3
:== 1,3 10,3 9,9
:== 5,1 6,5
:== 5,3
Each symbol defines a group of dies to be dropped out. A group may contain up
to 10 cells listed as shown. All the dies contained in the first n groups, where n is
the number of dropouts, will be dropped out.
$ PLUGIN
== 2
Defines how many of the groups of dropouts defined above are to be plugged in
(A plugin die means that a pattern file, which is defined below, is exposed at that
die) The plugin process begins with the first group of dropouts using the first
plugin pattern defined and continues sequentially through the defined groups
using the corresponding plugin patterns. This enables several different patterns
to be defined within one layout. If fewer plugin groups than dropout groups are
defined then no exposure is carried out at any of the dies in the remaining
groups of dropouts.
$ PLUGINWORKFILE_1
$ PLUGINWORKFILE_2
:== ENGINEERING_DIE_1
:== TEST_DIE_1
Defines the names of the pattern files to be exposed at each die in a group of
plugin dies. The patterns for each group must be defined by defining the symbols
pluginworkfile_1 to pluginworkfile_n where n is the same as the number of
plugins.
$ RESET_DATUM_INTERVAL :== 00:30:00
Defines the interval during pattern exposure at which the datum is reset using
mcjobs:sdp.com. Set to 999 if this is not required.
Part Number:878275
Vectorbeam Operator Manual
Page 221
$ CALIBRATE_INTERVAL
:== 02:00:00
Defines the interval during pattern exposure at which jobcal is run using
mcjobs:reset_ontime_jobcal.com. Set to 999 if this is not required.
$ DISPLAY
:== none
Defines whether the cell index is typed up before processing each cell. Can be
set to none or cell.
$ SORTMODE
:== normal
Defines the subfield sorting strategy used by the pattern generator. Usually set to
normal but can be set to nosort to minimise subfield stitch errors for some
applications.
$ RECOVERY_DO
$ RECOVERY_DOSE
$ RECOVERY_MOVE
$ RECOVERY_PATTERN
:== continue
:== continue
:== continue
:== continue
Defines the error recovery actions. Can be set to either continue, manual, redo,
skip, stop or user=@JOB_NAME
$ @VB$SEQ:WLVD.COM [optional DCL command or Emma command]
This line calls the file that carries out the necessary operations to expose the
layout as defined. If no command is put after the wlvd.com, the pattern is
exposed at each layout cell. If an Emma command or DCL command is put after
the wlvd.com e.g.
$ @vb$seq:wlvd.com "qdisplay height"
or
$ @vb$seq:wlvd.com "@[directory]expose_both_patterns.com"
this command will be run at each layout cell instead of the qexpose pattern
command. (The file expose_both_patterns.com must have $
OPEN/APPEND/SHARE POST$EMMA MAILBOX$EMMA as the first line and
then any usual Emma and DCl commands)
Multiple layouts can be exposed by one parameter file by repeating the above
sequence in the same file. The parameters can be thus redefined and must be
followed each time by the line running the file wlvd.com . The wlvd.com file is
described below.
$ FINISH_ALL:
This is the line to which the software jumps when control_c or control_y is
pressed. This line is placed at the end of this file so that if the file contains more
than 1 layout, all following layouts are not executed and operation stops
immediately.
19.3.2.
Check that the required writing frequency is within range
Check that the selected dose, beamstep and beam current result in a pattern
generator frequency within the machine’s range and adjust the conditions if
necessary. Type cfreq in the job control window.
VB_OPER>CFREQ
Respond to questions.
VB5 and VB6 exposure conditions calculator
Part Number:878275
Vectorbeam Operator Manual
Page 222
Version: V01.01, date: 8-Jan-2001
Copyright (c) Leica Microsystems Lithography Ltd, Cambridge, UK.
Enter required calculation (F)requency,(C)urrent,(D)ose or (B)eamstep : f
Enter required dose type (A)rea,(L)ine or (P)oint : a
Enter beam current (nA) : 1
Enter area dose (uC/cm2) : 400
Enter beam step size (nm): 25
Frequency = 400.000 kHz
19.4.
Machine preparation
19.4.1.
Machine parameter configuration
Load all the required machine parameters. See Section “Database selection prior
to exposing” in Chapter “Databases”.
19.4.2.
Load holder on stage
See Section “Holder loading/unloading..” for description of how to load the holder
containing the substrate on the stage.
19.4.3.
19.4.3.1.
Confidence checks
Substrate height map check
Although this check is run automatically prior to exposure by wlvd.com it may be
useful to run it so that errors can be corrected. See Section “Height map
measurement” for details.
19.4.3.2.
Beam current check
Set up beam for exposure or load all the saved beams to be used and measure
beam current as described in the Section “Beam current measurement”.
Measure the beam current uniformity.
19.4.3.3.
Jobcal check
1. Run jobcal and note any warnings given by the program.
2. Check the noise in the calibration values as described in the Section
“Jobcal”.
19.4.3.4.
Main field distortions check
In order to verify that the main field distortions are valid use the main field
distortion calibration command with noupdate:
VB_OPER> CMFI/DIST/GRID=8/NOALIGN/COVER=..../NOUPDATE
The accuracy required will depend on the application. Repeating fullcal should
improve the accuracy to better than +/- 0.02.
Part Number:878275
Vectorbeam Operator Manual
Page 223
19.4.3.5.
Autostitch / overall calibration check
Use the measure autostitch routine on marks on a substrate (see Section
“Autostitch” in Chapter “Diagnostics”. This tests whether the mainfield, subfield
BEF, field corrections and height corrections are OK.
19.4.3.6.
Progress until exposure check
When the exposure has been started (see next Section) monitor the progress
until the actual pattern exposure begins.
19.5.
Expose (finally!)
When all the preparation has been done type :
VB_OPER> @filename.com
The correct sequence of operations to expose the layout will be carried out
(assuming that the parameters are correct!) by the file wlvd.com.
19.5.1.
19.5.1.1.
Interrupting exposure
Pause
The operations can be paused by pressing pause in the Emma Status Window.
19.5.1.2.
Stop
The job file commands can be interrupted by CTRL C first and then the pattern
exposure can be interrupted by pressing abort in the Emma Status Window.
Continue must then be pressed to allow Emma to continue.
19.5.2.
Wlvd.com
Issues commands to expose the layout defined in the parameter file. All Emma
commands are written in the full form (beginning with q) to avoid additional time
overheads associated with translating the mnemonics.
$ OPEN/APPEND/SHARE POST$EMMA MAILBOX$EMMA
This line is necessary so that Emma commands can be issued from a jobfile
called from another jobfile.
$ SET ON
Enable DCL error checking
$ ON CONTROL_C THEN GOTO FINISH_WLVD
$ ON CONTROL_Y THEN GOTO FINISH_WLVD
Define the actions taken on early termination.
$ ON ERROR THEN GOTO FINISH_WLVD
Set up error handling
$ ORIGINALFILE == F$TRNLNM(“VB_LOGFILE”)
Save existing logfile name before redirecting logging to new file.
$ JOB == F$TRNLNM("VB_JOBFILE")
Obtain jobfile name from logical vb_jobfile which is set using sjob command
$ JOBFILE:== 'F$ELEMENT(1,"]",JOB)'
$ JOBFILE:== 'F$ELEMENT(0,".",JOBFILE)'
Extract jobfile name from string containing complete directory and file name.
Part Number:878275
Vectorbeam Operator Manual
Page 224
$ DEFINE/GROUP/USER/NOLOG VB_LOGFILE "MCLOG:''JOBFILE'.LOG"
$ QSET OUT OFF
$ QSET OUT OFF
$ QSET OUT ON
Redirect the output to the new logfile with the same name as the job.
$ IF LAYOUTCENTRE .EQS. “RELATIVE” THEN QMOVE POS/REL/SPO=RELCENTRE 0 0
Create position symbol containing current position if the layout is defined as
being relative to current position. This is for nested layouts.
$ QSET CORR ON/ALL
Makes sure that all the corrections will be applied.
$ QSET HEIGHT/REALTIME
Makes sure that the heightmeter is working in real-time mode.
$ QMAP DWMODE ABSOLUTE/LOAD
Makes sure that exposures are carried out in absolute mode and not
mapped mode.
$ QSET SORT NORMAL
Makes sure that the exposure of shapes is carried out subfield by
subfield.
$ QSET VRU ‘WORKFILE_VRU’
Sets the vru to workfile_vru defined in the parameter file.
$ WORKFILE == F$EDIT(workfile,”UPCASE”)
$ IF WORKFILE .NES. "GRATING" .AND. WORKFILE .NES. “NONE”
Grating and none are options for the qset pattern command that don’t require
pattern files.
$ THEN
Deal with possible VEP or FRE file and any underlapping or overlapping with
FRE file
$
WORKFILE=F$EDIT(WORKFILE,"COLLAPSE")
Underlapping or overlapping specified - only used for FRE files
$
IF F$ELEMENT(1,"/",workfile) .NES. "/" THEN WFILE =
"VB$PATS:''f$element(0,"/",workfile)'.FRE/''f$element(1,"/",workfile)'
No underlapping or overlapping specified - default to VEP but if not present then
select FRE
$
IF F$ELEMENT(1,"/",workfile) .EQS. "/"
$
THEN
$
WFILE = "VB$PATS:''f$element(0,"/",workfile)'.VEP"
$
IF (f$search("''WFILE'") .eqs. "" ) THEN WFILE =
"VB$PATS:''f$element(0,"/",workfile)'.FRE"
$
ENDIF
$ ELSE
$
WFILE = WORKFILE
Sets the workfile equal to “grating” keyword.
$ ENDIF
$ QSET RESIST ‘STARTDOSE’
Sets the resist sensitivity to startdose defined in the parameter file.
$ IF HOLDER .NE. “999” THEN @VB$SEQ:HOLDER_TABLE ‘HOLDER’
If a holder number is specified then intialise the holder.
$ IF HOLDER .NE. “999” THEN @VB$ACCS:ACC_PLATEHEIGHT
If a holder number is specified then map the substrate height.
Part Number:878275
Vectorbeam Operator Manual
Page 225
$ IF BEAM .NE. "999"
$ THEN
$ IF F$ELEMENT(1,".",beam) .NES. "."
$ THEN
$
QFILE LOAD "MCDB:''beam'"/'F$ELEMENT(1,".",beam)'
$
QSET MODE FAB/RESTORE='F$ELEMENT(1,".",beam)'
$ ELSE
$
QFILE LOAD "MCDB:''beam'.TEST"/TEST_COL
$
QSET MODE FAB/RESTORE=TEST
$ ENDIF
$ ELSE
$
QSET MODE FAB
$ ENDIF
If a beam is specified then select that beam (if the extension is not specified it
defaults to .test) otherwise set fab mode.
$ IF CALIBRATE .EQS. “1” .OR. BEAM .NES. “999”
$ THEN
$
QMOVE SPO FM
$
VID_P
$
WAIT 00:00:03
$
VID_H
Do video adjustment until jobcal can cope by itself.
$
JOBCAL
Run jobcal before exposure if so defined in the parameters file.
$
DEFINE/GROUP/NOLOG/USER VB_JOBFILE 'JOB'
Reset logical which sjob command in jobcal has overwritten
$ ENDIF
$ CLOCKFILE = “VB$PATS:’’WORKFILE’.CLK”
Creates a local symbol containing the filename with extension .CLK.
$ if (f$search(“‘’CLOCKFILE’” .nes. “” )
$ THEN
$
QDISPLAY COMMENT Executing clock file ’CLOCKFILE’
$
@’CLOCKFILE’
If clockfile exists then run it. See “Example clockfile” in Chapter “Exposure dose”.
$ ELSE
$
QDISPLAY COMMENT No clock file - setting all clocks to relative dose 1
$
QSET DOSE 0-31 1
$ ENDIF
If no clockfile is present then the clocks are set to give a relative of 1. If the
pattern contains realtive doses then this will be overriden by the next step.
$ QSET PATTERN 'WFILE'
Select pattern. This will set any relative doses contained in the pattern
$ LAYOUT CLEAR
Clears any existing definitions.
$ LAYOUT PATTERN ‘WFILE’
Define pattern file.
$ MAINSCAN[0,32] :== 'MAINSCAN'
$ MAINSCAN :== 'F$EDIT(MAINSCAN,"COLLAPSE")'
Create symbol mainscan in case one was not defined in the parameter file but
keep any string if one was defined.
Part Number:878275
Vectorbeam Operator Manual
Page 226
$ IF MAINSCAN .NES. ""
$ THEN
$
LAYOUT MAIN 'MAINSCAN'
$ ELSE
$
QDISPLAY COMMENT NOTE: THE SYMBOL MAINSCAN HAS NOT BEEN
DEFINED
$
QDISPLAY COMMENT NOTE: THE DEFAULT SERPENTINE WILL BE USED
$ ENDIF
Define order of dies
$ IF LAYOUTCENTRE .EQS. “RELATIVE”
$ THEN
$
LAYOUT RECT 0 0 ‘PITCHINX’ ‘PITCHINY’ ‘CELLSINX’ ‘CELLSINY’ CENTRE
RELATIVE
$ ELSE
$
LAYOUT RECT ‘LAYOUTCENTRE’ ‘PITCHINX’ ‘PITCHINY’ ‘CELLSINX’ ‘CELLSINY’
CENTRE
$ ENDIF
Defines rectangular layout.
$ LAYOUT DOSE ‘STARTDOSE’ ‘DOSESTEP’ ‘OPERATOR’
Sets the dose parameters to those defined in the parameter file.
$ IF DROPOUTS .EQ. 0 THEN GOTO ENDDROPOUT
Define the dropout and plugin cells in sequence if any.
$ LAYOUTDROPOUT:
$ COUNT=1
$ LAYOUTDROPOUT_LOOP:
$ DROPOUTCELLS = DROPOUTCELLS_’COUNT’
Creates local symbol containing the name of the global symbol defined in the
parameter file
$ LAYOUT DROPOUT ‘DROPOUTCELLS’
Issues command to define the dropouts to be those contained by the global
symbol in the parameter file.
$ IF COUNT .LE. PLUGIN
$ THEN
$ PLUGINFILE = PLUGINWORKFILE_'COUNT'
$ IF PLUGINFILE .NES. ""
$ THEN
$
IF (F$SEARCH("VB$PATS:''PLUGINFILE'.FRE") .EQS. "")
$
THEN
$
QDISPLAY COMMENT ERROR: CANNOT FIND
VB$PATS:'PLUGINFILE'.FRE
$
GOTO ERROR_WLVD
$
ENDIF
$
LAYOUT PLUGIN VB$PATS:'PLUGINFILE'.FRE
$ ENDIF
$ ENDIF
$ IF COUNT .EQ. DROPOUTS THEN GOTO ENDDROPOUT
$ COUNT=COUNT+1
$ GOTO LAYOUTDROPOUT_LOOP
$ ENDDROPOUT:
Defines any plugins as those cells just dropped out using layout.
$ DISPLAY[0,32] :== 'DISPLAY'
$ DISPLAY :== 'F$EDIT(DISPLAY,"COLLAPSE")'
$ IF DISPLAY .NES. "" THEN LAYOUT DISPLAY 'DISPLAY'
Part Number:878275
Vectorbeam Operator Manual
Page 227
$ RECOVERY_DO[0,32] :== 'RECOVERY_DO'
$ RECOVERY_DO :== 'F$EDIT(RECOVERY_DO,"COLLAPSE")'
$ IF RECOVERY_DO .NES. "" THEN LAYOUT RECOVERY DO 'RECOVERY_DO'
$ RECOVERY_DOSE[0,32] :== 'RECOVERY_DOSE'
$ RECOVERY_DOSE :== 'F$EDIT(RECOVERY_DOSE,"COLLAPSE")'
$ IF RECOVERY_DOSE .NES. "" THEN LAYOUT RECOVERY DOSE 'RECOVERY_DOSE'
$ RECOVERY_MOVE[0,32] :== 'RECOVERY_MOVE'
$ RECOVERY_MOVE :== 'F$EDIT(RECOVERY_MOVE,"COLLAPSE")'
$ IF RECOVERY_MOVE .NES. "" THEN LAYOUT RECOVERY MOVE 'RECOVERY_MOVE'
$ RECOVERY_PATTERN[0,32] :== 'RECOVERY_PATTERN'
$ RECOVERY_PATTERN :== 'F$EDIT(RECOVERY_PATTERN,"COLLAPSE")'
$ IF RECOVERY_PATTERN .NES. "" THEN LAYOUT RECOVERY PATTERN
'RECOVERY_PATTERN'
Sets the display and error recovery behaviour. Symbols are created in case they
weren’t defined for backwards compatibility.
$ WRITE SYS$OUTPUT ""
$ LAYOUT INFO
$ WRITE SYS$OUTPUT ""
Types the current layout command settings.
$ IF LAYOUTCENTRE .EQS. “RELATIVE”
$ THEN
$
QMOVE SPO RELCENTRE
$ ELSE
$
QMOVE POS ‘CENTRE’
$ ENDIF
$ QDISPLAY HEIGHT/TAB=‘SUBSTRATE_TYPE’
Set the height meter to the table for the substrate (jobcal sets the table to 7).
$ RESET_DATUM_INTERVAL[0,32] :== 'RESET_DATUM_INTERVAL'
$ RESET_DATUM_INTERVAL :== 'F$EDIT(RESET_DATUM_INTERVAL,"COLLAPSE")'
Create symbol reset_datum_interval in case one was not defined in the
parameter file but keep any string if one was defined.
$ IF RESET_DATUM_INTERVAL .EQS. ""
$ THEN
$ QDISPLAY COMMENT NOTE: THE SYMBOL RESET_DATUM_INTERVAL HAS NOT
BEEN DEFINED
$ QDISPLAY COMMENT NOTE: THE DEFAULT NO DATUM RESET USING ONTIME WILL
BE USED
$ ENDIF
$ IF RESET_DATUM_INTERVAL .NES. "999" .AND. RESET_DATUM_INTERVAL .NES. ""
$ THEN
$ HH == F$ELEMENT(0,":",reset_datum_interval)
$ MM == F$ELEMENT(1,":",reset_datum_interval)
$ SS == F$ELEMENT(2,":",reset_datum_interval)
$ IF F$TYPE(HH) .NES. "INTEGER" .OR. F$TYPE(MM) .NES. "INTEGER" .OR.
F$TYPE(SS) .NES. "INTEGER"
$ THEN
$
QDISPLAY COMMENT RESET_DATUM_INTERVAL SYMBOL NOT CORRECT
$
GOTO ERROR_WLVD
$ ENDIF
Check syntax of time interval
$ OPEN/WRITE SDP MCLOG:'JOBFILE'_SDP.LOG
$ WRITE SDP "START NEW SDP LOGFILE ''JOBFILE'_SDP.LOG ''F$TIME()'"
$ CLOSE SDP
Create new separate logfile for periodic adjust datum using ontime
Part Number:878275
Vectorbeam Operator Manual
Page 228
$ @MCJOBS:SDP.COM FM FM 'reset_datum_interval'
$ ENDIF
Set up ontime for resetting the datum.
$ CALIBRATE_INTERVAL[0,32] :== 'CALIBRATE_INTERVAL'
$ CALIBRATE_INTERVAL :== 'F$EDIT(CALIBRATE_INTERVAL,"COLLAPSE")'
Create symbol calibrate_interval in case one was not defined in the parameter
file but keep any string if one was defined.
$ IF CALIBRATE_INTERVAL .EQS. ""
$ THEN
$ QDISPLAY COMMENT NOTE: THE SYMBOL CALIBRATE_INTERVAL HAS NOT BEEN
DEFINED
$ QDISPLAY COMMENT NOTE: THE DEFAULT NO REPEAT JOBCAL USING ONTIME
WILL BE USED
$ ENDIF
$ IF calibrate_interval .NES. "999" .AND. CALIBRATE_INTERVAL .NES. ""
$ THEN
$ HH == F$ELEMENT(0,":",calibrate_interval)
$ MM == F$ELEMENT(1,":",calibrate_interval)
$ SS == F$ELEMENT(2,":",calibrate_interval)
$ IF F$TYPE(HH) .NES. "INTEGER" .OR. F$TYPE(MM) .NES. "INTEGER" .OR.
F$TYPE(SS) .NES. "INTEGER"
$
THEN
$
QDISPLAY COMMENT CALIBRATE_INTERVAL SYMBOL NOT CORRECT
$
GOTO FINISH_WLVD
$ ENDIF
Check syntax of time interval
$ QSET ONTIME 'calibrate_interval' @MCJOBS:RESET_ONTIME_JOBCAL.COM
'calibrate_interval'
$ ENDIF
Set up ontime for running jobcal.
$ QDISPLAY COMMENT ’f$time()’: Started exposing ‘workfile’
Log the start time.
$ IF P1 .EQS. “” THEN LAYOUT DO “QEXPOSE PATTERN/NOPOSTMOVE”
$ IF P1 .NES. “” THEN LAYOUT DO “‘’P1’”
Expose the layout. If a string was passed to wlvd.com then issue this string
(should be a valid command) at each layout position instead of QEXPOSE
PATTERN.
$ QDISPLAY COMMENT ’f$time()’: Finished exposing ‘workfile’
Log the finish time.
$ ERROR == 1
Success error code
$ GOTO FINISH_WLVD
$ ERROR_WLVD:
$ ERROR == 44
Fatal or severe error code
$ FINISH_WLVD:
$ IF LAYOUTCENTRE .EQS. “RELATIVE” THEN QSET PATTERN NONE
If a relative layout has been processed then set the pattern back to none to avoid
offsets being introduced for pattern centring by next top level layout move.
$ QSET NOONTIME
Part Number:878275
Vectorbeam Operator Manual
Page 229
$ QSET NOONTIME
Switch off ontime timers - each requires a separate command
$ DEFINE/GROUP/USER/NOLOG VB_LOGFILE 'ORIGINALFILE'
Reset original logfile as output.
$ QSET OUT OFF
$ QSET OUT OFF
$ QSET OUT ON
$ EXIT ERROR
Pass the error status back to the parameter file.
19.6.
Nested layouts
It is possible to define a layout of a layout. An example of this is shown in Figure
19.12.
Figure 19.12: Nested layouts.
Nested layouts can be used by defining the top-level layout to call a second-level
layout at each position. The important points to note are that:
•
the centre of the top level layout is defined as a stage coordinate as
usual but the centre of the second level layout must be taken as the
centre of each top level die. This is done by using the option in the
layout command to define the centre as “relative”.
•
The workfile should be defined as “none” in the top level layout to
avoid any offset in the second level due to pattern centring.
An example jobfile is shown below
19.6.1.
Top level layout parameter file
The dose, dosestep and operator in this top level file are not used for the
exposures carried out by the second level jobfile.
$ ON CONTROL_C THEN GOTO FINISH_ALL
$ ON CONTROL_Y THEN GOTO FINISH_ALL
$ TYP 'F$ENVIRONMENT("PROCEDURE")'
$ SJOB 'F$ENVIRONMENT("PROCEDURE")'
$ holder
:== 999
! 6 inch mask 999 = dont init holder
Part Number:878275
Vectorbeam Operator Manual
Page 230
$ calibrate :== 0
! calibrate
$ workfile :== none
! No pattern file
$ workfile_vru
== 1
! 12.5 nm beamstep (vru*res)
$ startdose :== 135
! uc/cm^2 20 KV
$ dosestep :== 0.00
! 1 x overall
$ operator :== 0
! 0 (no update), + or *
$ beam
:== 20kV_5NA_600um
! max 5.25 na 999 = don't restore
beam
$ pitchinx :== 50
! in mm
$ pitchiny
:== 50
! in mm
$ cellsinx
:== 3
$ cellsiny
:== 3
$ layoutcentre
:== 77.500 90.500
! X Y position in mm
$ mainscan:== Serpentine ! Serpentine (default) or raster
$ dropouts == 1
! No. of groups of dropouts
$ dropoutcells_1
:== 2,2
$ plugin
== 0
! No. of groups of plugins
$ pluginworkfile_1 :== plugin_00
$ reset_datum_interval :== 999
$ calibrate_interval
:== 999
$!
$ @VB$SEQ:WLVD.COM @[VB.USERS.JOB_FILES]SECOND_LEVEL.COM
$!
$ FINISH_ALL:
19.6.2.
Second level layout parameter file
The name of this jobfile is “SECOND_LEVEL.COM”
$ ON CONTROL_C THEN GOTO FINISH_ALL
$ ON CONTROL_Y THEN GOTO FINISH_ALL
$ TYP 'F$ENVIRONMENT("PROCEDURE")'
$ SJOB 'F$ENVIRONMENT("PROCEDURE")'
$ holder
:== 999
! 6 inch mask 999 = dont init holder
$ calibrate :== 0
! calibrate
$ workfile :== VERNCHECKA
! 12.5 nm res
$ workfile_vru
== 1
! 12.5 nm beamstep (vru*res)
$ startdose :== 135
! uc/cm^2 20 KV
$ dosestep :== 0
! 1 x overall
$ operator :== 0
! 0 (no update), + or *
$ beam
:== 999
! 2 na 999 = don't restore beam
$ pitchinx :== 0.75
! in mm
$ pitchiny :== 0.75
! in mm
$ cellsinx :== 3
$ cellsiny :== 3
$ layoutcentre
:== relative
! X Y position in mm
$ mainscan:== Serpentine ! Serpentine (default) or raster
$ dropouts == 1
! No. of groups of dropouts
$ dropoutcells_1 :== 3,1 2,2 3,2
$ plugin
== 0
! No. of groups of plugins
$ pluginworkfile_1 :== plugin_00
$ reset_datum_interval :== 999
$ calibrate_interval
:== 999
$!
$ @VB$SEQ:WLVD.COM
$!
$ FINISH_ALL:
Part Number:878275
Vectorbeam Operator Manual
Page 231
20.
Direct write alignment
Direct write alignment is the process that aligns one pattern to an existing pattern
on the substrate. All the direct write methods used on the VB are based on
mapping the machine’s absolute co-ordinate system to match the substrate’s coordinate system. This allows substrate design distances to be used directly for
positioning the stage and the beam and so when a pattern, which is laid out in
CAD coordinates, is exposed it will be accurately positioned relative to the
existing pattern. In order for the VB to be able to calculate the mapping
coefficients, both the design dimensions and the dimensions measured on the
machine must be known.
There are two mapping modes called absolute. One is a stage mode,
which uses mapping coefficients to compensate for any positioning
errors from absolute. The other is a direct write mode for which the
mapping coefficients are all zero. The appropriate stage mode is used
in addition to the direct write mode.
Figure 20.1: Schematic of the various errors to be corrected with direct write mapping
coefficients. The black squares are the expected and the white squares are the measured
positions of the alignment marks.
20.1.
Direct write alignment methods
Many direct write alignment methods are possible and the best method will
depend on the application. The differences between the methods relate to the
number and proximity of marks used per exposure.
Regular rectangular arrays of marks are the ones most commonly encountered
and a template jobfile, which supports such arrays, is described below and
supplied as part of the Applications jobfiles release. However, the underlying
Emma mapping command can operate with marks, which are not on a regular
grid and other template files are available which allow for irregular grids, irregular
layouts, irregular sequencing and alternative marks.
Part Number:878275
Vectorbeam Operator Manual
Page 232
20.1.1.
Global alignment
Global alignment is normally always carried out as the first step in any alignment
scheme. Global alignment may also be the only alignment step. Global alignment
is faster because only a few marks are located before exposing all the substrate
but consequently less accurate than die-by-die alignment.
20.1.2.
Die-by-die alignment
Die-by-die alignment is slower but more accurate than global alignment. As
several marks close to each die are aligned, localised substrate or pattern
distortions will be taken into account and this method is therefore more accurate.
20.1.3.
Direct alignment commands on the VB
The implementation of all the various methods involves the appropriate use of
just two commands:
1. The first command is the generation of the mapping coefficients from the
design (expected) positions of the pattern already on the substrate and the same
distances as measured (observed) on the machine. e.g.
VB_OPER>QMAP DWCOORDS WAFER /EXPECTED=(E1, E2, E3, E4)
/OBSERVED=(O1,O2,O3,O4)
The direct write transformation using four marks does not function if
the marks are in a cross pattern “+”. Imagine distorting a square into a
keystone shape. The midpoints of the sides of the square do not
move at all. Consequently it can be seen that the keystone values are
not defined by marks in a “+” pattern. If a substrate already has marks
defined in a “+” pattern then use three mark alignment.
2. The second command is the loading of the coefficients into the stage and
deflection systems.
VB_OPER>QMAP DWMODE WAFER/LOAD
Note that if the qmap dwenter command is used it immediately issues
a qmap dwmode/load command automatically if the mode named in
qmap dwenter is the current mapped mode.
20.1.3.1.
Advanced note on expected positions
The expected positions are taken from the CAD data and supplied to the QMAP
DWCOORDS command as position identifiers. The position identifiers are set up
using the QSET SPO command. It is expected that under no circumstances are
they obtained by mark location because this would give an observed, not
expected, position. Consequently it is only the numbers themselves that matter
for the expected positions; the mode is assumed to be the mode about to be
mapped into. (It must be the mode about to be mapped into, because once the
mapping has been done and the new mode loaded, it is expected that after
typing QMOVE POS <expected position of E1>, the mark E1 is exactly on axis.
Of course, if E1 is defined to be in Absolute mode and then QMOVE POS E1 is
typed, E1 will not be on axis. To be unambiguous the command
SSPO/DWMAP=<new mode> could be used when setting up expected
positions.)
The software does not insist that the mode of expected positions MUST be the
mode about to be mapped into, although this is the default.
Part Number:878275
Vectorbeam Operator Manual
Page 233
If the command QMOVE POS /REL/SPO=... is used to set up the expected
positions in a mode other than Absolute, then this implicitly bases the expected
positions on the results of previous mark locations.
20.2.
A general direct write alignment method for regular
rectangular arrays
An alignment scheme and associated jobfiles have been developed for the
Vectorbeam enabling global alignment with the option of die-by-die alignment to
any regular rectangular array of marks. The jobfile parameters can be chosen to
give a variety of different alignment schemes. The main steps, described below,
in this general alignment scheme are:
1. Optional alignment of reference feature.
2. Alignment of first global mark.
3. Alignment of a further 1, 2 or 3 global marks.
4. Optional die-by-die alignment.
20.2.1.
Global alignment
Global alignment must be carried out if any alignment is required. It may be used
as the only alignment before exposure or as the setup in order to be able to use
die-by-die alignment. Steps 1 to 3 above carry out the global alignment.
The uncertainty in the position of the substrate on the holder after a substrate
has been loaded will be several tens of microns at best and may be as much as
a few mm. This uncertainty will be mainly in X and Y as the rotation of the
substrate will have been matched to the stage using the alignment microscope.
Therefore the first step is to find one mark or feature and eliminate this X and Y
shift so that subsequent marks can be more easily found. If the uncertainty in the
positions of any of the mark is more than the maximum coarse search range of
the mark locate, or if a reference feature is used, then manual global alignment
must be carried out in SEM mode.
20.2.1.1.
Optional alignment of reference feature
As an option, a reference feature may be used as the first global alignment
feature. This feature does not have to be an alignment mark and must be aligned
manually in SEM mode. This option is chosen to avoid accidental exposure of
device areas during the initial search on the substrate as the reference feature is
usually well away from the dies to be exposed. Once the reference feature has
been found the X and Y substrate insertion errors are eliminated and uncertainty
in the positions of further marks is lower.
20.2.1.2.
Alignment of first global mark
If the reference feature option is not used, then the uncertainty in the position of
the substrate after the substrate has been loaded will be present when searching
for the first mark. If the uncertainty in the position of the first mark is more than
the maximum coarse search range then manual global alignment must be
carried out in SEM mode. If the reference feature option is used then the first
global mark will still be located.
20.2.1.3.
Alignment of further global marks
After the reference feature and first global alignment mark or just first global
alignment mark have been found, the uncertainties in the positions of further
marks for global alignment will be much smaller (typically < 100 µm) and depend
Part Number:878275
Vectorbeam Operator Manual
Page 234
mostly on the rotation of the substrate. 1, 2 or 3 further marks on the substrate,
as far apart as possible, are aligned making a total of 2, 3 or 4 global marks. If a
total of 2 marks are used, the direct write mapping will use an X and Y offset and
the same scale and rotation in both X and Y. If a total of 3 marks are used, the
direct write mapping will use an X and Y offset and separate X and Y scales and
rotations. If a total of 4 marks are used rather than 3, the direct write mapping
can correct for keystone errors and will be more accurate. The mapping
coefficients generated are used for either for moving accurately to the die-by-die
alignment marks or for exposing the dies directly.
20.2.2.
Die-by-die alignment
A 2, 3 or 4 mark global alignment is carried out first as described above. The
global alignment enables alignment marks associated with each die to be placed
accurately within the automatic mark locate search range. The uncertainty in the
position of these marks will be determined as much by the accuracy in their
manufacture as by the machine operation and can be less than 1 µm. The dieby-die alignment is usually fully automatic and consists of aligning to each die in
turn and exposing.
20.3.
Layout definition for regular rectangular alignment
mark arrays
The “layout” program utility is used to access any regular 2-D rectangular array
of positions on any substrate by referring to indices rather than coordinates.
20.3.1.
Global alignment mark layout
An example substrate with global alignment marks is shown in Figure 20.2 along
with the chosen layout of 2 x 2 global cells. The 2 x 2 layout allows all the global
marks to be accessed (other layouts might also work). The global cell layout is
only used to carry out the global alignment and then the die layout is selected.
The centre of the global cell layout is always taken to be at the same position as
the centre of the die layout and this is what relates the positions.
If GlobalPitchX is positive, GlobalPitchY is positive, Global_OffsetX and
Global_OffsetY are negative, and Global_OffsetX and Global_OffsetY are
positive, the indices of the global alignment marks are as shown in the diagram.
The order in which the marks are visited is global_cell_1 followed by
global_cell_2 followed by global_cell_3 followed by global_cell_4. A good set of
marks would be 1 1 1, 2 1 2, 2 2 3 and 1 2 4 as they are all outside the area to
be aligned and exposed.
Part Number:878275
Vectorbeam Operator Manual
Page 235
Figure 20.2: Diagram showing the meaning of global alignment mark layout parameters.The
mark indices are correct assuming that Global_Offset_X is negative, Global_CDCX is
positive, GlobalPitchX is positive and GlobalPitchY is positive.
20.3.1.1.
Global cell
A global cell refers to one of the rectangular areas on the substrate defined by
the global layout parameters. The parameters defining the layout of global cells
can often be chosen in several different ways so that they contain some of the
global alignment marks on the substrate. The global cells layout should be
chosen to make the required global marks on the substrate available to the
layout command. The global cell layout may be an array across the substrate
(Figure 20.2) or just one cell (Figure 20.3). Figure 20.2 shows an array of marks
20.3.1.2.
Global_OffsetX, Global_OffsetY
The Global_OffsetX and the Global_OffsetY parameters are the X and Y
distances respectively between the centre of a global cell and the lower left
corner of the lower left mark.
20.3.1.3.
Global_CDCX, Global_CDCY
The Global_CDCX and Global_CDCY parameters are the distances between the
global marks in the X and Y directions respectively within a cell.
20.3.2.
20.3.2.1.
Simple global alignment mark layout
Example 1
An example of a commonly used simple global alignment layout is shown in
Figure 20.3.
Part Number:878275
Vectorbeam Operator Manual
Page 236
Figure 20.3: Example global alignment mark layout.
In this case the number of global cells in x and y is 1. The pitch of the global
alignment cells is not defined physically, but a value should be entered.
20.3.2.2.
Example 2
It is possible to use the die alignment marks for global alignment and not have
any global alignment marks. All the parameters for the global alignment are the
same as for the die alignment.
20.3.3.
Automatic global alignment
Automatic global alignment requires a scheme to deal with the range of shifts
and rotations of the substrates in the holders, which result in the actual mark
positions being up to several hundred microns away from the expected mark
positions. Reinserting a particular substrate in a particular holder will typically be
only within +/- 25 µm. With different holders and substrates the shifts are larger.
Since the coarse search of the mark locate is limited to the fieldsize which may
be less than the substrate shift, the scheme should ideally involve searching over
a larger distance in order to ensure capturing the marks.
A suggested scheme is to use an array of square marks centered at the required
global mark position. The pitch of the marks increases from the centre of the
array outwards. The mark locate is configured to locate the squares. Three
adjacent marks on a diagonal are located and the measured positions allow the
position of the centre mark of the array to be found. This scheme permits fast,
automated global alignment, because it minimizes the coarse search area while
allowing substrate shifts of up to half the size of the array. If the “pit” mark locate
algorithm is used, only the first mark will require a coarse search over more than
about 1 µm.
For example an array of 8 µm by 8 µm squares can be used. The squares are
placed at varying pitch, starting at 75 µm at the centre and growing in 1 um
increments towards the edges of the mark area. If there are 27 by 27 squares
this would occupy a total area of about 2 mm by 2 mm. The size of the array can
be adjusted for the area allocated on the substrate, eg 500 µm by 500 µm. The
starting pitch of the marks could be reduced to say 30 µm to reduce the coarse
search time further. There should be 3 or 4 such arrays on the wafer.
Part Number:878275
Vectorbeam Operator Manual
Page 237
The DCL procedure to locate the target is called locate_prealign.com. The
sequence locates any 3 targets on a diagonal.
This target has the advantages that coarse searching only needs to be done
over a small distance, short scans are less likely to scan outside the allocated
area on mechanically misaligned wafers and the whole target is not destroyed by
subsequent processing (only 3 targets are destroyed, the rest of the targets may
be used).
20.3.4.
Die alignment mark layout
Figure 20.4: Diagram showing die alignment mark layout parameters.
20.3.4.1.
Die
A die is defined for the purposes of this direct write alignment as a rectangular
area of the substrate with boundaries, which are placed half way between the
centre positions of neighbouring patterns. The centre of the die corresponds to
the centre of the pattern. After the die marks have been located and the mapping
into die mode has been done, the 0 0 point is defined by the offsetx and offsety
values. The pattern will be centered at the 0 0 point which is not necessarily the
centre of the alignment marks.
20.3.4.2.
OffsetX, OffsetY
The OffsetX and the OffsetY parameters are the X and Y distances respectively
between the centre of a die and the lower left corner of the lower left mark.
20.3.4.3.
CDCX, CDCY
The CDCX and CDCY parameters are the distances between the die marks in
the X and Y directions respectively.
20.4.
Pattern data preparation
See Section “Pattern data preparation”.
Part Number:878275
Vectorbeam Operator Manual
Page 238
20.5.
Job preparation
20.5.1.
Layout parameter file set up
In addition to the parameters for non-aligned exposures, described in Section
“Layout parameter file set up”, further parameters are required for exposures
with direct write alignment and these are described below.
Create a file, which contains all the DCL statements listed in the parameter file in
the previous chapter followed also by all those below. This is most easily done
by copying the template file vb$jobs:layout_dw_parameters_template.com to a
suitable file name for the exposure. Edit the file and change the parameters to
those required.
$------------------------------------------------------------------------------------------------------$! Global alignment parameters
$------------------------------------------------------------------------------------------------------$ Global_alignment
:== 1
Defines the global alignment method: 0 for no global alignment, 1 for manual
global alignment, 2 to select wafer mode (previous global alignment) which is
useful when several layouts on the same substrate are exposed.
$ Global_PitchInX
:== 15.30
Defines the pitch in mm in the x direction of the global cells (see Figure 20.2).
$ Global_PitchInY
:== 14.35
Defines the pitch in mm in the y direction of the global cells (see Figure 20.2).
$ Global_CellsInX
:== 7
Defines the number of global cells in the x direction (see Figure 20.2).
$ Global_CellsInY
:== 7
Defines the number of global cells in the y direction (see Figure 20.2).
$ Global_offsetx
:== -0.25
The offset in mm in the x direction of the lower left corner of the lower left
alignment mark from the centre of the global cell (see Figure 20.2).
$ Global_offsety
:== -0.25
The offset in mm in the y direction of the lower left corner of the lower left
alignment mark from the centre of the global cell (see Figure 20.2).
$ Global_marksizeX
:== 0.01
The X dimension in mm of the global alignment mark. This can be given as 0.00
if it is desired to set the global offset to be the distance to the centre of the mark
instead of the corner.
$ Global_marksizeY
:== 0.01
The Y dimension in mm of the global alignment mark. This can be given as 0.00
if it is desired to set the global offset to be the distance to the centre of the mark
instead of the corner.
$ Global_CDCX
:== 2.5
The X pitch in mm of the global alignment marks within cell (see Figure 20.2).
$ Global_CDCY
:== 2.5
The Y pitch in mm of the global alignment marks within cell (see Figure 20.2).
$ Global_MARKER
Part Number:878275
:== Mark_10
Vectorbeam Operator Manual
Page 239
The name of the mark definition for the global alignment marks.
[$ Global_Mark_Locate
:== AUTO]
This is optional and defaults to MAN. Defines mark locate procedure during
global alignment: MAN requires a manual stage alignment using the joystick
before each mark locate, AUTO just uses the automatic mark locate at the
expected global mark positions.
$ REFERENCEOFFSET
:== -20 -19
The distance from the centre of the layout to a reference feature which is usually
well away from the dies to be exposed to avoid accidental exposure during the
initial search on the substrate. This is useful for the initial coarse global
alignment before the final global alignment is carried out. If 999 is used then no
reference feature search will be carried out.
$ Global_cell_1
$ Global_cell_2
$ Global_cell_3
$ Global_cell_4
:== 2 2 1
:== 4 2 1
:== 2 4 1
:== 4 4 1
! 999 for only 2 mark global
! 999 for only 3 mark global alignment
These symbols define the alignment marks used for the global alignment. The
first 2 symbols must be defined, as a minimum of 2 marks are required for global
alignment. The 3rd and 4th marks are optional. If 999 is entered for Global_cell_3
then only 2 marks are used for global alignment. If 999 is entered for
Global_cell_4 then only 3 marks are used for global alignment. The first two
numbers of each symbol are the X Y indices of the global cells. The third number
is the alignment mark number within a cell.
[$ Global_cell_1_POS
[$ Global_cell_2_POS
[$ Global_cell_3_POS
[$ Global_cell_4_POS
:== 55.746 32.495
:== 999
:== 999
:== 999
! 999 for no stored global position]
! 999 for no stored global position]
! 999 for no stored global position]
! 999 for no stored global position]
These symbols are optional and the defaults are the expected positions
calculated from the layout parameters. They may be used to define more
accurate X Y positions for the global marks than the expected positions
calculated from the layout parameters. Such positions can come from substrate
measurements before exposure and allow more easily a batch of substrates to
be exposed reliably with the same jobfile, especially if automatic global alignment
is used. The search for the global marks will be carried out at these positions
instead of the normal expected positions. It is not necessary to define these
positions and they may all be set to 999.
$------------------------------------------------------------------------------------------------------$! Die-by-die alignment parameters
$------------------------------------------------------------------------------------------------------$ DirectWriteStrategy
:== DW2
Defines the method used:
DW1 means that no die-by-die alignment is carried out but just the previous
global alignment is used.
DW2 means die-by-die alignment is carried out and all four marks of each die
are located before exposing each die. When the machine only finds 0,1 or 2
alignment marks a warning message is generated and the die is not processed.
DW3 means die-by-die alignment is carried out by measuring only those marks
which have not already been measured. If neighbouring dies use the same
alignment marks then the mark is only located once the first time it is
encountered and then stored in memory. When the machine only finds 0,1 or 2
alignment marks a warning message is generated and the die is not processed.
Part Number:878275
Vectorbeam Operator Manual
Page 240
DW4 is similar to DW2 and DW5 is similar to DW3 except for the following:
When the machine only finds 0,1 or 2 alignment marks, the mapping of the last
die with 4 alignment marks is used together with an X,Y shift found from the first
mark of the current die to be located. By using the mapping of last die with 4
alignment marks it is hoped that the scale, rotation and keystone corrections will
be approximately correct for the current die. If no previous dies with 4 alignment
marks have been found then the defined dies further on in the matrix will be
aligned in turn until one with 4 marks is found and mapping coefficients can be
generated. The processing resumes at the first die. If no dies with 4 marks are
found then an error is reported, no dies are processed.
$ OffsetX
:== -0.25
The offset in mm in the x direction of the lower left corner of the lower left
alignment mark from the centre of the die (see Figure 20.4).
$ OffsetY
:== -0.25
The offset in mm in the y direction of the lower left corner of the lower left
alignment mark from the centre of the die(see Figure 20.4).
$ MARKSIZEX
:== 0.01
The X dimension in mm of the alignment mark. This can be given as 0.00 if it is
desired to set the offsetx to be the distance to the centre of the mark instead of
the corner.
$ MARKSIZEY
:== 0.01
The Y dimension in mm of the alignment mark. This can be given as 0.00 if it is
desired to set the offsety to be the distance to the centre of the mark instead of
the corner.
$ CDCX
:== 2.5
The X pitch in mm of the alignment marks within the die (see Figure 20.4).
$ CDCY
:== 2.5
The Y pitch in mm of the alignment marks within the die (see Figure 20.4).
$ MARKER
:== Mark_10
The name of the mark definition for the alignment marks. If the name starts with
“@” then it is taken to be the name of a jobfile to be run at each die alignment
mark instead of mark locate e.g. $ MARKER :== @[directory]jobfile_1.com
$ RECOVERY_ADJUST_FIELD :== continue
$ RECOVERY_LOCATE
:== continue
$ RECOVERY_MAP
:== continue
Defines the error recovery actions. Can be set to either continue, manual, redo,
skip, stop or user=@JOB_NAME.
$ @VB$SEQ:WLVD_DW.COM [optional DCL command or Emma command]
This line calls the file that carries out the necessary operations to expose the
layout as defined. If no command is put after the wlvd.com, the pattern is
exposed at each layout cell. If an Emma command or DCL command is put after
the wlvd.com e.g.
$ @vb$seq:wlvd_dw.com "qdisplay height"
or
$ @vb$seq:wlvd_dw.com "@[directory]expose_both_patterns.com"
this command will be run at each layout cell instead of the qexpose pattern
command. (The file expose_both_patterns.com must have $
Part Number:878275
Vectorbeam Operator Manual
Page 241
OPEN/APPEND/SHARE POST$EMMA MAILBOX$EMMA as the first line and
then any usual Emma and DCl commands)
Multiple layouts can be exposed by one parameter file by repeating the above
sequence in the same file. The parameters can be thus redefined and must be
followed each time by the line running the file wlvd_dw.com.
20.6.
Machine preparation for direct write
See Section “Machine preparation”.
20.7.
Substrate preparation for direct write
See Section “Alignment of substrate for direct write”.
20.8.
Expose !
Type :
$ @filename.com
The correct sequence of operations to expose the layout will be carried out
(assuming that the parameters are correct!) by the file wlvd_dw.com.
Wlvd_dw.com
Issues commands to expose the layout defined in the parameter file. This file is
similar to WLVD.COM except it contains some additional items to carry out
global alignment and set up the die-by-die alignment parameters
Part Number:878275
Vectorbeam Operator Manual
Page 243
21.
Remote operation
The most common requirement when the operator is located away from the
machine, for example outside the cleanroom, is to check the status of a job
which has been started locally.
The Vectorbeam can, however, be operated from any computer running a
terminal emulation program which can connect to the Vectorbeam operator
terminal. For example it is possible to operate a VB, which is networked at its
installation site with a computer with an internet connection, from a PC, which
can be located anywhere in the world, connected via a modem to an internet
service provider.
21.1.
Checking status remotely
The Emma interface program itself does not have any command that provides
current status information to a user logged in remotely, however it is possible to
read the contents of the group logicals. Many group logicals are set by Emma as
a way of outputting data or showing the status. They can all be shown by typing:
vb_super> show logical vb_*
Some of these logicals will always show the current status but some will only be
updated when the appropriate "qdisplay" command is issued by the jobfile. For
example vb_pat_file is updated with the selected pattern file whenever the
"qselect pattern" command is issued but vb_dcpo_abs_x is only updated with the
current stage position when the command "qdisplay position" command is
issued.
All the logicals beginning with "vb_lay_" are set by the layout program. In
particular vb_lay_cur_cell_x and vb_lay_cur_cell_y are updated by layout on
starting each new cell and so it is possible to see remotely which cell the
machine is currently working on.
Commands can be included in jobfiles to set new logicals at various points which
can then read remotely. For example:
$ define/group/user my_logical "Some string or other"
21.2.
Obtaining the “oper” control prompt
If possible, the command “super” should be entered at the operator terminal to
allow the remote user to obtain the “oper” prompt by typing:
VB_SUPER>OPER
It might be useful to include in each jobfile the command “$ SUPER” at the end
so that when the jobfile has finished operation can be continued remotely.
If the “oper” status is assigned to a DECTerm, which cannot be accessed, it is
possible to get rid of that DECTerm (make sure that you do not interfere with
someone else’s machine operation) by typing:
VB_SUPER>stop vb_oper
Part Number:878275
Vectorbeam Operator Manual
Page 244
The “oper” status can then be obtained. Type:
VB_OPER>start
in order to connect to the subsystems and set up the environment for the new
terminal. The machine can now be operated in interactive mode.
21.3.
Login without using second license
In order not to use the second login license, which prevents the system manager
logging remotely, the menu item called “New Login” in the Applications menu of
the Session Manager should used. This should be selected whenever it is
required to login to another account, rather than SET HOST 0. The “New Login”
facility uses the command:
CREATE/TERM/DETACH/NOLOGIN
Which creates a new login WITHOUT using up the System Managers license.
NOTE: The command above and the New Login menu can only be used when
sitting at the machine. They cannot be used remotely.
21.4.
Batch queue operation
In order to avoid having to be connected for the duration of the job, jobs can be
submitted to the batch queue. Type
VB_OPER> submit jobfilename.com
The batch queue will take over the “oper” status and control of the VB.
21.5.
Re-booting the subsystems remotely
If the subsystems require rebooting it may be possible to do this remotely using
software commands.
21.5.1.
Pattern generator
Log into the MUP microprocessor and type
->reboot 5
which will reboot all the PG microprocessors. Alternatively, log into each PG
microprocessor in turn and type:
->reboot 2
21.5.2.
Stage
Log into the stage microprocessor and type:
->reboot 2
Part Number:878275
Vectorbeam Operator Manual
Page 245
21.5.3.
EO
Log into the eo microprocessor and type:
->reboot 2
Part Number:878275
Vectorbeam Operator Manual
Page 247
22.
Logfiles and logging
22.1.
Emma logging
22.1.1.
File
All Emma commands can be recorded in a logfile. The logging is enabled by
default when Emma is started and can be disabled as follows:
VB_OPER> QSET OUT OFF
VB_OPER> QSET OUT OFF
The command needs to be repeated due to a bug in the software as does the
command to enable the logging:
VB_OPER> QSET OUT ON
VB_OPER> QSET OUT ON
The default logfile is sys$login:esprit_log.dat. The logfile name is read from the
vb_logfile logical when the logging is restarted. The logfile can be changed by
the following commands:
VB_OPER> QSET OUT OFF
VB_OPER> QSET OUT OFF
VB_OPER> define/group/user vb_logfile disk:[directory]logfile.log
VB_OPER> QSET OUT ON
VB_OPER> QSET OUT ON
Note that the Emma logfile only contains the Emma commands issued
interactively or by a jobfile. For full logging of DCL and Emma commands the
following notes may be useful.
22.1.2.
DECTerm
All Emma commands will be typed up in the DECTerm by defining the ELOG
logical as follows:
VB_OPER> define/group/user ELOG ON
This can be switched off by typing:
VB_OPER> define/group/user ELOG ON
This facility can be used together with the DECTerm logging described below.
22.2.
Notes on OpenVMS logging
For a full description, please see the DEC documentation. OpenVMS has 3 ways
Part Number:878275
Vectorbeam Operator Manual
Page 248
to log the DECTerm output.:
1. DECTerm logging during batch queue operation.
2. DECTerm logging using the SET HOST command.
3. DECTerm logging using the “Options” menu.
Note that if the SET VERIFY command is issued, all commands will be typed
up in the DECTerm before being executed and a complete log of
everything that has been done can be created. This can be cancelled
using the “SET NOVERIFY” command.
22.2.1.
DECTerm logging during batch queue operation
The DECTerm output which is produced by any DCL or Emma commands
issued by jobfile being run by the batch queue can be logged. The command
used to start a job would be:
VB_OPER> SUBMIT <disk:[directory]filename.com>
This will submit the job to the batch queue and automatically create a log file with
the same name as the jofile but extension .log in the vb$log directory. All
standard output and standard error messages will be written to this log file.
22.2.2.
DECTerm logging using the SET HOST command
This is useful for interactive work. A new DECTerm is created which is logged. If
the “OPER” mode is required in the new DECTerm, then OPER status will need
to be given up by typing “SUPER”. The new DECTerm with logging can be
created with the following command:
VB_SUPER>SET HOST 0 /LOG=<name of log file>
This will ask you to login as a new user on the same OpenVMS machine. All
commands typed and their output will be logged into the specified file.
The VB only has a license for one additional login so this will only work if all other
users besides user “VB” are logged out, or the system will report “Attempted
usage exceeds active license limits”.
22.2.3.
DECTerm logging using the “Options” menu
All output which is typed up in the DECTerm can in addition be written to a logfile
by setting the following options in the “Options” menu of the DECTerm:
1. Printing destination to “file”
2. File to “[directory name]filename”
3. Printer to “auto print mode”
To stop the logging, switch the Printer in the “Options” menu to “normal print
mode”.
Part Number:878275
Vectorbeam Operator Manual
Page 249
23.
Creating scanning electron image files
The VB has a facility for scanning a rectangular area using the pattern generator
and recording the video level at each point in a file. This is useful for recording
images of resolution samples or marks. The detectors can be either the
backscattered or transmission detectors. As an example the following command
scans a 10 x 10 μm area:
VB_OPER>qimage
/size=(x=10,y=10)/skip=(x=4,y=4)/filt=8/points=8/frames=1/file=10um_are
a
The image can be viewed on screen by using a PVWave program:
VB_OPER>wave –r qimage_utility
This program reads the .img file, which is output by the pattern generator, and
allows the image to be written as a .tif or postcript file.
Part Number:878275
Vectorbeam Operator Manual
Page 251
24.
Advanced operation
24.1.
Calculating throughput
Calculating the pattern time is necessary for scheduling jobs and for optimising
the throughput.
Total pattern time
= Beam-on time
+main field deflector settling time
+ subfield deflection settling time
+ shape synchronisation time
+ stage movement time
+ stage settling time
+ heightmeter measurement time
+ data processing time
+ alignment mark registration time
+ load direct write map time
A jobfile, which does this calculation, can be run as follows:
VB_SUPER> run vb$seq:vb_exposure_time.exe
The jobfile vb_exposure_time.exe is documented in the manual “Acceptance
tests and operator jobfiles” part number 892777.
24.1.1.
Beam on time
The beam-on time
=total number of exels / clock frequency
= total pattern area to be exposed / (beamstep size x beamstep size * clock
frequency)
The total pattern area can be found from the converter or alternatively, the total
number of exposed exels is typed up after exposure.
24.1.2.
Mainfield deflector settling time
Mainfield deflector settling time
=
Part Number:878275
the sum for each block of the pattern of:
Vectorbeam Operator Manual
Page 252
[ Number of adjacent occupied subfields (maximum = 64 * 64) * short delay
+ Number of successive occupied subfields with 2 to 6 subfields separation *
medium delay
+ Number of successive occupied subfields with >6 subfields separation * long
delay ]
The information about the number of short, medium and long subfield jumps is
not easily obtained. An estimate of the average number of subfield changes per
block can be made based on the pattern density. The settling times may be
displayed and set as described in the section “Displaying and setting the settling
times”.
24.1.3.
Subfield deflector settling time
Subfield deflector settling time
= Number of shapes in pattern after fracturing into subfields * Subfield settling
delay (Shape-to-shape delay)
The total number of shapes after subfield fracturing is typed up in the job control
window after exposure. The settling times may be displayed and set as
described in the section “Displaying and setting the settling times”.
24.1.4.
Shape synchronisation time
Shape synchronisation time
= Number of shapes in pattern after fracturing into subfields * (1.5 / exposure
clock frequency)
24.1.5.
Stage movement time
Stage movement time
= the sum for the pattern of:
Step distance to each successive block * Step time
The order of the exposed blocks is defined by a meander pattern. The step times
for distances up to about 1 mm may be estimated from the times measured as
part of the acceptance tests. The step times for distances > 1mm may be
estimated from the stage speed specification.
24.1.6.
Stage settling time
Total stage settling time
= Number of X steps * X settling time + Number of Y steps * Y settling time
The settling times may be displayed and set as described in the section
“Displaying and setting the settling times”.
24.1.7.
Heightmeter time
The total heightmeter measurement time
=
Part Number:878275
number of blocks * heightmeter measurement time
Vectorbeam Operator Manual
Page 253
24.1.8.
Data processing time
The data processing time
= time to transfer pattern data from hard disk to FISP input buffer over ethernet
+ time to fracture and sort shapes into subfields
+ time to transfer data to SLC input buffer
+ time to fracture trapezia into lines
+ time to transfer lines to linewriter input buffer
Due to the simultaneous data processing and buffering at several points along
the chain, the data processing time with two 300 MHz PowerPCs with 128
Mbytes of memory is 0s for most patterns.
24.1.9.
Die-by-die alignment time
The die-by-die alignment time
= X stage travel time between marks
+ Y stage travel time between marks
+ Stage settling time
+ Mark locate time
+ Calculate mapping time
+ Load mapping time
24.2.
Displaying and setting the settling times
The various settling times can be displayed and set as described in the following
sections.
24.2.1.
24.2.1.1.
Mainfield deflector settling times
16-bit pattern generator
The current values in μs may be displayed by logging onto the DCP and
entering:
-> G_MfSettlingShort
-> G_MfSettlingMedium
-> G_MfSettlingLong
-> G_UseMfSettlingShort
(must = 1 )
These values can be changed directly by entering:
-> G_MfSettlingShort=(value in μs)
-> G_MfSettlingMedium=(value in μs)
Part Number:878275
Vectorbeam Operator Manual
Page 254
-> G_MfSettlingLong=(value in μs)
-> G_UseMfSettlingShort=1
The mainfield settling values will be reset to any values specified in the
[EMMA.CTRL]DCP_CONFIG.VW file (for 16-bit pattern generators) or the
[EMMA.CTRL]WFDCP_CONFIG.VW (for 18-bit and 20-bit pattern generators)
file whenever the DCP is rebooted. These values are set by the same
statements as above in the relevent file:
G_MfSettlingShort=(value in μs)
G_MfSettlingMedium=(value in μs)
G_MfSettlingLong=(value in μs)
G_UseMfSettlingShort=1
24.2.1.2.
18-bit and 20-bit pattern generators
The current values in μs may be displayed by logging onto the DCP and
entering:
-> G_BlankTimeMin
-> G_BlankTimeMax
The minimum time is that for a mainfield move of 1 subfield. The maximum time
is that for a mainfield move of the maximum number of subfields that are
currently in use. All moves inbetween are calculated from a linear relationship
between these two points. These values can be changed directly by entering:
-> G_BlankTimeMin =(value in μs)
-> G_BlankTimeMax =(value in μs)
followed by
-> setBlankDelayTab
The mainfield settling values will be reset to any values specified in the
[EMMA.CTRL]DCP_CONFIG.VW file (for 16-bit pattern generators) or
[EMMA.CTRL]WFDCP_CONFIG.VW (for 18-bit and 20-bit pattern gnerators)
whenever the DCP is rebooted. These values are set by the same statements as
above in the relevent file:
G_BlankTimeMin =(value in μs)
G_BlankTimeMax =(value in μs)
setBlankDelayTab
24.2.2.
24.2.2.1.
Subfield deflector settling time
16-bit pattern generator
The current subfield settling delay is displayed in the Display Database/Strategy
panel (Figure 7.14) as SS Settling. This value may be changed using the
command:
VB_OPER>qset ss (value in ns)
Part Number:878275
Vectorbeam Operator Manual
Page 255
24.2.2.2.
18- and 20-bit pattern generators
The subfield settling delay is hard coded as 2 us for shape-to-shape movements
of ¼ of the subfield size or less and 8 us for shape-to-shape movements of more
than ¼ of the subfield size.
24.2.3.
Stage settling time
The various parameters can be displayed and set when logged onto the stage
microprocessor. For the following descriptions of interactions note that the
current settings of any parameter can be displayed by simply typing the
parameter name at the prompt, without assigning a value e.g.:
-> (double)SetDelayX_g
will display the current fixed X settling time in μs, and
-> (double)SetDelayY_g
will display the current fixed Y settling time in μs.
24.2.3.1.
16-bit pattern generator
The settling times can be changed directly by entering:
-> (double)SetDelayX_g =(double)(value in μs)
-> (double)SetDelayY_g =(double)(value in μs)
The stage settling values will be reset to any values specified in the
[EMMA.CTRL]SV_CONFIG.VW file whenever the stage is rebooted. These
values are set by the same statements in the SV_CONFIG.VW file as above:
(double)SetDelayX_g =(double)(value in μs)
(double)SetDelayY_g =(double)(value in μs)
24.2.3.2.
18-bit and 20-bit pattern generators
The stage settling times can be configured to be either fixed, as for the 16-bit
pattern generator, or “intelligent”. The operation in the fixed mode is as described
above. In the intelligent mode the BEF signal is monitored after each stage move
and when the peak-to-peak variation in the BEF signal falls below a specifiable
level, the stage is flagged as settled. This optimises the time for each move and
usually results in lower overall settling times. The intelligent mode is selected by
logging onto the stage microprocessor and entering:
-> useIntelligentSettling_g = 1
The fixed settling time mode as implemented for the 16-bit pattern generator can
be selected by entering:
-> useIntelligentSettling_g = 0
The maximum peak-to-peak variation in microns in BEF signal allowed before
the stage is considered settled is set by entering (eg):
->(double)SettleWindowXum_g = (double)0.20
->(double)SettleWindowYum_g = (double)0.20
Part Number:878275
Vectorbeam Operator Manual
Page 256
The sampling rate in ms is set by entering (eg):
->(double)SettleInterval_g = (double)2.5
The number of consecutive samples, which must be within the settling
requirement is set by entering (eg):
->SettlePeaks_g = 2
The timeout in ms for the settling is set by entering (eg):
->SettleTimeout_g = 2000
All these various parameter values will be reset when the stage is rebooted to
program defaults unless they are specified in the
[EMMA.CTRL]SV_CONFIG.VW file. Therefore include the same statements, as
above, in the SV_CONFIG.VW file. For example
(double)SettleWindowXum_g = (double)0.20
24.3.
Under- or overlapping mainfields (sparse tiling)
The stepping pitch between the blocks of a pattern is normally automatically set
to the block size in a pattern. This can however be overridden to give under or
overlapped mainfields, both for FRE and VEP format files. This option can be
used with normally tiled VEP files but cannot be used with VEP files making use
of the random-field placement. The VEP file format allows the stage stepping
pitch and the block size to be different and so under- or overlapping mainfields
can be defined in the pattern file itself without the need to override the stepping
pitch. The exposure of pattern in this fashion is useful for minimising the number
of stage moves during pattern exposure but is only useful for specialised
applications where the time saving is extremely important.
The command for this function consists of an optional qualifier added to the qSet
Pattern command, namely:
VB_OPER>qSet Pattern <filename>
/Blockstep=(X=<x_pitch>,Y=<y_pitch>)
<x_pitch> and <y_pitch> are the required stepping pitches for the Physical Block,
in millimetres. These stepping pitches are not saved in the database and remain
valid only until the next qSet Pattern command. /Blockstep can't be used with
"qSet Pattern Grating", though it's not needed there anyway.
24.4.
Random field placement (sparse tiling)
The VEP format has an option, which allows the user to select the position of
each e-beam block rather than use the standard tiling covering the entire pattern
area from the lower left corner. This is supported by Cats version 10:24:00
onwards and the Cats documentation should be consulted for details. One of the
uses of random field placement is enabling sparse tiling to be carried out. Figure
24.1 shows a simple example of sparse tiling.
Part Number:878275
Vectorbeam Operator Manual
Page 257
Figure 24.1: Example of random-field placement used for sparse tiling. The pattern is an array
of crosses, shown in red. The standard tiled mainfields (5x5 total =25) completely enclose 4
crosses in the lower left corner but only 1 or 2 otherwise and are shown in green. The random
field placements (3x3 total=9) each contain 4 crosses and are shown blue.
Random field placement also allows the area enclosed at each position to be
varied.
24.5.
Selectable field correction interpolations
24.6.
Optimising throughput
The individual contributions of such things as calibration, direct write alignment
and pattern exposure to the total time for a job should be estimated. This will
highlight areas where improvements may be made. In many cases, changing
parameters to increase the speed of operation results in a decrease in the
pattern fidelity. This performance is a fundamental characteristic of the system.
The goal is to achieve the best compromise for the application and the points
listed below should be considered.
24.6.1.
Increasing current and spot size
24.6.2.
Reducing command processing times
The total command processing time overhead may be significant for jobfiles
containing many commands. Some command processing times, in particular
those due to the operation of Emma, may be reduced by the following actions:
1. Turn the logging off (by typing qset logging off (SLOF)).
2. Write all Emma commands in a DCL command file in the full form
(beginning with q) to avoid additional time overheads associated with
translating the mnemonics.
Part Number:878275
Vectorbeam Operator Manual
Page 258
3. Do not iconise the Status Window.
4. Control Emma through a control program, which is installed in VMS.
24.7.
Pattern sleeving
Pattern sleeving is a technique, which is used to advantage when exposing a
pattern containing both large and small shapes. The pattern data are
manipulated so as to obtain two separate pattern files. The first contains the
borders of all the shapes with a border width of at least the minimum dimension.
The second contains the remaining parts of the shapes. The first pattern is
exposed with a small beam diameter to obtain high fidelity of all edges. The
second pattern is exposed with a larger beam diameter to quickly fill in the
centres of the shapes. This technique enables the faster exposure of patterns
while retaining the fidelity of using a small beam diameter.
24.8.
Fieldsize adjustment resolution
Very small changes in the field size are possible up to the maximum range limit.
However, all the corrections such as rotation, keystone, magnetic map etc. are
applied to the same DAC and so the maximum range for scaling alone only
applies if all the other corrections are zero.
24.8.1.
16-bit pattern generator
The mainfield fine scaling DAC, which is 18 bit, has a total range of about +/12.5% of the field size. This means that for a field size of 0.32768 mm it has a
range of about +/-41 um. The software however does not actually load all 18 bits
of the main field scaling DAC. The two least significant bits are initialised to zero
and then the 18 bit DACs are used as 16 bit DACs.
The subfield has its own scaling DAC, which is 12 bits. As the subfield deflection
DAC is 10 bits, 1 lsb on the subfield scaling has the same weighting as 1 lsb on
the main field.
This means that the smallest change of the maximum fieldsize is about 1.2 nm or
4 ppm.
24.8.1.1.
Limits
The maximum range of subfield scaling around the nominal that the hardware
can apply and it is +/- 12.5%. However, due to the hardware arrangement, this is
only if there are no other corrections to be applied. This is because the hardware
uses only 1 corrections DAC for the X direction and 1 for the Y direction.
Corrections are updated on a point-by-point basis during exposure of a shape
within a subfield. Scaling in X is carried out by adjusting the X shift and rotation
in X is carried out by adjusting the Y shift. All scaling and rotation corrections are
fed through digital multipliers and summed before being applied to the correction
DAC on a point-by-point basis.
This means the subfield corrections DAC must apply both the on-axis and offaxis scaling and rotation and any additional scaling and rotation required through
the direct write mapping. If the on- and off-axis calibrations are large then there
is little range left for additional direct write mappings.
The exact limits vary from machine to machine as the subfield rotation values
depend on the mechanical arrangement of the deflection coil assembly. On D660
the X and the Y rotation corrections are balanced so rotating the coil will not
Part Number:878275
Vectorbeam Operator Manual
Page 259
improve the situation.
24.8.2.
18-bit pattern generator
The mainfield fine scaling DAC, which is 18 bit, has a total range of about +/6.25% of the field size. This means that for a field size of 0.32768 mm it has a
range of about +/-20.5 um.
The subfield has separate scaling and rotation correction DACS. The scaling
DAC covers +/- 3.125 % and the rotation DAC covers +/- 6.25%. The DACS are
both 14 bit.
As the subfield deflection DAC is 14 bits, 1 lsb on the subfield scaling DAC has
the same weighting as 2 lsb on the mainfield scaling DAC and the software sets
the values appropriately. This means that the smallest change of the maximum
fieldsize is about 0.15 nm or 0.5 ppm.
24.8.3.
20-bit pattern generator
The mainfield fine scaling DAC, which is 18 bit, has a total range of about +/6.25% of the field size. This means that for a field size of 0.32768 mm it has a
range of about +/-20.5 um.
The subfield has separate scaling and rotation correction DACS. The scaling
DAC covers +/- 3.125 % and the rotation DAC covers +/- 6.25%. The DACS are
both 14 bit.
As the subfield deflection DAC is 14 bits, 1 lsb on the subfield scaling DAC has
the same weighting as 1 lsb on the mainfield scaling DAC and the software sets
the values appropriately. This means that the smallest change of the maximum
fieldsize is about 0.15 nm or 0.5 ppm. (For a 20 bit mainfield the resolution of the
DAC is however only 0.25 that of the PG resolution.)
24.8.3.1.
Limits
The maximum range of subfield scaling around the nominal that the hardware
can apply is +/- 3.125%. However, due to the hardware arrangement, this is the
total scaling which includes contributions from calibrations as well as direct write
scalings.
The hardware uses separate corrections DACs for the scaling and for the
rotation for both the X direction and the Y direction. Corrections are updated on a
point-by-point basis during exposure of a shape within a subfield. Scaling in X is
carried out by adjusting the X shift. All scaling corrections are fed through digital
multipliers and summed before being applied to the scaling correction DAC on a
point-by-point basis.
This means the subfield scaling corrections DAC must apply both the on-axis
and off-axis scaling and any additional scaling required through the direct write
mapping. If the on- and off-axis scaling values are large then there is little range
left for additional direct write mappings.
24.9.
Grating generator
A grating generator has been implemented in the 18-bit and 20-bit pattern
generators to:
1. Reduce the deflection settling overheads for the exposure of a grating as
consecutive complete lines, by improving on the method used by the
Part Number:878275
Vectorbeam Operator Manual
Page 260
current 16-bit pattern generator using “nosort” exposure mode to expose
consecutive complete lines.
2. Provide a mechanism for fine tuning the tradeoff between settling
overheads and subfield stitching accuracy.
These enhancements are possible by changing the order in which shapes, after
fracturing into subfields, are exposed. The term “sub-shapes” is used to refer to
those shapes produced by fracturing the original shape into subfields.
The order in which subfields are addressed affects the amount of subfield
stitching error on a shape passing through adjacent subfields due to beam drift.
The order in which subfields are addressed also affects the settling time. There
are 3 different settling delays used by the PG when switching from one subfield
to another:
1. Short: Used for jumps between adjacent subfields.
2. Medium: Used for jumps of 2 to 6 subfields
3. Long: Used for jumps of more than 6 subfields.
24.9.1.
Defining the grating
The grating must be defined in terms of the linewidth, lineheight, pitch, start
position, the number of lines with dimensions in micrometres (consistent with
units of sman) and the relative dose for the lines. The origin for the start
x_position and y_position is the centre of field (consistent with sman). One
exposure field may contain groups of lines exposed with different relative doses.
The Emma command is :
VB_OPER>qset grating n /width=<width_of_line>
/height=<height_of_line> /pitch=x=<x_pitch> | pitch=y=<y_pitch>/start=
(x_position,y_position)
/number_of_lines=<number>/relative_dose=<relative_dose>
/shape_meander=<number of shapes exposed together before switching
subfields> /block=<blocknumber between 1 and 19> /offset=(X=<>,Y=<>)
/scale=(X= ,Y=)
Part Number:878275
Vectorbeam Operator Manual
Page 261
Figure 24.2: Diagram showing the definition of parameters used in the “qset grat” command.
24.9.1.1.
Segment
n is the segment number which is an integer between 1 and 64. The command
allows up to 64 sets of parameter conditions to be defined per block. The
algorithmic generation function works through each segment in numerical order
i.e. the order defined by n.
24.9.1.2.
Height, width, pitch and start
The height, width, pitch and start dimensions are in microns. The origin for the
start position is the centre of the field.
24.9.1.3.
Block
The block number allows multi-field patterns to be defined and can be between 1
and 19. If the /block qualifier is omitted, the block number defaults to 0. Blocks
will be exposed in numerical order from 0 upwards. Block numbers need not be
consecutive.
24.9.1.4.
Offset
The /offset qualifier defines the stage position relative to the position for block 0,
in millimetres (i.e., not the position relative to the last block to be exposed). The
/offset qualifier will not be accepted for Block 0 (generates warning and is
ignored). The stage positions will not be corrected for the scales applied; it is the
user's responsibility to ensure that adjacent blocks written at different scales will
stitch correctly.
The /Offset qualifier obviously applies to the whole block, rather than to any one
segment therein. However, unfortunately a segment number still has to be
supplied even if the qSet Grating command contains only /Offset or /Scale
qualifiers.
24.9.1.5.
Scale
The /scale qualifier allows additional scaling factors to be applied for the block,
relative to the current D.W. mode, where 1.0 implies no change of scale. Note
that the "sticky" re-interpolations are applied, i.e. if the command "qSet DWMode
Part Number:878275
Vectorbeam Operator Manual
Page 262
/Load Wafer /Field=Main" was used to set up the current D.W. mode, then the
system will re-interpolate only the Main corrections when it applies the Scale
adjustment.
The /Scale qualifier obviously applies to the whole block, rather than to any one
segment therein. However, unfortunately a segment number still has to be
supplied even if the qSet Grating command contains only /Offset or /Scale
qualifiers.
When the machine is in Wafer mode, any scale tweak that is being applied via
the MOGG is included in the calculation of the interpolation coefficients for the
corrections tables. In Absolute mode, a direct copy is done, not interpolation.
24.9.2.
Displaying grating definition
The command to display all sets that have been defined is:
VB_OPER>qdisplay grating
24.9.3.
Clearing grating definition
A command to clear all the sets that have been defined is required:
VB_OPER>qset grating none
This will clear all data for all blocks, but "qSet Grating None /Block= " will clear
only the data for the nominated block.
24.9.4.
Selecting the algorithmic grating generation
The current command to select the pattern should be expanded to include the
algorithmic grating generation alternative e.g.
VB_OPER>qset pattern grating
24.9.5.
Defining the order of the shapes
The existing “nosort” and “normal” sorting modes set by the “qset sort” command
or the “qset pg_strategy” command do not apply and will have no effect.
The order in which sub-shapes of gratings are exposed is configurable to include
the orders as follows:
1. Expose each line (all sub-shapes of the shape) completely before starting
the next, as done in the existing “nosort” mode on the 16-bit pattern
generator however, start the exposure of the next line at the nearest
subfield to the end of the previous line. This reduces the total deflection
settling overhead by replacing long subfield jumps with short ones. For
comparison, the existing “nosort” mode always starts the exposure of a
line at the subfield closest to the bottom left corner of the block. (Note that
whether the number of passes making up each line is odd or even, which
determines whether the scanning of each line within a subfield ends
adjacent to the next subfield is not relevant)
2. Expose a specified number of sub-shapes before moving to the next
subfield. This means that a number of lines will be exposed a group
completely before starting the next group. If the specified number is less
than the total number of lines crossing a subfield, the subfield will have to
be revisited. For each subfield, the sub-shapes exposed in a group before
switching to the next subfield must come from the same set of shapes,
Part Number:878275
Vectorbeam Operator Manual
Page 263
until those shapes have been completely exposed. If, after exposing
several groups of lines in the same row or column of subfields, the
remaining number of lines is less than the specified number, only these
lines will be exposed as a group. The next group of lines in the adjacent
row or column will contain the specified number again.
The functionality described at points 1 and 2 above is configurable to be the
same for both for X and Y gratings.
The command to define the order of the shapes is a further option for the Emma
command defining the grating:
VB_OPER>qset grating/shape_meander=number_of_lines_per_bundle
where n is an integer between 1 and 16384 and specifies the number of subshapes exposed before switching to the next subfield. (16384 = 214, which is the
maximum number of bits in a subfield) If this option is set and n=1, then the
description at point 1 above applies. If the option is not specified then n defaults
to 1. If this option is set and n>1, then the requirement at point 1 under heading 6
also applies but with the word “line” replaced by “group of lines”. If this option is
set and n >1 the order of the sub-shapes also complies with point 2 under
heading 6. If n is greater than the actual number in a subfield, then no message
is required and the subfield will simply not be revisited.
24.10.
Shape erosion
The shapes in patterns are defined as outlines. However exposure must be done
as a series of exposure points or exels. The conversion from outline format to
exel format is done by the PG software. The upper and right edges are moved
VRU exels towards the lower left edges and this is known as shape erosion. The
remaining points in the eroded outline are exposed. Figure 24.3 shows this
process for VRU 1 where the grid spacing equals the pattern generator
resolution
Figure 24.3: Diagram showing a square
shape outline and the exposed points at VRU 1.
This has the side effect of shifting the centre of the shape in exel format by (exel
size)/2 with respect to the initial outline. This does not create any difficulty as the
position of the stage is shifted during exposure to compensate.For some special
applications it might be useful to change the erosion method. The 16-bit, 18-bit
and 20-bit pattern generators allow the user to choose the mode of shape
erosion using the command:
Part Number:878275
Vectorbeam Operator Manual
Page 264
VB_OPER>qset erosion | normal | nodiscard | none or noerode |
As an example, the results of exposing the Vistec resolution pattern
acc3n125_sl10_00.fre with the various options are described below.
24.10.1.
“normal” option
Figure 24.4 shows the usual case for VRU 1 and normal erosion.
Figure 24.4: Diagram showing the exposed exels for pattern acc3n125_sl10_00.fre at VRU 1
and normal erosion.
Figure 24.5 shows the exels exposed VRU 2. Since the pattern contains singlepass lines at a PG resolution of 3.125 nm, the lines are missing at VRU 2.
Figure 24.5: Diagram showing the
exposed exels for pattern acc3n125_sl10_00.fre at VRU 2 and normal erosion.
24.10.2.
“Nodiscard” option
The nodiscard option causes all shapes to be eroded as normal, but shapes with
heights or widths smaller than an exel (but not zero) will be exposed as a single
exel high or wide, as appropriate.
Figures 24.6 and 24.7 show the exels exposed with the “nodiscard” option at
VRU 2 and 32 respectively. The single-pass lines are not missing and the other
Part Number:878275
Vectorbeam Operator Manual
Page 265
features in the pattern are unaffected (This could have been done by redefining
the width of the lines in the pattern).
Figure 24.6: Diagram showing the
exposed exels for pattern acc3n125_sl10_00.fre at VRU 2 and erosion nodiscard
. Figure 24.7: Diagram showing the exposed exels for pattern acc3n125_sl10_00.fre at VRU
32 and erosion nodiscard
24.10.3.
None or Noerode option
The none or Noerode option causes no shape erosion carried out. The pattern
outline format is treated as exel format.
Figure 24.8 shows the exels exposed with the “noerode” / “none” option and
VRU 32. The letters are oversized and have overlapping
Part Number:878275
Vectorbeam Operator Manual
Page 266
shapes.
Figure 24.8: Diagram showing the exposed exels for pattern acc3n125_sl10_00.fre at VRU 32
and erosion none.
24.11.
Zero-dimension shapes
Zero-dimension shapes in the FRE or VEP pattern data, i.e. those with zero
height or zero width or both, will be exposed with a single exel in that dimension.
Such shapes can be introduced in the pattern file by the converter.
The “lines yes” command in Cats will cause paths with zero widths in the input
file to be written to the output file as zero-width shapes. The following is an
example piece of Cats ctxt to create a zero-width line:
STRUCT zero_width_line
WIDTH 0.0
P 0,0 100,0 ENDP
ENDSTRUCTAlgorithmic
programming
Algorithmic programming is an alternative method of defining the pattern to be
exposed by means of a program, which generates each shape concurrently with
the exposure. No pattern file is required. This is useful when;
1. The pattern can be easily generated mathematically (for example a spiral).
2. The pattern would require a large file (for example, those containing
curved shapes, will be fractured by the converter into many trapezoids of
various sizes).
3. Many similar patterns are required which can be generated
mathematically by varying only a few start parameters (for example
gratings with different pitches).
For more information see the Vectorbeam Algorithmic Programming Software
User Guide (part number: 878612)
Part Number:878275
Vectorbeam Operator Manual
Page 267
25.
Routine maintenance and servicing
Service operations should only be carried out by personnel trained by Vistec engineers.
Generally, only Vistec engineers will carry out service operations. However, a limited set
of service and maintenance operations may be carried out by suitably trained customers,
based on the guidelines described in “Vectorbeam Customer service procedures" manual
- document number 893116.
Electrical and mechanical hazards exist when carrying out these
maintenance operations. They are intended to be carried out only by
personnel trained by Vistec.
WARNING
The table below describes the level of training required to perform operation and service
tasks. The user is responsible for analysing the risks of the work not described in these
manuals.
Allowed Operation
Training required
Operation of the tool, as described in
this Operator’s Manual
Vistec Course – Operator Training
Limited service operations and routine
maintenance – as covered in 893116
manual
Vistec Course – based on 893116.
Full Service operations
Vistec service engineer training
(includes hands-on) based on 893117
manual.
Table of Training Requirements for various operations
This section lists the main topics that are covered by this manual, for reference only:
•
Machine start-up from cold
•
Machine shut down.
•
Vacuum system start up and shutdown
•
Bakeout
•
Routine maintenance (covers water baths, vacuum pumps, gun cathode
replacement)
Maintenance of safety features
Safety features require no regular preventative maintenance to maintain their
effectiveness. However, checks are recommended at intervals to ensure that no faults
have arisen. These are detailed in the Routine Maintenance manual (referred to in
893116) or the Service Manual.
Part number: 878275
Vectorbeam Series
Vectorbeam Operator Manual
Page 268
26.
Diagnostics
Various jobfiles have been written to diagnose problems with the machine and these are
described in the manual Acceptance and Operator Jobfiles, part number 892777.
Part number: 878275
Vectorbeam Series
Vectorbeam Operator Manual
Page 269
27.
Recovery from exception conditions
27.1.
Job control window locks up
If the job control locks up but the other DECterms are still operating normally, select Exit
from the file menu in the job control DECterm. Start another DECterm from the Session
Manager, which should appear with the VB_OPER prompt. Enter “start” to set up the new
DECterm.
27.2.
Top half of the screen goes black
If the top half of the screen goes black (usually displaying information about Ethernet
communication) type control/F2 to return to normal.
27.3.
VAX/Alpha screen locks up
If the VAX or alpha screen locks up there is a failure in the VMS window handler.
To rectify the problem, you should log into the VAX remotely. Type "SHOW SYSTEM" to
display a list of running processes. You need to delete the right process, and this will
clear the fault. VUE$VECTORB is the probable cause of the trouble. Type "STOP
VUE$VECTORB" (or the process that you think is causing the problem), and look at the
VAXStation screen to see if it is running again.
27.4.
Height meter error recovery
If any height meter errors are reported in response to a "QDISP HEIGHT" command then
this may be due to one of the following:
1. The holder is positioned at a point where the height sensor will not work because
no surface is present.
2. The height sensor table is not correct for the surface.
3. The height meter needs resetting.
If a "QCAL HEIGHT" reports an error, it should be retried once more, if the error persists
then the most probable cause is that the holder is positioned where the height sensor will
not work.
If this is the case then the holder should be moved to a position where it is known to work
(e.g. the middle of a plate) and it should be re-calibrated and height reading taken as a
check.
If it still gives errors on calibration then the height sensor should be reset (using the
button on the height sensor PCB located in the top of Cabinet A) and the calibration
repeated.
If it still will not work then connections and power supplies etc. should be checked.
These are the status values which can be reported by the Laser Height Sensor and
Part number: 878275
Vectorbeam Series
Vectorbeam Operator Manual
Page 270
picked up by the pattern generator.
At present , the pattern writing will continue if any of these faults appear except the stage
fault ( 9 ), the last-measured height being used instead.
•
0 - good reading.
• 1 - poor reading from poor video signal. Possible holder shadowing or wrong LHS
calibration table being used (e.g. LHS calibrated on a bright focus mark but now
measuring a dark anti-reflective chrome plate).
• 2 - LHS at limit. Laser gone to max or min brightness. Ignore, recalibration
desirable, but not essential.
• 3 - LHS overrange. Height too great/small, or faulty CCD. Recalibrate or
investigate.
• 4 - LHS measurement fault. No signal. (No plate ?). Investigate.
• 5 - LHS off. LHS has not been calibrated since being switched off or reset.
Recalibrate.
• 6 - LHS PSU fault. PSU faulty - investigate.
• 7 - LHS system fault. H/W faulty - investigate.
• 8 - LHS comms fault. PG cannot establish comms. Faulty PG, LHS or wire joining
them.
• 9 - LHS stage fault. Stage not moved. Not LHS fault.
Height sensor reset
Reset the height sensor by pressing the red button on the edge of the PCB located in the
top of Cabinet A and repeat QCAL HEIGHT command.
Check
Ensure that there is a holder on the stage
VB_OPER> MVSP FM move to the Focus Mark
VB_OPER> QCAL HEIGHT /TAB=7
calibrate the height sensor
VB_OPER> QDISP HEIGHT
measure the height
27.5.
Subfield calibration error
If the subfield calibration fails with an error message and the residual errors are very
large this is because the subfield deflection is not working. There are a number of
possible causes:
1. The subfield calibrations coefficients have got themselves out of range. This could
happen if there is a glitch in the mark locate position or other disturbance to the
tool. Therefore try the command:
VB_OPER>qcal trap/init/load
in order to zero the coefficients. Then try running jobcal. If the same error occurs during
the subfield calibration part of jobcal then enter the "qcal trap/init./load" command again
before moving on to point 2 below.
2. Power off and on the PGD, run start and the holder sequence and then try jobcal.
If the same error occurs during jobcal then enter the "qcal trap/init./load"
Part Number:878275
Vectorbeam Operator Manual
Page 271
command again before moving on to point 3 below.
3. In SEM mode observe the position of the datum mark when moving the subfield in
X and Y e.g.
VB_OPER>strp 5 0
VB_OPER>strp 0 0
VB_OPER>strp 0 5
VB_OPER>strp 0 0
There should a movement of 5 um in both X and Y of about half the size of FM. If not,
then there is probably a fault with the subfield power supply or cabling.
27.6.
Errors and warnings message list with suggested
recoveries
Emma will report information, warnings and error messages in a text form for most of the
normal Emma command errors or machine hardware and software problems (The DCL
command interpreter will however deal with all other commands). The information,
warning or error will be typed below the command issued in the job control DECterm and
a list of all such messages is given in the Sections “Emma information messages” and
“Emma error messages”. The logical “estatus” will also be set simultaneously to an error
number and list of such error numbers is given in the Section “Emma error numbers”.
27.6.1.
Jobfile automatic recovery
The estatus number can be read from a jobfile and the appropriate recovery action taken
automatically in some cases. Note:
1. ON ERROR only works for DCL commands and not for Emma commands. Include
a command such as
$ ON ERROR THEN EXIT 44
ON ERROR requires the number to be added to EXIT for nested com files. This
ensures that the error condition is passed up the chain of .com files, executables
etc to the top level. The number 44 is used as it combines message number 40
(“ABORT”) with severity 4 (fatal or severe). The number must be put together in
binary. The bits 0 to 2 signify the severity (0=warning, 1=success, 2=error,
3=informational, 4=fatal or severe). The bits 3 to 15 signify the message. ( “$ SET
ON” is required to get ON to work at all.) Refer to the appropriate DCL manual for
full information.
2. After Emma commands, any errors can be trapped using:
$IF F$TRNLNM("ESTATUS") .NES. "%X00000001" THEN ...
Such a line is however required after each Emma command.
Alternatively the symbol “Emmaerr” can be defined as the name of a jobfile to be run if an
Emma error occurs during the execution of a jobfile:
Emmaerr ==”[vb.users]error_recovery_jobfile.com”
The text associated with an error number (that typed in the DECterm) can be found by
typing:
VB_OPER>write sys$output f$message(NUMBER)
Part Number:878275
Vectorbeam Operator Manual
Page 272
27.6.2.
Subsystem errors
Emma normally interprets warnings and errors received from sub-systems and reports
them as described above. Emma may also receive errors from the sub-systems for which
it has no interpretation and no F$message exists, and will then report sub-system errors
directly. The text of such errors and warnings will be reported followed by “% EMMA-...”
27.6.3.
Emma information messages
SUCCESS
" Command Successful "
CALNOUPDATE “New data discarded because /NOUPDATE set. "
DCNEWCURFRQ “Current frequency not retained, was outside new band "
EOINFO “Successful. Message from EO Control in console window. "
EOINIT
“Initialising EO communication link "
EOLNKACT
“EO communication link active "
EOLNKNRDY
“EO communication link is not ready "
LMAPDEASS
“Lens Map(s) deassigned from changed DW transform(s) "
LNKALRDYCON “ Host is already connected to the sub-system "
LNKESTB
“Host to sub-system communications link established "
NEWMRK
“New mark definition "
NUPPOSDISP
“Couldn't update stage position display correctly. "
PGINFO “Successful. Message from PG in console window. "
PGINIT
“Initialising PG communication link "
PGLNKACT
“PG communication link active "
PGLNKNRDY
“PG communication link is not ready "
QUALIGNORE
“Illegal qualifier(s) ignored. "
STINIT
“Initialising Stage communication link "
STLNKACT
“Stage communication link active "
STLNKNRDY
“Stage communication link is not ready "
SVINFO “Successful. Message from Stage in console window. "
27.6.4.
Emma error messages
All Emma errors are preceeded by %EMMA-W-. Normal operating errors are given in the
following list:
ADCFILEERROR
" File error in file for ADC plot "
ADCFILEOPENING
“Could not open file for ADC plot "
Check protection setup on terminal.
AGAFAIL
" AGA Failed "
Check video levels in SEM mode on suitable target.
AGASIGHIGH
" AGA Signal Too High "
Check video levels in SEM mode on suitable target.
AGASIGLOW
" AGA Signal Too Low "
Check video levels in SEM mode on suitable target.
AXIALDRIVE
" Axial stig drive beyond range "
Check parameters and column adjustment
BADDBSECN
“Invalid database section "
Use alternative database or set up appropriate machine parameters
BADHOLDERINPUT
“Incorrect holder ID specified "
Specify correct holder ID
BADLENSGRID
“qCal Lens: Grid size is too large "
Specify smaller grid
BADLENSGRY
“qCal Lens: Grid size in Y is too large "
Specify smaller grid in Y
BADLENSID
“qCal Lens: lens map number is out of range "
Specify valid map number
BADLENSORD
“Lens map order specified is out of range "
Specify valid map order
BADLENSORGX
“qCal Lens: Origin offset in X is out of range "
Specify valid X origin
BADLENSORGY
“qCal Lens: Origin offset in Y is out of range "
Specify valid Y origin
BADLENSSEND
“Transmission of lens map coefficients to PG failed "
Reboot PG and retry
Part Number:878275
Vectorbeam Operator Manual
Page 273
BADLENSSTEP
“qCal Lens: Y step size is negative or out of range "
Specify valid Y step size
BADLMDATSND
“Transmission of lens map assignment to PG failed "
Reboot PG and retry
BADSTAGEBLK
“Stage move block positions outside stage limits "
Check pattern limits are less than the stage travel range and reposition
exposure so that it all falls within the stage range
BADTIME
" Unable to get system time/date "
BLKTRNERR
“Block transfer failed "
Check ethernet link to PG. Reboot PG.
CALNOUPFORCE
“Not in Absolute mode - /NOUPDATE /DIAG options forced. "
Switch to absolute mode if update required.
CANTREEXP_NOPAT “Cannot reexpose as no pattern yet exposed "
Don’t use /reexpose qualifier
CANTREEXP_PRTFLD
“Cannot reexpose as pattern has part fields "
Don’t use /reexpose qualifier
CASSUNDEF
“Cassette undefined "
Issue qdisplay air/read command
CLKADJFAIL
" Clock adjustment failed "
Check VRU, current, clocks, doses and resist sensitivity parameters. Retry.
CLKADJNEG
“Invalid/unset nominal dose "
Set valid nominal dose
CMDABORT
" Command Aborted "
Correct for first error reported.
CMDNCOMPLETE
" Command not completed "
Correct for first error reported.
COLRESTORE “Unable to restore column settings "
Retry.
COLUPDATE “Unable to update column settings "
Retry. Check lens drivers. Check gun (C1) operating conditions for FEG.
CORBIG
" Calculated corrections within 10% of maximum "
Investigate why corrections are so large. Maybe no problem.
CORTOOBIG " Calculated corrections greater than maximum "
Possible error in specified positions or observed positions or the substrate
rotation is too large. Possible gross substrate errors.
CRTDWLERR “Correction down load error "
May occur during qcal main when updating scale,keystone and rotation. Retry
command, check ethernet link, reboot PG, stop Emma and run Emma
environment, exit Emma and session.
CURRFAIL
" Failed to set requested current "
Check the validity of the current spot and demg tables. Check the current
column adjustment. Check the current holder positions. Check the current
autofocus and autostig parameters.
DBBADMC
" This file was created on a different machine "
The values (such as the substrate load position) in the database are unlikely
to be correct. Use only with caution.
DBBEFSENS " Bef sensitivity in file different to current value "
Set current value to that saved in file if known and then retry. Alternatively use
the /override qualifier but note that all other mismatches will be overriden
DBEHT
" EHT in file different to current value "
Database file specified may be incorrect for current EHT. Use appropriate
database.
DBFILEHEAD “Bad database file header "
Use alternative database.
DBFLD
" Field size in file different to current value "
Set current value to that saved in file if known and then retry. Alternatively use
the /override qualifier but note that all other mismatches will be overriden
DBFOCSENS “Height/focus factor in file different to current value "
Set current value to that saved in file if known and then retry. Alternatively use
the /override qualifier but note that all other mismatches will be overriden
DBHRSENS
“Height/rotation factor in file different to current value "
Set current value to that saved in file if known and then retry. Alternatively use
the /override qualifier but note that all other mismatches will be overriden
Part Number:878275
Vectorbeam Operator Manual
Page 274
DBMFSENS
“Main sensitivity in file different to current value "
Set current value to that saved in file if known and then retry. Alternatively use
the /override qualifier but note that all other mismatches will be overriden
DBMVPIVOT “ Main pivot point in file different to current value "
Set current value to that saved in file if known and then retry. Alternatively use
the /override qualifier but note that all other mismatches will be overriden
DBPARSE
" Failed to parse file specification "
DBSEARCH
" Could not decode file specification, or no file"
DBTFSENS
" Trap sensitivity in file different to current value "
Set current value to that saved in file if known and then retry. Alternatively use
the /override qualifier but note that all other mismatches will be overriden
DBTVPIVOT
" Trap pivot point in file different to current value "
Set current value to that saved in file if known and then retry. Alternatively use
the /override qualifier but note that all other mismatches will be overriden
DCBADDOSE “Illegal dose value: zero or negative "
Set valid dose.
DCBADEXEL “Illegal exel size: zero or negative "
DCBADFREQ “Frequency can't be set: out of hardware range "
Set frequency less than 25 MHz
DCBADFRQADJ
“Frequency can't be adjusted: out of hardware range "
Check VRU, current, clocks, doses and resist sensitivity parameters. Change
conditions if necessary.
DCBANDNARR
“Clock band not set: too narrow "
Set wider clock band.
DCBANDNSET “Couldn't set clock band "
DCBANDWIDE “Clock band wide: clocks may be inaccurate "
Set narrower clock band
DCCLKSOUTB “Clock(s) outside clock band "
Set wider clock band to cover clock or change clock.
DCCMDFAIL “Clock command failed "
Check clock hardware. Reboot PG.
DCCMDNOGOOD
“Clock command irrelevant to installed hardware "
Check clock hardware configuration file. Reboot PG
DCFRQOUTBND
“Frequency can't be set: outside clock band "
Set clock band to cover required frequency.
DCUNKNERR “Unknown clock command error code was returned "
Retry. Reboot PG
DCUNKNHW “Can't find what PG clock hardware is in use "
Check clock hardware configuration file. Reboot PG
DEMAGFAIL " Demag. Table Calibration Failed "
Note first error message given and rectify.
DIAGDRIVE
" Diag stig drive beyond range "
DMATRIX1
" dmatrix allocation failure 1"
DMATRIX2
" dmatrix allocation failure 2"
DOSADJFAIL " Dose adjustment failed "
Check VRU, current, clocks, doses and resist sensitivity parameters. Change
conditions if necessary.
DOSEFAIL
" Failed to set requested dose "
Check VRU, current, clocks, doses and resist sensitivity parameters. Change
conditions if necessary.
DOSTYPINV “Invalid dose type "
Specify valid dose type.
DVECALLOC “dvector allocation failure"
DWABSMODINV
“Absolute mode is invalid for this command "
DWBACKSOLN " Invalid DW back transform"
Part Number:878275
Vectorbeam Operator Manual
Page 275
DWCOPTOSELF
“Can't copy current mode to itself "
Specify two different modes
DWCURMODINV
“Current mode (Absolute) is invalid for this command "
DWDIVZ3DD “Division by 0 in DW back transform (3D denom) "
Failed internal consistency check. Make sure the guilty mode has been
set up correctly. Check expected and observed positions. Try restarting
Emma. Contact Vistec if it persists.
DWDIVZ3DSY “Division by 0 in DW back transform (3D ScaleY) "
Failed internal consistency check. Make sure the guilty mode has been
set up correctly. Check expected and observed positions. Try restarting
Emma. Contact Vistec if it persists.
DWDIVZ4DCHI “Division by 0 in DW back transform (4D Chi) "
Failed internal consistency check. Make sure the guilty mode has been
set up correctly. Check expected and observed positions. Try restarting
Emma. Contact Vistec if it persists.
DWDIVZ4DD “Division by 0 in DW back transform (4D denom) "
Failed internal consistency check. Make sure the guilty mode has been
set up correctly. Check expected and observed positions. Try restarting
Emma. Contact Vistec if it persists.
DWDIVZ4DSX “Division by 0 in DW back transform (4D ScaleX) "
Failed internal consistency check. Make sure the guilty mode has been
set up correctly. Check expected and observed positions. Try restarting
Emma. Contact Vistec if it persists.
DWDSTMAPINV
“Destination map mode invalid in ConvertMappedPosns "
The number that identifies the DW map mode is not in the range 0 to 9.
Internal consistency check has failed. Try reloading the current DW mode, if
not ABS.Try setting-up the faulty mode again, if you know which it is. Try
restarting Emma. Contact Vistec if it persists.
DWINVPARAMS
“Invalid number of exp/obs points"
Use 1,3 or 4 points for both expected and observed positions.
DWMAPORDINV
“Mapping order invalid: if given must be 1, 3 or 4 "
The map order isn't 1, 3 or 4. Internal consistency check has failed. Try
setting up the faulty mode again. Try restarting Emma. Contact Vistec if it
persists.
DWNACBACK " Inaccurate back transform"
DWSRCMAPINV
“Source map mode invalid in ConvertMappedPosns "
The number that identifies the DW map mode is not in the range 0 to 9.
Internal consistency check has failed. Try reloading the current DW mode, if
not ABS.Try setting-up the faulty mode again, if you know which it is. Try
restarting Emma. Contact Vistec if it persists.
DWVECALLOC " DW transform matrix allocation failure"
DWXKEYINV “X Keystone value is out of usable range "
Check the specified expected positions and the observed positions. Check
that any specified keystone is within range. Possible gross substrate error.
DWXROTINV “X Rotation value is out of usable range "
Check the specified expected positions and the observed positions. Check
that any specified rotation is within range. Possible gross substrate rotation.
DWXSCAINV “X Scale value is out of usable range "
Check the specified expected positions and the observed positions. Check
that any specified scale is within range. Possible gross substrate error
DWYKEYINV “Y Keystone value is out of usable range "
Check the specified expected positions and the observed positions. Check
that any specified keystone is within range. Possible gross substrate error
DWYROTINV “Y Rotation value is out of usable range "
Check the specified expected positions and the observed positions. Check
that any specified rotation is within range. Possible gross substrate rotation
DWYSCAINV “Y Scale value is out of usable range "
Check the specified expected positions and the observed positions. Check
that any specified scale is within range. Possible gross substrate error
EDGEATXTREM
" Edge too close to extremity of scan "
Part Number:878275
Vectorbeam Operator Manual
Page 276
Increase scan length and check mark size or edge offset.
EDGEDATANON
" Edge data does not make sense "
Check the parameters particularly the bright/dark selection.
EHTDEFERR “EHT not correctly defined on the pattern generator "
EHTDISABLED “EHT disabled "
EHTFAULT
“EHT hardware fault "
EHTOFF
“EHT off "
EHTON
“EHT on "
EHTRAMPDWN
“EHT ramping down "
EHTRAMPUP “EHT ramping up "
EOERROR
“EO Control error - message in console window. "
EOFAULT
“EO Control fault - message in console window. "
EOGLBSECT
“EO global data section is not available "
EOVXERR
“EO Control VxWorks error - message in console window. "
EOWARN
“Warning message from EO Control in console window. "
ETHDEADCI
“Subsystem's Command Interpreter process suspended!!"
ETHEMMASUPCMD
“A slave processor received an Emma command "
ETHHOOKADD
“Subsystem couldn't set up Ethernet packet intercept "
ETHIFUNIT
“Subsystem Ethernet ifunit failure "
ETHIPQCRE
“Subsystem couldn't create Ethernet input queue "
ETHIPQFAIL
“Subsystem couldn't queue Ethernet message for input "
ETHIPQOVF “Subsystem rejected command - its i/p queue would overflow "
Reset subsystem and retry.
ETHLONGMSG
“Subsystem long Ethernet message send failure "
ETHOPQCRE “Subsystem couldn't create Ethernet output queue "
ETHOPQFAIL “Subsystem couldn't queue Ethernet message for output "
ETHOPSEND “Subsystem couldn't pass message to Ethernet output "
ETHOPSPAWN
“Subsystem couldn't spawn Ethernet output process "
EXPMAT_BAD_POS
“Expose matrix - stage move outside limits "
EXPMAT_BAD_REP
“Expose matrix - bad repeat value "
FADDR
“Pattern file offset address invalid "
FILBLOWN
“Filament blown "
Check the filament power supply. Check the contact of the gun cable in the
gun socket. Check the continuity of the filament by probing the contacts in the
gun before opening. On FEG machines do not open gun but contact Vistec
Engineer.
FILDISABLED “Filament disabled "
Part Number:878275
Vectorbeam Operator Manual
Page 277
FILEMPTY
“Pattern file empty "
FILFAULT
“Filament hardware fault "
FILMAPSIZ
“File mapping error "
FILOFF
“Filament off "
FILRAMPDWN “Filament ramping down "
FILRAMPON
“Filament ramping on "
FILRAMPUP
“Filament ramping up "
FLDADRERR
“Pattern field address transfer failed "
FLDHDRERR
“Pattern field header transfer failed "
FLDSIZERR
“Field sizing error "
Check that the fieldsize is within range for the EHT set. This error will occur if
the EHT is zero.
FLTCNVVAX “VME to VAX floating point conversion; number too big "
FLTCNVVME
“VAX to VME floating point conversion; number too small "
FNCNTAVAIL “Function is not implemented "
FPE
" Floating-point arithmetic error "
HGTMEASERR
“Height Measurement Error "
HGTPRVRDNG
“Using previous height reading. "
HGTTBLDNLD “Height Table Download Failed "
HLDRPOSINIT “Cannot initialise holder - Centre/FM/DP not defined"
HOLDERINIT
“Cannot initialise this holder "
HOLDERTHERE
“Airlock already occupied "
Choose alternative destination for holder. Or first transfer holder from airlock
to pouch or library, or vent and remove and then retry.
HOLDINAL
“Holder already in airlock "
Choose alternative destination for holder. Or first transfer holder from airlock
to pouch or library, or vent and remove and then retry.
HOLDINCP
“Holder already in crane pouch "
Choose alternative destination for holder. Or first transfer holder from crane
pouch to front pouch or library and then retry.
HOLDINFP
“Holder already in front pouch "
Choose alternative destination for holder. Or first transfer holder from front
pouch to crane pouch or library and then retry.
HOLDONSTAGE
“Holder already on stage "
Choose alternative destination for holder. Or first transfer holder from stage to
crane pouch, front pouch or library and then retry.
HSTCOMM
“Host communication not initialised "
Use incm/sys=eo or pg or stage to initialise communication.
HWFLT
“Hardware fault "
ILLMAXMIN
“Illegal max and min values "
ILLPRONUM
“Illegal profile number "
ILLVALUE
“Illegal parameter value entered "
Check and adjust parameter
Part Number:878275
Vectorbeam Operator Manual
Page 278
INVALIDFMT “The command was not in a valid format "
Check the format of the command
INVALIDRES “Invalid communication response "
Check the subsystem cabling and power. Reset subsystem
INVBLKALN
“Invalid block alignment"
INVFILHDR
“Invalid file header "
INVPOSID
" Invalid position identifier"
ITRUPACT
" Interrupt is already active "
ITRUPEST
" Interrupt established for end of current command "
ITRUPIGN
“ Interrupt ignored no command active "
IVECALLOC
“ivector allocation failure"
LENSGRDSMAL
“qCal Lens: Grid size too small, (order+1) is minimum "
Increase grid points
LENSYGRDSMA
“qCal Lens: Y Grid size too small, (order+1) is minimum "
Increase Y grid points
LHSATLIM
“Laser height sensor brightness at limit "
Check that the reading is not being taken off the substrate, that the selected
height table is correct, that the height calibration has been done on the
substrate.
LHSCOMFAULT
“Laser height sensor COM fault "
LHSFAULT
“Laser height sensor fault "
Check that the reading is not being taken off the substrate, that the selected
height table is correct, that the height calibration has been done on the
substrate.
LHSOFF
“Laser height sensor off "
Switch on.
LHSOVRRNG “Laser height sensor over range "
Substrate not present or incorrect stage position or incorrect height meter
table specified or height table calibration not valid. Rectify and retry
LHSPOOR
“Laser height sensor reading poor "
Substrate not present or incorrect stage position or incorrect height meter
table specified or height table calibration not valid. Rectify and retry.
LHSPSUFAULT “Laser height sensor PSU fault "
LHSSYSFAULT “Laser height sensor SYS fault "
LHSTBL
“Unable to set the Laser Height sensor table "
LIMITEDACC
" Beam diameter of limited accuracy "
LMP2FEWDATA
“Can't fit polynomial to data - too few good points. "
LMPBADDWMAP
“The locates at all 4 corners must succeed, but didn't. "
LMPBADORDER
“Bad lens map order found when calculating polynomial "
LMPCOLHOLE “Data has consecutive failed locates, looking down columns. "
LMPPERCENT “Significant percentage of mark locates failed. "
Check video levels and mark locate parameters give good reliability on good
marks. Check mark quality of array of marks being used.
LMPROWHOLE
“Data has consecutive failed locates, looking along rows. "
LNKHSTNCON “Host is not connected "
LNKTIMOUT
Part Number:878275
“Link timeout for receive Ethernet packet "
Vectorbeam Operator Manual
Page 279
LNKWNGHST “Subsystem is already connected to another host "
LOADERROR “Substrate load error "
LOCFAIL
“Locate mark failed "
LUMATDEC
" DW LU matrix decomposition error"
MAINDEFLIM
“Main field deflection limit exceeded "
MAPSIZERR
“Map size error "
MISSPKT
“Missing ethernet packet during block transfer "
MRKABORT
" Operator aborted mark locate "
MRKARITH
" Arithmetic error during mark locate "
MRKBDW
" Mark bandwidth "
MRKBEDGE " Failed to find bottom edge "
Check the video levels and mark locate parameters. Using SEM mode check
that the mark is not damaged.
MRKCSLEN
“Mark (cross) coarse search length parameter out of range "
Reduce the coarse search length parameter
MRKCSLIM
" Mark coarse search limit "
MRKCSOFF
“Mark (cross) coarse search offset parameter out of range "
MRKCSRCH
" Mark locate exhausted coarse search area "
MRKCT
“Mark contrast parameter out of range "
MRKCTT
" Mark contrast tolerance "
MRKDBFULL “Mark definition data base full "
List the marks in the database using the “qmark list” command. Delete any
unwanted marks from the database using the “qmark del ...” command.
MRKDEFFAIL “Mark definition failed "
MRKEDG
" Mark edge data insufficient or of poor quality "
MRKFILT
" Mark filter parameter out of range "
Define filter to be in range.
MRKFSLIM
" Mark fine search limit "
MRKFSRCH
“Mark fine search "
MRKFULLFAIL " Mark locate exhausted full field "
MRKFXFIT
" Mark fine x fit "
MRKFXSRCH “Mark fine search x "
MRKFYFIT
“Mark fine y fit "
MRKFYSRCH " Mark fine search y "
MRKHEIGHT " Height of feature found does not correspond to param "
Check using SEM mode that the correct mark is being scanned and that it is
undamaged. Check that the height,width and tolerance mark locate
parameters are correct
MRKHGTPRM " Mark height parameter out of range "
Part Number:878275
Vectorbeam Operator Manual
Page 280
Define the mark height to be within range.
MRKLEDGE
" Failed to find left edge "
MRKLINEAV " Mark line averaging parameter out of range "
Refer to Emma command manual for valid range.
MRKLMBWID " Mark (cross) limb width parameter out of range "
MRKLOOK
" Mark look option unknown"
MRKMFDAC
" Mark main field DAC "
MRKMFLDP
“ Main field position out of range "
MRKMSRHGT " Mark measurement height parameter out of range "
MRKMSRLEN " Mark measurement length inappropriate for mark size "
MRKMSRWIDTH
“ Mark measurement width parameter out of range "
MRKNONSPEC" Error occured in module not specific marklocate "
MRKOFFWIDTH
" Mark offset width parameter out of range "
Refer to Emma command manual for valid range.
MRKPOINTAV " Mark point averaging parameter out of range "
Refer to Emma command manual for valid range.
MRKPRLL
" Number of parallel scans parameter out of range "
Refer to Emma command manual for valid range.
MRKREDGE " Failed to find right edge "
MRKRT
" Mark rise time parameter out of range "
MRKRTT
" Mark rise time tolerance "
MRKSFDAC
" Mark trap field DAC "
MRKTEDGE
" Failed to find top edge "
MRKTFLDP
“Trap field position out of range "
MRKTOL
" Mark tolerance parameter out of range "
MRKUNKDEF “Unknown deflection option“
Check command syntax and use available options
MRKUNKDIR “Unknown raster scan direction option“
Check command syntax and use available options
MRKUNKLOC “Unknown locate option“
Check command syntax and use available options
MRKUNKPLT “Unknown plot option"
Check command syntax and use available options
MRKVRU
" Mark step resolution parameter out of range "
MRKWIDPRM " Mark width parameter out of range "
MRKWIDTH
" Width of feature found does not correspond to param "
MRKWRITFLD " Trap field extends beyond writing field "
MRKZEXSIZ
“Zero exel size "
MSLOPEFAIL " Marker Slope Calibration Failed "
NOCASHOLDER
“No holder in airlock "
Check the source position specified. Check the occupancy using the “qdisplay
air/read” command. If it is known that a holder IS present then extreme
Part Number:878275
Vectorbeam Operator Manual
Page 281
caution is required when recovering the situation and a Vistec engineer
should be consulted.
NOHOLDINAL “No holder in airlock "
Check the source position specified. Check the occupancy using the “qdisplay
air/read” command. If it is known that a holder IS present then extreme
caution is required when recovering the situation and a Vistec engineer
should be consulted.
NOHOLDINCP “No holder in crane pouch "
Check the source position specified. Check the occupancy using the “qdisplay
air/read” command. If it is known that a holder IS present then extreme
caution is required when recovering the situation and a Vistec engineer
should be consulted.
NOHOLDINFP “No holder in front pouch "
Check the source position specified. Check the occupancy using the “qdisplay
air/read” command. If it is known that a holder IS present then extreme
caution is required when recovering the situation and a Vistec engineer
should be consulted.
NOHOLDSTAGE
“No holder on stage "
Check the source position specified. Check the occupancy using the “qdisplay
air/read” command. If it is known that a holder IS present then extreme
caution is required when recovering the situation and a Vistec engineer
should be consulted.
NOMRKFND “No mark found in the data base "
Use mlis to show the marks in the database. Define mark if needed.
NONEWHOLDER
" Could not create a new holder definition "
NOT_PAT_FIL “Not a pattern file"
Check that the file specified is correct.
NOVIDEO
" No video signal detected "
OUTVBNL
“Outside virtual block limits "
PACKORERR “Ethernet packet order error "
PARAMRNG “Parameter passed was out of range "
Check validity of parameter.
PGCFGBAD
“PG setup is inconsistent: bad mix of processor types "
Check PG configuration file. Reset PG.
PGCFGCFAIL “PG configuration check failed. "
PGCFGNLOGS
“PG setup: no. of SLAVE logicals not same as no. of FISPs "
Check PG configuration file. Reset PG.
PGCFGNOTOK
“PG unusable: processors are not OK or missing (reboot?) "
Wait for 1 minute and retry. Reset PG. Check PG configuration file.
PGERROR
“Pattern Generator error - message in console window. "
PGFAULT
“Pattern Generator fault - message in console window. "
PGGLBSECT
“PG global data section is not available "
PGNRDY
“Pattern Generator is not ready for exposure“
PGVXERR
“Pattern Generator VxWorks error - message in console window. "
PGWARN
“Warning message from PG in console window. "
PTNBADFIRSTXY
" First (x,y) badly specified "
PTNBADLASTXY
“Last (x,y) badly specified "
PTNBADRANGEAREA
PTNCANTFIND
Part Number:878275
“Bad pattern Range Area "
“Cannot find fields in given Range Area "
Vectorbeam Operator Manual
Page 282
PTNDATA
“Pattern data transfer failed "
PTNHDRERR “Pattern header transfer failed "
PTNLASTFIRST
PTNNSLC
" Last field < First field "
“Pattern file is not selected "
PTNRESERR “Pattern resolution does not match calibrated resolution "
Change fieldsize and hence the pattern generator resolution to match the
pattern (Remember to load the appropriate field corrections), recalibrate and
retry. Use the “/noresol” qualifier. Change the resolution in the converter to
match ythe machine and reconvert the pattern.
QUALBADVAL “Bad value supplied for qualifier "
RBOUTTOL
“Readback out of tolerance "
Retry. If error persists there may be a hardware fault.
RKOFFHGT
" Mark offset height parameter out of range "
Define mark offset height to be within range.
SBERR
“Structure Block transfer failed "
SINGMATRIX " Singular matrix"
SLVCPUERR “Slave Processor is not initialised for communications "
SPCALFAIL
" Spot Table Calibration Failed "
Note the first error message to be reported as this will be the underlying
problem to be solved.
SPOTFAIL
" Failed to set requested spot "
Check that the current spot and demagnification tables are correct. Check
that the mark position and locate parameters are correct. Check that the
Faraday cup position is correct. Check that the autofocus and autostigmation
functions work correctly with the current parameters.
STGLBSECT “Stage global data section is not available "
STGMOVBLK “Stage Move Block Transfer Error "
Reboot PG and retry.
STIGERROR " Error occured during auto stig "
Check that a normal SEM image of the mark can be obtained. Check that the
mark position and locate parameters are correct. Check that the
autostigmation parameters are correct. Adjust the stigmation manually and
retry.
STIGSNOTFND" Unable to find optimum stig settings "
Check that a normal SEM image of the mark can be obtained. Check that the
mark position and locate parameters are correct. Check that the
autostigmation parameters are correct. Adjust the stigmation manually and
retry.
STNATMODINV
“Natural mode is invalid for this command "
STSRCMAPINV
“Source map mode invalid in ConvertStagePosns "
The number that identifies the Stage mode is not in the range 0 to 2. Internal
consistency check has failed. Try reloading the Stage mode. Try restarting
Emma. Contact Vistec if it persists.
SUBBUSY
“Sub-system Busy "
Wait for sub-system to finish previous command if required. If the sub-system
will require too long to finish, type CTRL C to exit from any jobfile and press
the abort button in the Emma status window. If the sub-system does not
respond or has stopped working reboot the subsystem and then type “start” at
the VB_OPER prompt.
SVD2FEWROWS
“Can't solve SVD matrix - has fewer rows than columns "
Check for sensible command parameters. Contact Vistec.
SVDDIVZAII
“Division by zero in SVD matrix arithmetic (Aii) "
Check for sensible command parameters. Contact Vistec.
SVDDIVZAIL “Division by zero in SVD matrix arithmetic (Ail) "
Check for sensible command parameters. Contact Vistec.
SVDDIVZH
“Division by zero in SVD matrix arithmetic (h) "
Check for sensible command parameters. Contact Vistec.
Part Number:878275
Vectorbeam Operator Manual
Page 283
SVDDIVZHY “Division by zero in SVD matrix arithmetic (hy) "
Check for sensible command parameters. Contact Vistec.
SVDDIVZX
“Division by zero in SVD matrix arithmetic (x) "
Check for sensible command parameters. Contact Vistec.
SVDDIVZZ
“Division by zero in SVD matrix arithmetic (z) "
Check for sensible command parameters. Contact Vistec.
SVDNOCONV “SVD matrix arithmetic didn't converge "
Check for sensible command parameters. Contact Vistec.
SVERROR
“Stage error - message in console window. "
Check for sensible command parameters. Contact Vistec.
SVFAULT
“Stage fault - message in console window. "
Check for sensible command parameters. Contact Vistec.
SVVXERR
“Stage VxWorks error - message in console window. "
Reboot stage.
SWERR
“Sub-system software error "
Reboot subsystem.
TRAPDEFLIM “Trapezium deflection limit exceeded "
UABLTODB
“Unable to open machine database file "
Exit Emma, run Emma environment and then restart Emma. Check that the
logical vb$db exists. Check the directory and file exists.
UABLTOUPD "Unable to update machine database file "
Check the directory and file exists using the directory command
UNABLCLOSE “Unable to close file "
UNABLEOPN
“Unable to open file "
UNKNOWNHOLDER
“Unknown holder specified "
UNKNSUBSYS “Message from unknown (!) subsystem in console window. "
UNLOADERROR
“Substrate unload error "
UNRECCMND “Sub-system received but did not recognise command "
UNSOLINP
“Unsolicited input on Ethernet link "
XFERERROR " Substrate transfer error "
If the loader arm on a VB5 has stopped anywhere but in the fully retracted
position due to the emergency switch being activated then extreme caution is
required. A Vistec engineer should be contacted.
If the cause of the error is clear and not a mechanical fault with the loading
mechanism (such as the destination position being occupied or the stage not
being able to move to the load position due an interferometer error) correct
the command parameters or clear the error. Issue the qdisplay air/read
command and retry.
27.6.5.
Emma error numbers
08018009
08018013
0801801B
08018023
0801802B
08018033
0801803B
08018043
0801804B
08018053
0801805B
08018063
0801806B
08018073
0801807B
band "
Part Number:878275
SUCCESS " Command Successful "
EOINIT " Initialising EO communication link "
EOLNKACT " EO communication link active "
EOLNKNRDY " EO communication link is not ready "
STINIT " Initialising Stage communication link "
STLNKACT " Stage communication link active "
STLNKNRDY " Stage communication link is not ready "
PGINIT " Initialising PG communication link "
PGLNKACT " PG communication link active "
PGLNKNRDY " PG communication link is not ready "
LNKALRDYCON" Host is already connected to the sub-system"
LNKESTB " Host to sub-system communications link established "
NEWMRK " New mark definition "
CALNOUPDATE " New data discarded because /NOUPDATE set."
DCNEWCURFRQ " Current frequency not retained, was outside new
Vectorbeam Operator Manual
Page 284
08018083
PGINFO " Successful. Message from PG in console window. "
0801808B
SVINFO " Successful. Message from Stage in console window. "
08018093
EOINFO " Successful. Message from EO Control in console
window. "
0801809B NUPPOSDISP " Couldn't update stage position display correctly. "
080180A3 LMAPDEASS " Lens Map(s) deassigned from changed DW transform(s) "
080180AB QUALIGNORE " Illegal qualifier(s) ignored. "
08018FA0 ITRUPACT " Interrupt is already active "
08018FA8 ITRUPEST " Interrupt established for end of current command "
08018FB0 ITRUPIGN " Interrupt ignored no command active "
08018FB8 EOGLBSECT " EO global data section is not available "
08018FC0 STGLBSECT " Stage global data section is not available"
08018FC8 PGGLBSECT " PG global data section is not available "
08018FD0 LNKTIMOUT " Link timeout for receive Ethernet packet "
08018FD8 LNKHSTNCON " Host is not connected "
08018FE0 LNKWNGHST " Subsystem is already connected to another host "
08018FE8 UNSOLINP " Unsolicited input on Ethernet link "
08018FF0 PACKORERR " Ethernet packet order error "
08018FF8 FNCNTAVAIL " Function is not implemented "
08019000 EHTRAMPUP " EHT ramping up "
08019008 EHTRAMPDWN " EHT ramping down "
08019010 EHTDISABLED " EHT disabled "
08019018 EHTOFF
" EHT off "
08019020 EHTON
" EHT on "
08019028 EHTFAULT " EHT hardware fault "
08019030 FILRAMPON " Filament ramping on "
08019038 FILRAMPUP " Filament ramping up "
08019040 FILRAMPDWN " Filament ramping down "
08019048 FILDISABLED " Filament disabled "
08019050 FILOFF
" Filament off "
08019058 FILBLOWN " Filament blown "
08019060 FILFAULT " Filament hardware fault "
08019068 FLTCNVVME " VAX to VME floating point conversion; number too small "
08019070 FLTCNVVAX " VME to VAX floating point conversion;number too big "
08019078 FPE
" Floating-point arithmetic error "
08019080 INVALIDRES " Invalid communication response "
08019088 ILLPRONUM " Illegal profile number "
08019090 ILLMAXMIN " Illegal max and min values "
08019098 ILLVALUE " Illegal parameter value entered "
080190A0 INVALIDFMT " The command was not in a valid format "
080190A8 PARAMRNG " Parameter passed was out of range "
080190B0 HWFLT
" Hardware fault "
080190B8 RBOUTTOL " Readback out of tolerance "
080190C0 HSTCOMM " Host communication not initialised "
080190C8 UNRECCMND " Sub-system received but did not recognise command "
080190D0 UABLTODB " Unable to open machine database file "
080190D8 UABLTOUPD " Unable to update machine database file "
080190E0 DBFILEHEAD " Bad database file header "
080190E8 BADDBSECN " Invalid database section "
080190F0 BADTIME " Unable to get system time/date "
080190F8 UNABLCLOSE " Unable to close file "
08019100 DBBADMC " This file was created on a different machine "
08019108 DBEHT
" EHT in file different to current value "
08019110 DBFLD
" Field size in file different to current value "
08019118 DBMFSENS " Main sensitivity in file different to current value "
08019120 DBTFSENS " Trap sensitivity in file different to current value "
08019128 DBBEFSENS " Bef sensitivity in file different to current value "
08019130 DBMVPIVOT " Main pivot point in file different to current value "
08019138 DBTVPIVOT " Trap pivot point in file different to current value "
08019140 DBFOCSENS " Height/focus factor in file different to current value "
08019148 DBHRSENS " Height/rotation factor in file different to current value "
08019150 DBPARSE " Failed to parse file specification "
08019158 DBSEARCH " Could not decode file specification, or no file"
08019160 COLRESTORE " Unable to restore column settings "
Part Number:878275
Vectorbeam Operator Manual
08019168
08019170
08019178
08019180
08019188
08019190
08019198
080191A0
080191A8
080191B0
080191B8
080191C0
080191C8
080191D0
080191D8
080191E0
080191E8
080191F0
080191F8
08019200
08019208
08019210
08019218
08019220
08019228
08019230
08019238
08019240
08019248
08019250
08019258
08019260
08019268
08019270
08019278
08019280
08019288
08019290
08019298
080192A0
080192A8
080192B0
080192B8
080192C0
080192C8
080192D0
080192D8
080192E0
080192E8
080192F0
080192F8
08019300
08019308
08019310
08019318
08019320
08019328
08019330
08019338
08019340
08019348
08019350
08019358
08019360
Part Number:878275
Page 285
COLUPDATE " Unable to update column settings "
INVFILHDR " Invalid file header "
FILEMPTY " Pattern file empty "
UNABLEOPN " Unable to open file "
SWERR
" Sub-system software error "
SUBBUSY " Sub-system Busy "
INVBLKALN " Invalid block alignment"
MISSPKT " Missing ethernet packet during block transfer "
SLVCPUERR " Slave Processor is not initialised for communications "
NOT_PAT_FIL " Not a pattern file"
PTNHDRERR " Pattern header transfer failed "
FLDADRERR " Pattern field address transfer failed "
FLDHDRERR " Pattern field header transfer failed "
FADDR
" Pattern file offset address invalid "
PTNDATA " Pattern data transfer failed "
PGNRDY
" Pattern Generator is not ready for exposure "
PTNNSLC " Pattern file is not selected "
PTNRESERR " Pattern resolution does not match calibrated resolution "
PTNLASTFIRST
" Last field < First field "
PTNBADFIRSTXY " First (x,y) badly specified "
PTNBADLASTXY
" Last (x,y) badly specified "
PTNBADRANGEAREA " Bad pattern Range Area "
PTNCANTFIND
" Cannot find fields in given Range Area "
CANTREEXP_NOPAT " Cannot reexpose as no pattern yet exposed "
CANTREEXP_PRTFLD " Cannot reexpose as pattern has part fields "
EXPMAT_BAD_REP " Expose matrix - bad repeat value "
EXPMAT_BAD_POS " Expose matrix - stage move outside limits "
STGMOVBLK " Stage Move Block Transfer Error "
BADSTAGEBLK " Stage move block positions outside stage limits "
FILMAPSIZ " File mapping error "
MAPSIZERR " Map size error "
OUTVBNL " Outside virtual block limits "
BLKTRNERR " Block transfer failed "
MRKDBFULL " Mark definition data base full "
NOMRKFND " No mark found in the data base "
TRAPDEFLIM " Trapezium deflection limit exceeded "
MAINDEFLIM " Main field deflection limit exceeded "
MRKDEFFAIL " Mark definition failed "
LOCFAIL " Locate mark failed "
CRTDWLERR " Correction down load error "
EHTDEFERR " EHT not correctly defined on the pattern generator "
FLDSIZERR " Field sizing error "
LHSPOOR " Laser height sensor reading poor "
LHSATLIM " Laser height sensor brightness at limit "
LHSOVRRNG " Laser height sensor over range "
LHSOFF
" Laser height sensor off "
LHSFAULT " Laser height sensor fault "
LHSPSUFAULT " Laser height sensor PSU fault "
LHSSYSFAULT " Laser height sensor SYS fault "
LHSCOMFAULT " Laser height sensor COM fault "
LHSTBL
" Unable to set the Laser Height sensor table "
MRKUNKDEF " Unknown deflection option "
MRKUNKDIR " Unknown raster scan direction option "
MRKUNKLOC " Unknown locate option "
MRKUNKPLT " Unknown plot option"
MRKZEXSIZ " Zero exel size "
MRKMFLDP " Main field position out of range "
MRKTFLDP " Trap field position out of range "
MRKWRITFLD " Trap field extends beyond writing field "
MRKWIDPRM " Mark width parameter out of range "
MRKHGTPRM " Mark height parameter out of range "
MRKMSRWIDTH " Mark measurement width parameter out of range "
MRKMSRHGT " Mark measurement height parameter out of range "
MRKOFFWIDTH " Mark offset width parameter out of range "
Vectorbeam Operator Manual
08019368
08019370
08019378
08019380
08019388
08019390
08019398
080193A0
080193A8
080193B0
080193B8
080193C0
080193C8
080193D0
080193D8
080193E0
080193E8
080193F0
080193F8
08019400
08019408
08019410
08019418
08019420
08019428
08019430
08019438
08019440
08019448
08019450
08019458
08019460
08019468
08019470
08019478
08019480
08019488
08019490
08019498
080194A0
080194A8
080194B0
080194B8
080194C0
080194C8
080194D0
080194D8
080194E0
080194E8
080194F0
080194F8
08019500
08019508
08019510
08019518
08019520
08019528
08019530
08019538
08019540
08019548
08019550
08019558
08019560
Part Number:878275
Page 286
MRKOFFHGT " Mark offset height parameter out of range "
MRKLMBWID " Mark (cross) limb width parameter out of range "
MRKTOL " Mark tolerance parameter out of range "
MRKRT " Mark rise time parameter out of range "
MRKCT
" Mark contrast parameter out of range "
MRKLOOK " Mark look option unknown"
MRKFILT " Mark filter parameter out of range "
MRKLINEAV " Mark line averaging parameter out of range "
MRKPOINTAV " Mark point averaging parameter out of range "
MRKVRU " Mark step resolution parameter out of range "
MRKPRLL " Number of parallel scans parameter out of range "
MRKCSOFF " Mark (cross) coarse search offset parameter out of range "
MRKCSLEN " Mark (cross) coarse search length parameter out of range "
MRKMSRLEN " Mark measurement length inappropriate for mark size "
MRKCSLIM " Mark coarse search limit "
MRKFSLIM " Mark fine search limit "
MRKCSRCH " Mark locate exhausted coarse search area "
MRKHEIGHT " Height of feature found does not correspond to param "
MRKWIDTH " Width of feature found does not correspond to param "
MRKEDG " Mark edge data insufficient or of poor quality "
MRKMFDAC " Mark main field DAC "
MRKSFDAC " Mark trap field DAC "
MRKLEDGE " Failed to find left edge "
MRKREDGE " Failed to find right edge "
MRKTEDGE " Failed to find top edge "
MRKBEDGE " Failed to find bottom edge "
MRKARITH " Arithmetic error during mark locate "
MRKNONSPEC " Error occured in module not specific marklocate "
MRKABORT " Operator aborted mark locate "
MRKRTT " Mark rise time tolerance "
MRKCTT " Mark contrast tolerance "
MRKBDW " Mark bandwidth "
MRKFXSRCH " Mark fine search x "
MRKFYSRCH " Mark fine search y "
MRKFSRCH " Mark fine search "
MRKFXFIT " Mark fine x fit "
MRKFYFIT " Mark fine y fit "
AGAFAIL " AGA Failed "
AGASIGHIGH " AGA Signal Too High "
AGASIGLOW " AGA Signal Too Low "
EDGEATXTREM " Edge too close to extremity of scan "
EDGEDATANON " Edge data does not make sense "
NOVIDEO " No video signal detected "
LIMITEDACC " Beam diameter of limited accuracy "
AXIALDRIVE " Axial stig drive beyond range "
DIAGDRIVE " Diag stig drive beyond range "
STIGSNOTFND " Unable to find optimum stig settings "
STIGERROR " Error occured during auto stig "
DEMAGFAIL " Demag. Table Calibration Failed "
CORBIG " Calculated corrections within 10% of maximum "
CORTOOBIG " Calculated corrections greater than maximum "
SPCALFAIL " Spot Table Calibration Failed "
MSLOPEFAIL " Marker Slope Calibration Failed "
SPOTFAIL " Failed to set requested spot "
CURRFAIL " Failed to set requested current "
DOSEFAIL " Failed to set requested dose "
DOSADJFAIL " Dose adjustment failed "
CLKADJFAIL " Clock adjustment failed "
CLKADJNEG " Invalid/unset nominal dose "
CMDNCOMPLETE" Command not completed "
CMDABORT " Command Aborted "
ADCFILEOPENING " Could not open file for ADC plot "
ADCFILEERROR" File error in file for ADC plot "
LOADERROR " Substrate load error "
Vectorbeam Operator Manual
08019568
08019570
08019578
08019580
08019588
08019590
08019598
080195A0
080195A8
080195B0
080195B8
080195C0
080195C8
080195D0
080195D8
080195E0
080195E8
080195F0
080195F8
08019600
08019608
08019610
08019618
08019620
08019628
08019630
08019638
08019640
08019648
08019650
forced. "
08019658
08019660
08019668
08019670
08019678
08019680
08019688
08019690
08019698
080196A0
080196A8
080196B0
080196B8
080196C0
080196C8
080196D0
080196D8
080196E0
080196E8
080196F0
080196F8
08019700
08019708
08019710
08019718
08019720
08019728
08019730
08019738
08019740
08019748
08019750
08019758
Part Number:878275
Page 287
UNLOADERROR " Substrate unload error "
CASSUNDEF " Cassette undefined "
NOCASHOLDER " No holder in airlock "
HOLDERTHERE " Airlock already occupied "
HOLDONSTAGE " Holder already on stage "
NOHOLDSTAGE " No holder on stage "
XFERERROR " Substrate transfer error "
HOLDINAL " Holder already in airlock "
HOLDINFP " Holder already in front pouch "
HOLDINCP " Holder already in crane pouch "
NOHOLDINAL " No holder in airlock "
NOHOLDINFP " No holder in front pouch "
NOHOLDINCP " No holder in crane pouch "
HLDRPOSINIT " Cannot initialise holder - Centre/FM/DP not defined"
HOLDERINIT " Cannot initialise this holder "
DVECALLOC " dvector allocation failure"
IVECALLOC " ivector allocation failure"
DMATRIX1 " dmatrix allocation failure 1"
DMATRIX2 " dmatrix allocation failure 2"
SINGMATRIX " Singular matrix"
DWVECALLOC " DW transform matrix allocation failure"
LUMATDEC " DW LU matrix decomposition error"
DWBACKSOLN " Invalid DW back transform"
DWNACBACK " Inaccurate back transform"
DWINVPARAMS " Invalid number of exp/obs points"
INVPOSID " Invalid position identifier"
HGTMEASERR " Height Measurement Error "
HGTTBLDNLD " Height Table Download Failed "
HGTPRVRDNG " Using previous height reading. "
CALNOUPFORCE " Not in Absolute mode - /NOUPDATE /DIAG options
DWABSMODINV " Absolute mode is invalid for this command"
STNATMODINV " Natural mode is invalid for this command "
DWCURMODINV " Current mode (Absolute) is invalid for this command "
DWCOPTOSELF " Can't copy current mode to itself "
DWMAPORDINV " Mapping order invalid: if given must be 1, 3 or 4 "
DWXSCAINV " X Scale value is out of usable range "
DWYSCAINV " Y Scale value is out of usable range "
DWXROTINV " X Rotation value is out of usable range "
DWYROTINV " Y Rotation value is out of usable range "
DWXKEYINV " X Keystone value is out of usable range "
DWYKEYINV " Y Keystone value is out of usable range "
DWSRCMAPINV " Source map mode invalid in ConvertMappedPosns "
STSRCMAPINV " Source map mode invalid in ConvertStagePosns "
DWDSTMAPINV " Destination map mode invalid in ConvertMappedPosns "
DWDIVZ3DD " Division by 0 in DW back transform (3D denom) "
DWDIVZ3DSY " Division by 0 in DW back transform (3D ScaleY) "
DWDIVZ4DSX " Division by 0 in DW back transform (4D ScaleX) "
DWDIVZ4DD " Division by 0 in DW back transform (4D denom) "
DWDIVZ4DCHI " Division by 0 in DW back transform (4D Chi) "
DCBANDNSET " Couldn't set clock band "
DCUNKNHW " Can't find what PG clock hardware is in use "
DOSTYPINV " Invalid dose type "
DCBADFREQ " Frequency can't be set: out of hardware range "
DCFRQOUTBND " Frequency can't be set: outside clock band "
DCBADFRQADJ " Frequency can't be adjusted: out of hardware range "
DCBADDOSE " Illegal dose value: zero or negative "
DCBADEXEL " Illegal exel size: zero or negative "
DCCMDFAIL " Clock command failed "
DCCMDNOGOOD " Clock command irrelevant to installed hardware "
DCBANDNARR " Clock band not set: too narrow "
DCBANDWIDE " Clock band wide: clocks may be inaccurate "
DCUNKNERR " Unknown clock command error code was returned "
DCCLKSOUTB " Clock(s) outside clock band "
Vectorbeam Operator Manual
Page 288
08019760 PGWARN
" Warning message from PG in console window. "
08019768 SVWARN
" Warning message from Stage in console window. "
08019770 EOWARN
" Warning message from EO Control in console window. "
08019778 LMPROWHOLE " Data has consecutive failed locates, looking along rows. "
08019780 LMPCOLHOLE " Data has consecutive failed locates, looking down columns.
"
08019788 LMPPERCENT " Significant percentage of mark locates failed. "
08019790 BADHOLDERINPUT " Incorrect holder ID specified "
08019798 NONEWHOLDER " Could not create a new holder definition "
080197A0 UNKNOWNHOLDER " Unknown holder specified "
080197A8 MRKFULLFAIL " Mark locate exhausted full field "
0801AEE2 ETHOPSPAWN " Subsystem couldn't spawn Ethernet output process "
0801AEEA ETHIPQCRE " Subsystem couldn't create Ethernet input queue "
0801AEF2 ETHOPQCRE " Subsystem couldn't create Ethernet output queue "
0801AEFA ETHHOOKADD " Subsystem couldn't set up Ethernet packet intercept "
0801AF02 ETHLONGMSG " Subsystem long Ethernet message send failure "
0801AF0A ETHOPQFAIL " Subsystem couldn't queue Ethernet message for output "
0801AF12 ETHOPSEND " Subsystem couldn't pass message to Ethernet output "
0801AF1A ETHIFUNIT " Subsystem Ethernet ifunit failure "
0801AF22 ETHIPQFAIL " Subsystem couldn't queue Ethernet message for input "
0801AF2A ETHIPQOVF " Subsystem rejected command - its i/p queue would overflow "
0801AF32 ETHEMMASUPCMD " A slave processor received an Emma command "
0801AF3A ETHDEADCI " Subsystem's Command Interpreter process suspended!!"
0801AF42 PGERROR " Pattern Generator error - message in console window. "
0801AF4A SVERROR " Stage error - message in console window. "
0801AF52 EOERROR " EO Control error - message in console window. "
0801AF5A PGFAULT " Pattern Generator fault - message in console window. "
0801AF62 SVFAULT " Stage fault - message in console window. "
0801AF6A EOFAULT " EO Control fault - message in console window. "
0801AF72 PGVXERR " Pattern Generator VxWorks error - message in console
window."
0801AF7A SVVXERR " Stage VxWorks error - message in console window. "
0801AF82 EOVXERR " EO Control VxWorks error - message in console window. "
0801AF8A UNKNSUBSYS " Message from unknown (!) subsystem in console window. "
0801AF92 SBERR
" Structure Block transfer failed "
0801AF9A QUALBADVAL " Bad value supplied for qualifier "
0801AFA2 SVD2FEWROWS " Can't solve SVD matrix - has fewer rows than columns "
0801AFAA SVDNOCONV " SVD matrix arithmetic didn't converge "
0801AFB2 SVDDIVZH " Division by zero in SVD matrix arithmetic (h) "
0801AFBA SVDDIVZAIL " Division by zero in SVD matrix arithmetic (Ail) "
0801AFC2 SVDDIVZAII " Division by zero in SVD matrix arithmetic (Aii) "
0801AFCA SVDDIVZHY " Division by zero in SVD matrix arithmetic (hy) "
0801AFD2 SVDDIVZX " Division by zero in SVD matrix arithmetic (x) "
0801AFDA SVDDIVZZ " Division by zero in SVD matrix arithmetic (z) "
0801AFE2 LMP2FEWDATA " Can't fit polynomial to data - too few good points. "
0801AFEA LMPBADDWMAP " The locates at all 4 corners must succeed, but didn't. "
0801AFF2 LMPBADORDER " Bad lens map order found when calculating polynomial "
0801AFFA BADLENSID " qCal Lens: lens map number is out of range "
0801B002 BADLENSSTEP " qCal Lens: Y step size is negative or out of range "
0801B00A BADLENSGRID " qCal Lens: Grid size is too large "
0801B012 BADLENSGRY " qCal Lens: Grid size in Y is too large "
0801B01A LENSGRDSMAL " qCal Lens: Grid size too small, (order+1) is minimum "
0801B022 LENSYGRDSMA " qCal Lens: Y Grid size too small, (order+1) is minimum "
0801B02A BADLENSORGX " qCal Lens: Origin offset in X is out of range "
0801B032 BADLENSORGY " qCal Lens: Origin offset in Y is out of range "
0801B03A BADLENSSEND " Transmission of lens map coefficients to PG failed "
0801B042 BADLMDATSND " Transmission of lens map assignment to PG failed "
0801B04A BADLENSORD " Lens map order specified is out of range "
0801B052 PGCFGCFAIL " PG configuration check failed. "
0801B05A PGCFGBAD " PG setup is inconsistent: bad mix of processor types "
0801B062 PGCFGNOTOK " PG unusable: processors are not OK or missing (reboot?) "
0801B06A PGCFGNLOGS " PG setup: no. of SLAVE logicals not same as no. of FISPs
"
Part Number:878275
Vectorbeam Operator Manual
Page 289
27.6.6.
Pattern generator error messages
The following error messages are generated by the processors in the pattern generator
and passed to Emma. As a result, Emma may generate and report its own error number
and message as listed above. The original processor error number is only visible on a
terminal which is logged into that processor. A message also appears in the job control
window which is preceeded by PG-SYS-E-FAULT or PG-SYS-E-ERROR.
27.6.6.1.
Queue creation errors
0x400b0001
Couldn't create qErrors queue
0x400b0004
Couldn't create pattern input queue
Reboot PG
0x400b0005
Couldn't create pattern output queue
0x400b0006
Couldn't create height sensor --> Root queue
0x400b0007
Couldn't create Root --> height sensor queue
0x400b0008
Couldn't create SuP Mgr --> Root queue
0x400b0009
Couldn't create SuP Mgr --> patWrite queue
Reboot PG
0x400b000a
Couldn't create SuP Mgr command input queue
0x400b000b
Couldn't create PatWrite --> Root queue
0x400b000c
Couldn't create Root --> patWrite queue
27.6.6.2.
Reboot PG
Reboot PG
Reboot PG
Reboot PG
Reboot PG
Reboot PG
Reboot PG
Task spawn errors
0x400b0101
Couldn't spawn Slave Manager task
0x400b0102
Couldn't spawn Height Sensor task
Reboot PG
0x400b0103
Couldn't spawn Pattern Writing task
0x400b0104
Couldn't spawn a task
0x400b0105
Couldn't spawn SLC task
Reboot PG
0x400b0106
Couldn't spawn FISP task
Reboot PG
0x400b0107
Couldn't spawn FISP buffer fill task
Reboot PG
0x400b0108
SLC task has already been spawned
0x400b0109
FISP task has already been spawned
27.6.6.3.
Reboot PG
Reboot PG
Reboot PG
Reboot PG
Reboot PG
Reboot PG
'C' library errors
0x400b0201
Part Number:878275
Malloc failed in pattern reception
Reboot PG
Vectorbeam Operator Manual
Page 290
27.6.6.4.
Semaphore errors
0x400b0301
Error creating semaphore
Reboot PG
0x400b0302
Error granting semaphore
Reboot PG
27.6.6.5.
Memory allocation errors
0x400b0401
Error allocating memory
Reduce any data gathering processes. Reboot PG
0x400b0402
Error freeing memory
0x400b0403
Can't generate Physical-logical table
27.6.6.6.
Reboot PG
Reboot PG
Register access errors
0x400b0500
This register is write only.
Use “qset reg” command not “qdisp reg”. Reboot PG
0x400b0501
This register is read only
Use “qdisp reg” command not “qset reg”. Reboot PG
0x400b0502
This register does not exist
If using “qset reg” command check parameters. Reboot PG
0x400b0503
Wrong data type for this register
If using “qset reg” command check parameters. Reboot PG
0x400b0504
Data out of range
If using “qset reg” command check parameters. Reboot PG
0x400b0505
Illegal function attempted
If using “qset reg” command check parameters. Reboot PG
0x400b0506
Illegal data type
If using “qset reg” command check parameters. Reboot PG
27.6.6.7.
Operator caused errors
0x200b0600
Command aborted by operator
Press the continue button and then continue.
27.6.6.8.
Exceptions (usually bus errors)
0x400beeee
Task suspended because of exception.
Possible hardware error. Reboot PG.
27.6.6.9.
Master Micro Command Interpreter Errors
0x400c0001
MupCI receive from qEtherIP queue failed.
Reboot PG.
0x400c0002
MupCI send to SuP Manager queue failed.
Reboot PG.
0x400c0003
MupCI receive from SuP Manager queue failed. Reboot PG.
0x400c0004
MupCI received a reply to the wrong command. Reboot PG.
0x400c0005
Receive from qErrors queue failed
Reboot PG.
0x400c0006
Slave doesn't exist
Possible PG configuration file error. Reboot PG
0x400c0007
Wrong no of bytes in long message
Reboot PG
0x400c0008
MupCI send to qPatternIP queue failed
Reboot PG
0x400c0009
MupCI receive from qPatternOP queue failed
Reboot PG
0x400c000a
MupCI receive from qLHS_Root queue failed
Reboot PG
0x400c000b
MupCI send to qRootLHS queue failed
Reboot PG
0x300c000c
Reply queue not empty before queueing command
Reboot PG
0x400c000d
Register command received by wrong subsystem
If using “qset reg” command check parameters. Reboot PG
0x400c000e
Pattern Generator s/w configuration inconsistent
Possible PG configuration file error. Reboot PG
27.6.6.10.
Slave Micros Manager Errors
0x400d0001
0x400d0002
0x400d0003
0x400d0004
0x400d0005
0x400d0006
Part Number:878275
Receive from SuP Manager Cmnd queue failed
Watchdog timeout on SuP Mgr command send
Watchdog timer Start error
Watchdog timer Cancel error
Send failed, SuP Mgr -> Return queue
Not allowed to send to this destination
Reboot PG
Reboot PG
Reboot PG
Reboot PG
Reboot PG
Reboot PG
Vectorbeam Operator Manual
Page 291
Send failed, Sup Manager -> qPatternIP
Reboot PG
No source for Async mailbox interrupt
Reboot PG
Send failed, L/W EOF interrupt -> qPatternIP
Reboot PG
0x400d000A
Slave inaccessible from VME bus (not booted?)
Possible PG configuration file error or slave not working. Reboot PG.
0x400d000B
Couldn't find Sup Manager task's priority
Reboot PG
0x400d000C
Couldn't reset Sup Manager task's priority
Reboot PG
0x400d000D
Can't communicate with slave - unknown H/W type
Possible PG configuration file error. Reboot PG.
0x400d000E
Can't communicate with slave - unknown mailbox
Possible PG configuration file error. Reboot PG.
0x400d0007
0x400d0008
0x400d0009
27.6.6.11.
CPU Board Errors
0x400e0001
Error in DMA write
Reboot PG
0x400e0002
Requested VME DMA xfer over 256-byte boundary
Reboot PG
0x400e0003
Can't set up mailboxes
Reboot PG
0x400e0004
DMA xfer not on 4-byte boundary
Reboot PG
0x400e0005
Can't understand vxWorks version number
Reboot PG
27.6.6.12.
Pattern Writing errors
0x400f0001
PatWrite receive error from qPatternIP Reboot PG
0x400f0002
PatWrite: invalid response from DCP
Reboot PG
0x400f0003
Invalid FISP-Complete response
Reboot PG
0x400f0004
Invalid SLC-Complete response
Reboot PG
0x400f0005
PatWrite: invalid response from slave Reboot PG
0x400f0006
PatWrite: invalid command
Reboot PG
0x400f0007
PatWrite error sending to slave
Reboot PG
0x400f0008
PatWrite error receiving from slave
Reboot PG
0x400f0009
PatWrite wrong reply received from slave
Reboot PG
0x400f000a
Error on stage move
Possible hardware fault on stage to PG fibre optic link. Reboot PG
0x400f000b
Invalid LHS response
Possible hardware fault on LHS link. Reboot LHS and possibly PG.
0x400f000c
Invalid Linewriter EOF interrupt
Possible hardware fault. Reboot PG
0x400f000d
Invalid FISP transfer response
Reboot PG
0x400f000e
Invalid SLC transfer response
Reboot PG
0x400f000f
Stage move start not signalled
Possible hardware fault on stage to PG fibre optic link. Reboot PG
and stage
0x400f0010
Stage move end not signalled
Possible hardware fault on stage to PG fibre optic link. Reboot PG
and stage
0x400f0011
Stage move abort not signalled
Possible hardware fault on stage to PG fibre optic link. Reboot PG
and stage
0x400f0012
Stage move start timeout
Possible hardware fault on stage to PG fibre optic link. Reboot PG
and stage
0x400f0013
Stage move end timeout
Possible hardware fault on stage to PG fibre optic link. Reboot PG
and stage
0x400f0014
Bad reply to stage start ready
Possible hardware fault on stage to PG fibre optic link. Reboot PG
and stage
0x400f0015
Bad reply to stage end ready
Possible hardware fault on stage to PG fibre optic link. Reboot PG
and stage
0x400f0016
Can't reexpose - insufficient SLCs
Possible PG config file error. Reboot PG.
0x400f0017
Headers not allocated
Reboot PG
Part Number:878275
Vectorbeam Operator Manual
Page 292
0x400f0018
Can't reexpose - SLC buffer too small
Don’t use /reexpose qualifier
0x400f0019
Can't reexpose - an SLC has more than 1 field
Don’t use /reexpose qualifier
0x400f001a
No room in Pipe Field Table
Widefield
0x400f001b
Field not found in Pipe Field Table
Widefield
0x400f001c
Can't create field-header-address table Widefield
0x400f001d
Can't find field number in PPFT
Widefield
0x400f001e
Can't find field in pattern
Widefield
27.6.6.13.
LHS task errors
0x40100001
LHS: receive error from qRoot_LHS
Reboot LHS
0x40100002
LHS: error sending to qLHS_Root
Reboot LHS
0x40100003
LHS: error sending to qPatternIP
Reboot LHS
0x40100004
LHS: invalid command
Reboot LHS
0x40100005
LHS: stage init error
Possible LHS cabling fault. Reboot LHS
0x40100006
Height Sensor init error
Possible LHS cabling fault. Reboot LHS
0x30100007
Error reading height for field 1
If pattern exposure started off the substrate or where the height meter
is blocked by substrate mounting in holder then a valid reading close
to the start position prior to the exposure is required. Possible
incorrect height meter table selected.
27.6.6.14.
Slave Micro Modules
Slave Command Interpreter - Module 128 = 80
0x10800001
More SupCI commands waiting
0x40800002
SupCI mailbox interrupt, but no source found
0x40800003
Interprocessor comms semaphore Give error
Reboot PG
0x40800004
Interprocessor comms semaphore Take error
27.6.6.15.
Reboot PG
Reboot PG
Reboot PG
Reboot PG
Slave - SLC errors - Module 129 = 81
0x40810001
SLC: 1st opcode in field not SubField or EndOfField
Possible faulty pattern. Reboot PG
0x20810002
SLC: Invalid command received
Reboot PG
0x20810003
SLC: Invalid VRU received
Reboot PG
0x20810004
SLC: Invalid invert strategy received
Reboot PG
0x10810005
SLC: Info: Empty field received
Reboot PG
0x40810006
SLC: Output buffer overflowed
Reboot PG
0x40810007
SLC: Couldn't allocate linewriter output buffer
Reboot PG
27.6.6.16.
Slave - FISP errors - Module 130 = 82
0x20820001
0x20820002
Part Number:878275
FISP: Invalid command received
Reboot PG
FISP: Invalid VRU received
Reboot PG
0x20820003
FISP: Field too large, data will swamp SLC
Old
software
0x40820004
FISP: Division by zero in CadDig
Possible invalid shape in pattern file. Use smaller VRU. Reboot PG
0x20820005
FISP: End of last shape is after the end of buffer Reboot PG
0x20820006
FISP: Transfer too long for i/p buffer
Reboot PG
0x20820007
FISP: Array overflow (field too large?)
Reboot PG
0x40820008
FISP: Invalid pointer
Reboot PG
0x40820009
FISP: Ethernet timeout waiting for pattern data
Possible cabling fault. Reboot PG
0x2082000A
FISP: Invalid sorting strategy received
Reboot PG
0x2082000B
FISP: Bad subfield number calculated
Reboot PG
0x2082000C
FISP: Invalid stripe number
Reboot PG
0x1082000D
FISP: Info: Buffer fill semaphore timeout
Reboot PG
0x4082000E
FISP: Tried to spawn 2nd buffer fill task
Reboot PG
0x2082000F
FISP: Illegal opcode in input pattern data
Reboot PG
0x40820010
FISP: Semaphore taken but Fisp buffer full
Vectorbeam Operator Manual
Page 293
Reboot PG
0x20820011
FISP: Structure ID number out of range
Possible pattern data error. Reboot PG
0x30820012
FISP: Ethernet timeout waiting for pattern data
Used instead of ER_FISP_ETHERNET_TIMEOUT when retry is
possible. If the retry is successful then no action is required.
Otherwise reboot PG.
27.6.6.17.
Slave - DCP errors
0x20830001
DCP: Already wobbling stigs
Reboot PG
0x20830002
DCP: Not wobbling stigs
Reboot PG
0x40830003
DCP: Can't create wobble task
Reboot PG
0x40830004
DCP: Can't delete wobble task
Reboot PG
0x20830005
DCP: Bad stig value to set
Check value being set. Reboot PG.
0x20830006
DCP: Focus setting at max extreme
Set the fine focus to 0.0 and check image in SEM mode. Adjust C2 to
give best focus and try again. Check the autostig/autofocus
parameters.
0x20830007
DCP: Focus setting at min extreme
Set the fine focus to 0.0 and check image in SEM mode. Adjust C2 to
give best focus and try again. Check the autostig/autofocus
parameters.
0x20830008
DCP: Unable to find best stigs
Check video levels and image in SEM mode. Check autostig
parameters or detector selection or column adjustment.
0x40830009
DCP: Axial stig DAC value out of range
Adjust the focus and stigmation manually in SEM mode. Check the
autostig/autofocus parameters and try again.
0x4083000A
DCP: Diagnonal stig DAC value out of range
Adjust the focus and stigmation manually in SEM mode. Check the
autostig/autofocus parameters and try again.
0x40830011
DCP: Focus/stig zero length scan, or dvd by zero
Check autostig parameters particularly the scanlength and
edgeoffset.
0x20830012
DCP: Looks like no video
Check video levels and image in SEM mode. Check autostig
parameters or detector selection or column adjustment.
0x20830013
DCP: No sensible edge data.
Check video levels and image in SEM mode. Check autostig
parameters or detector selection or column adjustment.
0x20830014
DCP: Edge too close to scan limit
Check autostig parameters particularly the scanlength and
edgeoffset.
0x20830015
DCP: Bad subfield address
Reboot PG
0x20830016
DCP: Main field scale out of range
Reduce any entered value. The main field sensitivity may need
adjusting.
0x20830017
DCP: Main field DAC out of range
Reduce any entered value. The main field sensitivity may need
adjusting.
0x20830018
DCP: Subfield scale out of range
Reduce any entered value. The subfield sensitivity may need
adjusting.
0x20830019
DCP: Subfield DAC out of range
Reduce any entered value. The subfield sensitivity may need
adjusting.
0x2083001A
DCP: BEF DAC out of range
Reduce any entered value. The BEF sensitivity may need adjusting.
0x2083001B
DCP: Channel plate lost refresh
0x2083001C
DCP: Bad video - too little contrast etc
Check the SEM image on a suitable mark
0x2083001D
DCP: Focus not found - video not good enough
Check video levels and image in SEM mode. Check autostig
parameters or detector selection or column adjustment.
Part Number:878275
Vectorbeam Operator Manual
Page 294
0x4083001E
DCP: Unable to initialise clock
Clock hardware not present or error. Reboot PG.
0x4083001F
DCP: Readback failed in clock
Clock hardware not present or error. Reboot PG.
0x20830020
DCP: Function not valid for current clock H/W.
Possible PG configuration file error.
0x20830021
DCP: Clock band too narrow.
Widen band.
0x30830022
DCP: Clock band wide; you may lose accuracy. Reduce
band.
0x30830023
DCP: Clock freq. outside band; nearest poss. was set.
0x20830024
DCP: Autostig: zero exel size.
Increase scanlength
0x20830025
DCP: Autofocus/stig: Curve-fit has no maximum
Adjust the focus and stigmation manually in SEM mode. Check the
autostig/autofocus parameters and try again.
0x20830026
DCP: Autofocus/stig: Curve-fit is out of h/w range
Adjust the focus and stigmation manually in SEM mode. Check the
autostig/autofocus parameters and try again.
0x40830027
DCP: Afoc/stg curve fit: Div by zero ScaleVector Reboot PG
0x40830028
DCP: Afoc/stg curve fit: Div by zero in fwd. elim. Reboot PG
0x40830029
DCP: Afoc/stg curve fit: Div by zero in back subst
Reboot PG
0x4083002A
DCP: Astg plane fit: fewer than 3 points
Check the autostig/autofocus parameters and try again. Reboot PG.
0x4083002B
DCP: Astg plane fit: Div by zero finding X coeff Reboot PG
0x4083002C
DCP: Astg plane fit: Div by zero finding Y coeff Reboot PG
0x4083002D
DCP: Astg plane modify: points coincident
Reboot PG
0x4083002E
DCP: Autostig timed out
Reboot PG
0x4083002F
DCP: Autostig history list overflow
Reboot PG
0x40830030
DCP: Used CheckTime uninitialised
Reboot PG
0x20830031
DCP: Afoc/astg parabola fit gave minimum not maximum
Reboot PG
0x30830032
DCP: Warning: Autostig closed off, accuracy dubious
Reboot PG
0x40830033
DCP: Tried to start a mark locate when one was already
running
Change mark locate parameters to speed it up.
0x40830034
DCP: Tried to abort non-abortable function
Reboot PG
0x40830035
DCP: Tried to abort a function that wasn't running
No
action
0x30830036
DCP: Abort came too late to stop function
No
action
0x40830037
DCP: Cannot query the state of this function
No action
0x20830038
DCP: Unable to append to image file
Check that the directory protection for [vb]dat.dir allows Write on
operator terminal.
0x40830039
DCP: Image collection command received when one was
already running
No
action.
0x4083003A
DCP: Timed out getting BEF update semaphore Reboot PG
0x2083003B
DCP: Unable to append to dump file
Check that the directory protection for [vb]dat.dir allows Write on the
operator terminal
27.6.6.18.
Slave - PGP errors
0x40840001
0x40840002
27.6.7.
PGP: Couldn't spawn SLC task
PGP: Couldn't spawn FISP task
Reboot PG
Reboot PG
Stage error messages
0x400b0001
0x400b0002
Part Number:878275
Couldn't create qErrors queue
Reboot stage
Couldn't create intertask comms queue Reboot stage
Vectorbeam Operator Manual
0x400b0004
0x400b0005
0x400b0006
0x400b0007
0x400b0008
27.6.7.1.
27.6.7.4.
Couldn't spawn expose task
Couldn't create PGD Mon semaphore
Couldn't spawn PGD Mon task
VxWorks Version Number erroneous
Couldn't spawn Par IO task
Reboot stage
Reboot stage
Reboot stage
Reboot stage
Reboot stage
Malloc failed in pattern reception
Reboot stage
0x400b0301
Error creating semaphore
0x400b0302
Error getting semaphore
Command Interpreter Errors
qEtherIP receive error
Wrong no of bytes in long message
Stage move table already exists
Send to message queue failed
Got reply to wrong command
Got Abort out of context
Invalid command in current state
Query of wrong command
Parallel I/O checksum failure
Parallel Input send to CI failed
Parallel Output receive from CI failed
Parallel Input timeout
Parallel Output timeout
TEST BEAMS Parallel Output timeout
TEST BEAMS Parallel Input timeout
TEST BEAMS Parallel I/P char timeout
qErrors receive error
qCI receive error
Reboot
Expose Errors
0x400d0001
0x400d0002
0x200d0003
0x400d0004
0x200d0005
0x400d0006
0x200d0007
0x400d0008
0x400d0009
27.6.7.6.
Reboot stage
Reboot
Semaphore errors
0x400c0001
0x400c0002
0x400c0003
0x400c0004
0x400c0005
0x200c0006
0x200c0007
0x200c0008
0x400c0009
0x400c000a
0x400c000b
0x400c000c
0x400c000d
0x400c000e
0x400c000f
0x400c0010
0x400c0011
0x400c0012
stage
27.6.7.5.
Couldn't spawn vacuum task
Couldn't spawn stage task
'C' library errors
0x400b0201
27.6.7.3.
Page 295
Reboot stage
Reboot stage
Reboot stage
Reboot stage
Reboot stage
Task spawn errors
0x400b0101
0x400b0102
stage
0x400b0103
0x400b0104
0x400b0105
0x400b0106
0x400b0107
27.6.7.2.
Couldn't create vacuum system queue
Couldn't create stage queue
Couldn't create expose queue
Couldn't create Par IP --> CI queue
Couldn't create CI --> Par OP queue
Error receiving from qExpose queue
Invalid state type
Invalid cmnd in current state
Illegal number of fields for exposure
Vacuum not OK for exposure
Stage move timeout
Abort arrived too late
Invalid semaphore ID
PG not removed stage-move signal 1
Stage Errors
0x400e0001
0x200e0002
0x200e0003
0x200e0004
0x400e0005
0x400e0006
0x200e0007
0x400e0008
0x400e0009
Part Number:878275
Error receiving from qStage
The LOAD position is not defined
X destination out of range
Y destination out of range
Stage move timeout
Stage home timeout
Stage needs initialising via move home
X Interf Measurement Signal Error
X Interf Position Overflow Error
Vectorbeam Operator Manual
Page 296
Part Number:878275
0x400e000a
0x400e000b
0x400e000c
0x400e000d
0x400e000e
0x400e000f
0x400e0010
0x400e0011
0x400e0012
0x400e0013
0x400e0014
0x400e0015
0x400e0016
0x400e0017
0x400e0018
0x400e0019
0x400e001a
0x400e001b
0x400e001c
0x400e001d
0x400e001e
0x200e001f
0x200e0020
0x400e0021
0x400e0022
0x400e0023
0x400e0024
0x400e0025
0x400e0026
0x400e0027
0x400e0028
0x400e0029
0x400e002a
0x400e002b
0x400e002c
0x400e002d
X Interf Stage Velocity Error
X Interf Undefined Error
Y Interf Measurement Signal Error
Y Interf Position Overflow Error
Y Interf Stage Velocity Error
Y Interf Undefined Error
Y Interf Reference Signal Error
Y Interf Reference Not Present
Y Interf Laser Not Ready
X Interf Reference Signal Error
X Interf Reference Not Present
X Interf Laser Not Ready
Y Interf Error Setting Destination
X Interf Error Setting Destination
Stage Control Output error
Stage Control Input error
X Stage Not Moving
Y Stage Not Moving
Stage Electronics Failure
Stage Power Failure
X Stage Not Ready
Stage No Cooling Air Pressure
Stage Not Free To Move
Y Stage Not Ready
Y Stage Error
X Stage Error
X Stage Retry Error
Y Stage Retry Error
X Stage Not At position
Y Stage Not At position
X Position Error initialisation
Y Position Error initialisation
Error turning X BEF on
Error turning Y BEF on
Error turning X BEF off
Error turning Y BEF off
0x200e002e
0x400e002f
0x200e0030
0x400e0031
0x200e0032
0x400e0033
0x200e0034
0x400e0035
0x400e0036
0x400e0037
0x400e0038
0x400e0039
0x400e003a
0x400e003b
0x400e003c
0x400e003d
0x400e003e
0x400e003f
0x400e0040
0x400e0041
0x400e0042
0x400e0043
0x400e0044
0x400e0045
0x400e0046
0x400e0047
0x400e0048
X Stage at 1st left limit switch
X Stage at 2nd left limit switch
X Stage at 1st right limit switch
X Stage at 2nd right limit switch
Y Stage at 1st left limit switch
Y Stage at 2nd left limit switch
Y Stage at 1st right limit switch
Y Stage at 2nd right limit switch
Reference Signal Error at X PEO
Reference Signal Error at Y PEO
Measurement Signal Error at X PEO
Measurement Signal Error at Y PEO
Position Overflow Error at X PEO
Position Overflow Error at Y PEO
Stage Velocity Error at X PEO
Stage Velocity Error at Y PEO
Undefined Error at X PEO
Undefined Error at Y PEO
Backoff Error Testing X Limits
Backoff Error Testing Y Limits
Error Finding X Left Limit
Error Finding X Right Limit
Error Finding Y Left Limit
Error Finding Y Right Limit
Too Many Retries Moving Stage
Yaw Interferometer Measurement Signal Error
Yaw Interferometer Position Overflow Error
Vectorbeam Operator Manual
Page 297
0x400e0049
0x400e004a
0x400e004b
0x400e004c
0x400e004d
0x400e004e
0x400e004f
0x400e0050
0x400e0051
0x400e0052
0x400e0053
0x400e0054
0x400e0055
0x400e0056
0x400e0057
0x400e0058
0x200e0059
27.6.7.7.
Yaw Interferometer Stage Velocity Error
Yaw Interferometer Undefined Error
Yaw Interferometer Reference Signal Error
Yaw Interferometer No Reference Signal
Yaw Interferometer Laser Not Ready
Yaw Interferometer Error Setting Destination
Yaw Position Error Card Initialisation Error
Too Many Retries; Stage at Travel Limit
Too Many Retries; Stage at X 2nd Limit
Too Many Retries; Stage at Y 2nd Limit
Too Many Retries Moving Stage in X
Too Many Retries Moving Stage in Y
Stage settling Time Not Found
BEF Rollover Error in X
BEF Rollover Error in Y
Error finding limit difference
Function not valid for current stage HW
Vacuum Errors
0x400f0001
Error receiving from qVac queue
0x200f0002
Abort arrived too late
No action
0x200f0003
Invalid cassette number
0x400f0004
Cassette move timeout
0x400f0005
SCALP link test failed
0x200f0007
Stage not at load position
0x200f0008
Cassette contents undefined
0x400f000d
Command accept timeout
0x200f000e
Invalid gauge type selected
0x400f000f
Error initialising ISCOS O/P PIO
0x400f0010
Error initialising ISCOS I/P PIO
0x200f0011
Transfer source is same as destination
0x400f0017
Timeout for substrate transfer
0x400f0018
Unknown source for substrate transfer
0x400f0019
Unknown destination for substrate transfer
0x400f001a
Timeout reading sensors
0x300f001b
Airlock not fully pumped down
0x400f001c
Vacuum timeout waiting for transfer
0x400f001e
Vacuum alarm set after substrate transfer
0x400f0025
OCC Tx readback error
0x400f0026
OCC Rx link error
0x400f0027
OCC No new data (timeout?)
0x200f0030
Not safe to move the cassette
0x200f0031
Cassette not at index position
0x200f0032
Not safe to perform transfer
0x400f0033
Not safe to move loader arm
0x400f0034
Error occurred during transfer
0x400f0035
Cassette motor didn't start
0x400f0036
General cassette error
0x400f0037
Could not open main gate valve V4
0x400f0038
Could not close main gate valve V4
0x200f0039
Could not perform dummy load because cassette too full
0x200f003a
Stage contents presently unknown
0x400f003b
Substrate handler is not at forksafe
0x200f003c
Source was empty
0x200f003d
Destination was full
0x400f003e
There is a holder on the substrate handler already
0x400f003f
Substrate handler generated an error
0x200f0040
Airlock gate valve still open
0x200f0041
Cassette at up overtravel
0x200f0042
Cassette at down overtravel
0x400f0043
General PICS error
0x200f0044
Airlock door open; not safe to move cassette
Close the airlock. Check the proximity switch.
0x200f0045
Substrate handler failed to collect holder
0x200f0046
Substrate handler failed to deliver holder
Part Number:878275
Vectorbeam Operator Manual
0x400f0050
0x400f0051
0x400f0052
0x400f0053
0x400f0054
0x400f0055
0x400f0056
0x400f0057
0x400f0058
0x400f0059
27.6.8.
EO error messages
27.6.8.1.
Ethernet Errors
Page 298
Could not access the barcode reader link
Could not open serial link to barcode reader
Could not close serial link to barcode reader
Could not allocate memory for barcode reader command
Error reading from barcode reader serial link
Barcode reader link timeout
Incorrectly formatted reply received
Barcode symbology not supported
Barcode reader rejected command
Could not read barcode
All of these are internal so the advice is:
1. Check ethernet cabling, transceivers, bridges etc.
2. Reboot subsystem
0x40010001
0x40010002
0x40010003
0x40010004
0x40010005
0x40010006
0x40010007
0x40010008
0x40010009
0x4001000a
0x4001000b
0x1001000C
0x4001000D
0x4001000E
0x4001000F
0x40010010
27.6.8.2.
Couldn't spawn Ethernet output process
Couldn't create Ethernet input queue
Couldn't create Ethernet output queue
Couldn't set up Ethernet packet intercept
Long Ethernet message send failure
Couldn't queue Ethernet message for output
Couldn't pass message to Ethernet output
Ethernet ifunit failure
Host is not connected
Missing ethernet packet during block transfer
Already connected to a different host
Already connected to the subsystem
No action
Couldn't queue Ethernet message for input
Command rejected - qEtherIP queue would overflow
Ordinary Ethernet command received by a slave
Command Interpreter process suspended
On-axis & Standalone EHT errors
0x400b0001
0x400b0002
0x400b0003
0x400b0104
0x400b0141
0x400b0301
0x400b0302
0x400b0401
0x400b0402
0x400b0411
0x400b0412
0x400b0500
0x400b0501
0x400b0502
0x400b0503
0x400b0504
0x400b0505
0x400b0506
0x400beeee
0x400c0101
0x400c0102
0x400c0103
0x400e0001
0x400e0002
0x400e0003
0x400e0004
0x400e0005
0x30AA0001
0x30AA0002
0x40AA0003
Part Number:878275
Couldn't create qErrors queue
Couldn't create message queue
Couldn't send to message queue
Couldn't spawn a task
Couldn't spawn Emma command interpreter task
Error creating semaphore
Error getting semaphore
Error allocating memory
Error freeing memory
Couldn't allocate memory for Emma reply packet
Couldn't free memory for Emma reply packet
This register is write only
This register is read only
This register does not exist
Wrong data type for this register
Data out of range
Illegal function attempted
Illegal data type
Task suspended because of exception
CI cmnd receive from qEtherIP queue failed
Error in Emma command interpreter
Receive from qErrors queue failed
Error in DMA write
Requested VME DMA xfer over 256-byte boundary
Can't set up mailboxes
DMA xfer not on 4-byte boundary
Can't understand vxWorks version number
CCU: Error in digital readback
CCU: Error in analogue readback
CCU: Miscellaneous hardware fault
Vectorbeam Operator Manual
Page 299
0x20AA0004 CCU: Parameter is out of range
0x40AA0005 CCU: Low voltage psu failure
0x40AA0006 CCU: Logic psu failure
0x40AA0007 CCU: EILink Primary failure
0x40AA0008 CCU: EILink Secondary failure
0x40AA0009 CCU: EILink Logic psu failure
0x40AA000a CCU: EIlink +24V psu failure
0x40AA000b CCU: EIlink -24V psu failure
0x40AA000c
CCU: Mulitiple EILink faults
0x40AA000d CCU: Hardware addressing error
0x40AA000e CCU: Lens driver over temperature
0x40AA000f
CCU: Lens current source failure
0x40AA0010 CCU: Gun tilt current source failure
0x40AA0011 CCU: Gun shift current source failure
0x40AA0012 CCU: Eht is disabled
0x40AA0013 CCU: Eht is turned off
0x40AA0014 CCU: Filament is disabled
0x40AA0015 CCU: Beam is on
0x40AA0016 CCU: Generic software error
0x20AA0F01 SAEHT: Unknown command
0x20AA0F02 SAEHT: Unknown parameter
0x20AA0F03 SAEHT: Wrong unit for current mode
0x10AA0F05 SAEHT: Busy, command queued
0x20AA0F06 SAEHT: Busy, command rejected
0x40AA0F07 SAEHT: Unit badly earthed
0x40AA0F08 SAEHT: Bad vacuum
0x20AA0F09 SAEHT: Unit not switched on
0x20AA0F0A SAEHT: Interlocks overridden
0x20AA0F0B SAEHT: No LaB6, command rejected
0x20AA0F0C SAEHT: No FEG, command rejected
0x40AA0F0D SAEHT: Safety interlocks not OK
0x40AA0F0E SAEHT: Filament broken
0x20AA0F0F SAEHT: Undefined Runup profile
0x20AA0F10 SAEHT: GSC power off
0x40AA0F12 SAEHT: GSC driver not reset
0x40AA0F13 SAEHT: Low voltage PSU fault (+15V)
0x40AA0F14 SAEHT: Low voltage PSU fault (-15V)
0x20AA0F16 SAEHT: GS type not specified
0x20AA0F17 SAEHT: EHT turned off
0x40AA0F18 SAEHT: EHT disabled
0x40AA0F19 SAEHT: Filament disabled
0x20AA0F20 SAEHT: Focus supply off
0x20AA0F21 SAEHT: Extractor supply off
0x40AA0F22 SAEHT: Hot Box link problem (E_HBTIMO)
0x40AA0F23 SAEHT: Hot Box not enabled
Check the EHT power supply is switched on.
0x40AA0F24 SAEHT: Hot Box tripped out
0x40AA0F25 SAEHT: Hot Box link problem (E_HBCMD)
0x40AA0F26 SAEHT: Hot Box link problem (E_HBILPA)
0x40AA0F27 SAEHT: Hot Box link problem (E_HBPAOR)
0x40AA0F28 SAEHT: Hot Box link problem (E_HBLINK)
0x30AA0F29 SAEHT: Analogue readback error (focus)
0x20AA0F2A SAEHT: Value out of min/max range (focus)
0x30AA0F2B SAEHT: Analogue readback error (extractor)
0x20AA0F2C SAEHT: Value out of min/max range (extractor)
0x40AA0F2D SAEHT: Extractor ADC not zero
0x40AA0F2E SAEHT: Focus DAC not zero
0x40AA0F2F Error in reading from hotbox
0x20AA0F30 SAEHT: Illegal Runup profile parameter
0x40AA0F31 SAEHT: Checksum not OK
0x20AA0F40 SAEHT: Invalid unit specified
0x30AA0F41 SAEHT: Digital readback error
0x30AA0F42 SAEHT: Analogue readback error
0x20AA0F43 SAEHT: Beam turned on
Part Number:878275
Vectorbeam Operator Manual
0x40AA0F44
0x20AA0F45
0x40AA0F46
0x20AA0F50
0x20AA0F51
0x10AA0F60
0x40AA0F61
0x40AA0F62
0x40AA0F63
0x40AA0F64
0x40AA0F65
0x40AA0F70
0x20AA0F71
0x30AA0F72
0x30AA0F73
0x30AA0F74
0x40AA0F75
0x10AA0F81
0x10AA0F82
0x10AA0F83
0x10AA0F84
0x10AA0F85
0x40AA0F86
0x30AA0F87
0x30AA0F88
0x30AA0F89
0x30AA0F8A
0x30AA0F8B
0x30AA0F8C
0x30AA0F8D
0x30AA130E
0x30AA130F
0x40AA1409
0x20AA140C
0x20AA140D
0x20AA140E
0x20AA1410
0x20AA1411
0x20AAC000
0x20AAC001
0x30AAC002
0x20AAC003
0x30AAC004
0x40AAC005
0x40AAC006
0x20AAC007
0x20AAC008
0x30AAC009
0x40AAC00A
0x20AAC00B
0x20AAC00C
0x20AAC00D
0x20AAC00E
0x40AAC00F
0x40AAC010
0x40AAC011
0x40AAC012
0x40AAC017
0x40AAC020
0x40AAC021
0x40AAC022
0x40AAC023
0x40AAC024
0x40AAC025
Part Number:878275
Page 300
SAEHT: Hardware fault
SAEHT: Control mode not (yet) OK
SAEHT: No extractor current
SAEHT: param name not specified
SAEHT: value not specified
SAEHT: Vacuum OK again
SAEHT: Vacuum poor
SAEHT: Vacuum timed out
SAEHT: Vacuum bad
SAEHT: Vacuum failure
SAEHT: UPS exhausting
SAEHT: Could not spawn Set process
SAEHT: Maximum less than standby value
Cannot connect to SAEHT
Cannot disconnect from SAEHT
SAEHT communications link error
SAEHT not yet initialised
SAEHT: Runup started
SAEHT: Rundown started
SAEHT: Monitor mode set ON
SAEHT: Monitor mode set OFF
SAEHT: Mains failure
SAEHT: Hot box detected on supposedly LaB6 system
SAEHT: EHT analogue reading unstable
SAEHT: Emission current analogue reading unstable
SAEHT: Bias voltage analogue reading unstable
SAEHT: Filament voltage analogue reading unstable
SAEHT: Filament current analogue reading unstable
SAEHT: Filament power analogue reading unstable
SAEHT: Analogue reading unstable
Command paused by operator
Command aborted by operator
Conversion parameter out of range
Standby value greater than maximum
Minimum value greater than maximum
Maximum value less than minimum
CCU: Extractor setting less than focus setting
CCU: Focus setting greater than extractor setting
Value out of min/max range (wehnelt)
Value out of min/max range (emission)
Analogue readback error (wehnelt)
Filament disabled
Analogue readback error (filament)"
EHT logic PSU fault
Power failure of gun +/-15 V supply
EHT disabled
EHT turned off
Analogue readback error (EHT)
Signal selected for AD conversion is unknown
Wehnelt value out of min/max range
Filament value out of min/max range
EHT value out of min/max range
EHT value out of (DAC) range
EHT hardware fault
Power failure of aligner driver +/-15 V supply
Failure of tilt current source(s)
Failure of shift current source(s)
Aligner driver interrupt status register hardware error
C0 power amplifier temp. exceeds 80 C
Failure of C0 lens driver current source
Power failure of C0 lens driver +/-15 V supply
C0 lens driver board power failure
C1 power amplifier temp. exceeds 80 C
Failure of C1 lens driver current source
Vectorbeam Operator Manual
0x40AAC026
0x40AAC027
0x40AAC028
0x40AAC029
0x40AAC02A
0x40AAC02B
0x40AAC02C
0x40AAC02D
0x40AAC02E
0x40AAC02F
0x30AAC030
0x30AAC031
0x30AAC032
0x30AAC033
0x30AAC034
0x30AAC035
0x30AAC036
0x30AAC037
0x30AAC100
0x40AAC101
0x40AAC102
0x40AAC102
0x40AAC103
0x40AAC201
0x40AAC202
0x40AAC203
0x40AAC204
0x40AAC206
0x40AAC207
0x40AAC208
0x30AAC209
0x30AAC210
0x30AAC212
0x10AAC213
0x10AAC214
0x30AAC215
0x40AAC216
0x40AAC217
0x40AAC218
0x20AAC219
0x20AAC21A
0x20AAC21B
0x40AAC21C
0x40AAC21D
0x40AAC21E
0x40AAC21F
0x40AAC230
0X40AAC231
0X40AAC232
0x20AB0301
0x20AB0302
0x20AB0303
0x20AB0304
0x40AB0308
0x40AB0309
0x40AB030C
0x40AB030D
0x20AB030E
0x40AB0400
Part Number:878275
Page 301
Power failure of C1 lens driver +/-15 V supply
C1 lens driver board power failure
C2 power amplifier temp. exceeds 80 C
Failure of C2 lens driver current source */
Power failure of C2 lens driver +/-15 V supply
C2 lens driver board power failure
FL power amplifier temp. exceeds 80 C
Failure of FL lens driver current source
Power failure of FL lens driver +/-15 V supply
FL lens driver board power failure
C0 lens readback tolerance error
C1 lens readback tolerance error
C2 lens readback tolerance error
FL lens readback tolerance error
C0 range register error
C1 range register error
C2 range register error
FL range register error
Invalid EHT value for lens EHT alignment
Lens out of range
Lens setting out of range
Lens mode out of range
Lens demand is non-zero when EHT is off
EIlink primary status register's fixed bit pattern not present
Failure of EIlink primary +5V supply
EIbus addressing error
Multiple EIlink errors
Failure of EIlink secondary -24 V supply
Failure of EIlink secondary +24 V supply
EIlink secondary hardware error
CCU: Operation requested not supported
CCU: Unable to initialise serial link to SAEHT
CCU: Actual EHT values do not match expected EHT values
CCU: Supply ramping
CCU: SAEHT already initialised
CCU: Cannot read calibration file
AGA: Number of tilt steps = 0
AGA: Number of shift steps = 0
AGA: EB ADC signal overload
AGA: Insufficient memory for the number of steps specified
AGA: Background noise too high to perform reliable AGA
AGA: EB ADC signal too low
AGA: Unknown EB ADC signal specified
Channel Plate Refresh timed out
EB ADC filter value out of range
Previous AGA command still running
EHT driver not initialised
Filament mode out of range
Wehnelt mode out of range
Gun align: bad aligner number argument
Gun align: bad drive value argument
Gun align: bad signal number argument
Gun align: bad kilovoltage value argument
Gun align: analogue readback out of tolerance
Gun align: digital readback out of range
Gun align: settling-time delay failed in SetDrive
Gun align: settling-time delay failed in SetEht
Gun align: kilovoltage value not 0, 20, 50 or 100
Image Processor: Video overload
Vectorbeam Operator Manual
Vistec Lithography Ltd
PO Box 87
515 Coldhams Lane
Cambridge, CB1 3XE. UK
Telephone +44 (0)1223 411123
Fax +
+44(0) 1223 211310
www.semiconation.com