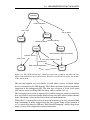
1
Department of Computer Science Selma Lagerløfs Vej 300 DK-9220 Aalborg Ø Telephone (+45) 9635 8080 http://www.cs.aau.dk Abstract: Title: Auditory & Visual Debugging Aids Project Theme: Specialization in Programming Technologies Project period: Spring Semester 2013, February 1st to June 13th , 2013 Project group: sw107f13 Authors: Anders Buch Frandsen Rune Jensen Michael Ørts Lisby Supervisor: Kurt Nørmark Print run: 5 Pages: 87 Appendices: In writing A: User stories B: Algorithm description C: Quantitative test results D: AVD User manual Digital, on attached CD E: AVD source code F: Test source code G: Test notes H: Interview recordings I: Video introduction to AVD Digital, on YouTube J: Test recordings This project report describes the development and testing of AVD (Audio Visual Debugging), a prototype Eclipse plug-in that uses Audio to aid in debugging Java programs. Development started by establishing the idea of using audio as a new dimension in debugging. This was not a novel idea, and to address this, it was decided to try combining audio with tracing as a means for debugging. A prototype was developed incorporating both visual and auditory aids for Java traces. The prototype was developed over 4 sprints, each incorporating user stories based on a backlog of wanted features. An experiment was planned to test if the developed prototype really did improve the debugging experience. 16 test participants were invited to use both the prototype and the Eclipse debugging tools to debug two programs, in a usability test setup. All participants were questioned during and interviewed after the test, and this data, combined with quantitative data that was also collected, was used as the basis for a discussion on the hypothesis. In the end the conclusion was that the prototype did not improve efficiency in its current form, but that the idea of using audio as a new dimension in debugging may still have merit, though changes and improvements are required. The contents of the report are freely available, however publishing (with source) must happen only by agreement with the authors. PREFACE This project report has been developed by three 10th semester students from Aalborg University, institute of Computer Science, in the spring of 2013. This project contributes further to research carried out during the 9th semester. The report contains an introduction; a review of literature related to debugging; a hypothesis, providing the course of the conducted work; description of the design and implementation carried out during the course of this semester; description of the test and results that came as a result of the conducted test; and finally concluding with a review of the implementation, as well as suggestions to continue the work carried out during this semester. In addition to the main contents of the report, the appendix contains further details. Appendix A to D, attached in paper form, holds, in turn; the user stories used during the development phase; descriptions of the algorithms used during the test, we carried out; quantitative results from the test; and the user manual in the Danish translation, which was available to the test participants during the test. Further, Appendix E to J, available on the attached CD, holds; The source code for the AVD plug-in; The source code, the test participants debugged during the conducted tests; notes from the test sessions; audio recordings of the interviews conducted after the test session; and the introduction video, the last half of the test participants were shown as introduction. Additionally, this report is available in pdf-format on the CD. Video recordings of the test sessions can be found as appendix J, or at http://bit.ly/avdvideos. 5 6 CONTENTS 1 Introduction 9 2 Literature review 2.1 Tracing . . . . . . . . . . . 2.2 Visual Debugging Tools . . 2.3 Audio enhanced debugging 2.4 Previous Semester . . . . . . . . . . . . . . . . . . . . . . . . . . . . . . . . . . . . . . . . . . . . . . . . . . . . . . . . . . . . . . . . . . . . . . . . . . . . . . . . . . . . . . . . . . . . . 11 11 13 15 17 3 Hypothesis 19 4 Design 4.1 Language . . . . 4.2 Target Platform 4.3 Tracing . . . . . 4.4 Filters . . . . . . 4.5 Audio . . . . . . 4.6 Visualization . . . . . . . . 21 21 21 22 23 23 24 5 Development 5.1 Development Process . . . . . . . . . . . . . . . . . . . . . . . . . 5.2 Implemented Functionality . . . . . . . . . . . . . . . . . . . . . 5.3 Dismissed Features . . . . . . . . . . . . . . . . . . . . . . . . . . 25 25 26 32 6 Testing 6.1 Test Design . . . . . . . . . . . . . . . . . . . . . . . . . . . . . . . 6.2 Test Details . . . . . . . . . . . . . . . . . . . . . . . . . . . . . . 6.3 Error Sources . . . . . . . . . . . . . . . . . . . . . . . . . . . . . 35 35 38 41 7 Results 7.1 Quantitative Results . . . . . . . . . . . . . . . . . . . . . . . . . 7.2 Notable Findings . . . . . . . . . . . . . . . . . . . . . . . . . . . 43 43 45 8 Conclusion 8.1 Discussion . . . . . . . . . . . . . . . . . . . . . . . . . . . . . . . 8.2 Final Words . . . . . . . . . . . . . . . . . . . . . . . . . . . . . . 53 53 60 A User Stories 65 . . . . . . . . . . . . . . . . . . . . . . . . . . . . . . . . . . . . . . . . . . . . . . . . . . . . . . . . . . . . . . . . . . . . . . . . . . . . . . . . . . . . . . . . . . . . . . . . . . . . . . . . . . . . . . . . . . . . . . . . . . . . . . . . . . . . . . . . . . . . . . . . . . . . . . . . . . . . . . . . . . 7 Contents B Algorithm Descriptions B.1 Algoritmer . . . . . . . . . . . . . . . . . . . . . . . . . . . . . . . B.2 Dijkstra . . . . . . . . . . . . . . . . . . . . . . . . . . . . . . . . . B.3 Activity Selection . . . . . . . . . . . . . . . . . . . . . . . . . . . 71 71 71 71 C Quatitative Results 73 D User manual 81 8 CHAPTER 1 INTRODUCTION ”Much to the surprise of the builders of the first digital computers, programs written for them usually did not work.” - Rodney Brooks [1] A major part of the time spent developing software is spent locating bugs. We therefore firmly believe that making it easier to find and correct bugs would ultimately result in better software, as more time could be spent implementing new or improved features. A recent survey from Cambridge University[2] shows that 49.9% of an average programmers time is spent debugging. It stands to reason that making the debugging more efficient would be very valuable. The process of eliminating bugs from a software product allows for several different approaches, just like the process of programming. In our experience, however, the tools available for writing software have been improving at a faster rate than debugging tools. As such, modern Integrated Development Environments (IDEs) seem more focused on helping programmers write code correctly in the first place, than on fixing the bugs that are inevitably introduced. Last semester, we identified that visual debugging tools were a better aid in the process of identifying bugs, than textually based tools were. This has been supported by the development of the computers used for programming and debugging. These continue to gain improved support for visual tools, as screens and graphics cards are constantly improving in quality. They have not traditionally supported sounds however. While sound cards have also seen a dramatic improvement through the years, no major IDE has adopted the use of sounds as a tool. We believe that this is an oversight, as modern hardware ought to provide a solid foundation for experimenting with the addition of sounds to the feature set of debugging tools. We intend to review the possibilities of adding not only more visual components, but sound as well, to the feature set of a debugging tool. The primary focus of this project will be to implement a prototype with both visual and auditory features, allowing us to gain an understanding of the possible merging of these tools in regards to the feedback the user receives from 9 Chapter 1. Introduction the debugging tool during the debugging phase. The prototype implementation should thus allow for a review of the advantages and disadvantages of adding an additional type of feedback to the debugging experience. 10 CHAPTER 2 LITERATURE REVIEW In this chapter, we review literature that we have found relevant to the direction of the project. This starts off with an article introducing the concept of tracing, then a review of several visual debugging tools, most of which employ tracing. Other articles focusing on using audio to debug are also reviewed, and finally a review of the project perform on the previous semester, which this project is a continuation of, is presented. 2.1 Tracing The following sections present the concept of tracing, and some of the advantages and problems associated with this. The introduction is present, as tracing is a central concept in much of the reviewed literature, and seems a promising idea for improving the state of debugging. 2.1.1 Event Tracing ”Towards Scalable Event Tracing for High End Systems”[3], discusses the use of event tracing for large systems with many1 processors. Event tracing is the concept of recording events during program execution that can be analyzed afterwards, often with the goal of discovering performance problems. Events can be many things, and vary from tool to tool. The following examples are taken from [4]: • • • • • • Machine instruction Basic block execution Memory reference Function call Message send Message receive Depending on the types of events and the application traced, the trace files can vary from rather small to extremely large. When dealing with many processors, the traces will grow to become very large even if only a few event 1 many being hundreds or thousands. 11 Chapter 2. Literature review types are traced. Most tools tackle this problem with solutions like limiting the time the trace is running or only tracing part(s) of the running application. The experiment that makes up the bulk of the article is not of great interest to us, as its primary focus is systems with many processors, but we believe it prudent to mention the main finding of the article: Tracing overhead, that is, the added execution time required to store the events, scales badly as the number of processors goes up. 2.1.2 Summarized Trace Indexing In ”Summarized Trace Indexing and Querying for Scalable Back-in-Time Debugging”[5], Guillaume Pothier and Eric Tanter describe their attempt to devise a both storage- and time-efficient way of storing and querying traces of executions of Java programs. The main target for their system is to provide the possibility to inspect program traces of larger programs. Whereas traces of smaller programs is possible to store in the memory, larger programs requires disk storage, as they simply do not fit in the memory. The devised approach consists of storing snapshots at fixed intervals of the program execution. In-between each of these snapshots, the control flow and memory accesses of the program is stored. This means that stepping to a specific point in history consists of locating the latest snapshot before the point, and then executing the stored flow, until the point is reached. The system consists of a database that stores structure information of the objects, their methods, and their variables, and a client that provides access to the data in the database. The client can query a specific state, or a specific variable, and its changes throughout the execution. The most important feature regarding the program tracing is the importance of deterministic and non-deterministic events. These differ in that deterministic events are re-executable2 , the non-deterministic events are recorded, to ensure the proper outcome of the calculations are utilized in later executions. The tracing of a program execution adds a fair bit of overhead. The encountered overhead was approximately 10-30 times the normal execution of the program. In addition to this, the program is required to be replayed and indexed, bringing the total overhead to upwards of 100 times normal execution speed. 2 12 Because the result would not change in different executions. 2.2. VISUAL DEBUGGING TOOLS 2.2 Visual Debugging Tools Several tools attempt to deliver an improvement to the debugging experience using visual aids. We have selected four of these technologies that will be reviewed in the following sections. In addition to those four technologies, our research identified two other tools that, while not suitable for a larger review, are worth mentioning: ”Code Canvas”[6] for Microsoft Visual StudioTM provides a zoomable view of the entire project, giving both structural overview, and easy access to implementation specific details, only requiring the programmer to zoom in or out, to affect the detail level. ”Programming Without Coding Technology”[7] provides a view of the state of the execution of a program at any time. Changing time is done using a timeline slider, a feature that might be feasible to implement, if a debugging tool should allow the programmer to select a specific point in time to view. 2.2.1 JIVE Java Interactive Visualization Environment (JIVE), as described in ”Methodology and Architecture of JIVE”[8], is an Eclipse plug-in attempting to improve runtime debugging of Java programs by adding visualization. It does this by attaching itself to an already running JVM. This is achieved with the following functionality: • Objects are depicted, providing details regarding method calls and object state. • Multiple views of execution states are available, differing in granularity. • The user can jump forwards and backwards in the state of a program execution. • Variable values can be queried and changes identified. By providing several views with varying granularity of objects, JIVE allows the user to consider the program at several abstraction levels, using the same interface. Combined with details of the object state and method invocations, it becomes possible to track the execution order, and should thus allow for improved visual aid towards identifying errors in the program. The available views are sequence diagram view, Call-path view, detailed view, and compact view. The latter two provides a view of the object internals at different levels. JIVE is also capable of representing static members, inner classes, as well as clear marking of actions by different threads. The latter is achieved by applying different colors to each thread. 13 Chapter 2. Literature review JIVE logs changes to the running program, and thus allows the programmer to, for instance, trace all changes applied to a variable. This trace can be applied to a single instance, or to all instances of a class member variable. 2.2.2 Visual Tracing Building on the implementations of JIVE, ”Visual tracing for the Eclipse Java Debugger”[9] suggests visualizing traces of a program execution. The primary concept is to change the behavior of the debugger. This is achieved by, instead of pausing execution when a breakpoint is hit, recording the stacktrace, and quietly resuming execution. The collected information is then used to visualize the execution, meaning that whenever a breakpoint is hit, an additional timeline event is added to the trace history. When viewing the trace visualization after execution, the calls are displayed on a horizontal line, and can either be distributed evenly, or by their relative time difference, providing different views of the same data. In addition to tracing statement executions, it is also possible to monitor variable development. Each instance variable can be watched, and thus provide the debugging programmer with a complete history of the development of the value of variable instances. For numeric, primitive types, the variable history is displayed as a graph. Variables with types that inherit from Object provides quick access to the value of the toString() method. In addition to graphs and timelines, the instance variable values of NULL are clearly marked using colors. 2.2.3 JInsight JInsight, as described in ”Visualizing the Execution of Java Programs”[10], provides a way of visually representing the execution stack of a running Java program. This is achieved using several views, providing various details regarding objects, their member variables and methods, as well as the call stack executed. The available views include Histogram View, Reference pattern view, Event sequences, and Call Trees. The key features of each feature will be highlighted in the following sections. Histogram View The Histogram view provides an overview of the amount of instantiations of a class, as well as a colorization of metrics of the runtime load caused by each object. This could either be the time spent, amount of method calls, memory consumption or the amount of threads, the object participates in. 14 2.3. AUDIO ENHANCED DEBUGGING Reference Pattern View The Reference pattern view provides an overview of the references, an object has to other objects. Rather than visualizing all objects referenced, related objects are grouped, and a label containing the number of objects is added. Event Sequences Event sequences shows the stack of methods call to reach a specific point in the code. This provides the programmer with a visualization of the execution path through the code. In addition to visualizing the path taken through the execution, the visualized length of a method displays the amount of time spent executing the method. Call Tree The call tree view displays statistics of the method calls made in the execution. This allows the programmer to view how much time was spent executing a part of the program, as well as which operations required most execution time. 2.2.4 Execution Trace Analysis In ”Execution Trace Analysis through Massive Sequence and Circular Bundle Views”[11], the primary focus is targeted potential problems regarding overview of the execution trace in a debugging session. The suggestion is to provide the debugger with two separate views, The circular Bundle View, and the Massive Sequence View. The Circular Bundle view relates classes and packages to each other, as well as displays calls made between classes, or, should the user decide to change the view, packages. The Massive Sequence view provides the programmer with a diagram displaying the execution trace as a sequential progress through the code. The Massive Sequence views are, as their name implies, very large, and seems rather confusing at first. The case studies provided in the article supports this, and even though some event types are not recorded in the examples, the Sequence views are, at best, hard to achieve an overview of. 2.3 Audio enhanced debugging ”Siren Songs and Swan Songs - Debugging with Music”[12] suggests a novel way of using music to give feedback to the programmer about the execution of a program. Using auditory methods of supplying feedback is not an entirely 15 Chapter 2. Literature review new concept though. In the 1950’s programmers were already doing so, by tuning their AM radios to pick up the interference caused by their processor units, effectively allowing them to monitor their CPUs via audio. Even so, audio enhanced programming and debugging has received little attention throughout time compared to the visual tools mostly used in modern IDEs. In fact, auditory tools are used in only a few, if any, major modern IDEs. Paul Vickers and James L. Alty hopes to change this with their CAITLIN system. By modifying applications made in Pascal, they can slow down the execution of said applications and append auditory output to events occurring while running them. This allows the debugger to essentially listen to a for loop and determine if it is running correctly. In CAITLIN, each type of selection or iteration is given its own specific sound, and each individual construct can then be modified by changing its tone or pitch to make it easy to identify. This is further enhanced by making the tones for evaluations such as if-statements play in major if true, and minor if false. The programmer can thus hear exactly how the program evaluates expressions. In order to tell the programmer exactly where in a piece of running code the program is currently as, a set of HTML-like opening and closing tags are used for blocks. Each is given a specific opening tone and a different closing tone. A continuously held note is then played while the nested block is in effect, constantly reminding the programmer that the execution is currently within some nested block. To facilitate further nesting, deeper levels are given different pitches to their tones, essentially making a nested block play a chord while executing. While this is a novel way of making the program tell the programmer how the execution is performing, research has also been made that suggest that using notes, or music, in this way may not be ideal. Indeed, Palladino and Walker detail in the article ”Learning Rates for Auditory Menus Enhanced with Spearcons Versus Earcons”[13] their research into using compressed speech patterns, spearcons, as substitutes for the so-called earcons. Earcons describes any sound used to represent a certain thing or action, that is either a nomic or a symbolic representation of said thing or action. Using musical notes to represent code constructs would thus fall into the category of earcons. The tests performed by Palladino and Walker were in regards to auditory menus for cellphones, but the conclusion in regards to learning rate and usability should not be completely dismissed in regards to using audio feedback for debugging. In their tests, they found that test participants could recognize the spearcon menus after hearing the sounds only once, while the same menus took an average of 5 tries to get correct for earcon test participants. This may point to spearcons being more effective at giving information to the user compared to the musical notes used by CAITLIN for instance. 16 2.4. PREVIOUS SEMESTER 2.4 Previous Semester The research and implementation carried out through the course of this project is a continuation of the work we performed in the previous semester. This section briefly reviews the work and conclusions done during that project. Like this project, the previous semester started with a review of relevant literature. This research resulted in the following list of concepts that we found important[14, p. 43]: Immediacy Property of a tool that becomes transparent when used, allowing the user to perform the task without thinking about the tool. Color Cues Makes it possible to distinguish similar data by groups based on their color. Pacing The concept that understanding what is happening in a running program or algorithm requires different speeds at different times. Audio Probe Much like a breakpoint, but plays a sound rather than pausing execution. Based on that aforementioned research, and own experiences, we made the following problem statement: Visual debugging tools are more efficient than command line tools.[14, p. 46] We divided this into four hypotheses[14, p. 46]: • Visual tools conveys a better feeling of immediacy. • It can be hard to remember the value of all the relevant variables when single stepping through a program. • Visual tools can aid the developer in keeping an overview of the relevant value changes. • It can be harder for the developer to realize which values are the most relevant at any given time. To test this, we performed an experiment, using different debugging tools (Eclipse, JDB and GDB) to debug programs with deliberate bugs inserted. The data collected during this experiment was the time needed to debug the different bugs using the different tools. 17 Chapter 2. Literature review The test had a number of problems, including a very limited amount of people included3 , lacking understanding of the code being tested, and unclear data analysis methods. We concluded that the visual tools offered a better immediacy and that remembering variable values was one of the hard parts of debugging. We also concluded that while visual tools did help with the cause/effect chasm[14, p. 12], something more was needed. On a side note, we found indications that object oriented programming languages benefited more from going from textual to visual tools than imperative languages. 3 18 We only used ourselves as test participants. CHAPTER 3 HYPOTHESIS This chapter will list the hypotheses that we will work with in this project. These came about not only as a result of working with the literature reviewed in the previous chapter, but also based on the work we performed in the previous semester, summarized in section 2.4 on page 17. In our work during the last several years we have used a wide assortment of debugging tools. These tools have each had their own strengths and weaknesses, and while most have been useful in making the debugging process simpler, some are at times more of a hindrance. In particular this was the case with the Eclipse C debugger as described in section 2.4 on page 17. Based on the literature reviewed, and in particular on our findings from the previous semester[14], we devised a set of hypotheses that we wished to test in this project. As most of the hypotheses we proposed in the previous semester held true, or partially true, we wanted to further look into these ideas. The following assumptions are all based on tools of the same quality, that is, they allow the user the same information, but not necessarily expressed in similar ways. Our first hypothesis intended to further test the findings of our last project: The more visually expressive a debugging tool is, the more efficient it is. Where visually expressive describes the amount of visual elements, the tool can provide. For instance, a purely textual debugging tool, like GDB, is not at all visually expressive, whereas the Eclipse C debugger is somewhat more visually expressive, albeit not much. As we saw in the previous project[14], using visual tools did indeed make the debugging process faster, but our tests were flawed in several ways, as discussed in section 2.4 on page 17. As such, we wish to test this statement more specifically, by introducing outside test participants, and in greater number. Instead of simply focusing on the speed of debugging, our intention is to gain more qualitative feedback from our testing. As such, our focus in the hypotheses for this project will be not on the speed of debugging, but rather on 19 Chapter 3. Hypothesis its efficiency. That is, do the tools perform as intended, and do the users experience a better debugging process than otherwise. To answer these questions requires a more thorough analysis of the process, and qualitative feedback from users, more so than measuring metrics. A subject only briefly covered in the literature review of the previous project was that of audio debugging. We have since then, as also described in section 2.3 on page 15, looked into several other ways in which auditory feedback can be used to enhance the debugging experience, leading us to the hypothesis that: Auditory tools will, in most cases, lead to a better understanding of the running code, and a more efficient debugging process. What we have not found much coverage of however, is the combined usage of both visual and auditory tools. This seems interesting to us, as one would assume that the combined effects of these sort of tools would further increase their effect on the debugging process. As such, we want to explore the possible combination of these tools, in order to test the hypothesis that: Allowing the user to freely choose when to use auditory or visual tools, in combination with each other or by themselves, will make for a more efficient debugging process. In order to test these hypotheses, in particular the last one, which will be the main point of our research, we will design and develop a debugging tool to allow the simultaneous use of both visual and auditory features in order to get a better understanding of the running code. Developing such a tool will further allow us to attempt to improve the debugging experience for the user. As mentioned, this is a difficult thing to measure, seeing as the experience of a debugging session is solely reliable on the users’ subjective opinions. Still, we find that the combination of auditory and visual debugging is promising in regards to an improved debugging experience, and we therefore believe it to be a feasible goal for the project to test this. 20 CHAPTER 4 DESIGN The goal of the project is to test the hypotheses presented in the previous chapter. In order to do so, we must first create a prototype of a tool using both audio and visuals to perform debugging. We called this tool AVD, and it is reffered to as such in the entire report. In this chapter we describe our initial plan for such a tool. This initial plan was, on purpose, too large to ever be feasible, intended to serve as a backlog of the desired features for the development phase. 4.1 Language In the previous semester[14], one of the hypotheses was that the benefits of visual feedback during the debugging session were more prominent for object oriented languages than for imperative languages. While we could not make a concrete conclusion on that hypothesis, we did get a strong indication that this was in fact the case. Along with our experience, this led us to choosing Java as the language to be used with the tool. 4.2 Target Platform Eclipse is a large IDE supporting many languages, and has large support for plug-ins. In fact the core IDE is very small consisting of only a core that is expanded with plug-ins developed by the Eclipse team using the same Software Development Kit (SDK), we would be using. Plug-ins developed for Eclipse function independently of each other, but can be used in unison. Each plug-in is essentially a set of views (a UI part, such as an editor, the console view or the project view) and perhaps some perspective (a collection of views in some configuration) detailing their presentation. Eclipse makes it possible to make different configurations of views, including support for maximizing and tabbing when views are placed in the same position. Perspectives can be defined by plug-ins, as is the example with some predefined perspectives, such as Java and Debugging; or they can be defined by the user. 21 Chapter 4. Design 4.3 Tracing In our literature review, both in this project and the project performed in the previous semester, we have seen ways of using audio as debugging tools[12, 14]. There are many ways of doing this, none of which have had any mainstream success yet. In this project we wish to test a new way of using audio to debug, rather than copy the approach of a known technology. This, combined with the concept of pacing that we discovered last semester[14, p. 19], led us to disregard live debugging in favor of using tracing. Before proceeding, we must therefore define what we mean by tracing, as it is a widely used term. Tracing is the process of recording the execution of a program. This can be done in many different ways. We wish to perform what is normally called event tracing in which the recording is done by recording discrete events. There are many different types of events, such as method calls, and I/O. The approach we chose to apply resembles the one applied in ”Towards Scalable Event Tracing for High End Systems”[3], reviewed in section 2.1.1 on page 11. We chose event tracing since it would enable us to assign a sound to an event. By recording the precise time of each event it would be possible to create a playback of a program where the pacing could be changed during playback, and replaying a sequence would be much easier than during live debugging where you would traditionally have to restart the program in order to do so. In the remainder of this report, tracing is synonymous with event tracing. We further reviewed literature discussing the possibility of indexing traces to compress the space required for AVD, as described in 2.1.2 on page 12, but quickly identified it was not necessary, due to the low amount of events needing to be recorded in AVD. 4.3.1 Event Types The literature review of ”Towards Scalable Event Tracing for High End Systems”[3] further identified the requirement of predefined events to be traced. Initially we had two event types, Method Call and Field Access. Method Call events was initially intended to track the activation of a method. Implementation issues required us to change this to the return statement of the method, to be able to store the return value with the event. Field Access events are recorded when a field is accessed. This includes object instance variables and static class variables. Later we found that we wanted to be able to have audio playing while execution was inside a method. This lead us to add a third event type, called InMethod, with two timestamps, unlike the two others which only have a 22 4.4. FILTERS single timestamp. The first timestamp is recorded when the method is entered and the other just before it returns. This means that every InMethod event has a corresponding Method Call event, where the second timestamp of the InMethod is before the timestamp of the Method Call event, guaranteeing that there will be no events between them. Another large difference between Method Call events and InMethod events is that Method Call events include calls to methods in the Java class library. InMethod on the other hand are only recorded for methods on classes outside the Java class library, as we assume that the library works as intended and would thus only bloat the trace with unnecessary events. 4.4 Filters As hinted in section 4.3 on the facing page, we wanted to associate events with sounds. We wanted to do this by creating filters that would match some, or all, of the recorded events. By assigning audio to each filter, we would be able to playback the events playing different audio based on the filters. The intention being that the selection of the audio to be played is completely in the hands of the user, rather than having us decide how an event should sound. The tool would further allow the user to concentrate on only the desired parts of a larger trace by letting the user add time constraints to the filters. Examples of different filters could be matching all method calls where the method has returned null, all field accesses reading a value below 4, or all calls to a method in a specific part of the execution trace. 4.5 Audio There are several options when it comes to kind of sound that should be available. One option that had good results in another context are spearcons[13], as described in section 2.3 on page 15. The idea is to speed up a Text-ToSpeech recording of a menu item of a mobile phone so much that it is not recognizable as speech, but retains its pitch. This could be translated to the domain of AVD by creating spearcons based on the method name of method call events. This would, however, conflict with our wish to make the tool as customizable as possible. As would the approach implemented in CAITLIN[12], also described in section 2.3. Instead, we considered allowing the user to create sound files that they could then use. But having to create audio files before being able to debug anything would most likely not increase efficiency. 23 Chapter 4. Design In the end, we decided that simply selecting notes and instruments to play them on would be preferable. This can be done using the MIDI standard, allowing us to concentrate on the rest of the tool. 4.6 Visualization Since we also wanted to test how audio worked together with visual tools we wanted to create visualizations of the traces. We wanted to do this in a number of ways, some resembling already existing Eclipse features, others inspired by the features described in the reviewed literature in section 2.2 on page 13: Zoomable Canvas We wanted to create a large canvas where the objects could be visualized during playback of a trace, inspired by the [6]. The idea was that the canvas should be zoomable such that zooming in on an object reveals more detail, and zooming out will group objects, first by class, and then by package. Variable View In the Eclipse Debugging perspective there is a variable view that shows the current values of the variables in the local scope. We wanted to create something similar, but with the added feature of historical data, and display both past and future values of the variables as well. Control Flow In the previous semester[14, p. 80] we discovered that it could be quite problematic to keep track of recursive methods. We therefore wanted a view that could visualize this in a way that would help the user keep track of recursive depth. 24 CHAPTER 5 DEVELOPMENT In this chapter, we first describe the development process we have gone through. Then we walk through the different components of AVD, and describe some of the implementation details. In the last part of the chapter we go through the features that we initially wanted that did not make it into the final version used for testing. The code is available as appendix E on the enclosed CD. 5.1 Development Process To quickly get a working prototype of the tool, it was developed in an agile manner, drawing on the strengths of the Scrum development practice that have shown to be most useful to us when working in the setting of a semester project. The goal was to use the prototype for early testing by ourselves in order to flesh out features, and quickly thereafter have an updated version ready for user testing. Ideally, this would allow us to adjust the tool further after the first users had tested it, before the project ended. In order to do so, it was prudent that development did not get hung up on detail. Continuous progress were preferred over tedious analysis of every feature trying to perfect the tool in the design phase. To facilitate this, each sprint would hopefully implement a set of features that should be able to function on their own. Each feature should ideally be capable of functioning independently of the others, making sure that new features in one area would not break another. Later sprints would then be used to weave the features together, and make them function with each other to the extent needed. In the end, what we hoped to end up with was a feature rich tool, testing off a variety of different ideas. The goal being that we would see how users decided to use such a set of features, and what they gained from that, as opposed to perfecting and testing a single, novel feature. Features were implemented by first creating a series of User Stories, describing how we envisioned a user using the tool. Note that this means we designed the tool such that there was at least one correct way of using the tool, although we did not intend the users to necessarily use it in that way. Each story was made prior to the sprint in which it were used, but most of the later stories came about as we ourselves used the, then current, prototype. As such, the later sprints build directly upon the experience we gather from the earlier 25 Chapter 5. Development sprints. All User Stories used in the project are available in Appendix A on page 65. 5.2 Implemented Functionality This section describes the technical setup of the AVD plug-in. First, the overall user interface of the plug-in and the overall architecture will be described, followed by a technical perspective of each component. In the remainder of this chapter, the following highlighting conventions apply: • Bold text - AVD user interface components, for instance AVD Toolbar. • Italic text - Packages that are part of the AVD plug-in code base, for instance views. Figure 5.1: AVD Interface. The toolbar (1) is the AVD toolbar component. The upper left view (2) is the code editor view. The lower view (4) is the event list view. This view can alternatively hold the filter view by pressing the tab labeled ”Filter List” 3. The upper right view (5) is the AVD class diagram view. 5.2.1 User Interface The AVD perspective as it is presented to the user the first time AVD is started, can be seen in figure 5.1. The interface can also be experienced in the introduction video included as appendix I on the enclosed CD. 26 5.2. IMPLEMENTED FUNCTIONALITY Figure 5.2: The Filter dialog of AVD. The settings regarding the events to be filtered are set in 1, auditory feedback in 2, and visual feedback in 3. The AVD Toolbar, marked with 1 in the figure, allows the user to record a new trace, select which trace to work with, as well as delete traces that are no longer needed. The code editor, marked with 2, is the default code editor, the user already knows from other Eclipse perspectives. The code editor can be used by the plug-in to highlight the line where an event was recorded. The class diagram, marked with 3, provides the user with a visual display of the classes of the application in the selected trace. The class diagram highlights method calls and field accesses, if the user has enabled this in a filter. The event list, marked with 4, lists the events that are recorded in the trace, and filtered by the user-applied filters. The filter list, available as an alternative view in the area marked with 4, provides the user with a list of all filters currently existing. From the filter list, it is possible to disable and enable filters, as well as add, edit and delete them. Adding and editing filters brings up the filter dialog, presented in figure 5.2. 27 Chapter 5. Development 5.2.2 AVD Architecture This section describes the architecture of AVD, which can be seen in figure 5.3 on the facing page. The figure displays the packages that are part of AVD, and the connections that exist between the packages. The details of each component is described after the review of the general architecture. To ensure a better overview in the figure, all visual packages, such as UI and snapshotcanvas, have been grouped into the Visual component. The UI package provides interface components, such as toolbars and dialog boxes, to the plug-in. The larger interface elements of AVD, the views, are provided by the views package and a separate package for the class diagram view, called snapshotcanvas1 . These three packages are utilized by the perspective, both directly through Java code references, and indirectly by references in the plugin.xml file that defines the content of the plug-in. The packages referenced in Java code are marked with full lines, whereas references made in the plugin.xml file are depicted with dashed lines in figure 5.3. The handler package provides handlers invoked by the Eclipse plug-in, when the user interacts with the defined UI components. Each handler is coupled to a specific action, and provides code that ensures the required methods are called correctly. The packages that the handlers can delegate to are the ones the handler package can communicate with, as depicted in the figure. When the agent is activated by the associated handler, it records a trace, and stores the recorded trace in the database, which is accessed through the lib package. When the user creates or edits a filter, the handler provides access to the filter package, and allows the user to create and edit filters. The filter manager is further accessed by the view package, to allow listing filters that currently exist, and by the packages responsible for playing events, the audio and snapshotcanvas packages, to allow these access to information regarding how to play a specific event. This access is invoked when the two packages are notified by the player, that an event is to be played. The player is, in addition to handling playing events, responsible for enacting upon handlers that allow the user to start, stop, pause and step in the event queue. 5.2.3 AVD Agent The AVD agent is the component responsible for collecting the trace data. In Java there are a three main ways of gaining access to information from a running VM, the first being the debugging API. This does provide access to information, but slows execution quite a lot. 1 28 The name stems from the initial working title of the component. 5.2. IMPLEMENTED FUNCTIONALITY Handlers Control Playback Run Trace Set up filters Player Agent Broadcast Event Visual Broadcast Event Audio Get instrument, notes and velocity Retrieve Traces Insert Trace Get Class Diagram Color Filter Event Filter Change Notification Lib Filter Figure 5.3: The AVD Architecture. Each box represent a component, while the line between them indicate their interactions. Each line is labeled to describe the nature of the interaction. The two last options are very similar to each other, as they are both agents that are attached to the VM directly. This allows for better speed of execution compared to the debugging API. The first type of agent is a low level agent with direct access to things like the heap, and is written in C++. The last option is to write an agent in Java which can gain access to classes as they are loaded, and even change them having only little effect on the running time. Changing a class in this way is know as instrumenting. While the C++ agent gains access to more information, it is very advanced and time consuming to write compared to the Java agent. Some of the features of a C++ agent also puts the VM into ”Full Speed Debugging” which, despite its name, is very slow compared to normal execution. 29 Chapter 5. Development Therefore we wrote the tracer as a Java agent using the Javassist[15] library to make the appropriate changes to the classes at load time. Events are traced by instrumenting each method such that both entries and exits are logged along with every field access, both read and write, and each method call inside a method is logged along with its return value. The event types has been selected based on two criteria: They were easily available from Javassist making development of a prototype faster, and, more importantly, we believe that they were sufficient to locate most bugs. Running and debugging an application in Eclipse relies on the concept of run configurations. A run configuration is a collection of the metadata used to start the application, such as which VM to use, which class to use for the main class, and which arguments to set on the VM and the application. Running the agent from the prototype is done by selecting an existing run configuration. This allows the user to set any of the options needed to test the application. The agent is added to the run configuration, and Eclipse is told to start the configuration. 5.2.4 AVD Player The AVD Player is the central component for playback of events. The Player sends notifications to the visual and audio components when an event is to be played, and those components are then responsible for handling the events, if they are required to do so, as per a filter. In the rest of this report, the term ”playing an event” refers to notifying the relevant components that an event has been made active. The Player additionally provides functionality for starting, stopping, and pausing the playback, as well as stepping through single events. These methods are called from interface components, both the direct controls in the event view, as well as indirectly through the player time slider, which automatically pauses the player upon activation. In an earlier version, the Player provided the user with interface functionality allowing the her to apply time dilation to the Player, that is change the factor applied to the event times to make them further apart than the nanoseconds they were apart when recorded. We removed this in the end, as getting the values to work correctly proved to be difficult as there was to much overhead during conversion calculations to make it work in its current form. The player is designed around a local time concept. It runs in a loop, checking 25 times a second if any events should be played. This made it possible to easily pause the execution, and change the time when the user pulled the time scroll bar. To help with pacing, we limit the maximum time between events to 1 second. 30 5.2. IMPLEMENTED FUNCTIONALITY 5.2.5 Audio Player The Audio player activates when it receives an event from the AVD Player. Initially, it checks if the event requires auditory feedback. If this is not the case, the Audio Player ignores the event, and continues to wait for events from the AVD Player. If auditory feedback is required, the Audio Player retrieves the note(s) to play, and checks whether the note(s) is already playing. If this is the case, it postpones the end time of the playing note, to ensure the same note is not played several times in parallel. If not, it starts playing the notes. 5.2.6 Event View The event view utilizes an SWT listing feature that filters an input list. In AVD, the input list is the full event list of the trace, filtered by the filters set by the user, if any. This list is then retrieved from the event view by the player. This implementation is a leftover from the initial tests, where the simplest working implementation was used. It makes the data model dependent on interface code, and is, at best, a bad design decision. The list of events should be filtered by the model, not by the interface, and this should be one of the first changes in further development of AVD. A further problem with the event view is that the player controls must be placed within it. This is required to ensure, the list of events utilized by the player for playing events, is properly updated. This is only possible by ensuring, the event view is currently active on the screen whenever the player is started. 5.2.7 Filtering The filtering consists of a set of filters, applied to the event set selected by the user. On creation of a new filter, it is added to the filter set, but the filtering is not yet added to the event list, as this does not happen until the user opens the event list again. This is due to the internal implementation of list filtering in Eclipse, combined with our implementation of the event list and the filter, as described in the previous section. 5.2.8 Class Diagram The class diagram provides the AVD user with an overview of filtered classes. Further, the fields accessed and methods called are highlighted, allowing the user to see the order in which method calls and field accesses are made. 31 Chapter 5. Development The classes, fields and methods involved are added to the class diagram as they are encountered by the received events. This means that the initial class diagram is empty, and only when classes become relevant are they added. The class diagram is dependent on the SWT canvas for drawing on. The SWT interface components are well supported by the Eclipse plug-in API, and we identified that the canvas met our requirements, at least initially. During development, however, we identified that the canvas flickered, when it was forced to redraw a class diagram with more than 10 elements. The issue is caused by the canvas redrawing the entire contents of the class diagram every time it redraws, and does not allow for any proper caching. By redesigning the class diagram component, we were able to decrease the flickering, but not remove it fully. To fully remove the flickering, we suggest reviewing other drawable surfaces applicable to SWT components. The selected solution should support caching contents, and only redrawing parts of the canvas, as the class diagram potentially could be rather large. We investigated two other solutions during the development phase. First, we experimented with applying a cache functionality to the class diagram, but found this solution hard to manage, and hardly improving the issue. In the second experiment we attempted to lower the update frequency of the canvas. While this did improve the issue, it did not solve it, as the flickering still was there. It would have been an option to reduce the update frequency further, but we decided not to do so, as the update speed of the class diagram would be affected if we did so. The final class diagram is the first step towards creating the desired zoomable canvas discussed in chapter 4 on page 21. 5.3 Dismissed Features This section describes features that were considered, and partly implemented, but later removed due to the issues described for the individual component. 5.3.1 AVD Player Early in the development process, we identified the player as a key feature, and several experiments were conducted around the functionality of this particular component. During the development process, we implemented two different solutions to handle playing events. These were both an attempt to solve the pacing problem, we identified in the literature review in section 2.4 on page 17, but in the end, neither solution proved to be the exactly right, though we kept the second solution as described in section 5.2.4 on page 30 because it worked well enough to complete the experiment. 32 5.3. DISMISSED FEATURES The first player, that was later dismissed, worked with a global time concept relying heavily on the getCurrentMillis() Java system call. When an event is played, this first player then looked at the timestamp of the next event, and paused its thread an appropriate amount of time until the next event should be played. This worked well until we started to implement pausing and time changing, leading us the develop the player that is used in the final version of AVD. 5.3.2 Variable View Early in the development process, we identified the requirement for tracking the value of variables, in addition to the capability of tracking when a variable changes, as the final implementation allows. An attempt at creating a variable view was intended to display all variables and their current state, as well as allow a per-variable historical overview of earlier values. Unfortunately, we had no way of keeping track of when objects were destroyed. This meant that the view would bloat up to become completely useless rather fast, as 600 elements of an array were accessed for instance. In the end we ended up removing the view from AVD. Late in the development phase we considered displaying variable values when they were accessed or updated, in the class diagram. This idea was dismissed because moving the player bar would then cause issues, we were uncertain, how to handle. Furthermore, we found that the class diagram would need to be restructured to ensure the diagram was not cluttered with too much information. 5.3.3 Timeline View Initial versions of AVD contained a timeline view that displayed events encountered on a per-class basis. The timeline view thus gave a historical overview of previously played events. After the initial implementation of the timeline was finished, it was part of the plug-in, but we did not find it useful in the preliminary experiments during the development phase. We decided to remove the feature from the plug-in altogether, as we found it did not add value to the plug-in. 5.3.4 Control Flow In chapter 4 on page 21 we discussed our wish to create a visual representation of the control flow of the application. We still wish to create this view, but since the goal of the project was to test the use of both audio and visual tools, we decided to concentrate on one visual view rather than spending time on adding another. 33 Chapter 5. Development 34 CHAPTER 6 TESTING In this chapter we will describe our testing goals and the procedure we used to test our developed prototype. Our testing goals include both the qualitative goals, but also the quantitative measurements performed during the test. Results from the test are presented in chapter 7 on page 43. 6.1 Test Design The developed tool is, as described earlier, a prototype of a collection of features, we found would be useful to have available during a debugging session. The overall goal of testing the tool was to identify possible usage patterns, and potential issues with already implemented features. These could be design problems as well as implementation problems. Lastly we hoped to identify features users could potentially benefit from, if they were added to AVD. As such, we defined a set of goals for the test. We wished to monitor whether the participants: • Used the audio functionality? • Used the visual functionality? • Combined the audio and visual functionality? In addition, we wished to monitor which actions were taken in order to use the features. The actions in question are listed on the next two pages, divided into groups, to ease overview. 35 Chapter 6. Testing • Player – Play The Player was started. – Stop The Player was stopped. – Pause The Player was paused. – Stepping Single stepping was used in the Player. – Scrolling The scroll bar of the player was used. • Class Diagram – Used A filter was created with the Class Diagram enabled. – Colors A filter was created with the Class Diagram enabled, with a color different from the default color. • Filter Parameters – User Defined Filters A filter was created manually. – Filter Name A filter was given a name. – CallerClass A filter with a CallerClass parameter was created. – OwnerClass A filter with an OwnerClass parameter was created. – Value A filter with a field access value parameter or a method call return value parameter was created. – Name A filter with the Field Access, or Method Call, name parameter was created. – Read/Write A filter with an access type parameter was created. – Reg-ex’s A regular expression was used to filter any of the possible parameters. – Auto Complete The Auto Complete feature was used to select a value for any of the possible parameters. 36 6.1. TEST DESIGN • Audio Result – InMethod Sound A filter was created that associated one or more InMethod events with a sound result. – Velocity The velocity was changed on a filter using audio. – Tones A filter was created that specified one or more tones to be played. • Instruments – Guitar A filter used the Guitar instrument. – Bass A filter used the Bass instrument. – Drums A filter used the Drums instrument. – Piano A filter used the Piano instrument. – Tuba A filter used the Tuba instrument. • Other – Code Editor Highlighting A filter was created with ”Highlight in code editor” enabled. – Default Filters The default filters were used. – Number of Filters The total number of filters (default not included) used in a debugging session. – Number of Traces The total number of traces recorded in a debugging session. 37 Chapter 6. Testing Our main hypothesis is based on comparing debugging tools, and in order to support this in the test, we tested both AVD and the Eclipse debugging tools. We asked each of the test participants to debug two simple programs that we had deliberately introduced bugs into, one bug per program. One program were to be debugged by using the tools that by default is available in Eclipse, the other by using AVD. By alternating between the program to be debugged in Eclipse and AVD between test participants, we assumed that differences between programs would not have a large impact on the results. In order to record data on the test participants usage of the different tools, we also be monitored: Debug Method The debugging method(s) used by the test participant when using the Eclipse debugging tools. AVD Success (Yes or No) Whether the test participant found the bug using AVD. Eclipse Success (Yes or No) Whether the test participant found the bug using the Eclipse debugging tools. The list of metrics presented on the two preceding pages is large, but the attentive reader may have noticed that the time spent debugging is not included. In the previous project[14] we used time as the primary metric, but ultimately we felt that personal experience had a bigger impact on the time used than the tools had. As such, we did not use time as a metric in this test. Rather than simply trying to determine which tool were ”best”, we focused the test on the different ways the test participants used AVD compared to the traditional debugging tools of Eclipse. In particular we hoped to be able to evaluate the different features of AVD individually as well as combined. 6.2 Test Details The test were divided into three phases, in an effort to speed up the process of testing, as they could be performed in parallel. The phases are described in the following sections. 6.2.1 Initial Phase In the initial phase the test participant was asked to read a manual describing the features of AVD. This was required to ensure that the test participant knew what AVD is capable of, while still not giving the test participants too many ideas about how it ”should” be used. This meant that their use of AVD 38 6.2. TEST DETAILS would be their own interpretation of the possible usages of the tool, and hopefully show many different uses. Also, it was intended to test the intuitiveness of the different features. During the first few tests, we discovered that the test participants had difficulty translating the manual into actual use. We assumed this to be because they had not actually seen the software while reading the manual. We therefore recorded a video showing the same walkthrough as the manual, but this time using the actual tool, which the second half of the test participants watched instead of reading the manual. They were still provided the manual for reference. The manual is included as appendix D on page 81, while the video introduction is included as appendix I on the enclosed CD. In the test performed in the previous semester[14] it proved to be time consuming during the tests when a participant did not know the algorithm used in the program. We had originally feared that knowing the algorithm before the test would cause the test participants to see the bug before opening the debugging tool, just by looking at the code, and as such we had not introduced them to it beforehand. That did not turn out to be the case however, so in this test we decided to give a brief introduction to the algorithms used during the initial phase. This were done with a short description of both algorithms, which was available to the test participant both during the initial phase and during the main phase. The descriptions are included in this report as Appendix B on page 71. The initial phase also introduced the test participant to the main phase, and clarified that the test purpose was the usage patterns of AVD, not the test participants’ debugging capabilities. 6.2.2 Main Phase In the main phase the test participants performed the actual debugging. A computer with Eclipse and the test programs installed was set up in a room with a camera placed in the room looking over the shoulder of the test participant, recording both the sound in the room and the actions on the screen. One group member was appointed test leader, and was present in the room, asking the test participant to explain the choices made during the test, and providing help to questions about the code, algorithms or AVD in general. The participant was first asked to debug one of the test programs using AVD. If the bug were not found after a period of approximately 20 minutes, the test leader would ask the participant to move on to debugging the other program using only the Eclipse debugging tools. Otherwise this the test participant would be asked to move on after the bug was found. The participant would then be given approximately 20 minutes to identify and resolve the bug using the features of Eclipse, as he usually would. It should be noted that we would have liked to let the test participants finish 39 Chapter 6. Testing Test participant Introduction TP1 TP2 TP3 TP4 TP5 TP6 TP7 TP8 TP9 TP10 TP11 TP12 TP13 TP14 TP15 TP16 Manual Manual Manual Manual Manual Manual Manual Manual Video Video Video Video Video Video Video Video Dijkstra Eclipse AVD X X X X X X X X X X X X X X X X Activity Selection Eclipse AVD X X X X X X X X X X X X X X X X Table 6.1: Breakdown showing the tools used by each participant for the individual programs, and the introduction they were given beforehand. their debugging session, but we would have had trouble scheduling enough participants who would have agreed to spend the amount of time required for this to work. The entire test order, including the differences in the initial phase can be seen in table 6.1. The source code for the test projects are included as appendix F on the enclosed CD. 6.2.3 Debriefing Phase In this phase the test participant was interviewed about the test and the prototype. We asked them only a few structured questions, and otherwise attempted to get them to talk about how they experienced the idea of using AVD. The structured questions, translated from Danish, were: • • • • • What is your previous experience with Java? What is your previous experience with Eclipse? How do you normally perform your debugging? How did you experience using sound as a debugging tool? Did you feel that you had a better or worse understanding of the code when using AVD, and why? • Did the class diagram help you find the bug? 40 6.3. ERROR SOURCES • What was the best feature, if any? • What was the worst feature, if any? • What, if anything, should be changed to make the tool, as a whole, better? 6.3 Error Sources When analyzing the results of the test there are many things to take into account. This includes: Experience of the Test Participants The test participants came from different backgrounds and have different levels of experience with Java, Eclipse and debugging in general. We try to account for this by asking them to use both the default Eclipse debugging tools and AVD, which can then be used for better comparison. Different experience with the tools The test participants were somewhat experienced with Eclipse beforehand, whereas they had merely seen a manual or short instructional video for AVD. Further, AVD is only a prototype, and as such, some functionality might not work entirely as intended, and other features have been omitted as mentioned in section 5.3 on page 32. Artificial situation While we attempted to make the situation feel as natural as possible for the test participants, it were still an artificial situation that naturally changes the behavior of the participants. Even though this is a problem, relating to a single test participant, it should matter less when comparing several test participants, as they were all put in the same, artificial situation. Unknown Environment The test participants are asked to use a computer we provide. This places them in an environment that will not feel like their own personal environment on their own PC’s. Like with the artificial situation, this will be similar for all participants, but with a greater variation, since we do not know which operating systems and development environments the participants use normally. Unknown Code In the test, each participant had two sessions of 20 minutes each to get to know a completely new code base and locate a bug within it. The individual participants experience will differ in regards to how quickly they understand the new code. This influences comparison across test participants, but as the two code projects are separate, the same effect should be experienced both for the AVD debugging session and the Eclipse debugging session. Further, the influence experienced is noticeable only for a metric we do not consider, time. Small Sample The test we conducted included a, for a feature test experiment, rather low amount of test participants. There are a number of reasons to this. First, we found it more imminent to develop features than conducting the experiment with for instance 50 test participants. 41 Chapter 6. Testing As such, less time was scheduled for the test itself. Further, the state of the prototype was not advanced sufficiently to require one such experiment. The main outcome of the test was to identify the direction, any further development of the tool should take. Time Constraint Each test participant is allotted only 20 minutes to find each bug. We felt the need to impose this limit as the participants are working for free, and have projects of their own to complete. This means that there may be some differences in the way they do debugging, since it would be fair to assume that more advanced features would not be used until the more basic features are understood. Even with the issues above taken into account, we still argue that we were able to get a feeling for whether the idea of combining sound and visuals, as well as application traces, is an area which holds potential for further study. 42 CHAPTER 7 RESULTS This chapter will present the results of the user test, as well as an in depth discussion of any significant findings found during the testing. First, all quantitative metrics tracked during the test will be presented and used as a baseline for discussion. Secondly, qualitative observations, and responses from the test participants, will be presented. Each section will feature a preliminary discussion for its pertaining subject, while the complete discussion will be featured in chapter 8 on page 53. Videos of all the tests are available as appendix J at http://bit.ly/avdvideos. Audio recordings of the interviews conducted are available as appendix H on the enclosed CD. 7.1 Quantitative Results This section contains the quantitative results of the user test. The data was collected by studying the videos recorded during the test and noting each time a feature was used for the first time for each test participant. Table 7.1 on the next page contains the usage percentage for all the recorded features. It should be noted that this table does not state whether a given test participant used a feature more than once, only that it was actually used. As such, it does also not reflect whether the test participant actually gained anything from using the feature or not. The usage percentage was calculated using the recorded data seen in appendix C on page 73. In addition to these features, a few other data points measured from the recordings: Filters The total number of filters created by the test participant. This does not include the default filters, if used. On average the test participants created 1.56 filters. Traces The total number of traces performed by the test participant. Some test participants performed several traces without changing the code. We assume this was because of missing feedback upon trace recording, or some other usability issue. As such, we did not account for these traces in the total, making the average number of traces recorded by the test participants one. 43 Chapter 7. Results Feature Usage Percentage Play 87.50 % Stop 62.50 % Player Pause 50.00 % Stepping 18.75 % Scrolling 43.75 % Used 31.25 % Class Diagram Colors 0.00 % User Defined Filters 68.75 % Filter Name 12.50 % CallerClass 6.25 % OwnerClass 12.50 % Filter Parameters Value 6.25 % Name 50.00 % Read/Write 6.25 % Reg-ex’s 0.00 % Auto Complete 37.50 % InMethod Sound 25.00 % Audio Result Velocity 0.00 % Tones 43.75 % Guitar 12.50 % Bass 0.00 % Instruments Drums 12.50 % Piano 25.00 % Tuba 25.00 % Table 7.1: The usage percentage of each feature of AVD. 44 7.2. NOTABLE FINDINGS Debug Method The debugging method used by the test participant when using the Eclipse debugging tools. There were three different methods: Read the Code The test participant spent their time reading the code. This does not mean that the test participant never ran the application, but only that no changes where made to the code and that no tools were used. 18.75 % of the test participants debugged in this way. Print The test participant inserted one or more print statements into the code go gain access to information while the application were running. 18.75 % of the test participants debugged in this way. Breakpoints The test participant used the Eclipse debugging tools, breakpoints, and possibly more of the Eclipse debugging tools, such as the variable view and expressions view. 62.50 % of the test participants debugged in this way. AVD Success Boolean value representing whether the test participant found the bug using the AVD plug-in. 12.50 % of the test participants located the bug using the AVD plug-in. Eclipse Success Boolean value representing whether the test participant found the bug using the Eclipse debugging tools. 31.25 % of the test participants located the bug using the Eclipse debugging tools. 7.2 Notable Findings This section will discuss the notable observations done during the tests. First, the observations on AVD are listed, divided by the component, they relate to. Second, general observations on Eclipse, and general debugging are listed. These include both positive and negative observations, based on the test participant’s actions and spoken words during the test, as well as their answers during the interview that was conducted immediately after the test. 1. Two test participants noted that the sound was confusing them during the debugging session. (1A, 3A) 2. Several test participants stated that the sound was unnecessary or simply not useful. (1I, 3I, 4I, 7I, 10I, 13I, 14I, 15I) 3. Sound allowed test participants to identify repeating code structures without looking at the code. (2A, 12A) 4. Two test participants stated that the sound directly helped them in locating the bug. (5I, 12I) Findings 7.1: Observations on the AVD sound features. 45 Chapter 7. Results 1. It is not possible to interact with the class diagram. (2A) 2. The class diagram provides a good overview of calls made in the executing code. (5A, 13A) 3. Seven test participants stated that the class diagram directly helped them gain a better understanding of the code. (2I, 3I, 4I, 5I, 13I, 14I, 15I) 4. Two test participants believed that the class diagram would have been useful if it had shown values being passed as arguments. (I7, 13I) 5. One test participant felt that they came closer to finding the bug by using the class diagram. (5I) Findings 7.2: Observations on the AVD class diagram. The notable findings are presented in the gray boxes titled ”Findings”. While the boxes are divided into the groups described above, the accompanying text will refer to the boxes when needed, and will, as such, not be presented in the same order. For each note, the test participants that experienced this issue will be noted. The number identifies the order in which the test participants participated, while the letter identifies the time during the test session, the test participant experienced or expressed the statement. The letters used, and their meaning, are: • A - Denotes AVD test sessions. • E - Denotes Eclipse test sessions. • I - Denotes post-test interview. If no letter is noted, the issue was identified across the test sessions. The CD enclosed with this report contains both the transcriptions of the interview and the test logs that are the basis of these findings. Throughout the result discussion, which is presented in the following section, references to specific observations will also be made. The references will identify both the listing, as well as the number of the referenced observation. As an example, a reference to the first observation in the listing regarding the AVD sound feature will be presented as (Findings 7.1 - item 1). 7.2.1 Discussion The addition of sound to debugging was one of the more novel features, compared to traditional debugging, that we wished to explore during this project. We found that some test participants were able to put the addition of sounds to good use(Findings 7.1 on the previous page - items 3, 4), whereas other test participants were confused as to how they could use it(Findings 7.1 - items 1, 46 7.2. NOTABLE FINDINGS 1. It is unclear that the trace button in the toolbar is not used to start playback of the trace. (4A, 9A) 2. It is hard to limit AVD traces to smaller code blocks, for instance a method. (4A, 16A) 3. Trace is easier to use than normal debugging. It is easier to have the full list of method calls and field accesses, and select the needed events, instead of having to pinpoint the interesting features by following a program execution live. (16A) Findings 7.3: Observations on the AVD trace feature. 2). One of the cases where the sound feedback was applied by several test participants, were in identifying repeating structures, for example data structure initialization (Findings 7.1 - item 3). That a large amount of test participants found the sound confusing, could very well be caused by the test participants not knowing how to apply sounds properly in the context of a problem. The test we set up allowed them to experiment freely with the possibilities of AVD, as we did not instruct them in how to use it to find bugs, causing some test participants to give up on the use of several features, including sounds. This may have skewed the results of the test a bit, as several test participants also noted that they might have had better luck finding bugs if they had been more familiar with the tool. Other features of AVD was, in part due to this very non-restrictive test setup, applied in ways we had not expected. For instance, several test participants used the event list as their primary information source (Findings 7.5 on the following page - item 3). Especially test participant 12 applied the event list to the debugging in an unforeseen way, and was capable of identifying the issue mainly by looking at a filtered list of events. We did not at any time during development of the tool intend for the event list to be used in this way, yet it seemed obvious to the test participant that this was the list’s purpose. An issue that was noted by several test participants concerns all visual feedback elements of AVD; the event list, class diagram, and the code editor. Users would have liked the opportunity to interact with these (Findings 7.5 on the next page - item 4, Findings 7.2 on the facing page - item 1) instead of just using them for visual feedback. This is a very important observation as it shows a clear lack of immediacy in the design of these features. This fact was not surprising to us, seeing as we had discussed the opportunity to apply interactivity to both the class diagram and code editor, yet ultimately had to dismiss due to complexity and time constraints. Test participants utilizing the event list as a mean to identify issues came to a surprise to us, but the request for interactivity with the events present in it did not. The standard filters provided an overwhelming amount of sound feedback to the test participants (Findings 7.4 on the next page - item 2). This caused confusion and made the test participants affected less willing to use the tool 47 Chapter 7. Results 1. Information box informing test participant that standard filters are applied, is not read. test participant continues to apply an additional filter. (4A, 6A) 2. Sounds played when standard filters are applied are too numerous for the test participants to gain any useful information. (4A, 7A, 11A, 13A) 3. Filtering concepts are not obvious to test participants. (6A) 4. Some test participants assumed filtering only set rules for sound playback, not visual feedback too. (9A) 5. One test participant used the trace, with filters, exclusively in order to find the bug. (8I) 6. Two test participants noted that setting up filters is ”too slow” and annoying. (2I, 12I) 7. One test participant stated that he would have liked to have the program set up the filters for him. It should be noted that he did not use the standard filters as he never clicked ”Play”. (11I) 8. Five test participants stated after testing that they did not understand what they were supposed to do with the filters. It should be noted that (5) still managed to find the error by actively using the standard filters instead. (5I, 6I, 7I, 10I, 11I) 9. One test participant explicitly stated during the test that he had no idea how the note would actually sound.(9A) Findings 7.4: Observations on the AVD filtering feature. 1. Selection of an event in the event list should highlight the corresponding line in the code editor. (5A, 16A, 14I) 2. The AVD event list is empty if one filter is created, but not active. (11A, 12A) 3. Event list allows test participants to review the program flow. (3A, 8A, 14A, 16A) 4. One test participant wanted to be able to start the playback from a specific event by clicking on it. (4I) One test participant applied the filtering and event list to review the method calls, the test participant identified as potential issues, and, in doing so, found and corrected the problem. Findings 7.5: Observations on the AVD event list. 48 7.2. NOTABLE FINDINGS 1. The stepping feature should also allow the user to step over a method, as well as step backwards. (13A, 14A, 14I, 16I) 2. Timeline time selection does not work as intended. (14A) 3. Timeline times and timestamps does not correspond. (14A) 4. Playing or stepping through events provides help for some test participants. (5A) 5. Playing or stepping through events does not help some test participants. (6A) 6. One test participant has problems finding the player controls. Would have liked them in the top toolbar. (6I) 7. One test participant would like to be able to set up limits for the player so that it would simply skip through segments of the execution. (13I) Findings 7.6: Observations on the AVD player. further. An additional issue with the standard filters was that some test participants did not read the pop-up window with information on the standard filters. This windows shows up if the Play button is clicked without any other filters specified informing the user that the standard filter has been activated (Findings 7.4 - item 1. This possibly caused even further confusion for the test participants as they did not seem to expect the tool to behave in that way, despite it being stated in both the manual and the instruction video. It is clear that the standard filters, as they stand, are not implemented in a way that makes sense for the average user. Additionally, one test participant did not realise that the standard filters were a part of the plug-in, and erroneously assumed that he was required to set up the filters himself (Findings 7.4 - item 7). Setting up custom filters caused problems for several of the test participants as well. In particular, they had trouble setting up sounds as it is not clear what sound a filter will actually produce during the setup (Findings 7.4 - item 9). Currently, one would have to actually play a trace with the filter active in order to hear the sounds produced. This is obviously a major usability problem, and it makes the tool difficult to use in the intended way. In all, filters were deemed both hard to set up (Findings 7.4 - item 6), not easily applicable (Findings 7.4 - item 8), and was not understood as they were intended (Findings 7.4 - item 4). Adding to the problems with filters somewhat, several test participants felt that they had trouble limiting the playback in a way that could be used to examine only parts of a trace (Findings 7.3 on page 47 - item 2, Findings 7.6 item 7). The user is supposed to use filters to achieve this, by setting up filters to match only the desired part of the execution, but it turns out to be not only a confusing and difficult task, but also something the test participants would rather do during the trace recording itself. 49 Chapter 7. Results 1. AVD elements are not positioned such that test participants are able to find the required elements. (1A, 3A, 4A, 6A, 7A) 2. Variable values cannot be inspected during a trace play. (3A, 7A, 8A, 12A, 14A, 16A) 3. It is not clear to test participants how AVD can be applied to the problem (7A, 10A) 4. Relationship between Class Diagram and Code editor highlighting is very usable (5A) Findings 7.7: Observations on AVD in general. The test participants identified several other issues that related to the playback. The most prevalent issue is that selecting a time on the timeline will not ensure, the player starts at this point. This happens as the player currently plays the next event available after being set to a new time by dragging the bar. Unfortunately, there may occur long periods of no recorded events during a trace, leading the user to think that the player skipped a part of the trace, while in fact, it didn’t. Additionally, the timestamps in the event list, and the time label on the timeline, do not show the same values. This is because the timeline shows the recorded time in milliseconds, while the event list shows the time in nanoseconds. This is not obvious, which further confuses test participants (Findings 7.6 on the preceding page - items 2, 3). Several test participants noted (Findings 7.6 - item 1) that they would have liked step controls to resemble those of Eclipse, that is, providing options to step over a method, step to method return, and explicitly step into a method. Further, similar features, stepping backwards instead of forwards, were identified as a feature, the test participants would have liked. An additional issue observed was the lacking coherence between player controls and the player. Because the Play, Stop, Pause, and Step controls are placed in the event list view, the test participants were required to have this view open, and failing to have so when needing the play controls caused confusion as to how one controlled the playback (Findings 7.6 - item 6, 7.7 - item 1). By observing the test participants, and as a result of the post-test interviews we identified that AVD lacks the possibility to inspect variable values (Findings 7.7 - item 2, Findings 7.2 on page 46 - item 4). This comes as no big surprise, as we had already looked into possible solutions providing variable values to the user. A discussion regarding this feature, and its dismissal, can be found in section 5.3 on page 32. Finally, some test participants noted during the test that they were not able to identify a specific case in which it would make sense to use AVD to find a potential error (Findings 7.7 - item 3). 50 7.2. NOTABLE FINDINGS 1. Test participants were confused when the Eclipse debugger opened library classes when using step into. (6E, 12E) 2. A test participant spent long time identifying the source of an error, because it was hidden behind a sequence of method calls. (8E) Findings 7.8: Observations on debugging in eclipse. Observations Regarding Debugging In General Even though the process of debugging was not the main observation target of the study, we still evaluated the test participants’ debugging capabilities. All test participants were told that we were not testing them, but rather AVD, yet it is still relevant to us to know how they would usually debug, and in particular how they used, or did not use, the tools available for this. Some test participants were not that experienced with the eclipse debugger. This could be identified as they were surprised by the debugger opening library classes1 , when using the step into feature, even though that is exactly what the feature is supposed to do (Findings 7.8 - item 1). An interesting observation regarding the debugging sessions in general were that several test participants applied keyboard shortcuts when attempting to identify the bug using default eclipse debugging features2 , whereas the same shortcut was not used when using AVD, even though it would have worked just as well. (Findings 7.9 on the next page - item 2). This could be due to the fact that the AVD perspective does not resemble neither standard Java, nor the standard debug, perspectives of Eclipse. Finally, several test participants identified boolean expressions as the primary source of bugs, at least in their experience (Findings 7.9 - item 1). 7.2.2 Test Participants The test participants were all volunteers from the Department of Computer Science at Aalborg University. They had all completed at least 5 semesters of their study, and they had all worked with Java before in some way. Their experience working with both Java and Eclipse ranged from 4 months to 3 years. Of other notable influence, most of them had worked several years with C# and Visual Studio, and as such have had ample time to get accustomed to debugging tools like those in both Eclipse and Visual studio. Of interest however, is that the use of such debugging tools were not as widespread as we assumed. During the interviews, only 7 out of our 18 test participants claimed to be using any tool, such as breakpoints, while debugging. 6 test participants claimed to exclusively use print statements, while 3 1 2 For instance, the ArrayList add() method. For instance, F3 for opening method declaration. 51 Chapter 7. Results 1. Boolean comparisons are thought to be an issue by several test participants. (8A, 9A, 12E, 15E) 2. New plug-in makes test participants disuse keyboard shortcuts, they already know, and that would work normally. (10, 12, 13) 3. Test participants might be biased to try to apply AVD in nonapplicable situations. (This was especially clear with 11, 12) Findings 7.9: Observations on the debugging session in general. test participants would start out with print statements and move on to breakpoints if they had no luck finding the bug otherwise. As such, it is of little surprise that the test participants had trouble using AVD, as it was a very large break from not only their normal debugging environment, but also from their normal debugging process. Even so, of the people not claiming to use debugging tools regularly, all but one of those who managed to use the class diagram during testing said that it helped them gain an understanding of the code (TP2, TP3, TP4, TP5). As the class diagram is an easy to understand tool, their unwillingness to use regular debugging tools might be caused by them not understanding their use. 52 CHAPTER 8 CONCLUSION In this final chapter, we conclude on our results. We first make a discussion, included an evaluation of our error sources, and what could be done by other researchers in the future. Lastly, we compare our results to our initial hypothesis, and make our closing remarks. 8.1 Discussion In this section we will take a closer look at the outcome of our user test, and we will discuss how our findings could be used in other research into auditory and visual debugging. Initially, we will discuss the previously mentioned error sources, we thought could influence the test. Afterwards, we will discuss two major problem areas we noticed during our tests, immediacy and user understanding. While not having a direct connection to the concept of neither auditory nor visual debugging, they still gave us a larger insight in the usability of debugging tools, and some of the obstacles one must circumvent for a tool to be effective. Later, we will also review the more direct impact on efficiency we found with the two types of debugging tools. 8.1.1 Error Sources In section 6.3 on page 41, we identified some attributes concerning the test setup, we found to be potentially problematic. In the following sections we review some of them, and what could be done to rectify them in further testing. Artificial Situation It was clear that some test participants were affected by the artificial situation, we put them under during the test. In particular, one test participant (12A) identified, by line number, the issue, within two minutes of the debugging session, without using AVD. Afterwards, he proceeded to apply the tool, and became rather confused as to where the bug was located. In the end, he managed to confirm his suspicions by using AVD slightly, but the forced appliance of the tool was a hindrance in this case. 53 Chapter 8. Conclusion This shows that the test participant felt forced to apply AVD to the debugging session, even though he needed not. It is not certain, but most likely, that other test participants experienced similar situations, though they were not as easily identified. Unknown Environment Several participants were proficient using the Eclipse tool and keyboard shortcuts available. They did not, however, apply these shortcuts when using AVD, even though they were fully functional. Further, it was clear that some users were not used to the keyboard provided, which, from time to time, caused them to push keys they were not intending to. The implications of these issues were that the test participants spent more time changing their normal usage patterns to the ones they thought were required, and thus, less time testing AVD, as was the actual goal of the test. In order to get around this issue, future tests could let user bring their own device, to make them fell more at home. Unknown Code Several test participants mentioned they had issues with the code. Whether it be the lack of comments, confusing naming conventions or lacking understanding of the applied syntax, this was a clear issue during the test sessions. This is a hard issuse to get around in a test like this, but in the future there may be greater success in following test participant in debugging their own project over a longer period of time, which would remove this problem. Time Constraint It is obvious that cutting off the test after approximately 20 minutes would cause some test participants to not finish the task. One could hope that this would happen only in situations where the test participant was more or less clueless in regards to what to do next. This was clearly not the case, and several test participants identified the erroneous method, or even method part, correctly. Whether they would be able to solve the problem if they had had an additional ten minutes, is unknown, but it stands clear that they were on the right track. Providing additional time for the debugging session in AVD might allow some test participants to gain a better understanding of the capabilities of AVD. This might, in turn, have caused more test participants to apply further features of AVD. 54 8.1. DISCUSSION 8.1.2 User Understanding Naturally we did not expect our test participants to be fully capable of using AVD, mostly due to them not being used to it in any way. However, we had not expected such a high degree of confusion as to what the tool would actually do or not do. In general, the issues our test participants had with understanding the tool can be divided into three categories; General Confusion, Audio, and Immediacy. General Confusion We intentionally did not instruct our test participants in how to utilize the tool, rather we decided to present the set of features and let them use them in the way they saw fit. Initially we did this by providing them with a user manual, included as appendix D on page 81, presenting each feature of the tool in detail, and explaining how to use the tool, but not how to actually find bugs with it. This turned out to be a problem for most of our participants as they simply had no idea where to start. As we expected the problem to be rooted in the test participants not actually having seen the tool in use before being asked to use it themselves, we decided to create a video, showcasing the use of the tool, for our next batch of test participants. This video is included on the enclosed CD as appendix I. Again, this video did not explain how one might use the tool to find bugs, but merely showed how to record a trace, apply filters, and start and control playback. It was always our intention that the test participants should use the tool in their own way, instead of us limiting them to our way of thinking. This did not immediately solve the problem, although it did make every test participant more confident in actually using the tool. We believe that much of this general confusion could be completely removed if the test participants had more time to get accustomed with the tool. Also, it would likely be less of a problem if the user had actively sought to use the tool on their own. Audio An area in which we could do little to help with the problem was the audio in general. Simply put, the test participants did not see how it could be used to find bugs. Or, if they could, they generally felt that it would be easier to use a log for the same purpose. We feel that this was mainly due to the way we implemented the audio features. We had a vision of a tool with which you could tailor the sounds and visuals to perfectly suit your needs. In reality, the audio ended up being too difficult to set up. That is, all the customization that we hoped would make the tool better than other tools, ended up making it slow, difficult to use, and ineffective. 55 Chapter 8. Conclusion Part of this problem is most likely due to the way the player works. As it is, the playback of notes is very monotone in its execution, and it does not always sound the same when the events are played. This is because the system that ensures that events are only played with at most one second between them will also cut the any playing sounds of. We implemented it this way to ensure that you could actually hear all the sounds instead of them being played on top of each other, but in the end it made for odd cut-off of sounds, and lead to a lack of connection with the actual execution speed. None of our test participants directly made any comments on this, but we assume this is because they had little knowledge of what was supposed to happen during playback, or what we ideally wanted. It is entirely possible that some of the test participants could have used audio for debugging if it had worked differently. 8.1.3 Immediacy In our efforts to get as many features as we could working, we have had little time to make them function completely in concert with each other. As such, our test participants regularly noted that they expected something to work, and was confused when it did not, or when they needed to access the feature in a different way. This became particularly clear in regards to the placement of the player controls. While it might not have been necessary to put the controls together with the time bar, some test participants said they felt like they should be in the top toolbar, it was definitely not correct to put them in the event table. This problem was caused due to an architectural issue that required the event list to be the active view, as described in section 5.2.6 on page 31. Another big problem seemed to be the way in which the test participants wanted to use the event table. We had not expected them to use it for the information it contained, and as such, we had not expected them to actually interact with it in any meaningful way. It was primarily there so that the user could get a quick overview of the type of events that would be played by the player. However, the test participants wanted the table to highlight the current event, as well as being able to skip to an event by clicking on it in some way. In particular they wanted the editor to go the the call that spawned the event. Also, they wanted to be able to create a filter with an event as a basis. While we did not expect this, we can clearly see the value in allowing these kinds of interaction with the view. It would connect every part of the tool in a very intuitive manner, and allow for many different ways to navigate through the features. It stands to reason that the class diagram should react in a similar way to most of these inputs, something also noted by several test participants. 56 8.1. DISCUSSION Combined Components A major goal in this project was to see if visual and auditory debugging aids would work better in unison than they did on their own. As such, we had hoped that the test participants would combine the use of the class diagram with sounds being played, but not one of our test participants did this. A few test participants used the code editor in conjunction with sounds, and reported that it helped them understand the code a bit better. One test participant stated that he felt the sounds made it easier to understand the code along with the class diagram. However, we cannot see this in our recorded data of the session. He did clearly use the sounds along with the code editor though. It seems as if the idea of combining these tools is sound enough, but in AVD their interactivity was not fleshed out enough. This seems to have affected the immediacy of the tool severely, leading to less usage of the combined components. Variables We did not manage to present the variable view we wanted in a reasonable way, and as such it was cut from the final prototype. As we expected, several test participants missed it greatly, most suggesting that they simply wanted to regular variable view from the Eclipse debugger. As we do not use the regular debugger for anything in AVD, that would unfortunately not be possible. It is clear, however, that the test participants would have liked this feature, and it created some confusion as to how they were to get that sort of information instead. Some suggested that we show the values being passed in the class diagram, others that the information were to be found in the event table. In fact, since we collected this information it would have been trivial to add this information to the event table, and we consider not adding it an oversight, as it was something we discussed during development. Ideally, we would have liked to have a variable view for AVD, much like the one found in the original Eclipse debugger. As mentioned earlier, in section 5.3.2 on page 33, we could not implement such a feature due to the way we recorded and played traces. 8.1.4 Efficiency Unfortunately, we were not able to prove that either of our hypotheses were correct. As it is, only two test participants found the bug with AVD, while a total of five found the bug with the Eclipse debugger. Also, one of the test participants who found the bug using AVD, did not use the class diagram nor the audio features. 57 Chapter 8. Conclusion As such, we cannot conclude much on the general efficiency of both visual and auditory debugging tools. We will instead evaluate the features based on our qualitative observations made during the testing. We would have liked our quantitative results to say more about the efficiency of the different features, but unfortunately our test participants did not manage to use many of the features, and those they did were used sparingly. For instance, two of our test participants did not even press Play, and thus did not use any of our visual or auditory features. We cannot conclude that those features thus have a bad efficiency compared to other features, since we do not have data to support it either way. What we can say though, is that they most likely had low usability. Visual Efficiency We had designed our test cases to specifically set up a situation in which the test participants could use the class diagram to spot a certain kind of bug, namely a initializing method call circumventing the intended wrapper method and thus failing to set up the proper data values. It would be possible to see this as one could spot the alteration of the data structure coming without the wrapper method being activated. Not a single test participant caught onto this however. Instead they used the class diagram solely to gain an understanding of the running code, something most seemed to agree was a benefit to them. It is difficult to say if this improves the efficiency of the tool, as one would assume an at least basic understanding of the code before debugging in a general setting. We also noticed that several test participants used the code editor highlighting during playback a great deal. This is akin to single stepping through the entire program, as you could do with the regular debugger, but it has the added benefits of being completely automatic, and only jumping to the contents of your filters. Ultimately it seems as if the visual features of the tool primarily helped our test participants in gaining further understanding of the code. It is hard to say exactly how relevant this would be in a real setting, and one would most likely require a long running test in order to definitively conclude anything as to its efficiency. Auditory Efficiency In general, our auditory features did little to improve the efficiency of the tool. Mostly, people felt it were confusing and difficult to use. We blame this on the lack of immediacy in its design. An example would be that there is no way to listen to a note before it is played by the player. As such, you have to spend some time connecting sounds to different filters by looking at the event table 58 8.1. DISCUSSION and estimating which event is currently being played. Otherwise, you would simply never know what a specific sound represents. This is a problem as it makes it very unintuitive to use the tool. This is enhanced by the entire system being too complex. Most of our test participants did not want to spend time setting up different kinds of filters, and the standard filter did not help them enough to prevent this. Combined Effeciency None of our test participants actively used the visual and auditory features at the same time in any meaningful way. Again, we assume this is because it was too complex to set up properly. The standard filters did not help either, as several test participants complained that the sounds were distracting when trying to look at either the editor or the class diagram. 8.1.5 Future Work It should be clear by now that the prototype we developed in this project had major flaws. However, we do not believe the idea to be any less sound than it were when we started the project, but merely that it should be taken in different directions. In this section we will discuss how further research into these areas could benefit from the findings of this project. Visual The visual tools in this project are quite lacking in many aspects, most of which have been discussed earlier, one place being section 5.3 on page 32 on the dismissed features. During the test, we noticed that the idea of using traces is, while not novel, a powerful tool, not only to improve on performance problems, where it is often applied, but also as a debugging tool. This is exemplified by one of the two users who found the bug, doing it by using filters and then looking only at the event list to correctly identify the malfunctioning piece of code. We therefore recommend further study in the area of using traces for debugging. With an actual query system in place, this could become a powerful tool, especially in debugging when the bugs are hard, but not impossible, to reproduce. Such a query system could work by allowing developers to build queries over traces. These traces could containing more types of information, including variables in the local scope. An interesting point of research could be whether such a query system would work better as a textual language, or a visual system, not unlike the filter interface in AVD. 59 Chapter 8. Conclusion Auditory In our research, both in this project and the previous[14], we have found a number of different ways of using audio as a tool for debugging. While the results of this project are not promising, we remain convinced that audio can be used as a dimension in debugging, as also evidenced by several of the other studies we have mentioned[13, 12]. Ultimately our solution did not work. We take this as a sign that further research is needed to find a way to incorporate audio in the debugging process, as we still believe that there is a place for the audio dimension in development. An area of particular interest that we have not located any study on, and have not considered in this project, is whether using audio is of more use to people with experience in music. When we developed the filters for AVD, we noticed that they could be used as a sort of unit testing framework. We therefore consider using audio in automated testing environments another area that could be interesting to study. Combined The truly novel idea in this project was the combination of traces with both visual and auditory tools. Our test showed many problems with the implementation we created. However, combining visual and auditory tools is still something we consider a good idea, though the exact implementation requires some experimentation to locate the best way of combining the two things. One idea that could be explored takes inspiration from the use of the code editor with the standard filters in AVD. Perhaps a ”walkthrough” mode could be added to the Eclipse debugger. In this mode, the debugger could single step automatically through a program, playing a different tone depending on some parameter, such as the active thread. Making this a standardized tone would likely be the best course of action based on our findings. 8.2 Final Words We started the last semester with the statement that the evolution of debugging tools has been at a standstill for almost 40 years[14, p. 11]. During that project, we performed a test to see if visual tools made improvements to the debugging experience compared to textual tools representing the same data. Our results in that project were lacking in some areas, but we got clear indications that visual tools did in fact make it more efficient to find bugs. In extension of these results, we identified additional possibilities for improving debugging capabilities, by adding auditory features, and combining them 60 8.2. FINAL WORDS with visual feedback. Even though we still find these ideas interesting and promising, we admit that the execution in the plug-in does not prove the full potential of auditory debugging, thus making us unable to conclude on our hypotheses definitely. Nevertheless, we still have some important observations and partial conclusions to divulge for each of our hypotheses: The more visually expressive a debugging tool is, the more efficient it is. The final prototype implementation of AVD provides the class diagram and the code editor highlighting to test this. While both features were highlighted by our test participants as nice during the post-test interview, we are, due to the lack of success in identifying and solving the bugs, unable to comment on the efficiency of the features. This is not due to the provided implementation, however, but rather the fact that we were required to cut off the test participants’ attempts to solve the bugs. We believe that a field test of the plug-in in a different state would indeed provide better feedback in regards to the actual efficiency of the visual feedback provided. Based on the feedback we did receive on the visual expressiveness, AVD provides, and the above statements regarding the test composition, we argue that an improved implementation, and further testing should display that the more extensive visual expressiveness a debugging tool provides, the more it improves the debugging session. We further made the statement that: Auditory tools will, in most cases, lead to a better understanding of the running code, and a more efficient debugging process. We argue that the feedback from our users, while giving both positive and negative feedback regarding the usefulness of auditory tools, is not caused by the idea, but rather the implementation. As we have mentioned before in this chapter, we still believe that audio has a place in debugging. However, it is clear that it should be better integrated with the code editor and other debugging features in order to make sense. The solution we implemented was more confusing than helpful to many of the participants. This was caused mainly by our good intentions, as we intended to provide the user with the possibility to customize the debugging experience to his needs. This affected the debugging session negatively in that the user was required to set up the debugging sessions, and wasted their time setting up filters instead of actually debugging. The last hypothesis was made on the idea that combining the two solutions would be better, and that customization in debugging would help the user, as 61 Chapter 8. Conclusion it would then be possible to always have the debugging tools provide the exact feedback, the user wanted: Allowing the user to freely choose when to use auditory or visual tools, in combination with each other or by themselves, will make for a more efficient debugging process. Seeing as none of the test participants used the visual and auditory tools together, we cannot make any conclusions on this. Again, the customization became to much of a hassle, rather than a great way of allowing the users to get just what they wanted. Perhaps a deeper study over a longer period could reveal weather the two worked well together. Ultimately we can conclude this: We had an idea of how audio could be used in debugging. We built a prototype, tested it, and in the end concluded that while audio may have a place in debugging, this was not the way to do it. It is our hope that others who share our idea of wanting to use audio in debugging will read this report and learn from what we did wrong and what we did right in order to make a new attempt at using audio for debugging. 62 BIBLIOGRAPHY [1] Rodney A. Brooks. Programming in Common LISP. John Wiley & Sons, Inc., New York, NY, USA, 1985. 9 [2] Tom Britton, Lisa Jeng, Graham Carver, Paul Cheak, and Tomer Katzenellenbogen. Reversible debugging software. http://goo.gl/ I4qqi. 9 [3] Kathryn Mohror and Karen L. Karavanic. Towards scalable event tracing for high end systems. In Ronald Perrott, Barbara M. Chapman, Jaspal Subhlok, Rodrigo Fernandes Mello, and Laurence T. Yang, editors, High Performance Computing and Communications, volume 4782 of Lecture Notes in Computer Science, pages 695–706. Springer Berlin Heidelberg, 2007. 11, 22 [4] Kathryn Mohror and Karen L. Karavanic. Trace profiling: Scalable event tracing on high-end parallel systems. Parallel Computing, 38:194 – 225, 2012. 11 [5] Guillaume Pothier and Éric Tanter. Summarized trace indexing and querying for scalable back-in-time debugging. In Proceedings of the 25th European conference on Object-oriented programming, ECOOP’11, pages 558–582, Berlin, Heidelberg, 2011. Springer-Verlag. 12 [6] Robert DeLine and Kael Rowan. Code canvas: zooming towards better development environments. In Proceedings of the 32nd ACM/IEEE International Conference on Software Engineering - Volume 2, ICSE ’10, pages 207–210, New York, NY, USA, 2010. ACM. 13, 24 [7] Mahmoud Samir Fayed. Programming without coding technology official website, 2013. http://doublesvsoop.sourceforge.net/. 13 [8] Paul Gestwicki and Bharat Jayaraman. Methodology and architecture of jive. In Proceedings of the 2005 ACM symposium on Software visualization, SoftVis ’05, pages 95–104, New York, NY, USA, 2005. ACM. 13 [9] B. Alsallakh, P. Bodesinsky, A. Gruber, and S. Miksch. Visual tracing for the eclipse java debugger. In Software Maintenance and Reengineering (CSMR), 2012 16th European Conference on, pages 545 –548, march 2012. 14 63 Bibliography [10] Wim De Pauw, Erik Jensen, Nick Mitchell, Gary Sevitsky, John Vlissides, and Jeaha Yang. Visualizing the execution of java programs. Technical report, IBM T.J. Watson Research Center, 2002. 14 [11] Bas Cornelissen, Andy Zaidman, Danny Holten, Leon Moonen, Arie van Deursen, and Jarke J. van Wijk. Execution trace analysis through massive sequence and circular bundle views. Journal of Systems and Software, 81(12):2252 – 2268, 2008. 15 [12] Paul Vickers and James L. Alty. Siren songs and swan songs debugging with music. Commun. ACM, 46(7):86–93, July 2003. 15, 22, 23, 60 [13] Dianne K. Palladino and Bruce N. Walker. Learning rates for auditory menus enhanced with spearcons versus earcons. In in International Conference on Auditory Display (ICAD2007, pages 274–279, 2007. 16, 23, 60 [14] Anders Frandsen, Michael Lisby, and Rune Jensen. Visual and textual debugging tool, a comparative study, 2012. 17, 18, 19, 21, 22, 24, 38, 39, 60 [15] Shigu Chibera. Javassist, 2013. http://www.csg.ci.i.u-tokyo. ac.jp/˜chiba/javassist/. 30 64 APPENDIX A USER STORIES US 1 Description: A user wants to see a list of all the recorded events that happens during a run of their program. Actions: • Open the program project in Eclipse. • Click the ”Record Execution Run” button – The AudioVisual Debugging perspective opens. – The program code is compiled and executed. • Interact with the running program as needed. • Browse list of recorded events after finishing execution. US 2 Description: A user wants to see a list of all calls to a specific method. Actions: • • • • Perform US 1. Click on the ”Find Method” button. Type name of method in pop-up and press ”Find”. Browse list of filtered events. US 3 Description: A user wants to see a list of all uses of a specific field. Actions: 65 Appendix A. User Stories • • • • Perform US 1. Click on the ”Find Field” button. Type name of field in pop-up and press ”Find”. Browse list of filtered events. US 4 Description: A user wants to see visual playback of all events currently in the filtered list. Actions: • Perform US 1. – Perform US 2 or US 3 any number of times. • Click on the ”Visualize Current Selection” button. • Watch playback of events in the Visual Playback view. US 5 Description: A user wants to hear and auditory representation of all events currently in the filtered list. Actions: • Perform US 1. – Perform US 2 or US 3 any number of times. • Click on the ”Listen To Current Selection” button. • Listen to audio playback. US 6 Description: A user wants to filter events, such that only relevant events are displayed. • • • • • 66 Perform US 1. Click Find. Click Add new Filter. Select the method or field to find events for. The filtered list with the union of the result of all filters are displayed. US 7 Description: A user would like to have events displayed in a timeline, providing a historical overview of the events in the trace. • • • • • • Perform US 1. Click Find. Click Add new filter. Select the method or field to find events for. Open the timeline view. Method calls and field accesses are now displayed on a timeline on an object basis. US 8 Description: A user would like to have audio feedback when events are played. • • • • • • • Perform US 1. Click Find. Click Add New Filter. Select the method or field to filter on. Select the node to play on the filtered events. Select Play. The playing corresponds to the nodes selected for the filter. US 9 Description: A user is annoyed with having to play through the event list in the pre-defined speed, as interesting blocks are played too fast, and uninteresting blocks too slow. The play speed should be changeable during play. • Perform US 1. • During initialization, the play is sped up, to skip intialization, where the events are widespread. • Later, the play is sped down, by lowering the time dilation. • The user can now inspect the auditory or visual feedback in low speed. 67 Appendix A. User Stories US 10 Description: A user would like a Class diagram displaying the interactions happening in the filtered events. • • • • Perform US 1. Click Add filter. Set up the filter. Class diagram is now displayed for the selected items. US 11 Description: A user would like the code editor to highlight the line that activated a certain event when the event is played. • • • • • • Perform US 1. Click Add filter. Select filtering details. Apply Code Editor highlighting on the filter. Click Play. The code editor will now highlight activating code lines when playing through the code. US 12 Description: A user would like to switch between already recorded traces. • Perform US 1 (possibly several times). • Use the toolbar dropdown list, and select the trace to play. • Click Play to start playing the selected trace. US 13 Description: This user story included stop, a missing feature from the previous sprint, as well as the option to step forward a single event. Additionally, jumping forwards and backwards by moving the player bar was part of this user story. 68 • • • • • • • • Perform US 1. Start playing the current trace by clicking Play. Stop the play by clicking Stop. Restart the play by clicking Play - this causes the play to start from the beginning. Pause the play by clicking Pause. Step one item forwards by clicking Step. The player plays the next event, and pauses immediately again. Move the player time bar. Restart the play by clicking Play - this causes the play to resume from the event, the time bar was dragged to. US 14 Description: A user is annoyed by the class diagram flickering during play, and would like to have this stop. • Perform US 10. • When a refresh is required, only changed classes are redrawn. US 15 Description: A user would like to have current and historical variable values displayed. • Perform US 3. • Select the Variable Development view. • The development of the selected variables is now displayed. US 16 Description: A user is confused when no filters are applied, and play does not provide any feedback, and would like to have a default filter applied. • Perform US 1. • Start playing by clicking Play. • Default filter, providing both auditory and visual feedback, is applied, as the user did not himself apply one or more filters. 69 Appendix A. User Stories US 17 Description: A user would like to have the activated fields or methods highlighted in the class diagram, using a user-defined color. • Perform US 7. • Filtered events are highlighted in the Class diagram with the configured colors, not a default color. US 18 Description: A user would like to have a wider range of nodes and instruments to select from. • Perform US 1. • Click Add filter. • Filter setup allows to select instrument and either node or sub-instrument, depending on the selected instrument. US 19 Description: A user would like to be notified during a method activation, not only on method return. • Perform US 1. • The returned event list contains, in addition to earlier described events, inMethod events. 70 APPENDIX B ALGORITHM DESCRIPTIONS This chapter contains the danish algorithm descriptions provided to the test participant during the test. B.1 Algoritmer I denne test vil du blive bedt at at bruge forskellige værktøjer til at debugge to Java programmer der implementerer hver sin algoritme. Dette dokument vil fungere som en overfladisk introduktion til de to algoritmer. B.2 Dijkstra Dijkstras algoritme er en enkelt kildes, korteste vej, bredde først algoritme. Algoritmen kan bruges til at udregne både den korteste vej til alle knuder i en graf og den korteste vej mellem to knuder i en graf. Den givne implementation beregner korteste vej fra den givne kilde til alle knuder i den definerede graf. Implementationen antager, enhver kant er tovejs. Det vil sige; hvis der er en kant med en given vægtning mellem knude 1 og knude 2, så er der også en kant med samme vægtning mellem knude 2 og 1. Ud fra den knude med lavest vægtning (i første gennemløb kilden), beregnes afstanden til alle andre knuder, via knuden med lavest vægtning. Er denne afstand kortere, opdateres knudens vægt. Efterfølgende beregnes den næste knude med lavest vægtning. Knuder, der allerede en gang har været udgangspunkt, udelades fra denne betragtning. Når der ikke længere er knuder at vælge, er beregningen afsluttet, og grafen returneres, og udskrives. Den graf, der benyttes i eksemplet, er afbildet herunder. B.3 Activity Selection Activity Selection er et problem der ofte bruges til at introducere grådige algoritmer. Formålet med algoritmen er at skedulere det maximale antal af aktiviteter der kan passes ind i en tidsramme uden overlap ud fra en given 71 Appendix B. Algorithm Descriptions mængde af aktiviteter. Det kan bevises at ved først at sortere listen af givne aktiviteter ud fra deres sluttidspunkt og altid vælge den næste aktivitet som ikke overlapper med den senest valgte aktivitet vil et optimalt sæt opnås. 72 APPENDIX C QUATITATIVE RESULTS This appendix contains tables detailing the quantitative results collected during the test in this project. See chapter 7 on page 43 for a detailed description of the collection method used to create the tables. Each table specifies which test participant performed the test and which project they debugged using the AVD plug-in. The two projects are denoted ACT for Activity Selection and DJ for the Dijkstra project. With the exception of the last table the values in the table are binary with a 1 representing a used feature and a zero representing a feature that was not used by the test person. The Usage Percentage row contains a percentage representing the portion of test persons who used the feature. In the last table, the Average row contains the average for each applicable column. With the exception of the last table, the tables are split solely on the basis of making the tables fit the pages. 73 Appendix C. Quatitative Results Test Person AVD project Play Stop Pause Stepping Scrolling Class Diagram 1 ACT 1 1 1 1 1 0 2 DJ 1 1 1 0 1 0 3 ACT 1 0 1 1 1 0 4 DJ 1 1 0 0 0 0 5 DJ 1 1 1 0 1 0 6 ACT 1 1 0 1 0 0 7 DJ 1 0 1 0 0 1 8 ACT 0 0 0 0 0 0 9 DJ 1 0 0 0 0 1 10 ACT 0 0 0 0 0 0 11 DJ 1 1 0 0 0 0 12 ACT 1 0 1 0 0 0 13 DJ 1 1 0 0 1 1 14 ACT 1 1 1 0 1 1 15 DJ 1 1 1 0 0 1 16 ACT 1 1 0 0 1 0 Usage Percentage 87,5% 62,5% 50,0% 18,75% 43,75% 31,25% Table C.1: Quantitative Result Table 1 74 75 Table C.2: Quantitative Result Table 2 Test Person AVD project Colors User Defined Filters Filter Name CallerClass OwnerClass 1 ACT 0 0 0 0 0 2 DJ 0 1 0 0 1 3 ACT 0 0 0 0 0 4 DJ 0 0 0 0 0 5 DJ 0 0 0 0 0 6 ACT 0 1 0 0 0 7 DJ 0 1 0 1 0 8 ACT 0 1 0 0 1 9 DJ 0 1 0 0 0 10 ACT 0 0 0 0 0 11 DJ 0 1 1 0 0 12 ACT 0 1 0 0 0 13 DJ 0 1 0 0 0 14 ACT 0 1 0 0 0 15 DJ 0 1 1 0 0 16 ACT 0 1 0 0 0 Usage Percentage 0,0% 68,75% 12,5% 6,25% 12,5% Appendix C. Quatitative Results Test Person AVD project Value Name Read/Write Reg-ex’s Auto Complete 1 ACT 0 0 0 0 0 2 DJ 0 1 0 0 1 3 ACT 0 0 0 0 0 4 DJ 0 0 0 0 0 5 DJ 0 0 0 0 0 6 ACT 0 0 0 0 0 7 DJ 0 1 1 0 1 8 ACT 0 1 0 0 0 9 DJ 1 1 0 0 1 10 ACT 0 0 0 0 0 11 DJ 0 1 0 0 1 12 ACT 0 1 0 0 1 13 DJ 0 0 0 0 0 14 ACT 0 1 0 0 1 15 DJ 0 1 0 0 0 16 ACT 0 0 0 0 0 Usage Percentage 6,25% 50,0% 6,25% 0,0% 37,5% Table C.3: Quantitative Result Table 3 76 77 Guitar Bass Drums Piano Tuba 0 0 0 0 0 0 0 0 0 1 0 0 0 0 0 0 0 0 0 0 0 0 0 0 0 0 0 0 0 0 0 0 0 0 0 0 0 0 0 0 0 0 1 0 1 0 0 0 0 0 1 0 0 1 0 0 0 1 0 1 0 0 0 1 0 0 0 0 0 0 0 0 0 1 1 1 0 0 1 0 12,5% 0,0% 12,5% 25,0% 25,0% Table C.4: Quantitative Result Table 4 Test Person AVD project InMethod Velocity Tones 1 ACT 0 0 0 2 DJ 1 0 1 3 ACT 0 0 0 4 DJ 0 0 0 5 DJ 0 0 0 6 ACT 0 0 0 7 DJ 0 0 0 8 ACT 0 0 0 9 DJ 1 0 1 10 ACT 0 0 0 11 DJ 0 0 1 12 ACT 1 0 1 13 DJ 0 0 1 14 ACT 0 0 0 15 DJ 1 0 1 16 ACT 0 0 1 Usage Percentage 25,0% 0,0% 43,75% Appendix C. Quatitative Results Test Person AVD project Code Editor Highlight Default Filters AVD Runs Eclipse Runs 1 ACT 0 1 3 0 2 DJ 1 1 8 3 3 ACT 0 1 1 0 4 DJ 0 1 2 3 5 DJ 0 1 4 2 6 ACT 1 0 1 3 7 DJ 0 1 1 3 8 ACT 0 0 0 3 9 DJ 1 0 2 2 10 ACT 0 0 0 2 11 DJ 0 0 1 6 12 ACT 1 0 2 3 13 DJ 1 0 3 4 14 ACT 1 0 2 2 15 DJ 1 0 4 6 16 ACT 1 0 4 2 Usage Percentage 50,0% 37,5% 2,38 2,75 Table C.5: Quantitative Result Table 5 78 79 Table C.6: Quantitative Result Table 6 Test Person AVD project Filters Traces Debug Method AVD Success Eclipse Success 1 ACT 0 1 Read The Code No No 2 DJ 2 1 Print No Yes 3 ACT 0 1 Read The Code No No 4 DJ 0 1 Print No Yes 5 DJ 0 1 Breakpoints No No 6 ACT 1 1 Breakpoints No No 7 DJ 1 1 Print No No 8 ACT 2 1 Breakpoints Yes Yes 9 DJ 2 1 Read The Code No No 10 ACT 0 1 Breakpoints No Yes 11 DJ 2 1 Breakpoints No No 12 ACT 2 1 Breakpoints Yes No 13 DJ 3 1 Breakpoints No Yes 14 ACT 2 1 Breakpoints No No 15 DJ 6 1 Breakpoints No No 16 ACT 2 1 Breakpoints No No Average 1,56 1 N/A 12,5% 31,25% Appendix C. Quatitative Results 80 APPENDIX D USER MANUAL The next 6 pages include the danish user manual given to the participants during the test. 81 Manual til AVD AVD er et plugin til Eclipse, der tilbyder tracing af Java programmer, der efterfølgende kan afspilles med lyd og/eller visualisering. Denne manual er en kort gennemgang af alle features, til hjælp under aftestning af AVD. Manualen vil gennemgå de features man kan finde ved at åbne “Audiovisual Debugging” perspektivet i Eclipse. Allerførst er det dog vigtigt at forklare ideen bag to vigtige koncepter, nemlig trace og filtre Trace Kort fortalt er et trace en optagelse af en kørsel af et program, hvor forskellige events noteres, så de efterfølgende kan undersøges. I dette plugin er der tale om følgende events der optages: 1. Metodekald 2. Felt tilgang 3. I Metodekald Plugin’et giver mulighed for at afspille et optaget trace med nedsat hastighed så det er muligt at følge med i eksekveringen. Der kan under afspilningen spoles frem og tilbage, så man kan undersøge mistænkte områder igen, og der kan afspilles et enkelt event ad gangen, hvis en mere kontrolleret afspilning er ønsket. Metodekald og felt tilgange er begge meget ens, og indeholder information om hvornår henholdsvis en metode kaldes og et felt tilgåes. For metoder skal man være opmærksom på at metode kald er logget efter metoden har returnet, da vi også logger returværdien. I modsætning til dette starter “InMethod” events som det allerførste i en metode, og slutter som det sidste, altså vil et “InMethod” event komme før alt hvad der sker i metoden og slutte lige før dets tilhørende “MethodCall” event. InMethod events er kun optaget for klasser der ligger uden for standard biblioteket i Java, mens MethodCall er alle metodekald. Filtre Filtre i dette plugin bruges til at filtrere de forskellige events på ting som navne og klasser. De præcise detaljer om hvilke ting der kan filtreres på kommer i afsnittet om filtre i UI’et. Der er 4 forskellige: ● Any Bruges til at matche både metodekald og felttilgange. ● MethodCall Bruges til at matche Metodekald. ● FieldAccess Bruges til at matche felt tilgange ● InMethod Specielt filter der bruges til at spille lyd imens man er inde i en metode. Side 1 af 6 Oversigt Når man åbner perspektivet første gang vil man blive mødt af denne vinduesopsætning. Perspektivet består af følgende toolbar og views: 1. Toolbar 2. Code Editor 3. Filter List 4. Event List 5. Class Diagram Disse er yderligere beskrevet i de kommende afsnit. Toolbar Toolbaren tilbyder 3 features: 1. Optage et nyt trace. 2. Vælge trace. 3. Sletning af trace. Optage et nyt trace Første gang man trykker på “Optag Trace” bliver man bedt om at vælge en runconfiguration der skal traces. En runconfiguration er et Eclipse concept, og er en beskrivelse af hvordan et program skal køres. Eclipse opretter automatisk en runconfiguration når man trykker “Kør”, og det er normalt denne du skal vælge, altså skal du have kørt programmet som normalt før du kan optage et trace. Side 2 af 6 Vælge trace Alle features i perspektivet arbejder på et enkelt trace. I denne dropdown kan du vælge det trace du arbejder på. Når du har optaget et nyt trace skal du være opmærksom på at dette trace ikke automatisk bliver valgt. Traces i denne liste er navngivet efter det tidspunkt hvor optagelsen starter. Sletning af trace Med denne knap er det muligt at slette det valgte trace. Filter Liste Dette filter giver et overblik over de filtre der er sat op på nuværende tidspunkt. Hvert filter er repræsenteret i listen og kan, ved hjælp af checkboxen slås til eller fra. De tre knapper gør det muligt at tilføje nye filtre, samt slette eller redigere eksisterende filtre. Bemærk at det ikke er muligt at redigere filtre under afspilning. Både tilføjelse og redigering af filtre bruger den samme dialogboks. Den er bygget op i to dele, en del hvor man vælger hvilke elementer der skal bruges til at matche med, og en del hvor man vælger hvad der skal ske under afspilningen når et filter matcher et event. Filter typer Som nævnt i introduktionen er der 4 type filtre. Hver filtertype har forskellige delelementer der kan bruges til at matche event. Det følgende er en gennemgang af elementerne for de enkelte filter typer: Any Macther både Metode kald og felt tilgange. ● Caller Class Den klasse der kalder metoden eller tilgår feltet. ● Owner Class Den klasse feltet eller metoden tilhører. Side 3 af 6 Method Call Matcher Metode kald. ● Caller Class Den klasse der kalder metoden. ● Owner Class Den klasse metoden tilhører. ● Method Name Navnet på metoden ● Return Value Retur værdien Field Access Matcher Felt tilgange. ● Caller Class Den klasse der tilgår feltet. ● Owner Class Den klasse feltet tilhører. ● Field Name Navnet på feltet. ● Field Value Feltets værdi. Hvis værdien af feltet er blevet ændret, er dette den nye værdi. ● Access Type Om der er tale om en skrivning eller en læsning. In Method Matcher in method events. ● Caller Class Bruges ikke, og kan ikke sættes. ● Owner Class Den klasse metoden tilhører. ● Method Name Metodens navn. I alle felter er det muligt at bruge regulære udtryk. Ved at holde musen over et felt kommer der et tooltip frem med hjælp til at skrive de regulære udtryk. Når man begynder at skrive, eller ved at trykke ctrl + space vil der komme forslag frem til hvad der kan skrives i de enkelte felter. I Return og Field Value felterne er det desuden muligt at anvende > og < til at matche events med talværdier over eller under den angivne værdi. Et eksempel på dette er “<5” der vil matche events hvor værdien er under eller lig 5. De enkelte felter kan slås til og fra ved hjælp af check boxen ud for deres navn. Resultat specificering Resultat delen består af 3 underdele; Code Editor, Visual og Audio: Code Editor Code Editor er slået til som standard. Er det slået til, vil events der bliver matchet af dette filter, åbne den linje kode der resulterede i eventet i kode editoren under afspilning. Dette fungerer tilsvarende almindelig linje highlighting i det normale debugging værktøj. Visual Dette resultat betyder at eventet vil blive tegnet på Class Diagram viewet med den angivne farve. Side 4 af 6 Audio Dette resultat vil betyde at når eventet bliver matchet under afspilningen vil de(n) angivne tone(r) blive afspillet med det valgte instrument. Der er fire instrumenter at vælge mellem: ● Piano ● Guitar ● Tuba ● Trommer Under trommer er det ikke muligt at vælge en tone, men i stedet en specifik tromme. For at vælge flere toner eller trommer skal man holde ctrl nede mens man vælger. For metode kald og felt tilgange bliver en tone blot slået an med den angivne velocity, der er et udtryk for hvor voldsomt tonen slåes an. For “InMethod” events gælder det i stedet at en tone holdes mens man er inde i den matchede metode. For at opnå dette er det kun muligt at vælge Tuba som instrument, da den er den eneste af de 4 instrumenter der kan holde en tone. Event liste Dette er listen over de events der er matchet af et eller flere filtre. Hvis der ikke er oprettet nogle filtre vises alle events, men hvis der blot ikke er nogle aktive filtre vises ingen events. Rækkefølgen er sat efter tid, og her opstår en vigtigt forskel mellem MethodCall og InMethod events: InMethod ligger som det første når en metode er kaldt, mens MethodCall først ligger når metoden har returneret, da vi også optager dens return værdi, hvis den har en sådan. Udover at vise de matchede events tilbyder event listen følgende knapper: 1. 2. 3. 4. 5. Tilføj et filter Starte afspilningen Stoppe afspilningen Pause afspilningen Steppe frem til næste event i afspilningen. Side 5 af 6 Class Diagram I dette view bliver de enkelte klasser tegnet, og det bliver indikeret når et felt bliver tilgået eller en metode bliver kaldt. Dette sker dog kun hvis Visual Result er aktiveret i filtrene. I bunden af viewet ligger en timeline der viser hvor i afspilningen man er kommet til. Denne kan man trække i for at komme et bestemt sted hen. Når man gør dette pauser afspillingen og skal manuelt startes igen ved at trykke på play. I venstre ende af timelinen ligger et tal der indikerer hvor langt i afspilningen man er, og i høje side et tal der viser hvor lang afspilningen er i alt. Man vil under afspilningen se at timelinen af og til hopper fremad. Dette sker for at der ikke skal opstå for lange ventetider mellem afspilningen af de enkelte events. Editor Dette er den almindelige Java kode editor. Når et event bliver afspillet, vil, med mindre det er blevet deaktiveret i filtret, klassen blive åbnet så man kan se hvilken linje der er tale om. Side 6 af 6