1
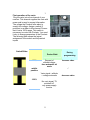
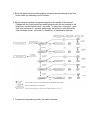
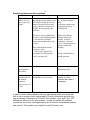
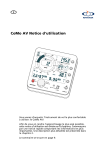
Picolario User Manual Table of content: Release August 4th., 2004 Preface How to connect the cable to the Picolario Mounting considerations for the vario First operation of the vario The vario function The receiver battery check Automatic altitude mode Request of altitude or voltage, time automatic for altitude Failsafe at PCM-receiver Programming of the Picolario Talk and Parameter setting Flight book, minimum / maximum values General tips Usage of the altitude request Usage in electric models Problems of not enough receiver channels Professional programming of the requests Technical Data Sales and Information, Manufacturer Quick start, short reference Possible problems and their solutions Dear customer, Congratulations to your new Picolario talk. You have chosen an expandable telemetry system, which is designed and manufactured in Germany. The main idea is to supply a lot of data, without distracting the pilot from flying. In critical situations the pilot has to focus on the model. Hence, a voice data output is the perfect solution. The pilot is informed by a friendly voice. Due to the wide spread of vario/telemetry systems the Picolario uses a 14 channel transmitting module. A cheap 1 channel solution is insufficient due to the limited usage for just 1 pilot. The receiver of the US version is a standard FRS unit (462 MHz) which could also be used for other communication purposes. Another point we would like to mention is the update and upgrade ability of the Picolario Talk. To get the latest news, just take a look at www.picolario.com US sales and information; take a look at www.kennedycomposites.com Please take care to plug the cable correctly. Please take a look at the picture shown on the right. Lay the Picolario on a table with the pins to the right side so that the small tube of the pressure sensor is next to you. The cable is plugged in on the pins on the other side. Take the row next to the table and then minus (-), then plus (+) and then the signal Mounting considerations for the vario: Stick the vario using the Velcro inside your model. If you have a carbon fuselage it is recommended to have the antenna outside. The antenna should also be straight and not parallel to other wires or metal pieces, as this will reduce the transmitting range. We have tested the Picolario with several 35 and 72 Mhz receivers and we could not see a big impact in the range. However, we recommend performing a range check in any case. We think this is generally a good idea after installation of new electronic components such as servos, receivers or varios anyway. If you run into problems please contact us. The majority of problems are due to a general problem with the specific installation and the vario makes a bad thing even worse as it had already been. We saw a range decrease on some receivers when the RC receiver antenna was close to servo wires, without even having a Picolario installed. 1 First operation of the vario: Plug the vario into a free channel of your receiver. This channel supplies the vario with power and is used to request information. The voltage the Picolario talks about is exactly this voltage. Assign a switch (3 positions) or a slider to this channel. Ensure that it has a 100% range. This switch is necessary to control the Picolario. You need it also to change parameters of the Picolario. The following table shows the logical assignment of the switch and its practical impact Switch/Slider During flight 100% Request of altitude/voltage time automatic alt mode middle position During programming Increase value / Vario signal + altitude + voltage automatic -100% No vario signal, TX switched off, only power supply monitor 2 decrease value Select at your transceiver the same channel as selected on the Picolario. You can also use the scan feature of your transceiver to find the channel selected at the Picolario. At a low squelch level it is possible that the transceiver recognizes the Picolario at several channels. So it is a good idea to verify the channel which you have selected on both sides of the transmission path. After a short initialization you will hear the vario signal Vario function: The vario indicates climbing through short “beeps”. The higher the pitch the better the climbing. Also the interval between the “beeps” gets shorter with increasing climb rate. A constant sound indicates falling. No sound is 0 or depends on your “quiet zone” setting. You can select in set mode 2 the sink tone level, where the sink tone starts working. If you set this value to a little bit more than the standard sink rate of your glider, then you will have during normal flight no sound and only in sinking air a sink tone. But this depends on your taste. The voltage monitor of the receiver battery: The receiver battery voltage is measured by the Picolario. Only if it decreases its value a voltage announcement will occur. This allows the usage of 2 batteries connected through a switch unit. Again you are only told the voltage automatically if it has decreased by another 0.1 Volt step. If you want to know the current voltage then you can request this information at every time by the 3 position switch. Automatic altitude mode at middle switch position (100 feet automatic): The Picolario automatically zeros itself when turned on. So if you switch it on at 1234 feet altitude it will subtract this value from all future measured values. If you climb 2 feet to 1236 feet then the vario calculates 1236 minus 1234 = 2 feet and this is the altitude it will tell you. The altitude automatic (only in middle position) will tell you every 100 feet automatically without a request) the altitude. So if you climb to 220 ft you will hear “100 feet” and “200 feet” automatically. If you sink afterwards from 220 ft the next information will be “100 feet”. The reason for that is that you will not be distracted by the voice output when you fly around a 100 feet step altitude and your altitude varies about for instance in 1 ft. steps (199ft 201ft 199ft) 3 Request of the altitude or the voltage and time automatic for altitude: In addition to the automatic announcement of the altitude the precise altitude can be requested at any time. To do that the switch must be in the 100% position for about 2 seconds. Then you get a precise announcement of the current altitude. If you leave your switch in the 100% position during the announcement the voltage information will follow. If you leave your switch in this position for a longer period off time then after a programmable interval an announcement will occur, for instance every 10 seconds. This announcement has no “altitude” in front of it and simply tells you “360feet”. You can program this time interval in set mode 4 between 10 to 60 seconds in 10 second steps. Please note. The first request for an altitude announcement starts the flight book recording. Failsafe detection with PCM receiver They have a predefined setting. You can use the requested altitude information to detect if your PCM receiver has gone into failsafe mode. You have to program the channel of the Picolario that it goes to 150% (2ms) during Failsafe. During flying you have set your switch at middle position or off. If you receive an announcement which has not been requested by you, you know that your PCM receiver has gone into failsafe mode. It is always amazing what our spirit lets us do. Parameter setting The latest model allows you to set the delay time, the sink tone level, the acoustic scale range and the time interval for the time automatic. With that you can adapt the Picolario to various different models or weather conditions. At very calm conditions at flat lands you can select 800 feet per minute (4 m/s) as acoustic scale. For all other purposes 1600 (8) to 3200 feet per minute (16 m/s) is recommended. 400 feet per minute (2 m/s) is only for test purposes as we believe this is too sensitive. To program a parameter set the switch into the middle position. You enter the programming mode by pressing the red button or the external button WHILE you switch on your model. The Picolario enters the set mode and will announce this to you. Now you can select one of the 5 set modes with your switch (up or down). If you have reached your mode you want to change just press the red button or the external button again and enter the corresponding value setting. Then you can change the value with the 3 way switch and save it by pressing a third time the red/blue button on the Picolario. 4 The following summarizes the parameters you can change: 1) Delay time (set mode 1) The delay time is the time until the Picolario indicates rising or sinking. Normally this time is set to one second. The main reason for this time is that thermal could be too small to be used. If it beeps with a delay of 1 second, you can be sure that the thermal is big enough for circling. 2) Sink tone level (set mode 2) This level sets when the sink tone starts. There will be 3 different logical levels. Immediately will give you always a sink tone. (standard setting with 40 ft/min (0.2 m/s).) A little bit more than the sink rate of your glider, will give you a quiet zone when you fly in calm air with no rising or falling. Only if the air is also sinking the sink tone will appear. Last a value of about 600 ft/min (3 m/s) can be programmed if you like it quiet during sinking, but want to be informed when a maximum sink level is reached. 3) Acoustic scale range (set mode 3) The Picolario has 40 different tone pitches for each, climbing and declining. You can select the range in which the 40 sounds are used. The less the value the more nervous (and sensitive) the instrument is. 4) Automatic time interval for altitude (set mode 4) Time interval for the automatic altitude announcement 5) Sensitivity of Interference detection (set mode 5) The Picolario detects the jitter of the pulse. If you reach the range limit of your remote control the servos start to jitter. Depending on different receivers the jitter is different therefore you have the opportunity to adjust the sensitivity of the interference detection. You can set the sensitivity between 1 and 5 where 1 is the lowest and 5 is the highest sensitivity. The highest sensitivity means an early warning. Factory default is 3. The warning will be a verbal “attention”. This warning could have 2 reasons. Either you are operating your plane close to the range limit or your receiver got interference. After about 5 attentions in a row the Picolario enters the summary mode to avoid to distract you more than necessary and also enable you to get some acoustic vario, altitude and voltage information which maybe important. For instance the voice will tell you “attention 42” instead of 42 times the word “attention”. When conditions are back to normal the Picolario will tell you "attention zero stop" which means no jitter was detected in the last summary interval. This announcement stops the summary mode and returns to the initial mode with single “attention” announcements. We recommend 800 feet per minute (4 m/s) for the acoustic scale range and a delay of 1 second. At strong winds and thermals in high mountains we recommend 1600 (8) or 3200 feet per minute(16m/s) with a delay of 1 second. If the Picolario sounds too nervous to you, select a higher delay time and a higher acoustic scale range setting. The flight book: The Picolario continuously measure the voltage and altitude and also the climbing and sinking rate. If you want you can store the maximum and minimum values after a flight by pressing the blue button or the external button. Please note that the recording starts after the first request for an altitude announcement. You enter the flight book mode by pressing the blue button or the external button. The minimum and maximum values of the last flight will be announced and saved. If you don’t press the blue button or the external button after a flight the flight data will be lost. There are 10 data sets available and you can select with your 3 pole switch the flight of interest. Flight number 1 is the most recent one. Flight number 10 is the oldest. It is a circular buffer. If you want to hear the data from flight number 2 (2 flights ago) then you bring the 3 pole switch in the middle position after “flight number 2” has been announced. If you wait 2 seconds the minimum and maximum values will automatically be announced. To leave the flight book mode switch off your model. Some words about using a Picolario in the model plane 1. Altitude measurement It is based on air pressure measurement, which is very sensitive. If you have your model inside a building, pressure changes of up to 3feet will be possible. You will notice that too if you simply open or close a door and the vario will start to beep. If the weather changes it is also possible that the zero altitude from take off will change by up to 60 feet in each direction. At thunderstorms or cold fronts even more. 2. Usage of the altitude information. The altitude information has several useful applications. If you cannot land near you, altitude information can be very useful (if you have done some pre measurements). If you know the altitude difference between your place and the landing site, the altitude will give you an indication when it is time to think about a landing approach. If you have already lost 400 from 500 feet maybe some thoughts about landing directions might be helpful. Also, the altitude information is great at light thermals. If you have in one part of the circle climbing and in the other sinking then the altitude information will tell you if it is worth staying there or not. With the altitude announcement you can also stay at places where you only make 100 feet in 10 minutes. There, a normal vario would be at it’s limits. During competitions it is also very useful to bring all pilots to the same altitude. 3. Usage in electric gliders The impact of the ventilation openings common at electric models is in most cases less than feared. Generally you should try to have a pressure which has minimum variation with speed. Sometimes it is possible to hear motor sounds through the Picolario caused by high frequency pulses on the power supply line. 4. Problems at big models with only few free receiver channels Often big models have an insufficient amount of free channels at the receiver. You can use the vario together with a V wire, which splits the operation with other functions. The vario is operated in parallel. Ensure that no servo is operated above it’s limits. Sometimes, there is also a limitation due to the paralleling. 5. Clever programming for easy operation It is recommended to have a 3 pole switch controlling the Picolario. With that switch you control the programming mode and the functions in operation. If you have an additional easy reachable switch you can program your RC transmitter in a way that you can get easy announcements. Technical data: Sensitivity: approx. 10 feet/min Resolution altimeter: 1 foot Operating range: -1500 ft to 27000 ft Temperature: -0° F to + 130° F Dimensions: 82 x 23 x 13 mm approx. 3 1/4" x 1/2" x 1“ Weight : approx. ¾ oz. Power supply : 4.6 V to 10V through RC receiver Current consumption: 45 mA TX frequencies: 14 channels in the 462 MHz FRS band Set modes: delay time, sink tone level, acoustic scale range Functions: vario signal, announcement of altitude and voltage flight book with minimum / maximum storage, interference warning In preparation: Modules for speed, current, voltage, rotary speed, temperature and PC-connections If you have constructive feedback, please let us know. USA Sales General Sales Manufacturer Picolario-usa.com Thommys Modellbau Renschler Instr. Rochester, Mi 48307 Rebenweg 27 Kirchtalstr. 30 Tel. (248) 652 8042 73277 Owen 70435 Stuttgart www.picolario-usa.com Germany Germany [email protected] www.picolario.com www.renschler.de [email protected] Disclaimer: You will use the Picolario at your own risk. Any damage to property or injury is the responsibility of the purchaser. We recommend a range check every time before you launch! 7 Picolario Talk short reference, quick start 1) Select the same channel at the Picolario and the transceiver according to the table on the backside. 2) Mount the Picolario with the Velcro 3) Connect the Picolario to a free channel of your receiver 4) Program to this channel a 3 way switch or slider Switch/Slider During programming During flight 100% middle position Request of altitude/voltage time automatic alt mode Vario signal + altitude + voltage automatic Increase value / decrease value -100% No vario signal, TX switched off, only power supply monitor 5) Switch it on and do a range check. Now you are ready to start. 8 Parameter setting 1. Bring the switch into the middle position and press the red external or the blue button while you switching on the Picolario. 2. Modify values according to programming plan in the middle of this manual Change with the 3-way switch and select/program with the red external or the blue button on the Picolario itself. set mode 1 = delay time set mode 2 = sink tone level set mode 3 = acoustic scale range set mode 4 = time interval for time automatic model set mode 5 = Sensitivity of interference detection 3. To leave the programming mode, just switch off power. 9 Possible problems and their solutions Problems Possible cause FRS (walkieWrong channel set at FRS. talkie) receives Might happen if the channel was only weak or no not set but scanned. In case the signal distance between receiver and vario is short the selectivity of the FRS at low squelch is not sufficient FRS shows correct channel but the vario is not installed optimal, i.e. the antenna is parallel between metal and carbon rods or wires The switch dedicated to the Picolario is set at – 100% travel respectively lower than 0% which means vario is switched off. Solution Choose correct channel acc. to shown channel table Or increase squelch and scan again in at least 1 yard distance Mount vario that the antenna will not be parallel to electro conductive rods and wires. If necessary direct antenna outside the fuselage Set the switch/slider in middle position The vario does not respond to the switch Not enough travel at the switch Increase travels to plus/minus 100% Vario can be switched off but the altitude cannot be retrieved (or vice versa) Middle position of the switch/slider is not accurate Trim the middle position exactly to 0 and increase the travel if necessary In case you have other problems with your vario please place your model with built-in vario, remote control receiver and LPD next to the phone and give us a ring at Kennedy Composites at 972.602.3144 between 1 p.m. and 5 p.m. CST. Mutually we will try to solve your problem. In case you solved the problems yourself we would very much appreciate to let us know the encountered problem and solution. This would be very helpful for other Picolario users.