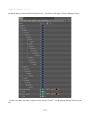
1
I/Ogre User Manual - 03/19/11
I/Ogre User Manual
A User Manual for Red-i Productions' Game-Oriented DCC Tools plug-in for Cinema 4D R10.1 or
later (PC 32 & 64bit, Mac 32 & 64bit Universal Binary).
Copyright © 2011 by Keith Young
Spanki's Prop Shop
1/73
I/Ogre User Manual - 03/19/11
Table of Contents
Overview..............................................................................................................5
End User License Agreement...............................................................................5
Disclaimer.............................................................................................................................................6
Registration / Purchasing.......................................................................................................................7
Support & Contact Information.............................................................................................................8
Requirements.......................................................................................................9
Application / System.............................................................................................................................9
IOTags plug-in.......................................................................................................................................9
Revision History.................................................................................................10
Version 2.3...........................................................................................................................................10
Version 2.2...........................................................................................................................................10
Version 1.5...........................................................................................................................................11
Version 1.4...........................................................................................................................................12
Version 1.3...........................................................................................................................................13
Version 1.2...........................................................................................................................................14
Version 1.1...........................................................................................................................................15
Version 1.0...........................................................................................................................................15
Getting Started...................................................................................................16
Installation...........................................................................................................................................16
Ogre3D Importing...............................................................................................17
............................................................................................................................................................17
Importing .mesh files...........................................................................................................................17
Import Options Dialog.........................................................................................................................18
Presets.............................................................................................................................................18
Mesh Scaling..................................................................................................................................18
Mesh Tab.........................................................................................................................................19
UV Coords:................................................................................................................................19
Normals:.....................................................................................................................................19
Materials:...................................................................................................................................20
Invert X Axis:.............................................................................................................................20
Invert Z Axis:.............................................................................................................................20
Swap Y/Z Axis:..........................................................................................................................26
Skeleton Tab...................................................................................................................................27
2/73
I/Ogre User Manual - 03/19/11
Skeleton:....................................................................................................................................27
Skeletal Animation:....................................................................................................................28
Add Rest Pose:...........................................................................................................................28
Doc Frames Per Second:............................................................................................................28
Layers Tab.......................................................................................................................................29
Importing .skeleton files......................................................................................................................30
Importing .skeleton files......................................................................................................................30
Import Examples.................................................................................................................................31
Jaiqua figure....................................................................................................................................31
MrBones figure...............................................................................................................................34
Ninja figure.....................................................................................................................................36
Using Presets..................................................................................................................................38
Ogre3D Exporting...............................................................................................39
............................................................................................................................................................39
Background Discussion.......................................................................................................................39
Export Preparation...............................................................................................................................42
Defining a Figure............................................................................................................................42
Figure Export Tag......................................................................................................................44
Anim Clip Tag............................................................................................................................45
Bake Animation.........................................................................................................................46
Key Reduction...........................................................................................................................46
Keyframing.....................................................................................................................................46
Export Checklist.............................................................................................................................48
Exporting .mesh files...........................................................................................................................49
Export Options Dialog.........................................................................................................................50
Presets.............................................................................................................................................50
Mesh Scaling..................................................................................................................................51
General Tab.....................................................................................................................................51
Rest Pose Frame.........................................................................................................................51
All Visible Objects / Selected Object Only................................................................................51
Files............................................................................................................................................51
Mesh Tab.........................................................................................................................................52
Normals......................................................................................................................................52
UV Coords.................................................................................................................................53
Shared Geometry.......................................................................................................................53
SubMesh Names........................................................................................................................54
Skeleton Name...........................................................................................................................54
Invert X Axis:.............................................................................................................................55
Invert Z Axis:.............................................................................................................................55
Swap Y/Z Axis:..........................................................................................................................55
Vertex Buffer Assignment..........................................................................................................55
Skeleton Tab...................................................................................................................................56
Skeletal Animation.....................................................................................................................56
3/73
I/Ogre User Manual - 03/19/11
Binary Conversion..........................................................................................................................57
Convert XML to binary..............................................................................................................57
Converter:..................................................................................................................................57
Ogre3D Binary ↔ XML Converter......................................................................58
Single File Mode.................................................................................................................................58
Multi-Files Mode.................................................................................................................................59
Binary → XML..............................................................................................................................60
XML → Binary...............................................................................................................................60
Mesh Files.......................................................................................................................................60
Skeleton Files.................................................................................................................................60
Both................................................................................................................................................60
Converter:.......................................................................................................................................60
VALVe:Source Importing.....................................................................................61
VALVe:Source Exporting....................................................................................63
Export Options Dialog.........................................................................................................................65
Rest/Bind Pose Frame.....................................................................................................................65
.......................................................................................................................................................66
Mesh (reference).............................................................................................................................66
Skeletal Animations........................................................................................................................66
Axis Adjustment.............................................................................................................................66
Export Paths....................................................................................................................................66
MilkShape3D Importing......................................................................................67
MilkShape3D Exporting......................................................................................69
Export Options Dialog.........................................................................................................................69
Scene Filter Tab..............................................................................................................................70
All visible scene objects as Geometry-Only..............................................................................70
Rigged (and possibly Animated) Figure:...................................................................................70
Axis Adjustment(s)....................................................................................................................70
Figure Tab.......................................................................................................................................71
Mesh...........................................................................................................................................71
Skeleton......................................................................................................................................71
Skeletal Animations...................................................................................................................72
Rest/Bind Pose Frame................................................................................................................72
4/73
I/Ogre User Manual - 03/19/11
Overview
I/Ogre is an Import / Export plug-in for Cinema 4D, R10.1 or later. While originally designed for
working with the “.mesh” and “.skeleton” file formats of the popular Ogre3D rendering engine, with
the recent additions of VALVe:Source Engine “.smd” and MilkShape3D “.ms3d” file modules, it's new
focus is providing Game-Oriented Digital Content Creation Tools to Cinema 4D artists and gamedevelopers.
There are other more 'generic' exchange formats available, such as FBX and Collada, but because of
the more general nature of these formats, they are not always well suited for game development and/or
may have quirky or non-optimal implementations with the Cinema 4D built-in filters.
Just as one example, the FBX format is heavily dependent on which version/application created the file
and the built-in Importer always/only creates “Bone” deformers for rigging (instead of the newer, more
flexible and efficient “Joint” rigging system).
While there is much diversity between the actual file structures of the Ogre/VALVe/MilkShape formats,
all 3 of them are fairly “well defined”, work exclusively with triangles and support skeletal rigging and
animations. I/Ogre acts as a bridge/translator between these formats and removes most distinctions
between them from the user's perspective (wherever possible) – all Import modules create a similar
Joint-rigged 'figure' representation within Cinema 4D and all Export modules are designed to work
with that structuring / representation.
Until now, Cinema 4D has lacked support for many of the game-oriented file formats – I/Ogre is
designed to fill that void – allowing developers and artists more flexibility and options in their
production pipeline.
End User License Agreement
This package and contents are Copyright © by Keith Young. This is commercial software. You are
granted license to use this package on one or more of your own computers (ie. PC, Mac, Laptop),
but you may not redistribute your serial / registration code to others in any form (the plug-in relies
on individual Cinema 4D Serial codes). You may not decompile or otherwise reverse-engineer this
product or use any parts of it in your own products. Minor updates and/or bug-fix releases will be
provided free of charge to licensed users.
The distribution archive is a "fully functional" version of the full package, but is limited to a 30-day
Trial Period - after which, you must enter a valid serial/registration code to continue using the plugin.
5/73
I/Ogre User Manual - 03/19/11
Disclaimer
While every effort has been made to insure the intended and safe operation of this utility and there
are no known disastrous error conditions, we can not anticipate every situation and therefore can not
guarantee 100% error-free operation. By using this software, the user agrees not hold Red-i
Productions, it's employees or agents or Keith Young responsible for any loss of work, loss of time,
mental stress, or any other actual or perceived damages caused by the use of this software. In short,
THIS SOFTWARE COMES WITH NO OTHER WARRANTEE, EITHER EXPRESSED OR
IMPLIED - USE AT YOUR OWN RISK.
Any questions regarding this license can be directed to:
typhoon[AT]jetbroadband[DOT]com
6/73
I/Ogre User Manual - 03/19/11
Registration / Purchasing
The first time you run Cinema 4D after installation, the registration / serial code dialog will open. If
you have already purchased the plug-in and have an I/Ogre serial code, you should enter that in the
appropriate slot, otherwise, you can activate the plug-in for a 30-day Free Trial by entering
"DEMO" (in all caps, but without the quotes). Once the trial period expires, you'll have to purchase
a license to continue using it.
You may purchase the plug-in via PayPal or Amazon Payments, directly from the I/Ogre Product
Page at Spanki's Prop Shop. When you do so, for prompt service, please provide the following
information in the extra field provided on the PayPal checkout page:
•
•
•
•
Your full name.
A valid e-mail address.
Your Cinema 4D version.
Your 11-digit Cinema 4D serial code (NOTE: If you are using a ".5" version (like R10.5), I
don't need that number - I just need the 11 digits of the "CINEMA 4D" entry on the
registration dialog)*.
...I need all of the above information before sending your serial/registration code. If you forget to
enter it on the PayPal checkout page (or are purchasing via the Amazon Payments option), you can
send the registration info to me directly at: typhoon [at] jebroadband [dot] com
Once I have your purchase receipt and your information, I will send you a serial / registration code
that you can enter in the Cinema 4D Registration dialog (from the "Help -> Personalize" menu).
*NOTE: Some users have expressed concern over sending their “Cinema 4D serial numbers”.
Note that the full serial number looks something like the following:
10902015463-ZRNS-LXZU-JCFJ-KWFD
(not an actual serial number, I made it up)
...in other words, “11 digits” (shown in green, above), followed by “4 sets of 4 characters”
(shown in red, above). Cinema 4D requires that entire thing in order to activate the program,
but once you enter that, only the first “11 digits” are shown in the Registration dialog.
You should never send anyone the entire serial string (more specifically, never send anyone
the 4 sets of 4 characters shown in red, above) – but sending those 11 digits is fine – there is no
way for them to use/abuse them and the plug-in already has access to them anyway – it's a
means for the plug-in to verify license information, provided by the Maxon-supplied “Software
Developer's Kit” that plug-in developers use.
7/73
I/Ogre User Manual - 03/19/11
Support & Contact Information
• Spanki's Prop Shop is the home site of Red-i Production's products, including I/Ogre,
Riptide, Riptide Pro, Undertow and the AddNormals plugins, as well as some Poser Products.
• For Bug Reports, Feedback / Feature Suggestions* or general Support Questions and
discussions, please use the I/Ogre Support Forums.
• For Purchasing or Licensing Inquiries, you can use this Contact Form.
• If you want to send me a PM at Spanki's Prop Shop, my user name is 'Spanki'.
…* Note that I'm always interested in hearing about how people use my products and am always open
to suggestions for improvements. Also note that while I make every effort to test my products, each
individual user may have some particular work-flow that was not anticipated or possibly overlooked in
testing...
I can't fix bugs that I don't know about and can't anticipate every potential enhancement / suggestion. If
you want some influence over future enhancements or just want to figure out why something is
working (or not) the way you think it should – Help me to help You - please take the time to report
your findings, make suggestions or ask questions in the forums.
The forums require a free sign-up/registration, but will give you direct access to the author of the
product (myself) – I make every effort to answer posts there on a timely basis.
8/73
I/Ogre User Manual - 03/19/11
Requirements
Application / System
•
•
Cinema 4D R10.1 or later.
• PC: 32bit or 64bit
• Mac: 32bit or 64bit, starting with R11 (Universal Binary)
IOTags plug-in* – this is a free plug-in, available from Spanki's Prop Shop
*NOTE: This plug-in does not (yet) exist. I have decided to make this optional (for the time-being, at
least). The I/Ogre plug-in (currently) contains the sub-plug-ins to provide the new Tags, but the rest of
this documentation has not been updated to reflect this (see below).
IOTags plug-in
My original Wavefront .obj file plug-in “Riptide” as well as the commercial “Riptide Pro” plug-ins
both introduce a few new Cinema 4D 'Tags' to help track some data and/or options for Export purposes
(the “Group”, “Region” and “Export Mask” tags). This new I/Ogre plug-in, as well as another plugin under development introduce two additional tags – the “Figure Export Tag” and “Anim Clip Tag”
(both of these are documented in later sections).
Since multiple plug-ins share common tags, any programming changes to those tags has to be done in
multiple projects and even then, the actual tag sub-plug-in that gets loaded will depend on which plugins the end-user owns and which order the parent plug-ins get loaded (the shared sub-plug-ins use the
same IDs and Cinema 4D won't load the same ID twice).
Because of the above, the user might be looking for the Export Mask Tag (for example) within the
“Riptide Pro” menu, when it might actually now only be found under the “I/Ogre” menu (I/Ogre may
not actually provide/use this tag right now, but it might in the future).
The idea behind the IOTags plug-in is to move these tag sub-plug-ins out of the file filter plug-ins and
just have them all provided and maintained in a single, external plug-in. As of this writing, I have not
yet published the IOTags plug-in... An initial pass has been done, but I'd like to spend a little more time
thinking about and refining the interaction with the other plug-ins before posting it and also note that
this might eventually lead to a name change.
In the meantime, please note that the following documentation still states that the IOTags plug-in is
required to provide some functionality or another (the “Figure Export Tag” and “Anim Clip Tag”
features) in several places throughout the document – for the time-being, just ignore those comments.
Once I have the new tag plug-in available, I'll make announcements on my site and other appropriate
forums and update the documentation to reflect any changes.
9/73
I/Ogre User Manual - 03/19/11
Revision History
Version 2.3
New Features:
•
•
•
Added support for my up-coming xAlpha Channel Shader (to get texture filename).
Added code to allow mesh/primitive objects within Skeletal Hierarchy.
Related to the above, if any mesh within the figure (including within the Skeletal Hierarchy) has
no weight tag, the mesh itself is now treated as a bone and the vertices of that mesh are bound
to this new bone (all vertices get 1.0 weighting to the bone).
Fixes / mods:
•
•
•
•
•
Fixed Ogre3D exported <scale> animation key records to be 'absolute' (instead of delta) values.
Fixed "missing faces" bug if multiple Texture Tags on same mesh used same Material.
Finally fixed UV-Baking to correctly handle offset/scaling from Texture Tag.
During Import (at least for Ogre3D .mesh files), the UVWTag is now added first (right-most
tag).
Changed 'default' Material color value to the blue-grey that R12 uses.
Version 2.2
[NOTE: The primary changes for this version were the massive changes required for R11.5 & R12
compatibility. There were several (unpublished) intermediate versions along the course of development
towards a working the R11.5 / R12 plugin, but all those changes, fixes and/or additions were backfitted into the R10+ & (new) R11 builds as well... some of the 'fixes' listed below may or may not be
relevent to the previously published R10+ version (they may be fixes to one of the intermediate
versions), but the changes listed below include all changes since v1.5]
New Features:
•
•
•
Added (simplistic) .material file export for Ogre3D.
Added support for Maxon License Server.
Added new "Figure Normalizer" plugin - to generate mesh-spanning smooth Vertex Normals.
Docs: This menu command will generate smooth normals across mesh-boundries (separate C4D
mesh objects), as if the separate meshes were joined as a single mesh. For example, if you split
a Sphere mesh in half and one mesh was the top half and another mesh was the bottom half, this
command would generate smooth normals, hiding what would otherwise be a (shading) 'seam'
between the 2 meshes. The command will operate on the selected object – and any children of
that object – so you could for example just select the parent figure-null object and any meshes
under that parent would have their Normal Tags (re)generated.
10/73
I/Ogre User Manual - 03/19/11
•
Added new (BETA / as-is) “Blizzard .m3 file Import” module. [NOTE: The .m3 Import module
is being included as a bonus/as-is feature – There are no current plans to develop a .m3
'Export' module. While it's had fairly extensive testing on the PC (specifically, R12, 64bit), it
has not been tested in any other configuration (most specifically, on the Mac – although the
code is in place to do the necessary byte-swapping – it just hasn't really been tested... use at
your own risk and/or feel free to report any issues]
Fixes / mods:
•
•
•
•
•
•
•
•
•
•
•
•
Added support for Ogre3D 'singleton' section records.
Fixed 'Animation' Export (R12 only issue?) for all modules.
Fixed keyframe Import for .smd files.
Fixed restframe Import issue for .smd files.
Removed the PolygonizeDocument() scene from .ms3d Export.
Updated all Import modules to check for and eliminate degenerate triangles.
Cleaned up Animation Import for all modules to be more consistant (removed cross-animation
contamination).
Beefed up Animation Export support for various scaling issues (Ogre3D files now contain
'scale' records).
Fixed keyframe bug in all Export modules.
Added additional BoneID count checks for .ms3d file Export (limit is 128 'skinned' bones).
Bone -> Vertex weight-clamping raised from 1% to 1/10th% to handle additional cases.
C4D "Luminance" channel is now mapped to/from "emissive" instead of "ambient" for
MilkShape 3D files.
Version 1.5
MilkShape3D:
• New Feature: Now Includes MilkShape3D binary .ms3d File Export module.
• Mac plug-in: Both the Import and (new) Export modules have been ported to and are now
available on the Mac platform. [NOTE: these have not been thoroughly tested, so please report
any problems].
• Import: Previous versions of the plug-in ignored the “Document Frames Per Second” value
on the Import Options Dialog - the value stored in the .ms3d file was used instead. This update
let's you choose between using the value stored in the file or setting it manually.
Common:
• Keyframing:
The Animation / Keyframe system (commonly used by all Import/Export modules) has been
enhanced to generate and maintain more accurate/stable animations. In previous releases, the
11/73
I/Ogre User Manual - 03/19/11
keyframe parser (when Importing) always applied a particular key-reduction method to the keys
being read in, in an attempt to minimize the total number of keys used, without affecting the
animation.
Unfortunately, a side-effect of the method being used did in fact affect some animations (the
details are a bit technical, but it depended on how the before/after tangents of the curves ended
up being set up). The above-mentioned key-reduction has been disabled in this version – all
imported keys are now kept and created in the C4D time-line. This should eliminate any odd
bone 'drift' that you may have seen (on Imported files) before.
On a related note, my previous suggestions/instructions for using IK and other methods for
creating animations turned out to be misleading and/or incomplete (keep in mind that I am
primarily a programmer and not personally an experienced animator). For details on this topic,
see this thread on CGTalk (there are some good / alternative work-flow suggestions from
experienced animators there as well).
The above issue led to some new options that can be set on the Figure Export Tag...
•
•
•
•
“Bake Animation”: The Figure Export Tag now has an option/checkbox to allow
baking keyframes. See the Export Preparation / Figure Export Tag section for details.
•
“Key Reduction”: This is an enhanced version of my original method, but is only used
for Export (I'll try to back-fit the code as an Import option in a future update). See the
Export Preparation / Figure Export Tag section for details.
Animation Clip Tag: You can now create more than one of these on the same object at the
same time (previously, you'd have to place them on separate objects).
Vertex Weighting: Starting with this update, any bone/joint that influences a vertex by less
than 1% (0.01 weighting) is now ignored by the various Export modules and the remaining joint
weights are scaled up/down appropriately... the total weight from all joints influencing each
vertex is scaled to 100% (see this thread in the I/Ogre Support forums for additional details).
Floating Point Precision: One of the earlier updates increased the floating point precision from
3 digits after the decimal to 8 digits for any text-based format files. With this update, that has
been scaled back to 6 digits after the decimal (ie. 0.000001 (one one-millionth) resolution,
which should be sufficient for most purposes and makes the output files smaller).
Version 1.4
•
•
•
New Feature: Now Includes VALVe:Source Engine .smd File Export module. Be sure to read
the notes section on this feature for some important details.
Ogre Export: Fixed memory leak when Exporting Ogre3D .mesh files (depending on some
export options).
SMD Import: Fixed some issues related to Figure Tag updating (if you imported a second
12/73
I/Ogre User Manual - 03/19/11
•
reference mesh, the Skeleton Root Bone link on the previous figure/document was being
cleared by accident).
General: some general clean-up of a few dialog/menu option strings/labels and some other
internal maintenance.
Version 1.3
•
New Features / New Focus / Major Internal Changes
While the original plug-in was written to only support the Ogre3D .mesh and .skeleton file
formats, with this update, it now also supports importing VALVe:Source Engine “.smd” files,
as well as importing MilkShape3D “.ms3d”* files (Export modules are planned for both of
those as well).
The new focus of the plug-in is providing a set of Game-Oriented Digital Content Creation
Tools – something Cinema 4D is lacking currently. Because these formats are fairly specific in
nature, they are often the best file-exchange formats to use when dealing with game-oriented
content. The original plan was to provide these as separate plug-ins, but I have decided to go
with the “swiss-army-knife” approach, for added value and convenience.
Anyway, the guts/frame-work of the plug-in underwent some fairly hefty changes in order to
get all of these modules working with the same internal structures – as far as I can tell so far, it
all seems to still be working :) - but please let me know if I broke anything in the process.
*NOTE: The MilkShape .ms3d format is a binary format – and has not (yet) been ported to
the Mac plug-in. The current implementation is such that porting it will be tedious, but I'll
likely work on that before (or as) I do the .ms3d Export module.
•
Pricing:
Due to the above change of direction (including multiple modules in a single plug-in), the
pricing structure may ultimately need to change as well. While I do not want to burden
potential customers with getting (paying for) formats that they may not use, the other side of
that coin is that the potential user-base for any one of these formats by itself (who also happen
to prefer using Cinema 4D as their modeler) likely doesn't justify the time and effort needed to
implement and maintain a separate plug-in.
Combining them into a single tool-set lets me spread the development cost by sharing common
code between them and provides the end-user the convenience of only needing a single licensekey.
As I write this (Feb. 7, '09), there have been no changes to the pricing structure.
13/73
I/Ogre User Manual - 03/19/11
...Anyone who purchases the plug-in at this time will also be given free upgrades for the
planned .smd and .ms3d 'Export' modules when they're ready, as well as any minor update and
bug-fix releases (this current release marks the 3rd free update, btw).
Ultimately, the pricing (as well as future features and/or the development of additional fileformat modules) will be governed by the amount of support (sales) the plug-in receives, so if
you'd like to show your support and get in while the Introductory Pricing is still in effect (Feb.
7, '09), now's your chance :).
•
•
Ogre-Import: Depending on exactly which options were set, uv-mapping was sometimes
reversed (completely wrong) on every triangle – fixed.
Fixed a few potential initialization issues, along with some general code clean-up.
Version 1.2
•
•
•
•
New Feature: “Binary ↔ XML” menu plug-in added.
New Feature: “Swap Y/Z Axis” is now Enabled as an Export Option.
Presets: a few 'default' options were updated.
Export: Resolved potential root bone parent issue when exporting...
The plug-in makes 2 passes when adding 'Bones' to the list to be exported. In the first pass, it
loops through the joints listed in the Weight Tag on the (each) mesh and if that joint has
actually has weights for the mesh, it gets added to the list, along with it's “Parent Name” (the
name of the object that it's a child of).
In the second pass, the plug-in starts with the “Skeleton Root Bone” linked in the Figure Tag
and (optionally) adds that and any objects found under it. As it does this, the first hierarchical
level of objects (which would just be that Skeletal Root Bone, if it's written as a bone) are added
to the list with null Parent Names (it's a root-level bone, that has no parent).
The potential issue that was addressed was this... it's possible that the user had joints/bones
listed in the Weight Tag that were not in fact ultimately found under (as a child of) the Skeletal
Root Bone object. This could also mean that they had an invalid “Parent Name” (unless they
happened to be root-level hierarchical objects in the Object Manager). Anyway, the plug-in
now makes a corrective pass through the final bone list and fixes up any issues before
exporting.
•
Export: 'root bone' axis are now adjusted for global Cinema 4D adjustments...
In the previous versions, if the parent of the Skeleton Root Bone (ie. Like the Figure's root null
object) had been rotated at all, then the animations would be out of whack.
With this update, in that final corrective pass mentioned above, the plug-in now also corrects the
14/73
I/Ogre User Manual - 03/19/11
axis of the (any) root bones to fix this issue. NOTE: This correction does not work as expected
when the “Swap Y/Z Axis” option is used on Export.
Import: Submesh names are now more cleanly and clearly tied to the material being used on
that mesh, when no submesh names exist to override the name.
Version 1.1
•
•
•
•
•
•
Bug Fix: Fixed a crash bug when exporting multiple meshes/figures at once.
Added “Invert X Axis” option for both Import and Export
Added “Invert Y Axis” option for both Import and Export
Added “Swap Y/Z Axis” for Export (currently disabled).
Increased floating point resolution in all output files (version 1.0 used only 3 digits after the
decimal, potentially causing some rounding errors for small-scale figures).
The above fix also fixed some zero vertex->bone weight values.
Version 1.0
•
First release.
15/73
I/Ogre User Manual - 03/19/11
Getting Started
Installation
NOTE: I/Ogre relies on several new Tags provided by the (free) IOTags plug-in, so be sure to
download and install that plug-in as well.
The I/Ogre plug-in is distributed as a .zip file, that contains everything needed to use the plug-in...
1. If Cinema 4D is running, save any current work and exit the program.
2. Download the appropriate .zip package for your system...
The categories on the Downloads section of my site are set up by “required Cinema 4D
version”. So for example any plug-ins found in the “R10.1 or later” category require at least
R10.1 of Cinema 4D, but will likely still work fine with R11 (for example).
If you are using C4D R11, but don't see the plug-in you are looking for in th “R11 or later”
category, then look in the next-lower version/category (ie. “R10.5 or later”) until you find the
best version for your system.
Note: Both PC & Mac versions of the plug-in come in the .zip file, so you don't have to look for
a machine-specific version.
3. Copy the .zip file to your Cinema 4D “plugins” folder.
4. Extract the .zip file, making sure to use included folders...
The .zip file will create an “IOgre” folder and the contents of the package will be placed inside
that folder.
...again, I/Ogre relies on several new Tags provided by the (free) IOTags plug-in, so be sure to
download and install that plug-in as well (using the same steps as above). Once both plugins are
installed, you can re-start the application.
When you re-start Cinema 4D, you may be presented with a warning dialog, stating that the
serial/license key for I/Ogre is missing or invalid. When the registration dialog opens, you can enter
DEMO as a license key to activate the Free Trial period (to continue using the plug-in after the trial
period expires, you will need to purchase a license).
16/73
I/Ogre User Manual - 03/19/11
Ogre3D Importing
Importing .mesh files
While it's primary use may be as a Digital Content Creation utility for Ogre3D (exporting .mesh
and .skeleton files), the plug-in will also let you Import existing content. Since the resulting Object
Manager layout will help illustrate some concepts related to Exporting, we'll cover the Import
functionality first.
As mentioned in the Overview section, the plug-in is designed to read the text-based “.xml” format
files, so if you want to import a binary .mesh file, you will first need to manually convert it (and it's
.skeleton file if it has one) to .xml format before importing.
NOTE: the plug-in has an option for automatically converting Exported .xml files to binary
using the “OgreXMLConverter.exe” utility that comes with the Ogre3D distribution, but there
is no such option for Importing, so it must be done manually, prior to Importing (the process
typically results in a “.mesh.xml” and/or “.skeleton.xml” file(s)).
When you are ready to Import a .mesh file (more specifically a .mesh.xml file), you start by activating
the “I/Ogre Importer” menu option found in the Plugins menu...
...selecting that will first bring up a standard file dialog. Select the .mesh.xml file to be imported.
NOTE: The plug-in only reads the text-based .xml files, but if you select a .mesh (binary) file
by mistake, the plug-in will tack on a .xml extension and try to find/load that instead.
NOTE: A current limitation of the Import plug-in is that it does not import .mesh files that
were saved (whether from this plug-in or some other app) with the “Shared Geometry” option.
17/73
I/Ogre User Manual - 03/19/11
Import Options Dialog
After selecting the file to load, the Import Options Dialog will open with the most recently used
options set...
Presets
The top section of the dialog will let you create/select an unlimited number of option “Presets”. This
will allow you to easily switch between several different setups, depending on where the file originated
and/or what you want to do with it (for example, since you can set a scaling value that is applied to
both the mesh and it's skeleton, you could set up multiple presets for different scalings). Any and all
options on the dialog are stored with each preset.
Mesh Scaling
This section will let you scale the mesh (and it's skeleton) up or down by a fixed amount. Note that the
scaling value is specified in 'whole' numbers, not fractions.
18/73
I/Ogre User Manual - 03/19/11
Mesh Tab
(refer to the previous image)
The bottom section of the dialog has several Tabs... the Mesh tab will let you set various options to
apply to the mesh being imported...
UV Coords:
This option determines whether UV Texture Coordinates (uv-mapping) will be loaded or not.
Normally, you'd want this Enabled, but you may have some reason to not want uv-mapping from the
file (?).
Normals:
This option determines whether Vertex Normals are loaded or not. This option probably requires
further discussion...
When this option is Enabled (and assuming Normals are found in the file), vertex normals are loaded
from the file and a Cinema 4D “Normal Tag” is generated and added to the (each) mesh. In order to
see the mesh shaded/lit as it will be in Ogre3D (referring to the smoothness/sharpness of the polygons,
not the materials), then you should Enable this option, but due to the way the Normal Tag is
implemented in Cinema 4D, there are some issues to be aware of:
1. Normally (pun intended), smooth-shading is handled by the Cinema 4D “Phong Tag” (the plugin will automatically add a Phong Tag to the (each) mesh). The Phong Tag lets you control the
smoothing angle for shading and also handles any phong edge-breaks, however the Normal
Tag overrides any Phong Tag settings.
2. Any edits to the mesh (adding/removing vertices, or even moving them around) will break /
invalidate the Normal Tag.
3. A third unwanted result of a Normal Tag being present is that the normals are not correct during
animation.
...basically, Cinema 4D provides the Normal Tag as a convenience feature, for a limited set of
circumstances – it's not a good general solution, but provides a way of importing or setting specific
vertex normals. There are some fairly valid technical reasons for #1 and #2, but I think #3 is just a bug/
oversight.
When this option is Disabled, vertex normals are not loaded and no Normal Tag is created (but a Phong
Tag is always created for each mesh). Without the Normal Tag, you will likely see 'breaks' in the
shading of the mesh, between any submeshes as well as any discontinuous uv-mapping (anywhere the
uv-mapping vertices of two polygons get split to form a seam).
19/73
I/Ogre User Manual - 03/19/11
So, the question of whether or not to Enable this option depends on what you intend to do with the
imported mesh and whether or not you plan to re-Export the results...
•
If you don't plan to add/remove or move vertices around (for example, if you just want to scale
the mesh or do some uv-adjustments or just paint some new textures In BodyPaint or modify
the animations), then I'd recommend Enabling this option to get the normals in place for reExporting (just ignore the bad shading when playing animations... the normals should still be
good in it's exported “Rest Pose”).
•
If you do plan to do any mesh edits, then you're going to need to 'fix' the normals before
exporting anyway (likely welded some seams in the mesh, which may also require re-weighting
the joints, etc.), so you might as well Disable this option, or possibly delete the created Normal
Tag later if/as needed – just remember that the Normal Tag overrides the Phong Tag, so if the
mesh starts looking wonky as soon as you start editing the mesh, it's because the Normal Tag is
now invalid.
Materials:
This option determines whether Cinema 4D “Materials” and “Texture Tags” get generated.
NOTE: As of v1.1 of the plug-in, the plug-in makes no attempt at reading any Ogre3D
formatted material files, so no material colors and textures are set up, just 'blank', place-holder
Materials are created (using the material names found in the .mesh file) and Texture Tags are
added to the mesh(es), using those Materials.
Invert X Axis:
See the notes on Invert Z Axis, below.
Invert Z Axis:
In Cinema 4D's coordinate system, the positive Z direction goes deeper into the scene (away from the
camera). In Ogre3D .mesh and .skeleton files, the the positive Z direction is towards the camera (the
opposite direction – Inverted – from Cinema 4D).
The Invert X Axis and Invert Z Axis options allow you to flip the mesh/skeleton X and/or Z axis from
positive to negative and vise-versa. In other words, if Invert Z Axis is Enabled, any positive +Z values
from the file become negative -Z values and any negative -Z values become positive +Z values. This
effectively 'flips' the mesh from back to front.
Note that this operation is not a 'rotation'.
...so it doesn't rotate the mesh around the Y axis by 180° to make it face the opposite direction, it's more
like the mesh is collapsed in on itself (turned inside-out) until all the vertex positions have been
20/73
I/Ogre User Manual - 03/19/11
inverted. To illustrate why this distinction might be important, let's look at an example using the 'Ninja'
figure. If you load that figure into the CeguiMeshViewer (included with the Ogre3D distribution), you
get something like this:
...note 2 things:
1. The figure is facing away from the camera.
2. He appears to be right-handed (has a sword in his right hand).
...with version 1.0 of the plug-in, the goal was to achieve the above orientation, when loading figures
into Cinema 4D (Ninja facing away from the camera, with sword in his right hand).
In order to achieve this, the plug-in always inverted the Z axis (remember, the positive Z direction in
Cinema 4D is the opposite from .mesh/.skeleton file data). Accordingly, when importing the Ninja
figure, you'd get something like this (image on next page):
21/73
I/Ogre User Manual - 03/19/11
...so the mesh and his skeleton are facing away from the camera in the Z direction and the sword is in
his right hand – so far, so good.
With I/Ogre v1.1, the Z axis is no longer inverted by default – this is now a user-controlled option.
If we Import the figure with Invert Z Axis and Invert X Axis options Disabled, you'd get this (next
page):
22/73
I/Ogre User Manual - 03/19/11
...note that he's now facing the camera on the Z axis, but also note that the sword now “appears to be”
in his left hand! If the Ninja figure's bones were named something meaningful (instead of 'Joint1',
'Joint2', etc), you would see that the sword didn't magically change hands – it's still in his 'right' hand –
but now the joint names wouldn't make sense (his left and right arms/legs would be labeled opposite of
what you would expect).
If you would like to have the figure in Cinema 4D, facing the camera like this, but want the sword back
on the other side and all the bone-naming 'fixed', you can Enable the Invert X Axis option. This will
invert all the mesh vertices – as well as the bone positions - on the X axis, so that everything makes
sense again (image next page):
23/73
I/Ogre User Manual - 03/19/11
...bingo – fixed.
On the other hand (pun intended), if you want to 'convert' the figure (and all of it's animations!)
from right to left-handed, you could simply Import with Invert X Axis Disabled, rename the bones
(assuming they had meaningful names in the first place and assuming they needed to be labeled
correctly) and re-Export the file with the Invert X Axis (Export) option Enabled.
NOTE: If you are inverting the Z axis when you Import (so that the figure faces away from the
camera), then you'd also want to invert the X axis when you Import (to convert the figure from
right to left-handed), renamed the bones and then Export with the invert X axis option Disabled.
The point being to Import with it set one way and Export with it set the other. Whether it's
Enabled or Disabled when you Import will depend on whether you are inverting the Z axis
when you Import.
...note that in either case (any and all cases and combinations of X and Z invert options), the animations
will still play 'correctly' for that orientation – it's just a question of which direction he's facing and
24/73
I/Ogre User Manual - 03/19/11
whether he appears to be right or left-handed.
<Rant>
Lefties of the world, unite! Demand equal time! Game developers – think outside the box –
add variety to your game – give us lefties some left-handed characters! (and monsters)
</Rant>
...joking aside (I am left-handed, btw), I'd love to be able to choose my character's right/left handedness
in every RPG/FPS game I play... even if the tightly-scripted cut-scene animations (interactions between
two figures) weren't updated to account for lefties – for most game-time animation, it won't matter (to
the game engine) whether I'm swinging a sword with my left or right hand and in many/most cases, the
meshes don't even need to be duplicated, just the skeletons and/or animations. Anyway, these options
give you a handy way to easily convert skeletons/animations from one side to the other.
Wrapping up, due to the differences in Ogre/Cinema and depending on whether you want to simply
work on / produce a figure facing the camera or actually want to convert it's handedness, there is some
room for confusion about how to set these options, so here's some charts to help:
Importing
Invert X Axis
Invert Z Axis
*Preserve Ogre orientation, Preserve Ogre handedness.
Disable
Enable
Preserve Ogre orientation, Convert Ogre handedness.
Enable
Enable
Convert Ogre orientation, Preserve Ogre handedness.
Enable
Disable
Convert Ogre orientation, Convert Ogre handedness.
Disable
Disable
...in the chart above, “Preserve Ogre orientation” and “Preserve Ogre handedness”, are both in
reference to how the figure is viewed in CeguiMeshViewer.
Exporting
Invert X Axis
Invert Z Axis
*Preserve C4D orientation, Preserve C4D handedness.
Disable
Enable
Preserve C4D orientation, Convert C4D handedness.
Enable
Enable
Convert C4D orientation, Preserve C4D handedness.
Enable
Disable
Convert C4D orientation, Convert C4D handedness.
Disable
Disable
** The cases marked with an asterisk are the 'default' settings and mimic I/Ogre v1.0 behavior. **
...in the chart above, “Preserve C4D orientation” and “Preserve C4D handedness”, are both in reference
to how the figure is currently viewed in Cinema 4D – regardless of how it got that way – whether it
was Imported or newly created work.
The only question at that point (which the above table answers) is which Export options to set, relative
to how you want the newly created files to look once loaded back into CeguiMeshViewer... If it's
25/73
I/Ogre User Manual - 03/19/11
facing away from the camera in Cinema 4D and you want to 'preserve' that orientation (facing away
from the camera) in CeguiMeshViewer, then (consulting the chart above,) you need to Enable the
Invert Z Axis Export option.
You may have noticed a similarity (an duplication, in fact) between the Import and Export settings –
the difference is in whether you are trying to preserve/convert an orientation/handedness in reference to
how you are viewing it in the 'source' application into how it will be viewed in the 'destination'
application.
In the case of Importing, the 'source' application is CeguiMeshViewer. In the case of Exporting, the
'source' application is Cinema 4D.
I hope all of this explanation doesn't confuse more than help – if in doubt, just be sure to check/verify
your Exported files in CeguiMeshViewer or a similar Ogre application before delivery.
NOTE: in many cases, the handedness of the figure may not even be relevant (ie. Symmetrical
mesh/textures with symmetrical animations), but more often than not, the figure may have
animations / skeletal structure set up for one hand or the other, so be sure to verify this.
Swap Y/Z Axis:
This option is used to help 'correct' any mesh files that may have been exported (“incorrectly”) from
3DS Max or other apps that think that “Z is up” - we all know that Y is 'up' – right? :) at least it is in
Cinema 4D.
26/73
I/Ogre User Manual - 03/19/11
Skeleton Tab
The Skeleton tab contains options for handling the skeleton file...
Skeleton:
This option determines whether the .skeleton file (named within the .mesh file) is potentially loaded or
not. When the plug-in parses the .mesh file, there may be a skeleton file name listed. If it sees this (and
this option is Enabled), the plug-in will also attempt to import the .xml formated version of the
skeleton file.
NOTE: As mentioned elsewhere, if you intend to have the skeleton loaded, you'll need to have
already converted the binary .skeleton file to the text-based .skeleton.xml file before importing
the mesh.
If this option is Enabled and the file is found/loaded, a Cinema 4D “Joint”-based rigging is created for
the mesh and the vertices of the mesh are weighted to the appropriate joints. A “Figure Export Tag”
(supplied by the “IOTags” plug-in) will also be created and filled in for you.
27/73
I/Ogre User Manual - 03/19/11
NOTE: In Ogre3D terminology, the skeleton is made up of 'bones', so I may use the terms
'joint' and 'bone' interchangeably, but just be aware that I'm not talking about the Cinema 4D
'Bone' Deformer... unless I make it clear that I am. There will be more discussion on this topic
later.
If this option is Disabled, the .skeleton file will not be loaded and the other options on this tab are also
disabled / not used.
Skeletal Animation:
If this option is Enabled, any animations found in the .skeleton file are loaded and set up in the Cinema
4D Timeline. An “Animation Clip Tag” (supplied by the “IOTags” plug-in) will also be created and
filled in for you.
If this option is Disabled, no skeletal animations are loaded and the options below it are also disabled /
not used.
Add Rest Pose:
If this option is Enabled, a “Rest Pose” is created at frame “-1” on the Timeline. This is basically the
mesh in it's natural, undeformed, un-animated state, with no animation applied to the joints of the
skeleton.
If this option is Disabled, no “Rest Pose” frame is created (which may or may not be useful... my
advice is to leave this enabled).
Doc Frames Per Second:
This allows you to set the frame-rate for the newly created document. Note that this option will not
speed up or slow down animations that are imported – the animations are specified in numbers of
seconds of length - it merely determines how many frames to squeeze into each second.
The animation may be smoother with more frames-per-second to interpolate the keyframes with, but
the overall timing of the animations remains (roughly) the same.
NOTE: In the initial release (at least), the length of animations is slightly off - off by one frame.
In other words, if the animation is supposed to be 1 second long and you have set this option to
30-frames-per-second, then the first frame will be frame 0 and the last frame will be frame 30
(instead of frame 29), which gives 31 total frames for that animation, making it 1/30th of a
second too long.
28/73
I/Ogre User Manual - 03/19/11
Layers Tab
The final tab on the Import Options Dialog is the Layers tab...
...this tab has options for creating Cinema 4D Layers. Here's an example result in the Layer Browser:
29/73
I/Ogre User Manual - 03/19/11
Importing .skeleton files
If you only want to Import a .skeleton (.skeleton.xml) file without the mesh, you can just select that in
the file dialog. You'll still get the same Import Options Dialog (described in the previous section), but
only the options that apply to skeletons will be relevant / used.
30/73
I/Ogre User Manual - 03/19/11
Import Examples
Jaiqua figure
Let's take a look at a couple of Import examples. The first one is one of the sample meshes included
with the Ogre3D distribution called “jaiqua”...
...in this example, the mesh was scaled up by 10x and is shown here in mid 'sneak' animation.
NOTE: The blank Material and Texture Tag on the mesh were created by the plug-in, but I
manually loaded the texture into that material after importing, to help show the joints.
There is also a bone (C4D Joint object) that goes from the origin over to her hip bone, but I have that
hidden in the editor (otherwise it looks like she has a large pole up her rear ☺).
31/73
I/Ogre User Manual - 03/19/11
Here is the result in the Cinema 4D Object Manager...
...note that the left arm and leg branches of the hierarchy are collapsed to keep down on the clutter, but
they are pretty much mirror images of the right arm and leg branches.
There are several things in this image that I'd like to discuss now – many of which will also be related
and relevant to Exporting figures.
32/73
I/Ogre User Manual - 03/19/11
The first thing to note is the very top Null Object named “jaiqua”. This Null Object (named after the
root of the filename) is not part of the file itself, but was created by the plug-in as an organizational
object. It acts as a 'handle', so to speak, for the newly imported figure and any meshes and/or
skeleton/joints are created as a child of that root-level Null Object. You can also see two Tags on that
root Null...
...the one that looks like a dog-bone is the new “Figure Export Tag” and the scissors-cutting-a-filmstrip tag is a new “Animation Clip Tag”. Both of these tags are supplied/handled by the IOTags plugin and are created and filled in by the I/Ogre Importer plug-in. I'll discuss both of these in more detail
in the Export section, but I wanted to point them out here.
The next object down in the tree is a C4D Joint Object named “Jaiqua_Mod”. This represents the
parent/root bone of the skeleton from the jaiqua.skeleton.xml file (the names of the bones come from
the file). Worth noting here is that in this example, that was the only bone in the file that didn't have a
“parent”.
In either case, the important concept here is that there is a single 'handle' to the figure's Skeleton - also
known as the “Skeleton Root Bone” in the “Figure Export Tag”. As far as the I/Ogre Export plug-in
is concerned, any children of that object (and optionally that object itself) will be written out as an
Ogre3D 'bone'. This will be discussed further in the Export section.
Before moving on to the next example, let's take a quick look at the mesh part of this figure...
...in this case, there is only a single mesh object (Ogre3D submesh) and the name once again comes
from the .mesh.xml file.
The mesh has several tags on it, which from left to right are:
•
•
•
•
•
•
Weight Tag
Phong Tag
UVW Tag
Normal Tag
Texture Tag
Polygon Selection Tag (set up for and used by the Texture Tag).
...the only one worth commenting on right now is the Weight Tag, which is filled in with links to the
appropriate Joint objects for this mesh and also maintains the vertex weight information for each of
those joints. The “Skin” (deformer) child of the mesh uses the info in the Weight Tag to deform /
animate the mesh.
33/73
I/Ogre User Manual - 03/19/11
MrBones figure
The next example is a “skeleton” figure that I got from the WorldForge project. To avoid naming
confusion, I changed the filename from “skeleton” (skeleton.mesh and skeleton.skeleton) to
“MrBones”. Here he with his Y/Z Axis swapped (he was exported with 'Z' as the 'Up' axis), scaled up
by 100x and in mid punch animation...
...the rigging of this figure is quite different from most others I've seen. Note that there is no bone/joint
connecting the hip to the thighs, and there is also no bone/joint connecting the knee/shin to the foot.
34/73
I/Ogre User Manual - 03/19/11
In the previous example, there was a single “root-level” bone (bone with no parent) – in this figure
there are 5 bones with no parent and additional translations are used to get everything working
correctly. Here's the C4D Object Manager setup for this one...
...again, note that the two thigh bones, the two foot bones and the spine1 bone were all root-level
bones, so in order to have a single skeletal root bone, a Null Object was added by the plug-in (the
35/73
I/Ogre User Manual - 03/19/11
highlighted “MrBones_SkelRoot” object) and all the other bones were parented to that.
The other thing worth pointing out is the name used for the mesh object... since there were no submesh
names in the .mesh.xml file, the name was generated by the plug-in.
Ninja figure
It seems that no Ogre example is complete without the obligatory “Ninja” figure, so here he is, scaled
at 1x and in the middle of one of his idle animations...
...just to be different, I downloaded the original files from the Psionic 3D Game Resources site and
36/73
I/Ogre User Manual - 03/19/11
loaded his brown texture instead of the green one :). And here is this figure's Object Manager layout...
...in this case, there was only a single root-level bone (“Joint1”), so the plug-in did not need to create
one.
37/73
I/Ogre User Manual - 03/19/11
The only other thing worth noting here (aside from the obscure bone naming) is the fact that this
particular file had more than one submesh (figure and sword). Each submesh gets it's own set of tags
and separate Skin Deformer, but they share a common set of bones (C4D Joint objects).
Using Presets
Before moving on to the Export plug-in, I thought I'd mention a little something about the practical use
of option Presets...
While I was developing the plug-in, I was looking around and loading every Ogre mesh/skeleton I
could find for testing. Some of them were saved at tiny scales and some were saved at larger scales and
while most were saved with a Y-is-up coordinate system, I also found several that were saved with a Zis-up coordinate system.
So, what I would do was start with some default options and import the figure. I might then decide that
it needed to be scaled up by 10x or 100x (and/or enable the Swap Y/Z Axis option), so I'd close that file
and re-Import the figure again with new options. Once I had the correct options, I'd just create a new
options Preset, giving it a somewhat descriptive name, for future use.
So for example, I now have the following Presets...
Scale 1x
Scale 10x
Scale 100x
Scale 1x Swap Y/Z
Scale 10x Swap Y/Z
Scale 100x Swap Y/Z
...in my case, I generally use the same frames-per-second and other common settings, but you can make
as many Presets as you need.
The Export plug-in also has this Presets feature, so I made similar Presets for the Export plug-in.
Depending on what you want to do, you might want/need to re-Export the figure in the same
orientation and scaling as you Imported it, so if you swapped the Y/Z Axis when you Imported the
figure, you might (or might not) want to Swap Y/Z Axis (back) when you Export it. If you scaled it Up
by 10x on Import, you might want to scale it (back) Down by 10x when Exporting it.
38/73
I/Ogre User Manual - 03/19/11
Ogre3D Exporting
NOTE: While this chapter is found within the Ogre3D section and generally only talks about
exporting Ogre files, pretty much all of the Background Discussion and Export Preparation
sections (including the Defining a Figure and Export Checklist subsections) apply to the other
formats provided by the plug-in as well.
Background Discussion
When implementing the Import plug-in, the task at hand was relatively straight-forward and well
defined: “attempt to re-create a Cinema 4D representation of an Ogre3D figure (mesh + skeleton),
maintaining as much information as possible and allow some transformation options in the process”.
Of course there were some sub-goals such as having the user-interface make a certain amount of sense
while still providing as much flexibility as possible.
From a slightly different and simplified perspective, the source of the data is/was the Ogre3D .mesh
and .skeleton files and the destination of the translated representative animated figure is Cinema 4D.
Of course for the Export plug-in, the goals are similar, but the source and destinations are reversed, so
the task moves on into:
•
•
•
•
•
how/where to find the needed data in Cinema 4D
how to translate/transform that data into a format that Ogre3D understands
accomplish both of the above in a relatively straight-forward and easy to understand way
accomplish all of the above, while still providing flexibility in options
accomplish all of the above, within any limitations of the Cinema 4D plug-in SDK
...the overriding difference between implementing the Import plug-in and the Export plug-in is that
with the Import plug-in, the source data (.mesh and .skeleton files) is relatively fixed and well-defined,
while for the Export plug-in the source data (mesh, rigging and animation info from Cinema 4D) is or
can be quite abstract and free-form.
Here are just a few examples of what I'm talking about:
Source Data
Ogre3D
(sub)Mesh Names If exists, from file
Cinema 4D
From each object in scene, but potentially duplicate names
and/or may not be well defined by the user (ie. Some
objects may end being named “HyperNURBS”).
39/73
I/Ogre User Manual - 03/19/11
Source Data
Ogre3D
Cinema 4D
(sub)Meshes
From file
Scene must be parsed and all deformers, generators and
effectors baked. Many objects will need to be split into
multiple submeshes (due to multiple materials on a mesh).
There may also be meshes in the scene that the user does
not want exported (or possibly exported to separate figure
files).
Vertices
From file
After baking (see above), the individual meshes then need
to be scanned and new (unique) Vertices generated for any
splits/seams in either Normal or UVW (duplicating the
Normal Vertices, UV Vertices and Vertex->bone weighting
in the process).
Normal Vertices
If exists, from file
Objects in scene may or may not have Normal Tags, or
Phong Tags.
Faces / Polygons
From file (triangles) After the above operations, all polygons must be converted
to triangles and have their vertex indices remapped to
account for both submesh splitting and unique Vertex
generation listed above.
Bones
From file
Animations
Multiple, named
A single (unnamed) Timeline (at least in R10.1).
animation clips, from
file
Keyframes
Sparse keyframe
(Assuming you can find the bones, in the earlier step
data, per bone, from above), Multitudes of possibilities (ie. The bones
file
themselves may not even have any keyframes set).
Multitudes of possible rigging setups.
...the above is not a complete list of issues that needed to be tackled, but I hope it gives you some idea.
When you combine the issues above with the sub-goals of:
“reasonable ease of use”
“make sense from a work-flow perspective”
“don't impose unnecessary restrictions on the artist”
“still provide as much flexibility as possible”
...then the complexity of the task starts snow-balling :).
So, just to clarify – my purpose in explaining the above is not to garner sympathy, but just to help
explain some of the resulting implementation details and/or limitations that you (the end-user / artist)
might have to deal with.
40/73
I/Ogre User Manual - 03/19/11
In short, for some of these issues, I was either faced with a lack of (specific) information needed and/or
some limitation of the plug-in SDK, relative to the differing nature of the source/destination formats.
In these cases, mechanisms needed to be designed and implemented to address the issue at hand, which
may (will) require some setup/forethought on the part of the end-user / artist, prior to exporting – which
is the topic of the next section.
41/73
I/Ogre User Manual - 03/19/11
Export Preparation
Unlike Importing Ogre figures (mesh and/or skeleton), the process of Exporting figures requires a bit
of preparation and/or imposes certain limitations on scene-setup and your work-flow (if you haven't
already done so, I'd recommend that you read the previous Background Discussion section).
Most of the issues are related to giving the plug-in enough information for it to achieve the desired
results, given any technical limitations and accounting for differences in the source and destination
platforms. While some of these issues are common to any objects/figures you would be exporting,
many are also specific to each instance (for example, the names and numbers of animation clips).
When Importing a mesh/figure, all of the Import options can be found on the Import Options Dialog.
However, due to the above, the same is not true for Exporting meshes/figures – there are some
additional procedures and/or Tags that need to be filled in first.
NOTE: Most of this discussion is related to exporting fully rigged and potentially animated
figures. The plug-in can also export single/static meshes, but the two operations are closely
linked / intertwined in the plug-in, so at least the structural/hierarchical portions of this should
be followed for simple/static meshes as well (if you're not exporting animations, then you won't
need an Animation Clip Tag for example, but you might still want/need the Figure Export Tag
and follow the parent/child setup described below.
Defining a Figure
One of the most basic issues to be addressed is that the plug-in needs some means and specific
information about exactly what the end-user / artist wants exported and which elements within the
scene make up that data.
To resolve this issue, the first step is to introduce the concept of a 'figure'. The loose definition of a
figure in this context is: “A root-level object in the Cinema 4D Object Manager window”. By rootlevel, I mean the left-most column in the Object Manager... objects that do not have any parent.
For illustration purposes, let's open a fresh scene in Cinema 4D and add a Sphere and a Cube primitive
objects...
42/73
I/Ogre User Manual - 03/19/11
…since neither of these objects have parents, the Export plug-in would consider these to be two
separate figures – one named “Cube” and one named “Sphere” (the point is that it would not save mesh
data from both objects into the same .mesh file). Next let's add a Null Object as a parent for the two
objects...
...now (at best) we have a single figure/mesh, named “Null Object” (by default, the name of the figure
– and thus, the filename - is derived from the name of the root-level parent object).
The above example illustrates an important point... if you were to export this scene, at best you would
end up with an Ogre3D .mesh.xml file named “Null Object.mesh.xml” and within that file, you'd have
two submeshes:
1. one (potentially) named “Cube”, with a material named “Cube_defMat”
2. one (potentially) named “Sphere”, with a material named “Sphere_defMat”
...the point being that the less preparation you do and the less information you provide, the less ultimate
control you have over what gets Exported. Before leaving this subject, let's give the Exporter
something more to work with...
...here's the changes and the resulting affects:
•
•
•
•
•
I have renamed the null object to “red_box” - the filename will now be “red_box.mesh.xml”
renamed Cube to “box” - that submesh will now be named “box”
added a “Red” material to the cube/box – it's material will now be named (referenced as) “Red”
renamed Sphere to “ball” - that submesh will now be named “ball”
added a “Blue” material to the sphere/ball – it's material will now be named (referenced as)
“Blue”
...nothing earth-shattering, but at least it's a bit more descriptive - a third party could now look at the
43/73
I/Ogre User Manual - 03/19/11
.xml text file and imagine that this was likely a red box mesh with a blue ball sitting on top/beside of it.
Figure Export Tag
To allow even further control (on a per-figure level), a new “Figure Export Tag” was created (the dogbone looking tag)...
...Note that this tag must be placed on the root-level object of the figure.
NOTE: The Figure Export Tag is provided by the IOTags plug-in, which must also be
installed [Except that... that plug-in doesn't yet exist – ignore the above comment for now :) ].
The Figure Export Tag has several attributes to help define/specify figure parameters...
...most of these settings currently deal with exporting fully rigged/animated figures, but note that there
is an option of specifying the root .mesh and .skeleton names. This will let you rename the root-level
object (that Null Object) whatever you want and still have control over the output filename(s).
You might also be sharing some skeleton file between multiple meshes... you can specify the name of
44/73
I/Ogre User Manual - 03/19/11
the skeleton file to use in the space provided (if either of these fields is set to “Automatic”, then the
root-level object name is used for that file root-name).
While this Figure Export Tag is optional for simple/static meshes, it is required when exporting
.skeleton files (with or without animations). For additional information on the “Skeleton” section of
attributes, please refer to the earlier Import Examples section of this document, but basically you need
to drag-n-drop a link to the root-bone of the figure's skeleton into the “Skeleton Root Bone” field.
Anim Clip Tag
One of the other issues related to differences in data formats is skeletal animations. An Ogre file can
list multiple animations for each figure, but in Cinema 4D there is only one Timeline.
NOTE: R11 introduced some new 'motion clips' and non-linear animation editing tools, but I
haven't investigated them thoroughly yet – this plug-in is designed to work with R10 or later.
When Importing animated figures, the individual animations are loaded end-to-end in the Timeline, so
that the first animation might go from frame #0 to frame #30, then the next one starts at frame #31, etc.
This information, along with the names of the animations is stored in a new “Anim Clip Tag”. Here's
a look at the interface, after loading the 'Ninja' figure from the earlier Import examples...
45/73
I/Ogre User Manual - 03/19/11
...this Tag is automatically created and filled in for you when using the Import plug-in, but if you are
Exporting a new animated figure, you'll need to add one of these and fill it in manually to define your
animations.
NOTE: The Anim Clip Tag is provided by the IOTags plug-in, which must also be installed.
Before exporting, you also need to drag-n-drop a link to this tag into the field provided on the Figure
Export Tag. While the Figure Export Tag must be located on the root-level object of the figure to be
exported, the Anim Clip Tag can be anywhere in the scene (the plug-in uses the link to find it). This
also implies that you could have several of these tags set up for different uses (perhaps depending on
the mesh/figure being exported?) and just link the one you want to use for a given export.
Bake Animation (New: v1.5)
When Exporting animations, the plug-in looks for 'recorded' keyframes on each bone/joint (see the next
section for details). If you are using IK or other controllers to animate the figure, you can use this
option to have the plug-in export every frame, for every joint (whether it has a 'recorded' key or not).
This feature works similarly to (and effectively like) the “Bake Object” option in the Cinema 4D timeline menus, but it doesn't create additional keys within C4D, only within the exported file.
Key Reduction (New: v1.5)
When exporting keys (for each joint, of each animation), enabling this option will cause the plug-in to
try to eliminate many of the redundant keys (if some joint is not animating at some point, for example).
Reducing the number of keys can optimize performance in some applications/game-engines and also
makes the exported files somewhat smaller.
NOTE: This process is limited to 'duplicate' key elimination and does not perform more
sophisticated key reduction methods that may be available within Cinema 4D or other software.
Having said that, also note that:
• It's better than no reduction at all :)
• It will still leave some duplicate keys in place (two keys to start a span, then an an
additional key at the end of the span, after the eliminated keys) – this is intentional, to
correct the way auto-tangents are generated between transitions to/from animating some
joint.
Keyframing
This topic has more to do with your actual work-flow than the export process itself – except that you'll
need to know this ahead of time in order to get the desired export results ☺.
Probably the biggest issue the plug-in faces is in trying to determine just how a figure is rigged and
therefore which objects it needs to be concerned with parsing in the Timeline in order to export
keyframed animations.
46/73
I/Ogre User Manual - 03/19/11
Each artist has their own particular methods for rigging and animating figures, using various
combinations of Nulls, Joints, IK, Constraints, Goals, Controllers, imported mocap data and potentially
Expressions and other defomers.
Take 'IK' for example. It's fairly common practice to rig a figure with Joints (or even Bone deformers),
set up IK on various sections and then add 'Controller' objects (the Controller objects are typically kept
in a separate hierarchy from the actual skeleton). The artist then animates (records keyframes for) the
Controller objects, but the Joints themselves may not have any actual keyframes recorded at all.
If you want an exported Bone to have keyframe data and be animated, you'll need
to record keyframes for the objects that represent those Bones – alternatively, you
need to Enable the “Bake Animations” option of the Figure Export Tag.
...you can still use your controllers and IK and any kind of fancy rigging you can imagine, but when
you go to record keyframes, you need to record them for the bones/joints that are being moved by the
controllers (or whatever else is moving them)**.
** NOTE: The above advice may not be correct/practical/complete. My expertise is in
programming and not animating. Recent testing seems to indicate that recording keyframes on
joints that are also being controlled by IK or some other controller/constraint causes conflict,
which messes up the animation.
There may be other methods or work-flows of addressing this issue (re-targeting animation
from one rig to another, for example), but my current advice (known to work) is that if you are
using IK or some other external controlling mechanism (ie. Any case where you are not
recording keyframes for the joints themselves), then you should enable the new “Bake
Animations” option on the Figure Export Tag. This option causes the plug-in to export
keyframe data for every frame, for every joint, so it doesn't bother looking for only the
'recorded' keyframes.
If you do enable the Bake Animations option, you might also want to enable the new “Key
Reduction” option as well – this will help compensate for (cull out some of) the additional
volume of keys being exported.
47/73
I/Ogre User Manual - 03/19/11
Export Checklist
Hopefully the restrictions imposed for exporting are not too confusing or restrictive to your work-flow.
In case you're totally confused by now, here's a quick recap/checklist/tips:
•
•
•
•
•
•
•
•
•
•
•
•
•
•
Give your Meshes, Materials and Polygon Selection Tags (typically used as Texture Tag
restrictions) meaningful, unique names and try to avoid using spaces in those names.
Root-level objects in the Cinema 4D Object Manager define a 'figure'.
Any meshes that you intend to end up in the same .mesh file need to be children of that figure's
root object.
If you intend to Export a .skeleton file, everything below here applies...
The figure's root object must have a Figure Export Tag.
Anything you want exported as an Ogre Bone must be a child of a top-level skeletal root object
(which is typically the child of the figure's root object, but could be anywhere in the scene).
Likewise, any objects found under the top-level skeletal root object will be written out as an
Ogre Bone (in other words, your Controllers should not be in the same hierarchy as the joints).
The root of the skeleton needs to be linked as the Skeleton Root Bone in the Figure Export
Tag.
Make sure that you have a “rest pose” frame available on the Timeline, where the meshes and
skeletons are in their 'natural' (non-animated) state.
If you want the .mesh and/or .skeleton filenames to be something other than the name of the
figure's root object name, you can set that information up in the Figure Export Tag.
If you intend to Export skeletal animations in the .skeleton file, everything below here applies...
Make sure that your joints/bones have keyframes recorded (just recording keyframes for your
Controller objects is not sufficient).
Create and fill in an Anim Clip Tag.
Make sure that the Anim Clip Tag is linked in the Figure Export Tag.
...I'd also recommend Importing a few figures and studying the results in the Object Manager and/or
referring back to the Import Examples section of this documentation. The layout created by the
Import plug-in is perfectly suitable for the Export plug-in to handle (though not strictly required in all
aspects... it serves as a good example).
Note that the information tracked by the new Tags discussed above is the type of information that's
likely to be more specific to each figure (links to actual joint objects and specific animation clip data,
etc). The more general Export options will be set in the Export Options Dialog, discussed in the next
section.
48/73
I/Ogre User Manual - 03/19/11
Exporting .mesh files
If you haven't already done so, I suggest that you read the previous sections, starting with Export
Preparation. Once you're ready to Export, you start by activating the “I/Ogre Exporter” menu
option found in the Plugins menu...
… selecting that will first bring up the Export Options Dialog (described in the next section). Once
you click OK on the Export Options Dialog, you will be prompted to select a folder/path to save the
exported file(s) to.
49/73
I/Ogre User Manual - 03/19/11
Export Options Dialog
The Export Options Dialog is where the more general Export options are set...
Presets
The top section of the dialog will let you create/select an unlimited number of option “Presets”. This
will allow you to easily switch between several different setups, depending on how the figure(s) are
laid out and/or what you want to do with it (for example, since you can set a scaling value that is
applied to both the mesh and it's skeleton, you could set up multiple presets for different scalings). Any
and all options on the dialog are stored with each preset.
50/73
I/Ogre User Manual - 03/19/11
Mesh Scaling
This section will let you scale the mesh (and it's skeleton) up or down by a fixed amount. Note that the
scaling value is specified in 'whole' numbers, not fractions.
General Tab
(refer to the previous image)
The General Tab has options related to the type of export operation you want to perform and which
files to create.
Rest Pose Frame
Before the plug-in can export meshes from the scene, it needs to convert (bake) any Primitive objects,
deformers, generators and effectors to end up with just polygonal mesh objects (later on, it also
converts the polygons to triangles and does some further processing on them).
Since the figures in the scene may be animated, the plug-in needs to know which frame on the Timeline
will put the meshes and joints/bones into their 'natural' (not animated) state. It will animate the
document to that frame before doing the baking step, above.
NOTE: The Import plug-in always creates a frame '-1' and sets the joints to their natural state in
this frame (the animations are then loaded starting at frame '0').
All Visible Objects / Selected Object Only
This option determines whether multiple meshes/figures will be exported or only the selected
mesh/figure.
NOTE: If “Selected Object Only” is used, a figure's root-level object (the one with the Figure
Export Tag on it) should be selected before activating the I/Ogre Exporter menu.
Files
Here you can select which files to export - .mesh and/or .skeleton files.
NOTE: Currently, no material files are exported. Just to be clear, inside the .mesh file, each
submesh can 'reference' a material to be used and this reference is will be written out, but no
separate material related files (with color/texture/shader information) are exported at this time.
51/73
I/Ogre User Manual - 03/19/11
Mesh Tab
This set of options controls what information is written to the .mesh file(s) and in some cases, how it
gets formatted...
...note that the Vertices and Faces (triangles) of the mesh are always exported, so there's no option for
those.
Normals
This option determines whether Vertex Normals are exported or not. If this option is Enabled, the plugin will retrieve Vertex Normals for each mesh from the Phong Tag if it's available. If it's not available,
the plug-in will compute averaged face normals. Just note that if a Normal Tag is present on a given
52/73
I/Ogre User Manual - 03/19/11
mesh, the Vertex Normals contained in it will override the normals that the Phong Tag would
otherwise generate (the Phong Tag will give the plug-in normals from the Normal Tag instead of the
ones it normally generates and maintains).
Since the Phong Tag allows you to set a smoothing angle and also takes phong edge-breaks into
account, and will also handle the case where a Normal Tag exists, I recommend always having a
Phong Tag present (instead of relying on the fall-back case where the plug-in generates averaged
normals). Almost every (?) object / generator in Cinema 4D comes with a Phong Tag by default, so
this is not something you need to worry much about – just don't delete them ☺.
For further information about Normals in Cinema 4D, please refer to the Importing .mesh files section
on Normals.
UV Coords
Also known as UVW Coordinates, uv-mapping and/or Texture Vertices or some combination of those
terms... this option determines whether uv-mapping info for you mesh gets exported or not.
Shared Geometry
This option may take a little explaining... an Ogre mesh object at it's most basic form is made up of
Vertices and Faces. The vertices define the shape of the mesh and the faces describe how to connectthe-dots (vertices) with a series of triangles to describe the surface of the mesh.
In the .mesh file, the Face information is always written written to the 'submesh' section of the file.
However, there are two different methods for writing the Vertex information...
1. As “Shared Geometry” – when this option is used, the vertices (for all submeshes within the
file) are written into a common pool, within the 'mesh' level section of the file.
2. When the above option is not used, the vertices are written to the file into the 'submesh' level,
along with the faces.
...while it's not necessary for this discussion, also note that since the faces are basically just a list of
vertex indices and those indices are either mesh-relative or submesh-relative, depending on the option
used above (the plug-in handles this remapping automatically).
A further refinement on the above (in either case) is that the vertices – along with normal vertices and
texture vertices – also get assigned to some “Vertex Buffer”. Without going into the finer technical
details, it takes more processing time to process additional vertex buffers (“batches”), but you get finer
control (if needed) over which vertices are being processed by segmenting them into smaller groups.
In most cases, the game/application likely doesn't need any distinction between submeshes (relative to
processing the vertex positions) within a mesh object and the mesh is only broken up into submeshes in
the first place due to changes in materials/shaders, or some combination of the source mesh data and
the export process.
53/73
I/Ogre User Manual - 03/19/11
With the above in mind, the most optimal situation would be:
•
•
Use Shared Geometry (within a mesh) whenever possible and/or...
...at least don't create any more submeshes than needed (when not using shared geometry, each
new submesh has it's own set of vertex buffers).
...in other words (and relevant to this plug-in), the source meshes within Cinema 4D should be grouped/
combined based on material differences only (ideally) – so instead of exporting 32 'Cube' primitives
that all use the same material, combine them into a single mesh object before exporting.
NOTE: The game/app (and possibly even the engine) may have batching methods implemented
that will remove any distinction discussed above. If in doubt, check with your programmer.
Now, after having said all of the above, I'll wrap this up with the following comments:
•
•
•
Despite everything I said above about Shared Geometry being the best (most efficient) option,
the Import plug-in does not currently Import .mesh files that use this option.
Before implementing all of the skeletal animation code (ie. Exporting simple static mesh
objects), this option was tested and working as expected, but use of this option has not been
extensively tested relative to exporting animated figures (ie. vertex->bone weighting).
Because of the two issues above, this option may or may not be enabled/accessable in the first
release of the plug-in. If it is enabled, take heed of the comments above.
SubMesh Names
This option determines whether submesh names are exported or not. The game/app may or may not
need access to individual submesh names, but it's probably a good idea to Enable this option in either
case. They don't take up a lot of memory and they might come in handy for future reference. If in
doubt, check with your programmer.
Also note that if the plug-in needs to split a C4D mesh up into multiple submeshes (ie. If it uses more
than one material), then it also has to 'generate' new, unique names for those new submeshes (it does so
by tacking an incrementing sequence number onto the mesh name), so if you want further control over
the exact names used, you'll need to split the mesh up manually, prior to exporting.
Skeleton Name
When exporting a .skeleton file, the name of the skeleton file will also be written into the .mesh file
(and therefore, this option gets ghosted – the name will be written). If you are not exporting a .skeleton
file, you can still force the name of some skeleton file to be written to the .mesh file using this option.
This option can be used, for example, in a situation where multiple meshes all used the same .skeleton
file (in which case, you'll likely want to set the name of the skeleton file to use manually in the Figure
Export Tag).
54/73
I/Ogre User Manual - 03/19/11
Invert X Axis:
See below.
Invert Z Axis:
See the notes in the Import section for a description of these options.
Swap Y/Z Axis:
Like the similarly named Import option, this feature can now be used when Exporting as well, to reorient the exported figure to a 'Z is Up' instead of a 'Y is Up' orientation/coordinate system (or viseversa, if that option was not used when the figure was Imported).
NOTE: The one current caveat to using this option is that you will not get expected results if
the 'parent' of the Skeleton Root Bone (ie. the Figure's root object) is rotated at all. A workaround would be to move the Skeleton Root Bone outside the Figure's root object hierarchy
after doing any rotations, but prior to exporting, if you plan to use the Swap Y/Z Axis option
when Exporting.
Vertex Buffer Assignment
Vertex Buffers were mentioned briefly back in the “Shared Geometry” section. They basically
represent some batch of vertices to be processed. This set of options gives you a finer level of control
over which vertices (Vertex, Normal Vertex, Texture Vertex) end up in which Vertex Buffers. You can
either group any two or all three of them into the same buffer or give each their own buffers. Check
with your programmer to see if there's a preference.
55/73
I/Ogre User Manual - 03/19/11
Skeleton Tab
There's not much to set on the Skeleton options tab - just a single option currently...
Skeletal Animation
This option determines whether or not animations are written to the .skeleton file. The other options
for the skeleton are more specific to each figure and are handled by the Figure Export Tag and the
Anim Clip Tag, so be sure to fill those in as well.
56/73
I/Ogre User Manual - 03/19/11
Binary Conversion
(refer to previous image)
As mentioned earlier, the I/Ogre plug-in only Imports/Exports the text-based .xml versions of the
Ogre3D .mesh and .skeleton file formats. However, the Ogre3D distribution comes with a utility named
“OgreXMLConverter.exe”to convert these files to and from the binary format.
NOTE: The plug-in will export the .xml file and then launch the conversion utility, but it does
not 'wait' for the conversion utility to finish before moving on (it's an asynchronous process), so
it's likely that the plug-in will finish it's tasks before the conversion(s) are complete.
Convert XML to binary
Enable this option if you want the plug-in to automatically convert the .xml files into binary.
Converter:
Enter (or browse to) the location of the “OgreXMLConverter.exe” utility here.
57/73
I/Ogre User Manual - 03/19/11
Ogre3D Binary ↔ XML Converter
On the “IOgre” plug-in menu, there is a new entry labeled “Binary ↔ XML Converter”:
...this option will allow you to easily convert one or an entire folder full of .mesh and/or .skeleton files
to the text-based .xml format, or vise-versa (ie. It can convert one or an entire folder of .mesh.xml and/
or .skeleton.xml files into the binary format).
Single File Mode
When you select this menu option, a dialog will open:
...most of the options on this dialog only apply to the “Multi-Files” mode, so with the “Single File”
option selected, most of the other options are ghosted. Be sure to fill in or browse to the converter
58/73
I/Ogre User Manual - 03/19/11
program (normally, this would be “OgreXMLConverter.exe” that is part of the Ogre3D distribution)
and click on OK.
After clicking OK, a standard file dialog will be presented, to allow you to select the file to convert.
The selected file will be passed to the 'Converter:' program you have specified.
The “OgreXMLConverter.exe” utility determines which direction to convert based on the filename if it has an “.xml” extension, it will be converted to binary. If it doesn't, it will be converted to .xml
format.
NOTE: While this plug-in was primarily designed to be used with the
“OgreXMLConverter.exe” utility, in “Single File” mode (in particular), it could be used as a
means of passing any selected file to any specified application or console utility. The plug-in
merely spawns the specified executable, passing it the filename.
Multi-Files Mode
When the “Multi-Files” option is selected, the additional options become available:
...in this mode, after selecting OK, you will be presented with a “Directory” selection dialog and the
selected options/actions will be performed on files within that directory/folder, that meet the specified
criteria.
**NOTE: This plug-in 'spawns' the specified application/utility, passing it the filenames that
meet the specified criteria, but this is an asynchronous process – the plug-in does not wait for
the file to be processed before moving on to the next file – which means that if you have dozens
(or hundreds) of files that meet the criteria in the selected folder, you could potentially end up
with dozens (or hundreds) of spawned processes. To avoid any trouble – try to avoid these
situations by either refining the criteria (do the mesh files in one pass, then do the skeleton files
in a separate pass), or by physically dividing your files up into smaller folders.
59/73
I/Ogre User Manual - 03/19/11
On a similar and related note, the “debug” versions of executables (like the
“OgreXMLConverter.exe” utility) run considerably slower than “release” versions of the same
executables. Whenever possible, be sure to use the “release” version, to help keep the spawned
processes from getting backed up (the quicker they complete their task, the quicker they go
away – allowing more memory and processing power for newly spawned processes).**
Binary → XML
When this option is selected, only .mesh (and/or .skeleton) files in the selected folder without a .xml
extension will be processed. As the name implies, they will be converted from Binary format to the
text-based XML format.
XML → Binary
When this option is selected, only .mesh.xml (and/or .skeleton.xml) files in the selected folder will be
processed. As the name implies, they will be converted from text-based XML format to the Binary
format.
Mesh Files
When this option is selected, only .mesh (or .mesh.xml) files in the selected folder will be processed.
Skeleton Files
When this option is selected, only .skeleton (or .skeleton.xml) files in the selected folder will be
processed.
Both
When this option is selected, both .mesh and .skeleton (or .mesh.xml and .skeleton.xml) files in the
selected folder will be processed.
Converter:
Enter (or browse to) the location of the “OgreXMLConverter.exe” conversion utility here (preferably,
the “release” build).
60/73
I/Ogre User Manual - 03/19/11
VALVe:Source Importing
(New: v1.3)
[Editor's Note: This section of the documentation is not yet complete... in the meantime, here are a few
quick tips:]
The SMD (“Studio Model”) format files are used by the VALVe:Source SDK, which comes with and
can be used to create mods for VALVe's games. The .smd files typically come in two flavors:
•
Reference files - the reference files (“reference” is typically, but not always part of the
filename) contain the mesh geometry (“triangles” section), along with the base positions and
orientations of the rigging/bones/skeleton. You should import one of these first.
•
Animation files – these files only contain the information needed for skeletal animations (new
bone positions/orientations for specific keyframes/times). The names of these files is usually the
intended name of the animation they provide.
...the plug-in scans the file to determine which type it is and presents the appropriate options dialog.
NOTE: There is actually a 3rd form of these files (with a '.vta' extension) that contains vertex
animation information, but the plug-in (currently, at least) does not read those.
As mentioned above, you should load a “reference” file first. Once loaded, you will end up with the
same type of “figure” layout that the Ogre3D Import plug-in sets up – one or more meshes, along with
the joints/rigging and the mesh will be skinned/weighted to that rigging, but won't have any animations
yet.
At this point, you can import one or more (as many as you want) animation files, either appending the
animations to the end of any current ones, or replacing the current one with the new one. The
Animation Clip Tag will be updated appropriately, as you do so.
ADDITIONAL NOTES:
•
The “names” of the Cinema 4D “Joint” objects that make up the rigging are important – the
animation files reference those joints by name, so don't go editing them, at least until you've
loaded whatever animations you intend to.
•
Animations are (currently) applied to the first “figure” - as defined in the earlier Ogre3D
documentation – but more specifically, the first root-level object in the Object Manager, that has
a Figure Tag on it. A future enhancement may allow you to select which “figure” to apply it to.
•
If you import an animation file when there is no (valid) figure in the scene, the plug-in will just
create a new animated joint-rig, with no mesh. But keep in mind that the animation files do not
61/73
I/Ogre User Manual - 03/19/11
contain “rest pose” information, so the rig will be in some state of animation at every keyframe.
•
If you just want to import a rig+animation, go ahead and import the reference file first anyway
– you can always delete/replace any meshes that are attached to it (and then redo the
skinning/weighting with the new mesh).
•
Due to the differences in native coordinate systems between Cinema 4D and the Source Engine,
if you were to import a figure with no transformation options set (Flip X Axis, Flip Z Axis,
Swap Y/Z Axis), it would be loaded into the scene, taking a dirt-nap (face-down), and facing
away from the camera along the Z axis.
To get the figure into something easier to work with in Cinema 4D, the 'default' Import options
have both “Flip Z Axis” and “Swap Y/Z Axis” options enabled. I'd suggest leaving them that
way – but just remember to set those same options when Exporting (erm... there is no .smd
or .ms3d file Export module(s) yet, but you'll likely want to at least Flip Z Axis when exporting
to the other formats).
I'll try to update this section of the documentation next time, but hopefully the dialogs and options will
make sense – the earlier documentation for the Ogre3D Importer should help (many features/options
are similar).
62/73
I/Ogre User Manual - 03/19/11
VALVe:Source Exporting
(New v1.4)
[Editor's Note: This section of the documentation is not yet complete... in the meantime, here are a few
quick tips:]
The SMD (“Studio Model”) format files are used by the VALVe:Source SDK, which comes with and
can be used to create mods for VALVe's games. The .smd files typically come in two flavors:
•
Reference files - the reference files (“reference” is typically, but not always part of the
filename) contain the mesh geometry (“triangles” section), along with the base positions and
orientations of the rigging/bones/skeleton.
•
Animation files – these files only contain the information needed for skeletal animations (new
bone positions/orientations for specific keyframes/times). The names of these files is usually the
intended name of the animation they provide.
...the new SMD Export module works with the 'figure' structure set up in Cinema 4D by the various
I/Ogre Import modules (ie. It parses the Figure Export and Animation Clip tags). It can export both
types of .smd files and will do so using the same export options dialog, depending on which options are
set.
NOTE: There is actually a 3rd form of these files (with a '.vta' extension) that contains vertex
animation information, but the plug-in (currently, at least) does not read those.
Just to clarify the above... assuming you have both “Mesh (reference)” and “Skeletal Animations”
options enabled, a mesh/reference .smd file will be created and one or more animation .smd files will
be created. So if you had been Importing .smd animations (with the “Append” option set) on your
figure, then it would already have a properly filled in Animation Clip Tag and each animation clip
listed in that tag would be exported to a separate animation .smd file, using the name of the clip as the
name of the file.
The Export Options Dialog is fairly straight-forward, so I'll cover that in a bit, but before I do so, I want
to cover an issue/topic with the Figure Export Tag, related to the “Skeleton Root Bone” and the
“Export Skel Root as Bone”option, among other things.
As a refresher, you should (re)read the “Export Preparation” section of this document in the Ogre3D
section, but basically the Figure Export Tag has several attributes to help define/specify figure
parameters (see image, next page)...
63/73
I/Ogre User Manual - 03/19/11
...most of these settings currently deal with exporting fully rigged/animated figures, but note that there
are also options for specifying the root mesh and skeleton file names.
The first thing to note about SMD file Exporting is this – the “Mesh File Root Name” options are
used, but the “Skel File Root Name” options are ignored - the 'skeleton' is saved inside the
mesh/reference file and any 'animation' .smd files get their names from the names of the animation
clips.
The next topic is the Skeleton Root Bone... if you recall from the original discussion on this, the plugin uses this (in addition to the Weight Tags on polygonal mesh objects) to determine exactly which
Cinema 4D objects make up the 'bones' of the figure. When the various Import modules import a
figure, if they find more than one 'root-level bone' (a bone with no Parent bone), they generate a
Cinema 4D 'Null' object as the Skeleton Root Bone and all other bones in the file are made children of
that. This Null object is the name of the figure, with “_SkelRoot” appended.
When Exporting, the “Export Skel Root as Bone” option determines whether the Skeleton Root
Bone (whether it's a Null 'xxxxx_SkelRoot' object or a real bone from the file) gets exported as a
bone...
I don't want to drag this out into too much detail, so suffice it to say that – for SMD file Exporting – a
plug-in generated Null 'xxxxx_SkelRoot' object should not be written out as a bone. For the other
file formats, you may or may not want it exported, but not for the SMD format. Because of this, the
SMD Import module 'clears' that option when importing a figure (so you would need to enable it if you
want it for some other format Export). Additionally, the SMD Export module will ignore the
“Export Skel Root as Bone” option – IF the name of that bone ends with “_SkelRoot”.
64/73
I/Ogre User Manual - 03/19/11
The Point is: If you are creating new work or otherwise want that Skeleton Root Bone exported as a
bone, make sure that the name doesn't end with “_SkelRoot”, or it won't be exported.
Export Options Dialog
The Export Options Dialog is where the general Export options are set...
...in this case, all the options are on one page, so it's pretty straight-forward. In fact, most of the options
are similar to (if not exactly the same as) the options found on other Export (and Import) modules'
dialogs, so I'll just hit on a few highlights, below.
Rest/Bind Pose Frame
When Exporting, the plug-in needs to know which animation frame to set the document to that will put
the figure into it's “Bind Pose” (ie. The default, undeformed, non-animated mesh). By convention, all
65/73
I/Ogre User Manual - 03/19/11
Import modules create this at frame number -1 and start the animation frames at frame 0 (although
there are usually options to disable creating the rest/bind pose frame – I recommend always leaving that
enabled).
Mesh (reference)
This option enables/disables exporting the figure 'reference' .smd file. As mentioned in the Import
section, as well as the introductory part of the Export section, there are two types of SMD files –
'reference' files contain the mesh geometry information, along with the skeleton/bone orientation and
linkage information.
By convention, the name of the reference file should normally have “reference” as part of the name.
The plug-in uses the same mesh file naming rules as all other I/Ogre Export modules, so you should
either have the root-level figure object (the thing with the Figure Export Tag on it) named
appropriately, or set the “Mesh File Root Name” to Manual and fill in the name there.
Skeletal Animations
This option determines whether 'animation' .smd files are created. When enabled, each animation clip
listed in the Animation Clip Tag will generate a separate .smd file, using the name of the clip as the
filename.
Axis Adjustment
If the figure in your Cinema 4D scene is facing the camera, along the Z axis (however they got that
way), then to convert it to the orientation expected by VALVe:Source Engine games (Half-Life2, Team
Fortress, etc.), you should enable both “Invert Z Axis” and “Swap Y/Z Axis” options.
Export Paths
This section allows you to pre-specify folders for the Mesh (reference) and Animation .smd files. Note
that currently, you will still get a confirmation dialog for each, but it will already have the folders
specified in these two fields preselected, so you can just click OK if everything looks good...
NOTE: Files in those folders that have the same filenames as ones being saved are overwritten, with no warning (currently).
...you can use these fields to set up some project folders and then create a new Preset for each project
(for example).
66/73
I/Ogre User Manual - 03/19/11
MilkShape3D Importing
(New: v1.3)
[Editor's Note: This section of the documentation is not yet complete... in the meantime, here are a few
quick tips:]
First off – as mentioned in the Overview Section – the MilkShape3D .ms3d format is a binary format
(the others are text-based). The reason this is important is because binary data is formatted differently
between the Mac and PC (Intel) systems, so the code that reads/writes those files needs to do some
translations...
The .ms3d Import module has not yet been ported to the Mac platform.*
...sorry for the inconvenience, but I'll get to that as time permits (tip: if you're a Mac guy wanting to
read/write .ms3d files, you can help speed up the process by showing your support (ie. Purchasing the
plug-in) and/or at least voicing some interest).
[* NOTE: While not extensively tested, as of v1.5, the Import and new Export modules have
both been ported to the Mac platform.]
Moving on.... there's not a whole lot else to mention at this point – except that:
•
The options dialog was largely borrowed from my Riptide Pro (and other) plug-in(s), and is a
work-in-progress (some options may not do anything, or work as you expect yet). Having said
that, you won't “break” anything by messing with the options, so feel free to experiment :).
•
The good news is that of the 3 formats (at least partially) implemented so far, this is the only
one that can actually import textures and color values for materials – just be sure that Cinema
4D can find the textures in it's “Texture Paths” preferences, or that you set up the “Suggested
Path” option to point to where they are. Also keep in mind that PC x64 versions of Cinema 4D
can't load .png files, so if you end up with 'all black' textures, be sure to check that as a cause.
•
Unfortunately, the .ms3d format doesn't have any provision for splitting animations into
separately named animation clips, so the Animation Clip Tag will get set up with just a single
“default” animation that encompasses the entire time-line. Before Exporting (to Ogre3D
format, for example), you'll probably want to edit that (if you purchase or download
animated .ms3d files, they typically come with a text file that lists the animations by
keyframe/times – you should be able to use that as a guide).
•
Just as an aside... I think you'll find that .ms3d formatted files (imported with this plug-in), will
become the “preferred” file-exchange format over say FBX or Collada for these type of files.
It's a more rigid/fixed format, so there's less room for “interpretation” of the data and so you
tend to get expected results (and joint-rigged, vs. bone-rigged figures, btw). If you have access
67/73
I/Ogre User Manual - 03/19/11
to the same data in multiple formats, I suggest that you test this for yourself.
•
If you're looking for some .ms3d files to mess with, Psionic's 3D Game Resources has some
free models you can download and some 3rd-party developers like Dexsoft Multimedia
sometimes offer prepackaged model assets like their Black Knightress model pack in a variety
of file formats (this particular one comes in .ms3d as well as FBX, Collada, etc.). Of course
MilkShape3D supports numerous game-oriented file formats so having a native path to and
from Cinema 4D will give MilkShape+C4D owners a lot of options.
I'll try to update this section of the documentation next time, but hopefully the dialogs and options will
make sense – the earlier documentation for the Ogre3D Importer should help (many features/options
are similar).
68/73
I/Ogre User Manual - 03/19/11
MilkShape3D Exporting
(New: v1.5)
Along with Importing MilkShape binary .ms3d files, the plug-in now also allows you to Export those
files as well. These files can either be exported as static mesh objects/props (all visible objects within
the scene are combined into a single mesh object, with no skeleton or animations) or as a rigged (and
potentially animated) 'Figure'.
Export Options Dialog
The Export Options Dialog is where the general Export options are set...
...the top sections (Presets and Scaling) operate like the other modules of this plug-in (see previous
sections for details), the lower Tabs section also has similar options, but those options are described in
more detail below.
69/73
I/Ogre User Manual - 03/19/11
Scene Filter Tab
The Scene Filter Tab (see image on previous page) controls the type of .ms3d file that will be generated
(static mesh or rigged / animated figure) as well as some general options that apply to both types of
files.
All visible scene objects as Geometry-Only
If this option is Enabled, the entire scene is exported as a single static mesh/prop, with no skeleton or
animations. Note that objects (even entire branches of objects) that are 'hidden' in the Editor Window
are not included, so you can still control exactly what gets exported.
Rigged (and possibly Animated) Figure:
If the plug-in finds root-level objects in the scene with “Figure Export Tags” on them (which also
have a valid “Skeleton Root Bone” link), this option will be available. If you use this option, you
should select the figure to be exported from the drop-down list to the right.
NOTE: Because this option may or may not be available (depending on whether 'figures' are
found in the scene being Exported), the “Last Used” Preset (the initial options set when the
dialog opens each time) may have this option Disabled (but available for use), so be sure to
double-check which option is set before clicking OK...
In other words, you might Export some figure. You might then export some scene that has no
figures in it (forcing the “All visible scene objects...” option to be set/stored in the “Last Used”
Preset). The next time you Export, you might have figures available and you might even see the
one you want listed in the drop-down menu, but if you don't Enable this option, you'll end up
exporting a static mesh.
Axis Adjustment(s)
These two options (Invert X Axis, Invert Z Axis) operate exactly the same as the same options for the
other file format modules of this plug-in.
NOTE: There is currently no “Swap Y/Z Axis” option available in either the Import or Export
modules for the .ms3d file format, since MilkShape uses the same “Up” axis as Cinema 4D.
70/73
I/Ogre User Manual - 03/19/11
Figure Tab
This tab has options that are only related to exporting rigged and potentially skeletally animated
'figures'...
Mesh
This option determines whether the mesh geometry (vertices, polygons, etc) gets exported or not.
Skeleton
This option determines whether the skeleton / rigging gets exported or not.
NOTE: As implied by the above two options, it's possible to export only the mesh or only the
skeleton of a figure or both the mesh and the skeleton (see also: the Skeletal Animations
option, listed next), but if you don't enable either option, there's nothing to export, so the plug-in
will display a message and abort.
71/73
I/Ogre User Manual - 03/19/11
Skeletal Animations
This option determines whether skeletal animations are exported or not. Note that this option is only
relevant (and available) if you are also exporting a Skeleton.
Rest/Bind Pose Frame
When Exporting, the plug-in needs to know which animation frame to set the document to that will put
the figure into it's “Bind Pose” (ie. The default, undeformed, non-animated mesh). By convention, all
Import modules create this at frame number -1 and start the animation frames at frame 0 (although
there are usually options to disable creating the rest/bind pose frame – I recommend always leaving that
enabled).
72/73
I/Ogre User Manual - 03/19/11
The End.
73/73