1
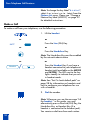
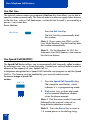
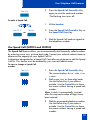
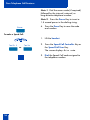
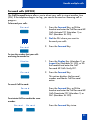
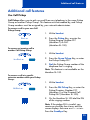
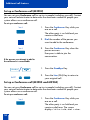
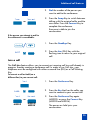
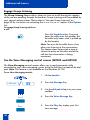
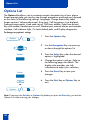
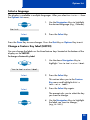
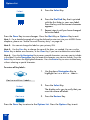
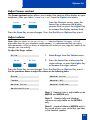
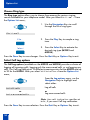
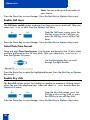
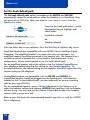
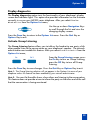
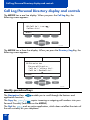
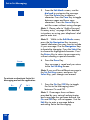
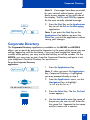
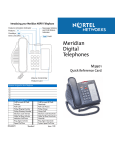
Nortel Knowledge Network
Meridian Digital
Telephones
M3902
M3903
M3904
Quick Reference Guide
Enterprise Voice Solutions Customer Documentation
While you are away from your desk: Call Forward
38
Contents
M3902, M3903, and M3904 Meridian Digital Telephones
7
Your Telephone Call Features
9
Use Auto Dial ........................................................................................ 9
Make a Call ..........................................................................................10
Make a call while on-hook .....................................................................11
Redial last number called .......................................................................11
Use Ring Again (M3902) .......................................................................12
Use Ring Again (M3903 and M3904) ....................................................13
Use Hot Line .........................................................................................14
Use Speed Call (M3902) .......................................................................14
Use Speed Call (M3903 and M3904) ....................................................15
Answer a call
17
Place a call on Hold ...............................................................................17
Transfer a call (M3902) ..........................................................................18
Transfer a call (M3903 and M3904) .......................................................19
Handle multiple calls
20
Use Call Waiting ...................................................................................20
Forward calls (M3902) ...........................................................................21
Forward calls (M3903 and M3904) ........................................................22
Additional call features
23
Use Call Pickup .....................................................................................23
Set up a Conference call (M3902) ...........................................................24
Set up a Conference call (M3903 and M3904) ........................................24
Join a call .............................................................................................25
Engage Group Listening .........................................................................26
Use the Voice Messaging control screens (M3903 and M3904) ................26
Options List
28
Select a language ..................................................................................29
Change a Feature Key label (M3902) .....................................................29
Change a Feature Key label (M3903 and M3904) ...................................31
Adjust Screen contrast ............................................................................33
3
Contents
Adjust volume ......................................................................................33
Choose Ring type .................................................................................34
Select Call Log options ..........................................................................34
Use Live dial pad ..................................................................................35
Select Preferred name match ................................................................35
Set up area code ..................................................................................35
Enable Call timer ..................................................................................36
Select Date/time format ........................................................................36
Enable Key click ...................................................................................36
Use Headset port on call .......................................................................37
Activate Headset port external alerter ....................................................37
Use Call indicator light ..........................................................................37
Set On hook default path ......................................................................38
Display diagnostics ...............................................................................39
Activate Group Listening .......................................................................39
Call Log/Personal Directory display and controls
40
Identify specialized keys ........................................................................40
Use Directory password protection .........................................................41
Manage Call Log
43
Access and use the Callers List (M3903) ................................................43
Access and use the Callers List (M3904) ................................................44
Access and use the Redial List (M3903) .................................................46
Access and use the Redial List (M3904) .................................................47
Access and use the Personal Directory
48
Access the Personal Directory ................................................................48
Add a Personal Directory entry .............................................................48
Add an incoming call ...........................................................................50
Delete or edit a Personal Directory entry ................................................51
Delete your Personal Directory ..............................................................52
Use the Personal Directory to make a call ...............................................52
Use Card View .....................................................................................53
Search for an entry ...............................................................................54
Copy a number from the Redial List .......................................................54
4
Contents
Set-to-Set Messaging
56
Corporate Directory
59
Virtual Office
62
Secure your telephone
64
5
Contents
6
M3902, M3903, and M3904 Meridian Digital Telephones
M3902, M3903, and M3904 Meridian Digital
Telephones
There are five models in the M3900 Series Meridian Digital Telephone portfolio.
This document describes the M3902, M3903, and M3904 features and how to
use them. For user information on the M3901, refer to the M3900 Series
Meridian Digital Telephone User Guide. For information on the M3905, refer to
the M3905 Call Center Meridian Digital Telephone User Guide.
The M3902 has one Line (DN) Key and three Programmable Feature Keys
(self-labeled).
M3902 telephone
LCD Indicator
Message Waiting Light/
Incoming Call Indicator
One Line (DN)
Programmable
Soft Keys
(self-labeled)
Options
Message
Transfer
Hold
LED
Handsfree Key
Goodbye
Navigation Keys
Volume Control Bar
LED
Mute
553-8624
7
M3902, M3903, and M3904 Meridian Digital Telephones
The M3903 has two Programmable Line (DN)/Feature Keys (self-labeled) with
two features or lines (DNs) configured on each key. The M3903 also has four
Context Sensitive Soft Keys (self-labeled).
M3903 telephone
LCD Display
Goodbye
Hold
Message Waiting Light/
Incoming Call Indicator
Programmable Line (DN)/
Feature Keys (self-labeled)
Context Sensitive
Soft Keys (self-labeled)
Copy
LED
Handsfree Key
Fixed Feature Keys
Shift
Applications
Navigation Keys
Volume Control Bar
LED
Headset
Mute
Options
Quit
Call Log
Message
553-8625B
The M3904 has six Programmable Line (DN)/Feature Keys (self-labeled), with two
features or lines (DNs) configured on each key. The M3904 also has four Context
Sensitive Soft Keys (self-labeled).
M3904 telephone
LCD Display
Goodbye
Hold
Message Waiting Light/
Incoming Call Indicator
Programmable Line (DN)/
Feature Keys (self-labeled)
Context Sensitive
Soft Keys (self-labeled)
LED
Handsfree Key
Fixed Feature Keys
Volume Control Bar
Headset
Shift
Copy
LED
Mute
Options
Quit
Message
8
Applications
Navigation Keys
Directory/Log
553-8626B
Your Telephone Call Features
Your Telephone Call Features
Your M3900 Series Meridian Digital Telephone provides easy access to a wide
range of business features. Your network administrator assigns features to your
telephone and provides you with passwords and other codes as required.
This section describes the features available for your telephone and how to use
them.
Use Auto Dial
The Auto Dial feature allows the user to press one Feature Key (Auto Dial Key) to
dial a specific telephone number automatically. This feature must be enabled by
your network administrator.
To use Auto Dial:
1. Lift the handset.
AutoDial
2. Press the associated Auto Dial Key.
This automatically dials the number.
To display the Auto Dial number (M3903 and M3904):
Display
1. Press the Display Key.
Note: On the Meridian SL-100, press the
Auto Dial Key to display the number.
AutoDial
2. Press the configured Auto Dial Key.
The number appears on the display.
To store an Auto Dial number:
AutoDial
1. Press the Auto Dial Key, without lifting
the handset.
2. Dial the number to be stored on the
Auto Dial Key.
Note 1: The number may contain up to
31 digits.
Note 2: If you are storing an external or
long distance number, be sure that the
appropriate access codes are included.
AutoDial
3. Press the Auto Dial Key again.
The number is stored on the key.
9
Your Telephone Call Features
Note: To change the key label “AutoDial”,
select Change feature key label from the
Options List menu. Please see “Change a
Feature Key label (M3902)” on page 29
for detailed instructions.
Make a Call
To make a call from your telephone, use the following procedure:
1. Lift the handset.
or
or
Press the Line (DN) Key.
2637
or
or
Press the Handsfree Key.
Note: The Handsfree Key must be enabled
by the network administrator
Headset
or
or
/
Press the Headset Key if you have a
headset connected to your telephone’s
headset jack (available on the M3903
and M3904). The LED next to the key
lights steadily to indicate that you are
in headset mode.
Note: See “Set On hook default path” on
page 38 for information on headsets and
how to configure your telephone for use
with a headset.
2. Dial the number.
Note: Whenever you see the message “Lift
the handset.” in this guide, you may
alternatively press a free Line (DN) Key, the
Handsfree Key, or Headset Key (if a
headset is connected to the headset jack).
You receive a dial tone from each action.
10
Your Telephone Call Features
Make a call while on-hook
Leave the handset in the cradle while you dial a number.
To dial on-hook:
1. Press a Line (DN) Key.
2637
2. Dial the number when you receive a
dial tone.
3. Lift the handset to speak when the
called party answers.
If the called number is busy:
Goodbye
/
or
RingAgn
Press the Goodbye Key to release the
line.
or
Press the Ring Again Key.
Redial last number called
The Last Number Redial feature allows you to automatically redial the last number
you dialed. This feature must be enabled by your network administrator.
To use Last Number Redial:
1. Lift the handset.
2637
2. Press a Line (DN) Key.
To use Last Number Redial on a
handsfree call:
2637
Press the Line (DN) Key twice.
2637
The last number you dialed is
automatically redialed.
Note: On Meridian SL-100, press the £
Key twice.
11
Your Telephone Call Features
Use Ring Again (M3902)
Use the Ring Again feature when you dial a number and receive a busy tone or
no answer. The Ring Again feature lets you know when the person you dialed is
available or has used their telephone. The feature notifies you when to redial your
party. The Ring Again feature automatically redials the number.
To use Ring Again:
1. Dial a number and receive a busy tone
or no answer.
Note: On the Meridian SL-100, Ring
Again is available on busy tone only.
RingAgn
To call a Ring Again party when you
receive notification:
2. Press the Ring Again Key.
When the number you want to reach is
available, or the person has re-used their
set, you hear the Ring Again tone.
1. Lift the handset.
RingAgn
2. Press the Ring Again Key.
To cancel Ring Again before
notification:
RingAgn
12
Press the Ring Again Key a second
time.
Your Telephone Call Features
Use Ring Again (M3903 and M3904)
Use the Ring Again feature when you dial a number and receive a busy tone or
no answer. The Ring Again feature lets you know when the person you dialed is
available or has used their telephone. The feature notifies you when to redial your
party. The Ring Again feature automatically redials the number.
To use Ring Again:
1. Dial a number and receive a busy tone
or no answer.
Note: On the Meridian SL-100, Ring
Again is available on busy tone only.
RingAgn
2. Press the Ring Again Key.
The screen displays Ring again is
active.
To call a Ring Again party when you
receive notification:
When the number you want to reach is
available, or the person has re-used their
set, you hear the Ring Again tone and the
screen displays Party free, select line.
1. Lift the handset or press a Line (DN)
Key.
RngCall
2. Press the Ring Call Key.
To cancel Ring Again before
notification:
CanclRA
Press the Cancel Ring Again Key. The
screen displays Ring Again is
cancelled.
13
Your Telephone Call Features
Use Hot Line
The network administrator can program a Hot Line Key that allows you to dial a
specific number automatically. The network administrator can apply other features
to the Hot Line, such as Call Redirection, so that the Hot Line call is answered by a
person—not a mail box.
To use Hot Line:
Hotline
Press the Hot Line Key.
The Hot Line Key automatically dials
the number.
Note 1: If your main Line (DN) is a Hot
Line, lift the handset. The Hot Line Key dials
the number automatically.
Note 2: On the Meridian SL-100, the
Automatic Line (AUL) feature is the same as
the Hot Line feature.
Use Speed Call (M3902)
The Speed Call feature allows you to automatically dial frequently called numbers
by entering a one, two, or three digit code. Contact your network administrator to
determine the capacity of your Speed Call list.
A telephone designated as a Speed Call Controller can program or edit the Speed
Call list. This feature must be enabled by your network administrator.
To store or change a Speed Call
number:
SpcCtlr
1. Press the Speed Call Controller Key.
The triangular icon flashes, which
indicates it is in programming mode.
2. Dial a one, two, or three digit code
and associated telephone number
when the phone prompts.
Note 1: Dial the access code (if required)
followed by the internal, external, or
long-distance telephone number.
Note 2: Press the Pause Key to insert a
1.5 second pause in the dialing string.
14
Your Telephone Call Features
SpcCtlr
3. Press the Speed Call Controller Key
again to save the code and number.
The flashing icon turns off.
To make a Speed Call:
1. Lift the handset.
SpcCtrl
or
SpcUsr
2. Press the Speed Call Controller Key or
the Speed Call User Key.
3. Dial the Speed Call code assigned to
the telephone number.
Use Speed Call (M3903 and M3904)
The Speed Call feature allows you to automatically dial frequently called numbers
by entering a one, two, or three digit code. Contact your network administrator to
determine the capacity of your Speed Call list.
A telephone designated as a Speed Call Controller can program or edit the Speed
Call list. This feature must be enabled by your network administrator.
To store or change a Speed Call
number:
SpcCtrl
1. Press the Speed Call Controller Key.
The screen displays Enter Code, then
number.
2. Dial a one, two, or three digit code.
Use the Delete Key if you make a
mistake. Use the Cancel Key to leave
the screen without storing a speed call
number.
Note: A dash is automatically inserted
after the required number of digits have
been entered.
3. Dial the associated telephone number.
Use the Delete Key if you make a
mistake. Use the Cancel Key to leave
the screen without storing a speed call
number.
15
Your Telephone Call Features
Note 1: Dial the access code (if required)
followed by the internal, external, or
long-distance telephone number.
Note 2: Press the Pause Key to insert a
1.5 second pause in the dialing string.
4. Press the Done Key to save the code
and number.
Done
To make a Speed Call:
1. Lift the handset.
SpcCtrl
or
SpcUsr
2. Press the Speed Call Controller Key or
the Speed Call User Key.
The screen displays Enter code.
3. Dial the Speed Call code assigned to
the telephone number.
16
Answer a call
Answer a call
When you receive an incoming call, your telephone rings and the LCD indicator
flashes.
To answer a call:
Lift the handset.
or
or
Press the Handsfree Key.
or
or
Press the flashing Line (DN) Key when
using a headset.
2637
Place a call on Hold
Use the Hold feature when you are talking with one party and a second call
comes in on a second line. You can answer the second call and retain the original
call by putting it on hold.
To place a call on hold:
Hold
/
Press the Hold Key.
The LCD indicator flashes beside the
line on hold.
Note 1: If Automatic Hold feature is
configured for your Meridian 1, the active
call is automatically put on hold when you
answer the second call.
Note 2: On the Meridian SL-100,
Automatic Hold is the default feature.
Note 3: The caller hears music while on
hold if the Music On Hold feature is
configured for your system.
To retrieve a call on hold:
2637
Press the Line (DN) Key beside the
flashing LCD indicator.
17
Answer a call
Transfer a call (M3902)
Use the Transfer feature to direct a call to a third party.
Transfer
/
1. Press the Transfer Key.
The other party is on hold and you
receive dial tone. The LCD indicator
lights steadily.
2. Dial the number of the telephone
where the call is to be transferred.
Transfer
/
3. When you hear the ring or a person
answers, press the Transfer Key to
complete the call transfer.
The LED indicator goes from steady on
to off.
To go back to the original call if the
transfer is incomplete:
2637
If the person you called is not
available, press the Line (DN) Key to
reconnect to the original call.
The LCD indicator goes from flashing
to steady on.
Note: On the Meridian SL-100, press the
Transfer Key, dial the number, and press
the Goodbye Key. If you press the Transfer
Key a second time, you get a three-way
conference.
18
Answer a call
Transfer a call (M3903 and M3904)
Use the Transfer feature to direct a call to a third party.
To use the Transfer feature:
1. Press the Transfer Key.
Trans
The other party is on hold and you
receive dial tone. The screen displays
Call on hold, dial number.
2. Dial the number of the telephone
where the call is to be transferred.
Swap
or
Connect
3. Press the Swap Key to switch between
talking with the original caller and the
new caller. Press the Connect Key to
complete the transfer.
The two callers are connected and
your telephone is ready to make or
receive new calls.
To go back to the original call if the
transfer is incomplete:
Goodbye
2637
/
1. Press the Goodbye Key.
2. Press the Line (DN) Key with the
flashing icon to return to your original
call.
19
Handle multiple calls
Handle multiple calls
Use Call Waiting
The Call Waiting feature allows you to put your current call on hold while you
answer an incoming call. This feature must be enabled by your network
administrator.
To answer an incoming call while on
another call:
Hold
/
1. Press the Hold Key when you hear the
tone.
The Call Waiting status icon appears
in the display.
2. Press the Call Wait Key (CWait for
M3902) to answer the call.
CallWait
To return to your first telephone call:
Hold
Goodbye
/
1. Press the Hold Key, if you want to put
the second call on hold.
or
or
/
Press the Goodbye Key to end the
second call.
2. Press the Line (DN) Key associated
with the first call.
2637
If you do not have a Call Waiting
Key:
Goodbye
2637
20
/
1. If you do not have a Call Waiting Key
and you hear the Call Waiting tone,
press the Goodbye Key to end your
current call.
2. Press the Line (DN) Key beside the
flashing status icon to answer the
incoming call.
Handle multiple calls
Forward calls (M3902)
The Call Forward feature allows you to direct your calls to ring at another Line
(DN). If the telephone begins to ring, you cannot forward an incoming call in
progress.
To forward your calls:
Forward
1. Press the Forward Key, or lift the
handset and enter the Call Forward All
Calls Activate FFC (Meridian 1) or
FAC (Meridian SL-100).
2. Dial the DN where you want to
forward your calls.
Forward
3. Press the Forward Key.
To view the number that your calls
are being forwarded to:
Display
1. Press the Display Key (Meridian 1) or
Inspect Key (Meridian SL-100), or lift
the handset and enter the Call
Forward All Calls Verify FFC.
Forward
2. Press the Forward Key.
This action displays the forward
number and leaves Call Forward
active.
To cancel Call Forward:
Forward
Press the Forward Key, or lift the
handset and enter the Call Forward All
Calls Deactivate FFC (Meridian 1) or
FAC (Meridian SL-100).
To reinstate Call Forward to the same
number:
Forward
Forward
Press the Forward Key twice.
21
Handle multiple calls
Forward calls (M3903 and M3904)
The Call Forward feature allows you to direct your calls to ring at another line
(DN). If the telephone begins to ring, you cannot forward an incoming call in
progress.
To forward your calls:
Forward
1. Press the Forward Key.
The previously stored forward number
appears, if one exists, and the screen
displays Enter forward number.
2. If desired, enter a new number. The
existing number is automatically
deleted. If you make a mistake, use the
Delete Key to delete the previous
digit(s). Press Cancel to leave this
screen without forwarding your
telephone or changing the number.
Done
3. Press the Done Key to activate Call
Forward.
To view the number that your calls
are being forwarded to:
CheckFw
Exit
1. Press the Check Forward Key.
2. Press the Exit Key to return to the
previous screen.
This action will leave Call Forward
active.
To cancel Call Forward:
22
CheckFw
1. Press the Check Forward Key.
CanclFw
2. Press the Cancel Forward Key.
Additional call features
Additional call features
Use Call Pickup
Call Pickup allows you to pick up a call from any telephone in the same Pickup
Group or another Pickup Group. This feature must be enabled by, and Pickup
Group numbers must be assigned by, your network administrator.
To answer a call in your own Call
Pickup Group:
1. Lift the handset.
Pickup
2. Press the Pickup Key, or enter the
Pickup Ringing Number FFC
(Meridian 1) or FAC
(Meridian SL-100).
To answer an incoming call in
another Call Pickup Group:
1. Lift the handset.
GrpPickup
2. Press the Group Pickup Key, or enter
the Pickup Group FFC.
3. Dial the Pickup Group number of the
telephone that is ringing.
Note: This feature is not available on the
Meridian SL-100.
To answer a call at a specific
extension number within your Pickup
Group:
1. Lift the handset.
DNPickup
2. Press the DN Pickup Key, or enter the
Pickup Directory Number FFC
(Meridian 1) or the Directed Call
Pickup FAC (Meridian SL-100).
3. On the Meridian SL-100 dial the DN
of the ringing number.
Note: If the pickup DN is invalid, you
receive an overflow burst tone, and the
screen displays Release and try again.
Press the Goodbye Key.
23
Additional call features
Set up a Conference call (M3902)
You can set up a Conference call for up to six people (including yourself). Contact
your network administrator to determine the maximum number of people your
system allows on a conference call.
To set up a conference call:
Conf
1. Press the Conference Key while you
are on a call.
The other party is on hold and you
receive a dial tone.
2. Dial the number of the person you
want to add to the conference.
Conf
3. Press the Conference Key when the
person answers.
Everyone is able to join the
conversation.
If the person you attempt to add to
the conference is unavailable:
Goodbye
/
1. Press the Goodbye Key.
2. Press the Line (DN) Key to return to
your original call.
2637
Set up a Conference call (M3903 and M3904)
You can set up a Conference call for up to six people (including yourself). Contact
your network administrator to determine the maximum number of people your
system allows on a conference call.
To set up a conference call:
Conf
1. Press the Conference Key while you
are on a call.
The other party is on hold and you
receive a dial tone. The screen
displays Call on hold, dial number.
24
Additional call features
2. Dial the number of the person you
want to add to the conference.
Swap
or
Connect
3. Press the Swap Key to switch between
talking with the original caller and the
new caller. Press the Connect Key to
complete the conference.
Everyone is able to join the
conversation.
If the person you attempt to add to
the conference is unavailable:
Goodbye
1. Press the Goodbye Key.
/
2. Press the Line (DN) Key with the
flashing icon to return to your original
call.
2637
Join a call
The Call Join feature allows you to connect an incoming call to a call already in
progress thereby creating a conference call. In order to use Call Join, your
telephone must be configured with either a second line (DN) or a Call Waiting
Key.
To connect a call on hold (on a
different line) to your current call:
1. Press the Conference Key.
Conf
2. Press the Key that has the caller you
want to connect to your current call.
2498
Conf
Connect
or
M3902
M3903/
M3904
3. Press the Conference Key again
(M3902), or press the Connect Key
(M3903 and M3904).
The person on hold joins your
conversation.
25
Additional call features
Engage Group Listening
The Group Listening feature allows others to listen to a call through the speaker
while you are speaking through the handset. Group Listening must be enabled by
your network administrator. Please refer to “Activate Group Listening” on
page 39 for instructions on activating the Group listening option in the Options
List.
To engage Group Listening while on
a call:
Press the Handsfree Key. Everyone
hears the caller over the speaker, but
the caller only hears what is picked up
by the handset.
Note: You must let the caller know when
others are listening to the conversation.
This feature does not provide a tone to
inform the party on the other end of the
call that the conversation is being
monitored.
Use the Voice Messaging control screens (M3903 and M3904)
The Voice Messaging control screens allow you to send commands while
connected to your voice messaging system using the Soft Keys instead of the dial
pad. Note: This feature is not available on the Meridian SL-100.
To use Voice Messaging controls:
1. Lift the handset.
Message
/
2. Press the Message Key.
3. Use the dial pad to log in to your voice
mailbox.
26
Vmsg
4. Press the Voice Message Key.
Play
5. Press the Play Key to play your first
new message.
Additional call features
Note: Use the More. . . Key to view
additional message options.
Stop
or
Last
or
Next
or
Delete
or
Skip->
or
Skip<-
Quit
6. Press the Stop Key to pause playback
of the message. Press Play to resume
playback
or
Press the Last Key to go to the previous
message. Press Play to playback the
message or Press Last again to move
to previous messages.
or
Press the Next Key to go to the next
message. Press Play to playback the
message or Press Next again to move
to later messages.
or
Press the Delete Key to delete the
current message.
or
Press the Skip Forward Key to
advance three seconds in the current
message.
or
Press the Skip Backward Key to
rewind three seconds in the current
message.
7. Press the Quit Key at any time to exit
your voice messaging system. Your
telephone is now ready to make or
receive new calls.
27
Options List
Options List
The Options List allows you to customize certain characteristics of your phone.
Screen prompts take you step-by-step through procedures and keep you informed
on the status of the following settings: Language, Change feature key label,
Screen contrast, Volume adjustment, Ring type, Call log options, Live dial pad,
Preferred name match, Area code set-up, Call timer enable, Date/time format,
Key click enable, Headset port on call, Headset port external alerter and recorder
interface, Call indicator light, On hook default path, and Display diagnostics.
To change any option’s setting:
Options
/
1. Press the Options Key.
2. Use the Navigation Keys to move up
or down through the options list.
Select
3. Press the Select Key when the desired
option is highlighted.
4. Change the option’s settings. Refer to
the following pages for details. The
display also provides you with
information to adjust your selection.
Done
Quit
or
Options
5. Press the Done Key to save your
changes.
6. Press the Quit Key or Options Key to
exit.
/
Note: If you press the Quit Key or Options Key before you press the Done Key, you exit the
Options List without saving your changes.
28
Options List
Select a language
The display is available in multiple languages. After you select Language. . . from
the Options List menu,
1. Use the Navigation Keys to highlight
the desired language (e.g., German).
Deutsch
Select
2. Press the Select Key.
Press the Done Key to save changes. Press the Quit Key or Options Key to exit.
Change a Feature Key label (M3902)
You can change the labels on the three feature keys located at the bottom of the
display on the M3902.
To change a Feature Key label:
1. Use the down Navigation Key to
highlight Change feature key label.
Change feature key label
Select
2. Press the Select Key.
This action takes you to the Feature
Key menu and highlights Edit a
feature key label.
Select
3. Press the Select Key again.
The prompt asks you to select the key
you want to change.
4. Use the Navigation Keys to highlight
the label you want to change,
(e.g., AutoDl).
29
Options List
Select
5. Press the Select Key.
6. Press the Dial Pad Key that is printed
with the first letter in your new label.
Press the key until the correct character
appears.
7. Repeat step 6 until you have changed
the entire label.
Press the Done Key to save changes. Press the Quit Key or Options Key to exit.
Note 1: For a detailed example of using the dial pad to enter text into your M3900 Series
telephone, please see “Add a Personal Directory entry” on page 48.
Note 2: You cannot change the label on your primary DN.
Note 3: Use the Case Key to change the case of the letter, as needed. You can use the
Delete Key to delete one character, or the Clear Key if you want to delete the entire label.
Note 4: Press the Up Navigation Key to access special characters you may want to include
in the label. Use the Navigation Keys to locate the character you want to include. Press the
Select Key to choose the highlighted character. Press the Return Key to return to label entry
without selecting a special character.
To restore all key labels:
1. Use the down Navigation Key to
highlight Restore all key labels.
Restore all key labels
Select
2. Press the Select Key.
The display asks you to verify that you
want to restore all labels.
Restore
3. Press the Restore Key.
Press the Done Key to return to the Options List. Press the Options Key to exit.
30
Options List
Change a Feature Key label (M3903 and M3904)
You can change the name on the Programmable Line (DN)/Feature Keys
(self-labeled). These keys are located on both sides of the top portion of the
display area on the M3903 and M3904.
To change a Feature Key label:
1. Use the down Navigation Key to
highlight Change feature key label.
Change feature key label
Select
2. Press the Select Key.
This action takes you to the Feature
Key menu and highlights Change
feature key label.
Select
3. Press the Select Key again.
The prompt asks you to select the key
you want to change.
AutoDial
4. Press the Programmable Line
(DN)/Feature Key whose label you
want to change, (e.g., AutoDial).
5. Press the Dial Pad Key that is printed
with the first letter in your new label.
Press the key until the correct character
appears.
6. Repeat step 5 until you have changed
the entire label.
Press the Done Key to save changes. Press the Quit Key or Options Key to exit.
Note 1: For a detailed example of using the dial pad to enter text into your M3900 Series
telephone, please see “Add a Personal Directory entry” on page 48.
Note 2: You cannot change the label on the primary DN. Press the Shift Key if the label
you want to change is on the second layer of the Programmable Line (DN)/Feature Keys
(self-labeled).
31
Options List
Note 3: Use the Case Key to change the case of the letter, as needed. You can use the
Delete Key to delete one character, or the Clear Key (M3903) if you want to delete the entire
label. On the M3903 you may use the Space Key to enter a space or the Restore Key to
restore the label to the default value.
Note 4: Press the Up Navigation Key or the Chars Key (M3903) to access special
characters you may want to include in the label. Use the Navigation Keys to locate the
character you want to include. Press the Select Key to choose the highlighted character. Press
the Return Key to return to label entry without selecting a special character.
To restore one key label (M3904):
1. From the Feature Key menu, use the
down Navigation Key to highlight
Restore one key label.
Restore one key label
Select
Purchasing
2. Press the Select Key.
3. Press the Programmable Line
(DN)/Feature Key (self-labeled) that
you want to restore to the original
label (e.g., Purchasing).
Press the Done Key to return to the Options List menu. Press the Quit Key or
Options Key to exit.
To restore all key labels:
1. Use the down Navigation Key to
highlight Restore all key labels.
Restore all key labels
Select
2. Press the Select Key.
The display asks you to verify that you
want to restore all labels.
Restore
3. Press the Restore Key.
Press the Done Key to return to the Options List. Press the Options Key to exit.
32
Options List
Adjust Screen contrast
The Screen contrast option allows you to adjust the contrast of the display on your
telephone. After you select Screen contrast from the Options List menu;
Lower
Higher
or
From the Contrast screen, press the
Lower Key to decrease the display
contrast level, or press the Higher Key
to increase the display contrast level.
Press the Done Key to save changes. Press the Quit Key or Options Key to exit.
Adjust volume
Note: After you select Volume adjustment. . . from the Options List menu, a list of
adjustable items for your telephone model appears. It is recommended that you adjust
these parameters while you are on a telephone call so that you can judge the impact of the
changes your are making.
To adjust the Ringer volume:
1. Select Ringer from the Volume menu.
Ringer
Lower
Higher
or
2. Press the Lower Key to decrease the
ringer volume, or press the Higher Key
to increase the ringer volume.
Press the Done Key to save changes. Press the Quit Key or Options Key to exit.
Use the procedure above to adjust the volume on the following items:
Buzzer
Headset listen
Speaker
Headset talk
Handset listen
Headset sidetone
Handsfree listen
Note 1: Headset listen is adjustable on the
M3903 and M3904 only.
Note 2: Headset talk and Headset
sidetone are adjustable on the M3904
only.
Note 3: Headset sidetone (M3904 only) is
the sound of your own voice that you hear
in the headset speaker.
33
Options List
Choose Ring type
The Ring type option allows you to choose from among the various ringing
sounds available for your telephone model. After you select Ring type. . . from
the Options List menu;
1. Use the Navigation Keys to scroll
through the list of ring types.
Ring type 3
Play
2. Press the Play Key to sample a ring
tone.
Select
3. Press the Select Key to activate the
desired ring type (M3903 and
M3904).
Press the Done Key to save changes. Press the Quit Key or Options Key to exit.
Select Call Log options
The Call Log options (available on the M3903 and M3904) provides a choice of
logging all incoming calls, logging only the unanswered calls, or not logging any
calls. The Call Log holds up to 10 different incoming entries for the M3903 and up
to 20 for the M3904. After you select Call log options from the Options List
menu;
From the Log options menu, use the
Navigation Keys to highlight and
select either:
Log all calls
or
Log unanswered calls
Log all calls
or
Log unanswered calls
Note: New call indication must be set
to On, if you want Call Log notification.
Press the Done Key to save selection. Press the Quit Key or Options Key to exit.
34
Options List
Use Live dial pad
The Live dial pad option (available on the M3904) allows you to press any dial
pad key to automatically access a dial tone. After you select Live dial pad from
the Options List menu;
On
or
Off
From the Live dialpad screen, press
the On Key to turn on Live dial pad, or
press the Off Key to turn off Live dial
pad.
Press the Done Key to save changes. Press the Quit Key or Options Key to exit.
Select Preferred name match
The Preferred name match option (available on the M3904) displays the names
of incoming and outgoing callers as stored in your Personal Directory, if the
telephone number matches the one stored in your directory. This option allows you
to personalize the displayed names for incoming and outgoing calls. After you
select Preferred name match from the Options List menu;
On
or
Off
From the Name match screen, press
the On Key to turn on Preferred name
match, or press the Off Key to turn off
Preferred name match.
Press the Done Key to save changes. Press the Quit Key or Options Key to exit.
Note: Preferred name match cannot support Dialed Number Identification
Services (DNIS) interworking unless the preferred name configured (within the set)
is less than or equal in length to the CPND/DNIS name configured on the Call
Server.
Set up area code
Using the Area code set-up option (available on the M3904) causes the Callers
List and Calling Line ID (CLID) display show the number/extension followed by the
area code/prefix in parenthesis. This makes it easier to identify local calls and
internal calls. You can define up to three area codes. After you select Area code
set-up from the Options List menu
1st Code: 408
2nd Code:
3rd Code:
Use the Navigation keys to place your
cursor in the first line and use the dial
pad to enter an area/country code of
your choice.
35
Options List
Note: You can enter up to three codes of
your choice.
Press the Done Key to save changes. Press the Quit Key or Options Key to exit.
Enable Call timer
The Call timer enable option measures how long you are on each call. After you
select Call timer enable from the Options List menu;
On
Off
or
From the Call timer screen, press the
On Key to turn on the Call timer, or
press the Off Key to turn off the Call
timer.
Press the Done Key to save changes. Press the Quit Key or Options Key to exit.
Select Date/time format
There are eight Date/time formats. Four formats are based on the 12 hour clock
and four are based on the 24 hour clock. After you select Date/time format. . .
from the Options List menu;
Use the Navigation Keys to scroll
through the eight formats.
Format 3
Press the Done Key to select the highlighted format. Press the Quit Key or Options
Key to exit.
Enable Key click
The Key click option causes the handset or speaker to produce a clicking sound
when you press the telephone keys. After you select Key click enable from the
Options List menu;
On
Off
or
From the Key click screen, press the
On Key to turn on Key click, or press
the Off Key to turn off Key click.
Press the Done Key to save changes. Press the Quit Key or Options Key to exit.
36
Options List
Use Headset port on call
The Headset port on call option (available on the M3904) requires that a
lamp-type accessory be connected to the headset port. When the Headset port on
call option is activated and the user is on a call, the lamp lights providing an
indication that a call is in progress. After you select Headset port on call from
the Options List menu;
On
Off
or
From the On call screen, press the On
Key to turn on Headset port on call, or
press the Off Key to turn off Headset
port on call.
Press the Done Key to save changes. Press the Quit Key or Options Key to exit.
Note: Additional equipment is required to implement this option. For more information
please contact your Nortel Networks distributor.
Activate Headset port external alerter
When the Headset port external alerter option (available on the M3904) is
activated, it supports a visual or audible alerter and/or recorder device. This
device plugs into the Headset port, which is located on the bottom of the
telephone. After you select Headset port ext alerter from the Options List
menu;
On
Off
or
From the External alerter screen, press
the On Key to turn on Headset port
external alerter, or press the Off Key to
turn off Headset port external alerter.
Press the Done Key to save changes. Press the Quit Key or Options Key to exit.
Note: Additional equipment is required to implement this option. For more information
please contact your Nortel Networks distributor.
Use Call indicator light
You can control the incoming call indicator light (available on the M3904). After
you select Call indicator light from the Options List menu;
On
Off
or
From the Indicator screen, press the
On Key to turn on Call indicator light,
press the Off Key to turn off Call
indicator light.
Press the Done Key to save changes. Press the Quit Key or Options Key to exit.
37
Options List
Set On hook default path
The On hook default path option (available on the M3903 and M3904)
automatically opens the voice path on either the Headset or on Handsfree when
you press a Line (DN) Key. After you select On hook default path from the
Options List menu;
From the On hook path menu, use the
Navigation Keys to highlight and
select either:
Handsfree selected
or
Headset selected
Handsfree selected
or
Headset selected
Press the Done Key to save selection. Press the Quit Key or Options Key to exit.
Amplified headsets are compatible with your M3900 Series Meridian Digital
Telephone. The amplified headset is an option for noisy environments. An
amplified headset should be connected to the handset jack. The Headset Key is
not able to control a headset that is connected to the handset jack. In this
configuration, do not select Headset as the On hook default path.
For an amplified headset, adjust the volume using the Volume Control Bar on
your telephone before adjusting the volume on your headset amplifier. To
minimize distortion, the volume setting on the amplifier should be higher than the
volume setting on the telephone.
Unamplified headsets are compatible with the M3903 and M3904. An
unamplified headset should be plugged into the headset jack. With Headset
selected as the On hook default path, you can make calls or answer incoming
calls by pressing a DN Key.
For an unamplified headset, access Volume Adjustment in the Options List to
adjust the headset volume and sidetone (M3904) that work best with the headset
you are using. You may also use the Volume Control Bar to adjust the headset
volume while you are on a call.
Refer to your distributor for recommended headset types for use with the M3900
Series telephones.
38
Options List
Display diagnostics
The Display diagnostics option tests the functionality of your telephone’s display
screen and indicator lights. This option also provides information on the firmware
currently in use on your M3900 series telephone. After you select Display
diagnostics from the Options List menu;
Use the up or down Navigation Keys
to scroll through the list and view the
changing display screens.
Press the Done Key to return to the Options List menu. Press the Quit Key or
Options Key to exit.
Activate Group Listening
The Group Listening feature allows you to talk on the handset to one party while
other people listen to the conversation on your telephone’s speaker. The network
administrator must enable this feature. After you select Group listening from the
Options List menu;
On
Off
or
From the Group listening screen, press
the On Key to turn on Group listening,
press the Off Key to turn off Group
listening.
Press the Done Key to save changes. Press the Quit Key or Options Key to exit.
Note 1: The Group listening selection will not appear in the Options List menu of your
telephone unless this feature has been enabled by your network administrator.
Note 2: You must let the caller know when others are listening to the conversation.
This feature does not provide a tone to inform the party on the other end of the call
that the conversation is being monitored.
39
Call Log/Personal Directory display and controls
Call Log/Personal Directory display and controls
The M3903 has a one line display. When you press the Call Log Key, the
following screen appears:
01 Call Log (use
Callers List
)
Select
Quit
Copy
553-9079
The M3904 has a three line display. When you press the Directory/Log Key, the
following screen appears:
01 Directories
Personal Directory
Call Log (Callers List)
Call Log (Redial List)
Select
Quit
Copy
553-9080
Identify specialized keys
The Navigation Keys
application functions.
enable you to scroll through the features and
copies incoming or outgoing call numbers into your
The Copy Key Copy /
Personal Directory (available on the M3904).
The Quit Key Quit ends an active application, which does not affect the status of
the calls currently on your telephone.
40
Call Log/Personal Directory display and controls
Use Directory password protection
You can password protect your Call Log, Redial list, and Personal Directory.
To enable password protection:
/
Call Log
1. Press the Call Log Key (M3903) or the
Directory/Log Key (M3904).
or
Directory/Log
/
2. From the Directories menu, use the
Navigation Keys to highlight
Password Administration.
Password Administration
Select
3. Press the Select Key.
The Password Administration menu
appears with Password enabled: OFF
highlighted.
Select
On
4. Press the Select Key again to select
Password enabled: OFF.
5. Press the On Key to enable password
protection.
6. Dial the password.
Enter
7. Press the Enter Key.
8. Dial (enter) the password again to
confirm your password.
41
Call Log/Personal Directory display and controls
Enter
9. Press the Enter Key.
Press the Done Key to save changes. Press the Quit Key, Call Log Key, or
Directory/Log Key to exit.
To disable Personal Directory
password:
/
Call Log
1. Press the Call Log Key (M3903) or the
Directory/Log Key (M3904).
or
Directory/Log
/
2. Dial the password.
Enter
3. Press the Enter Key.
4. Use the Navigation Keys to highlight
Password Administration.
Password Administration
Select
5. Press the Select Key.
The Password Administration menu
appears with Password enabled: ON
highlighted.
Select
Off
6. Press the Select Key again to select
Password enabled: ON.
7. Press the Off Key to disable password
protection.
Press the Done Key to save changes. Press the Quit Key, Call Log Key, or
Directory/Log Key to exit.
42
Manage Call Log
Manage Call Log
The Call Log records the name and number of incoming and outgoing calls and
can be password protected on the M3904. You can activate Call Log to record all
calls, record only the unanswered calls, or record no incoming calls.
The Callers List stores incoming calls, and the Redial List stores outgoing calls in
order of date and time received/made. The oldest call is stored at the top of the
list. The newest call is stored at the bottom of the list.
The M3904 Call log list holds up to 100 entries for incoming calls in the Callers
List and 20 entries for outgoing calls in the Redial List. The M3904 can copy a
number from the Callers List or Redial List and store it in the Personal Directory.
The M3903 Call log list holds up to 10 entries for incoming calls in the Callers List
and 5 entries for outgoing calls in the Redial List.
Note: Incoming calls to DBA/KBA are not logged into the Callers List.
Access and use the Callers List (M3903)
To access the Callers List using the
Call Log Key:
1. Press the Call Log Key.
Call Log
/
2. Use the Navigation Keys to highlight
Callers List.
Callers List
3. Press the Select Key.
Select
New
Old
or
4. Press the New Key to go to the top of
the new calls list, or press the Old Key
to go to the top of the old calls list.
To access the Callers List using a
Context Sensitive Soft Key or a
Programmable Feature Key:
Callers
Press the Callers Key.
If there are new calls, you are
presented with the first call in the new
calls list. If there are no new calls, you
are presented with the first call in the
old calls list.
43
Manage Call Log
To make a call from the Callers List:
1. Use the Navigation Keys to scroll
through the Callers List and highlight
the number you want to call.
Note 1: If you are calling an external or
long distance number, you will need to edit
the number to add the access codes
required by your system to make an
external or long distance call.
2498
Note 2: Press the Pause Key to insert a
1.5 second pause in the dialing string.
Dial
2. Press the Dial Key to call the number
selected. You leave the Callers List
when you make the call.
To exit the Callers List without
making a call:
Quit
Call Log
Press the Quit Key.
or
or
/
Press the Call Log Key.
Access and use the Callers List (M3904)
To access the Callers List:
Directory/Log
/
1. Press the Directory/Log Key.
2. Use the Navigation Keys to highlight
Call Log (Callers List).
Call Log (Callers List)
Select
44
3. Press the Select Key.
Manage Call Log
New
Old
or
4. Press the New Key to go to the top of
the new calls list, or press the Old Key
to go to the top of the old calls list.
To access the Callers List using a
Context Sensitive Soft Key or a
Programmable Feature Key:
Callers
Press the Callers Key.
If there are new calls, you are
presented with the first call in the new
calls list. If there are no new calls, you
are presented with the first call in the
old calls list.
To make a call from the Callers List:
1. Use the Navigation Keys to scroll
through the Callers List and highlight
the number you want to call.
Note 1: If you are calling an external or
long distance number, you will need to edit
the number to add the access codes
required by your system to make an
external or long distance call.
2498
Note 2: Press the Pause Key to insert a
1.5 second pause in the dialing string.
Dial
2. Press the Dial Key to call the number
selected. You leave the Callers List
when you make the call.
To exit the Callers List without
making a call:
Quit
Directory/Log
Press the Quit Key.
or
or
/
Press the Directory/Log Key.
45
Manage Call Log
Access and use the Redial List (M3903)
To access the Redial List using the
Call Log Key:
/
Call Log
1. Press the Call Log Key.
2. Use the Navigation Keys to highlight
Redial List.
Redial List
Select
3. Press the Select Key.
To access the Redial List using a
Context Sensitive Soft Key or a
Programmable Feature Key:
Redial
Press the Redial Key.
You are presented with the most
recently dialed number.
To make a call from the Redial List:
1. Use the Navigation Keys to scroll
through the Redial List and highlight
the number you want to call.
2637
Note: If you are calling an external or
long distance number, be sure that the
appropriate access codes are included.
Dial
2. Press the Dial Key.
Your call is automatically dialed and
you exit the Redial list.
46
Manage Call Log
Access and use the Redial List (M3904)
To access the Redial List using the
Directory/Log Key:
Directory/Log
/
1. Press the Directory/Log Key.
2. Use the Navigation Keys to highlight
Redial List.
Call Log (Redial List)
Select
3. Press the Select Key.
To access the Redial List using a
Context Sensitive Soft Key or a
Programmable Feature Key:
Redial
Press the Redial Key.
You are presented with the most
recently dialed number.
To make a call from the Redial List:
1. Use the Navigation Keys to scroll
through the Redial List and highlight
the number you want to call.
2637
Note: If you are calling an external or
long distance number, be sure that the
appropriate access codes are included.
Dial
2. Press the Dial Key.
Your call is automatically dialed and
you exit the Redial list.
47
Access and use the Personal Directory
Access and use the Personal Directory
The Personal Directory (available on the M3904) provides a personalized
directory of names and telephone numbers. The Personal Directory allows you to
add, delete, search, and edit entries and can be password protected. The
Personal Directory holds up to 100 entries (an entry is one name and one
telephone number). You can add a directory entry by copying the entry from your
Callers List or Redial List. You can also add entries with the “Add New” Key or by
using the Personal Directory PC Utility application. The Personal Directory PC
Utility uses an accessory cartridge to connect your PC and your M3904
telephone. You can create a directory on your Personal Computer and transfer it
to your M3904 telephone.
Access the Personal Directory
Directory/Log
/
Select
1. Press the Directory/Log Key.
2. Press the Select Key in the Directories
menu to select Personal Directory.
Note: When you press the Directory/Log
Key, your Personal Directory is
automatically selected. At this point, you
may begin searching the directory using
the telephone’s dial pad. See “Search for
an entry” on page 54.
Add a Personal Directory entry
After accessing your Personal
Directory:
AddNew
1. Press the Add New Key.
2. Dial the new name.
48
Access and use the Personal Directory
Example:
To enter the name and telephone
number for Chris:
1. Dial the name using the key pad.
Note: Press the Up Navigation Key to
access special characters you may want to
include in the name. Use the Navigation
Keys to locate the character you want to
include. Press the Select Key to choose the
highlighted character. Press the Return Key
to return to label entry without selecting a
special character.
¤¤¤
››
‡‡‡
›››
‡‡‡‡
2. Press the dial pad key with the desired
letter repeatedly until that letter
appears on the display.
3. Press the right Navigation key to go to
the next letter.
Note: The cursor automatically advances
to the next position, if a different-from-last
key is pressed, or after a short pause.
Next
4. Press the Next Key.
5. Use the dial pad to enter the telephone
number associated with the name
entered above.
Note 1: The number may contain up to
31 digits.
Note 2: Press the Pause Key to insert a
1.5 second pause in the dialing string.
Note 3: If you are adding an external or
long distance number, be sure to include
the access codes required by your system to
make an external or long distance call.
Done
6. When you have finished entering all of
the digits, press the Done Key to save
the changes.
49
Access and use the Personal Directory
Quit
or
Directory/Log
7. Press the Quit Key or the
Directory/Log Key to exit.
/
Add an incoming call
/
1. Press the Copy Key. The displays
shows the message Copy to.
Dirctry
2. Press the Directory Key when the
prompt asks Copy to?.
Copy
Next
or
Clear
Next
3. Press Next to copy the incoming call
without editing the name. Edit the
number, if required (see note for
step 4), and go to step 5.
or
Press Clear to make changes to the
name before saving. Add the name
using the dial pad, Delete, and Case
Keys as needed.
4. Press the Next Key. Make changes to
the telephone number, if required.
Note 1: The number may contain up to
31 digits.
Note 2: Press the Pause Key to insert a
1.5 second pause in the dialing string.
Note 3: If you are adding an external or
long distance number, be sure to include
the access codes required by your system to
make an external or long distance call.
Done
50
5. Press the Done Key to save the entry in
your directory.
Access and use the Personal Directory
Quit
or
Directory/Log
/
6. Press the Quit Key or the
Directory/Log Key to exit.
Note: You can edit the name or number
before or after you save to the directory.
Delete or edit a Personal Directory entry
To delete a Personal Directory entry:
1. Use the Navigation Keys to highlight
the entry you want to edit or delete.
Delete
Yes
2. Press the Delete Key to delete the
currently highlighted entry in your
Personal Directory.
3. Press the Yes Key to confirm the
deletion.
To edit a Personal Directory entry:
Edit
1. Press the Edit Key to change the
telephone number or name.
2. Use the Navigation Keys to highlight
the character you want to change.
3. Use the dial pad to enter the desired
changes. Refer to“Add a Personal
Directory entry” on page 48 for an
example of how to use the dial pad to
enter names.
Next
4. Press the Next Key. Edit the number if
necessary.
Done
5. Press the Done Key to save the
changes.
Quit
or
Directory/Log
6. Press the Quit Key or the
Directory/Log Key to exit.
/
51
Access and use the Personal Directory
Delete your Personal Directory
To delete your Personal Directory:
DelList
1. Press the Delete List Key. The message
Delete all entries? appears.
Yes
2. Press the Yes Key if you want to delete
all the entries in your Personal
Directory.
or
or
No
Press the No Key if you want to return
to the top of the Personal Directory
with no changes made.
Quit
or
3. Press the Quit Key or the
Directory/Log Key to exit.
/
Directory/Log
Use the Personal Directory to make a call
To use the Personal Directory to
make a call:
1. Use the up or down Navigation Keys
to highlight the desired name or
number.
Purchasing
Dial
Note: If you are dialing an external or
long distance number, be sure that your
directory entry includes the access codes
required by your system to make an
external or long distance call.
2. Press the Dial Key.
Note: If your primary DN is busy, the
following message will be displayed
Unable to Dial - Busy Primary Line.
Press the OK Key to clear the message.
Select an available DN Key, and press the
Dial Key again.
52
Access and use the Personal Directory
Use Card View
The Card View feature provides additional information about the Personal
Directory entry.
To look at the Card View:
1. Highlight the name.
2. Press the right Navigation Key.
To dial from Card View:
1. Use the Navigation Keys to show the
name and number of the currently
selected entry in the Card View.
Note: If you are dialing an external or
long distance number, be sure that your
directory entry includes the access codes
required by your system to make an
external or long distance call.
Dial
2. Press the Dial Key to place the call.
Note: If your primary DN is busy, the
following message will be displayed
Unable to Dial - Busy Primary Line.
Press the OK Key to clear the message.
Select an available DN Key, and press the
Dial Key again.
To exit Card View:
Press the left Navigation Key to leave
the Card View and return to the
selected name.
53
Access and use the Personal Directory
Search for an entry
You can search for a particular entry in your Personal Directory.
To search for an entry:
1. Use the Navigation Keys to scroll
through the Directories menu and
highlight Personal Directory.
Personal Directory
Select
2. Press the Select Key.
3. Use the dial pad to enter the first letter
of the name your are seeking. For
example, press ¤ twice to go to the
first entry that begins with the letter
“B”.
Note: To further refine your search, wait a
couple of seconds and use the dial pad to
enter the second letter of the name you are
seeking. You may enter up to the first three
letters in the name using this method.
Copy a number from the Redial List
You can copy a number from the Redial List to the Personal Directory.
To copy a number from the Redial
List:
1. Use the Navigation Keys to highlight
the name or number in your Redial List
that you want to copy to your Personal
Directory.
2498
Copy
/
Dirctry
54
2. Press the Copy Key.
The display shows Copy to?.
3. Press the Directory Key.
Access and use the Personal Directory
Next
or
Clear
Next
4. Press Next to copy the incoming call
without editing the name. Edit the
number, if required (see notes for
step 5), and go to step 6.
or
Press Clear to make changes to the
name before saving. Add the name
using the dial pad, Delete, and Case
Keys as needed.
5. Press the Next Key. Make changes to
the telephone number, if required.
Note 1: The number may contain up to
31 digits.
Note 2: Press the Pause Key to insert a
1.5 second pause in the dialing string.
Note 3: If you are copying an external or
long distance number, be sure that your
directory entry includes the access codes
required by your system to make an
external or long distance call.
Done
6. Press the Done Key. The entry is saved
to your Personal Directory and you are
returned to the Redial List.
55
Set-to-Set Messaging
Set-to-Set Messaging
With the Set-to-Set Messaging application activated (available on the M3903
and M3904), an internal caller using an M3903 or M3904 telephone receives a
quick visual message, which you have selected, whenever they dial your
telephone number. The length of your message is limited to 24 characters. The
message is entered through the dial pad keys using a process similar to the one
used for entering names in the M3904’s Personal Directory. Only one message
can be stored in your telephone’s memory.
You can check your Call Log to determine whether or not a caller was sent the
set-to-set message. A * (M3903) or
(M3904) will appear beside the call log
entry of the callers who saw your message. Note: This feature is not available on
the Meridian SL-100.
To access Set-to-Set Messaging:
Applications
/
1. Press the Applications Key.
2. From the Applications menu, use the
Navigation Keys to highlight Set to
Set Messaging.
Set to Set Messaging
Select
3. Press the Select Key. The Set-Set
Message screen appears indicating
the status of the feature (on or off) and
whether or not a message is stored
(defined) in memory.
Note: On the M3904, if you have
activated password protection on your
Directory/Log, you will need to enter your
password to continue.
To edit the currently stored message,
or to create a new message:
Edit
56
1. Press the Edit Key.
Set-to-Set Messaging
2. From the Edit Mode screen, use the
dial pad to enter a text message. Press
the Delete Key to delete a character.
Press the Case Key to toggle between
upper and lower case characters.
Press the Cancel Key to exit the screen
without saving changes.
Note 1: Please refer to “Add a Personal
Directory entry” on page 48 for detailed
instructions on using your telephone’s dial
pad to enter text.
Note 2: While in the Edit Mode screen,
Press the Up Navigation Key to access
special characters you may want to include
in the name. Use the Navigation Keys to
locate the character you want to include.
Press the Select Key to choose the
highlighted character. Press the Return Key
to return to label entry without selecting a
special character.
Done
3. Press the Done Key.
Your message is saved and you return
to the Set-Set Msg Screen.
To select a message provided by
your network administrator:
1. From the Set-Set Msg screen, use the
Navigation Keys to scroll through the
list of available messages.
Select
2. Press the Select Key to choose the
currently displayed message.
To customize a message provided by
your network administrator:
1. From the Set-Set Msg screen, use the
Navigation Keys to scroll through the
list of available messages.
Edit
2. Press the Edit Key to choose the
currently displayed message.
57
Set-to-Set Messaging
3. From the Edit Mode screen, use the
dial pad to customize the message.
Press the Delete Key to delete a
character. Press the Case Key to toggle
between upper and lower case
characters. Press the Cancel Key to
exit the screen without saving changes.
Note 1: Please refer to “Add a Personal
Directory entry” on page 48 for detailed
instructions on using your telephone’s dial
pad to enter text.
Note 2: While in the Edit Mode screen,
press the Up Navigation Key to access
special characters you may want to include
in your message. Use the Navigation Keys
to locate the character. Press the Select Key
to choose the highlighted character. Press
the Return Key to return to message entry
without selecting a special character.
4. Press the Done Key.
Done
Your message is saved and you return
to the Set-Set Msg Screen.
Note: If you scroll to a different message in
the Set-Set Msg screen, and press the
Select Key, your changes are erased.
To activate or deactivate Set-to-Set
Messaging and exit the application:
On
/
Off
1. Press the On Key/Off Key to toggle
the Set-to-Set Messaging status
between On and Off.
Note 1: If messages have not been
provided by your network administrator
and a message has not been defined, the
On and Off Keys will not appear. Use the
Edit Key to enter a message before
activating Set-to-Set Messaging.
58
Corporate Directory
Note 2: If messages have been provided
by your network administrator, up and
down arrows appear on the right side of
the display. The On and Off Keys appear
for the most recently selected message.
Quit
or
Applications
/
2. Press the Quit Key or the Applications
Key to exit the Set-to-Set Messaging
application.
Note: If you press the Quit Key or the
Applications Key before you press the
Done Key, you exit the application without
saving your changes.
Corporate Directory
The Corporate Directory application (available on the M3903 and M3904)
allows you to search by entering the characters in the name of the person you are
calling, beginning with the last name. Once you have located the name and
number of the person, you may use the dial soft key to call the number. On the
M3904, you may copy an entry from the Corporate Directory and paste it into
your telephone’s Personal Directory for quick access.
To use the Corporate Directory
application:
Applications
/
1. Press the Applications Key.
Note: If, when you press the Applications
Key, Corporate Directory is highlighted,
you may proceed directly to step 4.
2. From the Applications menu, use the
Navigation Keys to highlight
Corporate Directory.
Corporate Directory
Select
3. Press the Select Key. The Cor Dir Find
screen appears.
4. Use the dial pad to enter the name of
the person you want to call. Enter the
last name first. Separate the last name
and first name with a comma.
59
Corporate Directory
Note 1: The comma is the first character on
the ⁄ Key on your dial pad.
Note 2: You do not need to enter the
entire name. When the Done Key is
pressed, the application will highlight the
first directory entry that matches the text
that you entered.
5. Press the Done Key. The application
highlights the first directory entry that
matches the text you entered in step 4.
If there is no match, the screen
displays No matches found for . . .
(the text that you entered).
Done
6. Use the Navigation Keys to scroll
through the directory.
Note: The entire directory is available. The
“find” process determines which directory
entry to select as your starting point.
7. If desired, use the right Navigation
Key to move from “list” view to “card”
view. In card view, the telephone and
department numbers for the entry are
viewable. Use the left Navigation Key
to return to list view.
Note: While you are in card view, you
may use the up or down Navigation Keys
to scroll through directory entries.
8. Press the Dial Key to call the person
whose name is highlighted.
Dial
Note: On the Meridian SL-100, if your
primary DN Key is busy, select an
available DN Key after pressing the Dial
Key.
To find another directory listing or to
refine your current directory search:
NewFind
60
or
Resume
Press the NewFind Key to begin a new
search, or press the Resume Key to
enter additional characters so that you
may narrow your search.
Corporate Directory
To exit the Corporate Directory
application:
Quit
or
Applications
Press the Quit Key or the Applications
Key.
/
To copy an entry from the Corporate
Directory to your telephone’s
Personal Directory:
Copy
/
Dirctry
1. With the entry selected in the
Corporate Directory, press the Copy
Key.
2. In the Copy to screen, press the
Directory Key to copy the name and
telephone number to your Personal
Directory. After you complete editing
and entering the name and telephone
number, you are returned to the
Corporate Directory.
To transfer a call to a number in the
Corporate Directory:
Transfer
Applications
/
Dial
1. Before accessing the Corporate
Directory, press the Transfer Key.
2. Press the Applications Key.
Follow the steps outlined in “To use the
Corporate Directory application:” on
page 59 to find the person to whom
you want to transfer the call.
3. Press the Dial Key to transfer the call to
the person whose name is highlighted.
61
Virtual Office
Virtual Office
The Virtual Office feature (available on the M3903 and M3904) allows you to log
into a specially designated M3903 or M3904 telephone. When you log into the
telephone your individual configuration is downloaded to the telephone for line
(DN) and feature access. Virtual Office is ideal for use on a telephone which may
be assigned to different users depending on the hour-of-the-day or the
day-of-the-week.
To logon to the Virtual Office
telephone:
1. Lift the handset.
2. Dial the Virtual office Terminal Log oN
(VTLN) FFC on the Meridian 1 or the
Virtual Office Worker IN (VOWIN)
FAC on the Meridian SL-100.
3. On the Meridian 1, from the VTN
Login screen, Enter your password
using the telephone’s dial pad.
On the Meridian SL-100, you will
receive dial tone. Enter the VOW
authorization code, if required on
your system; then, after you receive
dial tone, Enter your personal
authorization code.
Note: If you make a mistake while entering
a code or number on the Meridian SL-100,
press the • Key and re-enter the code.
4. On the Meridian 1 you will be
prompted to Enter your User ID. Use
the dial pad to Enter the primary line
(DN) assigned to your Virtual Office
telephone.
On the Meridian SL-100, you will
receive dial tone. Use the dial pad to
Enter the primary line (DN) for your
telephone; then, after you receive dial
tone, Enter your passcode.
62
Virtual Office
Note 1: If your Virtual Office telephone is
configured as an M3903, you may only log
on to an M3903. If your Virtual Office
telephone is configured as an M3904, you
may only log on to an M3904.
Note 2: If two or more users are
attempting to log on at the same moment,
the system processes the log on information
for the first user. The other users will receive
a System busy, try later. message. Wait
a moment and try to log on again.
To logoff the Virtual Office
telephone:
1. Lift the handset.
2. Dial the Virtual office Terminal Log ofF
(VTLF) FFC on the Meridian 1 or the
Virtual Office Worker OUT
(VOWOUT) FAC on the
Meridian SL-100.
or
VTLF FFC
or
If available, Press the autodial key
which has been configured to dial the
VTLF FFC.
Note 1: You can not be logged on to more
than one Virtual Office telephone at any
time.
Note 2: Your network administrator
determines whether or not your Callers List
and Redial List are erased when you log off
the Virtual Office telephone. This automatic
erase feature is not available on the
Meridian SL-100.
63
Secure your telephone
Secure your telephone
You can lock your telephone with a password to prevent unauthorized use of your
telephone. Note: This feature is not available on the Meridian SL-100.
To lock your telephone:
1. Lift the handset.
2. Dial the Lock Flexible Feature Code
(FFC) and your Electronic Lock
Password.
Note: If you perform this operation from
someone else’s telephone, dial your line
(DN).
Goodbye
/
3. Press the Goodbye Key.
To unlock your telephone:
1. Lift the handset.
2. Dial the Unlock Flexible Feature Code
(FFC) and your Electronic Lock
Password.
Note: If you perform this operation from
someone else’s telephone, dial your line
(DN).
Goodbye
/
3. Press the Goodbye Key.
To change your password:
1. Lift the handset.
2. Dial the Password Change Flexible
Feature Code (FFC) and your current
password. Dial your new password
twice (for verification).
Goodbye
64
/
3. Press the Goodbye Key.
While you are away from your desk: Call Forward
38
Copyright © 2006 Nortel Networks. All rights reserved.
The information in this document is subject to change without notice.
The statements, configurations, technical data, and recommendations
in this document are believed to be accurate and reliable, but are
presented without express or implied warranty. Users must take full
responsibility for their applications of any products specified in this
document. The information in this document is proprietary to Nortel
Networks
.Nortel, Nortel (Logo), the Globemark, SL-1, Meridian 1, and Succession
are trademarks of NortelNetworks.
Publication Number: NN10300-116
Document Release: Standard 3.00
Date: April 2006
Produced in Canada
www.nortel.com