1
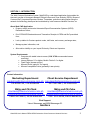
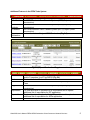
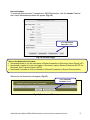
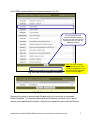
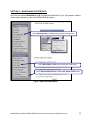
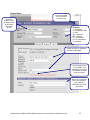
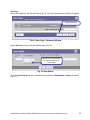
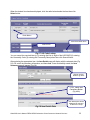
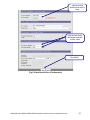
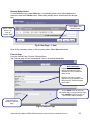
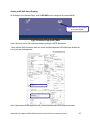
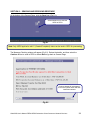
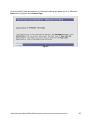
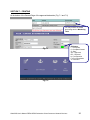
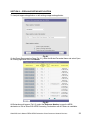
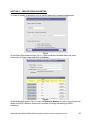
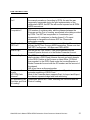
WEB CWS Custom’s Work Station User’s Manual V1.04 © Table of Contents: Section 1 - Introduction................................................................................3 About Web CWS Application: ............................................................................. 3 System Requirements: ....................................................................................... 3 Contact Information:............................................................................................ 3 Section 2 - AEDS Pre-Requisites ................................................................4 New PEZA-AEDS requirements: ........................................................................ 4 PEZA Trade System: .......................................................................................... 4 Additional Features in the PEZA Trade System: ................................................ 5 How to Nominate: ............................................................................................... 6 Note on the Nomination Procedure: .......................................................... 6 List of Exportables: ............................................................................................. 8 To Add LOE: ............................................................................................. 8 Note on the Payment Procedure: .............................................................. 8 Section 3 – Getting Started .......................................................................10 Online Registration: .......................................................................................... 10 To Log-In: .......................................................................................................... 10 Member’s Page: ................................................................................................ 11 Section 4 – Maintaining System Data ........................................................12 Exporter Maintenance ....................................................................................... 13 Section 5 – Preparing PEZA Automated Export Documentation System ...14 Type of Actions: ................................................................................................ 15 General Page: ................................................................................................... 16 Item Page .......................................................................................................... 18 Entering Multiple Items: .......................................................................... 22 Financial Page .................................................................................................. 22 Viewing of ED-SAD before Sending: ...................................................... 23 Section 6 – Sending and Receiving Response ..........................................24 Section 7 – Printing ...................................................................................26 Export Shipment Transaction Fee (ESTF): ............................................. 27 Export Document - Single Administrative Document (ED-SAD): ............ 27 InterCommerce Transaction Receipt: ..................................................... 28 AEDS System Status: ............................................................................. 28 Section 8 – Open an Existing Application ..................................................29 Section 9 – Create from an Existing ..........................................................30 FAQ: PEZA EST Fee ................................................................................31 © InterCommerce Network Services All Rights Reserved Unit 501, The Pearlbank Center 146 Valero Street, Salcedo Village 1227 Makati City, Philippines +63 (2) 752-1188 ; 845-0509 Fax +63 (2) 843 8160 [email protected] www.intercommerce.com.ph 2 SECTION 1 - INTRODUCTION The Web Customs Workstation System (WebCWS) is a web based application that enables the electronic transfer of documents between Philippine Economic Zone Authority (PEZA), Bureau of Customs (BoC), Importers/Exporters, Brokers, Forwarders, and other trading parties using the network and technology developed and maintained by InterCommerce Network Services, Inc. About Web CWS Application: Prepare, submit and receive Automated Export Documentation Systems (AEDS) Declarations Online; Print PEZA-AEDS declarations and Transaction Receipts in PEZA and BoC prescribed form; Look up tables for Customs product codes, tariff rates, and currency exchange rates; Manage system information; and Allow online visibility on your Import Entries by Clients and Importers. System Requirements: Computer with stable internet access (1024 X 768 recommended screen resolution) Internet Explorer 5.5 or higher; Mozilla Firefox 2.0 or higher Flash Player (browser plug-in) Microsoft Excel (optional - for reports) Microsoft compatible Printer (preferably Laser printer) Contact Information: Marketing Department Client Service Department [email protected] [email protected] 02-8432792 / 02-8438182 02-7521188 / 02-8450509 Mktg and CS-Clark Mktg and CS-Cebu [email protected] [email protected] [email protected] [email protected] 0928-5079044 / 0932-8463480 032- 514-2995 /0922-8689139 Chat Support: Yahoo! Messenger and MSN Messenger ID: manilacs WebCWS User’s Manual PEZA-AEDS Declaration © InterCommerce Network Services 3 SECTION 2 - AEDS PRE-REQUISITES New PEZA-AEDS requirements: Below lists must be submitted to Zone Manager and endorsed to INS by the ZM. 1. Annex – A: List of Exportables (Regulated/Unregulated) 2. Annex – B: Proforma Application Letter 3. Annex – C:Designation of Nominee Alternate Signatory 4. Annex – D : Endorsement of the list of Exportables 5. Letter D of Annex – B: INS-VASP Enrollment Form PEZA Trade System: Login at http://peza.intercommerce.com.ph (Fig 2.1) Fig 2.1 Login ID and password will be provided by InterCommerce or you may use your existing Login ID and password for the Electronic Import Permit (eIP) or it will be provided by INS. Fig 2.2 Additional Features of INS PEZA Trade System will be seen. WebCWS User’s Manual PEZA-AEDS Declaration © InterCommerce Network Services 4 Additional Features in the PEZA Trade System: Import Permit eCertification Letter of Authority eTransfers Export Declaration To view approved/used eIP for PEZA Electronic Zone Transfer System (eZTS) Project (under construction) for PEZA Electronic Zone Transfer System (eZTS) Project (under construction) for PEZA Electronic Zone Transfer System (eZTS) Project (under construction) to view the status of lodged AEDS Declaration (Fig 2.3) Fig 2.3 (Export Declaration Page) Locator Broker References Suppliers Importables Exportables Reports To view the Locator’s company information and to nominate Brokers and/or Forwarders for eIP and AEDS (Fig 2.4) To view the lists of Brokers/Forwarders To view the table of eIP Fees, HSCodes and Export Shipment Transfer Fees for PEZA Electronic Zone Transfer System (eZTS) Project (under construction) To view the status of uploaded list of Importables and to upload additional list of importables for EIP application To view the status of uploaded list of IExportables and to upload additional list of exportables for AEDs application To download reports for EIP and AEDS WebCWS User’s Manual PEZA-AEDS Declaration © InterCommerce Network Services 5 How to Nominate: To nominate Brokers and/or Forwarders for AEDS Declaration, click the Locator Tab and the Locator Maintenance window will appear (Fig 2.4). Select Nominated Forwarder button Fig 2.4 (Locator Page) Note on the Nomination Procedure: Nominated Broker is for the nomination of Broker/Forwarder for Electronic Import Permit (eIP) Nominated Logistics is for the nomination of Ecozone Logistics Service Enterprise (ELSE) for Electronic Zone Transfer System (eZTS) Nominated Forwarder is for the nomination of Broker/Forwarder for Export Documentation Window for the Nomination will appear (Fig 2.5). Select Nominate Forwarder button Fig 2.5 (Nomination Window) WebCWS User’s Manual PEZA-AEDS Declaration © InterCommerce Network Services 6 List of PEZA registered Broker/Forwarder will appear (Fig 2.6). Select the desired PEZA registered Broker/Forwarder from the lists and check the box beside the name and click the Add Button below. Fig 2.6 (Lists of PEZA Broker/Forwarder) Note: The list is arranged alphabetically and you may use the arrows below to view the desired PEZA registered Broker/Forwarder Name. Fig 2.7 (Nomination Window) System will go back to the nominated Window with your current lists of nominated Broker/Forwarder. To nominate additional Broker/Forwarder just follow Fig 2.5 and to remove nominated Broker/Forwarder, check the box beside the name and click Remove. WebCWS User’s Manual PEZA-AEDS Declaration © InterCommerce Network Services 7 Note on the Payment Procedure: Your nominated Broker/Forwarder for Export Documentation must accept/confirm your nomination using its own INS online account so that the PEZA ESTF and INS payment will be charged to automatically to Broker/Forwarder account. Should the nominated Broker/Forwarder for Export do not accept/confirm Exporter nomination, a PEZA Cash Advance by the Exporter is necessary. Nominated Broker/Forwarder may also have a PEZA Cash Advance specifically for the Exporter’s Account. List of Exportables: To view the current status of your List of Exportables (LOE), click the Exportables Tab and the List of Exportables window will appear (Fig 2.8). Fig 2.8 (List of Exportables Window) To Add LOE: Click the Add Item button From the List of Exportables Window (Fig 2.8), click the Add Item. WebCWS User’s Manual PEZA-AEDS Declaration © InterCommerce Network Services 8 Add Item Window will appear (Fig 2.9). Frequency of Information field is for the Regulated item only. Fig 2.9 (Add Item Window) Supply the item information in the fields then Click Save. Confirmation will appear (see below) then click OK. List of Exportables window will appear with the added Item Description. Please note that the uploaded new item will always have a status “For Approval”, you may follow up with your ZM/ZA for the approval of the added LOE (Fig 2.10) Fig 2.10 (List of Exportables Window with additional LOE) Note: Search-You may search the item by typing the item in the field and by selecting the Commodity Description from the drop down box then click Go. Export the List to Excel-Click the button and it will download all LOE in Excel Document WebCWS User’s Manual PEZA-AEDS Declaration © InterCommerce Network Services 9 SECTION 3 – GETTING STARTED Online Registration: Once the INS registration form and Information Services Agreement (ISA) has been submitted to InterCommerce, Exporter may already register On-line to be activated by InterCommerce. Visit www.intercommerce.com.ph and select Register (Fig 2.1) Select Register to create an Online Profile Fig 3.1 InterCommerce Main Page Fill up all the necessary information and select submit. You will be informed if your registration is successful. Please call our Client Service department for follow-up on account activation. To Log-In: Using the activated UserID and password, login at www.intercommerce.com.ph then click Log-In WebCWS User’s Manual PEZA-AEDS Declaration © InterCommerce Network Services 10 Member’s Page: Select WebCWS ver 1.04 to begin PEZA-AEDS Lodgment Select to Log-out of the system Select Cash Advance to View INS transactions and current INS Cash Credit Select Account PEZA Cash Advance Import or Export to view/download PEZA transactions and current PEZA Cash Credit Select Account Info to view/edit User’s Information Fig 3.2 WebCWS Member’s Page The Account Info link lets you update user’s data and password (Fig 2.2). Since all usernames and passwords are not case sensitive, it will be the user’s responsibility to regularly update and secure their password. If you think that somebody is using or accessing your account, please contact InterCommerce (by email or fax) immediately to freeze your account. WebCWS User’s Manual PEZA-AEDS Declaration © InterCommerce Network Services 11 SECTION 4 – MAINTAINING SYSTEM DATA Once the user selects WebCWS ver 1.04, the WebCWS Main Menu (Fig 4.1) will appear. Options will be made available to enter initial PEZA-AEDS declaration. Select Exchange Rate to view current and past exchange rates Select HS CODES to view current Codes and Tariff Rates Select Exporter Maintenance to view, edit, delete or add Clients Fig 4.1 WebCWS Main Menu WebCWS User’s Manual PEZA-AEDS Declaration © InterCommerce Network Services 12 Exporter Maintenance To Edit Client Information To Delete Client Information To add new Client Fig 4.2 Once the user selects Exporter Maintenance, a pop-up window will appear to show the list of client for this account. Select Add to add a new Client. This window also allows the user to edit and delete existing data. A Unique 3 char alphanumeric code White fields are required data. Grayed out fields are optional. Type NA for not applicable fields DUNS. Same as TIN User is advised to take extra diligence in encoding the correct data Fig 4.3 Add Client Window WebCWS User’s Manual PEZA-AEDS Declaration © InterCommerce Network Services 13 SECTION 5 – PREPARING PEZA AUTOMATED EXPORT DOCUMENTATION SYSTEM In the WebCWS Main Menu, select Create/Open Export Documentation for PEZA button then Click the Submit box (Fig 5.1). Select Create/Open Documentation for PEZA then click Submit Fig 5.1 WebCWS Main Menu In the next window, select a Broker/Forwarder Name from the drop down menu (Fig 5.2) Drop down button. Select the nominated Broker/Forwarder Select appropriate mode of declaration Select an Action from the lists Select Next>> when done Fig 5.2 WebCWS User’s Manual PEZA-AEDS Declaration © InterCommerce Network Services 14 After selecting the Nominated Broker/Forwarder name, select the mode of declaration; select an Action from the lists then click Next. Type of Actions: Create a New Application – To create/prepare an application from the start with zero data Open an Existing Application – To view approved application or to edit existing unapproved application. Create from an Existing Application – To create/prepare an application from an existing approved/unapproved application. The Create a New Application window will appear with the following data: Fig 5.3 If all the details are correct, select Continue to proceed (Fig 5.4). NOTE: 1. All required fields must be filled out before the declaration can be saved. White fields are mandatory and Grey Fields are optional. 2. The Reference number will only be stored in the system when the Import declaration is saved for the first time. The format is (AAAEDYYMMDDXXX): AAA – PEZA Locator Code ED – Export Documentation YY – Year MM – Month DD - Day XXX - Series Number 3. Drop Down Box are available in some fields for the available items that needs to be selected (see sample below). WebCWS User’s Manual PEZA-AEDS Declaration © InterCommerce Network Services 15 General Page: Reference number is autogenerated (refer to the format description above) This button allows you to go back to previous page ED Status: I – Incomplete C -Complete/Created S - Sent AG – Approved ER – Rejected H- For Inspection FX-For Cancellation X- Cancelled - Select the office of Clearance - Encode the BL/AWBL Total Containers field is not editable. This will display the number of containers encoded in the item page. Name can be selected thru Look-up table or by encoding the details directly on the given fields. WebCWS User’s Manual PEZA-AEDS Declaration © InterCommerce Network Services 16 System will automatically display the Broker/Forwarder information. By default, Location of Goods is set to Importer’s Premise Select the Country of Destination from the drop down lists. Port of Loading and Port of Departure are automatically generated based on the Office of Clearance selected above. Fig 5.4 PEZA-AEDS Declarations - General Page WebCWS User’s Manual PEZA-AEDS Declaration © InterCommerce Network Services 17 Item Page Select Item Page from the General Page (Fig 5.5). The Item Page summary window will appear. Select Add Button Fig 5.5 Item Page - Summary Window Select Add button to go to the Item Details page (Fig 5.6). Select Item Lookup Button to view/select the List of Exportables Fig 5.6 Item Details Once the Item Lookup has been selected Pop-up window for Exportables Lookup will appear (Fig 5.7). WebCWS User’s Manual PEZA-AEDS Declaration © InterCommerce Network Services 18 When the desired Item has been displayed, click the radio button beside the item then click Select button. Radio Button Click Select when done Search Area Fig 5.7 HS Code Lookup You can search the required Item by (1) entering the first six digits of the HSCODES (2) entering the Commodity Code (3) entering the Commodity Descriptions then click Search Button. After selecting the appropriate Item, the Item Details page will display with the selected data (Fig 5.8). Fill out all the necessary information, and then save. Once successfully saved, the Item Summary page will appear (Fig 5.9). Always use this button to go back If FCL, select Add Containers Button (Fig 4.8A) Item Description will be displayed as selected on the Item Lookup Fig 5.8 Item Details Data WebCWS User’s Manual PEZA-AEDS Declaration © InterCommerce Network Services 19 If Add Containers Button has been selected, Additional Containers Window will appear (Fig 5.8A). Select Add Button to add the container details then click SAVE. Select Add Button to add the containers details. Fig 5.8A Additional Containers Window Type the container details then Save. WebCWS User’s Manual PEZA-AEDS Declaration © InterCommerce Network Services 20 Type the Invoice Number and Invoice Date Type the Item Gross, Net Weight and Item Invoice Value Click SAVE Fig 5.8 Item Details Data (Continuation) WebCWS User’s Manual PEZA-AEDS Declaration © InterCommerce Network Services 21 Entering Multiple Items: To enter additional item select Add button, to review/edit previous item Select Open and to remove the item select Delete button. When adding multiple items, double-check the data per item. Select Add to add additional Item Select <<Back button to go back to General Page Fig 5.9 Item Page – 1 Item Enter all the necessary values on the succeeding items. Select Save when done. Financial Page From the General Page, Click the Financial Button. The Financial page can only be accessed if there is an existing saved item. Bank Information: In preparation for the E2M BoC AEDS, Bank name has been defaulted to PCHC and Branch Name is N.A. Reference Number, currently Exporter may type 000000 or the BRN issued by Authorized Agent Bank (AAB). Click to SAVE button to Store the information and go back to General Page. Click CANCEL button to go back to General Page without changes. Total Value as per declared in the item page Fig 5.9 Financial Page WebCWS User’s Manual PEZA-AEDS Declaration © InterCommerce Network Services 22 Viewing of ED-SAD before Sending: At the bottom of the General Page, click the ED-SAD Icon to view/print the created AEDS. Select SAD icon to view/print the created AEDS Fig 5.10 General Page Icons (SAD) User is advice to review the information before sending the AEDS declaration. . Note, that the SAD information does not contain the Barcode and the ED Reference Number as it is not yet sent and approved. Note: Unprocessed AEDS application will not have barcode and AEDS Reference number. WebCWS User’s Manual PEZA-AEDS Declaration © InterCommerce Network Services 23 SECTION 6 – SENDING AND RECEIVING RESPONSE At the bottom of the General Page, click the Send Icon (Fig 6.1): Select SEND icon to send the AEDS to PEZA Fig 6.1 Note: Only AEDS application with C (Created/Completed) status can be send to PEZA for processing. The Message Checking window will appear (Fig 6.2). Review the details, and then select the Continue button to send to PEZA or select Back to go back to General Page. Continue button will not appear if the fund for PEZA and/or INS has insufficient balance Fig 6.2 WebCWS User’s Manual PEZA-AEDS Declaration © InterCommerce Network Services 24 Once successfully sent and approved, a confirmation window will appear (Fig 6.3). Select the Back button to go back to the General Page. Fig 6.3 WebCWS User’s Manual PEZA-AEDS Declaration © InterCommerce Network Services 25 SECTION 7 – PRINTING At the bottom of the General Page of the approved declaration (Fig. 7.1 and 7.2) You may monitor the AEDS processing thru the Monitoring Table Fig 7.1 ED Status: I – Incomplete C -Complete/Created S - Sent AG – Approved ER – Rejected H- For Inspection FX-For Cancellation X- Cancelled Fig 7.2 WebCWS User’s Manual PEZA-AEDS Declaration © InterCommerce Network Services 26 Export Shipment Transaction Fee (ESTF): ESTF Receipt Icon – to view/print the PEZA Transaction receipt (Fig 7.3) Fig 7.3 Export Document - Single Administrative Document (ED-SAD): SAD Icon – to view/print the ED-SAD with barcode and PEZA Reference Number (Fig 6.4) Fig 7.4 WebCWS User’s Manual PEZA-AEDS Declaration © InterCommerce Network Services 27 InterCommerce Transaction Receipt: INS Receipt Icon – to view/print the InterCommerce Transaction Receipts (Fig 7.5) Fig 7.5 AEDS System Status: Code I C Description Incomplete Complete/Created S AG Sent Approved ER H FX X Rejected For Inspection For Cancellation Cancelled Remarks Declaration has been partially completed and cannot be sent to PEZA. Declaration has been completed and can already be sent to PEZA for processing. Declaration has been sent waiting for PEZA response. Declaration has been approved. SAD and ESTF can be printed. Declaration has been rejected by the ZM Declaration has been tag “For inspection” by the ZM A request to cancel the declaration ZM confirmed that the declaration has been cancelled. WebCWS User’s Manual PEZA-AEDS Declaration © InterCommerce Network Services 28 SECTION 8 – OPEN AN EXISTING APPLICATION To view/print approved application or edit existing unapproved application. Fig 8.1 On the Export Documentation Page (Fig 8.1), select the Broker/Forwarder Name and select Open an Existing Application then click Next>> Fig 8.2 All Declarations will appear (Fig 8.2), select the Reference Number to open the AEDS declaration to Edit or Submit for AEDS Processing. Declarations with AG Status is uneditable. WebCWS User’s Manual PEZA-AEDS Declaration © InterCommerce Network Services 29 SECTION 9 – CREATE FROM AN EXISTING To create or prepare an application from an existing approved or unapproved application. Fig 9.1 On the Export Documentation Page (Fig 9.1), select the Broker/Forwarder Name and select Create from an Existing Application then click Next>> Fig 9.2 All Declarations will appear (Fig 9.2), select the Reference Number you wish to copy. System will assign New AEDS reference number and is available for editing and sending for AEDS processing. WebCWS User’s Manual PEZA-AEDS Declaration © InterCommerce Network Services 30 FAQ: PEZA EST FEE What is PEZA EST Fee? What is the Computation? Who Pays for the EST Fee? How to Pay? Where to Pay? Can you use the current eIP PEZA Cash Advance? Is it applicable to all Ecozones and Ports of Loading? The PEZA EST Fee refers to the PEZA Transhipment Fee under the manual procedures. According to PEZA, the said fee was temporarily suspended during the pilot implementation of the old/previous AEDS; the EST fee will now be imposed on all PEZA AEDS transactions. The EST fee is automatically computed based on the LCL or FCL/number of container vans, and the distance between the Ecozone and the Port of Loading, as reflected in the table provided by PEZA. The EST fee is equivalent to 2 containers (and increments of 2 containers) or fraction thereof; LCL export shipments is charged the minimum EST fee. Please see computation sample. The PEZA Locator/Exporter or its nominated Brokers/Forwarders will pay the EST fee, for every AEDS transaction. Please note that 'NO EST Fee Payment - NO Approved PEZA AEDS. Just like the eIP Fee, the EST Fee is auto-debited from the Locator/Exporter Account or to the Broker/Forwarder Account. The PEZA Locator/Exporter or its nominated Brokers/Forwarders shall maintain a PEZA Cash Advance Account and remit deposits to the PEZA Cashier at the Ecozone or Head Office. PEZA will then encode it to the PEZA Trade under the Locator/Exporter or Broker/Forwarder Account with the OR number and the amount of the deposit. INS do not issue an Account number No, INS has separated the CA for Import and Export to have an accurate monitoring of PEZA Fund. Most of the Forwarder has a separate Dept. for Import and Export thus have a separate budget and fund monitoring. Please see Table of EST Fees, indicating the Ecozones and the Ports of Loading. WebCWS User’s Manual PEZA-AEDS Declaration © InterCommerce Network Services 31