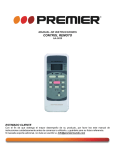
1
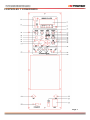
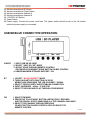
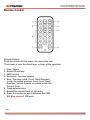
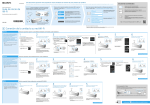
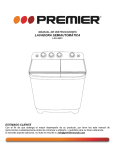
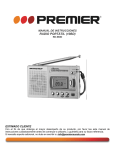
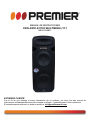
MANUAL DE INSTRUCCIONES
PARLANTE ACTIVO MULTIMEDIA (15”)
BB-5531USBTL
ESTIMADO CLIENTE
Con el fin de que obtenga el mayor desempeño de su producto, por favor lea este manual de
instrucciones cuidadosamente antes de comenzar a utilizarlo, y guárdelo para su futura referencia.
Si necesita soporte adicional, no dude en escribir a: [email protected]
PRECAUCIÓN
RIESGO DE CHOQUE
ELÉCTRICO , NO ABRA
Precaución: Para reducir el riesgo de choque eléctrico, no retire
la cubierta, no hay partes manipulables por el usuario al interior
de la unidad. Refiera todo mantenimiento o intervención técnica
a personal técnico calificado.
Este símbolo indica la existencia de voltaje peligroso al
interior de esta unidad, que constituye un riesgo de choque
eléctrico.
Este símbolo indica que hay importantes instrucciones de
operación y mantenimiento en la literatura que acompaña a
esta unidad.
LÍNEAS DE SERVICIO AL CLIENTE PREMIER
Venezuela:
Panamá:
Sitio Web:
E-mail:
0800 – ELECTRIC (353-2874)
507 300-5185
www.premiermundo.com
[email protected]
NOTA
Nos reservemos el derecho de modificar las especificaciones, características y/u operación de esta
unidad sin previo aviso, con el fin de continuar las mejoras y desarrollo del mismo.
Page 1
INSTRUCCIONES GENERALES
•
•
•
•
•
•
•
•
•
•
•
•
•
•
No sobrecargue la unidad para evitar daños en la misma.
No coloque objetos tales como candelabros sobre la unidad o justo a su lado, esto con el fin de
evitar incendios.
Esta unidad solo debe ser usada en interiores. En caso de ser usada en exteriores, asegúrese que
no esta expuesta a la lluvia ni humedad.
Cuando no use la unidad, desconéctela del tomacorriente.
Desconecte la unidad del tomacorriente antes de limpiarla o realizar reparaciones es la misma.
Asegúrese que la unidad es colocada en una superficie plata y estable.
Esta unidad puede ser colgada. En caso de colgarla, asegúrese que usa los materiales adecuados y
lo suficientemente resistentes para sostener la unidad, de igual manera asegúrese que nadie se
ubica debajo de la unidad mientras esta se encuentre colgada, esto para evitar cualquier tipo de
accidente.
No coloque sobre la unidad objetos con líquidos en su interior, tales como vasos de agua o floreros,
ya que estos podrían regarse y causar choques eléctricos.
Si desea transportar la unidad, use un medio adecuado con el fin de evitar lastimar su espalda.
Si la unidad presenta fallas en su funcionamiento, contacte a un agente calificado para su
reparación. Nunca intente reparar la unidad usted mismo.
Desconecte la unidad durante tormentas.
Ubique el cable de energía de tal manera que nadie pueda tropezarse en el ni colocar objetos
pesados sobre el.
Ajuste el nivel de volumen de la unidad al nivel mínimo antes de encenderla.
Evite que los niños jueguen con esta unidad.
OPERACIÓN DE LA UNIDAD
•
•
•
•
•
•
•
Antes de encender la unidad, baje el nivel de volumen al nivel mínimo.
Conecte la fuente de audio al conector de entrada apropiado.
Otro parlante puede ser conectado al puerto de salida, por ende varios parlantes pueden ser
conectados en cadena.
Conecte a un tomacorriente que sea compatible con el voltaje de la unidad.
Encienda la fuente de audio y la unidad.
Ajuste el nivel de volumen al nivel deseado.
Ajuste los niveles de bajos y agudos de la unidad.
Page 2
CONTROLES Y CONEXIONES
Page 3
1. Pantalla LCD
2. Control MP3 (Botón Reproducir/Pausar, Botón Modo, Botón repetir, Botón Anterior/VOL-, Botón
Siguiente/VOL+)
3. Entrada USB (El máximo de capacidad soportado es de 32GB).
4. Entrada de tarjeta de Memoria (El máximo de capacidad soportado es de 32GB).
5. Volumen de micrófono 1
6. Volumen de micrófono 2
7. Entrada de micrófono 1 de 6.35mm
8. Entrada de micrófono 2 de 6.35mm
9. Entrada de micrófono 1 XLR
10. Entrada de micrófono 2 XLR
11. Control de nivel de entrada de línea
12. Volumen maestro
13. Entrada auxiliar
14. Entrada de línea y selector de reproductor USB/SD
15. Perilla de ajuste de agudos
16. Entrada de línea RCA: Conecte la fuente de sonido a este conector.
17. Indicador LED de potencia: Se iluminara azul cuando la unidad este encendida.
18. Indicador de recorte: se ilumina rojo cuando se este cortando.
19. Control de bajos
20. Salida de línea RCA: esta salida de línea no la puede conectar a un parlante pasivo, la salida de
línea necesita ser conectada a un amplificador o a un parlante alimentado con el fin de que funcione
correctamente.
21. Volumen A de micrófono inalámbrico.
22. Volumen B de micrófono inalámbrico
23. Interruptor de potencia de micrófono inalámbrico.
24. Antena A de micrófono inalámbrico.
25. Antena B de micrófono inalámbrico.
26. Selector AC 115V/230V.
27. Interruptor de potencia.
28. Fuente de potencia.
OPERACIÓN USB/SD/BLUE-CONNECT
USB/SD
1. Entrada USB o de tarjeta SD
2. Seleccione el modo USB o SD
3. Seleccione una pista a través del control remoto o Anterior/Siguiente en control MP3
4. La capacidad de almacenamiento máximo soportado de USB/SD es de 32GB
Page 4
Blue-Connect
1. Seleccione el modo Blue-Connect
2. Encienda la función Bluetooth™ en su dispositivo móvil y busque “BB-5531USBTL”
3. Seleccione “BB-5531USBTL” y establezca una conexión
4. Ingrese la contraseña “0000” en caso de requerirla
5. Seleccione una pista y reprodúzcala a través de su dispositivo de audio externo.
Radio FM
1. Seleccione el modo FM
2. Presione Reproducir/Pausar por 3 segundos y FM empezara a buscar canales disponibles
3. Seleccione el canal manualmente usando los botones Siguiente o Anterior en el control MP3 o
selecciónelo usando el control remoto
CONTROL REMOTO
Sensor del control remoto
Apunte el control remoto a este sensor directamente en la unidad. El sensor se encuentra ubicado al
lado del logo metálico frente al parlante.
1.
2.
3.
4.
5.
6.
7.
8.
Reproducir/Pausar
Opciones de ecualización
Función FM
Aumentar / Disminuir volumen
Pista Siguiente / Anterior
Botones numéricos
Repetir actual pista o todas las pistas
Presione este botón para seleccionar entre USB, SD, Blue-connect, Entrada FM.
Page 5
ESPECIFICACIONES
Sistema
Woofer
Tweeter
Potencia RMS
Impedancia
Rango de frecuencia
Conector
Nivel de entrada de micrófono
Entrada de línea / nivel de salida
Voltaje de entrada
•
Parlante de 2x15’’
Active 2-vias rango completo
38cm (15’’)
3.5cm (1.4’’)
150W
8 ohms
35Hz-20KHz
XLR/6.35mm/RCA/3.5mm
<8mV
250mV/ 580mV
AC115/230V 60/50Hz
Las personas y/o Marcas registradas en este manual de instrucciones no están afiliadas a Premier Electric Japan Corp. y aparecen en
este Manual con propósitos ilustrativos únicamente.
Page 6
INSTRUCTION MANUAL
MULTIMEDIA ACTIVE SPEAKER (15”)
BB-5531USBTL
DEAR CUSTOMER
In order to achieve the best performance of your product, please read this instruction manual carefully
before using, and keep it for future reference.
If you need extra support, please write to [email protected]
CAUTION
RISK OF ELECTRIC
SHOCK, DO NOT
OPEN
Caution: To reduce the risk of electric shock do not open
this device, there are not serviceable parts for customers.
Please refer any maintenance or repair to qualified
personnel.
This sign means the existence of dangerous voltage at
the inside of the unit, which states a risk of electric shock.
This sign means that there are important instructions of
operation and handling in the manual that comes with this
device.
PREMIER CUSTOMER SERVICE
Venezuela:
Panama:
Website
E-mail:
0800 – ELECTRIC (353-2874)
507 300-5185
www.premiermundo.com
[email protected]
NOTE
This unit may be submitted to changes in specifications, characteristics and/or operation without prior
notice to the user, in order to continue improving and developing its technology.
OPERATION
1.
2.
3.
4.
5.
6.
7.
Prior to switching on, turn volume down to minimum.
Connect the audio source to the appropriate Input socket.
Another Speaker can be connected to the output socket, so that several boxes can be daisy chained.
Connect to the mains supply.
Switch on the audio source, followed by the active speaker.
Set the volume with the applicable control.
Adjust the bass + treble.
P-1
GENERAL USE INSTRUCTIONS
· Do not overload the box to avoid damage to the speakers.
· Do not place an open fire ( candles etc) on top or next to the box- FIRE HAZARD
· For indoor use only. If the box is used outdoors, you need to make sure that no humidity can enter
the box.
· When not in use, unplug the unit from the mains.
· Unplug the unit from the mains prior to checking or replacing the fuse.
· Make sure that the box is placed on a stable, strong surface.
· The boxes can be hung. Use only strong and approved mounting materials. During the
mounting, make sure that nobody is standing below the mounting area.
· Do not place liquids on the box and protect it against humidity. Humidity can shorten the life time
considerably.
· Only use suitable means of transportation if you want to move the box – BEARE OF YOUR BACK!!
· If the unit is damaged to an extent that you can see internal parts, do not plug the unit in a mains
Outlet. In this case, please contact PREMIER.
· Always unplug the unit during a thunderstorm or when it is not in use.
· If the unit has not been used for a long period of time, condensation can occur inside the housing.
Please let the unit reach room temperature prior to use.
· Never try to repair the unit yourself. It does not contain any user serviceable parts.
· Run the mains lead in such a way that nobody call fall over it and nothing can be put in it.
· Only use the supplied mains lead or another lead recommended by PREMIER.
· Set the unit to the lowest volume prior to switching it on.
· Keep the unit out of the reach of children.
SPECIFICATIONS
2x15’’Speaker Box
System
Active 2-way Full Range
Woofer
38cm (15’’)
Tweeter
3.5cm (1.4’’)
Power RMS
150W
Imdedance
8 ohms
Frequency Range
35Hz-20KHz
Connector
Mic Input Level
XLR/6.35mm/RCA/3.5mm
<8mV
Line Input / Output Level
250mV/ 580mV
Input Voltage
AC115/230V 60/50Hz
P-2
CONTROLS AND CONNECTIONS
P-3
1. LCD SCREEN
2. MP3 CONTROL
Play/Pause Button: The Play/Pause button will control the BLUE-CONNECT, USB/ Memory card, FM
functions.
MODE Button: Press this button to change USB/ Memory card, Blue-connect and FM radio. Blueconnect set as default when turning on the speaker.
Repeat Button: Press this button to select between repeating the current track. Repeating all tracks
and repeating one tracks on the USB or Memory card. When repeating the current track R1 will display
on the screen. When repeating all tracks RA will appear on the screen. When the repeat function is off,
RO will display on the screen.
Previous / VOL- Button: Press this button to move to the previous track on the USB , Memory card or
Blue-connect. Press and hold this button to reduce the volume.
Next / VOL+ Button: Press this button to move to the next track on the USB , Memory card or Blueconnect. Press and hold this button to increase the volume.
3. DIGITAL USB INPUT: Insert your Digital USB flash drive into this slot. The unit will only read MP3.
WMA files from Digital USB flash drive. The maximum storage size of the USB flash drive cannot
exceed 32GB
4. DIGITAL MEMORY INPUT: Insert your Digital Memory card into this slot. The unit will only read
MP3. WMA files from Memory card. The maximum storage size of the Memory card cannot exceed
32GB.
5. MIC1 VOLUME: This knob determines the signal level which will be sent by MIC1.
6. MIC2 VOLUME: This knob determines the signal level which will be sent by MIC2.
7. 6.35mm Microphone 1 input: Connect your microphone to these inputs. The microphone volume will
be controlled by the microphone knob.
8. 6.35mm Microphone 2 input: Connect your microphone to these inputs. The microphone volume will
be controlled by the microphone knob.
9. XLR Microphone 1 input: Connect your microphone to these inputs. The microphone volume will be
controlled by the microphone knob.
10. XLR Microphone 2 input: Connect your microphone to these inputs. The microphone volume will be
controlled by the microphone knob.
11. Line input level control: This knob determines the signal level which will be sent by Line Input.
12. Master Volume: Turn this knob to adjust the Blue-connect, the microphone inputs, line inputs, USB/
SD card inputs and line output volume.
13. AUX IN: is a 3.5mm input for connect phone, ipad, itouch.
14. Line Input & USB/SD player Selector: Press this button to switch between the Line input and the
Digital Blue-connect/Memory/USB.
15. Treble Knob: Turn this knob to increase the treble on the Blue-connect input, USB/ Memory card
inputs, microphone,and line input.
16. RCA LINE INPUT: Connect your sound source to this RCA input. The line volume will be controlled
by the line level knob.
17. Power LED Indicator: This indicator will illuminate in Blue light when it is power on.
18. Clip Indicator: This indicator will illuminate in Red light when it is clipping.
19. Bass Knob: Turn this knob to increase the Bass for Blue-connect/ USB/ Memory card, MIC. And Line
inputs.
20. RCA line output: is the line output. It can’t connect with a passive Speaker, The line output needs to
be connected to an amplifier or a powered loudspeaker in order to function properly.
21. Wireless microphone A Volume
P-4
22. Wireless microphone B Volume
23. Wireless microphone Power Switch
24. Wireless microphone Antenna A
25. Wireless microphone Antenna B
26. 115V/230V AC Seletor
27. Power Switch
28. Power supply: Connect the power cord here. The power switch should be set to the off position
before the power supply is connected.
USB/SD/BLUE CONNECT/FM OPERATION:
USB/SD
1. INPUT USB OR SD CARD
2. SELECT “USB” OR “SD” MODE
3. SELECT SONG THROUGH REMOTE CONTROL
OR PREVIOUS SONG/NEXT SONG BUTTON ON MP3 CONTROL
4. USB/SD MAXIMUM STORAGE SUPPORT: 32G
BT
1. SELECT “ BLUE-CONNECT” MODE
2. TURN ON BLUETOOTH FUNCTION ON YOUR
MOBILE AND SEARCHING THE “BB-5531USBTL” SIGNAL
3. SELECT “BB-5531USBTL”AND ESTABLISH CONNECTION
4. INPUT PASSWORD “0000” IF ASK FOR
5. SELECT THE SONG AND PLAY THROUGH YOUR MOBILE
FM
1. SELECT FM MODE
2. PRESS THE “PLAY/PAUSE” BUTTON LASTING FOR 3 SECONDS
AND THE FM WILL START SEARCHING ALL THE CHANNEL AVAILABLE
3. SELECT THE CHANNEL THROUGH PREVIOUS
OR NEXT BUTTON ON MP3 CONTROL KEYS OR SELECT BY
REMOTE CONTROL
P-5
Remote Control
Remote-Sensor:
Point the remote to this sensor to control the unit.
The sensor is near the metal logo, in front of the speakers.
1.
2.
3.
4.
5.
Play / Pause
Select EQ options
FM Function
Decrease / Increase Volume
Next / Previous track: Press “Next/Previous”
to skip to next or previous track; hold “Next/
Previous” to fast forward or rewind within the
Current track.
6. Track selector keys
7. Repeat the current track or all tracks
8. Press this button to select between the USB,
SD, Blue-connect, FM input.
P-6