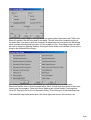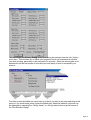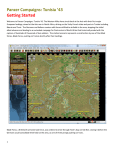
1
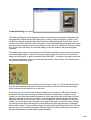
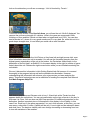
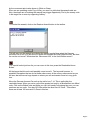
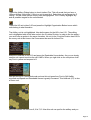
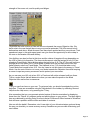
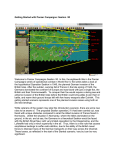
Getting Started This file contains instructions on how to get started with the Tobruk ‘41 software. If it is not already running, you should run the Main Program by clicking on the Main Program entry in the HPS Tobruk ‘41 program group (The HPS Tobruk “41 program group can be found under the Programs list from the Start button). By default, after the introduction the Main Program begins by prompting you for the name of the file to open using the File Selection Dialog. These instructions will get you started using the Tobruk Getting Started scenario. At the Fire Selection Dialog screen select New under the status section and Normal under mode. In the list of files displayed by the File Selection Dialog; select the #00_Started.scn. Information such as the title and the designer(s) will be displayed just above the short description of the battle. This is called the Overview and it is a good idea to read this section, as it will provide you insight in to the historical conditions occurring at the time of the battle. Sometimes you will get hints on how the designers may have intended the scenario to be played. Below the overview you will see the Map size and the number of turns in the scenario. This information can be used to judge if the scenario is suitable for your tastes and timeframe. Click on the OK button when you are ready to continue. Next, the A/I Selection Dialog will appear. Page 1 Since we are going to play as the Axis forces you should select Automatic with FOW in the Allied A/I group on the left hand side of the dialog. This will cause the computer to play as the Allied side. If we want to give the computer an advantage we could move the Advantage slider towards the Allied side, but leave it in the middle for now. This dialog screen can also be used to select the Optional Rules by clicking the Rules button at the bottom. Do so now to bring up the Optional Rules Dialog. By clicking the Default button at the bottom you will notice that the four Alternative Resolution options on the left are marked with a check. We will now also check off two more rules to play this scenario. Check the Recon Spotting and Virtual Supply Trucks options. Click OK. Now click OK on the A/I Selection Dialog. This will bring us to the battlefield map. The battlefield map will be drawn and in the lower right-hand corner of the screen, the Page 2 Command Dialog will appear . This dialog will appear at the beginning of each turn and tell you important information that has happened. Notice that this first report tells you that you first turn will be a “Dawn Turn.” Visibility is reduced during the Dawn and Dusk turns and playing with Fog Of War we will only see one Allied unit at the start of the game. The Command Report provides other useful pieces of game information and it is worth your time to look at it carefully at the start of each turn. Click on the OK button to close this dialog so you can examine the map and game interface. The battle begins with you in command of the German and Italian forces and as you read in the scenario description, “When the advance began again, the Germans did not know where the Allies were, or when they would stand and fight.” Looking at the map we can see our German and Italian units in the lower left-hand section of the screen. The Germans are blue and the Italians are green. You will only be able to see one Allied unit at this time. In hex # 1,16 a British Armored Car unit with an undetermined amount of vehicles is present. We know there are more Allied units out there but not visible to us at this time. Continuing to look over the map we see an Objective Hex at hex # 15,8 worth 25-points. It is a brown oval, the color showing you that the computer Allied player, controls it. In the center is a value that represents the number of victory points you gain or will deny the other side from having at the end of the game. In the top right-hand corner we also see an Axis Objective Hex with a value of zero. This is an Exit Objective. An Exit Objective is one that initially has a zero value and is located on the edge of the map. You receive Victory Points for moving units to this hex and then removing them from play using the menu Command | Remove from Map. To score a Major Victory we will need to gain at least 50 points. During play we will move our units towards the 25-point objective Hex but before we do so take a moment to familiarize yourself with the game interface. Page 3 Along the top of the screen you will see a Menu, and a Toolbar. All of the functions, such as firing Artillery, change a unit into Travel mode from normal or Deployed mode, or even advancing to the next turn is done from here. A detailed description of each Menu item and Button on the Toolbar can be seen in the Main Program Help File. Of course as with any Windows program, if your place your cursor over a button and wait for a moment, a "Tool Tip" is revealed. You will find the Tool Tips handy to learn the function of the buttons. As you explore the Menus and Buttons, you will find many useful functions to help you customize the game. For example, many veteran players enable Settings | Auto Scroll to remove the Windows Scroll bars so as to freely scroll around a large map using the mouse. Another useful feature is to activate the Divisional Markings from the toolbar. This toggles the display of colored symbols on each counter to indicate the Division or other higher-level organization the unit is associated with. Along the bottom of the screen you can see the Status Bar, which contains several pieces of information including Game Time, Date, what turn, and how many turns in the scenario. In the lower right you can see visual display of the time of day where the black at either end depicts night and the yellow in the center is daylight. Each turn in the game represents 2 hours during the day and 4 hours in the night. As time passes in each day the red current turn indicator moves from left to right, following the sun. The Status Bar is also used to display game messages, such as those you will see if you attempt to perform a function that is not allowed. For example, in the game you are not permitted to move a tank though a water hex. And if you try, nothing will happen. But if you Page 4 look on the status bar you will see a message “Unit is blocked by Terrain”. On the left of the screen, in the Hex Info Area, you will see the unit 1/Aufk.3 displayed. You can see the unit has a strength of 6 vehicles. Units in the game are measured in Men, Vehicles or Guns and this Vehicle unit has taken no losses and is at 100%. You can also see its Morale is C, where A is very good morale and E is very bad. So, while this unit is in good shape strength wise, it is not what you would call an elite formation. If you place your cursor over the Unit Picture or Hex Area Info and right mouse click, even more information about the unit is revealed. You will see the formation hierarchy from the highest parent organization of the unit at the bottom, the Deutsches Afrika-Korps, to the description of the unit itself, an Sdkfz221. In the same display to the right is number of game factors about the unit. Release the right mouse button when you are finished examining the unit details. We won’t discuss this information in this Getting Started help file because it is covered thoroughly in the program help as well as the printable documentation. However, understanding this information will enhance your enjoyment as you learn and play the game. These brief instructions are not a substitute for reading the complete User Manual and Main Program Help File. Left click on your Italian and German units in hex 1,18 and look at the Terrain box that appears below the unit picture. You can get confirmation on the type of terrain in the hex. In this case it is Clear. You can also see that Clear provides 0% additional protection for the defenders. Another important piece of information in this display is the Visibility, in this case 2 km. Each hex in the game represents 1 km, so in this scenario, at this time, you can see enemy units within 2 hexes. Visibility will be only 1 km at night and be reduced in dawn and dusk turns. The daytime visibility can even change increasing or decreasing from turn to turn with variations in the weather. Page 5 With your cursor on the objective hex, press the Visible Hexes button to see what hexes and how far you can see from this position. Most of the map will now be darkened and the lit up hexes will reveal what places you can see. This is governed by the visibility in hexes as well as the line-of-sight. Notice the hex with the British Unit is lit up so the unit is spotted. If you click on the enemy unit you can see some information about it, however, as this game is being played with Fog-of-War (FOW) ON, details such as exact Strength and Morale are hidden. Press the Visible Hexes button a second time to toggle this setting OFF and return the map to the normal state. There are many ways to proceed with your Mission. At this point, it is best to stop and consider your overall plan in light of your situation. The Game is a little like Chess, in that it is one thing to know HOW to move the pieces (or Units in this case) but it is quite another thing to use them in an integrated fashion to attain your goal. Here too, it is the side with the initiative that dictates the course of the play. As such, a good player will keep his opponent off balance. The best way to do this is to try and think ahead and to plan your move. No plan is perfect, nor is it likely to execute exactly as it is envisioned. So the essence of a good sound battle plan is flexibility. Examine the Map for a moment. We can see that the Axis units are in the lower left-hand portion of the map. To the North of this formation is a single British unit. To view the compass, simply press the SHIFT key and it will be displayed. To the Northeast up the trail is the 25-point Objective Hex and further along is the Exit Objective. We will challenge the known British unit but first let us go over the goal we have to achieve and how we will go about reaching it. We will want to score a victory in this battle and as stated we will need 50 points for an Axis Major Victory and half of this amount for a Minor Victory. We gain victory points three ways: killing the enemy, taking control of the enemy’s Objective Hexes and by exiting our units at the Exit Objective. This is a very short scenario and it may be difficult to get all our units off the map in such a short period of time. We will have to proceed towards the enemy Objective Hex and engage the Allied units when they are discovered. Recall from the scenario description; “When the advance began again, the Germans did not know where the Allies were, or when they would stand and fight.” There are Allied units out in the desert and they will have to be spotted before we can attack them. Our Recon units, such as the unit in hex 3,18, will be used to find the enemy, which will then be engaged and overpowered as we move to secure the Allied Objective Hex at hex 15,8. There you have it – a suitable battle plan that may change as the game progresses. Page 6 Now lets begin to move starting with the Italian Infantry unit in hex 1,18 and move it 1 hex to the North. This will place it in the adjacent hex to the British unit. Most actions, whether movement or combat, require that units first be selected. Clicking on a hex on the map with the left mouse button causes that hex to become the current Hot Spot, and the units are displayed in the Unit Window. If there is more than one unit in the hex and you only wish to select one of them, click on the pictures in the Unit Window. Notice that by clicking on the unit picture, you can Select (highlight) or Deselect (normal color) the unit. To move just right click on the hex you desire to move into. Once you have moved the Italians attempt to attack. Most veterans of the series do this by remaining in Move Mode and pressing the Control <Ctrl> Key and Right clicking. Notice when you do this the Cursor turns to a crosshair in a circle to denote Fire Mode. Since this unit has a Hard attack range of zero and the Allied unit is a Hard Target - you can assault but not fire at the British unit. With the Italian unit still selected right click on the British unit to Assault. An Assault is a different type of combat that involves movement and an attempt to occupy the Defenders’ hex. In this type of combat you do not put the game in Fire Mode. There are some restrictions on which units you can use to Assault. For example, a Disrupted unit cannot assault and a unit must also have 2/3 of its movement points remaining, which is indicated Page 7 by the movement point value shown in White or Green. Since we are operating under Fog-of-War, you won’t be told what the assault odds are. Also, the simple act of ordering the assault may trigger Opportunity Fire by the enemy units in the target hex or even by supporting Artillery. To conduct the assault, click on the Resolve Assault button in the toolbar. This will carry out the assault and display the assault results.Now select the German Armored Car in hex 3,18 and move it up the trail towards the Allied Objective Hex. But how far can the unit move? What does the “Movement 168” in the Unit Window mean? For a quick look at just how far you can move in this turn, press the Reachable Hexes Button. All the hexes that this unit could possibly move to are lit. The keyword however, is possible! Remember that we do not know where many of the enemy units are and as you will see, that will have a huge impact on where you can and cannot move to in any given turn. Move the German Armored Car unit up the trail to hex 7,14. This is well within the reachable hexes. When you arrive you will be greeted not only by a Minefield but two Allied units. Click on the British units and while you can’t tell exactly how strong they are, you can see there are two units. One has XXX Men while the other has XX Guns. This means there are at least 100 men and 10 Guns in this hex. Page 8 You may take damage from the Minefield and Opportunity Fire. The British units may randomly fire at your troops and they could fire more than once – or not at all. If they fired, you can take losses or suffer Battle Fatigue. Such information is reported in a Fire Dialog. If this dialog appears, click on OK when you are ready to continue. The two enemy units are Soft Targets and you will have your choice of which unit to concentrate you fire on. You can fire twice at the Allied units. Do so and then pull back to hex 6,14. After a unit enters a minefield, it is considered Penetrated. A Penetrated minefield does not block Supply. Engineers can remove minefields. Locate your Engineer unit in hex 1,19. You will notice for Movement Points it has 90T and there is a white bar at the bottom of the unit. The “T” stands for Travel Mode. Travel Mode means essentially that the units are lined up in such a manner as to take advantage of the road. Units in Transport Mode have increased movement rates due that are offset by reduced defense should they be need to fight or if they are attacked by air or artillery. Also, only units in Transport Mode use road movement rates or can cross a bridge. Select this unit and move it to hex 6,14. When you arrive at hex 6,14 press the Change Travel Mode button. When you do so, the white bar on the unit is removed. The number of available Movement Points (MPs) as shown in the units window is reduced from 90T to 1. The Engineer unit will not be able to move further in this turn. On turn two, as long as this unit isn’t Disrupted, you can move it into the Minefield to remove the mines. You normally do not want to attack or be attacked by enemy units while in Travel Mode but there will be cases when you might consider this. For example, you may catch weaker units and over run them. Also, this is the only way you can assault with tanks across a bridge. Now move your Armored Car in hex 1,18 to hex 4,15 to cover the flank and make a line of Zone of Control (ZOC) from the Italian unit at hex 1,17 to the Armored Car and Engineer unit at 6,14. Page 9 Select the Artillery Dialog button to check Indirect Fire. This will reveal that you have a 105mm Artillery Unit at hex 2,19 but no unit to spot for it. Select this unit and press the G Hotkey. You will notice that no enemy units are highlighted. The G Hotkey highlights any and all possible targets for the unit selected. Select the HQ unit at hex 0,20 and press the Highlight Organization Button to see which units belong in what formation. The Artillery unit is not highlighted. Now do the same for the HQ in hex 0,21. The artillery unit is highlighted with all the other units in the 5.Leichte Division. In order to fire the artillery you must have a spotter in the same formation. No unit in the 5.Leichte Division has LOS to an enemy unit at this time so the Guns cannot be used for Indirect Fire. Select the Halftrack in hex 0,19 and press the Reachable Hexes button. As you can clearly see this unit cannot travel too far with 16MPs. When you right click on the unit picture it will say Foot in yellow and a speed of 4. Now put the unit in Travel Mode and see how this unit goes from Foot to Soft Halftrk mounted and Speed and Reachable Hexes is greatly increased. This Halftrack (HT) is also a Recon unit. Move this Recon unit from hex 0,19 to 7,15. Now this unit can spot for the artillery and you Page 10 can use Indirect Fire from the Artillery Dialog Box to the British Gun in hex 7,13. On turn two you will want to Dismount or go to Normal Mode. Pressing the G Hotkey will confirm your targets. You will be able to fire only one time and the results will be displayed in the Fire Report. You may kill; inflict Fatigue and/or Disrupt enemy units. In this example all three have taken place. We should now provide cover for the right flank. Move the Motorcycle unit from 2,20 to 8,17. Select the unit (double click on it) and place it in Travel Mode (T-Mode). This time we will use a different method to move from hex to hex. You have seen that you can right click on each hex to move one hex at a time, but it is also possible to move a unit to a destination several hexes away in one step. Next, press and hold the left mouse button on the unit in the map Hot Spot. Now drag the mouse pointer to the desired destination hex and release the left mouse button there. The unit will proceed to move. If nothing happens you either had not selected the unit or you “left clicked and held” outside the Hot Spot. Since we are unsure of the location of the enemy units you should now take the Motorcycle unit out of Travel Mode either by the change Travel Mode button or the “T” Hotkey. As you gain experience you will learn when to take risks and leave the unit in Travel Mode and when to take it out. You never want to blunder into the enemy with a unit in Travel Mode. Also move the Armored Car from hex 3,20 to hex 9,20 to completely guard your flanks until you can figure out what is out there and if it threatens your flanks, your HQs, your Divisional Artillery and your supply route. Choose either Normal Mode or Travel Mode to move this unit. This will end our moves for turn one. Click on the Next Turn button. You will be prompted to save the battle you are playing and then the turn will be advanced. Page 11 Since the British are being played by the computer, you’ll notice some firing takes place automatically and, in the lower-right hand corner of the screen, the A/I Action Dialog appears. Each time it appears, click on the Step button to advance to the next action. After a while, when you are comfortable with what the A/I is doing, click on the Run button so that it doesn’t stop each time. When the Computer Opponent has completed its turn you will see your “Turn #2 of 8 - Axis Command Report”. You will see that reinforcements have arrived and Air units are now available. Click OK to continue. A quick look at the status bar at the bottom will also inform us that we have moved from Dawn to Day – units can now see further. Going over what you saw during the Computer’s turn we notice that the British unit that was assaulted by your Italian Infantry unit in turn one has retreated. Also other Allied units have moved into view. To start off turn two let’s place the reinforcements on the map. On the toolbar, you can find an Arrived Units button. You can use it at any time during your turn, but it is often best to proceed with your turn only after you know where all your units are located. Press this button now. After clicking the Arrived Units button, you should see the Arrived Dialog in the lower right hand corner of the screen. Notice that it lists three lines as there are three different groups arriving as reinforcements in three different locations. The way you place the units on the Map is to double-click on each entry in the Arrived Dialog. As you do this, you will notice the screen will move to the entry location. Notice that a red square on the map blinks to indicate the current Hot Spot location and that the new units arrive in that location and are displayed in detail in the Hex Info Area to the left of the screen. Click once for each line in the Arrived Dialog to bring on all your newly arriving units, before proceeding with your turn. Page 12 Now return to hex 6,14 and select the Engineer unit and move it into the Minefield. A “ Clearing Mines” label will be displayed on the Engineer unit in the Hex Info Area. If your Engineer unit was Disrupted you would not have been able to start clearing mines. Click on the Air Call button or use the “A” Hotkey to bring up the Air Mission Dialog. There are three groups listed for Recon and one for Air Strike. If a particular group is grayed out then the targeted hex is not in Line-Of-Sight (LOS) of a friendly unit. Depending on the structure of the Order-of-Battle file for a particular scenario, certain air units may be classified as being owned by a particular ground organization. When this occurs, air combat missions by those units can only be performed against hexes that are spotted by the owning organization. We will use the three Recon missions to try and spot more Allied units but we will save the Air Strike for later in the game. We may need it. Close the Air Mission Dialog and place the Hot Spot on hex 10,11. Reopen the Air Mission Dialog and select the first Recon Group (double click). The recon mission will then randomly provide spotting information on enemy units within the current Visibility range of the target hex. Sometimes a “?” will be displayed instead of the military symbol. This just means that an enemy unit was discovered but very little information about its weaponry and strength were discovered. It is referred to as an Unknown unit. An Unknown unit may be targeted for Indirect Fire and Air Strikes, but Indirect Fire against this unit will be at 1/4 effectiveness and the combat results will not be known. Use the last two Recon Air Missions now. Select hexes 14,11 and 9,8. Ground units that are designated for that purpose can also perform recon. The Armored Car in hex 6,14 is one such unit. Use Command/Recon Spotting to perform Recon. This command will attempt to spot enemy units within its Line-Of-Sight at a cost of 1/3 of the movement allowance. The probability of spotting the enemy units will depend on the distance from the recon unit to the enemy unit, the terrain that the enemy unit is in, the Page 13 strength of the recon unit, and its quality and fatigue. Right now we have to think on how we will move towards the enemy Objective Hex. We have units in the rear that will have to move up and be protected. The HQs cannot be left defenseless and alone. Allied Armored Cars have been spotted and they are a threat. Their speed and range in this wide-open terrain can give them the opportunity to strike deep in the rear on the weaker HQs and Artillery. Your Artillery can also be fired at this time and the choice of targets will vary depending on the LOS of units in its formation. The three reinforcement units that arrived in hex 0,19 are already in Travel Mode. Move all three along the trail to hex 6,15. The AT Guns will not have enough MPs to be taken out of Travel Mode. Unselect this unit and then remove the two Italian Infantry units from Travel Mode. The Halftrack in hex 7,15 should be taken out of Travel Mode and moved to hex 9,15. You don’t want a unit this close to the enemy in Travel Mode. Use the rest of this turn to move your flanks towards the Objective Hex while keeping a screen to spot any enemy movement and to protect your rear areas. As you can see your HQ unit at hex 0,21 is Fixed and will not be released until turn three. This is a major factor that will determine when you can make the push on the Allied Objective Hex and be free to maneuver. Carry on now from here on your own. To get more help, you should investigate the on-line help files. These are accessible using the Help button in the toolbar, by selecting General Help from the Help menu, or by pressing the F1 key. Also remember that you can generate printed copies of the documentation by displaying these from the Tobruk ‘41 program group and printing them on your printer. The best results here are obtained by printing using a current version of Microsoft Word instead of WordPad that will have a problem with the index and table of contents. Now on with the battle! Remember, don’t lose sight of your ultimate mission goal and along the way you should try to cause as many enemy casualties as you can while minimizing your own losses. Page 14 You can display the Victory Dialog at any time during the scenario from the Info | Victory … menu item. This will allow you to follow your progress, but do not be alarmed to see that your side is losing, particularly in the early part of a scenario. Often the winning side is not determined until the last couple of turns and you have plenty of time to accomplish your mission. Feel free to save this battle and come back to it later if you want to do more exploring at this point or if you would really prefer to play the British side. Whatever battle file you save can be displayed by selecting the “Old (by name)” or “Old (by date) button in top left corner of the File Selection Dialog”. Page 15 To get more information, see the following help files: User Manual Main Program Help File Scenario Editor Help File Order of Battle Editor Help File Good Luck, enjoy, and we on the development team hope that you get as much enjoyment out of playing Tobruk ’41 as we did in helping to create it. Page 16