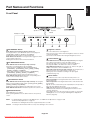
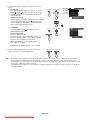
1
MultiSync 24WMGX3
User’s Manual
Downloaded from ManualMonitor.com Manuals
Index
Important Information ................................................................................................................................... English-1
Registration Information ............................................................................................................................... English-1
Preparation .................................................................................................................................................. English-3
What You Can Do with This Monitor… ............................................................................................... English-3
Accessories ........................................................................................................................................ English-4
Part Names and Functions .......................................................................................................................... English-5
Front Panel ......................................................................................................................................... English-5
Rear Panel ......................................................................................................................................... English-6
Remote Control .................................................................................................................................. English-7
Operating the Remote Control ........................................................................................................... English-8
Getting Started ............................................................................................................................................. English-9
Preparation ......................................................................................................................................... English-9
Connection Types ............................................................................................................................... English-10
Making Connections ........................................................................................................................... English-11
Setting Up .................................................................................................................................................... English-17
Performing Auto Adjust (PC Analog Connection Only) ....................................................................... English-17
Playing Games and Watching DVDs .................................................................................................. English-19
Monitor Settings (OSD Functions) ............................................................................................................... English-20
OSD Screen Operations ..................................................................................................................... English-21
Options for OSD Functions (for PC Input) .......................................................................................... English-23
Options for OSD Functions (for HDMI and Video Input) .................................................................... English-30
When OSD Functions Are Required ................................................................................................... English-33
Other Functions ........................................................................................................................................... English-34
Recommended use ...................................................................................................................................... English-35
Troubleshooting ........................................................................................................................................... English-37
If you are experiencing trouble… ....................................................................................................... English-37
Appendix ...................................................................................................................................................... English-41
Installing a Monitor Arm ...................................................................................................................... English-43
Terminology .................................................................................................................................................. English-45
Specifications ............................................................................................................................................... English-47
TCO’06 ....................................................................................................................................................... English-48
Manufacturer’s Recycling and Energy Information ...................................................................................... English-49
Downloaded from ManualMonitor.com Manuals
English
Important Information
WARNING
TO PREVENT FIRE OR SHOCK HAZARDS, DO NOT EXPOSE THIS UNIT TO RAIN OR MOISTURE. ALSO, DO NOT
USE THIS UNIT’S POLARIZED PLUG WITH AN EXTENSION CORD RECEPTACLE OR OTHER OUTLETS UNLESS
THE PRONGS CAN BE FULLY INSERTED.
REFRAIN FROM OPENING THE CABINET AS THERE ARE HIGH VOLTAGE COMPONENTS INSIDE.
REFER SERVICING TO QUALIFIED SERVICE PERSONNEL.
CAUTION
CAUTION:
TO REDUCE THE RISK OF ELECTRIC SHOCK, MAKE SURE POWER CORD IS UNPLUGGED FROM
WALL SOCKET. TO FULLY DISENGAGE THE POWER TO THE UNIT, PLEASE DISCONNECT THE
POWER CORD FROM THE AC OUTLET. DO NOT REMOVE COVER (OR BACK). NO USER
SERVICEABLE PARTS INSIDE. REFER SERVICING TO QUALIFIED SERVICE PERSONNEL.
This symbol warns user that uninsulated voltage within the unit may have sufficient magnitude to cause
electric shock. Therefore, it is dangerous to make any kind of contact with any part inside this unit.
This symbol alerts the user that important literature concerning the operation and maintenance of this unit
has been included. Therefore, it should be read carefully in order to avoid any problems.
CAUTION: Please use the power cord provided with this display in accordance with the table below. If a power cord is not
supplied with this equipment, please contact your supplier. For all other cases, please use a power cord that matches the
AC voltage of the power outlet and has been approved by and complies with the safety standard of your particular country.
North America
European
Continental
U.K.
Chinese
Japanese
Region
U.S.A./Canada
EU (except U.K.)
U.K.
China
Japan
Voltage
120*
230
230
220
100
Plug Type
Plug Shape
*When operating the MultiSync 24WMGX3 monitor with its AC 125-240V power supply, use a power supply cord that matches
the power supply voltage of the AC power outlet being used.
NOTE: This product can only be serviced in the country where it was purchased.
Registration Information
Declaration
Declaration of the Manufacturer
We hereby certify that the color monitor
MultiSync 24WMGX3 (L248HU) is in compliance with
and marked with
Council Directive 2006/95/EC:
– EN 60950-1
Council Directive 2004/108/EC:
– EN 55022
– EN 61000-3-2
– EN 61000-3-3
– EN 55024
NEC Display Solutions, Ltd.
4-13-23, Shibaura,
Minato-Ku
Tokyo 108-0023, Japan
English-1
Downloaded from ManualMonitor.com Manuals
Canadian Department of Communications Compliance Statement
DOC: This Class B digital apparatus meets all requirements of the Canadian Interference-Causing Equipment Regulations.
C-UL: Bears the C-UL Mark and is in compliance with Canadian Safety Regulations according to CAN/CSA C22.2 No. 60950-1.
FCC Information
1. Use the attached specified cables with the MultiSync 24WMGX3 (L248HU) color monitor so as not to interfere with radio
and television reception.
(1) Please use the supplied power cord or equivalent to ensure FCC compliance.
(2) Please use the supplied shielded video signal cable, Mini D-SUB 15 pin to Mini D-SUB 15 pin.
2. This equipment has been tested and found to comply with the limits for a Class B digital device, pursuant to part 15 of the
FCC Rules. These limits are designed to provide reasonable protection against harmful interference in a residential
installation. This equipment generates, uses, and can radiate radio frequency energy, and, if not installed and used in
accordance with the instructions, may cause harmful interference to radio communications. However, there is no
guarantee that interference will not occur in a particular installation. If this equipment does cause harmful interference to
radio or television reception, which can be determined by turning the equipment off and on, the user is encouraged to try
to correct the interference by one or more of the following measures:
•
•
•
•
Reorient or relocate the receiving antenna.
Increase the separation between the equipment and receiver.
Connect the equipment into an outlet on a circuit different from that to which the receiver is connected.
Consult your dealer or an experienced radio/TV technician for help.
If necessary, the user should contact the dealer or an experienced radio/television technician for additional suggestions.
The user may find the following booklet, prepared by the Federal Communications Commission, helpful: “How to Identify
and Resolve Radio-TV Interference Problems.” This booklet is available from the U.S. Government Printing Office,
Washington, D.C., 20402, Stock No. 004-000-00345-4.
Declaration of Conformity
This device complies with Part 15 of FCC Rules. Operation is subject to the following two conditions. (1) This device may not
cause harmful interference, and (2) this device must accept any interference received, including interference that may cause
undesired operation.
U.S. Responsible Party:
Address:
Tel. No.:
NEC Display Solutions of America, Inc.
500 Park Blvd, Suite 1100
Itasca, Illinois 60143
(630) 467-3000
Type of Product:
Computer Monitor
Equipment Classification:
Class B Peripheral
Model:
MultiSync 24WMGX3 (L248HU)
We hereby declare that the equipment specified above
conforms to the technical standards as specified in the FCC Rules.
Windows is a registered trademark of Microsoft Corporation. NEC is a registered trademark of NEC Corporation.
ENERGY STAR is a U.S. registered trademark.
OmniColor is a registered trademark of NEC Display Solutions Europe GmbH in the countries of EU and Switzerland.
ErgoDesign is a registered trademark of NEC Display Solutions, Ltd. in Austria, Benelux, Denmark, France, Germany, Italy,
Norway, Spain, Sweden, U.K.
NaViSet is a trademark of NEC Display Solutions Europe GmbH in the countries of EU and Switzerland.
MultiSync is a registered trademark of NEC Display Solutions, Ltd. in the countries of U.K., Italy, Austria, Netherlands,
Switzerland, Sweden, Spain, Denmark, Germany, Norway and Finland.
All other brands and product names are trademarks or registered trademarks of their respective owners.
As an ENERGY STAR® Partner, NEC Display Solutions of America, Inc. has determined that this product meets the ENERGY STAR
guidelines for energy efficiency. The ENERGY STAR emblem does not represent EPA endorsement of any product or service.
HDMI, the HDMI logo and High-Definition Multimedia Interface are trademarks or registered trademarks of HDMI Licensing LLC.
English-2
Downloaded from ManualMonitor.com Manuals
What You Can Do with This Monitor…
See low-light movie scenes more clearly and add more definition to digital camera images
• Dynamic Visual (DV) Mode: Pages 5, 7, 23 and 30
Dynamic Visual (DV) Mode provides the optimum image quality for different types of content, including movies, games,
photographs, and documents. Eight modes are available for PC Input or HDMI Input, and five modes are available for
Video Input.
Watch motion images clearly and sharply
• Motion Picture (MP) Mode: Pages 5, 7, 23 and 30
The newly-introduced Motion Picture Optimization Circuit helps to create sharp and less blurry images with during fast
motion scenes in games and movies by optimally combining three technologies: black screen insertion, backlight
scanning, and pixel overdrive.
Four levels of Motion Picture (MP) Mode are available according to the speed of motion in the image.
Enjoy images with less impact on your eyes
• Intelligent Visual (IV) Mode: Pages 24 and 30
Intelligent Visual (IV) Mode reduces the impact on your eyes by automatically controlling the screen brightness based on
ergonomic findings such as brightness perception differences according to the users’ age, and average brightness of the
current image.
Generally, settings for the younger age group are less bright, as their eyes are more sensitive to light.
Experience realistic sound created by the sound analysis and audio signal correction
• DIATONE® Linear Phase Circuit
The newly-installed DIATONE® Linear Phase Circuit analyses the intensity and transmission speed of each frequency from
a speaker.
Frequency correction characteristics produced from the analyzed data are then applied to reproduce a clear and rich
sound.
Switch one computer screen to another on a single monitor
• Dual Input: Page 11
Two computers can be connected to the monitor and the display from each computer can be displayed alternately.
Maximum of four computers can be connected when HDMI inputs are used at the same time.
Control brightness and colors
• On Screen Display (OSD) Function: Page 20
On Screen Display (OSD) enables control of screen brightness, image position, size, and colors via the screen.
This screen also enables you to set the OSD Function itself (OSD auto-off, OSD lock, etc).
Adjust monitor angle and height
• Monitor Stand Adjustment: Page 16
The monitor is equipped with a specially designed stand. The height of the stand can be altered within a range of 60 mm
(at 0° tilt).
The stand’s tilt angle can be altered in four directions: up, down, right, and left.
Control LED brightness
• LED Brightness Adjustment Function: Pages 28 and 33
Brightness of the LED indicator can be lowered to reduce disturbance when watching dark scenes in a movie or multiple
display usage.
Watch a video while you’re working on the computer
• Picture-In-Picture (PIP) Function: Pages 27 and 33
Picture-In-Picture (PIP) displays a sub-screen within the main screen. This enables you to display a video screen in a
computer screen or vise versa. (PIP Function may not be available in some combinations.)
NOTE: An LCD monitor is manufactured with high precision technology and some LCD may have some permanently lit or
unlit dots. This is common to all LCD monitors and not specific to NEC monitors.
The effective dot rate* of this monitor is 99.9995% or higher.
* The effective dot rate refers to the percentage of screen dots that NEC DISPLAY SOLUTIONS guarantees to
function correctly in the entire working dots in a given monitor.
According to ISO 13406-2, a picture element is described as a pixel, and a dot is described as a sub-pixel.
A pixel consists of three sub-pixels, each of which illuminates red, blue, or green. These sub-pixels provide color
and gradation to the corresponding pixel. In other words, a sub-pixel is an intra-pixel component that functions
independently of each other.
This monitor displays images generated from signals received from a PC, HDMI, or video input.
For details about connections, see “Connection Types” on page 10.
English-3
Downloaded from ManualMonitor.com Manuals
English
Preparation
PC Input
Connection Type
Computer Type
1
Output from Computer
Display Auto Control
Digital Connection
Windows*
Macintosh*2
DVI-D socket or DVI-I socket
Not required (plug and play)
Analog Connection
Windows*1
Macintosh*2
Mini D-Sub 15 pin socket,
Mini D-Sub 15 pin socket,
DVI-I socket*3 or D-Sub 15 pin socket
Required (Page 17)
Dual Input
Windows*1
Macintosh*2
Concurrent use of digital output and
analog output
Required (for analog
connection only)
*1 Install the specified driver when using Windows.
*2 Macintosh’s output sockets may vary according to the model. Some models may require a commercially available adapter.
See “Connection Types” on page 10 for details.
*3 Analog connection using a DVI-I socket requires a commercially available adapter.
See “Connection Types” on page 10 for details.
HDMI and Video Input
Output Signal from
Imaging Device
Imaging Device Type
Video Input Type
Audio Input Type
Component Video Output
(Y/Pb/Pr)
Digital Tuners,
DVD Players, etc.
Y/Pb/Pr Input (VIDEO1)
Video/Audio Input (VIDEO1)
S-Video Output
Video, game machine, etc.
S-Video Input (VIDEO2)
Video/Audio Input (VIDEO2)
Composite Video Output
Video, game machine, etc.
Video Input (VIDEO2)
Video/Audio Input (VIDEO2)
HDMI Video Output
Game Machine,
DVD Player, etc.
HDMI Video Input
(HDMI1 and HDMI2)
HDMI Audio Input
(HDMI1 and HDMI2)
* Shared with HDMI Video Input
Sockets
Accessories
The following accessories are included in the shipment (Contact your dealer if anything is missing or damaged):
•
Mini D-Sub 15 pin – Mini D-Sub 15 pin signal cable
(for analog connection)
Rear cover
•
DVI-D – DVI-D signal cable (for digital connection)
Audio cable
•
Remote controller with two AAA batteries
HDMI cable
•
Setup Manual
•
User’s Manual
•
Power cord
•
•
•
CD-ROM
Audio cable
Mini D-Sub 15 pin – Mini
D-Sub 15 pin signal cable
(for analog connection)
Remote controller with
two AAA batteries
HDMI cable
DVI-D – DVI-D signal cable
(for digital connection)
Power Cord
Setup Manual
Rear cover
English-4
Downloaded from ManualMonitor.com Manuals
English
Part Names and Functions
Front Panel
Remote control
receptor
Speaker
Speaker
Stand
Headphone output
1 MP MODE/PIP Button
5 Brightness Sensor
When PIP Screen Not Shown (Hot Key Function):
Pressing the button cycles MP Mode. (Four Levels) (Page 23
and 30) [OFF], [LEVEL1], [LEVEL2], and [LEVEL3].
Holding down the button turns on the PIP Function.
When PIP Screen Shown: Pressing the button toggles the main
screen and the sub-screen.
Holding down the button turns off the PIP Function.
This sensor detects the room brightness.
Then sensor becomes active when the Brightness Sensor is turned
on (Page 24 and 30).
Do not leave in the shadow when using the Brightness Sensor.
6 Control Button (
When OSD Screen Not Shown (Hot Key Function): Pressing the
top or bottom of the button controls the audio volume.
Pressing the right or left of the button controls the brightness.
Pressing the middle of the button turns mute on and off.
When OSD Screen Shown: Pressing the top, bottom, left, right, or
middle of the button controls the OSD Screen.
When PIP Screen Shown (Hot Key Function): Pressing the left or
right of the button cycles input signals for PIP Screen.
Cycling may not be available according to the input signal
combination (Page 27).
2 DV MODE/RESET Button
When OSD Screen Not Shown (Hot Key Function):
The button cycles DV Modes (Page 23 and 30).
• When PC Input or HDMI Input Selected (Eight Modes):
[STANDARD1], [STANDARD2], [TEXT], [sRGB], [PHOTO],
[GAME1], [GAME2], and [MOVIE].
• When Video Input Selected (Five Modes): [STANDARD1],
[STANDARD2], [GAME1], [GAME2], and [MOVIE].
The current status is shown at the top right of the screen.
When OSD Screen Shown: Displays the corresponding reset
screen for the currently shown controls.
7 Power Switch
3 INPUT/SELECT Button
When OSD Screen Not Shown (Hot Key Function): Pressing the
button cycles through the input signals. [D-SUB], [DVI-D], [HDMI1],
[HDMI2], [VIDEO1], and [VIDEO2].
Holding down the button displays the audio input select screen.
When OSD Screen Shown: The button specifies the control to set.
4 MENU/EXIT Button
Turns OSD Screen on and off.
While operating OSD Screen, the button returns to the previous
screen.
NOTE:
Caution:
)
This switch becomes active only when the main power is on.
When in Stand By: Pressing the button turns on the monitor and
the blue LED is lit.
When in Operation: Pressing the button turns off the monitor and
the blue LED.
Tip: Do not turn on and off the power repeatedly in a short period of
time. This may damage the monitor.
LED: LED illuminates blue when the monitor is turned on.
LED flashes blue while the Power Management Functions are in
operation (Page 34).
If the LED is not lit even after the monitor is turned on, check if the
LED brightness is too low using the LED Brightness Adjustment
Function (Page 28).
For detailed button operations in the OSD Screen, see “OSD Screen Operations” on page 21 and
“Front Panel Key Operations” on page 41.
The duration for holding down a button is approximately three seconds.
Pressing the Control button with force may cause damage to the controller.
English-5
Downloaded from ManualMonitor.com Manuals
Rear Panel
1 Video/Audio Input (VIDEO2)
9 PC Audio Input
Connect a commercially available audio cable from an
imaging device output to this input.
Connect a commercially available audio cable from a
computer output to this input.
2 Video/Audio Input (VIDEO1)
10 Signal Input (D-Sub)
Connect a commercially available audio cable from an
imaging device with a component video output (D Terminal)
to this input.
Connect a mini D-Sub 15 pin cable.
11 Signal Input (DVD-D)
Connect a DVI-D cable.
3 Optical Digital Audio Output
Outputs the optical digital audio signal.
Connect a cable to an audio amplifier etc. from this output.
This socket outputs HDMI1 and HDMI2 audio only.
Use the analog audio output to send out the other types of
audio signals.
4 Main Power Switch
|: On
O: Off
The main power switch is ON when the monitor is shipped.
5 Anti-Theft Lock Hole
12 Rear cover
Covers up the sockets and keeps the rear tidy.
13 HDMI Input (HDMI1 and HDMI2)
Connect an HDMI cable from an imaging device with an
HDMI output to this input.
(The upper socket is 1 and the lower is 2).
14 Component Input (VIDEO1)
Connect a commercially available video cable from an
imaging device with a component video output (Y/Pb/Pr) to
this input.
An anti-theft lock (by Kensington) can be installed.
15 Video Input (VIDEO2)
6 Power Input Socket
Connect a commercially available video cable from an
imaging device output to this input.
(S-Video Input has priority over this input).
Connect a power cable to this input.
7 Cable Space
16 S-Video Input (VIDEO2)
Excess cables can be tucked inside the space.
Connect a commercially available S-Video cable from an
imaging device with an S-Video output to this input.
8 Analog Audio Output
Outputs the audio signal specified on the monitor.
Connect a cable to an audio amplifier etc. from this output.
Can output audio for PC, HDMI and video.
Main Power Switch
Main Power Switch is located at the right back of the
monitor when you are facing the front of the monitor.
The main switch is ON when the monitor is shipped.
Turn main switch OFF when the monitor will not be in use
for a prolonged period.
English-6
Downloaded from ManualMonitor.com Manuals
1 POWER Button
13 OVERSCAN Button
Turns the power on and off.
Specifies the overscan ratio (Three
Levels) (Page 30 and 31): [FULL
(100%)], [98%], and [95%] or [93%].
2 VIDEO INPUT Button
[D-SUB], [DVI-D], [HDMI1], [HDMI2],
[VIDEO1], and [VIDEO2]. Switches the
image inputs.
14 ASPECT RATIO Button
Specifies the screen aspect ratio
suitable to the video input (Page 31).
• When SD Input is selected (Five
Modes): [AUTO], [4:3], [16:9],
[16:9 MODE], and [OFF].
• When HD Input is selected (Three
Modes): [16:9], [SIDE CUT], and
[16:9 MODE].
3 SCREEN SIZE Button
Changes screen sizes (Four Levels)
(Page 25 and 30): [FULL], [ASPECT],
[REAL], and [2X ZOOM].
4 THROUGH MODE Button
Turns Through Mode on and off
(Page 24 and 30).
15 INFORMATION Button
Displays the signal information
currently input, and [MODEL] and
[SERIAL NUMBER] of the monitor.
5 MENU/EXIT Button
Turns OSD Screen on and off.
While operating the OSD Screen, the
button returns to the previous screen.
16 AUTO ADJUST Button
(Available for PC analog input only)
Automatically adjusts the screen
position including left, right, top, and
bottom; horizontal size, and phase.
6 DV MODE Button
The button cycles DV Modes
(Page 23 and 30).
• When PC Input or HDMI Input is
selected (Eight Modes):
[STANDARD1], [STANDARD2],
[TEXT], [sRGB], [PHOTO], [GAME1],
[GAME2], and [MOVIE].
• When Video Input is selected
(Five Modes): [STANDARD1],
[STANDARD2], [GAME1], [GAME2],
and [MOVIE].
The current status is shown at the top right of the screen.
7 BRIGHTNESS Button
Controls the screen brightness.
: Brighter
: Darker
8 SUB-SCREEN – ON/OFF Button
Turns on and off sub-screen in PIP Function.
A sub-screen is not displayed while Through Mode is on.
17 RESET Button
When OSD Screen Is Shown. Displays
the corresponding reset screen for the
currently shown controls.
18 SELECT Button
When OSD Screen Shown.
Executes the selected control.
19 Control Buttons (
)
Executes an OSD Function.
MP MODE Button
The button cycles through the MP Modes (Four Levels)
(Page 23 and 30): [OFF], [LEVEL1], [LEVEL2], and
[LEVEL3].
This function is not available when DV Mode is set to either
[TEXT], [PHOTO], or [sRGB].
VOLUME Button
9 SUB-SCREEN – VIDEO INPUT Button
(Available only when the sub-screen is shown)
Switches videos displayed in the sub-screen.
10 SUB-SCREEN – TOGGLE Button
(Available only when the sub-screen is shown)
Toggles the currently showing main screen and the subscreen.
11 SUB-SCREEN – SIZE Button
Changes sub-screen sizes (Three Sizes).
Small, Medium, or Large.
Changes audio volume.
+: Louder
–: Quieter
AUDIO – INPUT Button
Switches audio input independently from the video input
currently provided.
AUDIO – MUTE Button
Mutes the sound.
Pressing the button again or pressing the VOLUME Button
cancels the mute.
12 SUB-SCREEN – POSITION Button
Determines the position of the sub-screen.
Press this button first and use the Control Buttons
(
) to determine the position of the sub-screen.
English-7
Downloaded from ManualMonitor.com Manuals
English
Remote Control
Operating the Remote Control
Basic Operations
Point the remote controller towards the receptor on the
monitor while operating.
Caution: Cautions on Remote Control Operations:
• The remote controller supplied with this monitor
cannot operate a TV or video.
• The remote controller is designed to function
up to three meters in a straight line from the
monitor; however, it may not function or the
monitor response may be slow depending on
the angle of the controller to the monitor. If this
happens, operate the controller at a closer
position or in front of the monitor.
• Do not drop or give a strong impact to the
remote controller.
Do not allow the controller to get wet or leave it
in a humid place.
This may damage the controller.
• Do not leave the controller in direct sunlight.
Heat may deform the controller.
• If the remote controller does not function,
assume the battery is exhausted.
Replace with new batteries.
• Avoid any obstacle between the remote
controller and the receptor on the monitor.
Replacing Batteries
A. Open the battery case cover by pressing the latch on the
cover.
B. Align the batteries according to the (+) and (-) indications
inside the case.
C. Close the cover.
Caution: • Incorrect use of batteries can result in leaks or
an explosion. Be especially careful about the
following points.
• The supplied batteries are not rechargeable.
Do not attempt to recharge them.
• Make sure to align the batteries according to
the (+) and (-) indications inside the case.
• Do not mix different types of batteries as they
posses different characteristics.
• Do not combine new batteries with used ones.
This causes shorter battery life or leakage from
the batteries.
• Remove dead batteries immediately to prevent
the batteries leaking.
Don’t touch exposed battery liquid, it may
damage the skin. Wipe with a cloth if leakage
occurs.
If the battery liquid comes into contact with the
skin, rinse thoroughly with water.
NOTE: • The supplied batteries may be consumed
quickly according to the length of preceding
storage. Replace them in good time.
• If you do not intend to use the Remote Control
for a long period, remove the batteries from the
case and store them separately.
English-8
Downloaded from ManualMonitor.com Manuals
English
Getting Started
Preparation
Caution: After taking the monitor out of the outer box, place the monitor face-down on
the floor.
Avoid placing the monitor face-up as the screws in the stand may damage the
surface (e.g. table).
Prohibition
Screws
1. Lay a soft cloth on an even stable surface and place the monitor face-down on it.
DO NOT block ventilated openings with mounting accessories or other accessories.
TIP: • Prevent the glass surface and the Control button on the front panel from touching the table or floor surface or
obstacles on the surface. Rest the monitor in a stable position.
Unstable placing may damage the monitor.
• To prevent the glossy surface of the casing from being scratched, do not remove the protective film on the glossy
surface until the monitor is set upright on its stand.
• After the monitor is set upright, remove* the protect film before using.
* Leaving the protective film may cause discoloration or other damage to the glossy surface.
Screws
Underside of the Stand
Stand Holder
Control Button
2. Remove screws and Stand Holder.
A. Remove screws.
B. Remove Stand Holder.
C. Lift the stand until it stops.
Caution: • Make sure to hold down the underside of the stand during this operation.
Otherwise the stand may accidentally raise and cause injury.
• Retain the screws and Stand Holder you have just removed as they will be required when re-packaging the
monitor in future.
3. Stand up the monitor.
a. Tilt the stand so that the bottom of the stand is extended outside the LCD panel.
b. Hold the casing and set the monitor upright.
Caution: Avoid scratching the LCD panel surface with your nails.
English-9
Downloaded from ManualMonitor.com Manuals
Connection Types
The Signal Input of the monitor accepts both analog signals (mini D-Sub 15 pin) and digital signals (DVD-D).
Also, two computers can be connected to the monitor and used at the same time by switching the image from one computer
to the other.
Check the pin type of your computer output before connecting the cable to the monitor socket.
Use the appropriate cable for each type of connection.
Digital Connection
Rear Panel
DVI-D
DVI-I*
Analog Connection
Connect
Computer
Monitor
Adapter
(commercially
available)
Mini D-Sub 15 Pin Socket
Connect
D-Sub 15 Pin Socket
*also accepts analog connection
Socket Types and Corresponding Cables
Sockets on monitor
DVI-D (digital)
Mini D-Sub 15 pin (analog)
Sockets on computer
DVI-I (analog/digital)
Connect with a DVI-D – DVI-D cable (digital)
Connect with a commercially available
DVI-A – Mini D-Sub 15 pin cable (analog)
DVI-D (digital)
Connect with a DVI-D – DVI-D cable
N/A
Mini D-Sub 15 pin (analog) (3 rows)
N/A
Connect with a Mini D-Sub 15 pin –
Mini D-Sub 15 pin cable
D-Sub 15 pin (analog) (2 rows)
N/A
Connect with a Mini D-Sub 15 pin –
Mini D-Sub 15 pin cable (a commercially
available adapter is required)
DVI-I: A DVI socket that works with both digital and analog input signals. The data type can be selected by using a cable that transfers either digital or
analog data.
DVI-D: A DVI socket that works with digital input only.
DVI-A: A DVI socket that works with analog input only.
* Apple Macintosh pin shape for analog RGB output sockets varies according to the model.
* It is not possible to connect two computers to the monitor through only the digital input.
* The monitor is not compatible with DVI-A.
English-10
Downloaded from ManualMonitor.com Manuals
English
Making Connections
TIP: Prior to connecting signal cables, switch off the monitor, computer, and peripheral devices.
NOTE: Cables can be connected more easily when the monitor is tilted upwards.
1. Connect signal cables.
Secure signal cables and adapters with attached screws after inserting them into their respective sockets.
Connecting one computer.
Through Digital Connection
DVI-D or DVI-I
Use DVI-D – DVI-D cable
Computer
Through Analog Connection
DVI-I
Adapter
(commercially
available)
Use Mini D-Sub 15 pin –
Mini D-Sub 15 pin cable
Mini D-Sub 15 pin (3 rows)
D-Sub 15 pin (2 rows)
Use commercially available
DVI-A – Mini D-Sub 15 pin cable
Adapter
(commercially
available)
Monitor (rear)
Use Mini D-Sub 15 pin –
Mini D-Sub 15 pin cable
Connecting two computers (Dual Input).
Computer
DVI-D or DVI-I
Use DVI-D – DVI-D cable
Computer
DVI-I
Adapter
(commercially
available)
Use commercially available
DVI-A – Mini D-Sub 15 pin cable
Monitor (rear)
Use Mini D-Sub 15 pin –
Mini D-Sub 15 pin cable
Mini D-Sub 15 pin (3 rows)
D-Sub 15 pin (2 rows)
Adapter
(commercially
available)
Use Mini D-Sub 15 pin –
Mini D-Sub 15 pin cable
English-11
Downloaded from ManualMonitor.com Manuals
To Connect a Computer to the HDMI Input
Computer
Commercially available
DVI-D – HDMI cable
DVI-I
DVI-D
To HDMI Input 2
or
HDMI Input 1
Monitor (rear)
When connecting a computer to the HDMI Input, a maximum of four inputs are available though DVI-D input and Mini D-Sub
input.
NOTE: When HDMI input is used for computer digital output, 1920 x 1200 resolution output may not be available.
Use DVI-D input instead.
2. Connecting an imaging device.
NOTE: For details of connecting imaging devices, see the documentation supplied with your devices.
To Connect an HDMI-Ready Imaging Device
Game machine, DVD player, etc.
Monitor (rear)
Output
HDMI cable
To HDMI Input 2
Or
To HDMI Input 1
Commercially available HDMI – DVI-D cable
To DVI-D Input
To connect an HDMI-ready imaging device to the DVI-D input, set OSD Function’s DVI EDID SELECT to AV (Page 28).
NOTE: When connecting an HDMI-ready imaging device to DVI-D input, audio included in the HDMI signals is not output.
English-12
Downloaded from ManualMonitor.com Manuals
Game machine, DVD player,
BS digital tuner etc.
Commercially available audio cable
DVI-I
Output
L
R
R
L
To Video/Audio
Input (VIDEO1)
To Y/Pb/Pr input
(VIDEO1)
Output
English
To Connect a Component Video Output - Ready Imaging Device
Monitor (rear)
Commercially available
Component Video – Component Video cable
To Connect an Imaging Device with S-Video Output
Commercially available S-Video cable
To S-Video input (VIDEO2)
Output
To Video/Audio
input (VIDEO2)
Monitor (rear)
Commercially available audio cable
Game machine, video, etc.
NOTE: Some game or video machines may use a special socket or stereo jack for audio output.
If a designated cable is required, purchase the model specified in the documentation supplied with the equipment.
To Connect an Imaging Device without S-Video/Component Video Output (Composite Video Output)
Commercially available video cable
To video input (VIDEO2)
Output
To video/audio
input (VIDEO2)
Commercially available audio cable
Monitor (rear)
Game machine, video, etc.
NOTE: Some game or video machine may use a special socket or stereo jack for audio output.
If a designated cable is required, purchase the model specified in the documentation supplied with the equipment.
English-13
Downloaded from ManualMonitor.com Manuals
To Connect an Imaging Device with DVI Output
The monitor can be used with an imaging device with DVI output (e.g. DVD player).
•
To connect a DVD player with DVI output, set OSD Function’s [DVI EDID SELECT] to [AV] (Page 28).
Monitor (rear)
DVI-D – DVI-D cable
To DVI-D input
DVI-I
DVI-D
DVD player with
DVI output etc.
3. Connect an audio cable.
Monitor (rear)
Computer
Audio cable
To audio input (pale blue)
Audio output
(green)
NOTE: • For details of connecting computers, see the documentation supplied with your computer.
• Use a low-impedance audio cable with a stereo mini jack plug.
Using a high-impedance audio cable may result in the audio not sounding or very low volume.
To Connect Audio Amplifiers
Input
Commercially available optical digital cable
To optical
digital audio
output
To connect to
an optical digital
audit input
Monitor (rear)
Audio amplifier
Speaker
Speaker
To connect to
line input
Input
Commercially available 2 pin –
Stereo mini plug audio cable
To analog audio
output (green)
NOTE: • For details of connecting an audio amplifier, see the documentation supplied with your amplifier.
• Use a low-impedance audio cable with stereo mini jack plug.
Using a high-impedance audio cable may result in the audio not sounding or very low volume.
• The optical digital audio output with this monitor is not capable for 5.1 channel.
English-14
Downloaded from ManualMonitor.com Manuals
1. Insert the power cord to the power socket of the monitor.
Connect the cord securely.
2. Feed the power cord, signal cables, and audio cables connected to the monitor through the cable space at the rear of the
stand.
Tuck the cables connected to the side of the monitor in the cable gap at the rear of the monitor (this will become a space
when the cover is closed) and feed them through the cable space of the stand.
TIP: Tilt the monitor upwards when putting the cables through the cable holes.
This will ensure sufficient cable length when the monitor is tilted back to the vertical position.
* These tasks are not required if you do not wish to use these holes for cable management.
3. Attach the rear cover.
TIP: Move the monitor up and down to confirm the cables are secured with sufficient allowance.
Caution: • Perform the reverse procedure when removing the cables and cord.
Start removing the cable from the point shown by the arrow ( ) in the following figure so that they can be
removed easily.
• Keep your face away from the rear cover and prevent your nails from getting caught in the cover when
taking it on or off.
This is to avoid injury in case the rear cover comes off accidentally.
• Prevent the cables from getting trapped in a narrow gap when replacing the rear cover.
4. Connect the power cord to the power outlet.
Hole
Hook
Cable Hole on
the Monitor
Hook
Hole
Hole
Cable Hole on
the Stand
Power cord
Power Cord Plug
TIP: The power outlet should be close to the equipment and be easily accessible.
Warning: Use the specified mains voltage only. Otherwise it may cause a fire or electric shock.
English-15
Downloaded from ManualMonitor.com Manuals
Remove
Cords from
Here
English
4. Connect the power.
5. Connecting Headphones.
Headphones can be connected to the headphone output of the monitor.
Caution: • Do not wear the headphones when connecting them to the monitor
headphones output. Loud noise may damage your ears.
• Do not turn up the volume too high while using
Headphone output
headphones.
Exposing your ears to loud volumes over a long period
may damage your hearing.
NOTE: • Headphones with a stereo mini jack plug can be used with the monitor.
If your headphone plug is too large, use a commercially available stereo mini jack plug adapter.
• Speaker sound is muted when headphones are connected to the monitor.
6. Install the monitor.
TIP: Position the mark on the underside of the stand to the front when installing
the monitor. If this mark is not aligned to the front, the monitor will not
swivel equally to the right and left.
Underside of
the Stand
(Rear)
7. Turn on the monitor and the computer.
5. Adjustments.
1. Adjust the Screen.
•
When Digital Connection is Used:
There is no need to perform screen setting adjustment as it is automatically adjusted.
•
When Analog Connection is Used:
Perform Auto Adjust following the instructions in “Performing Auto Adjust (PC Analog Connection Only)” on page 17.
If the display does not function correctly after Auto Adjust, see “Monitor Settings (OSD Functions)” on page 20.
2. Adjust Height and Angle.
Tilt Angle
Tilt Angle
Adjust the monitor height and angle to a
comfortable position. Position the monitor as
shown in the figure on the right.
Swivel Angle
Do not push the
LCD panel surface.
Approx. 60 mm
Caution: • Avoid trapping your hand or fingers between the display and the installation table or the
stand when adjusting the tilt angle and height. May cause an injury.
• The monitor joints may be stiff at the initial tilting and height adjustment. In this case,
hold the top and bottom of the monitor to make the adjustment.
• Do not tilt the monitor greater than 25° while in use, although it is physically possible.
Tilting beyond this degree may cause it to become unstable or cause insufficient
ventilation, resulting in injury or damage to the monitor.
• Set the stand height to the lowest when tilting the monitor beyond 25° for repackaging.
Otherwise, it may fall over resulting in an injury or damage to the monitor.
Also remove the rear cover before tilting.
The cover may become trapped between the back of the monitor and the stand
resulting in damage to the cover.
• Avoid pushing the LCD panel surface while adjusting the height and tilt angle.
This may cause damage, possibly leading to failure or injury.
• Swiveling may not be smooth if the monitor is installed on an uneven surface or at a
low height.
Do not swivel with force or this may damage the installation surface. Lift the monitor
front slightly when swiveling.
NOTE: The monitor joint becomes stiffer when the tilt angle reaches 25° indicating that this is the
limit for normal use.
English-16
Downloaded from ManualMonitor.com Manuals
Prohibition
English
Setting Up
Performing Auto Adjust (PC Analog Connection Only)
If the monitor is connected to a computer through an analog connection, perform Auto Adjust before using the monitor.
Then apply individual adjustment if necessary using the respective monitor controls (Page 23 to 25).
Auto Adjust can be divided into two sections: one for contrast, and the other for position, horizontal size, and phase.
Perform both Auto Adjust sections.
NOTE: • Auto Adjust sets the display contrast, position, horizontal size, and phase automatically to the optimum.
No Auto Adjust is required when a digital connection is used.
• For details of the Auto Adjust operations, including how to display the OSD Screen, see “OSD Screen Operations”
on page 21.
1. Turn on the monitor and the computer.
2. Press the INPUT/SELECT button on the monitor, or the D-SUB button in the VIDEO INPUT area on the remote controller
to change the video input to D-Sub.
Monitor Remote Control
3. Press MENU/EXIT button on the monitor or the remote
controller to display the OSD Screen.
4. Perform Auto Adjust for contrast.
1. On Monitor
button to the direction five times to
Press the
choose [IMAGE SETTING] -> [AUTO CONTRAST].
Monitor
Remote Control
AUTO
CONTRAST
On Remote Control
Press the Control button five times to choose
[IMAGE SETTING] -> [AUTO CONTRAST].
2. On Monitor
Press the middle of the
INPUT/SELECT button.
Monitor
button or press the
or
On Remote Control
Press the SELECT button.
Start Auto Adjust for contrast to match the input
signal level.
When the [Adjusting…] message disappears,
Auto Adjust for contrast is complete.
Proceed to Step 5.
English-17
Downloaded from ManualMonitor.com Manuals
VIDEO
SETTING
Remote Control
5. Perform Auto Adjust for position, horizontal size, and
phase.
1. On Monitor
After completing Auto Adjust for contrast, press the
in the direction five times and to the
button
direction once to choose [MONITOR SETTING] ->
[AUTO ADJUST].
Monitor
MONITOR
SETTING
AUTO
ADJUST
On Remote Control
After completing Auto Adjust for contrast, press the
Control button five times and the button once to
choose [MONITOR SETTING] -> [AUTO ADJUST].
Or press the AUTO ADJUST button.
2. On Monitor
Press the middle of the
INPUT/SELECT button.
Remote Control
or
Monitor
Remote Control
button or press the
or
On Remote Control
Press the SELECT button.
To match the input signal, Auto Adjust for the
horizontal display position, vertical display position,
horizontal size, and phase is performed.
When the [Adjusting…] message disappears,
Auto Adjust is complete.
Now all the Auto Adjust operations are complete.
6. Press the MENU/EXIT button on the monitor or the
remote controller to exit the OSD Screen.
Monitor
Remote Control
TIP: • Auto Adjust may not function correctly when either: a line-based screen, such as a DOS prompt is displayed;
or the image is not displayed in full screen mode. In this case, adjust the monitor manually (Page 23 to 25).
• Auto Adjust may not function correctly depending on the type of computer or video card, or the resolution setting.
In this case, adjust the monitor manually.
• Auto Adjust may not function correctly when the displayed image is not sufficiently white. In this case, adjust the
monitor manually.
English-18
Downloaded from ManualMonitor.com Manuals
NOTE: • Connect the game machine and imaging device first (Page 12 to 14) before using these functions.
• For details of connecting and operating a game machine or imaging device, see the documentation supplied with
your equipment.
1. Press the power switch on the monitor front or on the remote controller to switch on the monitor.
2. Press the INPUT/SELECT button on the monitor or a remote controller button in the VIDEO INPUT area to choose
[HDMI1], [HDMI2], [VIDEO1] or [VIDEO2].
Note: The image may not be displayed immediately when an HDCP-ready device is connected. Wait for several
seconds. If no image is displayed after several seconds, follow the steps below.
• Unplug the signal cable once and reconnect.
• Turn off the imaging device power once, and then turn on again.
3. Adjust the screen aspect ratio (Page 31).
In the OSD Screen, choose [MONITOR SETTING] -> [AV ASPECT RATIO], then the appropriate
aspect ratio.
Note: • For D1 and D2 (Page 33).
[AUTO], [4:3], [16:9], [16:9 MODE] or [OFF] can be specified. Choose [AUTO] normally.
If the screen is not displayed in a correct aspect ratio in [AUTO] setting, choose the
correct aspect ratio manually.
• For D3, D4 and D5 (Page 31): [16:9], [Side Cut] or [16:9 MODE] can be specified.
• Some settings may not be available when Through Mode is on.
D1 and D2
D3, D4 and D5
4. Adjust the Overscan ratio (Page 30).
In the OSD Screen, choose [MONITOR SETTING] -> [OVERSCAN], then the appropriate
aspect ratio.
If [FULL (100%)] is chosen, some image may show some noise on the edge.
This noise can be reduced by changing the [OVERSCAN] setting.
Note: • When an option other than [FULL (100%)] is chosen for [OVERSCAN],
the PIP Function may not be available.
• [OVERSCAN] cannot be adjusted when Through Mode is on.
5. Adjust the screen size (Page 25 and 30).
In the OSD Screen, choose [MONITOR SETTING] -> [SCREEN SIZE], then the appropriate
screen size.
Note: • This screen size is applied to the image adjusted in the previous steps:
“3 Adjust the screen aspect ratio” and “4 Adjust Overscan ratio.”
• [REAL] and [2X ZOOM] cannot be adjusted when Through Mode is on.
6. In the OSD Screen, choose [MONITOR CONTROL] -> [DV MODE] to change DV Modes
(Page 23 and 30).
7. In the OSD Screen, choose [MONITOR CONTROL] -> [MP MODE] to change MP Modes (Page 23 and 30).
Note: When [MP MODE] is set at [LEVEL1] to [LEVEL3] the display may flicker.
8. Adjust the volume (Page 27 and 33).
To control audio volume, press the
button on the monitor to either or direction, or press VOLUME Button on the
remote controller, or in the OSD Screen, choose [AUDIO SETTINGS] -> [VOLUME] then the appropriate volume.
button.
To mute the sound, press the middle of the
button again.
To cancel mute, press the middle of the
English-19
Downloaded from ManualMonitor.com Manuals
English
Playing Games and Watching DVDs
Monitor Settings (OSD Functions)
This monitor is equipped with OSD (On Screen Display) functions, which enable easy adjustment of the screen.
By using the menus displayed on the screen through the OSD functions, adjustments of the screen, such as brightness, etc.,
can be made.
Configuration of the OSD Screen
The configuration of the OSD Screen is as shown below.
Group Icon Screen
The selected group icon is highlighted.
Options Screen
The selected option is highlighted, , which is used for selecting other
options, is displayed on the right side of the screen.
Adjustment Screen
, which is used for making adjustments or selections relating to the
selected option, is displayed on both sides of the screen.
Configuration of group icons (when PC input is selected)
The configuration of each of the group icons is as shown below. For details on the options, refer to the page that is listed for
the explanation on each of the group icons.
PICTURE SETTINGS (P23, 24)
COLOR CONTROL (P25, 26)
ADJUSTING THE COLOR
DV MODE
BRIGHTNESS
CONTRAST
SHARPNESS
AUTO CONTRAST*1
WHITE LEVEL*1
BLACK LEVEL*1,2
INPUT TYPE*2
CR OPTIMIZER
IV MODE
THROUGH MODE
BRIGHTNESS SENSOR
1, 2, 3, N
MONITOR SETTINGS (P25)
1
AUTO ADJUST*
SCREEN SIZE
LEFT/RIGHT*1,2
DOWN/UP*1,2
HORIZONTAL SIZE*1
RESOLUTION SWITCHING*1
PHASE*1
PIP SETTINGS (P27)
MENU TOOLS (P29)
PIP ON/OFF
PIP SIZE
PIP POSITION
LANGUAGE
OSD POSITION
OSD AUTO OFF
INFORMATION AUTO OFF
OSD LOCK
RESOLUTION NOTIFIER
AUDIO SETTINGS (P26, 27)
TOOLS (P27, 28)
INFORMATION (P29)
TREBLE
BASS
BALANCE
SURROUND
AUDIO INPUT
VOLUME
INPUT SKIP
AUTO INPUT SWITCHING
DVI EDID SELECT*3
OFF TIMER
LED BRIGHTNESS
DDC/CI
SIDE BORDER COLOR
ECO METER
ALL RESET
DISPLAY MODE
*1: For D-SUB input only
*2: For DVI (AV) input only
*3: For DVI input only
NOTE: When a digital connection is used to connect this monitor to a regular computer (Page 4), the appropriate screen is
displayed automatically. The appropriate screen can also be displayed automatically for analog connections if
settings are specified in Auto Adjust (Page 17).
However, flickering or blurring of the screen may occur depending on the computer. In addition, the screen may not
be displayed properly depending on the input signal. If this occurs, use the OSD functions to make adjustments to
the screen (Page 25). In such cases, information for the screen settings after making adjustments is stored.
English-20
Downloaded from ManualMonitor.com Manuals
The configuration of each of the group icons is as shown below. For details on the options, refer to the page that is listed for
the explanation on each of the group icons.
PICTURE SETTINGS (P30)
DV MODE
BRIGHTNESS
CONTRAST
SHARPNESS
BLACK LEVEL
INPUT TYPE*4
CR OPTIMIZER
IV MODE
THROUGH MODE
BRIGHTNESS SENSOR
COLOR CONTROL (P32)
ADJUSTMENT OF COLOR
1, 2, 3, N*4
HUE*5, 6
SATURATION*5, 6
PIP SETTINGS (P33)
MENU TOOLS (P33)
PIP ON/OFF
PIP SIZE
PIP POSITION
LANGUAGE
OSD POSITION
OSD AUTO OFF
INFORMATION AUTO OFF
OSD LOCK
MONITOR SETTINGS (P30 to 32)
AUDIO SETTINGS (P33)
TOOLS (P33)
INFORMATION (P33)
SCREEN SIZE
OVERSCAN
AV ASPECT RATIO
NOISE REDUCTION*5, 6
LEFT/RIGHT
DOWN/UP
I/P CONVERSION*6
FILM MODE
PHASE*5
TREBLE
BASS
BALANCE
SURROUND
AUDIO INPUT
VOLUME
INPUT SKIP
OFF TIMER
LED BRIGHTNESS
DDC/CI
SIDE BORDER COLOR
ECO METER
ALL RESET
DISPLAY MODE
*4: For HDMI input only
*5: For VIDEO1 input only
*6: For VIDEO2 input only
OSD Screen Operations
Here, an explanation of how to perform basic OSD Screen operations is given, using contrast adjustment as an example.
For details on other options, refer to “Options for OSD Functions” (Page 23 and 30).
Example: Adjust the contrast to 100%.
1. Press the MENU/EXIT button on the monitor or the
remote control to display the OSD Screen.
The group icon that is currently selected is highlighted.
Note: • If the MENU/EXIT button on the monitor or the
remote control is pressed again, the OSD
Screen will be cleared.
• It is possible to change the position in which
the OSD Screen is displayed. Refer to the
options for [MENU TOOLS] (Page 29).
• To select another group icon, move the
button of the monitor in the
directions as
shown in the example below, or press and
move the
control buttons on the remote
control to the left or right.
Monitor
Remote Control
Example: Select Color Control
Monitor
Remote Control
2 to the right
2 to the right
English-21
Downloaded from ManualMonitor.com Manuals
English
Configuration of group icons (when HDMI/Video Input is selected)
2. Move the
button of the monitor in the direction, or
press the control button on the remote control to
display the Options Screen.
The option that is currently selected changes to reversed
display and is highlighted in blue, and the Adjustment
Screen is displayed.
Note: • To cancel the operation, press the MENU/EXIT
button on the monitor or the remote control to
return to the Group Icon Screen.
Monitor
Remote Control
button of the monitor in the direction, or
3. Move the
press the control button on the remote control, and
select [CONTRAST].
Note: • To cancel the operation, press the MENU/EXIT
button on the monitor or the remote control to
return to the Group Icon Screen.
Monitor
Remote Control
4. Move the
button of the monitor in the
directions,
or press the
control buttons on the remote control,
and adjust [CONTRAST].
Note: • Settings specified for DV MODE,
BRIGHTNESS, CONTRAST, SHARPNESS,
WHITE LEVEL, BLACK LEVEL, CR
OPTIMIZER, IV MODE, INPUT TYPE,
MONITOR SETTINGS, COLOR CONTROL
(1, 2, 3 only), AUDIO CONTROL, PIP
CONTROL, OSD SCREEN DISPLAY
POSITION, OSD AUTO OFF, OFF TIMER,
INFORMATION AUTO OFF, LED
BRIGHTNESS, and SIDE BORDER COLOR
can be restored to factory preset conditions
with [ALL RESET] (Page 28).
Monitor
Remote Control
5. Press the MENU/EXIT button on the monitor or the
remote control twice to clear the OSD Screen.
If pressed once, the screen returns to the Group Icon
Screen. If pressed twice, the OSD Screen is cleared.
Note: • Move the
button in the direction, or press
the control button on the remote control to
return to the Group Icon Screen from the
Options Screen.
Monitor
Remote Control
Contrast adjustment is now complete.
Note: • If no buttons on the monitor or remote control
are pressed, and the time set in OSD AUTO
OFF (Page 29) elapses, the OSD Screen is
cleared automatically.
• Depending on the option to be adjusted, an
OSD message that gives operation instructions
may be displayed. If such a message is
displayed, follow the instructions on the screen.
English-22
Downloaded from ManualMonitor.com Manuals
English
Options for OSD Functions (for PC Input)
Here, the details of each option are explained.
Picture Settings
DV MODE (Dynamic Visual Mode)
It is possible to switch the DV MODE according to your taste.
STANDARD1 (Default setting): Standard setting.
STANDARD2: Standard setting. SATURATION and HUE in Color Control can be adjusted.
Text: Setting where the overall brightness is subdued, best suited for regular word processing and spreadsheet
software, etc. The default color temperature setting is 5000K.
sRGB: The picture is represented in colors that support sRGB, an international standard for color reproduction
(Page 45). (Color adjustment is not possible).
Photo: Setting that gives sharpness to black and white colors, best suited for natural images and still images.
GAME1: Setting that gives sharpness to middle tones, best suited to games that provide images with more power.
GAME2: Setting that gives sharpness to middle tones, best suited to games that provide images with more power.
SATURATION and HUE in Color Control can be adjusted.
MOVIE: Setting that boosts tone production of dark scenes, best suited for movies that reproduce a sense of depth.
NOTE: • If the DV MODE/RESET button is pressed when the OSD Screen is not displayed, it is possible to switch
the DV MODE directly in the order of [STANDARD1] → [STANDARD2] → [TEXT] → [sRGB] → [PHOTO] →
[GAME1] → [GAME2] → [MOVIE] → [STANDARD1] etc. each time the button is pressed.
• When [sRGB] is selected, color adjustment is not possible.
• When [STANDARD1], [TEXT], [sRGB], [PHOTO], or [GAME1] is selected, CR Optimizer and IV MODE
are disabled.
MP MODE (Motion Picture Mode)
When you want to enjoy moving images such as games and movies, the MP MODE reproduces moving images
clearly with suppressed blurriness and reduced shaking, even for fast-moving images.
The MP MODE can be switched according to the movement of the contents.
OFF: The MP MODE is inactive.
LEVEL1: Best suited for moving images with little movement.
LEVEL2: Best suited for moving images with some movement.
LEVEL3: Best suited for moving images with fast movement, such as racing games. Improvement effects for
blurriness are as follows: (Large effect) LEVEL3 > LEVEL2 > LEVEL1 (Little effect)
NOTE: • When [TEXT], [PHOTO], or [sRGB] is selected for the DV MODE, it is not possible to switch the MP
MODE. (In this case, the MP MODE is set to [OFF]).
• If MP MODE is set at [LEVEL1] to [LEVEL3], the display may flicker.
• If MP MODE is set to [LEVEL1], [LEVEL2], or [LEVEL3], the brightness of the screen becomes dark as
follows: (Bright) Off > LEVEL1 > LEVEL2 > LEVEL3 (Dark).
• If using the monitor for still images, it is recommended to set MP MODE to [OFF].
• If the vertical frequency is a frequency other than 60 Hz, THROUGH MODE and MP MODE
(Levels 1, 2, 3) cannot be used together. In this case, THROUGH MODE is set to [OFF] or it cannot be
selected.
• When the MP MODE/PIP button is pressed in a state where the OSD Screen is not displayed, it is
possible to switch the MP MODE directly in the order of [OFF] → [LEVEL1] → [LEVEL2] → [LEVEL3] →
[OFF] etc. each time the button is pressed.
BRIGHTNESS
The adjustment bar (0.0% to 100.0%) is displayed. Move the
button in the
control buttons on the remote control to adjust the brightness of the screen.
directions, or press the
CONTRAST
The adjustment bar (0.0% to 100.0%) is displayed. Move the
button in the
control buttons on the remote control to adjust the contrast of the screen.
directions, or press the
SHARPNESS
The adjustment bar (0.0% to 100.0%) is displayed. Move the
of the text or picture.
English-23
Downloaded from ManualMonitor.com Manuals
button in the
directions to adjust the sharpness
AUTO CONTRAST (For D-SUB (RGB) input only)
The contrast is automatically adjusted. For detailed procedures on automatic adjustments, refer to “Performing Auto
Adjust” (Page 17).
WHITE LEVEL (For D-SUB input only)
The white level is automatically adjusted. Make adjustments by focusing on a bright part of the screen.
BLACK LEVEL (For D-SUB/DVI (AV) input only)
The black level is automatically adjusted. Make adjustments by focusing on a dark part of the screen.
INPUT TYPE (For DVI (AV) input only (Page 28))
Select whether to conduct Luminance Level Compensation for the input picture.
AV Mode (Default setting): Select when viewing video pictures from a video game console or a DVD player.
Luminance Level Compensation is applied.
PC Mode: Select when viewing video pictures from a computer. Luminance Level Compensation is not applied.
NOTE: • If the black tones in the picture appear lighter, select [AV Mode].
• If there is no gradation in the black and white areas (beyond the Luminance Level), select [PC Mode].
CR OPTIMIZER
Turns the CR Optimizer (Contrast Ratio Optimizer) function on or off.
NOTE: When [STANDARD1], [TEXT], [sRGB], [PHOTO], or [GAME1] is selected for DV MODE, or [LEVEL1],
[LEVEL2], or [LEVEL3] is selected for MP MODE, it is not possible to turn CR OPTIMIZER on.
IV MODE (Intelligent Visual Mode)
It is possible to select the brightness of the screen in accordance with how the monitor is used, in order to reduce
eye fatigue.
OFF: The IV MODE is disabled.
Junior: Recommended for when using the monitor for long periods of time, or for when there are large changes in
the brightness, such as in animations.
Middle: Suppresses glare and makes the screen sharp.
Senior: Suppresses glare when the overall screen is bright.
NOTE: When [STANDARD1], [TEXT], [sRGB], [PHOTO], or [GAME1] is selected for DV MODE, or [LEVEL1],
[LEVEL2], or [LEVEL3] is selected for MP MODE, it is not possible to turn IV Mode on.
THROUGH MODE
Mode that shortens the delay time of picture signals within the monitor. Use this mode when you are concerned
about the synchronization between the picture and audio.
NOTE: • THROUGH MODE realizes shortening of delay time by limiting the picture processing function.
As a result, several functions such as Color Control cannot be used.
In addition, there may be cases according to the type of picture where picture quality declines, such as
smoothness of tones being affected.
• Even when THROUGH MODE is used, there may be cases where the picture and audio are not
completely synchronized.
• If using the monitor for still images, it is recommended to set THROUGH MODE off.
• When THROUGH MODE is turned on, PIP is cleared and cannot be used.
• If [Real] or [2x Zoom] is selected for Screen Size, THROUGH MODE cannot be turned on.
• The following restrictions apply for DVI (AV), HDMI, and VIDEO Input.
When THROUGH MODE is turned on, [OVERSCAN] is set to [FULL (100%)].
If [AUTO] (for 16:9 input signal) or [16:9] is selected for AV Aspect Ratio, THROUGH MODE cannot be
turned on.
• If the vertical frequency is a frequency other than 60 Hz, THROUGH MODE and MP MODE
(Levels 1, 2, 3) cannot be used together. In this case, THROUGH MODE is set to [OFF] or it cannot be
selected.
BRIGHTNESS SENSOR
Switch the sensitivity of the Brightness Sensor, which detects the brightness inside a room.
Off: The brightness sensor is disabled.
WEAK: Reduces the sensitivity of the Brightness Sensor.
MEDIUM: Sets the sensitivity of the Brightness Sensor at medium level.
STRONG: Increases the sensitivity of the Brightness Sensor strong.
The brightness of the screen changes as follows: (Bright) OFF → WEAK → MEDIUM → STRONG (Dark).
English-24
Downloaded from ManualMonitor.com Manuals
AUTO ADJUST (For D-SUB (RGB) input only)
The display position in the horizontal and vertical directions, horizontal size, and phase are automatically adjusted.
For detailed procedures on automatic adjustments, refer to “Performing Auto Adjust” (Page 17).
SCREEN SIZE
Function that automatically expands the display screen. This function is enabled when the resolution of the input
signal is lower than the number of display pixels.
Full: The input picture signal is expanded to cover the entire screen. If a signal other than 16:10 is input for the
aspect ratio (horizontal to vertical ratio), the aspect ratio changes.
Aspect: Expands the picture signal to cover as much of the screen as possible, while maintaining the aspect ratio of
the input picture signal. Consequently, the display screen is not fully expanded in either the vertical or horizontal
direction, depending on the picture signal that is input.
Real: The input picture signal is displayed in its actual resolution. (The screen is not expanded).
2x Zoom: The resolution of the input picture signal is expanded by 2x vertically and horizontally and displayed.
NOTE: • When Screen Size is set to a setting other than [Full], there may be cases where PIP is not able to be
displayed. In such cases, set Screen Size to [Full].
• For some resolutions, the input picture signal is not expanded to cover the entire screen. Depending on
the input signal, the display screen may not be fully expanded in either the vertical or horizontal direction.
• The 2x Zoom function is active only when a resolution signal of 960 x 600 or smaller is input.
If a larger resolution signal is input, the signal is displayed in [FULL] even if [2x ZOOM] is selected.
• When THROUGH MODE is on, [REAL] and [2x ZOOM] cannot be selected.
LEFT/RIGHT (For D-SUB/DVI (AV) input only)
The adjustment bar (0.0% to 100.0%) is displayed. Move the
button of the monitor in the
directions, or press
control buttons on the remote control and adjust the display position in the horizontal direction.
the
DOWN/UP (For D-SUB/DVI (AV) input only)
The adjustment bar (0.0% to 100.0%) is displayed. Move the
button of the monitor in the
directions, or press
the
control buttons on the remote control and adjust the display position in the vertical direction.
HORIZONTAL SIZE (For D-SUB input only)
Adjust the horizontal size when vertical stripes appear on the screen or when the width of the screen size needs to
be adjusted.
button of the monitor in the
directions, or press
The adjustment bar (0.0% to 100.0%) is displayed. Move the
control buttons on the remote control and adjust the horizontal size.
the
RESOLUTION SWITCHING (For D-SUB input only)
It is possible to directly specify the resolution of the input signal manually. Depending on the input signal, there may
be cases where the correct resolution cannot be automatically determined. In such cases, it is possible to directly
specify a resolution using this function and display the screen in the specified resolution.
NOTE: If a resolution signal other than one that is displayed on the OSD (e.g. 640 x 480) is input, this function does
is disabled.
PHASE (For D-SUB input only)
Adjust the phase when noise in the horizontal direction is displayed on the screen, or blurring of text or fuzziness of
contours occurs.
button of the monitor in the
directions, or press
The adjustment bar (0.0% to 100.0%) is displayed. Move the
the
control buttons on the remote control and adjust the phase.
Color Control
It is possible to adjust the colors of the screen according to your taste. You can also store the values to which the
ratio of the colors was changed.
NOTE: When [sRGB] is selected for DV MODE, color control is not possible.
English-25
Downloaded from ManualMonitor.com Manuals
English
Monitor Settings
1, 2, 3
For the settings for 1, 2, and 3, the ratio of each of the colors (RED, GREEN, and BLUE) can be adjusted by moving
button in the
directions.
the
GAIN: The color strength can be adjusted for each of the colors*1. Making this value larger results in the selected
color becoming more vivid.
OFFSET: The black level can be adjusted for each of the colors*1. Making this value larger results in the selected
color becoming brighter.
SATURATION: The color strength can be adjusted. Making this value larger results in the entire screen becoming
more vivid.
HUE: The hue can be adjusted for each of the colors*2. By moving the
becomes closer to the color on the left end or right end of the lever bar.
button in the
directions, the color
*1 RED, GREEN, BLUE
*2 RED, YELLOW, GREEN, CYAN, BLUE, MAGENTA
NOTE: • When [STANDARD1], [TEXT], [PHOTO], or [GAME1] is selected for DV MODE, it is not possible to adjust
SATURATION or HUE.
• When the INPUT/SELECT button is pressed after pressing the DV MODE/RESET button, the color
settings return to their default values.
N (NATIVE)
The picture is displayed in the original LCD panel colors. (Adjustments cannot be made).
Audio Settings
TREBLE
Move the
button of the monitor in the
adjust the treble volume.
directions, or press the
control buttons on the remote control and
directions, or press the
control buttons on the remote control and
BASS
Move the
button of the monitor in the
adjust the bass volume.
BALANCE
Move the
button of the monitor in the
directions, or press the
control buttons on the remote control and
adjust the balance of the L/R volume. The volume on the left side becomes larger when is pressed and the volume
on the right side becomes larger when is pressed.
SURROUND
Switch the surround function on or off.
Off: The surround function is disabled.
On: The surround function is enabled.
AUDIO INPUT
It is possible to switch only the audio input, without changing the connection to a particular device.
MAIN SCREEN PRIORITY (Default setting): The audio input switches in conjunction with switches in the picture
input for the main screen.
SUB-SCREEN PRIORITY: The audio input switches in conjunction with a switch in the picture input for the subscreen. If the sub-screen is not displayed, the audio input switches to that of the main screen. The green bar on the
OSD indicates that AUDIO SWITCH MODE is enabled.
FIXED AUDIO: It is possible to select a desired audio input. In addition, the audio input does not switch even when
the picture input switches. The green bar on the OSD indicates that AUDIO SWITCH MODE is enabled.
When MAIN SCREEN PRIORITY is selected. When SUB-SCREEN PRIORITY is selected. When [PC] for FIXED
AUDIO is selected.
NOTE: • If the INPUT/SELECT button is pressed for a long time when the OSD Screen is not displayed, the display
jumps to this [Audio Input] settings screen.
• If an item other than [MAIN SCREEN PRIORITY] is displayed, there may be cases where the audio is not
output, depending on the input.
• If the DVI input screen is displayed for either the main screen or the sub-screen, HDMI1 and HDMI2 audio
are not output and there is no sound.
• If the HDMI1 input screen is displayed for either the main screen or the sub-screen, HDMI2 audio is not
output and there is no sound. PC audio can be selected.
• If the HDMI2 input screen is displayed for either the main screen or the sub-screen, HDMI1 audio is not
output, and there is no sound. PC audio can be selected.
English-26
Downloaded from ManualMonitor.com Manuals
Move the
button in the
directions to adjust the volume.
Turn the mute function on or off by pressing the center of the
English
VOLUME
button.
NOTE: This monitor does not support double audio (bilingual audio).
PIP Settings
PIP ON/OFF
Select which input signal to display as the sub-screen inside the regular screen. When Off is selected, the PIP
function is disabled.
The PIP (Picture-in-Picture) function displays a sub-screen inside the main screen, enabling the user to view the
computer screen and TV or video screen simultaneously. The combinations for the main screen and sub-screen that
are supported are as follows.
Sub
D-SUB
DVI-D
HDMI1
HDMI2
-
-
-
Main
D-SUB
VIDEO1
VIDEO2
-
DVI-D
-
-
-
HDMI1
-
-
-
HDMI2
-
-
-
VIDEO1
VIDEO2
-
-
-
-
-
-
-
-
NOTE: • If you want to output the audio for the sub-screen, set “Audio Input” (Page 26) under the OSD function for
[AUDIO SETTINGS] to [SUB-SCREEN PRIORITY].
• If the vertical frequency of the picture signal is a frequency other than 60 Hz, there may be cases where
PIP cannot be displayed.
• Based on the settings for [SCREEN SIZE], [OVERSCAN], and [AV ASPECT RATIO] in [MONITOR
SETTINGS], there may be cases where PIP cannot be displayed.
• When THROUGH MODE is set to On, PIP cannot be used.
PIP SIZE
Specify settings for the size of the sub-screen. Based on the type of picture signal, the sub-screen is displayed in an
appropriate aspect ratio.
[4:3] picture signal
Small
Medium
Large
400 x 300
520 x 390
640 x 480
[5:4] picture signal
400 x 320
520 x 416
640 x 512
Wide picture signal [16:9]
400 x 225
520 x 292
640 x 360
Wide picture signal [16:10]
400 x 250
520 x 325
640 x 400
PIP POSITION
Move the
button of the monitor in the horizontal and vertical (
) directions, or press the
buttons on the remote control to move the sub-screen to an arbitrary position.
control
Tools
INPUT SKIP
By setting [SKIP], it is possible to force input to be disabled.
The inputs for which [SKIP] is set do not switch even when the INPUT/SELECT button is pressed, and are skipped.
By setting [SKIP] for an input that you will not use, it is possible for switching of input to be carried out even more
smoothly.
When [SKIP] is set, [Skip Mode] is displayed in green on the bottom of the OSD during switching of input, indicating
that Skip Mode is enabled.
To enable input again, change the setting to [Display].
NOTE: •
•
•
•
•
The default setting is [Display].
It is not possible to set [SKIP] for all inputs at once.
The inputs for which [SKIP] is set cannot be selected as the PIP screen.
Settings are possible even when there is no signal.
If the INPUT/SELECT button is pressed for a long time when the NO SIGNAL screen is displayed,
the SKIP MODE screen is displayed and settings are possible.
English-27
Downloaded from ManualMonitor.com Manuals
AUTO INPUT SWITCHING
Function that automatically selects a socket with an input signal in cases where there are multiple inputs.
The selected socket can be confirmed in Information on the OSD Screen.
ON: When there is no longer an input signal from the socket that is currently displayed, the display automatically
changes if a signal from another socket is input.
OFF: Automatic switching of the input signal display is not performed.
NOTE: • This function is supported only for PC connections (DVI or D-SUB connection).
• Although it is possible to use a conversion cable or conversion connector to input a PC signal for HDMI1,
HDMI2, VIDEO1 or VIDEO2, the Auto Input Switching function is not enabled for such inputs.
In this case, press the INPUT/SELECT button to switch the input.
DVI EDID SELECT
Select the input mode for the DVI input socket.
PC (Default setting): For when connecting a computer to the DVI input socket.
AV: For when connecting a game console or DVD player to the DVI input socket.
NOTE: • Operations are possible even when [NO SIGNAL] is displayed on the screen (Page 34).
• Supported for DVI-D input only.
OFF TIMER
Function that automatically turns off the power when the set time has elapsed after the power of this equipment is
turned on. Move the
button of the monitor in the
directions, or press the
control buttons on the remote
control and set OFF TIMER in a range between 1 hour and 24 hours, in increments of 1 hour. This function is
effective in reducing energy consumption, as it automatically turns off the monitor even when you forget to turn the
power off.
NOTE: If OFF TIMER is set, the power automatically turns off when the set time elapses, even when the monitor is
in use.
LED BRIGHTNESS
The adjustment bar (0.0% to 100.0%) is displayed. Move the
button in the
control buttons on the remote control to adjust the brightness of the power LED.
directions, or press the
DDC/CI
Function that limits various operations through DDC/CI (Page 45) communication. Move the
button of the monitor
in the
directions, or press the
control buttons on the remote control, and turn DDC/CI communication
on or off.
SIDE BORDER COLOR
Adjust the color of the areas on both sides of the monitor where nothing is displayed when Screen Size is set to Aspect.
button of the monitor in the
directions, or press the
control buttons on the remote control, select
Move the
a color from among R, G, and B, and press the buttons in the
directions to adjust each of the colors.
ECO METER
The power-saving effects are displayed.
Energy-saving power 1: The integrated power-saving effects for when the power is on are displayed in terms of
electric energy consumption (Wh).
Energy-saving power 2: The total integrated power-saving effects, including for when the power is off and when the
Power Management function is in operation, are displayed in terms of electric energy consumption (Wh).
ECO meter display:
OFF (Default setting): The ECO meter is not displayed.
ON: The ECO meter is displayed in the bottom right corner of the screen. The power-saving effect is displayed
in terms of electric power (W).
Transparency of ECO meter: The opacity of the ECO meter can be adjusted.
NOTE: • If the electric energy consumption (Wh) display is reset, the display for both Energy-saving power 1 and
Energy-saving power 2 returns to [0] Wh.
• Power-saving effects can be expected based on settings for IV MODE, CR OPTIMIZER and BRIGHTNESS.
• This function does not support electric power consumed through audio volume.
• The values for reduced electric energy consumption (Wh) and electric power (W) are rough indications.
[ALL RESET]
Settings for DV MODE, BRIGHTNESS, CONTRAST, SHARPNESS, WHITE LEVEL, BLACK LEVEL, CR
OPTIMIZER, IV MODE, INPUT TYPE, MONITOR SETTINGS, COLOR CONTROL (1, 2, 3 only), AUDIO CONTROL,
PIP CONTROL, OSD SCREEN DISPLAY POSITION, OSD AUTO OFF, OFF TIMER, INFORMATION AUTO OFF,
LED BRIGHTNESS, and SIDE BORDER COLOR can be restored to their default settings with [ALL RESET].
Follow the instructions on the screen to carry out reset processing.
English-28
Downloaded from ManualMonitor.com Manuals
LANGUAGE
A list of the display languages for the OSD Screen is displayed. Move the
button of the monitor in the
directions, or press the
control button on the remote control to switch the display language.
OSD POSITION
Move the
button in the
position of the OSD Screen.
directions, or press the
control buttons on the remote control to adjust the
OSD AUTO OFF
Function where the OSD Screen is automatically cleared after it is displayed, when the set time elapses. Move the
button of the monitor in the
directions, or press the
control buttons on the remote control, and set this
function in a range between 10 seconds and 120 seconds, in increments of 5 seconds.
INFORMATION AUTO OFF
Set the display time for the Guidance screen and the Precautions screen (Page 39). The Guidance screen and
button of the monitor in the
Precautions screen are automatically cleared after the set time elapses. Move the
directions, or press the
control buttons on the remote control, and set this function in a range between 1 second
and 10 seconds, in increments of 1 second. If this function is set to [OFF], the Guidance screen or Precautions
screen will continue to be displayed until the MENU/EXIT button is pressed.
OSD LOCK
Function that prohibits OSD Screen operations in order to prevent adjustments made by mistake. Even while OSD is
locked, brightness and contrast can be adjusted. Operations to set/disable OSD Lock cannot be carried out using the
remote control. Follow the procedure below to set/disable OSD Lock using the buttons on the monitor.
button in the
directions to adjust the contrast. When OSD is locked, it is
NOTE: • It is possible to move the
not possible to adjust the volume.
• When OSD is locked, operations cannot be carried out using the remote control.
Enabling OSD Lock: Display the OSD Screen, and while [OSD Lock] in MENU TOOLS is selected, hold down the
button in the direction.
INPUT/SELECT button, and move the
Disabling OSD Lock: Display a screen such as the one on the right where OSD Lock is enabled, hold down the
INPUT/SELECT button, and move the
button in the direction.
RESOLUTION NOTIFIER
Turns the function that displays the Guidance screen for the recommended signal if a signal other than the optimum
resolution is input on or off. For the operation procedure, refer to “OSD Screen Operations” (Page 21).
NOTE: This function is enabled only during D-SUB and DVI-D input. For HDMI1, HDMI2, VIDEO1, and VIDEO2
inputs, the Guidance screen is not displayed, regardless of this setting.
Information
DISPLAY MODE
The information for the signal that is input, as well as the model and serial number are displayed.
English-29
Downloaded from ManualMonitor.com Manuals
English
MENU TOOLS
Options for OSD Functions (for HDMI and Video Input)
Here, the details of OSD functions for only when HDMI and Video Input are selected are explained. Details of items that have
no explanations are the same as those for when PC input is selected (Page 23 to 29).
Picture Settings
DV MODE (Dynamic Visual MODE) (Page 23)
When HDMI input is selected: STANDARD1, STANDARD2, Text, sRGB, Photo, GAME1, GAME2, MOVIE.
When Video Input is selected: STANDARD1, STANDARD2, GAME1, GAME2, MOVIE.
MP MODE (Motion Picture MODE) (Page 23)
BRIGHTNESS (Page 23)
CONTRAST (Page 23)
SHARPNESS (Page 23)
BLACK LEVEL (Page 24)
INPUT TYPE (Page 24) (For HDMI input only)
CR OPTIMIZER (Page 24)
IV MODE (Page 24)
THROUGH MODE (Page 24)
BRIGHTNESS SENSOR (Page 24)
Monitor Settings
SCREEN SIZE (Page 25)
Function that automatically expands the display screen. This function is enabled when the resolution of the input
signal is lower than the number of display pixels. The screen is expanded for the pictures adjusted in the following
[OVERSCAN] and [AV ASPECT RATIO] functions.
Tip:
Please beware that if the television is set up in a cafe, hotel, etc., with the purpose of commercial gain or
public viewing, shrinking or stretching of the screen using the Screen Size Switching function may result in
a violation of rights that are protected by the Copyright Law.
NOTE: • When Screen Size is set to a setting other than [Full], there may be cases where PIP is not able to be
displayed. In such cases, set Screen Size to [Full].
• When Screen Size is set to [FULL], [AV ASPECT RATIO] does not function. (The picture is displayed over
the entire screen).
• When [REAL] is selected, and [AV ASPECT RATIO] is [16:9 MODE] or [SIDE CUT], SCREEN SIZE does
not function. (The picture is displayed in aspect over the entire screen).
• Other restrictions are the same as those for when PC input is selected (Page 25).
OVERSCAN
Sets the overscan ratio.
If “FULL (100%)” is set, noise may be visible on the edges of the screen, depending on the picture. By changing the
settings for [OVERSCAN], it is possible to cut off the edges of the screen and hide noise.
FULL (100%)
The input picture is displayed as is.
If the picture is adjusted in [AV ASPECT RATIO] (Page 31), the adjusted picture is
displayed as is.
Depending on the picture that is input, noise may be visible on the edges of the screen.
98%
The periphery of the picture that is input is cut, and 98% of the original picture is
displayed.
If noise is visible on the edges of the screen when [FULL (100%)] is set, select [98%].
If the picture is adjusted in [AV ASPECT RATIO] (Page 31), the periphery of the adjusted
picture is cut and 98% of it is displayed.
English-30
Downloaded from ManualMonitor.com Manuals
When a PAL 4:3 picture
signal is adjusted with AUTO.
Screen image
adjusted with 98%.
Screen image
adjusted with 93%.
*95%: For HDMI input, VIDEO1 input
**93%: For VIDEO2 input
NOTE: • When [OVERSCAN] is set to a setting other than [FULL (100%)], there may be cases where the PIP
function cannot be used.
• When [OVERSCAN] is set to a setting other than [FULL (100%)], there may be cases where the screen
position cannot be adjusted.
• When THROUGH MODE is set to On, this function cannot be used.
AV ASPECT RATIO
Set the aspect ratio for the screen with respect to the input picture. Performance changes based on the input signal.
This function is enabled only for HDMI input, D1 and D2 signals for VIDEO1 input (Page 33) and VIDEO2 input.
If a different picture signal is input, this function cannot be selected. The aspect ratio that is input and output as is.
NOTE: Specify [AUTO] under normal conditions. If the screen is not displayed in the proper aspect ratio when
[AUTO] is set, select the aspect ratio manually.
Off: The input signal is displayed without being adjusted.
For PAL 4:3 and PAL Squeeze, the picture is flattened
horizontally and vertically as shown in the diagrams and
displayed.
AUTO: Adjusts PAL 4:3 and PAL Squeeze picture signals
automatically so that they are circular.
PAL 4:3 video signal
PAL Squeeze video signal
Screen where a PAL 4:3
picture signal is adjusted
with [AUTO]
Screen where a PAL
Squeeze picture signal is
adjusted with [AUTO]
PAL 4:3 picture signal
Screen where a PAL 4:3
picture signal is adjusted
with 4:3
PAL Squeeze picture
signal
Screen where a PAL
Squeeze picture signal is
adjusted with 16:9
16:9 picture signal
Screen where a 16:9
picture signal is adjusted
with 16:9 MODE
4:3: The screen is expanded in the vertical direction by 1.125-fold.
This makes a PAL 4:3 picture signal circular. For other picture
signals, the circle becomes flattened horizontally.
16:9: The screen is scaled down in the vertical direction by 0.84fold. This makes a PAL Squeeze picture signal circular. For other
picture signals, the circle becomes flattened vertically.
16:9 MODE: This mode makes a 16:9 picture signal as close as to
an aspect of 16:9 as possible when THROUGH MODE is on.
(The circle is flattened horizontally).
When THROUGH MODE is off, it is recommended to use 16:9.
For other picture signals, the circle becomes flattened.
NOTE: • When THROUGH MODE is on, [AUTO] (when 16:9 signal is input) and [16:9] cannot be selected.
• When Screen Size is set to [FULL (100%)], [AV ASPECT RATIO] does not function.
(The picture is displayed over the entire screen).
• When [16:9 MODE] is set, [Real] and [2x Zoom] in [SCREEN SIZE] cannot be selected.
• When [OVERSCAN] is set to [98%] or [95%], [16:9 MODE] cannot be selected.
This function is enabled only for pictures from HDMI input and D3 to D5 signals for VIDEO1 input (Page 33).
If a different picture signal is input, this function cannot be selected. The aspect ratio that is input is output as is.
16:9: A 16:9 picture signal is displayed as is. (The picture is circularly displayed).
Side Cut: A 16:9 picture signal is displayed over the entire screen with
the original aspect ratio. The sides are partially cut off and become
hidden.
16:9 picture signal
Screen where a 16:9 picture
signal is adjusted with Side Cut.
English-31
Downloaded from ManualMonitor.com Manuals
English
95%* (93%**)
The periphery of the picture that is input is cut, and 95% (93%) of the original picture is
displayed.
If noise is visible on the edges of the screen when [98%] is set, select [95% (93%)].
If the picture is adjusted in AV ASPECT RATIO (Below), the periphery of the adjusted
picture is cut and 95% (93%) of it is displayed.
16:9 MODE: The screen is displayed with black bands on the top
and bottom. This mode makes a 16:9 picture signal as close as to
an aspect of 16:9 as possible when THROUGH MODE is on.
(The circle is flattened horizontally).
When THROUGH MODE is off, it is recommended to use 16:9.
16:9 picture signal
Screen where a 16:9
picture signal is adjusted
with 16:9 MODE.
NOTE: • When THROUGH MODE function is set to On, [16:9] cannot be selected.
• When [SCREEN SIZE] is set to [Full], [AV ASPECT RATIO] does not function.
(The picture is displayed over the entire screen).
• When [Side Cut] and [16:9 MODE] are selected, [Real] and [2x Zoom] in [SCREEN SIZE] do not function.
• When [OVERSCAN] is set to [98%] or [95%], [Side Cut] and [16:9 MODE] cannot be selected.
NOISE REDUCTION (For VIDEO1, VIDEO2 input only)
Reduces minute roughness (noise) in the picture. The adjustment bar (0.0% to 100.0%) is displayed.
OFF: The Noise Reduction function is enabled.
WEAK: Makes the noise reduction effects weaker.
STRONG: Makes the noise reduction effects stronger.
NOTE: Applying noise reduction more than necessary results in a tendency for detailed parts of the picture to
appear blurred.
LEFT/RIGHT (Page 25)
DOWN/UP (Page 25)
I/P CONVERSION (For VIDEO2 input only)
When an interlaced signal is input, the picture data is converted for progressive display. Using this function, it is
possible to select whether to apply three-dimensional I/P conversion when converting the picture data. For pictures
with rapid movement, such as games, there may be cases where movements appear smoother when this function is
set to [OFF] (three-dimensional I/P conversion is not used).
On: Interlaced signals are converted to progressive signals using three-dimensional I/P conversion.
Off: Interlaced signals are converted to progressive signals using two-dimensional I/P conversion.
NOTE: • If the input signal is progressive (D2 (480p), D4 (720p), D5 (1080p)), it is not possible to turn the signal
into interlaced display.
• If an interlaced signal is input for HDMI input or VIDEO1 input, the interlaced signal is converted to a
progressive signal using two-dimensional I/P conversion.
FILM MODE
Pictures with original signals of 24 frames/second, such as DVDs that contain films, etc., are played back in high
image quality.
NOTE: This function is enabled only when the picture source is interlaced (480i/1080i).
PHASE (Page 25) (For VIDEO1 input only)
Color Control
It is possible to adjust the colors of the screen according to your taste. You can also store the values to which the
ratio of the colors was changed.
1, 2, 3 (For HDMI input only) (Page 26)
N (NATIVE) (For HDMI input only) (Page 26)
HUE (For VIDEO1, VIDEO2 input only)
The adjustment bar (0.0% to 100.0%) is displayed. Move the
button of the monitor in the
directions and
adjust the hue of the screen. The color of the screen becomes redder when is pressed and greener when is
pressed.
SATURATION (For VIDEO1, VIDEO2 input only)
Move the
button of the monitor in the
directions, and adjust the color saturation of the screen.
English-32
Downloaded from ManualMonitor.com Manuals
Tools
TREBLE (Page 26)
INPUT SKIP (Page 27)
BASS (Page 26)
OFF TIMER (Page 28)
BALANCE (Page 26)
LED BRIGHTNESS (Page 28)
SURROUND (Page 26)
DDC/CI (Page 28)
AUDIO INPUT (Page 26)
SIDE BORDER COLOR (Page 28)
VOLUME (Page 27)
ECO METER (Page 28)
English
Audio Settings
ALL RESET (Page 28)
PIP Settings
PIP ON/OFF (Page 27)
MENU TOOLS
PIP SIZE (Page 27)
LANGUAGE (Page 29)
PIP POSITION (Page 27)
OSD POSITION (Page 29)
OSD OFF TIMER (Page 29)
INFORMATION AUTO OFF (Page 29)
OSD LOCK (Page 29)
Information
DISPLAY MODE (Page 29)
When OSD Functions Are Required
This function automatically judges the type of timing indicated in the chart below (Factory Preset Timing) and sets screen
information. When the monitor is connected to a computer, an appropriate screen is displayed automatically. However,
flickering or blurring of the screen may occur depending on the computer. In addition, the screen may not be displayed
properly depending on the input signal. In such cases, carry out MONITOR SETTINGS (Page 20). Information for the screen
after making adjustments is then recorded.
<Factory Preset Timing>
Resolution
1
2
3
4
5
6
7
8
9
10
640 x 480 (Mac)
832 x 624 (Mac)
1152 x 870 (Mac)
720 x 350
720 x 400
640 x 480
640 x 480
640 x 480
800 x 600
800 x 600
Frequency
Horizontal
Vertical
35.0kHz
66.7Hz
49.7kHz
74.5Hz
68.7kHz
75.0Hz
31.5kHz
70.1Hz
31.5kHz
70.1Hz
31.5kHz
59.9Hz
37.9kHz
72.8Hz
37.5kHz
75.0Hz
35.2kHz
56.3Hz
37.9kHz
60.3Hz
Resolution
11
12
13
14
15
16
17
18
19
20
21
22
23
24
25
800 x 600
800 x 600
1024 x 768
1024 x 768
1024 x 768
1152 x 864
1280 x 960
1280 x 960
1280 x 1024
1280 x 1024
1440 x 900
1600 x 1200
1680 x 1050
1920 x 1200*
1920 x 1200
Frequency
Horizontal
Vertical
48.1kHz
72.2Hz
46.9kHz
75.0Hz
48.4kHz
60.0Hz
56.5kHz
70.1Hz
60.0kHz
75.0Hz
67.5kHz
75.0Hz
60.0kHz
60.0Hz
75.0kHz
75.0Hz
64.0kHz
60.0Hz
80.0kHz
75.0Hz
55.5kHz
60.0Hz
75.0kHz
60.0Hz
64.7kHz
60.0Hz
74.0kHz
60.0Hz
74.6kHz
60.0Hz
Resolution
26
27
28
29
30
720 x 480 (interlaced)*1
720 x 480*2
1920 x 1080 (interlaced)*3
1280 x 720*4
1920 x 1080*5
Frequency
Horizontal
Vertical
15.7kHz
59.9Hz
31.5kHz
59.9Hz
33.7kHz
59.9Hz
45.0kHz
59.9Hz
67.4kHz
59.9Hz
If a signal other than a resolution of 1920 x 1200
is input, text may be blurred or graphics may be
distorted on the monitor.
*: Recommended signal timing
*1: 480i
*2: 480p
*3: 1080i
*4: 720p
*5: 1080p
NOTE: • Distinction of input signals is carried out through horizontal frequency/vertical frequency/synchronization signal
polarity/synchronization signal type.
• This monitor is equipped with a function that can record 32 types of timings other than the factory preset timings
(User Memory function). When the signal that you want to record is input and you adjust the screen using the OSD
functions (Page 25), the timing and screen information are automatically recorded.
• If [All Reset] is executed, all of the values recorded in the user memory are erased.
• This monitor supports a horizontal frequency of 31.5 to 82.3 kHz and vertical frequency of 56 to 76 Hz when the
resolution is 1280 x 1024 or smaller, and a horizontal frequency of 31.5 to 82.3 kHz and vertical frequency of 56 to
60 Hz when the resolution is larger than 1280 x 1024. Even within these ranges, however, there may be cases
where the picture is not properly displayed depending on the input signal.
In such cases, change the computer’s frequency or the resolution.
• Composite synchronization signals and Sync-on-Green signals are not supported.
• If the digital output of a computer is connected to the HDMI input terminal, there may be cases where a resolution
of 1920 x 1200 is not output. In this case, use the DVI-D input terminal.
English-33
Downloaded from ManualMonitor.com Manuals
Other Functions
Here, explanations on functions other than the OSD function are given.
Enlargement/Antialiasing Function
Function that displays pictures by automatically enlarging input screens that have a lower resolution than the panel resolution.
Smooth pictures with little roughness and text with little jaggedness are displayed.
NOTE: Depending on the input signal, there may be cases where the picture is not enlarged to cover the entire screen.
Simple Display Function
Function that automatically reduces and displays the screen when a resolution signal higher than
that supported by the monitor is input. In addition to displaying the Precautions screen for the OSD
Screen, the screen is reduced and displayed through the Simple Display Function. It is also
possible to change the settings of the computer to a resolution that is supported by this monitor,
without having to connect the computer to a different high-resolution monitor.
NOTE: Depending on the input signal, there may be cases where this function does not operate
properly.
Precautions screen for the
OSD Screen
Plug & Play Function (only when PC input is selected)
If the monitor is connected to a computer that supports VESA’s DDC (Display Data Channel) 2B standard, the computer can
read information about this monitor, such as the number of display pixels, frequency, color characteristics, etc., and a screen
that is optimal for this monitor is automatically set.
For details, refer to the operating manual for your computer.
No Touch Auto Adjust (NTAA) Function
(only when PC input is selected and the resolution is 800 x 600 or higher)
Adjustments are automatically applied if a signal of a type that is not recorded in the user memory is input. The monitor’s
microcomputer detects the input signal, and initiates automatic adjustment of the display position in the horizontal direction,
the display position in the vertical position, the horizontal size, and the phase. While automatic adjustments are being applied,
the message [Adjusting…] is displayed.
NOTE: This function is disabled for Y, Pb, Pr input.
Power Management Function (only when PC input is selected)
Function that reduces the power consumption of the monitor when the computer is not used.
NOTE: This function operates only when the monitor is connected to a computer that is equipped with a VESA DPMcompatible Power Management function.
Power consumption and the lighting status of the power LED when the Power Management function is in operation are as
follows:
Mode
Power consumption
Power LED
During normal operation
110 W
Blue light is lit*
During Sleep Mode
2 W or less
Blue light is blinking*
* If brightness is lowered in the LED Brightness Control function (Page 28), there may be cases where the LED does not light up.
For computers where video signals (R, G, B) are output regardless of the horizontal or vertical synchronization signal being
OFF, there may be cases where the Power Management function does not operate properly.
NOTE: The screen is restored if you press any key on the keyboard or move the mouse.
If the screen is not restored or if the monitor is connected to a computer that does not have the Power Management
function, it is possible that the signal cable is disconnected or the computer’s power is turned off. Check the cable
and the computer.
DVI EDID SELECT Function
If [NO SIGNAL] is displayed as a result of [DVI EDID SELECT] (Page 28) not being property set,
it is possible to change the settings to correct this problem.
button
Press the DV MODE/RESET button while [NO SIGNAL] is displayed, and move the
in the
directions to specify proper settings.
English-34
Downloaded from ManualMonitor.com Manuals
Safety Precautions and Maintenance
FOR OPTIMUM PERFORMANCE, PLEASE NOTE
THE FOLLOWING WHEN SETTING UP AND
USING THE LCD COLOR MONITOR:
•
DO NOT OPEN THE MONITOR. There are no user serviceable parts inside and opening or removing covers may expose
you to dangerous shock hazards or other risks. Refer all servicing to qualified service personnel.
•
Do not spill any liquids into the cabinet or use your monitor near water.
•
Do not insert objects of any kind into the cabinet slots, as they may touch dangerous voltage points, which can be harmful
or fatal or may cause electric shock, fire or equipment failure.
•
Do not place any heavy objects on the power cord. Damage to the cord may cause shock or fire.
•
Do not place this product on a sloping or unstable cart, stand or table, as the monitor may fall, causing serious damage to
the monitor.
•
The power supply cord you use must have been approved by and comply with the safety standards of your country.
(Type H05VV-F 3G 1mm2 should be used in Europe).
•
In UK, use a BS-approved power cord with molded plug having a black (13A) fuse installed for use with this monitor.
•
Do not place any objects onto the monitor and do not use the monitor outdoors.
•
The lamps in this product contain mercury. Please dispose according to state, local or federal law.
•
Do not bend power cord.
•
Do not use monitor in very hot, humid, dusty, or oily areas.
•
Do not cover vent on monitor.
•
Vibration can damage the backlight. Do not install where the monitor will be exposed to continual vibration.
•
If monitor or glass is broken, do not come in contact with the liquid crystal and handle with care.
•
To prevent damage to the LCD monitor caused by tipping over due to earthquakes or other shocks, make sure to install
the monitor in a stable location and take measures to prevent falling.
Immediately unplug your monitor from the wall outlet and refer servicing to qualified service personnel under the following
conditions:
•
When the power supply cord or plug is damaged.
•
If liquid has been spilled, or objects have fallen into the monitor.
•
If the monitor has been exposed to rain or water.
•
If the monitor has been dropped or the cabinet damaged.
•
If the monitor does not operate normally by following operating instructions.
CAUTION
•
Allow adequate ventilation around the monitor so that heat can properly dissipate.
Do not block ventilated openings or place the monitor near a radiator or other heat sources.
Do not put anything on top of monitor.
•
The power cable connector is the primary means of detaching the system from the power supply. The
monitor should be installed close to a power outlet which is easily accessible.
•
Handle with care when transporting. Save packaging for transporting.
•
The monitor must be installed or carried by two or more people.
•
Carry the monitor holding the built-in handle and bottom frames of the monitor.
•
Do not carry holding only the stand.
Image Persistence: Image persistence is when a residual or “ghost” image of a previous image remains visible on the
screen. Unlike CRT monitors, LCD monitors’ image persistence is not permanent, but constant images being displayed for a
long period of time should be avoided.
To alleviate image persistence, turn off the monitor for as long as the previous image was displayed. For example, if an image
was on the monitor for one hour and a residual image remains, the monitor should be turned off for one hour to erase the
image.
NOTE: As with all personal display devices, NEC DISPLAY SOLUTIONS recommends using a moving screen saver at regular
intervals whenever the screen is idle or turning off the monitor when not in use.
English-35
Downloaded from ManualMonitor.com Manuals
English
Recommended use
CORRECT PLACEMENT AND ADJUSTMENT OF THE MONITOR CAN
REDUCE EYE, SHOULDER AND NECK FATIGUE. CHECK THE
FOLLOWING WHEN YOU POSITION THE MONITOR:
•
For optimum performance, allow 20 minutes for warm-up.
•
Adjust the monitor height so that the top of the screen is at or slightly below eye level.
Your eyes should look slightly downward when viewing the middle of the screen.
•
Position your monitor no closer than 40 cm and no further away than 70 cm from your
eyes. The optimal distance is 50 cm.
•
Rest your eyes periodically by focusing on an object at least 20 feet away. Blink often.
•
Position the monitor at a 90° angle to windows and other light sources to minimize
glare and reflections. Adjust the monitor tilt so that ceiling lights do not reflect on your
screen.
•
If reflected light makes it hard for you to see your screen, use an anti-glare filter.
•
Clean the LCD monitor surface with a lint-free, non-abrasive cloth. Avoid using any
cleaning solution or glass cleaner!
•
Adjust the monitor’s brightness and contrast controls to enhance readability.
•
Use a document holder placed close to the screen.
•
Position whatever you are looking at most of the time (the screen or reference material) directly in front of you to minimize
turning your head while you are typing.
•
Avoid displaying fixed patterns on the monitor for long periods of time to avoid image persistence (after-image effects).
•
Get regular eye checkups.
Ergonomics
To realize the maximum ergonomics benefits, we recommend the following:
•
Adjust the Brightness until the background raster disappears.
•
Do not position the Contrast control to its maximum setting.
•
Use the preset Size and Position controls with standard signals.
•
Use the preset Color Setting.
•
Use non-interlaced signals with a vertical refresh rate of more than 60 Hz.
•
Do not use primary color blue on a dark background, as it is difficult to see and may produce eye fatigue due to insufficient
contrast.
Cleaning the LCD Panel
•
When the liquid crystal panel is stained with dust or dirt, please wipe gently with soft cloth.
•
Please do not rub the LCD panel with hard or coarse material.
•
Please do not apply pressure to the LCD surface.
•
Please do not use OA cleaner as it will cause deterioration or discolor on the LCD surface.
Cleaning the Cabinet
•
Unplug the power supply
•
Gently wipe the cabinet with a soft cloth
•
To clean the cabinet, dampen the cloth with a neutral detergent and water, wipe the cabinet and follow with a dry cloth.
NOTE: Many plastics are used on the surface of the cabinet. DO NOT clean with benzene, thinner, alkaline detergent,
alcoholic system detergent, glass cleaner, wax, polish cleaner, soap powder, or insecticide. Do not touch rubber or
vinyl to the cabinet for a long time. These types of fluids and fabrics can cause the paint to deteriorate, crack or peel.
English-36
Downloaded from ManualMonitor.com Manuals
English
Troubleshooting
If you are experiencing trouble…
Check the following:
When there is no display…
Symptom
There is no picture
on the screen
Condition
If the power LED is not lit
Causes and Solutions
Refer to
Check the power switch, as there is a possibility that it is not
turned on.
Page 5
Check the power cord, as there is a possibility that it is not
properly connected.
Page 15
Check using a different device whether power is properly
supplied to the power outlet.
If the power cord is connected to the outlet on the
computer’s body, it may be possible that the power of the
computer is not turned on. Check whether the power of the
computer is turned on.
If the power LED is blue
and lit up
Check the LED Brightness Control function, as there are
cases where the LED does not light up if the brightness is
lowered.
Page 28,
33
Display the OSD Screen and check the following
items:
Page 21
• If the OSD Screen cannot be displayed, it is possible that
there is a malfunction.
Consult with the dealer or the Repair Consultation Service.
• If the OSD Screen is displayed under normal conditions,
there is no malfunction. Adjust [BRIGHTNESS] and
[CONTRAST] in [PICTURE SETTINGS].
Page 23
• If the computer screen is not displayed even when the
OSD Screen is properly displayed and you have adjusted
[BRIGHTNESS] and [CONTRAST], check the connection
with the computer, as well as the computer’s frequency,
resolution, and type of output signal.
Page 11,
12, 29
If an HDCP-compliant device is connected and the screen is
not displayed, turn off the power of the connected device
and then turn it back on again.
If the power LED is blue and
blinking
The Power Management function may be in operation.
Press any key on the keyboard or move the mouse.
Page 34
Check the signal cable, as there is a possibility that it is not
properly connected to the monitor or the computer’s socket.
Page 11,
12
Check the conversion adapter, as there is a possibility that
it is not properly connected.
Page 11,
12
Check the computer’s power, as there is a possibility that it
is not turned on.
When the screen is no
longer displayed
If a screen that was properly
displayed becomes dark,
flickers, or is no longer
displayed*
A replacement with a new LCD panel is necessary.
Consult with the dealer or the [Repair Consultation Service].
* The backlight used in the LCD monitor has a limited operating life.
English-37
Downloaded from ManualMonitor.com Manuals
When the display is strange…
Symptom
Causes and Solutions
Refer to
There is a black spot (spot
that does not light up) or a
bright spot (spot that
remains lit) on the screen
As this is dependent on the properties of the LCD panel, it is not a malfunction.
Page 3
The brightness of the
screen display is uneven
Although, this kind of symptom may occur depending on the display contents, as it is
dependent on the properties of the LCD panel, it is not a malfunction.
There are faint shadows of
vertical stripes on the
screen
Although, this kind of symptom may occur depending on the display contents, as it is
dependent on the properties of the LCD panel, it is not a malfunction.
When detailed patterns are
displayed, flickering or
moiré occurs
Although, this kind of symptom may occur when detailed patterns are displayed, as it is
dependent on the properties of the LCD panel, it is not a malfunction.
The thickness, etc.,
of lines becomes blurry
Although, this kind of symptom may occur when pictures of a resolution of 1920 x 1200 or
higher are displayed, as it is dependent on the properties of the LCD panel, it is not a
malfunction.
A residual image occurs in
an area outside of the
display area, where there is
no display.
Although, this kind of symptom may occur when a picture is displayed for long periods of time
when the display area does not fill the entire screen, as it is dependent on the properties of
the LCD panel, it is not a malfunction.
Page 46
The contrast changes
depending on the angle at
which the screen is viewed
The contrast changes depending on the viewing angle (angle at which the screen is viewed).
As this is dependent on the properties of the LCD panel, it is not a malfunction.
Page 46,
47
The display conditions of
the screen keep changing
Since fluorescent light is used in the LCD panel, the display conditions change little by little in
accordance with the elapsed usage time. Although display conditions for the screen may be
affected by the surrounding temperature, as this symptom is dependent on the properties of
the LCD panel, it is not a malfunction.
Even after the screen
switches, an image of the
previous screen faintly
remains.
If a still screen is displayed for a long period of time, this kind of phenomenon known as
“residual image” may occur. Turn off the power, or display a changing screen. The image will
disappear in approximately 1 day.
Page 35,
46
The display color is strange
Display the OSD Screen and check the following items:
Page 21
• If the OSD Screen cannot be displayed properly, it is possible that there is a malfunction.
Consult with the dealer or the Repair Consultation Service.
• If the OSD Screen is displayed under normal conditions, there is no malfunction.
Adjust the color ratio by selecting [COLOR CONTROL], or restore to factory settings using
the DV MODE/RESET button.
Page 25,
26
• If the computer screen is not properly displayed even when the OSD Screen is properly
displayed and you have adjusted [COLOR CONTROL], check the connection with the
computer, as well as the computer’s frequency, resolution, and type of output signal.
Page 11,
12, 29
The screen flickers
(when a distributor is used)
Connect the computer to the monitor directly, without using a distributor.
Page 11,
12
The screen flickers (in
cases other than the above)
Display the OSD Screen and check the following items:
Page 21
• If the OSD Screen cannot be displayed properly, it is possible that there is a malfunction.
Consult with the dealer of the “Repair Consultation Service”.
• If the OSD Screen is displayed under normal conditions, there is no malfunction.
Select [PHASE] in MONITOR SETTINGS and make adjustments.
Page 25
• If the computer screen is not properly displayed even when the OSD Screen is properly
displayed and you have adjusted [Phase], check the connection with the computer, as well
as the computer’s frequency, resolution, and type of output signal.
Page 11,
12, 29
If MP MODE is used, flickering of the screen may occur, but this is not a malfunction.
If the flickering bothers you, turn MP MODE off.
Page 23
English-38
Downloaded from ManualMonitor.com Manuals
Symptom
[NO SIGNAL] is displayed
on the screen!*1
[OUT OF RANGE] is
displayed on the screen!*2
[RESOLUTION NOTIFIER] is
displayed on the screen!
Causes
Solutions
Refer to
It is possible that the signal cable is not
properly connected to the monitor or the
computer’s socket.
Connect the signal cable to the monitor or the
computer’s socket properly.
Page 11,
12
It is possible that the signal cable is
disconnected.
Check whether the signal cable is
disconnected.
If the power LED is blue and blinking, it is
possible that the computer’s power is turned
off.
Check whether the power of the computer is
turned on.
The computer’s Power Management function
may be in operation.
Move the mouse or press any key on the
keyboard.
Page 34
DVI EDID SELECT may not be properly set.
Press the DV MODE/RESET button while
[NO SIGNAL] is displayed and check that
proper settings are specified.
Page 34
If an HDCP-compatible device is connected,
the screen may not be displayed immediately.
Wait for several seconds.
It is possible that a signal that is not
supported by the monitor is input.
Change the input frequency or the computer’s
resolution.
Page 29,
33
A signal for a resolution higher than that
supported by the monitor is input.
Change the input frequency or the computer’s
resolution.
Page 29,
33
The resolution signal output from the
computer that you are using is set to a size
other than the recommended sizes.
Change the resolution of the computer
to 1920 x 1200.
If you want to continue using the same
resolution and not have [RESOLUTION
NOTIFIER] displayed, turn RESOLUTION
NOTIFIER off (so that it is not displayed).
Page 29
*1 Depending on the computer, since a regular signal is not output immediately even when the resolution or input frequency is changed, the Precautions screen
may be displayed. However, if the screen is displayed properly after waiting for a while, the input signal is appropriate.
*2 Depending on the computer, since a regular signal is not output immediately even when the power is turned on, the Precautions screen may be displayed.
However, if the screen is displayed properly after waiting for a while, the frequency of the input signal is appropriate.
Other (only for when PC input is selected)
Symptom
Causes
Solutions
The resolution and number
of colors are fixed/cannot
be changed
Though rare, signals may not be input/output
properly.
Turn off the power of the monitor and the
computer once, and then turn on the power
once again.
If using Windows®, it is possible that
installation of Windows® Setup Information is
necessary.
Download the Windows® Setup Information
from the NEC Web site, and install the
information in your computer.
If it is still not possible to change the settings
even after installing Windows® Setup
Information, or if you are using an OS other
than Windows®, it is possible that the driver
for the graphics board is not properly
recognized by the OS.
Reinstall the driver for the graphics board.
For information on reinstalling the driver, refer
to your computer’s operating manual, or direct
your inquiries to the support center for the
computer’s manufacturer.
English-39
Downloaded from ManualMonitor.com Manuals
Refer to
English
When the Guidance screen/Precautions screen is displayed (only for when PC input is selected)
Other (remote control, speaker)
Symptom
The remote control does
not work
There is no sound from the
speakers
Causes
Solutions
Refer to
The batteries for the remote control may have
expired.
Replace the batteries.
The batteries for the remote control may be
inserted in the wrong direction.
Check the direction in which the batteries are
inserted.
The remote control may not be properly
pointed at the light-receiving section of the
monitor's body.
Point the remote control at the light-receiving
section and then try using it.
It is possible that the audio cable is not
properly connected to the monitor or the
computer’s socket.
Check whether it is properly connected.
Page 14
There is no sound from the speakers when
headphones are plugged in.
Disconnect the headphones.
Page 16
The volume may be minimized or muted.
Adjust the volume through [VOLUME] in the
OSD function for [AUDIO SETTINGS], or
disable [MUTE].
Page 26,
27, 33
When watching videos (only for when HDMI, VIDEO Input are selected)
Symptom
Causes
Solutions
Refer to
There is no sound
or picture
Is the imaging device properly connected and
properly operating?
For details, refer to the operating manual for
the imaging device.
Page 12
to 14
There is no color,
or the color is strange
The hue or saturation may be set improperly.
Adjust [HUE] and [SATURATION] in the
OSD function for [COLOR CONTROL].
Page 33
The screen appears long in
the horizontal direction
A 4:3 picture may be stretched out to 16:10
and displayed as a picture that is long in the
horizontal direction.
In order to view the picture in the correct ratio, Page 25,
set [SCREEN SIZE] in the OSD function to
30
[ASPECT] or [REAL].
English-40
Downloaded from ManualMonitor.com Manuals
English
Appendix
Front Panel Key Operations
When nothing is displayed on the main screen
MP MODE/
PIP button
When the DVI EDID
SELECT settings
screen is displayed
When [NO SIGNAL]
is displayed
Short press
—
—
—
—
Longer press
(3 seconds
or more)
—
—
—
—
Short press
—
DVI EDID SELECT
Displays settings
screen
Resets
selected
item
Resets
selected
item
Longer press
(3 seconds
or more)
—
—
—
—
Short press
—
Input switches
—
—
—
—
Clears OSD Screen
Clears OSD Screen
Clears OSD Screen
During the
Power Save mode * Displayed for DVI-D
(blue LED is blinking)
input only
DV MODE/
RESET
button
INPUT/
SELECT
button
The blue LED lights,
and VIDEO INPUT
screen is displayed
Displays Input Skip
settings screen
Longer press
(3 seconds
or more)
—
MENU/EXIT
button
Clears OSD Screen
When the Input Skip
settings screen is
displayed
When the
power is OFF
(blue LED
is not lit)
Up
—
—
—
Down
—
—
—
Left
—
—
Right
—
—
—
—
Turns power ON
Turns power OFF
Center button
Power switch
Executes OSD
Screen operations
Turns power OFF
English-41
Downloaded from ManualMonitor.com Manuals
Executes OSD
Screen operations
—
—
Turns power OFF
Turns power OFF
When something is displayed on the main screen
When PIP screen is not displayed
When PIP screen is displayed
When main
OSD Screen is displayed
When main
OSD Screen is displayed
When main
OSD Screen is not displayed
When main
OSD Screen is not displayed
The MP MODE switches
—
Switches between main screen
and sub-screen
*Depending on input signal, operations
may not be possible
—
Displays sub-screen
—
Clears sub-screen
—
The DV MODE switches
Resets selected item
The DV MODE switches
Resets selected item
—
—
—
—
Switches input for main screen
Sets selected adjustment item
Switches input for main screen
Sets selected adjustment item
Displays Audio Input
settings screen
Displays Audio Input
settings screen
—
—
Displays OSD Screen
Returns to screen above
current one.
If pressed when a group icon
selected, clears main OSD Screen.
Adjusts volume (becomes louder)
Adjusts volume (becomes softer)
Adjusts brightness (becomes darker)
Displays main OSD Screen
Returns to screen above
current one.
If pressed when a group icon
selected, clears main OSD Screen.
Adjusts volume (becomes louder)
Adjusts volume (becomes softer)
Executes
OSD Screen
operations
Switches input for the sub-screen
*Depending on the combination of
input signals, operations may not
be possible
Adjusts brightness (becomes brighter)
Executes
OSD Screen
operations
Sets selected adjustment item
Turns mute function on/off
Sets selected adjustment item
Turns mute function on/off
Turns power OFF
Turns power OFF
Turns power OFF
Turns power OFF
English-42
Downloaded from ManualMonitor.com Manuals
Commercially-available monitor arms that conform to VESA standards (200 mm x 100 mm pitch) can be attached to the
monitor.
TIP: • Select an arm that can fully support the monitor.
• Make sure that the buttons are not pressed against tables, etc.
Monitor body (no stand)
Mass
24WMGX3
Approx. 7.9 kg
NOTE: This monitor satisfies various specification requirements in the state where the stand is attached.
How to detach the stand
Install a monitor arm in accordance with the following.
1. Turn off the power to the monitor, computer, and peripheral devices, and disconnect the signal cable and the power cable.
2. Place a soft cloth on a flat and stable surface, and lay down the monitor so that the LCD
panel is facing downwards.
TIP: Lay down the monitor so that it is stable and so that the glass surface and the control
buttons on the front do not come in contact with surfaces such as tables, etc., or
protruding objects. Otherwise, this may result in damage.
3. Remove the 2 screws that fix the stand to the monitor body.
TIP: If a rear cover is attached, remove the rear cover first (Page 15).
4. Remove the stand by sliding it.
5. Remove the 2 screws on the back of the monitor.
TIP: • If attaching the stand, do so by carrying out the reverse procedure. Make sure to use
the screws that were originally used for attaching the stand. Using other screws may
cause the monitor to malfunction.
• When tightening the screws, make sure not to forget to insert the screws, and confirm
that all of the screws are securely tightened. Attachment of the stand is to be carried
out under the responsibility of the customer. Please note that if an accident should
occur, NEC does not bear responsibility.
Caution: Be careful not to get your fingers caught when attaching or detaching the stand.
Otherwise, this may result in injuries.
English-43
Downloaded from ManualMonitor.com Manuals
Control buttons
English
Installing a Monitor Arm
How to attach the arm
Screw
1. Attach the arm as follows.
Arms that can be attached:
Thickness of installation area: 2.0 mm to 3.2 mm
Compliance with VESA standard: 200 mm x 100 mm pitch
14 mm
M4
Tighten all of the screws securely in order to prevent them
Arm attachment area
from loosening. (However, the screws may break if
Thickness: 2.0 mm to 3.2 mm
excessively tightened). The appropriate tightening torque
is 98 to 137 N•cm.
100 mm
Caution: To prevent the monitor from falling:
100 mm
• If the LCD monitor cannot be fixed in place while it is laid down,
carry out attachment operations using 2 people. Otherwise, the monitor
may fall, resulting in injuries.
• Before carrying out attachment operations, make sure to read the instruction
manual for the arm. To reduce harm, such as injuries resulting from the monitor
falling during an earthquake, etc., make sure to consult with the arm
100 mm
manufacturer regarding the installation location, etc.
* The configuration for the arm’s
• Attachment of the arm is carried out under the responsibility of the customer.
attachment area above is only a
Please note that if an accident should occur, NEC does not bear any
reference.
responsibility.
• Do not sleep in locations where it is possible that the monitor will fall during an earthquake, etc.
To prevent fires and electric shocks:
• When attaching the arm, make sure to use the screws indicated below. Using other screws may cause the
monitor to malfunction or for fires and electric shocks to occur.
M4 screws with locking spring washers (length: 14 mm)
• Even when an arm is attached to the monitor, do not use the monitor in a state where it is turned 90° or 180°.
Otherwise, heat becomes trapped inside, resulting in fires and electric shocks.
Prohibition
English-44
Downloaded from ManualMonitor.com Manuals
This section contains simple explanations of technical terms used in this document. In addition, the main pages where a
particular term is used are listed, which enables for you to search for operations related to the term.
Dual input (Page 11)
Refers to 2 input terminals available for connecting 2
computers.
DDC 2B standard (Display Data Channel) (Page 34)
Standard proposed by VESA that controls each of the
adjustment functions for the monitor from the computer
through two-way communication between the monitor and
computer.
HDMI (High-Definition Multimedia Interface) (Page 4, 6, 12)
Digital interface for AV that can be connected to DVD
recorders and players. Component picture signals, audio
signals and control signals can be connected using a single
cable.
I/P Conversion (Page 32)
Refers to converting the scan mode for displaying a picture
on the screen from interlaced format to progressive format.
DDC/CI standard (Display Data Channel Command
Interface)
International standard that enables for exchange of settings
information, etc., bi-directionally between the monitor and
the computer. If [Visual Controller], which is control software
that complies with this standard, is used, it is possible to
carry out operations such as adjustment of the color and
picture quality not only from the buttons on the front of the
monitor, but from your computer as well.
IV MODE (Intelligent Visual Mode) (Page 24, 30)
Automatically carries out brightness control in accordance
with the brightness that one feels based on age and the
average brightness of the displayed picture based on
ergonomic knowledge, and alleviates fatigue of the eyes.
Since younger people have a higher sensitivity to brightness
in general, the IV MODE enables for settings that further
suppress brightness. Settings can be selected from among
[OFF], [JUNIOR], [MIDDLE], and [SENIOR].
DPM (Display Power Management) (Page 34)
Standard proposed by VESA relating to energy-saving of
monitors. DPM controls the electric power consumption
conditions of the monitor based on signals from the
computer.
MP MODE (Motion Picture Mode) (Page 5, 7, 23, 30)
By optimally combining black interpolation in the Motion
Picture Optimization Circuit, backlight scanning, and
overdrive, it is possible to reproduce moving images with
suppressed blurriness and reduced shaking, even for
pictures with fast movement, when you want to enjoy
moving pictures such as games and movies. Settings can
be selected from among [OFF], [LEVEL1], [LEVEL2], and
[LEVEL3], depending on the movement of the contents.
DV MODE (Dynamic Visual Mode) (Page 5, 7, 23, 30)
Function that enables you to select the optimal screen for
the contents to be displayed from among 8 types of screens:
[STANDARD1 or 2], [TEXT], [PHOTO], [sRGB],
[GAME1 or 2], and [MOVIE].
DVI-A terminal (Digital Visual Interface-Analogue)
(Page 10)
DVI terminal that supports only analog input.
LED Brightness (Page 28, 33)
Function that adjusts the brightness of the power LED.
Plug & Play (Page 34)
Standard proposed by Windows®. Plug & Play enables for
monitors as well as various peripheral devices to be
connected to a computer without having to specify settings.
DVI-D terminal (Digital Visual Interface-Digital)
(Page 4, 6, 10 to 14)
DVI terminal that supports only digital input.
DVI-I terminal (Digital Visual Interface-Integrated)
(Page 4, 10 to 12, 14)
DVI terminal that supports both digital and analog input. It is
possible to use this terminal for either digital or analog input
by using a conversion adapter or a connection cable for
either type of input.
Component (Page 4, 13)
A video terminal that is universal in the industry and that
enables for connection of DVD recorders/players.
Component picture signals and identifying signals such
as picture format and aspect ratio can be connected using
a single cable. This monitor supports picture formats ranging
from 480i to 1080p.
Picture format
Number of
scanning lines
Number of effective
scanning lines
Scan mode
480i
480p
1080i
720p
1080p
525 lines
525 lines
1125 lines
750 lines
1125 lines
480 lines
480 lines
1080 lines
720 lines
1080 lines
Interlaced
Progressive
Interlaced
Progressive
Progressive
RESOLUTION NOTIFIER (Page 29, 39)
Function that displays guidance for the recommended signal
on the screen when a signal other than the optimal
resolution is set from the computer.
sRGB standard (Page 23, 30)
International standard for color reproduction prescribed by
the IEC (International Electrotechnical Commission). This
standard ensures that hues of all sRGB-compliant displays
on a network are uniform, making it easier to match the
colors with supported printers, scanners, digital cameras,
etc.
VESA standard (Video Electronics Standards
Association) (Page 34, 43, 44)
Standard proposed aiming at establishing criteria relating to
video and multimedia.
Phase (Page 25)
One of the adjustment options for displaying analog signals
clearly. By adjusting the phase, it is possible to eliminate
blurring of text and noise in the horizontal direction.
HDCP (High-bandwidth Digital Content Protection
System) (Page 47)
Copyright protection system that encrypts digital picture
signals. By connecting an HDCP-compatible imaging
device, it is possible to view video contents protected by
HDCP.
English-45
Downloaded from ManualMonitor.com Manuals
English
Terminology
Interlace (Page 32, 45)
One of the formats for displaying a frame that scans every
other line of the frame. It is possible to use this format when
displaying a screen that contains movement, such as TV,
but not for when displaying still images as flickering of the
screen is conspicuous. As a result, most computer monitors
use a progressive format, which suppresses flickering of still
images.
Horizontal frequency/Vertical frequency (Page 33, 47)
Horizontal frequency: Refers to the number of horizontal
lines displayed in 1 second. If the horizontal frequency is
31.5 kHz, horizontal lines are displayed 31,500 times per
second.
Vertical frequency: Represents the number of times the
screen is rewritten in 1 second. If the vertical frequency is
60 Hz, the screen is rewritten 60 times per second.
Energy Star Program (Page 2, 47)
Program that is being promoted by the US Environmental
Protection Agency (EPA) in order to reduce power
consumption of desktop computers.
Tilt angle/Swivel angle (Page 16, 47)
Tilt angle: Refers to the angle that the monitor screen can
be moved up and down.
Swivel angle: Refers to the angle that the monitor screen
can be rotated in the horizontal direction.
Overscan (Page 30)
Refers to displaying pictures so that a few % of the effective
picture that is input falls outside of the display area of the
monitor’s screens (the part that is outside of the display area
is not displayed on the screen). Regular TV is adjusted in an
overscan state.
Response time (Page 47)
Refers to the speed at which screens switch when the
displayed screen is changed (follow), where a smaller
number represents a faster response time. The response
time is the total amount of time necessary for changing from
black → white → black tones.
Brightness (Page 47)
Refers to the pitch for brightness per unit area, where a
higher number represents a brighter display screen.
Contrast ratio (Page 47)
Refers to the ratio that indicates the ratio of the brightness
of white and black colors. If the brightness is the same, a
higher contrast ratio represents a sharper screen.
Component picture (Page 4, 13)
Picture signals are divided into brightness signals (Y) and
color signals (red (Pb)/blue (Pr)), synthesized by the
receiving display device when projecting the signals on the
screen, and then turned into a picture. Since brightness
signals and color signals are sent separately, it is possible to
reduce deterioration of image quality that occurs easily in
conventional analog TV broadcasting, such as unnecessary
coloring and blurring of colors.
No Touch Auto Adjust (NTAA) (Page 34)
Function that automatically sets the optimal condition for the
screen each time a new signal is received from the
computer.
Noise reduction (Page 32)
Reduces minute roughness (noise) in the picture.
Power Management function (Page 34)
Function that is built in to reduce power consumption of the
computer. Reduces electric power consumption when the
computer is not used for a fixed period of time (there is no
key input over a fixed period of time). Returns to a normal
state when you want to use the computer again.
Display pixels/resolution (Page 29, 33, 34, 47)
Commonly referred to as “resolution.” Represents the
number of pixels in the horizontal and vertical directions per
screen. A larger number of display pixels enables for a
larger amount of information to be displayed.
Progressive (Page 32, 45)
One of the formats for displaying a frame by the screen
(frame) at once. Format that displays all pixels by scanning
in order from the top, and which is why it is referred to as
the progressive scanning method. Compared to the interlace
method, there is less flickering of the screen, enabling for
clearer images. Also referred to as noninterlace.
Side border color (Page 28, 33)
Function that adjusts the colors of the parts on both ends of
the screen where there is no picture if using aspect display.
Residual image (Page 38)
Residual images are images of the previous screen that was
displayed that remain after the screen display is changed,
when the same screen is displayed for a long period of time.
Residual images gradually disappear if the screen display
changes. However, they eventually may not disappear if the
same screen is displayed often for long periods of time;
avoid using the monitor where the same screen is displayed
for long periods of time. It is recommended to change the
display screen by using [Screensaver], etc.
View angle (Page 38, 47)
Refers to the angle from which a regular picture is viewed,
such as when looking at a picture diagonally. A larger view
angle indicates that it is possible to view pictures from a
broader range.
English-46
Downloaded from ManualMonitor.com Manuals
English
Specifications
Model name
24WMGX3
LCD panel
AMVA format, Surface processing: Antiglare (antireflection)
Size (viewable size)
24.1-inch (61.1 cm)
Effective display area
518.4 x 324.0 mm
Resolution*4
1920 x 1200
Pixel pitch
0.270 mm
Color
Approx. 16.77 million colors
View angle (typical)*1
Left and right: 178°, up and down: 178°
Brightness (typical)
500 cd/m2 (when MP MODE is off)
Contrast ratio (typical)
1000:1
Response time
16 ms (GTG 6 ms*2)
PC input
Video input
Audio input/output
Horizontal frequency
31.5 to 93.8 kHz
Vertical frequency
56 to 76 Hz: When resolution is 1280 x 1024 or lower
56 to 60 Hz: When resolution is higher than 1280 x 1024
Video signal
Digital RGB, analog RGB
Synchronization signals
Separate synchronization signals (TTL)
Signal input socket
DVI-D (HDCP-compatible), 15-pin mini D-SUB
Input format
480i (D1), 480p (D2), 1080i (D3), 720p (D4), 1080p (D5)
Video signals
Analog RGB, analog component, digital RGB
Signal input socket
DVI-D (HDCP-compatible, 15-pin mini D-SUB (analog RGB only), HDMI terminals (dual),
Composite video, component video (Y/Pb/Pr)
Signal input socket
RCA PIN-JACK L/R INPUT x 2, 3.5 mm STEREO Mini Jack INPUT x 1
Speakers
5 W + 5 W (stereo)
Audio output
3.5 mm STEREO Mini Jack
Headphones
3.5 mm STEREO Mini Jack
Optical digital audio output
Compatible standard, etc.*3 Energy-saving standards
Safety
SPDIF (for HDMI input)
International Energy Star Program
Electrical Appliance and Material Safety Law, UL60950-1, c-UL
Ergonomics
ISO13406-2 (compliant), TCO’06
Plug & play
VESA DDC2B
Other
DDC/CI, Windows Vista® Premium
Usage environment conditions
Temperature:
Humidity:
5°C to 35°C
30 to 80% (non-condensing)
Storage environment conditions
Temperature:
Humidity:
-10°C to 60°C
10 to 85% (non-condensing)
Power supply input
Power consumption
Energy-saving mode
AC 100 – 240V 50/60 Hz
Standard:
Sleep mode:
OFF mode:
110 W
2 W or less
1 W or less
Power supply input socket
3PIEC type
Mass
Approx. 11.2 kg (approx. 7.9 kg without stand)
Packaging conditions (mass/dimensions)
Approx. 14.5 kg / 653 (W) x 515 (H) x 280 (D) mm
Tilt angle/swivel angle/height adjustment
Up 25°, down 10° / 90° / approx. 60 mm (for tilt angle of 0°)
Outside dimensions
*1 View angle: Indicates the angle at which a black-white contrast ratio of 10 or more can be displayed.
*2 Average value for response speeds between each specified tone level (e.g. 0, 31, 63, 95, 127, 159, 191, 223, 255).
*3 This monitor satisfies various specification requirements in a state where the stand is attached.
*4 If a signal other than a resolution of 1920 x 1200 is input, text may be blurred or graphics may be distorted on the monitor, depending on the signal.
NOTE: Technical specifications are subject to change without notice.
English-47
Downloaded from ManualMonitor.com Manuals
TCO’06
Congratulations!
The product you have just purchased carries the TCO’06 Media
Displays label. This means that your display is designed and
manufactured according to some of the strictest performance and
environmental criteria in the world. The manufacturer of this
display has selected it to be certified to TCO’06 Media Displays as
a sign of usability, high performance and reduced impact on the
natural environment.
Products certified to TCO´06 Media Displays are specifically designed for high quality
reproduction of moving images. Features such as luminance, colour rendition and response
time are important when watching TV or working with media, graphics, web design and other
applications that demand outstanding moving images.*
Other features of TCO’06 Media Displays:
Ergonomics
• Good visual ergonomics and image quality in order to reduce vision and strain problems.
Criteria for luminance, contrast, resolution, reflectance, colour rendition and response time.
Energy
• Energy saving mode – beneficial both for the user and the environment
• Electrical safety
Emissions
• Low electromagnetic fields surrounding the display
Ecology
• Product is designed for recycling. Manufacturer must have a certified environmental
management system such as EMAS or ISO 14 001
• Restrictions on:
- Chlorinated and brominated flame retardants and polymers
- Hazardous heavy metals such as cadmium, mercury, hexavalent chromium and lead.
All TCO labelled products are verified and certified by TCO Development, an independent third
party labelling organization. For over 20 years, TCO Development has been at the forefront of
moving the design of IT equipment in a more user-friendly direction. Our criteria are developed
in collaboration with an international group of researchers, experts, users and manufacturers.
Since the program’s inception, TCO labelled products have grown in popularity and are now
requested by users and IT-manufacturers all over the world.
Full specifications and lists of certified products can be found on our homepage
www.tcodevelopment.com
* For a display used primarily for conventional work tasks such as word processing, we recommend a display certified to our
office display series TCO’03 Displays or later version.
English-48
Downloaded from ManualMonitor.com Manuals
NEC DISPLAY SOLUTIONS is strongly committed to environmental protection and sees recycling as one of the company’s
top priorities in trying to minimize the burden placed on the environment. We are engaged in developing environmentallyfriendly products, and always strive to help define and comply with the latest independent standards from agencies such as
ISO (International Organisation for Standardization) and TCO (Swedish Trades Union).
Disposing of your old NEC product
The aim of recycling is to gain an environmental benefit by means of re-use, upgrading, reconditioning or reclamation of
material. Dedicated recycling sites ensure that environmentally harmful components are properly handled and securely
disposed. To ensure the best recycling of our products, NEC DISPLAY SOLUTIONS offers a variety of recycling
procedures and gives advice on how to handle the product in an environmentally sensitive way, once it has reached the end
of its life.
All required information concerning the disposal of the product and country-specific information on recycling facilities can be
found on our following websites:
http://www.nec-display-solutions.com/greencompany/ (in Europe),
http://www.nec-display.com (in Japan) or
http://www.necdisplay.com (in USA).
Energy Saving
This monitor features an advanced energy saving capability. When a VESA Display Power Management Signalling (DPMS)
Standard signal is sent to the monitor, the Energy Saving mode is activated. The monitor enters a single Energy Saving mode.
Mode
Power consumption
LED colour
Normal Operation
Approx. 110W
Blue
Energy Saving Mode
2W or less
Blue blinking
Off Mode
1W or less
Unlit
WEEE Mark (European Directive 2002/96/EC)
Within the European Union
EU-wide legislation, as implemented in each Member State, requires that waste electrical and electronic
products carrying the mark (left) must be disposed of separately from normal household waste. This includes
monitors and electrical accessories, such as signal cables or power cords. When you need to dispose of your
NEC display products, please follow the guidance of your local authority, or ask the shop where you
purchased the product, or if applicable, follow any agreements made between yourself and NEC.
The mark on electrical and electronic products only applies to the current European Union Member States.
Outside the European Union
If you wish to dispose of used electrical and electronic products outside the European Union, please contact your local
authority so as to comply with the correct disposal method.
English-49
Downloaded from ManualMonitor.com Manuals
English
Manufacturer’s Recycling and Energy Information