1
SNTP Display User Manual
Including a Powershell module for controlling the SNTP Display and the
#twatch
David Moisan, N1KGH
5/14/2012
CONTENTS
Introduction ................................................................................................................................................ 1
Flashing the SNTP Display Firmware ........................................................................................................... 2
Connecting and Using the SNTP Display ..................................................................................................... 3
Building the SNTP Display Firmware from Source ...................................................................................... 4
Installing and Using the PowerShell LCDDisplay Module ........................................................................... 5
Prerequisites ........................................................................................................................................... 5
Enable Script Execution .......................................................................................................................... 5
Installing the Module .............................................................................................................................. 5
Using The Module ................................................................................................................................... 6
“Hello, World” Example .......................................................................................................................... 6
PowerShell LCDDisplay Module Reference................................................................................................. 7
Start-LCDDemo ....................................................................................................................................... 7
SYNTAX ................................................................................................................................................ 7
DESCRIPTION....................................................................................................................................... 7
Find-MCHPIPDevice ................................................................................................................................ 8
SYNTAX ................................................................................................................................................ 8
LCD Command Code ........................................................................................................................... 8
DESCRIPTION....................................................................................................................................... 8
INPUTS ................................................................................................................................................ 8
OUTPUTS ............................................................................................................................................. 8
Enter-LCDmode ....................................................................................................................................... 9
SYNTAX ................................................................................................................................................ 9
DESCRIPTION....................................................................................................................................... 9
PARAMETERS ...................................................................................................................................... 9
Connect-Lcd ............................................................................................................................................ 9
SYNTAX ................................................................................................................................................ 9
DESCRIPTION....................................................................................................................................... 9
PARAMETERS ...................................................................................................................................... 9
OUTPUTS ............................................................................................................................................. 9
Clear-LCD............................................................................................................................................... 10
i|Page
SYNTAX .............................................................................................................................................. 10
DESCRIPTION..................................................................................................................................... 10
PARAMETERS .................................................................................................................................... 10
Write-LCD .............................................................................................................................................. 10
DESCRIPTION..................................................................................................................................... 10
SYNTAX .............................................................................................................................................. 10
PARAMETERS .................................................................................................................................... 10
Set-LCDbacklight ................................................................................................................................... 11
SYNTAX .............................................................................................................................................. 11
DESCRIPTION..................................................................................................................................... 11
PARAMETERS .................................................................................................................................... 11
Set-LCDbrightness ................................................................................................................................. 11
SYNTAX .............................................................................................................................................. 11
DESCRIPTION..................................................................................................................................... 11
PARAMETERS .................................................................................................................................... 11
Set-LCDCursortype ................................................................................................................................ 12
SYNTAX .............................................................................................................................................. 12
DESCRIPTION..................................................................................................................................... 12
PARAMETERS .................................................................................................................................... 12
Set-LCDcustomchar ............................................................................................................................... 13
SYNTAX .............................................................................................................................................. 13
DESCRIPTION..................................................................................................................................... 13
PARAMETERS .................................................................................................................................... 13
NOTES ............................................................................................................................................... 13
Set-LCDhome ........................................................................................................................................ 13
SYNTAX .............................................................................................................................................. 13
DESCRIPTION..................................................................................................................................... 13
PARAMETERS .................................................................................................................................... 13
Set-LCDposition..................................................................................................................................... 14
SYNTAX .............................................................................................................................................. 14
DESCRIPTION..................................................................................................................................... 14
PARAMETERS .................................................................................................................................... 14
ii | P a g e
NOTES ............................................................................................................................................... 14
Show-NetworkonLCD ............................................................................................................................ 14
SYNTAX .............................................................................................................................................. 14
DESCRIPTION..................................................................................................................................... 14
PARAMETERS .................................................................................................................................... 14
Exit-LCDMode ....................................................................................................................................... 15
SYNTAX .............................................................................................................................................. 15
DESCRIPTION..................................................................................................................................... 15
PARAMETERS .................................................................................................................................... 15
Close-LCD .............................................................................................................................................. 15
SYNTAX .............................................................................................................................................. 15
DESCRIPTION..................................................................................................................................... 15
PARAMETERS .................................................................................................................................... 15
Troubleshooting ........................................................................................................................................ 16
More Information and Contacts ............................................................................................................... 16
Legal Information ...................................................................................................................................... 16
APPENDIX – Matrix Orbital Command Code Reference ........................................................................... 17
iii | P a g e
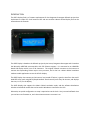
INTRODUCTION
The SNTP Display Clock is a firmware replacement for the Dangerous Prototypes #Twatch project that
implements a simple UTC clock based on NTP and can emulate a Matrix Orbital display that can be
accessed over the network.
The SNTP Display is based on the #Twatch project by Ian Lesnet, Dangerous Prototypes and is based on
the Microchip 18F67J60 microcontroller with full Ethernet support. It’s connected to an HD44780based LCD display with 4 lines of 20 characters. The original #Twatch connects to the Internet to
retrieve the top-trending Twitter topics at any moment, and it also has a Matrix Orbital emulation
mode to enable applications to use the LCD for display.
The SNTP Display also connects to the Internet, but instead of Twitter, it gets the time from the worldwide NTP server pool using SNTP (Simple Network Time Protocol) once every 20 minutes, and displays
the time, in UTC, on the display.
The SNTP Display also supports the Matrix Orbital emulation mode, and the software distribution
includes a PowerShell module that can be used in Windows to interface to the LCD.
Otherwise, no special configuration or setup is required to use the clock. You just need a #Twatch that
you can burn new firmware on, and a home Internet router to connect it to.
FLASHING THE SNTP DISPLAY FIRMWARE
You need a TFTP (Trivial File Transfer Protocol) program to transfer the file. Windows, from Vista and
later, has TFTP available as an optional Windows component. It’s available in the Add/Remove
Programs dialog; click on “Add/Remove Windows Components” and check off “Trivial File Transfer
Protocol”.
The network bootloader has the address 192.168.1.123. If your network doesn’t use this range, you’ll
need to change the IP address on your NIC to match the range in the bootloader.
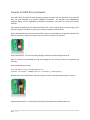
Power off the #Twatch and find the PGD and PGC contacts on the header on the opposite side from the
Ethernet connector, and place a jumper over the contacts as shown in the picture.
Plug in the #Twatch. The LCD may show garbage or be blank and the backlight will be off.
Open a command or PowerShell prompt and navigate to the directory where you unpacked the
firmware.
Enter the following command:
tftp 192.168.1.123 put sntpdisplayv1.hex
Transfer successful: 163385 bytes in 6 second(s), 27230 bytes/s
Remove power from the #Twatch. Move the jumper so that it’s between GND and PGC, as shown:
Plug the #Twatch back in. The display should light up and display the IP address and time.
2|Page
CONNECTING AND USING THE SNTP DISPLAY
If you’ve just flashed the #Twatch, it’s already connected to the Internet. Otherwise, just plug it into
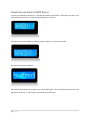
your network and turn it on. You’ll see these displays as it starts up.
The display will show its default IP address, before it acquires a new one from DHCP.
The display has gotten its address.
The clock has started but has not gotten sync from the NTP pool. The clock will always start at the Unix
epoch time of January 1st, 1970, until it connects with an NTP server.
3|Page
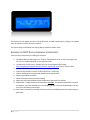
The display has now gotten the time from the NTP pool, and will keep doing so, polling for an update
every 20 minutes until the device is turned off.
The time is always maintained, even during Matrix Orbital emulation mode.
BUILDING THE SNTP DISPLAY FIRMWARE FROM SOURCE
These are the prerequisites for building the firmware:
1. The MPLab IDE from Microchip.com. Click on “Development Tools” on their main page, and
then click on “MPLAB IDE 8.85” on the right hand side.
2. The Microchip TCP/IP library, available via a link from Dangerous Prototypes,
http://dangerousprototypes.com/docs/Twatch_networked_LCD Click on “TCP/IP 5.20b”.
3. Install the IDE and the library.
4. Copy the Source folder from the zip file and place it in a directory.
5. Find the SNTPDisplayv1.mcp file and double-click to open the IDE.
6. Select Project/Make to build it.
7. Select File/Export to open the export dialog.
8. Make sure that Program Memory and Configuration Bits boxes are checked.
9. IMPORTANT: Change the Export End address to 0x1DBBF. The network bootloader is beyond
this address, and if the end address is not changed, you will overwrite the bootloader! Be very
sure of this step before proceeding!
10. Follow the instructions for flashing the firmware from the SNTPDisplayV1.hex file that was just
generated.
4|Page
INSTALLING AND USING THE POWERSHELL LCDDISPLAY MODULE
PREREQUISITES
To use the LCDDIsplay PowerShell module, you need PowerShell 2.0 on your PC. This is included by
default on Windows Vista and later, and Windows Server 2008 and later. For Windows XP SP3 and
Windows Server 2003, download and install the Windows Management Framework Core from
Microsoft at http://support.microsoft.com/kb/968929.
ENABLE SCRIPT EXECUTION
If you have never used PowerShell on the particular PC you want to run the module from, you may
need to enable script execution. Start PowerShell by clicking Start, Run and then enter Powershell in
the dialog box. Click OK. You will see a command prompt window.
Enter this command to enable script execution:
PS C:\Windows\system32> set-executionpolicy unrestricted
Execution Policy Change
The execution policy helps protect you from scripts that you do not trust. Changing
the execution policy might expose
you to the security risks described in the about_Execution_Policies help topic at
http://go.microsoft.com/fwlink/?LinkID=135170. Do you want to change the execution
policy?
[Y] Yes [N] No [S] Suspend [?] Help (default is "Y"):
Enter Y to proceed. If you are on Windows Vista or Windows 7, you may get an access-denied error; in
this case, hit Start, enter “PowerShell” in the search box, and right-click on the first icon that appears.
Select “Run As Administrator”, and Windows UAC should ask to confirm it. Click OK, or enter your
admin credentials, and repeat this step.
INSTALLING THE MODULE
If you haven’t already done so, unzip the source file into a temporary directory of your choice. In the
ZIP file there is a folder under “Powershell” called “LCDDisplay”. Copy this folder. In your home
directory,
there
should
be
a
folder
called
“WindowsPowerShell”,
as
in
“C:\users\davidmoisan\windowspowershell\”, for example. If there isn’t a folder called
modules, create one. Move to the modules folder and copy the LCDDisplay folder to there.
5|Page
USING THE MODULE
The module comes with a demo routine that exercises all of the functions of the #twatch. In
PowerShell, enter:
Import-module LCDDisplay
This command should run without any output, meaning that the module has been loaded successfully.
Then type,
Start-LCDDemo
The demo program will run and perform all of the LCD functions.
You’ll perform these basic functions to send text and formatting to the LCD:
1.
2.
3.
4.
5.
6.
7.
Get the address of the device using find-mchpipdevice
Connect to the device and get a connection object by using Connect-LCD.
Stop the clock (or #twatch) display using enter-lcdmode.
Send text to the LCD with write-lcd.
Position the cursor with set-lcdposition.
Resume the clock (or #twatch) display using Exit-LCDmode.
Finally, close the LCD connection with Close-LCD.
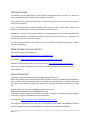
“HELLO, WORLD” EXAMPLE
This is a simple example of the canonical “Hello, World” program implemented with the module.
# Hello, World Example
#
Import-module LCDDisplay –erroraction silentlycontinue
# Discover the #twatch’s address.
$display = Find-MCHPIPDevice
# If not found (no #twatch), exit
If ($display –eq $null) {
Write-error “No #twatch found!”
Exit
}
# Otherwise, continue
Else {
$lcd = Connect-LCD –ipaddress $display.IPAddress
Enter-LCDMode –connection $lcd
Clear-LCD –connection $lcd
6|Page
Set-LCDPosition –connection $lcd –row 2 –column 8
Write-LCD –connection $lcd –textstring “Hello, World!”
# Pause for one minute
Sleep 60
# Exit LCD mode and reenter clock (or #twatch) mode.
Exit-LCDMode –connection $lcd
Close-LCD –connection $lcd
}
# Done!
exit
Details on the PowerShell functions are in the next section. To display a list of commands in the
module, type:
Get-Command –module LCDDisplay.
POWERSHELL LCDDISPLAY MODULE REFERENCE
START-LCDDEMO
SYNTAX
Start-LCDDemo
DESCRIPTION
Runs a two-minute demo that shows all the functions of the LCD.
7|Page
FIND-MCHPIPDEVICE
SYNTAX
Find-MCHPIPDevice
LCD COMMAND CODE
None
DESCRIPTION
Sends a broadcast packet to UDP 30303 and waits for a response from a Microchip device that uses the
TCP/IP stack.
INPUTS
None
OUTPUTS
Returns one object corresponding to the first device that responds to a discovery broadcast.
Fields are as follows. All are strings.
IPAddr
Hostname
MACAddr
ResetReason
8|Page
IP Address of device responding
Name of device responding
MAC address of device responding, in string format.
Reason for last reset
ENTER-LCDMODE
SYNTAX
Enter-LCDmode -connection <TcpClient>
DESCRIPTION
Sends command to enter LCD mode.
PARAMETERS
-connection <TcpClient>
LCD Connection object of type System.Net.Sockets.TcpClient as returned by Connect-LCD.
CONNECT-LCD
SYNTAX
Connect-Lcd -ipaddress <String> [-port <Int32>]
DESCRIPTION
Connect to an IP LCD display implementing the Matrix Orbital protocol
PARAMETERS
-ipaddress <String>
The IP address of the display. Required
-port <Int32>
The port on the display to connect with. The default port is 1337.
OUTPUTS
LCD Connection object of type System.Net.Sockets.TcpClient as returned by Connect-LCD.
9|Page
CLEAR-LCD
SYNTAX
Clear-LCD –connection <TcpClient>
DESCRIPTION
Clear LCD screen
PARAMETERS
-connection <TcpClient>
LCD Connection object of type System.Net.Sockets.TcpClient as returned by Connect-LCD.
WRITE-LCD
DESCRIPTION
Write a text string to LCD.
SYNTAX
Write-LCD -connection <TcpClient> -textstring <String>
PARAMETERS
-connection <TcpClient>
LCD Connection object of type System.Net.Sockets.TcpClient as returned by Connect-LCD.
-textstring <String>
10 | P a g e
SET-LCDBACKLIGHT
SYNTAX
Set-LCDbacklight -connection <TcpClient> [-light <Boolean>]
DESCRIPTION
Turn LCD backlight on or off
PARAMETERS
-connection <TcpClient>
LCD Connection object of type System.Net.Sockets.TcpClient as returned by Connect-LCD.
-light <Boolean>
$true Backlight on
$false Backlight off
SET-LCDBRIGHTNESS
SYNTAX
Set-LCDbrightness -connection <TcpClient> [-brightness] <Byte>
DESCRIPTION
Set brightness of the LCD.
PARAMETERS
-connection <TcpClient>
LCD Connection object of type System.Net.Sockets.TcpClient as returned by Connect-LCD.
-brightness <Byte>
Desired brightness
(0-255, default 255)
Note: Not implemented in #Twatch or SNTPDisplay.
11 | P a g e
SET-LCDCURSORTYPE
SYNTAX
set-lcdcursortype -connection <TcpClient> [[-underline] | [-block]] [-enable
<Boolean>]
DESCRIPTION
Enable or disable the cursor and set it to block or underline
PARAMETERS
-connection <TcpClient>
LCD Connection object of type System.Net.Sockets.TcpClient as returned by Connect-LCD.
-underline
Specifies underline cursor (default)
-block
Specifies block cursor.
-enable <Boolean>
Boolean value to enable or disable specified cursor.
$true Enable cursor
$false Disable cursor
12 | P a g e
SET-LCDCUSTOMCHAR
SYNTAX
Set-LCDcustomchar –connection <TcpClient> -charnum <Byte> -bitmap <Byte[]>
DESCRIPTION
Define LCD custom character by specifying an eight-byte bitmap and the character number to replace.
PARAMETERS
-connection <TcpClient>
LCD Connection object of type System.Net.Sockets.TcpClient as returned by Connect-LCD.
-charnum <Byte>
Character position to replace with custom bitmap;
Valid values are 0 through 7.
-bitmap <Byte[]>
Eight-byte bitmap array
NOTES
The character bitmap is encoded as follows:
Byte
0
1
2
3
4
5
6
7
Bitmap
***nnnnn
***nnnnn
***nnnnn
***nnnnn
***nnnnn
***nnnnn
***nnnnn
***nnnnn
* = Ignored.
Only the five least significant bits are used to compose the character--the three higher bits are ignored.
See the HD44780 data sheet for more details.
SET-LCDHOME
SYNTAX
set-lcdhome [-connection] <TcpClient> [<CommonParameters>]
DESCRIPTION
Set the LCD cursor to home position
PARAMETERS
-connection <TcpClient>
LCD Connection object of type System.Net.Sockets.TcpClient as returned by Connect-LCD.
13 | P a g e
SET-LCDPOSITION
SYNTAX
Set-LCDposition -connection <TcpClient> -column <Byte> -row <Byte>
DESCRIPTION
Set LCD Cursor position
PARAMETERS
-connection <TcpClient>
LCD Connection object of type System.Net.Sockets.TcpClient as returned by Connect-LCD.
-column <Byte>
LCD column position, 1 to 20.
-row <Byte>
LCD row position, 1 to 4
NOTES
Because displays based on the HD44780 can be, and often are, of many different sizes and dimensions,
this function does not attempt to perform cursor position validation. All cursor values are passed
through to the firmware without modification. The #twatch uses a 20x4 LCD.
SHOW-NETWORKONLCD
SYNTAX
Show-NetworkonLCD -connection <TcpClient>
DESCRIPTION
Display network IP, gateway and DNS information on the LCD
PARAMETERS
-connection <TcpClient>
LCD Connection object of type System.Net.Sockets.TcpClient as returned by Connect-LCD.
14 | P a g e
EXIT-LCDMODE
SYNTAX
exit-lcdmode -connection <TcpClient>
DESCRIPTION
Send command to exit LCD emulation mode and return to SNTP Display (or #twatch)
PARAMETERS
-connection <TcpClient>
LCD Connection object of type System.Net.Sockets.TcpClient as returned by Connect-LCD.
CLOSE-LCD
SYNTAX
close-lcd -connection <TcpClient>
DESCRIPTION
Close LCD connection.
PARAMETERS
-connection <TcpClient>
LCD Connection object of type System.Net.Sockets.TcpClient as returned by Connect-LCD.
15 | P a g e
TROUBLESHOOTING
The #Twatch—and the SNTP display—have almost no configurable options, so there isn’t much that
can go wrong. Most problems will be due to network connectivity.
If your display comes up on the UNIX January 1st epoch, and stays there for more than a few minutes,
check your connectivity.
If you are using the Matrix Orbital emulation mode and the screen is blank, doesn’t display text
properly, or just displays junk, this is also probably a network problem.
IMPORTANT: If you are connecting your #Twatch to a managed switch, be sure to set the #Twatch port
to 10 MBps half duplex, and disable Spanning Tree Protocol on the port, if you can. Otherwise, the
#Twatch will miss your commands at random.
The SNTP Display should work for a long time, and will probably be obsolete long before it breaks.
Enjoy the timekeeping.
MORE INFORMATION AND CONTACTS
The primary web site for the #Twatch is
http://dangerousprototypes.com/docs/Twatch_networked_LCD.
The forum is at http://dangerousprototypes.com/forum/viewforum.php?f=17.
Updates to the SNTP Display will be posted to my blog at http://davidcmoisan.wordpress.com/
Thanks to Ian Lesnet and Dangerous Prototypes for their original #Twatch design from which my
project is based.
LEGAL INFORMATION
This project is based on the #twatch project (dangerousprototypes.com).
NOTE: The firmware source requires the Microchip TCP/IP stack, which is released under the Microchip
license. Code written by the #twatch project is released into the public domain. The Microchip license
still applies to the Microchip TCP/IP stack. Navigate this copyright and patent minefield at your own
risk!
Originally written by Ian Lesnet <[email protected]>
Modified by David Moisan <[email protected]>
To the extent possible under law, the author has waived all copyright and related or neighboring rights
to this code. This work is published from the United States.
For details see: http://creativecommons.org/publicdomain/zero/1.0/.
This program is distributed in the hope that it will be useful, but WITHOUT ANY WARRANTY; without
even the implied warranty of MERCHANTABILITY or FITNESS FOR A PARTICULAR PURPOSE.
16 | P a g e
APPENDIX – MATRIX ORBITAL COMMAND CODE REFERENCE
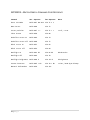
Dec. Sequence
Command
Hex. Sequence
Enter LCD Mode
0xFE 0x47 0x1 0x1 254 71 1 1
Home Cursor
0xFE 0x48
254 72
Cursor position
0xFE 0x47 c r
254 71 c r
Clear Screen
0xFE 0x58
254 88
Underline cursor on
0xFE 0x4A
254 74
Underline cursor off
0xFE 0x4B
254 75
Block cursor on
0xFE 0x53
254 83
Block cursor off
0xFE 0x54
254 84
Backlight on
0xFE 0x42 dd
254 66 dd
Backlight off
0xFE 0x46
254 70
Backlight brightness
0xFE 0x98 b
254 152 b
b=brightness
Custom character
0xFE 0x4E c 8b
254 78 c 8b
c=char, b8=8-byte bitmap
Network Information
0xFE 0xFD
254 251
17 | P a g e
Notes
c=col, r=row
dd=duration