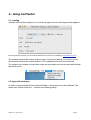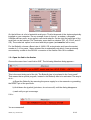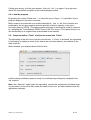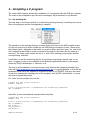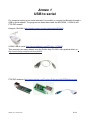
1
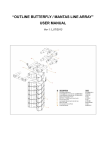
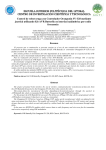
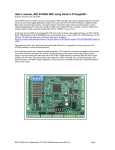
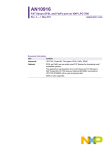
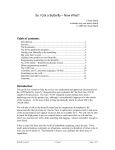
AvrFlasher for OS X
Henri-Pierre GARNIR
University of Liège, Belgium [www.ipnas.org]
1.- General description
AvrFlasher allows the downloading (“or flashing”) of programs to the ATMEL AVR microcontroller family. It has been extensively tested with the “AVR Butterfly” kit but could also
be adapted to other processors. The program is written in JAVA under Xcode (Macintosh
OS X development kit) but the .jar file runs “as is” under LINUX.
The program connects itself through a serial link to the an AVR imbedded serial programmer. For computers (as Macintoshes) lacking a true serial port, it is necessary to use
anUSB to Serial converter to obviate the problem (cf. Annex 1).
After having installed the AVR-gcc compiler and its AVR library (cf. annex 2), the program
can control the compiling and loading of .hex files by simple menu invocations. (This option avoids direct typing of cryptic instructions in a terminal window!).
A very simple terminal emulator is also included in AvrFlasher in order to be able to dialog
with the micro-controler when needed.
The latest version of AvrFlasher for Mac OS x is available at :
http://www.ipnas.ulg.ac.be/garnir/avr/AvrFlasher.zip
©HPG, U.Lg. 20-mars-08
1/13
2.- Using AvrFlasher
2.1- Loading
A double click on the program icon, loads the program and the following window appears :
If the program did not load, you must check that the Java run time is installed (cf. http://java.sun.com ).
The window presents the status of the program. On the first launch, no serial port is selected and the link to the remote flasher is not established and no file are selected.
To configure the program at least three steps are mandatory and can be activated through
the Action menu.
2.2.-Open the serial port
In order to communicate with the external flasher, a serial port has to be initialized. The
menu item “Select serial port...” present the following dialog :
©HPG, U.Lg. 20-mars-08
2/13
On the left there is a list of potential serial ports. That list depends of the devices physically
installed on your computer. On my example, there is 4 ports : a modem, a Keyspan
USA28x with two ports, an an generic usb-serial adapter. On the right the baud rate of the
serial link can be selected. The Terminator menu has four choices (CR, LF, CR-LF and LFCR). The socket nb. option is not used with this program (and must be left to zero).
For the Butterfly, choose a Baud rate of 19200, CR as terminator and leave the socket
number to 0. In my case, I have selected the cu.usbserial0 port which I have previously
connected by a cable to the RS-232 connector of the flasher.Click OK to validate.
2.3.- Open the link to the flasher
Choose the menu item “reset link to AVR”. The following Attention dialog appears :
This is the most tricky part of the job. The Butterfly has to be placed in the “boot mode”.
That means that a special program, located in the Butterfly has to be activated. The way to
do is :
a) Reset the Butterfly (by removing the power supply for a few seconds or grounding
the RESET pin of the processor.
b) Hold down the joystick (just down, do not move it!) until the dialog disappears.
c) wait until you got a message.
If it is :
You are connected!
©HPG, U.Lg. 20-mars-08
3/13
If thing goes wrong, (not the good answer, “time out”, etc...) try again. If you get stuck,
check the connexions and goes to the troubleshooting section.
2.4.- Load the program
By pushing the button “Read from...” or select the menu “Open...” it is possible load a
program adapted to the micro-controller.
Binary code for the controller are usually imbedded in .hex or .bin files. Hex files are
produced by the avr-gcc compiler and are specially coded for transfer to the microcontroller memory) NOTE : The demonstration program of the Butterfly could be restored
by activating the” Load Butterfly DEMO” item of the “File “menu. (This option allows to reset the Butterfly to its original state as described in the manual).
2.5.- Press the button “Flash” of select the menu item “Flash”
The uploading of the file to the controller should start. If “Verify” is activated, the uploading
is followed by a reading to check if the data in the controller memory are identical to the
data in the file.
When finished, your display should look like this:
And the newly installed program is ready to be activated by clicking the trackpad to the
“up” position.
Note : the “Save bin” option skips the uploading, read the file contained in the flash memory and save it on the local disk (under the name x.bin in the .jar folder hidden inside the
application package).
©HPG, U.Lg. 20-mars-08
4/13
3.- Compiling a C program
The menu AVR-compiler allows the compilation of C programs with the AVR-gcc compiler.
The result of the compilation (and the error messages) are presented in a log window.
3.1.- Set working dir...
The first step to use these options is to define the working directory containing the source
files of the program and the corresponding “makefile”.
The selection of the working directory is made by the first item of the AVR-compiler menu.
As I do not know hot to select a folder by the FileDialog() instruction of Java, I have used
the following trick : Navigate to the folder you want to select and click “open” on one of the
file contained in that folder in order to memorize the path to the folder (the file name is irrelevant). The folder must contain the list of .c and .h files forming your program and the
corresponding “makefile”.
A makefile is a text file containing the list of instructions executing a certain task. In our
case, I suggest to rely on the makefile for the Butterfly application based on the sample
written by Eric B. Weddington, J. Wunsch, et al.
The way to write makefile is out of the scope of this text but the sample presented in the
hello test (http://www.ipnas.ulg.ac.be/garnir/avr/hello.zip) is a good example. In that file the
parameters that has to be adapted to a specific project is (a) TARGET, that give the name
of the file containing the starting point of the program, and (b) SRC that lists the .c source
files that compose the project.
For “hello” the list contain only one file;
# Target file name (without extension).
TARGET = lcdhello
# List C source files here. (C dependencies are automatically generated.)
SRC = $(TARGET).c
Hereafter, a more conventional example with many files :
# Target file name (without extension).
TARGET = main
# List C source files here. (C dependencies are automatically generated.)
SRC = $(TARGET).c
SRC += BCD.c \
LCD_functions.c \
LCD_driver.c \
©HPG, U.Lg. 20-mars-08
5/13
eeprom169.c \
ADC.c \
timer0.c
3.2.- MAKE all & MAKE clean
The menu items “MAKE all” and “MAKE clean” allow respectively to compile and clean the
program. The activate the makefile that has to be present in the selected working directrory. They both open automatically the log window where progress messages will be displayed. If you get a message like :
Working dir : /Volumes/xxxxx/
ERROR : make: *** No rule to make target `clean'.
Stop.
This means that in the folder selected as working dir., no ad-hoc makefile is present!
The MAKE clean option removes all the files that have eventually been created by “MAKE
all” (including the .hex). That reduces the number of file of the folder to the strict minimum
and prepares it for a new compilation. “MAKE all” try to compile and link the program. To
execute that instruction the AVR-gcc compiler and the AVR library have to be correctly installed (see annex 2). During the “MAKE all” process, errors could be encountered as
messages presented in the log window could indicate. When the process terminate correctly the message :
Errors: none
-------- end -------(eventually followed by some warnings) is displayed and the newly created .hex file is
loaded.
In case of errors the .hex file is not loaded and you will have to use a text editor (as Xcode)
to debug and correct your files before starting again!
3.4.- Load .hex
The “Load .hex” menu item allows to load the first encountered .hex file present is the
working folder (without recompiling).
3.5.- Log window
The “Log window” item reveals the log window or bring it to the front.
3.6.- Terminal...
The “Terminal...” item switch on the terminal option (and broke the serial link to the controller).
©HPG, U.Lg. 20-mars-08
6/13
4.- Using the terminal window
When the terminal window is invoked a setup dialog appears :
This dialog allows to select the device, the baud rate and the line terminator to be used.
By clicking <ok> the terminal window appears.
In the upper text field you type your command. <return> send the line to the controller. If
you want to include the terminator string at the end of your message put a • (bullet) at the
end. A <esc> character is sent by including a ? (question mark) in your text.
The response from the controller is displayed in the lower text area.
The button “clear” clear the receiving window.
©HPG, U.Lg. 20-mars-08
7/13
Annex 1
USB to serial
For computer lacking a true serial interface it is possible to connect the Butterfly through a
USB to serial adapter. The program has been tested with the KEYSPAN , UC232-A and
FTDI DIP models.
Keyspan USA-28X (http://www.keyspan.com/products/usb/USA28x/)
UC232 USB to serial (http://www.dealtime.com/xPO-Aten_UC232A)
This converter (as many others) uses the Prolific chip PL-2303 with updated driver on :
http://sourceforge.net/projects/osx-pl2303/
FTDI DIP modules (http://www.ftdichip.com/Products/EvaluationKits/DIPModules.htm)
©HPG, U.Lg. 20-mars-08
8/13
Annex 2
How to install the AVR C compiler
In order to compile a C program in the AVR language a specially adapted C compiler has
to be used. This development system is under permanent evolution and is distributed under the GNU copyright concept. The latest version for different OS could be found on the
web.
However, for people not very accustom to the technicality of the Linux system, I will describe hereafter an installation for the Mac OS X based on an “old” (2004) version suited
for the Buttefly.
A) Install the AVR-GCC compiler
Get the file avr-gcc-macosx-20040203.dmg (14.2 M).It is a disk image of an installer that
conforms to the usual OS X installation procedure1.
A copy the file is available at http://www.ipnas.ulg.ac.be/garnir/avr/avr_gcc_macosx_20040203.dmg
Install it.
B) Install the AVR library
Get the zipped file avr-libc-1.0.5.zip containing the AVR specific instructions.
A copy of that file (730k) is available at http://www.ipnas.ulg.ac.be/garnir/avr/avr-libc-1.0.5.zip
De-zip it and follows these steps:
a) The folder avr-libc-1.0.5 containing 36 files should be on a writable disk.
b) Activate the terminal program (situated in the utilities folder of Applications)
1
Thank you to Mike Seeman cf. : Resources - AVR Microcontroller Programming on a Mac
©HPG, U.Lg. 20-mars-08
9/13
c) Place yourself in the avr-libc-1.0.5 folder (use “cd” for change directory).
xxxxx$ cd <full path>/avr-libc-1.0.5¬
Note : by dragging the folder image into the terminal window the path is automatically inserted.
d) Activate the following commands (in bold - xxx$ is the prompt and ¬ means <return>) :
xxx$ ./doconf¬
xxx$ ./domake¬
xxx$ sudo ./domake install¬ (this requires a password)
Each of them provokes a huge listing a cryptic commands. Let each processe goes to its
end and wait for the reappearance of the prompt message (xxx$) before typing the next
command.
Important note : “make” works only after xCode has been installed. xCode is free and
can be dowloaded from http://developer.apple.com/tools/xcode/
C) Get the manual of the library
These httml files describe the C instructions specifically designed for the microcontroller
and that can be used in your program.
A copy of that file (172k) is available at http://www.ipnas.ulg.ac.be/garnir/avr/avr-libc-user-manual-1.0.5.zip
©HPG, U.Lg. 20-mars-08
10/13
Annex 3
TROUBLESHOOTING
More messages...
Yon can get more information on the program working by looking at the console output.
During the running of the program many technical messages are send to the console.
These messages give informations on the status of the program and, when an error occurs, they explain with some details what did happen.
Establishing the link
To put the Butterfly in the boot mode and prepare it for receiving the program could be a
little tricky. The first step is to activate the boot-loader program (which is protected and, fortunately, cannot be erased by mistake!).
From the demo program, a jump to the boot section can be done with the joy stick, “Options>Boot loader> Jump to Boot loader”. However, as soon as the demo program is replaced by one of yours, that option is no more available!
The other way to go into the boot mode is to reset the system by shortcutting (for a instant)
pins 5 and 6 on J403, the ISP connector. A convenient way to perform the operation is by
soldering a push button switch between these pins. After a reset (or on power on) the Butterfly starts in the boot section and nothing is displayed on the LCD.
When in boot mode, holding down the joystick sent on the RS-232 serial port a train of ?
(question mark) at 19200 bauds. This is the signature of the boot loader. When AvrFlasher
detect that signal, he send the character <escape> to which the boot-loader answers by
sending its identification (here AVRBOOT), signaling that the link is established and that
the upload could start.
If that sequence in not satisfied in due time, AvrFlash time out and the link is not established. The whole process (reseting & pushing down the joystick) has to be retried.
©HPG, U.Lg. 20-mars-08
11/13
The programming instructions are described in the “AVR109: Self Programming application note” (see Atmel site) and the source of the boot-loader is available on the net.
How to start my program?
One quits the boot mode and run the program by clicking the joystick to the up position.
Avoid draining the battery
The demo program and the boot-loader have both as self power-off feature that put the
system to sleep after ≈30 minutes of inactivity. When your program is running, that option
is no more available and the processor is consuming electricity at all time - the serial chip
is particularly glutton - and this can drain the battery overnight. So, after you are done,
disconnect the power supply, reset to boot mode, or flash the demo program back to the
memory (cf. Menu File> Load demo). You can also include a power save function into your
code.
Source code of AvrFlash
The source code of the program may be available by requesting it by email. Please contact me at : [email protected] .
For Linux fan
AvrFlash has been tested on Linux (Intel) and works without recompiling. However the
Mac package has to be disentangle to extract the AvrFlasher.jar file which contains the
code.
No “exotic” folder path
AvrFlasher needs a be placed in a folder having a “clean” path, that means not embedded
in a chain of folder with names containing “exotic” characters (not event <space>). This
restriction is due to the fact that unix restriction on file naming is not enforced on Macintosh and some characters that are allowed on OS X file names perturb the good working
of unix command. (This is also true for Xcode).
This text is available at : http://www.ipnas.ulg.ac.be/garnir/avr/AvrFlasher_Manual.pdf
©HPG, U.Lg. 20-mars-08
12/13
References
This text and related info are available on :
http://www.ipnas.ulg.ac.be/garnir/avr
Place on the web to look for :
Good information on the Butterfly :
http://www.atmel.com/dyn/products/tools_card.asp?tool_id=3146 (the ref. & technical doc.)
http://www.smileymicros.com/ (good book and great project kit -recommended for starter!)
Some projects :
http://www.siwawi.arubi.uni-kl.de/avr_projects/
http://www.avrfreaks.net/index.php?module=FreaksTools&func=viewItem&item_type=tool&item_id=462
http://www.amazon.com/exec/obidos/tg/detail/-/0976682206/103-9096425-3248627?v=glance
The compiler installer for OS X and more info for OS X:
http://ccrma.stanford.edu/~matt/avr-osx.htm
http://hubbard.engr.scu.edu/embedded/avr/software/
The AVR library (the version 1.2.xx seems not to work!)
http://www.nongnu.org/avr-libc/
Serial to USB adapters for OS X (these work well):
• Keyspan (the more reliable)
http://www.keyspan.com/products/homepage-OSMac.spml
• FTDI (good chip but need soldering!)
http://www.ftdichip.com/
• UC232A (low cost - check if an OS X driver is included! : a.e. PL2303_1.0.8.pkg)
http://www.dealtime.com/xPO-Aten_UC232A
http://www.prolific.com.tw/eng/support.asp
©HPG, U.Lg. 20-mars-08
13/13