1
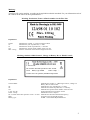
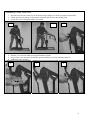
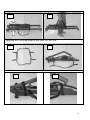
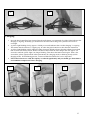
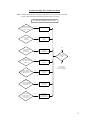
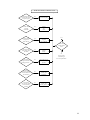
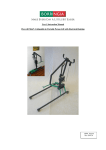
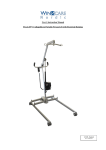
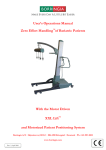
User’s Instruction Manual Flex-Lift™, Collapsible & Portable Person Lift with Electrical Hoisting 12A98, English Rev. 2014.10 USER’S INSTRUCTION MANUAL Flex-Lift™ - Collapsible, Portable Person Lift with Electrical Lifting CONTENTS: Page: 1. Marking 2 2. General instructions 4 3. Measurements & Weight 7 3. Photo instructions 8 4. Mounting the wall charger 16 5. Trouble Shooting 17 6. Service Logbook Annex Manufacturer: Borringia A/S Importer / Dealer (Stamp): Hejreskovvej 18 B-C DK-3490 Kvistgård Phone: +45 49 13 88 55 Authorised Service (Stamp): 1 Marking: Your Flex-Lift carries marking, according to the applicable technical standards. For your information each of the 3 labels on the Flex-Lift are explained below: Marking, Production, Frame- & Batch number for the Flex-Lift: Max. 130 kg Explanation: 12A98: 01: 10 102 Max. 130 kg Identifies the product, i.e. a Flex-Lift Person Hoist Identifies the year of production, i.e. 2001 Identifies the month of production, i.e. October Identifies the specific frame number of this one unit Informs of the limit of the allowed weight of the user Marking, 12A94 & 12B22 Control-, Charge- & Battery Box w. Hand Control: U out: 24 V DC Int: Actuator short-time operation: 2 min. / 10 min. IP 20 Battery type: NiMH I Max: 5 Amp. Caution: Not to be opened by unauthorised personnel Explanation: 12A94/12B22: Identifies the product, i.e. a Borringia Control-, Charge- & Battery Box w. hand control 02: Identifies the year of production, i.e. 2002 02: Identifies the month of production, i.e. February 101: Identifies the specific frame number of this one unit U out: 24 V dc: Output maximum 24 volt direct current I Max: 5 Amp.: Maximum Current 5 ampere Int.: Actuator short-time operation: 2 min. / 10 min.: Identifies the maximum utilisation frequency IP20: Protection level for dust & moisture Battery type: NiMH: Nickel-Metal Hydride Batteries 2 Marking, 12B21, Borringia Charging Adaptor: Explanation: 12B21: 02: 02: 103: V in: 230V ~ ± 10% / 50 Hz: I in: Max. 110 mA: Fuse: Thermal protection 200 mA: U out: 34 V dc peak, 700 mA, 17 W: IP40: Caution: Only to be mounted in dry rooms: Identifies the product, i.e a Borringia Charging Adpator Identifies the year of production, i.e. 2002 Identifies the month of production, i.e. February Identifies the specific frame number of this one unit Characterises acceptable power supplied Maximum power consumption Point of overload cut-out Maximum output from adaptor Protection level for dust & moisture Do not install in bathrooms or the like Marking, Transport Packaging: Flex – Lift ™ Foldable & Portable Person Hoist Frame & Batch No. : 12A98 01 10 102 Storage: Keep Dry, 25-90% relative humidity, 0-50º Celcius, 250-1200 hPa Explanation: Borringia: Flex-Lift: Foldable & Portable Person Hoist: Frame- & Batch No.: Storage: Keep dry: 25-90% Relative humidity: 0-50º Celcius: 250-1200 hPa The manufacturer Brand name of the product Product description Identification of the specific product Information about how to store the product To be stored away from rain and water Indication of safe humidity-level Safe storage temperature Safe air pressure 3 Flex-Lift™ - Collapsible, Portable Person Lift with Electrical Lifting Flex-Lift Person Lift does everything a good person lift should do, both seen from the user’s and from the carer’s perspective. The lift is collapsible and can be dismantled into two main parts, which means that the lift does not take up much space, when it is not in use. Furthermore, the Flex-Lift is easy to carry and to bring with you, either in the transport bags or secured with the special carrying straps. The lift fits easily into the boot of even small cars. All assembly and disassembly of the Flex-Lift can be executed without the use of tools. When collapsed, the two main parts each take up only approx. 113x30x30 cm (44”x12”x12”). The undercarriage of the Flex-Lift can be folded, when the lift is not in use. With a width of only 22,5 cm (9”) this makes the Flex-Lift easy to store for example behind a door or up against the wall in the corridor. Furthermore, this feature also makes it possible to use the Flex-Lift in not easily accessible rooms, i.e. bathrooms with narrow doors. When in its working position, the undercarriage has a width of 74,5 cm or 29,3” (internal measurement), which enables the Flex-Lift to straddle wide wheelchairs. The Flex-Lift offers a lifting range of 116 cm (46”) and can be used for lifting persons from the floor. This means that one single carer can handle all lifting situations by carrying the Flex-Lift with him to the point of use, even in extreme cases like for instance a person having fallen over in the bathroom. Lifting is electrical. Disassembled and packed either in the carrying bags or with the carrying straps applied, the Flex-Lift is truly portable and can be brought anywhere both by the user and by the carer. If you have any questions or suggestions for improvements, you are very welcome to contact Borringia Research & Development on phone +45 49 13 88 55 or by e-mail: [email protected] Flex-Lift™ is easily assembled without tools and simple to use. Nonetheless, we kindly ask you to read the instructions below before taking the Flex-Lift into use: Assembly: The Flex-Lift is supplied in two main parts: A wheeled undercarriage, which is foldable and a lifting module made up of mast, lifting arm and yoke. The lifting module is fitted with actuator, battery pack and control electronics. 1. Remove the carrying straps from the undercarriage. Grap the cross bars and gently pull until the undercarriage has unfolded completely and the cross bars have clicked into the working position. In order to fold the undercarriage, release the handle on the back of the Flex-Lift whilst pushing the mast forwards. As off the point where the cross bars are perpendicular to the legs of the undercarriage, folding should be carried out by grabbing both legs behind the wheels and by gently pushing these towards one another. DO NOT use the cross bars for this operation as you may pinch your fingers between the cross bars and the legs of the undercarriage. 2. Remove the carrying straps from the lifting module and place the mast in the hole in the central box of the undercarriage and drive the mast all the way home. Lift the lifting arm until it clicks into position. In order to release the lifting arm again, lift the locking pawl whilst lowering the lifting arm 3. The Flex-Lift is now ready for use. Lifting: The lifting function is electrical. Power is supplied by a 24 volt battery (NiMh) with a capacity of 1,3 Ah, sufficient for 25-30 full lifting cycles when fully charged. 4 Pressing the corresponding button on the hand control activates lifting and lowering. As soon as the button is released, movement stops. During movement, the green lamp on the hand controls is activated. When the battery has reached a level where remaining power is sufficient for approx. 5 lifting cycles, the hand control give an acoustic warning signal. Lift movement “Up” Lift movement “Down” Malfunction: In case of errors in the electrical system, the yellow lamp on the hand control will blink rapidly. Take the Lift out of use and contact an authorised Borringia dealer for service. Charging: NEVER attempt to charge the battery with anything but the charger and the wall mounted charging station supplied with the Flex-Lift. NEVER charge the Flex-Lift in humid surroundings, i.e. in bathrooms or the like 1. Insert hand control into the wall mounted charging station and charging will commence automatically (Mount charging station as described later) The charging cycle is automatically controlled. When the battery is fully charged, the system automatically changes to trickle charge mode. (During charging the yellow lamp on the hand control lights up. In trickle charge mode the yellow lamp blinks slowly, i.e. approx. 2 blinks per second). 2. We recommend that you always leave the Flex-Lift to charge when not in use. If the battery has been depleted, a full charging takes approximately 4-5 hours. (Or overnight) The charging adaptor was designed specifically for the Flex-Lift. NEVER attempt charging other batteries with this system! Emergency Stop: Interference: In the – unlikely – event that movement continues after the buttons on the hand control have been released, all activity can be blocked by pushing the red emergency button situated on the control box either with the hand or the foot. The button is released again by turning it clockwise. IMMEDIATELY contact your dealer and DO NOT use the Lift again, before it has been inspected and repaired. In unlikely case of the Flex-Lift interfering with other electrical appliances, immediately take the Flex-Lift out of use and request service. 5 Safety: Low Temperatures: Note the following instructions carefully: Never leave person alone, when lifted Make sure that the hands, legs and feet of the user are not squeezed by the sling, or between parts of the Flex-Lift and other aid products (e.g. wheelchair, bed, commode chair or the like) Never use the Flex-Lift in humid surroundings like e.g. in the shower or for lifting into and out off bathtubs, swimming pools or the like Only use the Flex-Lift together with CE-marked slings or harnesses, approved for use with yokes for “2-point-suspension” Never use the Flex-Lift in hot surroundings, e.g. in saunas or in steam baths All batteries loose performance when they are cold, i.e. at 0° Celsius (32° F) or colder. If you have left your Flex-Lift in the boot of your car in cold weather, you may have to recharge the batteries, before using the Flex-Lift Temperature: Normal operational temperature should be 0°- 40° Celsius (32° - 104° F) Humidity: Normal operational humidity should be below 90% relative humidity. Service: As defined by law Flex-Lift™ must undergo at least one service inspection annually by an authorized technician. Service agreements can be made with your dealer. Borringia cannot be held responsible for damage to persons caused by failure to carry out the annual service inspection Batteries: The batteries are an integrated part of the control-box and should only be changed by the manufacturer. Daily Inspection: Before using the Flex-Lift, always check the following points: There should be no visual cracks, dents or deformation of any metal part on the Lift All retaining rings should be in place The actuator should not make jarring sounds when activated with load Slings used with the Flex-Lift must be for yokes with two-point fixation and must be CE-marked Cleaning: Use water with standard detergents or dish washing liquid on a damp cloth. Dry with cloth. Never hose the Flex-Lift down as the electronics and the actuator are vulnerable to moisture and will brake down if exposed high humidity or water. Never use acids or organic solvents. Lubrication: Approx. once a month, apply a bit of Vaseline to the part of the mast, which goes into the centre box. This makes it easier to assemble & disassemble the Flex-Lift. User Weight: Flex-Lift™ is tested and approved for use by persons weighing a maximum of 130 kg (286 lbs.) Disposal: When the Flex-Lift is taken out of use, you should see to it that the Lift disposed off in an environmentally friendly way. Follow the instructions below: Metal parts: All metal parts are made of steel and can safely be recycled. The painting will not result in any toxic components as a result of recycling. Electronics: The electronics including the batteries should be delivered to a recycling plant equipped to handle electronic waste safely. If in doubt as to whether such a facility is available, please return the electronic components to your dealer, who will then pass these on to the manufacturer for safe recycling. 6 Measurements & Weight: Flex-Lift, assembled: Height: Lifting range: Yoke, lowest position: Yoke, highest position: Yoke height at maximum reach: Maximum reach: Reach at minimum yoke height: Width, folded: Width, outside measurement Width, inside measurement Height of undercarriage: Clearance, undercarriage: Turning radius Total weight: Max user weight: 117 - 174 cm 116 cm 46 cm 162 cm 110 cm 57 cm 33 cm 28 cm 77,5 cm 66 cm 11,5 cm 5,5 cm 140 cm 23,9 kg 130 kg Battery: Battery capacity: Charging: (46-69”) (46”) (18”) (64”) (43,3”) (22,4”) (13”) (11”) (30,5”) (26”) (4,5”) (2,2”) (55”) (52,6 lbs.) (286 lbs.) 24 volt 25 – 30 lifting cycles Through hand control at External charging station 4-5 hours Charging time: Undercarriage: Length: Width, folded: Weight: Measurements in bag: Weight in bag: 113 cm 22,5 cm 12,6 kg 128x32x34 cm 16,8 kg (44,5”) (9”) (27,7 lbs.) 46”x12”x13” (37,0 lbs.) Lifting Mast Length: Weight: Measurements in bag: Weight in bag: 110 cm 11,3 kg 128x32x34 cm 15,5 kg (43”) (24,9 lbs.) 46”x12”x13” (34,1 lbs.) Optional Equipment: Warranty: Full-body sling Carrying bags with shoulder straps Extra battery pack Two years warranty on failure in metal construction. Warranty does not cover damage as a result of faulty use of the lift. Casters, actuator, electronics & battery-pack, which are subject to normal tear, are warranted for one year; failure as a result of misuse is not covered by the warranty. 7 Assembly of the Flex-Lift: 1. Insert the mast into the centre box of the undercarriage and drive it all the way home (downwards). 2. Lift the hoisting arm and move the actuator outwards until it clicks into holding slots. 3. Loosen the screw holding the handles in position. 1 2 3 4. Push the screw inwards while moving both handles upwards. 5. Let go of the screw and move the handles upwards until they click into operating position. 6. Tighten the screw securely. 4 5 6 8 7. Pull outwards on both legs. N.B. MIND HANDS AND FINGERS!!! 8. Pull the cross bars backwards until the undercarriage clicks into operating position. 9. Check that the Emergency Button is released: Turn the button clockwise and release. 7 8 9 10. If necessary, insert the plug of the actuator & the security electronics into the left socket on the control box (Socket No. 1). Make sure that the plugs are driven all the way home. 10 9 Folding the Undercarriage of the Flex-Lift: 1. Lock the brakes on both rear wheels. With your right foot push the Bordeaux-coloured release handle to the left whilst simultaneously pushing the central box forwards. 2. Release the brakes on both rear wheels 3. Push inwards on both legs. N.B. MIND HANDS AND FINGERS!!! 1 2 3 Folding the Hoisting Arm of the Flex-Lift: 1. Use the hand control to electrically drive the actuator into the lowest position. Then Lift the hoisting arm to the top position 2. Lift both security flaps towards the hoisting arm and gently pull the actuator towards the mast. 3. Lower the hoisting arm and place the yoke parallel to the mast. 1 2 3 10 Folding the Handles on the Flex-Lift: 1. Loosen the security screw. 2. Push the security screw towards the mast while folding handles downwards. 3. Let go of security screw. Fold the handles downwards until they click into position. Then tighten the security screw. 1 2 3 Applying the Carrying Strap to the Undercarriage of Flex-Lift: 1 2 11 3. N.B.: The Velcro®-straps go underneath rear cross bars where shown with “” 4 3 Applying the Carrying Strap to the Mast of Flex-Lift: 1 2 3 4 12 5 6 Charging: 1. Once the hand control has been inserted into the wall charger, a permanently lit yellow light indicates that charging is ongoing. Preferably you should leave the Flex-Lift to charge for a period of 4-5 hours or overnight. 2. A yellow light blinking slowly (approx. 2 blink per second) indicates that “trickle charging” is ongoing. This means that the software is “topping-up” in order charge the batteries to their absolute maximum. 3. A yellow light blinking quickly indicates either electronic default or that or that the software has not had time to run a full security check. Remove the hand control from the wall charger and wait approx. 20 seconds or until the yellow light is no longer blinking. Then insert the hand control again. After a few seconds the yellow light should be either permanently lit (charging mode) or blinking slowly (trickle charging mode). If fast blinking persists, contact an authorized dealer for service inspection. 4. N.B: If the batteries are cold, the capacity is reduced significantly and you should give them time to reach ambient temperature before charging. 1 2 3 13 Hoisting from the Floor with the Flex-Lift: 1. Apply the sling to the patient by rolling the patient onto the side, placing sling on the floor and then rolling the patient back onto his back. Drive the Flex-Lift into position so that the patient’s head is closest to the mast of the Flex-Lift. Place the carrying straps of the sling into the hooks on the yoke. Remember to cross the leg-straps so that the leg-strap carrying the patient’s left leg is hooked onto the hooks on the right hand side of the yoke and vice-versa. 2. Begin hoisting by pushing the appropriate button on the hand control. Always make sure that the patient is comfortable, make sure that his head is well supported by the sling and that the arms and the legs are not exposed to pressure from the sling. 1 2 3. When the patient has been hoisted, turn him by pulling on the straps on the back of the sling so that he faces in the desired direction. 4. The patient can now be lowered into e.g. a wheelchair. 3 4 14 Emergency Lowering with the Flex-Lift: 1. In the highly unlikely event of electrical failure after the patient has been hoisted, the Flex-Lift is equipped with a separate electrical “Emergency Lowering Box”. 2. In order to use the Emergency Lowering, remove the cable of the actuator from the control box (The plug is inserted in socket No. 1) 3. Insert the cable of the actuator in the socket on the side of the “Emergency Lowering Box” (as shown in Pic. 3) 1 3 2 4. Push the red button on the side of the “Emergency Lowering Box” and lowering takes place. N.B.: Contact an authorised dealer for service inspection before using the Flex-Lift again. 5. The “Emergency Lowering Box” is powered by a 9 Volt battery. The battery should be replaced once a year and/or after use of the emergency lowering function. Loosen the 4 screws on the “Emergency Lowering Box” with a Philips screw driver. 6. Replace the battery an close the box again tightening the 4 screws securely 4 5 6 15 Montering af væg-ladestation MONTER VÆGLADESTATIONEN I ET TØRT LOKALE, ALDRIG I BADEVÆRELSET 1. 2. 3. 4. 5. 6. Fjern dækslet (4) ved at løsne de fire skruer (5). Monter bagkappen af ladestationen (1) på væggen ved hjælp af de medfølg- ende vægskruer (3). Såfremt der skal bores for i væggen, er det lettest at holde bagkappen op på væggen og markere med en skrue i hvert af de fire huller. Skru dækslet (4) på bagkappen, sådan at stikket til lader peger ned imod gulvet. Laderen (2) sættes i stikkontakten. Stikkontakten tændes og væg-ladestationen er nu klar til brug. Håndbetjeningen sættes i ladestationen med krogen øverst. Mounting the Charger ALWAYS MOUNT THE WALL CHARGER IN A DRY ROOM, NEVER IN THE BATHROOM 1. 2. 3. 4. 5. 6. Remove the cover (4) by loosening the screws (5). Mount the cabinet of the charger (1) on the wall using the screws supplied (3) If drilling is need, the easiest way is to hold the cabinet against the wall and mark with a screw in each of the four holes in the cabinet. Mount the cover on the cabinet in such a way that the plug on the cover faces downwards. Put the charger (2) into the socket. Turn on the power and the charging station is ready for use. Place the hand control in the charger with the hook going behind the top of the cabinet. 16 Trouble Shooting, Flex-Lift Person Hoist Note: Always deactivate the emergency stop button. If it is activated, the battery power is disconnected and the lifting function does not work! If LIFT MOVEMENT doesn't work Is the hand control securely fastened on the power pack? No Are all cables correctly connected? No Connect the cables Does the patient weigh more than 120 kg? yes Check max weight in User's Manual Connect the plugs Yes Does the lift movement work? Does the Power Pack "beep" when activated? yes Recharge or change battery No Get in contact with Borringia Service representative Is the undercarriage locked into the working position? Is the mast securely lockked into the chassis and driven home? Is the lifting arm securely locked into the hoisting position? No Click undercarriage into working position No Click mast securely into the chassis No Click arm securely into hoisting position 17 If lift movement UP doesn't work Is the hand control securely fastened on the power pack? No Are all cables correctly connected? No Connect the cables Does the patient weigh more than 120 kg? yes Check max weight in User's Manual Connect the plugs Yes Does the lift movement work? Does the Power Pack "beep" when activated? yes Recharge or change battery No Get in contact with Borringia Service representative Is the undercarriage locked into the working position? Is the mast securely lockked into the chassis and driven home? Is the lifting arm securely locked into the hoisting position? No Click undercarriage into working position No Click mast securely into the chassis No Click arm securely into hoisting position 18 If lift movement DOWN doesn't work Is the hand control securely fastened on the power pack? No Are all cables correctly connected? No Connect the plugs Connect the cables Yes Does the lift movement DOWN work? Does the patient weigh more than 120 kg? yes Check max weight in User's Manual No Lower the hoist using manual emergency system on the actuator Does the Power Pack "beep" when activated? yes Recharge or change battery Does the lift movement work? Is the undercarriage locked into the working position? Is the mast securely lockked into the chassis and driven home? Is the lifting arm securely locked into the hoisting position? No Click undercarriage into working position No Click mast securely into the chassis No Click arm securely into hoisting position Yes No Get in contact with Borringia Service representative 19