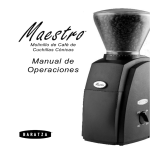
1
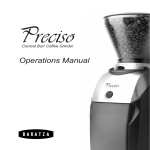
™
Ceramic Burr Coffee Grinder
Operations Manual
™
Ceramic Burr Coffee Grinder
Operations manuals are available in
the following languages at
www.baratza.com
English.pdf
Spanish.pdf
French.pdf
™
filter or ground coffee bin for
Filter and French Press.
Thank you for purchasing the
VARIO™ Coffee Grinder. With
the VARIO™, it’s now easier
than ever to make professional
quality coffee, whether at home,
the office, or your café. Below
are detailed descriptions of the
features that put the VARIO™ in
a class of it’s own.
Innovative grind adjustment
system
Macro and Micro adjustments
are quickly and repeatedly
achievable with the intuitive
VARIO™ adjustment system.
The range of grind and the accuracy of the settings are truly
impressive. The VARIO™ has
230 distinct settings of grind
from Espresso to French Press.
Precision, commercial-quality
ceramic burrs
Manufactured in Germany by
MAHLKÖNIG, the VARIO’s™
ceramic burrs are of the same
material and durability as the
industry’s highest-quality line
of commercial coffee grinders.
Ceramic burrs remain sharp for
up to twice the lifetime of the
highest quality steel burrs.
Quiet drive system
The VARIO™ houses a high
torque DC motor with a belt
drive transmission. The precise
timing belt drive provides for
smooth, quiet operation and
thermal disconnection of motor
and burr casing. Additionally,
the VARIO™ possesses an autoreset thermal safety circuit that
protects the motor from overheating.
Grind on Demand with
electronic dosing
Grind on Demand operation
with electronically controlled
dosing grinds only the coffee you require for each shot
directly into your espresso porta
1
Table of Contents
Introduction .......................................................................................... 1
Table of Contents ................................................................................. 2
Parts Identification ............................................................................... 3
Safety Information ................................................................................ 4
Initial setup and operation ................................................................... 5
Setting the Macro and Micro Grind Adjustment ............................... 5
Normal Grinding Operation ............................................................. 6
Programming Grind Dosing Times .................................................. 6
Sleep Mode ................................ .................................................... 7
PortaHolder™ Installation ................................................................ 7
Burr Calibration ............................................................................... 8
Cleaning the Housing and Hopper ................................................. 9
Cleaning the Burrs .......................................................................... 9
Automatic Cleaning ......................................................................... 9
Removing the Upper Burr ............................................................... 10
Replacing the Upper Burr ............................................................... 10
Replacing the Bean Hopper ........................................................... 10
Help and Troubleshooting ................................................................... 10
Warranty .............................................................................................. 11
Grinding Notes .................................................................................... 12
Baratza Contact Information ................................................................ 13
2
™
Parts Identification
Hopper lid
Whole bean hopper (250 grams)
LCD grind time indicator
Grind time adjustment buttons (2)
Start / Stop button
Manual grind button
Programable grind setting buttons (3)
Grind button LED (3)
Macro grind adjustment lever
Micro grind adjustment lever
Ground coffee bin (250 grams.)
Upper burr carrier
Ceramic burrs
3
Important Information
visit the web at www.baratza.com
for assistance.
Please read the information below
very carefully. It contains important tips for the use, the safety and
the maintenance and care of this
appliance. Please keep these operating instructions for future reference.
Repairs are to be performed only
by authorized service centers. An
improperly repaired grinder is a
source of risk to the user and voids
the warranty.
Baratza will not accept any liability
for damage or injury if the grinder
is used other than for its intended
purpose or is improperly operated
or repaired. All warranty claims will
be void.
Your new VARIO™ is rated for either
120 VAC or 230 VAC. Please confirm the voltage of your VARIO™
on the nameplate attached to the
bottom of the grinder. The 120
VAC Vario can be used from 100 to
130 VAC and the 230 VAC VARIO™
can be used from 200 to 240 VAC.
Please insure your supply voltage
range matches the nameplate voltage on you VARIO™.
For Your Safety
Do not operate the grinder with
a damaged cord or plug, or if the
grinder malfunctions.
Do not leave your grinder unattended while turned ON.
Only clean the grinder housing with
a dry or slightly damp cloth.
Shut off and unplug the grinder
from the electrical outlet before
cleaning. To unplug, grasp plug
and removed from the outlet-never
pull on the cord.
Do not use this grinder for anything other than its intended use
(i.e. grinding whole roasted coffee
beans). Maximum continuous duty
cycle is 25%. Longest continuous
grind time is 90 seconds.
Do not immerse the grinder, plug or
cord in water or any other liquid.
Disassemble your grinder only as
directed in the care and cleaning
section of this manual. If you cannot remedy a malfunction, please
4
equal to one “click” or position on
the Macro scale. With both levers,
moving UP produces a smaller
particle size and DOWN produces
a larger particle size. The actual
grind size for a particular setting will
vary depending on many factors,
including: degree of roast (light vs.
dark), freshness, humidity, type of
bean, oil content, etc. With use,
you will determine the setting that
is right for your taste, brewing style
and your favorite beans.
Initial Set Up
Place the Vario Grinder on a level
surface. Insert the hopper by lining
up the two small tabs on the base
of the hopper with their respective slots, turn clockwise until the
back tab lines up with the mark on
the back of the grinder. Insert the
plug into an AC outlet. Pour the
desired quantity of roasted whole
coffee beans into the hopper up
to a maximum of 250 Grams. Replace the lid. Ensure the ground
coffee bin or PortaHolder™ is fully
inserted.
Setting the Macro and Micro
Grind Adjustment
Move the Macro lever up or down
to the desired range of grind size
(Note: whenever moving the Macro lever up the grinder should be
running). Set the Micro adjustment
lever to the middle of the scale.
Grind a small amount of coffee by
pressing the START button, then
pressing it again to stop. Check
the particle size. If the particle size
is close to what you desire, now
use the Micro lever to “fine tune”
your grind size. If the particle size
needs a big change, then adjust
the Macro lever to a new position,
then fine tune with the Micro lever.
The full range on the Micro scale is
5
Normal Grinding Operation
seconds and Press: 30 seconds.
After adjusting the grind (particle
size) to your desired setting, press
the desired button, and then press
START. The grinder will run and
the display will count down from
the preset time.
Press the desired button (Espresso, Filter or Press). The blue LED
next to the button will light and the
display LCD will show the corresponding programmed grind time
in seconds. Press START button
to begin grinding. While grinding,
the LCD will count down the seconds to 0. When the LCD reaches
0 seconds, the motor will stop and
the display will reset again to the
programmed time. For greater
quantities of ground coffee, press
the MANUAL button then START.
The grinder will count up to a limit
of 90 seconds then shut off automatically. At any time during MANUAL, you can stop the grinding by
pressing the START button. The
motor will stop and the LCD will reset to 000. The limit of 90 seconds
is not user adjustable.
The grinder will stop automatically
when time reaches 0. To stop at
any time during grinding, just press
the START button again. Depending on the amount of coffee ground,
you can easily program more or
less grinding time as follows:
Programming Grind Dosing
Times
The VARIO™ is equipped with
three programmable dosing grind
times. The buttons are conveniently labeled for Espresso, Filter and
Press. These programmable buttons only adjust the grinding TIME,
they do not adjust the coarseness
of the grind. Each button comes
from the factory with a preset time:
Espresso: 10 seconds, Filter: 20
1. Press the up or down arrow just
below the LCD display to adjust
the time. Press and hold the arrow
for 3 second to advance the time
more quickly.
2. Once you have reached the desired time setting, press the corre6
PortaHolder™ Installation
sponding button (Espresso, Filter,
or Press) and hold for 3 seconds.
The time shown in the LCD display
will blink to confirm the setting is
stored.
Insert the PortaHolder™ into the
grinder until it clicks. Then insert
your porta filter into the PortaHolder™ by tipping the basket down so
the lip of the porta filter slides under and gets hooked by the hook
bracket at the top rear of the PortaHolder™ while the base of the basket is supported by the two metal
fingers that extend from the PortaHolder™ If the porta filter basket is not horizontal in the holder,
remove the screw and move the
bracket higher or lower in order to
level the portafilter basket.
3. Repeat steps 1 and 2 above for
each of the other two buttons.
The quantity of ground coffee you
need depends on the type of bean,
coarseness of the grind, brewing
method and personal taste. With
use, you will find the most suitable
settings for your personal taste.
Sleep Mode
This is a programmable feature to
allow the lights and display to turn
off after a pre selected amount of
time elapses since last grinding.
Also there is the ability to “force”
it to sleep mode by pressing and
holding the START button for 3
seconds. As soon as the lights
turn off you can release the button.
Touching any button will “wake it
up” (but will not perform the function of the button pressed). To select sleep mode delay, press and
hold the MANUAL button for 3 seconds until the display shows “S00”.
“S 00” means Sleep mode never
happens. The up or down arrow allows selection for 3 minute delay
(S03), 5 minute (S05), 10 minutes
(S10), 20 minutes (S20), 30 minutes (S30) or infinity (S00) . Press
the MANUAL button to store the
value you desire.
To use, insert your porta filter
into the PortaHolder™. Press the
desired dose button, then press
START. The grinder will run for the
preset dose time and stop automatically.
7
Burr Calibration
of the VARIOTM
A secondary 2mm allen head calibration screw has been added. It
is located in the round hole between the discharge chute and the
calibration grommet (see photo).
This calibration screw allows the
user to easily adjust the calibration in the finer direction while the
grinder running.
To make the adjustment, empty all
beans from the grinder, lower the
Macro and Micro levers all the way
to the bottom and run it briefly to
expel any partially ground coffee.
Press the Manual button and then
the Start button. While the grinder
is running, raise the Macro arm all
the way to the top (Espresso). You
should not hear any change in motor speed. Now raise the Micro arm
up the midpoint. You should begin
to hear the motor slow (or labor a
little). If not, use the special Vario
tool (see photo) provided with your
grinder. Insert the tool and turn in
the finer direction until you begin to
hear the motor slow or labor. You
are done! If you do not have a tool
you can substitute a 2mm Allen
wrench and turn clock wise while
looking up at it.
8
Cleaning the Housing and
Hoppers
Automatic Cleaning
A thorough fast, and easy cleaning
can be accomplished using GRINDZ™ grinder cleaner. GRINDZ™
is a product designed to dislodge
coffee particles and absorb and remove odors and coffee oil residue.
Simply place the recommended
amount of GRINDZ™ (35g) into the
empty grinder hopper. Adjust the
grind setting to Filter, press MANUAL, then START until all of the
GRINDZ™ has been ground, and
then press START again to stop
the grinder. Once complete, we
recommend passing through some
coffee to remove any GRINDZ™
residue. Discard the ground coffee. For information on GRINDZ™
go to www.urnex.com.
Remove the plug from the AC
power outlet. Remove the hopper
by twisting it in a counterclockwise
direction until it stops and then lift
the bean hopper from the housing.
Wash the hopper, hopper lid, and
ground coffee bin in warm soapy
water, rinse and dry.
Caution: Do not put the bean hopper, hopper lid, or ground coffee
bin in the dishwasher. Hand wash
only. Do not immerse the grinder
housing in water.
Cleaning the Burrs
If the grinder is used daily, the
burrs should be cleaned every
few weeks. Cleaning enables the
burrs to achieve the most consistent grind possible. Cleaning
also removes coffee oils which will
stale and degrade the flavor of the
ground coffee. Do not wash the
burrs.
To purchase GRINDZ™ go to www.
baratza.com.
9
Removing the Upper Burrs
The upper burr can be removed in
order to clean the burrs, however
it is imperative that there are no
coffee grounds on the mating surfaces when you replace the burr.
Any coffee grounds left between
the mating surface will affect the
calibration and the grinders ability
to grind fine.
To remove the burr, rotate the
metal burr carrier clockwise until it
stops then lift straight up and out
of the grinder housing. Clean the
burr using a stiff brush. Remove
any loose coffee grounds on both
the fixed burr and the lower burr
mounted within the motor housing.
Need Help?
For FAQ’s or to troubleshoot a
problem, please see the Troubleshooting section at www.baratza.
com
Replacing the Upper Burr
While rocking the burr side to side,
push down firmly on the burr carrier to ensure that it seats properly.
Rotate the burr carrier counterclockwise until it stops.
Replacing the Bean Hopper
To replace the bean hopper, line
up the two small tabs on the base
of the hopper with their respective
slots.
10
Warranty and Service
Length of Warranty: One-year
the unlikely event of a product
safety notification and assist us in
complying with the provisions of
the Consumer Product Safety Act.
The serial number is located on
the bottom of the grinder.
from date of purchase.
United States
Warranty Information
If your grinder fails within one
year: e-mail: support@baratza.
com or call
877-701-2021. Baratza will deliver an identical or comparable
replacement grinder to your door,
free of charge, and arrange to
have your “failed” grinder returned
to us.
Please keep your sales receipt
that shows the date of purchase
and complete the following for
your personal records:
Serial Number (located on bottom
of grinder):
When you receive your replacement grinder, please use the
carton and packing material and
the return shipping label supplied
to return the “failed” grinder to us.
Also, please include your name,
address and telephone number.
Date Purchased:
Store:
International Warranty
Information
For repairs or parts contact
Go to: www.baratza.com or call
425-641-1245 for international
warranty information.
Baratza LLC
3923-120th Ave. S.E.
Bellevue, WA. 98006
877-701-2021
e-mail: support@baratza. com
Parts: www.baratza.com
Proof of Purchase and
Product Registration
You can register your grinder at
www.baratza.com. Registration
will enable us to contact you in
11
Grinding Notes
12
© 2009
Baratza, LLC
3923-120th Ave. S.E.
Bellevue, WA. 98006
www.baratza.com
rev: 122109
13