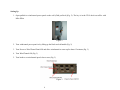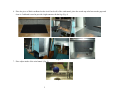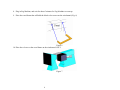
1
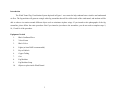
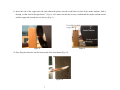
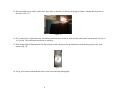
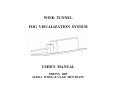
WIND TUNNEL
FOG VISUALIZATION SYSTEM
USER’S MANUAL
SPRING 2005
ALISSA WONG & VLAD MUNTEANU
Figure 1: Fog Visualization System
1. Wind Tunnel
12. Black Velvet
13. Velvet Frame
2. Lights
11. Honeycomb
10. Copper
Tubing
14. Viewing Area
5. Wind Tunnel
Control Panel
7. Wind Tunnel
ON/OFF switch
9. Fog Machine
setup
3. Cart
8. Fog fluid tray
4. Fog Machine
2
6. Wind Tunnel
power cord
Introduction
The Wind Tunnel Fog Visualization System depicted in Figure 1 was created to help students better visualize and understand
air flow. The fog machine will generate a single white fog streamline that will be visible inside of the wind tunnel, and students will be
able to observe its motion around different objects such as miniature airplane wings. If you intend to take photographs of the fog
streamline, please follow the entire procedure. But if you intend to just observe the streamline, you do not need to complete steps 9,
10, 13 and 16 of the procedure.
Equipment Needed
1.
Black Cardboard Piece
2.
Velvet Frame
3.
Black Velvet
4.
Lights (at least 500W recommended)
5.
Key to Padlock
6.
Copper Tubing
7.
Cart
8.
Fog Machine
9.
Fog Machine Setup
10.
Objects to place inside Wind Tunnel
3
Setting Up
1. Open padlock to wind tunnel power panel on the wall (Gold pad lock) (Fig. 2). The key is in the ITLL check out office with
Mike Elliot.
Figure 2
2. Turn wind tunnel power panel on by lifting up the black and red handle (Fig. 2)
3. Turn Power to Wind Tunnel Panel ON and allow wind tunnel to warm up for about 15 minutes (Fig. 3)
4. Turn Wind Tunnel ON (Fig. 3)
5. Turn knob to set wind tunnel speed close to zero (Fig. 3)
Figure 3
4
6. Place the piece of black cardboard on the inside back wall of the wind tunnel, place the scotch tape tabs between the gaps and
close it. Cardboard is used to provide a high contrast with the fog. (Fig. 4)
Figure 4
7. Place object inside of the wind tunnel. (Fig. 5)
Figure 5
5
8. Plug in Fog Machine, and wait for about 5 minutes for Fog Machine to warm up.
9. Place the wood frame that will hold the black velvet screen on the wind tunnel (Fig. 6)
Figure 6
10. Place the velvet over the wood frame on the wind tunnel (Fig.7)
Figure 7
6
11. Insert one end of the copper tube (the end without the plastic) into the wood block in front of the smoke machine. Push it
through, so that it sticks through about 1” (Fig. 8). Also make sure that the tin tray is underneath the smoke machine nozzle
and the copper tube extends out over the tray (Fig. 9).
Figure 8
Figure 9
12. Place Plug the steam line into the honeycomb of the wind tunnel (Fig. 10).
Figure 10
7
13. Place the lights on top of the wind tunnel. Place them so that they sit directly on the glass window, shining directly down on
the object. (Fig. 11)
Figure 11
14. If 15 minutes have elapsed since the wind tunnel panel has been turned on, then start the wind tunnel with an initial velocity of
10-15 mi/hr. The wind tunnel needs time to warm up.
15. If the orange light is illuminated on the fog machine remote, then press the green button to start shooting fog into the wind
tunnel. (Fig. 12)
Figure 12
16. Set up your camera underneath the black velvet hood, and take photographs.
8
Clean Up
1. Turn the wind tunnel speed down to zero, then turn the wind tunnel off, and the wind tunnel panel off.
2. Then turn off the wall panel and close the gold pad lock.
3. Unplug the fog machine.
4. Empty the fog liquid tray into the used fog liquid container.
5. Remove the object from the wind tunnel.
6. Remove the stream lines from the back of the wind tunnel.
7. Remove the velvet and the frame from the wind tunnel.
8. Return equipment to checkout.
9