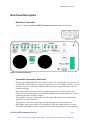
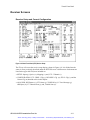
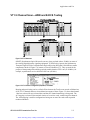
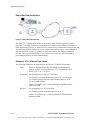
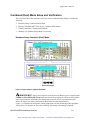
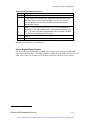
1
Artisan Technology Group is your source for quality new and certified-used/pre-owned equipment • FAST SHIPPING AND DELIVERY • TENS OF THOUSANDS OF IN-STOCK ITEMS • EQUIPMENT DEMOS • HUNDREDS OF MANUFACTURERS SUPPORTED • LEASING/MONTHLY RENTALS • ITAR CERTIFIED SECURE ASSET SOLUTIONS SERVICE CENTER REPAIRS Experienced engineers and technicians on staff at our full-service, in-house repair center WE BUY USED EQUIPMENT Sell your excess, underutilized, and idle used equipment We also offer credit for buy-backs and trade-ins www.artisantg.com/WeBuyEquipment InstraView REMOTE INSPECTION LOOKING FOR MORE INFORMATION? Visit us on the web at www.artisantg.com for more information on price quotations, drivers, technical specifications, manuals, and documentation SM Remotely inspect equipment before purchasing with our interactive website at www.instraview.com Contact us: (888) 88-SOURCE | [email protected] | www.artisantg.com User Manual p ST112 SONET Transmission Test Set 070-9398-03 This document supports firmware version 4.4 and above Artisan Technology Group - Quality Instrumentation ... Guaranteed | (888) 88-SOURCE | www.artisantg.com Copyright © 1998 Tektronix, Inc. All rights reserved. Licensed software products are owned by Tektronix or its suppliers and are protected by United States copyright laws and international treaty provisions. Use, duplication, or disclosure by the Government is subject to restrictions as set forth in subparagraph (c)(1)(ii) of the Rights in Technical Data and Computer Software clause at DFARS 252.227-7013, or subparagraphs (c)(1) and (2) of the Commercial Computer Software Restricted Rights clause at FAR 52.227-19, as applicable. Tektronix products are covered by U.S. and foreign patents, issued and pending. Information in this publication supersedes that in all previously published material. Specifications and price change privileges reserved. Printed in the U.S.A. Tektronix, Inc., P.O. Box 1000, Wilsonville, OR 97070-1000 TEKTRONIX and TEK are registered trademarks of Tektronix, Inc. ii ST112 SONET Test Set User Manual Artisan Technology Group - Quality Instrumentation ... Guaranteed | (888) 88-SOURCE | www.artisantg.com Warranty Tektronix warrants that this product will be free from defects in materials and workmanship for a period of one (1) year from the date of shipment. If any such product proves defective during this warranty period, Tektronix, at its option, either will repair the defective product without charge for parts and labor, or will provide a replacement in exchange for the defective product. In order to obtain service under this warranty, Customer must notify Tektronix of the defect before the expiration of the warranty period and make suitable arrangements for the performance of service. Customer shall be responsible for packaging and shipping the defective product to the service center designated by Tektronix, with shipping charges prepaid. Tektronix shall pay for the return of the product to Customer if the shipment is to a location within the country in which Tektronix service center is located. Customer shall be responsible for paying all shipping charges, duties, taxes, and any other charges for products returned to any other locations. This warranty shall not apply to any defect, failure or damage caused by improper use or improper or inadequate maintenance and care. Tektronix shall not be obligated to furnish service under warranty a) to repair damage resulting from attempts by personnel other than Tektronix representatives to install, repair or service the product; b) to repair damage resulting from improper user or connection to incompatible equipment; or c) to service a product that has been modified or integrated with other products when the effect of such modification or integration increases the time or difficulty of servicing the product. THIS WARRANTY IS GIVEN BY TEKTRONIX WITH RESPECT TO THIS PRODUCT IN LIEU OF ANY OTHER WARRANTIES, EXPRESSED OR IMPLIED. TEKTRONIX AND ITS VENDORS DISCLAIM ANY IMPLIED WARRANTIES OF MERCHANTABILITY OR FITNESS FOR A PARTICULAR PURPOSE. TEKTRONIX’ RESPONSIBILITY TO REPAIR OR REPLACE DEFECTIVE PRODUCTS IS THE SOLE AND EXCLUSIVE REMEDY PROVIDED TO THE CUSTOMER FOR BREACH OF THIS WARRANTY. TEKTRONIX AND ITS VENDORS WILL NOT BE LIABLE FOR ANY INDIRECT, SPECIAL, INCIDENTAL, OR CONSEQUENTIAL DAMAGES IRRESPECTIVE OF WHETHER TEKTRONIX OR THE VENDOR HAS ADVANCE NOTICE OF THE POSSIBILITY OF SUCH DAMAGES. ST112 SONET Test Set User Manual Artisan Technology Group - Quality Instrumentation ... Guaranteed | (888) 88-SOURCE | www.artisantg.com iii How to Reach Customer Service If you have any questions regarding the operation, maintenance, repair, or application of your Tektronix equipment, contact your local sales and service office. For a complete list of the Worldwide Sales and Service Offices contact (800) 426-2200. Tektronix provides high quality Technical Support on applications, operation, measurement specifications, hardware, and software by expert application engineers. For Applications Support, call the Customer Support Center listed below. Mailing Address Tektronix, Inc. Measurement Business Division P.O. Box 500 Beaverton, Oregon 97077-0001 USA Attn. Customer Service Customer and Sales Support Center 800-TEK-WIDE or 800-835-9433 Ext 2400 Hours are 6:00 AM to 5:00 PM, Pacific Time. Direct 503-627-2400 Fax 503-627-5695 E-Mail [email protected] Web Site http://www.tek.com iv After hours Voice Mail is available. ST112 SONET Test Set User Manual Artisan Technology Group - Quality Instrumentation ... Guaranteed | (888) 88-SOURCE | www.artisantg.com Table Of Contents General Safety Summary ............................................................................................. Preface.......................................................................................................................... viii xi Introduction Product Description........................................................................................................ Accessories....................................................................................................................... Safety Instructions .......................................................................................................... Laser Safety..................................................................................................................... 1-2 1-4 1-5 1-6 Functional Overview Panel Connectors, Controls, Indicators ........................................................................ Front Panel Overview................................................................................................... Rear Panel Overview.................................................................................................... Getting Started................................................................................................................ Display, Display Controls, and Indicators .................................................................... Setup Menu System ........................................................................................................ Transmitter Description................................................................................................. Transmitter Connectors, Front Panel............................................................................ Configuration Keys, TX ............................................................................................... Receiver Description....................................................................................................... Receiver Connectors, Front Panel ................................................................................ Input Key, Receiver...................................................................................................... Configuration Keys, RX............................................................................................... Receiver Status Indicators ............................................................................................ Section Alarms ............................................................................................................. Line Alarms.................................................................................................................. Path Alarms.................................................................................................................. VT Path Alarms............................................................................................................ Pointer Indicators ......................................................................................................... Payload, DS1, and DS3 Indicators ............................................................................... View History Key............................................................................................................ Measurement Controls and Indicators ......................................................................... Remote Indicators........................................................................................................... Rear Panel Description................................................................................................... Rear Panel Connectors ................................................................................................. Transmitter Connectors, Rear Panel............................................................................. Receiver Connectors, Rear Panel ................................................................................. Standard Connectors, Rear Panel ................................................................................. AC Power Fuse............................................................................................................. 2-2 2-2 2-2 2-3 2-4 2-5 2-6 2-6 2-7 2-8 2-8 2-8 2-9 2-9 2-9 2-10 2-10 2-11 2-12 2-12 2-13 2-14 2-14 2-15 2-15 2-15 2-16 2-16 2-18 ST112 SONET Test Set User Manual Artisan Technology Group - Quality Instrumentation ... Guaranteed | (888) 88-SOURCE | www.artisantg.com v LCD Menus and Displays Functional Verification .................................................................................................. Setup Menus.................................................................................................................... Report/Test Time Menu ............................................................................................... Auxiliary Setup ............................................................................................................ Receiver Menus & Displays ........................................................................................... Overhead Displays ....................................................................................................... Mapping Menus ........................................................................................................... Channel Menus............................................................................................................. Pointer Menus .............................................................................................................. DCC- Orderwire Menus ............................................................................................... Error Measurement Displays........................................................................................ Optical Input Select Menu............................................................................................ DS, VT, STS, 3c and 12c Menus, RX ............................................................................ Pattern Menus and Displays ......................................................................................... Framing ........................................................................................................................ Payload Error Display .................................................................................................. Transmitter Menus & Displays ..................................................................................... Output Menu & Display ............................................................................................... Optical Output Menu Displays..................................................................................... Overhead Menus .......................................................................................................... Mapping Menus ........................................................................................................... Timing.......................................................................................................................... Pointer .......................................................................................................................... Alarm Generation Menus ............................................................................................. Error Generation Menus............................................................................................... DCC - Orderwire ......................................................................................................... DS, VT, STS, 3c and 12c Menus, TX............................................................................. Pattern Menus............................................................................................................... Framing Menu .............................................................................................................. Payload Error - Alarm .................................................................................................. 3-2 3-2 3-5 3-6 3-7 3-7 3-9 3-10 3-12 3-12 3-13 3-14 3-16 3-16 3-17 3-17 3-19 3-19 3-19 3-20 3-21 3-22 3-22 3-23 3-24 3-24 3-25 3-25 3-27 3-27 Virtual Front Panel (VFP) ................................................................................ 4-1 Applications & Uses Applications..................................................................................................................... Passive Monitoring....................................................................................................... Active Analysis ............................................................................................................ Circuit Pack Testing ....................................................................................................... VT1.5 Channel Scan - ADM and E-DCS Testing......................................................... Combined (Dual) Mode Setup and Verification........................................................... Virtual Front Panel Combined (Dual) Mode ............................................................... Trouble Scan Basics........................................................................................................ Trouble Scan Combined (Dual) Mode .......................................................................... vi 5-2 5-2 5-3 5-4 5-5 5-11 5-14 5-17 5-20 ST112 SONET Test Set User Manual Artisan Technology Group - Quality Instrumentation ... Guaranteed | (888) 88-SOURCE | www.artisantg.com External Controllers & Printers Remote Control Applications......................................................................................... Printer Applications ....................................................................................................... Using the RS-232C Port ................................................................................................. Using the GPIB Port ....................................................................................................... 6-2 6-2 6-3 6-7 Remote Commands Command Types & Syntax ............................................................................................ Command Symbols and Delimiters ............................................................................... Multiple Commands ....................................................................................................... Table of Commands........................................................................................................ Standard Register Commands ....................................................................................... General Setup Commands.............................................................................................. Receiver Setup and Mode Commands .......................................................................... Transmitter Setup and Mode Commands..................................................................... Test Cycle Control Commands ...................................................................................... Payload Commands ........................................................................................................ Pointer Commands, SPE ................................................................................................ Pointer Commands, VT.................................................................................................. Receiver Overhead Query Commands.......................................................................... Receiver Measurement Commands............................................................................... Receiver LED Status Commands .................................................................................. Transmitter Error Commands ...................................................................................... Alarms, TX ...................................................................................................................... Loss of Signal .................................................................................................................. Combined (Dual Mode) Commands.............................................................................. 7-2 7-2 7-3 7-5 7-13 7-15 7-20 7-24 7-27 7-30 7-37 7-39 7-41 7-43 7-48 7-54 7-65 7-72 7-73 Appendices Specifications................................................................................................................... Incoming Inspection Test ............................................................................................... Calibration Verification ................................................................................................ Cleaning Optical Cables............................................................................................... Index ................................................................................................................................ A-1 B-1 C-1 C-9 I-1 ST112 SONET Test Set User Manual Artisan Technology Group - Quality Instrumentation ... Guaranteed | (888) 88-SOURCE | www.artisantg.com vii Safety Summary General Safety Summary Review the following safety precautions to avoid injury and prevent damage to this product or any equipment connected to it. To avoid potential hazards, use this product only as specified. To avoid potential hazards, use this product only as specified. Only qualified personnel should perform service procedures. While using this product, you may need to access other parts of the system. Read the General Safety Summary in other system manuals for warnings and cautions related to operating the system. Injury Precautions Use Proper Power Cord To avoid fire hazard, use only the power cord specified for this product. Avoid Electric Overload To avoid electric shock or fire hazard, do not apply a voltage to a terminal that is outside the range specified for that terminal. Ground the product This product is grounded through the grounding conductor of the power cord. To avoid electric shock, the grounding conductor must be connected to earth ground. Before making connections to the input or output terminals of the product, ensure that the product is properly grounded. Do not operate without covers To avoid electric shock or fire hazard, do not operate this product with covers or panels removed. Use Proper Fuse To avoid fire hazard, use only the fuse type and rating specified for this product. Do not operate in Wet/Damp Conditions To avoid electric shock, do not operate this product in wet or damp conditions. ST112 SONET Test Set User Manual Artisan Technology Group - Quality Instrumentation ... Guaranteed | (888) 88-SOURCE | www.artisantg.com viii Safety Summary Do not operate in Explosive Atmosphere To avoid injury or fire hazard, do not operate this product in an explosive atmosphere. Wear Eye Protection To avoid eye injury, wear eye protections if there is a possibility of exposure to high-intensity rays. Product Damage Precautions Use Proper Power Source Do not operate this product from a power source that applies more than the voltage specified. Provide Proper Ventilation To prevent product overheating, provide proper ventilation. Do not operate with suspected failures If you suspect there is damage to this product, have it inspected by qualified service personnel. ST112 SONET Test Set User Manual Artisan Technology Group - Quality Instrumentation ... Guaranteed | (888) 88-SOURCE | www.artisantg.com ix Safety Summary Safety Terms and Symbols Terms in this manual These terms may appear in this manual: Icon Label Meaning WARNING! Warning statements identify conditions or practices that could result in injury or loss of life. CAUTION! Caution statements identify conditions or practices that could result in damage to this produce or other property. DANGER indicates an injury hazard immediately accessible as you read the marking. WARNING indicates an injury hazard not immediately accessible as you read the marking. CAUTION indicates a hazard to property including the product. Symbols on the Product The following symbols may appear on the product: DANGER High Voltage Protective Ground (Earth) Terminal ATTENTION Refer to Manual Double Insulated Certifications and Compliances CSA Certified Power Cords CSA Certification includes the products and power cords appropriate for use in the North American power network. All other power cords supplied are approved for the country of use. x ST112 SONET Test Set User Manual Artisan Technology Group - Quality Instrumentation ... Guaranteed | (888) 88-SOURCE | www.artisantg.com Preface Preface This manual describes how to use the Tektronix ST112 SONET Test Set. This manual is your primary source of information about how the ST112 SONET Test Set functions. This manual is divided into eight sections: Chapter 1—Introduction Describes the test set and provides a list of standard and optional accessories. Chapter 2—Functional Overview Describes controls, indicators, connectors, display elements, and menu structures. Includes sections that detail receiver and transmitter specifics, and general sections that apply to both. Chapter 3—LCD Menus and Displays Describes the use of LCD menu structures and displays. In addition to general displays and menus, there are separate sections that detail setup, receiver, and transmitter specifics. Chapter 4—Virtual Front Panel Describes the use of terminal display menu structures, accessed by using a VT-100 terminal emulator. These full screen displays provide more information than individual LCD displays and can be used remotely or with a local terminal Chapter 5—Applications and Use Provides common examples of telecommunication network applications. Details how to use the test set for Passive Monitoring, Active Analysis, and Test Signal Generation. Chapter 6—External Controllers and Using Printers Explains how to connect external devices to the RS-232C, GPIB, and parallel ports. Chapter 7—Remote Commands Explains the general syntax of the remote command language and defines all commands. Command definitions are grouped by function. In addition, an alphabetical list of all ST112 commands is provided with page references to individual command descriptions. Appendices A—Specifications B—Incoming Inspection Test C—Calibration Verification Test xi Artisan Technology Group - Quality Instrumentation ... Guaranteed | (888) 88-SOURCE | www.artisantg.com Safety Summary Conventions This manual uses the following conventions: xii • The names of front-panel controls and menus appear in all upper case letter, for example, TRANSMIT and HELP. • Names appear in the same case in this manual as they appear on the display of the ST112, for example, Test Duration and USER DEFINED. • Within a procedure, a specific button to be pressed or a parameter to be selected appears in boldface print. ST112 SONET Test Set User Manual Artisan Technology Group - Quality Instrumentation ... Guaranteed | (888) 88-SOURCE | www.artisantg.com Introduction This chapter describes the ST112 SONET Transmission Test Set and provides a list of standard optional and general safety information. Artisan Technology Group - Quality Instrumentation ... Guaranteed | (888) 88-SOURCE | www.artisantg.com Introduction Product Description Figure 1–1 ST112 SONET Transmission Test Set The ST112 SONET Transmission Test Set is an extensive SONET STSX-1, OC-1, OC-3, OC-12, signal analyzer and generator for tributary and network testing. DSX-1 and DSX-3 Asynchronous Cross Connect Testing capabilities can be used independently or integrated with the SONET testing capabilities. Designed for both field and lab use, the Test Set extends SONET Testing Technology by delivering a clear channel STS-3c and STS-12c concatenated mappings in addition to the standard DS3 and VT1.5 mappings. The front panel design is shown in Figure 1–1. When Ordering the ST112 SONET Transmission Test Set, use the following numbers: ST112 SONET Transceiver Test Set ORDERING INFORMATION Nomenclature Description ST112 Opt. 03 Opt. 04 Opt. 06 Opt. 07 Opt. 08 Opt. 1C Opt. 2C Opt. 3C Opt. 4C Opt. 1M Opt. 5R 1–2 SONET Test Set DS1, DS3, STS1 OC-1, OC-3, and OC-3c 1310 nm FC Connector OC-1, OC-3, OC-3c, and OC-12 1310 nm FC Connector LabView Drivers Remote Test Event Sync Output OC-12c STS-12c Payload Mapping Replace the BNC Connectors with WECO 560 Connectors Replace the 310 Connectors with Bantam Connectors Replace the FC Connectors with SC Connectors Replace the FC Connectors with ST Connectors Rack Mount Replace 1310 nm Laser with 1550 nm Laser ST112 SONET Transmission Test Set Artisan Technology Group - Quality Instrumentation ... Guaranteed | (888) 88-SOURCE | www.artisantg.com Introduction ST112 SONET Transmission Test Set Factory Upgrades Nomenclature Description ST112 ST11F03 ST11F04 ST11F08 ST11F3C ST11F5R ST11FE4 ST11FR3 ST11FR4 Add the OC-1, OC-3, and OC-3c to the Electrical Unit Add the OC-12 to the OC-1, OC3, and OC-3c Unit Add the OC-12c to the OC-1, OC-3, OC-3c, OC-12 Unit Add the OC-3c to the OC-1, OC-3, and OC-12 Unit Replace the 1310 nm Laser with the 1550 nm Laser Add the OC-1, OC-3, and OC-12 to the Electrical Unit Replace the FC Connectors with SC Connectors Replace the FC Connectors with ST Connectors Bellcore CLEI and CPR Product Codes The ST112 SONET Transmission Test Set has been assigned the following Bellcore COMMON LANGUAGE Product Codes: CLEI SNTQAB36AA CPR 674662 ST112 SONET Transmission Test Set Features and Capabilities • OC-12c, OC-12, OC-3c, OC-3 SONET Section, Line, Path, and VT-Path Testing B1, B2, and B3 Error Measurement Section, Line, Path, and VT-Path Alarm Detection Line Layer Alarm and Error Generation • Truly portable—22 pounds (10 kilograms) maximum weight • A simple menu system • Integrates with the ST2400 2.4 Gb/s SDH/SONET Test Set for complete “full-rate” up to OC-48 SONET analysis • Optical Capability • Intermediate Reach 1310 nm • Long Reach 1550 nm • Direct user download of software updates • GR-253-CORE framing • Complete Remote Control • RS-232 and GPIB ports, and standard printer interfaces • VT100 Virtual Front Panel Functions • Remote Command Interpreter • Standard tributary output interfaces • Four DSX-1 electrical • Six DSX-3 or STSX-1 electrical • One OC-1, OC-3, or OC-12 optical ST112 SONET Transmission Test Set 1–3 Artisan Technology Group - Quality Instrumentation ... Guaranteed | (888) 88-SOURCE | www.artisantg.com Introduction • Interface to STE, LTE and other test equipment The ST112 SONET Transmission Test Set meets the needs of development, network design, and service engineers by providing the capabilities for: • System Interrogation and Conformance Testing • Manufacturing Production Testing • Network Integrity Testing • Network Performance Monitoring • Network Troubleshooting Accessories Some accessories are included with the ST112 SONET Transmission Test Set. If you wish to purchase optional accessories contact your local Tektronix Representative. Standard Accessories • User Manual • Certificate of Traceable Calibration • Front Cover • Power Cord Optional Acccessories • 1–4 Interface Cables, RS-232-C, GPIB, Centronics RS-232-C 012-1379-00 012-1298-00 012-1398-00 9-pin female to 9-pin male 9-pin female to 25-pin male 9 in. RS-232-C to plotter/printer GPIB 012-0991-00 012-0991-01 012-0991-02 012-1282-00 2m, double-shielded 1m, double-shielded 4m, double-shielded 0.5 m, GPIB Centronics 012-1233-00 012-1214-00 012-1284-00 3 m, 4693 to Terminal 8 ft. Male Centronics to PC 25-Pin D 9 ft. Male to Male ST112 SONET Transmission Test Set Artisan Technology Group - Quality Instrumentation ... Guaranteed | (888) 88-SOURCE | www.artisantg.com Introduction Safety Instructions W A R N I N G ! Read and Follow all of these Safety Instructions. Failure to do so can cause injury to the user and damage the instrument. AC Power The ST112 SONET Transmission Test Set is designed to sense and switch line voltages between 115 VAC (90 to 132 VAC) and 230 VAC (180 to 250 VAC) and to operate at a line frequency of either 50 Hz or 60 Hz (47 to 63 Hz range). Never connect the Test Set to a line voltage that falls outside these voltage or frequency ranges. Ground the Instrument The ST112 SONET Transmission Test Set is grounded through its AC LINE connector. Always power the Test Set using a three-conductor power cord that is plugged into a grounded, threeconductor outlet. If you operate the Test Set without a proper ground then all metal surfaces of the instrument can become potential shock hazards. Use the Proper Fuse Always replace the AC LINE fuse using the procedure and fuse rating specified. Use a 5 Amp SLOBLO fuse. Operating the instrument with an improper fuse will create a fire hazard. Do Not Look into the OPTICAL Output The ST112 SONET Transmission Test Set OPTICAL output is equipped with a high-powered laser. Never look directly into the laser output or into an unterminated optical patch cord connected to this output. If you do not follow these precautions, permanent eye injury can result. Do Not Operate in an Explosive Atmosphere The ST112 SONET Transmission Test Set does not provide protection from static discharges or arcing components and therefore must not be operated in an explosive atmosphere. Do Not Remove Instrument Covers To avoid a shock hazard and to maintain proper air flow, never operate the Test Set with any of its outside covers removed. ST112 SONET Transmission Test Set 1–5 Artisan Technology Group - Quality Instrumentation ... Guaranteed | (888) 88-SOURCE | www.artisantg.com Introduction Laser Safety W A R N I N G ! Read and Follow all of these Safety Instructions. To prevent injury, ensure the following information is reviewed before operating this equipment. The ST112 SONET Transmission Test Set with Options 03, 04, and 5R are Class I laser products that comply with the United States Food and Drug Administration (FDA) Standard 21 CFR Ch. 1040.10. The Laser radiation emitted from the ST112 SONET Transmission Test Set aperture when the fiber optic cable is disconnected has a wavelength which is in the near infrared spectrum and is invisible. Safety Precautions To avoid exposure to hazardous laser radiation, it is recommended that the following practices are observed when operating this equipment: 1–6 • Always use service-trained personnel, who are aware of the hazards involved, to work with laser based equipment, circuits, and networks. • Never examine or stare into an open or broken optical fiber when it is connected to any laser output device or equipment—whether or not that laser is activated. • Always assume that the laser is on whenever it is not connected to a circuit or covered. • Always deactivate the laser before connecting or disconnecting optical cables. • When connecting or disconnecting the optical cables between this equipment and the circuit, network, or equipment-under-test, use the following connection sequences. • Connecting: Before activating the laser output (1) connect all optical cables to the equipment-under-test, circuit, network, and this equipment (2) ensure that the circuit is complete and properly terminated. • Disconnecting: Before disconnecting any part or piece of the network, circuit, or equipment-under-test (1) ensure that the laser is deactivated as detailed above. ST112 SONET Transmission Test Set Artisan Technology Group - Quality Instrumentation ... Guaranteed | (888) 88-SOURCE | www.artisantg.com Functional Overview This section describes ST112 SONET Transmission Test Set controls, indicators, connectors, and display elements. It includes separate sections that detail the transmitter and receiver specifics for the front and rear panels. Artisan Technology Group - Quality Instrumentation ... Guaranteed | (888) 88-SOURCE | www.artisantg.com Functional Overview Panel Connectors, Controls, and Indicators Front Panel Overview Figure 2–1 ST112 SONET Transmission Test Set Front Panel Illustrated in Figure 2–1 a complete view of the front panel. The front panel can be divided into five functional sections: • Display and Display Controls • Transmitter Controls, Connectors, and Status LED • Receiver Controls, Connectors, and Status LEDs • Measurement Controls and Indicators • GPIB LED Status Indicators W A R N I N G ! Always avoid exposure to the laser beam. Before power is applied to the ST112 SONET Transmission Test Set be sure that all laser outputs are either covered with the screw cap provided or connected to the appropriate circuit. 2–2 ST112 SONET Transmission Test Set Artisan Technology Group - Quality Instrumentation ... Guaranteed | (888) 88-SOURCE | www.artisantg.com Functional Overview Getting Started Be sure to read and understand all of the Front and Rear Panel hardware details and descriptions in this chapter and all of the Safety Instructions in Chapters 1 and 2 before applying power to the ST112 SONET Transmission Test Set. Before using the ST112 Test Set verify that it is properly set up and powered on, as follows: 1. Remove the unit from its shipping carton and place it on a hard firm surface. 2. Verify that the operating environment is within the limits detailed under the Environmental Requirement section in this manual. 3. Allow approximately 2 inches (5 cm) clearance for cooling on the top and rear of the unit. The two rear panel fans draw air into the ST112 SONET Transmission Test Set which is exhausted through the top vents. 4. Wire the unit for a chosen application. Never exceed the maximum optical power limits (–10 dBm) listed on the front panel. Always cover the unused OC connectors. CAUTION! Signal levels greater than –10 dBm (negative 10 dBm) may damage the Optical Input devices. Always pad the input level to less than –10 dBm. 5. Plug the unit into the appropriate AC Power source as follows: AC Power Requirements AC Voltage Voltage Range 110 VAC 90 VAC - 135 VAC 220 VAC 180 VAC - 270 VAC ST112 SONET Transmission Test Set Frequency Range 47 - 63 Hz 47 - 63 Hz Maximum Power 250 Watts 250 Watts 2–3 Artisan Technology Group - Quality Instrumentation ... Guaranteed | (888) 88-SOURCE | www.artisantg.com Functional Overview Display, Display Controls, and Indicators Figure 2–2 shows the ST112 SONET Transmission Test Set display and display controls. The display is a two-line by twenty-four character back-lit super twisted Nematic LCD (liquid crystal display) that provides a sharp image and increased viewing angle in all directions. The LCD display is used to present main menus, submenus, and test results. There are five display controls and one LED indicator. The right and left arrows are used to position the LCD cursor. The INC (increment) and DEC (decrement) keys are used to change values. The ENTER key is used to insert the selected value. The ENTER key houses an LED indicator that flashes whenever an action is requested or required. It will continue to flash until the ENTER key is pressed, entering a new value or executing the function. Figure 2–2 ST112 SONET Transmission Test Set LCD Display 2–4 ST112 SONET Transmission Test Set Artisan Technology Group - Quality Instrumentation ... Guaranteed | (888) 88-SOURCE | www.artisantg.com Functional Overview Setup Menu System The SETUP key is located below the ENTER key on the front panel. Pressing the SETUP key at any time will start the menu sequence, as Figure 2–3 shows. Each additional press, represented by the black arrow, will access the next menu. There are nine main menus, some of which have submenus. All menus are detailed in Chapter 3 LCD Menus and Displays. The SETUP menus are arranged in a continuous loop. Press any other key to exit the setup mode. WARNING! Before activating the LASER its output must be connected to a circuit. Figure 2–3 Setup Main Menus ST112 SONET Transmission Test Set 2–5 Artisan Technology Group - Quality Instrumentation ... Guaranteed | (888) 88-SOURCE | www.artisantg.com Functional Overview Transmitter Description This section describes the transmitter inputs, outputs, controls and indicators. Figure 2–4 shows the ST112 SONET Transmission Test Set transmitter front panel area. WARNING! Before activating the LASER its output must be connected to a circuit. Figure 2–4 Transmitter Front Panel Transmitter Connectors, Front Panel The front panel has eleven output connectors. In the DSX-1 section there are four connectors, either Bantam or WECO 310 jacks. They provide the industry standard Digital Signal crossconnect Level 1 (DSX-1) 100 ohm balance output. The OUTPUT section has six 75 ohm output connectors—either WECO 560 or BNC. The Output Key is used to switch between STSX-1 and DSX-3, providing either the Synchronous Transport Signal cross-connect Level 1 (STSX-1) output or Digital Signal cross-connect Level 3 (DSX-3) output. Two yellow LEDs indicate the selected signal, STSX-1 or DSX-3. On the lower right side of the transmitter section, in the LASER ON area, is an industry standard FC/PC optical output connector. ST and SC connectors are available as options. The optical output key is used to switch between OC-1, OC-3, and OC-12 signals. Three yellow LEDs are used to indicate which is selected. There is a red LED that illuminates when the laser is on. The optical connector is equipped with a screw cap to protect the optics from airborne contamination, such as dust. Optical devices can be cleaned by using compressed air or with a Microtip Medium Swab dipped in isopropyl alcohol that has greater than 70 percent alcohol. Fiber optic cables should also be cleaned with a lint free wipe and isopropyl alcohol, before connecting them. 2–6 ST112 SONET Transmission Test Set Artisan Technology Group - Quality Instrumentation ... Guaranteed | (888) 88-SOURCE | www.artisantg.com Functional Overview Configuration Keys, Transmitter The transmitter front panel configuration keys and their menus will be detailed in Chapter 3— LCD Menus and Displays. In general, seven are in the general area and three are in the DS3/VT1.5/STS-3c/STS-12c area. They are as follows: OVHD (Overhead), MAPPING, TIMING, ALARM, POINTER, DCC/OW (Data Communications Channel / Orderwire), ERROR, PATTERN, FRAMING, and ERR/ALM (Error/Alarm). ST112 SONET Transmission Test Set 2–7 Artisan Technology Group - Quality Instrumentation ... Guaranteed | (888) 88-SOURCE | www.artisantg.com Functional Overview Receiver Description This section describes the ST112 SONET Transmission Test Set receiver front panel inputs, outputs, controls, and indicators shown in Figure 2–5. Figure 2–5 Receiver Front Panel Receiver Connectors, Front Panel The front panel has three input connectors (Figure 2–5). On the lower left side of the receiver section is an industry standard FC/PC optical output connector. ST and SC connectors are available as options. The maximum input is –10 dBm. The optical output key is used to switch between OC-1, OC-3, and OC-12 input signals—three yellow LEDs indicate which is selected. On the lower right side of the receiver front panel is a 75 ohm input connector, either a WECO 560 or a BNC, and a 100 ohm input connector, either bantam or WECO 310. The STSX-1 or DSX-3 signal can be applied to the 75 ohm input. The DSX-1 signal can be applied to the 100 ohm input. Input Key, Receiver The receiver INPUT select key and four associated yellow LED indicators are on the lower right side of the receiver front panel (Figure 2–5). The key is used to select between the STSX-1, DSX-3, DSX-1 and MON (monitor) inputs. The monitor input accepts a low level input from a network element’s monitor (MON) output. The INPUT LCD menu, detailed in Chapter 3 LCD Menus and Displays, provides the four selections. Both the STSX/DSX and MON LEDs are illuminated when the monitor mode is selected. 2–8 ST112 SONET Transmission Test Set Artisan Technology Group - Quality Instrumentation ... Guaranteed | (888) 88-SOURCE | www.artisantg.com Functional Overview Configuration Keys, Receiver The front panel configuration keys and their menus will be detailed in Chapter 3, LCD Menus and Displays. In general, six are in the general area and three are in the DS/VT/3c area. They are as follows: OVHD (Overhead), MAPPING, CHANNEL, POINTER, DCC/OW (Data Communications Channel / Orderwire), ERROR, PATTERN, FRAMING, and ERROR. Receiver Status Indicators Figure 2–6 Receiver Status Indicators The status indicators (Figure 2–6) are divided into six groups that are detailed below. The appropriate LED indicator will light for a minimum of 200 milliseconds when a corresponding alarm or error is detected. Detected errors and alarms are stored as historical data. Section Alarms The Section is a transmission medium that includes termination at both ends. In a SONET transmission system it includes the optical connections between two regenerators or between a Network Element and the adjacent signal regenerator. The Test Set has four section alarm LED indicators, as follows: • The receiver LOS (Loss Of Signal) alarm indicates an STS-n or OC-n signal failure in the monitored direction. • The receiver LOF (Loss Of Frame) alarm indicates that more than 3 milliseconds of an out of frame condition has occurred. • The OOF (Out Of Frame) alarm indicates that 4 or more consecutive frames of the signal have had frame alignment errors detected in the A1 or A2 bytes. May result from a high sustained error rate or error bursts in the monitored direction. • The B1 error indicates that STS-n section BIP-8 (Bit Interleaved Parity-8) code violations were detected. Section BIP-8 is carried in the B1 overhead byte. Section code violations indicate an error condition in the monitored section between the monitor point and the next upstream Section Terminating Equipment (STE), Line Terminating Element (LTE) or a Regenerator. ST112 SONET Transmission Test Set 2–9 Artisan Technology Group - Quality Instrumentation ... Guaranteed | (888) 88-SOURCE | www.artisantg.com Functional Overview Line Alarms The Line is a transmission medium between the line signal originating Network Element (NE) and the line signal terminating Network Element. It includes one or more sections, the associated regenerators and the required Line Terminating Equipment (LTE). The ST112 SONET Transmission Test Set has four Line LED indicators, as follows: • The AIS (Alarm Indication Signal) indicates that bits 6, 7, and 8 of the K2 byte have been a binary 111, respectively, for five or more consecutive frames. This condition indicates or emulates an upstream SONET facility failure. • The LOP (Loss Of Pointer) indicates that a New Data Flag (NDF) or invalid pointer has occurred in eight or more STS-n frames. • The RDI (Remote Defect Indicator) alarm indicates that bits 6, 7, and 8 of the K2 byte have been a binary 110, respectively, for five or more consecutive frames. This condition indicates or emulates an downstream LTE failure. • The B2 error indicates that line parity errors were detected. Path Alarms The Path is a logical connection between the point of frame origin and the point of frame destination. These points can be further defined as the point where the frame of a specified rate (OC-12, OC-3, OC-1, DS1, or DS3) is assembled and the point where the frame of that same rate is disassembled. The Test Set has four Path LED indicators, as follows: 2–10 • The AIS (Alarm Indication Signal) indicates an upstream STS-1, STS-3c, or STS-12c path failure in the monitored direction. The STS-1 and STS-3c paths may travel across multiple STS-n transmission facilities and a failure in any one of them will result in a path AIS at all downstream points. • The RDI (Remote Defect Indicator) alarm indicates an upstream STS-1, STS-3c, or STS-12c path failure in the unmonitored direction. In other words, the PTE (Path Terminating Element) receiving the monitored STS-n path has entered a failure state or is receiving a line AIS (failure indication). • The FEBE (Far End Block Error) indicates that there are upstream STS-1, STS-3c, or STS12c path bit errors in the unmonitored direction. In other words, the PTE receiving the other direction of the monitored STS-n path has detected one or more path BIP-8 code violations. • The B3 error indicates that STS-1, STS-3c, or STS-12c path BIP-8 code violations were detected. STS path BIP-8 is carried in the B3 POH byte. Path code violations indicate an error condition in the monitored path between the monitor point and the upstream PTE. ST112 SONET Transmission Test Set Artisan Technology Group - Quality Instrumentation ... Guaranteed | (888) 88-SOURCE | www.artisantg.com Functional Overview VT Path Alarms Figure 2–7 Receiver Status Indicators The Virtual Tributary (VT) Path is a logical connection between the point of frame origin and the point of destination. The structure is designed for the transport and switching of DS1 subpayloads. These points can be further defined as the point where the frame of a specified rate (OC-12 or OC-3) is assembled and the point where the frame of that same rate is disassembles. The Test Set has four VT Path LED indicators (Figure 2–7), as follows: • The AIS (Alarm Indication Signal) indicates an upstream VT1.5 path failure in the monitored direction. The VT1.5 may travel across multiple STS-n or OC-n transmission facilities and a failure in any one of them will cause a VT path AIS at all of the downstream points. • The RDI (Remote Defect Indicator) indicates a VT1.5 path failure in the other direction (unmonitored direction). In other words the PTE receiving the other direction of the monitored VT1.5 has entered a failure state or is receiving a line AIS. • The FEBE (Far End Block Error) indicates VT1.5 path bit errors in the other direction (i.e. the unmonitored direction). In other words the PTE receiving the other direction of the monitored VT1.5 has detected one or more path BIP-2 code violation. • The BIP-2 LED indicates that VT1.5 path code violations were detected indicating an error condition in the monitored VT path between the monitor point and the upstream PTE. ST112 SONET Transmission Test Set 2–11 Artisan Technology Group - Quality Instrumentation ... Guaranteed | (888) 88-SOURCE | www.artisantg.com Functional Overview Pointer Indicators Three SPE and three VT indicators show the occurrence of Pointer Justifications (PJ)and New Data Flags (NDF). Each of these will flash for about 1 second each time the associated event occurs. They are not status indicators and they have no history state. Under normal network conditions the New Data Flags (NDF) rarely occur. The Pointer Justifications (PJ) are commonly activated by either the STS-n or OC-n signal sources. The PJ VT pointers are commonly activated by their VT1.5 payloads. The function of each POINTER indicator is as follows: • The NDF will flash one time when a new data flag indication is detected. This condition can occur when bench testing network elements, when signal or timing is loss, or when a new timing is switched. • The +PJ will flash one time when a positive pointer adjustment is detected. • The –PJ will flash one time when a negative pointer adjustment is detected. Payload, DS1 and DS3 Indicators The receiver front panel, shown in Figure 2–7, has eleven red LED payload indicators. They are arranged in three individual columns under the heading PAYLOAD/DS1/DS3. The function of each, are as follows: 2–12 • LOS indicates the loss of the DSX-1 or DSX-3 signal. • LOF indicates the loss of the DS1 or DS3 payload framing. • PAR indicates a parity error in the DS3, M13, or Cbit frame formatted payload. • CRC indicates one or more errored bits in a DS1 frame. • AIS is a DS1 or DS3 payload Alarm Indication Signal. It shows the detection of an unframed 1111... sequence in a DS1 payload, and a framed 1010... sequence in a DS3 payload. • RAI (Remote Alarm Indication) shows the detection of a SF, SLC-96, or ESF Yellow in a DS1 payload. • IDLE shows the detection of a framed 1100... sequence in a DS3 payload. • YEL-DS3 shows the detection of both x-bits within a DS3 frame being zero. • ONES shows the detection of a 1111... sequence in a DS3 payload. • SYNC shows the detection of a PRBS or fixed word test pattern loss of sync condition in the current payload—DS1, DS3, VT1.5, OC-3c, or OC-12c. • BIT shows the detection of a test pattern bit error condition in the current payload. ST112 SONET Transmission Test Set Artisan Technology Group - Quality Instrumentation ... Guaranteed | (888) 88-SOURCE | www.artisantg.com Functional Overview View History Key Figure 2–8 History View Key The HISTORY VIEW key is used to review past alarms and errors. A history status bit is set, and the status LED built into the key will flash once an alarm or error has been detected during the test cycle. Pressing this key will display the history status of the alarm and error LED indicators instead of the current status. Releasing this key will return to the current status display within 500 milliseconds. History is cleared when a new test cycle starts. ST112 SONET Transmission Test Set 2–13 Artisan Technology Group - Quality Instrumentation ... Guaranteed | (888) 88-SOURCE | www.artisantg.com Functional Overview Measurement Controls and Indicators Figure 2–9 shows the ST112 SONET Transmission Test Set measurement controls and indicators. The RUN/STOP key provides duration control over the test cycle. RUN clears all counters, clears history data, and starts the test cycle. STOP halts the test cycle without effecting counter values. The LED indicator, inside the RUN key, is on during the RUN cycle. The PAUSE/RESUME key permits a temporary stop of the test cycle. The LED indicator is on when the test cycle is in the pause mode. Pressing the key, once again, extinguishes the LED and resumes the test. All counters are suspended in the PAUSE mode and continue from that point when the test cycle is resumed (RESUME). The LED indicators continue to operate while the test cycle is in a paused state, but no data or history is saved. A stopped test can be restarted using the pause-run-resume sequence, saving stored history data. In other words, when the test cycle has been stopped, pressing the PAUSE/RESUME key will change the test mode from stopped to pause. Then the RUN/STOP key is pressed to restart the test in the paused state. Next the PAUSE/RESUME key is pressed, restarting the test cycle without loss of the previous test data. Figure 2–9 Measurement Controls and Indicators Remote Indicators Figure 2–10 shows the two GPIB front panel LED status indicators. The Remote Operation (REM) LED indicates that the Test Set is being controlled through its GPIB connection. The REM LED is off when the unit is in the local mode. In the Local Lockout (LLO) mode, the ST112 SONET Transmission Test Set front panel is disabled by a remote controller that is using GPIB access commands. Front panel control can only be restored by the appropriate GPIB command or by a power initialization cycle. Power initialization should only be used when the Test Set is not being remotely operated. Figure 2–10 Communication Indicators 2–14 ST112 SONET Transmission Test Set Artisan Technology Group - Quality Instrumentation ... Guaranteed | (888) 88-SOURCE | www.artisantg.com Functional Overview Rear Panel Description Rear Panel Connectors Figure 2–11 shows the ST112 SONET Transmission Test Set rear panel connectors. Figure 2–11 Rear Panel Connectors Transmitter Connectors, Rear Panel The rear panel TRANSMITTER section shown in Figure 2-11 has eight connectors. The two TX CLOCK INPUT BNC connectors, on the left, support the STS-1 (51.84 MHz) and STS-3 (155.52 MHz) clock sources. A maximum of 800 mV peak to peak can be applied to these 50 ohm ACcoupled clock inputs The next three BNC connectors are ECL compatible outputs for TX CLOCK, DATA, and SYNC. The clock and data rates are 52 Mb/s NRZ formatted. The synchronization rate is 8 kHz it identifies the start of each STS-1 frame. The next BNC connector is TX 155 Mb/s CLOCK output. The signal is AC-coupled and the amplitude is nominal of 800 MV. The last two TX connectors, on the right, are Digital Signal Cross Connect inputs. The BITS/DSX-1 input accepts a WECO 310 plug and has a 100 ohm input impedance. It is used when BITS (framed DS1 all ones) is selected as the SONET timing reference or when mapping ST112 SONET Transmission Test Set 2–15 Artisan Technology Group - Quality Instrumentation ... Guaranteed | (888) 88-SOURCE | www.artisantg.com Functional Overview an external DS1 signal by choosing EXT 1.5 BIT FLOAT map mode from the transmitter mapping menu. The DSX-3 BNC 75 ohm input connector, on the right, is used for a DS3 input when the EXT DS3 map mode is selected. Receiver Connectors, Rear Panel RECEIVER 52 Mb/s CLOCK BIT ERR DATA DATA ECL OUT TTL OUT 100 OHM DIFF INPUT 50 OHM/-2V 2.5V +/- 1V Figure 2–12. Receiver Connectors, Rear Panel The rear panel RECEIVER section shown in Figure 2–12 has four BNC connectors. The 52 Mb/s CLOCK output connector, on the left, provides the 51.84 MHz ECL compatible 50 ohm output that was recovered from the received STS-1 signal. The BIT ERR TTL OUT connector will generate a: • DS3 RZ pulse for each bit error. • DS1 NRZ pulse for each bit error. • STS-3c byte wide NRZ pulse for each occurrence of 1 to 8 errors in each byte. • STS-12c four byte wide NRZ pulse for each occurrence of 1 to 32 errors in 4 contiguous bytes. The last two connectors, on the right, are optional data measurement inputs that are used for differential 52 Mb/s data input. Standard Connectors, Rear Panel The standard connectors include the following: 2–16 • Orderwire Handset; • DCC; • GPIB; • RS-232-C; • Parallel Printer Port; and, • Event Sync TTL output (option). ST112 SONET Transmission Test Set Artisan Technology Group - Quality Instrumentation ... Guaranteed | (888) 88-SOURCE | www.artisantg.com Functional Overview The Orderwire Handset port provides handset access to the local (section) or express (line) ORDERWIRE channel in the selected STS-n, setup dependent. The DCC (Data Communications Channel) connector is a 15-pin DB socket that can be used with a protocol analyzer or related test set to access V.11 compatible data and clock signals. External data can be carried by the section DCC (D1 to D3 bytes) at a 192 Kb/s rate or the line DCC (bytes D4 to D12) at a 576 Kb/s rate. In each case the Test Set supplies a smooth clock source at the appropriate rate and expects a return data bit within 500 ns after each rising edge of the clock. The pin numbers and functions are listed in Table 2–1. Figure 2–12 shows the transmit data input pins 2 and 9. They are differentially terminated with a 100 ohm input impedance. All other signals are high impedance differential outputs. Pins 1 and 8 are signal ground. Table 2–1 Data Communications Channel (DCC) Pinouts Pin Function Pin 7 Transmit Clock (True) 6 14 Transmit Clock (Compliment) 13 2 Transmit Data (True) 4 9 Transmit Data (Compliment) 11 1 Ground 8 Function Receiver Clock (True) Receiver Clock (Compliment) Receiver Data (True) Receiver Data (Compliment) Ground Figure 2–12 I/O Circuit Logic ST112 SONET Transmission Test Set 2–17 Artisan Technology Group - Quality Instrumentation ... Guaranteed | (888) 88-SOURCE | www.artisantg.com Functional Overview The GPIB receptacle is an IEEE-488.2 standard connector provided for remote operation. The RS-232C serial interface connector is a 25-pin socket that can be used with the ST2400 in the dual mode. It can also be used with a VT100 terminal or PC running VT100 terminal emulation software, or with a serial printer. The Parallel Printer interface is a Centronics DB-25 socket. Event SYNC is a BNC connector. Event SYNC results when an alarmed condition (SONET) is detected by the ST112. The signal is a negative TTL pulse during the alarmed period. For example, if you were to send a LOS (Loss of Signal condition) alarm <1 µs>, when the button is pressed to send the event, there would be a 1 µs negative pulse representing the start to end of the LOS alarm duration. This connection is optional. If the alarm is selected for "<x>" number of frames, the pulse will occur for that period of time. If you were to send a LOF (Loss of Frame condition) BURST of <1> frame, there will be a 125 µs negative pulse representing 1 frame event for the Loss of Frame alarm time. This would occur as soon as the button is pressed to send the BURST EVENT. 1 frame 125 µs 2 frames 250 µs 3 frames 375 µs The same condition would continue for <x> amount of frames. This also is the start to end time that the event will occur. An APS (Automatic Protection Switching) is the capability of the transmission system to detect a failure on a working facility and to switch to a standby facility to recover the traffic. In SONET, the transmission is protected on optical lines from the Head end (the point at which the Line Overhead is inserted) to the Tail end (the point where the Line Overhead is terminated). An APS condition results by selecting the correct byte(s) from the Transmitter's TOH/POH menu and changing the byte for the situation requested. Once changed, press "ENTER". As soon as the key is depressed, the EVENT SYNC occurs. Switching time can be measured from the time the EVENT SYNC output switches from a high to low transition to the time the equipment under test changes to alarmed condition. AC Power Fuse Figure 2–11 shows the rear panel controls and connectors. The AC power module is located on the right side corner of the rear panel. It has a removable fuse panel that can be opened with a small flat blade screw driver after the AC Line Cord has been unplugged. The AC power supply can accept 115 VAC input. A 5 Amp SLOBLO fuse is used with the AC source voltage. W A R N I N G ! Always disconnect the AC Power Cord before opening the rear fuse panel. 2–18 ST112 SONET Transmission Test Set Artisan Technology Group - Quality Instrumentation ... Guaranteed | (888) 88-SOURCE | www.artisantg.com LCD Menus and Displays This chapter describes the use of the ST112 SONET Transmission Test Set LCD menu structures and displays. In addition to the general displays and menus, there are separate sections that detail setup, receiver, and transmitter specifics. Artisan Technology Group - Quality Instrumentation ... Guaranteed | (888) 88-SOURCE | www.artisantg.com LCD Menus and Displays Functional Verification A functional verification of the ST112 SONET Transmission Test Set can be performed while reviewing this chapter. To do so, connect the three front panel receiver inputs (one laser and two electrical) to their appropriate front panel outputs, as shown in Figure 3–1. To avoid overdriving the receiver and avoid erroneous errors and readings, use a 10 to 15 dB attinuator for the OC-n Loopback connection. Any one of the electrical outputs for DSX-1 and DSX-3 will work. Be sure to read and observe all of the appropriate safety rules in chapters 1 and 2. Figure 3–1 Functional Verification Test Setup Setup Menu System Pressing the setup key at any time will cause the ST112 SONET Transmission Test Set to enter the Setup Menu System, accessing the menus and submenus shown in Figure 3–2 and Figure 3– 3. Four keys are used to navigate through this menu system: Setup, Enter, Increment, and Decrement. The left and right arrow keys are used to move the cursor. The increment and decrement keys can be used to move the cursor and change values. The left column of Figure 3–2 shows nine main menus that make up the Setup main menu system. It is a continuous loop that begins with the SONET QUICKSET LCD display and ends with the ST2400 COM LINK display menu. When power is applied the first three LCD splash screens will display the following: 1. The Tektronix/MWL Products logo and Copyright notice. 2. Performing Self-test and Serial Number. 3. Test Set logotype and Software Version number and all front panel LEDs will illuminate, verifying their operation. The third splash screen and all of the illuminated LEDs will continuously be displayed if you press and hold the HISTORY VIEW key before the power key is set to on, and continue to hold it in during the power up cycle. The OUICKSET LCD will not be displayed until you release the HISTORY VIEW key. This feature is only available in version 4.1 software. 3–2 ST112 SONET Transmission Test Set Artisan Technology Group - Quality Instrumentation ... Guaranteed | (888) 88-SOURCE | www.artisantg.com LCD Menus and Displays Figure 3–2 Menu System—Part 1 • After the power-up cycle, or when the setup key is pressed, the SONET QUICKSET LCD menu shown in Figure 3–2 should be the first menu displayed. If not, press the setup key one or more times until one of the menus labeled SONET QUICKSET is visible. There are four SONET QUICKSET (three optical and one electrical), one for each of the signal rates: OC-12, OC-3, OC1, and STSX-1 The OC-12 menu has four payload choices: DS3, VT, 3c, and 12c. The cursor, in Figure 3–2, is positioned around the 3c payload—pressing the ENTER key maps four 3c payloads into an OC-12 SONET signal. In this mode, the ST112 SONET Transmission Test Set will replicate the same 3c signal four times, and the appropriate front panel rate and payload LED indicators will illuminate. In this example, both the receiver and transmitter OC-12 input ST112 SONET Transmission Test Set 3–3 Artisan Technology Group - Quality Instrumentation ... Guaranteed | (888) 88-SOURCE | www.artisantg.com LCD Menus and Displays and output LEDs and their 3c/12c mapping LEDs will light. Use the INC or DEC key to scroll through the other SONET QUICKSET menus and the arrow keys to make your choice. Choosing any OC rate will activate the Transmitter Laser Output. WARNING! Before activating the LASER, its output must be connected to a circuit. 3–4 • A second press of the SETUP key will access the QUICK DSX SETUP menu, used to configure the asynchronous cross connect signals. Selecting either DSX-1 or DSX-3 from this menu, will enable its respective electrical output, and disable the optical output. When DSX-1 is selected the receiver DSX-1 LED will illuminate. DSX-3 will illuminate the receiver DSX-3 LED and the transmitter DSX-3 LED. • Another push of the setup key will access the DSX-1 LINE CODE menu. It is used to select a line code for the DSX-1 signals. Either AMI (Alternate Mark Inversion) or B8ZS (Bipolar 8 Zero Substitution), as the case may be, can be used to test T1 compatible networks and network elements. • Another push of the setup key will access the OC-12 CHANNEL NUMBERING menu. STANDARD uses the STS-3/STS-1 channel numbering scheme, starting with: 1,1; 1,2; 1,3; 2,1; 2,2; 2,3; 3,1; ..., and detailed in the Bellcore GR-253-CORE Standard. The C1 ID numbers the channels in sequence from 1 to n, according to their appearance on the high speed line. Standard indicates which tributary (STS-n) the channel came from and C1 ID does not. • The STORE/RECALL SETUP menu is next. It is used to access either the USER stored setup or the FACTORY DEFAULT setup. Pressing the enter key will access the submenu from which one of the ten LOC (locations) can be RCLL (recalled) or STOR (stored). Up to ten individual user setups can be saved in memory locations 0 through 9. A unique 10 character label can be stored with each saved setup. The arrow keys are used to position the cursor anywhere in the label area, and the INC or DEC key is used to scroll through the ASCII characters—including numbers and symbols. Moving the cursor to FACTORY DEFAULT and pressing the enter key will access that NO or YES menu—that defaults to NO. Moving the cursor to YES and pressing the enter key will restore the factory default configuration. Pressing the setup key will return to the STORE/RECALL SETUP display. • REPORT / TEST TIME is the next setup menu. It is used to access a complete set of measurement control, test, and report submenus that will be detailed in the next section of this chapter. Pressing the setup key will move to the next main menu. • The VIEW ANGLE can be set to one of eight integers (0 through 7). Zero should be the best view angle when the ST112 SONET Transmission Test Set is positioned below the operator and 7 is best when the operator is looking up at the Test Set front panel. The change is interactive; it is executed whenever the increment or decrement key is pressed. In the same menu, the VOLUME can be set using integers 0 through 9. Zero is off and 9 is the loudest. Errors and alarms activate the beeper, unless the volume is set to zero. • AUXILIARY SETUP is the next setup menus. Pressing the enter key will access the auxiliary setup menu system shown in Figure 3–3 and described later in this chapter. Pressing the setup key will access the ST2400 COM LINK menu. ST112 SONET Transmission Test Set Artisan Technology Group - Quality Instrumentation ... Guaranteed | (888) 88-SOURCE | www.artisantg.com LCD Menus and Displays • The ST2400 COM LINK is the last of the nine setup menus. Pressing the setup key will loop back to the QUICK SETUP (starting) menu. Moving the cursor to OPEN and pressing the enter key will enable the communication link between the ST112 Test Set and the ST2400 2.4Gb/s SDH/SONET Test Set, expanded its capabilities to OC-48 testing. This Combined (Dual) Mode function is detailed in the Applications Chapter of this manual. Report/Test Time Menu System The REPORT/TEST TIME main menu is used to access seven submenus that are used to configure the measurement control, test time, and report setup. Pressing the enter key will access the MEASURE CONTROL menu. • The MEASURE CONTROL menu sets the test cycle to be used when the run key is pressed. UNTIMED will run until the stop key is pressed. TIMED will run the test for the duration of time set in the TEST TIME menu. REPEAT will run the test for the duration of time set in the TEST TIME menu, then start the test again. The stop key can stop any test that is running. • Next is the TEST TIME menu used to set the test run duration, in terms of days (D), hours (HH), minutes (MM) and seconds (SS). The maximum time supported is 9 days, 23 hours, 59 minutes, and 59 seconds. Press the enter key to store any changes and the setup key to move to the next menu. • Next is the REPORT SETUP PRINT menu used to control the printing. Setting it to OFF means no printout, ERR will print a report each time an error is detected, during a test cycle. EOT will print a report summary at the end of the test cycle. BOTH will print on error and at the end of test cycle. The printer can be connected to either the parallel or serial (RS-232-C) port. Parallel is the factory default setting. • The REPORT SETUP SQUELCH menu is used to limit the total number of errors logged, saving memory space. When squelch is set to ON error recording will stop after 10 consecutive seconds with errors. Then error recording will be resumed after 10 consecutive seconds without any errors. • The PRINTER SELECTION menu offers either PARALLEL or RS-232-C (RS232) serial printer selection. The printer should be connected to the appropriate port on the ST112 SONET Transmission Test Set rear panel. • In the REPORT SETUP menu CLEAR ERR (error) is used to clear the error log by moving the cursor to YES and pressing the enter key. It immediately clears the error log and returns to NO after execution. The error log should be cleared before running a long test, preventing buffer overflow. An error log warning message will be displayed when the run key is pressed, if the log is 95% full. • The REPORT REPRINT menu is used to print the previous error log (ERR), the previous end of test summary (PREV–EOT), or the current error log (CURR) if it exist. ST112 SONET Transmission Test Set 3–5 Artisan Technology Group - Quality Instrumentation ... Guaranteed | (888) 88-SOURCE | www.artisantg.com LCD Menus and Displays Auxiliary Setup Menu System Figure 3–3 Menu System—Part 2 The left column of Figure 3–3 shows the auxiliary setup menu which is part of the nine Setup main menus. The right side shows the auxiliary submenus. Press the enter key to access them. 3–6 • TIME is the first submenu accessed from the auxiliary setup menu. It is used to store the year current (YY), month (MM), day (DD), hours (HH) minutes (MM), and seconds (SS), in a battery backed memory. Whenever changes are made, the enter key LED will start flashing, indicating that the ENTER Key should be pressed to enter the new value. • Use the setup key to access the GPIB port characteristics menu, shown in Figure 3–3. The port address is an integer from 0 to 31. It can be changed with the INC or DEC keys. The enter key LED will flash, push it before proceeding. Either an EOI (End-Or-Identify) or EOI/LF (End-Or-Identify with a Line Feed) can be used to terminate the GPIB message sent by the Test Set. • Next is the RS-232-C (RS 232) SETUP menu. Press the setup key to bypass the six nested port configuration submenus or the enter to access them. They store the characteristics for BAUD rate, PARITY, CHAR (character) SIZE, END OF LINE, ECHO, and XON/XOFF (flow control). ST112 SONET Transmission Test Set Artisan Technology Group - Quality Instrumentation ... Guaranteed | (888) 88-SOURCE | www.artisantg.com LCD Menus and Displays • Pressing the setup key again will return to the AUXILIARY menu in the quick setup main menu loop. Another press of the setup key will, once again, return to the ST2400 COM LINK menu display in the main menu system, shown in Figure 3–2. Receiver Menus and Displays Overhead Displays, Receiver Figure 3–4 Receiver Overhead LCD Displays The ten displays shown on the left side of Figure 3–4 are the RX OVHD (overhead) bytes that are located in the first STS-1 of the SONET frame. They can be displayed by pressing the OVHD key on the receiver panel. Each time the key is pressed the next group of overhead bytes will be displayed in a continuous loop, until some other key is pressed. There are nine displays of four bytes each, and one APS display. The first display screen illustrated in Figure 3–4, shows the cursor around the word DISP (display). Pressing the ENTER key will display the contents of the J1 TRACE, which is illustrated on the upper right side of Figure 3–4. ASCII data may be displayed on the second line of that display. Pressing the receiver OVHD key returns to the main overhead display. The tenth display provides the APS message, detailed in the following section of this chapter. ST112 SONET Transmission Test Set 3–7 Artisan Technology Group - Quality Instrumentation ... Guaranteed | (888) 88-SOURCE | www.artisantg.com LCD Menus and Displays Automatic Protection Switching (APS) Figure 3–5 illustrates the APS message display. From the top line: The direction can be UNI (unidirectional), BI (bi-directional), FERF-L (Far End Receive Failure-Line), AIS (Alarm Indication Signal), or four asterisks (****) indicating none of the four line types. The Protection can either be 1+1 (one-to-one) or 1:N (several unallocated lines specified by the number N). The Request Line (the line requesting to be switched) and the Switch Line (the line that the Request Line wants to switch to) can be any decimal number from 0 to 15. Figure 3–5 Automatic Protection Switching (APS) The bottom line of the APS will display one of sixteen possible messages: 0 No Request 8 Manual Switch 1 Do Not Revert 9 Invalid 2 Reserve Request 10 SD-Lo Priority 3 Invalid 11 SD-Hi Priority 4 Exercise 12 SF-Lo Priority 5 Invalid 13 SF-Hi Priority 6 Wait To Restore 14 Forced Switch 7 Invalid 15 Lockout Protect The nomenclature SD-Lo Priority means Signal Degrade Low Priority and SF-Lo Priority means Signal Failure Low Priority. 3–8 ST112 SONET Transmission Test Set Artisan Technology Group - Quality Instrumentation ... Guaranteed | (888) 88-SOURCE | www.artisantg.com LCD Menus and Displays Mapping Menus, Receiver Figure 3–6 Mapping, Receiver All of the ST112 SONET Transmission Test Set receiver payload mapping menus are shown in Figure 3–6 and detailed in the Bellcore GR-253-CORE standard. Press the receiver MAPPING key to display one of the five mapping choices shown. Then use the INC and DEC keys to display the others. The mapping choice that is being displayed is selected by pressing the ENTER key, or any other key when leaving the mapping menus. • STS-12c (STS-12 Concatenated Payload Mapping) • STS-3c (STS-3 Concatenated Payload Mapping) • VT1.5 BIT FLOAT (DS1 Asynchronous Payload Mapping, Floating Mode) • VT1.5 BYTE FLOAT (DS1 Byte Synchronous Payload Mapping, Floating Mode) • DS3 (DS3 Asynchronous Payload Mapping) STS-12c mapping choice is only displayed when that option is installed. ST112 SONET Transmission Test Set 3–9 Artisan Technology Group - Quality Instrumentation ... Guaranteed | (888) 88-SOURCE | www.artisantg.com LCD Menus and Displays Channel Menus, Receiver Figure 3–7 Channel Menus, Receiver Pressing the CHANNEL key will access the LCD menus shown in Figure 3–7. All three menus are present with VT1.5 mapping, but only the RX STS CHANNEL menu is available with all STS payload configurations. The RX STS CHANNEL menu shows how many channels are accessible (1:12 in this example), which STS Channel is being analyzed (5 in this example), and its STS position (2,2 in this case) when using the GR-253-CORE numbering format. The STS channel can be changed using the INC, DEC, and ENTER keys. The ACTIVE VT CHANNEL menu is used to choose one VT1.5 sub-channel from the chosen STS Channel. There are twenty-eight (1:28) VT1.5 sub-channels, in this example number nine (9) is selected. In the VT CHANNEL MAP menu the virtual tributaries can be mapped sequentially from 1 to 28 or in a 4x7 matrix—in accordance with Bellcore GR-253-CORE (see Figure 3–8 and Table 3–1). Figure 3–8 VT1.5 Structures 3–10 ST112 SONET Transmission Test Set Artisan Technology Group - Quality Instrumentation ... Guaranteed | (888) 88-SOURCE | www.artisantg.com LCD Menus and Displays Table 3–1 VT1.5 Locations and Channel Numbering Conventions Group #, VT # Bellcore TA-253 1,1 2,1 3,1 4,1 5,1 6,1 7,1 1,2 2,2 3,2 4,2 5,2 6,2 7,2 1,3 2,3 3,3 4,3 5,3 6,3 7,3 1,4 2,4 3,4 4,4 5,4 6,4 7,4 VT 1.5 # (1 x 28) format 1 2 3 4 5 6 7 8 9 10 11 12 13 14 15 16 17 18 19 20 21 22 23 24 25 26 27 28 ST112 SONET Transmission Test Set VT 1.5 # (4 x 7) format * 1 5 9 13 17 21 25 2 6 10 14 18 22 26 3 7 11 15 19 23 27 4 8 12 16 20 24 28 STS-1 SPE Column #s 2,31,60 3,32,61 4,33,62 5,34,63 6,35,64 7,36,65 8,37,66 9,38,67 10,39,68 11,40,69 12,41,70 13,42,71 14,43,72 15,44,73 16,45,74 17,46,75 18,47,76 19,48,77 20,49,78 21,50,79 22,51,80 23,52,81 24,53,82 25,54,83 26,55,84 27,56,85 28,57,86 29,58,87 3–11 Artisan Technology Group - Quality Instrumentation ... Guaranteed | (888) 88-SOURCE | www.artisantg.com LCD Menus and Displays Pointer Displays, Receiver Figure 3–9 Pointer Displays, Receiver Pressing the POINTER key will access the RX PTR (Receiver Pointer) displays shown in Figure 3–9. They are used to monitor the number of pointer adjustments and NDF (New Data Flags) that occur during the test cycle. The SPE and VT pointers keep track of the starting positions of their respective payload envelopes. In this example (Figure 3–9) the pointer value 522 in the SPE display represents the offset of the first SPE byte (J1). The pointer word is located in the H1 and H2 bytes of the STS frame. The SPE pointer can be any value from 0 to 782. Also in this example, the counts for +PJ and –PJ are zero. They change each time the pointer value changes, during the measurement period. The VT pointer display is only accessible in the VT1.5 mode. The VT pointer value, 78, indicates the position of the first payload (V5) byte in the sub-channel. The pointer word is located in the V1 and V2 bytes of the VT frame. The VT pointer can be any value from 0 to 103. Data Communications Channel–Orderwire Menus, Receiver Figure 3–10 DCC/Order Wire Menus, Receiver Data or voice can be received on a device connected to the rear panel DCC/OW connector on the Section or Line DCC or Order Wire channels. Pressing the receiver DCC/OW key one or more times will access the configuration menus shown in Figure 3–10. Using the arrow and enter keys The DCC (Data Communications Channel) can be configured for OFF, SECTION, or LINE. 3–12 • DCC is used to transfer data between NE (network elements) and ORDERWIRE is used for voice communications. • The data can be received in either the SECTION or LINE DCC channel. • LOCAL refers to the connection between two adjacent devices (such as a regenerator and a NE or two adjacent regenerators) and EXPRESS indicates the connection is between two NE with regenerators in between. Communications between two Network Elements (NE) with no regenerators can use either a LOCAL or an EXPRESS connection. ST112 SONET Transmission Test Set Artisan Technology Group - Quality Instrumentation ... Guaranteed | (888) 88-SOURCE | www.artisantg.com LCD Menus and Displays Error Measurement Displays, Receiver Figure 3–11 SONET Error Measurement Displays, Receiver There are two ERROR Keys on the receiver side of the ST112 Test Set. This material addresses the ERROR Key in the dark gray area which is used for the SPE (Synchronous Payload Envelope) error detection. The other ERROR Key, in the light gray area, is used to display payload and asynchronous signal errors. It is detailed under the heading Payload Error Display, Receiver later in this chapter. The ERROR key on the receiver side of the front panel is used to scroll through error displays. The eight LCD displays shown in Figure 3–11 are SONET Error Measurement Displays. SONET errors that were detected are included in the SECT (section), LINE, PATH, VT (Virtual Tributary), and STSX-1 error summary menus. The first three menus in Figure 3–11 include the ES (Errored Seconds), SES (Severely Errored Seconds), the BER (Bit Error Rate), and the TOT (Total Count). The two VT displays are only present when the VT1.5 payload is selected. The total (TOT) and BER is displayed for the VT BIP-2 (Bit-Interleaved Parity-2) in the fourth LED display. In this example (Figure 3–11), the sixth error display provides the the totals for B1, B2, B3, and FEBE (Far End Block Error). The next push of the ERROR key will display the BIP-2 total, FEBE total, and the LOP STAT (Loss Of Pointer Status) for the Virtual Tributary (VT) subchannel. An eighth press will display ELAPSED TIME of the Test Cycle. Each press of the error key will cycle to the next error display in a continuous loop, until some other key is pressed. ST112 SONET Transmission Test Set 3–13 Artisan Technology Group - Quality Instrumentation ... Guaranteed | (888) 88-SOURCE | www.artisantg.com LCD Menus and Displays Optical Input Select Menu, Receiver Figure 3–12 Optical Input Select Menu, Receiver The menu display shown in Figure 3–12 is accessed by pressing the receiver Optical Input Selection key located on the front panel in the light gray laser input area. Use the arrow and enter keys to select one of the four choices: OC-1, OC-3, OC-12, BIPOLAR. Input Select Menus and Displays, Receiver Figure 3–13 Input Select Menus and Displays, Receiver Press INPUT Key to scroll through the menus shown on the left side of Figure 3–13, but the four menus illustrated on the right side are selection dependent. The first menu, RX INPUT SELECTION, offers four choices: three electrical cross connects (STSX-1, DSX-3, and DSX-1) and one optical (OPTIC). Positioning the cursor around OPTIC and pressing the enter key will take you to the next menu, shown on the right side of Figure 3–13. This RX INPUT SELECTION menu is used to choose one of three optical rates (OC-1, OC-3, and OC-12) or BIPOLAR. Selecting the word BIPOLAR, in that menu, will return the display the first RX INPUT SELECTION menu, that offers three electrical input and access to the OPTIC (optical) menu. Selecting any of the three electrical cross connects from the first RX INPUT SELECTION menu and pressing the enter key will access the RX INPUT TERMINATION menu, shown on the lower right side of Figure 3–13. It has two choices TERM (Terminate) and MONITOR. The TERM input terminates the electrical cross connect input signal. The MONITOR input configures the appropriate electrical input to accept a low level input from the monitor output of the a network element or a DSX (Digital Signal Cross-Connect) panel. 3–14 ST112 SONET Transmission Test Set Artisan Technology Group - Quality Instrumentation ... Guaranteed | (888) 88-SOURCE | www.artisantg.com LCD Menus and Displays The next LCD menu is used to obtain a configuration for the ST112 Test Set receiver. The two choices in the AUTOMATIC INPUT MODE menu are used to query and configure the receiver, each in its own way. • AUTOSEEK searches for the Mapping, Pattern, and Framing from the incoming input signal and configures the receiver accordingly. • AUTOLINK searches for the transmitter’s Mapping, Pattern, and Framing, whether or not the receiver has an input, and configures the receiver accordingly. The next LCD display in Figure 3–13 shows the receiver’s configuration. In this example OC-12, CHAN STS-1 and VT sub-channel 1 are shown on the top of the display, VT1.5 ASYNC and UFM QRW on the bottom. The next LCD displays the receiver’s input configuration. Manual settings for Mapping, Pattern, and Framing are disabled when either AUTOSEEK or AUTOLINK is active. Pressing the receiver keys for Mapping, Pattern, or Framing will cause a momentary display message. Either RX AUTOSEEK ENABLED or RX AUTOLINK ENABLED, whichever one is enabled. Then the configuration display will return. The next LCD menu is used to run the TROUBLE SCAN MODE on the incoming signal. A printer should be connected to the rear panel parallel printer port, or serial port, and the printer and report printing functions should be configured using the SETUP menus that were detailed earlier in this chapter. • The cursor has three positions: OFF, ON, and DWELL (time in seconds). As the name (Trouble Scan) implies, in this mode, all channels are scanned for problems. DWELL is the length of sample time for each channel—10 seconds in this example. Dwell time can be set from 5 to 99 seconds. The RUN key must be pressed, starting the test cycle, before Trouble Scan can be set to ON. The test cycle must be stopped before the Trouble Scan Mode can be set to OFF. • The CLEAR TROUBLE SCAN LOG menu will supersede the Trouble Scan execution if the log contains data from a previous Trouble Scan. When the Trouble Scan Mode is set to ON, during a test cycle, a CLEAR TROUBLE SCAN LOG? query menu provides the opportunity to delete existing data. Two choices, ESC and YES, are presented. Use the arrow keys to move the cursor, and the ENTER key to execute your choice. ESC will exit After the choice is made, the TROUBLE SCAN MODE will be on. The same menu will appear each time a new test cycle is started, if the error log contains data. • The last display, at the bottom of Figure 3–13, shows the trouble scan running. The top line provides the STS channel number and the current status of that channel, SCANNING—in this example. The bottom line provides the date and time that the scan began. The word SCANNING will change to the words NO TROUBLE when the scan ends without any problems. Errors and alarms, if they occur during the scan, will be displayed. The words PAUSE ON will be displayed when the test cycle is interrupted with the PAUSE-RESUME key. ST112 SONET Transmission Test Set 3–15 Artisan Technology Group - Quality Instrumentation ... Guaranteed | (888) 88-SOURCE | www.artisantg.com LCD Menus and Displays DS, VT, STS, 3c, and 12c Menus, Receiver The three keys in this section (PATTERN, FRAMING, and ERROR) are used to configure the receiver to the incoming payload content, to be analyzed. Pattern Menus and Displays, Receiver Figure 3–14 Pattern Menus and Displays, Receiver The Pattern LCD display is payload dependent. Four possible displays are shown in Figure 3–14 but only the relevant one will be displayed. The top line of each RX PATTERN display indicates the payload type: VT1.5, DS3, STS-3c, or STS-12c. The VT1.5 and DS3 payloads require manual selection from the list of available patterns. QRW (Quasi Random Word Patterns), 2E15 PRBS, 2E23 PRBS (Pseudo Random Bit Sequence), and WORD is a payload dependent eight or twenty-four bit pattern. When the receiver is configured for DS1 or VT1.5 a twenty-four bit pattern is expected. The DS3 payload configuration expects an eight bit word pattern. Use the arrow keys to move the cursor and the enter key to make the selection. The second line of the STS-3c and STS-12c displays, illustrated in Figure 3–14, indicate the pattern found. The word UNKNOWN will be displayed when a pattern search is in progress, when live traffic is present, or when no pattern can be detected. 3–16 ST112 SONET Transmission Test Set Artisan Technology Group - Quality Instrumentation ... Guaranteed | (888) 88-SOURCE | www.artisantg.com LCD Menus and Displays Framing, Receiver Figure 3–15 Framing, Receiver The four Framing LCD displays shown in Figure 3–15 are payload dependent. The top line of each RX FRAME display indicates the payload (DS1, DS3, STS-3c, or STS-12c). The DS1 and DS3 payloads require manual selection from the list of available patterns. The STS-3c and STS12c FRAME is displayed without selections. Payload Error Display, Receiver Figure 3–16 Payload Error Displays, Receiver Pressing the Error key in the light gray area of the receiver will display the ELAPSED TIME of the test cycle. Pressing it a second time will display the payload errors. Illustrated in Figure 3– 16 are the 12c and DS1 payload error displays. The DS3 and 3c error displays are not illustrated but they are the same and only one payload error display will be accessible when its respective payload is selected. The payload error display shows the TOT (total) errors that occurred during the test cycle and the current BER (Bit Error Rate). NOTE: The Bit Error Rate is displayed as a negative exponent. An error rate of 1.0E–6 would equate to the decimal number derived from sending one errored bit in a million bits. In other words, one divided by one million would equal 0.000001 or 1.0E–6 decimal. ST112 SONET Transmission Test Set 3–17 Artisan Technology Group - Quality Instrumentation ... Guaranteed | (888) 88-SOURCE | www.artisantg.com LCD Menus and Displays Figure 3–17 DSX-3 Payload Error Displays, Receiver Figure 3–17 illustrates the DSX-3 Error Measurement Displays. Figure 3–18 DSX-1 Payload Error Displays, Receiver Figure 3–18 illustrates the DSX-1 Error Measurement Displays. 3–18 ST112 SONET Transmission Test Set Artisan Technology Group - Quality Instrumentation ... Guaranteed | (888) 88-SOURCE | www.artisantg.com LCD Menus and Displays Transmitter Menus and Displays OUTPUT Menu and Display The transmitter has two output keys, one for the electrical selections and one for the optical selections. Pressing the key labeled OUTPUT will access the TX ELECTRICAL OUTPUT menu, shown at the top of Figure 3–19. Use the arrow keys to move the cursor between the two cross connect transmitter electrical outputs, STSX-1 or the DSX-3. The LED in the ENTER key will flash whenever the cursor is moved. Press the ENTER key to activate the selection. Figure 3–19 Output Menu and Display Pressing the OUTPUT key a second time will display the current configuration, shown at the bottom of Figure 3–19. This two line display will change whenever the configuration changes. On the top left it indicates that the signal is an electrical STSX-1 rate. On the bottom left it indicates that VT1.5 Bit mapping is the selected payload. The top right side of the same display shows that the (CHAN VT:) Virtual Transport Channel (sub-channel) selected is number one, in this example. On the lower right side of the display is the Framing Pattern (UFM) and the Test Pattern (QRW) are shown. Use this display to see the transmitted configuration, at a glance. Configuration changes made in the quick setup menus will be displayed, whether or not they are electrical. Both displays shown in Figure 3–19, TX ELECTRICAL OUTPUT and the Current Configuration, are accessed by pressing the OUTPUT key. Sometimes, when the output key is pressed, the configuration display will be first. A second push of the output key will switch to the TX ELECTRICAL OUTPUT menu. Optical Output Menu Displays Figure 3–20 Optical Output LCD Menu The TX OPTICS menu (Figure 3–20) can be accessed by pressing the transmitter optical output key in the LASER ON area. It is in the transmitter area to the left of the three yellow LED indicators labeled: OC-1, OC-3, and OC-12, respectively. Use the arrow keys to move the cursor and the ENTER key to activate the laser. The appropriate LED will illuminate indication your selection. Units without the OC-12 option will not have an OC-12 on their menu or an OC-12 LED on their front panel. ST112 SONET Transmission Test Set 3–19 Artisan Technology Group - Quality Instrumentation ... Guaranteed | (888) 88-SOURCE | www.artisantg.com LCD Menus and Displays Overhead Menus, Transmitter Figure 3–21 Transmitter Overhead Menus The transmitter overhead byte menus can be used to edit various SONET overhead bytes. Pressing the OVHD (overhead) key will scroll through the Section (SECT), Line (LINE), and Path (PATH) overhead bytes shown on the left side of Figure 3–21. The top line of each display identifies the designated SONET overhead byte. The bottom line displays the current value of those bytes. Use the arrow keys to position the cursor and the INC and DEC to change values. The enter key LED will flash when a byte value is changed. Press the ENTER key to set the new value. Three menus in of Figure 3–21 show the words TRACE EDIT (J1), H1 EDIT, and APS EDIT. They have short arrows pointed to their respective edit menus. In each one use the arrow keys to move the cursor to the word EDIT, and press the enter key to began the edit session. 3–20 • The J1 Trace Edit menu is used to add an ASCII message, clear the J1 Trace Field, or fill it with any hexadecimal code. Use the arrow, INC and DEC, and ENTER keys to select, change, and store values. Press the OVHD key to return to the LINE APS menu. • The H1 SS Bits (bits 5 and 6 of the H1 byte) can be changed to either a binary one or zero. Use the arrow, INC and DEC, and ENTER keys to select, change, and store values. Press the OVHD key to return to the LINE APS menu. • The LINE APS menu is used to access and change the Automatic Protection Switching bytes. Position the cursor over the word EDIT (Figure 3–21, LINE APS menu) and press the enter key. The APS menu illustrated on the lower right side of Figure 3–21 will be displayed. Use the arrow, INC and DEC, and ENTER keys to select, change, and store values. Press the OVHD key to return to the LINE APS menu. ST112 SONET Transmission Test Set Artisan Technology Group - Quality Instrumentation ... Guaranteed | (888) 88-SOURCE | www.artisantg.com LCD Menus and Displays Mapping Menus, Transmitter Figure 3–22 Mapping Menus, Transmitter Press the transmitter key labeled MAPPING to display the payload mapping choices, shown in Figure 3–22. The ST112 SONET Transmission Test Set transmitter mapping conforms to ANSI and Bellcore standards. The mapping can be divided into three groups: • Concatenated (STS-12c or STS-3c) • VT1.5 (1.544Mb/s Virtual Tributary) • DS3 (44.736 Mb/s ASYNC signal) The INC (increment) and DEC (decrement) keys are used to scroll through the choices. The ENTER key is used to select one of the maps. The LED indicator in the enter key will flash whenever a selection is requested or required. Three yellow LED indicators identify which mapping is active: DS3, VT, or 3c/12c. Additional menus, configuration dependent, may be accessible with each push of the transmitter MAPPING Key. When the OC-3 rate with a VT1.5 payload is selected, for example, three menus shown in Figure 3–23 will be displayed. They are used to select the active VT1.5 sub-channels and configure the payload. But when an OC-3 rate with a DS3 payload is configured from the Quick Setup menu, then only one map will be displayed, INT DS3 for example. Figure 3–23 VT1.5 Mapping Menus, Transmitter ST112 SONET Transmission Test Set 3–21 Artisan Technology Group - Quality Instrumentation ... Guaranteed | (888) 88-SOURCE | www.artisantg.com LCD Menus and Displays Timing, Transmitter Figure 3–24 Timing The ST112 SONET Transmission Test Set provides for five TIMING sources, detailed below. Switching, disconnecting, or any other loss of timing can cause a TX: LOSS OF SONET CLOCK message to appear momentarily or periodically switch on and off. • ASYNC provides internal timing for the test set. • The numbers 52 or 155 refers to the respective rear panel transmitter input. There is one 52Mb/s clock input and one 155 Mb/s clock input. • BITS extracts the timing from an incoming BITS DSX-1 signal connected to the rear panel 100 ohm input provided. A second LCD menu, TX V1.5/BITS INPUT will be displayed when BITS is selected. It is used to configure this rear panel input for normal termination (TERM) or a low level input from a network element’s MONITOR output. • LOOP, as the name implies, is LOOP timed to the receiver’s incoming SONET signal, optical or electrical. Pointer, Transmitter Figure 3–25 Pointers, Transmitter Pressing the POINTER key on the transmitter side of the front panel will display the TX PTR (Transmitter Pointer) menus shown in Figure 3–25. The SPE and VT pointers keep track of the starting positions of their respective payloads. In the SPE pointer menu the number 522 under the PTR label represents the current pointer value, located in the H1 and H2 bytes. It is the offset between the H3 byte and the J1 byte, the first byte of the STS SPE. The number 522 under the NDF label is a variable value that can be changed to generate a new pointer value. When it is changed a NDF (new data flag) will be set and the pointer value under the PTR label will change. Use the arrow keys to position the cursor, the INC and DEC keys to set to any number from 0 to 782, and the enter key to execute the change. Moving the cursor to either +PJ or –PJ and pressing the enter key will generate a change in pointer value. The VT pointer menu in Figure 3–25 is only accessible in the ST112 Test Set’s VT1.5 mode. The value 78, under the PTR label, indicates the position of the V5 byte. In this Test Set all 28 VT pointers are set to the same value. The VT pointer can be set to any value from 0 to 103. Use the arrow keys to position the cursor, the INC and DEC keys to change the value, and the enter key to execute the change. Move the cursor to either +PJ or –PJ and press the enter key to 3–22 ST112 SONET Transmission Test Set Artisan Technology Group - Quality Instrumentation ... Guaranteed | (888) 88-SOURCE | www.artisantg.com LCD Menus and Displays generate an incremental change in pointer value. Changing the pointer value incrementally will not generate a NDF (new data flag) in the V1 and V2 bytes. Alarm Generation Menus, Transmitter Figure 3–26 Alarm Generation Menus, Transmitter The transmitter ALARM key is used to select one of the following alarm menus shown in Figure 3–26: LOSS OF SIGNAL (LOS), ERRORED FRAME, LINE RDI (FERF), LINE AIS, PATH AIS, PATH-RDI, LOSS OF SPE POINTER, OUT OF RANGE SPE POINTER, VT PATH AIS, VT PATH-RDI, and LOSS OF VT POINTER. The alarm conditions are defined in the Bellcore GR-253-CORE standard. • LOSS OF SIGNAL: can be set to occur for a specified amount of time and will be injected each time that the ENTER key is pressed. Use the left and right arrow keys to move the cursor, and the INC and DEC keys to increase or decrease the LOS time from 1 to 150 microseconds. Moving the cursor to any of the three digits (100 in this example) and holding the INC or DEC key will cause the numerical value to scroll. Releasing the INC or DEC key, or reaching the limit, will stop the scroll. Each of the other alarm menus have the following parameters (The alarm Loss of the SPE Pointer only has the OFF and CONT (continuous) conditions): • OFF: The alarm is disabled. • CONT: Turns the alarm condition on continuously, generating a hard failure. Use the right arrow key to move the cursor to CONT and the enter key to activate the alarm. Then use the left arrow key to move the cursor back to OFF and the enter key to turn the alarm off. Using the alarm key to leave the menu will not turn the alarm off. Additional alarms can be activated at the same time, simulating multiple failures. ST112 SONET Transmission Test Set 3–23 Artisan Technology Group - Quality Instrumentation ... Guaranteed | (888) 88-SOURCE | www.artisantg.com LCD Menus and Displays • BURST: Sets the duration of the alarm for the number of frames specified (nnn FRAMES), ten in the Figure 3–26 example. Position the cursor using the left and right arrow keys. Use the INC and DEC keys to change the value from 1 to 255 frames. Pressing the enter key while the test is running generates the alarm condition. Only a single burst can be generated at a time. Error Generation Menus Figure 3–27 Error Generation Menus Pressing the transmitter ERROR key will scroll through the menus shown in Figure 3–27 when the OC-12 rate and the VT1.5 Payload is selected. Each configuration made from the Quick Setup Menu will provide a similar set of Error Menus. The arrow keys are used to move the cursor when selecting menu items. The INC and DEC keys are used to change values. The ENTER key is used to execute the function. Enabling any error will disable all other active errors. The error rate ranges from 1.0E–3 to 1.0E–9. The ERROR RATE OUT OF RANGE message will be displayed whenever an error rate greater or smaller than the range is inserted. Data Communications Channel–Orderwire (DCC/OW) Figure 3–28 DCC/Order Wire Configuration Menus, Transmitter Data or voice can be transmitted from a device connected to the rear panel DCC/OW connector on the Section or Line DCC or Order Wire channels. Pressing the transmitter DCC/OW key one or more times will access the configuration menus shown in Figure 3–28. The DCC (Data Communications Channel) can be configured for OFF, SECTION, or LINE. Generally: 3–24 • DCC is used to transfer data between NE (network elements) and ORDERWIRE is used for voice communications. • Voice can be transmitter in either the LOCAL or EXPRESS ORDERWIRE. ST112 SONET Transmission Test Set Artisan Technology Group - Quality Instrumentation ... Guaranteed | (888) 88-SOURCE | www.artisantg.com LCD Menus and Displays LOCAL refers to the connection between two adjacent devices (such as a regenerator and a NE or two adjacent regenerators) and EXPRESS indicates that the connection is between two Network Elements with regenerators in between them. Communications between two Network Elements (NE), without any regenerators between them, can use either a LOCAL or an EXPRESS connection. DS, VT, STS, 3c, and 12c Transmitter Menus The three keys in this section (PATTERN, FRAMING, and ERR/ALM) are used to configure the transmitter payload content. Pattern Menus, Transmitter Figure 3–29 Pattern Menus, Transmitter The LCD menus illustrated in Figure 3–29 are used to generate payload test patterns. The actual LCD Menus are configuration dependent. This set is accessible when the OC-3 or OC-12 rates, and the DS3, VT1.5, OC-3c, or OC-12c payloads are selected. The top two TX PATTERN menus on the left side of Figure 3–29 are used to test the DSX1/VT1.5 and the STS-3c payloads. The test patterns available DSX-1/VT1.5 menu, illustrated in Figure 3–29, are: QRW (Quasi Random Word), two Pseudo Random Bit Sequences (2E15 and 2E23), and a six character hexadecimal word (wd440004 in this example). Use the arrow keys to select the pattern and the ENTER key to enable the chosen pattern, before or during the test cycle. Two test patterns are available from the STS-3c menu, 2E23 and 2E23 INV (inverted). They are Pseudo Random Bit Sequences. The third menu on the left side of Figure 3–29 is used to access the TX STRESS PATTERN menus for DSX-1 network testing. Press the ENTER key to access the first of nine TX STRESS ST112 SONET Transmission Test Set 3–25 Artisan Technology Group - Quality Instrumentation ... Guaranteed | (888) 88-SOURCE | www.artisantg.com LCD Menus and Displays PATTERN menus, and the pattern key to scroll through them to the desired test pattern. Then press the ENTER key to make it active. When a stress pattern is active the word ACTIVE preceded by an asterisk can be seen in the lower right side of the menu. Such as the one illustrated in the STANDARD PATTERN of this example. TX Stress Patterns The ST112 SONET Transmission Test Set includes additional patterns to provide more ways to stress-test DS1 circuits. Telecommunications research notes that the QRW (Quasi Random Word) test pattern, universally used for out-of-service testing of DS1 circuits, is not up to the task of determining the true performance of DS1 circuits used for the transport of digital services. The span line repeater continues as a major component of the T-Carrier network. For this reason, the majority of tests that have evolved are designed to ensure the performance of them under live traffic conditions. Since most network equipment contains regeneration and timing recovery functions, similar to those of these repeaters, the tests originally developed for them have proven suitable for testing all network equipment. The following are Stress Test patterns that can be transmitted: 3–26 • The Daly patterns (DALY-1, DALY-2, and DALY-3) is a version of the 55-octet pattern, developed by Tom Daly, that has been modified to meet pulse density standards when framed on octet boundaries. The Daly pattern has been found useful for stressing the timing recovery circuits of line cards and the preamplifier-equalizer circuits of repeaters utilizing discrete component ALBOs (Automatic Line Build-Outs). A Daly pattern stresses a circuit by introducing rapid transitions from long sequences of low density octets to high density octets, high density octets to low density octets, and rapid 1-0-1-0 transitions. • The 1-IN-8 pattern, containing strings of seven sequential zeros, is used on a circuit equipped with B8ZS to determine the ability of a circuit to handle payload signals having a minimum ones density. Use of this pattern will often reveal the existence of timing recovery problem under conditions of low signal density. • The 2-IN-8 pattern is used to verify the correct optioning of the circuit for AMI or B8ZS line coding. • The framed all-ZEROS pattern is useful as a final confirmation that all network elements in a circuit are properly optioned with B8ZS for clear channel operation. The framed all-ZEROS pattern should not be used until all other tests have been successfully completed. Transmission of an all-ZEROS pattern through some DS3 equipment, may cause DS1 failure if the DS3 equipment is not properly optioned for B8ZS (clear channel) operation. • The primary DS1 test pattern for many years, the QRW (Quasi Random Word) is the basic pattern used for testing DS1 circuits and equipment to verify continuity and performance. The QRW pattern is also the standard pattern recommended for use when performing jitter measurements at DS1. • the All-ONES pattern consists of a series of consecutive “ones”. For tests of T1 span lines, the all-ONES pattern causes the span line repeater to consume the maximum amount of power. If the DC power delivered to a regenerator is incorrect, transmission errors may occur as a result of insufficient pulse power or distorted pulse shapes of the all-ONES signal output of a regenerator. ST112 SONET Transmission Test Set Artisan Technology Group - Quality Instrumentation ... Guaranteed | (888) 88-SOURCE | www.artisantg.com LCD Menus and Displays • The 3-IN-24 pattern is used to determine the ability of network equipment to function properly when transporting signal sequences containing both minimum density and a maximum of fifteen consecutive zeros during periods of minimum overall pulse density. Valuable for testing AMI circuits, the 3-IN-24 pattern is of little use of circuits equipped with B8ZS options for clear channel operation. Framing Menu, Transmitter Figure 3–30 Framing Menu, Transmitter The FRAMING menus illustrated in Figure 3–30 are used to select framing for the DSX-1, VT1.5, and DS3 payloads. The TX DS1 FRAME DSX-1/VT1.5 (top) menu has four possible choices are: UNFRM (Unframed), SF (Super Frame), ESF (Extended Super Frame), and SLC96 (Subscriber Loop Carrier 96). The TX DS3 FRAME menu offers three choices: M13 (M1-3), CBIT (C-BIT), UNFRM (Unframed). Payload Error-Alarm Menu, Transmitter Press the ERR/ALM key, located in the light gray transmitter area, to display the available payload Error and Alarm menus. They are rate and payload dependent. The top one on the left and the two center ones illustrated in Figure 3–32 will become accessible when the test set is configured for the OC-12 rate with a 3c payload. The top one on the right and the two center ones (Figure 3–32) will become accessible when the test set is configured for the OC-12 rate with a 3c payload. Other menus, some of which are shown in Figure 3–32, will become accessible with other rate and payload configurations. Figure 3–31 Payload Error-Alarm Menu, Transmitter Each SINGLE ERR menu (Figure 3–32) has two fields on the top line. The left field has the label, SINGLE ERR. And the right field contains the number of errors received during the test cycle, RX 12c:0 in the top right sample menu. The bottom line of the menu has multiple selections. For any particular configuration, only the active ones are shown. Inactive ones are replaced with dashed lines. The three dashed lines shown in the top right field of the top left menu, in Figure 3–32, indicate that the receiver section of the ST112 Test Set is not configured for a DS1 payload. That field will ST112 SONET Transmission Test Set 3–27 Artisan Technology Group - Quality Instrumentation ... Guaranteed | (888) 88-SOURCE | www.artisantg.com LCD Menus and Displays change to RX DS1:0 when the Test Set is configured for DS1 mapping. The top right field of the top right menu indicates that receiver is configured for 12c payload mapping. Use the arrow keys to position cursor over either the DS1 or the STS-12c selection and press the enter key to inject a single bit error. The RX (receiver) error count field, in the SINGLE ERR menu, is limited to three digits. An asterisk will be displayed in the left most digit position when the count exceeds 999 telling the operator that the count is not valid. This error count field is transmitter independent but it can provide limited immediate feedback when used in conjunction with it during a loop-back test, for example. The total error count and bit error rate can be obtained by pressing the receiver payload ERROR key. Figure 3–32 DSX-3 Error-Alarm Menu, Transmitter Figure 3–32 shows the Error-Alarm LCD menus that will be displayed when the test set is configured for DSX-3 cross connect, each functions as follows: 3–28 • This SINGLE ERR menu is used to inject one single bit error into the DS3 payload by positioning the cursor around the DS3, on the second line of the display, and pressing the enter key. The left side of the top line provides the display name, but the right side indicates the number of DS3 bit errors received during the test cycle, 42 in this example. This same menu is used to inject a single bit error into the DS1 when a DSX-1 cross connect signal is configured. The DSX-3 or DSX-1 electrical signals will be transmitted from the designated front panel connectors. • DS1/VT BIT ERROR RATE menu is used to set the rate that will be used during the test cycle. Use the left and right arrow keys and the enter key to set the error rate from 1.0E–9 to 1.5E–3. An ERROR RATE OUT OF RANGE message will be displayed when the enter key is pressed for any out of range setting and the nearest valid setting will be forced. ST112 SONET Transmission Test Set Artisan Technology Group - Quality Instrumentation ... Guaranteed | (888) 88-SOURCE | www.artisantg.com LCD Menus and Displays • DS3 BIT ERROR RATE menu is used to set the rate that will be used during the test cycle. Use the left and right arrow keys and the enter key to set the error rate from 1.0E–9 to 1.5E–3. An ERROR RATE OUT OF RANGE message will be displayed when the enter key is pressed for any out of range setting and the nearest valid setting will be forced. • DSX-3 BPV ERROR RATE menu is used to set the rate that will be used during the test cycle. Use the left and right arrow keys and the enter key to set the error rate from 1.0E–9 to 1.5E–3. An ERROR RATE OUT OF RANGE message will be displayed when the enter key is pressed for any out of range setting and the nearest valid setting will be forced. • DSX-3 SINGLE menu is used to inject one single Bipolar Violation each time the enter key is pressed during the test cycle. The left side of the top line provides the display name, but the right side indicates the number of BPV errors received during the test cycle. The *07 (asterisk-zero-seven) in this example shows that the number 7 is invalid because the three digit counter has rolled over at least one time. Restarting the test cycle will clear the counter. • DS3 ALARMS menu is used to inject one of three payload alarms: YELLOW, AIS, or IDLE • YELLOW is generated by setting the x-bits to zero. • AIS, the Alarm Indication Signal, generates a framed 1010... sequence in the DS3 payload. • IDLE generates a framed 1100... sequence in the DS3 payload. • DS3 PATH ALARMS PARITY is used to inject a burst of parity errors. The number of parity errored frames (FRM) can be set from 1 to 511 and will be injected each time the enter key is pressed during the test cycle. Use the arrow keys to position the cursor and the INC (increment) and DEC (decrement) keys to change the number of frames. • DS3 PATH ALARMS SEF is used to inject a burst of severely errored frames with either M13 or CBIT framing. The number of frames (FRM) can be set from 1 to 511 and will be injected each time the enter key is pressed during the test cycle. Use the arrow keys to position the cursor and the INC (increment) and DEC (decrement) keys to change the number of frames. • DS3 PATH ALARMS YELLOW is used to inject a burst of the yellow alarm. The number of frames (FRM) can be set from 1 to 511 and will be injected each time the enter key is pressed during the test cycle. Use the arrow keys to position the cursor and the INC (increment) and DEC (decrement) keys to change the number of frames. • DSX-3 LOSS OF SIGNAL is used to generate a loss of the DSX-3 cross connect signal for a period of 1 to 150 microseconds each time the enter key is pressed during the test cycle. Use the arrow keys to position the cursor and the INC (increment) and DEC (decrement) keys to change the period of the LOS. • DS1 ALARMS is used to generate the AIS or RAI payload alarms. Use the arrow keys to position the cursor and the enter key to inject the alarm during the test cycle. • AIS, the Alarm Indication Signal, generates a unframed 1111... sequence in the DS1 payload. • RAI generates a Remote Alarm Indication in the DS1 payload. The term YELLOW preceded the RAI designation. ST112 SONET Transmission Test Set 3–29 Artisan Technology Group - Quality Instrumentation ... Guaranteed | (888) 88-SOURCE | www.artisantg.com LCD Menus and Displays NOTE: The Bit Error Rate is inserted as a negative exponent. An error rate of 1.0E–6 would equate to the decimal number derived from sending one errored bit in a million bits. In other words, one divided by one million would equal 0.000001 or 1.0E–6 decimal. 3–30 ST112 SONET Transmission Test Set Artisan Technology Group - Quality Instrumentation ... Guaranteed | (888) 88-SOURCE | www.artisantg.com Virtual Front Panel This chapter describes the use of ST112 SONET Transmission Test Set terminal displayed menu structures, accessed by using a VT100 or VT100 terminal emulator. These full screen displays provide more information than individual LCD displays and can be used with a remote or local terminal. There are separate sections, in this chapter, that detail setup, receiver, and transmitter specifics. Artisan Technology Group - Quality Instrumentation ... Guaranteed | (888) 88-SOURCE | www.artisantg.com Virtual Front Panel Terminal Type and Setup Before reviewing this chapter, connect the three ST112 SONET Transmission Test Set front panel receiver inputs (one laser and two electrical) to their appropriate front panel transmitter outputs. Any one of the electrical outputs for DSX-1 and DSX-3 will work. Be sure to read and observe all of the appropriate safety rules in chapters 1, 2, 3, and 4. The Test Set can display its Virtual Front Panel (VFP) on a VT100 terminal that has a 24 line 80 column display, or on a personal computer (PC) running VT100 emulation software. Standalone communication applications such as Procomm®, Crosstalk®, or the Terminal software bundled with Windows® will run the Test Set VFP. Some applications may not have a VT100 selection. Crosstalk 2.0 for Windows offers a VT-102 terminal selection that is VT100 compatible. The communication software documentation should identify their VT100 compatible emulators. All references to the word terminal in this manual mean any VT100 compatible terminal or PC running VT100 emulation software. Figure 4–1 ST112 SONET Transmission Test Set Terminal Connection Use an RS-232-C modem cable to connect the serial port of the terminal and the Test Set, as shown in Figure 4–1. The cable must have a 25 pin D-type plug, for the Test Set, and the appropriate mating connector for the terminal or selected PC port. Chapter 6 External Controllers and Printers provides ST112 SONET Transmission Test Set port pinouts, this chapter, and Chapter 3 (LCD Menus and Displays) details the port settings. RS-232-C Port Settings Use the Quick Set-up menus detailed in Chapter 3 LCD Menus and Displays to set the ST112 SONET Transmission Test Set RS-232C port as follows: Baud Rate 9600 b/s End of Line CR-LF Parity None XON/XOFF ON Data Bits 8 Bit Local Echo ON Access the QUICK SETUP menu by pressing the front panel SETUP key. Continue pressing the SETUP key until the AUXILIARY SETUP menu is displayed, then push the ENTER key. Continue pressing the SETUP key until the RS-232-C (RS 232) BAUD menu is displayed, beginning the RS-232-C port configuration menus. Use the arrow keys and the enter key to configure the port as shown above. The new settings will be retained when the Test Set is powered off. If the selections described above are already set correctly, use the setup key to move to the next menu. Press any other key to exit the quick setup menu system. Use the same settings for your terminal. 4–2 ST112 SONET Transmission Test Set Artisan Technology Group - Quality Instrumentation ... Guaranteed | (888) 88-SOURCE | www.artisantg.com Virtual Front Panel Terminal Set Up After reviewing the documentation that came with your terminal or terminal emulator, configure the serial port using the same settings listed above, with the following additions: Local Echo OFF Stop Bits 1 Function keys that may have been changed by the terminal emulator, other software, or communication application may need to be reset to their default values. Other options, such as those that hide or turn off the cursor may also need to be reset. Additional settings recommended for the Windows 3.1 Terminal Software or other communication packages may be available from Tektronix Customer Support. Remote Modem Connections Remote connections using modems should use the same configuration and will operate identically with the addition of the modem set-up and dialing commands. The recommended speed between the ST112 SONET Transmission Test Set and its local modem, and the VT100 and its local modem is 9600 baud, though lower baud rates are supported. Communications Initiation Pressing the enter key on the terminal or PC should cause the Test Set prompt to appear on the terminal screen. ST112> If it does not, or if a message appears, indicating that the input was lost, verify the port parameter settings for the ST112 SONET Transmission Test Set and the terminal. Verify that the Test Set RS-232 ECHO is enabled using the setup LCD menu. Verify that the RS-232C interface cable is properly connected. When the Test Set prompt appears on the screen, type either: VT100 (when using a VT100 compatible terminal) PC100 (when using an IBM compatible PC) The difference between the VT100 and the PC100 commands are the character sets used to draw lines and boxes. Standard ASCII characters are used when the PC is running a VT100 emulator. Special PC graphic characters are used in the PC100 mode. After entering either command the ST112 SONET Transmission Test Set will draw the VFP on your terminal or PC screen, as illustrated in Figure 4–2, and throughout the next section. If your display looks different, type CTRL Q to quit and try the other command. ST112 SONET Transmission Test Set 4–3 Artisan Technology Group - Quality Instrumentation ... Guaranteed | (888) 88-SOURCE | www.artisantg.com Virtual Front Panel Screen Displays All of the screens illustrated in this chapter are shown as either full 24 lines by 80 column screens, or partial screen that focus on the individual example. All are intended to illustrate current samples and provide simplified explanations. Some minor differences in location, size, and shape may occur. Setup and Current Configuration Screen Figure 4–2 Virtual Front Panel (VFP) Setup Display The setup display, shown in Figure 4–2, is divided into six areas. On the upper left there is a list of submenus (in this example, the list begins with: (q) Quick Setup, (w) Time, (r) DSX Line Code; and, the list ends with (m) Current Configuration. Pressing the appropriate key (q, w, r, ..., m) on the keyboard will access these submenus. Menu keys are only active when they are displayed. The Current Configuration, at the top center of Figure 4–2, is a read-only display. It shows the transmitter and receiver selections that were made in other menus. The m key returns it to the top center display after using any other menu. The ST112 SONET Transmission Test Set front panel status LED indicators are replicated on the right side of the display (Figure 4–2). The Section, Line, Path, VT Path, and Payload indicators are preceded by an asterisk, period, or the letter H indicating their respective status— on, off, or history. 4–4 ST112 SONET Transmission Test Set Artisan Technology Group - Quality Instrumentation ... Guaranteed | (888) 88-SOURCE | www.artisantg.com Virtual Front Panel Receiver Error Summary data is shown in the center of the display (Figure 4–2), below the Current Configuration. Listed are the error totals for B1, B2, B3, and the Payload Bit Error Count and Rate (BER). NOTE: Bit Error Rates are displayed as a negative exponent. An error rate of 1.0E-6 would equate to the decimal number derived from receiving one errored bit in a million bits. In other words, one divided by one million would equal 0.000001 or 1.0E-6 decimal. Along the bottom, are the function and control keys, and a message and status display area. Function and Control Keys, VFP Along the bottom of the display shown in Figure 4–2 are the function and control keys. Three function keys and one control key are used to access four VFP screens. TX SETUP (F1) RX SETUP (F2) RESULTS (F3) SETUP (CTRL-T) These four menus will be detailed under their appropriate headings in this chapter. Two additional control keys are used as switches. The CTRL-R will run and stop receiver test cycles and CTRL-P will pause and resume them. Starting a test cycle will erase all previously collected data. Stopping or pausing a test cycle will not affect the stored data. When CTRL R is used to start the test the following message may be displayed across the bottom of the screen if the error log buffer is full: ERROR LOG IS > THAN 95% FULL TO CLEAR IT HIT KEY “Y” OTHERWISE HIT KEY “N” Select Y for yes or N for no, when prompted. When the error log is full, no additional data can be stored. Pressing CTRL R while a test is running will stop the test and disable the error log. CTRL P is used to pause the test and maintain the current error log. Pressing CTRL P again will restart the test in progress. The words STOPPED, RUNNING, or PAUSED will appear under the appropriate control key, indicating the test status. Test cycles stopped with CTRL-R may be restarted with the pause-run-resume sequence, saving previously stored data. Press CTRL-P, CTRL-R, and CTRL-P, in that order. Stored data can be seen in the RX Error Summary or by pressing the F3 function key. CTRL-T returns to the setup menu (Figure 4–2). The last two control keys interrupt the VFP. The CTRL-Z is used to refresh the VT100 display and CTRL-Q exits the Virtual Front Panel program. Refreshing the display or exiting the VFP will not alter any of the ST112 SONET Transmission Test Set settings. If the receiver test cycle was running when the VFP session ended, it will still be running the same test cycle when the VT100 Virtual Front Panel is reentered. Avoid using the front panel controls and LCD menus whenever the Virtual Front Panel is in use, because those changes may not be updated in the VFP display. If this situation occurs, quit and restart the VFP software. NOTE: Some communication software packages and VT100 emulators allow the user to define special keys—such as function, control, arrow, and others. These unique settings may cause VFP problems—disable them before starting the VFP. ST112 SONET Transmission Test Set 4–5 Artisan Technology Group - Quality Instrumentation ... Guaranteed | (888) 88-SOURCE | www.artisantg.com Virtual Front Panel Configuration Submenus After starting the ST112 SONET Transmission Test Set Virtual Front Panel software, press the CTRL T keys to access the SETUP menu list, shown on the left side Figure 4–2. The CURRENT CONFIGURATION and RX ERROR SUMMARY displays, center of Figure 4–2, will change with the selections made in the appropriate setup menus and described later in this chapter. Other setup submenu selections are made from the upper left side of the display by typing the appropriate letter: q, w, r, t, y, or u. The letter m will return to the Current Configuration display. Quick Setup Figure 4–3 VFP Quick Setup Display Menu WARNING! Before activating the LASER, its output must be connected to a circuit. Always replace the screw caps when the optical outputs are not in use. The QUICK SETUP menu, shown in Figure 4–3, offers three electrical and three optical rates. DSX-1 (DSX1) and DSX-3 (DSX3) are two asynchronous cross-connect electrical rates. STSX-1 (STSX1) is the synchronous cross-connect electrical rate. Either a DS3 or VT1.5 payload can be chosen for the STSX-1 rate. DSX-1 is always available at the front panel. Either DSX-3 or STSX-1 will be available depending on the QUICK SETUP menu choice made. Whenever installed and enabled, the optical rates: OC-1 (OC1), OC-3 (OC3), and OC-12 (OC12), are also front panel available. In addition to the DS3 and VT1.5 payloads for all of the Optical Carrier Rates, the 3c payload is available for the OC-3 rate and the 3c and 12c payloads are available for use with the OC-12 rate. Signals and payloads that conform to industry standards can be mapped and configured with test patterns using other menus, detailed later in this chapter. 4–6 ST112 SONET Transmission Test Set Artisan Technology Group - Quality Instrumentation ... Guaranteed | (888) 88-SOURCE | www.artisantg.com Virtual Front Panel Time Menu Figure 4–4 VFP Time Setup Menu The date and time sub menu (w) is selected by pressing the letter w on the keyboard. This display is used to enter the year (YY), month (MM), day (DD), hours (HH) minutes (MM), and seconds (SS). The year is four digits, all the rest are two. All changes are immediately entered into a battery backed memory, and will be retained even when the Test Set is powered off. DSX-1 Line Code Setup Menu Figure 4–5 VFP DSX-1 Line Code Setup Menu The DSX-1 (DSX1) LINE CODE SETUP menu, shown in Figure 4–5, is used to configure the DSX-1 signals with either AMI (Alternate Mark Inversion) or B8ZS (Bipolar 8 Zero Substitution) line codes. Both can be used to test T-1 compatible networks and network elements. ST112 SONET Transmission Test Set 4–7 Artisan Technology Group - Quality Instrumentation ... Guaranteed | (888) 88-SOURCE | www.artisantg.com Virtual Front Panel Store and Recall Menu Figure 4–6 VFP Store / Recall Setup Menu The submenu shown in Figure 4–6 is used to STORE and RECALL the Test Set system configurations. In this example, pressing the F4 function key will recall a previously stored configuration named My Test, from memory location number (5) five. The F4 function key request will remain hidden until the cursor is moved to the STORE/RECALL menu item. Then it will be pressed to execute the selected function, RECALL in this example. Up to 10 individual user setups can be saved in memory location 0 to 9. A unique 10 character label can be stored with each saved setup. The arrow keys are used to move the reverse video cursor between variables. When the cursor is positioned at the LOCATION menu item, the number keys are used to select one of ten possible storage areas. If a unique name had been assigned to the location selected, it will not be displayed until the cursor is moved to the NAME menu item, where the name can be changed, or added, if none were assigned. 4–8 ST112 SONET Transmission Test Set Artisan Technology Group - Quality Instrumentation ... Guaranteed | (888) 88-SOURCE | www.artisantg.com Virtual Front Panel Timed Test Setup Menu Figure 4–7 VFP Timed Test Setup Display The TIMED TEST submenu (y) is selected by pressing the letter y on the keyboard. Use the up and down arrows to move between the MEASURE CONTROL and TEST TIME fields. Use the left and right arrows to move within the fields. Moving to the end of the TEST TIME field, with the left or right arrow, will switch to the MEASURE CONTROL field. Moving to the end of the MEASURE CONTROL field, with the left or right arrow, will not switch to the TEST TIME field. Use the number keys to change the time that the test will run for, in terms of days (DD), hours (HH), minutes (MM) and seconds (SS). The maximum test time supported is 9 days, 23 hours, 59 minutes, and 59 seconds. All changes are immediately entered into a battery backed memory, and will be retained even when the Test Set is powered off. ST112 SONET Transmission Test Set 4–9 Artisan Technology Group - Quality Instrumentation ... Guaranteed | (888) 88-SOURCE | www.artisantg.com Virtual Front Panel Print Report Setup Figure 4–8 VFP Print Report Setup Display Letter u is the PRINT REPORT SETUP submenu. Use the up and down arrow keys to move between fields. Use the left and right arrow keys to move within the field. The fields are used as detailed below. 4–10 • PRINT CONTROL: Use the left and right arrow keys to select one of four settings. OFF will not print any reports. ON ERROR will print a report when an error is detected. END TEST prints a report summary at the end of the test cycle. Or, BOTH will print a report when an error occurs and a summary at the end off the test cycle. Leaving the menu will enter the new value. • PRINT SQUELCH: Is used to reduce the total number of errors being logged. When squelch is ON the errors will be logged for 10 consecutive seconds, then stop. Error logging will resume when ten consecutive seconds have passed without error. Squelch ON saves memory and reduces lengthy error reports. The left and right arrows are used to position the reverse video cursor. Leaving the menu will enter the new value. • PRINT PORT is used to set the printer port to either parallel or RS232 (serial). The printer may be connected to the parallel port on the Test Set rear panel. Or the VT100 emulator can be used to set up the Test Set then use CTRL-Q to exit the VT100 program, and use the remote run command test_state run to initialize the test. This allows the test data to be fed back and made available for capture by a terminal emulator program. Many communications software programs support this procedure. The Test Set will still accept remote commands, such as test_state stop or test_state?, and VT100 commands, such as VT100 to restart the VFP. • CLEAR ERRORS: Is used to clear the error log by moving the cursor to YES and pressing the enter key. It immediately clears the error log and returns to NO after execution. The error log should be cleared before a test run because when the error log is full new errors will be discarded. Clearing the error log while the test is running will stop the test. • REPRINT CONTROL: Is used to print the previous error log ON ERROR, the previous end of test summary PREV–EOT, or the current error log CURR if it exist. ST112 SONET Transmission Test Set Artisan Technology Group - Quality Instrumentation ... Guaranteed | (888) 88-SOURCE | www.artisantg.com Virtual Front Panel Receiver Screens Receiver Setup and Current Configuration Figure 4–9 Virtual Front Panel (VFP) Receiver Setup The F2 key will access the receiver setup display, shown in Figure 4–9. It is divided into the same six areas previously described under the SETUP Screen. A different set of submenus are listed in the upper left field, now included are: • SETUP: Input (q); Optics (w); Mapping (r); and, VT1.5 Channel (t). • CONFIGURATION: VT1.5/DSX-1 Cfg (y); DS3/DSX-3 Cfg. (u); STS-3c Cfg (i); and the Current Cfg (m) detailed earlier in this chapter. • ANALYSIS: SPE Pointer (o); VT Pointer (p); TOH/POH (s); J1 Trace Message (g); APS Bytes (h); VT Channel Scan (j); and, Trouble Scan (n). ST112 SONET Transmission Test Set 4–11 Artisan Technology Group - Quality Instrumentation ... Guaranteed | (888) 88-SOURCE | www.artisantg.com Virtual Front Panel Input Setup Menu, Receiver Figure 4–10 Receiver Drop Configuration The INPUT menu (q) has five areas: INPUT SELECTION, RX AUTOMATIC INPUT MODE, BIPOLAR TERMINATION, DCC ACCESS, and ORDERWIRE. Use the up and down arrow keys to move the reverse video cursor between menu areas. Use the left and right arrow keys, and the enter key, to position the reverse video cursor on any selection within the menu area and select it. 4–12 • The INPUT SELECTION menu area has three electrical cross connect modes: STSX-1, DSX-3, and DSX-1. The OPTIC selection will activate the laser output (OC-1, OC-2, OC-3, OC-12) that is configured in the Optics Setup Menu (w—described later in this chapter). • The RX AUTOMATIC INPUT MODE is used to configure the receive to either the incoming payload (AUTOSEEK), or to the transmitter’s payload configuration (AUTOLINK). AUTOSEEK obtains payload Mapping, Pattern, and Framing from the incoming signal. AUTOLINK obtains that same information from the Test Set transmitter configuration. When either AUTOLINK or AUTOSEEK is on the VT100 menus for Mapping, Pattern, and Framing are inaccessible. • The BIPOLAR TERMINATION menu area is used to configure the receiver’s electrical inputs for either TERM (termination) or MONITOR mode. The TERM input terminates the electrical cross connect input signal. The MONITOR input configures the appropriate Test Set electrical input to accept a low level input from a network element’s monitor output. • DCC ACCESS is used to transfer data to and from a device connected to the ST112 Test Set’s rear panel DCC connector, and to and from network elements. The data can be transferred in either the SECTION or LINE DCC channel. • ORDERWIRE is used to communicate with a handset connected to the Test Set’s rear panel ORDERWIRE connector from and to network elements. LOCAL refers to the connection between two adjacent devices (such as a regenerator and a network element or two adjacent regenerators). EXPRESS indicates the connection between two network elements with or without a regenerators in between. ST112 SONET Transmission Test Set Artisan Technology Group - Quality Instrumentation ... Guaranteed | (888) 88-SOURCE | www.artisantg.com Virtual Front Panel Optics Setup Menu, Receiver Figure 4–11 Optics Menu The OPTICS Setup Menu (w) can only be accessed when the INPUT (q) is set to OPTIC. It provides four choices for OC-1 (OC1), OC-3 (OC3), OC-12 (OC12), and OC-48 (OC48). The OC-48 setting is only active when the ST112 SONET Transmission Test Set is used in the Combined (Dual) Mode, with an ST2400 2.4 Gb/s SDH/SONET Test Set. (The Combined (Dual) Mode Operation is detailed in the Applications Chapter of this manual.) Use the arrow keys to navigate through the menu (Figure 4–11), and the enter key to activate the selection. The STS CHANNEL area of the menu is used to select a valid STS Channel for analysis. The total number of Valid STS Channels will change with the Optical Rate Selected. Mapping Setup Menu, Receiver Figure 4–12 Receiver Payload Mapping Select Mapping menu (r) to access the ST112 SONET Transmission Test Set receiver payload maps shown in Figure 4–12 and detailed in the Bellcore GR-253-CORE standard. Use the arrow keys to position the reverse video cursor on one of the five maps shown. Then use the enter key to make the selection. The available maps are listed below: • DS3 (DS-3 Asynchronous Payload Mapping) • VT1.5 BIT FLOAT (DS-1 Asynchronous Payload Mapping, Float Mode) • VT1.5 BYTE FLOAT (DS-1 Byte Synchronous Payload Mapping, Float Mode) • STS-3c (STS-3 Concatenated Payload Mapping) • STS-12c (STS-12 Concatenated Payload Mapping) ST112 SONET Transmission Test Set 4–13 Artisan Technology Group - Quality Instrumentation ... Guaranteed | (888) 88-SOURCE | www.artisantg.com Virtual Front Panel VT1.5 Channel Setup Menu, Receiver Figure 4–13 Receiver VT1.5 Channel Configuration (VFP) Menu The last receiver setup menu, VT1.5 Channel (t), is shown in Figure 4–13. It is used to configure the VT1.5 channel format. It is only accessible when a VT map is selected from the receiver’s Mapping Menu (r). The VT CHANNEL NUMBERING at the top is used to map the virtual tributaries sequentially (1 to 28) or in a four by seven (4x7) matrix, in accordance with Bellcore GR-253-CORE (illustrated in Figure 4–13). The lower portion of this display shows that 28 channels are accessible (1-28) and that STS Channel 1 (in this example) is being analyze. Use the arrow keys to position the reverse video cursor, and the enter key to activate the menu choice. Figure 4–14 VT1.5 Structures VT1.5/DSX-1 Configuration Menu, Receiver 4–14 ST112 SONET Transmission Test Set Artisan Technology Group - Quality Instrumentation ... Guaranteed | (888) 88-SOURCE | www.artisantg.com Virtual Front Panel Figure 4–15 VT1.5/DSX-1 Configuration Menu, Receiver The VT100 menu, shown in Figure 4–15, is used to configure the receiver to the incoming VT1.5 or DSX-1 (DSX1) payload FRAMING and PATTERN that will be analyzed. In this example the UNFRM (Unframed) QRW (Quasi Random Word) has been selected. Additional DS1 FRAMING choices include SF (Super Frame), ESF (Extended Super Frame), and SLC96 (Subscriber Loop Carrier 96). Additional Patterns are two Pseudo Random Bit Sequence (2E15 and 2E23) and the 24 bit WORD. DS3/DSX-3 Configuration Menu, Receiver Figure 4–16 DS3/DSX-3 Configuration Menu, Receiver The VT100 menu, shown in Figure 4–16, is used to configure the receiver to the incoming DS3 or DSX-3 (DSX3) payload FRAMING and PATTERN that will be analyzed. In this example the M13 (M1-3) and 2E15 Pseudo Random Bit Sequence has been selected. Additional FRAMING choices include the CBIT (C-BIT) or the UNFRM (Unframed) configurations. Additional Patterns include 2E23 Pseudo Random Bit Sequence and the 8 bit WORD. ST112 SONET Transmission Test Set 4–15 Artisan Technology Group - Quality Instrumentation ... Guaranteed | (888) 88-SOURCE | www.artisantg.com Virtual Front Panel STS-3c Configuration Menu, Receiver Figure 4–17 STS-3c Configuration Menu, Receiver The VT100 menu, shown in Figure 4–17, is used to configure the receiver to the incoming STS-3c (STS3C) payload FRAMING and PATTERN that will be analyzed. In this example only the UNFRM (Unframed) and 2E23 Pseudo Random Bit Sequence are accessible. SPE Pointer Analysis Display, Receiver Figure 4–18 SPE Pointer Analysis Display, Receiver The RX SPE POINTER (o) display shown in Figure 4–18 is used to view the pointer values that accommodate differences caused by adjusting the starting position of the payload. The SPE POINTER displays the current pointer value. The number 522, in this example, represents the value extracted from the H1 and H2 bytes, It is the offset between the H3 byte and first byte (J1) of the STS SPE The NDF (New Data Flag) indicates the total number of arbitrary changes in the pointer value recorded during the test cycle. The POINTER JUSTIFICATION values for +PJ and – PJ are zero in this example. They show the total count of the positive and negative justifications recorded during the test cycle. 4–16 ST112 SONET Transmission Test Set Artisan Technology Group - Quality Instrumentation ... Guaranteed | (888) 88-SOURCE | www.artisantg.com Virtual Front Panel VT Pointer Analysis Display, Receiver Figure 4–19 VT Pointer Display, Receiver The RX VT POINTER (p) display shown in Figure 4–19 is used to view the pointer processing that accommodates differences caused by adjusting the starting position of the VT payload. The VT pointer display is only accessible in the VT mode. There are 28 VT pointers within the SPE (Synchronous Payload Envelope). The VT pointer value, 78, indicates the position of the V5 byte and its location in the active channel, one of the 28 Virtual Tributaries. Channels are selected in the Receiver VT1.5 Channel Setup Menu (t). The NDF (New Data Flag) indicates the total number of arbitrary changes in the VT pointer value recorded during the test cycle. The POINTER JUSTIFICATION values for +PJ and –PJ are zero in this example. They show the total count of the positive and negative justifications recorded during the test cycle. TOH/POH Overhead Analysis Display, Receiver Figure 4–20 VFP Receiver Overhead display The TOH/POH (s) Receiver Overhead display shown in Figure 4–20 is used to monitor the overhead bytes in the first STS-1 of the SONET frame. ST112 SONET Transmission Test Set 4–17 Artisan Technology Group - Quality Instrumentation ... Guaranteed | (888) 88-SOURCE | www.artisantg.com Virtual Front Panel J1 Trace Message Analysis Display, Receiver Figure 4–21 J1 Trace Message The J1 TRACE MESSAGE (g) is shown in Figure 4–21. Received ASCII data is being displayed. APS Bytes Analysis Display, Receiver Figure 4–22 VFP Automatic Protection Switching (APS) Bytes The letter h in the RX SETUP list accesses the read only display of the APS (Automatic Protection Switch) bytes. At the top of the display are the K1 and K2 bytes in hexadecimal. The APS line architecture can be either 1+1 (one-to-one) or 1:N (one-to-several allocated lines specified by the number N). The line direction can be UNI (unidirectional), BI (bi-directional), or Other indicating none of the four line types. Code 8 Manual Switching is being shown in Figure 4–22, other possible codes are listed below. The Request Line (the line requesting to be switched) and the Switch Line (the line that the Request Line wants to switch to) can be any decimal number from 0 to 15. 4–18 ST112 SONET Transmission Test Set Artisan Technology Group - Quality Instrumentation ... Guaranteed | (888) 88-SOURCE | www.artisantg.com Virtual Front Panel 0 No Request 8 Manual Switch 1 Do Not Revert 9 Invalid 2 Reserve Request 10 SD-Lo Priority 3 Invalid 11 SD-Hi Priority 4 Exercise 12 SF-Lo Priority 5 Invalid 13 SF-Hi Priority 6 Wait To Restore 14 Forced Switch 7 Invalid 15 Lockout Protect VT1.5 Channel Scan Analysis Display, Receiver Figure 4–23 VT1.5 Channel Scan VT1.5 Channel Scan, shown in Figure 4–23, can be used to detect the unique channel ID (Identification) Code in of each of the VT1.5 channels, and detect the Framing and Pattern used on one or all of them. In this example, the first six channels have been scanned. The channel ID for each, except channel three, has been displayed. Channel three displays the letters D/QW for its framing and pattern indicators, as indicated in Table 4–1. VT1.5 Channel Scan cannot be used when Trouble Scan is running. VT1.5 Channel Scan Use and Operation is detailed in the Applications Chapter of this manual. Table 4–1 VT Channel Scan Framing and Pattern Codes Framing Codes Pattern Codes U Unframed FX 24 Bit Fixed Word D D4 (SF) 15 2E15 PRBS E ESF 23 2E23 PRBS S SLC96 QW Quasi-Random Word * Unknown Signal ? Unknown (probably Live Traffic) AIS DS1 Alarm Indication Signal ST112 SONET Transmission Test Set 4–19 Artisan Technology Group - Quality Instrumentation ... Guaranteed | (888) 88-SOURCE | www.artisantg.com Virtual Front Panel Trouble Scan Analysis Display, Receiver Figure 4–24 Trouble Scan Trouble Scan, shown in Figure 4–24, can be used to examined STS channels for errors and alarms. In this example, the first two STS1 channels have been scanned and the third is being scanned. Trouble Scan is detailed in the Applications Chapter of this manual. Receiver Error Summary Analysis Display Figure 4–25 Receiver Error Summary Terminal Display Pressing the F3 (RESULTS) function key will display the read-only receiver error summary menu, shown in Figure 4–25. The large RX ERROR SUMMARY display area does not list any 4–20 ST112 SONET Transmission Test Set Artisan Technology Group - Quality Instrumentation ... Guaranteed | (888) 88-SOURCE | www.artisantg.com Virtual Front Panel other accessible submenus on its upper left side. The only keys that can be used to exit this display are F1, F2, or CTRL-T. The RESULTS screen includes the B1 section, B2 line, and B3 path errors. The totals for B1, B2 and B3 Errored Seconds (ES), Severely Errored Seconds (SES), Bit Error Rate (BER), and the total number of Line FEBE ERRORS can be read. NOTE: The Bit Error Rate (BER) is displayed as a negative exponent. An error rate of 1.0E-6 would equate to the decimal number derived from receiving one errored bit in one million. In other words, one divided by one million would equal 0.000001 or 1.0E-6 decimal. Transmitter VFP Menus and Displays Transmitter Current Configuration Figure 4–26 Virtual Front Panel (VFP) Transmitter Configuration Use the F1 function key to access the Transmitter setup display. Its menu and submenus are used to configure the SONET test signal. The main menu is divided into the same six areas previously described in the SETUP Screen section of this chapter. The list of submenus on the upper left side of Figure 4–26 now begin with Output/Optics (q), Timing (w), Mapping (r), and end with the STS3c Cfg (i). ST112 SONET Transmission Test Set 4–21 Artisan Technology Group - Quality Instrumentation ... Guaranteed | (888) 88-SOURCE | www.artisantg.com Virtual Front Panel Output and Optics, Transmitter Figure 4–27 VFP Output/Optics Transmitter Configuration The OUTPUT/OPTICS (q) configuration menu is shown in Figure 4–27. Use the up and down arrows to move between the four sections, and the left and right arrows to move between choices. Use the ENTER key to select the choice under the reverse video cursor. The first two areas are used to configure the electrical and optical outputs. The electrical can be configured to generate either the SONET Synchronous Transport Cross Connect Signal (STSX-1) or the Asynchronous Digital Cross Connect Signal (DSX-3) from the six front panel connectors. Either the STSX-1 or DSX-3 LED indicator will light when the signal is selected. DSX-3 can only be activated when the OPTICS are set to the OFF condition. The Electrical Asynchronous Digital Cross Connect Signal, DSX-1, does not appear on the menu because it is always being transmitted from the four front panel connectors. The OPTICS section has five choices, OFF and four rates. The OC-48 (OC48) rate can only be activated when the ST112 SONET Transmission Test Set is being used in the Combined (Dual) Mode with an ST2400 2.4 Gb/s SDH/SONET Test Set. The Combined (Dual) Mode is detailed in the Applications Chapter of this manual. The other three rates, OC-1, OC-3, and OC-12 are detailed in this text. OC-12 has been selected in this example. Data or voice can be transmitted from a device connected to the rear panel DCC/OW connector on the Section or Line DCC or Order Wire channels. The DCC (Data Communications Channel) can be configured for OFF, SECTION, or LINE. Generally: • DCC is used to transfer data between NE (network elements) and ORDERWIRE is used for voice communications. • Voice can be transmitter in either the LOCAL or EXPRESS ORDERWIRE channel. LOCAL refers to the connection between two adjacent devices (such as a regenerator and a NE or two adjacent regenerators) and EXPRESS indicates the connection is between to NE with regenerator in between. Communications between two Network Elements (NE) can use either a LOCAL or an EXPRESS connection. Timing, Transmitter 4–22 ST112 SONET Transmission Test Set Artisan Technology Group - Quality Instrumentation ... Guaranteed | (888) 88-SOURCE | www.artisantg.com Virtual Front Panel Figure 4–28 VFP Timing Transmitter Configuration The ST112 SONET Transmission Test Set provides for five TIMING sources, detailed below. Switching, disconnecting, or any other loss of timing can cause a TX: LOSS OF SONET CLOCK message to appear momentarily or periodically switch on and off. • ASYNC provides internal timing for the test set. • The numbers STS-1 or STS-3 refers to the respective rear panel transmitter inputs. There is one 52 Mb/s (STS-1) clock input and one 155 Mb/s (STS-3) clock input. • BITS extracts the timing from an incoming BITS DSX-1 signal connected to the rear panel 100 ohm input provided. The second menu item, TX V1.5/BITS INPUT TERMINATION is used to configure this rear panel input for normal termination (TERM) or a low level input from a network element’s MONITOR output. • LOOP, as the name implies, is LOOP timed to the RECEIVER incoming SONET signal, optical or electrical. Use the arrow keys and the enter (return) key on the VT100 keyboard to navigate through the menu and activate your choice. ST112 SONET Transmission Test Set 4–23 Artisan Technology Group - Quality Instrumentation ... Guaranteed | (888) 88-SOURCE | www.artisantg.com Virtual Front Panel Mapping, Transmitter Figure 4–29 VFP Mapping, Transmitter Figure 4–29 shows the transmitter payload MAPPING (r) menu. The Test Set transmitter mapping conforms to ANSI and Bellcore standards. The mapping can be divided into three groups: • DS3 (44.736 Mb/s ASYNC signal) • VT1.5 (1.544Mb/s Virtual Tributary) • Concatenated (STS-3c or STS-12c) A DS-1 input can be applied to the rear panel BITS/DSX-1 connector and mapped into the VT1.5 payload. The second menu item, TX V1.5/BITS INPUT TERMINATION is used to configure this rear panel input for normal termination (TERM) or a low level input from a network element’s MONITOR output. Use the up and down arrow keys to move between menu areas, and the left and right arrow keys to position the cursor within either menu area. The ENTER key is used to activate menu items. One of the three yellow LED indicators (DS3, VT, or 3c/12c) identify which mapping is active. 4–24 ST112 SONET Transmission Test Set Artisan Technology Group - Quality Instrumentation ... Guaranteed | (888) 88-SOURCE | www.artisantg.com Virtual Front Panel SPE Pointer, Transmitter Figure 4–30 VFP SPE Pointer, Transmitter The SPE POINTER menu (o) shown in Figure 4–30. The SPE Pointers keep track of the starting position of the Synchronous Payload Envelopment. The number 522 represents the offset between the pointer word (H1 and H2 bytes) and first byte of the STS SPE (J1 byte). The SPE pointer can be set to any value from 0 to 782. The NDF (New Data Flag) indicates an arbitrary change in the pointer value due to a change in the payload position. Change the NEW POINTER (NDF) number when the reverse video cursor is over it, as illustrated. Press the F4 key, during the test cycle, to execute the SPE pointer change. Use the arrow keys to move the cursor to either SINGLE +PJ or SINGLE –PJ and press the F4 key to change the respective pointer values. Changing the pointer value will change the CURRENT SPE POINTER number at the top of the display (Figure 4–30). ST112 SONET Transmission Test Set 4–25 Artisan Technology Group - Quality Instrumentation ... Guaranteed | (888) 88-SOURCE | www.artisantg.com Virtual Front Panel VT Pointer, Transmitter Figure 4–31 VFP VT Pointer, Transmitter The VT POINTER (p) menu is only accessible in the VT mode. All 28 VT pointers within the SPE (Synchronous Payload Envelopment) generated by the Test Set receive the same value, 78 in this example. The VT pointer value indicates the position of the V5 byte. The VT pointer values can be set to any number from 0 to 103. The NDF (New Data Flag) indicates an arbitrary change in the pointer value due to a change in the payload position. Use the arrow keys to move the reverse video cursor to the NEW POINTER (NDF) number. Use the VT100 keyboard to type a different VT pointer number. Press the F4 key, during the test cycle, to execute the change. Use the arrow keys to move the cursor to either SINGLE +PJ or SINGLE –PJ and press the F4 key to change the respective pointer values. Changing the pointer value will change the CURRENT VT POINTER number at the top of the display (Figure 4–31). 4–26 ST112 SONET Transmission Test Set Artisan Technology Group - Quality Instrumentation ... Guaranteed | (888) 88-SOURCE | www.artisantg.com Virtual Front Panel SONET Alarms, Transmitter Figure 4–32 SONET Alarms, Transmitter The SONET ALARMS menu (s) shown in Figure 4–32 is used to select and generate continuous or burst alarm conditions during the test cycle. There are five headings in three areas. Use the up and down arrow keys to move between the menu headings and the left and right arrow keys to move within a section. For example, in Figure 4–32, the reverse video cursor is positioned on the CONTINUOUS ALARMS heading. Press the down arrow to move to the CONT ALARMS heading. Then press the up arrow to return to the CONTINUOUS ALARMS heading. The continuous alarm section has two headings: CONTINUOUS ALARMS and CONT ALARMS. When the reverse video course is at the CONTINUOUS ALARMS heading, pressing the F4 key will clear all the continuous alarms. Using the left and right arrow will move through the list of continuous alarms and pressing the enter key will select the alarm under the cursor. Use the down arrow key to move the cursor to the CONT ALARMS heading and the right arrow and enter keys to move the cursor to the ON position and activate the selected continuous alarms. More than one continuous alarm can be activated during the test cycle. The CONTINUOUS ALARMS include: EF (Errored Frame); AIS (Alarm Indication Signal) and RDI (Remote Defect Indication) for the Line, Path, and Virtual Tributary; LOP (Loss Of Pointer) for the Path and Virtual Tributary; and, OORP (Out Of Range Pointer) for the Synchronous Payload Envelope. ST112 SONET Transmission Test Set 4–27 Artisan Technology Group - Quality Instrumentation ... Guaranteed | (888) 88-SOURCE | www.artisantg.com Virtual Front Panel Figure 4–33 SONET Alarms, Burst Example, Transmitter The next section of the SONET ALARMS menu (Figure 4–33) is used to generate a BURST ALARM condition for some, but not all, of the same alarm conditions. The up and down arrow keys are used to move between the two headings: BURST ALARM and NUMBER OF BURST FRAMES. When the cursor is positioned over BURST ALARM the left and right arrow keys are used to maneuver the reverse video cursor over the alarm condition to be activated for the number of frames specified, 12 in this example. One and only one alarm condition can be generated in a burst. When the down arrow is used to move the cursor to the NUMBER OF BURST FRAMES heading the F4 key can be pressed to generate the selected burst condition, VT-RDI in this example. Figure 4–34 SONET Alarms, LOS Example, Transmitter The last SONET ALARMS selection is LOSS OF SIGNAL, shown in Figure 4–34. It can be set from 1 to 150 microseconds. Pressing the F4 key, during the test cycle, will execute the alarm. 4–28 ST112 SONET Transmission Test Set Artisan Technology Group - Quality Instrumentation ... Guaranteed | (888) 88-SOURCE | www.artisantg.com Virtual Front Panel SONET Error, Transmitter Figure 4–35 SONET Error, Transmitter Figure 4–35 illustrates the SONET ERROR menu (g), its makeup is configuration dependent. This is an example of the menu that will be seen when the transmitter is configured for the OC12 rate with a VT1.5 payload. The menu has five sections that can be accessed with the arrow keys, as follows: • STS1/3 SINGLE ERROR INJECT section is used to inject a single bit error on the B1, B2, B3, PYLD (VT1.5 Payload Pattern), and BPV (Bipolar Violation). Use the arrow keys (left and right) to position the reverse video cursor and press the F4 key to generate the error. • SONET RANDOM ERROR RATE section is used to set the error rate range from 1.0E–3 to 1.0E–9 and generate (ENABLE—ON) it on the optical rate (OC-1, OC-3, and OC-12). Use the arrow keys to position the reverse video cursor and the enter key to execute the set error rate. • STSX-1 BPV ERROR RATE section is used to set the error rate range from 1.0E–3 to 1.0E– 9 and generate (ENABLE—ON) it on the electrical cross connect rate (STSX-1). Use the arrow keys to position the reverse video cursor and the enter key to execute the set error rate. • BIP2 ERROR RATE section is used to set the error rate range from 1.0E–3 to 1.0E–9 and generate (ENABLE—ON) the VT1.5 payload parity errors at that rate. The ST112 SONET Transmission Test Set transmitter must be configured for the VT1.5 payload in the SONET signal. Use the arrow keys to position the reverse video cursor and the enter key to execute the set error rate. • TX OCN SINGLE is used to select the STS-1 channel when either the OC-3 or OC-12 rates are being transmitted. There are three channels in the OC-3 rate and twelve in the OC-12 rate. Type the desired channel number and press the F4 key to change the channel. ST112 SONET Transmission Test Set 4–29 Artisan Technology Group - Quality Instrumentation ... Guaranteed | (888) 88-SOURCE | www.artisantg.com Virtual Front Panel TOH/POH, Transmitter Figure 4–36 TOH/POH, Transmitter The transmitter overhead byte menu, TOH/POH (l), is used to edit various SONET overhead bytes. Use the arrow keys to navigate through the Section, Line, and Path overhead bytes shown in Figure 4–36. The up and down arrow key will move from line to line, and the left and right will move horizontally along each line in the matrix. Each SONET byte designator is to the left of the equal sign, and the byte value is to the right, A1 = F6, in this example. 4–30 ST112 SONET Transmission Test Set Artisan Technology Group - Quality Instrumentation ... Guaranteed | (888) 88-SOURCE | www.artisantg.com Virtual Front Panel J1 Trace Message, Transmitter Figure 4–37 J1 Trace Message, Transmitter The J1 TRACE MESSAGE (z) shown in Figure 4–37 is used to add and edit the ASCII data being generated. Press the up arrow key to move to that display field. The TRACE MESSAGE (ASCII) can now be entered from the VT100 keyboard—as shown in the this is a test... example. Press the up arrow one time to move to the FILL MESSAGE (HEX) section. The F4 (execute) key will be displayed next to it. Any hexadecimal code can be entered, but only those within the ASCII range can be displayed. Press the up arrow one more time and the F4 key will appear next to the selection labeled CLEAR MESSAGE (00). Press the F4 key to clear the trace message. Actually the trace message will be filled with all zeros. ST112 SONET Transmission Test Set 4–31 Artisan Technology Group - Quality Instrumentation ... Guaranteed | (888) 88-SOURCE | www.artisantg.com Virtual Front Panel VT1.5 Channel, Transmitter Figure 4–38 VT1.5 Channel Configuration Menu, Transmitter The menu shown in Figure 4–38 is used to configure the VT1.5 channel format. It is only accessible after selecting VT mapping from the transmitter’s Mapping Menu (r).The VT CHANNEL NUMBERING, at the top of the display is used to map the virtual tributaries sequentially (1 to 28) or in a four by seven (4x7) matrix (similar to Bellcore GR-253-CORE and illustrated in Figure 4–38). The ACTIVE VT1.5 CHANNEL can be set to SINGLE (number 1, in this example) or ALL of the 28 VT channels that will be configured before mapping them into the Synchronous Payload Envelopment. The lower portion of this display (Figure 4–38) shows that 28 channels are accessible (1-28) to and that VT channel number 1 (in this example) is being configured with the settings from the VT1.5/DSX-1 Configuration menu (Figure 4–40 detailed later in this chapter). Use the arrows keys to position the cursor and the enter key to activate your selection. The Input Not Accepted message will appear in the lower left corner of the display if the CHANNEL is set to number larger than 28. When this happens, the CHANNEL number will reset and the message will remain until the enter key is pressed. 4–32 ST112 SONET Transmission Test Set Artisan Technology Group - Quality Instrumentation ... Guaranteed | (888) 88-SOURCE | www.artisantg.com Virtual Front Panel Figure 4–39 VT1.5 Structures VT1.5 and DSX-1 Configuration Figure 4–40 VT1.5/DSX-1 Configuration The VT1.5/DSX-1 CONFIGURATION menu (y) shown in Figure 4–40 has three section that are used to generate payload test patterns. The top section is used for DS1 FRAMING. Four possible choices are shown: UNFRM (Unframed), SF (Super Frame), ESF (Extended Super Frame), and SLC96 (Subscriber Loop Carrier 96) The next menu section is used to configure the test patterns for DSX-1 (DSX1) and VT1.5 payloads, as follows: QRW (Quasi Random Word), 2E15 PRBS (Pseudo Random Bit Sequence), 2E23 PRBS, and a six character hexadecimal word (wd440004 in this example). The third menu section is used to access the DSX-1 (DSX1) STRESS PATTERN that can be used for DSX-1 network testing. The selected stress pattern is active during the test cycle. ST112 SONET Transmission Test Set 4–33 Artisan Technology Group - Quality Instrumentation ... Guaranteed | (888) 88-SOURCE | www.artisantg.com Virtual Front Panel TX Stress Patterns The ST112 SONET Transmission Test Set includes additional patterns to provide more ways to stress-test DS1 circuits. Telecommunications research notes that the QRW test pattern, universally used for out-of-service testing of DS1 circuits, is not up to the task of determining the true performance of DS1 circuits used for the transport of digital services. The span line repeater continues as a major component of the North American T-Carrier networks. For this reason, the majority of tests that have evolved were designed to ensure the performance of span line and office repeaters under live traffic conditions. Since most network equipment contains regeneration and timing recovery functions, similar to those of a repeater, the tests originally developed for repeater span line testing have proven suitable for testing all network equipment. STANDARD is a switch that is used to activate the previously selected test pattern from the PATTERN submenu. As shown in Figure 4–40 the QRW pattern would become active when the word STANDARD is selected from the DSX-1 STRESS PATTERN submenu. The other choices are the following Stress Test patterns that can be generated: 4–34 • The Daly patterns (DALY-1, DALY-2, and DALY-3) is a version of the 55-octet pattern, developed by Tom Daly, that has been modified to meet pulse density standards when framed on octet boundaries. The Daly pattern has been found useful for stressing the timing recovery circuits of line cards and the preamplifier-equalizer circuits of repeaters utilizing discrete component ALBOs (Automatic Line Build-Outs). A Daly pattern stresses a circuit by introducing rapid transitions from long sequences of low density octets to high density octets, high density octets to low density octets, and rapid 1-0-1-0 transitions. • The 1-IN-8 pattern, containing strings of seven sequential zeros, is used on a circuit equipped with B8ZS to determine the ability of a circuit to handle payload signals having a minimum ones density. Use of this pattern will often reveal the existence of timing recovery problem under conditions of low signal density. • The 2-IN-8 pattern is used to verify the correct optioning of the circuit for AMI or B8ZS line coding. • The 3-IN-24 pattern is used to determine the ability of network equipment to function properly when transporting signal sequences containing both minimum density and a maximum of fifteen consecutive zeros during periods of minimum overall pulse density. Valuable for testing AMI circuits, the 3-IN-24 pattern is of little use of circuits equipped with B8ZS options for clear channel operation. • The All-ONES pattern consists of a series of consecutive “ones”. For tests of T1 span lines, the all-ONES pattern causes the span line repeater to consume the maximum amount of power. If the DC power delivered to a regenerator is incorrect, transmission errors may occur as a result of insufficient pulse power or distorted pulse shapes of the all-ONES signal output of a regenerator. • The framed all-ZEROS pattern is useful as a final confirmation that all network elements in a circuit are properly optioned with B8ZS for clear channel operation. The framed all-ZEROS pattern should not be used until all other tests have been successfully completed. Transmission of an all-ZEROS pattern through some DS3 equipment, may cause DS1 failure if the DS3 equipment is not properly optioned for B8ZS (clear channel) operation. ST112 SONET Transmission Test Set Artisan Technology Group - Quality Instrumentation ... Guaranteed | (888) 88-SOURCE | www.artisantg.com Virtual Front Panel VT Errors/Alarms Figure 4–41 VT1.5/DSX-1 Error/Alarm The VT1.5/DSX-1 ERROR/ALARM menu (k) is used to inject payload Errors and Alarms before the DS1 is mapped to the VT1.5 STS-1 frame. The VT1.5 Channel menu (t) was used to configure the effected channels. The menu has three sections. The first is used to enable or disable AIS and RAI alarms. AIS is a DS1 or DS3 payload Alarm Indication Signal and RAI is a Remote Alarm Indication signal that shows the detection of a SF, SLC-96, or ESF Yellow in a DS1 payload. When the SINGLE ERROR INJECT heading is selected the word F4 in reverse video will appear on its right side, indicating that each push of the F4 function key will insert one bit error into the DS1 payload. The last menu heading DS1/VT BIT ERROR RATE has two selections. The one on the left is used to set the error rate from 1.0E–9 to 1.5E–3. And the other is used to ENABLE the flow of BIT Errors. Use the up and down keys to move the cursor between heading and sections, use the left and right arrow keys to move within each section. Use the Enter key to active individual sections. ST112 SONET Transmission Test Set 4–35 Artisan Technology Group - Quality Instrumentation ... Guaranteed | (888) 88-SOURCE | www.artisantg.com Virtual Front Panel DS3/DSX-3 Configurations Figure 4–42 DS3/DSX-3 Configuration The DS3/DSX-3 Cfg (u) menu shown in Figure 4–42 is used to configure the DS3 or DSX-3 payload FRAMING and PATTERN, to be transmitted. In this example the M13 (M1-3) and 2E15 Pseudo Random Bit Sequence has been selected. Other FRAMING choices include CBIT (CBIT) and UNFRM (Unframed) configurations. Additional patterns include 2E23 Pseudo Random Bit Sequence and the 8 bit WORD. This menu screen is only accessible when the DSX-3 Rate or DS3 Payload is selected. Make the appropriate choices from the QUICK SETUP menu (CTRL T menu q). Use the arrow keys to navigate through the menu and the enter key to enable the selections. 4–36 ST112 SONET Transmission Test Set Artisan Technology Group - Quality Instrumentation ... Guaranteed | (888) 88-SOURCE | www.artisantg.com Virtual Front Panel DS3 Alarms and Errors Figure 4–43 DS3 Alarms and Errors The DS3 Err/Alarms (h) menu shown in Figure 4–43 is only accessible when DS3 Payload Mapping is selected with one of the supporting transfer rates. Make the appropriate choices in the QUICK SETUP menu (CTRL T menu q). The menu has four main areas, as follows: • The first main heading, DS3 ALARMS, is used to generate a continuous alarm during the test cycle. YEL, AIS, and IDLE are the three alarms that can be selected. Only one continuous alarm can be enabled at a time. OFF disables any set alarm. • The second main heading, BURST ALARM, will generate the selected alarm (PARITY, SEF, or YEL) for the number of frames set in the subheading, 44 in this example. The F4 key is press, during the test cycle, to insert the burst alarm, PARITY in this example. • The next main heading, SINGLE ERROR INJECT, will insert a single bit error into the DS3 payload each time the F4 function key is pressed. The F4 key command is hidden until the reverse video cursor is moved to this selection. • The bottom main heading, DS3 BIT ERROR RATE, is used to insert a bit error rate. When the reverse video cursor is positioned on this main menu the error rate can be set from 1.0E– 9 to 1.5E–3. Pressing the down arrow will move the cursor to the ENABLE subheading. Where the left and right arrow keys and the enter key can be used to enable (ON) or disable (OFF) this error generator. Errors will only be counted during the test cycle. ST112 SONET Transmission Test Set 4–37 Artisan Technology Group - Quality Instrumentation ... Guaranteed | (888) 88-SOURCE | www.artisantg.com Virtual Front Panel DSX-3 Errors and Alarms Figure 4–44 DSX-3 Errors and Alarms Transmitter The DSX-3 (DSX3) Error and Alarm menu shown in Figure 4–44 is accessible when the Test Set is configured to transmit the DSX-3 asynchronous cross connect signal. The first heading DSX-3 (DSX3) BPV ERROR RATE is used to set the error rate to a number from 1.0E–9 to 1.5E–3, and enable Bipolar Violations. The next main heading, DSX-3 (DSX3) BPV SINGLE ERROR INJECT, is used to inject one Bipolar Violation at a time. When selected the hidden F4 function key will be displayed. The DSX-3 (DSX3) LOSS OF SIGNAL alarm can be set for a period from 1 to 150 microseconds. The hidden F4 key will be displayed, and used, to execute this function when pressed. 4–38 ST112 SONET Transmission Test Set Artisan Technology Group - Quality Instrumentation ... Guaranteed | (888) 88-SOURCE | www.artisantg.com Virtual Front Panel STS-3c Configuration Menu, Transmitter Figure 4–45 STS-3c Configuration Menu, Transmitter The STS-3c CONFIGURATION (i), shown in Figure 4–45, is output dependent. It is only accessible when either the OC-12 or OC-3 rate is selected with 3c payload mapping. Press CTRL T and the q key to access the Quick Setup menu. Use this menu to configure the STS-3c payload PATTERN, that will be transmitted, and to inject a single bit error in that pattern. Under the STS-3c (STS3C) PATTERN heading either the 2E23 Pseudo Random Bit Sequence or the 2E23 INV (Inverted) can be selected. Use the arrow keys and enter key to change selections. Pressing the F4 function key will inject a single error when the SINGLE ERROR INJECT heading is selected—as shown in this example. ST112 SONET Transmission Test Set 4–39 Artisan Technology Group - Quality Instrumentation ... Guaranteed | (888) 88-SOURCE | www.artisantg.com Virtual Front Panel STS-12c Configuration Menu, Transmitter Figure 4–46 STS-12c Configuration Menu, Transmitter The STS-12c (STS12C) CONFIGURATION (i) menu, shown in Figure 4–46, is output dependent. It is only accessible when the OC-12 rate is selected with 12c payload mapping. Press CTRL T and the q key to access the quick setup menu. Use this menu to configure the STS-12c payload PATTERN that will be transmitted and to inject a single bit error in that pattern. Under the STS-12c (STS12C) PATTERN heading select either the 2E23 Pseudo Random Bit Sequence or the 2E23 INV (Inverted). Use the arrow keys and enter key to change selections. Pressing the F4 function key will inject a single error when the SINGLE ERROR INJECT heading is selected—as shown in this example. 4–40 ST112 SONET Transmission Test Set Artisan Technology Group - Quality Instrumentation ... Guaranteed | (888) 88-SOURCE | www.artisantg.com Applications and Use This section provides common examples of telecommunication network applications. It details how the ST112 SONET Transmission Test Set can be used for: • Passive Monitoring • Active Analysis • Circuit Pack Testing • VT Channel Scan—ADM and E-DCS Testing • Combined (Dual) Mode • Virtual Front Panel Combined (Dual) Mode • Trouble Scan Basics • Trouble Scan Combined (Dual) Mode Artisan Technology Group - Quality Instrumentation ... Guaranteed | (888) 88-SOURCE | www.artisantg.com Applications and Use Applications The ST112 SONET Transmission Test Set basic applications include Passive Monitoring, Active Analysis, Circuit Pack Testing, ADM (Add-Drop Multiplexer) Testing, and E-DCS (Electronic-Digital Cross-connect System) Testing. The Advanced Applications include the Combined (Dual) Mode and Trouble Scan in the Combined (Dual) Mode. Specific applications for field service troubleshooting, engineering analysis, production test, and maintenance test are the same or similar. Passive Monitoring Figure 5–1 Passive Monitoring The passive monitoring application can be used to monitor optical and electrical SONET sources (OC-12, OC-3, OC-1, STSX-1) and asynchronous electrical sources (DSX-3 and DSX-1). Using a passive coupler, such as an 80/20 or 90/10 splitter/coupler as illustrated in Figure 5–1, to connect and disconnect the Test Set without disrupting live traffic. This setup is used for non-intrusive network monitoring applications. It is perfect for LEC/IXC (local exchange carrier / inter-exchange carrier) cross-boundary or other long-term, passive performance monitoring. It does not allow line error injection testing. This installation splits the optical signal through a passive coupler, which can be mounted in an optical or electrical cross-connect bay or other convenient location. Since there is no active regeneration of the line signal, the system under test must have adequate margin to accommodate the coupler insertion loss. Therefore measurements should be made close to the transmitter. The Test Set accommodates the electrical monitor output capabilities of common network elements for STSX-1, DSX-3, and DSX-1 signals. Measurements are made with the Test Set, as required. 5–2 ST112 SONET Transmission Test Set Artisan Technology Group - Quality Instrumentation ... Guaranteed | (888) 88-SOURCE | www.artisantg.com Applications and Use Active Analysis Figure 5–2 Active Analysis The Active Analysis application inserts the Network Element into the active signal path (Figure 5–2) provided by the ST112 SONET Transmission Test Set. This configuration is suitable for test or operation where live traffic is not being carried over the network, such as: new installation of a network element, equipment and network maintenance, conformance testing, and production test. Figure 5–2 shows the NE under test inserted in the optical carrier signal path. The Test Set provides electrical outputs and inputs used to test STSX-1, DSX-3, and DSX-1 network elements and networks. On the transmitter side, the Test Set provides: • Four DSX-1 outputs that are always on. • Six STSX-1 or DSX-3 outputs that can be activated for testing. • One optical output connector that can be switched to OC-12, OC-3, or OC-1. On the receiver side, the Test Set provides: • One optical input connector that can be switched to OC-12, OC-3, or OC-1. • One STSX-1 or DSX-3 input connector that can accept either normal or a low level monitor input signal. • One DSX-1 input connector for either normal or a low level monitor input signal. In this application the ST112 SONET Transmission Test Set can be used with the ST2400 transceiver, which is actively inserted into the signal path. The Test Set provides a variety of signal and analysis options for complete testing of the OC-48 signal. ST112 SONET Transmission Test Set 5–3 Artisan Technology Group - Quality Instrumentation ... Guaranteed | (888) 88-SOURCE | www.artisantg.com Applications and Use Circuit Pack Testing Figure 5–3 Circuit Pack Testing Figure 5–3 illustrates a Circuit Pack test setup. Three STSX-1 signals are used to busy-up the circuit pack under test, and its OC-3 output is being analyzed by the Test Set receiver input. All six STSX-1 outputs could be used with signal splitters to test an OC-12 Circuit Pack. Payload and overhead manipulation, as detailed in Chapters 3 and 4, can be used to analyze the Circuit Pack. 5–4 ST112 SONET Transmission Test Set Artisan Technology Group - Quality Instrumentation ... Guaranteed | (888) 88-SOURCE | www.artisantg.com Applications and Use VT1.5 Channel Scan—ADM and E-DCS Testing Figure 5–4 VT1.5 Structures SONET (Synchronous Optical Network) can carry large payloads (above 50 Mb/s) on most of the existing digital hierarchy signaling equipment. To achieve this capacity the Synchronous Transport Signal (STS) has a Synchronous Payload Envelop (SPE) that is divided into smaller components, shown in Figure 5–4, known as Virtual Tributaries (VT). They are used for the purpose of transporting and switching payloads smaller than the STS-1 rate (51.84 Mb/s), for example, asynchronous services below the DS3 rate (45 Mb/s). Figure 5–5 VT1.5 Channel Configuration (VFP) Menu, Transmitter Routing and provisioning can be verified off-line because the Test Set can encode valid data into all 28 VT1.5 channels and user selected data into anyone of them. Figure 5–5 shows that channel 1 has been selected for user selected data, and that 4x7 channel numbering is being used. The 4x7 mapping is selected if the terminal consists of seven line cards, each having four channels. The 1x28 mapping is used for configurations having one or more line cards with sequential numbered channels. ST112 SONET Transmission Test Set 5–5 Artisan Technology Group - Quality Instrumentation ... Guaranteed | (888) 88-SOURCE | www.artisantg.com Applications and Use Figure 5–6 Transmitter VT1.5/DSX1 Configuration (VFP) Menu Figure 5–6 shows that the ST112 SONET Transmission Test Set transmitter is configured to generate the Unframed (UNFRH) Quasi-Random Word (QRW) mapping into the selected channel. The other 27 channels contain a background pattern that has a unique 24-bit embedded channel code. It can be recognized by the Test Set receiver and displayed on the VT1.5 Channel Scan VFP display. Figure 5–7 ST112 SONET Transmission Test Set ADM and W-DCS Testing The test setup illustrated in Figure 5–7 is used to verify provisioning. The test setup can be done with a single ST112 SONET Transmission Test Set and Terminal because each Test Set has both the Transmitter and Receiver Sections required to analyze the NE (Network Element) under test. In this example the ADM (Add-Drop Multiplexer) or W-DCS (Wideband-Digital Cross-Connect System) has four OC-3 inputs and one OC-12 output. The Test Set transmitter section generates the OC-3 with Unframed Quasi-Random Word U/QRW (U/QW) mapping into VT1.5 Channel 1 of the STS-1. Not shown in Figure 5–7 are the equipment provisioning requirements of the Network Element under test, because they are installation dependent After setting up the NE use the VT Channel function mode to make a Provisioning Analysis. 5–6 ST112 SONET Transmission Test Set Artisan Technology Group - Quality Instrumentation ... Guaranteed | (888) 88-SOURCE | www.artisantg.com Applications and Use VT Channel Scan Setup Before running the VT Channel Scan mode the ST112 SONET Transmission Test Set Receiver Section Mapping (r), VT1.5 Channel (t), and VT1.5/DSX1 Configuration (y) must be configured for the incoming signal. Error indications (such as BIT, SYNC, and LOF) may occur when these settings are incorrect. The VT Channel Scan display will confuse numbering and data when VT Channel Numbering (t) is set incorrectly. Autoseek and Autolink are not used (set to off) to avoid obtaining information about the incoming signal or the Test Set Transmitter configuration. Autoseek would detect the configuration, including channel numbering, from the incoming signal and Autolink would obtain the Test Set Transmitter configuration except channel numbering. Both would interfere with the Provisioning Verification. There are two types of VT1.5 channel numbering. The top of Figure 5–8 shows the VT1.5 Channel Scan display with 1x28 sequential channel numbering and the bottom shows 4x7 matrix numbering. The 1x28 display counts VT channels from top to bottom, and the 4x7 display counts them from left to right. Figure 5–8 RX Setup, VT1.5 Channel Scan Display ST112 SONET Transmission Test Set 5–7 Artisan Technology Group - Quality Instrumentation ... Guaranteed | (888) 88-SOURCE | www.artisantg.com Applications and Use Figure 5–9 ST112 SONET Transmission Test Set ADM and E-DOS Testing Figure 5–9 illustrates the ST112 SONET Transmission Test Set VT1.5 Channel Scan test display taken from a NE being tested to verify its provisioning. The 4x7 channel numbering is used and the Unframed Quasi-Random Word (U/QW) has been detected on channel 12 of the first STS-1 tributary in the OC-12 frame. During this test, the Test Set transmitter generates the same signal to all its STS SONET tributaries. Therefore setting the STS channel to any number from 1 to 12 will display the same information. During the VT1.5 Channel Scan test, the transmitter is also generating, and the receiver is receiving, a channel identification (ch01 through ch28) on each Virtual Tributary in the selected STS channel. If provisioning was done incorrectly the U/QRW (U/QW) being generated would appear on another channel and the detected channel identification would be next to some other display number, providing a clear indication of the error. In our example (Figure 5–10) ch05 and ch12 have been incorrectly provisioned. Figure 5–10 ST112 SONET Transmission Test Set ADM and E-DOS Testing 5–8 ST112 SONET Transmission Test Set Artisan Technology Group - Quality Instrumentation ... Guaranteed | (888) 88-SOURCE | www.artisantg.com Applications and Use Table 5–1 VT1.5 Locations and Channel Numbering Conventions Group #, VT # Bellcore TA-253 1,1 2,1 3,1 4,1 5,1 6,1 7,1 1,2 2,2 3,2 4,2 5,2 6,2 7,2 1,3 2,3 3,3 4,3 5,3 6,3 7,3 1,4 2,4 3,4 4,4 5,4 6,4 7,4 VT1.5 # (1 x 28) format 1 2 3 4 5 6 7 8 9 10 11 12 13 14 15 16 17 18 19 20 21 22 23 24 25 26 27 28 VT1.5 # (4 x 7) format * 1 5 9 13 17 21 25 2 6 10 14 18 22 26 3 7 11 15 19 23 27 4 8 12 16 20 24 28 STS-1 SPE Column #s 2,31,60 3,32,61 4,33,62 5,34,63 6,35,64 7,36,65 8,37,66 9,38,67 10,39,68 11,40,69 12,41,70 13,42,71 14,43,72 15,44,73 16,45,74 17,46,75 18,47,76 19,48,77 20,49,78 21,50,79 22,51,80 23,52,81 24,53,82 25,54,83 26,55,84 27,56,85 28,57,86 29,58,87 When testing provisioning or mapping (1x28 or 4x7) avoid using channels 1, 10, 19, and 28 because they are in the same logical VT slot in both configurations, as can be seen in Figure 5–8 and Table 5–1. ST112 SONET Transmission Test Set 5–9 Artisan Technology Group - Quality Instrumentation ... Guaranteed | (888) 88-SOURCE | www.artisantg.com Applications and Use End-to-End Path Verification Figure 5–11 End-to-End Path Verification The same VT1.5 Channel Scan feature can be used to verify facility assignments, or trace a particular VT through a network of several network elements, such as ADMs or Terminals, at different locations. Figure 5–11 shows one CO (Central Office) Location that is multiplexing and demultiplexing STSX-1s into an OC-12 rate. Just as cross connects can be verified through an individual network element, it is possible to verify the complete path mapping thought the network. The setup illustrated (Figure 5–11) can be used to verify the end-to-end channel provisioning and can be used for troubleshooting. Summary, VT1.5 Channel Scan Setup The following summarizes the setup used for the Test Set VT Channel Scan feature: Setup Select the Payload and the Rate for both the transmitter and the receiver sections. The payload must be VT1.5 but the Rate can be STSX-1, OC-1, OC-3, or OC-12. Transmitter Set the mapping (r) to INT VT1.5 Bit Float. VT Channel (t) select the numbering (1x28 or 4x7), set the active VT Channel to Single, and select the Channel Number (1 of 28) for the U/QRW (U/QW). Under VT1.5/DSX1 Cfg (y) Set the Framing for UNFRM, and the Pattern for QRW. Receiver Set the mapping (r) to VT1.5 Bit Float. VT Channel (t) select the numbering (1x28 or 4x7). Under VT1.5/DSX1 Cfg (y) set the Framing for UNFRM, and the Pattern for QRW. 5–10 ST112 SONET Transmission Test Set Artisan Technology Group - Quality Instrumentation ... Guaranteed | (888) 88-SOURCE | www.artisantg.com Applications and Use Combined (Dual) Mode Setup and Verification This section will detail the setup and verification of the Combined (Dual) Mode. It includes the following: • Hardware Setup, Combined (Dual) Mode • Remote Commands and VT100 Access, Combined (Dual) Mode • Virtual Front Panel, Combined (Dual) Mode • Summary of Combined (Dual) Mode Verification Hardware Setup Combined (Dual) Mode Figure 5–12 Active Analysis, Combined (Dual) Mode W A R N I N G ! Always avoid exposure to the laser beam. Before power is applied to the ST2400 2.4 Gb/s SDH/SONET Test Set be sure that all laser outputs are either covered with the screw cap provided or connected to the appropriate circuit. Be sure to read, understand, and follow all of the Laser Safety instructions in the ST2400 Test Set documentation. Figure 5–12 illustrates the front panel cabling connections, not the positioning of the equipment. Always allow for adequate air flow when installing, positioning, or mounting equipment. ST112 SONET Transmission Test Set 5–11 Artisan Technology Group - Quality Instrumentation ... Guaranteed | (888) 88-SOURCE | www.artisantg.com Applications and Use The OC-48 hardware setup shown in Figure 5–12 can be used to test and analyze all of the OC48 sub-rates, tributaries, and payloads. In this illustration: • The ST112 SONET Transmission Test Set Transmitter output is connected to the ST2400 155/622 IN (OC-3/OC-12) optical input connector. • The ST112 SONET Transmission Test Set Receiver input is connected to the ST2400 155/622 OUT (OC-3/OC-12) optical output connector. • The OC-48 NE (Network Element) receives its signal from the ST2400 2.4Gb/s OUT (OC48) output connector, and sends its signal to the ST2400 2.4Gb/s IN (OC-48) input connector. The Rear Panel connections are NOT illustrated in Figure 5–12, but the following connections are used: • Connect the RS-232 cable between the ST112 SONET Transmission Test Set and the ST2400. The cable is a straight through DB-9 socket to DB-25 plug. The DB-9 socket connects to the ST2400 plug labeled ST112 SONET Transmission Test Set RS-232. The DB-25 plug connects to the ST112 SONET Transmission Test Set labeled RS-232. • Connect the RS-232 cable between the ST2400 Test Set and a Terminal1. A straight through cable with a DB-9 plug connects to the ST2400 Test Set RS-232 socket. The other end is adapted to the Terminal requirements. The hardware configuration and cabling shown in Figure 5–12 can be used to setup and run tests in the Combined (Dual) Mode. A fiber optical cable with a 15 dB fixed value attenuator (such as AMP 06-0033 FC) is used in place of the OC-48 NE to loop the output of the ST2400 Test Set to its input. CAUTION! Always use 15 dB of attenuation when connecting the ST2400 transmitter output to its receiver input. Failure to do so will damage the optical detector. VT100 Initialization, Combined (Dual) Mode Figure 5–13 VT100 Initialization, Combined (Dual) Mode After connecting the attenuator apply the power and the ST2400 2.4Gb/s SDH/SONET Test Set prompt shown in Figure 5–13 should be seen on the Terminal display. Then the remote commands combined_mode?, combined_mode on, and combined_mode off can be used to respectively query, enable, and disable the Combined Mode. The figure also shows that the 1 The word Terminal can be a VT100 terminal, PC (Personal Computer) running a VT100 emulator, or other compatible VT100 terminal types. 5–12 ST112 SONET Transmission Test Set Artisan Technology Group - Quality Instrumentation ... Guaranteed | (888) 88-SOURCE | www.artisantg.com Applications and Use ST2400 2.4Gb/s SDH/SONET Test Set prompt changes to ST112\ST2400> when the link is enabled. After which the VT100 command can be used to activate the VFP (Virtual Front Panel). The ST112-ST2400 Link may be rejected, also shown in Figure 5–13, or an existing link may be broken. Error messages on the terminal or LCD display should assist the diagnosis. Figure 5–14 ST112 SONET Transmission Test Set Dual Mode Connection LCD Menu The ST112 SONET Transmission Test Set has an LCD setup menu, shown in Figure 5–14 and detailed in Chapter 3, that can be used to OPEN the COM LINK between the two units. Use the right arrow key to move the cursor to OPEN and the enter key to enable the link. The ST2400 2.4Gb/s SDH/SONET Test Set must be configured for SONET2 operation before it can be used in the dual mode. If it is not, the Test Set will display a LINK FAILED, CHANGE ST2400 TO SONET MODE message. After the mode is changed the ST2400 2.4Gb/s SDH/SONET Test Set must receive a power cycle, then the link can be opened. When the link is established, remote commands sent through the RS-232 port will be handled by the Test Set until the combined mode off command terminates the connection between the two systems. The ST2400 2.4Gb/s SDH/SONET Test Set will process remote commands sent through the ST2400 2.4Gb/s SDH/SONET Test Set GPIB port even if the ST2400 2.4Gb/s SDH/SONET Test Set is in the combined (dual) mode. 2 The ST2400 can be used to test both SONET and SDH networks. The ST112-ST2400 Link can only be used when the ST2400 is in the SONET mode. ST112 SONET Transmission Test Set 5–13 Artisan Technology Group - Quality Instrumentation ... Guaranteed | (888) 88-SOURCE | www.artisantg.com Applications and Use Virtual Front Panel Combined (Dual) Mode Figure 5–15 Combined (Dual) Mode Connection VFP Display The Virtual Front Panel (VFP) display in the combined mode (Figure 5–15) is very similar to that described in Chapter 4 of this manual. It too is divided into six areas. On the upper left there is a list of submenus under the heading TX Setup. The list begins with: (q) Output/Optics, (w) Timing, (r) Mapping; and, the list ends with (m) Current Configuration and (v) ST2400 2.4Gb/s SDH/SONET Test Set TX Setup. Chapter 4 in this manual and Chapter 4 in the ST2400 2.4Gb/s SDH/SONET Test Set User Manual describes and details all of the VFP menus listed in the SETUP, TX SETUP, and RX SETUP menu list. The reader should be familiar with them before proceeding with the Combined (Dual) Mode setup. W A R N I N G ! Always avoid exposure to the laser beam. Before power is applied to the ST2400 2.4 Gb/s SDH/SONET Test Set be sure that all laser outputs are either covered with the screw cap provided or connected to the appropriate circuit. Be sure to read, understand, and follow all of the Laser Safety instructions in the ST2400 2.4Gb/s SDH/SONET Test Set documentation. C A U T I O N ! Figure illustrates the front panel cabling connections, not the positioning of the equipment. Always allow for adequate air flow when installing, positioning, or mounting equipment. 5–14 ST112 SONET Transmission Test Set Artisan Technology Group - Quality Instrumentation ... Guaranteed | (888) 88-SOURCE | www.artisantg.com Applications and Use Figure 5–16 Combined (Dual) Mode TX Setup From the TX Setup main menu select the ST2400 2.4Gb/s SDH/SONET Test Set TX (v) Setup menu and the list of menus will change to ST2400 TX SETUP, as shown in Figure 5– 16. Then select the 2.4Gb/s Laser menu (l) which is the OC-48 TX LASER menu shown in Figure 5–16. This menu will be used to power on the ST2400 Laser. It also shows that this ST2400 has a TX LASER WAVELENGTH option either 1310nm or 1550nm can be selected. The ST2400 2.4Gb/s SDH/SONET Test Set User Manual describes that option. Figure 5–17 Quick Setup menu, Combined (Dual) Mode Press CTRL T to access the SETUP main menu. Then select the Quick Setup submenu (q) shown in Figure 5–17. This menu is used to select the rate and payload—OC-48 and VT1.5 in this example. Figure 5–18 Quick Setup menu, Combined (Dual) Mode ST112 SONET Transmission Test Set 5–15 Artisan Technology Group - Quality Instrumentation ... Guaranteed | (888) 88-SOURCE | www.artisantg.com Applications and Use The RX SETUP main menu now has a Dual Mode Configuration (Combined (Dual) Mode) submenu. It is used to select the ST2400 2.4Gb/s SDH/SONET Test Set Tributary that will be dropped out to the Test Set, either 155Mb/s (OC-3) or 622Mb/s (OC-12). The Section and Line LED Display and the B1/B2 Error Data Display can be viewed either on the ST2400 2.4Gb/s SDH/SONET Test Set at the OC-48 Rate or on the ST112 SONET Transmission Test Set at the drop rate. Figure 5–19 TX Setup, Combined (Dual) Mode The ST112 SONET Transmission Test Set TX SETUP (v) menu list has a ST2400 2.4Gb/s SDH/SONET Test Set TX SETUP (v) menu, the letter v key is used to switch between the them. These menus are detailed in the ST2400 2.4Gb/s SDH/SONET Test Set Manual. Summary of Combined (Dual) Mode Verification The following summaries the steps used to setup and verify of the Combined (Dual) Mode after the hardware cabling and terminal configuration has been completed. 1. Use the Combined Mode ON command to initiate the combined (Dual) mode. 2. Use the VT100 command to access the VFP. 3. Access the ST2400 2.4Gb/s SDH/SONET Test Set TX SETUP (v) submenu and activate the OC-48 laser. 4. Press CTRL T to access the SETUP menu. 5. Access the Quick Setup (q) menu and select the rate and payload. After which all of the errors and alarms should clear, except for some residual history indications that should clear when the next test cycle begins. 5–16 ST112 SONET Transmission Test Set Artisan Technology Group - Quality Instrumentation ... Guaranteed | (888) 88-SOURCE | www.artisantg.com Applications and Use Trouble Scan Basics The ST112 SONET Transmission Test Set Receiver can be used to scan and analyze SONET STS signals, in a hierarchical manner, with a variety of rates and payload mappings. The Trouble Scan (n) mode will provide a report of section, line, and path errors and alarms that occur during the user-selected dwell time. Trouble Scan can only examine relevant STS information. The ST112 SONET Transmission Test Set Trouble Scan Mode supports the STS-1, OC-1, OC-3, and OC-12 rates with DS3, VT1.5, OC-3c, and OC-12c payload mapping. The Test Set can be used with the ST2400 2.4Gb/s SDH/SONET Test Set to run Trouble Scan at the OC-48 rate with DS3, VT1.5, OC-3c, and OC-12c payload mapping detailed later in this chapter. The Trouble Scan Mode has two types of logs. The Dwell Period Event Log records section, line, path, and a summary of the events that were detected. The Detailed Event Log records errors and alarms with date-stamped. Both event logs can be printed out or displayed on a terminal. All of the errors and alarms are detailed in the Receiver Status Indicators section of Chapter 2. When the Trouble Scan Mode is set to ON it takes over complete command of the Test Set, all other Test Set receiver features are not available. After starting Trouble Scan the test will run continuously or stop automatically at the end of the time that was set in the Timed Test menu. The Virtual Front Panel (VFP) menu n (Figure 5–20) is used to enable the Trouble Scan Mode. To run the Trouble Scan function it is necessary to start the test cycle, after enabling the mode, by typing Ctrl R at the terminal keyboard. During the Trouble Scan test cycle payload results normally available from the Test Set displays are inactive. Normal payload results will resume when the Trouble Scan Mode is turned off and the test cycle is restarted. Figure 5–20 Receiver Trouble Scan Mode The Trouble Scan display, illustrated in Figure 5–20, shows that only the first STS-1 channel in each of the four STS-3 channel groups is being scanned, because 3c mapping is being used at the OC-12 rate. It also shows that pressing the F4 key on the terminal keyboard will access the error log. ST112 SONET Transmission Test Set 5–17 Artisan Technology Group - Quality Instrumentation ... Guaranteed | (888) 88-SOURCE | www.artisantg.com Applications and Use Figure 5–21 Receiver Trouble Scan Mode In Figure 5–21, the Trouble Scan display where all the STS-1 channels in each of the four STS-3 channel groups are being scanned, because DS3 mapping is being used at the OC-12 rate. It also illustrates errors that were detected on two view channels, 3 and 4 (1,3 and 2,1), and that view channel 6 (2,3) is currently being scanned. VIEW CHANNEL numbers, shown in Figure 5–22, are used in the log because any particular rate can contain several different payloads. The first STS-3 can be mapping DS3 payloads, the second STS-3 can be mapping a 3c payload and the other two STS-3 channels can have entirely different payloads, VT1.5 for example. Such an example would provide ten view channels. The first three (1, 2, and 3) would be multiplexed into the first STS-3. Then view channel 4 with its 3c payload would be all of the second STS-3 (all three STS-1 channels). The last six view channels would be multiplexed into the last two STS-3 channels. View channels are numbered sequentially from the first STS-1 (1,1) to the last (4,3). Figure 5–22 Dwell Period Event Log for VIEW CHANNEL 3 5–18 ST112 SONET Transmission Test Set Artisan Technology Group - Quality Instrumentation ... Guaranteed | (888) 88-SOURCE | www.artisantg.com Applications and Use Figure 5–23 Detailed Event Log for VIEW CHANNEL 3 and 4 From the Dwell Period Event Log press the L key to access the Detailed Event Log. Figure 5–23 illustrates the detailed event logs for view channels 3 and 4, respectively. Trouble Scan Summary Trouble Scan is both a mode and a function. The mode can be set to ON anytime but the function only runs and logs maintenance signals (errors and alarms) during the test cycle. ST112 SONET Transmission Test Set 5–19 Artisan Technology Group - Quality Instrumentation ... Guaranteed | (888) 88-SOURCE | www.artisantg.com Applications and Use Trouble Scan Combined (Dual) Mode Trouble Scan is both a Mode and a Function. It was described in detail previously in this chapter. Therefore only the differences and some refreshed material will be presented in this section. Review Trouble Scan Basics section previously presented using Trouble Scan at the OC-48 rate. Figure 5–24 Trouble Scan VFP, Combined (Dual) Mode Trouble Scan can be run at the OC-48 rate when the ST112 SONET Transmission Test Set and the ST2400 2.4Gb/s SDH/SONET Test Set are connected in the Combined (Dual) Mode configuration, illustrated in Figure 5–12. Figure 5–24 illustrates the Trouble Scan Virtual Front Panel at the OC-48 level with VT1.5 payload mapping. The Trouble Scan Mode can be enabled (set to ON) using the software switch at the bottom of the display. The CHANNEL DWELL TIME can also be set from 1 to 99 seconds at the bottom of the same display. The VFP display in Figure 5–24 shows 16 STS-3 channels, each containing its own set of three STS-1 channels. These channels are numbered from 1,1 to 16,3, sequentially. View Channels are number from 1 to 48, sequentially. Whereas STS (STS-3, STS-1) channel 1,1 is equal to View Channel 1 and STS Channel 1,2 is equal to View Channel 2, because the payload is VT1.5. If the STS Channel 1,1 had an OC-3c payload then View Channel 2 would be STS channel 2,1. Figure 5– 25 and Figure 5–26 illustrate Dwell Period Event Log and Detailed event Log for VIEW CHANNEL 3 shown with an LOS error in Figure 5–24. 5–20 ST112 SONET Transmission Test Set Artisan Technology Group - Quality Instrumentation ... Guaranteed | (888) 88-SOURCE | www.artisantg.com Applications and Use Figure 5–25 Dwell Period Event Log, OC-48 Rate Figure 5–26 Detailed Event Log, OC-48 Rate ST112 SONET Transmission Test Set 5–21 Artisan Technology Group - Quality Instrumentation ... Guaranteed | (888) 88-SOURCE | www.artisantg.com Applications and Use 5–22 ST112 SONET Transmission Test Set Artisan Technology Group - Quality Instrumentation ... Guaranteed | (888) 88-SOURCE | www.artisantg.com External Controllers and Printers This chapter explains how to connect external devices to the RS-232-C, GPIB, and parallel ports. This chapter also includes port setup procedures. ST112 SONET Transmission Test Set 6–1 Artisan Technology Group - Quality Instrumentation ... Guaranteed | (888) 88-SOURCE | www.artisantg.com External Controllers and Printers Remote Control Applications The ST112 SONET Transmission Test Set can be remotely operated from its RS-232-C, ST112, or GPIB ports in one of the following ways: • Use the RS-232-C Port manually from a VT100 terminal or VT100 emulation program, using the ST112 SONET Transmission Test Set Virtual Front Panel feature. Recommended for field test and short run applications. • Use the RS-232-C Port manually from a VT100 terminal or VT100 emulation program, entering commands individually. Recommended for learning commands and syntax. • Use the GPIB or RS-232-C Port Automatically from a PC or engineering workstation using a control program. Recommended for factory automation applications. Printer Applications The ST112 SONET Transmission Test Set can print reports to its: 6–2 • Parallel port using a Centronics printer interface • Serial port using an RS-232-C serial printer interface ST112 SONET Transmission Test Set Artisan Technology Group - Quality Instrumentation ... Guaranteed | (888) 88-SOURCE | www.artisantg.com External Controllers and Printers Using the RS-232-C Port The following section describes the RS-232-C serial port. All port setup procedures are detailed in Chapter 4, Menus and Displays. Serial Interface Parameters ST112 SONET Transmission Test Set serial port parameters are listed in Table 6–1 along with their available values and default value. In addition, ECHO and XON/XOFF can be changed remotely via the GPIB or RS-232 port. Table 6–1 RS-232-C (Serial Port) Parameters Parameter MENU and Description BAUD: Baud rate in bits per second. PARITY: Error detection. SIZE: Data bits per character. EOL: End-of-Line terminator. XON/XOFF: Flow control. ECHO: Echo back to the controller each character received by the Test Set. Possible Values 300, 1200, 2400, or 9600 Even, Odd, or None 7 or 8 CR (ASCII decimal 13), LF (ASCII decimal 10), CR/LF, or LF/CR. ON (enabled) or OFF (disabled) ON (enabled) or OFF( disabled) Default Value 9600 None 8 CR/LF ON ON RS-232-C Connector Pinout The RS-232-C interface is a 9-pin D-type socket connector located on the rear-panel. The pin-out of this connector is shown in Table 6–2 below. The ST112 SONET Transmission Test Set RS232-C port is wired as a DCE (data communications equipment) device, it receives on pin 2 and transmits on pin 3. Table 6–2 RS-232-C Connector Pin-out PIN NAME FUNCTION 1. GND Protective Ground 2. RxD Received Data Input: Data is received by the Test Set on this pin. 3. TxD Transmit Data Output: Data is transmitted by Test Set on this pin. 4. CTS Clear To Send. A high level or open applied to this pin indicates to the Test Set that the controller or terminal is ready to receive data. A low level indicates that the controller or terminal is not ready. The Test Set pulls this pin high internally with 27 kohms to +12V. 5. RTS Request to Send. The Test Set always sets this pin high. 6. DTR Data Terminal Ready. The Test Set always sets this pin high. 7. GND Signal Ground. ? DSR Data Set Ready. This input is ignored. all other pins not used. ST112 SONET Transmission Test Set 6–3 Artisan Technology Group - Quality Instrumentation ... Guaranteed | (888) 88-SOURCE | www.artisantg.com External Controllers and Printers Cables Use a straight-through (modem) cable when connecting the Test Set to a DTE (data terminal equipment) device, or a null-modem cable when connecting to another DCE device. Cables are listed in Chapter 1, Getting Started. Quick Test, RS-232-C Port You can perform a quick test of the ST112 SONET Transmission Test Set RS-232-C port using a terminal (or a PC running terminal emulation software) as follows: 1. Verify that the Test Set echo mode is on. 2. Power off the Test Set. 3. Attach the appropriate 9-pin cable from the RS-232-C port to the terminal. Terminals and controller should be configured as a DTE and therefore use straight-through (modem) cable. 4. Power on the ST112 SONET Transmission Test Set and verify that the following prompt appears on the terminal's display: ST112> If the above prompt does not appear, then one or more of the following problems may exist: 1. The cable may be defective. 2. The cable could be the wrong cable type. Use a straight-through (modem) cable if the terminal is configured as a DTE, or a null-modem cable if the terminal is DCE configured. 3. The RS-232-C port setup (baud rate, data bits, parity, etc.) may not be compatible with that of the terminal; both setups should be the same. Protocol The ST112 SONET Transmission Test Set RS-232-C port operates in a terminal mode. Received characters are stored in the receive buffer until a line terminator (CR, LF, LF/CR, or CR/LF) is received, at which point the command is executed. Before a line terminator is received, the backspace key is used to erase the last (right-most) character in the receive buffer. You may use EVEN or ODD parity to perform byte-by-byte error detection. 6–4 ST112 SONET Transmission Test Set Artisan Technology Group - Quality Instrumentation ... Guaranteed | (888) 88-SOURCE | www.artisantg.com External Controllers and Printers Command Format Refer to Chapter 7, Remote Commands for an explanation of the Test Set commands. Except for terminator characters, the same commands are used on the GPIB port. Error Messages The ST112 SONET Transmission Test Set verifies all commands received on the RS-232-C port to make sure that they contain the appropriate mnemonics and parameters. All valid commands will be executed. The Test Set will issue an error message and discards the command when the mnemonic is invalid or an associated parameter is out of range. Error messages are listed in Table 6–3. Table 6–3 RS-232-C Port Error Messages ERROR MESSAGE MEANING *** Input Lost The RS-232-C interface hardware has detected one or more lost or corrupted characters. *** Input Buffer Overflow More than 80 characters are received without a line terminator. *** Command Mnemonic Not Found Unknown command mnemonic received. *** Invalid Command For Interface Command mnemonic found, but it is not valid for the RS-232-C interface. *** Invalid Command Type Command mnemonic found, but it has a missing or added "?" at the end. *** Too Few Parameters One or more expected parameters are missing. *** Too Many Parameters Too many parameters were received, or unknown characters were found trailing the command. *** Invalid Parameter Parameter is not valid for the command. *** Parameter Out of Range Parameter value is not in the range specified for the command. *** Parameter Not In Set Parameter value is not in the set of allowed values for the command. *** Invalid String Length Parameter character string is too long for the command. *** Parameter Separator An expected semicolon (;) between two parameters is missing or a command line is terminated immediately after a semicolon. *** Invalid Non-decimal Parameter Parameter is not in a valid non-decimal format, or the value of the parameter is out of the range 0 to 255 decimal. *** Command Execution Error The instrument did not execute the command properly. *** Out of Memory Processor is out of memory. ST112 SONET Transmission Test Set 6–5 Artisan Technology Group - Quality Instrumentation ... Guaranteed | (888) 88-SOURCE | www.artisantg.com External Controllers and Printers Storing and Printing Data Most Terminal Emulation packages have the ability to capture data to a file or direct it to a printer. These functions are usually listed as File Capture and Print Capture. The file capture function prompts for a path and file name before saving the file to disk. Saved data files can be reviewed on screen or printed on paper at any time when the data is needed. Using the RS-232-C for PC-based Printing The VFP (VT100 emulator) must be off. Enter CTRL + Q to quit VFP mode if it is active. Sequentially push the SETUP key on the Test Set until the REPORT/TEST TIME menu is displayed. Enter the menu and set up the report as if it was going to be printed on a dedicated printer. Rather than select the default parallel printer port, however, select the RS-232-C port instead. With the RS-232 port and your emulator set up as described earlier, all reports that normally would go to the printer will be displayed on the screen. The scrolling buffer and data capture capabilities provided by your communications software are available for viewing and reviewing the data. An example of the on-screen printer display is shown in Figure 6–1 below. The first part is an ON ERROR report, the second part is a SUMMARY report example. ------------------------------------------------------------------------1994/04/02 09:56:28 B1 ERR 1994/04/02 09:56:38 B1 ERR 1994/04/02 09:56:39 B1 ERR 1994/04/02 09:56:47 B2 ERR 1994/04/02 09:56:48 B2 ERR 1994/04/02 09:56:49 B3 ERR 1994/04/02 09:56:50 B1 ERR B2 ERR B3 ERR 1994/04/02 09:56:51 B1 ERR B2 ERR B3 ERR ------------------------------------------------------------------------/START 1994/04/02 09:56:24 RATE: STS1 DATA: BIPOL CLOCK: RECOVER \STOP 1994/04/02 09:57:00 PAYLOAD: VT1.5(01) B1 ERR B2 ERR B3 ERR B1 ERR COUNT 12 B2 ERR COUNT 9 B3 ERR COUNT 8 BPV COUNT 10 BIT ERR COUNT 7 ELAPSED SECONDS 37 SECT ES 5 SECT SES 0 LINE ES 4 LINE SES 0 PATH ES 3 PATH SES 0 SECT SEFS 0 ------------------------------------------------------------------------- Figure 6–1 Error Reports Available (Example Screen) Be sure that the ST112 SONET Transmission Test Set printer function is turned off before activating the VT100 emulator. The printer and VT100 cannot work simultaneously through the single Test Set RS-232 port. If a parallel printer is connected to the ST112 SONET Transmission Test Set parallel printer port, then the printer and VT100 remote screen can function simultaneously. 6–6 ST112 SONET Transmission Test Set Artisan Technology Group - Quality Instrumentation ... Guaranteed | (888) 88-SOURCE | www.artisantg.com External Controllers and Printers Using the GPIB Port The following section describes the GPIB port. All port setup procedures are detailed in Chapter 4, Menus and Displays. GPIB Address and Terminator Use the Auxiliary Setup menu (shown in Chapter 4) to set the GPIB address and message terminator. They can be set as follows: • Address from 0 to 31(Address 31 is off the bus) • Message terminator is set to EOI or EOI/LF (End-Or-Identify with a Line Feed) GPIB Remote and Local Modes The GPIB controllers can be used to put the Test Set into a remote mode, disabling all front panel setup controls. The REM LED (left side corner of front panel) will indicate whether the Test Set is in the remote mode (LED on) or the normal local mode (LED off). Press the SETUP key to return the instrument to the local mode. Local Lock Out GPIB controllers can also put the ST112 SONET Transmission Test Set into the local lock out mode. The LLO LED (left side corner of front panel) indicates whether the Test Set is in the Local Lock Out mode (LED on) or not (LED off). In the LLO mode, like the REMOTE mode, the front panel is disabled. However, unlike the REMOTE mode, there is no key that can disable the LLO mode. Instead, you must issue the appropriate GPIB command, or power off and then on the Test Set. ST112 SONET Transmission Test Set 6–7 Artisan Technology Group - Quality Instrumentation ... Guaranteed | (888) 88-SOURCE | www.artisantg.com External Controllers and Printers GPIB Interface Functions The ST112 SONET Transmission Test Set is configured as a GPIB talker/listener. It does not provide any controller functions. Table 6–4 lists the GPIB functions described in the ANSI IEEE Std. 488.2-1987 that are supported by the Test Set. Table 6–4 GPIB Interface Functions Subset Implementation SH1 Complete source handshake. AH1 Complete acceptor handshake. T6 Basic talker, serial poll, no talk-only, unaddressed if addressed to listen, no extended talker. L4 Basic listener, no listen-only, unaddressed if addressed to talk, no extended listener. SR1 Complete service request. RL1 Remote/local capability including local lockout. PP0 No parallel poll capability. DC1 Complete device clear capability. DT0 No device trigger capability. C0 No controller capability. E2 Tri-state drivers used on DI0 lines for maximum data transfer rate. GPIB Connector An IEEE-488.2 standard GPIB connector is provided for GPIB communication. GPIB Command Format Refer to Chapter 7 for a complete explanation of the Test Set commands. Most remote commands are the same for both the GPIB and RS-232-C ports. ANSI IEEE 488.2 Programming Manual Requirements This section explains how the ST112 SONET Transmission Test Set implements certain standard GPIB functions, as required by ANSI/IEEE Std. 488.2-1987. Power-On Settings When powered-on, the ST112 SONET Transmission Test Set will automatically restore all device settings to their last powered settings. No remote commands will affect this power-on rule. However if the instrument detects a problem in non-volatile (battery-backed) RAM at power up, then factory default settings will be restored rather than the last powered settings. A RAM problem at power up will be indicated in the LCD display by the message: RAM Corruption 6–8 ST112 SONET Transmission Test Set Artisan Technology Group - Quality Instrumentation ... Guaranteed | (888) 88-SOURCE | www.artisantg.com External Controllers and Printers Message Exchange The GPIB message exchange characteristics are as follows: • The input buffer is command line oriented. A new buffer is provided for each new command line. • Each command line may contain a maximum of 80 characters. • The only ST112 SONET Transmission Test Set commands that can return more than one message unit are: *lrn?, oh_all?, oh_err_all? • Command responses are generated immediately. The Test Set will not wait for a read command before generating a response to a query command. • No commands are coupled. ANSI IEEE Functional Elements All functional elements (GPIB Message Types) from the ANSI IEEE 488.2-1987 standard that are supported in Test Set GPIB interface are listed below. For more information refer to your computer or controller documentation and the ANSI IEEE 488.2-1987 standard: Sections 4.3; 7.1.1; 7.3.3 and tables 4.2; 4.3. 1. <PROGRAM MESSAGE> 2. <PROGRAM MESSAGE TERMINATOR> 3. <PROGRAM MESSAGE UNIT> 4. <PROGRAM MESSAGE UNIT SEPARATOR> 5. <COMMAND MESSAGE UNIT> 6. <QUERY MESSAGE UNIT> 7. <COMMAND PROGRAM HEADER> (see note) 8. <QUERY PROGRAM HEADER> (see note) 9. <PROGRAM HEADER SEPARATOR> 10. <PROGRAM DATA SEPARATOR> 11. <PROGRAM DATA> 12. <DECIMAL NUMERIC PROGRAM DATA> 13. <CHARACTER PROGRAM DATA> 14. <NON-DECIMAL NUMERIC PROGRAM DATA> NOTE: The ST112 SONET Transmission Test Set cannot process a <COMPOUND COMMAND PROGRAM HEADER> or a <COMPOUND QUERY PROGRAM HEADER>. ST112 SONET Transmission Test Set 6–9 Artisan Technology Group - Quality Instrumentation ... Guaranteed | (888) 88-SOURCE | www.artisantg.com External Controllers and Printers Specific Command Implementations Reset Command, as defined in the ANSI IEEE 488.2-1987 standard, the Test Set reset command (*rst) does the following: • Resets all device settings to their default values, except remote interface settings. • Ignores macros (macros are not implemented in the Test Set). • Forces the Test Set into the Operation Complete Command Idle State (OCIS) and Operation Complete Query Idle State (OQIS). Overlapped and Sequential Commands: All Test Set commands are sequential. Operation Complete Message: Test Set command operation is always immediate. GPIB Status and Event Reporting System The ST112 SONET Transmission Test Set GPIB status and event reporting functions are compatible with the ANSI IEEE 488.2-1987 standard. The status and event reporting system can be configured to alert the GPIB controller whenever a status change or event occurs. This is accomplished by maintaining two status registers and their associated enable register. The four status registers are: • Standard Event Status Register (SESR) general purpose status register • Event Status Enable Register (ESER) enable register • Status Byte Register (SBR) general purpose status register • Service Request Enable Register (SRER) enable register The GPIB bus SRQ (service request) line is asserted when one or more status bits are set. The controller uses a serial poll procedure to find out which instrument initiated the SRQ. Specific status bits can be enabled or disabled to control which status changes or events result in an SRQ. The Test Set status registers can be read and set from the RS-232 control interface, however, the SRQ function is only available on the GPIB bus. A status register may contain defined (used) bits and undefined (unused) bits. Each defined bit in a status register corresponds to a given instrument status or event. Once cleared (set to zero), the value of a status bit will remain zero (false) as long as the corresponding event or status does not occur. However, if it is enabled, the value of a status bit will be set to one (true) when the corresponding event or status occurs. Status bits are latched once a status bit is set to one and will remain in this state even when the corresponding event or status becomes false, until the bit is reset by a command or when the ST112 SONET Transmission Test Set is powered off. Each status register has an associated enable register. Moreover, each defined bit in a status register has a corresponding defined bit in the associated enable register. When an enable bit is set to zero, then the corresponding status bit is ignored by the instrument regardless of the state of the relevant event or instrument status. However when an enable bit is set to one, the corresponding status bit is enabled. 6–10 ST112 SONET Transmission Test Set Artisan Technology Group - Quality Instrumentation ... Guaranteed | (888) 88-SOURCE | www.artisantg.com External Controllers and Printers GPIB Commands The contents of any Test Set status or enable register can be read by an external controller using the appropriate query command. The contents of any enable register can be set to a particular value using the appropriate set command. The contents of the SESR register can be cleared using the Clear Status (*CLS) command. The SESR is automatically cleared (reset) after being queried. For more information on Test Set remote commands, see Chapter 7. The correspondence between ST112 SONET Transmission Test Set status registers, enable registers, and commands is summarized in Table 6–5. Table 6–5 Status Registers, Enable Registers, and Related Commands Status Register Status Register Query Enable Register Commands Standard Event Status Register (SESR) Status Byte Register (SBR) *ESR? Event Status Enable Register (ESER) *STB? Service Request Enable Register (SRER) Enable Register Commands Set *ESE *SRE Query *ESE? *SRE? • The *CLS command to clear (reset) the SESR and return the instrument to the Operation Complete Command Idle State and the Operation Complete Query Idle State. In this state the instrument has no data in its input or output buffers and is not executing a command. • The *ESR? query command also clears (resets to zero) the SESR status register. Standard Event Status Register The Standard Event Status Register (SESR) is a status register that indicates errors in command syntax and related occurrences. The name of each bit in the SESR is shown in Table 6–6. The function of each bit in the SESR is defined in Table 6–7. Table 6–6 Standard Event Status Register (SESR) 7 6 5 4 PON URQ CME EXE ST112 SONET Transmission Test Set 3 DDE 2 QYE 1 RQC 0 OPC 6–11 Artisan Technology Group - Quality Instrumentation ... Guaranteed | (888) 88-SOURCE | www.artisantg.com External Controllers and Printers Table 6–7 SESR Bit Definitions Bit Definition 7 (MSB) PON (Power On): Set to one when the instrument is first powered on. 6 URQ (User Request): Not used. 5 CME (Command Error): Set to one when a command header (mnemonic) has been received that is not recognized or is invalid. 4 EXE (Execution Error): Set to one when an error has occurred while the instrument was responding to a set command or query. May indicate: a) parameter is out of range, b) command uses too many or too few parameters, or c) command cannot be properly executed due to the instrument's current state. 3 DDE (Device Dependent Error): Set to one if input data has been lost at the interface (corrupted characters) or the input buffer has overflowed because a command exceeded the 80 character limit without a terminator. 2 QYE (Query Error): Set to one if: a) an attempt has been made to query the output queue when there are no messages available or pending, b) a command is received but the output queue is not empty, or c) an attempt has been made to query the output queue when an unterminated command is in the input queue. 1 RQC (Request Control): Not used. 0 (LSB) OPC (Operation Complete): Set to one after a *OPC command is received. Event Status Enable Register The Event Status Enable Register (ESER) is the enable register associated with the SESR status register. Each enable bit in the ESER occupies the same bit position as the corresponding status bit in the SESR. Status Byte Register The Status Byte Register (SBR) indicates the overall status of the instrument and is used to control the SRQ line on the GPIB bus. The name of each defined bit in the SBR is shown in Table 6–8. The function of each defined bit in the SBR is described in Table 6–9. Table 6–8 Status Byte Register (SBR) 7 6 -- 6–12 MSS 5 ESB 4 MAV 3 2 -- 1 -- 0 -- -- ST112 SONET Transmission Test Set Artisan Technology Group - Quality Instrumentation ... Guaranteed | (888) 88-SOURCE | www.artisantg.com External Controllers and Printers Table 6–9 Status Byte Register Bit Definitions Bit Definition 7 (MSB) Not defined. 6 MSS 1(Master Status Summary): This bit summarizes the state of the three other bits in the SBR. It is set to 0 if all other bits are 0. It will be set to 1 when any other bit in the SBR equals 1 and its corresponding bit in the SRER is set to one. The status of the MSS bit is reevaluated each time a bit in the SBR or the Service Request Enable Register (SRER) changes. 5 ESB (Event Status Bit): This bit summarizes the Standard Event Status Register (SESR). It is set to 0 if all bits in the SESR are 0. It is set to 1 if any enabled bit in the SESR equals 1. If the ESB is enabled and set to 1, then the RQS and MSS bits will be set to 1. The status of the ESB bit is reevaluated each time one of the bits in the SESR or the Event Status Enable Register (ESER) changes. 4 MAV (Message Available): This bit is set to 1 when there is an output available for the controller. 0-3 Not defined. 1 When you use a serial poll to read the SBR, bit 6 is the RQS bit. When you use the *STB? query to read the SBR, bit 6 is the MSS bit. Service Request Enable Register The Service Request Enable Register (SRER) is the enable register associated with the SBR status register defined above. The SRER contains an enable bit for the ESB and MAV bits in the SBR. However there is no enable bit for the MSS or RQS bits which are always enabled. ST112 SONET Transmission Test Set 6–13 Artisan Technology Group - Quality Instrumentation ... Guaranteed | (888) 88-SOURCE | www.artisantg.com External Controllers and Printers 6–14 ST112 SONET Transmission Test Set Artisan Technology Group - Quality Instrumentation ... Guaranteed | (888) 88-SOURCE | www.artisantg.com Remote Commands This chapter explains the general syntax of the ST112 SONET Transmission Test Set remote command language and defines all commands. Command definitions are grouped by function. In addition, an alphabetical list of all Test Set commands is provided with page references to individual command descriptions. Artisan Technology Group - Quality Instrumentation ... Guaranteed | (888) 88-SOURCE | www.artisantg.com Remote Commands Command Types and Syntax The ST112 SONET Transmission Test Set command set includes two basic types, set and query. The set commands are used to change current status, values, or states—to start or stop a test, for example. While query commands ask the instrument to respond with the contents of a status register, the value of a given setup parameter, a measurement result, or a current state. Remote commands are directly related to setup parameters and results rather than to front panel keys or setup menus. For example, there is no remote command used to press the SETUP Key. Some commands may only have a query form or only a set form, however, many have both forms. When a command has both a set and query form, the mnemonic header used for the query form will be identical to its corresponding set command form, except for an added (?) question mark. The following examples use the mnemonics for the view angle query and set commands: view_angle? (query command) view_angle n (set command) The view angle query command uses the header, view_angle, with a question mark and no space. The view angle set command uses the same header with a the veritable n (which represents an integer from 0 to 7) with a space. Command Symbols and Delimiters Symbol <CR> <LF> numbers and integers <string> [] | 7–2 Meaning Carriage return (ASCII decimal 13). Line Feed (ASCII decimal 10). 10 Decimal #HFA Hexadecimal: #Q377 Octal: #B11111111 Binary: NOTE: Unless otherwise indicated, all numbers and integers are decimal. A character string. Enclosed argument is required. Exclusive OR argument [a | b | c] that means include one and only one of the following parameters: a, b, or c. ST112 SONET Transmission Test Set Artisan Technology Group - Quality Instrumentation ... Guaranteed | (888) 88-SOURCE | www.artisantg.com Remote Commands Multiple Commands A given command line may contain one or more commands, up to 80 ASCII characters, both upper and lower case. Multiple commands use a semicolon as a delimiter, as follows: Prompt> rx_sts_chan 3; sts_oof?; sect_los?; sect_lof?; b1_ber? Arguments Commands may include one or more arguments (parameters) following the header. The first argument following the header must be separated from the header by one or more blank characters (spaces). Subsequent arguments must be separated from previous parameters using commas. Blank Characters (Spaces) One or more spaces are required between the command header and first parameter (if any). Otherwise spaces are ignored and may be used on a command line between headers, parameters, or required separators for readability. Arguments Outside of Legal Ranges If the instrument receives a set command with an argument that is outside the legal range for that argument, then the instrument will set the indicated parameter to its maximum or minimum legal value, depending on which is closer to the received value. Command Line Terminator Command lines must be terminated as follows: • RS-232 Interface: Command lines issued to the instrument should be terminated by a simple carriage return (CR). Responses generated by the instrument will be terminated as specified in the RS-232 End-of-Line setup menu for carriage return and line feed functions (CR, LF, CR/LF or LF/CR). • GPIB Interface: Command lines issued to the instrument can be terminated by either EOI (End-Or-Identify) or EOI/LF. Responses generated by the instrument will be terminated as specified in the GPIB setup menu for End-Or-Identify and Line Feed functions (EOI or EOI/LF). ST112 SONET Transmission Test Set 7–3 Artisan Technology Group - Quality Instrumentation ... Guaranteed | (888) 88-SOURCE | www.artisantg.com Remote Commands Command Examples The following is a brief example of an interactive remote session that does the following: 1. Generates a random bit error rate of 1 x 10⁻⁶. 2. Enables the Loss Of Signal (LOS) to occur for 135 micro seconds. 3. Sets the Line AIS Indication Signal to “Burst” and enables that Alarm output. 4. Sets the SPE Pointer set during the LOP test to “burst,” with the Pointer value set to 522. Example interactive session: 7–4 parity_rate 6 (sets error generator rate 1 x10⁻⁶). parity_rate? (queries error generator rate setup) PARITY_RATE 6 (response) error_rate on (turns error generator on) error_rate? (queries state of error generator) ERROR_RATE ON (response) los_time 135e-06 (sets LOS generator time to 135 µs) los_enab (causes one LOS event) alm_burst l_ais (configures alarm burst generator for AIS) alm_count 100 (sets alarm burst length to 100 STS-n frames) alm_enab_burst (generates one AIS alarm burst) ST112 SONET Transmission Test Set Artisan Technology Group - Quality Instrumentation ... Guaranteed | (888) 88-SOURCE | www.artisantg.com Remote Commands Table Of Commands GENERAL COMMANDS.................................................................................... 12 header [on | off ] Header Mode Set Command................................................................................... 12 header? Header Mode Query Command .......................................................................................... 12 logo? Logo Query Command ........................................................................................................... 12 *idn? Identify ................................................................................................................................... 12 *lrn? Learn Query Command .......................................................................................................... 12 *wai Wait Command ...................................................................................................................... 13 STANDARD REGISTER COMMANDS .............................................................. 13 *cls Clear Status Register Command............................................................................................. 13 *ese [n] Event Status Enable Register Set Command....................................................................... 13 *ese? Event Status Enable Register Query Command ..................................................................... 13 *esr? Event Status Register Query Command ................................................................................. 13 *opc Operation Complete Command .............................................................................................. 13 *opc? Operation Complete Query Command ................................................................................... 14 *rst Reset Command ..................................................................................................................... 14 *sre [n] Service Request Enable Command ..................................................................................... 14 *sre? Service Request Enable Query Command.............................................................................. 14 *stb? Status Byte Query Command ................................................................................................. 14 tse Test Status Enable Register Set Command................................................................................. 14 tse? Test Status Enable Register Query Command........................................................................ 15 tsr? Test Status Register Command............................................................................................... 15 GENERAL SETUP COMMANDS....................................................................... 15 quick_setup [n] Quick Setup Command............................................................................................. 15 audio_vol [n] Audio Volume Set Command.................................................................................... 15 audio_vol? Audio Volume Query Command ................................................................................... 15 date “[ yy(yy)/mm/dd ]” Date Set Command ..................................................................................... 15 date? Date Query Command ............................................................................................................ 16 dsx1_code [ ami | b8zs ] DSX-1 Code Configuration Set Command................................................. 16 dsx1_code? DSX-1 Code Configuration Query Command........................................................... 16 edit_setup [n], “[s]” Edit Setup Label Set Command......................................................................... 16 edit_setup? [n] Edit Setup Label Query Command ............................................................................ 16 gpib_address? GPIB Address Query Command ................................................................................ 16 gpib_address [n] GPIB Address Set Command ................................................................................. 17 gpib_bus? GPIB Bus Query Command ........................................................................................... 17 gpib_bus [talk_listen | off_bus] GPIB Bus Mode Command ............................................................. 17 options? Options Query Command ................................................................................................... 17 print_port? Print Port Query Command ............................................................................................ 17 print_port [ parallel | serial ] Print Port Select Command .................................................................. 17 rs_echo [on | off] RS-232 Echo Control Command ........................................................................... 18 rs_echo? RS-232 Echo Control Command ........................................................................................ 18 rs_pmt_lf [on | off] RS-232 Prompt Linefeed Set Command ............................................................. 18 rs_pmt_lf? RS-232 Prompt Linefeed Query Command.................................................................... 18 rs_prompt "s" RS-232 prompt command .......................................................................................... 18 rs_xon_xoff [ on | off ] RS-232 Flow Control Set Command............................................................. 18 rs_xon_xoff? RS-232-C Flow Control Query Command ................................................................ 19 ST112 SONET Transmission Test Set 7–5 Artisan Technology Group - Quality Instrumentation ... Guaranteed | (888) 88-SOURCE | www.artisantg.com Remote Commands save_setup [n] Save Setup Command ................................................................................................ 19 stored? Stored Setup Query Command............................................................................................ 19 time “[ hh:mm:ss ]” Internal Time Clock Set Command................................................................... 19 time? Internal Time Clock Query Command ................................................................................... 19 view_angle? Front-panel View Angle Query Command................................................................ 19 view_angle [ n ] Front-panel View Angle Set Command.................................................................. 19 RECEIVER SETUP AND MODE COMMANDS.................................................. 20 dsx_level [ terminate | bridge ] DSX/STSX Level Setup Command .................................................. 20 dsx_level? DSX/STSX Level Query Command ............................................................................... 20 rx_dcc [ section | line ] Receive Data Comm Channel Set Command................................................ 20 rx_dcc? Receive Data Communication Channel Query Command .................................................. 20 rx_map [ ds3 | bit_fl | byte_fl | 3c | 12c ] Rx Mapping Mode Set Command..................................... 21 rx_map? Receive Mapping Mode Query Command.......................................................................... 21 rx_ocn [ oc1 | oc3 | oc12 ] Receiver Optical Rate Set Command..................................................... 21 rx_ocn? Receiver Optical Rate Query Command ............................................................................. 21 rx_owire [ local | express ] Receive Order Wire Set Command ......................................................... 21 rx_owire? Receive Order Wire Query Command............................................................................ 22 rx_signal [ stsx1 | dsx3 | dsx1 | optic ] Rx Signal Set Command ....................................................... 22 rx_signal? Receiver Signal Query Command................................................................................... 22 rx_sts_chan [ n ] Receiver STS-1 Channel Set Command ................................................................. 22 rx_sts_chan? Receive STS-1 Channel Query Command ................................................................ 22 rx_vt_chan [ n ] Receiver VT Channel Set Command ....................................................................... 22 rx_vt_chan? Receive VT Channel Query Command ..................................................................... 23 rx_vt_map [ map1x28 | map4x7 ] Receiver VT Mapping Set Command .......................................... 23 rx_vt_map? Receive VT Mapping Query Command ..................................................................... 23 TRANSMITTER SETUP AND MODE COMMANDS .......................................... 24 opt_output [ on | off ] Optical Output Set Command ......................................................................... 24 opt_output? Optical Output Query Command................................................................................ 24 sts_sync [ sts1 | sts3 | async | bits | loop ] Transmit Timing Set Command.............................................. 24 sts_sync? Transmit Timing Query Command................................................................................. 24 tx_dcc [ off | section | line ] Tx Data Comm Channel Set Command ................................................ 24 tx_dcc? Transmit Data Communication Channel Query Command ................................................. 25 tx_map [int_ds3 | ext_ds3 | int_bit_fl | ext_bit_fl |byte_fl | 3c | 12c ] Tx Mapping Mode Set Command 25 tx_map? Transmitter Mapping Mode Query Command .................................................................... 25 tx_ocn [ oc1 | oc3 | oc12 ] Transmitter Optical Rate Set Command................................................... 25 tx_ocn? Transmitter Optical Rate Query Command......................................................................... 25 tx_owire [ local | express | off ] Transmit Order Wire Set Command ................................................ 26 tx_owire? Transmit Order Wire Query Command .......................................................................... 26 tx_signal [ stsx1 | dsx3 ] Tx Signal Set Command ............................................................................. 26 tx_signal? Transmitter Signal Query Command .............................................................................. 26 tx_vt_map [ map1x28 | map4x7 ] Transmitter VT Mapping Set Command ...................................... 26 tx_vt_map? Transmitter VT Mapping Query Command ............................................................... 27 TEST CYCLE CONTROL COMMANDS ............................................................ 27 test_mode [ untimed | timed | repeat ] Test Mode Set Command ....................................................... 27 test_mode? Test Mode Query Command ......................................................................................... 27 test_print [ log | prev | current | off ] Test Print Set Command........................................................... 27 test_report [ log | eot | both | off ] Test Report Set Command ........................................................... 28 test_report? Test Report Query Command.................................................................................... 28 test_squelch [ on | off ] Test Squelch Set Command .......................................................................... 28 7–6 ST112 SONET Transmission Test Set Artisan Technology Group - Quality Instrumentation ... Guaranteed | (888) 88-SOURCE | www.artisantg.com Remote Commands test_squelch? Test Squelch Query Command.................................................................................. 28 test_state [ run | stop ] Test State Set Command ................................................................................ 28 test_state? Test State Query Command........................................................................................... 29 test_time “[ d-hh:mm:ss ]” Test Time Set Command......................................................................... 29 test_time? Test State Query Command........................................................................................... 29 pause_state [ pause | resume ] Pause State Set Command .................................................................. 29 pause_state? Pause State Query Command .................................................................................... 29 print_string "s" Print String Command .............................................................................................. 29 PAYLOAD COMMANDS .................................................................................... 30 ds3_word #H[ 00–FF ] DS3 Word Set Command ............................................................................. 30 ds3_word? DS3 Word Query Command .......................................................................................... 30 rx_ds3_frm [ m13 | cbit | unframed ] Rx DS3 Framing Format Set Cmd. .......................................... 30 rx_ds3_frm? Rx DS3 Framing Format Query Command ............................................................... 30 rx_ds3_pat [ prbs_15 | prbs_23 | word ] Rx DS3 Pattern Set Command............................................ 30 rx_ds3_pat? Receiver DS3 Pattern Query Command .................................................................... 31 rx_stress [ daly1 | daly2 | daly3 | word_18 | word_28 | word_324 | ones | zeros | off ] Receiver Stress Test Set Command 31 rx_stress? Receiver Stress Test Query Command .......................................................................... 31 rx_vt_chan [ n ] Receiver VT Channel Select Command................................................................... 31 rx_vt_chan? Receiver VT Channel Query Command.................................................................... 31 rx_vt_fram [ unframed | sf | esf | slc ] Rx VT Frame Set Command................................................... 32 rx_vt_fram? Receiver VT Frame Query Command....................................................................... 32 rx_vt_patt [ prbs_23 | prbs_15 | qrw | word ] Rx VT Pattern Set Command ......................................... 32 rx_vt_patt? Receiver VT Pattern Query Command .......................................................................... 32 s12c_patt_inv [ norm | invert ] 12c or 3c Pattern Set Command........................................................ 32 s12c_patt_inv? Receiver 12c or 3c Pattern Query Command ............................................................ 33 tx_ds3_frm [ m13 | cbit | unframed ] Tx DS3 Framing Format Set Cmd. .......................................... 33 tx_ds3_frm? Tx DS3 Framing Format Query Command ............................................................... 33 tx_ds3_pat [ prbs_15 | prbs_23 | word ] Tx DS3 Pattern Set Command ............................................ 33 tx_ds3_pat? Transmitter DS3 Pattern Query Command................................................................ 33 tx_stress [ daly1 | daly2 | daly3 | word_18 | word_28 | word_324 | ones | zeros | off ] Transmitter Stress Test Set Command 34 tx_stress? Transmitter Stress Test Query Command ...................................................................... 34 tx_vt_chan [ n ] Transmitter VT Channel Select Command .............................................................. 34 tx_vt_chan? Transmitter VT Channel Query Command ............................................................... 34 tx_vt_fram [ unframed | sf | esf | slc ] Tx VT Frame Set Command ................................................... 35 tx_vt_fram? Transmitter VT Frame Query Command .................................................................. 35 tx_vt_mode [ all | single ] Tx VT Mode Set Command ..................................................................... 35 tx_vt_mode? Transmitter VT Mode Set Command ........................................................................ 35 tx_vt_patt [ prbs_23 | prbs_15 | qrw | word ] Tx VT Pattern Set Command ......................................... 35 tx_vt_patt? Transmitter VT Pattern Query Command...................................................................... 35 vt_word [ b1, b2, b3 ] VT 24-Bit Word Set Command..................................................................... 36 vt_word? VT 24-Bit Word Query Command ................................................................................ 36 POINTER COMMANDS, SPE ............................................................................ 37 burst_state? Burst State Query Command..................................................................................... 37 spe_burst [ pos | neg ] SPE Burst Pointer Set Command ................................................................... 37 rx_pos_pj? Receiver SPE +PJ Query Command.............................................................................. 37 rx_neg_pj? Receiver SPE –PJ Query Command .............................................................................. 37 rx_spe_ndf? Receiver SPE NDF Count Query Command............................................................. 38 rx_spe_pntr? Receiver SPE Pointer Value Query Command ......................................................... 38 tx_ptr_ndf [ n ] Transmitter STS NDF Setup Command.................................................................... 38 ST112 SONET Transmission Test Set 7–7 Artisan Technology Group - Quality Instrumentation ... Guaranteed | (888) 88-SOURCE | www.artisantg.com Remote Commands tx_ptr_ndf? Transmitter STS NDF Setup Query Command ............................................................. 38 tx_spe_ndf Transmitter SPE NDF Set Pointer Execute Command .................................................. 38 tx_spe_pntr? Transmitter SPE Pointer Query Command................................................................ 38 tx_spe_sing [ pos | neg ] SPE Single Step Pointer Set Command ...................................................... 39 POINTER COMMANDS, VT............................................................................... 39 rx_vt_ndf? Receiver VT Count Query Command............................................................................ 39 rx_vt_pntr? Receiver VT Value Query Command............................................................................ 39 vt_ptr_ndf [ n ] Transmitter VT NDF Setup Command ..................................................................... 39 vt_ptr_ndf? Transmitter VT NDF Setup Query Command ............................................................... 39 tx_vt_ndf Transmitter VT NDF Set Pointer Execute Command.................................................... 40 tx_vt_pntr? Transmitter VT NDF Pointer Query Command ............................................................ 40 tx_vt_sing [ pos | neg ] VT Single Step Pointer Set Command .......................................................... 40 vt_pos_pj? Receiver VT +PJ Query Command ............................................................................... 40 vt_neg_pj? Receiver VT –PJ Query Command ............................................................................... 40 RECEIVER OVERHEAD QUERY COMMANDS ................................................ 41 rx_aps_byte? Receiver APS Bytes Query Command ...................................................................... 41 rx_j1_trace? Receive J1 Trace Query Command ........................................................................... 41 rx_oh_all? Receive Overhead All Query Command......................................................................... 41 rx_oh_byte? “[ s ]” Receive Overhead Byte Query Command .......................................................... 42 rx_oh_offset? [n] Receive Overhead Offset Query Command........................................................... 42 RECEIVER MEASUREMENT COMMANDS ...................................................... 43 b1_ber? B1 Error Rate Query Command.......................................................................................... 43 b1_err? B1 Error Count Query Command ....................................................................................... 43 b1_es? B1 Errored Seconds Query Command ................................................................................ 43 b1_ses? B1 Severely Errored Seconds Query Command ................................................................. 43 b2_ber? B2 Error Rate Query Command.......................................................................................... 43 b2_err? B2 Error Count Query Command ....................................................................................... 43 b2_es? B2 Errored Seconds Query Command ................................................................................ 44 b2_ses? B2 Severely Errored Seconds Query Command ................................................................. 44 b3_ber? B3 Error Rate Query Command.......................................................................................... 44 b3_err? B3 Error Count Query Command ....................................................................................... 44 b3_es? B3 Errored Seconds Query Command ................................................................................ 44 b3_ses? B1 Severely Errored Seconds Query Command ................................................................. 44 bpv_err? BPV Error Count Query Command .................................................................................... 44 bpv_rate? BPV Error Rate Query Command .................................................................................. 45 ds_bit_err? DS1/DS3 Bit Error Count Query Command................................................................... 45 ds_bit_rate? DS1/DS3 Bit Error Rate Query Command................................................................. 45 ds_fram_err? DS1/DS3 Frame Bit Error Count Query Command .................................................. 45 ds1_crc6_err? DS1 CRC-6 Parity Error Query Command ................................................................ 45 ds1_crc6_rate? DS1 CRC-6 Parity Error Rate Query Command....................................................... 45 ds3_bit_es? DS3 Bit Errored Seconds Query Command .............................................................. 45 ds3_bit_ses? DS3 Bit Severely Errored Seconds Query Command ............................................... 46 ds3_par_err? DS3 Parity Error Count Query Command................................................................. 46 ds3_par_es? DS3 Parity Errored Seconds Query Command ......................................................... 46 ds3_par_rate? DS3 Parity Error Rate Query Command .................................................................... 46 ds3_par_ses? DS3 Parity Severely Errored Seconds Query Command............................................ 46 elap_time? Elapsed Test Cycle Time Query Command.................................................................... 46 log_clear Clear Error Log Execute Command .............................................................................. 46 log_print Print Error Log Execute Command ............................................................................... 47 7–8 ST112 SONET Transmission Test Set Artisan Technology Group - Quality Instrumentation ... Guaranteed | (888) 88-SOURCE | www.artisantg.com Remote Commands s3c_bit_err? s3c_bit_rate? s12c_bit_err? s12c_bit_rate? sts_febe_err? sts_fram_err? vt_bip2_err? vt_bip2_rate? STS-3c Bit Error Count Query Command ................................................................ 47 STS-3c Bit Error Rate Query Command.................................................................... 47 STS-12c Bit Error Count Query Command .............................................................. 47 STS-12c Bit Error Rate Query Command................................................................. 47 FEBE Total Error Count Command ........................................................................... 47 STS-n Frame Error Query Command........................................................................ 47 VT BIP-2 Error Query Command ............................................................................. 48 VT BIP-2 Error Rate Query Command..................................................................... 48 RECEIVER LED STATUS COMMANDS ........................................................... 48 ds_ais ? DS1 AIS Query Command............................................................................................... 48 ds_crc? DS1 CRC Query Command ................................................................................................ 48 ds_lof? DS1 LOF Query Command................................................................................................. 48 ds_sync? DS1 SYNC Query Command ........................................................................................ 49 ds1_yellow? DS1 YEL-DS3 Query Command .............................................................................. 49 ds3_bit_sta? DS3 BIT Indicator Query Command ........................................................................ 49 ds3_idle? DS3 IDLE Indicator Query Command .......................................................................... 49 ds3_ones? DS3 All Ones Query Command .................................................................................... 49 ds3_par_sta? DS3 Parity Query Command..................................................................................... 50 ds3_xbit? DS3 Yellow-DS3 Query Command............................................................................... 50 led_stat? LED Status Query Command............................................................................................. 50 line_ais? Line AIS Query Command ................................................................................................ 50 line_b2? Line B2 Query Command .................................................................................................. 50 line_ferf? Line FERF Query Command ......................................................................................... 51 line_lop? Line LOP Query Command ........................................................................................... 51 path_ais? Path AIS Query Command ............................................................................................ 51 path_b3? Path B3 Query Command .............................................................................................. 51 path_febe? Path FEBE Query Command......................................................................................... 51 path_yel? Path Yellow Query Command ....................................................................................... 52 pyld_los? Payload LOS Query Command ..................................................................................... 52 sect_b1? Section B1 Query Command ............................................................................................. 52 sect_lof? Section LOF Query Command ...................................................................................... 52 sect_los? Section LOS Query Command ...................................................................................... 52 sts_oof? STS-1 OOF Query Command ............................................................................................ 53 vt_ais? VT Path AIS Query Command .......................................................................................... 53 vt_bip2_stat? VT Path BIT-2 Query Command .............................................................................. 53 vt_febe? VT Path FEBE Query Command ....................................................................................... 53 vt_yellow? VT Path (Yellow) RDI Query Command ...................................................................... 53 TRANSMITTER ERROR COMMANDS.............................................................. 54 b1_parity B1 Parity Error Set Command........................................................................................ 54 b2_parity B2 Parity Error Set Command........................................................................................ 54 b3_parity B3 Parity Error Set Command........................................................................................ 54 bip2_error VT BIP-2 Parity Error Set Command............................................................................. 54 bip2_rate [ n ] VT BIP-2 Parity Error Set Command ........................................................................ 54 bip2_rate? VT BIP-2 Error Rate Query Command ......................................................................... 54 bip2_random [ on | off ] VT BIP-2 Random Error Rate Set Command ............................................. 55 bip2_random? VT BIP-2 Random Error Rate Query Command ....................................................... 55 bpv_error STSX-1 BPV Error Set Command ................................................................................ 55 ds1_bit_rate [ n ] DS1 Bit Error Rate Set Command ......................................................................... 55 ds1_bit _rate? DS1 Bit Error Rate Query Command......................................................................... 55 ds1_bit _random [ on | off ] DS1 Random Error Rate Set Command ............................................... 55 ds1_bit_random? DS1 Random Error Rate Query Command........................................................... 56 ST112 SONET Transmission Test Set 7–9 Artisan Technology Group - Quality Instrumentation ... Guaranteed | (888) 88-SOURCE | www.artisantg.com Remote Commands ds1_bit_error DS1 Bit Error Set Command.................................................................................... 56 ds3_bit_rate [ n ] DS3 Bit Error Rate Set Command ......................................................................... 56 ds3_bit _rate? DS3 Bit Error Rate Query Command......................................................................... 56 ds3_bit_random [ on | off ] DS3 Random Error Rate Set Command ................................................ 56 ds3_bit_random? DS3 Random Error Rate Query Command........................................................... 56 ds3_bpv_rate [ n ] DS3 BPV Error Rate Set Command..................................................................... 57 ds3_bpv_rate? DS3 BPV Error Rate Query Command...................................................................... 57 ds3_bpv_random [ on | off ] DS3 BPV Random Error Set Command ............................................... 57 ds3_bpv_random? DS3 BPV Random Error Query Command ........................................................ 57 ds3_error DS3 Bit Error Set Command ........................................................................................ 57 error_rate [ on | off ] STS Bit Error Rate Set Command ................................................................... 57 error_rate? STS Bit Error Rate Query Command ............................................................................ 58 parity_rate [ n ] STS-n Parity Rate Set Command.............................................................................. 58 parity_rate? STS-n Parity Rate Query Command.......................................................................... 58 pyld_err [ parameter1, parameter2 ] Change Displayed Menus Remotely......................................... 58 random_b1 Random B1 Parity Error Set Command......................................................................... 58 s3c_error STS 3c Error Set Command .......................................................................................... 59 sts_err [ parameter1, parameter2 ] Change Displayed Menus Remotely........................................... 59 stx_bpv_rate [ n ] STSX-1 BPV Rate Set Command ......................................................................... 59 stx_bpv_rate? STSX-1 BPV Rate Query Command ......................................................................... 59 stx_bpv_rand [ on | off ] STSX-1 BPV Random Set Command ........................................................ 60 stx_bpv_rand? STSX-1 BPV Random Query Command................................................................... 60 spe_error SPE Error Set Command ............................................................................................... 60 tx_j1_fill #h[nn] Transmit J1 Trace Set Command............................................................................ 60 tx_j1_trace “[ message ]” Transmit J1 Trace Set Command.............................................................. 60 tx_j1_trace? Transmit J1 Trace Query Command ......................................................................... 60 tx_oh_all? Transmit Overhead All Query Command ...................................................................... 61 tx_oh_def TX Overhead Default Set Command.............................................................................. 61 tx_oh_edit [ on | enter | esc ] TX Overhead Edit Command............................................................... 61 tx_oh_edit? TX Overhead Edit Query Command .......................................................................... 61 tx_oh_byte “[ s ]”, #h[ b ] TX Overhead Byte Set Command............................................................ 62 tx_oh_byte? “[s]” Transmit Overhead Byte Query Command .......................................................... 62 tx_oh_offset [n], #h[b] Transmit Overhead Offset Byte Set Command ............................................. 63 tx_oh_offset? [n] Transmit Overhead Offset Query Command ......................................................... 63 tx_sts_chan [ n ] STS-n Channel Error Set Command ...................................................................... 63 tx_vt_v5 [n] Transmit V5 Byte Set Command................................................................................ 64 tx_vt_v5? Transmit V5 Byte Query Command ............................................................................... 64 ALARMS, TRANSMITTER................................................................................. 65 alm_burst [ lof | l_ais | ferf | sts_ais | sts_yel | vt_ais | vt_yel | sts_oorp ] Alarm Burst Set Command..... 65 alm_burst? Alarm Burst Query Command ........................................................................................ 65 alm_clear Alarm Clear Command................................................................................................... 65 alm_enab [ burst | multi | off ] Alarm Enable Command .................................................................... 65 alm_enab? Alarm Enable Query Command...................................................................................... 66 alm_count [n] Alarm Count Set Command ....................................................................................... 66 alm_count? Alarm Count Query Command ...................................................................................... 66 alm_ferf [ on | off ] Alarm FERF Set Command ............................................................................... 66 alm_ferf? Alarm FERF Query Command ...................................................................................... 66 alm_l_ais [ on | off ] Alarm Line AIS Set Command ........................................................................ 66 alm_l_ais? Alarm Line AIS Query Command ................................................................................. 67 alm_lof [ on | off ] Alarm LOF Set Command .................................................................................. 67 alm_lof? Alarm LOF Query Command............................................................................................. 67 alm_oorp [ on | off ] Alarm OORP Set Command ............................................................................ 67 alm_oorp? Alarm OORP Query Command ..................................................................................... 67 7–10 ST112 SONET Transmission Test Set Artisan Technology Group - Quality Instrumentation ... Guaranteed | (888) 88-SOURCE | www.artisantg.com Remote Commands alm_sts_ais [ on | off ] Alarm STS-n (Line) AIS Set Command ........................................................ 67 alm_sts_ais? Alarm STS-n (Line) AIS Query Command ............................................................... 68 alm_sts_lop [ on | off ] Alarm STS-n LOP Set Command ................................................................ 68 alm_sts_lop? Alarm STS-n LOP Query Command......................................................................... 68 alm_sts_yel [ on | off ] Alarm STS-n (Path) YEL Set Command ....................................................... 68 alm_sts_yel? Alarm STS-n (Path) YEL Query Command.............................................................. 68 alm_vt_ais [ on | off ] Alarm VT AIS Set Command ......................................................................... 68 alm_vt_ais? Alarm VT AIS Query Command............................................................................... 69 alm_vt_lop [ on | off ] Alarm VT LOP Set Command ....................................................................... 69 alm_vt_lop? Alarm VT LOP Query Command ............................................................................. 69 alm_vt_yel [ on | off ] Alarm VT YEL Set Command ....................................................................... 69 alm_vt_yel? Alarm VT YEL Query Command ............................................................................. 69 ds1_alarms [ ais | yel | off ] DS1 Alarm Set Command ..................................................................... 69 ds1_alarms? DS1 Alarm Query Command .................................................................................... 70 ds3_alarms [ ais | xbit | idle | off ] DS3 Alarm Set Command ........................................................... 70 ds3_alarms? DS3 Alarm Query Command .................................................................................... 70 ds3_pth_bur [ n ] DS3 Path Burst Alarm Set Command.................................................................... 70 ds3_pth_bur? DS3 Path Burst Alarm Query Command.................................................................... 70 ds3_pth_tri? DS3 Path Trigger Command ..................................................................................... 70 ds3_pth_ty [ frame ], [ alarm ] DS3 Path Alarm Burst Set Command ............................................... 71 ds3_pth_ty? DS3 Path Alarm Burst Query Command................................................................... 71 LOSS OF SIGNAL ............................................................................................. 72 los_enab Loss Of Signal Enable Command ....................................................................................... 72 los_time [ n ] Loss Of Signal Time Command ................................................................................ 72 los_time? Loss Of Signal Time Query Command........................................................................... 72 los_secs n.m ............................................................................................................................................ 72 los_tm_enab ............................................................................................................................................ 72 los_off ..................................................................................................................................................... 72 los_cont ................................................................................................................................................... 72 los_active?............................................................................................................................................... 73 COMBINED (DUAL) MODE COMMANDS......................................................... 73 combined_mode [ on | off ] Combined Mode Set Command ............................................................ 73 combined_mode? Combined Mode Query Command ...................................................................... 73 ST112 SONET Transmission Test Set 7–11 Artisan Technology Group - Quality Instrumentation ... Guaranteed | (888) 88-SOURCE | www.artisantg.com Remote Commands General Commands header [on | off ] Header Mode Set Command Enables or disables headers. The header is the part of a response that replicates the command. Arguments: on enables headers in the response to any query command. off disables headers. Example: header on Response: NONE Note: When the header is on, the query command gpib_bus? will respond with both the header and the status: GPIB_BUS TALK_LISTEN When the header is off, the query command gpib_bus? will respond with the status only: TALK_LISTEN header? Header Mode Query Command Returns a response string indicating the headers are enabled or disabled. Example: header? Response: HEADER ON Note: See the Header Mode Set Command. logo? Logo Query Command Returns a character string that includes: company name, instrument model number, current software version, and software date. Example: logo? Response: **** TEKTRONIX MICROWAVE LOGIC, ST112, v.vv yyyy/mm/dd Note: v.vv will be replaced by the software version number yyyy/mm/dd will be replaced by the software date *idn? Identify Returns a character string that includes: company name, instrument model number, and current software version. Example: *idn? Response: **** TEKTRONIX, ST112, 0, v.vv Note: v.vv will be replaced by the software version number *lrn? Learn Query Command List the ST112 current setup, except for: RS-232-C port information. Example: lrn? Response: AUTO_VOL 0; PRINT_PORT PARALLEL; VIEW_ANGLE 1; .... Note: The response is a series of commands (headers and parameters) separated by semicolons. They can be stored in the controller and used to restore the same setup later. 7–12 ST112 SONET Transmission Test Set Artisan Technology Group - Quality Instrumentation ... Guaranteed | (888) 88-SOURCE | www.artisantg.com Remote Commands *wai Wait Command Stop processing any additional commands until all pending operations are completed. Example: *wai Response: NONE Standard Register Commands *cls Clear Status Register Command Clears the Standards Events Status Register (SESR) and the Event Status Bit (ESB) in the Status Byte Register (SBR); initiates the Operation Complete Idle State and Operation Complete Query Idle State Example: *cls Response: NONE Note: after execution the ST112 will have no data in its input and output registers, and will not be executing any command. *ese [n] Event Status Enable Register Set Command Sets the Event Status Enable Register (ESER) to the argument n Argument n = a decimal number between 0 and 255 Example: *ese 255 Response: NONE Note: decimal 255 sets the register to 11111111 binary *ese? Event Status Enable Register Query Command Sets the Event Status Enable Register (ESER) to the argument n Example: *ese? Response: *ESER [n] (n = a decimal number between 0 and 255) Note: decimal 255 sets the register to 11111111 binary *esr? Event Status Register Query Command Returns the content of the Event Status Register (ESR) Example: *esr? Response: *ESR [n] (n = a decimal number between 0 and 255) Note: decimal 255 indicates the register is set to 11111111 binary *opc Operation Complete Command Enables (Sets) the OPC bit to "1" Example: *opc Response: NONE Note: Used to determine when a group of commands have been completed. ST112 SONET Transmission Test Set 7–13 Artisan Technology Group - Quality Instrumentation ... Guaranteed | (888) 88-SOURCE | www.artisantg.com Remote Commands *opc? Operation Complete Query Command Returns the ASCII character "1" when all previous commands and queries have been completed. Example: *opc? Response: *OPC? [n] (n=1 indicates incomplete, n=0 indicates complete) Note: Used to determine when a group of commands have been completed. *rst Reset Command Returns the ST112 to its factory default settings and initiates the Operation Complete Idle State and Operation Complete Query Idle State. Example: *rst Response: NONE Note: This command does NOT change the setup of the RS232C or GPIB ports, alter calibration data, alter the SESR (Standard Event Status Register), alter the ESER (Event Status Enable Register), change power-on status clear flag setting, alter stored word patterns. *sre [n] Service Request Enable Command Returns the content of the Service Request Enable Register (SRER) Example: *sre 51 Response: NONE Note: decimal 51 indicates the register is set to 00110011 binary. Using the IEEE 488.2 GPIB standard, register bits are numbered 7 to 0 (left to right). However, the SONET standard labels bits 1 to 8 (left to right). In either case, the MSB is the left most binary bit, and the LSB is the right most binary bit. *sre? Service Request Enable Query Command Returns the content of the Service Request Enable Register (SRER) Example: *sre? Response: *SRE [n] (n = a decimal number between 0 and 255) Note: decimal 255 indicates the register is set to 11111111 binary *stb? Status Byte Query Command Returns the content of the Status Byte Register (SBR) Example: *stb? Response: *STB [n] (n = a decimal number between 0 and 255) Note: decimal 255 indicates the register is set to 11111111 binary tse Test Status Enable Register Set Command Sets the content of the TSER (Test Status Enable Register) to a decimal number from 0 to 255 Example: tse 255 Response: NONE Note: decimal 255 indicates the register is set to 11111111 binary 7–14 ST112 SONET Transmission Test Set Artisan Technology Group - Quality Instrumentation ... Guaranteed | (888) 88-SOURCE | www.artisantg.com Remote Commands tse? Test Status Enable Register Query Command Returns the content of the TSER (Test Status Enable Register) Example: tse? Response: TSE [n] (n = a decimal number between 0 and 255) Note: decimal 255 indicates the register is set to 11111111 binary tsr? Test Status Register Command Returns the content of the TSR (Test Status Register). Example: tsr? Response: TSR [n] (n = a decimal number between 0 and 255) Note: decimal 255 indicates the register is set to 11111111 binary General Setup Commands quick_setup [n] Quick Setup Command Used to recall one of the six factory default setups: Arguments: n=0 sets the ST112 to the STSX-1 factory default settings. n=1 sets the ST112 to the OC-1 factory default settings. n=2 sets the ST112 to the OC-3 factory default settings. n=3 sets the ST112 to the OC-12 factory default settings. n=4 sets the ST112 to the DSX-1 factory default settings. n=5 sets the ST112 to the DSX-3 factory default settings. Example: quick_setup 3 Response: NONE audio_vol [n] Audio Volume Set Command Sets the audio volume of the internal speaker. Example: audio_vol n (n = a decimal integer from 0 to 8) Response: NONE Note: 0 = off, 1 = minimum, and 8 = maximum volume audio_vol? Audio Volume Query Command Returns a decimal integer from 0 to 8 Example: audio_vol? Response: AUDIO_VOL n Note: n = a decimal integer from 0 to 8 date “[ yy(yy)/mm/dd ]” Date Set Command Sets the instrument’s internal calendar. Example: date “1996/08/30” Response: NONE ST112 SONET Transmission Test Set 7–15 Artisan Technology Group - Quality Instrumentation ... Guaranteed | (888) 88-SOURCE | www.artisantg.com Remote Commands date? Date Query Command Returns a character string indicating the internally stored date. Example: date? Response: DATE “1996/08/30” dsx1_code [ ami | b8zs ] DSX-1 Code Configuration Set Command Configures the DSX-1 code for both the input and output. Argument: ami = Alternate Mark Inversion (bipolar). b8zs: = bipolar with 8 zero substitution. Example: dsx1_code ami Response: NONE dsx1_code? DSX-1 Code Configuration Query Command Returns a character string that indicates the DSX-1 current Code Configuration Example: dsx1_code? Response: DSX1_CODE AMI Note: The DSX-1 Code can be either AMI or b8zs (see DSX-1 Code Configuration) edit_setup [n], “[s]” Edit Setup Label Set Command Assigns a label [s] to the saved setup [n] Augment: n: is the setup number from 0 to 9 in decimal. s: is the string of Example: edit_setup 7, “OC-12 Test” Response: NONE Note: Up to 10 ASCII characters can be saved with each of the 10 setups. The string must be enclosed in quotation marks. Only upper case ASCII characters A to Z and numbers 0 to 9 can be used, along with the following ASCII symbols: # $ % & ‘ ( ) * + - , / : edit_setup? [n] Edit Setup Label Query Command Returns the current label assigned to the [n] setup saved in memory Example: edit_setup? [n] (n = a decimal integer between 0 and 9) Response: EDIT_SETUP OC-12 TEST Note: Up to 10 ASCII characters can be saved with each of the 10 setups. gpib_address? GPIB Address Query Command Returns the current address value. Example: gpib_address? Response: GPIB_ADDRESS 15 Note: This command is only used through the RS-232-C Port connection. 7–16 ST112 SONET Transmission Test Set Artisan Technology Group - Quality Instrumentation ... Guaranteed | (888) 88-SOURCE | www.artisantg.com Remote Commands gpib_address [n] GPIB Address Set Command Sets the value of the GPIB Port address. Example: gpib_address n (n = a decimal integer from 0 to 15) Response: NONE Note: This command is only used through the RS-232-C Port connection. gpib_bus? GPIB Bus Query Command Returns the current status of the GPIB bus. Example: gpib_bus? Response: GPIB_BUS TALK_LISTEN Note: The GPIB bus can be off (off_bus) or on (talk_listen) This command is only used through the RS-232-C Port connection. gpib_bus [talk_listen | off_bus] GPIB Bus Mode Command Sets the GPIB bus mode to on or off. Arguments: talk_listen enables the gpib bus. off_bus disables the gpib bus. In this mode the gpib bus will not respond to any commands except the GPIB Bus talk_listen from the RS-232-C port. Example: GPIB Bus off_bus Response: None (see gpib_bus? command) Note: This command is only used through the RS-232-C Port connection. options? Options Query Command Returns one or more character strings indicating which options are installed. Example: options? Response: OPTIONS OC12, 3C, 12C Note: The response indicates supported testing: OC-12, OC-3c, and OC-12c. print_port? Print Port Query Command Returns the current printer port setting. Example: print_port? Response: PRINT_PORT PARALLEL Note: The default printer port can be set to parallel or serial. print_port [ parallel | serial ] Print Port Select Command Sets the default printer port to parallel or serial. Example: print_port parallel Response: NONE Note: directs all printing to the parallel (centronics) port. ST112 SONET Transmission Test Set 7–17 Artisan Technology Group - Quality Instrumentation ... Guaranteed | (888) 88-SOURCE | www.artisantg.com Remote Commands rs_echo [on | off] RS-232 Echo Control Command Enables or disables the echo on the RS-232-C port. Example: rs_echo on Response: NONE Note: When the echo is on the ST112 will echo back each ASCII character sent to the RS-232-C port (Full Duplex mode). When the echo is off the ST112 will NOT echo back ASCII characters sent to the RS-232-C port (Half Duplex mode). rs_echo? RS-232 Echo Control Command Returns a character string that indicates whether the echo control is enabled or disabled. Example: rs_echo? Response: RS_ECHO ON Note: Indicates that the echo control is enable (Full Duplex Mode). The response OFF would indicate that the echo control was disable (Half Duplex Mode). rs_pmt_lf [on | off] RS-232 Prompt Linefeed Set Command Enables or disables the current RS-232 EOL (end-of-line) terminator. Example: rs_pmt_lf on Response: NONE Note: The current EOL can be set to CR, LF, CR+LF, or LF+CR. rs_pmt_lf? RS-232 Prompt Linefeed Query Command Returns a character string that indicates the current RS-232 EOL (end-of-line) terminator status. Example: rs_pmt_lf? Response: RS_PMT_LF ON Note: The current EOL can be on (enabled) or off (disabled). Its value is unknown. It may be set to CR, LF, CR+LF, or LF+CR using the quick setup menu. rs_prompt "s" RS-232 prompt command Set the character string "s" on the RS-232 prompt. Example: rs_prompt " ST112 Unit A> " Response: ST112 Unit A> Note: The character string "s" will be at the start of each new line. Quotation marks must be used before and after the character string, and the string is limited to 12 characters in length. rs_xon_xoff [ on | off ] RS-232 Flow Control Set Command Enables or disables the RS-232 flow control mode Example: rs_xon_xoff on Response: NONE 7–18 ST112 SONET Transmission Test Set Artisan Technology Group - Quality Instrumentation ... Guaranteed | (888) 88-SOURCE | www.artisantg.com Remote Commands rs_xon_xoff? RS-232-C Flow Control Query Command Returns a character string that indicates the current RS-232-C flow control status. Example: rs_xon_xoff? Response: RS_XON_XOFF ON Note: The current XON XOFF flow control can be on (enabled) or off (disabled). save_setup [n] Save Setup Command Saves the current instrument setup in location n. Example: save_setup n (n = a decimal number from 0 to 9) Response: NONE stored? Stored Setup Query Command Returns the currently stored setup locations saved in memory. Example: stored? Response: STORED 0,1,2... Note: Stored locations are numbered from 0 to 9 in decimal. time “[ hh:mm:ss ]” Internal Time Clock Set Command Sets the internally stored time of day clock. Example: time "15:30:45" Response: NONE Note: Uses 24 hours format, HH:MM:SS (Hours Minutes Seconds) time? Internal Time Clock Query Command Returns the time from the ST112 internal time of day clock. Example: time? Response: TIME "15:30:45" view_angle? Front-panel View Angle Query Command Returns a decimal integer that indicates the display angle of view. Example: view_angle? Response: VIEW_ANGLE 2 Note: View angle is an integer from 0 to 7. Zero should be the best view angle when the ST112 is positioned below the operator. view_angle [ n ] Front-panel View Angle Set Command Sets the view angle to an integer from 0 to 7 decimal. Example: view_angle 1 Response: NONE Note: View angle is an integer from 0 to 7. Zero should be the best view angle when the ST112 is positioned below the operator. ST112 SONET Transmission Test Set 7–19 Artisan Technology Group - Quality Instrumentation ... Guaranteed | (888) 88-SOURCE | www.artisantg.com Remote Commands Receiver Setup and Mode Commands dsx_level [ terminate | bridge ] DSX/STSX Level Setup Command Sets the input gain of the electrical inputs to either terminate or bridge (monitor). Argument: terminate = sets the input gain of the electrical ports to be compatible with signals from dsx and stsx cross-connect outputs. bridge = sets the input gain of the electrical ports to be compatible with signals from dsx and stsx cross-connect monitors outputs. Example: dsx_level terminate Response: NONE Note: The ST112 receiver input jacks are located on the front panel. One is a BNC 75ohm and the other is a 100-ohm input impedance. dsx_level? DSX/STSX Level Query Command Sets the input gain of the electrical inputs to either terminate or bridge (monitor). Argument: terminate = sets the input gain of the electrical ports to be compatible with signals from dsx and stsx cross-connect outputs. bridge = sets the input gain of the electrical ports to be compatible with signals from dsx and stsx cross-connect monitors outputs. Example: dsx_level? Response: NONE Note: The ST112 receiver input jacks are located on the front panel. One is a BNC 75-ohm and the other is a 100-ohm input impedance. rx_dcc [ section | line ] Receive Data Comm Channel Set Command Select the DCC to be dropped from the received SONET signal to the rear panel DCC Port. Argument: Section: drops the section DCC (D1 to D3). Line: drops the line DCC (D4 to D12). Example: rx_dcc section Response: NONE rx_dcc? Receive Data Communication Channel Query Command Returns a character string indicating which DCC from the received SONET signal is being dropped. Example: rx_dcc? Response: RX_DCC LINE 7–20 ST112 SONET Transmission Test Set Artisan Technology Group - Quality Instrumentation ... Guaranteed | (888) 88-SOURCE | www.artisantg.com Remote Commands rx_map [ ds3 | bit_fl | byte_fl | 3c | 12c ] Rx Mapping Mode Set Command Sets the Receiver Payload Mapping Mode. Argument: dc3: Asynchronous DS3 bit_fl: bit floating synchronous, floating VT1.5 byte_fl: byte floating synchronous, floating VT1.5 3c: concatenated STS-3 (Synchronous Transport Signal, Level 3) 12c: concatenated STS-12 (Synchronous Transport Signal, Level 12) Example: rx_map 12c Response: NONE rx_map? Receive Mapping Mode Query Command Returns a character string indicating the current Receiver Payload Mapping. Example: rx_map? Response: RX_MAP 12C Note: Receiver Mapping can be DS3, BIT_FL, BYTE_FL, 3c, or 12c (see Rx Mapping Mode Set Command) rx_ocn [ oc1 | oc3 | oc12 ] Receiver Optical Rate Set Command Sets the Receiver Optical Rate. Argument: oc1: optical carrier, level 1 (51.84 Mb/s) oc3: optical carrier, level 3 (155.52 Mb/s) oc12: optical carrier, level 12 (622.08 Mb/s) Example: rx_ocn oc12 Response: NONE Note: see Optical Output (opt_output) and Tx OC-n rate tx_ocn commands rx_ocn? Receiver Optical Rate Query Command Returns a character string indicating the current Receiver Optical Rate. Example: rx_ocn? Response: RX_MAP OC12 Note: Receiver optical rate can be OC-1, OC-3, or OC-12 (see Receiver Optical Rate Set Command) rx_owire [ local | express ] Receive Order Wire Set Command Selects the Order Wire to be dropped from the received STS-n signal to the rear panel Port. Argument: local: drops the Section Order wire Channel (byte E1). express: drops the Line Order wire Channel (byte E2). Example: rx_owire local Response: NONE Note: The rear panel port is labeled ORDER WIRE ST112 SONET Transmission Test Set 7–21 Artisan Technology Group - Quality Instrumentation ... Guaranteed | (888) 88-SOURCE | www.artisantg.com Remote Commands rx_owire? Receive Order Wire Query Command Returns a character string indicating which Order Wire from the received STS-n signal is being dropped. Example: rx_owire? Response: RX_OWIRE LOCAL rx_signal [ stsx1 | dsx3 | dsx1 | optic ] Rx Signal Set Command Selects the signal to be received by the applicable front panel connector. Argument: stsx1: select the stsx1 electrical input from the front panel 75 ohm connector dsx3: select the dsx3 electrical input from the front panel 75 ohm connector dsx1: select the dsx1 electrical input from the front panel 100 ohm connector optic: select the optical input from the front panel optical connector Example: rx_signal optic Response: NONE Note: see Rx Optical Rate Set Command (rx_ccn) commands rx_signal? Receiver Signal Query Command Returns a character string indicating the current signal type being received. Example: rx_signal? Response: RX_SIGNAL STSX1 Note: The receiver signal can be used to indicate which port is selected. The STSX-1 and DC3 signals use the 75 ohm front panel port, the DSX-1 is received by the 100 ohm front panel port, and the optical port receives all of the OC-n signals. rx_sts_chan [ n ] Receiver STS-1 Channel Set Command Sets the Receiver STS-1 Channel number within the OC-3 or OC-12 channel. Argument: n = a decimal number from 1 to 12 (OC-12 rate). n = a decimal number from 1 to 3 (OC-3 rate). Example: rx_sts_chan 3 Response: NONE rx_sts_chan? Receive STS-1 Channel Query Command Returns a character string indicating the current VT1.5 Channel selected. Example: rx_sts_chan? Response: RX_STS_CHAN 3 Note: See the Receiver STS-1 Channel Set Command rx_vt_chan [ n ] Receiver VT Channel Set Command Sets the Receiver VT1.5 Channel number within the STS-1 channel. Argument: n: a decimal number from 1 to 28 Example: rx_vt_chan 14 Response: NONE 7–22 ST112 SONET Transmission Test Set Artisan Technology Group - Quality Instrumentation ... Guaranteed | (888) 88-SOURCE | www.artisantg.com Remote Commands rx_vt_chan? Receive VT Channel Query Command Returns a character string indicating the current VT1.5 Channel selected. Example: rx_vt_chan? Response: RX_VT_CHAN 14 Note: See the Receiver VT Channel Set Command rx_vt_map [ map1x28 | map4x7 ] Receiver VT Mapping Set Command Sets the Receiver VT1.5 Payload Mapping. Argument: map1x28: Selects sequential VT channel numbering 1 to 28 map4x7: Select 4 x 7 VT channel numbering. Example: rx_vt_map map4x7 Response: NONE rx_vt_map? Receive VT Mapping Query Command Returns a character string indicating the current VT1.5 Payload Mapping selected. Example: rx_vt_map? Response: RX_VT_MAP MAP4x7 Note: VT1.5 channel numbering (mapping) can be either sequential (MAP1x28) or 4x7 interleaved (MAP4x7). ST112 SONET Transmission Test Set 7–23 Artisan Technology Group - Quality Instrumentation ... Guaranteed | (888) 88-SOURCE | www.artisantg.com Remote Commands Transmitter Setup and Mode Commands opt_output [ on | off ] Optical Output Set Command Enables or disables the Optical Output for OC-1, OC-3, and OC-12 Arguments ON: enables the Optical Output. OFF: disables the Optical Output. Example: opt_output on Response: NONE Note: Only valid when an optical option is installed. The STS-1 signal must be set using the tx_signal sts1 command. opt_output? Optical Output Query Command Returns a character string that indicates the current optical output status. Example: opt_output? Response: OPT_OUTPUT ON Note: The optical output can be on (enabled) or off (disabled). sts_sync [ sts1 | sts3 | async | bits | loop ] Transmit Timing Set Command Sets the STS-n Clock Synchronization Source for the Transmit STS-n Frame. Argument: sts1: use the rear panel STS-1 clock input sts3: use the rear panel STS-3 clock input async: use the internal STS-1 (51.84 Mb/s) clock bits: use the rear panel BITS TIMING input (framed DS1 all ones signal) loop: use the receive recovered clock Example: sts_sync loop Response: NONE sts_sync? Transmit Timing Query Command Returns a character string indicating the current STS-n Clock Synchronization Source. Example: sts_sync? Response: STS_SYNC LOOP Note: (see Transmit Timing Set Command) tx_dcc [ off | section | line ] Tx Data Comm Channel Set Command Enables and disables the rear panel DCC Port signal insertion. Argument: section: enables insertion into the section DCC (D1 to D3). line: enables insertion into the line DCC (D4 to D12) off: disables insertion. Example: tx_dcc section Response: NONE 7–24 ST112 SONET Transmission Test Set Artisan Technology Group - Quality Instrumentation ... Guaranteed | (888) 88-SOURCE | www.artisantg.com Remote Commands tx_dcc? Transmit Data Communication Channel Query Command Returns a character string indicating the status DCC insertion. Example: Tx_dcc? Response: TX_DCC LINE Notes: The DCC insertion can be set to SECTION, LINE, or OFF see tx_dcc and rx_dcc set commands. tx_map [int_ds3 | ext_ds3 | int_bit_fl | ext_bit_fl |byte_fl | 3c | 12c ] Tx Mapping Mode Set Command Sets the Transmitter Payload Mapping Mode. Argument: int_ds3: Asynchronous DS3, Internally Generated ext_ds3: Asynchronous DS3 signal applied to the rear panel DSX-3 input. int_bit_fl: bit floating synchronous, floating VT1.5, Internally Generated ext_bit_fl: bit floating synchronous applied to the rear panel BITS/DSX-1 input. byte_fl: byte floating synchronous, floating VT1.5 3c: concatenated STS-3, Internally Generated 12c: concatenated STS-12 Externally Generated Payload Required Example: tx_map 12c Response: NONE tx_map? Transmitter Mapping Mode Query Command Returns a character string indicating the current Transmitter Payload Mapping. Example: tx_map? Response: TX_MAP 12C Note: Transmitter Mapping can be: INT_DC3, EXT_DC3, INT_BIT_FL, EXT_BIT_FL BYTE_FL, 3c, or 12c (see Tx Mapping Mode Set Command) tx_ocn [ oc1 | oc3 | oc12 ] Transmitter Optical Rate Set Command Sets the Transmitter Optical Rate. Argument: oc1: optical carrier, level 1 (51.84 Mb/s) oc3: optical carrier, level 3 (155.52 Mb/s) oc12: optical carrier, level 12 (622.08 Mb/s) Example: tx_ocn oc12 Response: NONE Note: see Optical Output (opt_output) and Rx OC-n rate tx_ocn commands tx_ocn? Transmitter Optical Rate Query Command Returns a character string indicating the current Transmitter Optical Rate. Example: tx_ocn? Response: TX_OCN OC12 Note: Transmitter optical rate can be OC-1, OC-3, or OC-12 (see Receiver Optical Rate Set Command) ST112 SONET Transmission Test Set 7–25 Artisan Technology Group - Quality Instrumentation ... Guaranteed | (888) 88-SOURCE | www.artisantg.com Remote Commands tx_owire [ local | express | off ] Transmit Order Wire Set Command Disables or enables and selects the Order Wire to be used as the transmit input to the rear panel port for the STS-n signal. Argument: local: drops the Section Order Wire Channel (byte E1). express: drops the Line Order Wire Channel (byte E2). off: fills both Order wire channels with all zeros. Neither is available for use. Example: tx_owire local Response: NONE Note: The rear panel port is labeled ORDER WIRE tx_owire? Transmit Order Wire Query Command Returns a character string indicating which Order Wire is used for the transmit STS-n signal. Example: tx_owire? Response: TX_OWIRE LOCAL tx_signal [ stsx1 | dsx3 ] Tx Signal Set Command Selects the cross-connect signal to be transmitted from the six 75 ohm front panel connectors. Argument: stsx1: enables the stsx1 electrical outputs dsx3: enables the dsx3 electrical outputs Example: tx_signal stsx1 Response: NONE Note: The STSX-1 is automatically selected when the Transmitter Optical Output is enabled (see the opt_output on command). The DSX-1 output is always active. tx_signal? Transmitter Signal Query Command Returns a character string indicating the current cross-connect signal type being transmitted. Example: tx_signal? Response: TX_SIGNAL STSX1 Note: Either STSX! or DSX-1 cross-connect signal will be transmitted from the six 75 ohm front panel ports. The STSX-1 is automatically selected when the Transmitter Optical Output is enabled (see the opt_output on command). tx_vt_map [ map1x28 | map4x7 ] Transmitter VT Mapping Set Command Sets the Transmitter VT1.5 Payload Mapping. Argument: map1x28: Selects sequential VT channel numbering 1 to 28 map4x7: Select 4 x 7 VT channel numbering. Example: tx_vt_map map4x7 Response: NONE 7–26 ST112 SONET Transmission Test Set Artisan Technology Group - Quality Instrumentation ... Guaranteed | (888) 88-SOURCE | www.artisantg.com Remote Commands tx_vt_map? Transmitter VT Mapping Query Command Returns a character string indicating the current VT1.5 Payload Mapping selected. Example: tx_vt_map? Response: TX_VT_MAP MAP4x7 Note: VT1.5 channel numbering (mapping) can be either sequential (MAP1x28) or 4x7 interleaved (MAP4x7). Test Cycle Control Commands test_mode [ untimed | timed | repeat ] Test Mode Set Command Sets the test measurement mode. Arguments untimed: sets the continuous measurement mode. timed: sets the timed measurement mode. repeat: sets the repeat-timed measurement mode. Example: test_mode timed Response: NONE Note: See the test time (test_time) set command The timed test runs for the duration of time set by the test_time command The repeat test runs for the duration of time set by the test_time command test_mode? Test Mode Query Command Returns the current status of the test measurement mode. Example: test_mode? Response: TEST_MODE TIMED Note: See the Test Mode Set Command. test_print [ log | prev | current | off ] Test Print Set Command Used to print or stop printing the test results. Arguments log: prints the content of the error log. prev: prints an end-of-test report at the end of the previous test interval. current: prints an end-of-test report from the current test interval. off: disables report printing. Example: test_print off Response: NONE ST112 SONET Transmission Test Set 7–27 Artisan Technology Group - Quality Instrumentation ... Guaranteed | (888) 88-SOURCE | www.artisantg.com Remote Commands test_report [ log | eot | both | off ] Test Report Set Command Enable or disable Test Report Type. Arguments log: enable event log reports eot: enable end-of-test reports. both: enable both log and eot reports. off: disables reports. Example: test_report both Response: NONE test_report? Test Report Query Command Returns a character string indicating the report status. Example: test_report? Response: TEST_REPORT BOTH Note: See the Test Report Set Command test_squelch [ on | off ] Test Squelch Set Command Enables or disables the Squelch. Arguments on: (1) logs 10 consecutive events (2) waits for 10 event free seconds. off: logs every event. Example: test_squelch on Response: NONE Note: When the Squelch is enabled error logging is limited to ten consecutive reports. Then Error logging is resumed after 10 event free seconds. test_squelch? Test Squelch Query Command Returns the current status of the Squelch Example: test_squelch? Response: TEST_SQUELCH ON Note: See the Test Squelch Set Command. test_state [ run | stop ] Test State Set Command Sets the test state to either run or stop. Arguments run: clears all counters, clears the history, and starts the test cycle. stop: suspends the test cycle. Example: test_state run Response: NONE Note: See pause_state command. The Trouble Scan Mode must be OFF before the Test State can be enabled. 7–28 ST112 SONET Transmission Test Set Artisan Technology Group - Quality Instrumentation ... Guaranteed | (888) 88-SOURCE | www.artisantg.com Remote Commands test_state? Test State Query Command Returns the current status of the test cycle. Example: test_state? Response: TEST_STATE ON Note: The test cycle can be either on (running) or off. When the test state = stop the pause-run-resume sequence can be used to save the current data and history. test_time “[ d-hh:mm:ss ]” Test Time Set Command Sets the duration of the test cycle in days (d), hours, (hh) minutes (mm), and seconds (ss). Example: test_time “0-02:00:00” Response: NONE Note: The Argument must be enclosed in quotation marks. One hyphen and two colons must be used as shown in the example. Maximum Test Time = 9 days, 23 hours, 59 minutes, 59 seconds. test_time? Test State Query Command Returns a character string indicating the current test time settings. Example: test_time? Response: TEST_TIME “0-02:00:00” pause_state [ pause | resume ] Pause State Set Command Sets the test state to either pause or resume. Arguments pause interrupts the test cycle. resume restarts the test cycle. Example: pause_state pause Response: NONE Note: See test_state command pause_state? Pause State Query Command Returns the current status of the test cycle. Example: pause_state? Response: PAUSE_STATE PAUSE Note: The PAUSE cycle can be either on (running) or off. When the test state = stop the pause-run-resume sequence can be used to save the current data and history. print_string "s" Print String Command Prints the string "s" out the current printer port. Example: print_string "This is a test." Response: This is a test. Note: The character string [s] can be up to 80 (eighty) characters long. It begins and ends with quotation marks. ST112 SONET Transmission Test Set 7–29 Artisan Technology Group - Quality Instrumentation ... Guaranteed | (888) 88-SOURCE | www.artisantg.com Remote Commands Payload Commands ds3_word #H[ 00–FF ] DS3 Word Set Command Programs the 8-bit DS3 word pattern within the SPE pattern generator. Argument: any octet from 00 to FF hexadecimal Example: ds3_word #Haa Response: NONE Note: #Haa sets the ds3 octet to 10101010 binary (AA hexadecimal). ds3_word? DS3 Word Query Command Returns a character string indicating the current ds3 word in hexadecimal. Example: ds3_word? Response: DS3_WORD? #HAA Note: #Haa sets the ds3 octet to 10101010 binary (AA hexadecimal). rx_ds3_frm [ m13 | cbit | unframed ] Rx DS3 Framing Format Set Cmd. Sets the receiver to analyze the DS3 Framing Format. Argument: m13: (M1-3) 28 DS1 channels multiplexed into a DS3 signal. cbit: C-Bit Parity Analysis of the DS3 signal. unframed: Used to analyze the unframed DS3 payloads. Example: rx_ds3_frm cbit Response: NONE rx_ds3_frm? Rx DS3 Framing Format Query Command Returns a character string indicating the current receiver DS3 Framing Format. Example: rx_ds3_frm? Response: RX_DS3_FRM? CBIT Note: M1-3 (m13), C-Bit , or Unframed DS3 Frames can be analyzed. rx_ds3_pat [ prbs_15 | prbs_23 | word ] Rx DS3 Pattern Set Command Sets the receiver to the selected DS3 Test Pattern. Argument: prbs_15: Inverted PRBS Pattern (215 –1) prbs_23: Inverted PRBS Pattern (223 –1) word: an eight bit sequence set with the ds3_word command. Example: rx_ds3_pat word Response: NONE 7–30 ST112 SONET Transmission Test Set Artisan Technology Group - Quality Instrumentation ... Guaranteed | (888) 88-SOURCE | www.artisantg.com Remote Commands rx_ds3_pat? Receiver DS3 Pattern Query Command Returns a character string indicating the current receiver DS3 Test Pattern Example: rx_ds3_pat? Response: RX_DS3_PAT? WORD Note: PRBS 15, PRBS 23, and WORD are the three test patterns that can be received. rx_stress [ daly1 | daly2 | daly3 | word_18 | word_28 | word_324 | ones | zeros | off ] Receiver Stress Test Set Command Sets the Stress Test Pattern to be compared with the received DSX-1 Payload Pattern. Argument: daly1: 55 octet pattern. daly2: 55 octet pattern, modified version of daly1. daly3: 55 octet pattern, modified version of daly1. word_18: 1 in 8 pattern containing a string of 7 zeros. word_28: 2 in 8 pattern word_324: 3 in 24 pattern ones: all ones pattern. zeros: all zeros pattern. off: returns to the pattern set by the rx_vt_patt command. Example: rx_stress word_324 Response: NONE Note: The Stress Test only functions in the DSX-1 mode (to run, use quick_setup 4). See: (tx_stress) Transmitter Stress Test Set Command. rx_stress? Receiver Stress Test Query Command Returns a character string indicating the selected receiver Stress Test Pattern. Example: rx_stress? Response: RX_STRESS? WORD_324 Note: The Stress Test only functions in the DSX-1 mode. See: (rx_stress) Receiver Stress Test Set Command. rx_vt_chan [ n ] Receiver VT Channel Select Command Selects the VT1.5 Channel Number to be monitored. Example: rx_vt_chan [n] (n = a decimal number from 1 to 28) Response: NONE Note: The VT1.5 channel is selected from the currently selected STS-1 channel. See (rx_sts_chan) Receive STS Channel Select Command. rx_vt_chan? Receiver VT Channel Query Command Returns a character string indicating the current receiver VT1.5 Channel selected. Example: rx_vt_chan? Response: RX_VT_CHAN N (N = a decimal number from 1 to 28) Note: See (rx_vt_chan) Receive VT Channel Select Command. ST112 SONET Transmission Test Set 7–31 Artisan Technology Group - Quality Instrumentation ... Guaranteed | (888) 88-SOURCE | www.artisantg.com Remote Commands rx_vt_fram [ unframed | sf | esf | slc ] Rx VT Frame Set Command Sets the receiver DS-1 Frame Format Argument: unframed: sf: super frame esf: extended super frame slc: (SLC-96) Subscriber Loop Carrier - 96 Example: rx_vt_fram esf Response: NONE rx_vt_fram? Receiver VT Frame Query Command Returns a character string indicating the selected receiver VT Frame Format. Example: rx_vt_fram? Response: RX_VT_FRAM? ESF Note: For Arguments see (rx_vt_fram) Rx VT Frame Set Command. rx_vt_patt [ prbs_23 | prbs_15 | qrw | word ] Rx VT Pattern Set Command Sets the receiver DS-1 Pattern Argument: prbs_23: 223 –1 Pseudo-Random Bit Stream prbs_15: 215 –1 Pseudo-Random Bit Stream qrw: Quasi-Random Word word: 24 Bit Word Pattern (auto-configuration) Example: rx_vt_patt prbs_23 Response: NONE Note: This Pattern will be use to analyze the VT1.5 Payload (DS-1). rx_vt_patt? Receiver VT Pattern Query Command Returns a character string indicating the selected receiver VT Frame Format. Example: rx_vt_patt? Response: RX_VT_PATT? PRBS_23 Note: For Arguments see (rx_vt_patt) Rx VT Pattern Set Command. s12c_patt_inv [ norm | invert ] 12c or 3c Pattern Set Command Sets the polarity of the test pattern in the selected STS-3c or STS-12c Argument: norn: normal CCITT Standard Pattern invert: inverted CCITT Standard Pattern Example: s12c_patt_inv invert Response: NONE Note: These patterns will be use to analyze the STS-3c or STS-12c Payloads. 7–32 ST112 SONET Transmission Test Set Artisan Technology Group - Quality Instrumentation ... Guaranteed | (888) 88-SOURCE | www.artisantg.com Remote Commands s12c_patt_inv? Receiver 12c or 3c Pattern Query Command Returns a character string indicating the selected STS-3c or STS-12c test pattern Example: s12c_patt_inv Response: S12C_PATT_INV NORM Note: For Arguments see the (s12c_patt_inv) 12c or 3c Pattern Set Command tx_ds3_frm [ m13 | cbit | unframed ] Tx DS3 Framing Format Set Cmd. Sets the transmitter to generate the DS3 Framing Format. Argument: m13: (M1-3) 28 DS1 channels multiplexed into a DS3 signal. cbit: C-Bit Parity Analysis of the DS3 signal. unframed: Used to analyze the unframed DS3 payloads. Example: tx_ds3_frm cbit Response: NONE tx_ds3_frm? Tx DS3 Framing Format Query Command Returns a character string indicating the current transmitter DS3 Framing Format. Example: tx_ds3_frm? Response: TX_DS3_FRM? CBIT Note: M1-3 (m13), C-Bit , or Unframed DS3 Frames can be analyzed. tx_ds3_pat [ prbs_15 | prbs_23 | word ] Tx DS3 Pattern Set Command Sets the transmitter to the selected DS3 Test Pattern. Argument: prbs_15: Inverted PRBS Pattern (215 –1) prbs_23: Inverted PRBS Pattern (223 –1) word: an eight bit sequence set with the ds3_word command. Example: tx_ds3_pat word Response: NONE tx_ds3_pat? Transmitter DS3 Pattern Query Command Returns a character string indicating the current transmitter DS3 Test Pattern Example: tx_ds3_pat? Response: TX_DS3_PAT? WORD Note: PRBS 15, PRBS 23, and WORD are the three test patterns that can be transmitted. ST112 SONET Transmission Test Set 7–33 Artisan Technology Group - Quality Instrumentation ... Guaranteed | (888) 88-SOURCE | www.artisantg.com Remote Commands tx_stress [ daly1 | daly2 | daly3 | word_18 | word_28 | word_324 | ones | zeros | off ] Transmitter Stress Test Set Command Sets the Stress Test Pattern to be transmitted as the DSX-1 Payload Pattern. Argument: daly1: 55 octet pattern. daly2: 55 octet pattern, modified version of daly1. daly3: 55 octet pattern, modified version of daly1. word_18: 1 in 8 pattern containing a string of 7 zeros. word_28: 2 in 8 pattern word_324: 3 in 24 pattern ones: all ones pattern. zeros: all zeros pattern. off: returns to the pattern set by the rx_vt_patt command. Example: tx_stress word_324 Response: NONE Note: The Stress Test only functions in the DSX-1 mode (to run, use quick_setup 4). See: (tx_stress) Transmitter Stress Test Set Command. tx_stress? Transmitter Stress Test Query Command Returns a character string indicating the selected transmitter Stress Test Pattern. Example: tx_stress? Response: TX_STRESS? WORD_324 Note: The Stress Test only functions in the DSX-1 mode. See: (rx_stress) Receiver Stress Test Set Command. tx_vt_chan [ n ] Transmitter VT Channel Select Command Selects the VT1.5 Channel Number that will contain the user-specified DS-1 Payload. Example: tx_vt_chan [n] (n = a decimal number from 1 to 28) Response: NONE Note: The VT1.5 channel is selected from the currently selected STS-1 channel. See (tx_sts_chan) Transmitter STS Channel Select Command. tx_vt_chan? Transmitter VT Channel Query Command Returns a character string indicating the current transmitter VT1.5 Channel selected. Example: tx_vt_chan? Response: TX_VT_CHAN N (N = a decimal number from 1 to 28) Note: See (rx_vt_chan) Receive VT Channel Select Command. 7–34 ST112 SONET Transmission Test Set Artisan Technology Group - Quality Instrumentation ... Guaranteed | (888) 88-SOURCE | www.artisantg.com Remote Commands tx_vt_fram [ unframed | sf | esf | slc ] Tx VT Frame Set Command Sets the transmitter DS-1 Frame Format Argument: unframed: sf: super frame esf: extended super frame slc: (SLC-96) Subscriber Loop Carrier - 96 Example: tx_vt_fram esf Response: NONE tx_vt_fram? Transmitter VT Frame Query Command Returns a character string indicating the selected receiver VT Frame Format. Example: tx_vt_fram? Response: TX_VT_FRAM? ESF Note: For Arguments see (tx_vt_fram) Tx VT Frame Set Command. tx_vt_mode [ all | single ] Tx VT Mode Set Command Sets the transmitter VT1.5 Mode Argument: all: set the mode to use all 28 VT1.5 Channels. single: sets the mode to the one channel set by the tx_vt_chan command. Example: tx_vt_mode single Response: NONE tx_vt_mode? Transmitter VT Mode Set Command Returns a character string indicating the selected VT1.5 Channel Mode. Example: tx_vt_mode? Response: TX_VT_MODE? SINGLE Note: For Arguments see (tx_vt_mode) Tx VT Mode Set Command. tx_vt_patt [ prbs_23 | prbs_15 | qrw | word ] Tx VT Pattern Set Command Sets the transmitter DS-1 Pattern Argument: prbs_23: 223 –1 Pseudo-Random Bit Stream prbs_15: 215 –1 Pseudo-Random Bit Stream qrw: Quasi-Random Word word: 24 Bit Word Pattern (auto-configuration) Example: tx_vt_patt prbs_23 Response: NONE Note: The DS-1 Pattern will mapped into the VT1.5 Payload. tx_vt_patt? Transmitter VT Pattern Query Command Returns a character string indicating the selected transmitter VT Frame Format. Example: tx_vt_patt? Response: TX_VT_PATT? PRBS_23 Note: For Arguments see (tx_vt_patt) Tx VT Pattern Set Command. ST112 SONET Transmission Test Set 7–35 Artisan Technology Group - Quality Instrumentation ... Guaranteed | (888) 88-SOURCE | www.artisantg.com Remote Commands vt_word [ b1, b2, b3 ] VT 24-Bit Word Set Command Sets the transmitter DS-1 Pattern Argument: All three hexadecimal characters must be submitted at the same time. Example: vt_word #haa, #h00, #hff Response: NONE Note: The Example shows the 24-bit DS-1 hexadecimal word AA00FF being inserted. vt_word? VT 24-Bit Word Query Command Returns a character string indicating the 24-bit Word that was previously set. Argument: All three hexadecimal characters must be submitted at the same time. Example: vt_word? Response: VT_WORD #HAA, #H00, #HFF Note: The Example shows the 24-bit DS-1 hexadecimal word AA00FF that had been set. 7–36 ST112 SONET Transmission Test Set Artisan Technology Group - Quality Instrumentation ... Guaranteed | (888) 88-SOURCE | www.artisantg.com Remote Commands Pointer Commands, SPE burst_state? Burst State Query Command Returns a character string indicating the STS-n SPE pointer burst state. Example: burst_state? Response: BURST_STATE RUN Notes: RUN: Indicates that the pointer burst is in progress. STOP: Indicates that the pointer burst is not in progress. For details, see the spe_burst command. spe_burst [ pos | neg ] SPE Burst Pointer Set Command Sets STSn SPE pointer to a negative or positive burst state. Argument: pos: executes a positive pointer burst. neg: executes a negative pointer burst. Example: spe_burst pos Response: NONE Notes: The Example shows that a positive pointer adjust will occur ever 20 ms for the duration of the burst. The duration of the burst is equal to the SPE pointer value time 20 ms—15.68 seconds. The burst will return to the STOP state after completing the cycle. See the burst_state? command. Use of any other transmit SPE pointer commands must be avoided while this command is being executed. The STSn is selected using the tx_sts_chan command. rx_pos_pj? Receiver SPE +PJ Query Command Returns a character string indicating the number of positive SPE pointer adjustments counted during the test cycle. Example: rx_pos_pj? Response: RX_POS_PJ 43 Note: SPE Pointer adjustments are counted on the current STSn that was selected using the tx_sts_chan command. rx_neg_pj? Receiver SPE –PJ Query Command Returns a character string indicating the number of negative SPE pointer adjustments counted during the test cycle. Example: rx_neg_pj? Response: RX_NEG_PJ 43 Note: SPE Pointer adjustments are counted on the current STSn that was selected using the tx_sts_chan command. ST112 SONET Transmission Test Set 7–37 Artisan Technology Group - Quality Instrumentation ... Guaranteed | (888) 88-SOURCE | www.artisantg.com Remote Commands rx_spe_ndf? Receiver SPE NDF Count Query Command Returns a character string indicating the number of New Data Flag adjustments counted in the received SONET signal. Example: rx_spe_ndf? Response: RX_SPE_NDF 1234 Note: There is one NDF for each STS-1 Channel received in the SONET signal. rx_spe_pntr? Receiver SPE Pointer Value Query Command Returns a character string indicating the value of the STS SPE Pointer in the received SONET signal. Example: rx_spe_pntr? Response: RX_SPE_PNTR 522 tx_ptr_ndf [ n ] Transmitter STS NDF Setup Command Sets the value of the New Data Flag that will become the active transmit STS-n SPE pointer value when the next tx_spe_ndf command is executed. Example: tx_ptr_ndf [ n ] (n = a decimal number from 0 to 782) Response: NONE Note: See the tx_spe_ndf command. tx_ptr_ndf? Transmitter STS NDF Setup Query Command Returns a character string indicating the New Data Flag value associated with the tx_ptr_ndf Set Command, that will become the STS NDF value when the tx_spe_ndf command is executed. Example: tx_ptr_ndf? Response: TX_PTR_NDF 500 Note: There is one NDF for each STS-1 Channel received in the SONET signal. tx_spe_ndf Transmitter SPE NDF Set Pointer Execute Command Sets the New Data Flag Pointer Value to the value that was specified by the tx_ptr_ndf Set Command. Example: tx_spe_ndf Response: NONE Note: See the tx_ptr_ndf command. tx_spe_pntr? Transmitter SPE Pointer Query Command Returns a character string indicating the current value of the New Data Flag STS-n SPE pointer. Example: tx_spe_pntr? Response: TX_SPE_PNTR 500 Note: There is one pointer value for each STS-1 Channel received in the SONET signal. 7–38 ST112 SONET Transmission Test Set Artisan Technology Group - Quality Instrumentation ... Guaranteed | (888) 88-SOURCE | www.artisantg.com Remote Commands tx_spe_sing [ pos | neg ] SPE Single Step Pointer Set Command Increments or decrements the STSn SPE pointer value. Argument: pos: increments the value. neg: decrements the value. Example: tx_spe_sing pos Response: NONE The value of the pointer is increased or decreased by 1 each time the command is executed. Pointer Commands, VT rx_vt_ndf? Receiver VT Count Query Command Returns a character string indicating the number of New Data Flag adjustments counted in the selected VT1.5 channel in the received SONET signal. Example: rx_vt_ndf? Response: RX_VT_NDF 310 Note: There is one NDF for each VT Channel received in the SONET signal. rx_vt_pntr? Receiver VT Value Query Command Returns a character string indicating the value of the VT Pointer in the selected VT1.5 Channel. Example: rx_vt_pntr? Response: RX_VT_PNTR 522 vt_ptr_ndf [ n ] Transmitter VT NDF Setup Command Sets the value of the New Data Flag that will become the active transmit VT pointer value when the next tx_vt_ndf command is executed. Example: vt_ptr_ndf [ n ] (n = a decimal number from 0 to 103) Response: NONE Note: See the tx_vt_ndf command. vt_ptr_ndf? Transmitter VT NDF Setup Query Command Returns a character string indicating the New Data Flag value associated with the tx_vt_ndf Set Command, that will become the VT NDF value when the tx_vt_ndf command is executed. Example: vt_ptr_ndf? Response: VT_PTR_NDF 70 Note: There is one NDF for each VT1.5 Channel received in the SONET signal. ST112 SONET Transmission Test Set 7–39 Artisan Technology Group - Quality Instrumentation ... Guaranteed | (888) 88-SOURCE | www.artisantg.com Remote Commands tx_vt_ndf Transmitter VT NDF Set Pointer Execute Command Sets the New Data Flag Pointer Value to the value that was specified by the vt_ptr_ndf Set Command. Example: tx_vt_ndf Response: NONE Note: See the vt_ptr_ndf command. tx_vt_pntr? Transmitter VT NDF Pointer Query Command Returns a character string indicating the current value of the New Data Flag VT1.5 pointer. Example: tx_vt_ndf? Response: TX_VT_NDF 500 Note: There is one NDF for each VT1.5 Channel received in the SONET signal. tx_vt_sing [ pos | neg ] VT Single Step Pointer Set Command Increments or decrements the VT pointer value. Argument: pos: increments the value. neg: decrements the value. Example: tx_vt_sing pos Response: NONE The value of the pointer is increased or decreased by 1 each time the command is executed. vt_pos_pj? Receiver VT +PJ Query Command Returns a character string indicating the number of positive VT1.5 pointer adjustments counted during the test cycle. Example: vt_pos_pj? Response: VT_POS_PJ 122 Note: VT Pointer adjustments are counted on the current VT1.5 Channel that was selected using the tx_vt_chan command. vt_neg_pj? Receiver VT –PJ Query Command Returns a character string indicating the number of negative VT1.5 pointer adjustments counted during the test cycle. Example: vt_neg_pj? Response: VT_NEG_PJ 78 Note: VT Pointer adjustments are counted on the current VT1.5 Channel that was selected using the tx_vt_chan command. 7–40 ST112 SONET Transmission Test Set Artisan Technology Group - Quality Instrumentation ... Guaranteed | (888) 88-SOURCE | www.artisantg.com Remote Commands Receiver Overhead Query Commands rx_aps_byte? Receiver APS Bytes Query Command Return the current value of the APS (Automatic Protection Switching) bytes: K1 and K2 Example: rx_aps_byte? Response: RX_APS_BYTE #HFF, #H55 Note: The codes #HFF and #H55 are the hexadecimal numeric value of the K1 and K2 bytes, respectively. rx_j1_trace? Receive J1 Trace Query Command Returns the value specified in the J1 Trace message. Example: rx_j1_trace? Response: RX_J1_TRACE [Message] Note: The message can be any ASCII Text String, up to 64 Characters. rx_oh_all? Receive Overhead All Query Command Returns 40 bytes: 27 are valid (TOH) Section and Line overhead bytes. 9 are valid (POH )Path Overhead bytes. And 4 are valid (VT) Virtual Tributary overhead bytes. Table 7–1 Byte Mnemonics TOH Section (Sec.) and Line Overhead Bytes POH Bytes VT Bytes Sec. A1 A2 C1 J1 V1 Sec. B1 E1 F1 B3 V2 Sec. D1 D2 D3 C2 V3 Line H1 H2 H3 G1 V4 Line B2 K1 K2 F2 Line D4 D5 D6 H4 Line D7 D8 D9 Z3 Line D10 D11 D12 Z4 Line S1 Z2 E2 Z5 Example: rx_oh_all? Response: RX_OH_ALL 0,#HF6;1,#H28;... etc. Note: The first number before the comma is the NR1 byte count format, ranging from zero to thirty-five for the TOH and POH bytes in the following order: A1, A2, C1, J1, B1, ..., B3, ..., D1, ..., Z5, and bytes thirty-six through thirty-nine are: V1, V2, V3, V4. The #H code after the comma is corresponding byte value in non-decimal numeric (hexadecimal). ST112 SONET Transmission Test Set 7–41 Artisan Technology Group - Quality Instrumentation ... Guaranteed | (888) 88-SOURCE | www.artisantg.com Remote Commands rx_oh_byte? “[ s ]” Receive Overhead Byte Query Command Returns the value of the specified TOH byte. Whereas the argument [s] is a byte mnemonic listed in Table 7–1 Example: rx_oh_byte? “K2” Response: RX_OH_BYTE “K2” ,#H22 Note: The argument “K2” in the example corresponds to the K2 byte. It must be enclosed in quotation marks , as shown. The “K2” before the comma in the response is the corresponding byte label. The code #H22 after the comma is the hexadecimal (non-decimal numeric value) of the K2 byte. rx_oh_offset? [n] Receive Overhead Offset Query Command Returns 40 bytes: 27 are valid (TOH) Section and Line overhead bytes. 9 are valid (POH )Path Overhead bytes. And 4 are valid (VT) Virtual Tributary overhead bytes. Whereas the argument [n] is the corresponding offset value for the byte mnemonic using the format byte mnemonic: offset value listed in Table 7–2 Table 7–2 Byte Mnemonic and Offset TOH Section (Sec.) and Line Overhead Bytes POH Bytes VT Bytes Sec. A1: 00 A2: 01 C1: 02 J1:03 V1: 36 Sec. B1: 04 E1: 05 F1: 06 B3: 07 V2: 37 Sec. D1: 08 D2: 09 D3: 10 C2: 11 V3: 38 Line H1: 12 H2: 13 H3: 14 G1: 15 V4: 39 Line B2: 16: K1: 17 K2: 18 F2: 19 Line D4: 20 D5: 21 D6: 22 H4: 23 Line D7: 24 D8: 25 D9: 26 Z3: 27 Line D10: 28 D11: 29 D12: 30 Z4: 31 Line S1: 32 Z2: 33 E2: 34 Z5: 35 Example: rx_oh_offset? 18 Response: RX_OH_OFFSET 18, #H22 Note: The number 18 in the example and the response corresponds to the K2 byte's offset value. The number #H22 in the response is the non-decimal numeric (hexadecimal) value of the K2 byte. The label K2 is not entered or displayed. 7–42 ST112 SONET Transmission Test Set Artisan Technology Group - Quality Instrumentation ... Guaranteed | (888) 88-SOURCE | www.artisantg.com Remote Commands Receiver Measurement Commands b1_ber? B1 Error Rate Query Command Returns the rate of STS-n Section BIP-8 Code Violations Measured in the received SONET signal. Example: b1_ber? Response: B1_BER 1.7E-5 Note: The rate is returned as a negative exponent. b1_err? B1 Error Count Query Command Returns the number of STS-n Section BIP-8 Code Violations counted in the received SONET signal. Example: b1_err? Response: B1_ERR 43234 b1_es? B1 Errored Seconds Query Command Returns the number of errored seconds counted in the received SONET signal. Example: b1_es? Response: B1_ES 42 Note: Errored seconds are for the STS-n Section BIP-8 Code Violations counted. b1_ses? B1 Severely Errored Seconds Query Command Returns the number of severely errored seconds counted in the received SONET signal. Example: b1_ses? Response: B1_SES 22 Note: Errored seconds are for the STS-n Section BIP-8 Code Violations counted. b2_ber? B2 Error Rate Query Command Returns the rate of STS-n Line BIP-8 Code Violations Measured in the received SONET signal. Example: b2_ber? Response: B2_BER 2.4E-06 Note: The rate is returned as a negative exponent. b2_err? B2 Error Count Query Command Returns the number of STS-n Line BIP-8 Code Violations counted in the received SONET signal. Example: b2_err? Response: B2_ERR 22325 ST112 SONET Transmission Test Set 7–43 Artisan Technology Group - Quality Instrumentation ... Guaranteed | (888) 88-SOURCE | www.artisantg.com Remote Commands b2_es? B2 Errored Seconds Query Command Returns the number of errored seconds counted in the received SONET signal. Example: b2_es? Response: B2_ES 77 Note: Errored seconds are for the STS-n Line BIP-8 Code Violations counted. b2_ses? B2 Severely Errored Seconds Query Command Returns the number of severely errored seconds counted in the received SONET signal. Example: b2_ses? Response: B2_SES 1229 Note: Errored seconds are for the STS-n Line BIP-8 Code Violations counted. b3_ber? B3 Error Rate Query Command Returns the rate of STS-n Path BIP-8 Code Violations Measured in the received SONET signal. Example: b3_ber? Response: B3_BER 4.0E-09 Note: The rate is returned as a negative exponent. b3_err? B3 Error Count Query Command Returns the number of STS-n Path BIP-8 Code Violations counted in the received SONET signal. Example: b3_err? Response: B3_ERR 5280 b3_es? B3 Errored Seconds Query Command Returns the number of errored seconds counted in the received SONET signal. Example: b3_es? Response: B3_ES 9477 Note: Errored seconds are for the STS-n Path BIP-8 Code Violations counted. b3_ses? B1 Severely Errored Seconds Query Command Returns the number of severely errored seconds counted in the received SONET signal. Example: b3_ses? Response: B3_SES 58 Note: Errored seconds are for the STS-n Path BIP-8 Code Violations counted. bpv_err? BPV Error Count Query Command Returns the number of Bipolar Violations counted in the received STSX-1, DSX-3, or DSX-1 signal. Example: bpv_err? Response: BPV_ERR 1234 7–44 ST112 SONET Transmission Test Set Artisan Technology Group - Quality Instrumentation ... Guaranteed | (888) 88-SOURCE | www.artisantg.com Remote Commands bpv_rate? BPV Error Rate Query Command Returns the rate of Bipolar Violations Measured in the received STSX-1, DSX-3, or DSX-1 signal. Example: bpv_rate? Response: BPV_RATE 4.0E-09 Notes: The rate is returned as a negative exponent. The result is not valid when receiving an OC-n (optical) signal. ds_bit_err? DS1/DS3 Bit Error Count Query Command Returns the number of Bit (Test Pattern) errors counted in the selected DS1 or DS3 signal. Example: ds_bit_err? Response: DS_BIT_ERR 35 ds_bit_rate? DS1/DS3 Bit Error Rate Query Command Returns the rate of Bit (Test Pattern) errors measured in the selected DS1 or DS3 signal. Example: ds_bit_rate? Response: DS_BIT_RATE 3.5E-09 Note: The rate is returned as a negative exponent. ds_fram_err? DS1/DS3 Frame Bit Error Count Query Command Returns the number of Frame Bit errors counted in the selected DS1 or DS3 signal. Example: ds_fram_err? Response: DS_FRAM_ERR 12765 ds1_crc6_err? DS1 CRC-6 Parity Error Query Command Returns the number of CRC-6 Parity Errors counted in the selected DS1 or DS3 signal. Example: ds1_crc6_err? Response: DS1_CRC6_ERR 432 ds1_crc6_rate? DS1 CRC-6 Parity Error Rate Query Command Returns the rate of CRC-6 Parity Errors measured in the selected DS1 or DS3 signal. Example: ds1_crc6_rate? Response: DS1_CRC6_RATE 1.7E-08 Note: The rate is returned as a negative exponent. ds3_bit_es? DS3 Bit Errored Seconds Query Command Returns the number of test pattern bit errored seconds counted in the selected DS3 signal. Example: ds3_bit_es? Response: DS3_BIT_ES 3394 ST112 SONET Transmission Test Set 7–45 Artisan Technology Group - Quality Instrumentation ... Guaranteed | (888) 88-SOURCE | www.artisantg.com Remote Commands ds3_bit_ses? DS3 Bit Severely Errored Seconds Query Command Returns the number of bit severely errored seconds counted in the selected DS3 signal. Example: ds3_bit_ses? Response: DS3_BIT_SES 314 ds3_par_err? DS3 Parity Error Count Query Command Returns the number of C-Bit and M-Bit Parity Code Violations counted in the selected DS3 signal. Example: ds3_par_err? Response: DS3_PAR_ERR 297 ds3_par_es? DS3 Parity Errored Seconds Query Command Returns the number of C-Bit and M-Bit Parity Errored Seconds counted in the selected DS3 signal. Example: ds3_par_es? Response: ds3_par_es? 28 ds3_par_rate? DS3 Parity Error Rate Query Command Returns the rate of C-Bit and M-Bit Parity Errors calculated in the selected DS3 signal. Example: ds3_par_rate? Response: DS3_PAR_RATE 7.8E-7 Note: The rate is returned as a negative exponent. ds3_par_ses? DS3 Parity Severely Errored Seconds Query Command Returns the number of C-Bit and M-Bit Parity severely errored seconds counted in the selected DS3 signal. Example: ds3_par_ses? Response: DS3_PAR_SES 8 elap_time? Elapsed Test Cycle Time Query Command Returns the number of elapsed seconds in the current Test Cycle. Example: elap_time? Response: ELAP_TIME 120 Note: Returns the total duration of the last completed Test Cycle, when no Test Cycle is currently running (between Test Cycles). log_clear Clear Error Log Execute Command Clears all error log reports stored in the non-volatile memory Error Log. Example: log_clear Response: NONE 7–46 ST112 SONET Transmission Test Set Artisan Technology Group - Quality Instrumentation ... Guaranteed | (888) 88-SOURCE | www.artisantg.com Remote Commands log_print Print Error Log Execute Command Prints all error log reports stored in the non-volatile memory Error Log. Example: log_print Response: NONE s3c_bit_err? STS-3c Bit Error Count Query Command Returns the number of Test Pattern Bit errors counted in the selected STS-3c payload. Example: s3c_bit_err? Response: S3C_BIT_ERR 813 s3c_bit_rate? STS-3c Bit Error Rate Query Command Returns the rate of Test Pattern Bit errors calculated in the selected STS-3c payload. Example: s3c_bit_rate? Response: S3C_BIT_RATE 4.1E-9 Note: The rate is returned as a negative exponent. s12c_bit_err? STS-12c Bit Error Count Query Command Returns the number of Test Pattern Bit errors counted in the selected STS-12c payload. Example: s12c_bit_err? Response: S12C_BIT_ERR 813 s12c_bit_rate? STS-12c Bit Error Rate Query Command Returns the rate of Test Pattern Bit errors calculated in the selected STS-12c payload. Example: s12c_bit_rate? Response: S12C_BIT_RATE 4.1E-9 Note: The rate is returned as a negative exponent. sts_febe_err? FEBE Total Error Count Command Returns the number of path Far End Block Errors counted in the received signal. Example: sts_febe_err? Response: STS_FEBE_ERR [n] (n = the total count in decimal) sts_fram_err? STS-n Frame Error Query Command Returns the number of Frame errors counted in the STS-n A1 or A2 framing bytes of the SONET signal. Example: sts_fram_err? Response: STS_FRAM_ERR 7 ST112 SONET Transmission Test Set 7–47 Artisan Technology Group - Quality Instrumentation ... Guaranteed | (888) 88-SOURCE | www.artisantg.com Remote Commands vt_bip2_err? VT BIP-2 Error Query Command Returns the number of VT1.5 Bit Interval Parity errors counted during the test cycle. Example: vt_bip2_err? Response: VT_BIP2_ERR 12 vt_bip2_rate? VT BIP-2 Error Rate Query Command Returns the VT1.5 Bit Interval Parity error rate detected during the test cycle. Example: vt_bip2_rate? Response: VT_BIP2_RATE 3.2E-7 Note: The error rate is displayed as a negative exponent. Receiver LED Status Commands ds_ais ? DS1 AIS Query Command Returns the current state of the PAYLOAD\DS1\DS3 AIS indicator—Clear, History, or Current Example: ds_ais? Response: DS_AIS CLEAR Note: CLEAR: Indicates that the LED is off and no history is available. HIST (History): Indicates that the LED is off and historical data is available. CUR (Current): Indicates that the LED is on. ds_crc? DS1 CRC Query Command Returns the current state of the PAYLOAD\DS1\DS3 CRC indicator—Clear, History, or Current Example: ds_crc? Response: DS_CRC HIST Note: CLEAR: Indicates that the LED is off and no history is available. HIST (History): Indicates that the LED is off and historical data is available. CUR (Current): Indicates that the LED is on. ds_lof? DS1 LOF Query Command Returns the current state of the PAYLOAD\DS1\DS3 LOF indicator—Clear, History, or Current Example: ds_lof? Response: DS_LOF CUR Note: CLEAR: Indicates that the LED is off and no history is available. HIST (History): Indicates that the LED is off and historical data is available. CUR (Current): Indicates that the LED is on. 7–48 ST112 SONET Transmission Test Set Artisan Technology Group - Quality Instrumentation ... Guaranteed | (888) 88-SOURCE | www.artisantg.com Remote Commands ds_sync? DS1 SYNC Query Command Returns the current state of the PAYLOAD\DS1\DS3 SYNC indicator—Clear, History, or Current Example: ds_sync? Response: DS_SYNC CLEAR Note: CLEAR: Indicates that the LED is off and no history is available. HIST (History): Indicates that the LED is off and historical data is available. CUR (Current): Indicates that the LED is on. ds1_yellow? DS1 YEL-DS3 Query Command Returns the current state of the PAYLOAD\DS1\DS3 RAI indicator—Clear, History, or Current Example: ds1_yellow? Response: DS1_YELLOW HIST Note: CLEAR: Indicates that the LED is off and no history is available. HIST (History): Indicates that the LED is off and historical data is available. CUR (Current): Indicates that the LED is on. ds3_bit_sta? DS3 BIT Indicator Query Command Returns the current state of the PAYLOAD\DS1\DS3 Bit Status indicator—Clear, History, or Current Example: ds3_bit_sta? Response: DS3_BIT_STA CUR Note: CLEAR: Indicates that the LED is off and no history is available. HIST (History): Indicates that the LED is off and historical data is available. CUR (Current): Indicates that the LED is on. ds3_idle? DS3 IDLE Indicator Query Command Returns the current state of the PAYLOAD\DS1\DS3 DS3 IDLE indicator—Clear, History, or Current Example: ds3_idle? Response: DS3_IDLE CLEAR Note: CLEAR: Indicates that the LED is off and no history is available. HIST (History): Indicates that the LED is off and historical data is available. CUR (Current): Indicates that the LED is on. ds3_ones? DS3 All Ones Query Command Returns the current state of the PAYLOAD\DS1\DS3 DS3 ONES indicator—Clear, History, or Current Example: ds3_ones? Response: DS3_ONES HIST Note: CLEAR: Indicates that the LED is off and no history is available. HIST (History): Indicates that the LED is off and historical data is available. CUR (Current): Indicates that the LED is on. ST112 SONET Transmission Test Set 7–49 Artisan Technology Group - Quality Instrumentation ... Guaranteed | (888) 88-SOURCE | www.artisantg.com Remote Commands ds3_par_sta? DS3 Parity Query Command Returns the current state of the PAYLOAD\DS1\DS3 PAR indicator—Clear, History, or Current Example: ds3_par_sta? Response: DS3_PAR_STA CUR Note: CLEAR: Indicates that the LED is off and no history is available. HIST (History): Indicates that the LED is off and historical data is available. CUR (Current): Indicates that the LED is on. ds3_xbit? DS3 Yellow-DS3 Query Command Returns the current state of the PAYLOAD\DS1\DS3 DS3 YEL-DS3 indicator—Clear, History, or Current Example: ds3_par_sta? Response: DS3_PAR_STA CLEAR Note: CLEAR: Indicates that the LED is off and no history is available. HIST (History): Indicates that the LED is off and historical data is available. CUR (Current): Indicates that the LED is on. led_stat? LED Status Query Command Returns a summary the current state of all receiver front panel indicators—Clear, History, or Current Example: led_stat? Response: LED_STAT HIST Note: CLEAR: Indicates that all LEDs are off and no history for any is available. HIST (History): Indicates that all LEDs are off and some historical data is available. CUR (Current): Indicates that some LEDs are on. line_ais? Line AIS Query Command Returns the current state of the LINE AIS indicator—Clear, History, or Current Example: line_ais? Response: LINE_AIS CUR Note: CLEAR: Indicates that the LED is off and no history is available. HIST (History): Indicates that the LED is off and historical data is available. CUR (Current): Indicates that the LED is on. line_b2? Line B2 Query Command Returns the current state of the LINE B2 indicator—Clear, History, or Current Example: line_b2? Response: LINE_B2 CLEAR Note: CLEAR: Indicates that the LED is off and no history is available. HIST (History): Indicates that the LED is off and historical data is available. CUR (Current): Indicates that the LED is on. 7–50 ST112 SONET Transmission Test Set Artisan Technology Group - Quality Instrumentation ... Guaranteed | (888) 88-SOURCE | www.artisantg.com Remote Commands line_ferf? Line FERF Query Command Returns the current state of the LINE FERF indicator—Clear, History, or Current Example: line_ferf? Response: LINE_FERF HIST Note: CLEAR: Indicates that the LED is off and no history is available. HIST (History): Indicates that the LED is off and historical data is available. CUR (Current): Indicates that the LED is on. line_lop? Line LOP Query Command Returns the current state of the LINE LOP indicator—Clear, History, or Current Example: line_lop? Response: LINE_LOP CUR Note: CLEAR: Indicates that the LED is off and no history is available. HIST (History): Indicates that the LED is off and historical data is available. CUR (Current): Indicates that the LED is on. path_ais? Path AIS Query Command Returns the current state of the Path AIS indicator—Clear, History, or Current Example: path_ais? Response: PATH_AIS CLEAR Note: CLEAR: Indicates that the LED is off and no history is available. HIST (History): Indicates that the LED is off and historical data is available. CUR (Current): Indicates that the LED is on. path_b3? Path B3 Query Command Returns the current state of the Path B3 indicator—Clear, History, or Current Example: path_b3? Response: PATH_B3 HIST Note: CLEAR: Indicates that the LED is off and no history is available. HIST (History): Indicates that the LED is off and historical data is available. CUR (Current): Indicates that the LED is on. path_febe? Path FEBE Query Command Returns the current state of the Path FEBE indicator—Clear, History, or Current Example: path_febe? Response: PATH_FEBE CUR Note: CLEAR: Indicates that the LED is off and no history is available. HIST (History): Indicates that the LED is off and historical data is available. CUR (Current): Indicates that the LED is on. ST112 SONET Transmission Test Set 7–51 Artisan Technology Group - Quality Instrumentation ... Guaranteed | (888) 88-SOURCE | www.artisantg.com Remote Commands path_yel? Path Yellow Query Command Returns the current state of the Path Yellow indicator—Clear, History, or Current Example: path_yel? Response: PATH_YEL CLEAR Note: CLEAR: Indicates that the LED is off and no history is available. HIST (History): Indicates that the LED is off and historical data is available. CUR (Current): Indicates that the LED is on. pyld_los? Payload LOS Query Command Returns the current state of the Payload LOS Indicator—Clear, History, or Current Example: pyld_los? Response: PYLD_LOS HIST Note: CLEAR: Indicates that the LED is off and no history is available. HIST (History): Indicates that the LED is off and historical data is available. CUR (Current): Indicates that the LED is on. sect_b1? Section B1 Query Command Returns the current state of the Section B1 Indicator—Clear, History, or Current Example: sect_b1? Response: SECT_B1 CUR Note: CLEAR: Indicates that the LED is off and no history is available. HIST (History): Indicates that the LED is off and historical data is available. CUR (Current): Indicates that the LED is on. sect_lof? Section LOF Query Command Returns the current state of the Section LOF Indicator—Clear, History, or Current Example: sect_lof? Response: SECT_LOF CLEAR Note: CLEAR: Indicates that the LED is off and no history is available. HIST (History): Indicates that the LED is off and historical data is available. CUR (Current): Indicates that the LED is on. sect_los? Section LOS Query Command Returns the current state of the Section LOS Indicator—Clear, History, or Current Example: sect_los? Response: SECT_LOS HIST Note: CLEAR: Indicates that the LED is off and no history is available. HIST (History): Indicates that the LED is off and historical data is available. CUR (Current): Indicates that the LED is on. 7–52 ST112 SONET Transmission Test Set Artisan Technology Group - Quality Instrumentation ... Guaranteed | (888) 88-SOURCE | www.artisantg.com Remote Commands sts_oof? STS-1 OOF Query Command Returns the current state of the STS-1 OOF Indicator—Clear, History, or Current Example: sts_oof? Response: STS_OOF CUR Note: CLEAR: Indicates that the LED is off and no history is available. HIST (History): Indicates that the LED is off and historical data is available. CUR (Current): Indicates that the LED is on. vt_ais? VT Path AIS Query Command Returns the current state of the VT Path AIS Indicator—Clear, History, or Current Example: vt_ais? Response: VT_AIS CLEAR Note: CLEAR: Indicates that the LED is off and no history is available. HIST (History): Indicates that the LED is off and historical data is available. CUR (Current): Indicates that the LED is on. vt_bip2_stat? VT Path BIT-2 Query Command Returns the current state of the VT Path BIT-2 Indicator—Clear, History, or Current Example: vt_bip2_stat? Response: VT_BIP2_STAT HIST Note: CLEAR: Indicates that the LED is off and no history is available. HIST (History): Indicates that the LED is off and historical data is available. CUR (Current): Indicates that the LED is on. vt_febe? VT Path FEBE Query Command Returns the current state of the VT Path FEBE Indicator—Clear, History, or Current Example: vt_febe? Response: VT_FEBE CUR Note: CLEAR: Indicates that the LED is off and no history is available. HIST (History): Indicates that the LED is off and historical data is available. CUR (Current): Indicates that the LED is on. vt_yellow? VT Path (Yellow) RDI Query Command Returns the current state of the VT Path (Yellow) RDI Indicator—Clear, History, or Current Example: vt_yellow? Response: VT_YELLOW CUR Note: CLEAR: Indicates that the LED is off and no history is available. HIST (History): Indicates that the LED is off and historical data is available. CUR (Current): Indicates that the LED is on. ST112 SONET Transmission Test Set 7–53 Artisan Technology Group - Quality Instrumentation ... Guaranteed | (888) 88-SOURCE | www.artisantg.com Remote Commands Transmitter Error Commands b1_parity B1 Parity Error Set Command Generates a single STS-n section BIP-8 code violation. Example: b1_parity Response: NONE Note: Inverts one bit of the b1 byte. b2_parity B2 Parity Error Set Command Generates a single STS-n line BIP-8 code violation. Example: b2_parity Response: NONE Note: Inverts one bit of the b2 byte. b3_parity B3 Parity Error Set Command Generates a single STS-n path BIP-8 code violation. Example: b3_parity Response: NONE Note: Inverts one bit of the b3 byte. bip2_error VT BIP-2 Parity Error Set Command Generates a single VT BIP-2 code violation (VT1.5 Bit Interval Parity error). Example: bip2_error Response: NONE Note: Inverts one of the two parity bits in the V5 byte. bip2_rate [ n ] VT BIP-2 Parity Error Set Command Generates the VT1.5 Bit Interval Parity error rate. Example: bip2_rate [ n ] Response: NONE Note: The error rate is a negative exponent from 1.0E-9 to 1.5E-3. bip2_rate? VT BIP-2 Error Rate Query Command Returns the VT1.5 Bit Interval Parity error rate settings. Example: bip2_rate? Response: BIP2_RATE 3.2E-7 Note: The error rate is displayed as a negative exponent. 7–54 ST112 SONET Transmission Test Set Artisan Technology Group - Quality Instrumentation ... Guaranteed | (888) 88-SOURCE | www.artisantg.com Remote Commands bip2_random [ on | off ] VT BIP-2 Random Error Rate Set Command Rendomly generates the VT1.5 Bit Interval Parity error rate. Argument: on: Turns the VT BIP-2 error rate generator on and off, randomly. off: Turns the VT BIP-2 error rate generator off. Example: bip2_random on Response: NONE Note: The error rate is a negative exponent from 1.0E-9 to 1.5E-3. bip2_random? VT BIP-2 Random Error Rate Query Command Returns the state of the VT1.5 Bit Interval Parity error rate random generator. Example: bip2_random? Response: BIP2_RANDOM ON bpv_error STSX-1 BPV Error Set Command Generates a single bipolar violation in the STSX-1 electrical cross connect (B3ZS) signal. Example: bpv_error Response: NONE Notes: Zero substitution codes are NOT impacted. Bit errors are NOT caused. ds1_bit_rate [ n ] DS1 Bit Error Rate Set Command Sets the DS1-VT1.5 Bit Error Rate. Example: ds1_bit_rate [ n ] Response: NONE Note: The error rate is a negative exponent from 1.0E-9 to 1.5E-3. ds1_bit _rate? DS1 Bit Error Rate Query Command Returns a character string indicating the current value of the DS1-VT1.5 Bit Error Rate. Example: ds1_bit_rate? Response: DS1_BIT_RATE 3.2E-7 Note: The error rate is displayed as a negative exponent from 1.0E-9 to 1.5E-3. ds1_bit _random [ on | off ] DS1 Random Error Rate Set Command Randomly generates the DS1-VT1.5 error rate. Argument: on: Turns the DS1-VT1.5 error rate generator on and off, randomly. off: Turns the DS1-VT1.5 error rate generator off. Example: ds1_bit_random on Response: NONE Note: The error rate is a negative exponent from 1.0E-9 to 1.5E-3. ST112 SONET Transmission Test Set 7–55 Artisan Technology Group - Quality Instrumentation ... Guaranteed | (888) 88-SOURCE | www.artisantg.com Remote Commands ds1_bit_random? DS1 Random Error Rate Query Command Returns the state of the DS1-VT1.5 Bit error rate random generator. Example: ds1_bit_random? Response: DS1_BIT _RANDOM ON ds1_bit_error DS1 Bit Error Set Command Generates a single DS1 bit error. Example: ds1_bit_error Response: NONE Notes: This error occurs in each DS1 carried as a VT1.5 payload and in each DSX-1 output. The error may fall on the DS1 overhead or payload. ds3_bit_rate [ n ] DS3 Bit Error Rate Set Command Sets the DS3 Bit Error Rate. Example: ds3_bit_rate [ n ] Response: NONE Note: The error rate is a negative exponent from 1.0E-9 to 1.5E-3. ds3_bit _rate? DS3 Bit Error Rate Query Command Returns a character string indicating the current value of the DS3 Bit Error Rate. Example: ds3_bit_rate? Response: DS3_BIT_RATE 3.2E-7 Note: The error rate is displayed as a negative exponent from 1.0E-9 to 1.5E-3. ds3_bit_random [ on | off ] DS3 Random Error Rate Set Command Randomly generates the DS3 error rate. Argument: on: Turns the DS3 error rate generator on and off, randomly. off: Turns the DS3 error rate generator off. Example: ds3_bit_random on Response: NONE Note: The error rate is a negative exponent from 1.0E-9 to 1.5E-3. ds3_bit_random? DS3 Random Error Rate Query Command Returns the state of the DS3 Bit error rate random generator. Example: ds3_bit_random? Response: DS3_BIT_RANDOM ON 7–56 ST112 SONET Transmission Test Set Artisan Technology Group - Quality Instrumentation ... Guaranteed | (888) 88-SOURCE | www.artisantg.com Remote Commands ds3_bpv_rate [ n ] DS3 BPV Error Rate Set Command Sets the DS3 BPV Error Rate. Example: ds3_bpv_rate [ n ] Response: NONE Note: The error rate is a negative exponent from 1.0E-9 to 1.5E-3. ds3_bpv_rate? DS3 BPV Error Rate Query Command Returns a character string indicating the current value of the DS3 BPV Error Rate. Example: ds3_bpv_rate? Response: DS3_BPV_RATE 3.2E-7 Note: The error rate is displayed as a negative exponent from 1.0E-9 to 1.5E-3. ds3_bpv_random [ on | off ] DS3 BPV Random Error Set Command Randomly generates the DS3 BPV error rate. Argument: on: Turns the DS3 error rate generator on and off, randomly. off: Turns the DS3 error rate generator off. Example: ds3_bpv_random on Response: NONE Note: The error rate is a negative exponent from 1.0E-9 to 1.5E-3. ds3_bpv_random? DS3 BPV Random Error Query Command Returns the state of the DS3 BPV error rate random generator. Example: ds3_bpv_random? Response: DS3_BPV_RANDOM ON ds3_error DS3 Bit Error Set Command Generates a single DS3 bit error. Example: ds3_error Response: NONE Notes: This error occurs in each DS3 carried as an STS-n payload and each DSX-3 output. The error may fall on the DS3 overhead or payload. error_rate [ on | off ] STS Bit Error Rate Set Command Generates random bit errors in any bit position within the STS-n frame. Example: error_rate on Response: NONE Note: These errors cause STS-n BIP-8 code violations (in the line, section, and path) and VT1.5 BIP-2 code violations. ST112 SONET Transmission Test Set 7–57 Artisan Technology Group - Quality Instrumentation ... Guaranteed | (888) 88-SOURCE | www.artisantg.com Remote Commands error_rate? STS Bit Error Rate Query Command Returns a character string indicating the state of the STS Bit Error Rate Generator. Example: error_rate? Response: ERROR_RATE ON Note: the STS Bit Error Rate Generator can be on (enabled) or off (disabled). parity_rate [ n ] STS-n Parity Rate Set Command Sets the STS-n Bit Error Rate Generator to a number n from 1.0E–9 to 1.5E–3. Example: parity_rate 1.3E–6 Response: NONE Note: The parity error generator will be enabled by the error_rate on command. parity_rate? STS-n Parity Rate Query Command Returns the current STS-n Bit Error Rate Generator. Example: parity_rate? Response: PARITY_RATE 1.3E–6 Note: The error rate is a negative exponent from 1.0E–9 to 1.5E–3. pyld_err [ parameter1, parameter2 ] Change Displayed Menus remotely. Example: Pyld_err,ds3_bit Argument DS3_BIT DS3_PAR DSX3_BPV CRC6 DS1_BIT S3C_BIT S12C_BIT DS1_SUM DS3_SUM ELAP_TIME Note: random_b1 Change Displayed Menus Remotely for DS3 bit error menu for DS3 parity error menu for DSX3 bipolar violation error menu for CRC-6 error menu for DS1 bit error menu for 3C bit error menu for 12C bit error menu for DS1 errors summary menu for DS3 errors summary menu for elapsed time menu The remote command will change the menu only when the new menu is valid for the current configuration. If the menu is not valid, an execution error will result. There is no space allowed between the two parameters. The command and parameters can be either written in either upper or lower cases. Random B1 Parity Error Set Command Generates a single STS-n section BIP-8 code violation. Example: random_b1 Response: NONE Note: Errors caused by this command result in a section BIP-8 code violation (B1 error) because a single bit error is located, at random, anywhere in the STS-n TOH or SPE bytes after the section, line, and path parity has been calculated. 7–58 ST112 SONET Transmission Test Set Artisan Technology Group - Quality Instrumentation ... Guaranteed | (888) 88-SOURCE | www.artisantg.com Remote Commands s3c_error STS 3c Error Set Command Generates a single bit error in the STS-3c synchronous payload. Example: s3c_error Response: NONE Note: Bit errors caused by this command result in section, line, and path BIP-8 code violation because a single bit error is located, at random, anywhere in the STS-3c payload after the section, line, and path parity has been calculated. sts_err [ parameter1, parameter2 ] Change Displayed Menus remotely. Example: sts_err,oc48_b2 Argument B1 B2 B3 STS_SUM OC48_B1 OC48_B2 OC48_SUM STSX_BPV BIP2 DS1_SUM ELAP_TIME Note: stx_bpv_rate [ n ] Change Displayed Menus Remotely for B1 error menu for B2 error menu for B3 error menu for STSn errors summary menu for OC48 B1 error menu for OC48 B2 error menu for OC48 errors summary menu for STSX bipolar violation error menu for BIP-2 error menu for DS1 errors summary menu for elapsed time menu The remote command will change the menu only when the new menu is valid for the current configuration. If the menu is not valid, an execution error will result. There is no space allowed between the two parameters. The command and parameters can be either written in either upper or lower cases. STSX-1 BPV Rate Set Command Sets the STSX-1 BPV Error Rate Generator to a number (n) from 1.0E-9 to 1.5E-3. Example: stx_bpv_rate 1.0E-6 Response: NONE Note: The errors will be generator when the stx_bpv_rand on command is executed. stx_bpv_rate? STSX-1 BPV Rate Query Command Returns the current STSX-1 BPV Rate settings. Example: stx_bpv_rate? Response: STX_BPV_RATE 1.0E-6 Note: The rate is a negative exponent from 1.0E-9 to 1.5E-3. ST112 SONET Transmission Test Set 7–59 Artisan Technology Group - Quality Instrumentation ... Guaranteed | (888) 88-SOURCE | www.artisantg.com Remote Commands stx_bpv_rand [ on | off ] STSX-1 BPV Random Set Command Turns the STSX-1 BPV error rate generator on or off. Argument: on: generates BPV errors randomly across the STSX-1 frame at the rate set by the stx_bpv_rate command. off: disables the STSX-1 BPV error generator. Example: stx_bpv_rand on Response: NONE Note: See the stx_bpv_rate command. stx_bpv_rand? STSX-1 BPV Random Query Command Returns a character string indicating the state of the STSX-1 BPV Error Rate Generator. Example: stx_bpv_rand? Response: STX_BPV_RAND ON Note: See the STSX-1 BPV Random Set Command spe_error SPE Error Set Command Generates a single bit error in the Synchronous Payload Envelope. Example: spe_error Response: NONE Note: Bit errors caused by this command result in STS-n section, line, and path BIP-8 code violations because a single bit error is located, at random, anywhere in the SPE after the section, line, and path parity has been calculated. tx_j1_fill #h[nn] Transmit J1 Trace Set Command Sets the value of the J1 Trace message. Fills all 64 bytes with the hexadecimal characters nn. Example: tx_j1_fill #h45 Response: NONE Note: Any two hexadecimal characters from 00 to FF may be used. tx_j1_trace “[ message ]” Transmit J1 Trace Set Command Sets the value of the J1 Trace message. Example: tx_j1_trace “Tektronix” Response: NONE Note: The message can be any ASCII Text String, up to 64 Characters enclosed in quotation marks. tx_j1_trace? Transmit J1 Trace Query Command Returns the value specified in the J1 Trace message. Example: tx_j1_trace? Response: TX_J1_TRACE TEKTRONIX Note: The message can be any ASCII Text String, up to 64 Characters. 7–60 ST112 SONET Transmission Test Set Artisan Technology Group - Quality Instrumentation ... Guaranteed | (888) 88-SOURCE | www.artisantg.com Remote Commands tx_oh_all? Transmit Overhead All Query Command Returns 36 bytes: 27 are valid (TOH) Section and Line overhead bytes and 9 are valid (POH )Path Overhead bytes. Bites Vi through V4 are not displayed. Table 7–3 Byte Mnemonics TOH Section (Sec.) and Line Overhead Bytes POH Bytes VT Bytes Sec. A1 A2 C1 J1 V1 Sec. B1 E1 F1 B3 V2 Sec. D1 D2 D3 C2 V3 Line H1 H2 H3 G1 V4 Line B2 K1 K2 F2 Line D4 D5 D6 H4 Line D7 D8 D9 Z3 Line D10 D11 D12 Z4 Line S1 Z2 E2 Z5 Example: tx_oh_all? Response: TX_OH_ALL 0,#HF6;1,#H28;... etc. Note: The first number before the comma is the NR1 byte count format, ranging from zero to thirty-five for the TOH and POH bytes in the following order: A1, A2, C1, J1, B1, ..., B3, ..., D1, ..., Z5, and bytes thirty-six through thirty-nine are: V1, V2, V3, V4. The #H code after the comma is corresponding byte value in non-decimal numeric (hexadecimal). tx_oh_def TX Overhead Default Set Command Returns the STS-n Overhead Bytes (TOH and POH) to their factory default settings. Example: tx_oh_def Response: NONE tx_oh_edit [ on | enter | esc ] TX Overhead Edit Command This command is used to start and end, with or without saving the changes, the TOH editing session. Arguments: on starts the editing session enter saves all changes and ends the edition session esc ends the editing session without saving any changes Example: tx_oh_edit on Response: NONE Note: This command enables and disables the use of the following commands: tx_oh_byte, tx_oh_offset, tx_oh_pass, and tx_oh_write tx_oh_edit? TX Overhead Edit Query Command Returns status of the TOH editing session. Example: tx_oh_edit? Response: TX_OH_EDIT ON Note: The editing session can be either ON or OFF. ST112 SONET Transmission Test Set 7–61 Artisan Technology Group - Quality Instrumentation ... Guaranteed | (888) 88-SOURCE | www.artisantg.com Remote Commands tx_oh_byte “[ s ]”, #h[ b ] TX Overhead Byte Set Command This command is used to set the hexadecimal value (s) of the selected overhead byte (b). Arguments: s: is the mnemonic (Table 7–4) label of the overhead byte (TOH or POH) to be set. b: is the hexadecimal value that the byte will be set to. Example: tx_oh_byte “e1”,#hff Response: NONE Note: This command is enabled and disabled by the tx_oh_edit commands. The byte mnemonic must be enclosed in quotation marks and followed by a comma. The hexadecimal number must be preceded by a pound sign and the letter h (upper or lower case). It can be any number from 00 to FF in hexadecimal. tx_oh_byte? “[s]” Transmit Overhead Byte Query Command Returns the current hexadecimal value [b] of the overhead byte [s]. Example: tx_oh_byte? “d3” Response: TX_OH_BYTE D3, #H00 Note: s = the byte mnemonic from A1 to Z5 shown in Table 7–4 b = the byte content in hexadecimal format, such as, #H22 The byte mnemonic must be enclosed in quotation marks. Table 7–4 Byte Mnemonics TOH Section (Sec.) and Line Overhead Bytes Sec. A1 A2 C1 Sec. B1 E1 F1 Sec. D1 D2 D3 Line H1 H2 H3 Line B2 K1 K2 Line D4 D5 D6 Line D7 D8 D9 Line D10 D11 D12 Line S1 Z2 E2 7–62 POH Bytes J1 B3 C2 G1 F2 H4 Z3 Z4 Z5 VT Bytes V1 V2 V3 V4 ST112 SONET Transmission Test Set Artisan Technology Group - Quality Instrumentation ... Guaranteed | (888) 88-SOURCE | www.artisantg.com Remote Commands tx_oh_offset [n], #h[b] Transmit Overhead Offset Byte Set Command Sets the overhead byte associated with offset [n] to the hexadecimal value [b] from 00 to FF Arguments: n: is the offset of the mnemonic label, shown in Table 7–5. b: is the hexadecimal value that the byte will be set to. Example: tx_oh_offset 26, #h00 Response: NONE Note: The table below list each Overhead Byte mnemonic label and its offset. The tx_oh_edit command is used to enabled and disabled this command. The offset number must be followed by a comma. The hexadecimal number must be preceded by a pound sign and the letter h (upper or lower case). It can be any number from 00 to FF in hexadecimal. Table 7–5 Byte Mnemonic and Offset TOH Section (Sec.) and Line Overhead Bytes Sec. A1: 00 A2: 01 C1: 02 Sec. B1: 04 E1: 05 F1: 06 Sec. D1: 08 D2: 09 D3: 10 Line H1: 12 H2: 13 H3: 14 Line B2: 16: K1: 17 K2: 18 Line D4: 20 D5: 21 D6: 22 Line D7: 24 D8: 25 D9: 26 Line D10: 28 D11: 29 D12: 30 Line S1: 32 Z2: 33 E2: 34 tx_oh_offset? [n] POH Bytes VT Bytes J1:03 B3: 07 C2: 11 G1: 15 F2: 19 H4: 23 Z3: 27 Z4: 31 Z5: 35 V1: 36 V2: 37 V3: 38 V4: 39 Transmit Overhead Offset Query Command Returns the overhead byte value [b] associated with offset [n] Example: tx_oh_offset? 26 Response: TX_OH_OFFSET 26, #H00 Note: n = the byte mnemonic from A1 to Z5 shown in Table 7–5. b = the byte content in hexadecimal format, such as ,#H22 tx_sts_chan [ n ] STS-n Channel Error Set Command Generates a single bit error, at random, within the selected STS-1 channel. Argument: n = the STS-1 channel number Example: tx_sts_chan 2 Response: NONE Notes: The OC-3 rate has three STS-1 channels, numbered 1 to 3. The OC-12 rate has three STS-1 channels, numbered 1 to 12. Errors caused by this command result in an STS-n section BIP-8 code violation and various STS-1 payload errors—mapping mode dependent. A single bit error is located, at random, anywhere in the selected STS-1 channel after the section, line, and path parity has been calculated. ST112 SONET Transmission Test Set 7–63 Artisan Technology Group - Quality Instrumentation ... Guaranteed | (888) 88-SOURCE | www.artisantg.com Remote Commands tx_vt_v5 [n] Transmit V5 Byte Set Command Sets the (VT1.5) V5 overhead byte to a decimal value from 0 to 63. Example: tx_vt_v5 [n] (n = a number from 0 to 63 decimal.) Response: NONE Notes: The V5 byte bit positions are numbered from 1 (msb) to 8 (lsb). bits 1 and 2 are inaccessible bit 3 = VT Path FEBE (20 hex = 32 decimal) bit 4 is Unassigned (10 hex = 16 decimal) bits 5, 6, 7 = VT Path Signal Label (listed below, in binary) 0 0 0 VT SPE Unequipped (00 hex = 0 decimal) 0 0 1 VT SPE Equipped—Payload Not Specified (02 hex = 2 decimal) 0 1 0 VT SPE Equipped—Unassigned (04 hex = 4 decimal) 0 1 1 VT SPE Equipped—Unassigned (06 hex = 6 decimal) 1 0 0 VT SPE Equipped—Unassigned (08 hex = 8 decimal) 1 0 1 VT SPE Equipped—Unassigned (0A hex = 10 decimal) 1 1 0 VT SPE Equipped—Unassigned (0C hex = 12 decimal) 1 1 1 Alarm Indication Signal (0E hex = 14 decimal) bit 8 = Yellow Signal (01 hex = 1 decimal) tx_vt_v5? Transmit V5 Byte Query Command Returns the decimal value of the (VT1.5) V-5 overhead byte. Example: tx_vt_v5? Response: TX_VT_V5 14 Note: See the Transmit V5 Byte Set Command (tx_vt_v5 [n]) 7–64 ST112 SONET Transmission Test Set Artisan Technology Group - Quality Instrumentation ... Guaranteed | (888) 88-SOURCE | www.artisantg.com Remote Commands Alarms, Transmitter alm_burst [ lof | l_ais | ferf | sts_ais | sts_yel | vt_ais | vt_yel | sts_oorp ] Alarm Burst Set Command Specifies which alarm condition will be generated when the alarm enable is set to burst. Argument: lof: Loss Of Frame (loss of the STS-n section framing) l_ais: Line Alarm Indication Signal (for the STS-n line) ferf: Far End Receive Failure (STS-n line failure indication) sts_ais: STS-n Path Line Alarm Indication Signal sts_yel: STS-n Path Yellow Alarm Indication Signal vt_ais: VT1.5 Path Line Alarm Indication Signal vt_yel: VT1.5 Path Yellow Alarm Indication Signal sts_oorp: STS-n Out Of Range Pointer Indication Signal Example: alm_burst lof Response: NONE Note: Only one alarm condition at a time can be generated in the burst mode. See the Alarm Enable command. alm_burst? Alarm Burst Query Command Returns a character string indicating the selected alarm burst condition. Example: alm_burst? Response: ALM_ENAB [alarm mode] Note: For a list of burst alarms, see Alarm Burst Set Command alm_clear Alarm Clear Command Turns off all alarm conditions in progress and disables all continuous alarm conditions. Example: alm_clear Response: NONE Note: This command has the same function as the Alarm_Enable OFF command. alm_enab [ burst | multi | off ] Alarm Enable Command Executes or stops the execution of the alarm conditions that were configured by other commands. Arguments: burst generates one single alarm event set by the alm_count command multi generates continuous alarm events off stops all alarms events including continuous and burst Example: alm_enab burst Response: NONE Note: Alarm events include all continuous alarm conditions and current burst alarm conditions if the burst is in progress. ST112 SONET Transmission Test Set 7–65 Artisan Technology Group - Quality Instrumentation ... Guaranteed | (888) 88-SOURCE | www.artisantg.com Remote Commands alm_enab? Alarm Enable Query Command Returns the current alarm mode. Example: alm_enab? Response: ALM_ENAB [alarm mode] Note: Alarm Modes can be MULTI, BURST, or OFF (see Alarm Enable Command) alm_count [n] Alarm Count Set Command Sets the alarm burst duration to a specified number of frames from 1 to 255. Example: alm_count 40 Response: NONE Note: Use the alm_enab burst command to executed the alarm condition. alm_count? Alarm Count Query Command Returns the number of frames specified by the Alarm Count Set Command. Example: alm_count? Response: ALM_COUNT 40 Note: Use the alm_enab burst command to executed the alarm condition. alm_ferf [ on | off ] Alarm FERF Set Command Enables or disables the FERF (Far-End Receive Failure) alarm condition to be generated Arguments: on: enables the condition off: disables the condition Example: alm_ferf on Response: NONE Note: Use the alm_enab command to executed the enabled alarm condition. alm_ferf? Alarm FERF Query Command Returns the FERF (Far-End Receive Failure) alarm condition as on (enabled) or off (disabled). Example: alm_ferf? Response: ALM_FERF ON Note: See the Alarm FERF Set Command alm_l_ais [ on | off ] Alarm Line AIS Set Command Enables or disables the L_AIS (Line Alarm Indication Signal) alarm condition to be generated Arguments: on: enables the condition off: disables the condition Example: alm_l_ais on Response: NONE Note: Use the alm_enab command to executed the enabled alarm condition. 7–66 ST112 SONET Transmission Test Set Artisan Technology Group - Quality Instrumentation ... Guaranteed | (888) 88-SOURCE | www.artisantg.com Remote Commands alm_l_ais? Alarm Line AIS Query Command Returns the FERF (Far-End Receive Failure) alarm condition as on (enabled) or off (disabled). Example: alm_l_ais? Response: ALM_L_AIS ON Note: See the Alarm Line AIS Set Command alm_lof [ on | off ] Alarm LOF Set Command Enables or disables the LOF (Loss Of Frame) alarm condition to be generated Arguments: on: enables the condition off: disables the condition Example: alm_lof on Response: NONE Note: Use the alm_enab command to executed the enabled alarm condition. alm_lof? Alarm LOF Query Command Returns the LOF (Loss Of Frame) alarm condition as on (enabled) or off (disabled). Example: alm_lof? Response: ALM_LOF ON Note: See the Alarm LOF Set Command alm_oorp [ on | off ] Alarm OORP Set Command Enables or disables the OORP (Out Of Range Pointer) alarm condition to be generated Arguments: on: enables the condition off: disables the condition Example: alm_oorp on Response: NONE Note: Use the alm_enab command to executed the enabled alarm condition. alm_oorp? Alarm OORP Query Command Returns the OORP (Out Of Range Pointer) alarm condition as on (enabled) or off (disabled). Example: alm_oorp? Response: ALM_OORP ON Note: See the Alarm OORP Set Command alm_sts_ais [ on | off ] Alarm STS-n (Line) AIS Set Command Enables or disables the STS-n (Line) AIS alarm condition to be generated Arguments: on: enables the condition off: disables the condition Example: alm_sts_ais on Response: NONE Note: Use the alm_enab command to executed the enabled alarm condition. ST112 SONET Transmission Test Set 7–67 Artisan Technology Group - Quality Instrumentation ... Guaranteed | (888) 88-SOURCE | www.artisantg.com Remote Commands alm_sts_ais? Alarm STS-n (Line) AIS Query Command Returns the STS-n (Line) AIS alarm condition as on (enabled) or off (disabled). Example: alm_sts_ais? Response: ALM_STS_AIS ON Note: See the Alarm STS-n (Line) AIS Set Command alm_sts_lop [ on | off ] Alarm STS-n LOP Set Command Enables or disables the STS-n LOP (Loss Of Pointer) alarm condition to be generated Arguments: on: enables the condition off: disables the condition Example: alm_sts_lop on Response: NONE Note: Use the alm_enab command to executed the enabled alarm condition. alm_sts_lop? Alarm STS-n LOP Query Command Returns the STS-n LOP (Loss Of Pointer) alarm condition as on (enabled) or off (disabled). Example: alm_sts_lop? Response: ALM_STS_LOP ON Note: See the Alarm STS-n LOP Set Command alm_sts_yel [ on | off ] Alarm STS-n (Path) YEL Set Command Enables or disables the STS-n (Path) Yellow alarm condition to be generated Arguments: on: enables the condition off: disables the condition Example: alm_sts_yel on Response: NONE Note: Use the alm_enab command to executed the enabled alarm condition. alm_sts_yel? Alarm STS-n (Path) YEL Query Command Returns the STS-n (Path) Yellow alarm condition as on (enabled) or off (disabled). Example: alm_sts_yel? Response: ALM_STS_YEL ON Note: See the Alarm STS-n (Path) YEL Set Command alm_vt_ais [ on | off ] Alarm VT AIS Set Command Enables or disables the VT AIS (VT Alarm Indication Signal) alarm condition to be generated Arguments: on: enables the condition off: disables the condition Example: alm_vt_ais on Response: NONE Note: Use the alm_enab command to executed the enabled alarm condition. 7–68 ST112 SONET Transmission Test Set Artisan Technology Group - Quality Instrumentation ... Guaranteed | (888) 88-SOURCE | www.artisantg.com Remote Commands alm_vt_ais? Alarm VT AIS Query Command Returns the VT AIS (VT Alarm Indication Signal) alarm condition as on (enabled) or off (disabled). Example: alm_vt_ais? Response: ALM_VT_AIS ON Note: See the Alarm VT AIS Set Command alm_vt_lop [ on | off ] Alarm VT LOP Set Command Enables or disables the VT LOP (Loss Of Pointer) alarm condition to be generated Arguments: on: enables the condition off: disables the condition Example: alm_vt_lop on Response: NONE Note: Use the alm_enab command to executed the enabled alarm condition. alm_vt_lop? Alarm VT LOP Query Command Returns the VT LOP (Loss Of Pointer) alarm condition as on (enabled) or off (disabled). Example: alm_vt_lop? Response: ALM_VT_LOP ON Note: See the Alarm VT LOP Set Command alm_vt_yel [ on | off ] Alarm VT YEL Set Command Enables or disables the VT Yellow alarm condition to be generated Arguments: on: enables the condition off: disables the condition Example: alm_vt_yel on Response: NONE Note: Use the alm_enab command to executed the enabled alarm condition. alm_vt_yel? Alarm VT YEL Query Command Returns the VT Yellow alarm condition as on (enabled) or off (disabled). Example: alm_vt_yel? Response: ALM_VT_YEL ON Note: See the Alarm VT YEL Set Command ds1_alarms [ ais | yel | off ] DS1 Alarm Set Command Enables or disables the DS1 Alarms Argument: ais: Activates the DS1 Alarm Indication Signal. yel: Activates the DS1 Yellow Alarm Condition. off: Turns both DS1 AIS and YEL alarm conditions. Example: ds1_alarms yel Response: NONE ST112 SONET Transmission Test Set 7–69 Artisan Technology Group - Quality Instrumentation ... Guaranteed | (888) 88-SOURCE | www.artisantg.com Remote Commands ds1_alarms? DS1 Alarm Query Command Returns a character string indication the current state of the DS1 Alarms (AIS and YEL). Example: ds1_alarms? Response: DS1_ALARMS YEL Note: see the DS1 Alarm Set Command. ds3_alarms [ ais | xbit | idle | off ] DS3 Alarm Set Command Enables or disables the DS1 Alarms Argument: ais: Activates the DS3 Alarm Indication Signal. xbit: Sets the two X-bits in each M-Frame to their Alarm Condition (00). idle: Sets the DS3 Idle indication. off: Turns the DS3 AIS, X-bit, and Idle alarm conditions to off. Example: ds3_alarms xbit Response: NONE ds3_alarms? DS3 Alarm Query Command Returns a character string indication the current state of the DS1 Alarms (AIS and YEL). Example: ds3_alarms? Response: DS3_ALARMS XBIT Note: see the DS3 Alarm Set Command. ds3_pth_bur [ n ] DS3 Path Burst Alarm Set Command Sets the DS3 Alarm Burst duration. Example: ds3_pth_bur [ n ] (n = a decimal number from 1 to 255 frames) Response: NONE Note: See the ds3_pth_tri command. ds3_pth_bur? DS3 Path Burst Alarm Query Command Returns a character string indicating the current value of the DS3 Alarm Burst duration. Example: ds3_pth_bur? Response: DS3_PTH_BUR 40 Note: See the DS3 Path Burst Alarm Set Command ds3_pth_tri? DS3 Path Trigger Command Triggers the DS3 Path Alarms that were selected for remote operation Example: ds3_pth_tri Response: NONE Note: An execution error will occur if the selected DS3 frame selected for remote operation is not the same as the DS3 frame being transmitted. See the ds3_pth_ty Path Alarm Set Command. 7–70 ST112 SONET Transmission Test Set Artisan Technology Group - Quality Instrumentation ... Guaranteed | (888) 88-SOURCE | www.artisantg.com Remote Commands ds3_pth_ty [ frame ], [ alarm ] DS3 Path Alarm Burst Set Command Specifies the DS 3 Path alarm condition to be generated when the ds3_pth_tri command is executed. Frame: m13: When the frame is set to M-13 the parity, sef, and xbit alarms are valid. cbit: When the frame is set to C-Bit all four alarms are valid. Alarms: parity: Enables P-Bit or C-Bit parity errors. sef: Enables 4 out of 16 F bit errors on each DS1 frame. xbit: Sets the two X-bits in each M-Frame to their Alarm Condition (00). febe: Enable a Far End Block Error (C-Bit format only) Example: ds3_alarms xbit Response: NONE Note: See the ds3_pth_tri command. ds3_pth_ty? DS3 Path Alarm Burst Query Command Returns a character string indication the current state of the DS1 Alarms (AIS and YEL). Example: ds3_pth_ty? Response: ds3_pth_ty? CBIT, FEBE Note: see the DS3 Path Alarm Burst Set Command. ST112 SONET Transmission Test Set 7–71 Artisan Technology Group - Quality Instrumentation ... Guaranteed | (888) 88-SOURCE | www.artisantg.com Remote Commands Loss Of Signal los_enab Loss Of Signal Enable Command Enables the LOS event for the amount of time specified by los_time. Example: los_enab Response: NONE los_time [ n ] Loss Of Signal Time Command Set Loss of Signal event to a specific amount of time from 1 to 127 microseconds Example: los_time 50 Response: NONE Note: In the example the LOS will last for 50 microseconds los_time? Loss Of Signal Time Query Command Returns the LOS time duration in microseconds Example: los_time? Response: LOS_TIME n (n = a decimal quantity from 1 to 127 microseconds) los_secs n.m Sets the timed LOS event to a duration from 1.0 to 9.9 seconds Example: los_secs n.m (n.m = a decimal number from 1.0 to 9.9) Response: NONE los_tm_enab Enables the LOS event for the amount of time specified by los_secs command. Example: los_tm_enab Response: NONE los_off Disables the LOS event currently being generated. Example: los_off Response: NONE los_cont Generates a continuous LOS event. Example: los_cont Response: NONE 7–72 ST112 SONET Transmission Test Set Artisan Technology Group - Quality Instrumentation ... Guaranteed | (888) 88-SOURCE | www.artisantg.com Remote Commands los_active? Queries the current condition of the LOS event. Example: los_active? Response: LOS_ACTIVE ON Note: ON indicates that the LOS event is currently activated, OFF indicates that the LOS event is inactive. Combined (Dual) Mode Commands When the ST112 SONET Transmission Test Set is connected to an ST2400 2.4 Gb/s SDH/SONET Test Set, the combined (dual) mode on command can be used to initiate the link procedure between the two systems. When the link is made the ST2400 2.4 Gb/s SDH/SONET Test Set will be controlled by the ST112 through its remote serial interface (RS-232-C port). All remote commands sent to the ST2400 through the RS-232-C port will be passed on to the ST112 for processing. The ST112 VT100 menus will include the ST2400 2.4 Gb/s SDH/SONET Test Set menus. When the link is already established, the combined (Dual) mode off command will be handled by the ST112 SONET Transmission Test Set, which will terminate the connection between the two systems. combined_mode [ on | off ] Combined Mode Set Command Used to initiate or terminate the combined mode between the ST112 and ST2400 Example: combined_mode on Response: NONE combined_mode? Combined Mode Query Command Used to query the combined mode status, between the ST112 and ST2400 Example: combined_mode? Response: COMBINED_MODE OFF ST112 SONET Transmission Test Set 7–73 Artisan Technology Group - Quality Instrumentation ... Guaranteed | (888) 88-SOURCE | www.artisantg.com Remote Commands 7–74 ST112 SONET Transmission Test Set Artisan Technology Group - Quality Instrumentation ... Guaranteed | (888) 88-SOURCE | www.artisantg.com Appendix A Specifications Artisan Technology Group - Quality Instrumentation ... Guaranteed | (888) 88-SOURCE | www.artisantg.com Appendix A: Specifications This addendix documents the specifications that apply to the latest software release for the ST112 SONET Transmission Test Set, Version 4.1. Table A-1: Standard ST112 Electrical Specifications Characteristic Generator Output Electrical Output Data Rates Data Formats Frame Formats Description DSX-1: 1.544 Mb/s DSX-3: 44.736 Mb/s STSX-1: 51.84 Mb/s DSX-1: AMI, B8ZS DSX-3: B3ZS STSX-1:B3ZS DS1: UNFRAMED, SF, ESF, SLC96 DS3: Payload Mappings Active Channel Signal Level at Transmit Output (Output Amplitude) Pulse Shape at Transmit Output UNFRAMED, M13, C-BIT VT1.5 BIT FLOAT (INT/EXT) VT1.5 BYTE FLOAT DS3 (INT/EXT) DS3 Mapping: All STS-1’s are filled with the selected DS3 pattern. VT1.5 Mapping: Any 1 channel or all channels are filled with a selected VT1.5 pattern. If a single channel is selected, then the remaining channels are filled with a unique SF 24-bit fixed word pattern. DSX-1: 3.0 ± 0.3 volts peak DSX-3: 0.5 ± 0.2 volts peak STSX-1:0.5 ± 0.2 volts peak STS-1: ECL DSX-1: Meets TR-TSY-000499, Issue 1, December 1987. DSX-3: Meets TR-TSY-000499, Issue 3, December 1989. See Note. STSX-1: Meets TA-NWT-000253, Issue 8, October 1993. See Note. Note: The six STSX1/DSX-3 outputs are provided through three 2way power splitters. Each pair, taken side-by-side, must be terminated in 75 ohm resistive to meet the pulse shapes specified. Isolation between each pair exceeds 15 dB. A slight waveform aberration will occur on an opposite output if it’s pair is not terminated but will typically pass pulse shape tests. A–2 ST112 SONET Transmission Test Set Artisan Technology Group - Quality Instrumentation ... Guaranteed | (888) 88-SOURCE | www.artisantg.com Appendix A: Specifications Impedance/Connectors Rear Panel Output Data Rates Data Formats Signal Level Connector Termination Other Rear Panel Outputs Pulse Width DSX-1: DSX-3: STSX-1: Balanced, 100 ohm, WECO 310 jack Unbalanced, 75 ohm, BNC Unbalanced, 75 ohm, BNC “52 Mb/s CLOCK” (Tx side): “52 Mb/s DATA”: “8 kHz SYNC OUTPUT”: “52 Mb/s CLOCK” (Rx side): NRZ ECL BNC 50 ohm/-2V “BIT ERR”: detected. 51.84 Mb/s 51.84 Mb/s 8 kHz 51.84 Mb/s DS1: One DS1 NRZ pulse for each bit error DS3: One DS3 RZ pulse for each bit error detected. STS-3c: One STS-3c byte wide NRZ pulse for one or more bit error(s) detected within each byte. STS-12c:One STS-12c four byte wide NRZ pulse for one or more bit error(s) detected within any four continguous bytes. Note: For NRZ pulses, the pulse width will depend on the number of consecutive bit errors (i.e., one bit error results in a single pulse; two consecutive bit errors results in a pulse width that is twice as wide). Signal Level Connector Transmitter “EVENT SYNC OUTPUT” (option): One positive pulse the length of which is the start to the end of an event. TTL “BIT ERR”: BNC “EVENT SYNC OUTPUT”: BNC ST112 SONET Transmission Test Set A–3 Artisan Technology Group - Quality Instrumentation ... Guaranteed | (888) 88-SOURCE | www.artisantg.com Appendix A: Specifications Internal Pattern Generator Patterns DSX-1/VT1.5: QRW, PRBS 215-1, 223-1; 24-bit programmable word (hex) DS3: PRBS 215-1, 223-1; 8-bit programmable word (hex: 00 to FF) STS-3c: 223-1, 223-1 INV STS-12c: 223-1, 223-1 INV Stress Patterns (DSX-1 only) Error Rate Range and Resolution DALY-1, DALY-2, DALY-3, 1/8, 2/8, 3/24, ONES, ZEROS (refer to chapter 4 for a complete description of each of these stress patterns) Section BIP (B1) Line BIP (B2) (single error is placed in B2 byte of each STS-N) Path BIP (B3) (single error is placed in B3 byte of each STS-N)** Payload pattern bit (SPE) BiPolar Violations (BPV) (if configured for STSX-1/DSX-3 signals) ** NOTE: A concatenated signal will only have one B3 byte (e.g., STS3c or STS-12c payloads) SONET Random Error Rate BIP2 Random Error Rate STSX-1 BPV Error Rate Channel Bit Error (single bit error injected into selected channel of an STS-N signal) 1x10⁻³ to 1x10⁻⁹ (range varies based on selected error type) with 0.1 resolution SONET Alarms Continuous EF (Errored Frame) AIS (Alarm Indication Signal) for: Errors Single Errors Continuous • Line (Line-AIS) • Path (Path-AIS) • Virtual Tributary (VT Path-AIS) RDI (Remote Defect Indication) for: • SONET Alarms Burst Payload Alarms Continuous Simultaneous Alarms A–4 Line (Line-RDI) • Path (Path-RDI) • Virtual Tributary (VT Path-RDI) LOP (Loss Of Pointer) for: SPE or VT OORP (Out Of Range Pointer) for the SPE. EF, Line-RDI, Line-AIS, Path-AIS, Path-RDI, OORP, VT-AIS, and VTRDI. (number of errored frames selectable from 1 to 255). LOS (Loss Of Signal: number of microseconds selectable from 1 to 150). DS3-YEL (Yellow) DS3-AIS (Alarm Indication Signal) DS3-IDLE DS1-AIS (Alarm Indication Signal) DS1-RAI (Remote Alarm Indication) Supported ST112 SONET Transmission Test Set Artisan Technology Group - Quality Instrumentation ... Guaranteed | (888) 88-SOURCE | www.artisantg.com Appendix A: Specifications Transmitter Clock Internal Clock Rates/Accuracy External Clock Reference (rear panel) Rates/Accuracy Recovered Clock Loop timing Receive Input Electrical Input Data Rates Data Formats Signal Sensitivity Signal Equalization Impedance/Connector Rear Panel Input Rates/Accuracy Data Line Code Clock (for transmitter) Impedance/Connector SONET 51.84 MHz ± 10 ppm DS3 44.736 Mhz ± 10 ppm DS1 1.544 MHz ± 50 ppm for instrument calibrated within 12 months “52 Mb/s” “155 Mb/s” “BITS DSX1” 51.84 MHz ± 100 ppm 155.52 MHz ± 20 ppm 1.544 MHz ± 5 ppm Clock is recovered from received SONET Line signal. DSX-1: 1.544 Mb/s DSX-3: 44.736 Mb/s STSX-1:51.84 Mb/s DSX-1: AMI, B8ZS DSX-3: B3ZS STSX-1:B3ZS DSX-1: 2.7 Vpk min to 3.3 Vpk max DSX-1 Monitor: 20 dB of flat loss below DSX-1 DSX-3: 0.25 Vpk min to 0.6 Vpk max DSX-3 Monitor: 20 dB of flat loss below DSX-3 STSX-1: 0.25 Vpk min to 0.6 Vpk max STSX-1 Monitor: 20 dB of flat loss below STSX-1 DSX-3/STSX-1: Cross-connect equalization for 450 feet of AT&T 728A cable. DSX-1: Balanced, 100 ohm, WECO310 jack. DSX-3/STSX-1: Unbalanced, 75 ohm, BNC Input for an external STS-1 or STS-3 clock source (Rates/accuracy listed under the External Clock Reference). Input for an external DS1 or DS3 to be mapped into a higher level SONET signal. “DSX3 INPUT”: 51.84 MHz ± 20 ppm “BITS DSX1 INPUT”: AMI, B8ZS “DSX3 INPUT”: B3ZS “52 Mb/s INPUT”: 800 MV pk-pk “155 Mb/s INPUT”: 800 MV pk-pk “52 Mb/s INPUT”: AC-coupled, 50 ohm, BNC “155 Mb/s INPUT”: AC-coupled, 50 ohm, BNC “BITS DSX1 INPUT”: Balanced, 100 ohm, WECO310 jack “DSX3 INPUT”: Unbalanced, 75 ohm, BNC ST112 SONET Transmission Test Set A–5 Artisan Technology Group - Quality Instrumentation ... Guaranteed | (888) 88-SOURCE | www.artisantg.com Appendix A: Specifications Transmit and Receive Functional Specifications Section Overhead Access Set overhead bytes to any value from hex 00 to FF: A1, A2, E1, F1, D1-D3 View all Section Overhead bytes. Add/Drop Insert data from the DCC connector into the Section DCC (192 Kb/s). Insert voice from the Orderwire Handset connector into the Section (local) orderwire channel. Drop data from the Section DCC out to the DDC connector. Drop voice from the Section (local) orderwire channel to the Orderwire Handset connector. Line Overhead Access Add/Drop K1 and K2 (APS) Path Overhead Access Path Trace Byte J1 Set overhead bytes to any value from hex 00 to FF: K1, K2, D4-D12, Z1, Z2, E2 View all Line Overhead bytes. Insert data from the DCC connector into the Line DCC (576 Kb/s). Insert voice from the Orderwire Handset connector into the Line (express) orderwire channel. Drop data from the Line DCC out to the DDC connector. Drop voice from the Line (express) orderwire channel to the Orderwire Handset connector. Set the APS Bytes, K1 and K2, to any code defined in ANSI T1.105A Selectable by text description. Set Path Overhead bytes to any value from hex 00 to FF: C2, G1, F2, H4, Z3, Z4, and Z5 View all Path Overhead bytes. Send user-defined 64-byte sequence (user-defined 62 bytes plus 2 bytes for CR/LF inserted automatically), or set to any value from hex 00 to FF. View Path Trace message (J1). Pointer Movement (SPE or VT) Single Single pointer justification (positive or negative) Set to Value Set to a new location with the NDF being set. The range for SPE pointers is 0 to 782. The range for VT pointers is 0 to 103. A–6 ST112 SONET Transmission Test Set Artisan Technology Group - Quality Instrumentation ... Guaranteed | (888) 88-SOURCE | www.artisantg.com Appendix A: Specifications Measurements STS SPE Pointer Measurements T1M1.3 Analysis Section B1 Seconds and ratio Line B2 Seconds and ratio Path B3 Seconds and ratio STSX-1 BPV Total and ratio VT BIP-2 Total and ratio Summary Total error counts Elapsed Time Count: New Data Flags (NDFs) Positive justifications (+PJs) Negative justifications (-PJs) In-Service Measurements ES, SES, BER Total Error Count ES, SES, BER Total Error Count ES, SES, BER Total Error Count BER Total Error Count BER Total Error Count B1, B2, B3, FEBE For VT only: BIP-2, FEBE, LOP STAT Displayed in hours:minutes:seconds T1M1.3 Analysis Pattern Bit (DS1 and DS3) Second and ratio Pattern Parity (DS3) Second and ratio Pattern CRC-6 (DS1) Second and ratio Summary Total error counts Elapsed Time Out-of-Service Measurements ES, SES, BER Total Error Count ES, SES, BER Total Error Count ES, SES, BER Total Error Count For DS3: Frame, Parity, and Bit For DS1: Frame, CRC, and BIT Displayed in hours:minutes:seconds LEDs SECTION Status Indicators LINE Status Indicators PATH Status Indicators VT PATH Status Indicators POINTER (SPE or VT) Status Indicators PAYLOAD/DS1/DS3 Status Indicators Measurement Utilities Measurement Control Result Logging LOS, LOF, OOF, B1 AIS, LOP, RDI, B2 AIS, RDI, FEBE, B3 AIS, RDI, FEBE, BIP-2 NDF, +PJ, -PJ LOS, LOF, PAR, CRC, AIS, RAI, IDLE, YEL-DS3, ONES, SYNC, BIT UNTIMED: Start/Stop TIMED: 1 seconds to 9 days with 1 second resolution REPEAT All measurements are recorded with start, stop time and date. The current and previous results are stored in memory. Utilities ST112 SONET Transmission Test Set A–7 Artisan Technology Group - Quality Instrumentation ... Guaranteed | (888) 88-SOURCE | www.artisantg.com Appendix A: Specifications Data Communication Channel This connector provides the interface to an external protocol Add/Drop Interface analyzer. Add/Drop: D1-D3, D4-D12 Connector: 15 Pin female DIN (DTE and DCE), V.11 compatible Orderwire Add/Drop Interface This connector provides the interface to an external handset (i.e., telephone). Add/Drop: E1, E2 Connector: 4-wire, handset jack Computer Interface GPIB: Standard IEEE-488 socket. RS-232-C: DB-25 pin female connector used for terminals or serial printer. Parallel Printer A–8 Connector: DB-25 pin female connector. ST112 SONET Transmission Test Set Artisan Technology Group - Quality Instrumentation ... Guaranteed | (888) 88-SOURCE | www.artisantg.com Appendix A: Specifications Table A-2 lists specifications for additional features when the ST112 is equipped with option 03. Table A-2: ST112 Option 03 Optical Specifications (OC-1 and OC-3) Characteristic Generator Output Optical Output Data Rates Signal Level & Wavelength Pulse Shape Wavelength Spectral Width (RMS) Laser Classification Connectors Payload Mappings Standards Compliance Receive Input Optical Input Data Rates Description OC-1: 51.84 Mb/s OC-3: 155.52 Mb/s 1310 nm, -9 dBm typical +2/-3 dBm Meets Bellcore GR-253-CORE Eye Pattern Masks 1270 to 1330 nm 10 nm Max Class 1 laser, complies with Fid. A Reg. 21 CFR. FC-PC Standard: ST and SC Optical Connectors are orderable options. STS-3c Meets the requirements of ANSI T1.105A, Section 8 and Bellcore GR-253-CORE. Signal Sensitivity OC-1: 51.84 Mb/s OC-3: 155.52 Mb/s -14 dBm 1310 nm and 1550 nm: 1100 nm to 1570 nm operating range -30 dBm for BER 10-10 Connectors FC-PC standard: ST and SC Optical Connectors are orderable options. Maximum Input Power Operating Wavelength Measurements T1M1.3 Analysis Pattern Bit (STS-3c) Total and ratio Summary Total error counts Out-of-Service Measurements BER Total Error Count Bit only Table A-3 lists specifications for additional features when the ST112 is equipped with option 04. ST112 SONET Transmission Test Set A–9 Artisan Technology Group - Quality Instrumentation ... Guaranteed | (888) 88-SOURCE | www.artisantg.com Appendix A: Specifications Table A-3: ST112 Option 04 Optical Specifications (OC-1, OC-3, and OC-12) Characteristic Generator Output Optical Output Data Rates Signal Level & Wavelength Pulse Shape Wavelength Spectral Width Laser Classification Connectors Payload Mappings Standards Compliance Receive Input Optical Input Data Rates Description OC-1: 51.84 Mb/s OC-3: 155.52 Mb/s OC-12 622.08 Mb/s 1310 nm, -8 dBm typical +3/-5 dBm Meets Bellcore GR-253-CORE Eye Pattern Masks 1260 to 1360 nm 4 nm Max Class 1 laser, complies with Fid. A Reg. 21 CFR. FC-PC Standard: ST and SC Optical Connectors are orderable options. STS-12c Meets the requirements of ANSI T1.105A, Section 8 and Bellcore GR-253-CORE. Signal Sensitivity OC-1: 51.84 Mb/s OC-3: 155.52 Mb/s OC-12: 622.08 Mb/s -8 dBm 1310 nm and 1550 nm: 1100 nm to 1570 nm operating range -28 dBm for BER 10-10 Connectors Note: Typically exceeds -30 dBm at dBm for BER 10-10 at 622 MHz. FC-PC standard: ST and SC Optical Connectors are orderable options. Maximum Input Power Operating Wavelength Measurements T1M1.3 Analysis Pattern Bit (STS-12c) Total and ratio Summary Total error counts Out-of-Service Measurements BER Total Error Count Bit only Table A-4 lists specifications for additional features when the ST112 is equipped with option 5R. A–10 ST112 SONET Transmission Test Set Artisan Technology Group - Quality Instrumentation ... Guaranteed | (888) 88-SOURCE | www.artisantg.com Appendix A: Specifications Table A-4: ST112 Option 5R Optical Specifications (OC-1, OC-3, and OC-12) Characteristic Generator Output Optical Output Data Rates Signal Level & Wavelength Pulse Shape Wavelength Spectral Width Laser Classification Connectors Payload Mappings Standards Compliance Receive Input Optical Input Data Rates Description OC-1: 51.84 Mb/s OC-3: 155.52 Mb/s OC-12: 622.08 Mb/s 1550 nm, -1 dBm typical ±3 dBm Meets Bellcore GR-253-CORE Eye Pattern Masks 1480 to 1580 nm 1 nm Max Class 1 laser, complies with Fid. A Reg. 21 CFR. FC-PC Standard: ST and SC Optical Connectors are orderable options. STS-12c Meets the requirements of ANSI T1.105A, Section 8 and Bellcore GR-253-CORE. Signal Sensitivity OC-1: 51.84 Mb/s OC-3: 155.52 Mb/s OC-12: 622.08 Mb/s -8 dBm 1310 nm and 1550 nm: 1100 nm to 1570 nm operating range -28 dBm for BER 10-10 Connectors Note: Typically exceeds -30 dBm at dBm for BER 10-10 at 622 MHz. FC-PC standard: ST and SC Optical Connectors are orderable options. Maximum Input Power Operating Wavelength Measurements T1M1.3 Analysis Pattern Bit (STS-12c) Total and ratio Summary Total error counts Out-of-Service Measurements BER Total Error Count Bit only ST112 SONET Transmission Test Set A–11 Artisan Technology Group - Quality Instrumentation ... Guaranteed | (888) 88-SOURCE | www.artisantg.com Appendix A: Specifications Table A-5: Environmental Specifications Characteristic Description Environmental & Safety Operating Temperature Storage Temperature Humidity 0 to 40 degrees Centigrade -40 to 70 degrees Centigrade 0 to 95% relative humidity Table A-6: Physical Characteristics Characteristic Description Dimensions Height: 152 mm (6 in) Width: 366 mm (14.4 in) Depth: 419 mm (16.5 in) Net: Approximately 10 kg (22 lb) Weight Safety Power Requirements A–12 Designed to meet UL/CSA safety requirements. Line Voltage Line Frequency 110 (90 to 130) VAC 47 Hz to 63 Hz Maximum power consumption is 250 Watts. ST112 SONET Transmission Test Set Artisan Technology Group - Quality Instrumentation ... Guaranteed | (888) 88-SOURCE | www.artisantg.com Appendix B Incoming Inspection Test Artisan Technology Group - Quality Instrumentation ... Guaranteed | (888) 88-SOURCE | www.artisantg.com Incoming Inspection Test Introduction The purpose of this procedure is to allow the customer a means with which to verify that any ST112 Transceiver received from Tektronix is operational upon arrival. This procedure is designed to be a brief verification that the general functionality of the unit responds correctly. Required Equipment The following equipment will be required in order to verify that the ST112 Transceiver is functioning properly. Fiber Optical Cable - must be a single mode cable and have connectors matching those on the unit under test In-line 5db optical attenuator (required if unit has optical options) BNC 75 ohms coaxial cable DS1 WECO 310 compatible patch cord Optical cleaning kit** (required if unit has optical options) **Note: See last section of instructions for contents. General Functionality Verification This section of the User Manual tests the functionality of the unit. The procedure consists of eleven sections in which the functionality of the unit is verified. Note: The procedure assumes you are proceeding in sequential order. Before beginning the procedure, you must Ram Corrupt the unit to ensure that you are starting the procedure from a known state. To Ram Corrupt the unit, first press ERROR once on the receiver side of the front panel. Then, press the LEFT cursor and then ENTER consecutively eleven times. When finished, power down the unit. Power the unit on and the power-up sequence on the display should show a Ram Corrupt message after the revision display. If you do not see this message then the unit was not Ram Corrupted and the process must be done again. STSX1 Quick Set-Up B–2 ST112 SONET Transmission Test Set Artisan Technology Group - Quality Instrumentation ... Guaranteed | (888) 88-SOURCE | www.artisantg.com Incoming Inspection Test This section of the procedure verifies that the Synchronous Transport Signal Cross-connect Level 1 (STSX1) is functioning properly. The quick set-up places the unit into a default mode which selects specific settings for the unit. These default settings are preprogrammed and therefore consistent from unit to unit. There are eight steps in this section of the procedure. 1. Connect the transmitter and the receiver together with the BNC 75ohm cable. Connect one end of the cable to the input connector on the right side, or receiver section, of the front panel. Connect the other end of the cable to one of the output connectors on the left side, or transmitter section, of the front panel. 2. Power on the unit. After the power-up sequence, the display should show the SONET QuickSet menu. 3. Using the INC/DEC keys, select STSX1. Note: The option with the brackets surrounding it is the current selection. 4. Using the LEFT/RIGHT cursors, select DS3 and then press ENTER. Note: The green LED within the RUN/STOP switch should be lit. 5. The transmitter and the receiver sides should now be linked error-free. Note: Error-free means that you see no lit LEDs on the receiver side of the front panel. 6. Remove the 75 ohm coax cable from the transmitter output connector. Note that there are now error light lit on the receiver side of the front panel. 7. Reconnect the 75 ohm cable to one of the output connectors on the transmitter side of the front panel. Note that the error lights are no longer lit on the receiver side. 8. On the receiver side of the front panel, press and hold down HISTORY VIEW. Observe that certain red LEDs on the receiver side of the front panel are now lit. HISTORY VIEW reflects the last errors which occured. Note: HISTORY VIEW reflects past history in the red LEDs only. If any condition occurs causing the POINTER section LEDs to light, HISTORY VIEW will not reflect those LEDs. Parity and Random Errors (STSX1) At this point, you have determined that the unit will link error-free. The next step is to inject some errors to see if the unit will respond correctly. There are twenty-seven steps in this section of the procedure. 1. On the transmitter side of the front panel, press ERROR until the top left hand side of the display shows STS1/3 ERR. STS1/3 ERR is the name of this menu. RX is the receiver’s setting and response to what is inputted from the transmitter (i.e. presently the receiver is set for B1 errors). B1 is the current selection and the bottom line contains all of the options for the transmitter available in this menu. 2. Note that there is a number after B1 in the receiver section of the display. Press RUN/STOP once and note that the green LED inside the button is no longer on. Press RUN/STOP again and note that the green LED is now on. Also, in the receiver’s section of the display, note that B1 now has a zero after it. ST112 SONET Transmission Test Set B–3 Artisan Technology Group - Quality Instrumentation ... Guaranteed | (888) 88-SOURCE | www.artisantg.com Incoming Inspection Test Note: Make sure that the green LED within the button is lit. This is the RUN mode. If the green LED is not lit, then the RUN mode is not active and no errors will be counted (i.e. a STOP condition exists). 3. Using the LEFT/RIGHT cursors, select B1 and then press ENTER. 4. In the receiver’s STATUS section of the front panel, observe that the red LED for B1 flashes once. Also observe, in the receiver section of the display, that B1 has a one after it. Note: The STATUS section of the receiver refers to the error lights on the receiver side of the front panel. 5. Press ENTER twice and, in the receiver’s STATUS section of the front panel, observe that the red LED for B1 flashes twice. Also, in the receiver section of the display, observe that B1 has a three after it. 6. Using the LEFT/RIGHT cursors, select B2 and then press ENTER three times. 7. In the receiver’s STATUS section of the front panel, observe that the red LED for B2 flashes three times. Also observe, in the receiver section of the display, that B2 has a three after it. 8. Using the LEFT/RIGHT cursors, select B3 and then press ENTER three times. 9. In the receiver’s STATUS section of the front panel, observe that the red LED for B3 flashes three times. Also, in the receiver section of the display, observe that B3 has a three after it. 10. Using the LEFT/RIGHT cursors, select SPE. Observe, in the receiver’s section of the display, that SPE already equals three. These resulted from the three B3 errors injected in Step 8. 11. On the front panel, press ENTER three times. 12. On the receiver’s STATUS section of the front panel, observe that the red LEDs for B1, B2, and B3 flash each time the ENTER key is pressed. Also, on the receiver section of the display, observe that SPE now equals six. 13. On the receiver side of the front panel, press ERROR until the lefthand side of the display reads SECT on the top line and B1 on the bottom line. The value of TOT should equal six and the value of SECT ES should be equal to or less than six. 14. On the receiver side of the front panel, press ERROR until the lefthand side of the display reads LINE on the top line and B2 on the bottom line. The value of TOT should equal six and the value of LINE ES should be equal to or less than six. 15. On the receiver side of the front panel, press ERROR until the lefthand side of the display reads PATH on the top line and B3 on the bottom line. The value of TOT should equal six and the value of PATH ES should be equal to or less than six. 16. On the receiver side of the front panel, press ERROR until the top line shows B1, B2, B3, and FEBE. The values of B1, B2, and B3 should all equal six. 17. Press RUN/STOP twice to clear all errors. 18. On the transmitter side of the front panel, press ERROR until the display shows the STSX1 Random Error Rate menu. 19. Using the LEFT/RIGHT cursors, select 1.0E-3 and then press ENTER. B–4 ST112 SONET Transmission Test Set Artisan Technology Group - Quality Instrumentation ... Guaranteed | (888) 88-SOURCE | www.artisantg.com Incoming Inspection Test 20. In the receiver’s STATUS section of the front panel, observe that the red LEDs for B1, B2, B3, FEBE (Path), PAR, and BIT remain lit. These are on-going error conditions because the red LEDs remain lit. 21. On the display, observe that the cursor is flashing under the one. Press the RIGHT cursor on the front panel until the display cursor is flashing under the three. 22. On the front panel, use INC to change the rate on the display to 1.0E-9 and then press ENTER. 23. In the receiver’s STATUS section of the front panel, the red LEDs will flash about every twenty seconds. 24. On the front panel, use DEC to change the rate to 1.0E-6 and then press ENTER. 25. In the receiver’s STATUS section of the front panel, observe that the red LEDs are lit for B1, B2, B3, PAR, and BIT. 26. Using the LEFT/RIGHT cursors, select OFF and then press ENTER. In the receiver’s STATUS section, observe that the red LEDs for B1, B2, B3, PAR, and BIT are no longer lit. 27. Press RUN/STOP twice to clear all errors. New Data Flag (NDF) and SPE Pointer (STSX1) This section verifies that the data flags and the Synchronous Payload Envelope (SPE) pointers are functioning correctly. Leave everything set-up as it was in the last section. There are thirteen steps in this section of the procedure. 1. On the transmitter side of the front panel, press POINTER. 2. Using the LEFT/RIGHT cursors, select +PJ and then press ENTER. Under the SPE section of the POINTER heading in the receiver’s STATUS section, observe that the green LED for +PJ flashes once. On the display, observe that TX PTR now reads 523. 3. Using the LEFT/RIGHT cursors, select -PJ and then press ENTER. Under the SPE section of the POINTER heading in the receiver’s STATUS section, observe that the green LED for -PJ flashes once. On the display, observe that TX PTR now reads 522. 4. Using the LEFT/RIGHT cursors, select 522 under NDF and then press ENTER. Under the SPE section of the POINTER heading in the receiver’s STATUS section of the front panel, observe that the yellow LED for NDF flashes once. 5. Using the INC/DEC keys and the LEFT/RIGHT cursors, set the NDF to 500 and then press ENTER. 6. In the receiver’s STATUS section of the front panel, observe that the yellow LED for NDF flashed once and that, under the PAYLOAD/DS1/DS3 heading, the red LEDs for LOF, PAR, SYNC, and BIT flashed once. Also, on the display, observe that the number after SPE is now equal to 500. 7. On the receiver side of the front panel, press POINTER. ST112 SONET Transmission Test Set B–5 Artisan Technology Group - Quality Instrumentation ... Guaranteed | (888) 88-SOURCE | www.artisantg.com Incoming Inspection Test 8. On the display, observe that SPE is at 500, +PJ has a one under it, -PJ has a one under it, and NDF has a two under it. 9. Press RUN/STOP twice to clear all errors. 10. On the transmitter side of the front panel, press POINTER. 11. Using the LEFT/RIGHT cursors, select 500 under NDF. 12. Using the INC/DEC keys and the LEFT/RIGHT cursors, set the NDF to 522 and then press ENTER. 13. Press RUN/STOP twice to clear all errors. Transport Overhead/Path Overhead This section of the procedure ensures that the editing function is working accurately. Leave everything set-up as it was in the last section. There are seventeen steps in this section of the procedure. 1. On the transmitter side of the front panel, press OVHD until the top line shows D7, D8, D9, and Z3. 2. Using the LEFT/RIGHT cursors, select D7. Note: The brackets showing the selection do not appear in the OVHD menu. The cursor flashes underneath the position of the current selection. 3. Using the INC/DEC keys and the LEFT/RIGHT cursors, change D7 to AA and then press ENTER. 4. Using the LEFT/RIGHT cursors, select D8. 5. Using the INC/DEC keys and the LEFT/RIGHT cursors, change D8 to 11 and then press ENTER. 6. Using the LEFT/RIGHT cursors, select D9. 7. Using the INC/DEC keys and the LEFT/RIGHT cursors, change D9 to 05 and then press ENTER. 8. On the receiver side of the front panel, press OVHD until the top line shows D7, D8, D9, and Z3. 9. On the display, observe that D7, D8, and D9 all reflect the values you placed into the transmitter (i.e. D7 = AA, D8 = 11, D9 = 05, and Z3 = 00). 10. On the transmitter side of the front panel, press OVHD. 11. Using the LEFT/RIGHT cursors, select D7. 12. Using the INC/DEC keys and the LEFT/RIGHT cursors, change D7 to 00 and then press ENTER. 13. Using the LEFT/RIGHT cursors, select D8. 14. Using the INC/DEC keys and the LEFT/RIGHT cursors, change D8 to 00 and then press ENTER. B–6 ST112 SONET Transmission Test Set Artisan Technology Group - Quality Instrumentation ... Guaranteed | (888) 88-SOURCE | www.artisantg.com Incoming Inspection Test 15. Using the LEFT/RIGHT cursors, select D9. 16. Using the INC/DEC keys and the LEFT/RIGHT cursors, change D9 to 00 and then press ENTER. 17. On the receiver side of the front panel, press OVHD and observe that the values of D7, D8, and D9 are once again zero. Continuous Alarms (STSX1) This section of the procedure ensures that the continuous alarm settings are functioning properly. Leave everything set-up as it was in the last section. There are thirty-five steps in this section of the procedure. 1. On the transmitter side of the front panel, press ALARM until the display shows the Errored Frame menu. 2. Using the LEFT/RIGHT cursors, select CONT and then press ENTER. 3. On the receiver’s STATUS section of the front panel, observe that the following error lights appear. Note: If a red LED remains lit, then the error or alarm is still occuring. If a LED under the POINTER heading remains lit, then the condition is still occuring. A. Under the SECTION heading, the red LEDs for LOF, OOF, and B1 remain lit. B. Under the LINE heading, the red LEDs for AIS, LOP, RDI, and B2 remain lit. The red LEDs for AIS, LOP, and RDI may flash. C. Under the PATH heading, the red LEDs for RDI, FEBE, and B3 remain lit. The red LED for RDI may flash. D. Under the PAYLOAD/DS1/DS3 heading, the red LEDs for LOF, PAR, SYNC, and BIT remain lit. E. Under the SPE section of the POINTER heading, the yellow LED for NDF remains lit and the green LEDs for +PJ and -PJ remain lit. 4. Using the LEFT/RIGHT cursors, select OFF and then press ENTER. 5. Press RUN/STOP twice to clear all errors. 6. On the transmitter side of the front panel, press ALARM until the display shows the LineRDI (FERF) menu. 7. Using the LEFT/RIGHT cursors, select CONT and then press ENTER. 8. On the receiver’s STATUS section of the front panel, under the LINE heading, observe that the red LED for FERF remains lit. 9. Using the LEFT/RIGHT cursors, select OFF and then press ENTER. 10. Press RUN/STOP twice to clear all errors. ST112 SONET Transmission Test Set B–7 Artisan Technology Group - Quality Instrumentation ... Guaranteed | (888) 88-SOURCE | www.artisantg.com Incoming Inspection Test 11. On the transmitter side of the front panel, press ALARM until the display shows the Line AIS menu. 12. Using the LEFT/RIGHT cursors, select CONT and then press ENTER. 13. On the receiver’s STATUS section of the front panel, observe that the following error lights appear. A. Under the LINE heading, the red LED for AIS remains lit. B. Under the PATH heading, the red LEDs for AIS and RDI remain lit. C. Under the PAYLOAD/DS1/DS3 heading, the red LEDs for LOF, SYNC, BIT, and ONES remain lit. 14. Using the LEFT/RIGHT cursors, select OFF and then press ENTER. 15. Press RUN/STOP twice to clear all errors. 16. On the transmitter side of the front panel, press ALARM until the display shows the Path AIS menu. 17. Using the LEFT/RIGHT cursors, select CONT and then press ENTER. 18. On the receiver’s STATUS section of the front panel, observe that the following error lights appear. A. Under the PATH heading, the red LEDs for AIS and RDI remain lit. B. Under the PAYLOAD/DS1/DS3 heading, the red LEDs for LOF, PAR, SYNC, BIT, and ONES remain lit. 19. Using the LEFT/RIGHT cursors, select OFF and then press ENTER. 20. Press RUN/STOP twice to clear all errors. 21. On the transmitter side of the front panel, press ALARM until the display shows the PathRDI (Yellow) menu. 22. Using the LEFT/RIGHT cursors, select CONT and then press ENTER. 23. On the receiver’s STATUS section of the front panel, under the PATH heading, observe that the red LED for RDI remains lit. 24. Using the LEFT/RIGHT cursors, select OFF and then press ENTER. 25. Press RUN/STOP twice to clear all errors. 26. On the transmitter side of the front panel, press ALARM until the display shows the Loss of SPE Pointer menu. 27. Using the LEFT/RIGHT cursors, select CONT and then press ENTER. 28. On the receiver’s STATUS section of the front panel, under the LINE heading, observe that the red LED for LOP remains lit. Under the SPE section of the POINTER heading, observe that the yellow LED for NDF remains lit. 29. Using the LEFT/RIGHT cursors, select OFF and then press ENTER. 30. Press RUN/STOP twice to clear all errors. B–8 ST112 SONET Transmission Test Set Artisan Technology Group - Quality Instrumentation ... Guaranteed | (888) 88-SOURCE | www.artisantg.com Incoming Inspection Test 31. On the transmitter side of the front panel, press ALARM until the display shows the Out of Range SPE Pointer menu. 32. Using the LEFT/RIGHT cursors, select CONT and then press ENTER. 33. On the receiver’s STATUS section of the front panel, under the LINE heading, observe that the red LED for LOP remains lit. 34. Using the LEFT/RIGHT cursors, select OFF and then press ENTER. 35. Press RUN/STOP twice to clear all errors. Virtual Tributary (VT) Payload This section of the procedure verifies that the VT payload is functioning properly. Leave everything set-up as it was in the last section. There are twenty-one steps in this section of the procedure. 1. On the transmitter side of the front panel, press MAPPING. 2. Using the INC/DEC keys, select INT VT1.5 BIT FLOAT and then press ENTER. 3. On the receiver side of the front panel, press MAPPING. 4. Using the INC/DEC keys, select VT1.5 BIT FLOAT and then press ENTER. 5. Press RUN/STOP twice to clear all errors. 6. The transmitter and receiver sides should now be linked error-free. 7. On the transmitter side of the front panel, press ALARM until the display shows the VT PATH AIS menu. 8. Using the LEFT/RIGHT cursors, select CONT and then press ENTER. 9. In the receiver’s STATUS section of the front panel, under the VT PATH heading, observe that the red LEDs for AIS, RDI, FEBE, and BIP-2 remain lit. Under the PAYLOAD/DS1/DS3 heading, observe that the red LEDs for AIS, SYNC, and BIT remain lit. 10. Using the LEFT/RIGHT cursors, select OFF and then press ENTER. 11. Press RUN/STOP twice to clear all errors. 12. On the transmitter side of the front panel, press ALARM until the display shows the VT Path-RDI (Yellow) menu. 13. Using the LEFT/RIGHT cursors, select CONT and then press ENTER. 14. In the receiver’s STATUS section of the front panel, under the VT PATH heading, observe that the red LED for RDI remains lit. 15. Using the LEFT/RIGHT cursors, select OFF and then press ENTER. 16. Press RUN/STOP twice to clear all errors. 17. On the transmitter side of the front panel, press ALARM until the display shows the Loss of VT Pointer menu. ST112 SONET Transmission Test Set B–9 Artisan Technology Group - Quality Instrumentation ... Guaranteed | (888) 88-SOURCE | www.artisantg.com Incoming Inspection Test 18. Using the LEFT/RIGHT cursors, select CONT and then press ENTER. 19. In the receiver’s STATUS section of the front panel, observe that the following error lights appear. A. Under the PAYLOAD/DS1/DS3 heading, the red LED for BIT may flash. B. Under the VT PATH heading,the red LED for BIP-2 may flash. C. Under the VT section of the POINTER heading, the yellow LED for NDF remains lit. 20. Using the LEFT/RIGHT cursors, select OFF and then press ENTER. 21. Press RUN/STOP twice to clear all errors. DS1 Quick Set-Up This section of the procedure verifies that the DS1 is functioning properly. The quick set-up places the unit into a default mode which selects specific settings for the unit. These default settings are preprogrammed and therefore consistent from unit to unit. Leave everything set-up as it was in the last section. There are sixteen steps in this section of the procedure. 1. Connect the transmitter and receiver together with a DS1 patch cord. Connect one end of the patch cord to the DS1 connector on the receiver side of the front panel. Connect the other end of the patch cord to one of the DS1 connectors on the transmitter side of the front panel. 2. On the front panel, press SETUP until the display shows the Quick DSX Set-Up menu. 3. Using the LEFT/RIGHT cursors, select DSX1 and then press ENTER. 4. Press RUN/STOP twice to clear all errors. 5. The transmitter and receiver sides should now be linked error-free. 6. On the transmitter side of the front panel, under the DS3/VT1.5-STS3C/12C heading, press ERR/ALM until the display shows the Single Error menu. 7. Using the LEFT/RIGHT cursors, select DS1 and then press ENTER three times. 8. On the receiver’s STATUS section of the front panel, under the PAYLOAD/DS1/DS3 heading, observe that the red LED for BIT flashed three times. Also, in the receiver’s section of the display, observe that the value of DS1 is three. 9. On the receiver side of the front panel, under the DS3/VT1.5-STS3C/12C heading, press ERROR until the lefthand side of the display shows DS1 on the top line and BIT on the bottom line. 10. On the display, observe that the value of BIT equals three. 11. Press RUN/STOP twice to clear all errors. 12. On the transmitter side of the front panel, under the DS3/VT1.5-STS3C/12C heading, press ERR/ALM until the top line of the display shows DS1 ALARMS. 13. Using the LEFT/RIGHT cursors, select AIS and then press ENTER. B–10 ST112 SONET Transmission Test Set Artisan Technology Group - Quality Instrumentation ... Guaranteed | (888) 88-SOURCE | www.artisantg.com Incoming Inspection Test 14. On the receiver’s STATUS section of the front panel, under the PAYLOAD/DS1/DS3 heading, observe that the red LEDs for AIS, SYNC, and BIT remain lit. 15. Using the LEFT/RIGHT cursors, select OFF and then press ENTER. 16. Press RUN/STOP to clear all errors. DS3 Quick Set-Up This section of the procedure verifies that the DS3 is functioning properly and that errors can be injected correctly. The quick set-up places the unit into a default mode which selects specific settings for the unit. These default settings are preprogrammed and therefore consistent from unit to unit. Leave everything set-up as it was in the last section. There are thirty steps in this section of the procedure. 1. On the front panel, press SETUP until the display shows the Quick DSX Setup menu. 2. Using the LEFT/RIGHT cursors, select DSX3 and then press ENTER. 3. Press RUN/STOP twice to clear all errors. 4. The transmitter and receiver sides should now be linked error-free. 5. On the transmitter side of the front panel, under the DS3/VT1.5-STS3C/12C heading, press ERR/ALM until the display shows the Single Error menu. 6. Using the LEFT/RIGHT cursors, select DS3 and press ENTER three times. 7. In the receiver’s STATUS section of the front panel, under the PAYLOAD/DS1/DS3 heading, observe that the red LEDs for PAR and BIT flashed three times. Also, in the receiver section of the display, observe that DS3 equals three. 8. On the receiver side of the front panel, under the DS3/VT1.5-STS3C/12C heading, press ERROR until the lefthand side of the display shows DS3 on the top line and PAR on the bottom line. 9. On the display, the value of TOT should equal three and the value of DS3 ES should be equal to or less than three. 10. On the receiver side of the front panel, under the DS3/VT1.5-STS3C/12C heading, press ERROR until the lefthand side of the display shows DS3 on the top line and BIT on the bottom line. 11. On the display, the value of TOT should equal three and the value of DS3 ES should be equal to or less than three. 12. On the receiver side of the front panel, under the DS3/VT1.5-STS3C/12C heading, press ERROR until the top line of the display shows FRM, PAR, and BIT. The values of PAR and BIT should equal three and the value of FRM should equal zero. 13. Press RUN/STOP twice to clear all errors. 14. On the transmitter side of the front panel, under the DS3/VT1.5-STS3C/12C heading, press ERR/ALM until the top line of the display shows DSX3 SINGLE. 15. Using the LEFT/RIGHT cursors, select BPV & then press ENTER three times. ST112 SONET Transmission Test Set B–11 Artisan Technology Group - Quality Instrumentation ... Guaranteed | (888) 88-SOURCE | www.artisantg.com Incoming Inspection Test 16. On the receiver side of the front panel, under the DS3/VT1.5-STS3C/12C heading, press ERROR until the lefthand side of the display shows DSX3 on the top line and BPV on the bottom line. The value of TOT should equal three. 17. Press RUN/STOP twice to clear all errors. 18. On the transmitter side of the front panel, under the DS3/VT1.5-STS3C/12C heading, press ERR/ALM until the display shows DS3 ALARMS on the top line. 19. Using the LEFT/RIGHT cursors, select YELLOW and then press ENTER. 20. In the receiver’s STATUS section of the front panel, under the PAYLOAD/DS1/DS3 heading, observe that the red LED for YEL-DS3 remains lit. 21. Using the LEFT/RIGHT cursors, select OFF and then press ENTER. 22. Press RUN/STOP twice to clear all errors. 23. Using the LEFT/RIGHT cursors, select AIS and then press ENTER. 24. In the receiver’s STATUS section of the front panel, under the PAYLOAD/DS1/DS3 heading, observe that the red LEDs for AIS, SYNC, and BIT remain lit. 25. Using the LEFT/RIGHT cursors, select OFF and then press ENTER. 26. Press RUN/STOP twice to clear all errors. 27. Using the LEFT/RIGHT cursors, select IDLE and then press ENTER. 28. In the receiver’s STATUS section of the front panel, under the PAYLOAD/DS1/DS3 heading, observe that the red LEDs for IDLE, SYNC, and BIT remain lit. 29. Using the LEFT/RIGHT cursors, select OFF and then press ENTER. 30. Press RUN/STOP twice to clear all errors. OC1 Quick Set-Up This section of the procedure verifies that the Optical Carrier Level 1 (OC1) is functioning properly. The quick set-up places the unit into a default mode which selects specific settings for the unit. These default settings are preprogrammed and therefore consistent from unit to unit. This section and the two following sections only apply if the unit contains an optical option. For all optical sections, an in-line 5db optical attenuator is required between the transmitter and receiver optical connectors. Before any connections are made, use the optical cleaning kit to clean the cable ends, the attenuator ends, and the optical connectors on the front panel of the unit. Note: The last section of the procedure provides an equipment list and simple instructions on how to clean the optical connectors. Leave everything set-up as it was in the last section. There are twenty-two steps in this section of the procedure. 1. Connect the transmitter and the receiver together with an optical cable with an attenuator attached to one end. Connect one end of the optical cable to the optical connector on the B–12 ST112 SONET Transmission Test Set Artisan Technology Group - Quality Instrumentation ... Guaranteed | (888) 88-SOURCE | www.artisantg.com Incoming Inspection Test transmitter side of the front panel. Connect the other end of the optical cable to the optical connector on the receiver side of the front panel. 2. On the front panel, press SETUP until the display shows the SONET Quickset menu. 3. Using the INC/DEC keys, select OC1. Note that the red LED for LASER ON now remains lit. 4. Press RUN/STOP twice to clear all errors. 5. The transmitter and the receiver should now be linked error-free. 6. Remove the bnc cable from the STSX connector on the receiver side of the front panel. The units should still be linked error-free. 7. On the transmitter side of the front panel, press ERROR until the display shows the STS1/3 ERR menu. 8. Using the LEFT/RIGHT cursors, select SPE & then press ENTER three times. 9. On the receiver’s STATUS section of the front panel, observe that the red LEDs for B1, B2, and B3 flashed three times. 10. On the receiver side of the front panel, press ERROR until the top line of the display shows B1, B2, B3, and FEBE. 11. On the display, the value of FEBE should equal zero. The values of B1, B2, and B3 should all equal three. 12. Press RUN/STOP twice to clear all errors. 13. On the transmitter side of the front panel, press POINTER. 14. Using the LEFT/RIGHT cursors, select NDF and then press ENTER. 15. On the receiver’s STATUS section of the front panel, under the SPE section of the POINTER heading, observe that the yellow LED for NDF flashes once. 16. Using the LEFT/RIGHT cursors, select +PJ and then press ENTER. 17. On the receiver’s STATUS section of the front panel, under the SPE section of the POINTER heading, observe that the green LED for +PJ flashes once. Also, on the display, observe that the value of SPE is now 523. 18. Using the LEFT/RIGHT cursors, select -PJ and then press ENTER. 19. On the receiver’s STATUS section of the front panel, under the SPE section of the POINTER heading, observe that the green LED for -PJ flashes once. Also, on the display, observe that the value of SPE is 522 once again. 20. On the receiver side of the front panel, press POINTER. 21. On the display, observe that SPE has a value of 522 and that +PJ, -PJ, and NDF all have values equal to one. 22. Press RUN/STOP twice to clear all errors. OC3 Quick Set-Up ST112 SONET Transmission Test Set B–13 Artisan Technology Group - Quality Instrumentation ... Guaranteed | (888) 88-SOURCE | www.artisantg.com Incoming Inspection Test This section of the procedure verifies that the Optical Carrier Level 3 (OC3) is functioning properly. The quick set-up places the unit into a default mode which selects specific settings for the unit. These default settings are preprogrammed and therefore consistent from unit to unit. For all optical sections, an in-line 5db optical attenuator is required between the transmitter and receiver optical connectors. Before any connections are made, use the optical cleaning kit to clean the cable ends, the attenuator ends, and the optical connectors on the front panel of the unit. The last section of the procedure provides an equipment list and simple instructions on how to clean the optical connectors. Leave everything set-up as it was in the last section. There are twenty steps in this section of the procedure. 1. On the front panel, press SETUP until the display shows the SONET Quickset menu. 2. Using the INC/DEC keys, select OC3. Using the LEFT/RIGHT cursors, select DS3 and then press ENTER. Note that the red LED for LASER ON remains lit. 3. Press RUN/STOP twice to clear all errors. 4. The transmitter and the receiver should now be linked error-free. 5. On the transmitter side of the front panel, press ALARM until the display shows the Errored Frame menu. 6. Using the LEFT/RIGHT cursors, select CONT and then press ENTER. 7. On the receiver’s STATUS section of the front panel, observe that the following error lights appear. A. Under the SECTION heading, the red LEDs for LOF, OOF, and B1 remain lit. B. Under the LINE heading, the red LEDs for AIS, LOP, B2, and RDI remain lit. The red LEDs for AIS, LOP, and RDI may flash. C. Under the PATH heading, the red LEDs for RDI, FEBE, and B3 remain lit. The red LED for RDI may flash. D. Under the PAYLOAD/DS1/DS3 heading, the red LEDs for LOF, PAR, SYNC, and BIT remain lit. E. Under the SPE section of the POINTER heading, the yellow LED for NDF remains lit and the green LEDs for +PJ and –PJ remain lit. 8. Using the LEFT/RIGHT cursors, select OFF and then press ENTER. 9. Press RUN/STOP twice to clear all errors. 10. On the transmitter side of the front panel, press MAPPING. 11. Using the INC/DEC keys, select INT STS3c and then press ENTER. 12. On the receiver side of the front panel, press MAPPING. 13. Using the INC/DEC keys, select STS3c and then press ENTER. 14. Press RUN/STOP twice to clear all errors. 15. On the transmitter side of the front panel, press ERROR until the display shows the Tx OC3 Single Error menu. B–14 ST112 SONET Transmission Test Set Artisan Technology Group - Quality Instrumentation ... Guaranteed | (888) 88-SOURCE | www.artisantg.com Incoming Inspection Test 16. Using the LEFT/RIGHT cursors, select “1” and then press ENTER three times. 17. In the receiver’s STATUS section of the front panel, observe that the red LEDs for B1, B2, B3, and BIT flashed once. 18. On the receiver side of the front panel, press ERROR until the top line of the display shows B1, B2, B3, and FEBE. 19. On the display, the value of B1 equals three. However, because of the position of the error being injected, B1 may equal up to six. For the same reason, the value of FEBE will be either zero or one and the values of B2 and B3 will be between zero and six. 20. Press RUN/STOP twice to clear all errors. OC12 Quick Set-Up This section of the procedure verifies that the Optical Carrier Level 12 (OC12) is functioning properly. The quick set-up places the unit into a default mode which selects specific settings for the unit. These default settings are preprogrammed and therefore consistent from unit to unit. For all optical sections, an in-line 5db optical attenuator is required between the transmitter and receiver optical connectors. Before any connections are made, use the optical cleaning kit to clean the cable ends, the attenuator ends, and the optical connectors on the front panel of the unit. The last section of the procedure provides an equipment list and simple instructions on how to clean the optical connectors. Leave everything set-up as it was in the last section. There are seventeen steps in this section of the procedure. 1. On the front panel, press SETUP until the display shows the SONET Quickset menu. 2. Using the INC/DEC keys, select OC12. Using the LEFT/RIGHT cursors, select DS3 and then press ENTER. Note that the red LED for LASER ON remains lit. 3. Press RUN/STOP twice to clear all errors. 4. The transmitter and the receiver should now be linked error-free. 5. On the transmitter side of the front panel, press ERROR until the display shows the Tx OC12 Single Error menu. 6. Using the LEFT/RIGHT cursors and INC/DEC keys, select “1” and then press ENTER three times. 7. In the receiver’s STATUS section of the front panel, observe that the red LEDs for B1, B2, and B3 flashed three times. 8. On the receiver side of the front panel, press ERROR until the lefthand side of the display shows SECT on the top line and B1 on the botttom line. 9. On the display, the value of TOT equals 3 and the value of SECT ES should be equal to or less than three. 10. On the receiver side of the front panel, under the DCC/OW button, press ERROR until the top line of the display shows B1, B2, B3, and FEBE. ST112 SONET Transmission Test Set B–15 Artisan Technology Group - Quality Instrumentation ... Guaranteed | (888) 88-SOURCE | www.artisantg.com Incoming Inspection Test 11. On the display, the value of B1 equals three. However, because of the position of the error being injected, B1 may equal up to six. For the same reason, the value of FEBE will be either zero or one and the values of B2 and B3 will be between zero and six. 12. Press RUN/STOP twice to clear all errors. 13. On the transmitter side of the front panel, press ALARM until the display shows the Errored Frame menu. 14. Using the LEFT/RIGHT cursors, select CONT and then press ENTER. 15. On the receiver’s STATUS section of the front panel, observe that the following error lights appear. A. Under the SECTION heading, the red LEDs for LOF and OOF remain lit. B. Under the LINE heading, the red LEDs for AIS, LOP, and RDI remain lit. The red LEDs for AIS, LOP, and RDI may flash. C. Under the PATH heading, the red LEDs for RDI, FEBE, and B3 remain lit. The red LED for RDI may flash. D. Under the PAYLOAD/DS1/DS3 heading, the red LEDs for LOF, PAR, SYNC, and BIT remain lit. E. Under the SPE section of the POINTER heading, the yellow LED for NDF remains lit and the green LEDs for +PJ and –PJ remain lit. 14. Using the LEFT/RIGHT cursors, select OFF and then press ENTER. 15. Press RUN/STOP twice to clear all errors. You have now successfully verified that the unit is functional. If you had any problems with the unit while performing the tests, repeat the procedure paying careful attention to the set-up of the units and the directions given. If the unit still has a problem, please call Tektronix Customer Sales and Support Center (CSSC) at 1-800-835-9433 x2400 or 503-627-2400 for assistance. Cleaning Optical Cables Required Equipment Clean Air Spray - Dust Free (suggested: Chemtronics E - Series Ultrajet) Isopropyl Alcohol 70% .035” Swab (suggested: Fisher Brand Cat.No. 14-959-77) Kimwipes Laboratory Wipes (suggested: PN 34155) Cleaning Procedure for Front Panel Optical Connectors B–16 ST112 SONET Transmission Test Set Artisan Technology Group - Quality Instrumentation ... Guaranteed | (888) 88-SOURCE | www.artisantg.com Incoming Inspection Test Note: This procedure should be performed each time the fiber assemblies are to be used to prevent scratching the fiber and ultimately destroying optical connectors. 1. Remove the protective optical cover from the connector to be cleaned. 2. Take a swab from the package and dip it into the clean Alcohol solution. 3. Gently insert the swab into the barrel (ferrule) opening of the fiber optic connector until it stops. 4. Gently spin the swab clockwise and the counter clockwise. 5. Remove the swab. 6. Using the clean air spray, spray the air into the barrel opening for at least three seconds. Note: Hold the can in an upright position. DO NOT tilt, invert, or shake the can during use. If a mist appears from the can, the cleaning process must be performed again. 7. Do not reuse the swab. Dispose of it immediately. Cleaning Procedure for Unconnected Fiber Cables Note: This procedure should be performed each time the fiber cables are to be used to prevent scraching the fiber and ultimately destroying the cables. 1. Hold the fiber optic connector to be cleaned in your hand. 2. Try not to put unnecessary strain on the fiber. 3. Take a clean Kimwipe from the box and dab it into the clean Alcohol. 4. Wipe the Alcohol soaked Kimwipe over the ends of the fiber optic cable gently. 5. Using the clean air spray, spray the air into the end of fiber for at least three seconds. Note: Hold the can in an upright position. DO NOT tilt, invert, or shake the can during use. If a mist appears from the can, the cleaning process must be performed again. 6. Dispose of the used Kimwipe immediately. Do not reuse it. ST112 SONET Transmission Test Set B–17 Artisan Technology Group - Quality Instrumentation ... Guaranteed | (888) 88-SOURCE | www.artisantg.com Incoming Inspection Test B–18 ST112 SONET Transmission Test Set Artisan Technology Group - Quality Instrumentation ... Guaranteed | (888) 88-SOURCE | www.artisantg.com Appendix C Calibration Verification Test Artisan Technology Group - Quality Instrumentation ... Guaranteed | (888) 88-SOURCE | www.artisantg.com Calibration Verification Test Introduction The purpose of this procedure is to allow the customer a means with which to verify that any ST112 Transceiver is within calibration. This procedure is designed to be a brief verification that the calibration of the unit is within the required specifications. Note: The optical sections only apply if the unit has optical options. Required Equipment The following equipment will be required in order to verify that the ST112 Transceiver is calibrated properly. Tektronix CSA803A oscilloscope with sampling head** freqency counter with a Khz to Mhz range** (suggested: Tektronix CMC251) m-m bnc 50 ohms coaxial cable f-m bnc 50 ohms thru terminator two male bnc 50 ohms to ground terminators Fiber Optical Cable - must be a single mode cable and have connectors matching those on the unit under test (required if unit has optical options) an in-line 5db optical attenuator (required if unit has optical options) m-m bnc 75 ohms coaxial cable f-m bnc 75 ohms thru terminator male bnc 75 ohms to ground terminator f-f-m bnc “T” adaptor DS1 WECO 310 compatible patch cord f-m bnc AC coupler adaptor (suggested: Tektronix Blocking Capacitor PN 015-1013-00) optical/electrical converter** (suggested: Tektronix P6703A) Optical cleaning kit (required if unit has optical options - see last section of the procedure for contents) special cable - DS1 WECO 310 compatible patch cord connector on one end separated into two coaxial cables with male bnc connectors on the other end (one of the cables is connected to the Tip and the other is connected to the Ring) **Note: These instruments must have the current N.I.S.T. traceable calibrations C–2 ST112 SONET Transmission Test Set Artisan Technology Group - Quality Instrumentation ... Guaranteed | (888) 88-SOURCE | www.artisantg.com Calibration Verification Test General Calibration Verification This section of the User Manual tests the calibration of the unit. The procedure consists of seven sections in which the calibration of the unit is verified. Note: The procedure assumes you are proceeding in sequential order. Before beginning the procedure, you must Ram Corrupt the unit to ensure that you are starting the procedure from a known state. To Ram Corrupt the unit, first press ERROR once on the receiver side of the front panel. Then, press the LEFT cursor and then ENTER consecutively eleven times. When finished, power down the unit. Power the unit on and the power-up sequence on the display should show a Ram Corrupt message after the revision display. If you do not see this message then the unit was not Ram Corrupted and the process must be done again. DS1 Frequency Verification This section of the procedure verifies that the frequency is within proper tolerance for the DS1 level. A frequency counter will be needed as well as the special cable. It is necessary to have a balanced signal out of the transmitter in order to measure the frequency. For this reason, a cable with a DS1 WECO 310 compatible patch cord connector on one end separated into two coaxial connectors with male bnc connectors on the other end is needed (one of the cables is connected to the Tip and the other is connected to the Ring) There are nine steps in this section of the procedure. Note: Only the DS1 sections of the procedure require the use of the special cable. 1. Connect the bnc “T” adaptor to the frequency counter and terminate on end of it with a 50 ohms to ground terminator. 2. Connect the DS1 compatible patch cord end of the special cable to the DS1 connector on the transmitter side of the front panel. 3. Terminate one of the coax cables with a 50 ohms to ground terminator. 4. Connect the other coax cable to the open end of the “T” connector attached to the frequency counter. 5. On the front panel, press SETUP until the display shows the Quick DSX Set-Up menu. 6. Using the LEFT/RIGHT cursors, select DSX1 and then press ENTER. 7. On the transmitter side of the front panel, under the DS3/VT1.5-STS3c/12c heading, press ERR/ALM until the display shows the DS1 Alarms menu. 8. Using the LEFT/RIGHT cursors, select AIS and then press ENTER. Note: This sets the pattern to unframed ALL 1’s. 9. The DS1 frequency is 1.544 Mhz. The frequency being measured is the full-rate data signal which is equal to half the rate of the system clock. The frequency shown on the counter should be 772 Khz + 7.72 Hz, which is equal to the half-rate clock. DS1 Signal Mask Verification ST112 SONET Transmission Test Set C–3 Artisan Technology Group - Quality Instrumentation ... Guaranteed | (888) 88-SOURCE | www.artisantg.com Calibration Verification Test The frequency for the DS1 signal has been verified so the signal mask must now be checked. For this section of the procedure, a CSA803A scope will be needed as well as the special cable. Disconnect the coax cable and remove the bnc “T” adaptor from the frequency counter. There are fourteen steps in this section of the procedure. 1. Disconnect the 50 ohms to ground terminator from the end of the coax cable. 2. Connect one of the coax cables to channel 1 of the scope (Tip). 3. Connect the other coax cable to channel 2 of the scope (Ring). 4. On the front panel, press SETUP until the display shows the DSX1 Line Code menu. 5. Using the LEFT/RIGHT cursors, select AMI and then press ENTER. 6. On the transmitter side of the front panel, under the DS3/VT1.5-STS3c/12c heading, press PATTERN until the display shows the TX Stress Pattern: DSX1 menu. 7. On the front panel, press ENTER. 8. On the transmitter side of the front panel, under the DS3/VT1.5-STS3c/12c heading, press PATTERN until the bottom line of the display shows “1/8”. 9. On the front panel, press ENTER. 10. Invert one of the scope channels and then add them. This gives the balanced signal needed. 11. Setting the signal around the center of the scope, measure the amplitude of the signal. Note: The amplitude of the signal is the peak-to-peak value. The amplitude of the DS1 signal should be 6 Vpp + 400mV. 12. Compare the signal on the screen to the standard DS1 mask. Only the scope’s vertical adjustment may be moved in order to make the signal fit within the mask. Note: The CSA803A oscilloscope contains the standard template in memory. 13. Set the vertical adjustment back to its normal position. 14. Remove the special cable from the transmitter and the scope. DS3 Frequency and Signal Mask Verifications This section of the procedure verifies that the frequency is within the proper tolerance and that the output signal matches the standard DS3 mask. The CSA803A scope, a frequency counter, a 75 ohms bnc thru terminator, a 75 ohms to ground bnc terminator, and a 75 ohms bnc cable are needed. There are nineteen steps in this section of the procedure. 1. Connect one end of the cable to the bottom left output connector on the transmitter side of the front panel. C–4 ST112 SONET Transmission Test Set Artisan Technology Group - Quality Instrumentation ... Guaranteed | (888) 88-SOURCE | www.artisantg.com Calibration Verification Test 2. Connect the 75 ohms to ground terminator to the bottom right output connector. The outputs are ganged together with isolated signal splitters. While measuring accuracy, it is wise to terminate the unused end of the split signal. 3. Connect the other end of the cable to the 75 ohms thru terminator. 4. Connect the other end of the thru terminator to the frequency counter. 5. On the front panel, press SETUP until the display shows the Quick DSX Set-Up menu. 6. Using the LEFT/RIGHT cursors, select DSX3 and then press ENTER. 7. On the transmitter side of the front panel, under the DS3/VT1.5-STS3c/12c heading, press PATTERN until the display shows the TX Pattern: DS3/PAYLOAD menu. 8. Using the LEFT/RIGHT cursors, select WORD. 9. Using the INC/DEC keys, change the word to FF and then press ENTER. 10. On the transmitter side of the front panel, under the DS3/VT1.5-STS3c/12c heading, press FRAMING until the display show the Tx DS3 Frame menu. 11. Using the LEFT/RIGHT cursors, select UNFRM and then press ENTER. 12. The DS3 frequency is 44.736 Mhz. The frequency being measured is the full rate data signal which is equal to half the rate of the system clock. The frequency shown on the counter should be 22.368 Mhz + 22 Hz, which is equal to the half rate clock. 13. On the transmitter side of the front panel, under the DS3/VT1.5-STS3c/12c heading, press PATTERN until the display shows the TX Pattern: DS3/PAYLOAD menu. 14. Using the LEFT/RIGHT cursors, select WORD. 15. Using the INC/DEC keys, change the word to AA and then press ENTER. 16. Remove the cable and terminator from the frequency counter and connect it to the scope. 17. Setting the signal around the center of the scope, measure the amplitude of the signal. Note: The amplitude of the signal is its peak-to-peak value. The amplitude of the DS3 signal should equal 1 Vpp + 200mV. 18. Compare the signal on the screen to the standard DS3 mask. Only the scope’s vertical adjustment may be moved in order to make the signal fit within the mask. Note: The CSA803A oscilloscope contains the standard template in memory. 19. Set the vertical adjustment back to the normal position. STS1 Frequency and Signal Mask Verification This section of the procedure verifies that the frequency is within the proper tolerance and that the output signal matches the standard STS1 mask. The CSA803A scope, a frequency counter, an AC coupler, a 75 ohms bnc thru terminator, a 75 ohms to ground bnc terminator, a 75 ohms ST112 SONET Transmission Test Set C–5 Artisan Technology Group - Quality Instrumentation ... Guaranteed | (888) 88-SOURCE | www.artisantg.com Calibration Verification Test bnc cable, a 50 ohms bnc thru terminator, and a bnc 50 ohms cable are needed. Leave everything as it was in the last section. There are eleven steps in this section of the procedure. 1. On the front panel, press SETUP until the display shows the SONET Quickset menu. 2. Using the INC/DEC keys, select STSX1. Using the LEFT/RIGHT cursors, select DS3 and then press ENTER. 3. Setting the signal around the center of the scope, measure the amplitdue of the signal. Note: The amplitude of the signal is its peak-to-peak value. The amplitude of the STSX1 signal should equal 1 Vpp + 200mV. 4. Compare the signal on the screen to the standard STS1 mask. Only the scope’s vertical adjusment may be moved in order to make the signal fit within the mask. Note: The CSA803A oscilloscope contains the standard template in memory. 5. Set the vertical adjustment back to the normal position. 6. Connect the 50 ohms bnc cable to STS1 CLOCK OUT on the transmitter side of the rear panel. 7. Connect the other end of the 50 ohms cable to the AC coupler. 8. Connect the AC coupler to one end of the 50 ohms thru terminator. 9. Connect the thru terminator to the frequency counter. 10. The STS1 frequency is 51.8400 Mhz + 51 Hz. The frequency shown on the counter should be 51.8400 Mhz + 51 Hz. 11. Remove all cables and terminators from the unit and scope. Note: For further information regarding the standard masks for DS1, DS3, and STS1 refer to the ANSI technical standard, T1.102. The masks supported by the CSA803A scope are direct representations of these standard masks. OC1 Signal Mask Verification This section of the procedure verifies that the output signal matches the standard OC1 mask. The CSA803A scope, a single mode optical cable, an in-line 5db optical attenuator, an Optical/Electrical converter, and a 50 ohms bnc cable are needed. For all optical sections, an inline 5db attenuator is required between the transmitter and receiver optical connectors. Before any connections are made, use the optical cleaning kit to clean the cable end, the attenuator end, and the optical connectors on the front panel of the unit. The last section of the procedure provides an equipment list and simple instructions on how to clean the optical connectors. There are seven steps in this section of the procedure. 1. Connect the bnc cable from the electrical end of the Optical/Electrical converter to the scope. 2. Connect one end of the optical cable to the optical connector on the transmitter side of the front panel. 3. Connect the other end of the optical cable to the optical end of the Optical/Electrical converter. C–6 ST112 SONET Transmission Test Set Artisan Technology Group - Quality Instrumentation ... Guaranteed | (888) 88-SOURCE | www.artisantg.com Calibration Verification Test 4. On the front panel, press SETUP until the display shows the SONET Quickset menu. 5. Using the INC/DEC keys, select OC1 and then press ENTER. 6. Compare the signal on the scope screen to the standard OC1 mask. Only the scope’s vertical adjustment may be moved in order to make the signal fit within the mask. Note: The CSA803A oscilloscope contains the standard template in memory. 7. Set the vertical adjustment back to the normal position. OC3 Signal Mask Verification This section of the procedure verifies that the output signal matches the standard OC3 mask. The CSA803A scope, a single mode optical cable, an in-line 5db optical attenuator, an Optical/Electrical converter, and a 50 ohms bnc cable are needed. Leave everything set-up as it was in the last section. There are five steps in this section of the procedure. 1. On the front panel, press SETUP until the display shows the SONET Quickset menu. 2. Using the INC/DEC keys, select OC3. 3. Using the LEFT/RIGHT cursors, select DS3 and then press ENTER. 4. Compare the signal on the scope screen to the standard OC3 mask. Only the scope’s vertical adjustment may be moved in order to make the signal fit within the mask. Note: The CSA803A oscilloscope contains the standard template in memory. 5. Set the vertical adjustment back to the normal position. OC12 Signal Mask Verification This section of the procedure verifies that the output signal matches the standard OC12 mask. The CSA803A scope, a single mode optical cable, an in-line 5db optical attenuator, an Optical/Electrical converter, and a 50 ohms bnc cable are needed. Leave everything set-up as it was in the last section. There are six steps in this section of the procedure. 1. On the front panel, press SETUP until the display shows the SONET Quickset menu. 2. Using the INC/DEC keys, select OC12. 3. Using the LEFT/RIGHT cursors, select DS3 and then press ENTER. 4. Compare the signal on the scope screen to the standard OC12 mask. Only the scope’s vertical adjustment may be moved in order to make the signal fit within the mask. Note: The CSA803A oscilloscope contains the standard template in memory. 5. Set the vertical adjustment back to the normal position. 6. Remove all cables and attenuators from the unit and the scope. ST112 SONET Transmission Test Set C–7 Artisan Technology Group - Quality Instrumentation ... Guaranteed | (888) 88-SOURCE | www.artisantg.com Calibration Verification Test Note: For further information regarding the optical standard masks for OC1, OC3, and OC12 refer to the Bellcore technical standard, GR-253-CORE. The masks supported by the CSA803A scope are direct representations of these standard masks. You have now successfully completed the verification of the calibration of the ST112 Transceiver. If you had any problems with the unit while performing the tests, repeat the procedure paying careful attention to the set-up of the units and the directions given. If the unit still has a problem, please call Tektronix Customer Sales and Support Center (CSSC) at 1-800835-9433 x2400 or 503-627-2400 for assistance. C–8 ST112 SONET Transmission Test Set Artisan Technology Group - Quality Instrumentation ... Guaranteed | (888) 88-SOURCE | www.artisantg.com Calibration Verification Test Cleaning Optical Cables Required Equipment Clean Air Spray - Dust Free (suggested: Chemtronics E - Series Ultrajet) Isopropyl Alcohol 70% .035” Swab (suggested: Fisher Brand Cat.No. 14-959-77) Kimwipes Laboratory Wipes (suggested: PN 34155) Cleaning Procedure for Front Panel Optical Connectors Note: This procedure should be performed each time the fiber assemblies are to be used to prevent scratching the fiber and ultimately destroying optical connectors. 1. Remove the protective optical cover from the connector to be cleaned. 2. Take a swab from the package and dip it into the clean Alcohol solution. 3. Gently insert the swab into the barrel (ferrule) opening of the fiber optic connector until it stops. 4. Gently spin the swab clockwise and the counter clockwise. 5. Remove the swab. 6. Using the clean air spray, spray the air into the barrel opening for at least three seconds. Note: Hold the can in an upright position. DO NOT tilt, invert, or shake the can during use. If a mist appears from the can, the cleaning process must be performed again. 7. Do not reuse the swab. Dispose of it immediately. Cleaning Procedure for Unconnected Fiber Cables Note: This procedure should be performed each time the fiber cables are to be used to prevent scraching the fiber and ultimately destroying the cables. 1. Hold the fiber optic connector to be cleaned in your hand. 2. Try not to put unnecessary strain on the fiber. 3. Take a clean Kimwipe from the box and dab it into the clean Alcohol. 4. Wipe the Alcohol soaked Kimwipe over the ends of the fiber optic cable gently. ST112 SONET Transmission Test Set C–9 Artisan Technology Group - Quality Instrumentation ... Guaranteed | (888) 88-SOURCE | www.artisantg.com Calibration Verification Test 5. Using the clean air spray, spray the air into the end of fiber for at least three seconds. Note: Hold the can in an upright position. DO NOT tilt, invert, or shake the can during use. If a mist appears from the can, the cleaning process must be performed again. 6. Dispose of the used Kimwipe immediately. Do not reuse it. C–10 ST112 SONET Transmission Test Set Artisan Technology Group - Quality Instrumentation ... Guaranteed | (888) 88-SOURCE | www.artisantg.com Index —A— AC Interlock, 2-18 AC Power, 2-18 AC Power Requirements, 1-5, 2-4 Accessories, 1-4 Active, 5-3 Alarms Line, 2-12 Payload, 2-14 Section, 2-11 VT Path, 2-13 APS LCD Display, 3-8, 3-9 Autolink, 3-15 Autoseek, 3-15 Auxiliary Setup, 3-5, 3-6 —C— Channel Numbering, 3-4 Cleaning, 2-7 Combined (Dual) Mode Commands, 7-72 Combined (Dual) Mode Setup, 5-13 Connectors Receiver, 2-9 Transmitte, 2-7 Current Configuration, 4-4 —D— Display, LCD, 2-5 —E— Error Display, LCD, 3-13 —F— Fuse Replacement, 2-18 —G— GPIB Port, 2-18 GPIB port ANSI manual requirements, 6-8 command format, 6-8 connector pinout, 6-8 event status enable register (ESER), 6-12 interface functions, 6-8 local lock out, 6-7 overview, 6-2 returning to local mode, 6-7 service request enable register (SRER), 6-13 standard event status register (SESR), 6-11 status and event reporting, 6-10 status byte register (SBR), 6-12 GPIB Port Setup, 3-6 —I— Indicators History, 2-15 Payload, 2-14 Pointer, 2-14 Remote, REM, LLO, 2-16 Inputs Rear Panel, 2-8 Rear Panel, Receiver, 2-10 Interlock AC Power, 2-18 —K— Key Pause/Resume, 2-16 View History, 2-15 —L— LCD Display, 2-5 LCD Displays APS, 3-8, 3-9 DCC, Orderwire, 3-12 Error, 3-13 Framing, 3-17 Pattern, 3-16 Payload Error, 3-17 Receiver Overhead, 3-7 RX Drop Select, 3-14 LCD Displays, Transmitter Alarms, 3-23 DSX3 Errors and Alarms, 3-28 Electrical Output, 3-19 Error, 3-24 Framing, 3-27 Mapping, 3-21 Optical Output, 3-19 Overhead, 3-20 Pattern, 3-25 Payload Errors and Alarms, 3-27 Pointers (SPE and VT, 3-22 Timing, 3-22, 3-24 LED Status Indicators, Receiver, 2-11 LED Test, 3-2 Live Traffic Monitoring, 5-2 Artisan Technology Group - Quality Instrumentation ... Guaranteed | (888) 88-SOURCE | www.artisantg.com —M— Modem Connections, 4-3 —N— New Data Flag, 3-22, 3-23 New Data Flag (NDF), 3-12 —O— Ordering Information, 1-2 Outputs DSX-1, 2-7 DSX-3, 2-7 Optical, 2-7 Rear Panel, ECL, 2-8 Rear Panel, Receiver, 2-10 STSX-1, 2-7 —P— Pause/Resume Key, 2-16 Power Requirements, 2-4 Printer Port, 2-18 Printer Selection, 3-5 printer, how to use, 6-2 Product Codes CLEI, CPR, 1-3 —R— Receiver Connectors, 2-9, 2-10 Receiver Overhead LCD Displays, 3-7 Receiver Status Indicators, 2-11 remote commands examples, 7-4 illegal arguments, 7-3 types, set and query, 7-2 Remote Connections, 4-3 remote control, 6-2 Report, 3-5 Report Reprint, 3-5 Report/Test Time, 3-5 Rev 4.1 Splash Screen Display, 3-2 RS-232 port cables, 6-4 command format, 6-5 error messages, 6-5 overview, 6-2 parameters, overview, 6-3 pinout, 6-3 protocol, 6-4 quick test, 6-4 RS-232C Port Storing and Printing Data, 6-6 RS-232C Port Setup, 3-6 RX Drop Select LCD Display, 3-14 —S— Safety practices, 1-5 Setting the New Data Flag, 3-22, 3-23 ST2400 Prompt, 4-3 ST-2400 RS-232C Port Settings, 4-2 Store/Recall, 3-4 —T— Terminal Setup, 4-3 Test Time, 3-5 Transmitter Connectors, 2-7 —V— VFP, 4-2 VFP Display Current Configuration, 4-4, 4-6 Quick Setup, 4-6 Setup, 4-4 Time Setup, 4-7 VFP Displays APS, 4-18 DSX1 Line Code Setup, 4-7 Print Report Setup, 4-10 Receiver Error Summary, 4-20 Receiver Setup, 4-11 Store and Recall Test Setups, 4-8 Timed Test Setup, 4-9 VFP Displays, J1 Trace Message, 4-31 VFP Displays, Overhead, 4-30 VFP Displays, Receiver DS3/DSX3 Configuration, 4-15 Input Configuration, 4-12 J1 Trace message, 4-18 Optics, 4-13 Overhead Bytes, 4-17 Paylosd Mapping, 4-13 SPE Pointer, 4-16 STS Channel, 4-13 STS3C Configuration, 4-16 Trouble Scan, 4-20 VT Channel Configuration, 4-14 VT Pointers, 4-17 VT1.5 Channel Scan, 4-19 VT1.5/DSX1 Configuration, 4-15 VFP Displays, SONET Alarms, 4-28 VFP Displays, SONET Errors, 4-29 VFP Displays, Transmitter Configuration, 4-21 DCC Orderwire Configuration, 4-22 DS3 Alarms and Errors, 4-37 DS3 Errors and Alarms, 4-38 DS3/DSX3 Configuration, 4-36 Mapping, 4-24 Optical Configuration, 4-22 SONET Alarms, 4-27 SPE Pointers, 4-25 STS12C Configuration, 4-40 Artisan Technology Group - Quality Instrumentation ... Guaranteed | (888) 88-SOURCE | www.artisantg.com STS3C Configuration, 4-39 Timing, 4-23 VT Errors/Alarms, 4-35 VT Pointers, 4-26 VFP Displays, VT1.5 Channel Configuration, 4-32 View History Key, 2-15 Virtual Front Panel, 4-2 VT Channel Mapping, 3-10 VT1.5 Structures, 4-14, 4-33 VT-100 terminal, 4-2 VT-100 terminal emulation, 4-2 —W— Warning and caution labels, xi Artisan Technology Group - Quality Instrumentation ... Guaranteed | (888) 88-SOURCE | www.artisantg.com Artisan Technology Group is your source for quality new and certified-used/pre-owned equipment • FAST SHIPPING AND DELIVERY • TENS OF THOUSANDS OF IN-STOCK ITEMS • EQUIPMENT DEMOS • HUNDREDS OF MANUFACTURERS SUPPORTED • LEASING/MONTHLY RENTALS • ITAR CERTIFIED SECURE ASSET SOLUTIONS SERVICE CENTER REPAIRS Experienced engineers and technicians on staff at our full-service, in-house repair center WE BUY USED EQUIPMENT Sell your excess, underutilized, and idle used equipment We also offer credit for buy-backs and trade-ins www.artisantg.com/WeBuyEquipment InstraView REMOTE INSPECTION LOOKING FOR MORE INFORMATION? Visit us on the web at www.artisantg.com for more information on price quotations, drivers, technical specifications, manuals, and documentation SM Remotely inspect equipment before purchasing with our interactive website at www.instraview.com Contact us: (888) 88-SOURCE | [email protected] | www.artisantg.com