1
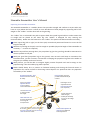
Steerable Kneewalker User’s Manual Operating the Steerable Kneewalker The Steerable Kneewalker is a mobility device that provides strength and comfort to anyone who may have an injury below the knee. It allows an even distribution of body weight by supporting half of the weight on the “walker” and the other half on the good leg. The “walker” has a cushioned knee pad to support both the injured leg and ankle to make certain that no weight will be placed on the lower leg. The “walker” is designed for easy steering and manoeuvrability. Brakes are also featured on this “walker” for speed controlled movement and safety. Place injured leg (left or right) on the knee pad; centred and positioned forward to cover the full length of the pad. With the injured leg on the pad, stand as straight as possible (adjust the height of the Kneewalker as necessary..... no tools are required). With the injured foot pointing down, the propulsion leg (yes the good leg) should be maintained as close as possible to the pad. With your good foot (propulsion leg) on the ground, start out with small steps to commence the forward motion, just like a scooter. Concentrate on keeping the propulsion leg next to the walker as this gives you stability and ease of control. With practice, you will be able to navigate slightly uneven footpaths and road crossings as the propulsion leg is also the stability leg when required. Hands should always be in a position to facilitate breaking and slowing the forward motion in preparation for uneven surfaces or detouring around objects at a speed that does not jeopardize the stability of the “walker”. Broad dual handles / dual brakes enhances balance & safety Easy to use brake adjusters & lock nuts to tighten / loosen the brakes Tool free lock hub to adjust handle bar height Tiller lock lever can be easily disengaged for storage & transportation **Once the tiller lock lever is disengaged & the tiller is folded, the nut connecting the base of the tiller into the receiving collar will become visible. Knee pad with “channel” provides added stability & comfort Pad height can be adjusted with the knee pad knob (no tools required) Sturdy dual frame adds strength, stability & durability to carry up to 136kgs / 300lbs Lower brake adjusters & lock nuts for additional brake adjustment Using the Hand Brake The Kneewalker’s brake is similar to a bicycle and also has a locking feature. To use the brake, simply pull the lever with your finger tips toward the handle bar. To lock the brake, push the brake lever away from the handle bar until it is locked in place. *Do not use the Kneewalker if the brake system is not working properly. Adjusting the Hand Brake For minor brake adjustments, the brake adjusters and lock nuts are located between the handbrakes & the brake cables: loosen the lock nut and turn the adjuster counter clockwise to tighten the brake, then retighten the lock nut. loosen the lock nut and turn the adjuster clockwise to loosen the brake, then retighten the lock nut. If further adjustment is required, apply the same method of adjustment to the lower brake adjusters & lock nuts. Adjusting the Handle Bar Height To adjust the handle height, release the lock hub on the collar and adjust the handle to the desired height. Push the lock hub back to tighten. Adjusting the Knee Pad Height To adjust the knee pad height, turn the knee pad knob located under pad counter-clockwise until free of the frame. Set pad to the desired height and return adjustment knob. Turn clockwise to tighten. To Fold Tiller (For transporting in the car or storage) To fold the tiller, pull the tiller lock lever away from the Kneewalker until the lock is disengaged. While holding the lock lever in the down position, fold the tiller down until it rests on the pad. **The nut connecting the base of the tiller into the receiving collar will become visible. Adjusting the Tiller Assembly To keep the unit tight and ensure it does not become loose after persistent use; tighten the nut connecting the base of tiller into the receiving collar (visible when the tiller is folded). Tightening is achieved by turning the locking collar clockwise (tool provided). To Reduce the Risk of Accident Follow the instructions provided by Kneewalker Oz or your healthcare professional. Once the Kneewalker is set up practice bending, reaching, ambulating and transfers on and off the Kneewalker. DO NOT use the Kneewalker by yourself until you feel confident and can manoeuvre independently. The use of the Kneewalker is individual to the person. You should develop your own methods for use based on your personal level of function and ability. NEVER attempt a manoeuvre that you are concerned will be beyond your ability. Be aware of your surroundings when operating the Kneewalker. Look for hazards and avoid them. Do not use on uneven surfaces, steep declines, broken pavements. Do not transverse hills or sloping gradients, keep the Kneewalker balanced at all times Do not use on stairs or step style escalators