1
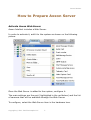
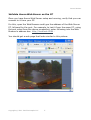
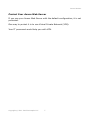
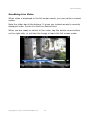
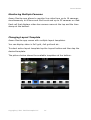
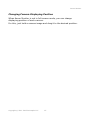
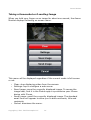
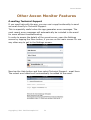
Axxon Monitor
Axxon Monitor
by DComplex LLC
User Manual
This document has the latest documentation about the Axxon Monitor,
iPhone/iPad app by DComplex LLC, for monitoring Axxon Intellect Video
Management System.
Download Axxon Monitor app from Apple App Store:
http://itunes.apple.com/us/app/axxonmonitor/id395441090
Axxon Monitor app is designed and developed by
DComplex LLC in New York, USA.
DComplex LLC is a software development company focusing
on professional iPhone and Mac video surveillance solutions.
dcomplex.com
Axxon is a global leader in the area of converging technologies.
cnbtec.com
Copyright © 2011-2012 DComplex LLC
1
Axxon Monitor
Table of Contents
How to Prepare Axxon Server.............................................................................................................. 3
Activate Axxon Web Server............................................................................................................. 3
Validate Axxon Web Server on the PC............................................................................................ 5
Validate Axxon Web Server from Your iPhone/iPad....................................................................... 6
Protect Your Axxon Web Server...................................................................................................... 7
How to Use Axxon Monitor................................................................................................................. 8
The First Launch.............................................................................................................................. 8
Providing Username and Password............................................................................................... 10
Requesting the List of Cameras..................................................................................................... 10
Monitoring Live Video....................................................................................................................... 11
The Full Screen Mode.................................................................................................................... 11
Digital PTZ.................................................................................................................................... 12
Toolbar........................................................................................................................................... 12
Scrubbing Live Video.................................................................................................................... 13
Monitoring Multiple Cameras....................................................................................................... 14
Changing Layout Template............................................................................................................ 14
Changing Camera Displaying Position.......................................................................................... 15
Taking a Screenshot or E-mailing Image....................................................................................... 16
Adding Cameras Using On-screen Camera List............................................................................ 17
Playing Back Recorded Video............................................................................................................ 18
How to Display Recorded Video................................................................................................... 18
Using Scrubbing and Frame Step Controls....................................................................................19
Changing Time............................................................................................................................... 20
Other Axxon Monitor Features........................................................................................................... 21
E-mailing Technical Support......................................................................................................... 21
Copyright © 2011-2012 DComplex LLC
2
Axxon Monitor
How to Prepare Axxon Server
Activate Axxon Web Server
Axxon Intellect includes a Web Server.
In order to activate it, add it to the system as shown on the following
picture.
Once the Web Server is added to the system, configure it.
The main settings are the port (highlighted in the red below) and the list
of cameras that will be available through the Web Server.
To configure, select the Web Server item in the hardware tree:
Copyright © 2011-2012 DComplex LLC
3
Axxon Monitor
Then adjust the configuration on the details panel:
Copyright © 2011-2012 DComplex LLC
4
Axxon Monitor
Validate Axxon Web Server on the PC
Once you have Axxon Web Server setup and running, verify that you can
connect to it from your PC.
For this, open the Web Browser and type the address of the Web Server
PC, followed by the port. For example, to test it from the same PC, using
the port value from the above screenshot, enter following into the Web
Browser's address bar: http://localhost:8084 .
You should get a web page that looks similar to this picture:
Copyright © 2011-2012 DComplex LLC
5
Axxon Monitor
Validate Axxon Web Server from Your iPhone/iPad
Once you can access the Axxon Web Server from a PC, the next step is
to access it from your iPhone/iPad.
If the iPhone/iPad cannot access the Web Server, then the Axxon Monitor
app will not work with it as well.
On your iPhone/iPad, open the Safari app and enter the address of the
web server, followed by the port, for example: http://1.1.1.1:8084.
You should get similarly looking Web Page:
Copyright © 2011-2012 DComplex LLC
6
Axxon Monitor
Protect Your Axxon Web Server
If you use your Axxon Web Server with the default configuration, it is not
protected.
One way to protect it is to use Virtual Private Network (VPN).
Your IT personnel would help you with VPN.
Copyright © 2011-2012 DComplex LLC
7
Axxon Monitor
How to Use Axxon Monitor
The First Launch
When you launch the Axxon Monitor app the first time, it will ask you to
add an Axxon Web Server as shown in the screenshot below.
Go ahead and tap the "Axxon" item to continue. The app will show New
Device screen as shown below.
Enter the data about your Axxon Web Server and tap "Save" button.
The first item (Friendly Name) is just a name that you want to associate
with the Web Server. In case if you add multiple Web Servers in the
future, the name will help you to distinguish it.
The address field allows you to enter the IP Address (as 1.1.1.1 below)
or a DNS name (as apple.com).
Copyright © 2011-2012 DComplex LLC
8
Axxon Monitor
The port is 80 by default. If your Axxon Web Server works on another
port, set the port field to the appropriate value.
Select the protocol to your Axxon Web Server. By default it is HTTP.
Tap the Save button when you are ready. The app will connect to the
Axxon Web Server and download the list of cameras.
This screen contains following items, from top to bottom.
• The back button named "Web Servers": it allows you to go back to
the previous screen.
• The name of the server on top (in the picture it is "dyn")
• List of cameras. Each camera entry contains four parts:
◦ Icon. The icon shows the last image downloaded from the
camera.
◦ The name of the camera.
◦ Below the name, the app shows the serial number of the camera
in the app.
◦ The PTZ indicator for PTZ cameras.
Touch a camera to see live video from it.
Copyright © 2011-2012 DComplex LLC
9
Axxon Monitor
Providing Username and Password
In order to specify username and password to access a protected Server,
touch the details button next to the Server name.
You will see the New Device screen again.
Enter the credentials and tap the Save button.
Requesting the List of Cameras
Open the list of Web Servers, tap on a Web Server entry to see its
cameras.
The list of cameras would look like the following picture.
Copyright © 2011-2012 DComplex LLC
10
Axxon Monitor
Monitoring Live Video
Monitoring live video will take the lion's share of your app use. Please
review these tips to get familiar will all relevant features. You might find
something that makes your experience much better.
The Full Screen Mode
The full screen mode displays video from one camera at a time,
centering the image and making it as large as the screen allows.
The app also allows to display multiple live video streams
simultaneously.
The
•
•
•
following functions are available in the full screen mode only.
PTZ
Digital PTZ
Instant replay of live video (scrubbing)
Copyright © 2011-2012 DComplex LLC
11
Axxon Monitor
Digital PTZ
When video is displayed in the full screen mode, you can perform Digital
PTZ.
Use standard iPhone multi-touch gestures: pinch out and pinch in to
digitally zoom into the picture. Once the picture is zoomed in, you can
hold and slide your finger to digitally pan and tilt the image.
Toolbar
The toolbar automatically disappears after a few seconds of inactivity. To
display it again, simply tap the screen.
The toolbar has following buttons.
•
•
•
•
Add Camera. Tap it to access on-screen camera list.
PTZ. Tap it to Pan, Tilt or Zoom cameras.
Layout. Tap it to select the layout to display multiple cameras in
2x2, 3x3 or other camera matrix as needed.
Settings.
Copyright © 2011-2012 DComplex LLC
12
Axxon Monitor
Scrubbing Live Video
When video is displayed in the full screen mode, you can perform instant
replay.
Note the slider bar at the bottom. It gives you instant access to recently
displayed video. Scrub it to find the desired time.
When you are ready to switch to live video, tap the double arrow button
on the right side, or just tap the image to leave the full screen mode.
Copyright © 2011-2012 DComplex LLC
13
Axxon Monitor
Monitoring Multiple Cameras
Axxon Monitor app allows to monitor live video from up to 16 cameras
simultaneously on iPhone and iPod touch and up to 30 cameras on iPad.
Each cell that displays video has camera name at the top and the time
stamp at the bottom.
Changing Layout Template
Axxon Monitor app comes with multiple layout templates.
You can display video in 2x2 grid, 4x4 grid and etc.
To select active layout template tap the Layout button and then tap the
desired template.
The picture below shows the available templates at the bottom.
Copyright © 2011-2012 DComplex LLC
14
Axxon Monitor
Changing Camera Displaying Position
When Axxon Monitor is not in full-screen mode, you can change
displaying position of each camera.
For this, just hold a camera image and drag it to the desired position.
Copyright © 2011-2012 DComplex LLC
15
Axxon Monitor
Taking a Screenshot or E-mailing Image
When you hold your finger on an image for about one second, the Axxon
Monitor displays following on-screen menu.
This menu will be displayed regardless if the current mode is full-screen
or not.
•
•
•
•
•
Clear: stop displaying video from the camera
Settings: tap to configure a web server
Save Image: save the currently displayed image. To access the
image later, find it in the Photos app or synchronize your iPhone
device with iTunes.
Send Image: email the currently displayed image. The standard
email form will appear to allow you to add comments, title and
recipients.
Cancel: dismisses the menu.
Copyright © 2011-2012 DComplex LLC
16
Axxon Monitor
Adding Cameras Using On-screen Camera List
Any time when you see the main screen, you can add cameras for
displaying without leaving the main screen.
For this, tap the “Add” button on the toolbar. The app will display the row
of buttons, with one button for each web server.
Tap the web server of your choice. You will see the row of its cameras
above. The row of cameras might extend beyond the main screen. Use
the standard horizontal scrolling gestures to scroll the list of cameras.
You can add a camera in any of two following ways:
•
•
Tap a camera. It will be displayed in the first available cell. If no
cell is available it will be displayed in the first cell. All the currently
displayed cameras will be moved to make room for it.
Drag the camera to the place on the screen where you want it
displayed.
Copyright © 2011-2012 DComplex LLC
17
Axxon Monitor
Playing Back Recorded Video
How to Display Recorded Video
When you watch live video on the main screen and need to see what a
camera saw in the past, use the Search button of the toolbar.
If the app displays multiple cameras, then the first camera will be
automatically switched to the full screen mode.
The recorded video will be displayed in the full screen mode.
To search for video, just select the start time and duration of the video
segment you need.
Note: Digital PTZ functionality is available for recorded video as well. Use
standard multi-touch pinch out and pinch in gestures as needed.
Copyright © 2011-2012 DComplex LLC
18
Axxon Monitor
Using Scrubbing and Frame Step Controls
It might take a few minutes to download the video segment. The good
news is that you do not have to wait until the whole video segment is
downloaded. You can start watching recorded video and use the playback
controls instantly.
As video is being downloaded, all playback controls will work within the
downloaded portion.
You can pause, play, go to the next image and go to the previous image.
In order to get to the end, tap the double arrow at the right of the slider.
The slider allows you easily scrub through the video.
Copyright © 2011-2012 DComplex LLC
19
Axxon Monitor
Changing Time
If you need to display other video segment, tap the "Time" button on the
toolbar to select the time. You will see the same time selection screen.
When you are done with the search, tap the "Done" button in the toolbar
to return to the main screen.
Copyright © 2011-2012 DComplex LLC
20
Axxon Monitor
Other Axxon Monitor Features
E-mailing Technical Support
If you need help with the app, you can use in-app functionality to send
an email directly to Technical Support.
This is especially useful when the app generates error messages. The
most recent error messages will automatically be included in the email
for more efficient troubleshooting.
In order to access the details of the recent errors, open the Settings
screen by tapping the More button, if you are on the main screen. Or use
any other way to get to the Settings screen:
Now tap the Help button and then select Technical Support - email item.
The recent error details will automatically be added to the email.
Copyright © 2011-2012 DComplex LLC
21