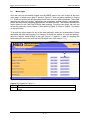
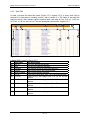
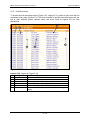
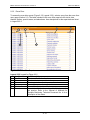
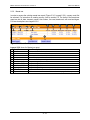
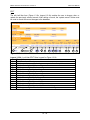
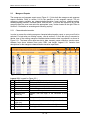
1
CONSERVATION AND SUSTAINABLE USE
OF THE
MESOAMERICAN BARRIER REEF SYSTEMS
PROJECT
(MBRS)
User Manual
for the
SAM / MBRS
Regional Environmental Information System
Volume I : Introduction
June 2005
Project Coordinating Unit
Coastal Resources Multi-Complex Building
Princess Margaret Drive
P.O. Box 93
Belize City Belize
Tel: (501) 223-3895; 223-4561
Fax: (501) 223-4513
Email: [email protected]
Website: http://www.mbrs.org.bz
MBRS Technical Document #13: Volume 1
REIS User Manual
CONTENTS
PAGE
1. Introduction
1
2. Database Design Process
2.1 Common Tables
2.2 Species List
2.3 Coral Reefs
2.4 Mangroves
2.5 Seagrasses
2.6 Marine Pollution
1
2
5
5
9
11
13
I-i
MBRS Technical Document #13: Volume 1
1.
REIS User Manual
INTRODUCTION
The Mesoamerican Barrier Reef System (MBRS) is the largest barrier reef system in the
Caribbean and the second largest reef system in the world. The primary goal of the MBRS
project is to enhance protection of these valuable ecosystems. Key to any protection strategy is
knowledge of the habitats and the various uses of those habitats. Management decisions need
to be based on information of the system. While there may be many efforts to monitor, study,
and manage individual portions of the MBRS a system wide overview of the information
available is essential for management of the MBRS as a whole unit. Collecting all of the
disparate information and compiling it into one easily accessible database is the goal of the
Regional Environmental Information System (REIS). The design of the database is based on
the information that is to be collected, or has been collected in the past.
The data are stored in PostgreSQL 7.3.2 on a Dell Server running Red Hat Linux Version 8.2.
Access to the data will be through a web interface running on Apache web server and using
PHP. This design is to allow easy data entry access and querying to researchers throughout
the 4 countries served by the MBRS Project.
The driving philosophy behind the database design was to have an efficient, normalized
database that would be easy to maintain and expand, as well as allow easy data entry and
access.
Based on this goal the database is set up to be accessed by web browsers over the internet.
The entire database is accessible through web pages that can be accessed via a link from the
MBRS website. These web pages have been tested with Internet Explorer, Netscape
Navigator, and Mozilla. Other web browsers should also work, however, some of the formatting
may not appear correctly.
2.
DATABASE DESIGN PROCESS
The first step in the database design was to analyze the data that would be collected and the
expected uses of the data.
For consistency, each data group is defined as a group of related data tables. Data from one or
more surveys may be included in a group. Analysis of the datasheets and data collection
methods identified several different data groups. The groups are:
Mangrove monitoring
Seagrass monitoring
Coral Reef Monitoring
Pollution monitoring
Oceanographic monitoring
Marine Protected Areas
The commonalities between the datasheets within each group where identified. These
commonalities would be in one table, to which all of the other tables in the group would be
linked. This would provide a connection between the various tables within a group.
I-1
MBRS Technical Document #13: Volume 1
REIS User Manual
To aid in the management of the data and tables, each table would have at least one field that
contained a unique identifier for that record, a field to identify who was doing the data entry, and
another field to track when the data was entered. In most cases these fields are hidden from
the user and are updated automatically by the system. This information is accessible by the
administrator for troubleshooting purposes. All values that require measurements such as
lengths, weights, temperature, salinity, etc are set up to allow only the precision at which the
parameter is measured. If the level of precision is unknown then it is set to 3 decimal places.
The following section will give a brief outline of the database design. Detailed descriptions for
all of the fields visible to the user are included in Chapter 1 Data Entry section of Volume 2 - 5 of
the manual. The overall design of the database is based on the information in the Manual of
Methods for the MBRS Synoptic Monitoring Program. The data forms in the manual where the
primary source material for designing the database, tables, and input forms. This information
was supplemented by interviews with MBRS staff, potential end users, and other personnel that
help create the Synoptic Monitoring Program (SMP) Manual.
The input forms are designed with the expectation that data would be entered into the database
from data sheets based on the data sheets in the SMP Manual. The user will collect the data in
the field and record the information on to the data sheets, as per the SMP Manual protocols.
These completed datasheets are then brought back to the office and the data is entered directly
from the data sheets into the web-based forms. Restrictions on values that can be entered and
whether duplicate values can be entered are based on the protocols of the SMP Manual.
2.1
Common Tables
There are a group of base tables that are used throughout the database. These tables are
common to some or most of the groups listed.
Site Table
At the highest level is the site information. The site table was created to store general
information for the site. This is one of the smallest tables, yet it provides a spatial reference to
all of the data in the database. In the event that a GIS system is used this table can be used as
a link between the locational information and the data. The system administrator enters the
data for the sites. All of the data entered by the users is linked back to this table, on the field
site_id. A brief description of the fields in the table are given in Table 1.3.1 in Volume 5 of the
manual.
Survey Table
One level down from the site table is the survey table. This table is linked to the site table via
the site_id value. This table is used across all of the groups and contains the detailed, survey
specific information such as time, date, sampler, weather conditions, lab providing analysis, etc.
This design allows the site information to be entered only once, regardless of how often a site is
visited during the course of the project. All of the specific data collection tables are linked to this
table through the transect table and the survey_id field. Survey_id is automatically added by
the database when a new survey record is entered. The survey table has one entry for each
separate dataset (i.e. point intercept benthic survey and benthic coral survey) every time a site
is surveyed. There is a one-to-many relationship between the site table and the survey table.
I-2
MBRS Technical Document #13: Volume 1
REIS User Manual
The various survey datasheets in the SMP Manual are each given their own table, and are
related back to the survey table. Multiple data sheets may relate back to one survey table
entry. With this design the user needs to enter the survey date, time, hydrologic, and
meteorological conditions only once for each survey.
Transect
The survey table records all of the information that is collected once per each site visit. In
addition to the survey information a table is needed to keep track of transects or plots at each
survey site. The information recorded for each transect or plot is usually limited to start times
and person. Therefore, a separate table was created for each transect or plot that serves as a
link between the detailed data collected and the survey record. An entry is required in this table
for every site or transect or plot that is completed. The system assigns each entry in this table a
unique number called transect_id. All of the datasheets link to this table on this number. Even
if there is only one sampling conducted for a site, and no transect or plots are used an entry is
still required in this table, with a transect number of 1. The water quality and pollution sampling
forms do not have an associated transect. They are linked directly to the survey table.
Person
The person table is a lookup table that provides an authoritative list of names of the people and
their agency that are registered to collect data for the project. This table is related to the
columns person_col and person_proc in survey table or person_col in transect table on
person_id. The list of names in the pull down menu for person collecting or person processing
is obtained from this table. Optionally this table could be expanded to include more information
for the individual than just the name and agency. This table is maintained by the database
administrator.
I-3
MBRS Technical Document #13: Volume 1
REIS User Manual
FIGURE 2.1 Entity relationship diagram of common tables.
I-4
MBRS Technical Document #13: Volume 1
2.2
REIS User Manual
Species List
Several tables are required to create an efficient species list. Since this database is being used
in several countries and in 2 languages, there could be a problem keeping track of common
names and threatened and endangered status of various species. The names and status
change from country to country, and may even be different within different regions of a country.
Therefore these features have been broken out into separate tables to accommodate the
potential variety. These tables are the basis for all the species names in the database. No
species name can be entered into any of the forms that is not present in this database.
Species
The species table is the basis of all the species information. At present it only contains the
scientific name (Genus and species), family, order, class and broad taxonomic classification
such as bird, fish, invertebrate, etc. It is hoped that it will be able to be expanded to
accommodate the full taxonomic information for each species. All of the forms that require
species names to be entered get the list of names from this table. The broad taxonomic
classification is used to restrict the selected list of species to what is appropriate for the form
being filled out. Therefore only coral species will be shown on the list for the coral forms, and
only fish species will be shown on the list for the adult fish forms. This table is maintained by
the database administrator. If species need to be added to the list, the species information
needs to be presented to the administrator. The administrator will then verify the information,
ensure that it does not already exist in the database, then enter the data for the species.
Local Names
The table localname provides the local common name for the species. This table is designed
to accommodate various local names based on countries or regions within a country. The
information in this table includes the common name, what country that common name is used
in, and if appropriate the region of the country. The local name is linked to the species table and
the scientific name based on the species_id. This table is maintained by the database
administrator.
Threatened and Endangered
The table tande identifies the threatened and endangered status of species. It includes the
national ranking for each country as well as the IUCN Red Book listing. The only species
included in this list are those that are listed as threatened or endangered in a country, or have
and IUCN Red Book listing of critically endangered, endangered, or vulnerable. It is designed to
accommodate different listing statuses based on country. This table is maintained by the
database administrator.
2.3
Coral Reefs
As with mangroves there are numerous tables that are related to data collected at coral reef
sites. The tables for site and survey are the same as for mangroves. Below are discussed the
tables specific for coral reefs. The following tables are in the coral reef monitoring group:
benthic, pointintercept, benthiclut, adult, recruit, rover, and manta. This is only a logical
I-5
MBRS Technical Document #13: Volume 1
REIS User Manual
assemblage of tables and is not physically set as an assemblage in the data structure. The
common links for all of these tables is the transect_id. Therefore this group can be easily
changed, by adding additional tables, or removing tables as needed. In all the tables that
require species name, a species_id is stored in the data table that is linked to the species table
identified above. This provides the flexibility of easily accommodating changes to the scientific
or common names, if necessary, in the future. It also eliminates the possibility of misspelling a
species name
Benthic Coral
The table benthic corresponds to the data form Benthic Data Entry Form in the SMP Manual.
This table records the information for the various corals found along the survey transect. The
table design has one row per coral record similar to the data entry form. In the SMP Manual the
data sheet has a column for disease in which a code is entered for the disease. The data table
uses nine columns for this information. There is a separate column for each type of disease.
These are Boolean fields, meaning that all they hold is a true or false value. If the coral has the
disease the box is checked and the value in the field is set to true. If the disease is not present
the box is left blank and the value in the field is blank.
Point Intercept
The pointintercept table corresponds to the data form “Point Intercept Transect Data Entry
Form” in the SMP Manual. The information in this table identifies the various types of substrate
on the transect. The identifier in this table is the column benthic_id. This is an ID number that
is linked to the table benthiclut which contains the names for the substrate. The input form,
however, allows the user to pick the substrate by name, and the user does not have to know the
benthic_id for each substrate. The information in this table is entered by transect, with the
transect number being recorded in the transect table. This table is linked to the transect table
on transect_id.
Benthiclut
This table is a lookup table with a list of all of the possible benthic components that would be
used in the point intercept data sheet. It is related to the pointintercept table on benthic_id.
This table is maintained by the database administrator.
Adult fish
The adult table records the information from the adult fish entry form. On the adult fish data
entry form in the SMP Manual there is a row for each species that is to be counted. However, in
the table only the species that were sighted and counted on the transect being surveyed are
entered. If a species on the data sheet does not have a count associated with it for that survey
and transect it is not entered into the table. As with all the other tables this table relates back to
the transect table on transect_id.
Fish Recruitment
The fish recruitment table recruit is similar to the adult table in that only the species that have
count information are entered into the database. A separate record in the transect table needs
to be created for each column on the datasheet. After entering a transect record users only
I-6
MBRS Technical Document #13: Volume 1
REIS User Manual
need to enter species and count information into this table. This table is linked to the transect
table on transect_id.
Rover Diver
The rover diver table rover is set up similar to the recruit table. Only species that are recorded
on the survey are entered into the database. This setup minimizes the size of the table and
allows for easy expansion of the species list that can be recorded in the table. Even though the
rover diver is not based on a transect, for compatibility with the other tables in the group, a
transect record still needs to be created before data can be entered into this table. The rover
table is linked to the transect table on transect_id.
Manta Tow
The data table manta is used for the data collected on the manta tow data form. This table is
set up to match the data form. Even though the manta tow is not done on a transect, for
compatibility with the other tables in the group an entry has to be made into the transect table
to be able to enter data into the manta table. The transect number in the transect table would
be 1. Within the manta table there cannot be two entries with the same tow number for each
transect.
The following page has the entity relationship diagram for corals and fish.
I-7
MBRS Technical Document #13: Volume 1
REIS User Manual
FIGURE 2.3 Entity relationship diagram for corals and fish
I-8
MBRS Technical Document #13: Volume 1
2.4
REIS User Manual
Mangroves
The following tables are in the mangrove monitoring group: zonation, structure, seedling,
seedlingbio, litter, interstitial. This is only a logical assemblage of tables and is not physically
set as an assemblage in the data structure. The common links for all of these tables is the
transect_id. Therefore this group can be easily changed, by adding additional tables, or
removing tables as needed. In all the tables that require species name, a species_id is stored
in the data table that is linked to the species table identified above. This provides the flexibility
of easily accommodating changes to the scientific or common names, if necessary, in the future.
It also eliminates the possibility of misspelling a species name
.
Forest structure
This data table is for recording the information for the forest structure. It is based on the forest
structure spreadsheet. However, instead of trunk length, the form takes height to first branch as
one of the fields. This was changed from the data sheet after consultation with several field
biologists, since it was determined that the measurement actually made in the field is height to
first branch. It is related to the transect table by the transect_id field. Since there may be
numerous plots at one site, there would be one transect_id record for each plot. There would
then be multiple entries in this table for each transect record. The value for transect_id is
automatically entered by the program.
Leaf Litter
The litter table is based on the leaf litter data entry form. This is one of the forms that requires a
start and end date. The start and end dates are entered in the survey table, and not in the
litter table. There are two different forms for leaf litter, the monthly litter fall entry form and the
surface litter entry from. This same table is used for both forms. For the surface litter entry form,
the start date and end date would be the same.
Other mangrove tables
The remaining four mangrove tables are used for recording the information from the Mangrove
structure seedling/sapling data entry sheet (seedling table), seedling biomass data entry sheet
(seedlingbio table), interstitial water data entry sheet (interstitial table), and mangrove
characterization/zonation data entry sheet (zonation table). These tables are related back to
the transect table with transect_id. There is one record in the transect table for each plot. The
setup of these tables is very similar to the paper data sheets and data entry is therefore almost
identical to the paper form.
The following page is a simplified entity-relationship diagram for mangroves.
I-9
MBRS Technical Document #13: Volume 1
REIS User Manual
Figure 2.4 Simplified entity-relationship diagram for mangroves
I - 10
MBRS Technical Document #13: Volume 1
2.5
REIS User Manual
Seagrasses
There are three tables associated with seagrasses, in addition to the site and survey tables.
Coral and fish surveys are typically done based on transect, whereas seagrass surveys are
based on quadrats or plots. The transect table is still used as the link between the seagrass
survey data sheets and the survey table.
Seagrass Biomass
The seagrass biomass table sgbiomass is based on the seagrass biomass entry form. There
is one record in the table for each core replicate taken. As with the seagrass growth table, a
record needs to be entered into the transect table for the seagrass biomass. If 2 stations are
sampled for each site, the entries in the transect table would represent the stations. None of
the calculated fields, such as Ratio A:B are stored in the table. These are all calculated by the
database, as required for view or printing reports, based on the input values.
Seagrass Growth
The sggrowth table contains the data from the Seagrass Growth Data entry form in the SMP
Manual. For this table the survey table should have a start date and end date. As with all other
tables this table is linked backed to the transect table with the transect_id. The quadrat number
for from the seagrass growth data sheet is recorded in this table and not in the transect table,
since there is only one set of data entered for each quadrat. An entry in the transect table is
still required for compatibility with other tables in the group. The transect table links the
sggrowth table back to the survey table. The transect number given in the transect table
should be 1. None of the calculated values such as areal productivity, turnover, or biomass of
the plants are stored in the data table. These are all calculated by the database, as required for
view or printing reports, based on the input values.
Seagrass Leaf Area Index
The seagrass leaf area index table sglai is used to store the information from the leaf area
index form. This table is linked back to the survey table through the transect table. There
should be one entry in the transect table for each quadrat that is sampled. The sglai table has
one record for each leaf that is measured. The area for each leaf is not entered. This value is
calculated by the database.
The following page has the entity relationship diagram for seagrasses.
I - 11
MBRS Technical Document #13: Volume 1
REIS User Manual
FIGURE 2.5 Entity relationship diagram for seagrasses
I - 12
MBRS Technical Document #13: Volume 1
2.6
REIS User Manual
Marine Pollution
The data collected for water quality and marine pollution are not connected with any transects,
plots, or quadrats so the transect table is not used for these forms. The water quality
information is expected to be completed for every survey that is conducted whether it is a coral
reef, mangrove, seagrass, or marine pollution survey. Each team that goes out in the field is
expected to take one of the MBRS projects mulitparameters sondes with them to measure the
water quality parameters.
Marine Pollution
The marine pollution table pollution corresponds to the Marine Pollution Samples data entry
form. This form is used to identify what samples were collected for pollution analysis, and
where they were collected. This table is linked to the survey table on survey_id. Survey_id is
entered and maintained by the system. The table closely resembles the data form so the user
can easily enter data from the form directly into the table. The table has an additional item,
sample_id that is not on the data sheet in the SMP Manual. This should be the same value that
is written on the sample jar. The sampleid is used to relate the lab analysis of the sample to the
location at which it was collected. The values for sample_id should be unique for each site
survey.
Water Quality
The water quality table, quality, is designed to maintain the results from the testing of water
samples. This table is linked to the survey table on survey_id. There should be at least one
record in this table for every entry in the survey table. Most of the data in this form is collected
by a multiparameter sonde. Therefore it is expected that there will be records for multiple
depths at the sampling sites. The multiparamater sonde should be able to collect the
information for all of the columns in this table except for ammonia, phosphate, nitrites, nitrates,
total coliform, and fecal coliform.
Pollution Analysis
The pollution analysis table, analysis, is designed to maintain the results from the laboratory
analysis of the sediment and organism samples collected. This table is linked to the pollution
table on the sample_id field. Therefore it is important that the sample_id field is accurate and
unique for each sample.
The following page has the entity relationship diagram for pollution and water quality.
I - 13
MBRS Technical Document #13: Volume 1
REIS User Manual
FIGURE 2.6 Entity relationship diagram for pollution and water quality
I - 14
CONSERVATION AND SUSTAINABLE USE
OF THE
MESOAMERICAN BARRIER REEF SYSTEMS
PROJECT
(MBRS)
User Manual
for the
SAM / MBRS
Regional Environmental Information System
Volume II : Coral Reef Ecology
June 2005
Project Coordinating Unit
Coastal Resources Multi-Complex Building
Princess Margaret Drive
P.O. Box 93
Belize City Belize
Tel: (501) 223-3895; 223-4561
Fax: (501) 223-4513
Email: [email protected]
Website: http://www.mbrs.org.bz
MBRS Technical Document #13: Volume 2
REIS User Manual
CONTENTS
Page
1. Data Entry
1.1 Login/Menu Pages
1.1.1 Coral and Fish Forms Menu
1
2
4
1.2 Survey and Transect Forms
1.2.1 Entering Survey Data
1.2.2 Editing Survey Data
1.2.3 Survey List
1.2.4 Transect Data
5
6
7
8
10
1.3 Coral and Fish Forms
1.3.1 Benthic Coral
1.3.2 Point Intercept
1.3.3 Adult Fish
1.3.4 Fish Recruitment
1.3.5 Rover Diver
1.3.6 Manta Tow
12
12
15
18
21
24
27
2. Reports
2.1 Menu Pages
2.1.1 Coral and Fish Reports
30
31
32
2.2 Query Page
33
2.3 Coral and Fish Reports
2.3.1 Benthic Coral
2.3.2 Point Intercept
2.3.3 Adult Fish
2.3.4 Fish Recruitment
2.3.5 Rover Diver
2.3.6 Manta Tow
38
38
39
40
41
42
43
II - i
MBRS Technical Document #13: Volume 2
1
REIS User Manual
DATA ENTRY
This chapter is designed to provide the user with step-by-step instructions necessary for
entering the field data into the database via web-based data entry forms. To enhance this user
guide, the brief explanation for each data entry form includes an introduction, objective,
structure, item descriptions, legend, screenshots, and any other information deemed useful to
the user. For each data entry form several elements, primarily those for navigation, remain the
same. Those elements are shown in Figure 1.0 and described in Legend 1.0. The items
identified in Figure 1.0 will not be identified on any subsequent pages.
Note: The screenshots used in this chapter, were created from a temporary database and the
data shown in the screenshots should not be considered applicable to the MBRS project. There
may be differences between the actual online form and the screenshots in this manual.
A
C
B
Figure 1.0. Basic elements for each data entry page.
Legend 1.0. Legend for Figure 1.0
Description
Indicates the name of the person currently logged into the REIS private
A
database.
This button will log the user out of the REIS private database.
B
This section serves as a navigation aid to what page the user is accessing, as
C
well as links to previous levels.
II - 1
MBRS Technical Document #13: Volume 2
1.1
REIS User Manual
Login/Menu Pages
When first accessing the system the user will be presented with a login page as shown in Figure
1.1a with navigation explained in Legend 1.1a. The users’ login name and password are
provided to the user by the MBRS database administrator. To access the site the user must
have cookies and Java enabled on their browser.
A
B
C
Figure 1.1a. User login page.
Legend 1.1a. Legend for Figure 1.1a
Description
This is where the user enters the login name provided by the MBRS database
A
administrator.
This is where the user enters the password provided by the MBRS database
B
administrator.
This submits the login and if valid connects the user to the menu page.
C
II - 2
MBRS Technical Document #13: Volume 2
REIS User Manual
Once the user has successfully logged onto the MBRS system, the user is taken to the main
menu page. A sample menu page is shown in Figure 1.1b with navigation explained in Legend
1.1b. There are seven main thematic areas found within this REIS database. These thematic
areas are coral reef ecology, mangroves and seagrasses, marine pollution, oceanography,
marine protected areas, spawning aggregations, and administration. This chapter discusses the
input forms for the Coral Reef Ecology thematic area. From this menu page, the user can
access the data entry forms (Chapter 1) and reports (Chapter 2). Refer to chapter 2 for report
details.
To access the data entry forms for any of the thematic areas, select the
button
associated with that thematic area. For example, to access the thematic area ‘coral reef
button directly to the right (Figure 1.1b, Legend 1.1b, label A).
ecology’, select the
Selecting this button takes the user to the coral reef and fish forms menu (See section 1.1.1).
A
B
C
D
E
F
G
Figure 1.1b. Menu form.
Legend 1.1b. Legend for Figure 1.1b
Description
Menu of coral reef ecology data entry forms.
A
Menu of mangrove and seagrass data entry forms.
B
Menu of marine pollution and oceanography data entry forms.
C
Menu of oceanography data entry forms. (Not yet implemented)
D
Menu of marine protected areas data entry forms. (Not yet implemented)
E
Menu of spawning aggregation data entry forms. (Not yet implemented)
F
Menu of administration data entry forms. (Must have administrative privileges.)
G
II - 3
MBRS Technical Document #13: Volume 2
1.1.1
REIS User Manual
Coral and Fish forms Menu
There are six different coral and fish data entry forms (Figure 1.1.1, Legend 1.1.1). These are
manta tow, adult fish, fish recruitment, rover diver, point intercept, and benthic coral. To begin
entering coral and fish survey data, the user must select either the
or
button. All of the monitoring data is linked to the survey information. Therefore a record must
be entered into the survey table before any monitoring data can be added. To enter a new
survey for a specific data set (i.e. adult fish, rover diver, benthic coral, etc) select the
button to the right of that form title. For details on how to enter a new survey and select an
existing survey, refer to section 1.2 of this user manual. If a survey has already been entered
button. A user
into the database, those surveys are accessed through the
would need to go to an existing survey, if there was more monitoring data to be entered for that
survey, or a mistake was made in the original data entry for the survey record and the user has
to correct it.
A
B
Figure 1.1.1. Coral and fish forms Menu
Legend 1.1.1. Legend for Figure 1.1.1.
Description
This column of buttons connects the user to the new survey entry form for the
A
dataset listed.
This column of buttons connects the user to the existing surveys for the
B
dataset listed.
II - 4
MBRS Technical Document #13: Volume 2
REIS User Manual
1.2 Survey and Transect Forms
The following procedures apply to the Coral and Fish forms (Section 1.3). This section provides
instructions on how to get through this procedure to access the data entry forms. In all of the
data entry forms required fields are marked with an asterisk.
The objective of the survey forms is to record the detailed sampling information that describes
the physical conditions at the time of the survey and other information describing the survey
itself. The survey items are listed and discussed in Table 1.2. There is one survey record for
each site visit, for each set of data collected.
Table 1.2. Survey Item Descriptions
Item Name
Required Item Description
Site ID
Yes
Site ID is an identifier used to relate information from
the survey table to the site table.
Person Collecting Yes
The name of the individual conducting the survey in the
field.
Person
The name of the individual processing the samples in
Processing
the lab.
Tide
Yes
The tidal stage at the time of the sampling. The valid
values are low, high, falling, and rising. Refer to the
“Manual of Methods for Synoptic Monitoring Technical
Document No. 4” for a description of the tidal stages.
Cloud Cover (0-8)
The cloud cover in eighths of sky covered (0-8) at the
time of the sampling. Refer to the “Manual of Methods
for Synoptic Monitoring Technical Document No. 4” for
a description of values 0 through 8.
Current Speed
The water current speed at the time of sampling
Start Date
Yes
Either the beginning date of a timed sampling, such as
(MM/DDMYY)
leaf litter or seagrass growth, or the date of sampling.
End Date
The end date of a timed sampling, such as leaf litter or
(MM/DDMYY)
seagrass growth.
Start Time
Yes
Time at which sampling was started.
(HH:MM)
Sea State
Yes
The sea state at the time of the sampling. The valid
values are calm, slight, moderate, and rough. Refer to
the “Manual of Methods for Synoptic Monitoring
Technical Document No. 4” for a description of valid
values.
Air Temp (°C)
The air temperature at the time of sampling.
Wind
The estimated wind speed at the time of sampling.
Secchi At Marking
The secchi value at the time of the first visit to the site.
This is used only for the seagrass growth surveys.
Secchi At
The secchi value at the time of the last visit to the site.
Collection
This is used only for the seagrass growth surveys.
Current Direction
The direction of the water current at the time of
sampling.
II - 5
MBRS Technical Document #13: Volume 2
1.2.1
REIS User Manual
Entering Survey data
To enter a new survey for a thematic area, select the
button (i.e. Coral
forms>Benthic data Figure 1.1.1, Legend 1.1.1, Letter A), found on the forms menu for that
thematic area (Figure 1.2.1, Legend 1.2.1). Note: One site may have multiple surveys. A survey
record needs to be completed for each type of survey being conducted (i.e. point intercept and
benthic coral) at a site. After the survey data has been entered the user will be taken to the
Survey List page (Section 1.2.3).
A
B
G
C
H
L
N
M
I
D
E
P
J
K
F
O
Figure 1.2.1. Survey data entry form.
Q
Legend 1.2.1. Survey entry data: Legend for Figure 1.2.1
Description
A
Select a site ID from the pull down menu
B
Select the name of the person who collected the data from the pull down
menu
C
Select the name of the person who processed the data in the lab. This is to be
left blank if no laboratory analysis was done.
D
Select the wind speed at the time of sampling from the pull down menu.
E
Enter a value 0-8 for the cloud cover present at the time of the sampling.
F
Enter the water current speed. This is an optional field.
G
Enter the date of the sampling or the start date for a timed interval sampling
such as seagrass growth or leaf litter.
H
Enter the end date of the sampling. This will be the same as the start date
unless it is a timed interval sampling such as seagrass growth or leaf litter.
I
Select a value from the pull down menu that represents the sea state at the
time of the sampling.
J
Enter the secchi value at the time of marking the seagrasses. (For seagrass
growth surveys only.)
K
Enter the direction of the water current at the time of sampling
L
Enter the time sampling started for the survey.
M
Select the tidal stage, at the time of the survey, from the pull down menu.
N
Enter the air temperature at the time of sampling
O
Enter the secchi value at the time of collecting the seagrasses. (For seagrass
growth surveys only.)
P
Select this button to insert this data into the database. This will take the user
to the survey information form (Figure 1.2.3a).
Q
Use the cancel button to clear the form without entering the data into the
database
II - 6
MBRS Technical Document #13: Volume 2
1.2.2
REIS User Manual
Editing Survey data
Use the survey edit form (Figure 1.2.2, Legend 1.2.2) to alter existing survey data. Existing
survey data should be altered only if there was an error in the original data entry for the survey,
or if there was missing data in the original form. The existing values will show up in the field
when the edit form is opened. The survey data edit form is accessed from within a thematic
area (i.e. Coral forms>Adult fish> existing survey> select site id> Edit; see Figure 1.3.3a,
Legend 1.3.3a, Letter J). The items and item descriptions for the edit survey form are listed in
Table 1.2.
A
B
G
C
L
H
I
E
D
N
M
J
K
F
Q
P
O
Figure 1.2.2. Survey edit form.
Legend 1.2.2. Edit Survey Data: Legend for Figure 1.2.2
Description
The site ID cannot be changed during the edit procedure
A
Edit the name of the person who collected the data from the pull down menu. If
B
you do not want to change the person, leave this as “no change”.
Edit the name of the person who is processing the data. If you do not want to
C
change the person, leave this as “no change”.
Edit the wind speed at the time of sampling
D
Edit the cloud cover present at the time of the sampling.
E
Edit the water current speed
F
Edit the start date of the sampling
G
Edit the end date of the sampling
H
Edit the sea state at the time of the sampling.
I
Edit the secchi value at the time of marking the seagrass.
J
Edit the direction of the water current at the time of sampling
K
Edit start the time of the first sampling
L
Edit the tidal stage at the time the data was collected
M
Edit the air temperature at the time of sampling
N
Edit the secchi value at the time of seagrass collection.
O
Select this button to update this edited data in the database
P
Use the “Cancel” button to cancel the editing and return to the previous page.
Q
II - 7
MBRS Technical Document #13: Volume 2
1.2.3
REIS User Manual
Survey List
The Survey List page (Figure 1.2.3a, Legend 1.2.3a) lists all of the surveys for the site shown
for the dataset that was originally selected. From this list the user can add or edit survey data,
refer to section 1.2.1 or section 1.2.2. Otherwise, select the survey to add data by selecting the
button (Figure 1.2.3a, Legend 1.2.3a, Letter L). This will take the user to the transect
page.
A
B
F
G
H
I
D
C
J
K
L
E
M
N
Figure 1.2.3a. List of available surveys.
Legend 1.2.3a. Legend for figure 1.2.3a
Description
The site ID
A
The location of the site
B
The ecosystem
C
The habitat type
D
The country in which the site is located.
E
Select to add a new survey to this site
F
The site ID
G
The survey ID. This is displayed for reference purposes only.
H
The start date.
I
The start time.
J
The person who collected the data.
K
Select this button to go to the transect form for this survey (i.e. Benthic coral
L
data)
Select this button to edit the survey information
M
Select this button to add water quality records to this survey.
N
Select this button to delete this survey
O
II - 8
O
MBRS Technical Document #13: Volume 2
REIS User Manual
If the
button was used at the thematic area menu an intermediate form (Figure
1.2.3b, Legend 1.2.3b) will be brought up, from which the user selects a site to add the data to.
If the user does not know the site id, then all of the surveys for that thematic area can be listed
by clicking on
Legend 1.2.3a).
. Once the site is selected, the survey list page is shown (Figure 1.2.3a,
A
B
Figure 1.2.3b. Intermediate form.
Legend 1.2.3b. Legend for Figure 1.2.3b
Description
Select an existing site from the pull down menu.
A
Select all survey records for the current thematic area
B
II - 9
MBRS Technical Document #13: Volume 2
1.2.4
REIS User Manual
Transect Data
The transect form (Figure 1.2.4, Legend 1.2.4) is used to identify only transect specific
information such as transect or plot number, person surveying the transect or plot, and in the
case of coral reefs the start and end depths of the transect. The transect items are listed and
discussed in Table 1.2.4.
Table 1.2.4 Transect Item Descriptions
Item Name
Required Item Description
Transect No
Yes
The transect or plot number associated with the
sampling. It is possible to have multiple transects per
station per day. Note: To enter multiple transects per
day, complete this form for each transect associated
with this survey site.
Person Collecting Yes
The name of the individual conducting the survey in the
field.
Start Time
Time at which sampling was started.
(HH:MM)
Start Depth (m)
The water depth in meters at the start of the coral
transect. This field is only used for coral transects
Stop Depth (m)
The water depth in meters at the end of the coral
transect. This field is only used for coral transects.
Bearing (0-360)
Heading in degrees from north of the transect line from
the shoreline. Used for mangrove forest zonation.
II - 10
MBRS Technical Document #13: Volume 2
REIS User Manual
If the appropriate transect is listed, use the
button to access the data form. If not listed
then add a new transect in the bottom line of the form. The new transect must be inserted
before a data entry form based on that transect can be accessed. The select button on the
transect form will take the user to the data entry form (i.e. Figure 1.3.2a).
A
C
B
D
E
F
G
H
K
J
Figure 1.2.4. Transect data entry form.
Legend 1.2.4. Transect Data Entry: Legend for 1.2.4.
Description
Enter the transect or plot number.
A
Select the name of the person who collected the data from the pull down
B
menu. This may be the same person that was entered in the survey form.
Enter the time the transect survey was started.
C
Enter the depth at the start of the transect. This is used only for benthic coral.
D
Enter the depth at the end of the transect. This is used only for benthic coral.
E
Enter the transect bearing. Used for mangrove forest zonation.
F
Use the select button to access the data entry form.
G
Use the edit button to edit the transect record.
H
Use the delete button to delete the transect record.
I
Use insert record to insert the data into the table. When a new transect is
J
entered it must be inserted before a data entry page based on the transect
can be selected.
Use the “Return to Site Page” button to clear the fields and return to the site
K
page listing all of the surveys.
II - 11
I
MBRS Technical Document #13: Volume 2
REIS User Manual
1.3 Coral and Fish Forms
The coral and fish forms menu (Figure 1.1.1) list all the coral and fish forms available for data
entry. Continuing from Section 1.1.1, the six coral and fish data entry forms are manta tow, adult
fish, fish recruitment, rover diver, point intercept, and benthic coral. To access any of the coral
or fish data entry forms, the user must select the either the
Then follow the steps outlined in section 1.2.
1.3.1
or
button.
Benthic coral
The purpose of the benthic data forms are to enter coral data that was collected along the
transects during the field sampling. The items in the benthic data table are species ID, species
name, diameter, height, old dead, new dead, BB, WB, WPII, YP, DSI, DSII, RB, ASP, OTH, and
bleached. Refer to Table 1.3.1 for item descriptions.
Table 1.3.1. Benthic Coral Items Descriptions.
Item Name Required Item Description
Species ID
Yes
A unique ID for the coral species being entered into the
database.
This field does not allow data entry. It is
automatically updated with entry of the scientific name.
Species
Yes
The name of the coral species
Name
Diameter
Yes
The diameter of the coral head being measured
(cm)
Height (cm) Yes
The height of the coral head being measured
Old Dead
Yes
The percent (0-100) of the coral that has been long dead.
(%)
New Dead
Yes
The percentage (0-100) of the coral that has recently died.
(%)
BB
The code for black band disease found on the coral.
WB
The code for white band disease found on the coral.
WPII
The code for white plague II disease found on the coral.
YB
The code for yellow blotch disease found on the coral.
DSI
The code for dark spots I disease found on the coral.
DSII
The code for dark spots II disease found on the coral.
RB
The code for red band disease found on the coral.
ASP
The code for aspogikosis disease found on the coral.
OTH
The code for other diseases found on the coral.
Bleached
A code for the level of coral bleaching present.
II - 12
MBRS Technical Document #13: Volume 2
REIS User Manual
ADD
The benthic coral data entry form enables the user to add new records to the benthic coral
table. Once the correct data is entered into the boxes, use the “insert record” button to enter this
data into the database. Unless the “insert record” button is used, the data will not be entered
into the database. When the user has finished inputting records into the table, select the
button to return to the list of surveys (Figure 1.2.3a).
B
A
C
E
D
G
F
I
H
K
J
M
L
N
O
Figure 1.3.1a. Benthic coral ADD data form.
Legend 1.3.1a. Benthic Coral ADD Data: Legend for Figure 1.3.6a
Description
Select
the species name of the coral identified along the transect.
A
B Enter the diameter (cm) of the coral species (Letter A) that was identified.
C Enter the height (cm) of the coral species (Letter A) that was identified.
D Enter the percent of dead coral species (Letter A) that was identified.
E Enter the percent of new dead coral species (Letter A) that was identified.
F Click on the BB box if black band disease is present. Refer to the “Manual of Methods for
G
H
I
J
K
L
M
N
O
Synoptic Monitoring Technical Document No. 4 for description of the disease type codes.
Click on the WB box if white band disease is present. Refer to the “Manual of Methods for
Synoptic Monitoring Technical Document No. 4 for description of the disease type codes.
Click on the WPII box if white plague II disease is present. Refer to the “Manual of Methods
for Synoptic Monitoring Technical Document No. 4 for description of the disease type codes.
Click on the YB box if yellow band disease is present. Refer to the “Manual of Methods for
Synoptic Monitoring Technical Document No. 4 for description of the disease.
Click on the DSI box if dark spots I disease is present. Refer to the “Manual of Methods for
Synoptic Monitoring Technical Document No. 4 for description of the disease.
Click on the DSII box if dark spots II disease is present. Refer to the “Manual of Methods for
Synoptic Monitoring Technical Document No. 4 for description of the disease.
Click on the RB box if red band disease is present. Refer to the “Manual of Methods for
Synoptic Monitoring Technical Document No. 4 for description of the disease.
Click on the ASP box if aspogikosis disease is present. Refer to the “Manual of Methods for
Synoptic Monitoring Technical Document No. 4 for description of the disease.
Click on the OTH box if other diseases are present. Refer to the “Manual of Methods for
Synoptic Monitoring Technical Document No. 4 for description of the disease.
Select the level of bleaching from the pull down menu. Refer to the “Manual of Methods for
Synoptic Monitoring Technical Document No. 4 for description of the bleaching levels.
II - 13
MBRS Technical Document #13: Volume 2
REIS User Manual
EDIT
To edit the data in the benthic coral table, use the edit benthic coral form (Figure 1.3.1b, Legend
1.3.1b). Once the changes have been made, select the “update record” button to commit the
edit to the database.
D
A
B
C
F
N
H
E
G
J
I
L
K
M
O
Figure 1.3.1b. Benthic coral data EDIT form.
Legend 1.3.1b. Benthic Coral EDIT Data: Legend for Figure 1.3.1b
Description
Edit the species name by selecting a new name from the pull down menu.
A
Edit the diameter (cm) of the coral identified along the transect
B
Edit the height (cm) of the coral identified along the transect.
C
Edit the percentage of dead coral found along the transect
D
Edit the percentage of newly dead coral found along the transect
E
Click on the BB box if black band disease is present. Refer to the “Manual of Methods for
F
G
H
I
J
K
L
M
N
O
Synoptic Monitoring Technical Document No. 4 for description of the disease type codes.
Click on the WB box if white band disease is present. Refer to the “Manual of Methods for
Synoptic Monitoring Technical Document No. 4 for description of the disease type codes.
Click on the WPII box if white plague II disease is present. Refer to the “Manual of
Methods for Synoptic Monitoring Technical Document No. 4 for description of the disease
type codes.
Click on the YB box if yellow band disease is present. Refer to the “Manual of Methods for
Synoptic Monitoring Technical Document No. 4 for description of the disease.
Click on the DSI box if dark spots I disease is present. Refer to the “Manual of Methods
for Synoptic Monitoring Technical Document No. 4 for description of the disease.
Click on the DSII box if dark spots II disease is present. Refer to the “Manual of Methods
for Synoptic Monitoring Technical Document No. 4 for description of the disease.
Click on the RB box if red band disease is present. Refer to the “Manual of Methods for
Synoptic Monitoring Technical Document No. 4 for description of the disease.
Click on the ASP box if aspogikosis disease is present. Refer to the “Manual of Methods
for Synoptic Monitoring Technical Document No. 4 for description of the disease.
Click on the OTH box if other diseases are present. Refer to the “Manual of Methods for
Synoptic Monitoring Technical Document No. 4 for description of the disease.
Select a new level of bleaching from the pull down menu.
II - 14
MBRS Technical Document #13: Volume 2
1.3.2
REIS User Manual
Point Intercept
The point intercept transect data entry forms are used to enter the types of substrate identified
on the transect. There are several differences between the field data sheets and the online
forms. On the field data sheet, multiple transects could be recorded side-by-side. When using
the web-based data entry forms, only one transect can be entered at a time. The field data
sheet also lists each of the possible benthic types to be identified during the field collection
whereas the online data entry form enables the user to select and enter data for only those
types that were counted during the survey. The items in the point intercept table (Table 1.3.2)
are benthic ID, benthic type, count, and comments.
Table 1.3.2. Point Intercept Items Descriptions
Item Name
Required Item Description
Benthic ID
Yes
A unique ID to represent the benthic type. This field does
not allow data entry. It is automatically updated with entry of
the benthic type.
Benthic Type Yes
A pull down menu of possible benthic types
Count
Yes
The number of occurrences for the benthic type identified
along the transect
Comments
A comments field without restrictions. Use this field to
record observations made for the benthic component or
transect.
II - 15
MBRS Technical Document #13: Volume 2
REIS User Manual
ADD
The point intercept form (Figure 1.3.2a, Legend 1.3.2a) enables the user to add records to the
point intercept table. Once the correct data is entered into the boxes, use the “insert record”
button to enter this data into the database. Unless the “insert record” button is used, the data
will not be entered into the database. When the user has finished inputting records into the
table, select the
button to return to the list of surveys (Figure 1.2.3a).
B
C
A
Figure 1.3.2a. Point Intercept ADD data form.
Legend 1.3.2a. Point Intercept ADD Data: Legend for Figure 1.3.5a.
Description
Select the benthic type from the pull down list.
A
Enter the count of the benthic type identified in letter A along the transect
B
Enter any additional comments taken during the transect.
C
II - 16
MBRS Technical Document #13: Volume 2
REIS User Manual
EDIT
Use the point intercept edit data form (Figure 1.3.2b, Legend 1.3.2b) to alter the records in the
point intercept table. Once the data has been changed, the “update record” button must be
selected to ensure the changes have been made to the database.
B
A
C
Figure 1.3.2b. Point Intercept data EDIT data form.
Legend 1.3.2b. Point Intercept EDIT Data: Legend for Figure 1.3.2b
Description
Edit the benthic type by selecting a new benthic type from the pull down
A
menu.
Edit the count of the benthic type in letter A, identified along the transect
B
Edit the text in the comments field.
C
II - 17
MBRS Technical Document #13: Volume 2
1.3.3
REIS User Manual
Adult fish
The adult data entry form enables the user to insert and edit the adult fish data collected in the
field into the database. The online data forms are different than the field data sheet from which
data are being entered. The field data sheet lists both the family and scientific names of the fish
species. You will notice that only the scientific names of the fish are on the online data entry
form. The field data sheet lists each of the possible species to be identified during the field
collection whereas the online data entry form enables the user to select and enter data for only
those species that were present at the time of the survey. The items in adult fish table are
described in Table 1.3.3.
Table 1.3.3. Adult Fish Items Descriptions.
Item Name Required Item Description
Species ID Yes
A unique ID of the species name. This field does not require
data entry. It is automatically updated with entry of the
scientific name.
Species
Yes
The scientific name of adult fish species. There cannot be 2
Name
entries with the same scientific name on the same transect.
0-5 cm
The count of adult fish in size range 0 to 5 cm
6-10 cm
The count of adult fish in size range 6 to 10 cm
11-20 cm
The count of adult fish in size range 11 to 20 cm
21-30 cm
The count of adult fish in size range 21 to 30 cm
31-40 cm
The count of adult fish in size range 31 to 40 cm
>40 cm
The count of adult fish that are larger than 41 cm in length
II - 18
MBRS Technical Document #13: Volume 2
REIS User Manual
ADD
To add a new record to the adult fish table, use the data entry boxes (Figure 1.3.3a, Legend
1.3.3a, Letters A-B, D-I). Once the correct data is entered into these boxes, use the “insert
record” button to enter this data into the database. Unless the “insert record” button is used, the
data will not be entered into the database. When the user has finished inputting records into the
table, select the
button to return to the list of surveys (1.2.3a).
B
D
F
H
E
A
C
G
I
J
Figure 1.3.3a. Adult fish ADD data form.
Legend 1.3.3a. Adult Fish ADD Data Form: Legend for Figure 1.3.3a.
Description
Displays the species ID associated with the species name.
A
Select the name of the species from the pull down menu. You cannot enter the
B
same scientific name twice in the same transect.
Returns to the survey list (Figure 1.2.3a)
C
Enter the count of the adult fish species (Letter B) that were identified as less
D
than 5 cm in length
Enter the count of the adult fish species (Letter B) that were identified as 6 to10
E
cm in length
Enter the count of the adult fish species (Letter B) that were identified as 11 to
F
20 cm in length
Enter the count of the adult fish species (Letter B) that were identified as 21 to
G
30 cm in length
Enter the count of the adult fish species (Letter B) that were identified as 31 to
H
40 cm in length
Enter the count of the adult fish species (Letter B) that were identified as greater
I
than 40 cm in length
Edit the row of data for a species
J
Delete a row of data for a species from the database
K
II - 19
K
MBRS Technical Document #13: Volume 2
REIS User Manual
EDIT
The edit adult fish data form (Figure 1.3.3b Legend 1.3.3b) enables the user to change, alter, or
update the previously entered records in the adult fish data table. After editing a species, select
the “update record” button to update the database with the new changes; otherwise, the edits
will be discarded.
Important note: only one fish species can be edited at a time. After each row of edits is entered
into the data entry boxes, ”update record“ (Legend 1.3.3b, Figure 1.3.3b) must be used to make
this update in the database. If edits are made to a row without using the update record, the edit
changes will not be made. The updated record will appear at the bottom of the record list.
D
B
A
C
E
F
G
Figure 1.3.3b. Adult fish EDIT data form.
Legend 1.3.3b. Adult Fish EDIT Data: Legend for Figure 1.3.3b.
Description
Edit the species name by selecting the new species from the pull down menu.
A
Edit the count of the adult fish species (Letter A) that were identified as less
B
than 5 cm in length
Edit the count of the adult fish species (Letter A) that were identified as 6 to10
C
cm in length
Edit the count of the adult fish species (Letter A) that were identified as 11 to 20
D
cm in length
Edit the count of the adult fish species (Letter A) that were identified as 21 to 30
E
cm in length
Edit the count of the adult fish species (Letter A) that were identified as 31 to 40
F
cm in length
Edit the count of the adult fish species (Letter A) that were identified as greater
G
than 40 cm in length
II - 20
MBRS Technical Document #13: Volume 2
1.3.4
REIS User Manual
Fish Recruitment
The fish recruitment data entry forms enable the user to enter and edit the relevant fish
recruitment monitoring data. Use these forms to enter the count of fish recruitment by species
that is below the max TL (cm). The values for the max TL (cm) are not provided on the webbased data entry form; refer to the field data sheet for the max TL (cm) per species. Refer to
Table 1.3.4 for item descriptions of the fields in the fish recruitment forms. The fish recruitment
forms differ slightly from the field data sheets taken into the field. On the field data sheet, both
the species name and common name of fishes are listed. The web-based data entry forms
includes the fish species name and does not include the common name. The field data sheet
lists each of the possible species to be identified during the field collection whereas the online
data entry form enables the user to select and enter data for only those species that were
present at the time of the survey.
Table 1.3.4. Fish Recruitment Items Descriptions.
Item Name Required Item Description
Species ID Yes
A unique ID of the species name. This field does not require
data entry. It is automatically updated with entry of the
scientific name.
Species
Yes
The scientific name of fish species.
Name
Fish Count Yes
The number of fish below the maxTL (cm). For an
explanation of max TL (cm) refer to the “Manual of Methods
for Synoptic Monitoring Technical Document No. 4”
II - 21
MBRS Technical Document #13: Volume 2
REIS User Manual
ADD
To add a new record to the fish recruitment table, use the fish recruitment data entry form
(Figure 1.3.4a, Legend 1.3.4a). Once the new data is entered into these boxes, use the “insert
record” button to commit this data into the database. Unless the “insert record” button is used,
the data will not be entered into the database. When the user has finished inputting records into
the table, select the
button to return to the list of surveys (Figure 1.2.3a).
B
A
Figure 1.3.4a. Fish recruitment ADD data form.
Legend 1.3.4a. Fish Recruitment ADD Data: Legend for Figure 1.3.4a
Description
Select the name of the species to add to the fish recruitment table using the pull
A
down menu.
Enter the count of fish species below the max TL (cm)
B
II - 22
MBRS Technical Document #13: Volume 2
REIS User Manual
EDIT
The edit fish recruitment data form (Figure 1.3.4b, Legend 1.3.4b) enables the user to change,
alter, or update the previously entered fish recruitment records. After editing a record, the
“update record” button must be used to commit the record changes to the database; otherwise,
the edits will be discarded.
B
A
Figure 1.3.4b. Fish recruitment EDIT data form.
Legend 1.3.4b. Fish Recruitment EDIT data: Legend for Figure 1.3.4b
Description
Edit the species name by selecting a new species from the pull down menu
A
Edit the count of fish species below the max TL (cm)
B
II - 23
MBRS Technical Document #13: Volume 2
1.3.5
REIS User Manual
Rover Diver
Use the rover diver forms to enter and edit the records in the rover diver table. The items in the
rover diver table are species ID, species name, and abundance. For item descriptions, refer to
Table 1.3.5. The web-based rover diver forms differ from the field data sheets. The field data
sheets list the possible fish species and four abundance values to circle. On the web-based
forms, the fish species are available as a pull down menu, and the abundance is an empty field.
Table 1.3.5. Rover Diver Items Description.
Item Name
Required Item Description
Species ID
Yes
A unique ID of the species name. This field does not
allow data entry. It is automatically updated with entry of
the scientific name.
Species Name
Yes
The scientific name of fish species.
Abundance (S, F, Yes
A one-letter code for the number of individual fish
M, A)
counted.
S = single, F = few, M = many, A = abundant
II - 24
MBRS Technical Document #13: Volume 2
REIS User Manual
ADD
To enter data into the rover diver table, use the rover diver form (Figure 1.3.5a, Legend 1.3.5a).
Once all the fields are filled in, select the “insert record” button. When the user has finished
inputting records into the table, select the
button to return to the list of surveys
(Figure 1.2.3a).
B
A
Figure 1.3.5a. Rover diver ADD data form.
Legend 1.3.5a. Rover Diver ADD Data: Legend for Figure 1.3.5a
Description
Select the name of the species to add to the fish recruitment database using
A
the pull down menu.
Enter S, F, M, or A into the field. See Table 1.3.4 for item descriptions. Note:
B
only S, F, M, A will be accepted into this field. Any other letter or number will
result in an error message.
II - 25
MBRS Technical Document #13: Volume 2
REIS User Manual
EDIT
The rover diver edit form (Legend 1.3.5b and Figure 1.3.5b) enables the user to edit previously
entered records in the rover diver table. After the edits have been made, select the “update
record” button to ensure the changes are recorded in the database.
B
A
Figure 1.3.5b. Rover diver EDIT data form.
Legend 1.3.5b. Rover Diver EDIT Data: Legend for Figure 1.3.5b.
Description
Edit the species Name by selecting a new species from the pull down menu
A
Edit the abundance value for the fish species
B
II - 26
MBRS Technical Document #13: Volume 2
1.3.6
REIS User Manual
Manta tow
Use the manta tow data entry form to enter and edit the manta tow sampling data. The items in
the manta tow table are the tow number, live coral, dead coral, soft coral, algae, and other
features. Refer to Table 1.3.6 for item descriptions.
Table 1.3.6. Manta Tow Items Descriptions.
Item Name Required Item Description
Tow Number Yes
The number of the tow being recorded.
Live Coral
Yes
The percentage of live coral.
(0-5)
Dead Coral
Yes
The percentage of dead coral
(0-5)
Soft Coral (0- Yes
The percentage of soft coral
5)
Algae (0-5)
Yes
The percentage of algae
Other
Other features found in the reef.
Features
II - 27
MBRS Technical Document #13: Volume 2
REIS User Manual
ADD
Use the manta tow form to add a new record into the manta tow table (Figure 1.3.6a, Legend
1.3.6a). After each row of correct data is entered into these boxes, use the “insert record” button
to enter this data into the database. Unless the “insert record” button is used, the data will not
be entered into the database. When the user has finished inputting records into the table, select
the
button to return to the list of surveys (Figure 1.2.3a).
A
B
C
D
E
F
G
J
H
Figure 1.3.6a. Manta tow ADD data form.
Legend 1.3.6a. Manta Tow ADD Data: Legend for Figure 1.3.6a
Description
Enter the number of the manta tow being entered into the database
A
Enter a value between 0 and 5, with an optional + or -, to represent the
B
percentage of live coral. Refer to the “Manual of Methods for Synoptic
Monitoring Technical Document No. 4 for an explanation of these values.
Enter a value between 0 and 5, with an optional + or -, to represent the
C
percentage of dead coral. Refer to the “Manual of Methods for Synoptic
Monitoring Technical Document No. 4 for an explanation of these values.
Enter a value between 0 and 5, with an optional + or -, to represent the
D
percentage of soft coral. Refer to the “Manual of Methods for Synoptic
Monitoring Technical Document No. 4 for an explanation of these values.
Enter a value between 0 and 5, with an optional + or -, to represent the
E
percentage of algae. Refer to the “Manual of Methods for Synoptic Monitoring
Technical Document No. 4 for an explanation of these values.
Enter any other features of the reef that were noted during the tow.
F
Use this button to edit the values in the database. See figure 12
G
Inserts the data entered into the fields A thought F into database.
H
Delete the row of data from the database. Remember all deletes are
I
permanent.
II - 28
I
MBRS Technical Document #13: Volume 2
REIS User Manual
EDIT
Use the manta tow edit form (Figure 1.3.6b, Legend 1.3.6b) to edit the data in the manta tow
table. To edit an existing record in the manta tow table, click the “edit” button next to the record
you would like to edit. After editing a record, “update record “must be used to update the
database with the edit changes; otherwise, the edits will be discarded.
A
B
C
D
G
E
F
H
Figure 1.3.6b. Manta tow EDIT data form.
Legend 1.3.6b. Manta Tow EDIT Data: Legend for Figure 1.3.6b
Description
Edit the tow number previously entered
A
Edit the percentage value for the live coral
B
Edit the percentage value for the dead coral
C
Edit the percentage value for the soft coral
D
Edit the percentage value for the algae
E
Edit the other features field for the tow.
F
Updates the database with the changed values entered in fields A-F. Note:
G
Updates will not be recorded if this button is not used.
Cancels the edit procedure, and returns to the Add screen without updating the
H
records in the database.
II - 29
MBRS Technical Document #13: Volume 2
2
REIS User Manual
REPORTS
This chapter is designed to provide the user with the step-by-step instructions necessary to view
and print the information in the data grouping tables in a report format. To enhance this user
guide, the explanation for each report includes, where applicable, an introduction, objective,
structure, item descriptions, legend, screenshots, and any other information deemed useful to
the user. For each report, several navigational elements remain the same as those in the forms.
Those elements are shown in Figure 1.1 and described in Legend 1.1. The items identified in
Figure 1.1 will not be identified on any pages in this chapter.
Note: The screenshots used in this chapter, were created from a temporary database
and the data shown in the screenshots should not be considered applicable to the
MBRS project. There may be differences between the actual online reports and the
screenshots in this manual.
II - 30
MBRS Technical Document #13: Volume 2
2.1
REIS User Manual
Menu pages
Once the user has successfully logged onto the MBRS system, the user is taken to the main
menu page. A sample menu page is shown in Figure 2.1 with navigation explained in Legend
2.1. There are seven main data groupings found within this reef system database. These data
groupings are coral reef ecology, mangroves and seagrasses, marine pollution, oceanography,
marine protected areas, spawning aggregations, and administration. This chapter discusses the
output reports for the Coral Reef Ecology data grouping. From this menu page, the user can
access the data entry forms (Chapter 1) and reports (Chapter 2). Refer to chapter 1 for details
on the input forms.
To access the output reports for any of the data groupings, select the “queries/reports” button
associated with that data grouping. For example, to access the reports for ‘coral reef ecology’,
select the “reports” button directly to the right (Figure 2.1, legend 2.1, label A). Selecting this
button takes the user to the coral reef and fish report menu (See section 2.1.1).
A
Figure 2.1. Report Menu
Legend 2.1 Legend for Figure 2.1
Description
The buttons in this column connect the user to menu of reports for the data set
A
listed.
II - 31
MBRS Technical Document #13: Volume 2
2.1.1
REIS User Manual
Coral and fish reports
The coral and fish menu (Figure 2.1.1, Legend 2.1.1) contains the list of reports that are
available to view or query. The fish and coral report categories are benthic data, point intercept
transect data, adult fish data, fish recruitment data, rover diver data and manta tow data. A
detailed description, explanation, and example are provided in Section 2.3 for each category of
coral and fish query and report.
A
B
Figure 2.1.1 Coral and Fish Report Menu
Legend 2.1.1 Legend for Figure 2.1.1
Description
The buttons in this column allow the user to construct a query on the detailed
A
data for the data set listed
This buttons in this column connect the user to predefined summary reports
B
on the dataset listed.
II - 32
MBRS Technical Document #13: Volume 2
2.2
REIS User Manual
Query page
For each data grouping, the format and structure of the query page will be the same. The first
task will be to select a field to query (Figure 2.2, Letter A). The fields available to query from will
change depending on which data table is being accessed. The next task is to decide if the query
should look for data that is equal, less than, greater than, not equal, or like (Figure 2.2, Letter B)
the value entered (Figure 2.2, Letter C).
A
C
B
F
D
Figure 2.2 Sample Query
Legend 2.2 Legend for Figure 2.2
Description
Select a field to query from.
A
Select equal, less than, greater than, not equal, or like from the pull down
B
menu
Enter the value
C
Select the submit button to execute the query
D
Select this link to access a list of sites with coral and fish data
E
Select this link to access a list of sites with seagrass data
F
Select this link to access a list of sites with mangrove data
G
II - 33
E
G
MBRS Technical Document #13: Volume 2
REIS User Manual
Wildcards can be used in the value field only if Like is selected as the comparison operator. A
wildcard character is a symbol that stands for one or more characters in text searches. The
database supports two wildcards: “_” and "%". The wildcard "_" matches any single character.
The wildcard “%” matches one or more of any characters. The following expressions will all find
Belize:
1) Country Equal Belize
2) Country Like Belize
3) Country Like _elize
4) Country Like %lize
But not:
5) Country Like _lize
6) Country Equal %lize
The items in the query field (Figure 2.2 Letter A), are based on each report form. The code for
the items is in the list is given in the pages following this section. Descriptions of the items are
given in the reports sections. The items common to all the reports are:
1) Country – The country in which the site is located.
2) Location – The name of the geographic feature on which the site is located, such
as Banco Chinchorro.
3) Ecosystem – The ecosystem as defined by the Manual of methods for the MBRS
Synoptic Monitoring Program. Currently the values are Coral, Mangrove, and
Seagrass.
4) Habitat – The habitat within the ecosystem as defined by the Manual of methods
for the MBRS Synoptic Monitoring Program. Currently the habitats are Shallow
Fore Reef, Shallow Back Reef, Deep Fore Reef, Coastal, and Fringing.
5) Site_id – The unique site identifier.
6) Survey_id – The unique identifier for each survey. This is not usually used by the
user.
7) Startdate – The date the sampling was conducted, or in the case of timed interval
sampling such as mangrove leaf litter and seagrass growth the date the interval
started.
8) Transect – The transect or plot number.
9) Collector – The person doing the field work collecting the data.
The following example shows how to create a query to select all the benthic coral data for the
country of Belize.
1) Access the coral and fish report menu page (Figure 2.1, Letter A).
2) Select the benthic data “queries” button (Figure 2.1.1, Letter A).
II - 34
MBRS Technical Document #13: Volume 2
A
REIS User Manual
3) Select country from the select a
field to query on menu (Figure
2.2a, Letter A).
Figure 2.2a Selecting item to query on.
A
4) Select “Equal” from the pull
down menu (Figure 2.2b, Letter
A).
Figure 2.2b. Select comparison operator.
A
5) Enter Belize in the value field
(Figure 2.2c, Letter A).
B
Figure 2.2c. Enter the value for comparison
6) Select the “submit” button (Figure 2.2c, Letter B).
7) An output report of benthic coral data should appear on the screen.
Up to three criteria can be used in querying the data. If the user wanted to further restrict the
search parameters instead of selecting the “Submit” button in step 6 they would repeat steps 3
through 5, except using the second row of the query form. For example, if only data for Belize
Deep Fore Reef environments was wanted the final query form would look like Figure 2.2d.
Figure 2.2d Query on two parameters.
II - 35
MBRS Technical Document #13: Volume 2
REIS User Manual
Query Item Code List
Common for all Queries
Code
Item
Site ID
site_id
Date
startdate
Transect
transect
Person Collecting collector
Supervisor
supervisor
Country
country
Location
location
Ecosystem
ecosystem
Habitat
habitat
Survey ID
Survey_id
Species Name
gen_spec
2.3.3 Adult Fish Report
Code
Item
0-5 cm
cm0_5
6-10 cm
cm6_10
11-20 cm
cm11_20
21-30 cm
cm21_30
31-40 cm
cm31_40
>40 cm
cm41_
2.3.4 Fish Recruitment Report
Code
Item
Count
fishcount
2.3.1 Benthic Coral Report
Code
Item
Diameter (cm)
diameter
Height (cm)
height
Old Dead (%)
olddead
Recent Dead (%)
newdead
Total Dead (%)
totaldead
Disease
disease
Black Band
bb
White Band
wb
White Plague II
wpii
Yellow Blotch
yb
Dark Spots I
dsi
Dark Spots II
dsii
Red Band
rb
Aspogikosis
asp
Other
other
Bleached
bleach
2.3.5 Rover Diver Report
Code
Item
Abundance
abundance
2.3.6 Manta Tow Report
Code
Item
Tow Number
Tow
Live Coral
corallive
Dead Coral
coraldead
Soft Coral
softcoral
Algae
algae
Features
features
2.3.2 Point Intercept Report
Code
Item
Substrate Type
component
Count
benthcount
Comments
comments
II - 36
MBRS Technical Document #13: Volume 2
2.3
REIS User Manual
Coral and fish reports
The coral and fish reports enable the user to view and print the data that was entered via the
data entry forms. The data can be viewed either by individual category (manta tow, adult fish,
fish recruitment, rover diver, point intercept, and benthic coral), or by a list of sites that have
surveys complete for each category (Figure 2.2, Letter E).
2.3.1
Benthic coral
An example report for benthic coral data is presented, as shown in Figure 2.3.1. The information
included in the benthic coral data report is described in Legend 2.3.1. The reports specific query
items are also shown in Legend 2.3.1
F
A
B
C
D
E
H
I
J
G
Figure 2.3.1 Benthic Coral Report
Legend 2.3.1 Legend for Figure 2.3.1.
Item Name
Item Description
This is an identifier for the site.
A Site ID
The date the data was collected.
B Date
The transect where the data was collected.
C Transect
Name of the person that collected data.
D Person
E Species Name The name of the coral species.
F Diameter (cm) The diameter of the coral head being measured.
The height of the coral head being measured.
G Height (cm)
H Old Dead (%) The percent (1-100) of the coral that has been long
dead.
The percentage (1-100) of the coral that has recently
I Recent Dead
(%)
died.
The total percentage (1-100) of the coral that had
J Total Dead
(%)
died.
A code for the type of disease found on the coral.
K Diseased
A code for the level of coral bleaching present.
L Bleached
II - 37
K
L
MBRS Technical Document #13: Volume 2
2.3.2
REIS User Manual
Point intercept
To access the existing point intercept report (Figure 2.3.2, Legend 2.3.2), a query must be
selected. For instruction on creating a query, refer to section 2.2. The query used to get the
results shown in Figure 2.3.2 was a “site_id greater than 1”. The point intercept query results
include site ID, date, transect, person, substrate type, and count. Item descriptions for these
results are found in Legend 2.3.2.
A
B
E
C
F
D
Figure 2.3.2 Point Intercept Report
Legend 2.3.2 Legend for Figure 2.3.2
Item Name
Item Description
This is an identifier for the site.
A Site ID
The date the data was collected.
B Date
The transect where the data was collected.
C Transect
Name of the person that collected data.
D Person
A pull down menu of possible benthic types.
E Substrate
Type
The number of occurrences for the benthic type identified
F Count
along the transect.
II - 38
MBRS Technical Document #13: Volume 2
2.3.3
REIS User Manual
Adult Fish
In order to access the adult fish report (Figure 2.3.3, Legend 2.3.3), a query must first be
selected. For instruction on creating a query, refer to section 2.2. The items in the adult fish
report are site id, date, transect, person, species name, and sizes 0-5 cm, 6-10 cm, 11-20 cm,
21-30 cm, 31-40 cm, and >40 cm. The item descriptions are found in Legend 2.3.3.
B
A
E
C
F
H
J
K
D
G
Figure 2.3.3 Adult Fish Report
Legend 2.3.3 Legend for Figure 2.3.3
Item Name
Item Description
This is an identifier for the site.
A Site ID
The date the data was collected.
B Date
The transect where the data was collected.
C Transect
Name of the person that collected data.
D Person
E Species Name Name of the species identified.
Count for the size range from 0 to 5 cm for the species
F 0-5 cm
Count for the size range from 6 to 10 cm for the
G 6-10 cm
species
Count for the size range from 11 to20 cm for the
H 11-20 cm
species
21-30 cm
Count for the size range from 21 to 30 cm for the
I
species
31-40 cm
Count for the size range from 31 to 41 cm for the
J
species
Count for the size range greater than 40 cm for the
K > 40cm
species
II - 39
I
MBRS Technical Document #13: Volume 2
2.3.4
REIS User Manual
Fish Recruitment
To access the fish recruitment report (Figure 2.3.4, Legend 2.3.4), select a query from the fish
recruitment query page (Section 2.2). The items included in the fish recruitment report are the
site id, date, transect, person, species name, and count. Refer to Legend 2.3.4 for item
descriptions.
E
A
B
F
C
D
Figure 2.3.4 Fish Recruitment Report
Legend 2.3.4 Legend for Figure 2.3.4
Item Name
Item Description
This is an identifier for the site.
A Site ID
The date the data was collected.
B Date
The transect where the data was collected.
C Transect
Name of the person that collected data.
D Person
E Species Name Name of the species identified.
The count of the fish species identified during the
F Count
survey.
II - 40
MBRS Technical Document #13: Volume 2
2.3.5
REIS User Manual
Rover Diver
To access the rover diver report (Figure 2.3.5, Legend 2.3.5), select a query from the rover diver
query page (Section 2.2). The items included in the rover diver report are the site id, date,
transect, person, species name, and abundance. Item descriptions for the report data are listed
in Legend 2.3.5.
E
C
A
B
D
Figure 2.3.5 Rover Diver Report
Legend 2.3.5 Legend for Figure 2.3.5
Item Name
Item Description
This is an identifier for the site.
A Site ID
The date the data was collected.
B Date
The transect where the data was collected.
C Transect
Name of the person that collected data.
D Person
Name of the species identified.
E Species Name
Abundance
A
one-letter code for the number of individuals seen for
F
the species. Refer to the “Manual of Methods for
Synoptic Monitoring Technical Document No. 4 for a
description of the codes.
II - 41
F
MBRS Technical Document #13: Volume 2
2.3.6
REIS User Manual
Manta tow
In order to access the existing manta tow report (Figure 2.3.6, Legend 2.3.6), a query must first
be selected. For instruction on creating a query, refer to section 2.2. The items in the manta tow
report are site id, date, transect, person, tow number, live coral, dead coral, soft coral and algae.
For item descriptions see Legend 2.3.6.
A
B
C
E
D
J
F
G
H
I
K
Figure 2.3.6 Manta Tow Report
Legend 2.3.6 Items for Manta tow report
Item Name
Item Description
This is an identifier for the site.
A Site ID
Date
The
date the data was collected.
B
The transect where the data was collected.
C Transect
Name of the person that collected data.
D Person
The number of the tow being recorded.
E Tow Number
Live
Coral
(0-5)
The
percentage of live coral.
F
The percentage of dead coral.
G Dead Coral (0-5)
The percentage of soft coral.
H Soft Coral (0-5)
Algae
(0-5)
The
percentage of algae.
I
This button connects the user with a list of all sites with coral data.
J Coral Site List
This button connects the user with the main menu page for this report.
K Reports Menu
II - 42
CONSERVATION AND SUSTAINABLE USE
OF THE
MESOAMERICAN BARRIER REEF SYSTEMS
PROJECT
(MBRS)
User Manual
for the
SAM / MBRS
Regional Environmental Information System
Volume III : Mangrove and Seagrass Ecology
June 2005
Project Coordinating Unit
Coastal Resources Multi-Complex Building
Princess Margaret Drive
P.O. Box 93
Belize City Belize
Tel: (501) 223-3895; 223-4561
Fax: (501) 223-4513
Email: [email protected]
Website: http://www.mbrs.org.bz
MBRS Technical Document #13: Volume 3
REIS User Manual
CONTENTS
PAGE
1. Data Entry
1.1 Login/Menu Pages
1.1.1 Mangrove and Seagrass Forms Menu
1
2
4
1.2 Survey and Transect Forms
1.2.1 Entering Survey Data
1.2.2 Editing Survey Data
1.2.3 Survey List
1.2.4 Transect Data
5
6
7
8
10
1.3 Mangrove Forms
1.3.1 Characterization/Zonation
1.3.2 Forest Structure
1.3.3 Seedling/Sapling
1.3.4 Seedling/Sapling Biomass
1.3.5 Leaf Litter
1.3.6 Interstitial Water
12
12
15
18
21
24
27
1.4 Seagrass Forms
1.4.1 Seagrass Growth
1.4.2 Seagrass Biomass
1.4.3 Seagrass Leaf Area Index
30
30
33
39
2. Reports
2.1 Menu Pages
2.1.1 Mangrove and Seagrass Reports
42
43
44
2.2 Query Page
45
2.3 Mangrove Reports
2.3.1 Characterization/Zonation
2.3.2 Forest Structure
2.3.3 Seedling/Sapling
2.3.4 Seedling/Sapling Biomass
2.3.5 Leaf Litter
2.3.6 Interstitial Water
50
50
51
52
53
54
55
2.4 Seagrass Reports
2.4.1 Seagrass Growth
2.4.2 Seagrass Biomass
2.4.3 Seagrass Leaf Area Index
56
56
57
59
III - i
MBRS Technical Document #13: Volume 3
1
REIS User Manual
DATA ENTRY
This chapter is designed to provide the user with step-by-step instructions necessary for
entering the field data into the database via web-based data entry forms. To enhance this user
guide, the brief explanation for each data entry form includes an introduction, objective,
structure, item descriptions, legend, screenshots, and any other information deemed useful to
the user. For each data entry form several elements, primarily those for navigation, remain the
same. Those elements are shown in Figure 1.0 and described in Legend 1.0. The items
identified in Figure 1.0 will not be identified on any subsequent pages.
Note: The screenshots used in this chapter, were created from a temporary database and the
data shown in the screenshots should not be considered applicable to the MBRS project. There
may be differences between the actual online form and the screenshots in this manual.
C
B
A
Figure 1.0. Basic elements for each data entry page.
Legend 1.0. Legend for Figure 1.0
Description
Indicates the name of the person currently logged into the REIS private
A
database.
This button will log the user out of the REIS private database.
B
This section serves as a navigation aid to what page the user is accessing, as
C
well as links to previous levels.
III - 1
MBRS Technical Document #13: Volume 3
1.1
REIS User Manual
Login/Menu Pages
When first accessing the system the user will be presented with a login page as shown in Figure
1.1a with navigation explained in Legend 1.1a. The users’ login name and password are
provided to the user by the MBRS database administrator. To access the site the user must
have cookies and Java enabled on their browser.
A
B
C
Figure 1.1a. User login page.
Legend 1.1a. Legend for Figure 1.1a
Description
This is where the user enters the login name provided by the MBRS database
A
administrator.
This is where the user enters the password provided by the MBRS database
B
administrator.
This submits the login and if valid connects the user to the menu page.
C
III - 2
MBRS Technical Document #13: Volume 3
REIS User Manual
Once the user has successfully logged onto the MBRS system, the user is taken to the main
menu page. A sample menu page is shown in Figure 1.1b with navigation explained in Legend
1.1b. There are seven main thematic areas found within this REIS database. These thematic
areas are coral reef ecology, mangroves and seagrasses, marine pollution, oceanography,
marine protected areas, spawning aggregations, and administration. This chapter discusses the
input forms for the Mangrove and Seagrasses thematic area. From this menu page, the user
can access the data entry forms (Chapter 1) and reports (Chapter 2). Refer to chapter 2 for
report details.
To access the data entry forms for any of the thematic areas, select the
button
associated with that thematic area. For example, to access the thematic area ‘Mangroves and
button directly to the right (Figure 1.1b, Legend 1.1b, label
Seagrasses’, select the
B). Selecting this button takes the user to the Mangroves and Seagrasses forms menu (See
section 1.1.1).
A
B
C
D
E
F
G
Figure 1.1b. Menu form.
Legend 1.1b. Legend for Figure 1.1b
Description
Menu of coral reef ecology data entry forms.
A
Menu of mangrove and seagrass data entry forms.
B
Menu of marine pollution and oceanography data entry forms.
C
Menu of oceanography data entry forms. (Not yet implemented)
D
Menu of marine protected areas data entry forms. (Not yet implemented)
E
Menu of spawning aggregation data entry forms. (Not yet implemented)
F
Menu of administration data entry forms. (Must have administrative privileges.)
G
III - 3
MBRS Technical Document #13: Volume 3
1.1.1
REIS User Manual
Mangrove and Seagrass forms Menu
There are six mangrove and three seagrass data entry forms to choose from (Figure 1.1.1,
Legend 1.1.1). The mangrove data entry forms are characterization and zonation, forest
structure, seedling and sapling, seedling and sapling biomass, interstitial water, and leaf litter,
as discussed in section 1.3. The seagrass forms are seagrass growth, seagrass biomass, and
seagrass leaf area index, as discussed in section 1.4. To begin entering mangrove and
seagrass survey data, use the
and
buttons.
A
B
Figure 1.1.1. Mangrove and Seagrass forms Menu
Legend 1.1.1. Legend for Figure 1.1.1.
Description
This column of buttons connects the user to the new survey entry form for the
A
dataset listed
This column of buttons connects the user to the list of data surveys that currently
B
exist for the dataset listed.
III - 4
MBRS Technical Document #13: Volume 3
REIS User Manual
1.2 Survey and Transect Forms
The following procedures apply to the Mangrove and Seagrasses Forms (Sections 1.3 -1.4).
This section provides instructions on how to get through this procedure to access the data entry
forms. In all of the data entry forms required fields are marked with an asterisk.
The objective of the survey forms is to record the detailed sampling information that describes
the physical conditions at the time of the survey and other information describing the survey
itself. The survey items are listed and discussed in Table 1.2. There is one survey record for
each site visit, for each set of data collected.
Table 1.2. Survey Item Descriptions
Item Name
Required Item Description
Site ID
Yes
Site ID is an identifier used to relate information from
the survey table to the site table.
Person Collecting Yes
The name of the individual conducting the survey in the
field.
Person
The name of the individual processing the samples in
Processing
the lab.
Tide
Yes
The tidal stage at the time of the sampling. The valid
values are low, high, falling, and rising. Refer to the
“Manual of Methods for Synoptic Monitoring Technical
Document No. 4” for a description of the tidal stages.
Cloud Cover (0-8)
The cloud cover in eighths of sky covered (0-8) at the
time of the sampling. Refer to the “Manual of Methods
for Synoptic Monitoring Technical Document No. 4” for
a description of values 0 through 8.
Current Speed
The water current speed at the time of sampling
Start Date
Yes
Either he beginning date of a timed sampling, such as
(MM/DDMYY)
leaf litter or seagrass growth, or the date of sampling.
End Date
The end date of a timed sampling, such as leaf litter or
(MM/DDMYY)
seagrass growth.
Start Time
Yes
Time at which sampling was started.
(HH:MM)
Sea State
Yes
The sea state at the time of the sampling. The valid
values are calm, slight, moderate, and rough. Refer to
the “Manual of Methods for Synoptic Monitoring
Technical Document No. 4” for a description of valid
values.
Air Temp (°C)
The air temperature at the time of sampling.
Wind
The estimated wind speed at the time of sampling.
Secchi At Marking
The secchi value at the time of the first visit to the site.
This is used only for the seagrass growth surveys.
Secchi At
The secchi value at the time of the last visit to the site.
Collection
This is used only for the seagrass growth surveys.
Current Direction
The direction of the water current at the time of
sampling.
III - 5
MBRS Technical Document #13: Volume 3
1.2.1
REIS User Manual
Entering Survey data
To enter a new survey for a thematic area, select the
button (i.e. Mangrove and
Seagrasses forms> Figure 1.1.1, Legend 1.1.1, Letter A), found on the forms menu for that
thematic area (Figure 1.2.1, Legend 1.2.1). Note: One site may have multiple surveys. A survey
record needs to be completed for each type of survey being conducted (i.e. point intercept and
benthic coral) at a site. After the survey data has been entered the user will be taken to the
Survey List page (Section 1.2.3).
A
B
G
C
H
L
N
M
I
D
E
P
J
K
F
O
Figure 1.2.1. Survey data entry form.
Q
Legend 1.2.1. Survey entry data: Legend for Figure 1.2.1
Description
A
Select a site ID from the pull down menu
B
Select the name of the person who collected the data from the pull down
menu
C
Select the name of the person who processed the data in the lab. This is to be
left blank if no laboratory analysis was done.
D
Select the wind speed at the time of sampling from the pull down menu.
E
Enter a value 0-8 for the cloud cover present at the time of the sampling.
F
Enter the water current speed. This is an optional field.
G
Enter the date of the sampling or the start date for a timed interval sampling
such as seagrass growth or leaf litter.
H
Enter the end date of the sampling. This will be the same as the start date
unless it is a timed interval sampling such as seagrass growth or leaf litter.
I
Select a value from the pull down menu that represents the sea state at the
time of the sampling.
J
Enter the secchi value at the time of marking the seagrasses. (For seagrass
growth surveys only.)
K
Enter the direction of the water current at the time of sampling
L
Enter the time sampling started for the survey.
M
Select the tidal stage, at the time of the survey, from the pull down menu.
N
Enter the air temperature at the time of sampling
O
Enter the secchi value at the time of collecting the seagrasses. (For seagrass
growth surveys only.)
P
Select this button to insert this data into the database. This will take the user
to the survey information form (Figure 1.2.3a).
Q
Use the cancel button to clear the form without entering the data into the
database
III - 6
MBRS Technical Document #13: Volume 3
1.2.2
REIS User Manual
Editing Survey data
Use the survey edit form (Figure 1.2.2, Legend 1.2.2) to alter existing survey data. Existing
survey data should be altered only if there was an error in the original data entry for the survey,
or if there was missing data in the original form. The existing values will show up in the field
when the edit form is opened. The survey data edit form is accessed from within a thematic
area. The items and item descriptions for the edit survey form are listed in Table 1.2.
A
B
G
C
L
H
I
E
D
N
M
J
K
F
Q
P
O
Figure 1.2.2. Survey edit form.
Legend 1.2.2. Edit Survey Data: Legend for Figure 1.2.2
Description
The site ID cannot be changed during the edit procedure
A
Edit the name of the person who collected the data from the pull down menu. If
B
you do not want to change the person, leave this as “no change”.
Edit the name of the person who is processing the data. If you do not want to
C
change the person, leave this as “no change”.
Edit the wind speed at the time of sampling
D
Edit the cloud cover present at the time of the sampling.
E
Edit the water current speed
F
Edit the start date of the sampling
G
Edit the end date of the sampling
H
Edit the sea state at the time of the sampling.
I
Edit the secchi value at the time of marking the seagrass.
J
Edit the direction of the water current at the time of sampling
K
Edit start the time of the first sampling
L
Edit the tidal stage at the time the data was collected
M
Edit the air temperature at the time of sampling
N
Edit the secchi value at the time of seagrass collection.
O
Select this button to update this edited data in the database
P
Use the “Cancel” button to cancel the editing and return to the previous page.
Q
III - 7
MBRS Technical Document #13: Volume 3
1.2.3
REIS User Manual
Survey List
The Survey List page (Figure 1.2.3a, Legend 1.2.3a) lists all of the surveys for the site shown
for the dataset that was originally selected. From this list the user can add or edit survey data,
refer to section 1.2.1 or section 1.2.2. Otherwise, select the survey to add data by selecting the
button (Figure 1.2.3a, Legend 1.2.3a, Letter L). This will take the user to the transect
page.
A
B
F
G
H
I
D
C
J
K
L
E
M
N
Figure 1.2.3a. List of available surveys.
Legend 1.2.3a. Legend for figure 1.2.3a
Description
The site ID
A
The location of the site
B
The ecosystem
C
The habitat type
D
The country in which the site is located.
E
Select to add a new survey to this site
F
The site ID
G
The survey ID. This is displayed for reference purposes only.
H
The start date.
I
The start time.
J
The person who collected the data.
K
Select this button to go to the transect form for this survey (i.e. Benthic coral
L
data)
Select this button to edit the survey information
M
Select this button to add water quality records to this survey.
N
Select this button to delete this survey
O
III - 8
O
MBRS Technical Document #13: Volume 3
REIS User Manual
If the
button was used at the thematic area menu an intermediate form (Figure
1.2.3b, Legend 1.2.3b) will be brought up, from which the user selects a site to add the data to.
If the user does not know the site id, then all of the surveys for that thematic area can be listed
by clicking on
Legend 1.2.3a).
. Once the site is selected, the survey list page is shown (Figure 1.2.3a,
A
B
Figure 1.2.3b. Intermediate form.
Legend 1.2.3b. Legend for Figure 1.2.3b
Description
Select an existing site from the pull down menu.
A
Select all survey records for the current thematic area
B
III - 9
MBRS Technical Document #13: Volume 3
1.2.4
REIS User Manual
Transect Data
The transect form (Figure 1.2.4, Legend 1.2.4) is used to identify only transect specific
information such as transect or plot number, person surveying the transect or plot, and in the
case of coral reefs the start and end depths of the transect. The transect items are listed and
discussed in Table 1.2.4.
Table 1.2.4 Transect Item Descriptions
Item Name
Required Item Description
Transect No
Yes
The transect or plot number associated with the
sampling. It is possible to have multiple transects per
station per day. Note: To enter multiple transects per
day, complete this form for each transect associated
with this survey site.
Person Collecting Yes
The name of the individual conducting the survey in the
field.
Start Time
Time at which sampling was started.
(HH:MM)
Start Depth (m)
The water depth in meters at the start of the coral
transect. This field is only used for coral transects
Stop Depth (m)
The water depth in meters at the end of the coral
transect. This field is only used for coral transects.
Bearing (0-360)
Heading in degrees from north of the transect line from
the shoreline. Used for mangrove forest zonation.
III - 10
MBRS Technical Document #13: Volume 3
REIS User Manual
If the appropriate transect is listed, use the
button to access the data form. If not listed
then add a new transect in the bottom line of the form. The new transect must be inserted
before a data entry form based on that transect can be accessed. The select button on the
transect form will take the user to the data entry form (i.e. Figure 1.3.2a).
A
C
B
D
E
F
G
H
K
J
Figure 1.2.4. Transect data entry form.
Legend 1.2.4. Transect Data Entry: Legend for 1.2.4.
Description
Enter the transect or plot number.
A
Select the name of the person who collected the data from the pull down
B
menu. This may be the same person that was entered in the survey form.
Enter the time the transect survey was started.
C
Enter the depth at the start of the transect. This is used only for benthic coral.
D
Enter the depth at the end of the transect. This is used only for benthic coral.
E
Enter the transect bearing. Used for mangrove forest zonation.
F
Use the select button to access the data entry form.
G
Use the edit button to edit the transect record.
H
Use the delete button to delete the transect record.
I
Use insert record to insert the data into the table. When a new transect is
J
entered it must be inserted before a data entry page based on the transect
can be selected.
Use the “Return to Site Page” button to clear the fields and return to the site
K
page listing all of the surveys.
III - 11
I
MBRS Technical Document #13: Volume 3
1.3
REIS User Manual
Mangrove Forms
The mangrove and seagrass forms menu (Figure 1.1.1) lists both the mangrove and seagrass
forms available for data entry. Refer to section 1.4 for the specifics on the seagrass forms.
Continuing from Section 1.1.1, the six mangrove data entry forms available are
characterization/zonation, forest structure, seedling/sapling, seedling/sapling biomass,
interstitial water, and leaf litter. To access the data entry form for any of the mangrove data
entry forms, the user must select either the
the steps outlined in section 1.2.
1.3.1
or
button. Then follow
Characterization/zonation
The mangrove characterization and zonation forms enable the user to input the field-collected
mangrove characterization and zonation data into the MBRS database. The items in the
mangrove characterization/zonation table are point distance, quadrant, start x, start y, bearing,
species, distance, CBH, height, and observations. Refer to Table 1.3.1 for these item
descriptions.
Table 1.3.1. Characterization/zonation Items Decription.
Item Name
Required Item Description
Point Distance
Yes
Distance from the origin of the centerline to the point
(m)
Quadrant
Yes
The number of the quadrant
Bearing (0-360) Yes
The bearing
Species
Yes
The name of the species
Distance (m)
Yes
The distance from the center point of the quadrant
CBH (cm)
Yes
The circumference of the tree at breast height
Height (m)
Yes
The height of the tree
Observations
Any additional comments or observations
III - 12
MBRS Technical Document #13: Volume 3
REIS User Manual
ADD
To add a record to the mangrove characterization and zonation table, use the mangrove
characterization and zonation add form. Enter the data into the appropriate fields (Figure 1.3.1a,
Letters A-G). Once the correct data is entered into the boxes, use the “insert record” button to
enter this data into the database. Unless the “insert record” button is used, the data will not be
entered into the database. When the user has finished inputting records into the table, select the
button to return to the list of surveys (Figure 1.2.3a). Note: The screenshot in
Figure 1.3.1a does not show the navigational features found on the forms. Refer to Table 1.2 for
information on navigational procedures through out the data entry process.
B
C
D
E
F
G
A
Figure 1.3.1a. Mangrove Characterization/zonation ADD data form.
Legend 1.3.1a. Characterization/Zonation ADD Data: Legend for Figure 1.3.1a
Description
Enter the distance from the origin of the centerline to the point in meters.
A
Enter the number of the quadrant. Valid values are I, II, III, and IV.
B
Select the tree species name from the pull down menu.
C
Enter the distance from the center point in centimeters.
D
Enter the circumference of the tree at breast height in centimeters.
E
Enter the height of the tree in meters in meters.
F
Enter any additional observations or comments.
G
III - 13
MBRS Technical Document #13: Volume 3
REIS User Manual
EDIT
To access the mangrove characterization/zonation edit form (Figure 1.3.1b, Legend 1.3.1b),
select the edit button of a current record in the mangrove characterization/zonation table. Once
the edited data is entered into the boxes, use the “update record” button to enter this data into
the database. Note: The screenshot in Figure 1.3.1b does not show the navigational features
found on the forms. Refer to Table 1 for information on navigational procedures through out the
data entry process.
A
B
C
D
E
F
Figure 1.3.1b. Mangrove characterization/zonation EDIT data form.
Legend 1.3.1b. Characterization/Zonation EDIT Data: Legend for Figure 1.3.1b
Description
Edit the point distance
A
Edit the number of the quadrant
B
Edit the species name by selecting a new species from the pull down menu.
C
Edit the distance in centimeters
D
Edit the circumference of the tree at breast height in centimeters
E
Edit the height of the tree in meters
F
Edit any additional observations or comments.
G
III - 14
G
MBRS Technical Document #13: Volume 3
1.3.2
REIS User Manual
Forest Structure
The purpose of the mangrove forest structure forms is to enter the field collected data into the
mangrove forest table. The items in the mangrove forest table (Table 1.3.2) are position x,
position y, tree number, species name, CBH, prop root length, height to first branch, and tree
height.
Table 1.3.2. Forest Structure Items Description.
Item Name
Required Item Description
Position X (m)
Yes
The X location of the tree in relation to the corner of the
plot.
Position Y (m)
Yes
The Y location of the tree in relation to the corner of the
plot.
Tree Number
Yes
The number of the tree within the plot.
Species
Yes
A pull down menu with the names of possible tree
species.
CBH (cm)
The circumference of the tree at breast height in
centimeters.
Prop Root
The height of the prop root in centimeters.
Length (cm)
Height to
The height to the first branch in meters.
Branch (m)
Tree Height (m)
The height of the tree in meters.
III - 15
MBRS Technical Document #13: Volume 3
REIS User Manual
ADD
To add a record to the mangrove forest structure table, use the mangrove forest structure data
entry form (Figure 1.3.2a, Legend 1.3.2a). Once the correct data is entered into the boxes, use
the “insert record” button to enter this data into the database. Unless the “insert record” button is
used, the data will not be entered into the database. When the user has finished inputting
records into the table, select the
1.2.3a).
button to return to the list of surveys (Figure
I
A
B
C
D
E
F
G
H
Figure 1.3.2a. Mangrove forest structure ADD data form.
Legend 1.3.2a. Forest Structure ADD Data: Legend for Figure 1.3.2a
Description
Enter the X position of the tree in meters
A
Enter the Y position of the tree in meters
B
Enter the number of the tree
C
Select the name of the tree species from the pull down menu.
D
Enter the circumference of the tree at breast height
E
Enter the prop root length of the tree in centimeters
F
Enter the height to the first branch of the tree in meters
G
Enter the height of the tree in meters
H
Select the Edit button to edit the data of an existing record
I
Delete the row of data from the database. Remember all deletes are
J
permanent.
III - 16
J
MBRS Technical Document #13: Volume 3
REIS User Manual
EDIT
Use the mangrove forest structure edit form to alter the existing records in the mangrove forest
structure table. Once the edits are complete, use the “update record” button to commit these
edits to the database.
C
A
B
D
E
F
G
Figure 1.3.2b. Mangrove forest structure EDIT data form.
Legend 1.3.2b. Forest Structure EDIT Data: Legend for Figure 1.3.2b
Description
Edit the X position of the tree
A
Edit the Y position of the tree
B
Edit the number of the tree
C
Edit the species name by selecting a new species from the pull down menu.
D
Edit the circumference of the tree at breast height
E
Edit the prop root length of the tree
F
Edit the trunk length of the tree
G
Edit the height of the tree
H
III - 17
H
MBRS Technical Document #13: Volume 3
1.3.3
REIS User Manual
Seedling/Sapling
The purpose of the seedling/sapling data forms is to record the mangrove forest structure
seedling/sapling subplots monitoring data into the seedling/sapling table (Table 1.3.3). The
items in the seedling/sapling table are subplot, position X, position Y, seedling/sapling, species,
CBH, height, and live.
Table 1.3.3. Seedling/Sapling Items Description.
Item Name
Required Item Description
Subplot
Yes
The subplot ID
Position X
Yes
The X location of the seedling/sapling in relation to the
corner of the subplot
Position Y
Yes
The Y location of the seedling/sapling in relation to the
corner of the subplot
Seedling/Sapling Yes
The seedling/sapling number in the plot
Species
Yes
The species name of the seedling/sapling
CBH (cm)
The circumference of the seedling/sapling at breast
height
Height (cm)
Yes
The height of the seedling/sapling
Live (Y/N)
Yes
Indicate whether the seedling/sapling is alive with a Y for
yes and a N for no.
III - 18
MBRS Technical Document #13: Volume 3
REIS User Manual
ADD
To add a new record to the seedling/sapling table, use the seedling/sapling data entry form
(Figure 1.3.3a, Legend 1.3.3a). Once the correct data is entered into the boxes, use the “insert
record” button to enter this data into the database. Unless the “insert record” button is used, the
data will not be entered into the database. When the user has finished inputting records into the
table, select the
button to return to the list of surveys (Figure 1.2.3a).
I
A
B
C
E
D
F
G
H
Figure 1.3.3a. Seedling/sapling subplot ADD data form.
Legend 1.3.3a. Seedling/Sapling Subplot ADD Data: Legend for Figure 1.3.3a
Description
Enter the number of the subplot.
A
Enter the X position of the seedling/sapling in centimeters.
B
Enter the Y position of the seedling/sapling in centimeters.
C
Enter the seedling/sapling number.
D
Use the pull down menu to select the species name.
E
Enter the circumference at breast height of the seedling/sapling in centimeters.
F
Enter the height of the seedling/sapling in centimeters.
G
Enter a Y for yes or N for no to indicate if the seedling/sapling is alive or not..
H
Use this button to edit the records in the database.
I
Delete the row of data from the database. Remember all deletes are permanent.
J
III - 19
J
MBRS Technical Document #13: Volume 3
REIS User Manual
EDIT
To edit a record in the seedling/sapling table, use the seedling/sapling edit form (Figure 1.3.3b,
Legend 1.3.3b). To access the seedling/sapling edit form, refer to Figure 1.3.3a, Letter I). Once
the edits have been completed, select the “update record” button to commit the changes to the
database.
A
D
B
C
E
F
G
H
Figure 1.3.3b. Seedling/sapling subplot EDIT data form.
Legend 1.3.3b. Seedling/Sapling Subplot EDIT data: Legend for Figure 1.3.3b
Description
Edit the number of the subplot
A
Edit the X position of the seedling/sapling
B
Edit the Y position of the seedling/sapling
C
Edit the seedling/sapling number
D
Edit the species name by selecting a new species from the pull down
E
menu
Edit the circumference at breast height of the seedling/sapling in
F
centimeters
Edit the height of the seedling/sapling in centimeters
G
Edit a Y for yes or N for no to indicate if the seedling/sapling is alive or not.
H
III - 20
MBRS Technical Document #13: Volume 3
1.3.4
REIS User Manual
Seedling/Sapling biomass
The purpose of the seedling/sapling biomass data forms is to record the seedling/sapling
biomass monitoring data into the seedling/sapling biomass table (Table 1.3.4). The items in the
seedling/sapling biomass table are species name, seedling/sapling, height, tare weight, and
total weight.
Table 1.3.4. Seedlings/Saplings Biomass Items Description.
Item Name Required Item Description
Species
Yes
The species name of the seedling/sapling
Name
Seedling
Indicate whether it is a seedling or sapling being measured.
/Sapling
Height (cm)
Yes
The height of the seedling/sapling
Tare Weight
Yes
The tare weight in grams
(g)
Total Weight Yes
The total weight in grams
(g)
III - 21
MBRS Technical Document #13: Volume 3
REIS User Manual
ADD
To add a new record to the seedling/sapling biomass table, use the seedling/sapling biomass
data entry form (Figure 1.3.4a, Legend 1.3.4a). Once the correct data is entered into the boxes,
use the “insert record” button to enter this data into the database. Unless the “insert record”
button is used, the data will not be entered into the database. When the user has finished
inputting records into the table, select the
(Figure 1.2.3a).
A
B
button to return to the list of surveys
C
D
E
Figure 1.3.4a. Seedling/sapling biomass ADD data form.
Legend 1.3.4a. Seedlings/Saplings Biomass ADD Data: Legend for Figure 1.3.4a
Description
Use the pull down menu to select the species name.
A
Enter either “seedling” or “sapling”.
B
Enter the height of the seedling/sapling in centimeters.
C
Enter the tare weight of the seedling/sapling in grams.
D
Enter the total weight of the seedling/sapling in grams.
E
III - 22
MBRS Technical Document #13: Volume 3
REIS User Manual
EDIT
To edit a record in the seedling/sapling biomass table, use the seedling/sapling biomass edit
form (Figure 1.3.4b, Legend 1.3.4b). To access the seedling/sapling biomass edit form, refer to
Figure 1.3.3a, Letter I). Once the edits have been completed, select the “update record” button
to commit the changes to the database.
A
B
C
D
E
Figure 1.3.4b. Seedling/sapling biomass EDIT data forms.
Legend 1.3.4b. Seedlings/Sapling Biomass EDIT Data: Legend for Figure 1.3.4b
Description
Edit the species name by selecting a new species from the pull down menu.
A
Edit the seedling/sapling.
B
Edit the height of the seedling/sapling in centimeters.
C
Edit the tare weight of the seedling/sapling in grams.
D
Edit the total weight of the seedling/sapling in grams.
E
III - 23
MBRS Technical Document #13: Volume 3
1.3.5
REIS User Manual
Leaf Litter
The purpose of the mangrove leaf litter data entry forms is to transfer the field collected (on
paper) data into the web-based forms by recording the leaf litter data into the leaf litter table
(Table 1.3.5). The items in the leaf litter table are trap number, species, leaf tare, leaf gross,
bract tare, bract gross, flower tare, flower gross, fruit tare, fruit gross, wood tare, wood gross,
miscellaneous tare, and miscellaneous gross.
Table 1.3.5. Leaf Litter Items Description.
Item Name Required Item Description
Trap
Yes
The ID of the trap used to collect the leaf litter
Number
Species
The name of the tree species
Leaf Tare
The tare weight of the leaves
Leaf Gross
The gross weight of the leaves
Bract Tare
The tare weight for bract
Bract Gross
The gross weight for bract
Flower Tare
The tare weight for flowers
Flower
The gross weight for flowers
Gross
Fruit Tare
The tare weight for fruit
Fruit Gross
The gross weight for fruit
Wood Tare
The tare weight for wood
Wood
The gross weight for wood
Gross
Misc Tare
The tare weight for miscellaneous material
Misc Gross
The gross weight for miscellaneous material
III - 24
MBRS Technical Document #13: Volume 3
REIS User Manual
ADD
Use the leaf litter data entry form (Figure 1.3.5a, Legend 1.3.5a) to add records into the leaf
litter table. Once the correct data is entered into the boxes, use the “insert record” button to
enter this data into the database. Unless the “insert record” button is used, the data will not be
entered into the database. When the user has finished inputting records into the table, select the
button to return to the list of surveys (Figure 1.2.3a).
A
B
C
D
E
F
G
H
I
J
K
L
M N
Figure 1.3.5a. Leaf litter ADD data form.
Legend 1.3.5a. Leaf Litter ADD Data: Legend for Figure 1.3.5a.
A
B
C
D
E
F
G
H
I
J
K
L
M
N
Description
Enter the number of the trap
Select the tree species name from the pull down menu
Enter the tare weight of the leaves in grams. If recorded weight is already adjusted for the tare
enter 0.
Enter the gross weight of the leaves in grams. If the recorded weight is already adjusted for the
tare, enter the recorded weight.
Enter the tare weight of the bract in grams. If recorded weight is already adjusted for the tare
enter 0.
Enter the gross weight of the bract in grams. If the recorded weight is already adjusted for the
tare, enter the recorded weight.
Enter the tare weight of the flower in grams. If recorded weight is already adjusted for the tare
enter 0.
Enter the gross weight of the flower in grams. If the recorded weight is already adjusted for the
tare, enter the recorded weight.
Enter the tare weight of the fruit in grams. If recorded weight is already adjusted for the tare enter
0.
Enter the gross weight of the fruit in grams. If the recorded weight is already adjusted for the
tare, enter the recorded weight.
Enter the tare weight of the wood in grams. If recorded weight is already adjusted for the tare
enter 0.
Enter the gross weight of the wood in grams. If the recorded weight is already adjusted for the
tare, enter the recorded weight.
Enter the tare weight of the miscellaneous material in grams. If recorded weight is already
adjusted for the tare enter 0.
Enter the gross weight of the miscellaneous material in grams. If the recorded weight is already
adjusted for the tare, enter the recorded weight.
III - 25
MBRS Technical Document #13: Volume 3
REIS User Manual
EDIT
The edit leaf litter form (Figure 1.3.5a, Legend 1.3.5a) enables the user to change, alter, or
update the previously entered records. After editing a record, the “update record” button must
be used to commit the record changes to the database.
A
B
C
D
E
F
G
H
I
J
K
L
Figure 1.3.5b. Leaf litter EDIT data form.
Legend 1.3.5b. Leaf Litter EDIT Data: Legend for Figure 1.3.5b
Description
Edit the number of the trap
A
Edit the species name by selecting a new species from the pull down menu
B
Edit the tare weight of the leaves in grams
C
Edit the gross weight of the leaves in grams
D
Edit the tare weight of the bract in grams
E
Edit the gross weight of the bract in grams
F
Edit the tare weight of the flower in grams
G
Edit the gross weight of the flower in grams
H
Edit the tare weight of the fruit in grams
I
Edit the gross weight of the fruit in grams
J
Edit the tare weight of the wood in grams
K
Edit the gross weight of the wood in grams
L
Edit the tare weight of the miscellaneous material in grams
M
Edit the gross weight of the miscellaneous material in grams
N
III - 26
M
N
MBRS Technical Document #13: Volume 3
1.3.6
REIS User Manual
Interstitial water
The purpose of the interstitial water data forms is to record the interstitial water monitoring data
into the interstitial water table (Table 1.3.6). The items in the interstitial water table are depth,
sediment surface exposure, and salinity.
Table 1.3.6. Interstitial Water Items Description.
Item Name
Required Item Description
Depth (cm)
Yes
The depth in centimeters at which the sample was collected
Sediment
Yes
Identifies whether the sediment surface was exposed
Surface
(above the water level) at the time of the sample was
Exposed
collected.
(Y/N)
Salinity (ppt)
Yes
The salinity of the water in parts per thousand.
III - 27
MBRS Technical Document #13: Volume 3
REIS User Manual
ADD
To add a new record to the interstitial water table, use the interstitial water data entry form
(Figure 1.3.6a, Legend 1.3.6a). Once the correct data is entered into the boxes, use the “insert
record” button to enter this data into the database. Unless the “insert record” button is used, the
data will not be entered into the database. When the user has finished inputting records into the
table, select the
A
button to return to the list of surveys (Figure 1.2.3a).
B
C
Figure 1.3.6a. Interstitial water ADD data form.
Legend 1.3.6a. Interstital Water ADD Data: Legend for Figure 1.3.6a.
Description
Enter the depth at which the sample was collected in centimeters
A
Enter a Y for yes or a N for no indicating that the sediment surface was
B
exposed at the time the sample was collected
Enter the salinity of the water in parts per thousand.
C
III - 28
MBRS Technical Document #13: Volume 3
REIS User Manual
EDIT
To edit a record in the interstitial water table, use the interstitial water edit form (Figure 1.3.6b,
Legend 1.3.6b). To access the interstitial water edit form, refer to Figure 1.3.3a, Letter I. Once
the edits have been completed, select the “update record” button to commit the changes to the
database
A
B
C
Figure 1.3.6b. Interstitial water EDIT data form.
Legend 1.3.6b. Interstitial Water EDIT Data: Legend for Figure 1.3.6b.
Description
Edit the depth at which the sample was collected in centimeters
A
Edit a Y for yes or a N for no that the sediment surface was exposed at the
B
time the sample was collected
Edit the salinity of the water in parts per thousand.
C
III - 29
MBRS Technical Document #13: Volume 3
REIS User Manual
1.4 Seagrass forms
The mangrove and seagrass forms menu (Figure 1.1.1) lists both the mangrove and seagrass
forms available for data entry. Refer to section 1.3 for the specifics on the mangrove forms.
Continuing from Section 1.1.1, the three seagrass data entry forms available are seagrass
growth, seagrass biomass, and seagrass leaf area index. To access the data entry form for any
of the seagrass data entry forms, the user must select the either the
or
button. Then follow the steps outlined in section 1.2.
1.4.1
Seagrass growth
The purpose of the seagrass growth data forms is to record the seagrass growth data into the
seagrass growth table (Table 1.4.1). The items in the seagrass growth table are quadrat, new
growth tare, new growth gross, old growth tare, old growth gross, standing crop tare, and
standing crop gross.
Table 1.4.1. Seagrass Growth Items Description.
Item Name
Required Item Description
Quadrat
Yes
The number quadrat where the monitoring occurred
New Growth
The tare weight for new leaves in grams
Tare (g)
New Growth
The gross weight for new leaves in grams
Gross (g)
Old Growth Tare
The tare weight for new growth on old leaves in grams.
(g)
Old Growth
The gross weight for new growth on old leaves in grams.
Gross (g)
Standing Crop
The tare weight for old standing crop in grams
Tare (g)
Standing Crop
The gross weight for old standing crop in grams.
Gross (g)
III - 30
MBRS Technical Document #13: Volume 3
REIS User Manual
ADD
Use the seagrass growth data entry form (Figure 1.4.1, Legend 1.4.1) to add records into the
seagrass growth table. Once the correct data is entered into the boxes, use the “insert record”
button to enter this data into the database. Unless the “insert record” button is used, the data
will not be entered into the database. When the user has finished inputting records into the
table, select the
A
button to return to the list of surveys (Figure 1.2.3a).
B
C
E
D
F
G
Figure 1.4.1a. Seagrass growth ADD data form.
Legend 1.4.1a. Seagrass Growth ADD Data: Legend for Figure 1.4.1a
Description
Enter the number of the quadrat (1-6).
A
Enter the new growth tare weight. If the recorded weight has already
B
adjusted for the tare, enter 0.
Enter the new growth gross weight. If the recorded weight has already
C
adjusted for the tare, enter the recorded weight.
Enter the old growth tare weight. If the recorded weight has already
D
adjusted for the tare, enter 0.
Enter the old growth gross weight. If the recorded weight has already
E
adjusted for the tare, enter the recorded weight.
Enter the standing crop tare weight. If the recorded weight has already
F
adjusted for the tare, enter 0.
Enter the standing crop gross weight. If the recorded weight has already
G
adjusted for the tare, enter the recorded weight.
III - 31
been
been
been
been
been
been
MBRS Technical Document #13: Volume 3
REIS User Manual
EDIT
The edit seagrass growth form (Figure 1.4.1b, Legend 1.4.1b) enables the user to change, alter,
or update the previously entered records. After editing a record, the “update record” button must
be used to commit the record changes to the database.
A
B
C
D
E
F
G
Figure 1.4.1b Seagrass growth EDIT data form.
Legend 1.4.1b. Seagrass Growth EDIT Data: Legend for Figure 1.4.1b.
Description
Edit the number of the quadrat.
A
Edit the new growth tare weight. If the recorded weight has already
B
adjusted for the tare, enter 0.
Edit the new growth gross weight. If the recorded weight has already
C
adjusted for the tare, enter the recorded weight.
Edit the old growth tare weight. If the recorded weight has already
D
adjusted for the tare, enter 0.
Edit the old growth gross weight. If the recorded weight has already
E
adjusted for the tare, enter the recorded weight.
Edit the standing crop tare weight. If the recorded weight has already
F
adjusted for the tare, enter 0.
Edit the standing crop gross weight. If the recorded weight has already
G
adjusted for the tare, enter the recorded weight.
III - 32
been
been
been
been
been
been
MBRS Technical Document #13: Volume 3
1.4.2
REIS User Manual
Seagrass Biomass
The purpose of the seagrass biomass data forms is to record the seagrass biomass data into
the seagrass biomass table (Table 1.4.2). The items in the seagrass biomass table are core
replicate, core diameter, core depth, living shoots, Thalassia green leaves tare weight,
Thalassia green leaves gross weight, Thalassia short shoots tare weight, Thalassia short shoots
gross weight, Thalassia rhizomes tare weight, Thalassia rhizomes gross weight, Thalassia roots
tare weight, Thalassia roots gross weight, Thalassia dead tissue tare weight, Thalassia dead
tissue gross weight, other grasses green tissue tare weight, other grasses green tissue gross
weight, other grasses nongreen tissue tare weight, Other nongrasses green tissue gross
weight, fleshy algae tare weight, fleshy algae gross weight, calcareous algae above ground
tare weight, calcareous algae above ground gross weight, calcareous algae below ground tare
weight, calcareous algae below ground gross weight.
Table 1.4.2. Seagrass Biomass Items Description.
Item Name
Required Item Description
Core Replicate
Yes
The core replicate number
Core Diameter (cm)
Yes
The diameter of the core in centimeters
Core Depth (cm)
The depth of the core in centimeters
Living Shoots
The number of living shoots in a core
Thalassia Green
The tare weight for the green leaves in grams.
Leaves Tare Wt.
Thalassia Green
The gross weight for the green leaves in grams.
Leaves Gross Wt.
From the tare and gross the net weight can be
calculated.
Thalassia Short
The tare weight for the short shoots in grams.
Shoots Tare Wt.
Thalassia Short
The gross weight for the short shoots in grams.
Shoots Gross Wt.
From the tare and gross the net weight can be
calculated.
Thalassia Rhizomes
The tare weight for the rhizomes in grams.
Tare Wt.
Thalassia Rhizomes
The gross weight for the rhizomes in grams. From
Gross Wt.
the tare and gross the net weight can be calculated.
Thalassia Roots
The tare weight for the roots in grams.
Tare Wt.
Thalassia Roots
The gross weight for the roots in grams. From the
Gross Wt.
tare and gross the net weight can be calculated.
Thalassia Dead
The tare weight for the dead tissue in grams.
Tissue Tare Wt.
Thalassia Dead
The gross weight for the dead tissue in grams.
Tissue Gross Wt.
From the tare and gross the net weight can be
calculated.
Other Grass Green
The tare weight for green tissue from other grasses
Tissue Tare Wt.
in grams.
Other Grass Green
Tissue Gross Wt.
The gross weight for the green tissue from other
grasses in grams. From the tare and gross the net
weight can be calculated.
III - 33
MBRS Technical Document #13: Volume 3
Other Grass
Nongreen Tissue
Tare Wt.
Other Grass
Nongreen Tissue
Gross Wt.
Fleshy Algae Tare
Wt.
Fleshy Algae Gross
Wt.
Calcareous Algae
Above Ground Tare
Wt.
Calcareous Algae
Above Ground
Gross Wt.
Calcareous Algae
Below Ground Tare
Wt.
Calcareous Algae
Below Ground Gross
Wt.
REIS User Manual
The tare weight for the nongreen tissue from other
grasses in grams.
The gross weight for the nongreen tissue from other
grasses in grams. From the tare and gross the net
weight can be calculated.
The tare weight for fleshy algae in grams.
The gross weight for the fleshy algae in grams.
From the tare and gross the net weight can be
calculated.
The tare weight for above ground calcareous algae
in grams.
The gross weight for the above ground calcareous
algae in grams. From the tare and gross the net
weight can be calculated.
The tare weight for the below ground calcareous
algae in grams.
The gross weight for the below ground calcareous
algae in grams. From the tare and gross the net
weight can be calculated.
III - 34
MBRS Technical Document #13: Volume 3
REIS User Manual
ADD
Use the seagrass biomass data entry form (Figure 1.4.2a, Legend 1.4.2a) to add records into
the seagrass biomass table. Once the correct data is entered into the boxes, use the “insert
record” button to enter this data into the database. Unless the “insert record” button is used, the
data will not be entered into the database. When the user has finished inputting records into the
table, select the
A
button to return to the list of surveys (Figure 1.2.3a).
B
D
F
C
H
E
K
J
I
L
G
N
M
U
Q
O
R
S
T
V
P
W
X
Figure 1.4.2a. Seagrass biomass ADD data form.
Legend 1.4.2a. Seagrass Biomass ADD Data: Legend for Figure 1.4.2a
Description
Enter the core replicate number.
A
Enter the diameter of the core.
B
Enter the depth of the core.
C
Enter the number of living shoots identified in the core.
D
Enter the tare weight for the green leaves in grams. If the recorded weight has
E
already been adjusted for the tare, enter 0.
Enter the gross weight for the green leaves in grams. From the tare and gross
F
the net weight can be calculated. If the recorded weight has already been
adjusted for the tare, enter the recorded weight.
Enter the tare weight for the short shoots in grams. If the recorded weight has
G
already been adjusted for the tare, enter 0.
Enter the gross weight for the short shoots in grams. From the tare and gross
H
the net weight can be calculated. If the recorded weight has already been
adjusted for the tare, enter the recorded weight.
III - 35
MBRS Technical Document #13: Volume 3
REIS User Manual
I
Enter the tare weight for the rhizomes in grams. If the recorded weight has
already been adjusted for the tare, enter 0.
J
Enter the gross weight for the rhizomes in grams. From the tare and gross the
net weight can be calculated. If the recorded weight has already been adjusted
for the tare, enter the recorded weight.
K
Enter the tare weight for the roots in grams. If the recorded weight has already
been adjusted for the tare, enter 0.
L
Enter the gross weight for the roots in grams. From the tare and gross the net
weight can be calculated. If the recorded weight has already been adjusted for
the tare, enter the recorded weight.
M
Enter the tare weight for the dead tissue in grams. If the recorded weight has
already been adjusted for the tare, enter 0.
N
Enter the gross weight for the dead tissue in grams. From the tare and gross the
net weight can be calculated. If the recorded weight has already been adjusted
for the tare, enter the recorded weight.
O
Enter the tare weight for green tissue from other grasses in grams. If the
recorded weight has already been adjusted for the tare, enter 0.
P
Enter the gross weight for the green tissue from other grasses in grams. From
the tare and gross the net weight can be calculated. If the recorded weight has
already been adjusted for the tare, enter the recorded weight.
Q
Enter the tare weight for the nongreen tissue from other grasses in grams. If the
recorded weight has already been adjusted for the tare, enter 0.
R
Enter the gross weight for the nongreen tissue from other grasses in grams.
From the tare and gross the net weight can be calculated. If the recorded weight
has already been adjusted for the tare, enter the recorded weight.
S
Enter the tare weight for fleshy algae in grams. If the recorded weight has
already been adjusted for the tare, enter 0.
T
Enter the gross weight for the fleshy algae in grams. From the tare and gross
the net weight can be calculated. If the recorded weight has already been
adjusted for the tare, enter the recorded weight.
U
Enter the tare weight for above ground calcareous algae in grams. If the
recorded weight has already been adjusted for the tare, enter 0.
V
Enter the gross weight for the above ground calcareous algae in grams. From
the tare and gross the net weight can be calculated. If the recorded weight has
already been adjusted for the tare, enter the recorded weight.
W
Enter the tare weight for the below ground calcareous algae in grams. If the
recorded weight has already been adjusted for the tare, enter 0.
X
Enter the gross weight for the below ground calcareous algae in grams. From
the tare and gross the net weight can be calculated. If the recorded weight has
already been adjusted for the tare, enter the recorded weight.
III - 36
MBRS Technical Document #13: Volume 3
REIS User Manual
EDIT
The edit seagrass biomass form (Figure 1.4.2b, Legend 1.4.2b) enables the user to change,
alter, or update the previously entered records. After editing a record, the “update record” button
must be used to commit the record changes to the database.
G
E
A
B
D
C
F
I
J
H
L
K
T
P
M
N
Q
R
S
X
O
U
V
W
Figure 1.4.2b. Seagrass biomass EDIT data form.
Legend 1.4.2b Seagrass Biomass EDIT Data: Legend for Figure 1.4.2b.
Description
A Edit the core replicate number
B Edit the diameter of the core
C Edit the depth of the core
D Edit the number of living shoots identified in the core
E Edit the tare weight for the green leaves in grams. If the recorded weight has
already been adjusted for the tare, enter 0.
F Edit the gross weight for the green leaves in grams. From the tare and gross the
net weight can be calculated. If the recorded weight has already been adjusted for
the tare, enter the recorded weight.
G Edit the tare weight for the short shoots in grams. If the recorded weight has already
been adjusted for the tare, enter 0.
H Edit the gross weight for the short shoots in grams. From the tare and gross the net
weight can be calculated. If the recorded weight has already been adjusted for the
III - 37
MBRS Technical Document #13: Volume 3
I
J
K
L
M
N
O
P
Q
R
S
T
U
V
W
X
REIS User Manual
tare, enter the recorded weight.
Edit the tare weight for the rhizomes in grams. If the recorded weight has already
been adjusted for the tare, enter 0.
Edit the gross weight for the rhizomes in grams. From the tare and gross the net
weight can be calculated. If the recorded weight has already been adjusted for the
tare, enter the recorded weight.
Edit the tare weight for the roots in grams. If the recorded weight has already been
adjusted for the tare, enter 0.
Edit the gross weight for the roots in grams. From the tare and gross the net weight
can be calculated. If the recorded weight has already been adjusted for the tare,
enter the recorded weight.
Edit the tare weight for the dead tissue in grams. If the recorded weight has already
been adjusted for the tare, enter 0.
Edit the gross weight for the dead tissue in grams. From the tare and gross the net
weight can be calculated. If the recorded weight has already been adjusted for the
tare, enter the recorded weight.
Edit the tare weight for green tissue from other grasses in grams. If the recorded
weight has already been adjusted for the tare, enter 0.
Edit the gross weight for the green tissue from other grasses in grams. From the
tare and gross the net weight can be calculated. If the recorded weight has already
been adjusted for the tare, enter the recorded weight.
Edit the tare weight for the nongreen tissue from other grasses in grams. If the
recorded weight has already been adjusted for the tare, enter 0.
Edit the gross weight for the nongreen tissue from other grasses in grams. From
the tare and gross the net weight can be calculated. If the recorded weight has
already been adjusted for the tare, enter the recorded weight.
Edit the tare weight for fleshy algae in grams. If the recorded weight has already
been adjusted for the tare, enter 0.
Edit the gross weight for the fleshy algae in grams. From the tare and gross the net
weight can be calculated. If the recorded weight has already been adjusted for the
tare, enter the recorded weight.
Edit the tare weight for above ground calcareous algae in grams. If the recorded
weight has already been adjusted for the tare, enter 0.
Edit the gross weight for the above ground calcareous algae in grams. From the
tare and gross the net weight can be calculated. If the recorded weight has already
been adjusted for the tare, enter the recorded weight.
Edit the tare weight for the below ground calcareous algae in grams. If the recorded
weight has already been adjusted for the tare, enter 0.
Edit the gross weight for the below ground calcareous algae in grams. From the
tare and gross the net weight can be calculated. If the recorded weight has already
been adjusted for the tare, enter the recorded weight.
III - 38
MBRS Technical Document #13: Volume 3
1.4.3
REIS User Manual
Seagrass Leaf Area Index
The purpose of the seagrass leaf area index data forms is to record the seagrass leaf area
index data into the seagrass growth table (Table 1.4.3a). The items in the seagrass leaf area
index table are shoot, leaf, round tip, length to epis, leaf length, leaf width.
Table 1.4.3. Seagrass Leaf Area Index Items Description.
Item Name
Required Item Description
Shoot
Yes
The number of the shoot that is being measured.
Number
Leaf Number
Yes
The number of the leaf on the associated shoot that is
being measured.
Round Tip
Indicates whether the tip of the leaf is rounded.
Epis
The length in centimeters from the base of the leaf to the
first occurrence of epiphytes.
Leaf Length
The length of the leaf in centimeters.
Leaf Width
The width of the leaf in centimeters.
III - 39
MBRS Technical Document #13: Volume 3
REIS User Manual
ADD
Use the seagrass leaf area index data entry form (Figure 1.4.3a, Legend 1.4.3a) to add records
into the leaf litter table. Once the correct data is entered into the boxes, use the “insert record”
button to enter this data into the database. Unless the “insert record” button is used, the data
will not be entered into the database. When the user has finished inputting records into the
table, select the
A
button to return to the list of surveys (Figure 1.2.3a).
B
C
D
E
F
Figure 1.4.3a Seagrass leaf area index ADD data form.
Legend 1.4.3a. Seagrass Leaf Area ADD Data: Legend for Figure 1.4.3a
Description
Enter the shoot number (1-5). Duplicate shoot numbers are not allowed within
A
a quadrat.
Enter the leaf number (1-5). Duplicate leaf numbers are not allowed on a
B
shoot.
Enter yes or no for round tip.
C
Enter the length to the epiphytes in centimeters. If epiphytes cover the entire
D
leaf all the way down to the base this value would be 0. If there are no
epiphytes this value would be the same as the leaf length.
Enter the length of the leaf in centimeters.
E
Enter the width of the leaf in centimeters.
F
III - 40
MBRS Technical Document #13: Volume 3
REIS User Manual
EDIT
The edit seagrass leaf area index form (Figure 1.4.3b, Legend 1.4.3b) enables the user to
change, alter, or update the previously entered records. After editing a record, the “update
record” button must be used to commit the record changes to the database.
A
B
C
D
E
Figure 1.4.3b Leaf area index EDITdata form
Legend 1.4.3b Leaf Area Index EDIT Data: Legend for Figure 1.4.3b
Description
Edit the shoot number (1-5).
A
Edit the leaf number (1-5).
B
Edit yes or no for round tip.
C
Edit the length to the epiphytes in centimeters.
D
Edit the length of the leaf in centimeters.
E
Edit the width of the leaf in centimeters.
F
III - 41
F
MBRS Technical Document #13: Volume 3
2
REIS User Manual
REPORTS
This chapter is designed to provide the user with the step-by-step instructions necessary to view
and print the information in the data grouping tables in a report format. To enhance this user
guide, the explanation for each report includes, where applicable, an introduction, objective,
structure, item descriptions, legend, screenshots, and any other information deemed useful to
the user. For each report, several navigational elements remain the same as those in the forms.
Those elements are shown in Figure 1.1 and described in Legend 1.1. The items identified in
Figure 1.1 will not be identified on any pages in this chapter.
Note: The screenshots used in this chapter, were created from a temporary database
and the data shown in the screenshots should not be considered applicable to the
MBRS project. There may be differences between the actual online reports and the
screenshots in this manual.
III - 42
MBRS Technical Document #13: Volume 3
2.1
REIS User Manual
Menu pages
Once the user has successfully logged onto the MBRS system, the user is taken to the main
menu page. A sample menu page is shown in Figure 2.1 with navigation explained in Legend
2.1. There are seven main data groupings found within this reef system database. These data
groupings are coral reef ecology, mangroves and seagrasses, marine pollution, oceanography,
marine protected areas, spawning aggregations, and administration. This chapter discusses the
output reports for the Mangroves and Seagrasses data groupings. From this menu page, the
user can access the data entry forms (Chapter 1) and reports (Chapter 2). Refer to chapter 1 for
details on the input forms.
To access the output reports for any of the data groupings, select the “queries/reports” button
associated with that data grouping. For example, to access the reports for ‘Mangroves and
Seagrasses’, select the “reports” button directly to the right (Figure 2.1, legend 2.1, label A).
Selecting this button takes the user to the mangroves and seagrass report menu (See section
2.1.1).
A
Figure 2.1. Report Menu
Legend 2.1 Legend for Figure 2.1
Description
The buttons in this column connect the user to menu of reports for the data set
A
listed.
III - 43
MBRS Technical Document #13: Volume 3
2.1.1
REIS User Manual
Mangrove and seagrass reports
The mangrove and seagrass report menu (Figure 2.1.1. Legend 2.1.1) identifies the reports that
are available to view or query. The mangrove categories are mangrove characterization and
zonation, forest structure, forest structure of seedlings and saplings, seedlings and sapling
biomass, and leaf litter data. For the discussion of mangrove reports refer to Section 2.3. The
seagrass categories are seagrass biomass, seagrass growth, and Thalassia leaf area index.
Refer to section 2.4 for the discussion of seagrass reports.
A
B
Figure 2.1.1 Mangrove and seagrass report menu
Legend 2.1.1 Legend for Figure 2.1.1
Description
The buttons in this column allow the user to construct a query on the detailed
A
data for the data set listed
This buttons in this column connect the user to predefined summary reports on
B
the dataset listed.
III - 44
MBRS Technical Document #13: Volume 3
2.2
REIS User Manual
Query page
For each data grouping, the format and structure of the query page will be the same. The first
task will be to select a field to query (Figure 2.2, Letter A). The fields available to query from will
change depending on which data table is being accessed. The next task is to decide if the query
should look for data that is equal, less than, greater than, not equal, or like (Figure 2.2, Letter B)
the value entered (Figure 2.2, Letter C).
A
C
B
F
D
Figure 2.2 Sample Query
Legend 2.2 Legend for Figure 2.2
Description
Select a field to query from.
A
Select equal, less than, greater than, not equal, or like from the pull down
B
menu
Enter the value
C
Select the submit button to execute the query
D
Select this link to access a list of sites with coral and fish data
E
Select this link to access a list of sites with seagrass data
F
Select this link to access a list of sites with mangrove data
G
III - 45
E
G
MBRS Technical Document #13: Volume 3
REIS User Manual
Wildcards can be used in the value field only if Like is selected as the comparison operator. A
wildcard character is a symbol that stands for one or more characters in text searches. The
database supports two wildcards: “_” and "%". The wildcard "_" matches any single character.
The wildcard “%” matches one or more of any characters. The following expressions will all find
Belize:
1) Country Equal Belize
2) Country Like Belize
3) Country Like _elize
4) Country Like %lize
But not:
5) Country Like _lize
6) Country Equal %lize
The items in the query field (Figure 2.2 Letter A), are based on each report form. The code for
the items is in the list is given in the pages following this section. Descriptions of the items are
given in the reports sections. The items common to all the reports are:
1) Country – The country in which the site is located.
2) Location – The name of the geographic feature on which the site is located, such
as Banco Chinchorro.
3) Ecosystem – The ecosystem as defined by the Manual of methods for the MBRS
Synoptic Monitoring Program. Currently the values are Coral, Mangrove, and
Seagrass.
4) Habitat – The habitat within the ecosystem as defined by the Manual of methods
for the MBRS Synoptic Monitoring Program. Currently the habitats are Shallow
Fore Reef, Shallow Back Reef, Deep Fore Reef, Coastal, and Fringing.
5) Site_id – The unique site identifier.
6) Survey_id – The unique identifier for each survey. This is not usually used by the
user.
7) Startdate – The date the sampling was conducted, or in the case of timed interval
sampling such as mangrove leaf litter and seagrass growth the date the interval
started.
8) Transect – The transect or plot number.
9) Collector – The person doing the field work collecting the data.
The following example shows how to create a query to select all the benthic coral data for the
country of Belize.
1) Access the coral and fish report menu page (Figure 2.1, Letter A).
2) Select the benthic data “queries” button (Figure 2.1.1, Letter A).
III - 46
MBRS Technical Document #13: Volume 3
REIS User Manual
3) Select country from the select a
field to query on menu (Figure
2.2a, Letter A).
A
Figure 2.2a Selecting item to query on.
A
4) Select “Equal” from the pull
down menu (Figure 2.2b, Letter
A).
Figure 2.2b. Select comparison operator.
A
5) Enter Belize in the value field
(Figure 2.2c, Letter A).
B
Figure 2.2c. Enter the value for comparison
6) Select the “submit” button (Figure 2.2c, Letter B).
7) An output report of benthic coral data should appear on the screen.
Up to three criteria can be used in querying the data. If the user wanted to further restrict the
search parameters instead of selecting the “Submit” button in step 6 they would repeat steps 3
through 5, except using the second row of the query form. For example, if only data for Belize
Deep Fore Reef environments was wanted the final query form would look like Figure 2.2d.
Figure 2.2d Query on two parameters.
III - 47
MBRS Technical Document #13: Volume 3
REIS User Manual
Query Item Code List
2.3.3 Forest Structure Seedling/Sapling
Report
Code
Item
Subplot
subplot
Position X
position_x
Position Y
position_y
Seedling/sapling
sapling
DBH (cm)
dbh
Height (cm)
height
Live (Y/N)
live
Biomass (g)
biomass
Common for all Queries
Code
Item
Site ID
site_id
Date
startdate
Transect
transect
Person Collecting collector
Supervisor
supervisor
Country
country
Location
location
Ecosystem
ecosystem
Habitat
habitat
Survey ID
Survey_id
Species Name
gen_spec
2.3.4 Seedling/Sapling Biomass Report
Code
Item
Seedling/sapling
sapling
Height (cm)
height
Weight (g)
weight
2.3.1 Mangrove
Characterization/Zonation Report
Code
Item
Distance
from distance
Shore (m)
Distance
from pointdistance
Point (m)
DBH (cm)
dbh
Height (m)
height
quadrant
quadrant
2.3.5 Leaf Litter Report
Code
Item
End Date
enddate
Duration (days)
duration
Leaf Weight
leaf
Bract Weight
bract
Flower Weight
flower
Wood Weight
wood
Fruit Weight
fruit
Misc. Weight
misc
Total Weight
total
2.3.2 Forest Structure Report
Code
Item
Position X
position_x
Position Y
position_y
Tree Number
tree
DBH (cm)
dbh
Proproot Height proproot
(cm)
Trunk Length (m) trunklength
Tree Height (m)
treeheight
Basal Area (cm²) basalarea
Biomass
(g) gbiomass
(Golly)
Biomass
(g) cbiomass
(Cintron)
2.3.6 Interstitial Water Report
Code
Item
Depth (cm)
depth
Sediment
sedexposed
Surface Exposed
(Y/N)
Salinity (ppt)
salinity
III - 48
MBRS Technical Document #13: Volume 3
REIS User Manual
2.4.1 Seagrass Growth Report
Code
Item
Quadrat
quadrat
New Vegetation
newleaf
Old Vegetation
oldleaf
Standing
standing
Vegetation
Days
day
Productivity
productivity
turnover
turnover
Fleshy Algae
Biomass (g/sq m)
Calcareous Algae
Above Ground (g)
Calcareous Algae
Below Ground (g)
Calcareous Algae
A:B Ratio
Calcareous Algae
Total (g)
Calcareous Algae
Biomass (g/sq m)
2.4.2 Seagrass Biomass Report
Code
Item
Person Processing processor
Core Replicate
replicate
Core Diameter
diameter
(cm)
Core Depth (cm)
depth
Living Shoots
livingshoots
Thalassia Green
tgrn
Leaves (g)
Thalassia Short
tsht
Shoots (g)
Thalassia
trhz
Rhizomes (g)
Thalassia Roots
troot
(g)
Thalassia Dead
tdead
Tissue (g)
Thalassia Above
tabove
Ground Tissue (g)
Thalassia Below
tbelow
Ground Tissue (g)
Thalassia A:B
tabratio
Ratio
Thalassia Total
ttotal
Tissue (g)
Thalassia Biomass tgsqm
(g/sq m)
Other Grass Green ogrn
Tissue (g)
Other Grass
ongrn
Nongreen Tissue
(g)
Other Grass Total
ototal
(g)
Other Grass
ogsqm
Biomass (g/sq m)
Fleshy Algae (g)
fa
fagsqm
caabv
cablw
caabratio
catotal
cagsqm
2.4.3 Thalassia Leaf Area Index Report
Code
Item
Shoot
shoot
Leaf
leaf
Tip
tip
Epis
epis
Length
lenght
Width
width
Area
area
III - 49
MBRS Technical Document #13: Volume 3
2.3
REIS User Manual
Mangrove Reports
The mangrove and seagrass report menu (Figure 2.1.1) lists both the mangrove and seagrass
reports available. Refer to section 2.4 for the specifics on the seagrass reports. The six
mangrove reports available are characterization/zonation, forest structure, seedling/sapling,
seedling/sapling biomass, interstitial water, and leaf litter. To access the reports for any of the
mangrove data, the user must select the appropriate “query” button located to the right. Refer to
Section 2.2 for details on accessing and executing a query.
2.3.1
Characterization/zonation
In order to access the existing mangrove characterization/zonation report, a query must first be
selected. For instruction on creating a query, refer to section 2.2. Once the query is executed, a
tabular view of the existing mangrove characterization/zonation data is presented, as shown in
Figure 2.3.1. The items in this report are site id, date, transect, person collection, species name,
distance from shore, distance from point, DBH, and height. Legend 2.3.1 contains item
descriptions for the mangrove characterization/zonation report data.
H
G
B
A
C
D
E
F
Figure 2.3.1 Mangrove characterization/zonation Report
Legend 2.3.1 Legend for Figure 2.3.1
Item Name
Item Description
This is an identifier for the site.
A Site ID
The date the data was collected.
B Date
The transect where the data was collected.
C Transect
D Person Collecting Name of the person that collected data.
The name of the species.
E Species Name
Distance from
Distance from the origin of the centerline to the
F
Shore (m)
point.
The quadrant the tree is located in.
G Quadrant
H
I
J
Distance from
point (cm)
DBH (cm)
Height (m)
The distance from the tree to the point on the line.
The diameter of the tree at breast height.
The height of the tree.
III - 50
I
J
MBRS Technical Document #13: Volume 3
2.3.2
REIS User Manual
Forest structure
To access the mangrove forest structure report, a query must be executed (See Section 2.2).
The sample mangrove forest structure report (Figure 2.3.2) is shown without the navigation box
due to the length of the report. The mangrove forest structure report items are site id, date, plot,
person collecting, species name, position X, position Y, tree number, DBH, proproot height,
trunk length, height, basal area, biomass (Golley) and biomass (Cintron). For item descriptions
for this report, see Legend 2.3.2.
I
D
A
C
B
E
H
F
M
J
K
N
O
L
G
Figure 2.3.2 Forest Structure Report
Legend 2.3.2 Legend for Figure 2.3.2
Item Name
Item Description
Site ID
This is an identifier for the site.
A
Date
The date the data was collected.
B
Plot
The sample area.
C
Person Collecting
Name of the person that collected data.
D
Species Name
The name of the species.
E
Position
X
The
X location of the tree in relation to the corner of the plot.
F
G
Position Y
The Y location of the tree in relation to the corner of the plot.
H
I
J
K
L
M
Tree Number
DBH (cm)
Proproot Height (cm)
Trunk Length (m)
Tree Height (m)
Basal Area (cm²)
N
Biomass (g) (Golley)
O
Biomass (g)
(Cintron)
The number of the tree within the plot.
The diameter of the tree at breast height in centimeters.
The height of the prop root in centimeters.
The length of the trunk in meters.
The height of the tree in meters.
The cross sectional area at the point where dbh was
measured.
The calculated biomass of tree based on dbh (Golley et al
1962).
The calculated biomass of tree based on Citron and Shaeffer
Novelli (1984).
III - 51
MBRS Technical Document #13: Volume 3
2.3.3
REIS User Manual
Seedling/Sapling
To access the mangrove forest seedling/sapling report, a query must be executed (Section 2.2).
The sample mangrove forest seedling/sapling report (Figure 2.3.3) is shown without the
navigation box due to the length of the report. The items shown are site id, date, transect,
person collecting, species name, subplot, position x, position y, sapling number, DBH, height,
live and biomass. These items are described in Legend 2.3.3.
A
I
D
J
K
M
L
B
C
E
F
G
H
Figure 2.3.3 Forest structure seedling/sapling report
Legend 2.3.3 Legend for Figure 2.3.3
Item Name
Item Description
Site ID
This is an identifier for the site.
A
Date
The
date the data was collected.
B
Transect
The transect where the data was collected.
C
Person Collecting
Name of the person that collected data.
D
Species Name
The species name of the seedling/sapling.
E
Subplot
The subplot ID.
F
Position X
The X location of the seedling/sapling in relation to the
G
corner of the plot.
Position Y
The Y location of the seedling/sapling in relation to the
H
corner of the plot.
Seedling/Sapling
The seedling/sapling number in the plot.
I
DBH (cm)
The diameter of the seedling/sapling at breast height.
J
Height (cm)
The height of the seedling/sapling.
K
Live (Y/N)
Indicate whether the seedling/sapling is alive with a Y for
L
yes and a N for no.
Biomass (g)
The seedling/sapling biomass in grams.
M
III - 52
MBRS Technical Document #13: Volume 3
2.3.4
REIS User Manual
Seedling/Sapling biomass
To access the mangrove forest seedling/sapling biomass report (Figure 2.3.4), a query must be
executed (Section 2.2). The items shown are site id, date, transect, person collecting, species
name, seedling/sapling, height, and weight. These items are described in Legend 2.3.4.
A
F
B
C
D
E
Figure 2.3.4 Seedling/sapling biomass report
Legend 2.3.4 Legend for Figure 2.3.4
Item Name
Item Description
This is an identifier for the site.
A Site ID
The date the data was collected.
B Date
The transect where the data was collected.
C Transect
Name of the person that collected data.
D Person
Collecting
The species name of the seedling/sapling.
E Species Name
The seedling/sapling number in the plot.
F Seedling
/Sapling
The height of the seedling/sapling.
G Height (cm)
Weight of the seedling/sapling in grams.
H Weight (g)
III - 53
G
H
MBRS Technical Document #13: Volume 3
2.3.5
REIS User Manual
Leaf litter
To access the mangrove forest leaf litter report, a query must be executed (Section 2.2). The
sample mangrove forest leaf litter report (Figure 2.3.5) is shown without the navigation box due
to the length of the report. The items included are site id, start date, end date, transect, person
collecting, species name, duration, leaf weight, bract weight, flower weight, wood weight, fruit
weight, misc. weight, and total weight. These items are described in Legend 2.3.5.
C
A
G
E
K
I
B
M
D
N
F
H
J
Figure 2.3.5 Leaf litter report
Legend 2.3.5 Legend for Figure 2.3.5
Item Name
Item Description
Site
ID
This is an identifier for the site.
A
The date the .monitoring period was started
B Start Date
The date the data was collected.
C End Date
The transect where the data was collected.
D Transect
Name of the person that collected data.
E Person
Collecting
F Species Name The name of the species.
G Duration (days) The duration of the sample interval.
The weight of the leaves.
H Leaf weight
Bract weight
The weight for bract.
I
Flower weight
The weight for flowers.
J
The weight for wood.
K Wood weight
The weight for fruit.
L Fruit weight
The weight for miscellaneous material.
M Misc. Weight
The total weight of all components.
N Total Weight
III - 54
L
MBRS Technical Document #13: Volume 3
2.3.6
REIS User Manual
Interstitial water
To access the interstitial water report (Figure 2.3.6), a query must be executed (Section 2.2).
The items shown on the report are depth, sediments surface exposure, and salinity. These
items are described in Legend 2.3.6.
A
B
C
D
E
F
G
Figure 2.3.6. Interstitial water report.
Legend 2.3.6 Legend for Figure 2.3.6
Item Name
Item Description
This is an identifier for the site.
A Site ID
The date the data was collected.
B Start Date
The transect where the data was collected.
C Transect
Name of the person that collected data.
D Person
Collecting
The depth in centimeters at which the sample was
E Depth (cm)
collected.
Identifies whether the sediment surface was exposed
F Sediment
Surface
(above the water level) at the time of the sample was
Exposed (Y/N) collected.
The salinity of the water in parts per thousand.
G Salinity (ppt)
III - 55
MBRS Technical Document #13: Volume 3
2.4
REIS User Manual
Seagrass Reports
The mangrove and seagrass report menu (Figure 2.1.1) lists both the mangrove and seagrass
reports available. Refer to section 2.3 for the specifics on the mangrove reports. The three
seagrass reports available are seagrass growth, seagrass biomass, and seagrass leaf area
index. To access the reports for any of the seagrass data, the user must select the appropriate
“query” button located to the right. Refer to Section 2.2 for details on accessing and executing a
query.
2.4.1
Seagrass Growth
To access the seagrass growth report, a query must be executed (Section 2.2). The sample
seagrass growth report (Figure 2.4.1) is shown without the navigation box due to the length of
the report. The items are site id, date, transect, person collecting, quadrant, new veg, old veg,
standing veg, duration, productivity, and turnover. These items are described in Legend 2.4.1.
E
C
A
D
B
G
F
I
H
Figure 2.4.1 Seagrass growth report
Legend 2.4.1 Legend for Figure 2.4.1
Item Name
Item Description
This is an identifier for the site.
A Site ID
The date the data was collected.
B Date
The transect where the data was collected.
C Transect
Name of the person that collected data.
D Person Collecting
The number quadrat where the monitoring
E Quadrat
occurred.
The weight of the new leaves.
F New Vegetation
The weight the new growth on old leaves.
G Old Vegetation
H Standing Vegetation The weight of the old standing crop.
The duration of the sampling interval in days.
I Duration
The amount of new material produced in
J Productivity
g/sqm/day.
The turnover rate in %/day.
K Turnover
III - 56
K
J
MBRS Technical Document #13: Volume 3
2.4.2
REIS User Manual
Seagrass Biomass
To access the seagrass biomass report (Figure 2.4.2) a query must be executed (Section 2.2).
The items are site id, date, transect, person collecting, replicate, core diameter, core depth, no
living shoots, seagrass fraction, and weight. These items are described in Legend 2.4.2.
A
C
E
B
F
D
Q
O
H
R
T
U
K
I
G
V
J
W
X
M
N
2
3
L
Y
Z
1
P
S
Figure 2.4.2 Seagrass biomass report
Legend 2.4.2 Legend for Figure 2.4.2
Item Name
Item Description
This is an identifier for the site.
A Site ID
The date the data was collected.
B Date
Name of the person that collected data.
C Person Collecting
Name of the person that processed the samples in the lab.
D Person Processing
The core replicate number.
E Core Replicate
F
G
Core Diameter (cm)
Core Depth (cm)
The diameter of the core in centimeters.
The depth of the core in centimeters.
H
I
The number of living shoots in a core.
The net weight for the green leaves in grams
K
Living Shoots
Thalassia Green Leaves
(g)
Thalassia Short Shoots
(g)
Thalassia Rhizomes (g)
The net weight for the rhizomes in grams.
L
Thalassia Roots (g)
The net weight for the roots in grams.
J
The net weight for the short shoots in grams.
III - 57
MBRS Technical Document #13: Volume 3
REIS User Manual
P
Thalassia Dead Tissue
(g)
Thalassia Above Ground
(g)
Thalassia Below Ground
(g)
Thalassia A:B Ratio
Q
Thalassia Total (g)
R
Thalassia Biomass (g/sq
m)
Other Grass Green
Tissue (g)
Other Grass Nongreen
Tissue (g)
Other Grass Total
The biomass of Thalassia in grams per square meter.
Other Grass Biomass
(g/sq m)
Fleshy Algae (g)
Fleshy Algae Biomass
(g/sq m)
Calcareous Algae Above
Ground (g)
The biomass of other grasses in grams per square meter.
M
N
O
S
T
U
V
W
X
Y
The net weight for the dead tissue in grams.
The net weight for the above ground tissue in grams.
The net weight for the below ground tissue in grams.
Ratio of the weight of above ground tissue to below ground
tissue.
The total net weight of Thalassia.
The net weight for green tissue from other grasses in grams.
The net weight for the nongreen tissue from other grasses in
grams.
The total net weight of other grasses.
The net weight for fleshy algae in grams.
The biomass of fleshy algae in grams per square meter.
The net weight for above ground calcareous algae in grams.
Z
Calcareous Algae Below
Ground (g)
The net weight for the below ground calcareous algae in
grams.
1
Calcareous Algae A:B
Ratio
Calcareous Algae Total
(g)
Calcareous Algae
Biomass (g/sq m)
Ratio of the weight of above ground tissue to below ground
tissue.
The total net weight of calcareous algae.
2
3
The biomass of calcareous algae in grams per square meter.
III - 58
MBRS Technical Document #13: Volume 3
2.4.3
REIS User Manual
Seagrass leaf area index
To access the seagrass leaf area index report (Figure 2.4.3) a query must be executed (Section
2.2). The items are site id, date, person collecting, shoot, leaf, tip, epis, length, and width. These
items are described in Legend 2.4.3.
A
B
C
D
E
F
G
H
I
Figure 2.4.3 Seagrass Leaf Area Index Report
Legend 2.4.3 Legend for Figure 2.4.3
Item Name
Item Description
This is an identifier for the site.
A Site_id
The date the data was collected.
B Date
The name of the person who collected the data.
C Person Collecting
The quadrat where the sample was collected.
D Quadrat
The number of the shoot.
E Shoot
The number of the leaf.
F Leaf
Y for yes and N for no if a tip was present.
G Tip
Distance from base to first occurrence of the epiphytes.
H Epis
Length
The length of the leaf.
I
The width of the leaf.
J Width
The area of the leaf in cm².
K Area
III - 59
J
K