1
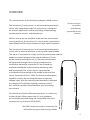
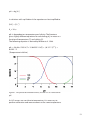
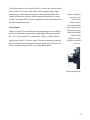
HYDROGEN SULFIDE SENSOR USER MANUAL
1
Hydrogen sulfide sensor manual
Copyright © 2012 · Unisense A/S
Version October 2012
HYDROGEN SULFIDE SENSOR MANUAL
UNISENSE A/S
TABLE OF CONTENTS
WARRANTY AND LIABILITY . . . . . . . . . . . . . . . . . . . . . . . . . . . . . . . . . . . . . . . . . . . . . . . . . . . 6
CONGRATULATIONS WITH YOUR NEW PRODUCT! . . . . . . . . . . . . . . . . . . . . . . . . . . . . 7
Support, ordering, and contact information
7
OVERVIEW . . . . . . . . . . . . . . . . . . . . . . . . . . . . . . . . . . . . . . . . . . . . . . . . . . . . . . . . . . . . . . . . . . . . 9
GETTING STARTED . . . . . . . . . . . . . . . . . . . . . . . . . . . . . . . . . . . . . . . . . . . . . . . . . . . . . . . . . . 11
Unpacking a new sensor
Polarize picoammeter
Connecting the microsensor
Pre-polarization
Calibration
11
11
11
11
12
Calibration theory
12
Calibration in the laboratory
14
Calibration in the field
16
Re-calibration17
MEASUREMENTS . . . . . . . . . . . . . . . . . . . . . . . . . . . . . . . . . . . . . . . . . . . . . . . . . . . . . . . . . . . . 18
Mounting the sensors
Electrical noise
pH influence
Interference
18
18
18
19
ADVANCED USE . . . . . . . . . . . . . . . . . . . . . . . . . . . . . . . . . . . . . . . . . . . . . . . . . . . . . . . . . . . . 20
STORAGE AND MAINTENANCE . . . . . . . . . . . . . . . . . . . . . . . . . . . . . . . . . . . . . . . . . . . . . . 21
Cleaning the sensor
21
REFERENCES . . . . . . . . . . . . . . . . . . . . . . . . . . . . . . . . . . . . . . . . . . . . . . . . . . . . . . . . . . . . . . . . 22
TROUBLE SHOOTING . . . . . . . . . . . . . . . . . . . . . . . . . . . . . . . . . . . . . . . . . . . . . . . . . . . . . . . 23
WARRANTY AND LIABILITY
Notice to Purchaser
This product is for research use only. Not for use in human diagnostic or
therapeutic procedures.
Warning
Microsensors have very pointed tips and must be handled with care to
avoid personal injury and only by trained personnel.
Unisense A/S recommends users to attend instruction courses to ensure
proper use of the products.
Warranty and Liability
The hydrogen sulfide microsensor is covered by a 90 days limited
warranty. Microsensors are a consumable. Unisense will only replace
dysfunctional sensors if they have been tested according with the
instructions in the manual within 14 days of receipt of the sensor(s).
The warranty does not include repair or replacement necessitated by
accident, neglect, misuse, unauthorized repair, or modification of the
product. In no event will Unisense A/S be liable for any direct, indirect,
consequential or incidental damages, including lost profits, or for any
claim by any third party, arising out of the use, the results of use, or the
inability to use this product.
Unisense mechanical and electronic laboratory instruments must
only be used under normal laboratory conditions in a dry and clean
environment. Unisense assumes no liability for damages on laboratory
instruments due to unintended field use or exposure to dust, humidity
or corrosive environments.
Repair or Adjustment
Sensors and electrodes cannot be repaired. Equipment that is not
covered by the warranty will, if possible, be repaired by Unisense A/S
with appropriate charges paid by the customer. In case of return of
equipment please contact us for return authorization.
For further information please see the document General Terms of Sale
and Delivery of Unisense A/S as well as the manuals for the respective
products.
6
CONGRATULATIONS WITH YOUR NEW PRODUCT!
Support, ordering, and contact information
The Unisense hydrogen sulfide microsensor is a miniaturized
Clark-type hydrogen sulfide sensor designed for reliable and fast
measurements in a large number of research applications.
If you wish to order additional products or if you encounter any
problems and need scientific/technical assistance, please do not
hesitate to contact our sales and support team. We will respond to
your inquiry within one working day.
E-mail: [email protected]
Unisense A/S
Tueager 1
DK-8200 Aarhus N, Denmark
Tel: +45 8944 9500
Fax: +45 8944 9549
Further documentation and support is available at our website
www.unisense.com.
REPLACEMENT OF SENSORS
Unisense will replace sensors that have been damaged during shipment provided that:
•
The sensors were tested immediately upon receipt in accordance with the delivery note
and the manual
•
The seal is still intact.
•
The sensors are returned to Unisense for inspection within two weeks.
•
The sensors are correctly packed for return to Unisense, in accordance with the note
included in the sensor box.
7
RECOMMENDED AMPLIFIERS
One-channel amplifier: Microsensor Monometer
Multi-channel amplifiers: Microsensor Multimeter
8
OVERVIEW
This manual covers all the Unisense hydrogen sulfide sensors.
IMPORTANT
Unisense sensors
are neither
intended nor
approved for use of
humans
The Unisense H2S microsensor is a miniaturized amperometric
sensor with a guard electrode. The microsensor is designed
for research applications within physiology, biotechnology,
environmental sciences, and related areas.
With its minute tip size, excellent response time, and minimal
stirring sensitivity, the Unisense H2S sensor makes it possible to
make reliable and fast measurements at high spatial resolution.
LEMO plug
The LEMO connector contains connections for
both reference, guard, and sensing cathode.
Sensor tip
For calculation of total sulfide concentrations, it is necessary
to know the pH. When measuring H2S in pH gradients,
pH should be measured along the same profile with a pH
microsensor (e.g. Unisense PH10/PH25).
Cable includes guard
The Unisense H2S microsensor is a miniaturized amperometric
sensor with an internal reference, a sensing and a guard anode.
The sensor is connected to a high-sensitivity picoammeter and the
anodes are polarized against the internal reference. Driven
by the external partial pressure, H2S from the environment
will penetrate through the sensor tip membrane into
the alkaline electrolyte, where the HS- ions formed are
oxidized immediately by ferricyanide, producing sulfur
and ferrocyanide. The sensor signal is generated by
re-oxidation of ferrocyanide at the anode in the tip of the
sensor (Jeroschewski et al. 1996). The Unisense picoampere
amplifier converts the resulting reduction current to a
voltage signal. Also the internal guard electrode is polarized
to scavenge H2S and helps keeping a constant ratio of
ferri- to ferro cyanide in the electrolyte, thus minimizing
zero-current.
9
The electrolyte in the H2S microsensor is photo-degraded by high
light intensities – especially UV and blue light. This is seen as a
higher signal in light as compared to the signal in darkness for
the same amount of H2S. The sensors are painted black to protect
them against light. Light may however, still enter the sensor
through the tip, which it is not possible to paint.
10
GETTING STARTED
Unpacking a new sensor
When receiving a new microsensor remove the shock-absorbing
grey plastic net. Please do not remove the seal and protective
tube before the following steps are successfully completed.
NOTE: if you have a H2S-MR electrode, calibrate in the
protective tube and then carefully move the sensor from this
tube into the provided blue guide.
Polarize picoammeter
The signal from the H2S sensor is generated in pA. Therefore the
H2S sensor must be connected to a Unisense picoampere amplifier
during measurements.
H2S sensors should be polarised with +85mV (on legacy PA2000
meters value is set at +0.08V). On the Microsensor Multimeter and
Microsensor Monometer, sulfide sensors with lemo-connectors
are automatically recognized and polarization automatically set. If
you are using another amplifier or sensor connection type, please
check the polarization voltage before connecting a sensor, since
incorrect polarization may destroy the sensor.
For details on how to set the polarization, consult the user manual
of the amplifier that you are using.
Connecting the microsensor
Connect the LEMO connector to the input terminal. The LEMO
connector contains connections for both reference, guard and
sensing anode.
Pre-polarization
When the sensor is not in use, hydrogen sulfide will build up inside
the electrolyte. This must be removed by the sensing anode and
the guard anode before stable operation of the sensor is possible.
WARNING
Do not remove the
seal and protective
plastic tube before
the following
steps (1-4) and
calibration
are succesfully
completed.
IMPORTANT
If you have a
H2S-MR electrode,
calibrate in the
protective tube
and then carefully
move the sensor
from this tube into
the provided blue
guide.
PREPOLARIZATION
If the sensor is
new or has not
been operated for
several days, then it
must be polarized
for at least 2 hours
before it can be
calibrated and
used. After shorter
periods without
polarization, the
sensor should be
polarized until it
has exhibited a
stable signal for 10
minutes.
11
Therefore, a period of polarization is necessary before you can use
the sensor. This is called the pre-polarization period.
If the sensor is new or has not been operated for several days,
it must be pre-polarized for at least 2 hours before it can be
calibrated and used. After shorter periods without polarization, the
sensor should be pre-polarized until it has shown a stable signal
for at least ten minutes.
When pre-polarization is initiated, the signal will be very high
and then drop rapidly over the first few minutes. After that, the
signal will drop slowly for up to two hours (for needle- and some
custom made sensors slightly longer). It takes normally between
10 minutes and an hour before a sensor is stable.
The sensor signal depends on the specific sensor (see the delivery
note which came with the sensor). If the signal does not stabilize
or is too high or too low, refer to the ‘Troubleshooting’ section.
Calibration
Calibration theory
The sensor detects the partial pressure of H2S gas, which is only
one component of the total sulfide equilibrium system. If the total
sulfide concentration,
[S-2tot], is defined as:
Stot-2 = [H2S] + [HS-] + [S2-]
the H2S concentration will be defined as
K1
(
[H2S] = [Stot-2] / 1 +
+
K1K2
[H30+]2
[H30+]
)
[H3O+] = [H+] = 10-pH
which can be simplified to
(
[H2S] = [Stot-2] / 1 +
K1
[H30+]
)
for pH<9 (Jeroschewski et al. 1996). Thus it is necessary to know
the pH (i.e. to know [H3O+]) of the sample/calibration solution to
calculate [Stot-2] (see Figure 1).
12
IMPORTANT
Calibration must
be performed after
pre-polarization
when the sensor
signal has
stabilized.
Always use
a calibration
solution with the
same temperature
and salinity as the
sample solution.
pH = -log [H+]
In solutions with a pH below 4 the equation can be simplified to:
[H2S] ≈ [Stot-2]
K1 = 10-pK1
pK1 is dependent on temperature and salinity. The literature
gives slightly different equations for calculating pK1 in water as a
function of temperature (T) and salinity (S).
The following equation is derived by Millero et al. 1988:
pK1 = -98.08 + 5765.4/T + 15.04555 * LN(T) + (-0.157 * (S0.5)) +
0.0135 * S
(Temperature in Kelvin)
Figure 1. The species distribution of H2S, HS and S2- as a function of
pH.
As H2S sensors are sensitive to temperature, it is necessary to
perform calibration and measurements at the same temperature.
13
Please note that, in contrast to oxygen, the relationship between
salinity, temperature and solubility is not well known and
therefore not tabled for sulfide gas
Calibration in the laboratory
Calibration must be performed after the sensor signal has
stabilized during pre-polarization. The H2S microsensor responds
linearly over a certain range (e.g. 0-300 µM), above which the slope
of the response curve decreases, but the response and resolution
above the linear range may be sufficiently good for reliable
measurements. We suggest that you establish the linear range by
making a coarse calibration in the entire concentration range of
interest. If measurements of concentrations above the linear range
are needed, a calibration with sufficient resolution has to be made
in the non-linear range, whilst a 3-point calibration is sufficient in
the linear range.
Please read the entire procedure below before the calibration is
commenced. It is best to first prepare the stock solution so it is
ready. Then prepare the buffer and perform the calibration quickly
thereafter in order to avoid reintroduction of oxygen.
IMPORTANT
It is important
to perform
calibration and
subsequent
measurements in
solution with the
same temperature
and salinity.
FIELD
CALIBRATION
For field
calibrations, please
see alternative
calibration
procedure below.
NOTE: for field calibrations, an alternative method is
recommended - this will enable you to prepare reagents to bring
into the field for easy calibration.
Laboratory calibration
1. Prepare a stock solution
A stock solution of S2- (≈ 0,01M total sulphide) is prepared
anaerobically by dissolving 0,24 g Na2S * 9 H2O in 100mL of
N2-flushed water in a closed container. The final concentration of
the stock solution should be determined by standard analysis (e.g.
Cline 1969 or Budd & Bewick 1952). Keep the stock solution out of
contact with oxygen.
2. Prepare the calibration buffer
Any standard pH buffer, with a pH value less than 4, can be used.
Remove oxygen from a volume of the buffer. This can be done in
14
WARNING
Vigorous bubbling
water with any
gas may cause
the water to cool
considerably.
Monitor the
temperature to find
a suitable bubbling
rate, which does
not cool the water
significantly.
two ways:
a. By vigorously bubbling with an
oxygen-free inert gas (e.g. N2) for at
least 5 minutes. NOTE: Vigorously
bubbling buffer with any gas may cause
the water to cool considerably. Monitor
the temperature to find a suitable
bubbling rate, which does not cool the
WARNING
It may be difficult
to use a standard
analysis for sulfide
in your calibration
solution (e.g.
Cline 1969) when
a reductant has
been added.
buffer significantly.
b. By adding a suitable reductant (e.g.
Ti(III)Cl; MERCK supplies this in a 10%
HCl solution) to the oxygen free buffer
to a final concentration of 50 mM. Add
a few glass beads (2-3 mm in diameter)
to facilitate mixing. The transfer is
preferably performed with a pipette
to minimize mixing with oxygen, and
a maximum of 10% of the vial volume
should be left as headspace. Close the
container with a gas tight lid and shake
vigorously.
3. Obtain zero reading
The signal at zero H2S can be obtained by immersing the sensor tip
into one of the vials with calibration buffer. Note the signal, which
is the calibration value for zero H2S partial pressure (S0). This signal
should be 0-30 pA (otherwise see “Troubleshooting”).
4. Obtain sulfide standard readings
Calibration points within the expected range of measurement are
prepared by injecting suitable amounts of the S2- stock solution
anaerobically into the calibration buffer with a micro-syringe
(the stock solution should be diluted at least 10 times). Mix the
solutions. If you have not added reductant, oxygen that dissolve
in the calibration solution will oxidize the sulfide, so the stock
solution should be added immediately after the oxygen removal
(e.g. N2 bubbling) and the calibration should be done immediately
after adding the stock solution.
15
For each calibration solution, measure the calibration values
by removing the rubber stopper and immerse the microsensor
tip into the solution. Read the signal and plot it against the
concentration.
The most precise calibration curve is obtained by fixing
the calibration solutions with Zn-acetate and subsequently
determining the total sulfide concentration using the Cline
method (Cline 1969). This may, due to the nature of the method,
be difficult if a reductant has been added previously.
Calibration in the field
For an easy and portable field calibration, prepare the following
reagents in the lab. Bring the reagents and a 1 ml syringe+needle
to the field.
Reagent 1:
•
1mM Na2S
• 1mM NaOH
Prepare the solution in a membrane flask with gas-tight lid. After
mixing, flush the solution with nitrogen gas to remove all oxygen
and quickly place the lid on the flask.
During storage, practically all sulfide in Reagent 1 will be in
alkaline form and since it is stored in an gas-tight vial, it cannot
evaporate to any significant degree.
Reagent 2:
•
0.1 M HCl
• 50mM TiCl
As the TICl is a strong reducing agent, all oxygen will be reduced in
the mixture, but it is still recommended that you avoid introducing
too much oxygen during mixing.
Fill reagent 2 into a 10 ml glass vial with gas-tight membrane
lid. Avoid head space. Prepare as many vials as the number of
calibrations you expect to make. Bring reagent 1, the vials with
reagent 2 and 1 ml syringe+needle with you to the field.
16
Calibration in the field.
Perform the zero point determination in clean water (without H2S)
at field site temperature.
Prepare a 100 µM calibration standard. Perform the calibration
quickly after mixing as the durability of the mix is short.
1. Loosen the lid of a reagent 2 vial
and remove carefully 1 ml with a
syringe+needle through the lid. Throw this
away.
2. Take 1ml of reagent 1 and add it to the
reagent 2 vial.
3. Tighten the lid and mix.
4. Remove the lid and place the sensor tip
carefully in the vial and perform the 100 mM
calibration.
For making higher or lower concentrated H2S calibration solutions,
make reagent 1 more or less concentrated with Na2S.
Re-calibration
Check the calibration at appropriate time intervals and repeat
it, if the sensor exhibits significant drift. When the sensor is
new, you may need to calibrate it every two hours. An older
extensively used sensor may require calibration only every 24
hours or less. To minimize the need for calibration, keep the
sensor polarized between measurements if possible (unless the
time between measurements exceeds several days). If the signal
does not stabilize or remains too high or too low, refer to the
“Troubleshooting” section in this manual.
The response of the H2S microsensor does change with time, and
a decrease in signal of up to 50% pr. month is to be expected. This
does not affect the quality of the measurements as long as the
sensor is regularly calibrated.
17
MEASUREMENTS
Mounting the sensors
Due to the small size of the microsensor tip and the steepness
of H2S gradients in many environments, even a few microns’
displacement of the sensor tip may change its immediate H2S
environment. The sensor tip is quite flexible and can bend around
physical obstacles. But coarse lateral movements of the sensor
when its tip is in contact with a solid substrate may easily cause
the tip to break.
Therefore measurements should be performed only in a stabilized
set-up fixed on a sturdy table free of moving or vibrating devices.
We recommend the Unisense lab stand LS18 and the Unisense
micromanipulator MM-33 (MM33-2 or MMS) for this purpose.
Electrical noise
The signal of the microsensor is very small (10 -10 to 10-13 ampere).
Although both the Unisense picoammeters and the Unisense
H2S microsensors are very resistant to electrical noise from the
environment, electrical fields may interfere with the sensor signal.
Therefore we recommend that unnecessary electrical/mechanical
equipment is switched off and by the sensor or wires are not
touched during measurements and signal recording.
On suspicion of sensor damage, repeat calibration and consult
“Troubleshooting”.
pH influence
As mentioned above, the H2S concentration is a function of pH. If
measurements of H2S are performed in points along a pH gradient,
pH should be measured in the same points with a pH microsensor
(e.g. Unisense PH10/PH25/PH100) to allow the determination of
the total sulfide concentration. Use the equations in the calibration
section in order to calculate [S-2tot].
Ferro cyanide reacts in light, especially blue (short-wave) light.
18
WARNING
Measurements in
a light gradient
should be avoided,
and interpretation
of measurements
in a light gradient
should be made
with the light
interference in
mind.
Thus light increases the signal of the H2S sensor by increasing the
zero current. This means that when measuring through a light
gradient (e.g. when measuring into an illuminated biofilm) the
signal will decrease slightly, when entering the biofilm. In many
systems the light will be almost completely attenuated within the
first few hundred microns.
Interference
There is a slight linear interference from hydrogen on the sulfide
sensor. At the same concentration, hydrogen will be responsible
for 1.15% of the signal. This means that 1 µM H2 = 0.015 µM H2S.
Light gives a false H2S sensor signal. The sensor has been painted
black to reduce this phenomen, however light may still enter the
sensor through the tip, which is not possible to paint.
WARNING
Always introduce
and retract the
microsensor
axially using a
micromanipulator
and a stable stand
when measuring in
solid or semisolid
substrate like
sediment, tissue,
biofilms, microbial
mats etc.
Micromanipulator
19
ADVANCED USE
Unisense can construct H2S sensors for customer requested
applications at additional costs. The most frequently construction
options are described at our web page.
The options include for instance customer specified dimensions,
cable length etc. If your specifications for a special H2S sensor are
not described at our web page please contact [email protected]
for further options.
20
STORAGE AND MAINTENANCE
Store the H2S microsensor unpolarized in the protective glass tube
used for shipping. Due to the light sensitivity of the electrolyte
H2S, microsensors should be applied and stored at low to
moderate levels of light. The sensor can be stored with the tip
exposed to water or air. The room in which the H2S microsensor is
stored should be dry and not too hot (about 5-35°C).
LIGHT SENSITIVITY
Due to the light
sensitivity of the
electrolyte H2S,
microsensors
should be applied
and stored at low
to moderate levels
of light.
Cleaning the sensor
Standard procedure: Rinse with 96% ethanol, rinse with 0.01 M HCl
and rinse with water.
Alternatively rinse with:
0.1M NaOH
Isopropanol
Detergent
21
REFERENCES
• Borum, J. et al. (2005) The potential role
of plant oxygen and sulphide dynamics
in die-off events of the tropical seagrass,
Thalassia testudinum. Journal of Ecology 93:
148-158
• Budd, M.S. & Bewick, H.A. 1952: Photometric
determination of hydrogen Sulfide and
reducible sulfur in alkalines. Analytical
Chemistry 24: 1536-1540.
• Cline J. D. (1969): Limnol. and Oceanogr. 14:
454-458.
• Jeroschewski P, Steuckart C & Kühl M (1996)
Anal. Chem. 68:4351-4357
• Kühl M, Steukart C, Eickert G & Jeroschewski
(1998): Aquat. Microb. Ecol. 15:201 209
22
TROUBLE SHOOTING
Problem
Possible cause 1
Solution
Possible cause 2
A high and drifting signal
Gas bubbles are present inside the sensor tip due to a short circuit
or electrical shock.
Degas water by boiling and subsequent cooling or by 10 minutes
of vacuum treatment. Immerse the sensor tip for 20 min in the
degassed water. Repeated or prolonged treatment may be
necessary.
The sensor tip is broken.
Solution
Replace the H2S microsensor.
Problem
A slow response.
Possible cause
Insoluble compounds deposited on the sensor tip.
Solution
Rinse with 96% ethanol, rinse with 0.01 M HCl and rinse with
water.
Problem
Measurements in two environments with equal H2S concen
trations exhibit different signals.
The light intensity differs between the two environments, causing
different light interference.
Try to keep constant light conditions and interpret data with the
light interference in mind.
Possible cause
Solution
Problem
Possible cause
Solution
Signal unstable fluctuatung if the set-up is touched or equipment
is introduced in the medium
Electrical disturbance through the tip membrane
Ground the set-up by connecting the reference plug on the
picoammeter (blue plug) with the medium you are measuring in.
Use the provided blue grounding wire. Leave the other end with
approximately 1 cm un-insulated wire (If you are measuring in e.g.
a sediment, just put the open wire end in the water column).
If you encounter other problems and need scientific/technical assistance, please contact
[email protected] for online support (we will answer you within one workday)
23
UNISENSE, DENMARK
www.unisense.com · [email protected]