1
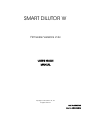
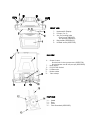
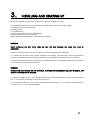
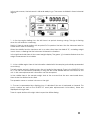
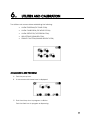
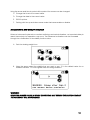
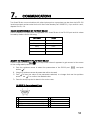
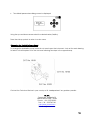
SMART DILUTOR W Firmware Versions 2.2x USER´S GUIDE SMART DILUTOR W Firmware Versions 2.2x USER’S GUIDE MANUAL Copyright © 2012/2014 IUL, S.A. All rights reserved. Cat. No. 50007662 Doc No. 50007662-04 INDEX 1. INTRODUCTION ................................................................................................................................. 1 WHAT IS THE SMART DILUTOR WHITE? ............................................................................................................ 1 2. TECHNICAL SPECIFICATIONS .............................................................................................................. 2 3. INSTALLING AND STARTING UP ............................................................................................................ 3 4. INSTALLING PERIPHERALS.................................................................................................................... 6 5. DILUTING AND DISPENSING ................................................................................................................ 7 PUTTING THE BAG IN THE HOLDER ................................................................................................................ 7 DILUTING A SAMPLE .................................................................................................................................... 7 DISPENSING A FIXED WEIGHT OF DILUENT .................................................................................................... 8 6. UTILITIES AND CALIBRATION ................................................................................................................ 9 ESTABLISHING A NEW PROGRAM ................................................................................................................. 9 REPLACE THE OPERATOR ID....................................................................................................................... 12 ESTABLISHING NEW SETTINGS ..................................................................................................................... 12 ESTABLISHING A NEW STABILITY FUNCTION ................................................................................................. 13 WARNING: ................................................................................................................................................ 13 7. COMMUNICATIONS......................................................................................................................... 14 VALUES CONFIGURABLES OF THE PORT RS-232.......................................................................................... 14 MODIFY THE PARAMETERS OF THE PORT RS-232 ......................................................................................... 14 8. MAINTENANCE AND SERVICE ........................................................................................................... 15 9. ACCESSORIES AND RELATED INSTRUMENTS ....................................................................................... 17 OPTIONAL ACCESSORIES. ......................................................................................................................... 17 RELATED INSTRUMENTS. ............................................................................................................................. 17 10. WARRANTY CONDITIONS .............................................................................................................. 18 FRONT VIEW 1 - Keyboard & Display 2 - Pumps (1or 2) 3 - Arm for pouring tube One pump (9002821) Two pumps (9002822) 4 - Bag holder (900099639) 5 - Knurled screw (90007582) REAR VIEW 6 - Screw for arm Knurled nut for two pumps arm (90002796) Knurled screw one & two pumps (90002800) 7 - Main switch 9 - RS-232 DB9 Socket 10 - IUL Barcode 11 - Mains cable 12 - Tube clamp PUMP HEAD 12 13 14 15 - Head Door Rotor Tube Standard (90002825) 1. INTRODUCTION The repeatability of results in microbiology depends to a great extent upon the sample preparation. These days the use of sterile bags to carry out homogenization processes has become essential. It is undeniable that, as well as its convenience, it brings a greater degree of safety and hygiene than any other kind. On the other hand, the manipulation of homogenizer bags when they have no consistency is an awkward operation, especially if, in order to obtain repeated results, the sample must be diluted with a proportional amount of diluent liquid. WHAT IS THE SMART DILUTOR WHITE? The Smart Dilutor White is a diluter especially designed for the carrying out of the dilution of microbiological samples directly in the sterile homogenizer bags. Because of the fact that the samples are usually solid, semi-solid, paste, etc., the gravimetric type of dilution has been chosen and has been incorporated into a weighing cell that is the heart of the system. This cell is continuously sending the signal that it generates to the ADC, and from that one to the microprocessor, which uninterruptedly monitors the weight in the pan and takes the necessary decisions in order to activate the diluent-pouring pump proportionally. Once the programmed dilution has been reached, the system notifies the operator that the process has finished. The software also takes into account the use of the instrument as a dispensing device for a previously determined quantity of liquid using any kind of container. N.B.: TO OBTAIN A GREAT PERFORMANCE OF THE INSTRUMENT, IT WILL NEED TO BE KEPT CLEAN BY THE USER (See Chapter 8) 1 2. TECHNICAL SPECIFICATIONS GENERAL FEATURES Dimensions (LxWxH): 300x325x365 mm Weight: 6.5 Kg Data output/input: Serial RS232, IUL Barcode (see Chapter 9) OPERATING CONDITIONS Mains: 100~240 ACV 50/60 Hz Power: 40 w Working temperature: + 5°C to + 40°C WEIGHING SPECIFICATIONS Weighing range: 2400 g, tare included Sample weight resolution: 0.01 g Weight accuracy: 1 % (for weight ≥ 10g) 2 % (for weight ≥ 5g) Calibration weight: 100 to 2000 g, user configurable (100 g steps) DILUTION SPECIFICATIONS Dilution ratio: any fraction with numerator 1 to 99 and denominator 1 to 999 Minimum sample weight: user configurable (default 1 g) Maximum sample weight: compatible with ratio, tare and weight range Dilution accuracy: 1 % (for dilution weight ≥ 100 g) 2 % (for dilution weight ≥ 50 g) Delivery speed: 950 ml / min DISPENSING SPECIFICATIONS Dispensing range: 20 g to full weighing range Dispensing accuracy: 1 % (for dispensed weight ≥ 100 g) 2 % (for dispensed weight ≥ 50 g) Delivery speed: 950 ml / min REMARKS: 1. Specifications above are given for operation with standard tubing bore 5 mm, stability function set to “0” (default), the instrument lying on a stable surface free of vibrations, and in absence of air movement or disturbances. 2. Accuracy specifications comply with the requirements of ISO 7218:2007/Amd.1:2013 and ISO 6887-1:1999. 2 3. INSTALLING AND STARTING UP When you receive the instrument make sure that the package contains: The apparatus itself with the mounted pump head (one or two according model). The rigid arm of the pouring tube. The bag holder. The 5 liters bottle. Two 0.2 micron filters for the bottle stopper. Spare adhesive to hold up the bags. Intake, pouring and peristaltic pump tube with stopper. WARNING ONCE INSTALLED DO NOT TURN, PUSH OR PULL THE BAG HOLDER, THE LOAD CELL CAN BE DAMAGED. Likewise make sure that none of the parts has suffered any apparent damage. A ) Place the instrument upon a rigid, vibration-free support, remembering that the Smart dilutor contains a weighing cell and must be located and maintained as though it were a balance. B ) Place the bag holder into its position on the weighing disc in the desired alignment, and screw it. It must be done without using any tool. WARNING WITHOUT THE BAG HOLDER OR ANY OPTIONAL PLATFORM THE INSTRUMENT WILL NOT BE USEFUL, THE WEIGHT READINGS MAY BE WRONG. C ) Screw the rigid arm,(no. 3), in the right hand side of the unit facing you and fix it with the screw (no. 6). Check the front/back movement of the arm. D ) To install the tube (no. 15) into the head of peristaltic pump (no. 12), make the door open (no. 13), the rotor (no. 14) is now accessible. 3 E ) Place the tube clamp in its housing. F) Install the tube below the rotor. G) Place the other clamp in its housing. WARNING TAKE SPECIAL CARE NOT TO GIVE THE TUBE A 180° TURN OVER ITSELF CREATING A BLOCKAGE THAT WILL PREVENT THE LIQUID FROM COMING OUT. H) Check that the tube is centered. I) Close the door. J) Place the pouring nozzle into its housing on the rigid arm, (3). Its shape allows directing the flow against the wall of the bag to prevent splash. K) Install a filter into the free tube of the stopper; it cleans the air which is introduced into the bottle when it empties. L) Connect the power cord and, with the rigid arm in the backward position, turn on the main switch. M) The instrument shows its firmware version in the screen while performing a fast auto-test which leaves it in the main screen. 4 In the main screen, the instrument is idle and ready to go. The screen is divided in three horizontal regions: 1.- In the top region starting from the left there is a symbol showing a bag. This sign is flashing when the unit waits for a new bag. Next to it there is a push button with a symbol 0.0 to perform the tare. Also the instrument asks for a tare action when it is flashing. When the stability function has been set to a value other than the default “0”, a shaking weight icon is shown, meaning that the instrument is tolerant to vibrations. In the right hand side there is the current weight display. The grams “g” character flashes when the weight measurement is not stable. 2.- In the middle region there is the information related with the sample (symbolically represented as a shrimp). The left sample symbol is flashing when the unit waits for the sample. There is the SAMPLE ID next to it. This can be introduced manually or using the Bar Code Reader device connected to the unit. In this case alphanumeric information can be accepted. In the middle there is the sample weight took at the moment that the arm was turned down; there is also the dilution factor used. The operator name or number is shown on the right. 3.- The arm is represented by a flashing icon, it indicates if the arm is backward or forwards. The pump number as well as the DILUENT ID used (also alphanumeric information), these are displayed at its right side. There is a push button at the right side to open the utilities dialog. 5 4. INSTALLING PERIPHERALS The main unit can accept three different kinds of peripherals: Serial Printer IUL Barcode Reader (See Chapter 9) IUL 4 pumps accessory (See Chapter 9) The last two items do not need any special configuration. The main unit recognizes them and work directly once connected. Connecting the printer The Smart Dilutor has a standard SUB-D 9 pin RS-232 female connector that can be connected to an external printer provided with RS-232 serial interface. Look at the chapter 9 for an optional printer cable. Configuring the Communication Parameters The serial interface specification on the printer and the Smart Dilutor must have the same values. Look at the printer user’s manual to know what the values of its communication settings are. See ESTABLISHING NEW SETTINGS at the chapter 6 to configure the Smart Dilutor. Instance of a results ticket: IUL Smart Dilutor 2.xx 02/01/2010 12:00:00 Operator Id. : 002700S402 Sample Id. : 6 Sample Weight : 0009.89 g Dilute. factor : 01:010 Dil. Id. : 0000000910 P: 1 Total Weight : 00099.0 g Final accuracy : 100.10% Calibration : 30/12/2009 6 5. DILUTING AND DISPENSING PERFORMING A DILUTION PROCESS PUTTING THE BAG IN THE HOLDER The bag holder is flexible and in its upper part there are two strips of adhesive putty. Place the mouth of the bag at the same level of the upper edge of the walls of the holder and, with the other hand, move the sides of the holder closer until they are squeezing the mouth of the bag. Letting go the holder, the bag will remain opened, ready to be filled. Press 0.0 (Tare) to cancel out the bag weight. During tare process, ---.- is displayed on the weight field. DILUTING A SAMPLE To get a sample diluted to a fixed ratio: Select the pump to be used. The instrument has been designed in such a way that the pump has not only the desired solvent or diluent assigned but also the type of work to perform (dilution or dispensing) as well as the parameters related (dilution factor and total weight). Introduce the sample carefully in the bag Pull the arm tube forward carefully. It will prevent a sample weighing error caused by a hit on the instrument when the weight reading is transferred to the memory. The pump starts delivering the solvent while the screen shows the current weight, continuously changing to reach the final target weight. As the weight approaches the end value, the speed of the pump is slowed down to reach it in a good approach. When the target weight is attained, the system produces a short beep and, if programmed to do so, prints a ticket. Moving the tube backward the instrument is ready for the next dilution. 7 PERFORMING A DISPENSING DISPENSING A FIXED WEIGHT OF DILUENT To dispense a fixed weight of diluent: Select the pump that has the dispensing program with the appropriate weight Place the container where the diluent must be transferred. Press 0.0 (Tare) to cancel out the container weight Pull the arm tube forward. The pump starts to deliver solvent while the screen shows the current weight, continuously changing to reach the final target weight. PAUSING THE PROCESS There are two ways to pause a running process: Pushing the arm tube backward. Pulling the arm tube forward again will continue the addition to the target weight. WARNING PUSH THE ARM TUBE BACKWARD SLIGHTLY (I.E., WITHOUT TAKING OUT THE POURING NOZZLE FROM THE BAG). ONCE THE MOTOR STOPPED PUSH THE ARM TUBE BACKWARD COMPLETELY. THIS ACTION AVOIDS SPILL OUT OF THE BAG. Pushing the pause button, pushing it again the dispensing will continue. 8 6. UTILITIES AND CALIBRATION The utilities main screen allows establishing the following: A NEW PROGRAM (THE PUMP ICON). A NEW CALIBRATION (THE WEIGHT ICON). A NEW OPERATOR (THE PERSON ICON). NEW SETTINGS (SPANNER ICON). STABILITY FUNCTION (SHAKING WEIGHT ICON) ESTABLISHING A NEW PROGRAM A. Push the pump icon. B. A new screen with these icons is displayed: C. Push the shrimp icon to program a dilution. Push the flask icon to program a dispensing. 9 D. The following screen is displayed if the shrimp icon has been pushed, otherwise go to the section E. D1. All the values displayed can be changed by using the arrows and the button. D2. Select the pump to be used. D3. If necessary set the solvent ID, it can be entered using barcode reader or the alphanumeric keyboard displayed at the time that this value is selected. D4. Note: This will be the procedure in the rest of the editable values. D5. If the Dilution process is accepted the screen remains as it was. D6. The Dilution factor can be changed by editing the second row. D7. The limits of the sample weight can be fixed on the third row. D8. The fourth row set the way to enter the sample ID, by default this ID is a number that will be increased automatically in every operation, if the Bar Code Reader is installed (optional accessory) when an operation starts it lights and the Bar Code read is stored as the sample ID. By default the keyboard icon is tagged, but if you push its near right button the tag is removed, this means that in every new operation this keyboard is showed: The Sample ID can be entered using this keyboard, once entered push the shrimp/flask button to begin the operation. If the Bar Code reader is installed it lights and the read Bar Code is stored as a Sample ID, the instrument will begin the operation automatically. 10 E. If in step C (Dispensing) was selected the screen displayed is the following: E1. Select the pump to be used. E2. If necessary set the solvent ID. E3. Set the weight to be dispensed. F. To access to other menus such as the Utilities, Calibration, and User ID use the icons of the last row. If the instrument has two or more pumps installed (these can be remote) a chain icon is displayed, it allows to work the pumps together (chain bond) or separately (chain open), these icons are displayed in both, the dispensing and the dilution screens: PERFORM A NEW CALIBRATION WARNING CALIBRATION MUST BE PERFORMED ON A STABLE SURFACE FREE OF VIBRATIONS, AND WITH THE STABILITY FUNCTION SET TO “0” (DEFAULT) A. Push the weight icon. B. A new screen is displayed: C. If the bag holder is empty the zero push button is flashing, push it. D. Now the calibration weight icon is flashing. Put the calibration weight on the center of the platform, the calibration weight can be changed by using the arrows. The current measured weight is displayed below the calibration weight. E. Push the weight button. If the weight is wrong the instrument cannot be calibrated. 11 Instance of a calibration ticket: IUL Smart Dilutor 2.xx 30/12/2009 17:59:59 Operator Id. : 002700S402 Cal. Weight : 1000.00 g Zero Offset : 1093885 Span Gain : 678 (1) (2) (1) “Zero Offset” is the 0 gr. corresponding value in internal units. It has utility for technical service only. (2) “Span gain” is the ratio between the calibration weight in µgr. and the distance from its corresponding value in internal units to “Zero Offset”. It has utility for technical service only. REPLACE THE OPERATOR ID A. Push the operator symbol B. A new screen appears. C. All the values button displayed can be changed by using the arrows and D. Change manually the operator ID or using the IUL Barcode reader if connected. ESTABLISHING NEW SETTINGS A. Push the spanner symbol B. A new screen with four rows appears. 12 the Using the arrows and the ok symbol all the parts of the screen can be changed C. Change the time to the correct value. D. Change the date to the correct value. E. RS-232 options. F. Pushing with the up and down arrows make the buzzer enable or disable. ESTABLISHING A NEW STABILITY FUNCTION When an instrument is placed on a surface suffering mechanical vibrations, an important delay to reach the end point of operation may occur. The tolerance to vibrations can be increased through the modification of the stability function value. A. Push the shaking weight icon B. Using the arrows select the stability that you want to use. “0” is the default value for no vibration surfaces. “4” is the highest value for strong vibrations. WARNING: SELECTING HIGHER VALUES IN STABLE CONDITIONS MAY REDUCE THE DILUTION TIME BUT THE ACCURACY WILL BE WORSENED. 13 7. COMMUNICATIONS The Smart Dilutor communications with other instruments or computers can be done by its RS-232 input/output port and a socket for the IUL Bar-Code Reader (Cat. 90005701). If you want to use it, request it to IUL, S.A. VALUES CONFIGURABLES OF THE PORT RS-232 Once enabled the parameters configurable from Smart Dilutor of the RS-232 port and his values formed by defect are the following: Parameter Value Baudrate 9600 Data bits 8 Parity Even Stop bits 1 bit Flow Crtl. RTS/CTS MODIFY THE PARAMETERS OF THE PORT RS-232 Push the spanner symbol of the configurable parameters. from any screen where it appears to get access to the screen A. Push the up/down arrows to select the parameters of the RS-232 port button and push B. Using the up/down arrows all parameter will be showed. C. Push to to see the value of the parameter selected, to change that use the up/down arrows. Press to confirm the desired value. D. Press the shrimp symbol to back to the main menu. RS-232 9 Pin Female Socket Pinout 1 2 3 4 5 Not Connected Tx Rx DTR (Internally jumpered with DSR) GND 6 7 8 9 DSR RTS CTS Not Connected 14 8. MAINTENANCE AND SERVICE CLEANING THE INSTRUMENT - Cleaning the screen and other surfaces with a brush, hot water and soap. - Cleaning the pumps: Use a brush with hot water and soap to clean the pump body. Then place a cloth soaked with water and soap instead of the tube and run an operation to move the rollers. DISINFECTION OF THE INSTRUMENT: Clean all the surfaces of the device (except bag holder) with a wet cloth with deionized water and 70% ethanol (or isopropyl alcohol). For the bag holder you should use water with 3% bleach. Restoring Factory Settings Error or malfunctions may be caused by wrong parameter values. Restoring the factory settings recovers the standard value for every parameter and lets the instrument in a known “must run” state. Beware that the printer settings are also reinitiated. After restoring factory settings when a printer is used, the communication parameters must be reset. To restore factory settings: Turn the instrument off Turn on again, and when the splash screen appears, keep the upper left zone pressed until the default parameters dialog appears. 15 The default parameters dialog screen is displayed: Using the up and down arrows select the desired value (Yes/No). Press the shrimp symbol to return to main menu. Changing the Peristaltic Pump Head To change the peristaltic pump head do not need open the instrument. Look at the next drawing to take it out and replace it for the new one following the steps in the opposite way. Contact the Technical Service in your country or IUL headquarters if any problem persists: IUL S.A. Torrent de l´Estadella 22 08030 BARCELONA - SPAIN Phone: +34 -932740232 Fax: +34 – 932740144 http://www.iul-inst.com E-mail: [email protected] 16 9. ACCESSORIES AND RELATED INSTRUMENTS OPTIONAL ACCESSORIES. As follows you can see the list of the optional accessories with their catalogue number. CAT. No. 90002528 90002530 90002738 90002800 90002806 90002836 90002837 90002838 90002853 90002854 90002855 90002885 90005510 90005701 90007528 90008165 90008181 90008182 90008183 90008331 90008332 90008390 900011102 900011103 DESCRIPTION Set of tubing 100 cm longer to bottle (for use with 90007528, 90008181 or 90008332) Silicone tube 5,650 m (for use with 90007528, 90008181 or 90008332) Holder for media bags Dilution arm screw Multilevel dilution / dispensing arm Support bar-code reader Bar-Code Reader with holder for Dilution Arm Weighing platform for beakers/flasks Tubing set with silicone lid (for GL-45), long Tubing for metallic edge (for use with 90007528, 90008181 or 90008332) Tubing for metallic edge, long 130cm (for use with 90007528, 90008181or 90008332) Accesory for 80 ml. Bags Communications Cable RS-232 with Adapters PC/Printer 1.8m Bar-Code Reader MMJ7 Edge for Septum bags, small Autoclavable bottle 5 l. PIREX (GL-45) Silicone lid with inox tubes (for GL-45) Set of 2 autoclavable 0.2 µ filters for bottle stopper Envelope with sticky putty "Blu-Tack" Stainless steel edge of dispensing tube Edge For Septum Bags, big Plastic screw for pan with O-ring (for use with 900011103) Adjustable two pumps arm Platform for Smart RELATED INSTRUMENTS. The Porta-bag is a device that allows holding six bags filled with the sample and the diluent in a vertical position without the worrying of spilling its contents. The tray and the pincers that holds them are made of stainless steel. The Masticator is the instrument that homogenizes the sample with the solvent after the dilution is made by the Smart Dilutor. The Bio-Dilutor is an instrument with a microprocessor that carries the serial dilution process of the sample needs before analysis. 17 10. WARRANTY CONDITIONS LIMITED WARRANTY IUL S.A. warrants the Instrument, disposables and replacement items, to the original “Purchaser” for a period of one (1) year after date of receipt by the end user, against defects in material and workmanship. IUL S.A. agrees to correct either by repair or, at its election, by replacement, any such defect found on examination to have occurred, under normal use and service, during such one (1) year period provided IUL is promptly notified in writing upon discovery of such defect to the address of one of its workshops noted in the User’s Guide. Upon discovery of such defect, the instrument should be sent to an IUL workshop noted in this User’s Guide, postage prepaid. EXCLUSIONS IUL S.A. shall not be liable as to any defect arising from abuse of the Instrument, failure to operate and maintain the Instrument in accordance with the User’s Guide supplied with the Instrument, repair, service, alteration or modification of the Instrument by any person other than the authorized service personnel of IUL, modification, change or reuse of the disposables supplied by IUL for use in the Instruments, operation outside of the environmental specifications for the product listed in the User’s Guide or accidental damage to the Instrument. NO OTHER WARRANTIES The warranty set forth above is exclusive and no other warranty, whether written or oral, is expressed or implied. IUL and its suppliers specifically disclaim any implied warranties including merchantability and fitness for a particular purpose. NO LIABILITY FOR CONSEQUENTIAL DAMAGES IUL or its suppliers shall not be liable as to any damage whatsoever (including without limitation, special, incidental, consequential, or indirect damages for personal injury, loss of business profits, business interruption, loss of business information, or any other pecuniary loss) or defect arising from abuse of the Instruments, failure to operate and maintain the Instruments in accordance with the User’s Guide, repair, service, alteration or modification of the Instruments by any person other than authorized service personnel of IUL, or modification, change or reuse of the disposables supplied by IUL for use in the Instruments. 18 Important information Purchaser shall indemnify IUL and hold it harmless for all expenses, damages, attorneys' fees, and costs resulting from claimed infringement from patents, trademarks or industrial property rights arising out of compliance by IUL with Purchaser's specifications, designs or instructions. All software, firmware, hardware and manuals relating to Instruments supplied to Purchaser by IUL shall be treated by Purchaser as confidential and proprietary and protected by copyright, and shall not be disclosed to third parties. Purchaser shall not reproduce copy or substantially duplicate any parts of said materials without the written consent of IUL. In the event any Instrument is returned to IUL for any reason, or transferred to a third party, Purchaser shall return all of said materials including copies thereof to IUL. Acceptance by IUL of purchaser’s order is expressly limited to and conditioned upon purchaser’s acceptance of, and assent to, these terms and conditions referred to herein. Any additional, inconsistent or different terms and conditions contained in purchaser’s purchase order or other documents submitted by purchaser to IUL at any time, are hereby expressly rejected by IUL. Purchaser acknowledges that, notwithstanding anything to the contrary contained in its purchase order or other documents, receipt and acceptance by purchaser of the Instrument shall constitute acceptance by purchaser of these terms and conditions. 19