1
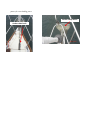
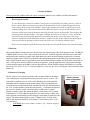
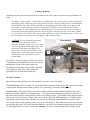
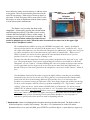
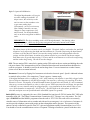
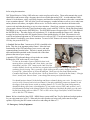
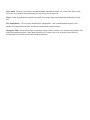
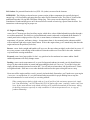
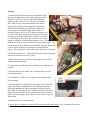
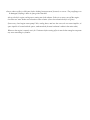
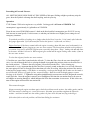
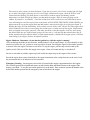
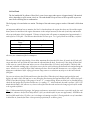
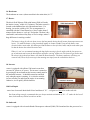
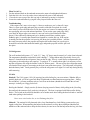
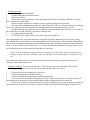
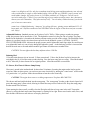
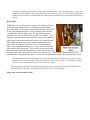
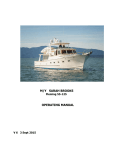
NOTES FROM THE OWNERS OF “TSIRKU”
Welcome aboard TSIRKU! (pronounced “SIR KU”)
She is named for a river in southeast Alaska near where we spent our first married years. We expect TSIRKU will
be taking us back that wonderful place some day.
She’s a 1996 Tartan 3500. We bought her in 2007 with Pacific Northwest waters in mind. We like her traditional
lines, high sailing performance, seaworthiness, quality of construction, and modern features such as a beavertail keel and step transom. We have enjoyed getting to know the boat. We have upgraded many systems and she
is very well prepared for chartering and cruising.
We hope you will appreciate the gear and equipment choices we made. And we hope you’ll enjoy sailing her and
cruising the islands as much as we do.
Our favorite things about TSIRKU: 1 She is nicely sized to be very comfortable for 4 adults, while being very easy
to manage by a couple or single-handed. 2 She is very well balanced and sails beautifully. She keeps her speed in
light air and is very stable in heavy weather. Her bow is shaped to slice thru the sea, and she does not pound. 3
The cabin design and teak interior gives her a warm, comfortable feel below that makes her a joy to sail or to sit
out a storm. 4 The feathering Auto Prop gives her good speed forward and allows her to back straight and true. 5
The new below decks autopilot steers the boat beautifully on all headings and under all conditions we have
experienced thus far. 6 The Webasco 5000 heater keeps the boat very warm and dry even during the shoulder
and off seasons. 7 The strongtrack mainsail system on the mast makes raising and lowering the main much
easier.
TSIRKU ‘s primary nuances. 1 The depth sounder is locked and requires a security code at startup. The code is
1234. Instructions are posted by the instrument.. 2 The bilge pump and shower sump pump switches are located
on the electrical panel. They should be kept in the ON position at all times to prevent shower water from
flooding the bilge
We’re immensely pleased with this well-built and beautiful vessel and look forward to sharing her with you, our
guests. We hope you’ll love TSIRKU as we do and we thank you for treating here with care and kindness. Please
share your thoughts and experiences in TSIRKU log book. Also, your children (and you) may enjoy reading
TSIRKU's copies Nora’s three young adult novels set in the islands, Alaska, and Montana, all places we have
lived.
Andrew Hansen and Nora Martin, owners
INDEX:
Introduction: Favorites & Nuances
1. Anchors
2. Anchor Windlass
3. Barbecue
4. Batteries & Charging
5. Berths
6. Bilge Pumps
7. Cockpit Table and Crib Boards
8. Dinghy
9. Dodger & Bimini
10. Electrical Panel
11. Electronics
12. Emergency/Safety
13. Engine & Handling
14. Fuel Tank
15. Head & Holding Tanks
16. Headroom
17. Heater
18. Inverter
19. Keel Depth
20. Outboard
21. Refrigerator
22. Sails
23. Shower, Hot Water & Shower Sump Pump
24. Spares
25. Stove/Oven/Microwave
26. Thruhulls
27. Water Pressure & Tanks
TSIRKU ’s specs:
Year: 1996 LOA: 35’ 2” LWL: 30’ Beam: 11' 9" Draft: 4'10" Displacement: 12,100 lbs Mast height
above WL: 55’ (with antenna) Fuel: 25 gal. Water: 75 gal. Holding: 17 gal. Auxiliary Engine: 27 hp
Yanmar 3GM30 Diesel Cruising RPM: 2350 Fuel consumption: ca 0.6 gph
1. Anchors.
TSIRKU is
equipped with two anchors, one forward and one mounted on the port aft pulpit. The primary bow
anchor is a 44 # Rocna with 60 feet of 3/8” BBB chain and 300 feet of 5/8“ rode (all new in 2009). The chain is
marked with white paint at 5’ and at 50’. The rode is marked at 30’ intervals with colored tabs and black plastic
ties. The anchor is oversized for the boat and offers excellent setting and holding capabilities.
A Kiwi Anchor Rider kedge (new in 2008) is stored under the aft cabin berth on the port side. It can be used to
increase anchor holding power under stormy conditions or if only short scope is possible. After the anchor is set
and tension still on the rode, the kedge is tied off on a bow cleat, placed on the rode (by lifting the lever, placing
on the rode, and lowering the lever) and lowered with the line until it is about three feet off the bottom (be sure to
tie off the lowering line on the bow cleat before deploying it)
The secondary stern anchor is a 14 # Danforth with 15 feet of chain and 150 feet of nylon rode is stored on the
on the stern pulpit. The rode is stored in a white plastic bucket in the lazarette.
A 300’ stern tie line is located under the forward side of the V-berth. (Please do not cut the line; it is all needed
for certain places in Desolation Sound.)
Deploying the Anchor.
The scope to use in the islands is 5-to-1 for the highest water depth you’ll encounter in the spot where you
choose to drop anchor. Check your tide data…to know how much water you may lose and how much water
you will gain as the tide floods in and ebbs out during your stay. Since most coves are 15’-30’ deep, expect
to pay out about 75’-150’ of rode. After you have paid out the suitable amount of rode, 2 minutes of
reverse (in idle speed reverse) sets the anchor and tests its holding power. (Note other boats and points of
reference on land. Are you moving? If not after 2 minutes, you’ve set you anchor successfully.) If you wish
to sleep even better, throttle up to about 1500 RPMs in reverse for another 20 seconds to prove to yourself
that the anchor is set well! If the boat moves, reset the anchor and try again.
When deploying the anchor, allow the chain to run through your hands (gloves are in the anchor chain
locker) so as to not damage the forward deck. When retrieving the anchor, bring in the last few feet of
chain slowly to prevent the anchor from banging into the hull. Set the anchor chain hook in the 6th link of
the chain and also fasten the safety tether from the anchor roller bar to the shackle on the head of the
anchor. Coil the rode carefully in the anchor chain well to leave plenty of room for the chain. There is
often not room for a 5:1 scope in tight or crowded anchorages. Setting at 3:1 or 4:1 and using the kedge is
recommended in this condition if winds or waves are expected to be light.
For stormy conditions (sustained winds of 20+ knots), extend your scope to 7 or 10-to-1, provided you
have room to leeward. Also deploy the kedge. Use it by first setting the anchor as described above. Then
take the kedge to the bow and tie the line to a bow cleat. Put the engine in reverse to apply gently pressure
on the anchor rode. Lift the kedge over the bow and attach to the rode with a half twist and lock the lever
into closed position. Slowly lower the kedge down the road with the line till it hits the bottom, then lift it 3
feet or so and secure the line to the cleat. Take the engine out of gear and turn off. Retrieve the kedge by
reversing this set of steps.
Under higher winds, also set two bow anchors (using the secondary anchor, chain and rode) in a v-type
pattern for extra holding power.
Anchor safety tether
Anchor chain hook
2. Anchor Windlass.
Always operate the windlass while the engine is running! Otherwise, the windlass will drain the batteries.
Retrieving the Anchor.
To raise the anchor, turn on the windlass switch, which is located below the battery selector switch at
the nav station. Motor the boat forward while the bowman takes in rode by hand. Engage the anchor
chain in the wildcat (teeth) of the windlass. Depress the windlass foot switch (on the deck port of the
windlass) flaking loose chain into the chain locker. When the chain is vertical and the anchor still set,
break the anchor loose from the bottom by motoring forward slowly over the anchor. Then bring up the
remaining chain with the windlass. The chain is marked with white at 50’ and at 5’ levels. Secure the
chain lock in the forth link of the chain below the head of the anchor. Secure the safety cable snap
shackle to the shackle on the head of the anchor. Carefully close the anchor chain locker adjusting the
chain to pass thru the opening on the forward side of the cover. Turn off the windlass switch.
Do not use the windlass to pull the boat up to the anchor nor to break the anchor loose from the bottom.
3. Barbecue.
The propane BBQ is fueled with a hose directly from one of the propane tanks in the propane locker. The BBQ is
a Marine Kettle 2 (new in 2011) and is stored on the stern rail. Insert the regulator arm in the base of the kettle
and thread on the retaining ring until finger tight and the ring does not turn when the regulator tube is rotated.
Open the propane locker, lift out the spare hose and regulator that attaches to the BBQ, prop open the propane
locker so that the hose does not get pinched, insert the regulator into the regulator arm in the base of the kettle at
an 8 o’clock position and turn clockwise to the noon position. Turn the regulator to the light position and light
with the starting button on the BBQ. Adjust to desired flame. When finished cooking, disassemble by reversing
these steps. Also, please be sure to clean the BBQ before returning the boat to Bellingham. The next charter guest
thanks you.
4. Batteries & Charging.
The DC system is powered by four house and one starter batteries aboard the
vessel, and powers everything onboard not powered by the AC system. The
system has a combiner (new in 2010), which distributes the loads optimally
among the batteries and protects the starter battery from being drawn down.
Leave the master switch located on the inboard side of the nav station turned to
the “ON” position and the system functions properly. If somehow the batteries
get too low to start the engine, place the battery switch to the “Combine”
position, start the engine, then return the battery switch to the “ON” position.
If the batteries are so low that the engine does not start from the cockpit, turn
on the ignition switch and depress the emergency start button located above the
engine. The house bank includes 4 group 27 batteries (new in 2010) with a
total of 460 amp hours and there is one group 27 starter battery (2011) with
115 amp hours.
CAUTION: Never turn a battery switch to “off” while the engine is
running! This
Battery selector switch and windlass switch
will blow the diodes on the alternator, and your batteries will no longer charge.
CAUTION: Be sure that the radar is turned off at the Chart Plotter if the cartplotter is left on at
anchor. Otherwise the radar will rain the battery.
Battery voltage can be checked on the electrical panel. The combiner will not allow the batteries to be drawn
down below 11.75 volts. Recharge the batteries by (1) running the diesel engine or (2) plugging into shore
power.
5. Berths.
TSIRKU is
ideal for two couples and two children, two adults in the forward cabin, two adults in the aft cabin,
and two children in the settees in the main cabin. The forward berth is 6’4’’ long, 5’ wide (at the head) and
2’” wide (at the foot). The aft berth is 6’4” long, 4’8” wide. The port and starboard settees are 5’11” long
and 2’4” wide (with side cushions removed).
6. Bilge pumps.
Please check the bilge each day, morning and evening. It is accessed by lifting the floorboard under the salon
table. TSIRKU is equipped with two bilge pumps:
1
An automatic bilge pump (new in 2010). The master switch is located on the left side of the switch
panel. This switch should always left in the ON position. You may occasionally hear the pump operate due to
condensation and water from the shaft log accumulating in the bilge.
2
An auxiliary hand-operated bilge pump is manned from the cockpit on the starboard side using the handle
provided for that purpose (stored in the propane locker). Monitor bilge water daily and alternate your choice of
pumps to ensure that both are functioning properly.
7. Cockpit Table and Crib Boards. The cockpit table and leafs are stored under the starboard settee seat and
are mounted at the pedestal in the cockpit.
Crib boards are stored in the aft cabin when not in use. Please be careful to not stack them on decks which
results in scratches.
8. Dinghy. The 8’ 4”Walker Bay Genesis inflatable dinghy (2008) is equipped with a pair of oars and a foot
pump (stowed in the starboard cockpit locker).
The pvc “hardbottom” is very soft and prone to damage if dragged rocks or beach. Please lift the dingy from
bow and stern and carry up the beach whenever two people are available. If only one person is available, very
carefully drag the boat on its wheels by lifting the bow. However, do not allow the rear pontoons to be in contact
with the rocks or sand, as this will easily damage them.
Please be gentle with oars. Do not use them to push off the beach, as you will likely break or bend one of them.
Make sure they are secured to the dinghy by snapping the straps around them when underway. For rougher
conditions, the oars can be strapped securely inside the dingy near the floor.
A small outboard motor can be mounted on its transom (see Outboard section).
It is important to remember to assign one of your crew “dinghy duty” upon entering a harbor to anchor or
marina to dock. This will assure the painter does not get caught in prop wash and become wrapped around the
shaft, leading to unnecessary delay and costly repairs.
In rough weather, pull the dinghy all the way up to the boat so that the bow is tight and high on the transom, or,
lift the dinghy with the spinnaker halyard onto the foredeck and tie down upside down there.
The dingy is not self draining. Periodically empty rain or other water from it.
Please clean off beach shoes carefully when entering dingy. Sand, stones, mud, etc. in the dingy cause excessive
wear.
The dingy repair kit and spare oarlocks are located under the setee forward of the main salon table on the
starboard side. The dingy inflation pump is located in the cockpit locker.
The dingy is best towed with about 3-4 feet of painter out. Tie the painter off twice – once at a cleat with a
standard cleat knot, then the bitter end to the stern rail. Relying on a single cleat hitch can result in dinghies
“lost at sea”. Also be sure to coil the remaining painter line inside the cockpit and ensure that it does not
fall into the water where it could foul the prop.
Please take special care when beaching the dinghy (refer to the dinghy beaching procedure in your charter
guest book). Most of the beaches you will land at are strewn with barnacle-covered, bottom-slicing rocks.
When approaching the shore, weight the dinghy aft by leaning or moving the crew toward the back of the
dinghy. Then offload everyone over the bow. Lift the dinghy above barnacle height using the hand lines on
either side, and set it down gently on the beach. Also remember to secure the painter under a rock or to a
large driftwood log – we have very large tidal fluctuations (so your dinghy won’t float away).
9. Dodger & Bimini.
Our dodger not only protects the crew from the weather when in the cockpit, but it has several grab handles for
safety.
The dodger’s plastic “glass” is vulnerable to scratching from salt crystals, especially after sailing into a
challenging breeze. When salt spray on the glass dries in the wind, tiny salt deposits are left behind and
tend to obscure your vision. Please avoid directly touching the glass with a damp rag or sponge. Salt
does dissolve in water, but not as fast as you might think. The salt crystals remain un-dissolved for
several seconds. It’s like rubbing the glass with sand paper! To clean, please use generous amounts of
fresh water from a pan from the galley and “flood” the glass to dissolve the salt crystals away. (Better
yet, wait until you’re at a dock where you can hose off the salt crystals. If the dodger glass is really clear,
you can thank previous guests for their diligence. And we thank you too!
CAUTION: We have found that most spray
sunscreens react chemically with the
plexiglass. So please inform your crew to spray
sunscreen downwind of the dodger glass. And
please don’t lean against the dodger with
sunscreen on your back and shoulders. Once
that chemical reaction takes place, the glass is
ruined and must be replaced (at a cost of
around $400).
To erect bimini:
3
1
2
The bimini is set up by zipping on the bimini cover (it
is stored under the starboard settee in the main cabin),
attaching the aft rods of the bimini frame, and
extending the bimini frame forward while raising the
forward portion of the frame, and securing the
horizontal braces with the ball-headed pins.
10. Electrical Panel.
Most switches at the panel board are self-explanatory, but some circuits are unique.
A/C (120V) Power. The A/C outlets will only function while connected to shore power OR, when not connected
to shore power and the inverter button is pressed “on” (converting 12 volt house battery to A/C).
Water Pressure. This pump pressurizes a small accumulator tank located beneath the navigation table, and it
shuts down when the tank is at “working pressure”. If you don’t hear the pump start up when you turn it on at
the panel board, hopefully it means that the system is at working pressure – you should hear the pump start again
after you use some fresh water. (When no one is below decks, especially while motoring or even when sailing,
turn off the water pressure breaker. Should you run a tank dry, the pump would continue to run until it burns
out…and you’d never hear it running while everyone is in the cockpit.) Water tank selection valves are located
are under the galley sink. The Forward and Port tank lines are labeled. See instructions under Water Tank below
for controlling the flow of water from the tanks.Autopilot. This turns on the Autopilot and the Depth, Speed,
and Wind instruments.
Nav Instruments. This switch turns on the
the fuel and water gauges at the Nav station.
Electrical panel
Radar. This switch turns on both the radar
and the charter plotter.
Running & Steaming Lights. Please be
advised that night passagemaking is not
permitted under terms of your charter
agreement with San Juan Sailing. Only use in
cases of reduced visibility (like fog or on the
rare days in the Pacific Northwest when
there’s heavy overcast).
Masthead Light. Should be on all night in an anchorage. (It won’t deplete batteries.)
11. Electronics.
The radar/chart plotter/GPS, depth sounder, wind instrument, and autopilot are all RayMarine products. All user
manuals are kept in the upper aft port locker in the cabin. Please handle these carefully and place them back in
the locker after use. These manuals are mostly originals and are irreplaceable.
Cellular Telephones. TSIRKU is equipped with a 12-volt cigarette lighter type outlet that may be used for
recharging your cellular telephone. The outlet is on the electrical panel face. The marine operator is on channel
20 in this area. This allows you to receive telephone calls and to make collect calls or calling card calls from any
of the major long distance carriers such as AT&T, MCI, Sprint, etc.
Autohelm. This new Raymarine ST70 Smart Pilot X-10 below-deck autohelm (2009) steers Tsirku very well.
The autohelm is powered by turning on the “navigation instruments” switch on the DC panel at the nav station.
The autohelm is engaged by depressing the auto button. It is turned off by depressing the standby button. Auto
tack is engaged by pressing MENU, +1 (starboard) or -1 (port), then ENTER. The autohelm will maintain a
heading to the wind by pressing MENU, highlight the wind vane mode, then press ENTER. A remote control for
the autohelm is keep in the nav station table. For more instructions on other features, please refer to the user
manual onboard.
Chart Plotter and Radar. A Raymarine CW 90 chartplotter and Randome Digital Radar (2012) are installed at
the helm. Detailed charts for Pacific Northwest waters are installed on the device. The charter plotter can be
used find the boats location on the charts, navigate to a waypoint, follow a route to a destination, plot the track of
the boat, and log distance covered. For instructions on these and other features, please refer to the Raymarine
user manuals in nav station. When the unit is turned on at the Nav panel, the chartplotter will boot, hit the “OK”
button (black button in the center of the rotory control. Zoon in out with the “IN” and “Out” button. Use the soft
keys to move to ship or cursor and to go to Presentation or Nav Options. Nav Options goes to Routes and
Tracks. You can create a Route and follow it. When anchored, one can turn on the Track as a safety measure to
detect if the anchor drags at some later time. Please do not change the system settings on the device. Also, please
do not delete the routes stored in memory or add new routes
or waypoints. This will ensure that the points stored in the
unit offer safe passage. Hard copies of charts are kept in a
tube in the V berth. Navigation will be most effective it the
hard copies are used in combination with the charter plotter
or if the charter plotter malfunctions.
Chart plotter and Radar
OK button
Radar softkey access
The Radar is set to overlay the chart on the
chartplotter. It turns on by pressing the red start button
and following the soft keys. The radar is set to overlay
with the chard and is highly effective in this setting. It
consumes power when in use and when on standby. Be
sure it is turned off when anchored or otherwise not
needed to minimize power drain. When the radar is turned off the radar icon in the upper right
corner of the Chartplotter is white.
We recommend that in addition to using your PRIMARY navigation aids – namely, the Maptech
waterproof chart book or the roll charts (with the most active “killer rocks” marked in red) – up in
the cockpit while underway, you also utilize the chartplotter for added safety. It helps you to see if you
are where you think you are on the chart book or paper charts. If someone asks, “Where are we?”
Within 3 seconds, you need to be able to point to the chart and show them the vessel’s precise
position. If you can’t, you’re in danger of hitting a rock.
The only time when the chartplotter becomes your primary navigation tool is when you’re in a “tight
spot” like going through a narrow pass or approaching the entrance to a secluded cove. (With the
chartplotter, you can “zoom in” to make something that’s the size of a dime on a paper chart into the
size of a paperback novel or larger on the screen. You can see more detail and, importantly, any
hazards in the area. Your boat’s position on the chartplotter is accurate to within 3 meters – about 10
feet. )
You should have little need of the radar except for the highly unlikely event that you are suddenly
enveloped by fog, which is rare in this area. The fog that we’ve encountered in the islands usually
forms in the wee hours of the morning and burns off by mid-day. So if it’s a little soupy after
breakfast, we put on an extra pot of coffee until it lifts. Never depart from a safe location into the fog!
To do so, even with radar, would be contrary to prudent seamanship. FYI – Fog becomes “reduced
visibility” when you can see ¼ mile (about 4 football fields) in all directions. It is safe to proceed
CAREFULLY in reduced visibility using your radar to “see” beyond the haze, but be sure to look up
from the screen about every 10 seconds and use your eyes to scan the horizon forward, behind, and
side to side. A motoryacht, tanker or freighter traveling at 20 knots takes only 39 seconds to travel ¼
mile! You need to see these fast-moving vessels soonerrather-thanlater so you can prepare, if
indicated, to quickly take evasive action to avoid an impending collision.
3. Depthsounder. Power on by flipping Nav Instrument switch on the electronic panel. The depth sounder is
locked and requires a security code at startup. The code is 1234. Instructions are in the Nav station.
Summarized here, to set, press ALARM, press OFFSET to scroll first digit to 1, repeat these two steps to set
digits 2-4, press ALARM twice.
The digital depthsounder will not give
accurate readings beyond 400’. In
deeper water, the sensitivity on the
unit increases as the transducer tries
to get some reading back.
Consequently, you will receive many
false readings caused by currents,
changes in water temperature, fish,
and seaweed. Use the depthsounder
only as an aid to navigation in shallow
water.
Depth, wind, and speed instruments
IMPORTANT: The key to avoiding rocks is NOT the depthsounder – but knowing where
you are at all times. (Rocks are the greatest navigational and safety hazard in the islands
– but they are all clearly marked on the charts.)
The alarm feature of this instrument can be very helpful. The depth, shallow, and anchor low and high
alarms are set by depressing the depth and alarm buttons for 2 seconds. Depressing the depth button
will then scroll thru the four alarms. Increase the settings with the reset button and decrease the
settings with the offset button. An anchor drag alarm can also be set on the GPS at the nav station.
Push menu twice to get the alarm setting. Use enter and the scroll buttons to scroll to the on/off setting
and the anchor drag setting. Hit edit to save the changes.
GPS. The nav station GPS is turned on by putting on the GPS switch at the nav station and holding down the
red power button. This instrument does not have a detailed chart data card inserted and thus should not be
used for navigation. It should be used for the anchor drag alarm. For more instructions on other features,
please refer to the user manual onboard.
Knotmeter. Power on by flipping Nav Instrument switch on the electronic panel. Speed is indicated in knots
or nautical miles per hour. (For comparison, 7 knots is approx. 8 statute mph.)
If the digital knotmeter shows a reading of “0.00” while underway, the impeller is most likely clogged with a
piece of eelgrass. Sometimes it will float off overnight. You can also try removing it by traveling for a short
distance in reverse. The impeller is located beneath the most forward salon sole board. (It’s not recommend
that you try to remove the impeller to clear it, unless you are VERY experienced in such things. An open hole
in the hull is a scary situation, and if not plugged quickly, it can jeopardize the boat and the safety of your
crew.) If the knotmeter is temporarily “out of service”, the GPS input to the chart plotter provides an
alternate and quite accurate speed indication called SOG (speed over ground).
Radio (VHF). TSIRKU is equipped with a new (2010) Standard Horizon Quest-X GX3100 marine DSC VHF radio
transmitter with AIS. The Federal Communications Commission (FCC) licenses it as a ship station. The Call
sign is WDG3953 and the MMSI # programmed into the radio is 367531380 This radio can be an extremely
valuable source of information such as weather and tides and in an emergency it is a vital source of assistance. It
can also provide telephone contact with people on shore through the marine operator. The operation of this
station is strictly controlled by part 80 of the FCC rules and regulations and the Communications Act of 1934.
You should review the communications section of Chapman’s Piloting to familiarize yourself with these rules
before using the transmitter.
DSC Digital Selective Calling) VHF radios are a major step forward in safety. These radios transmit the vessels
identification and location using a frequency that is more reliable than analog VHF. As with traditional VHFs,
channel 16 is the distress, safety, and calling frequency and should be monitored whenever the radio is on and not
in use on another channel. This will allow you to hear emergency weather bulletins or calls to you or other boats
and any distress calls where you might be able to assist. It will also enable you to hear how the marine radio
system works and what phraseology to use in various situations. Should you encounter an emergency situation,
you can send a distress call to the Coast Guard and to other vessels with DSC VHFs by: lift the red spring loaded
DISTRESS cover and press the DISTRESS key. The DISTRESS menu will appear on the LCD. Press and hold
the DISTRESS key. The radio display will count down (3-2-1) and then transmit the Distress call. After the
message has been sent, the radio will sound a Distress Alarm and the display will flash. The transceiver will
watch for and acknowledgement on CH70 and also receive calls on CH16. If an acknowledgement is received,
select channel 16 and advise your distress situation. To cancel a DSC Distress call sent in error by pressing the
CLR key, the press the ENT key.
A Standard Horizon Ram 3 remote mic (2010) is installed at the
helm. This also is an important safety feature. It has the basic
functionality of the VHF and allows you to receive and send
communications from the helm. This mic is stored in the Nav
table and should be attached on the forward side of the chart
plotter at the start of your voyage.
A portable VHF radio and charger is kept in the nav station.
Recharge the VHF at the start of your voyage.
To listen to the weather reports (should be done in the
morning before you head out and ½ hour before your final
Remote VHF mic
destination), push the “WX” button on the radio. Scan the
weather channels for the one with the best reception before sailing in the morning and prior to
anchoring for the evening. This is generally a light wind region but weather changes can be sudden.
Listen for the “inland waters of western Washington” Both cover the San Juan Islands and the
Canadian Gulf Islands. You will also hear “Strait of Juan de Fuca” (south of the San Juans), “Georgia
Strait” (north), and “Rosario Strait” (runs through the eastern part of the San Juans).
You should monitor channel 16 (the hailing and distress channel) during your cruise. You may save a
vessel or a life. You may hail vessels on channel 16, but after establishing contact on channel 16, ask
the skipper of the other boat to switch to working channels 78, 79 or 80. San Juan Sailing monitors
channel 80 during office hours (closed Sundays). If you need a review of VHF radio protocol, you’ll
find information located in the onboard Charter Guest Reference Notebook. (By phone you can reach
the San Juan Sailing office at -800-677-7245 or SJS’s owner, Roger Van Dyken, at 360-224-4300 on
cell or 360-354-5770 at home.)
Stereo. We have installed a Sony DSX – MS60 Stereo system with Tune Tray for Ipods and cockpit speakers
for your enjoyment (new in 2011). When only the cabin speakers are being used, please turn the cockpit
speakers off pressing the SEL button on the stereo and setting the fader to 15.
12. Emergency / Safety Equipment.
First Aid kit. The ship’s first aid kit is located behind the starboard setee back rest in the cabin. Please notify
SJS of any items used from this kit during your trip so they may be replaced.
Flares. Visual day/night distress signals are located are in orange bag located behind the starboard setee back
rest.
Fire Extinguishers. There are three hand-held fire extinguishers. One is mounted under the galley sink,
another is mounded in the aft cabin, the third is mounted in the cockpit lazerette.
Emergency Tiller. It sort of looks like a metal pipe, with an “elbow” bend in it. It’s located in the lazarette. The
rudder post attachment point is under the helmsman seat. To remove the cover, insert the bronze deck key
(located in the Nav Station) into the deck fitting and unscrew.
Life Jackets. Six personal flotation devices (PFD - life jackets) are stored in the lazarette.
LIFESLING. The lifesling overboard rescue system consists of three components: the specially designed
storage bag, a 150-foot floating polypropylene line, and a flexible floatation collar. The collar is a blend of the
traditional horseshoe life ring and a helicopter-lifting sling. This system was developed by the Sailing
Foundation of Seattle and has proven to be the most effective means of retrieving a person from the water. See
instructions on the storage bag for proper use.
13. Engine & Handling.
TSIRKU has a 27 horsepower diesel auxiliary engine, which drives a three-bladed adjustable propeller through a
reversible transmission. The shift lever (port) and throttle control (starboard) are mounted on the binnacle. A
control panel in the cockpit provides a key lock, a starter button, a tachometer, and alarms for water
temperature, oil pressure, and battery charge. A temperature alarm is also mounted on the exhaust manifold
with an indicator light at the engine starter button. If the or the engine alarm go off, immediately shut down the
engine and assess the problem (see below).
Reverse. TSIRKU backs straight and handles well in reverse. Be sure to hang on tightly to the wheel in reverse. If
not, water pressure on the aft edge of the rudder will slam the rudder over to one side or the other. And that’s
very hard on the steering mechanism.
Forward. TSIRKU has a large rudder. So she’s very quick on her feet and turns in a narrow radius. Small
rudder adjustments will easily change course.
Docking. TSIRKU carries momentum well, so your final approach and turn in toward your slip should almost
always be done with the shifter in neutral and approaching the dock at 0.5 kts or so. If you slow below, this,
simply shift the transmission into forward at idle. You will only need more than “idle speed forward” if there
are high headwinds. Shift into reverse when dockside and increase the rpms to bring the boat to a stop.
Never turn off the engine until the vessel is securely tied at the dock. Remember, you’ll need to use your engine
– in reverse – to stop the boat. It’s very difficult and often impossible for people holding lines to stop the
forward momentum of a vessel as heavy as a cruising sailboat.
When coming into our docks in high winds or if you’d just like a little assistance upon arrival, simply
hail “San Juan Sailing” on VHF channel 80. We’ll be glad to offer some “coaching” and/or catch your
lines. In fact, most marinas in the islands will help you if you hail them and ask for assistance. Asking
for docking assistance, especially in windy conditions or with an inexperienced crew, is a sign of
prudent seamanship.
Starting.
1 Check the Racor filter (no water or dirt should be in the
glass bowel) and the raw water strainer (no kelp or debris
should be visible in the bowel) (both located aft of the
engine) and the engine oil level at the start of each day.
The oil dip stick is on the starboard side of the engine.
Spare oil kept onboard (in aft starboard cockpit locker
should be located during your onboard orientation. Oil
levels anywhere between the high and low marks are
acceptable, but do NOT over fill. Add no more than a cup
at a time. Then, after waiting about 2 minutes for the oil to
trickle down to the pan, check the level again. Overfilling
is a bad thing to do to a diesel. The excess oil will escape
somehow, perhaps by blowing the head gasket. Also, if the dipstick
indicates no oil the first time you check it, reinsert and try again - the
correct level will show when the air lock bubble is broken. Expect the
oil to be blacker than that of a gasoline powered automobile
engine…this is normal for a diesel after only a few hours of operation.
2 Check the coolant level…anywhere between the two lines (high and
low) on the overflow reservoir is “good”.
3 While you have access to the front of the engine, check for belt
tightness and leaking fluids.
4 Look over the stern for kelp, logs or branches that could foul the
propeller.
5 Place the shift lever in neutral. Up is forward, down is reverse,
horizontal is neutral.
6 Turn engine key clockwise. The engine oil alarm should make
piercing sound.
7 Place the throttle at ¾ full-speed if the engine is cold. Press the
engine start button and gradually increase the throttle until the
tachometer indicates the engine has started (1000 rpm or more)
then reduce to 1000 rpms for a few minutes, the drop to idle. If the
engine does not start after 10-15 seconds, release the start button,
wait a little and try again. If the engine is warm, start the engine in
idle position.
8 Normal idle speed is about 800 rpm.
11 Please allow 10 minutes of warm up before placing a load on the engine. It is very hard on a diesel to be
placed under load when cold.
Always reduce to idle (ca 800 rpms) before shifting between neutral, forward, or reverse. The prop flange can
be damaged if shifting is done at rpms greater than 800.
Always check for engine cooling water coming out of the exhaust. If there is no water, turn off the engine,
check the raw water intake seacock and sea water strainer (close seacock and check for eel grass).
If necessary, check engine water pump V-belt, cooling hoses, and as a last resort, the raw water impeller. (A
spare impeller is located with the spares, underneath the forward starboard cushion in the main cabin.)
Whenever the engine is started, run it for 15 minutes before turning off as it must be hot enough to evaporate
any water remaining in cylinders.
Proceeding in Forward / Reverse.
ALL SHIFTING SHOULD BE DONE AT IDLE SPEED of 800 rpms. Shifting at higher speeds may strip the
gears, shear the flywheel or damage the shaft coupling, and ruin your trip.
Operation.
27 HP Yanmar 3 GM series engines are very reliable. Cruising speed is 6.3 knots at 2350 RPM. Fuel
consumption is approximately 0.6 gallon/hour at 2350 RPM.
Please do not exceed 2500 RPM because it’s hard on the diesel and fuel consumption goes WAY UP (at very
little increase in actual speed). For this reason, we ask that you limit the use of higher power settings to real
emergency situations.
To avoid the possibility of sucking air or sludge when the fuel level is too low, 1/4 of a tank, refuel when the
fuel gauge approaches ½ full (the actual fuel level at this point is ¼ of the tank, see below).
Engine Overheat. If the buzzer sounds while the engine is running, about 999 times out of a thousand it’s no
more serious than eelgrass plugging up your raw water strainer. The best upfront solution to this problem is
prevention—keep an eye peeled for eelgrass mats, especially along those “soapy” looking tide and eddy lines
in the water. And don’t run over it. When eelgrass gets sucked into the engine cooling water intake, it jams at
the raw water strainer.
To clear the eelgrass from the raw water strainer
1 Check the raw water filter located under the aft berth. To clean the filter, close the raw water through-hull
valve. (As with all through-hull valves, placing the handle in perpendicular position relative to the water flow is
the closed position). 2 Remove the two wing nuts, lift out and clean the filter. 3 After clearing any
obstructions, it is very important that the lid to the filter is properly seated so that there is no air leak. Otherwise
the water pump will suck air from the filter rather than raw water for cooling. Adjust the position of the strainer
in the bowl for proper seating. 4 TIP Before re-assembling, crack open the though hull to make sure the intake is
not still blocked. If there is no gush of water, suspect blockage. Back blow with the dinghy pump to remove
blockage in the thruhull. 5 Tighten the wing nuts simultaneously to assure an even seal. Reopen the seacock,
watch for leaks. Once the engine is started, use a flashlight to look into the sea strainer bowl to be sure no
air bubbles are moving through it, which indicates the lid to the sea strainer is not secure. If this is the case,
turn off the engine and reseat the sea strainer lid.
Then restart the engine.
If upon restarting the engine overheats again, check the seal between the strainer, the rubber gasket, and the
lid. If the strainer is drawing air, it won’t draw water. If needed, open and then retighten the lid on the
strainer…and check to make sure the rubber gasket is in place in the lid (and not lying in the bilge.)
If the above fails to solve the problem, call San Juan Sailing for assistance.
There may be other reasons you hear the buzzer. If you lost oil pressure, the oil icon warning light will light
up, so check which light is showing red. If it’s the oil light, shut down the engine, check the oil level, and
contact San Juan Sailing. The alarm buzzer is more likely to indicate engine overheating, and the
temperature icon light will light up. Before you shut down the engine, check for water gurgling out the
exhaust. If you have a “wet exhaust”, check the coolant level in the overflow reservoir bottle and if none is
seen, add enough to reach the top level line on the bottle. (ONLY AFTER THE ENGINE COOLS DOWN, you
might remove the cap on the engine block and add coolant.) And check the bilge for a light green liquid. If
found in the bilge, call San Juan Sailing. If the coolant reservoir bottle is full, check to see if the engine threw
a belt. Without a belt on the raw water pump, the coolant won’t circulate and cool the engine. (Replacement
belts are located in the engine spares kit.) One other possibility is that the impeller in the raw water pump
has failed. While they are replaced each spring with a new one, it’s still possible that a hard object may be
drawn in and break off an impeller blade. (A replacement impeller is found with the engine spares.) Call San
Juan Sailing if you suspect you have an impeller problem.
Engine Shutdown. Remember--do not shut the ignition key while the engine is running!
(This can damage the diodes on the alternator, and the batteries will no longer charge. If you accidentally do this,
turn the key back to the “on” position as soon as possible.) Instead, first bring the engine to idle and the gearshift
to neutral. Allow the engine 5 minutes to cool down. To stop the engine, pull the stop switch located by the
ignition switch. This cuts off the fuel supply to the engine. Alarm will sound until key is switched off.
Be sure to remember to push the engine stop back in after the engine stops or the engine will not restart.
Record the engine hours (meter located above the engine instruments in the cockpit lazerette) at the end of each
day and monitor this as an indication of fuel consumed.
Emergency Starting. An emergence start switch is located in the engine compartment above the engine.
This switch bypasses the solenoid and starter switch from the helm and should turnover the engine if the
battery is not dead. To use this turn on the ignition key at the helm. Have someone operate the throttle at the
helm while another person hits the emergency start switch above the engine.
14. Fuel Tank.
The fuel tank holds 26 gallons of diesel fuel. TSIRKU has a range under power of approximately 240 nautical
miles, depending on rpm, current, wind, etc. The tank should be kept as close to full as possible to prevent
water from collecting due to condensation.
The fuel gauge is located at the nav station. The shape of the tank causes gauge to read as if the tank is fuller than
it is.
An important additional way to monitor fuel level is based on hours the engine has been run. Record the engine
hours (meter located above the engine instruments in the cockpit lazerette) at the end of each day and monitor
this as an indication of fuel consumed. 25 hours of engine time will equate to consumption of approximately ½
tank of fuel at 2350 rpms. The Webasco diesel heater will use up to .5 to 1 gal of diesel on cold days, so factor
Level Showing on
Gauge
F
F
3/4
1/2
Level in Tank
F
¾
½
¼
this into your estimation of fuel consumption.
Please be very careful when fueling. Never allow maximum flow from the filler hose. If you do, the fill tube will
surge and diesel will spill from the vents onto the side and onto the deck. It takes only a few drops of diesel fuel
in the water to create a sheen and subject you to a Coast Guard fine. Fill slowly and carefully. Check the side
vent and, with dish washing soap, wipe up any excess fuel to avoid yellowing the hull and stern and polluting the
water. Also be very careful of drips when removing the hose. Diesel and shoe bottoms are a very slippery and
dangerous combination. After wiping, please use soapy water to scrub down any drips so it does not stain the
fiberglass.
Put your ear down to the fill hole and listen to the diesel flow. When the pitch changes and gets higher and
higher, the tank is likely full and you’re now filling the hose between the tank and the fill hole. Avoid a fuel spill –
STOP! Check the fuel gauge. If the gauge is not on “F”, continue filling. When you think you’re finished fueling,
check the fuel gauge one last time to make sure it’s reading “F”, which indicates the tank is at least ¾ full. If in
doubt that the tank is full, allow a very slow trickle of fuel into the tank and use the change of pitch of the sound
to be a guide to fullness.
Note: Unlike automobile fuel gauges, fuel gauges on boats are notoriously inaccurate, especially on the low end.
Therefore, whenever the fuel level drops below ½ full, you should refuel at your next opportunity. NEVER let the
fuel level fall much below 1/2 full or you’re in danger of running out of fuel. (Towing and the cost of a mechanic
to bleed the air from the fuel lines is an expensive proposition for a charter guest.)
15. Head & Holding Tanks. Tsirku has a 17-gallon holding tank and it needs to be emptied frequently.
Figure one gallon per use. Consider empting it once per day to avoid a leaking sewage or, worse yet, an
exploded holding tank…a real “vacation ruining” event! Over-filling the holding tank will force sewage into
the vent. Once the vent is plugged the entire system functions poorly if at all and the head or holding tank can
blow up. San Juan Sailing staff will discuss holding tanks, overboard discharge and pumpouts upon your
arrival.
If the toilet pump starts to resist your flushing effort, don’t force it! Exploding or leaking sewage is most
unpleasant! Search out the problem and correct it.
Flush by switching the lever to “wet bowl” and pumping handle up and down (five times) in a firm but gentle
manner. Pump handle and other parts can be broken by rough usage. After the bowl contents are evacuated,
continue to flush with 8 more pumps. This flushes effluent out of the lines connecting the head and holding tank.
Switch to “dry bowl” and pump head bowl until empty. LEAVE ON “DRY BOWL”.
NOTE: Failure to set to “DRY BOWL” could result in flooding the toilet and the head.
The switch behind the head can be set to “DISCHARGE” for overboard discharge or “TANK” to send head
contents to the holding tank. The arrows in the Y-valve indicate if the flow is to Tank or to Discharge.
The preferred method is to go to a pump out station several times a week following the directions found at the
pump out station. Consult the vessel manual onboard for pump out locations and directions.
The holding tank may also be emptied overboard with the masticator pump. The procedure is: open the thruhull
for the masticator pump which is located aft of the engine and accessed thru the aft cabin; the masticator switch
on the panel at the nav station is then depressed; hold down the masticator switch until the sound indicates the
tank is empty (this will take a few minutes); and release the switch; close the masticator thruhull.
The macerator will empty the tank in approx. 2 minutes. Please use only with the engine at idle or off in
order to be able to hear the change in sound when pumping is complete as the macerator will not turn off
automatically and must be turned off by releasing the switch.
If you pump out the holding tank at a shore facility, please fill it with about 5 gallons of fresh water through
the deck fitting to rinse, and then pump it out again. Thank you!
Offshore sailors have a rule: “Never put anything down a marine toilet that hasn’t been eaten first.” And
that, of course, includes feminine items. In fact, offshore sailors do not even put soiled toilet tissue down a
marine head. They simply deposit soiled toilet tissue (and feminine items) in a receptacle such as a waste
basket with a liner bag or a ziplock baggie, but not down the toilet. We and San Juan Sailing highly
recommend you follow this rule. And since we’ve been recommending this, we’ve had almost no incidents of
plugged heads!
16. Headroom.
The headroom on TSIRKU (taken centerline in the main salon) is 6’1”.
17. Heater .
The diesel-fired Webasto 5000 cabin heater (2009) will make
the interior “toasty” within 10-15 minutes. The heater control is
located on the bulkhead just aft of the starboard setee. For
heating, just set the switch to ON. The set temperature is
controlled with the UP and Down keys. Note: It takes about 5
minutes for the heater to “cycle up” and get hot. The heat is dry,
comfortable, and on those rainy days or cool evenings, makes a
huge difference in cruising comfort!
The heater is large for this size boat (we use the boat mostly during the off season when temperatures are
lower). To avoid the heater cycling on and off rapidly in warmer weather, keep all the heater vents
(forward cabin, main cabin, aft cabin open) and the doors to the aft cabin, head, and forward cabin open,
so that the heater has to heat the entire boat.
When it’s cool, we recommend warming the boat before turning in for the night, with the last person to
go to bed instructed to turn the diesel heater off before retiring. (Otherwise, the boat will get too hot and
the electric fan in the diesel heater will drain the house batteries. The down comforters will keep you
warm in bed.) Then, the first one up in the morning can simply turn the cabin heater back on.
18. Inverter.
TSIRKU is
equipped with a Heart 1500 watt inverter that
converts DC power to AC power. The inverter is turned on
by pressing the invert button on the inverter control panel in
the starboard lazerette. It should be turned on and used
only when the engine is running. It is critical to turn the
inverter off after use and when the engine is not running.
Otherwise, it will quickly kill the batteries
198. Keel Depth.
TSIRKU has
a beavertail shoal-draft fin keel and draws 4’10’’…so figure on 6 feet to be on the safe side.
San Juan sailing strongly recommends that you always maintain a minimum of 10’ - 12’ under the keel at all
times, both underway and at low tide on anchor.
20. Outboard.
TSIRKU is
equipped with a 4-stroke Honda 2 horsepower outboard (2008). This brand and size has proven to be a
practical and VERY reliable dinghy outboard. DO NOT add any oil to the gasoline mixture – it uses just straight
gasoline. The fill cap is located at the top of the engine.
As a courtesy we have an additional red spare gasoline container tied into your dinghy. WARNING –
Gasoline fumes are explosive and a very dangerous fire hazard if stored on a boat. Keep the spare
gasoline container in the dinghy, in the forward portion of the dingy sole and secure with the strap.
NEVER store the spare gasoline container in a locker, lazarette, or any other storage area on your
vessel.
The outboard is light so it’s easy to transfer from the stern rail outboard mount to the dinghy transom
(and vice versa). PLEASE do not cruise with the outboard on the dinghy. It will no longer work after
saltwater gets into or even near the intake of the carburetor. If this happens, you will have to condition
your rowing muscles until you get back to Bellingham). We also recommend taking the outboard off the
dinghy at night. We have actually had dinghies deflate in the cool of the night and had wind waves or
powerboat wakes flip the dinghy over. It’s a disturbing sight first thing in the morning to see your
outboard propeller sticking straight up, with the motor under the water. At that point it’s nothing more
than a very ineffective $900 anchor. And we do not want to have to sell you a non-working outboard after
it has been submerged!
To Start.
1
Push the fuel valve lever (starboard aft corner of the outboard) aft to open the fuel valve.
2
Pull out the choke switch (starboard forward corner of the outboard).
3
Open the air vent on the top of the fuel cap (top of outboard) by turning counterclockwise about 3 full
turns.
4
Make sure the black U-shaped kill clip (with the red lanyard) is clipped into the red shut-off knob (port
forward corner of the outboard).
5
Turn the handle throttle ¼ turn counter-clockwise.
6
Pull the rip cord until it starts. (You shouldn’t have to pull it more than 5 times.)
While Running.
1
Push the choke back in shortly after the engine starts (after about 10 seconds).
2
There is no transmission--just throttle up to go forward and throttle down to stop. If you want to go in
reverse--just swivel the outboard around 180 degrees.
To Shut Off.
1
Shut the outboard off by pushing in the red shut-off knob (where the kill clip is clipped in). Or just pull
the red lanyard until the clip pops off.
2
To avoid prop damage, shut the outboard off and raise it out of the water before you reach the shore. Pull
the outboard forward and out of the water until it clicks at stays in place. To put the outboard shaft back in the
water, release the stainless steel lever on the starboard side of the shaft.
1.
2.
3.
4.
When Not in Use.
Put the outboard back on the outboard mount on the stern rail and tighten both braces.
Push the fuel valve lever forward to close (starboard aft corner of the outboard).
Close the air vent on top of the fuel cap (top of outboard) by turning it clockwise.
Secure the outboard further by tying the safety lanyard with to the stern rail.
Troubleshooting.
If the engine won’t start, review steps 1-6 above to make sure you’ve done all 6 steps.
There is a spare spark plug and spark plug wrench in a labeled clear plastic box in the
setee locker just forward of the mast in case the engine won’t start or is running rough. (A
new spark plug solves myriad outboard problems. If you use the spare spark plug, notify
your check-in skipper upon your return so a new one can be placed aboard for future
guests.) If the outboard is running and you’re heading toward shore, and the engine
suddenly quits, it’s usually that someone has forgotten to vent the fuel cap. If the engine
is running fine but the propeller isn’t moving, the shear pin is probably broken – just take
the cotter pin out to remove the propeller and replace the broken shear pin (a spare pin is
located forward of the shaft under the handle grip) and put the propeller and new pin back
into place.
21. Refrigerator.
The well-insulated refrigerator (1’3” wide, 2’6’’ long, 1’8” deep) must be turned “on” at the electrical panel.
The temperature thermostat control dial (with 1 through 7, 7 being coldest and will probably freeze your
lettuce) is located inside the refrigerator, along on the aft edge. There is a small freezer compartment in the
refrigerator (a dozen hot dogs max capacity). A setting of “4” is usually about right. It is necessary to first
turn the refrigerator ON using the breaker on the DC breaker panel. Be sure to keep the refrigerator turned
off when the diesel engine is not running or the boat is not under shore power. The refrigerator will quickly
drain the battery bank. Foods generally stay cold in the refrigerator over night if it is run only during the day
while motoring.
22. Sails.
Headsail. The 130% genoa (110% jib in spring) has roller furling for your convenience. Whether fully or
partially deployed, you’ll have good sail shape. Slight hand-over-hand tension on opposing lines – furling
line and sheets – prevents problems such as a rat’s nest on the drum (should the wind catch the sail and
unwrap it violently) or a baggy furled sail.
Reefing the Headsail – Simply ease the jib sheets (keeping control of them) while pulling in the jib reefing
line until only the amount of sail you desire is deployed. The boat is equipped with Harken roller furling
blocks. The switch on the aft block should be set to ratchet mode when setting the head sail and to “smooth”
mode when pulling in the head sail.
Never use a winch on the line, as it will damage the furler.
Mainsail. The mainsail is fully battened with a Lazy Dutchman/Lazy Jack flaking system and two prerigged reefing lines. When attaching the halyard to the mainsail (we keep the main halyard shackled aft
stanchion on the starboard side to keep the noise down), be sure not to foul the halyard on the lazy jack lines.
The Strong Track low friction mast system (new 2010) allows the main to be raised about ¾ of the way by
hand and lowered very easily.
To deploy the main:
1
Steer head-to-wind and maintain.
2
Attach the halyard to the head of the sail.
3
Release the sail ties.
4
Release the Lazy Jack control line on the starboard side of the boom. Work the slack to the Lazy Jack
lines on the port side of the boom.
5
Release mainsail reefing lines, mainsheet, and vang when preparing to hoist the main.
6
Hoist the main, minding that the battens are inside of the Lazy Jack lines. One can stand on the starboard
cockpit seat and pull on the main halyard while watching that the battens go through the Lazy Jacks.
7
Winch the halyard up carefully the last few inches to eliminate wrinkles in the luff. (Don’t over-crank on
the winch or the sail could possibly rip somewhere along the luff.)
8
Let out the topping lift partially.
9
Fall off and you’re sailing! (Now you’re ready to deploy the head sail.)
When dropping the main, release the main sheet, take up the topping lift, tighten the Lazy Jack lines, pulling
slack from the port side of the boom to the starboard side, then release the main. When letting the mainsail down
take one wrap of the halyard around the winch and drop the main while flaking the aft portion of the main on the
boom. The sail will flake nicely for the first 1/3 to 1/2 of the sail, but then will require a few tugs on the leech or
luff to help flake the rest of the mainsail fold into the Lazy Jack lines.
Please resist the temptation to tighten up the loose reefing lines in the cockpit. Instead, wrap then in the
mainsail to make everything “shipshape” otherwise the main will be doubly difficult to hoist the next time
out.
Please place the mainsail cover over the furled main whenever the main will be exposed to the sun or the
elements for more than an hour or two.
Reefing the Mainsail: “Reef early and reef often.” This will keep your crew comfortable and you from
rounding up. Reefing the main is easy and can be done from the cockpit. Here's how.
1
De-power the main (by heading up or heaving to).
2
Tighten the topping lift to hold up the boom.
3
Let the tension off of both the boom vang and the main sheet.
4
Lower the mainsail so that the reefing point you desire is about 14 inches above the boom and cleat off
the main halyard to keep tension on the mainsail halyard when reefing down the foot of the main.
5
Pull in on the reefing line (using the winch if necessary) to tighten the sail, which will draw down the reef
point much closer to the boom and “shape” the sail. If needed, raise the main halyard slightly (with the winch).
TSIRKU is
a delight to sail. Her sail plan (a medium-sized furling genoa and battened main) was selected
with consideration for single or short-handed sailing. Once she has way, TSIRKU is easily steered with
small rudder changes. Her perfect breeze is 10-20 knots with heel at 5-20 degrees. Full sail can be
carried in winds up to 17 knots. If you reach the edge of your comfort envelope sooner, don’t hesitate to
shorten your sails. Remember, “Reef often and reef early.” You can always shake them out if you decide
you’ve been too conservative.
TSIRKU has
a 3-bladed feathering “Autoprop” for sailing efficiency, gaining you an additional 0.25- 0.5
knots under sail. Shift the transmission into NEUTRAL when the engine is shut down and you are under
sail.. Enjoy!
Adjustable Backstay. Standard pressure on all points of sail is 700 lbs. When going to weather in stronger
winds, the pressure can be increased to 1,300. The hydraulics control is in the port side of cockpit. The pump
handle for the hydraulics is located on the backstay adjuster on the port side of the cockpit. The black knob on the
adjuster is a pressure bleeder valve that releases pressure for the hydraulic system. CAUTION: DO NOT
LEAVE THIS KNOB OPEN. Adjust to the proper pressure and re-tighten this knob finger tight. Be careful not to
over tighten this knob as it can severely damage the hydraulic system. As the backstay pressure is increased the
draft in the main moves forward and the mainsail gets flatter which decreases weather helm.
CAUTION: Do not tighten the backstay adjustor above 1500 lbs.
Reducing Heel
1 Ease the main sheet traveler to leeward. 2 Sheet out mainsail. 3 Move the jib sheet lead aft to increase the
twist high in the jib. 4 Reef the main to reduce heeling. Ease the boom vang prior to reefing. 5 Reef the headsail
to 90%. Move the jib sheet forward of its original position. 6 Reef the mainsail a second time.
23. Shower, Hot Water & Shower Sump Pump.
Hot water is stored in the insulated tank. It takes about 30 minutes of running the engine under load to get the
water hot. When on shore power, you can heat your water electrically by turning the “water heater” switch on the
A/C panel to the “on” position. It takes about an hour to heat the water electrically.
CAUTION: The engine heats water to scalding temperatures! So please BE CAREFUL!
The shower and head sink both drain into the sump pump. The “sump pump” breaker on the electrical panel will
power the sump pump’s float switch, allowing it to drain the sump reservoir when it fills. Keep the sump pump
breaker turned ON at all times.
Upon entering the shower stall, carefully close the Plexiglas stall door to keep water in the stall. Turn on the
shower by raising the knob and control temperature by rotating left or right. Please towel out the walls, floor, and
floor boards of the shower stall after use to keep dry and clean.
Experienced cruisers know the sailor’s shower: get wet, turn off the water, soap up, rinse off.
On warm, sunny days, an alternative to the below decks shower is the swim platform shower (with hot and cold
water) located next to the swim ladder. This is also a good way to rinse off salt after swimming or dirt after going
ashore. The stern shower is operated by opening the plastic covers, pulling out the shower head, turning on the
water by carefully pulling on the control handle, and adjusting temperature by rotating the control handle. Note:
small fingers are needed to pull out the control handle!
24. Spares.
TSIRKU is
equipped with engine and general spares and lubricants. They are in plastic containers located under the
setee forward of the main salon table on the starboard side. Tools are located under the nav station seat.
25. Stove/Oven.
The galley has a three burner gimbaled propane stove with oven. It is fueled from a propane tank located at the
aft port cockpit seat. The manual valve on the top of the tank should be kept closed whenever the stove is not in
use. Ignite the stove by:
1
open the propane tank valve.
2
turn on the gas alarm switch on the DC panel at the nav station, allowing the gas alarm panel mounted by
the galley sink to go thru its start-up cycle.
3
press the “on” button on the gas alarm panel.
4
turn to left the knob for the desired burner, oven, or broiler, holding down the ignition button on the stove
face (or use a lighter), and continuing to hold down and rotate left the burner knob, then releasing the knob and
adjusting flame.
Propane is heavier than air so the gas will collect in the bilge, therefore a certain amount of caution is required. A
full tank of propane normally lasts a little more than two weeks.
Open the hand valve on the propane tank (located in the aft cockpit locker) until it is all the way open
and just snug. Otherwise gas may seep around the valve stem. Before lighting the oven, always light a
burner so that you are certain that gas is available at the stove. The wooden cover of the stove can be
lifted out for access to the stove top burners. We have found that opening and closing the oven door
slowly helps avoid blowing out the flame. Check the oven periodically to assure that it remains burning.
Be sure that you turn OFF the PROPANE circuit breaker when you have finished with the stove. For
greater safety, close the hand valve on the main propane tank in the aft cockpit before retiring for the
night and at the end of the cruise.
No need to shut off the propane tank during the day. At night, it’s recommended that you turn off the propane
tank with its faucet-like hand valve. That way, should the solenoid value fail, there’s no chance that propane will
leak into the vessel. (Since propane is a deadly gas, you’ll sleep much better!) Then, the first one up in the
morning can go out to the tank and turn it back on to start the water boiling for the coffee!
Please note that the propane tank and both propane valves (the hand valve and the solenoid valve) are
located in the propane locker in the port aft cockpit locker, which is vented and isolated from the rest of
the boat. Any leaks there will move down, out, and away from the boat.
While the propane tank normally lasts for 4 weeks or more, San Juan Sailing’s
staff tops them off every 2 weeks…so you’ll have plenty for you cruise!
If cooking underway, gimbal the stove by pulling inward the rods on either side of the oven so they are
not inserted in the holes. Then if the boat heels, hot liquids and foods will not readily slide off of the
stove. Also, for added security, use the fiddles that hold the pots/pans on the burners (located in the top
right galley drawer). If you have something in the oven, please lock the oven door so the contents cannot
slide out onto the galley sole (or someone’s feet). A latching mechanism is operated by lifting up the
door handle. WARNING: Never cook in high wave conditions or in strong, gusty winds. Food will
definitely go flying!
When cooking at a dock or in a quiet anchorage, lock the stove in position with the two rods). That way,
if someone leans on the stove or grabs the oven handle, it won’t tip and spill pot/pans on the cooktop.
26. Thruhulls. Tsirku has five thruhulls.
1. Galley sink drain - in bildge under aft floor board.
2. Head intake - in locker just forward of the head.
3. Head outlet - in aft cabin locker under floorboard.
4. Raw water intake - under aft berth behind engine.
5. Maserator pump outlet - under aft berth behind engine.
Wooden plugs are attached to each thruhull for use in case of emergency. Spongy plugs are also located
in the tool locker.
27. Water Pressure & Tanks.
Water pressure. The fresh “water pressure” switch is located on the electrical panel. Push the breaker “on” to
activate pump. The port water tank level indicator is at the nav station. Turn it on with the “nav instruments
switch.
It’s okay to leave on while someone is below decks. But please turn “off” when motoring or sailing. You
could burn out the domestic water pump should one of the tanks run dry as it tries in vain to pump water
to build pressure (and you would not hear the pump running continuously over the sound of motoring or
sailing).
Water tanks.
TSIRKU has two water tanks with a capacity of 35 gallons each and
are filled through fittings on the bow and the port deck amidships.
The tanks supply an electrically pressurized hot and cold water system
for the galley and the head sinks. Valves controlling flow from the
water tanks are under the galley sink. The procedure for getting a
continuous flow of water from both water tanks is as follows. After
filling the starboard and forward water tanks, open the valve under the
galley sink for the starboard tank and close the valve for the forward
tank. Monitor the draw down of the starboard tank with the water
gauge at the nav stations (which shows the level in the starboard
tank). As the starboard tank drops to ca ¼, open the valve under the
galley sink for the forward tank. This will allow water to drain from
the forward tank and fill the starboard tank. Again, monitor the water
tank gauge and when it drops to half, close the forward tank valve. This creates a vacuum and allows the
starboard tank to be pumped fully empty. It is time to re fill both tanks and follow the procedures above again.
State parks have no pressurized water to refill tanks, but all points of civilization do. If your crew does
not let the water run continuously while they brush their teeth, shave or shower, you shouldn’t need to
refill too often, probably about every 3 days with a crew of four.
When filling the water tanks, only fill until you hear the water reaching the bottom of the infill line. The
tanks overflow to the bilge, so continuing to fill will only run water to the bilge.
Enjoy your vacation aboard TSIRKU!