1
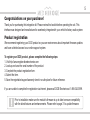
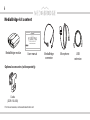
for select Toyota/Lexus/Scion vehicles
Installation Guide/User manual
2
Copyrights and Trademarks
Copyright 2012 DICE Electronics, LLC.
The DICE Electronics logo is trademarks of DICE Electronics, LLC.
iPod and iPhone are trademarks of Apple, Inc.
All Trademarks and Logos are the property of their respective owners.
All rights reserved.
Printed in the U.S.A.
3
Table of Contents
Warning and safety ..........................................................4
Controlling the MediaBridge iPod source ...........................20
Product registration ..........................................................5
Controlling the MediaBridge USB memory source .............21
MediaBridge kit content ...................................................6
Repeat and random settings ..............................................22
Identify your audio system ...............................................7
Controlling the MediaBridge SIRIUS source ......................23
DIP Switch overview ........................................................8
Bluetooth & MAT configuration ...........................................24
DIP Switch settings ..........................................................9
Pairing MediaBridge with cell phone via BT .......................25
Supported iPod models .................................................10
Answering / Making a phone call .......................................25
Note to Installer ..............................................................11
Playing music through MediaBridge via BT ........................25
Connection diagram .......................................................12
Accessing the auxiliary input .............................................26
Installation ......................................................................13
Internet Radio Application support .....................................27
iPod content browsing ...................................................14
Controlling Internet Radio Apps ..........................................28
Charging ........................................................................14
Text display from the Internet Radio App ............................29
iPod locked/unlocked settings and features ..................15
Terminating the Internet Radio App ....................................30
Basic operation ..............................................................16
Firmware update ................................................................31
Operating the MediaBridge unit from select radios ........17
Troubleshooting .................................................................32
Warranty .............................................................................36
4
Warning and safety!
Please read these instructions carefully before proceeding. Failure to follow instructions may result in
improper operation or injury. Neither DICE Electronics, LLC. nor Apple Inc., its regional offices, distributors or
resellers take any responsibility for any damage or injury as a result of using the integration kit.
•
•
•
•
•
•
•
•
•
Do not open, disassemble or alter the interface in any way.
Do not insert anything into the casing.
Do not cut or try to alter cables in any way and always use the correct connections.
Only operate unit when stationary or ask passengers to operate it for you.
Do not allow the Apple iPod/iPhone to distract you from driving.
Exercise good judgement and keep your eyes on the road at all times.
Do not expose unit to extreme temperatures, humidity or shock.
Keep the unit and iPod/iPhone away from fluids.
Keep away from children! - Interface components may contain small parts, can be broken or
disassembled and components may become loose from vibration and heat. Small components and
packaging materials may be a choking hazard when handled by children.
5
Congratulations on your purchase!
Thank you for purchasing this integration kit. Please review this booklet before operating the unit. This
interface was designed and manufactured to seamlessly integrate with your vehicle’s factory audio system.
Product registration
We recommend registering your DICE product so you can receive news about important firmware updates
and have unlimited access to our online support system.
To register your DICE product, please complete the following steps:
1. Visit http://www.register.diceelectronics.com
2. Look up and save the serial number of the product.
3. Complete the product registration form.
4. Submit the form.
5. Save the registration/support/warranty sheet in a safe place for future reference.
If you are unable to complete the registration via internet, please call DICE Electronics at 1-888-342-3999.
Prior to installation make sure the module’s firmware is up to date to ensure compatibility
with the latest features and enhancements. Please refer to page 31 to update firmware.
6
MediaBridge kit content
for select Toyota/Lexus/Scion vehicles
Installation Guide/User manual
MediaBridge module
User manual
Optional accessories (sold separately):
Cradle
(DCR-150-USB)
For more accessories, visit www.diceelectronics.com
MediaBridge
connector
Microphone
USB
extension
7
Identify your audio system
Select the emulation that best suits your vehicle. The following chart identifies the recommended emulation
for the listed radios. Note that your vehicle may support more than one type of emulation.
06-11
06-11
Note: Years and feature sets listed are shown as a guideline only and do not guarantee compatibility or limit
applicability.
* Not all radios support MD mode. If an external MD changer is present, it must be disconnected.
** Scrolling text function is available in Satellite emulation, please see page 23 for details.
8
DIP switches overview
The configuration switches located on the MediaBridge module are used to set various operation modes of the
interface. Incorrect DIP switch settings may cause the interface to not work properly or to not operate at all.
Disconnect the vehicle harness from the module and set the ignition to the off position for 60 seconds
after changing the switches then reconnect the module!
MediaBridge Module
9
DIP switch settings
The following DIP switch settings are used to configure the MediaBridge module to interface with
the various vehicle radios. Before installation, set the DIP switch to the position shown for the
corresponding radios.
Car configuration switches
Satellite (SAT)
CD changer (CDC)
OFF
ON
ON
Use this setting for best user
experience. Only available on
SAT capable radios. To enable
use of the SIRIUS Connect
tuner, SAT emulation must
be used. Available on selected
North American radios only.
OFF
MP3
Mini DISC (MD)
OFF
OFF
ON
ON
Use with early model
Use with late model radios
Use to retain factory SIRIUS/
year radios with external
where factory Sirius/XM
XM module, or on radios with
MD
changer support. MD
integrated satellite tuner. Also module is present (integrated)
text is available only on a
and CDC emulation is not
for radios that do not support
selected few radios, typically
supported (i.e. no text).
SAT mode. External CDC
navigation models.
(trunk or glove box) must be
disconnected.
10
Supported iPod models and firmware version requirements
Model
Firmware / OS Version
Model
Firmware / OS Version
1G nano
1.3.1
160 GB classic
2.0.4
iPod 5G
1.3
5G nano
1.0.2
2G nano
1.1.3
3G touch
iOS 5
iPod classic
1.1.2
iPhone 4
iOS 5
3G nano
1.1.3
iPhone 4S
iOS 5
iPod touch
iOS 3.1.3
4G touch
iOS 5
6G nano
1.2
iPhone
iOS 3.1.3
iPhone 3G
iOS 4.2.1
4G nano
1.0.4
120 GB classic
2.0.1
2G touch
iOS 4.2.1
iPhone 3GS
iOS 5
11
Attention Installer! Please read the following!
DICE strongly recommends that the unit be installed in an easily accessible place!
DO NOT PLACE IT BEHIND THE RADIO AND DO NOT HIDE UNDER CARPET!
Whether the unit is professionally or self installed, put the module where you, the end user can get to it easily
in the future. (Have the installer show you where the interface module is installed.)
Installing the module behind the radio will make it difficult to:
•
•
•
•
Add possible future upgrades, changing software, adding new features, improving operation;
Access the AUX input on the module to attach any audio device;
Access the DIP switches located on the module;
Remove the unit in case of failure.
MAKE SURE THAT THE MODULE IS IN AN ACCESSIBLE PLACE!
12
Connection diagram
iPod
Toyota radio with small connector
AUX audio device
Sirius SC-C1 SAT tuner
Microphone
USB thumb drive
MediaBridge module
MENU
cable receptacle*
AUX connector
Sirius SC-C1 factory cable
MediaBridge vehicle connector
USB cable or iPod docking cable
*If factory harness present, connect to receptacle.
Do not connect an iPod dock cable under any circumstance to the SIRIUS module connector! Improper
connection can cause permanent damage to iPod/SIRIUS module.
13
Installation
1. Verify compatibility.
2. Disconnect battery.
5. Route kit to glovebox or other accessible location.
3. Remove radio from car.
6. Connect battery and test.
4. Install MediaBridge cable.
7. Complete install by re-installing radio.
sable conte
Less brow
Playlist
Artist
Album
able content
By default, the interface creates a Playlist having a name that is the same
as the name of the iPod. This Playlist is the very first on the list of Playlists
shown while browsing in Playlist mode. This Playlist contains all the songs
on the iPod. Once a Playlist is selected an Artist may be selected within
that Playlist using the Artist Mode. Albums by the selected Artist within
the selected Playlist may be selected in Album Mode. “ALL ARTIST” and
“ALL ALBUM” designate all available content in those categories.
More brows
iPod content browsing
nt
14
Song
Charging
The interface automatically charges the battery of the iPod when
connected and your vehicle ignition key is in the ACC/ON position.
Charging may be shown by an
icon that appears on the upper
right corner of the iPod screen.
May vary by model.
15
iPod locked/unlocked settings and features
Radio control
Limited
iPod control
Before connecting the iPod to the
MediaBridge module, turn the hold switch
ON to fully control and browse the songs
from the radio. The iPod is locked in this
state.
Before connecting the iPod to the
MediaBridge module, turn the hold switch
OFF to fully control and browse the songs
from iPod. Browsing capabilities are
limited from the radio.
Note: Setting the iPod’s hold switch must be done prior to connecting it to the dock cable.
iPod nano 6th generation will always be in locked mode since it does not have a lock switch.
slide to unlock
For iPod touch and iPhone, when the screen is not active (as shown on the left), the
iPod/iPhone is locked (Press the power button to lock the iPhone/iPod Touch).
16
Basic operation
Accessing MediaBridge as the audio source:
Much like the radio’s AM/FM tuner, satellite radio or CD audio sources, the MediaBridge is integrated to be
part of the vehicle’s audio system. To access the MediaBridge source, press the SAT (for SAT emulation) or
DISC (for CDC/MD/MP3 emulation) button on the radio. Pressing this button repeatedly will cycle through
sources present in the vehicle.
MediaBridge source selection:
The MediaBridge adds additional audio sources including USB iPod/Memory, SIRIUS Satellite Radio*,
Bluetooth and Auxiliary audio input. To cycle between these sources, use the SEEK/TRACK/TUNE buttons
within the first 5 seconds of accessing the MediaBridge as the audio source while in PRESET/DISC 1.
*This source require additional parts/accessories/service from DICE and/or third parties.
MediaBridge Interface settings: (within first 5 seconds of accessing the MediaBridge as the audio source)
Select DISC/PRESET 1 to apply settings and resume audio playback.
Select DISC/PRESET 3 to change default volume level; use track up/down to adjust between Min and Max.
Select DISC/PRESET 4 to enable/disable scrolling text. (SAT emulation only)
Select DISC/PRESET 6 to view MediaBridge serial number and firmware version.
DISC 2 and 5 have no settings available.
17
Operating the MediaBridge from select Toyota, Lexus and Scion radios
MP3 emulation
CDC/MD emulation (without Navigation)
8
7
3
2
5
6
7
DISC
5
4
CD1 Album * Artist
1
6
3
4
2
1
1 Radio source selector (CD/MediaBridge)
1
Radio source selector (CD/AUX/MediaBridge)
2 Press to change TRACK.
2
Press to change TRACK.
3 Browse modes (iPod/USB), PRESETS (SIRIUS), Sound adjustments
3
Turn to change TRACK.
4
Browse modes (iPod/USB), PRESETS (SIRIUS), Sound
adjustments (AUX), Bluetooth & MAT configuration.
5
Press RPT short to repeat one, long to repeat all.
6
Press RAND short to shuffle songs, long to shuffle albums.
7
Source indicator
(AUX), Bluetooth & MAT configuration.
4 Press to RW or FFW.
5 Press RAND short to shuffle songs, long to shuffle albums.
6 Press RPT short to repeat one, long to repeat all.
7 Arrow shows if additional information is available. Hold TEXT button
for more information.
8 Press the TEXT button to cycle between display fields.
18
CDC/MD emulation (with Navigation)
CD2
CHANGER
DISC 1
CD2
1' 24"
TRACK 99
CHANGER
1
1
2
3
2
DISC
RPT
TITLE
SOUND
3
RPT
5
DISC
RAND
DISC
SCAN
RAND
SCAN
5
6
PLAYLIST
TITLE
OFF
6
SOUND
5
SCAN
FM2
1 AM SAT
4 Press DISC RAND to shuffle Albums.
DISC
RPT
DISC
RAND
DISC
SCAN
RPT
RAND
SCAN
5 Press RAND to Shuffle Songs.
6 Press to change TRACK.
TYPE
FOLDER
4 Browse modes (iPod/USB), PRESETS (SIRIUS), Sound adjustments (AUX),
7
DISC AUX
TEXT
2 Press to change TRACK.
3 Turn to change TRACK.
3
4
FM1
2 Press DISC RPT to Repeat All.
1 Radio source selector (AM/SAT/MediaBridge)
FILE
SAT1 Album * Artist
1 Press TITLE to toggle between screens.
3 Press RPT to Repeat One.
TRACK
SAT emulation (without Navigation)
2
1' 24"
TRACK 99
Playlist Name
4
4
DISC 1
DISC
DISC
DISC
6
Bluetooth & MAT configuration.
5 Use Scan to enable Shuffle and Repeat.
6 Press the TEXT button to toggle between available TEXT fields.
7 Press the TYPE button to engage/disengage RW or FFW.
19
SAT emulation (with Navigation)
1 Radio source selector (AM/SAT/MediaBridge)
2 Press to change TRACK.
SAT1
DISPLAY
USB MEMORY CH001
1 PRESET
INFO
CLIMATE
AUDIO
SOUND
5
ROOT
4 PRESET
2 PRESET
5 PRESET
3 PRESET
6 PRESET
TYPE
TEXT
TYPE
TYPE
SEEK
TYPE
SCAN
3
3 Browse modes (iPod/USB), PRESETS (SIRIUS), Sound
MENU
adjustments (AUX), Bluetooth & MAT configuration.
4 Press to enable Random.
DEST
5 Press the TEXT button to toggle between available TEXT
MAP
fields.
4
LOAD
12
VOL
2
SEEK•TRACK
1
3
AM/SAT
456
FM
TAPE•DISC
SCAN
TUNE
Note: Depending on operating mode, PRESET buttons will have
different labels.
20
Icon legends
Press button
Press button repeatedly
Press and hold button
Turn dial
CHANGE SONGS
PRESET/DISC 1
CHANGE PLAYLIST
PRESET/DISC 2
Controlling the MediaBridge iPod source
Use PRESET 1-6 (DISC 1-6) to enter browsing modes (SONG,
PLAYLIST, ARTIST, ALBUM, PODCAST and AUDIO BOOK).
SEEK TRACK
CHANGE ALBUM
PRESET/DISC 4
• Within each mode, use the SEEK/TRACK/TUNE buttons
to browse the items available.
TIP: In CDC/MP3/MD emulation, selecting DISCS is done by using the DISC +/buttons.
SEEK TRACK
CHANGE ARTIST
PRESET/DISC 3
Note: if the iPod is unlocked, radio control will be limited to Songs, Playlists, and
Albums. Text display will also be limited to show only current song information.
SEEK TRACK
SEEK TRACK
CHANGE PODCAST
PRESET/DISC 5
SEEK TRACK
CHANGE AUDIO BOOK
PRESET/DISC 6
SEEK TRACK
21
Controlling the MediaBridge USB memory source
CHANGE SONGS
• Select PRESET/DISC 1, then use the seek/track/tune buttons to change
from song to song.
PRESET/DISC 1
SEEK TRACK
CHANGE FOLDER
• Select PRESET/DISC 2-6 to access Folders and use the seek/track/tune
buttons to navigate through the folders on your USB flash drive.
PRESET/DISC 2
• The MediaBridge unit will recognize the first 8 levels of folders, with up to
200 accessible folders within each folder. Only the first 1000 files will be
read in each folder, the rest will be ignored.
PRESET/DISC 3
• Songs play in order of when they were added to the flash drive.
PRESET/DISC 4
SEEK TRACK
CHANGE FOLDER
SEEK TRACK
CHANGE FOLDER
SEEK TRACK
CHANGE FOLDER
PRESET/DISC 5
SEEK TRACK
CHANGE FOLDER
PRESET/DISC 6
SEEK TRACK
22
Repeat and random (shuffle) settings in USB iPod operation
CDC/MP3/MD
emulation
Random ALL
RND
Random ALBUMS
Repeat ONE SONG
RND
RPT
OR
TRACK UP
SAT emulation
Repeat ALL
OR
RPT
Random SONG, Random ALBUMS, Random OFF
SCAN
SCAN
Enter Shuffle & Repeat
selection menu.
TRACK DOWN
Repeat ALL, Repeat SONG, Repeat OFF
Exit Shuffle & Repeat
selection menu.
Repeat and random (shuffle) settings in USB Memory operation
CDC/MP3/MD
emulation
Random ALL
RND
Random FOLDER
Repeat ONE SONG
RND
RPT
OR
TRACK UP
SAT emulation
RPT
Random SONG, Random FOLDER, Random OFF
SCAN
Enter Shuffle & Repeat
selection menu.
Repeat FOLDER
OR
SCAN
TRACK DOWN
Repeat ALL, Repeat SONG, Repeat FOLDER
Exit Shuffle & Repeat
selection menu.
23
Controlling the MediaBridge SIRIUS source (available in SAT emulation only)
• Stations can be saved to PRESET 1-6 by holding the desired PRESET button, while listening to the
station.
• TEXT button will toggle between the text fields.
Sirius mode:
PRESET 1-6
Common control:
recall PRESET 1-6 stations
SEEK TRACK
Change Channel
to store
station
SCAN
PRESET 1-6
Scan Channel
store current station to PRESET 1-6
FOLDER/CAT/TYPE
Change Satellite Category
• If a Sirius Connect compatible tuner is not detected, then either a “No Tuner” message is displayed, or
the SIRIUS option will not be selectable. Please refer to the factory manual of your radio system about
operating the Satellite mode.
• Go to Channel 000 to view the Sirius Tuner ID for activation. The 12 digit SID display format is in two
halves as SID “123456-” followed by “-789ABC”.
24
Bluetooth & MAT (Music Announcer Technology) configuration
To alter voice announcement and Bluetooth pairing settings select Bluetooth as your audio source, press the preset button
that corresponds to the feature you want to configure, and then use track or channel UP/DOWN to browse through configuration options:
• PRESET/DISC 1, 2 or 3 should be selected if you want to control Bluetooth audio streaming playback.
• PRESET/DISC 4 controls the Autoconnect feature. Available options are Enable and Disable. This controls whether or
not the MediaBridge will reconnect automatically when phone becomes disconnected. Only the most recently paired
device will be reconnected automatically.
• PRESET/DISC 5 controls the paired devices memory. There is only one option. Tune or change tracks to clear the listing of paired devices with the MediaBridge and put module into discoverable mode.
• PRESET/DISC 6 controls MAT setting. Available options are Default, Extended, Phone only, and Off (refer to the chart
below).
Options
Default
Extended
Phone only
Off
Function
Reset MAT back to factory default configuration
Turn on ALL MAT feature
Turn on the phone relative MAT only
Turn off MAT completely
25
Pairing MediaBridge with your cell phone via Bluetooth
1. Turn on the Bluetooth feature on your cell phone.
2. Select MediaBridge as your audio source from your radio, then select Bluetooth mode.
3. Search device from your cell phone.
4. Select MediaBridge from device list and enter password “0000” to connect.
Note: MediaBridge is only discoverable for Bluetooth pairing for the first 60 seconds after selecting Bluetooth mode within
the MediaBridge. This is indicated with a “DISCOVRABL” message on the radio display. Please perform pairing while the
vehicle is parked. Bluetooth devices remain paired 30 seconds after exiting MediaBridge mode, within this time active audio
streams and phone calls aren’t audible on the phone but can be resumed by re-entering MediaBridge mode.
Answering / Making a phone call
• To answer an incoming call, press the button that tunes to the next
track or channel.
• To reject an incoming call or terminate an active call, press the button that tunes to the previous track or channel.
• To make an outgoing call, dial on the phone like you would normally.
Phone calls interrupt any music/
audio that is currently playing on
the radio while MediaBridge is the
selected audio source.
Playing music from a cell phone through MediaBridge via Bluetooth
1. Enter Bluetooth mode on MediaBridge.
2. Make sure your cell phone is paired with MediaBridge.
3. Select and play a song from your cell phone’s music player.
Note: Some cell phones require you to manually select the option to play music via (A2DP) Bluetooth Streaming. Song information is shown
on the radio display if your phone supports AVRCP1.3.
4. Use Track UP/DOWN to skip tracks / FF / RW songs on the AVRCP compatible phone.
26
Accessing the auxiliary input
• An auxiliary audio device can be connected to the MediaBridge
unit through it’s 1/8” headphone jack.
CHANGE VOLUME SETTING
PRESET/DISC 1
SEEK TRACK
CHANGE BASS SETTING
• In AUX mode, music is controlled only through the auxiliary
audio device.
PRESET/DISC 2
SEEK TRACK
CHANGE MID EQ SETTING
• Audio equilizer setting can be adjusted while in auxiliary mode
by selecting PRESET 1-4 (DISC 1-4) and using seek/track/tune
buttons to increase or decrease levels. DISC/PRESET numbers
and corresponding setting are shown on the right chart.
1/8” mini stereo jack (not included)
ig
(R
g
Ti
p
in
R
Sl
e
ev
e
(G
ro
un
d
ht )
(L
au
ef
t a dio
)
ud
io
)
TIP: In CDC/MP3/MD emulation, selecting DISCS is done by using the DISC +/- buttons.
PRESET/DISC 3
SEEK TRACK
CHANGE TREBLE EQ SETTING
PRESET/DISC 4
SEEK TRACK
27
Internet Radio Application support (iPhone/iPod touch)
This kit includes support for internet radio streaming apps available on
the iTunes® Store. Thousands of stations can be streamed through data
connections. Supported apps include Livio Car Internet Radio, Pandora,
iHeart Radio and more. Supported features such as text display on screen,
and next/previous track functions will vary by app.
To learn more about each app specifically, please visit the website for the app
you need information about.
Data connection requirements (3G/4G/WiFi)
Users must have an active wireless data connection in order to stream music from an app while in the car. Data
connections including “3G” or “4G” through wireless carriers, or a third party wireless Internet access point
connected to your mobile device through WiFi will work. Because this app requires a data connection, it will
only work on connected devices such as the iPhone and iPod touch.
28
Controlling Internet Radio Apps
NOTE: The following features may not be supported by all apps. For
demonstration purposes the following examples will show the features for
the Livio Car Internet Radio app.
The app must be active on the screen of the device. To do so, simply tap
the app’s icon and it will load.
Next/previous TRACK buttons execute application specific features such
as skipping stream or cycling between station presets. DISC/PRESET (16) buttons are associated with station presets when used with the Livio
Car Internet Radio application.
iPhone operating system iOS5 enabled application developers to share the
“now playing” screen information. For example, when using the Pandora
App, you will see artist, album and song information on the radio’s screen.
When using an application that doesn’t implement this feature, or running
iOS4, only the name of the application will be shown.
Please note that although iOS 4 (4.2.1) is supported on iPhone 3G and
iTouch 2nd generation, applications do not run in the background. As such,
loading the app takes longer than on devices where the app is present in
the background.
29
If your listening experience is interrupted by a call, under most conditions, the app will resume playback at the
end of the call.
Music playback apps running on your iPhone are sent to background automatically when the home button of
the phone is pressed, but the music playback itself is not stopped.
To resume playback of your iPod music library, stop Livio playback by tapping on the screen below the Livio
Radio logo. An icon representing “stop” will show on the main Livio screen. Press the home button to send
the application to the background. (Other apps may need to be terminated manually. Please see next page.)
A few seconds after this, the iPod music playback application will reinitialize itself and become active again if
the iPod was locked when it was connected to the kit. (This is indicated by an Accessory Connected message
being shown when the iPod icon is tapped.)
If the iPod was in unlocked state when it was connected to the kit, press the play button on the iPod application.
Text display from the Internet Radio App
Text that scrolls across the radio’s screen is associated with the stream shown on the radio and displays current
song or station information. Stream must be playing before information on the display is updated.
30
Terminate (kill) the App
If you need to terminate (kill) the app please follow the steps below:
1. Double-tap on the home button of the iPhone to bring up the list of running apps. If you don’t see the app’s
icon right away, swipe the screen left or right to locate it. Note: If you do not see such task bar but rather a
music control popup then you have an iOS device that does not support background run of apps, therefore
this section is not applicable to you.
2. Press and hold the icon of the app until a red minus icon shows.
3. Tap the red minus icon shown on top of the app.
4. This will close the app.
5. In a few seconds, the iPod music playback app should reinitialize itself and become active again. This can
be verified by going back to the list of running apps and swiping the screen unit the music control section is
shown. The iPod app icon next to the music control sections shows that iPod is your audio source.
Internet Radio App settings
Many radio stations offer lower bitrates. Selecting streams with a lower bitrate will reduce data usage and
may reduce stream interruptions during the drive. For example with the Livio Car Internet Radio app, to adjust
bitrates manually, users can: Go to the Setting menu of the device, select the Livio Radio settings the change
the Maximum Bitrate Filter and set it to 64K. Other settings such as Buffer time and Reliability filter may also
help in getting a more stable connection.
31
Updating firmware (Mac OS illustrated)
MediaBridge
MBR 1500
ABP 2.01
MBR
Connect module via mini USB
Device specifications and update selection
License Agreement (click Agree to proceed)
Product registration notification
Firmware update progress
Module updated successfully!
The above screen shots are for illustration purposes only.
32
Troubleshooting
Problem
Text is not displaying in selected
emulation.
Solution
Identify your audio system (refer to pg.7) first and set switches accordingly.
Note that your vehicle may support more than one mode. Use the TEXT
button on radio/display to toggle text fields.
No text display on radio.
Make sure DIP switch settings are correctly set for text display (refer to page
9 for DIP Switch Settings).
Correct DIP switch settings but still no
text display.
Try pressing the Text or Title button on the radio (which may only display on
the screen for touch screen head units) to cycle text fields.
iPod does NOT charge.
Check all connections. See if iPod charges while connected to computer or
wall charger. You may need to reset the iPod.
Music is distorted or sound level is too
low with iPod connected.
Make sure all EQ and BASS boost options are turned off on your iPod.
Adjustments to the gain setting may be required (refer to page 15).
No audio from iPod source.
Reset the iPod. Verify proper connection to iPod/interface. Check for
compatibility. Older iPod models don’t support USB audio and may only
operate in Locked mode.
33
Problem
Solution
Sirius tuner can’t be selected.
Ensure the cable connecting SIRIUS tuner is securely connected to the
correct receptacle on the MediaBridge module. Refer to page 15 for cycling
through MediaBridge audio sources.
Why does the radio display show
“EMPTY/STOP” and no music plays?
The iPod has reached the end of a selection. Go ahead and browse for
another selection.
Cannot select the interface.
Verify that the correct button is being pressed to access the interface (DISC
or SAT). Disconnect the MediaBridge module’s power connection for one
minute to reset it.
Radio/ steering wheel controls do not
operate iPod.
Reset iPod and make sure the most recent iPod firmware is installed. Check
vehicle user manual on how steering wheel controls work, long presses may
toggle alternate function.
Why does category read
“PRESELCTD”?
Playback of content selected on the iPod before it is connected to the
interface continues until new content is selected.
34
Problem
Solution
Why does the message “iPod
UNLOCKED” display on screen?
When the MediaBridge is playing iPod music in UNLOCKED mode, browsing
mode information isn’t available so the “iPod UNLOCKED” notification is
shown. To view information associated with browsing modes, ensure the hold
button of the iPod is set before connecting it to MediaBridge.
Why is the interface not controlling the
iPod/USB drive?
Please make sure that the USB connection is not loose. Make sure that
an iPod case is not preventing the dock connector from being fully seated.
Disconnect and reconnect the device. If iPod is not responding please try
resetting it. USB device must also be FAT16/32 format and contain supported
MP3, WMA or AAC content.
What size of USB flash drive should I
use?
Large capacities are supported, however up to 4GB is recommended for
optimal user experience.
35
Disclaimer
Important disclaimer, please read!
Unauthorized reproduction or reverse engineering is strictly prohibited! Intellectual property included is
distributed under specific license agreement with respective owners and is licensed only, not sold. No
warranty, explicit or implied, is stated. Neither DICE Electronics, LLC., nor any of its agents, distributors,
dealers or vendors shall be liable for damages.
IN NO EVENT SHALL DICE ELECTRONICS’ LIABILITY EXCEED THE PRICE PAID FOR THE PRODUCT
FROM DIRECT, INDIRECT, SPECIAL, INCIDENTAL, OR CONSEQUENTIAL DAMAGES RESULTING FROM
THE USE OF THE PRODUCT, ITS ACCOMPANYING SOFTWARE OR ITS DOCUMENTATION.
36
Support and Warranty
If you experience any problems or need help, please contact you local dealer or call DICE Electronics, LLC.
At 888-342-3999 or visit us at http://diceelectronics.com/product-support. Products carry a 1 year limited
warranty that protects you from defects in material and workmanship of products sold by DICE Electronics
or its authorized agents, distributors and dealers. The warranty period begins the day a product is purchased
by the end user. Products found to be defective during the warranty period will either be repaired or replaced
by DICE Electronics at no charge unless warranty is void. Unauthorized attempt of repair or alteration of the
product in any way immediately voids this warranty. Warranty does not extend to cosmetics or finish. A DICE
product specialist must determine that a defect is present in the product and issue an RMA. Be sure that all
wiring is connected as described in the user manual and all related equipment is functioning properly. DICE
Electronics disclaims any liability for other incurred damages resulting from product defects. Any expenses in
the removal and reinstallation of products are not covered by this warranty.
PLEASE NOTE: International customers requiring a product replacement, please contact the dealer your
product was purchased from!
37
Installation notes:
38
39
Toyota/Lexus/Scion compatible integration
for iPod/iPhone, Internet Apps, Bluetooth, SIRIUS and AUX.
www.diceelectronics.com
DICE-MB-TOY-0312