1
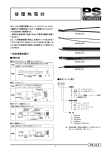
1.
CONTENTS
Page 2
1. Contents
2. Contact details
Page 3
3. Model check list SGS1-13, SGH2-16 & SGK3-19
Page 4
4. Introduction
5. Getting started
6. Safety first
Page 5
7. Preparation
8. Practice cuts
Page 6
9. Cutting & shaping the scions
10. Preparing rind grafts
Page 7
11. Preparing whip & tongue grafts
12. Preparing wedge grafts
Page 8
13. Preparing ‘V’ cleft grafts
14. Preparing chip buds
Page 9
15. Preparing ‘T’ buds
16. Blade care & replacement
Page 10
17. General maintenance & storage
18. Optional accessories & parts
Pages 11-13
19. Photographs: A, 1 – 15/ B, 16 – 30/ C, 31 – 45
Page 14
20. Blade sharpening & maintenance tips
2. CONTACT DETAILS
Manufacturer – Scionon Ltd, 712 Maxville Drive, Parkvale, Hastings 4122, Hawke’s Bay, NZ
Phone: mobile +64 (0)27 443 5472, A/H +64 (0)6 876 8529
Website: www.scionon.com E-mail: [email protected]
2
SCIONON® Grafting Shears™
3. CHECK LIST
Check the contents against the parts inventory list as supplied.
Model SGS1-13 (3mm – 13mm diameter capacity)
1 x hand held Grafting Shears with standard jaws fitted.
(Cutting blade, spare mounting fixings, pin plate & stop rest plate fitted)
Included Spare Fixings & Parts: model SGS1 - 13
Spare blade, Allen Key, paper clip & spare mounting screws (M3 x 6mm).
Model SGH2-16 (5mm to 16mm diameter capacity)
1 x hand held Grafting Shears with hybrid ‘kiwi’ jaws fitted.
(Cutting blade, spare mounting fixings, pin plate & 2 stop rest plates fitted)
Model SGK3-19 (8mm to 19mm diameter capacity)
1 x hand held Grafting Shears with open blunt cleft ‘kiwi’ jaws fitted.
(Cutting blade, spare mounting fixings, pin plate & 2 stop rest plates fitted)
Included Spare Fixings & Parts: models SGH2 -16 & SGK3 -19
Spare blade & stop rest plate, Allen Key, paper clip, spare mounting fixings (M3 x 6mm & 12mm).
OPTIONAL ACCESSORIES
30 ml bottle of sap removal cleaning solution
30 ml bottle of multi-purpose lubricating oil.
Carry pouch/ storage holster
3
4. INTRODUCTION
Congratulations on the acquisition of your new SCIONON® Grafting Shears™. With care and practice
you should get years of productive trouble free operation from your investment. The SCIONON®
Grafting Shears™ are a revolutionary new tool which will efficiently aid scion preparation and
assembly. They are a hand held device which enables increased safety & productivity for novices
through to experienced propagators. With them you have the ability to accurately field graft the
technically difficult ‘whip & tongue’ graft with ease, or prepare scions of many other different graft
types for grafting on in the field. These shears have been more than four years in development and
are thoroughly field tested. The SCIONON® Grafting Shears™ will deliver and change the way you
graft.
The standard SCIONON® Grafting Shears™ SGS1-13 (photo 1) are capable of preparing a wide range
of scion wood types of between 3mm & 13mm in diameter. If you have need to prepare scion wood
of greater diameter than this, other model variations are available. The SGH2-16 (photo 6) Grafting
Shears™ will allow you to prepare graft woods (eg. kiwifruit, grape etc.) of up to 16mm in diameter
when blunt ended cleft grafts are require and the SGK3-19 (photo 11)will increase the diameter
range to approximately 19mm on these soft wood types.
The bench mountable SCIONON® Graft Crafter™ (GBU3) is also available which will prepare wood of
up to 15mm in diameter. In addition the Drop Saw Unit (DSU) allows preparation of wood diameters
between 10mm - 25mm. The Full Modular Unit (FMU) combines these two units into one complete
tool. These units are most suited when significantly high numbers of larger scion wood diameters
require preparation.
All Grafting Shears™ models are capable of a range of cuts, but are most suited to particular graft
types. For more information please read further.
5. GETTING STARTED
First take a few minutes to visit our website www.scionon.com to view manual updates & video of
how the Grafting Shears™ and other SCIONON® products can be used to cut and shape scion wood.
Periodically we will be updating this manual which will be downloadable free to users in .pdf format.
6. SAFETY FIRST
•Take care when handling the blades that you do not accidentally cut yourself.
•Never place any part of your hand in the device in such a way that you may cause personal injury.
•Always be aware of your actions when operating, so as not to cause injury to yourself or others.
•Keep your work surface and surroundings clear of clutter and remove debris often.
•With commonsense and good practice you will have safe, effortless, trouble free operation of your
SCIONON® Grafting Shears™ (SGS).
Please ensure you take all reasonable care when operating this device in accordance with
recognised local industry Occupational Health & Safety (OHS) Authority legislation.
4
7. PREPARATION
With practice and patience you will quickly become familiar with the SCIONON® Grafting Shears™
(SGS) operation and master all the grafting techniques you require with ease. Before you begin
working with your SGS you are advised to review the user manual thoroughly too fully understand
how the shears can be used. When you are satisfied that you are ready to begin work it is advisable
to make practice cuts on waste wood to familiarise yourself with the basic operation before you
commence work in earnest.
Remove sufficient wood from storage for your daily requirements. Dry wood should be re-hydrated
for a period of 12 to 48 hours prior to use depending on need. Most woods if stored correctly will
not need anything other than being bought up to ambient temperature prior to use. Alternatively,
when available harvest fresh wood as required.
8. PRACTICE CUTS
Select your scion wood and remove the tips and ends ensuring you select the best wood available to
work with. At this point discard any suspect wood also, but retain it. Use this to practice on while
getting familiar with how to use your SGS. Roughly section the wood into manageable lengths.
Typically you will end up with lengths ranging in diameter from 5mm to 8mm, 9mm to 12mm &
13mm plus (photo 42). It is not advisable to attempt to cut material larger than 13mm in diameter
with the standard shears SGS1-13, (Photo 1) as this can cause stress on the tool and misalignment of
the blades which can result in damage to the cutting blade. When preparing larger diameter softer
woods between 13mm and 19mm such as kiwifruit, grape & many ornamentals, these are
accommodated for with the SGH2-16 & SGK3-19 (photos 6 & 11) versions of the Grafting Shears™.
To familiarise yourself with the functions and operation of your SGS start by making practice cuts
using the previously removed waste wood. Try cutting whips at first to get the feel of the slicing
action & experiment using differing wood diameters to get the feel of how to create the whip length
you require. Do this by holding the scion wood in the left hand while holding the shears in the right.
Place the wood so that the butt of the wood rests against the upper plate while also resting on the
lower anvil plain (photo 16). Use a lifting action to tension the wood on the underside of the cutting
blade so that it will bite into the wood when the handles are squeezed closed (photo 17). Close the
handles in a positive manner to create a straight clean cut (photo 18). By utilizing the full length of
the upper rest plate it is possible to cut whips of various different lengths and depths depending on
wood diameter and need.
When you are satisfied that you have mastered cutting the whip and are able to prepare rind grafts
(photo 3) with ease, move on to practicing the tongue cut (photo 20) to create a whip & tongue
graft (photo 21 ). To do this, rotate the scion wood in your left hand so that it sits on the fleshy part
of your hand above the thumb (photo 4). Grip the wood with the thumb and forefinger to hold it
firmly in place while resting the previous cut flat against the blade. Use the pins on the upper anvil to
hold the scion wood on the right hand side while you slice into the wood (photo 19). Start your cut
about 1/4 to 1/3 of the way along the whip (about the top of the pith). With patience and practice
you will soon feel at ease with this function and be able to create uniform matching scions that lock
5
together with a secure snug fit. Careful placement of the scion wood against the guide plate & blade
will ensure consistency.
When satisfied move on to creating the other graft types available to you by experimenting further.
The ‘V’ cleft (photo 9) & wedge (photo 24) grafts may take a bit more practice to perfect but your
perseverance will pay off in the long run. To cut these first make a whip cut as described previously.
Then reverse the flat of the whip so that it rests on the upper stop rest plate (photo 8). Tension the
wood again by using a lifting action to rest the wood against the cutting blade (photo 25). Squeeze
the handles closed to slice another whip. With practice you will be able to cut uniform symmetrical
cleft grafts of varying whip lengths (photos 27 & 28) depending on wood diameter and placement. It
is always a good practice not to rush the alignment of the scion wood against the stop plate or the
blade. With practice, combined with developing a natural rhythm, your speed and accuracy will
increase. If a longer cleft is desired the whips can be lengthened by resting the tip between the
upper and mid stop plates and slicing again (photo 40). When using the SGH2-16 Grafting Shears the
tip can be severed to the desired length (photo 29) to form a blunt ended cleft graft.
9. CUTTING & SHAPING THE SCIONS
Select the wood you will be working with and decide on the number of buds and length you require.
The graft wood can be sectioned into scion lengths ranging from one to four or more buds
depending on bud node intervals and wood scarcity. Alternatively you can prepare your scions from
the pre cut sections and sever to individual scion length once the scion has been shaped using the
cutting anvil on the tool. Severing is done at the point along the anvil nearest the handles. Rest the
wood across the anvil in the recess and squeeze the handles closed. Wood to a maximum of 13mm
in diameter can be sectioned in this way (SGS1-13). The wood should bottom out in the recess
(photo 42).
Decide on the appropriate graft type depending on your scion wood & under stock match. In
addition to ‘whip & tongue’ grafts (photo 21), you are able to prepare chip & ‘T’ buds (photo 43),
rind (Photo 3), ‘v’ cleft (photo 27) & wedge (photo 24) grafts with the SCIONON® Grafting Shears™.
The Whip & tongue & ‘v’ cleft can be completed using the Grafting Shears™ when required. The chip
bud (photo 33) can also be completed using the shears but will require a notch incision (photos 34 &
35) to be made on the under stock using the shears or a grafting knife. The chip bud can also be ‘T’
budded onto the rootstock if desired. Alternatively they along with the rind & wedge grafts can be
held in water & later placed onto the under stock in the field. Cut scions of harder wood like apple or
pear can be held in water for several days until utilised. If kept for periods of longer than one day the
water should be changed daily or depending on the wood type, they can be held in distilled water
and stored under refrigeration for up to a week. It is not advised to hold soft woods such as kiwifruit
in water for long periods. Wrapping in dampened cloth or paper towels and sealing in plastic is best
practice.
Extremely dry woods or medium density woods greater than 13mm in diameter should not be
sectioned or shaped using the Grafting Shears as resistance may cause damage to the cutting
blade and other fixings due to a crossing or splaying action being encountered & the tool being
overstressed. (Softer woods up to 16mm can be sectioned with the SGK3)
6
10. PREPARING RIND (BARK) GRAFTS
The first cut for all grafts is the whip cut (photo 2). With the Grafting Shears in the right hand and
while holding the wood with the left hand, follow the instructions previously described. The blade
will slice into the scion wood and finish the cut coming to rest between the anvil and stop plate. This
results in a precise straight cut being made (photo 3 ranging in length, depending on operator
placement and the graft wood diameter.
The operator has some user control of the acuteness of the whip produced by the positioning of the
wood when held on the lower plain of the anvil plate. Small diameters are held on the guide plain
recess at the desired point with the handles closed slightly. This will create the shortest possible
whip, while if a longer whip is required the scion wood can be held as far to the left as the guide
plate recess will allow and the handles fully opened before starting the cut. With care and practice
the operator will quickly master this simple action with effortless ease resulting in consistent
uniformity of the scions produced. If an acute tip is required the scion wood can be placed to the left
to be held by the extreme upper plate, when being cut.
As scion wood diameter changes you simply alter the angle that the wood is held at in relation to the
upper guide plate. With practice & care experienced operators will be able to use the Grafting
Shears for scion wood diameters, in the 3mm to 13mm range (SGS1-13).
11. PREPARING ‘WHIP & TONGUE’ (SPLICE) GRAFTS
The scion wood is located in the guide plate recess and the handles closed to create a whip cut as
described above (photos 2 & 3). To prepare whip & tongue grafts a second tongue cut is made to the
scion wood by rotating the wood in the left hand and placing the previously cut whip vertically
across the cutting blade. While holding the wood with the left hand and the shears in the right, the
whip face is carefully placed against the blade using the top of the pith as a guide. In most cases this
will mean the blade is resting against the scion wood between 1/4 & 1/3 of the way along the
previously made sloping cut (photo 4). This is the best place to start the incision to create the tongue
cut to allow uniform matching of the whip & tongue unions and prevent overhang which will require
additional tail trimming. The pins on the tip of the guide plate anvil are used to secure the wood so
that only the cutting blade moves. Slide the wood to the left as you make the cut (photo 5). With
practice you will get good at precisely judging the angle to pin the scion wood at so that the tongue
cut produced is on the correct slant. The depth of tongue cut required will vary depending on wood
diameter but similar wood & stock diameters will match neatly producing tight well anchored,
strong graft unions.
When field grafting the rootstock is cut to the desired length/ height and the shears turned upside
down so that the cutting blade will slice upwards on the stock material. The top of the stock material
is placed in the guide plate recess and the handles squeezed closed. The shears are then reversed
right side up so that the pins are able to grip the stock material. The cutting blade is aligned against
the previously cut whip (1/4 to 1/3 of the way from the tip) and the handles squeezed to create the
tongue.
7
When ready the graft union is made by firmly pushing the scion and rootstock together while taking
care to align the cambium layer. With pre grading, similar diameters will ensure scions and
rootstocks match neatly and firm cambium contact is guaranteed on at least one side, if not both.
Then the union is bound together with suitable grafting tape and the tip of the scion waxed or
painted with a suitable sealant. If excessively wet allow the union to dry slightly before sealing.
Whip and tongue bench grafts can also be prepared using the hand shears by following the above
process. These can be planted out immediately or packed in appropriate medium and stored for
later planting out. With the correct placement, alignment and care sealing them, and provided you
have a firm fit, your graft unions will take minor handling knocks without becoming dislodged or
compromised ensuring a high success of ‘take’ is achieved.
12. PREPARING WEDGE (NOTCH) GRAFTS
The Grafting Shears are also utilised to cut wedge grafts (photo 24). The first cut is made as
described above (photo 22), and then a second cut is made by placing the cut surface of the whip on
the upper surface of the stop rest plate. The wood is tilted so that only one side rests on the plate
(photo 23). The cut is made by biting into the wood with the blade slicing the wood to form a wedge
shape. With practice the positioning of the scion wood will result in a symmetrical wedge being
produced with a wider back and narrower front. A second cut can be made if the wedge formed is
not precise on the first attempt. Store these until ready to graft on in the field with a suitable saw,
chisel or grafting knife.
13. PREPARING ‘V’ CLEFT GRAFTS
When a ‘V’ cleft graft is required make the first cut as previously described. Lay the cut face across
the upper guide plate to finish the cleft graft by making a second cut. In normal situations the
second cut will produce a matching slope resulting in a ‘V’ being formed (photo 27). By using a
sliding action to start the cuts as the blade enters the wood you will maximize the whip lengths
produced (photo 28). This may take several attempts to perfect, but with patience & experience you
will produce these grafts with ease. If the ‘V’ formed is not uniform further cuts can be made to
centralise the ‘V’ of the cleft scion. This is done by aligning the tip of the scion in the upper plate
recess to the left (photo 40), or lying it across the upper plate bade and slicing again. If a blunt end is
desired lengthen the whips out by maximizing the handle opening. The tip can then be cut back to
the desired length of whip and bluntness of end required (photo 29). These grafts can be stored
ready to either graft on to understock in the field or complete at the bench.
To prepare the root stock to receive the ‘V’ cleft graft, cut the rootstock to the desired length below
a bud node. Now use the pins to grip the rootstock and align the end so that the blade is resting in
the middle on the top of the rootstock. With the left hand tension the rootstock against the pins to
lock in place. Now squeeze the handles closed so that the blade slices through the top of the
rootstock creating a split cut. With practice you will create the desired split to accept your previously
prepared ‘V’ grafts. Carefully push the two parts firmly together aligning the cambium on at least
one side. Seal and store for planting out, as described above. It is sometimes useful to use scion
8
wood slightly larger in diameter than the rootstock. This will often result in cambium contact
matching on both sides of the graft union.
14. PREPARING CHIP BUDS
To cut chip buds more exacting care is required when placing the scion wood into the guide plate
recess to sever and taper the end. Taper the end below the bud and sever by holding the wood on
an angle to create a slanting cut, below and away from the bud as the wood is cut (photo 31). Now
place the cut end of the wood along the guide plate in such a way so that a chip can be removed
with a bud retained centrally on the chip (photo 32). Shallow chips can be removed in the deep
recess (photo 33) or heavy chips are removed by altering the point of contact along the lower guide
plate to the left. The length and size of the chip is controlled by the bite point of the blade above the
bud. The buds will vary depending on wood diameters used and can be ‘T’ budded or notch cut into
the receiving stock or budded on out in the field. With practice it is possible to make a neat receiving
cut to accept the chip with the shears (photo 35). Alternatively a knife can be used.
When preparing all the previously described grafts, if the correct care is taken each time the whip
cut is made, chip buds can be retained for later use if desired. This is extremely useful if wood is
scarce and precious.
15. PREPARING ‘T’ (SHIELD) BUDS
To cut ‘T’ buds the pins are used to secure the scion wood on the side (photo 43). The wood is held
in the left hand so that they are facing away from you. The angle the pins are placed at on the side of
the wood determines the thickness of the bud sliced. More exacting care is required when cutting
the bud to control thickness, but thickness will also vary depending on wood diameters used. Place
the wood so that the blade slices under the bud without it being totally removed (photo 44) so it can
be can be peeled off the wood with a knife. Bud sticks can be wrapped in damp paper towels until
needed. The buds can then be held on the back of the knife blade while inserting them into ‘T’ cuts
or notch cut into the receiving stock at the bench or in the field. Alternatively, with practice it is
possible to make a neat shallow receiving cut with the shears to place the ‘T’ bud onto.
If exacting care is taken each time the bud is cut, most buds can be fully use if desired. This is
extremely useful if wood is scarce and precious. There will however be some limitations with close
nodes and soft green graft materials.
16. BLADE CARE & REPLACEMENT
The blade is the backbone of you SGS. Depending on use, wood type, hardness and diameters
prepared, it should produce many thousands of cuts without requiring replacement. It will however
be necessary to remove the blade at times for inspection, sharpening & cleaning. When necessary
remove the blade using the 2mm Allen key supplied. Be careful not to strip the screw heads.
Remove sap build-up with a suitable sap removal product and clean with rubbing alcohol or similar.
Clean at least daily or more often depending on use and need. Inspect the blade when it is removed
from the blade holder and replace it if the cutting edge is damaged or sharpen it as often as
9
necessary. Do this when the blade no longer bites into the wood or you feel that the wood has more
resistance when cutting through it and cuts become noticeably ragged or grainy.
Do not attempt to sharpen the blade yourself unless you are familiar with double bevel blade
sharpening procedures. If unable to do so yourself, it is advisable to have the blade professionally
sharpened to maintain the correct 13° - 15° bevel necessary for effective use. The blade can be
maintained on the tool when a touch-up resharpening is required by running a very fine diamond or
carbide stone across the face. To finish off, a fine wet/oil stone can be used. A light burr on the flat
back of the blade is sometimes useful to aid the bite of the blade. Burrs are a personal preference
with cutting tools. The bevel & burr also affects the bite of the blade and smoothness of the cut.
Replacement blades are readily available in packs of 2, 5 and 10.
17. GENERAL MAINTENANCE & STORAGE
During use it will be necessary to frequently release the stop rest plate to clear fibres that become
trapped in the grooves between the plate and the main anvil. It is not necessary to completely
remove the fixing screws but simply loosen them off so that the debris can be removed by sliding the
Allen key (or a paper clip) between the two surfaces. Regularly scrub the blades and jaws with a
toothbrush and disinfectant to help keep them clean and reduce the build-up of debris.
If the outer rest plate blade is completely removed always replace the spacer washes between the
plate and the main anvil. These provide clearance for the blades to cross and help to prevent them
becoming jammed. They also lift the rest plate blade away from the anvil which provides a more
secure stop rest and help to hold the smaller pin plate securely in place. For convenience two spare
fixing screws and spacer washers are located on the anvil next to the upper rest stop plate.
Periodically inspect your SGS for damage or wear. If parts are damaged or warn excessively,
replacement parts can be ordered, or you can return the complete tool to your supplier for
inspection and service. See additional tool maintenance tips on page 14.
Prior to prolonged storage completely remove the blades from the tool and clean using a suitable
sap removal agent to remove sap build-up. Wipe with a lightly oiled rag before storage.
Do not over tension the screws. Always replace the blade and rest plate fixings with new screws if
the heads become worn. These are easily obtainable from most specialist hardware stores.
18. OPTIONAL ACCESSORIES & PARTS
Spare blades - 2, 5 or 10 packs
Top jaw (cutting blade mount)
Spare pin/stop plate & mounting fixings
Bottom jaw (anvil - pin & stop plate mount)
2mm Allen key & fixing screws
Carry pouch/ storage holster
30 ml bottle of sap removal cleaning solution
30 ml bottle of multi-purpose lubricating oil.
10
11
12
For further instruction specific to each model please refer to our website video and image galleries
13
20. BLADE SHARPENING & MAINTENANCE TIPS
1. Blades have 2mm of tip wear available.
If damaged, rub the blade tip and sides
on a flat wet sharpening stone.
2. Restore bevel by rubbing on the sharpening
stone, stoking with a carbide file or…
3. …a fine flat diamond file or small wet stone.
4. Polish the bevel & remove any remaining
burr with 1200 grit wet/dry sandpaper.
Rub the flat back of the blade once to finish.
Sharpen only the bevel side of the blade.
The tip bevel should be no greater than 15°.
5. Alternatively, use a powered wet grinding
stone and finish on a burnishing wheel or
leather strop.
6. Finished tip bevel should be about 1mm.
When necessary hone the secondary bevel
back to maintain the shape in the same way.
7. Periodically clean to remove sap residue build-up with a suitable sap removal product.
Lightly oil when not in use and store spare blades in the pocket on tool base or pouch.
14