1
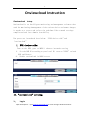
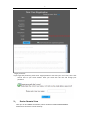
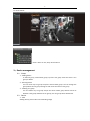
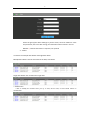
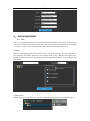
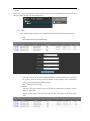
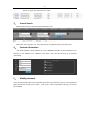
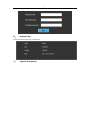
Onviewcloud Server
User Manual
1
Onviewcloud Instruction
Onviewcloud
intro:
Onviewcloud is an Intelligent monitoring and management software that
used for monitoring & management of the various device and remote images;
it works as a server and solves the problems like network settings
complicated and free domain instability.
Two parts are introduced here below: “DVR device-side”and
“onviewcloud”
I. DVR device-side:
Turn on the DVR, goes to MENU-> advance->network setting
1、 Set the DVR IP according to your local IP,turn on“UPNP” on both
DVR and Router。
2、 Enable onviewcloud in DDNS server.
II.“onviewcloud”setting:
1、
Log in
Open web explore,input www.onviewcloud.net to enter the login window as below:
2
Single User and Advanced User
Single user log in:
Supports one DVR serial number Log in
Insert DVR serial number and device password (with setup of password before)
Supper user:
To manage more devices' users
To insert user name and password to log in
User Register:
Please register before use log in first time. Follow the instruction and read the protocol carefully.
Note: Please fill the correct email address; this is the ONLY WAY to find your password.
3
Forget password:
If you forgot the password, please click” forgot password” and enter your user name, then a link
will be sent to your email address. Enter you email click this link and change your
password.
2、
Device Remote View
Here you can find GROUP and DEVICE, which all added in DEVICE MANAGEMENT.
Double click the device to view remotely.
4
Pic shows below:
Green: device on line, Gray: device off line
3、Device management
3.1、Group
1、Adding device
To add son group, select father group, input the son group name and save. A son
group is added
2、Revising device
You can revise any son group except the center father group. You can change the
group which the son group belongs to and revise the name of son group
3、Deleting son group
You can delete any son group except the center father group which cannot be
deleted. If the group deleted has son groups, the son groups were deleted too.
3.2、Device
1、Add
Adding device, please refer to the following image
5
Select the group (the device belongs to), device name, serial No. DVR user name
and password, click save. After saving, the information will be shown in the list
Marked *, the date information is required, not optional
2、Delete
It contains the multiple data delete and single data delete
Multiple data delete: click the check box of the date, click delete
Single data delete: click to delete the single data.
3. Modification
Click to modify the statistics that you try to edit, device code, if leave blank means no
modification.
6
4、 USER MANAGEMENT
4.1、Role
Role: It is so-called classification that means permission distribution; user under one specific role
can only use the permission of this specific role. The roles here also mean inheritance, for example:
A-> B, B-> C, thus, C can use B's permission, but cannot use all the permissions of A.
1. Adding
Add role, then add page, confirm the name of role, and choose main role, tick the permission of
this role(Group permission, means this role manages which groups 【the devices submit to the
group】; Operation permission, means the permission of operation function), save to complete this
role adding.
2, Modification
Modify any roles, but the main role cannot be modified, modify permissions and role names, etc.
7
3, Delete
Delete any roles, but main role cannot be deleted, if the main role is deleted, then the sub-role and
the users under the sub-role will be deleted too.
4.2、User
User: After the user login the system, authorities will be the authorities under the role.
1、 Add
Click add, and enter into the add page
Select the role, fill in the User and Password (the user and password is for the login
the system), email is necessary and convenient for the pickup in case of password
missing. Save and finish the adding of users.
Red*:Indicate it is necessary.
2、 Delete
There are two types of delete, one is for the delete of multi data, the other is for the
delete of single data.
Delete of multi data, select the box before the data, click delete, will delete multi
data.
8
Delete of single data, delete the bar of data.
3、
Journal Search
Search all the actions in the system that took by the user.
Select Role, User, Log Type, etc. Then click Search, a log will be listed in the below area.
4、
Personal information
The name Telephone, Email address etc. can be Modified. But Role, account infomation and
authority is not allowed to be modified. Click “Save” and a box will be pop up if modified
successfully.
5、
Modify password
Input the old password (the current password) and the new password. Input your new password
again and make sure they are the same. Click “save”. If the old password is wrong, a error will
be prompted
9
6、
System help
The information of this app is shown here
7、
Log out the system