1
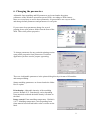
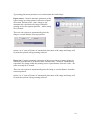
HUMAL Elektroonika ,Tartu, Estonia
DirectStamp™ user manual
Contents
1.
2.
3.
4.
5.
6.
Packing list
Overview
Starting up
Transport position
Changing parameters
Production of stamps
2
1. Packing list
DirectStamp™ stamp printer (DS)
Drawer for dies without mount
Printer cable
Driver disk
Power supply
Power cable
Samples of foam pieces in paper cartridges
NB! Foam in paper cartridges and specially treated covering film is designed for use
in DirectStamp machine. Using foam different foam pieces or similar film doesn’t
give satisfying results and will void warranty of machine.
3
2. Overview
Stop switch
power indicator
error indicator
place for the drawer
Thermal head
printer connector
power cable
4
3. Starting up
1. Keep DS at the room temperature at least a few hours before usage
2. Place the machine to the table. Make sure that there is free space behind the
machine.
3. Connect power cable from power supply to DS and then connect power supply
to mains connector of proper voltage.
4. Machine should start open itself. During opening both indicators (power:
green and yellow:error) should light. When it arrives only green light should
remain. When machine is not connected to the computer also green light
should turn off and start flashing after every 20 sec. because machine will go
to standby mode.
5. Try to put machine to closed position again. Press stop switch (the big gray
platen) and keep it pressed until green light will turn on and then off again.
6. When light goes off release the switch. Machine should start moving itself to
the transport position.
7. Disconnect the power.
8. Connect printer cable to DS and another end to computer while computer is
switched off.
9. Connect power to DS again and wait until it will open himself
10. Turn on the computer.
11. On the computer, Open Start -> Settings ->
Printers -> Add new printer
12. When manufacturer and model will be asked
select ->”Have Disk …” and specify the
location where Driver disk is accessible.
13. Complete the driver installation
14. Run the test program dstest.exe from Driver disk.
15. Follow the instructions in the test program. When test passes you have
successfully installed the DS to your computer.
5
4. How to move DS to the transport position
1. Press the stop switch and keep it pressed until power
indicator will turn off. (In case the machine was in standby mode and power indicator shortly flashing in every 20
sec. you should keep it pressed until indicator will turn on
and then continue to keep it pressed until it will turn off
again.)
2. Release stop switch and wait until DS will move to the
transport position
6
5. Operating the DS
•
DS is ready to receive information from PC (“normal mode”) when green light is
on and yellow light off. Some PC-s don’t initialize the printer port before the first
time of use. On this case DS remain in standby mode (indicated by rare short
flashes of the green light) until you will start printing on your PC.
•
DS errors are reported by flashing of the yellow light. Further information about
different error reasons can be obtained from error code indicated by the number of
flashes. The different error codes and reasons are listed in following table.
Error Fault
Code
1
Movement blocked or
internal error
User activities
Unplug the power. Check that there is
nothing on the table that can block the
movement of the DS. Power the DS again.
If you can’t find anything, report to the
supplier or manufacturer.
2
3
Reserve
Interrupted by user
4
Data error
5
Temperature too high
6
7
Voltage too high
Voltage too low
Press the switch a few times until DS will be
in the normal mode.
Check the data cable connection from PC.
Check the proper printer driver was selected.
Run DSTEST.EXE
Wait ca 5-10 minutes until temperature will
decrease and press the switch.
Verify the proper power supply is used.
Verify the proper power supply is used.
Pressing the switch cancels the current task. It also stops indication of the error
code. On some occasions canceling of one task can cause another error message to
appear (eg. Error code 3) So sometimes it is required to press the stop switch
several times, before DS goes to normal operating mode and is ready to accept
further command from PC.
•
If during the production cycle of stamp DS, detects that the motor brushes need
additional cleaning, DS will clean the brushes automatically after the stamp
production cycle. Cleaning is done by repeated back and forth moving. During the
cleaning cycle, the thermal head is on higher position from the die moulding level.
The cleaning cycles don’t affect the quality of the stamp die produced before
cleaning cycle automatically started. As the thermal head is raised during the
cleaning cycles you can remove the drawer with the moulded die at the time of the
cleaning cycle, or when cycle is finished.
•
DS doesn’t have power switch. DS will go to standby mode automatically when
computer is shut down. The standby mode is indicated by rare short flashes of the
7
green light. It’s not necessary to move DS to transport position nor unplug the
power at the end of the working day.
•
After transport or unplugging the power of the DS for best results it is advisable to
perform one empty printing cycle without the drawer and die inserted. It helps the
DS to use proper environment settings during production cycle.
•
When connecting the power to the DS always connect power supply to the DS and
then connect power supply to the wall socket. Never connect connector to the DS
when power supply is ON!
8
6. Changing the parameters
Adjustable foam moulding and DS parameters are located under the printer
parameters of the Windows operation system (WIN). According to WIN features
there are several ways to access these parameters. In general there are ways to define
and change default parameters and parameters for one print.
If you want to keep parameters change for several
printing please open printers folder from the Start of the
WIN. Then select printer properties.
To change parameters for any particular printing session
open printer properties from print menu of software
application you have used to prepare typesetting.
There are 4 adjustable parameters in the printer dialog directly relevant to DS machine
and stamp moulding.
Stamp moulding parameters are located under the folder
Device option
Print density: Adjustable intensity of the moulding
process. Default is 15. Print density varies depending
from materials used and advisable density is written on
the label.
Image control: Foam moulding temperature. Default is
110 C. Moulding temperature varies depending from
foam material used and advisable value is written on the
label.
9
Typesetting placement parameters are located under the folder Paper
Paper source: Controls automatic placement of the
typeset image on stamp printer in direction of head
movement. Default value: “place image to top”
automatically repositions any image within the
printing area to the topmost position – where stamp
die is located.
There are also options to automatically place the
image to certain distance from top position.
Option “as is” turn off feature of automatical placement of the image and image will
be printed as placed with typesetting software.
Paper size: Controls automatic placement of the typeset image on stamp printer in
direction perpendicular to head movement. Default value: “centered” automatically
repositions any image within the printing area to equal distance from two sides – the
same as stamp die is located.
There are also options to automatically place the image to certain distance from this
centered position.
Option “as is” turn off feature of automatical placement of the image and image will
be printed as placed with typesetting software.
10
7. Production of stamps
1. Prepare the typesetting in any typesetting software. Following samples are
made in CorelDraw.
2. You can set the paper size in your typesetting program to correspond the
maximum size of the stamp printer printing area: 52 x 102 mm.
3. To produce the stamp with DS stamp printer make sure the typesetting is
located fully inside the sheet and there isn’t any more artwork in this sheet. No
matter where on the sheet your typesetting is located, DS can itself place it
properly.
4. Select printer DirectStamp™ if it is not the default
printer in your system.
5. Adjust parameters if required.
11
6. Clean the thermal head with piece of dust-free cloth
moisten with ethyl alcohol when necessary. Normally
it should be done before first usage at the morning,
but largely depends on amount of dust in your room.
If you find light, less deeply sealed lines on your
stampdie after moulding you shall clean the head
more frequently.
7. Take the die from bag, close the bag properly. It is very important that the dies
with the cover film are deposited without dust on the surface of the film.
8. Place the blank die of adequate size to the drawer, inserting the folded edge of
supporting frame accurately in the drawer’s slot.
9. Keep the folded edge fully inserted in the slot and push the drawer into
machine.
12
10. Print
11. When machine begins moving forward make sure it can freely move over the
die; if required, press the die slightly down
12. When machine has performed the printing cycle and stops in the rearward
position, pull the drawer a few centimeters until its slot opens and remove the
die.
13. Detach die from paper frame and ink it in the inking tray.
You can verify your typesetting without spending dies and printing typesetting to the
fax-machine paper, using piece of paper in the top of die. To avoid heat affecting the
die reduce Print density to: 9.
13