1
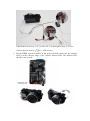
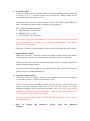
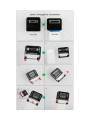
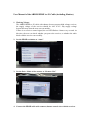
User Manual of the ARRIS HDMI to AV Cable (including Shutter)
1. Working Voltage
The ARRIS HDMI to AV cable with shutter does not support high voltage receiver,
the supply voltage of the receiver should be 4.8V to 6V. Any supply voltage
beyond this may burn the new convert module.
If there is no receiver control signal, the red LED flashes 4 times every second. At
this time, the user can check whether you power the receiver, or whether the radio
binds with the receiver successfully.
2. Set the HDMI resolution to “Auto”
3. Set the Drive Mode of the camera to “Remote Cdr.”
4. Connect the HDMI cable with camera, shutter control wire with the receiver
Connect the wire next to “G V” to video TX. G is the negative pole, V is video.
Connect the wire next to “
“with receiver.
5. Put the HDMI converter module in the proper position; make sure the infrared
LED is in the effective range of the Camera infrared LED. The infrared LED
should be not covered.
6. Set on the radio
If the user needs to use it to control video recording and taking pictures, you need
to assign it to a 3 position switch, and connect the shutter cable to the
corresponding channel on the receiver.
If the shutter wire does not connect with the receiver, this cable is just a HD to AV
cable; you could not control video recording or taking photos.
The 3-Positon Switch on the Radio:
1. High Position----Take Picture
2. Middle Position----Stop
3. Low Position----Record Video
Note: Before your power the HDMI to AV cable (include power on the camera and
give power supply to the receiver), the 3-Positin switch should be in the middle
position, this is important.
When the 3-Postion switch in middle position, the red LED indicator will be solid.
7. Taking Photos Control
When you move this 3-Position switch from middle to high position, the camera
will take photos. And the red LED indicator will flash 2 times every second.
When you move the 3-Position switch from high position to middle position, the
camera will stop taking pictures.
If you move the switch to high position and remain it there, the camera will take
pictures every 6 seconds automatically.
8. Video Recording Control
When you move the 3-postion switch to low position, the camera will begin to
record video and save it to the camera memory card.
If you move the switch to middle position and then move it to low position, the
camera will stop recording videos and save the file. This design is to avoid
stopping recording video by incorrect operation. Move the switch from middle
potion to low position, or from low position to middle position, please wait at least
3 seconds, the camera need time to response.
In all the cameras being tested, CANON 5D does not support remote control
recording function.
9. How to
pictures)
Change
the
Interface?
(Please
check
the
following