1
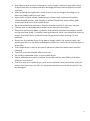
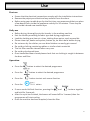
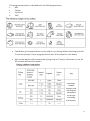
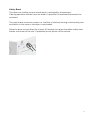
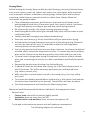
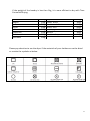
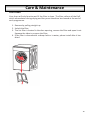
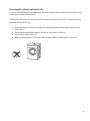
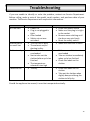
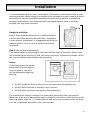
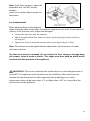
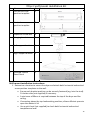
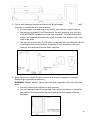
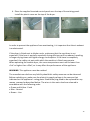
Installation and Operating Instructions Models: PT-F7-R As part of Parmco Appliances commitment to improving and updating product ranges, we reserve the right to alter, change and update technical specifications and appearance attributes of all Parmco Appliances products. E&OE. 727626102015 Dear Valued Customer, Thank you and congratulations on purchasing your new Parmco appliance. All Parmco products are made to the highest quality and design standards. We are sure you will enjoy your new appliance. As a note, please read through these instructions carefully. These will assist you in gaining a complete understanding of the functions and features offered by your appliance. Please take special note of all detailed technical information and installation instructions. It is essential that you follow these instructions to ensure the safety and reliability of this appliance. Furthermore, not using appropiate personnel to install this appliance may affect any future warranty claims lodged, so please check with Parmco Appliances before any installation is carried out. We hope you enjoy your new appliance. If you would like to find out more about this product or any other products in Parmco’s extensive range, visit us online at www.parmco.co.nz. Regards, The Parmco Team INDEX Safety information..................................................................................1 Product description ................................................................................4 Control panel...........................................................................................4 Operation................................................................................................5 Drying programmes................................................................................6 Drying hints .............................................................................................8 Care and cleaning ..................................................................................10 Troubleshooting......................................................................................12 Installation..............................................................................................13 Technical data.........................................................................................18 Warranty.................................................................................................19 0 Safety Information WARNING Read and understand thoroughly the below safety instructions before using this appliance. The points indicated below are very important safety precautions, which must be followed. Any failure or loss caused by ignoring the following in the manual will not covered under warranty. The appliance is not to be used by children or persons with reduced physical, sensory or mental capabilities, or lack of experience and knowledge, unless they are supervised. ELECTRICAL SAFETY Disassembly, repairs or modification must only be carried out by qualified technicians. The household electrical supply system (the current, the voltage, the cable, the fuse) should meet the specification requirements of the dryer under normal load. The power plug must be connected to a three-point socket with an earth wire and is grounded properly. If the supply cord is damaged, it must be replaced by the manufacturer, its service agents, or qualified persons. Appliance should not be used until cord is replaced. Do not disconnect the power plug by pulling on the supply cord. Turn power off before pulling out the plug. Hold the power plug head with your hand and then pull it out of the socket. Do not use the supply cord when the connection between the power plug and the supply cord is loose. Do not touch the power plug with wet hands. Wipe off dust or water drops over the power plug with a dry cloth. Do not over-bend the supply cord or put it under heavy weight. GAS/ VOLITILE LIQUIDS SAFETY • Do not put combustible liquid such as gasoline, petrol and alcohol into the appliance or nearby. 1 FIRE SAFETY Do not install the appliance close to fire or heat sources. Do not rest any burning candles or cigarettes on the appliance. Do not install appliance in areas where electrical components can be exposed to water e.g. Outside Do not install the dryer in places exposed to direct sunlight, to avoid the plastic components and rubber from components becoming aged. Do not wash the appliance with liquids when cleaning it. In order to avoid danger of fires caused by excessive heat, do not use the appliance to dry the following items: cushions, quilts, etc, as these items retain heat. Items that have been spotted or soaked with ve.g.etable or cooking oil are a fire hazard and should not be placed in the tumble dryer. Please make sure that no gas lighters or matches have been accidentally left in pockets of garments that are to be loaded into the appliance. WARNING: Never stop a tumble dry before the end of the dryer cycle unless all items are quickly removed and spread out so that the heat is dissipated. PHYSICAL SAFETY The packaging may be dangerous to children. Put all packaging (e.g., the plastic bag) out of reach of children. Do not put arm into drying tub, until the dryer completely stops. Do not keep children or pets nearby when the dryer door is open, as they may get trapped inside the dryer. Please check the drum carefully before closing the door. Other instructions This appliance is designed for domestic use. It must not be used for purposes other than those for which it was designed for. Only wash fabrics that are designed to be machine dried. Follow the instructions on each garment label. If the machine is situated on a carpet floor, please adjust the feet in order to allow air to circulate freely under the appliance. Do not climb onto the dryer, rest heavy objects/heavy devices, or items with water or liquid leakage on the dryer. This may cause damage to the unit. 2 Any objects such as coins, safety pins, nails, screws, stones or any other hard, sharp materials can cause extensive damage and must not be placed into the machine. After installing the appliance, check that it is not pressing or standing on its electrical supply cable or vent hose. Items such as foam rubber (latex foam), shower caps, waterproof textiles, rubber backed articles, and clothes or pillows fitted with foam rubber pads should not be dried in the tumble dryer. Do not overload the appliance. See the relevant section in the user manual. Clothes that are dripping wet should not be placed in the dryer. Garments which have been in contact with volatile petroleum products should not be machine dried. If volatile cleaning fluids are used, care should be taken to ensure that the fluid is removed from the garment before placing it in the machine. Never use the tumble dryer if the power supply cable, the control panel, the working surface, or the base is damaged so that the inside of the tumble dryer is accessible. The tumble dryer is not to be used if industrial chemicals have been used for cleaning. The filter must be cleaned after every use. Do not dry unwashed items in the tumble dryer. Fabric softeners or similar products should be used as specified by the fabric softener instructions. The final part of a tumble dryer cycle occurs without heat (cool down cycle) to ensure that the items are left at a temperature that ensures the items will not be damaged. 3 Product Description 9 8 7 10 1. Top board 2. Control Panel 3. Door 4. Front Panel 5. Side panel 6. Filter 7. Power plug 8. Switch 9. Drum 10.Front vent flange 4 Use First use Ensure that the electrical connections comply with the installation instructions. Remove the polystyrene block and any material from the drum. Before using your tumble dryer for the first time, we recommend that you place a few damp cloths inside the appliance and dry for 30 minutes. There may be dust inside a brand new tumble dryer Daily use Before drying, thoroughly spin the laundry in the washing machine Sort the laundry according to fabric type and drying programme Load the clothing one item at a time, shaking them out as much as possible Please close zips, hooks and eyelets, button up, tie fabric belts before drying Do not over dry the clothes, as over dried clothes can easily get creased Do not dry clothing containing rubber or similar elastic materials The lint filter must be cleaned after every use. Do not dry drycleaned items Once loaded and door closed please check that no clothing is caught in between the door and filter Operation Press the button to select the desired programme Press the button to select the desired programme Press the button to start anti-crease function Press the button If users need child lock function, pressing the and buttons together and hold for 3 seconds After the cycle has finished, the buzzer will sound off for 1 second, then the programme will start cooling. Once the machine has been emptied, clean the filter 5 The programme button is divided into the following sections: • Mix • Cotton • Synthetic • 1HR Cool down cycle means there is only cold air circulating before finishing cycle for 3 minutes (except 1 hour program which runs 10 minutes for cool down) Anti-crease option will increase the drying time to 2 hours, otherwise it runs for 30 minutes without this option Selecting a suitable Dryness Level and Program will depend on the type of clothing and capacity. 6 Safety Reset This dryer has a safety cut out switch which is activated by temperature. If during operation clothes have not dried it is possible the overheat thermostat has activated. This may be due to various reasons i.e. the filter is blocked, ducting is obstructed, poor ventilation in the room or the dryer is overloaded. Allow the dryer to cool down for at least 10 minutes then press the white safety reset button at the rear of the unit. If problems persist please call for service. 7 Drying Hints Before loading the laundry Never tumble dry the following: particularly delicate items such as net curtains, wool, silk, fabrics with metal trim, nylon tights, bulky materials such as anoraks, blankets, eiderdowns, sleeping bags, feather quilts and any items containing rubber foam or materials similar to rubber foam. Always follow the instructions on garment labels: Close pillowcases and covers with fasteners to prevent small laundry items getting tangled inside them. Close press studs, zips, hooks, tie belts, and apron strings. Sort laundry according to type and de.g.ree of drying required. Do not over dry laundry, this avoids creasing and saves energy. Avoid drying dark clothes with light coloured fluffy items such as towels as they could attract fluff. Laundry must be thoroughly spun before tumble drying. Even easy-case items (e.g. shirts) should be briefly pre-spun before drying. Knitted textiles (knitted underwear) may shrink a little during drying. Please do not over dry items of this type. It is advisable to allow for shrinkage when choosing the size of new purchases. You can also put starched items into your dryer. However, to achieve the desired starched effect, choose the programme Iron Dry. To remove any starch residues, wipe out the internal drum after drying with a moist cloth and then rub it dry. To avoid a static charge when drying is completed, use either a fabric softener when you are washing the laundry or a fabric conditioner specifically for tumble dryers. Remove the laundry when the dryer has finished drying. If individual items are still damp after drying, set a brief post-drying time of at least 30 minutes. This will be necessary particularly for multilayered items (e.g. collars, pockets, etc.). Make sure that no metal objects are left in the laundry (e.g. hair clips, safety pins, pins). Turn items with double-layered fabrics inside out (e.g. with cotton lined anoraks, the cotton layer should be on the outside). These fabrics will then dry better. The inside temperature and humidity will affect drying times. Maximum loads Recommended loads are indicated in the programme charts. General rules: • Cotton, linen: drum full but not too tightly packed. • Synthetics: drum no more than half full. • Delicate fabrics and woollens: drum no more than quarter full. Try to load to the maximum capacity as small loads are uneconomical. The following weights are indicative: 8 If the weight of the laundry is less than 1kg, it is more efficient to dry with Time Controlled Drying. bathrobe napkin quilt cover sheet pillowcase tablecloth bath towel tea towel 1200g 100g 700g 500g 200g 250g 200g 100g night dress ladies’ briefs men’s work shirt men’s shirt men’s pyjamas blouse men’s underpants 200g 100g 600g 200g 500g 100g 100g Please pay attention to use the dryer if the materials of your clothes can not be dried or contain the symbols as below: 9 Care & Maintenance Filter Clean Your dryer will only function well if the filter is clean. The filter collects all the fluff which accumulates during drying and they must therefore be cleaned at the end of each programme. 1. Remove by pulling straight up 2. Unbolt the filter 3. The lint filter is located in the door opening, remove the filter and open it out. Squeeze the sides to remove the filter 4. If the filter is cleaned with a damp cloth or in water, please install after it has dried. 10 Cleaning the cabinet and inner tub You must DISCONNECT the appliance from the power source before carrying out any cleaning or maintenance work. Periodically clean the interior part of the door to remove any fluff. Proper cleaning ensures effective drying. Use only soap and water and dry thoroughly when cleaning the cabinet and inner tub. Do not use methylated spirits, diluents, or similar products. Do not use water to rinse. Make sure the door is left open for aeration after cleaning the inner tub. 11 Troubleshooting If you are unable to identify or solve the problem, contact our Service Department. Before calling, make a note of the model, serial number, and purchase date of your machine. The Service Department will require this information. Problem Will not start External hot or can smell hot Clothes too dry Clothes shrink Cause Power cut Plug is not plugged in tight Over loaded Safety cut out was activated The lint filter is dirty The exhaust and/or ducting is dirty The machine is overloaded Not to take out the clothes before cycle has finished The temperature selected is too high Too dry Solution Check the power source Make sure the plug is in tight to the socket Remove some clothing until the drum can spin freely Reset the safety switch Make sure the filter is clean Make sure machine is not overloaded Tale out clothes immediately when cycle has finished Check the labels on the clothes Check the labels on the clothes Take out the clothes when slightly damp and hang the clothes to fully dry Should the appliance be moved, it must be transported vertically. 12 Installation It is recommended that for your convenience, the machine is positioned close to your washing machine. Whilst drying, the tumble dryer will expel a certain amount of warm, very moist air, and this should be removed from the room as quickly as possible to prevent condensation. In an extremely well ventilated room or close to an open window, this may occur naturally. Simple installation Step 1: Dryer should be placed in a ventilated are with not less than 10cm distance from the wall. If placed in a room such as a bathroom, it is suggested there are no obstacles within 1.5m in front of the dryer and keep ventilated. Step 2: The horizontal adjustment: Tie a heavy subject on the string on the front and two sides of the dryer. Please refer this to below figure, and if A=A, B=B, this means the dryer is placed horizontally. While the, you could place something on the grounding. Notice: If the dryer cannot be placed horizontally (the lean angle is no more than 2), the dryer will be unbalanced and stop working. Do NOT install the dryer in the open air or place easily damaged by rain Do NOT place the back of the dryer near curtains Do NOT place the dryer near gas or a flammable area The tumble dryer must be installed in a clean place, where dirt does not build up. Make sure there are no obstructing items or material near the air-intake louvres at the back (e.g. paper, rags, etc.). To keep vibration and noise to a minimum when the dryer is in use, it should be placed on a firm, level surface. 13 Note: If the floor is uneven, adjust the adjustable feet. DO NOT put any wooden pieces or any other objects under the foot bases. Level adjustment When pushing down on the diagonal edges of the top plate of the dryer, the machine should not rock at all. Please check all corners. If the machine rocks, adjust the feet again. Loosen the locknuts with the spanner. Adjust the adjustable feet: lower the dryer by turning right and ascend it by turning left. Tighten the locknut with the spanner after ensuring the dryer is level. Note: The locknuts must be tightened after adjustment. Any looseness can cause vibration and noise. The feet must never be removed. Do not restrict the floor clearance through deep pile carpets, strips of wood or similar. This might cause heat build-up which would interfere with the operation of the appliance. IMPORTANT: The hot air emitted by the tumble dryer can reach temperatures of o up to 60 C. The appliance must therefore not be installed on floors which are not resistant to high temperatures. When operating the tumble dryer, the room o o temperature must not be lower than +5 C or higher than +35 C as it may affect the performance of the appliance. 14 Dryer wall mount installation kit No. Name 1 Horizontal screw position template Qty Picture 1 2 Vertical screw position template 2 3 Expansion screw bolt 8 4 Hanging bracket 2 5 Left support bracket 1 6 Right support bracket 1 7 Plastic cover 1 8 Inverted Control Panel Decal 1 Wall mount installation instructions 1. Determine a location to mount the dryer and attach both horizontal and vertical screw position templates to the wall. Ensure each bracket position can be securely fastened (e.g. Into the stud). Fit timber slats (not supplied) if necessary. A minimum of 80mm is required between the top of the dryer and the ceiling. If mounting above the top load washing machine, allow sufficient space to open the washer’s lid. Use a spirit level (not supplied) to check both horizontal and vertical templates are level 15 2. Fix the wall hanging brackets and both left & right support brackets to the wall securely in accordance with the template. Ensure power cord and plug is accessible and reaches a power source. Mounting into Wood: Fix all brackets to the wall securely (e.g. Into the stud) with M8012 expansion screw (not supplied). Fit additional timber slat(s) (not supplied) between the studs to mount the bracket onto if the stud is too wide. Mounting into Concrete: Drill 8 holes on the wall with the diameter of 012 according to the screw position templates. Fix all brackets to the wall securely with expansion screw bolts supplied. 3. With assistance, mount the dryer on the wall bracket, upright or inverted depending on personal preference. WARNING: Weight Hazard. Two or more people required to lift and install the dryer. Ensure brackets are fixed to the wall securely Ensure hanging brackets are pushed into position and dryer is placed on the support brackets before slowly releasing the full weight onto the brackets. 16 4. Place the supplied inverted control panel over the top of the existing panel. Install the plastic cover on the top of the dryer. In order to prevent the appliance from overheating, it is important that the air exhaust is unobstructed. If the dryer is fitted next to kitchen units, make sure that the vent hose is not squashed. If the hose is partially squashed, drying efficiency will be reduced, resulting in longer drying times and higher energy consumption. If the hose is completely squashed, the safety cut-outs with which the machine is fitted may operate. When operating the tumble dryer, the room temperature must not be lower than +5oC or higher than +35oC, as it may affect the performance of the appliance. WARNING: This appliance must be earthed. The manufacturer declines any liability should this safety measure not be observed. Before switching on, make sure the electricity supply voltage is the same as that indicated on the appliance’s rating plate. Should the plug need to be replaced for any reason, proceed as described below. The wires in the mains lead are coloured in accordance with the following code: • Green and Yellow - Earth • Blue - Neutral • Brown - Live 17 Technical Dimension Rated input power 595 x 555 x 840mm 2000w Weight Rated volume Power supply 220-240v 50Hz Ambient Temperature 35kg 7.0kg (dry clothes) +5°c ˜ +35°c It is dangerous to alter the specifications or attempt to modify this product in anyway. Care must be taken to ensure that the appliance does not stand on the electrical supply cable. Any electrical work required to install this appliance should be carried out by a qualified electrician or professional person. IMPORTANT: The appliance must not be built-in. • Unpacking All packing must be removed before using the appliance. • Check accessory Open the accessory bag and check the accessories. 18 p: 09 573 5678 f: 09 573 5699 e: [email protected] w: www.parmco.co.nz Parmco Appliances extended 2 year warranty The Warranty: • Subject to the terms and conditions contained within this warranty, if the product is not of Acceptable Quality (as defined in the Consumer Guarantees Act) within 2 years of the date of original purchase, then Parmco Sales undertakes to repair or, at it’s sole discretion, replace the product. • The warranty does not cover the costs of transport, mileage or travelling time if the product is located beyond 30km of a recognised Service Agent. • This warranty is offered as an extra benefit, and does not affect other legal rights, which can not be modified or excluded by agreement. • This warranty only applies to goods supplied and installed in the North and South Islands of New Zealand. • The provisions of this warranty are in addition to the rights and remedies available to consumers under the Consumer Guarantees Act 1993. • Products purchased as seconds or thirds may or may not carry a warranty. Please check with your reseller at the time of purchase for the warranty period being offered. Product Date of purchase Dealer / Retailers Name Please retain this Warranty card together with receipt or other proof of purchase date when seeking service during the warranty period Please contact Parmco at 09 573 5678 if your appliance needs servicing under warranty. Please have your model number and proof of purchase ready. Warranty repairs must be authorized by Parmco. Subject to updates without prior notice, please visit www.parmco.co.nz for the latest version. New Zealand Owned & Operated for 25 Years The Warranty is not valid: • If the product is not installed and operated in accordance with the operating instructions. • If the product is not installed to comply with the electrical, gas, plumbing and other Regulations and Codes of Practice in New Zealand. • If the product is operated on voltages or frequencies outside the normal range for domestic appliances in New Zealand. • If the product is not used in normal domestic use, or if it is used in a business as defined in the Consumer Guarantees Act. • If any serial number has been removed or defaced. • If proof of date of purchase is not supplied, except at the sole discretion of Parmco Sales. Proof of purchase can be for the product itself, or if installed with a kitchen or house then proof of purchase can be from a Parmco reseller of products supplied by Parmco. • If the products are purchased in a second hand condition from other parties (including but not limited to TradeMe, Sella, etc.) Liability under this warranty will not be accepted for: • Wear and tear from normal domestic use. • Damage in transport. • Damage caused to the product by neglect, abuse, negligence, wilful act or misuse. • Any costs associated with the repair, replacement, removal or reinstallation of products installed in a damaged condition. • Any defect caused by accident, misuse, neglect, tampering with or unauthorised modifications of the appliance or any attempt at internal adjustment or repair by any person other than an Authorised Service Agent. • Service calls that relate principally to the following: • Instruction on how to use the product. • Repair or replacement of house fuses, electrical wiring, gas fitting or plumbing. • Wear and tear caused by normal use of the product. • Normal or scheduled maintenance including blocked filters or ducting. • Consumable items such as light bulbs. • Any damage to hobs caused by spills when cooking. • Any breakage or damage of glass items. • Any damage caused by non recommended product used for cleaning, maintaining, lubricating or similar. • Any aspect relating to the installation of the product, or damage caused during installation including blocked access for repair. • Any third party (including reseller) or consequential loss or damage (direct or indirect) however arising. E & O.E. 727626022015


![8KG HEAT PUMP DRYER [Met DTD 315]](http://vs1.manualzilla.com/store/data/005851733_1-4b2b64d3b006b4e2563952fefa7cfd52-150x150.png)