1
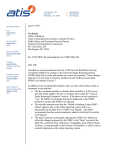
OMEGA 750 II
Please read this manual before operating unit.
This unit features an electronic timer, short cycle protection
for the lamp, and a beeper to confirm both trigger action and
the end of a timed cycle.
This manual contains instructions for assembly, operating
instructions, warnings and precautions, a problem solving
guide, and discussion of actions that could void the warranty.
Lions Dental Supply 951-276-3225
6.
1.
2.
3.
4.
INSTALLING
Power source should match Curing light voltage. (Check the rear label of unit’s voltage)
Insert the Gun Holder into the Tenon on backside of power box. (Fig. 1)
Set the Halogen Bulb in the socket of Gun-Body. (Fig. 3)
Turn the Gun-Cover clockwise to combine with Gun-Body. (Fig. 3)
Problem Solving
Problem
Solution
A. Lamp fails to light but,
the fan is working
A. Check the bulb for proper placement.
A-1. Replace the bulb.
B. Lamp fails to light, fan
fails to work
B. Check the main switch & light switch for on position.
B-1. Check power cord connections both at unit & outlet.
B-2. Try another outlet.
B-3. Replace the fuse.
B-4. Wait for unit to cool down.
C. Lamp fails to light after
checking (A) & (B)
Return unit for repair.
D. Lamp is on, fan fails to
operate.
Return unit for repair.
E. The blue light is reduced 1. Check the light guide for fracture lines.
2. The light guide should be plated to the circle of the light
meter.
3. Replace the bulb.
7.
OPERATION
1. Power on: Press Main Switch (rear panel) to the upper “1” position.
2. Oval shield should be put onto Light-Guide before turning the lamp on. Or the user should
wear protective glasses.
3. Curing Time: Select the timer knob (front panel) to set up 10 ~ 60 second
curing time.
4. Light Curing: Depress the Lamp Switch to turn on the Halogen Bulb (Fig. 4). The
Halogen light turns off automatically when the setting time has elapsed. During any
of the curing time, the lamp can be turned off manually by depressing the switch.
5. Pause Action: Three seconds is a protective period for the bulb. Once you turn the
lamp on/off it can not be processed for three (3) seconds. (This design prolongs the
life of the bulb)
6. Beep: The unit will beep every 10 seconds as a reminder, longer beep when cycle
ending.
7. Fan Cooling: The fan will continue to revolve through the curing period and remain
on for three (3) minutes after the lamp turns off.
8. LED Flashing: Power indicator will flash every second the Lamp Switch is turned on
until the fan turns off.
9. Power off: Leave Main Switch on after curing time until finished to allow Fan motor
to run its automatic cooling cycle.
F. Noisy fan
Return unit for repair.
G. The buzzer is not working
Return unit for repair.
H. The timer is not correct
Return unit for repair.
I. The power indicator is
not lighting
1.
2.
3.
4.
No AC power input – Check power source.
LED is broken – Return unit for repair.
LED connection is loose – Return unit for repair.
Broken PC board – Return unit for repair.
Storage: If long-term storage is needed, please pack the unit in its original package and
Protect against humidity.
Shipment: Please keep original packaging in case the product has to be sent in for service.
Storage/Shipment conditions:
Temperature range: 0 c~+40c
Humidity range: 10%~90%
Atmospheric pressure range: 700~1060hpa
OMEGA 750II
1. Specifications
(1) Input Rating
(2) Fuse
(3) Classification
(4) Wave-length
(5) Intensity
(6) Dimension
(7) Weight
(8) Symbols
230V~or 200V~T O.5A, 50/60 Hz
115V~or 100V~T 1A, 50/60 Hz
T2A 2pcs. Included for 230V~unit
T3A 1 pcs included for 115V~unit
Class IIa, BF type
400-500nm
400-999 MW/cm²
W200xD140xH80 (mm)
2.5kg
A. “~” :Alternating current
B. "
" Attention, consult accompanying documents
2. DescriptionThe Omega 750II Blue Light is a visible curing unit programmed for
polymerization of light cured materials.
3. Before Operating unitRead all instructions in this User’s Manual before installation or
operation.
This manual contains instructions for assembly, operating instructions,
warnings and precautions, a problem solving guide, and discussion of actions
Lions Dental Supply 951-276-3225
3. RECOMMENDATION
1. In the first few seconds of curing time, it is better to keep the light guide distant from the
dental composite. This will prevent the composite from adhering to the light guide.
2. If composite adheres to light guide, remove with a non-sharp tool.
3. Light gun should be placed in gun holder after use.
4. Light gun & eye shield should be sterilized before and after each use.
5. Bulb, light guide, & eye shield should be the only parts replaced by user.
6. If the power indicator is not illuminated upon turning the unit on, check the power source.
7. Stop using the machine if any unusual operation happens during the operation of the unit.
8. Do not use the Curing Light as an illuminative device.
9. After a period of time in use the bulb will be very hot, do not touch or remove with bare hands.
10. Do not shine light directly into patients eyes. This may cause injury.
11. If the light guide is split, do not use. This may decrease the light energy and cause the composite
to cure improperly.
12. If the light guide is broken, replace with a new one.
13. Never look directly into light.
14. The Curing Light unit has passed the Safety and EMC test according to the requirements of
IEC60601-1.
4. MAINTENANCE
1. Disconnect the equipment from the power source before performing any maintenance.
2. Remove the power cord if the Curing light is not in use for an extensive period of time.
3. Maintenance and repair need to be done by trained personnel.
4. Fuse location: There are two fuse’s for the 230V~unit: one is put inside the power socket,
(Fig. 1, 115V&230V~unit) the other inside the power box. (Fig. 2, 230V~unit only)
How to change the fuse:
Fuse in the power socket: Pry the fuse holder with a flathead screwdriver and replace the fuse with a
new one.
Fuse in the power box: Remove the power box cover and find the black fuse holder. Turn the thin part
to the indentation which will loosen the fuse socket, take the fuse out and replace.
5. CLEANING AND STERILIZATION PROCEDURES
The light guide must be cleaned and sterilized prior to each use.
1. Using a steam autoclave for sterilization ensures that the accessories cannot become carrier’s for
infection or disease.
2. The Light Guide can be safely autoclaved: Saturate in 121C, 1kg/cm² for 30 minutes. Let cool 30
minutes before handling.
3. The accessories that are in close contact with patients should be wiped down in accordance with
standard disinfecting procedures.
4. Plastic Light Guide
A) The same effieiency as the Glass Light guide.
B) Dispose of the Plastic Guide if it is blurred or broken.
C) The Plastic Guide is non-autoclavable and prohibited from high temperature sterilizing.
D) It can be cleaned by surgical spirits/alcohol.
E) Test the light intensity with a light meter before operating.
(Reference Index>300: follow material manufacturer’s device
200~300: Prolong curing time
<200: Replace /or clean light guide
5. Aluminum Joint (for plastic guide)
A) Able to be sterilized by Autoclave or other disinfectant methods.
CAUTION! DO NOT USE ANY CLEANING AGENTS THAT CONTAIN
GLUTARALDEHYDE – IT ATTACKS ALL PLASTIC PARTS.
WE RECOMMEND SOAPY WATER OR A SOLUTION
CONTAINING 70% ISOPROPYL ALCOHOL.