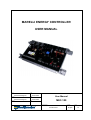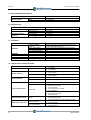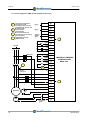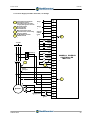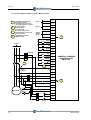
1
User Manual
English
MARELLI ENERGY CONTROLLER MEC-100
Regulation System for Three-phase Synchronous Generators
SIN.NT.023.5.ENG
This page is intentionally blank.
ENGLISH
PRELIMINARY INSTRUCTIONS
This Manual provides information about installation and operation of MEC-100 Regulation System.
It deals extensively with the following subjects:
General information.
Technical specifications.
Functional description.
Installation.
MEC-100 Interface System.
MEC-100 Interface System setting procedure.
Warranty, After Sales Service and Maintenance.
Several operations described in this manual are preceded by recommendations or symbols which alert
about possible risks of accidents. It is therefore important to understand the following symbols:
Refers to operations which may cause damage to the product, accessories or to the
components connected to the same. It also refers to procedures and operations which may
cause serious injury or death to persons.
Refers to immediate electrical dangers which may cause the death of persons.
WARNING: It is not the intention of this manual to cover all installation or connection
diagram variations, nor does this manual provide information for every possible
contingency. Only the technical information provided by Marelli Motori’s Technical
Personnel can integrate this Manual.
Should further information be required, please contact After Sales Department (see the
following reference).
AFTER MARKET DEPARTMENT
MARELLI MOTORI S.p.A.
Tel: +39 0444 479 775
Fax: +39 0444 479 757
E-mail: [email protected]
Web: www.marellimotori.com
SIN.NT.023.5
iii
ENGLISH
PRELIMINARY INSTRUCTIONS
PRELIMINARY INSTRUCTIONS
The CD-ROM provided together with the MEC-100 includes the utility for the installation of the MEC-100 Interface
System software, for setting and monitoring operations. The PC system has to match the following minimum
requirements.
Minimum PC System Requirements
Here below the minimum system requirements for the proper installation and utilization of the software are listed:
PC IBM compatible, Intel® Pentium® II (300MHz or higher recommended).
128MB of RAM (256MB or more recommended).
Microsoft Windows® OS.
CD-ROM drive.
RS-232 Serial port or USB port.
The provided CD-ROM includes also the MEC-100 User Manual files.
WARNING: Before to use the MEC-100 regulation device and/or install the MEC-100 Interface
System carefully read all the instructions included into the User Manual.
User Manual Consultation
In order to look the manual up, consider the following instructions:
Insert the CD-ROM disk provided with the MEC-100 into the PC CD-ROM drive.
Open the folder Manuals and click the manual file with the desired language.
Installing the MEC-100 Interface System
To install the MEC-100 Interface System in the PC, refer to Par. 5.2.
Commissioning - Warnings
WARNING: Unless prior agreement has been made with Marelli Motori, the initial start-up of a plant
with MEC-100 regulation unit MUST be always conducted by Marelli Motori personnel, strictly in
accordance with the provided connection diagrams. Any amendments to such diagrams must be
either made or approved by Marelli Motori.
Marelli Motori is under no liability for any damages which may occur to the AVR, the plant or the
persons, or for lost earnings, or financial loss, or system stoppages, due to either a start-up not
performed by a Marelli Motori's skilled personnel, and diagrams' modifications not carried out or
previously approved by Marelli Motori itself.
WARNING: Before doing any operations and/or any set-up on MEC-100, is to be taken into
consideration that lethal voltage is present at the top panel when the unit is energized. Top panel
connections and/or operations with or without tools should be made only when the unit is deenergized.
Should further information be required, please contact:
AFTER MARKET DEPARTMENT
MARELLI MOTORI S.p.A.
Tel: +39 0444 479 775
Fax: +39 0444 479 757
E-mail: [email protected]
Web: www.marellimotori.com
iv
SIN.NT.023.5
ENGLISH
PRELIMINARY INSTRUCTIONS
REVISION HISTORY
The following tables are the lists of hardware, firmware, software and manual revisions of the MEC-100, listed in
chronological order.
Part Number
M71FA300A
Version
Hardware
Firmware
Software
Date
Change
st
1 series
nd
2 series
rd
3 series
1.01
1.02
07/07
09/07
09/08
07/07
10/07
1.03
08/08
1.04
1.05
1.0 v5
1.0 v6
1.0 v7
1.0 v8
09/08
10/08
07/07
09/07
11/07
03/08
Initial release
Revised current sensing
Revised surge suppressors
Initial release
Improvements to Underfrequency Limiter options
Improvements to transient performances from parallel operation to single
unit operation
Decreased time delay of contact PF/VAR
Reviewed START contact
Initial release
Added Italian and English language User Manuals
Added auxiliary input display
Revised English language version
Part Number
M71FA310A - M71FA320A
Version
a
Date
Change
Hardware
3 serie
03/09
Initial release
Firmware
2.00
03/09
Initial release
3.0 v2
03/09
Initial release
3.0 v3
08/09
Revised printing tools
Software
MEC-100 Series
Manuals
Manual
SIN.NT.023.5
Version
Date
Change
Rev.0
07/07
Rev.1
09/08
Rev.2
Rev.3
Rev.4
11/08
02/09
03/09
Rev.5
07/09
Initial release
Revision 0 corrections
Added user instructions of the De-excitation Contact with MEC-100
Revision 1 corrections
Revision 2 corrections
Added Diode Monitoring Function and Field Current Regulation Mode
Additional installation instructions: De-excitation (Shutdown) contact
use, restrictions and EMC immunity
Additional instructions for UP/DOWN contacts: operating modes and
restrictions
Additional instructions for RESET contact for M71FA300A code
v
ENGLISH
PRELIMINARY INSTRUCTIONS
This page is intentionally blank.
vi
SIN.NT.023.5
MARELLI ENERGY CONTROLLER
USER MANUAL
Issued
Date
Stefano Massignani
Checked
22/04/2009
User Manual
Date
Stefano Massignani
Approved
23/04/2009
MEC-100
Date
Language
Document Number
SIN.NT.023.5
English
Pages
73
This page is intentionally blank.
ENGLISH
CONTENTS
CONTENTS
Minimum PC System Requirements..................................................................................................................... iv
Installing the MEC-100 Interface System ............................................................................................................. iv
1. GENERAL INFORMATION.................................................................................................... 7
1.1. iNTRODUCTION – MEC-100 SERIES ............................................................................................................... 7
1.2. MEC-100 SERIES CHARACTERISTICS............................................................................................................ 7
1.2.1. Functions ..................................................................................................................................................... 7
1.2.2. Inputs........................................................................................................................................................... 7
1.2.3. Outputs ........................................................................................................................................................ 8
1.2.4. Human-Machine Interface ........................................................................................................................... 8
1.3. DEVICE SELECTION ......................................................................................................................................... 8
2. TECHNICAL SPECIFICATIONS ............................................................................................ 9
2.1. SUPPLY AND POWER ...................................................................................................................................... 9
2.2. GENERATOR VOLTAGE SENSING .................................................................................................................. 9
2.3. NETWORK VOLTAGE SENSING ...................................................................................................................... 9
2.4. GENERATOR CURRENT SENSING ................................................................................................................. 9
2.5. ANALOGUE AUXILIARY INPUTS .................................................................................................................... 10
2.6. EXCITER FIELD ............................................................................................................................................... 10
2.7. ACCURACY ..................................................................................................................................................... 10
2.8. LIMITERS AND OTHER FUNCTIONS ............................................................................................................. 10
2.9. PROTECTIONS................................................................................................................................................ 11
2.10. CONTACTS .................................................................................................................................................... 11
2.11. ENVIRONMENT ............................................................................................................................................. 12
2.12. PHYSICAL SPECIFICATIONS ....................................................................................................................... 12
2.13. EMC................................................................................................................................................................ 12
3. FUNCTIONAL DESCRIPTION............................................................................................. 13
3.1. INTRODUCTION .............................................................................................................................................. 13
3.2. POWER AND CARD SUPPLY (P1-P2-P3) ...................................................................................................... 13
3.3. OPERATING MODES ...................................................................................................................................... 13
3.3.1. AVR (Automatic Voltage Regulation) Mode............................................................................................... 13
3.3.2. PF (Power Factor Regulation) Mode ......................................................................................................... 13
3.3.3. VAR (Reactive Power Regulation) Mode................................................................................................... 13
3.3.4. FCR (Field Current Regulation) Mode ....................................................................................................... 14
SIN.NT.023.5
3
ENGLISH
CONTENTS
3.4. ANALOGUE INPUTS (S1-S2-S3) .................................................................................................................... 14
3.4.1. Generator Voltage Sensing ....................................................................................................................... 14
3.4.2. Generator Current Sensing (A1-A5-B) ...................................................................................................... 14
3.4.3. Network Voltage Sensing (L1-L2).............................................................................................................. 14
3.4.4. Analogue Auxiliary Inputs (E1-E2-M) ........................................................................................................ 14
3.5. INPUT CONTACTS.......................................................................................................................................... 15
3.5.1. START (C1 Contact) ................................................................................................................................. 15
3.5.2. STOP (C2 Contact) ................................................................................................................................... 15
3.5.3. UP (C3 Contact) ........................................................................................................................................ 16
3.5.4. DOWN (C4 Contact).................................................................................................................................. 16
3.5.5. PAR (C5 Contact)...................................................................................................................................... 16
3.5.6. PF/VAR (C6 Contact) ................................................................................................................................ 17
3.5.7. VMATCH (C7 Contact).............................................................................................................................. 17
3.5.8. FCR (C8 Contact, except for M71FA300A model) .................................................................................... 17
3.5.9. RESET (C8 Contact, only for M71FA300A model).................................................................................... 17
3.6. MEC-100 PROTECTIONS ............................................................................................................................... 18
3.6.1. Field Over-voltage Protection.................................................................................................................... 18
3.6.2. Field Over-current Protection .................................................................................................................... 18
3.6.3. Generator Over-voltage Protection............................................................................................................ 18
3.6.4. Generator Under-voltage Protection.......................................................................................................... 18
3.6.5. Generator Over-current Protection ............................................................................................................ 19
3.6.6. Loss of Sensing Protection........................................................................................................................ 19
3.6.7. Diode Failure Monitoring ........................................................................................................................... 20
3.7. LIMITATION FUNCTIONS ............................................................................................................................... 21
3.7.1. Under-frequency Limiter............................................................................................................................ 21
3.7.2. Over-excitation Limiter .............................................................................................................................. 22
3.7.3. Under-excitation Limiter ............................................................................................................................ 23
3.7.4. Inrush Current Limiter................................................................................................................................ 24
3.8. PROGRAMMABLE RELAYS............................................................................................................................ 24
3.9. REACTIVE DROOP COMPENSATION ........................................................................................................... 24
3.10. SOFT-START................................................................................................................................................. 24
3.11. SETTING THE P.I.D. PARAMETERS ............................................................................................................ 25
3.11.1. Proportional, Integral and Derivative Controllers ..................................................................................... 25
3.11.2. Derivative Adjustments............................................................................................................................ 26
3.11.3. P.I.D. in PF/VAR Modes.......................................................................................................................... 26
3.12. DE-EXCITATION (SHUTDOWN) CONTACT: INSTRUCTIONS .................................................................... 26
4. INSTALLATION................................................................................................................... 27
4.1. INTRODUCTION.............................................................................................................................................. 27
4.2. MOUNTING...................................................................................................................................................... 27
4
SIN.NT.023.5
CONTENTS
ENGLISH
4.3. SERIAL COMMUNICATION AND PRELIMINARY SET-UP ............................................................................. 27
4.4. IMPORTANT NOTES CONCERNING CONNECTIONS - RESTRICTIONS..................................................... 28
4.5. CONNECTIONS (TYPICAL)............................................................................................................................. 31
4.5.1. Power Supply from Auxiliary Winding ........................................................................................................ 31
4.5.2. Power Supply from PMG (Permanent Magnet Generator) ........................................................................ 32
4.5.3. Power Supply from Main Terminals, Low Voltage ..................................................................................... 33
4.5.4. Power Supply from Main Terminals, Medium Voltage ............................................................................... 34
5. MEC-100 INTERFACE SYSTEM ......................................................................................... 35
5.1. INTRODUCTION .............................................................................................................................................. 35
5.2. INSTALLING MEC-100 INTERFACE SYSTEM................................................................................................ 35
5.2.1. Minimum System Requirements ................................................................................................................ 35
5.2.2. Installing the MEC-100 Interface System................................................................................................... 35
5.2.3. Starting the Program ................................................................................................................................. 35
5.2.4. Uninstalling the MEC-100 Interface System .............................................................................................. 36
5.2.5. Connection Between MEC-100 and PC..................................................................................................... 36
5.3. START-UP........................................................................................................................................................ 36
5.3.1. Acceptance of the General Contract Conditions........................................................................................ 36
5.3.2. Description of the Work Window................................................................................................................ 37
5.3.3. Establishing a Communication Link ........................................................................................................... 38
5.4. PASSWORD MANAGEMENT .......................................................................................................................... 39
5.4.1. Entering Password..................................................................................................................................... 39
5.4.2. Changing Password................................................................................................................................... 39
5.5. CHANGING THE SYSTEM SETTINGS............................................................................................................ 40
5.6. SAVING AND RETRIEVING A SET OF PARAMETERS.................................................................................. 41
5.6.1. Saving a Set of Parameters....................................................................................................................... 41
5.6.2. Loading a Set of Parameters ..................................................................................................................... 41
5.6.3. Checking a Set of Parameters Off-line ...................................................................................................... 42
5.6.4. Printing a Set of Parameters...................................................................................................................... 42
5.7. DEFINITION OF CONFIGURABLE PARAMETERS......................................................................................... 43
5.7.1. System Parameters ................................................................................................................................... 44
5.7.2. Sensing...................................................................................................................................................... 45
5.7.3. Setpoint ..................................................................................................................................................... 46
5.7.4. Other Settings............................................................................................................................................ 48
5.7.5. Stability (P.I.D. Settings)............................................................................................................................ 49
5.7.6. Limiters ...................................................................................................................................................... 50
5.7.7. Field Protections ........................................................................................................................................ 51
5.7.8. Generator Protections................................................................................................................................ 52
5.7.9. Diode Monitoring ....................................................................................................................................... 53
SIN.NT.023.5
5
ENGLISH
CONTENTS
5.8. SYSTEM MONITORING .................................................................................................................................. 55
5.8.1. Electrical System Parameters ................................................................................................................... 55
5.8.2. System Status ........................................................................................................................................... 55
5.8.3. Alarm Status.............................................................................................................................................. 55
5.8.4. Auxiliary Parameter Display ...................................................................................................................... 56
5.8.5. Phase Graphical Display ........................................................................................................................... 56
5.8.6. Oscillographic Display ............................................................................................................................... 56
5.8.7. Power Diagram.......................................................................................................................................... 57
6. SET-UP PROCEDURE ........................................................................................................ 58
6.1. MEC-100 INTERFACE SYSTEM INSTALLATION........................................................................................... 58
6.2. PREPARAZIONE DEL MEC-100 ..................................................................................................................... 58
6.3. STARTING THE PROGRAM............................................................................................................................ 59
6.4. ESTABLIGHING A COMMUNICATION LINK................................................................................................... 59
6.5. ENTERING THE PASSWORD......................................................................................................................... 60
6.6. CONFIGURE THE SYSTEM SETTING............................................................................................................ 60
6.7. SAVING A SET OF PARAMETERS................................................................................................................. 68
7. WARRANTY, AFTER SALES SERVICE AND MAINTENANCE ......................................... 69
7.1. WARRANTY..................................................................................................................................................... 69
7.2. PREVENTIVE MAINTENANCE........................................................................................................................ 69
7.3. AFTER SALES SERVICE ................................................................................................................................ 69
6
SIN.NT.023.5
ENGLISH
GENERAL INFORMATION
1. GENERAL INFORMATION
1.1. iNTRODUCTION – MEC-100 SERIES
The Marelli Motori Digital Regulation Systems included in MEC-100 series are microprocessor-based electronic
devices for the set-up and monitoring of the excitation system of Marelli generators with frame size ranging
between 400 and 800. The configurability of the system and control parameters makes the MEC-100 series
regulators flexible and suitable for a wide range of applications. These regulators are completely resin-bonded
and isolated to keep a high operating reliability even in difficult working conditions (high levels of humidity, dust,
salty atmosphere) and in presence of vibrations.
1.2. MEC-100 SERIES CHARACTERISTICS
1.2.1. Functions
Four operating modes:
•
Automatic voltage regulation (AVR Mode).
•
Power Factor Regulation (PF Mode).
•
Reactive Power Regulation (VAR Mode).
•
Field Current Regulation (FCR Mode).
Stability parameters which can be individually set (P.I.D.) or predefined standard parameterizations.
Soft start with a ramp which can be set, in AVR Mode.
Generators parallel operation by means of Reactive Droop Compensation.
Generator protections:
•
Field over-voltage.
•
Field over-current.
•
Generator over-voltage.
•
Generator under-voltage.
•
Generator over-current.
•
Loss of voltage sensing.
•
Diode Failure Monitoring.
Excitation limiters (over-excitation and under-excitation).
Under-frequency limiter.
Internal Inrush Current limiter.
1.2.2. Inputs
Generator voltage single-phase or three-phase sensing.
Current sensing on single phase (1A or 5A).
Network voltage single-phase sensing.
2 auxiliary analogue inputs (4-20mAdc) for the setpoint remote control.
8 contacts for external interface.
SIN.NT.023.5
7
ENGLISH
GENERAL INFORMATION
1.2.3. Outputs
PWM output up to a maximum of 15A in continuous current.
2 programmable output relays for signalling the occurred alarm.
1.2.4. Human-Machine Interface
An RS-232 communication port to interface with PC through MEC-100 Interface System software.
MEC-100 Interface System software for Windows® to set the generator adjustment and control parameters.
1.3. DEVICE SELECTION
The part number and the name, together with the proper suffix, describe the options included in the specific
device.
Here below the selection tables:
STYLE NUMBER SELETION
DEVICE MODEL
NAME
SUFFIX
PART NUMBER
-
MEC-100
-
M71FA300A
Basic
MEC-100
B
M71FA310A
With Diode Monitoring
MEC-100
D
M71FA320A
FEATURE
AVR
FCR
PFR
VAR
P.I.D. parameterization
Soft start
Reactive Droop Compens.
Field over-voltage
Field over-current
Generator over-voltage
Generator under-voltage
Generator over-current
Loss of voltage sensing
Diode Failure Monitoring
Over-excitation Limiter
Under-excitation Limiter
Under-frequency Limiter
Internal Inrush Current Lim.
2 analogue inputs 4-20mA
8 digital inputs
Human Machine Interface
OPTIONS GUIDE
M71FA300A
M71FA310A
M71FA320A
Example: to order a MEC-100 with diode monitoring, the following model must be required:
MEC-100 D M71FA320A
8
SIN.NT.023.5
ENGLISH
TECHNICAL SPECIFICATIONS
2. TECHNICAL SPECIFICATIONS
2.1. SUPPLY AND POWER
PARAMETER
DATA
Single-phase
Three-phase
Auxiliary winding
Mains
PMG
External supply
AC: 50 to 277Vac (@ 50 to 400Hz)
DC: 60 to 400Vdc
≥5Vac
Connection type
Supply type
Supply voltage type
Voltage build-up
2.2. GENERATOR VOLTAGE SENSING
PARAMETER
DATA
Single-phase
Three-phase
From 100Vac to 500Vac, at 50/60Hz
Connection type
Voltage Range
2.3. NETWORK VOLTAGE SENSING
PARAMETER
Connection type
Voltage Range
DATA
Single-phase
From 100Vac to 500Vac, at 50/60Hz
2.4. GENERATOR CURRENT SENSING
PARAMETER
Generator current
sensing on W phase
SIN.NT.023.5
Available inputs
Current range
DATA
1 channel with 2 available ranges
1Aac (@ 50/60Hz)
5Aac (@ 50/60Hz)
9
ENGLISH
TECHNICAL SPECIFICATIONS
2.5. ANALOGUE AUXILIARY INPUTS
PARAMETER
Auxiliary inputs
Available inputs
Range
DATA
2 channels
4 to 20 mAdc
Minimum value
Current range
Voltage range
Current range
Voltage range
DATA
2Ω
0 to 10 Adc
0 to 60 Vdc
0 to 20 Adc
0 to 120 Vdc
Voltage regulation
accuracy
Steady state stability
Thermal drift
V/Hz: voltage accuracy
Response time
Accuracy
Accuracy
Accuracy
Accuracy
DATA
±0.25% over load range at rated power factor and
constant generator frequency
±0.1% at constant load and generator frequency
±0.5% for a 30°C change in 10 minutes
±2%
<1 cycle
±2%
±2%
±2%
±0,5%
2.6. EXCITER FIELD
PARAMETER
Field resistance
Continuative operation
10 seconds forcing
operation
2.7. ACCURACY
PARAMETER
AVR Mode
FCR Mode
PF Mode
VAR Mode
Voltage matching
2.8. LIMITERS AND OTHER FUNCTIONS
PARAMETER
Soft start
Time adjust range
Minimum threshold
Voltage matching
Maximum threshold
Parallel operation
Type
Reactive droop compensation
Range
0 to 10%
Type
Inverse time curve
Over-excitation limiter
Thresholds
Under-excitation limiter
Range
Corner frequency
Under-frequency limiter
Zero Volt frequency
10
DATA
1 to 3600s
1s increment
90 to 100% of the rated generator voltage
1% increment
100 to 110% of the rated generator voltage
1% increment
1 maximum threshold
Range from 0 to 25A
0.1A increment
Time delay from 0 to 600s
0.1s increment
1 maximum continuative threshold
Range from 0 to 15A
0.1A increment
Setpoint setting from 0 to 50% of the maximum
rated reactive power.
Curve defined by MEC-100 Interface System.
40 to 60Hz
0.1Hz increment
0 to 40Hz
0.1Hz increment
SIN.NT.023.5
ENGLISH
TECHNICAL SPECIFICATIONS
2.9. PROTECTIONS
PARAMETER
Field over-voltage
Range of voltage
threshold
Alarm time delay
Field over-current
Range of current
threshold
Alarm time delay
Generator over-voltage
Range of voltage
threshold
Alarm time delay
Generator under-voltage
Range of voltage
threshold
Alarm time delay
Type
Generator over-current
Thresholds and alarm
time delay
Loss of sensing
Alarm time delay
Diode Monitoring
Excitation current ripple
levels and time delays
DATA
0 to 200Vdc
1Vdc increment
0 a 300s
0.1s
0 to 15Adc
0.1Adc increment
0 to 10s
0.1s increment
100 to 150% of the rated generator voltage
1% increment
0 to 300s
0.1s increment
0 to 100% of the rated generator voltage
1% increment
0 to 300s
0.1s increment
Inverse time curve
<1s
1 maximum threshold
Range from 0 to 120% of the rated stator current
1% increment
Time delay from 0 to 3600s
1s increment
1 maximum continuative threshold
Range from 0 to 110% of the rated stator current
1% increment
1 low failure level
Range from 0 to 100% of the rated excitation
current
1% increment
Time delay from 0 to 100s
1s increment
1 high failure level
Range from 0 to 100% of the rated excitation
current
1% increment
Time delay from 0 to 10s
1s increment
2.10. CONTACTS
PARAMETER
Type
Input contacts
Function
Function
Rated data
Output relays
Max switched voltage
Max switched current
Max switched power
SIN.NT.023.5
DATA
Dry contacts, only for devices equipped with
galvanically insulated outputs
START (excitation start contact)
STOP (excitation stop contact)
UP (increase setpoint)
DOWN (decrease setpoint)
PAR (enable par. operation with gen.)
PF/VAR (enable VAR/PF regulation)
VMATCH (enable voltage matching)
FCR (enable FCR mode)
Relays individually associated to alarm functions
1A @ 120Vac / 24Vdc resistive
AC: 120V
DC: 60V
1A
120VA, 30W
11
ENGLISH
TECHNICAL SPECIFICATIONS
2.11. ENVIRONMENT
PARAMETER
Operating temperature
Storage temperature
Range
Range
DATA
-30 to +70°C
-40 to +80°C
2.12. PHYSICAL SPECIFICATIONS
PARAMETER
Weight
Dimensions
Total weight
Length
Width
Height
DATA
1973g
353.0mm
183.5mm
52.5mm
2.13. EMC
Emission:
Reference standard EN 61000-6-3 (2001) + EN 61000-6-3/A11 (2004)
Test specifications
Environmental Phenomena
Result
EN 55022
EN 55022
EN 55014-1
EN 61000-3-2
EN 61000-3-3
Conducted disturbance
Radiated disturbance
Discontinuous disturbance voltage
Harmonic current emissions
Voltage fluctuations and flicker
Complies
Complies
Complies
Complies
Complies
Immunity:
Reference standard EN 61000-6-2 (2005)
Test specifications
Environmental Phenomena
Result
EN 61000-4-2
EN 61000-4-3
EN 61000-4-4
EN 61000-4-5
EN 61000-4-6
EN 61000-4-8
EN 61000-4-11
Electrostatic discharge
Radiated electromagnetic field
Electrical fast transients
Surge
Injected currents
Power frequency magnetic field
Dips/short interruptions
Complies
Complies
Complies
Complies
Complies
N.A. (+)
Complies
(+)
Apparatus does not contain devices susceptible to magnetic fields
The compatibility test results according to the 89/336 EEC and 2004/108 EC Directives and subsequent amendments.
12
SIN.NT.023.5
ENGLISH
FUNCTIONAL DESCRIPTION
3. FUNCTIONAL DESCRIPTION
3.1. INTRODUCTION
In the following section a short description of the functions implemented by the MEC-100 and the relevant limits
of use is provided. Before using the MEC-100 on any generator, make sure to read carefully and be familiar with
all instructions contained in this documentation. If you need more information, please contact the Marelli
Technical Support (see Section 6).
3.2. POWER AND CARD SUPPLY (P1-P2-P3)
The MEC-100 accepts (terminals P1-P2-P3) a supply single-phase or three-phase alternating voltage ranging
between 50 and 277V approximately with a frequency from 50 to 400Hz. The voltage can be obtained from the
main machine terminals, the auxiliary winding or the PMG: it is rectified, filtered and used to energize the internal
card circuitry and provide, through the chopper output stage, the power necessary for the appropriate generator
excitation.
MEC-100 also accepts a supply continuous voltage included between 60 and 400V.
3.3. OPERATING MODES
3.3.1. AVR (Automatic Voltage Regulation) Mode
In this operating mode, the MEC-100 allows to adjust the generator voltage.
At the START (see Par. 3.5.1), and FCR contact open (C8 contact, see Par. 3.5.8), the MEC-100 always
operates in AVR Mode and in this mode all the provided functions are active, excepted for the Under-excitation
Limiter (see Par. 3.7.3).
3.3.2. PF (Power Factor Regulation) Mode
In this operating mode, the MEC-100 allows to adjust the power factor.
The activation of the PF Mode is obtained by closing the PF/VAR input contact (C6 contact, see Par. 3.5.6), after
enabling the same mode during the first configuration step (see Par. 5.7.1). In the PF Mode also the Underexcitation Limiter is active (see Par. 3.7.3).
3.3.3. VAR (Reactive Power Regulation) Mode
In this operating mode, the MEC-100 allows to adjust the reactive power.
The activation of the VAR Mode is obtained by closing the PF/VAR input contact (C6 contact, see Par. 3.5.6),
after enabling the same mode during the first configuration step (see Par. 5.7.1). In the VAR Mode also the
Under-excitation Limiter function is active (see Par. 3.7.3).
SIN.NT.023.5
13
ENGLISH
FUNCTIONAL DESCRIPTION
3.3.4. FCR (Field Current Regulation) Mode
In this operating mode, the MEC-100 allows to adjust the excitation current.
The activation of the FCR Mode can be obtained by closing the FCR input contact (C8 contact, see Par. 3.5.8).
3.4. ANALOGUE INPUTS (S1-S2-S3)
3.4.1. Generator Voltage Sensing
The MEC-100 offers a wide range of measurement for the generator voltage. You can connect the three sensing
terminals (S1-S2-S3) directly to the main machine terminals for the following range: from 100Vac to 500Vac, at
50 - 60Hz frequencies (see Par. 2.2).
For applications with rated generator voltages higher than 500V you need to interpose a step-down transformer,
with rated secondary voltage included in the ranges indicated in the relevant specifications.
For the sensing both the single-phase and three-phase connection configurations are provided. In the case of
single-phase sensing, the voltage sensed is the line-to-line voltage between the phases U and V (UUV).
This input is internally insulated.
3.4.2. Generator Current Sensing (A1-A5-B)
The MEC-100 is equipped with a double channel for the sensing of the generator current: a 1A channel (A1-B)
and a 5A channel (A5-B), at 50-60Hz frequency, to be connected to a current step-down transformer with a
transformation ratio IN/1 or IN /5, where IN is the rated generator current. The phase whose current value is
measured is the W phase.
This input is internally insulated.
3.4.3. Network Voltage Sensing (L1-L2)
The MEC-100 offers a wide range of measurement for the network voltage. The two sensing terminals (L1-L2)
can be directly connected to the supply voltage for the following range: from 100Vac to 500Vac, at 50 - 60Hz
frequencies (see Par. 2.3).
For applications with supply voltages higher than 500V a step-down transformer must be interposed, with rated
secondary voltage included in the ranges indicated in the relevant specifications.
The only single-phase connection configuration is provided.
This input is internally insulated.
3.4.4. Analogue Auxiliary Inputs (E1-E2-M)
The MEC-100 is provided with two auxiliary inputs to control the voltage, power factor, reactive power and
st
nd
excitation current setpoints by means of an external device (1 In.: terminals E1-M; 2 In.: terminals E2-M).
These inputs can be used by applying a 4-20mA current and they can be individually associated to two
regulation Modes.
To the control current range corresponds the range established during set-up for the relative associated setpoint
(see Par. 5.7.3).
For example, if voltage setpoint limits are set to 80 and 120% of the generator rated voltage, 4mA will be associated to the
minimum limit (80%) and 20mA to the maximum limit (120%), and all the intermediate values of the generator voltage setpoint
will proportionally correspond to the current values between 4 and 20mA.
WARNING: THESE INPUTS ARE NOT INTERNALLY INSULATED.
The external device to which these inputs should be connected must be equipped with a
galvanically insulated output. Marelli Motori is under no liability for any damages which may
occur to the AVR, the plant or the persons, or for lost earnings, or financial loss, or system
stoppages, due to no insulation between MEC-100 and other external device connected to
these inputs.
14
SIN.NT.023.5
FUNCTIONAL DESCRIPTION
ENGLISH
3.5. INPUT CONTACTS
The MEC-100 is equipped with 8 input contacts for the operational control of the regulation modes. Here below
the description of the functions related to these contacts is provided.
WARNING: THESE INPUTS ARE NOT INTERNALLY INSULATED.
The external device to which these inputs should be connected must be equipped with a
galvanically insulated output. Marelli Motori is under no liability for any damages which may
occur to the AVR, the plant or the persons, or for lost earnings, or financial loss, or system
stoppages, due to no insulation between MEC-100 and other external device connected to
these inputs.
3.5.1. START (C1 Contact)
Excitation start contact (normally open, switch logic): when this contact is closed, the MEC-100 supplies power
to the exciter field and continues to do so until the contact remains closed. When this contact is opened, the
power supply to the exciter field is stopped.
If the excitation is present (START contact closed) and the temporary STOP contact is closed (see Par. 3.5.2),
the START contact is disabled and to supply the excitation power again it is necessary first to open and then reclose the START contact (with STOP opened).
When the START contact is closed, the LED corresponding to the Excitation State item in the system status
window in System Monitoring (see Par. 5.8.2) becomes green.
WARNING: START CONTACT MUST NOT BE CONSIDERED OR USED AS EMERGENCY
AND/OR SAFETY DEVICE.
START contact has only an operating function, it can not be considered or used as emergency
and/or safety device. Marelli Motori is under no liability for any damages which may occur to
the AVR, the plant or the persons, or for lost earnings, or financial loss, or system stoppages,
due to a not allowed use of START contact.
3.5.2. STOP (C2 Contact)
Excitation stop contact (normally open, momentary pushbutton logic): when this contact is temporarily closed,
the MEC-100 stops the power supply to the exciter field. When the stop command is given, the MEC-100 does
not supply the exciter field e the contact can be left again. This input is priority to the START contact.
If the excitation is present (START contact closed) and the temporary STOP contact is temporarily closed, the
START contact is disabled and to supply the excitation power again it is necessary first to open and then reclose the START contact (with STOP opened).
When the STOP contact is closed, the LED corresponding to the Operating Status item in the system status
window in System Monitoring (see Par. 5.8.2) turns off.
STOP can be associated to the de-excitation (shutdown) contact (see Par. 3.12)
WARNING: STOP CONTACT MUST NOT BE CONSIDERED OR USED AS EMERGENCY
AND/OR SAFETY DEVICE.
STOP contact has only an operating function, it can not be considered or used as emergency
and/or safety device. Marelli Motori is under no liability for any damages which may occur to
the AVR, the plant or the persons, or for lost earnings, or financial loss, or system stoppages,
due to a not allowed use of STOP contact.
SIN.NT.023.5
15
ENGLISH
FUNCTIONAL DESCRIPTION
3.5.3. UP (C3 Contact)
Active operational setpoint increasing contact (normally open, momentary pushbutton logic):
AVR Mode: increases the generator voltage setpoint.
PF Mode: if the power factor setpoint is of inductive type, decreases the power factor; if the setpoint is of
capacitive type, increases the power factor.
VAR Mode: increases the reactive power setpoint.
FCR Mode: increases the excitation current setpoint.
The setpoint increase is strictly related to the range established for the setpoint (see Par. 5.7.3) and the variation
speed (or traverse rate, see Par. 5.7.4).
It is assumed that the inductive reactive power is of positive sign and the capacitive reactive power of negative sign. In parallel
with the network (PF Mode or VAR Mode active) the UP contact increases the reactive power value so as to obtain the desired
power factor or reactive power setpoint depending on the selected regulation Mode.
WARNING: THE UP CONTACT CAN NOT BE USED FOR ENDLESS REPETITIVE
PURPOSES.
The UP contact can only perform a current setpoint change for spot operations; the endless
repetitive use of the contact is forbidden. If a continuous setpoint matching is required, the
auxiliary analogue inputs E1-E2-M must always be used (see Par. 3.4.4).
3.5.4. DOWN (C4 Contact)
Active operational setpoint decreasing contact (normally open, momentary pushbutton logic):
AVR Mode: decreases the generator voltage setpoint.
PF Mode: if the power factor setpoint is of inductive type, increases the power factor; if the setpoint is of
capacitive type, decreases the power factor.
VAR Mode: decreases the reactive power setpoint.
FCR Mode: decreases the excitation current setpoint.
The setpoint decrease is strictly related to the range established for the setpoint (see Par. 5.7.3) and the
variation speed (traverse rate, see Par. 5.7.4).
It is assumed that the inductive reactive power is of positive sign and the capacitive reactive power of negative sign. In parallel
with the network (PF Mode or VAR Mode active) the DOWN contact decreases the reactive power value so as to obtain the
desired power factor or reactive power setpoint depending on the selected regulation Mode.
WARNING: THE DOWN CONTACT CAN NOT BE USED FOR ENDLESS REPETITIVE
PURPOSES.
The DOWN contact can only perform a current setpoint change for spot operations; the
endless repetitive use of the contact is forbidden. If a continuous setpoint matching is required,
the auxiliary analogue inputs E1-E2-M must always be used (see Par. 3.4.4).
3.5.5. PAR (C5 Contact)
Generators parallel enabling contact (normally open, switch logic): this input activates the Droop mode for
paralleling one or more generators (for the Droop function see Par. 3.9). When this contact is closed the
excitation limiters, provided for the operating mode in parallel, are enabled and the voltage matching function is
disabled (see Par. 3.5.7).
When the PAR contact is closed, the LED corresponding to the Reactive Droop Compensation item in the
system status window in System Monitoring (see Par. 5.8.2) becomes green.
WARNING: CONTACT PAR MUST ALWAYS BE TURNED OFF (C5 OPEN) BEFORE
STOPPING THE GENERATOR.
16
SIN.NT.023.5
FUNCTIONAL DESCRIPTION
ENGLISH
3.5.6. PF/VAR (C6 Contact)
PF/VAR Mode enabling contact (normally open, switch logic): this input activates the PF (Power Factor) or VAR
(Reactive Power) regulation Mode (depending on the previously selected Mode, see Par. 5.7.1), for the mains
parallel operations. When this contact is closed the excitation limiters, provided for the operating mode in
parallel, are enabled and the voltage matching function is disabled (see Par. 3.5.7).
When the PF/VAR contact is closed, the LED corresponding to the Parallel with Line item in the system status
window in System Monitoring (see Par. 5.8.2) becomes green.
3.5.7. VMATCH (C7 Contact)
Voltage matching enabling contact (normally open, switch logic): this input enables the voltage matching
function from the MEC-100; if the network voltage value measured by the MEC-100 is included in the range of
set values (values referred to the generator rated voltage, see Par. 5.7.4), the generator voltage setpoint is
automatically modified from the pre-established value to the network voltage value in a fixed time interval of 1015 seconds approximately.
When the PAR or the PF/VAR contact is closed the voltage matching function is disabled and remains disabled
until both the PAR and PF/VAR contacts are opened.
When the VMATCH contact is closed (and both the PAR and PF/VAR contacts are disabled), the LED
corresponding to the Voltage Matching item in the system status window in System Monitoring (see Par. 5.8.2)
becomes green.
3.5.8. FCR (C8 Contact, except for M71FA300A model)
FCR enabling contact (normally open, switch logic): this input enables the FCR Mode for excitation current
regulation (Field Current Regulation, see Par. 3.4.4).
FCR Mode can be automatically selected in case of loss of sensing and Shutdown Mode enabled (see. Par.
5.7.8), and it does not depend on the status of FCR contact.
When the FCR function is operating, the LED corresponding to the Field Current Regulation FCR item in the
system status window in System Monitoring (see Par. 5.8.2) becomes green.
WARNING: BE CAREFUL IN THE USE OF THE FCR MODE.
The excitation current value in FCR mode must be chosen considering the generator
specifications and the operations to do: a too high excitation current value can lead to overexcitation and/or overvoltage conditions dangerous for the generator and/or the plant
(incautious use). A initial low value is suggested, not higher than the excitation current in
no load condition. Marelli Motori is under no liability for any damages which may occur to the
AVR, the plant or the persons, or for lost earnings, or financial loss, or system stoppages, due
to an incautious use of FCR mode.
3.5.9. RESET (C8 Contact, only for M71FA300A model)
Alarm reset contact (normally open, momentary pushbutton logic): this input allows to reset all active alarms as
a result of the intervention of one or more protections or limitations.
The alarm reset should usually be operated after the intervention on the system to remove the causes of the alarm condition.
If the system is still working and the alarm causes have not been removed, the RESET contact interrupts the alarms for about
a second, after which they are reactivated.
SIN.NT.023.5
17
ENGLISH
FUNCTIONAL DESCRIPTION
3.6. MEC-100 PROTECTIONS
The MEC-100 offers 7 protection functions which consist in transmitting externally a warning, of visual type,
through MEC-100 Interface System, and/or of signal type, by associating this last to a relay.
3.6.1. Field Over-voltage Protection
When the measured field voltage increases above a value threshold which can be set, for a time interval whose
length can be established, the field over-voltage protection is activated.
The activation of this protection is accompanied by a visual warning in the MEC-100 Interface System (Field
Overvoltage Protection item flashing, see Par. 5.8.3) and optionally can be associated to one of the two
programmable output relays.
The activation voltage threshold can be set between 0 and 200Vdc with increases of 1Vdc and the operation
time (measured by an internal timer) between 0 and 300s with increases of 0.1s. When the voltage falls below
the defined threshold, the protection timer is reset to zero.
This function can be enabled/disabled.
3.6.2. Field Over-current Protection
When the measured field current increases above a value threshold which can be set, for a time interval whose
length can be established, the field over-current protection is activated.
The activation of this protection is accompanied by a visual warning in the MEC-100 Interface System (Field
Overcurrent Protection item flashing, see Par. 5.8.3), and optionally can be associated to one of the two
programmable output relays.
The activation current threshold can be set between 0 and 15Adc with increases of 0.1Adc and the operation
time (measured by an internal timer) between 0 and 10s with increases of 0.1s. When the current falls below the
defined threshold, the protection timer is reset to zero.
This function can be enabled/disabled.
3.6.3. Generator Over-voltage Protection
When the measured generator voltage increases above a value threshold which can be set, for a time interval
whose length can be established, the generator over-voltage protection is activated.
The activation of this protection is accompanied by a visual warning in the MEC-100 Interface System
(Generator Overvoltage Protection item flashing, see Par. 5.8.3), and optionally can be associated to one of the
two programmable output relays.
The activation voltage threshold can be set in the form of percentage of the generator rated voltage, between
100 and 150% with increases of 1%, the operation time (measured by an internal timer) can be determined
between 0 and 300s with increases of 0.1s. When the voltage falls below the defined threshold, the protection
timer is reset to zero.
This function can be enabled/disabled.
3.6.4. Generator Under-voltage Protection
When the measured generator voltage falls below a value threshold which can be set, for a time interval whose
length can be established, the generator under-voltage protection is activated.
The activation of this protection is accompanied by a visual warning in the MEC-100 Interface System
(Generator Undervoltage Protection item flashing, see Par. 5.8.3), and optionally can be associated to one of the
two programmable output relays.
The activation voltage threshold can be set in the form of percentage of the generator rated voltage, between 0
and 100% with increases of 1%, the operation time (measured by an internal timer) can be determined between
0 and 300s with increases of 0.1s. When the voltage increases above the defined threshold, the protection timer
is reset to zero.
This function can be enabled/disabled.
18
SIN.NT.023.5
ENGLISH
FUNCTIONAL DESCRIPTION
3.6.5. Generator Over-current Protection
The MEC-100 is capable of monitoring the value taken by the generator stator current under load conditions and
sending a warning when the current value exceeds a predefined limit for a pre-established time interval; this time
interval can be derived from a curve of the type shown in Fig. 3.6.5.a. All of that before the over-current causes
a generator overheating/failure.
Generator Current [A]
Current Reference Level
Maximum Continuous Current
Operation Time Delay
Time [s]
Fig. 3.6.5.a
Generator Over-current Protection Curve
The characteristic curve is calculated starting from the determination of a maximum continuative current level
(given in percentage compared with the generator rated current value, with values included between 0 and
110%, and minimum increase of 1%), a current reference level (expressed in percentage compared with the
generator rated current value, with values included between 0 and 120%, and minimum increase of 1%) and a
minimum operation time value (time delay from 0 to 3600s, minimum increase of 1s) associated to the reference
level.
When the stator current value exceeds the maximum continuous current value, the generator over-current
protection is activated by a warning signal after a time interval depending on the generator current value which
has been reached, according to the curve of Fig. 3.6.5.a.
Higher the over-current, shorter the operation time (time delay).
The activation of this protection is accompanied by a visual warning in the MEC-100 Interface System
(Generator Overcurrent Protection item flashing, see Par. 5.8.3), and optionally can be associated to one of the
two programmable output relays.
This function can be enabled/disabled.
3.6.6. Loss of Sensing Protection
The MEC-100 is capable of sensing the over-excitation conditions resulting from the loss of voltage sensing and
coming into operation by a warning signal in less than 1s.
The activation of this protection is accompanied by a visual warning in the MEC-100 Interface System (Loss of
Sensing Protection item flashing, see Par. 5.8.3), and optionally can be associated to one of the two
programmable output relays.
The Loss of Sensing protection can directly operate one of the two following actions (preliminary choice is
required, see Par. 5.7.8):
Shutdown: the MEC-100 operates the instantaneous de-excitation (shutdown) of the generator.
FCR: the MEC-100 automatically changes over to FCR mode, supplying the excitation current value set in
the Setpoint window (see Par. 5.7.3).
SIN.NT.023.5
19
ENGLISH
FUNCTIONAL DESCRIPTION
This function can be enabled/disabled.
WARNING: Any activation of the protection when it is enabled will cause an excitation
shutdown or a change over to the FCR mode. Before enabling the protection, please
make sure that the choosen protection option is not dangerous for the plant or the
network to which the generator is connected.
Marelli Motori is under no liability for any damages which may occur to the AVR, the
plant or the persons, or for lost earnings, or financial loss, or system stoppages, due to
a not suitable use of the Loss of Sensing Protection.
3.6.7. Diode Failure Monitoring
The MEC-100 is capable of sensing abnormal excitation currents due to the damaging of one or more diodes in
the generator rectifier bridge (interrupted or shorted diode). These currents can lead to the exciter and/or
regulator damaging.
MEC-100 measures the excitation current (average value) and the width of its ripple. If a diode is damaged, the
excitation current ripple is higher than the one present in correct behaviour conditions, as showed in Fig. 3.6.7.a.
MEC-100 offers two types of protection threshold or failure level: Low Level and High Level of failure. The two
thresholds can be chosen in such a way to discern from a light failure (i.e. interrupted diode) to a heavy failure
(i.e. shorted diode).
Excitation current
Diode works fine
Ripple
Time
Interrupted diode
Ripple
Excitation current
Excitation current
Shorted diode
Time
Ripple
Time
Fig. 3.6.7.a
Excitation current when diode fails.
20
SIN.NT.023.5
ENGLISH
FUNCTIONAL DESCRIPTION
For example, the two levels can be chosen with the following method:
If excitation current ripple is lower than the Low Level of failure, the rectifier bridge can be considered
properly working.
If excitation current ripple is higher than the Low Level of failure (for a period longer than the set delay) but
lower than the High Level of failure, the Low Level allarm occures. This situation could be associated for
example to a light failure (i.e. interrupted diode) which can not damage the generator in a short period of
time, but has to be anyway solved.
If excitation current ripple is higher than the High Level of failure (for a period longer than the set delay), the
High Level allarm occures. This situation could be associated for example to a heavy failure (i.e. shorted
diode) which can damage the generator in a short period of time, and has to be solved as soon as possible.
The activation of this protection is accompanied by a visual warning in the MEC-100 Interface System: when
Low Level is reached, Diode Monitoring - Low Level item starts flashing (see Par. 5.8.3) and optionally can be
associated to one of the two programmable output relays.
When High Level is reached, Diode Monitoring - High Level item starts flashing (see Par. 5.8.3) and optionally
can be associated to one of the two programmable output relays or to the Shutdown option.
This function can be enabled/disabled.
3.7. LIMITATION FUNCTIONS
3.7.1. Under-frequency Limiter
The MEC-100 reduces the excitation current any time the generator is used at low speed to avoid damages to
the generator excitation system: in particular the voltage setpoint is automatically modified and reduced as soon
as the generator frequency falls below a set value, according to the curve shown in Fig. 3.7.1.a.
Voltage [in % of rated voltage]
100
C o rn e r
F re q u e n c y
0
0
Z e ro V o lt F re q u e n c y
F re q u e n c y [H z ]
R a te d
F re q u e n c y
Fig. 3.7.1.a
Generator Voltage Setpoint in Under-frequency Conditions
SIN.NT.023.5
21
ENGLISH
FUNCTIONAL DESCRIPTION
The parameters which determine the curve and, in particular, its slope are the following:
The Corner Frequency, which can be set from 40 to 60Hz with increases of 0.1Hz: represents the frequency
value below which the MEC-100 decreases the voltage setpoint.
The Zero Volt Frequency, which can be set from 0 to 40Hz with increases of 0.1Hz: represents the
frequency relative to the point where the voltage setpoint is zeroed.
The activation of this limitation function is accompanied by a visual warning in the MEC-100 Interface System
(Underfrequency Limiter item flashing, see Par. 5.8.3).
This function is always enabled and operates in AVR Mode.
3.7.2. Over-excitation Limiter
The MEC-100 is capable of reducing the excitation current when this last reaches such a value as to cause the
overheating of the exciter field. When this function is active (the activation results from the relevant
authorization) and a field over-current takes place, the field current value is decreased to a safety value, within a
pre-established time interval, which can be derived from the curve shown in Fig. 3.7.2.a.
Field Current [A]
Maximum Current Allowed
Maximum Continuative Current
Minimum Time Delay
Time [s]
Fig. 3.7.2.a
Excitation Limiter Curve
This characteristic curve is calculated starting from the determination of a maximum current level which can
never be exceeded (with value included between 0 and 25A, minimum increase of 0.1A), a minimum operation
time value (0 to 10s, minimum increase of 0.1s) and a maximum field current value which the MEC-100 can
support continuously without the activation of the relevant protection (0 to 15A, minimum increase of 0,1A).
When the field current value exceeds the maximum continuative current value, the field over-current limitation is
activated after a time interval depending on the field current value which has been reached, according to the
curve of Fig. 3.7.2.a.
Higher the over-current, shorter the operation time.
The activation of this limitation consists in reducing the field current until the maximum continuative current value
is reached. This current value is maintained until both the following conditions are simultaneously satisfied:
Enough time is passed to eliminate the generator overheating.
The operating conditions set the excitation current value required to the MEC-100 below the maximum
continuous current value.
22
SIN.NT.023.5
ENGLISH
FUNCTIONAL DESCRIPTION
The activation of this limitation is accompanied by a visual warning in the MEC-100 Interface System
(Overexcitation Limiter item flashing, see Par. 5.8.3), and optionally can be associated to one of the two
programmable output relays.
This function can be enabled/disabled:
If enabled, it can operate in all working Modes.
Even if disabled, the MEC-100 limits the maximum excitation current which can be supplied to the maximum
allowed set value.
3.7.3. Under-excitation Limiter
The MEC-100 is capable of activating an under-excitation limitation function to avoid demagnetizing effects and
losses of synchronism during the paralleling operations. When this function is active (the activation results from
the relevant authorization), the MEC-100 senses the reactive power output (of demagnetizing type) and limits
any consequent field current reduction.
The area of operation of the under-excitation limitation function is identified by a curve like that shown in Fig.
3.7.3.a.
Real Power
100%
B
50%
A
0.0
0.0
50%
100%
Reactive Power
Fig. 3.7.3.a
Under-excitation Limitation Curve
As you can see in the figure above, the dashed portion is the area where the MEC-100 cannot operate; the
limitation will be activated to prevent the working point from leaving the allowed operating area.
The limitation curve is obtained starting from the definition of the A point (see example of Fig. 3.7.3.a), identified
by the limit reactive power value with power factor equal to 0, expressed in percentage (0 to 50%, minimum
increase of 1%) compared to the maximum reactive power.
By the term maximum reactive power it is meant the reactive power which can be obtained with rated voltage, rated current
and power factor PF=0, that is at zero active power.
The MEC-100 calculate automatically the limitation curve: in particular, the B point will have the half of the limit reactive power
value at zero active power as abscissa (25% in the case shown in figure) and 100% of the active power at PF=1 as ordinate.
The activation of this limitation is accompanied by a visual warning in the MEC-100 Interface System
(Underexcitation Limiter item flashing, see Par. 5.8.3), and optionally can be associated to one of the two
programmable output relays.
This function can be enabled/disabled.
SIN.NT.023.5
23
ENGLISH
FUNCTIONAL DESCRIPTION
3.7.4. Inrush Current Limiter
The MEC-100 is equipped with an internal protection against the so-called “Inrush Current” or “Input Surge
Current”, that is the maximum, instantaneous input current which appears when the device input stage is
instantaneously energized. The limiter acts only on the inrush current, while it has not any further influence on
the normal working of the MEC-100.
3.8. PROGRAMMABLE RELAYS
The protection and limitation functions which can be set from MEC-100 Interface System can be individually
associated to each one of the two programmable relays provided with the MEC-100.
The provided contacts are normally open and the relevant technical data are specified in Par. 2.10.
3.9. REACTIVE DROOP COMPENSATION
The MEC-100 provides a Reactive Droop Compensation function: it is used to obtain the desired distribution of
the reactive load between two or more generators which operate in parallel.
When this function is enabled, the MEC-100 calculates the reactive part of the generator load, starting from the
measurement of the generator voltage between the U and V phases and the current of the W phase (see Par.
4.5), and modifies consequently the generator voltage setpoint.
A unit power factor does not lead to any change of the voltage setpoint. An inductive power factor (“lagging”)
leads to a decrease in the generator output voltage (Droop). A capacitive power factor (“leading”) leads to an
increase in the generator output voltage.
If with inductive-type load an increase in the generator voltage occurs, the following conditions must be verified:
the U phase is connected to S1 and the V phase is connected to S2.
the current sensing is made on the W phase.
If both points are verified, then it is necessary to reverse the two wires coming from the measurement TA on the generator
current sensing terminals.
Droop can be set from 0 to 10%, with increase of 0.1%, with phase current equal to the rated generator current
and power factor corresponding to 0.80.
This function is enabled by closing the PAR contact (C5 contact, see Par. 3.5.5).
It can only be activated in AVR Mode. The switching to the PF or VAR Mode disables automatically the Reactive
Droop Compensation.
During parallel operation between two or more generators (PAR contact closed), the LED corresponding to the
Reactive Droop Compensation item in the system status window in System Monitoring (see Par. 5.8.2) becomes
green.
3.10. SOFT-START
The MEC-100 provides the SOFT-START function to bring linearly the generator voltage from the residual value
to the reference one, in a time interval whose length can be defined, with minimum overshoot. For this function,
it is enough to set only one parameter: that is, the ramp-up time of the voltage setpoint. This parameter, whose
value is included between 0 and 3600s with increases of 1s, accounts for the time necessary to the MEC-100 to
lead the voltage setpoint from 0Vac to 100% of its predefined value (the rated voltage), starting from the moment
when the MEC-100 is enabled from the START contact (see Par. 3.5.1). In Fig. 3.10.a. the ideal time diagram of
the voltage setpoint during the SOFT-START function is shown.
The diagram in Figure 3.10.a refers to the ideal curve which the card processor makes the voltage setpoint follow to reach
100% of the pre-established value. Obviously, under real conditions, and at full rpm, the generator voltage does not start from
0Vac, but from the residual machine voltage value; moreover, under real conditions, starting from 0rpm up to reach the rated
speed, the voltage ramp-up may not be perfectly linear, but on the contrary may present a light overshoot at low frequencies
and voltages (in any case included within a range of not significant values).
24
SIN.NT.023.5
ENGLISH
FUNCTIONAL DESCRIPTION
110
Voltage [in % of the voltage setpoint]
100
90
80
70
60
50
40
30
20
10
0
0
1
2
3
4
5
6
7
8
9
10
11
12
13
14
15
16
17
18
19
20
Time [s]
Fig. 3.10.a
Generator Voltage Setpoint when the SOFT-START Function is Active
3.11. SETTING THE P.I.D. PARAMETERS
One of the functions which make the MEC-100 a particularly efficient and flexible device is the configurability of
the parameters that define the transient performances and the stability of the control system.
In particular, the MEC-100 system allows to use P.I.D. (Proportional, Integral, Derivative) controllers which can
be individually set by the direct insertion of the values corresponding to the relevant constants: KP, KI, and KD.
3.11.1. Proportional, Integral and Derivative Controllers
In the Table below an indicative scheme is provided where the KP, KI, and KD values are determined starting
from the hypothesis of submitting the closed chain system to a step input.
Controller
Ramp-up Time
Overshoot
Transient Length
Steady-State Error
Increase of KP
Decreases
Increases
Does not influence
Decreases
Increase of KI
Decreases
Increases
Increases
Eliminated
Increase of KD
Does not influence
Decreases
Decreases
Does not influence
It is to be specified that the above-mentioned relationships are not accurate, since controllers depend each
other, but they can be considered enough to tune controllers in order to obtain the best possible transient
response.
Generally speaking, the Proportional controller (KP) will contribute to reduce the step-response rise time
(parameter which characterizes the response readiness) and decrease, but not to eliminate, the steady-state
error. The Integral controller (I controller with KI constant) eliminates the steady-state error but worsens the
transient response (reduces the stability). The Derivative controller (KD) increases the stability of the system, by
improving the transient response.
SIN.NT.023.5
25
ENGLISH
FUNCTIONAL DESCRIPTION
3.11.2. Derivative Adjustments
The MEC-100 Interface System provides two further adjustment parameters (for derivative adjustments) to
improve the transient response:
st
1 Derivative Item – Time: describes the number of sampling intervals, referred to the discrete time, used for
the derivate calculation.
nd
2 Derivative item – Filter: describes the time constant, referred to the discrete time, of the low-pass filter
used to eliminate the derivate noise.
3.11.3. P.I.D. in PF/VAR Modes
The MEC-100 Interface System provides 3 P.I.D. controllers and 2 derivative adjustments to set the stability in
AVR Mode. Only P.I. controllers must be set in PF and VAR Modes.
For the setting of each parameter, see Par. 5.7.5.
3.12. DE-EXCITATION (SHUTDOWN) CONTACT: INSTRUCTIONS
Most of the generator connection diagrams include a de-excitation (shutdown) contact between the generator
power source (main terminals, auxiliary winding, PMG, etc.) and the MEC-100 supply terminals P1-P2(-P3 if
used), see Par. 4.4.
Switching-off the de-excitation contact leads to stop powering the generator exciter in a short time.
Especially in generator/hydro turbine applications, the load rejection (i.e. when generator is paralleled with the
network) must be always simultaneously accompanied by the prompt excitation shutdown of the generator, in
order to limit the generator over-voltage due to the load rejection and the turbine over-speed.
In case of hydro turbine applications, the de-excitation contact must be always switched-off
simultaneously with the load rejection and/or disconnection from parallel operation.
Generally, Marelli Motori recommends to associate the momentary switch-on of the STOP contact (C2) to the
switch-off of the de-excitation contact. This procedure permits to accelerate the excitation shutdown and strongly
limit the generator over-voltage.
WARNING: during the parallel operations, STOP contact and/or de-excitation contact can be only
used simultaneously with the load rejection and/or disconnection from parallel operation.
WARNING: read carefully all the instructions about START and STOP contacts operating use, see
Par. 3.5.
WARNING: Marelli Motori recommends to associate STOP contact to the de-excitation contact only
for improving the generator transient performance during the load rejection and/or disconnection
from parallel operation, and safe the MEC-100 regulation system.
Marelli Motori is under no liability for any damages which may occur to the AVR, the plant or the
persons, or for lost earnings, or financial loss, or system stoppages, due to a wrong or not allowed
use of STOP and de-excitation contacts.
26
SIN.NT.023.5
ENGLISH
INSTALLATION
4. INSTALLATION
4.1. INTRODUCTION
In this section the instructions for the mechanical fastening of the MEC-100 and its electrical connection are
provided.
4.2. MOUNTING
The MEC-100 support is conceived for two typologies of mounting:
On-board machine mounting: the fastening on vibration dampers and proper brackets is provided; the
brackets should be secured to the machine terminal board panel, see Fig. 4.2.a, page 28.
Panel mounting: the fastening should be done at the 4 holes shown in Fig. 4.2.b, page 29.
4.3. SERIAL COMMUNICATION AND PRELIMINARY SET-UP
The MEC-100 is equipped with an RS-232 serial port located on the card component side: it consists of a DB-9
female connector.
For the connection to Personal Computer (see Section 5 for the MEC-100 Interface System setting instructions)
a standard communication cable ending with a DB-9 female connector is required.
In Fig. 4.3.a the provided pin-to-pin connection is shown.
DB-9 Female
Connector
DB-9 Male
Connector
1
2
3
4
5
6
7
8
9
1
2
3
4
5
6
7
8
9
DCD
RXD
TXD
DTR
To PC
DB-9 Male Port
GND
DSR
RTS
CTS
RI
NC
TXD
RXD
ALI1
GND
To MEC-100
DB-9 Female Port
NC
ALI2
NC
NC
Fig. 4.3.a
MEC-100 Serial Connection to Personal Computer
SIN.NT.023.5
27
ENGLISH
INSTALLATION
If the DB-9 serial port is not available on PC, one of the USB ports must be used, paying attention to:
Interpose an USB/DB-9 adapter between the standard cable and the PC.
Install the adapter driver files on PC (please follow the provided instructions).
It is possible to set the MEC-100 regulation parameters only if the MEC-100 is properly supplied, as described in
Par. 2.1.
The MEC-100 is properly supplied if connected to a working generator (operating at rated voltage and rated
frequency), according to the provided connection diagrams, or supplied from an external supplier.
It is always advisable to supply the MEC-100 with the minimum voltage values included into the allowed supply
voltage range (see Par. 2.1). It is strongly recommended to not supply MEC-100 with voltage values ≥ 220Vac.
See the Set-up Procedure widely described in Section 6.
WARNING: Before doing any operations and/or any set-up on MEC-100, is to be taken
into consideration that lethal voltage is present at the top panel when the unit is
energized. Top panel connections and/or operations should be made only when the unit
is de-energized.
4.4. IMPORTANT NOTES CONCERNING CONNECTIONS - RESTRICTIONS
The MEC-100 is equipped with an RS-232 serial port located on the card component side: it consists of a DB-9
female connector.
WARNING: For all the applications with MEC-100, the CONNECTIONS MUST ALWAYS
COMPLY WITH THE MARELLI CONNECTION DIAGRAMS provided with the generator.
If included in the Marelli connection diagrams, the DE-EXCITATION (SHUTDOWN)
CONTACT MUST ALWAYS BE USED (see instructions in Par. 3.12).
ALL TYPES OF SWITCH OR OTHER DEVICE not formally included in the Marelli
connection diagrams CAN NOT BE USED AND/OR PUT on the MEC-100 output and/or
exciter field, without previous authorization of Marelli Motori S.p.A. skilled personnel.
Should further information about the connection diagrams and/or the used components
be required, Marelli Service (see Par. 7.3) must always be contacted and/or involved
BEFORE the MEC-100 commissioning.
WARNING: if the MEC-100 application environment is affected by electromagnetic
disturbance (EMI) higher than the specific limits described in Par. Errore. L'origine
riferimento non è stata trovata., the User must equip the MEC-100 system of the the proper
and suitable protections (shielded cables, ferrites, etc.) on his own.
EMI out of specifications can lead to unproper working of MEC-100 and/or to hardware
damages.
Marelli Motori is under no liability for any damages which may occur to the AVR, the
plant or the persons, or for lost earnings, or financial loss, or system stoppages, due to
missing application of EMI protections.
Should further information about the EMI protection of the system be required, Marelli
Service (see Par. 7.3) must always be contacted and/or involved BEFORE the MEC-100
commissioning.
28
SIN.NT.023.5
INSTALLATION
SIN.NT.023.5
29
ENGLISH
Fig. 4.2.a
MEC-100, Fastening with Vibration Dampers
ENGLISH
30
INSTALLATION
SIN.NT.023.5
Fig. 4.2.b
MEC-100, Standard Fastening
ENGLISH
INSTALLATION
4.5. CONNECTIONS (TYPICAL)
4.5.1. Power Supply from Auxiliary Winding
A
B
C
D
U and V phases must always be
connected to S1 and S2.
If the voltage sensing connection
is single-phase type, S3 is not used.
All contact terminals
can be associated
to each M terminal.
When U connected to S1 and
V connected to S2, current sensing
must be on W phase
For M71FA300A, C8 contact
is RESET, not FCR
R1
Relay 1
R2
R3
Relay 2
R4
E1
Analogue
auxiliary
inputs
E2
M
B
M
TO LOAD
START
C1
STOP
C2
UP
C3
DOWN
C4
U V W
M
Network VT
PAR
C5
PF/VAR
C6
VMATCH
FCR
C
D
C7
MARELLI ENERGY
CONTROLLER
MEC-100
C8
M
A5
Current
sensing CT
A1
B
S1
S2
S3
Generator VT
L1
L2
_
Generator
Exciter
Field
+
+
Auxiliary
winding
SIN.NT.023.5
A
P1
De-excitation
contact
P2
P3
31
ENGLISH
INSTALLATION
4.5.2. Power Supply from PMG (Permanent Magnet Generator)
A
B
C
D
U and V phases must always be
connected to S1 and S2.
If the voltage sensing connection
is single-phase type, S3 is not used.
All contact terminals
can be associated
to each M terminal.
When U connected to S1 and
V connected to S2, current sensing
must be on W phase
For M71FA300A, C8 contact
is RESET, not FCR
R1
Relay 1
R2
R3
Relay 2
R4
E1
Analogue
auxiliary
inputs
E2
M
B
M
START
C1
STOP
C2
UP
C3
DOWN
C4
TO LOAD
U V W
M
Network VT
PAR
C5
PF/VAR
C6
VMATCH
FCR
C
D
C7
MARELLI ENERGY
CONTROLLER
MEC-100
C8
M
A5
Current
sensing CT
A1
B
S1
S2
S3
Generator VT
L1
L2
_
Generator
A
Exciter
field
+
+
P1
P2
PMG
De-excitation
contact
32
P3
SIN.NT.023.5
ENGLISH
INSTALLATION
4.5.3. Power Supply from Main Terminals, Low Voltage
A
B
C
D
U and V phases must always be
connected to S1 and S2.
If the voltage sensing connection
is single-phase type, S3 is not used.
All contact terminals
can be associated
to each M terminal.
When U connected to S1 and
V connected to S2, current sensing
must be on W phase
For M71FA300A, C8 contact
is RESET, not FCR
R1
Relay 1
R2
R3
Relay 2
R4
E1
Analogue
auxiliary
inputs
E2
M
B
M
TO LOAD
U V W
START
C1
STOP
C2
UP
C3
DOWN
C4
M
Network VT
PAR
C5
PF/VAR
C6
VMATCH
FCR
C
D
C7
MARELLI ENERGY
CONTROLLER
MEC-100
C8
M
A5
Current
sensing CT
A1
B
S1
S2
S3
A
L1
N
L2
_
Generator
Exciter
field
+
+
P1
Supply by mains
De-excitation
contact
SIN.NT.023.5
P2
P3
33
ENGLISH
INSTALLATION
4.5.4. Power Supply from Main Terminals, Medium Voltage
A
B
C
D
U and V phases must always be
connected to S1 and S2.
If the voltage sensing connection
is single-phase type, S3 is not used.
All contact terminals
can be associated
to each M terminal.
When U connected to S1 and
V connected to S2, current sensing
must be on W phase
For M71FA300A, C8 contact
is RESET, not FCR
R1
Relay 1
R2
R3
Relay 2
R4
E1
Analogue
auxiliary
inputs
E2
M
B
M
TO LOAD
U V W
START
C1
STOP
C2
UP
C3
DOWN
C4
M
Network VT
PAR
C5
PF/VAR
C6
VMATCH
FCR
C
D
C7
MARELLI ENERGY
CONTROLLER
MEC-100
C8
M
A5
Current
sensing CT
A1
B
S1
S2
S3
Generator VT
L1
L2
_
Generator
A
Exciter
field
+
+
P1
P2
Supply VT
34
De-excitation
contact
P3
SIN.NT.023.5
ENGLISH
MEC-100 INTERFACE SYSTEM
5. MEC-100 INTERFACE SYSTEM
5.1. INTRODUCTION
The MEC-100 Interface System provides an interface tool between the MEC-100 and the user capable of:
Providing a user-friendly and intuitive working environment for the setting of the regulation system
parameters.
Displaying in real time the electrical data of the system controlled by the MEC-100.
Allowing the system status control.
Enabling the storage of the complete set of system parameters in the form of program files or text files.
5.2. INSTALLING MEC-100 INTERFACE SYSTEM
The CD-ROM provided together with the MEC-100 system includes the utility for the installation of the MEC-100
Interface System software and the user and maintenance manuals (User Manual) of the regulation system.
5.2.1. Minimum System Requirements
Here below the minimum system requirements for the proper installation and utilization of the software are listed:
PC IBM compatible, Intel® Pentium® II (300MHz or higher recommended).
128MB of RAM (256MB or more recommended).
Microsoft Windows® 95, 98, Me, 2000, XP, Vista.
CD-ROM drive.
RS-232 Serial port or USB port.
5.2.2. Installing the MEC-100 Interface System
TO DO:
To install the MEC-100 Interface System in the PC you must:
Insert the CD-ROM disk provided with the MEC-100 into the PC CD-ROM drive.
When the installation menu appears, click the Install button; the set-up utility of the MEC-100 Interface
System will install automatically the software.
Follow the instructions which appear on the PC screen.
5.2.3. Starting the Program
TO DO:
To start the MEC-100 Interface System you must:
Click the Windows® Start button.
Select Programs.
Point to the MarelliMotori directory.
Select the MEC-100 Interface System icon.
Follow the instructions which appear in the start menu.
SIN.NT.023.5
35
ENGLISH
MEC-100 INTERFACE SYSTEM
5.2.4. Uninstalling the MEC-100 Interface System
TO DO:
To uninstall the MEC-100 Interface System from your PC you must:
Open the Windows® File Manager.
Select the MEC-100 Interface System installation folder.
Double click on unins000.exe file.
Follow the instructions which appear on the PC screen.
5.2.5. Connection Between MEC-100 and PC
Connect a serial communication cable to the MEC-100 RS-232 connector and to the relevant PC communication
port. The MEC-100 RS-232 connector is located in the top of the device (see Par. 4.3).
5.3. START-UP
5.3.1. Acceptance of the General Contract Conditions
To start the MEC-100 Interface System follow the instructions provided in Par. 5.2.3.
At the start-up a presentation window (see Fig. 5.3.1.a), will be displayed with indication of the software version
and the request for acceptance of the general contract conditions.
Fig. 5.3.1.a
Start-up Window
36
SIN.NT.023.5
ENGLISH
MEC-100 INTERFACE SYSTEM
To start the MEC-100 Interface System you must select I accept the contract terms and then click on the Next
button.
READ CAREFULLY THE GENERAL CONTRACT CONDITIONS.
Perform the above-mentioned operations to start the program involves the
SIGNING and FULL ACCEPTANCE by the user of the there described terms and
conditions.
5.3.2. Description of the Work Window
After starting the MEC-100 Interface System as described in Par. 5.2.3 e 5.3.1, the work window for the
configuration and monitoring of the regulation system parameters appears. In Fig. 5.3.2.a. the displayed screen
is shown.
2
1
4
7
5
8
6
9
3
10
Fig. 5.3.2.a
MEC-100 Interface System Work Window
The Work Window is composed of the following sections:
1.
2.
3.
Rating data area: shows the generator rating data. It does not contain operating data, but only the
indications which identify the machine the MEC-100 has been configured for.
System monitoring area: displays in real time the values relative to the electrical system data, the status of
contacts and alarms.
Generator parameter area: set of pages dedicated to the system configuration. It includes the fields where to
assign the appropriate values to all parameters involved in the system configuration. The parameters are
grouped by type in 9 Categories (system data, sensing, setpoints and other settings, stability, limitation
parameters, protections, field and generator, diode monitoring).
SIN.NT.023.5
37
ENGLISH
MEC-100 INTERFACE SYSTEM
4.
MEC-100-PC communication area: area for the management of the communication between MEC-100 and
PC. It shows in real time the communication status.
5. Setpoint variation buttons: tools for the modification of the controlled quantity setpoint (voltage, power factor
or reactive power depending on the actual operating mode).
6. Group selection area: frame to select the desired configuration window.
7. Oscillographic tracing of a system quantity.
8. Electrical system parameter monitoring.
9. System status window.
10. Alarm window.
5.3.3. Establishing a Communication Link
Before configuring or monitoring the regulation system parameters you must establish a communication link
between MEC-100 and MEC-100 Interface System.
TO DO:
To establish a communication link between MEC-100 and
MEC-100 Interface System you must:
Verify that the connection between MEC-100 and Personal
Computer has been established as described in Par. 5.2.5.
Start the MEC-100 Interface System software as described
in Par. 5.3.1
Click on the Open Comm button as shown in Fig. 5.3.3.a.
Fig. 5.3.3.a
Connection Button
TO DO:
To select a PC communication port other than the default, execute the following operations:
Click on the Tools item in the menu bar of the MEC-100 Interface System (see Fig. 5.3.3.b).
In the displayed pull-down menu, select the Port Configuration item.
A window (see Fig. 5.3.3.c) appears where the desired communication port can be selected.
Fig. 5.3.3.b
Communication Port Setting
Fig. 5.3.3.c
Communication Port Selection
After establishing the connection, the MEC-100 Interface System configuration parameters, initially set to zero
by default, are automatically updated to the values saved in the MEC-100; these last can correspond to the
2
default values, if the regulator is set for the first time, or to those stored in the E PROM in case of previously
performed configuration operations.
The communication initialization and the update of the regulation system parameters may take a few seconds. In view of the
correct execution of such operations, it is recommended to wait until they are completed before entering any data.
It is possible to set the MEC-100 regulation parameters only if MEC-100 is properly supplied, as described in Par. 2.1. For
preliminary set-up, see Par. 7.2.
38
SIN.NT.023.5
ENGLISH
MEC-100 INTERFACE SYSTEM
5.4. PASSWORD MANAGEMENT
After starting the MEC-100 Interface System and establishing the connection, the System Monitoring section is
operative and shows the value of the regulation system electrical quantities on a real-time basis. In the System
Parameters section the values of the system parameters stored in the MEC-100 are displayed: they can
correspond to the default values in case of first configuration or to those saved during a previous configuration
operation.
Immediately after establishing the connection to the MEC-100 or after 5 minutes from the last use of the MEC100 Interface System, the System Parameters section appears to be write-protected: it is therefore necessary to
remove the write protection by entering a password.
Here below the password management modes for the MEC-100 Interface System are described.
5.4.1. Entering Password
TO DO:
To remove the write protection of the MEC-100 Interface
System and enter the password:
Click on the Enter Password button, placed at the left
bottom of the main screen, see Fig. 5.4.1.a.
Enter the password in the field of the displayed window
(see Fig. 5.4.1.b).
The default password is “Marelli”.
Click Apply.
Fig. 5.4.1.a
Enter Password Button
5.4.2. Changing Password
TO DO:
To modify the password:
Click on the Tools item in the menu bar of the MEC-100
Interface System (see Fig. 5.4.2.a).
In the displayed pull-down menu, point to the Modify
Password item and click.
In the window which appears enter the current password
in the Previous Password field and the desired password
in the New Password field; afterwards enter the desired
new password again for confirmation in the Confirm
Password field (see Fig. 5.4.2.b).
Click OK.
Fig. 5.4.2.a
Change Password Selection
SIN.NT.023.5
Fig. 5.4.1.b
Password Entry
Fig. 5.4.2.b
Modify Password
39
ENGLISH
MEC-100 INTERFACE SYSTEM
5.5. CHANGING THE SYSTEM SETTINGS
As anticipated in Par. 5.3.2, the system parameters are grouped into eight main categories according to their
typology:
System parameters.
Sensing.
Setpoint.
Stability.
Other settings.
Limiters.
Field protections.
Generator protections.
Diode monitoring.
Each category can be selected by the relevant button in the frame indicated with 6 in Fig. 5.3.2.a. After selecting
one of the categories, the corresponding set of parameters is displayed.
If connected to the MEC-100 (see Par. 5.3.3), the above-mentioned set of parameters can also be configured.
A parameter can be configured by clicking in the appropriate field and typing the desired value or selecting the
desired option.
In any field you can only enter values falling within determined limits, established on the basis of the parameter
type, the particular application and the other set parameters. The limits are normally indicated next to the name
of the parameter to be configured. If you try to enter a value outside the allowed range a red exclamation mark
will appear next to the entered item.
After configuring a group of parameters, you need to send the entered data to the MEC-100 before switching to
the next group; otherwise, the typed data will be lost.
TO DO:
To configure the MEC-100, that is to enter the desired
values for the system parameters, you must:
Connect to the MEC-100 (see Par. 5.3.3).
Enter la password if required (see Par. 5.4.1).
Select the desired group of data (see Fig. 5.5.a).
Click in the field to modify and enter the desired
value. Repeat the operation for each parameter to
be configured (see Fig. 5.5.b).
As soon as all parameters into the group are set,
click the Apply Current Page button, located under
the configuration area (see Fig. 5.5.c).
Fig. 5.5.a
Parameter Group Selection
Fig. 5.5.b
Typing Parameters
40
Fig. 5.5.c
Button for Sending Data to the MEC-100
SIN.NT.023.5
ENGLISH
MEC-100 INTERFACE SYSTEM
5.6. SAVING AND RETRIEVING A SET OF PARAMETERS
The MEC-100 offers the possibility of saving in a file the full set of system parameters to retrieve and load this
last later in the same MEC-100 or in another unit.
5.6.1. Saving a Set of Parameters
TO DO:
To save a full set of system parameters:
Connect to the MEC-100 (see Par. 5.3.3).
Enter the password if required (see Par. 5.4.1).
Configure all the parameters to be set (see Par. 5.5).
Click the Database button in the menu bar of the MEC-100
Interface System (see Fig. 5.6.1.a).
In the displayed pull-down menu, point to the Save
Parameter File On-line item and click.
In the File Manager window, select a directory where to
save the file, type the file name and click on OK.
Fig. 5.6.1.a
Saving a Configuration Set
5.6.2. Loading a Set of Parameters
TO DO:
To load a full set of system parameters:
Connect to the MEC-100 (see Par. 5.3.3).
Enter the password if required (see Par. 5.4.1).
Click the Database button in the menu bar of the MEC-100
Interface System (see Fig. 5.6.2.a).
In the displayed pull-down menu, point to the Open and
Apply Parameter File On-line item and click.
In the File Manager window, select the directory where the
file to load is stored, select it and click on OK.
This operation is possible only if the MEC-100 and the PC are
communicating (On-line operating mode). To check a parameter file
without automatic applying to MEC-100, see Par. 5.6.3.
Fig. 5.6.2.a
Loading a Configuration Set
BE CAREFUL TO APPLY A CONFIGURATION SET TO THE MEC-100 WHEN THIS LAST IS
COMMUNICATING WITH THE OPERATING GENERATOR.
Perform the above-mentioned operations to apply a configuration set to the MEC-100 regulating
the generator, involves a regulation setting alteration; it could be dangerous if the system
parameters are not properly set for the application. Marelli Motori is under no liability for any
damages which may occur to the AVR, the plant or the persons, or for lost earnings, or financial
loss, or system stoppages, due to a not allowed setting of the MEC-100.
IT IS ALWAYS ADVISABLE TO LOAD A NEW CONFIGURATION FILE WHEN THE MEC-100 IS
NOT REGULATING THE GENERATOR (SEE SECTION 6).
SIN.NT.023.5
41
ENGLISH
MEC-100 INTERFACE SYSTEM
5.6.3. Checking a Set of Parameters Off-line
TO DO:
To check a whole set of parameters without applying to MEC-100:
Interrupt the connection to the MEC-100 ( see Par. 5.3.3).
Click the Database button in the menu bar of the MEC-100
Interface System (see Fig. 5.6.3.a).
In the displayed pull-down menu, point to the Open Parameter
File Off-line item and click.
In the File Manager window, select the directory where the file
to load is stored, select it and click on OK.
This operation only allows to check the configuration file: it is not possible
to save a new configuration file in Off-line operating mode. In order to
modify a parameter set previously stored, please follow the instructions of
Par. 5.5 e 5.6.1.
Fig. 5.6.3.a
Opening a Configuration Set Off-line
5.6.4. Printing a Set of Parameters
TO DO:
To print a whole set of parameters:
Connect to the MEC-100 (see Par. 5.3.3) if required.
Enter the password if required (see Par. 5.4.1).
Click the button shown in Fig. 5.6.4.a. A new window will
appear (see Fig. 5.6.4.b).
Type the required data and click the button Preview. A
preview of the parameter list will appear.
To print it, click the button shown in Fig. 5.6.4.c.
Fig. 5.6.4.a
Print function selection
Fig. 5.6.4.b
Print data typing
42
Fig. 5.6.4.c
Print
SIN.NT.023.5
MEC-100 INTERFACE SYSTEM
ENGLISH
5.7. DEFINITION OF CONFIGURABLE PARAMETERS
Each one of the 9 parameter categories is characterized by its own window, which includes as many
configurable fields as many parameters are here considered and contained. Each field is generally characterized
by:
Parameter name.
Unit of measurement.
Maximum and minimum entry limits.
Entered parameter.
At the moment of the first configuration operation, each field includes a default value which
prevents the MEC-100 from malfunctions or damages. ALL PROTECTIONS AND
LIMITATIONS ARE DISABLED.
Here below a description of the configurable fields is provided: they are divided based on the group they belong
to.
Key:
Numeric value entry.
Value calculated, measured and/or displayed by MEC-100 Interface System.
Choosing one option leads to the exclusion of the other options.
Enabling flag.
Pull-down menu option.
SIN.NT.023.5
43
ENGLISH
MEC-100 INTERFACE SYSTEM
5.7.1. System Parameters
In Fig. 5.7.1.a the system parameters configuration area is shown.
Fig. 5.7.1.a
System Parameter Area
Three sets of parameters can be identified:
Generator Electrical Data
Rated Voltage (V): enter in this field the generator rated voltage value (phase-phase).
Rated Current (A): enter in this field the generator rated current value.
Rated Power Factor: enter in this field the generator rated power factor value.
Rated Frequency (Hz): enter in this field the generator rated frequency value.
Rated Excitation Cirrent (A): enter in this field the generator rated excitation current value.
Rated Real Power (kW): based on the data entered in the previous fields, the MEC-100 Interface System
calculates the generator rated real power value.
Rated Reactive Power (kvar): based on the data entered in the previous fields, the MEC-100 Interface
System calculates the generator rated reactive power value.
Rated Apparent Power (kVA): based on the data entered in the previous fields, the MEC-100 Interface
System calculates the generator rated apparent power value.
System Options
Voltage Sensing: in this field the user can define the type of sensing required by a given application: singlephase or three-phase sensing.
PF/VAR: network parallel mode selection field; in this field you can select which regulation mode should be
used in the network parallel operations. When the PF/VAR contact (see Par. 3.5.6) is closed, the MEC-100
will perform the adjustment of the power factor if PF has been selected or the reactive power if VAR has
been selected.
Aux. Analog Input Setting – Single Operation (see Par. 3.4.4):
No: if this option is selected, no analogue auxiliary input will be associated to the generator voltage setpoint.
1° In. : if this option is selected, analogue auxiliary input 1° will be associated to the generator voltage
setpoint.
2° In. : if this option is selected, analogue auxiliary input 2° will be associated to the generator voltage
setpoint.
44
SIN.NT.023.5
ENGLISH
MEC-100 INTERFACE SYSTEM
Aux. Analog Input Setting – Parallel Operation (see Par. 3.4.4):
No: if this option is selected, no analogue auxiliary input will be associated to the power factor or reactive
power setpoint (it depends on the Operating Mode selected in System Parameter area, see Par. 5.7.1).
1° In. : if this option is selected, the analogue auxiliary input 1° will be associated to the power factor o r
reactive power setpoint (it depends on the Operating Mode selected in System Parameter area, see Par.
5.7.1).
2° In. : if this option is selected, the analogue auxiliary input 2° will be associated to the power factor o r
reactive power setpoint (it depends on the Operating Mode selected in System Parameter area, see Par.
5.7.1).
5.7.2. Sensing
In Fig. 5.7.2.a the sensing parameters configuration area is shown.
Fig. 5.7.2.a
Sensing Parameter Area
Four sets of parameters can be identified:
Generator VT: present in the applications with generator voltages higher than 500V, which need a step-down
transformer between generator and MEC-100 sensing terminals.
Primary Voltage (V): enter in this field the primary voltage value of the TV used (100 to 22000V, with
minimum increase of 1V).
Secondary Voltage (V): enter in this field the secondary voltage value of the TV used (100 to 500V, with
minimum increase of 1V).
If the generator voltage value is lower than 500V, the use of a step-down transformer may not be necessary: therefore, the
MEC-100 is directly connected to the mains terminals. In this case, in both the Primary and Secondary Voltage fields the same
value, equal to the predefined rated value, should be entered.
Line VT: present in the applications with network (Line) voltages higher than 500V, which need a step-down
transformer between the network and MEC-100 sensing terminals.
Primary Voltage (V): enter in this field the primary voltage value of the TV used (100 to 22000V, with
minimum increase of 1V).
Secondary Voltage (V): enter in this field the secondary voltage value of the TV used (100 to 500V, with
minimum increase of 1V).
SIN.NT.023.5
45
ENGLISH
MEC-100 INTERFACE SYSTEM
If the network voltage value is lower than 500V, the use of a step-down transformer may not be necessary: therefore, the
MEC-100 is directly connected to the network terminals. In this case, in both the Primary and Secondary Voltage fields the
same value, equal to the predefined rated value, should be entered.
TA generator: makes the generator current sensing.
Primary Current (A): enter in this field the primary current value of the CT used (1 to 10000A, with minimum
increase of 1A).
Secondary Current (A): select in this field the secondary current value of the TA used by choosing between
the two standard values: 1A and 5A.
Calibrations: this set of parameters allows to calibrate the MEC-100 sensing function in case of non-ideal
transformation ratios; in this way the correct voltage, current and phase values are guaranteed to both the
regulation and monitoring areas.
Generator VT Ratio (%): if the MEC-100 Interface System senses and displays a generator voltage value
higher, of a given percentage, than the actual value, you need to add this percentage to the percentage
already entered in the field (100% of default), to obtain a correct and accurate sensing calibration (95 to
105%, with minimum increase of 0.1%).
Line VT Ratio (%): if the MEC-100 Interface System senses and displays a network voltage value higher, of
a given percentage, than the actual value, you need to add this percentage to the percentage already
entered in the field (100% of default), to obtain a correct and accurate sensing calibration (95 to 105%, with
minimum increase of 0.1%).
Generator CT Ratio (%): if the MEC-100 Interface System senses and displays a generator current value
higher, of a given percentage, than the actual value, you need to add this percentage to the percentage
already entered in the field (100% of default), to obtain a correct and accurate sensing calibration (95 to
105%, with minimum increase of 0.1%).
Phase Compensation (degrees): if the MEC-100 Interface System senses and displays a power factor value
higher or lower than the actual value, you need to introduce a compensation angle (0° default value), to
obtain a correct and accurate power factor measurement (-10° to +10°, with minimum increase of 0.1°).
5.7.3. Setpoint
In Fig. 5.7.3.a the setpoint configuration area is shown.
Fig. 5.7.3.a
Setpoint Area
Four sets of parameters can be identified:
46
SIN.NT.023.5
MEC-100 INTERFACE SYSTEM
ENGLISH
Generator Voltage Setpoint:
Voltage (%): enter in this field the voltage setpoint which is required at the generator output terminals,
expressed in percentage with respect to the machine rated value, see Par. 5.7.1 (the maximum and
minimum limits are defined in the two following fields, with minimum increase of 0.1%).
Minimum Limit (%): enter in this field the minimum value which the voltage setpoint can reach, expressed in
percentage with respect to the machine rated voltage, see Par. 5.7.1 (70 to 100%, with minimum increase
of 1%).
Maximum Limit (%): enter in this field the maximum value which the voltage setpoint can reach, expressed in
percentage with respect to the machine rated voltage, see Par. 5.7.1 (100 to 130%, with minimum increase
of 1%).
If one of the two limits is modified and the actual voltage setpoint is outside the new defined range, the setpoint is
automatically brought to the just modified limit value.
Power Factor Setpoint:
Power Factor Setpoint: defines if the power factor setpoint should be inductive or capacitive.
Power Factor: enter in this field the power factor setpoint you like to keep (the minimum leading and
minimum lagging limits are set in the following two fields; minimum increase of 0.001).
Leading PF: enter in this field the minimum leading value which the power factor setpoint can reach (0.5 to
1, with minimum increase of 0.01).
Lagging PF: enter in this field the minimum lagging value which the power factor setpoint can reach (0.5 to
1, with minimum increase of 0.01).
If one of the two limits is modified and the current power factor setpoint is outside the new defined range, the setpoint is
automatically brought to the just modified limit value.
Reactive Power Setpoint:
Reactive Power (%): enter in this field the reactive power setpoint you like to keep, expressed in percentage
with respect to the maximum reactive power (the maximum and minimum limits are established in the
following two fields, with minimum increase of 0.1%).
Minimum Limit (%): enter in this field the (capacitive) minimum value which the reactive power setpoint can
reach, expressed in percentage with respect to the maximum reactive power (–50% to 0%, with minimum
increase of 1%).
Maximum Limit (%): enter in this field the (inductive) maximum value which the reactive power setpoint can
reach, expressed in percentage with respect to the maximum reactive power (0% to 100%, with minimum
increase of 1%).
By the term maximum reactive power it is meant the reactive power which can be obtained with rated voltage, rated current
and power factor PF=0, that is at zero active power.
If one of the two limits is modified and the current reactive power setpoint is outside the new defined range, the setpoint is
automatically brought to the just modified limit value.
Excitation Current Setpoint:
Reactive Power (%): enter in this field the excitation current setpoint you like to keep, expressed in
percentage with respect to the rated excitation current (the maximum and minimum limits are established in
the following two fields, with minimum increase of 1%).
Minimum Limit (%): enter in this field the minimum value which the excitation current setpoint can reach,
expressed in percentage with respect to the rated excitation current (0% to 100%, with minimum increase of
1%).
Maximum Limit (%): enter in this field the maximum value which the excitation current setpoint can reach,
expressed in percentage with respect to the rated excitation current (1% to 120%, with minimum increase of
1%).
PAY PARTICULAR ATTENTION TO THE SELECTION AND/OR MODIFICATION OF THE
SETPOINT VALUES. The limit thresholds set by the MEC-100 Interface System to the setpoint
values do not protect against the selection of setpoints which may be potentially dangerous for
devices and/or installations connected to the generator. In all configuration operations of the
MEC-100 Interface System, always check that the new setpoints to be entered are appropriate
to the devices and/or installations connected to the generator.
Marelli Motori is under no liability for any damages which may occur to the AVR, the plant or
the persons, or for lost earnings, or financial loss, or system stoppages, due to a wrong
setpoint setting.
SIN.NT.023.5
47
ENGLISH
MEC-100 INTERFACE SYSTEM
5.7.4. Other Settings
In Fig. 5.7.4.a the configuration area relative to other functions is shown.
Fig. 5.7.4.a
Other Settings Area
Four sets of parameters can be identified:
Soft Start (see Par. 3.10):
Soft Start Time (s): enter in this field the time required by the voltage ramp, at the excitation Start-up, to
reach the setpoint value defined in the setpoints window, see Par. 5.7.3 (0 to 3600s, with minimum increase
of 1s).
Traverse rate:
Voltage (%/s): enter in this field the variation speed of the generator voltage setpoint when this last is
modified by means of the UP/DOWN contacts or the corresponding buttons of the MEC-100 Interface
System, see Par. 5.3.2 (0.1%/s to 5%/s, with minimum increase of 0.1%/s).
Power Factor (hundredthsPF/s): enter in this field the variation speed of the power factor setpoint when this
last is modified by means of the UP/DOWN contacts or the corresponding buttons of the MEC-100 Interface
System, see Par. 5.3.2 (1hundredthsPF/s to 10hundredthsPF/s, with minimum increase of
0.1hundredthsPF/s).
Reactive Power (%/s): enter the variation speed of the reactive power setpoint when this last is modified by
means of the UP/DOWN contacts or the corresponding buttons of the MEC-100 Interface System, see Par.
5.3.2 (0,1%/s to 5%/s, with minimum increase of 0.1%/s).
The traverse rate of the excitation current is fixed and kept slow by default.
PAY PARTICULAR ATTENTION TO THE MODIFICATION OF THE SETPOINT VALUES.
The limit thresholds set by the MEC-100 Interface System to the setpoint values do not protect
against the selection of setpoints which may be potentially dangerous for devices and/or
installations connected to the generator.
In all configuration operations of the MEC-100 Interface System, always check that the new
setpoints to be entered are appropriate to the devices and/or installations connected to the
generator.
Marelli Motori is under no liability for any damages which may occur to the AVR, the plant or
the persons, or for lost earnings, or financial loss, or system stoppages, due to a wrong
setpoint setting.
48
SIN.NT.023.5
ENGLISH
MEC-100 INTERFACE SYSTEM
Voltage Matching:
Minimum Limit (%): enter the minimum value of the network voltage range within which the voltage matching
is enabled; this limit is expressed in percentage respect to the rated generator voltage (90% to 100%, with
minimum increase of 1%).
Maximum Limit (%): enter the minimum value of the network voltage range within which the voltage
matching is enabled; this limit is expressed in percentage respect to the rated generator voltage (100% to
110%, with minimum increase of 1%).
Droop Settings:
Reactive Droop (%): enter in this field the Droop Compensation value (%) for parallel operations (0 to 10%,
with minimum increase of 0.1%).
5.7.5. Stability (P.I.D. Settings)
In Fig. 5.7.5.a the stability parameters configuration area is shown.
Fig. 5.7.5.a
Stability Parameter Area
Four sets of parameters can be identified:
Stability settings:
Custom setting: select this item in order to set individually each one of the following fields.
Standard setting: each configuration set contains an entire parameter set, stored by factory or by user.
Voltage Regulation Stability (see Par. 3.11.1):
Proportional Gain: enter in this field the proportional constant value of the regulation loop.
Integral Gain: enter in this field the integrative constant value of the regulation loop.
Derivative Gain: enter in this field the derivative constant value of the regulation loop.
Derivative Adjustments (see Par. 3.11.2):
st
1 Derivative Term - Time: enter in this field the parameter Time for derivative adjustment.
nd
2 Derivative Term - Filter: enter in this field the parameter Filter for derivative adjustment.
SIN.NT.023.5
49
ENGLISH
MEC-100 INTERFACE SYSTEM
Power Factor Regulation Stability (see Par. 3.11.3):
Proportional Gain: enter in this field the proportional constant value of the regulation loop.
Integral Gain: enter in this field the integrative constant value of the regulation loop.
5.7.6. Limiters
In Fig. 5.7.6.a the limitation parameters configuration area is shown.
Fig. 5.7.6.a
Limitation Parameter Area
Three sets of parameters can be identified:
Underfrequency Limiter (see Par. 3.7.1):
Corner frequency (Hz): enter in this field the corner frequency value in the under-frequency voltage limitation
curve (40 to 60Hz, with minimum increase of 0.1Hz).
Zero Volt Frequency (Hz): enter in this field the zero Volt frequency value in the under-frequency voltage
limitation curve (0 to 40Hz, with minimum increase of 0.1Hz).
Overexcitation Limiter (see Par. 3.7.2):
Maximum Current (A): enter in this field the maximum allowed current level value (0 to 25A, with minimum
increase of 0.1A).
Time Delay (s): enter in this field the minimum operation time value during which the MEC-100 is authorized
to supply the Maximum excitation Current (0 to 600s, with minimum increase of 1s).
Max. Continuative Current (A): enter in this field the maximum continuative current level value (0 to 15A, with
minimum increase of 0.1A).
Enable Limiter: limiter activation flag; click on this button to activate the over-excitation limitation function.
Apply to Relay 1: relay 1 assignment flag; click on this button to assign the limitation intervention signal to
relay 1.
Apply to Relay 2: relay 2 assignment flag; click on this button to assign the limitation intervention signal to
relay 2.
Underexcitation Limiter (see Par. 3.7.3):
Leading Power at PF=0 (%): enter in this field the maximum allowed absorbed reactive power value,
expressed in percentage with respect to the maximum reactive power (0 to 50%, with minimum increase of
1%).
50
SIN.NT.023.5
ENGLISH
MEC-100 INTERFACE SYSTEM
By the term maximum reactive power it is meant the reactive power which can be obtained with rated voltage, rated current
and power factor PF=0, that is at zero active power.
Enable Limiter: limiter activation flag; click on this button to activate the under-excitation limitation function.
Apply to Relay 1: relay 1 assignment flag; click on this button to assign the limitation intervention signal to
relay 1.
Apply to Relay 2: relay 2 assignment flag; click on this button to assign the limitation intervention signal to
relay 2.
5.7.7. Field Protections
In Fig. 5.7.7.a the field protection parameters configuration area is shown.
Fig. 5.7.7.a
Field Protection Parameter Area
Two sets of parameters can be identified:
Field Overcurrent (see Par. 3.6.2):
Maximum Current (A): enter in this field the maximum allowed field current level value (0 to 15A, with
minimum increase of 0.1A).
Time Delay (s): enter in this field the time interval value, during which the MEC-100 is authorized to supply
the Maximum Current before the activation of the relevant protection (0 to 10s, with minimum increase of
0.1s).
Enable Protection: protection activation flag; click on this button to activate the field over-current protection
function.
Apply to Relay 1: relay 1 assignment flag; click on this button to assign the protection intervention signal to
relay 1.
Apply to Relay 2: relay 2 assignment flag; click on this button to assign the protection intervention signal to
relay 2.
Field Overvoltage (see Par. 3.6.1):
Voltage Threshold (V): enter in this field the maximum allowed field voltage level value (0 to 200V, with
minimum increase of 1V).
Time Delay (s): enter in this field the time interval value during which the MEC-100 is authorized to supply
the Voltage Threshold value, before the activation of the relevant protection (0 to 10s, with minimum
increase of 0.1s).
SIN.NT.023.5
51
ENGLISH
MEC-100 INTERFACE SYSTEM
Enable Protection: protection activation flag; click on this button to activate the field over-voltage protection
function.
Apply to Relay 1: relay 1 assignment flag; click on this button to assign the protection intervention signal to
relay 1.
Apply to Relay 2: relay 2 assignment flag; click on this button to assign the protection intervention signal to
relay 2.
BY DEFAULT, PROTECTIONS ARE INITIALLY DISABLED. Pay particular attention, when
configuring the MEC-100, to the activation of all concerned protections.
5.7.8. Generator Protections
In Fig. 5.7.8.a the generator protection parameters configuration area is shown.
Fig. 5.7.8.a
Generator Protection Parameter Area
Four sets of parameters can be identified:
Generator Overcurrent (see Par. 3.6.5):
Maximum Current (%): enter in this field the maximum allowed generator current level value related to the
following Time Delay, and expressed in percentage with respect to the generator rated current value (0 to
120%, with minimum increase of 1%).
Time Delay (s): enter in this field the time interval value during which the MEC-100 is authorized to supply
the Maximum Current, before the activation of the relevant protection (0 to 3600s, with minimum increase of
1s).
Maximum Continuative Current (%): enter in this field the maximum continuous generator current value,
expressed in percentage with respect to the generator rated current value (0 to 110%, with minimum
increase of 1%).
Enable Protection: protection activation flag; click on this button to activate the generator over-current
protection function.
Apply to Relay 1: relay 1 assignment flag; click on this button to assign the protection intervention signal to
relay 1.
Apply to Relay 2: relay 2 assignment flag; click on this button to assign the protection intervention signal to
relay 2.
52
SIN.NT.023.5
MEC-100 INTERFACE SYSTEM
ENGLISH
Generator Overvoltage (see Par. 3.6.3):
Voltage Threshold (%): enter in this field the maximum generator voltage level value which corresponds to
the activation of the relevant protection. It is expressed in percentage with respect to the generator rated
voltage value (100 to 150%, with minimum increase of 1%).
Time Delay (s): enter in this field the time interval value during which the MEC-100 is authorized to supply a
voltage higher than or equal to the Voltage Threshold value, before the activation of the relevant protection
(0 to 300s, with minimum increase of 1s).
Enable Protection: protection activation flag; click on this button to activate the generator over-voltage
protection function.
Apply to Relay 1: relay 1 assignment flag; click on this button to assign the protection intervention signal to
relay 1.
Apply to Relay 2: relay 2 assignment flag; click on this button to assign the protection intervention signal to
relay 2.
Generator Undervoltage (see Par. 3.6.4):
Voltage Threshold (%): enter in this field the minimum generator voltage level value which corresponds to
the activation of the relevant protection. It is expressed in percentage with respect to the generator rated
voltage value (0 to 100%, with minimum increase of 1%).
Time Delay (s): enter in this field the time interval value during which the MEC-100 is authorized to supply a
voltage lower than or equal to the Voltage Threshold value, before the activation of the relevant protection
(0 to 300s, with minimum increase of 1s).
Enable Protection: protection activation flag; click on this button to activate the generator under-voltage
protection function.
Apply to Relay 1: relay 1 assignment flag; click on this button to assign the protection intervention signal to
relay 1.
Apply to Relay 2: relay 2 assignment flag; click on this button to assign the protection intervention signal to
relay 2.
Loss of Sensing (see Par. 3.6.6):
Enable Protection: protection activation flag; click on this button to activate the loss of sensing protection
function.
Apply to Relay 1: relay 1 assignment flag; click on this button to assign the protection intervention signal to
relay 1.
Apply to Relay 2: relay 2 assignment flag; click on this button to assign the protection intervention signal to
relay 2.
Shutdown/FCR: protection type selection. If Shutdown is selected, an instantaneous de-excitation of the
generator will be operated when the loss of sensing occurs, if FCR is selected, an instantaneous switch to
FCR Mode will be operated when the loss of sensing occurs.
BY DEFAULT, PROTECTIONS ARE INITIALLY DISABLED. Pay particular attention, when
configuring the MEC-100, to the activation of all concerned protections.
5.7.9. Diode Monitoring
In Fig. 5.7.9.a the diode monitoring parameters configuration area is shown.
Four sets of parameters can be identified:
Low Level (see Par. 3.6.7):
Maximum Ripple (%): enter in this field the maximum allowed excitation current ripple related to the following
Time Delay, and expressed in percentage with respect to the generator rated excitation current value (0 to
100%, with minimum increase of 1%).
Delay (s): enter in this field the time interval value during which the MEC-100 is authorized to work at/over
Maximum Ripple, before the activation of the relevant protection (0 to 100s, with minimum increase of 1s).
SIN.NT.023.5
53
ENGLISH
MEC-100 INTERFACE SYSTEM
Fig. 5.7.9.a
Diode Monitoring Parameter Area
High Level (see Par. 3.6.7):
Maximum Ripple (%): enter in this field the maximum allowed excitation current ripple related to the following
Time Delay, and expressed in percentage with respect to the generator rated excitation current value (0 to
100%, with minimum increase of 1%).
Delay (s): enter in this field the time interval value during which the MEC-100 is authorized to work at/over
Maximum Ripple, before the activation of the relevant protection (0 to 10s, with minimum increase of 1s).
Protection Options (see Par. 3.6.7):
Enable Monitoring: protection activation flag; click on this button to activate the diode monitoring function.
Enable Shutdown: shutdown activation flag; click on this button to activate the shutdown option for High
Level monitoring.
SHUTDOWN OPTION CAN BE USED ONLY ASSOCIATED TO HIGH LEVEL OF FAILURE.
Low Level can be only associated to external annunciation.
Alarm Options (see Par. 3.6.7):
High Level:
Apply to Relay 1: relay 1 assignment
relay 1.
Apply to Relay 2: relay 2 assignment
relay 2.
Low Level:
Apply to Relay 1: relay 1 assignment
relay 1.
Apply to Relay 2: relay 2 assignment
relay 2.
flag; click on this button to assign the protection intervention signal to
flag; click on this button to assign the protection intervention signal to
flag; click on this button to assign the protection intervention signal to
flag; click on this button to assign the protection intervention signal to
BY DEFAULT, PROTECTIONS ARE INITIALLY DISABLED. Pay particular attention, when
configuring the MEC-100, to the activation of all concerned protections.
54
SIN.NT.023.5
ENGLISH
MEC-100 INTERFACE SYSTEM
5.8. SYSTEM MONITORING
The MEC-100 allows to display on a real-time basis the value taken by the main electrical system parameters
and the status of inputs and outputs.
The section of the MEC-100 Interface System dedicated to the system monitoring is that identified by the label 2,
as shown in Figure 5.3.2.a.
It consists of six monitoring areas, which are described here below.
5.8.1. Electrical System Parameters
In Fig. 5.8.1.a the system parameters monitoring area
is shown.
It allows to measure in real time:
The three phase-to-phase voltages.
The current in the sensed phase.
The generator electrical frequency.
Excitation current and voltage.
Network frequency and voltage.
Real, reactive and apparent powers.
The power factor.
In the last column the units of measurement of the
measured electrical parameters are defined.
.
Fig. 5.8.1.a
Electrical System Parameter Monitoring
5.8.2. System Status
In Fig. 5.8.2.a the system status monitoring area is
shown.
It allows to display in real time:
The status of the voltage matching.
The status of the generators or the network parallel.
The status of the FCR Mode.
The excitation status of the system.
In the last column, each one of the illuminated LEDs
identifies the relevant active function (see the
description of contacts in Par. 3.5).
Fig. 5.8.2.a
System Status Monitoring
5.8.3. Alarm Status
In Fig. 5.8.3.a the alarm status monitoring area is
shown.
It allows to display in real time:
The status of the limiters.
The status of the protections.
In the last column, each one of the illuminated LEDs
identifies the relevant active alarm.
Together with the LED, also the relative description of
the alarm is flashing red.
Fig. 5.8.3.a
Alarm Status Monitoring
SIN.NT.023.5
55
ENGLISH
MEC-100 INTERFACE SYSTEM
5.8.4. Auxiliary Parameter Display
A
In Fig. 5.8.4.a an image of some auxiliary system
parameters is shown:
The internal MEC-100 bus voltage.
Analogue Auxiliary Input 1 current value (mA).
Analogue Auxiliary Input 2 current value (mA).
Excitation Current Ripple (%).
This graphical area can be selected or de-selected by
clicking the selection flag (A indicator) as shown in Fig.
5.8.4.a.
Fig. 5.8.4.a
Auxiliary Parameter Display
5.8.5. Phase Graphical Display
In Fig. 5.8.5.a an image of the graphical display relative
to the angle deviation between generator voltage and
current is shown.
Moreover it allows to display the numerical values of:
Phase (Degrees).
Sin φ.
Cos φ.
Fig. 5.8.5.a
Phase Graphical Display
5.8.6. Oscillographic Display
In Fig. 5.8.6.a an image of the oscillographic
indicator relative to the electrical system parameters
is shown.
C
A
In the figure the three areas concerned by the use of
this functions can be identified:
B
Selection of the electrical parameter to be
displayed (A indicator in Fig. 5.8.6.a). Next to
each one of the items corresponding to the
measured parameters, an option button (“”)
for the selection of the parameter to be
displayed is located.
To select the parameter to be displayed, click
on the option button associated to the relative
item.
Fig. 5.8.6.a
Visualisation of the selected parameter in
Oscillographic Display
function of the time (B indicator in Fig. 5.8.6.a).
C indicator shows the button to open the
oscillographic display settings.
In the example in the Fig. 5.8.6.a, the time profile of the voltage between the U and V phases, measured during
the SOFT-START phase, is shown.
56
SIN.NT.023.5
ENGLISH
MEC-100 INTERFACE SYSTEM
5.8.7. Power Diagram
A
B
C
Fig. 5.8.7.a
Power Diagram
In Fig. 5.8.7.a an image of the power diagram is shown.
It provides in real time the generator operating point, with:
The instantaneous indication of active and reactive power (B indicator in Fig. 5.8.7.a).
The visualisation of the curve defined by setting the under-excitation limiter (C indicator in Fig. 5.8.7.a, see
Par. 3.7.3).
The A indicator in Fig. 5.8.7.a identifies the button for the selection of the Power Diagram graphical display
mode; by clicking on it the described diagram replaces the System Parameters configuration window. By clicking
again on the same button, the System Parameters configuration window reappears.
SIN.NT.023.5
57
ENGLISH
SET-UP PROCEDURE
6. SET-UP PROCEDURE
In this Section basic instruction for the preliminary set-up of MEC-100 by MEC-100 Interface System will be
listed. Should more detailed information be necessary, please see Sections 3, 4 and 5.
6.1. MEC-100 INTERFACE SYSTEM INSTALLATION
TO DO:
Insert the CD-ROM disk provided with the MEC-100 into the PC CD-ROM drive.
When the installation menu appears, click the Install button; the set-up utility of the MEC-100 Interface
System will install automatically the software.
Follow the instructions which appear on the PC screen.
6.2. PREPARAZIONE DEL MEC-100
The MEC-100 is equipped with an RS-232 serial port located on the card component side: it consists of a DB-9
female connector. For the connection to Personal Computer (PC) a standard communication cable ending with a
DB-9 female connector is required.
If the DB-9 serial port is not available on PC, one of the USB ports must be used, paying attention to:
Interpose an USB/DB-9 adapter between the standard cable and the PC.
Install the adapter driver files on PC (please follow the provided instructions).
TO DO:
The basic connection diagram for the preliminary MEC-100 set-up is showm in Fig. 6.2.a. The proper actions are
the following (respect the shown order):
Conenct MEC-100 to PC by means of the communication cable.
Apply the supply voltage to supply terminalsi P1 and P2. The proper supply voltage ranges from 30Vac to
220Vac.
PC
SUPPLY
VOLTAGE
58
P1
P2
MEC-100
RS-232
SIN.NT.023.5
ENGLISH
SET-UP PROCEDURE
FOR THE PRELIMINARY MEC-100 SET-UP DISCONNECT ALL THE WIRING ADN SUPPLY
THE CARD BY MEANS OF AN EXTERNAL POWER SOURCE. Only the connections shown
in Fig. 6.2.a can be used.
WARNING: Before doing any operations and/or any set-up on MEC-100, is to be taken
into consideration that lethal voltage is present at the top panel when the unit is
energized. Top panel connections and/or operations with or without tools should be
made only when the unit is de-energized.
6.3. STARTING THE PROGRAM
TO DO:
Click the Windows® Start button.
Select Programs.
Point to the MarelliMotori directory.
Select the MEC-100 Interface System icon.
Follow the instructions which appear in the start menu.
6.4. ESTABLIGHING A COMMUNICATION LINK
TO DO:
Click the connection button Open Comm mostrato in Fig.
6.4.a.
If required, enter the generator serial number e click OK.
Click OK to all the following messages.
The message ON-LINE has to be displayed into the blue
bar below.
Fig. 6.4.a
Connection button
To select a PC communication port other than the default, execute the following operations:
Click on the Tolls item in the menu bar of the MEC-100 Interface System (see Fig. 6.4.b).
In the displayed pull-down menu, select the Port Configuration item.
A window (see Fig. 6.4.c) appears where the desired communication port can be selected.
Fig. 6.4.b
Communication Port Setting
SIN.NT.023.5
Fig. 6.4.c
Communication Port Selection
59
ENGLISH
SET-UP PROCEDURE
6.5. ENTERING THE PASSWORD
TO DO:
To remove the write protection of the MEC-100 and enter the password:
Click on the Enter Password button, placed at the left bottom of the main screen, see Fig. 6.5.a.
Enter the password in the field on the displayed window (see Fig. 6.5.b).
The default password is “Marelli”.
Click Apply.
To change the password, see Par. 5.4.2.
Fig. 6.5.a
Enter Password Button
Fig. 6.5.b
Password Entry
6.6. CONFIGURE THE SYSTEM SETTING
TO DO:
To carry out the complete MEC-100 set-up by means of MEC100 Interface System, read carefully the following instructions.
Remember that all parameters are divided by type in 9 groups,
each group associated to a setting window. The window
selection is achievable by clicking on one of the nine items of
the selection frame shown in 6.6.a.
As the set-up is obtained window by window, parameters set in
other windows could be not consistent with the ones just
entered (high-lined red point).
Please respect the order of the following instructions, in order
to get the total proper settup of MEC-100.
Please check alla the entered parameters before using the
MEC-100.
Fig. 6.6.a
Parameter Group Selection
60
SIN.NT.023.5
SET-UP PROCEDURE
ENGLISH
Sensing Window
TO DO:
Generator VT - Primary Voltage (V): enter the primary
voltage value of the TV used, otherwise the generator
rated voltage (100 to 22000V, with minimum increase
of 1V).
Generator VT - Secondary Voltage (V): the secondary
voltage value of the TV used, otherwise the generator
rated voltage (100 to 500V, with minimum increase of
1V).
Line VT - Primary Voltage (V): enter the primary voltage
value of the TV used, otherwise the line/network rated
voltage (100 to 22000V, with minimum increase of 1V).
Line VT - Primary Voltage (V): the secondary voltage
value of the TV if used, otherwise the line/network
rated voltage (100 to 500V, with minimum increase of
1V).
Generator CT - Primary Current (V): (A): enter the
primary current value of the CT used (1 to 10000A, with
minimum increase of 1A.
Generator CT - Primary Current (A): select in this field
the secondary current value of the TA used by
choosing between the two standard values: 1A and 5A.
Adjustment - Generator VT Ratio (%): if the MEC-100 Interface System senses and displays a generator
voltage value higher, of a given percentage, than the actual value, you need to add this percentage to the
percentage already entered in the field (100% of default), to obtain a correct and accurate sensing
calibration (95 to 105%, with minimum increase of 0.1%).
Adjustment - Line VT Ratio (%): if the MEC-100 Interface System senses and displays a network voltage
value higher, of a given percentage, than the actual value, you need to add this percentage to the
percentage already entered in the field (100% of default), to obtain a correct and accurate sensing
calibration (95 to 105%, with minimum increase of 0.1%).
Adjustment - Generator CT Ratio (%): if the MEC-100 Interface System senses and displays a generator
current value higher, of a given percentage, than the actual value, you need to add this percentage to the
percentage already entered in the field (100% of default), to obtain a correct and accurate sensing
calibration (95 to 105%, with minimum increase of 0.1%).
Adjustment - Phase Compensation (degrees): if the MEC-100 Interface System senses and displays a
power factor value higher or lower than the actual value, you need to introduce a compensation angle (0°
default value), to obtain a correct and accurate power factor measurement (-10° to +10°, with minimum
increase of 0.1°).
SIN.NT.023.5
61
ENGLISH
SET-UP PROCEDURE
System Parameters Window
TO DO:
Generator Data - Rated Voltage (V): enter the generator
rated voltage value (phase-phase).
Generator Data - Rated Current (A): enter the generator
rated current value.
Generator Data - Rated Power Factor: enter the
generator rated power factor value.
Generator Data - Rated Frequency (Hz): enter the
generator rated frequency value.
Generator Data - Rated Excitation Current (A): enter the
generator rated excitation current value.
System Options - Voltage Sensing: select the desired
sensing mode.
System Options - PF/VAR: select the desired regulazion
mode during parallel operations.
Aux. Analog Input Setting - Single Operation: select the
anlaog input to which associate the setpoint during
single operation.
Aux. Analog Input Setting - Parallel Operation: select
the anlaog input to which associate the setpoint during
parallel operation.
The two analog input are current type, 4-0mA: for example, if voltage setpoint limits are set to 80 and 120% of
the generator rated voltage, 4mA will be associated to the minimum limit (80%) and 20mA to the maximum limit
(120%), and all the intermediate values of the generator voltage setpoint will proportionally correspond to the
current values between 4 and 20mA.
Setpoint Window
TO DO:
Generator Voltage Setpoint - Voltage (%):enter the
generator voltage setpoint, expressed in percentage
with respect to the machine rated value (with minimum
increase of 0.1%).
Generator Voltage Setpoint - Minimum (%): enter the
minimum value which the voltage setpoint can reach,
expressed in percentage with respect to the machine
rated voltage (70 to 100%, with minimum increase of
1%).
Generator Voltage Setpoint - Maximum (%): enter the
maximum value which the voltage setpoint can reach,
expressed in percentage with respect to the machine
rated voltage (70 to 100%, with minimum increase of
1%).
Power Factor Setpoint: Select PF type, inductive or
capacitive.
Power Factor Setpoint - Power Factor: enter the PF
setpoint (with minimum increase of 0.001).
Power Factor Setpoint - Leading: enter the minimum
leading limit (0.5 to 1, with minimum increase of 0.01).
Power Factor Setpoint - Lagging: enter the minimum
lagging limit (0.5 to 1, with minimum increase of 0.01).
62
SIN.NT.023.5
SET-UP PROCEDURE
ENGLISH
Reactive Power Setpoint - Reactive Power (%): enter the reactive power setpoint, expressed in percentage
with respect to the maximum reactive power (with minimum increase of 0.1%)
Reactive Power Setpoint - Minimum (%): enter the (capacitive) minimum value of the reactive power
setpoint, expressed in percentage with respect to the maximum reactive power (–50% to 0%, with minimum
increase of 1%).
Reactive Power Setpoint - Maximum (%):enter the (inductive) maximum value of the reactive power setpoint,
expressed in percentage with respect to the maximum reactive power (0% to 100%, with minimum increase
of 1%).
Excitation Current Setpoint - Excitation Current (%): enter the excitation current setpoint, expressed in
percentage with respect to the rated excitation current (with minimum increase of 1%).
Excitation Current Setpoint - Minimum (%): enter the minimum value of the excitation current setpoint,
expressed in percentage with respect to the rated excitation current (0% to 100%, with minimum increase of
1%).
Excitation Current Setpoint - Maximum (%):enter the maximum value of the excitation current setpoint,
expressed in percentage with respect to the rated excitation current (1% to 120%, with minimum increase of
1%).
PAY PARTICULAR ATTENTION TO THE SELECTION AND/OR MODIFICATION OF THE
SETPOINT VALUES. The limit thresholds set by the MEC-100 Interface System to the setpoint
values do not protect against the selection of setpoints which may be potentially dangerous for
devices and/or installations connected to the generator.
In all configuration operations of the MEC-100 Interface System, always check that the new
setpoints to be entered are appropriate to the devices and/or installations connected to the
generator. Marelli Motori is under no liability for any damages which may occur to the AVR, the
plant or the persons, or for lost earnings, or financial loss, or system stoppages, due to a wrong
setpoint setting.
Other Settings Window
TO DO:
Soft Start - Soft Start Time (s): enter the voltage ramp
time (0 to 3600s, with minimum increase of 1s).
Traverse rate - Voltage (%/s): enter the variation speed
of the generator voltage setpoint (0.1%/s to 5%/s, with
minimum increase of 0.1%/s).
Traverse rate - Power Factor (centesimiPF/s): enter the
variation speed of the power factor setpoint
(1hundredthsPF/s to 10hundredthsPF/s, with minimum
increase of 0.1hundredthsPF/s).
Traverse rate - Reactive Power (%/s): enter the
variation speed of the reactive power setpoint (0,1%/s
to 5%/s, with minimum increase of 0.1%/s).
The traverse rate of the excitation current is fixed and kept slow by
default.
Voltage Matching - Minimum Limit (%): enter the
minimum value of the network voltage range within
which the voltage matching is enabled; this limit is
expressed in percentage respect to the rated generator
voltage (90% to 100%, with minimum increase of 1%).
Voltage Matching - Maximum Limit (%): enter the minimum value of the network voltage range within which
the voltage matching is enabled; this limit is expressed in percentage respect to the rated generator voltage
(100% to 110%, with minimum increase of 1%).
SIN.NT.023.5
63
ENGLISH
SET-UP PROCEDURE
Droop Settings - Reactive Droop (%): enter the Droop Compensation value (%) for parallel operations (0 to
10%, with minimum increase of 0.1%).
PID Setting Window
TO DO:
Stability Settings: select the desired predefined
standard setting or alternatively the custom setting in
order to tune the parameters each one.
Voltage Regulation Stability - Proportional Gain: enter
the proportional constant value of the regulation loop.
Voltage Regulation Stability - Integral Gain: enter the
integrative constant value of the regulation loop.
Voltage Regulation Stability - Derivative Gain: enter the
derivative constant value of the regulation loop.
st
Derivative Adjustments - 1 Derivative Term - Time:
enter the parameter Time for derivative adjustment.
nd
Derivative Adjustments - 2 Derivative Term - Filter:
enter the parameter Filter for derivative adjustment.
Power Factor Regulation Stability - Proportional Gain:
enter the proportional constant value of the regulation
loop.
Power Factor Regulation Stability - Integral Gain: enter
the parameter Filter for derivative adjustment.
PID setting advises: in case of MEC-100 without factory set-up, take the PID parameters from the following
table.
Generator
Type
AVR MODE
PF / VAR MODE
KP
KI
KD
1° d.t.
2° d.t.
KP
KI
MJB 400
1800
400
500
20
16
180
300
MJB 450
900
250
600
40
16
150
300
MJB 500
600
150
600
20
16
120
120
MJB 560
800
180
600
40
16
180
140
MJH 630
1000
150
1000
40
16
150
140
MJH 710
1100
150
1100
40
16
150
140
They are only standard parameters, not the optimum, and a subsequent tuning (step by step) is necessary to get
the best PID setting for the application.
In order to tune correctly the PID parameters, enter the values shown in table 6.6.a for the proper generator
frame size, and verify if they are proper for the application: if necessary, modify one by one KP, KI, KD (with this
order); changes have to be lower then 10% of the actual value, and can be increasing or decreasing, depending
on the generator time response.
Chosen voltage regulation PID parameters can be verified as follows:
by applying a small load, not higher than 50% of the rated value, and measuring voltage dip and related
recovery time;
by rejecting the same load and measuring the voltage overshoot and related recovery time.
Chosen PF regulation PI parameters can be verified as follows:
by applying a PF step value, not higher than 0.1, and measuring PF overshoot (if present) and recovery
time.
64
SIN.NT.023.5
SET-UP PROCEDURE
ENGLISH
Should better transient performances be required, contact the Marelli After Market Department for more
information (see Section 7).
Should the chosen PID parameters be unproper or dangerous for the application, stop
the generator and contact the Marelli After Market Department (see Section 7).
Limiters Window
TO DO:
Underfrequency Limiter - Corner Frequency (Hz): enter
the corner frequency value (40 to 60Hz, with minimum
increase of 0.1Hz).
Underfrequency Limiter - Zero Volt Frequency (Hz):
enter the zero Volt frequency value (0 to 40Hz, with
minimum increase of 0.1Hz).
Overexcitation Limiter - Maximum Current (A): enter the
maximum allowed current level value (0 to 25A, with
minimum increase of 0.1A).
Overexcitation Limiter - Time Delay (s): enter the
minimum operation time value during which the MEC100 is authorized to supply the Maximum excitation
Current (0 to 600s, with minimum increase of 1s).
Overexcitation Limiter - enter the maximum continuative
current level value (0 to 15A, with minimum increase of
0.1A).
Overexcitation Limiter - Enable Limiter: click to activate
the over-excitation limiter.
Overexcitation Limiter - Apply to Relay 1: click to assign
the limitation intervention signal to relay 1.
Overexcitation Limiter - Apply to Relay 2: click to assign
the limitation intervention signal to relay 2.
Underexcitation Limiter - Leading Power at PF=0 (%): enter the maximum allowed absorbed reactive power
value, expressed in percentage with respect to the maximum reactive power (0 to 50%, with minimum
increase of 1%).
Underexcitation Limiter - Enable Limiter: click to activate the under-excitation limiter.
Underexcitation Limiter - Apply to Relay 1: click to assign the limitation intervention signal to relay 1.
Underexcitation Limiter - Apply to Relay 2: click to assign the limitation intervention signal to relay 2.
BY DEFAULT, LIMITERS AND PROTECTIONS ARE INITIALLY DISABLED. Pay particular
attention, when configuring the MEC-100, to the activation of all concerned protections.
SIN.NT.023.5
65
ENGLISH
SET-UP PROCEDURE
Field Protections Window
TO DO:
Field Overcurrent - Maximum Current (A): enter the
maximum allowed field current level value (0 to 15A,
with minimum increase of 0.1A).
Field Overcurrent - Time Delay (s): enter in this field the
protection time delay (0 to 10s, with minimum increase
of 0.1s).
Field Overcurrent - Enable Protection: click to activate
the field over-current protection function.
Field Overcurrent - Apply to Relay 1: click to assign the
protection intervention signal to relay 1.
Field Overcurrent - Apply to Relay 2: click to assign the
protection intervention signal to relay 2.
Field Overvoltage - Voltage Threshold (V): enter the
maximum allowed field voltage level value (0 to 200V,
with minimum increase of 1V).
Field Overvoltage - Time Delay (s): enter in this field the
protection time delay (0 to 300s, with minimum increase
of 0.1s).
Field Overvoltage - Enable Protection: click to activate
the field over-voltage protection function.
Field Overvoltage - Apply to Relay 1: click to assign the
protection intervention signal to relay 1.
Field Overvoltage - Apply to Relay 2: click to assign the protection intervention signal to relay 2.
Generator Protections Window
TO DO:
Generator Overcurrent - Maximum Current (%): enter
the maximum allowed generator current, expressed in
percentage with respect to the generator rated current
value (0 to 120%, with minimum increase of 1%).
Generator Overcurrent - Maximum Continuative Current
(%):enter the maximum continuous generator current,
expressed in percentage with respect to the generator
rated current value (0 to 110%, with minimum increase
of 1%).
Generator Overcurrent - Time Delay (s): enter the time
delay during which the MEC-100 is authorized to supply
the Maximum Current (0 to 3600s, with minimum
increase of 1s).
Generator Overcurrent - Enable Protection: click to
activate the generator over-current protection function.
Generator Overcurrent - Apply to Relay 1: click to assign
the protection intervention signal to relay 1.
Generator Overcurrent - Apply to Relay 2: click to assign
the protection intervention signal to relay 2.
Generator Overvoltage - Voltage Threshold (%):enter
the maximum generator voltage, expressed in
percentage with respect to the generator rated voltage value (100 to 150%, with minimum increase of 1%).
Generator Overvoltage - Time Delay (s): enter the time delay (0 to 300s, with minimum increase of 1s).
Generator Overvoltage - Enable Protection: click to activate the generator over-voltage protection function.
Generator Overvoltage - Apply to Relay 1: click to assign the protection intervention signal to relay 1.
Generator Overvoltage - Apply to Relay 2: click to assign the protection intervention signal to relay 2.
66
SIN.NT.023.5
SET-UP PROCEDURE
ENGLISH
Generator Undervoltage - Voltage Threshold (%):enter the minimum generator voltage, expressed in
percentage with respect to the generator rated voltage value (0 to 100%, with minimum increase of 1%).
Generator Undervoltage - Time Delay (s): enter the time delay (0 to 300s, with minimum increase of 1s).
Generator Undervoltage - Enable Protection: click to activate the generator undervoltage protection function.
Generator Undervoltage - Apply to Relay 1: click to assign the protection intervention signal to relay 1.
Generator Undervoltage - Apply to Relay 2: click to assign the protection intervention signal to relay 2.
Loss of Sensing - Enable Protection: click to activate the loss of sensing protection function.
Loss of Sensing - Apply to Relay 1: click to assign the protection intervention signal to relay 1.
Loss of Sensing - Apply to Relay 2: click to assign the protection intervention signal to relay 2.
Loss of Sensing - Shutdown/FCR: select the desired intervention mode. If Shutdown is selected, an
instantaneous de-excitation of the generator will be operated when the loss of sensing occurs, if FCR is
selected, an instantaneous switch to FCR Mode will be operated when the loss of sensing occurs.
Diode Monitoring Window
TO DO:
Low Level - Maximum Ripple (%): enter the maximum
allowed excitation current ripple (low level of failure),
expressed in percentage with respect to the generator
rated excitation current value (0 to 100%, with minimum
increase of 1%).
Low Level - Delay (s): enter the time delay (0 to 100s,
with minimum increase of 1s).
High Level - Maximum Ripple (%): enter the maximum
allowed excitation current ripple (high level of failure),
expressed in percentage with respect to the generator
rated excitation current value (0 to 100%, with minimum
increase of 1%).
High Level - Delay (s): enter the time delay (0 to 10s,
with minimum increase of 1s).
Protection Options - Enable Monitoring: click to activate
the diode monitoring function (both Low Level and High
Level).
Protection Options - Enable Shutdown: click to activate
the shutdown option (only for High Level).
Alarm Options - Low Level - Apply to Relay 1: click to assign to relay 1.
Alarm Options - Low Level - Apply to Relay 2: click to assign to relay 2.
Alarm Options - High Level - Apply to Relay 1: click to assign to relay 1.
Alarm Options - High Level - Apply to Relay 2: click to assign to relay 2.
Levels Set-up: Diode Monitoring function is usually set in
factory (and left desabled).
If new setting should be necessary, follow this procedure:
Generator start, rated speed, no load conditions.
Take note of the Excitation Current Ripple % measured
by MEC-100. If this value is higher than 10%, stop the
generator and check the rectifier bridge, cause a
damage to one or more diodes is occurred.
Apply the rated load to the generator and take note of the new ripple% measured by MEC-100. Low Level
must be set to this value + 5%. High Level must be set to this value x 3 times. Example: ripple%=20% =>
Low Level=20+5=25% and High Level=20x3=60%. If calculated High Level should be higher than 100%, set
this value to 100% anymore.
If the instructions above are not executable, set Low Level=40% and High Level=100% or contact After
Market Department (see Section 7).
SIN.NT.023.5
67
ENGLISH
SET-UP PROCEDURE
6.7. SAVING A SET OF PARAMETERS
TO DO:
Click the Database button in the menu bar of the MEC-100 Interface System.
In the displayed pull-down menu, point to the Save Parameter File On-line item and click.
In the File Manager window, select a directory where to save the file, type the file name and click on OK.
To load a parameter set, see the User Manual.
PAY ATTENTION TO SAVE ALWAYS THE PARAMETER FILE AFTER PRELIMINARY SET-UP.
68
SIN.NT.023.5
ENGLISH
WARRANTY, AFTER SALES…
7. WARRANTY, AFTER SALES SERVICE AND MAINTENANCE
7.1. WARRANTY
The General Contract Conditions are specified in the presentation window at the MEC-100 Interface System
start-up (see Par. 5.3.1); see also the packing documentation and the relevant file in installation CD-ROM.
Please always refer to this document for all the warranty details.
7.2. PREVENTIVE MAINTENANCE
The only preventive maintenance required on the MEC-100 is a periodical check-up of the connections between
the MEC-100 and the system: pay attention that all the connections are clean and tight and no damages or
faults are affecting the wiring.
The MEC-100 is completely resin-bonded and isolated to keep a high operating reliability even in difficult
working conditions (high levels of humidity, dust, salty atmosphere) and in presence of vibrations: if it is not
working or not correct behaviours are present, MEC-100 must not be repaired or modified without Marelli Motori
S.p.A. approval.
7.3. AFTER SALES SERVICE
For any malfunctions, damages or any other queries, please contact Marelli Motori S.p.A. After Sales
Department.
AFTER MARKET DEPARTMENT
MARELLI MOTORI S.p.A.
Tel: +39 0444 479 775
Fax: +39 0444 479 757
E-mail: [email protected]
Web: www.marellimotori.com
SIN.NT.023.5
69
ENGLISH
NOTES
NOTES:
70
SIN.NT.023.5
NOTES
ENGLISH
NOTES:
SIN.NT.023.5
71
ENGLISH
NOTES
NOTES:
72
SIN.NT.023.5
Tutti i diritti di traduzione, riproduzione e addattamento, totale o parziale, con qualsiasi mezzo ( comprese le copie
fotostatiche e i microfilm ) sono riservati.
Neither this book nor any part may be reproduced or transmitted in any form or by any means, electronic or
mechanical ,including photocopying, microfilm, and recording, or by any information storage and retrieval system,
without permission and writing from the publisher.
Questo manuale è stampato su carta riciclata: un contributo MarelliMotori alla
salvaguardia dell’ambiente.
This manual is printed on recycled paper: MarelliMotori contribution to the safeguarding of
the environnement.
Ce manuel est imprimè sur papier recyclé: une contribution de MarelliMotori pour la
sauvegarde de l’environnement.
Dieses Handbuch ist auf wiederverwertbarem Umweltpapier gedruckt: Ein Beitrag von
Marelli Motori zum Schutz der Natur.
Este manual ha sido impreso en papel reciclado: una contribuciòn de MarelliMotori para la
salvaguardia del medio ambiente.