1
King Fahd University of Petroleum and Minerals
College of Computer Science and Engineering
Information and Computer Science Department
!"#$%"&
Table of Contents
Arabic Extended Abstract
1
Project Planning
6
Requirements Gathering
The Scenarios
Storyboarding
Functional Req.
Non-Functional Req.
Platform Specifications
Risk Analysis
System Designing
High Level Arch.
Database Design
Design Specification
User Interface
Conclusion
7
11
.. 21
Appendix 1(Input&Output Samples)
22
Appendix 2(Installation Instruction)
24
Appendix 3(User Manual)
25
1
!"#$"%&'
"
()*+
,
-*+
./0
1"23, 4$5678
)9"1"'- :0;9)+
<=>?
@#A%&'B"C*+
.D EFG=>?
@D &'
+HIJK"L)+
M
)+
M61-"4NA'#AFO
PD &'A*+
."GKQRQS, A+
TH>
:+CJLU K2+VW/B"G,8
:'XY"Z0,6[Z,
9+8
5'\6)+
M
G)+
M4NA+35]+
^ :MV0_Q
G
7/`a !#$_b
8 ,
$'cG
A67
C
Cde")'
'$5+'F,"^Z-6,/'
(_f
Gg$h(D
'c2"ZF'
)
i PYL
8 (7
'7
$&j7
C`PL
%&'6g
k9 :M
(_R
Gdec>"
G
%
'(6=>?
@D &'_l
3, 4$5")!, "m$&'"/"#\"3)+
M#F4no[p
+)+,
-3K"
8V'#'"GqMS Excelr4AC2*+
6g+^]5s7/"G8[9t,
uVcY"U-,"%&'
T>
qMS Excelr4AC2+p
-
G!&'[p
+)9^v'wvJ4AC2g+x'0 _Q
Gy0zz{?
p
^v'w4P4CF#' _b
$
:C
|27/`aq1"2#\}
)#rO
+7
C~(#\M
)+#'G[4@M
)+#' _f
`avN"v8[9t,
',
5
:0^"8[9t,M
)+#'
CGq
)#}1"2#\r P"
G P+t,'{7/
G*+
.
{
p
-
F6M
)9p
-d#'} _R
G4'A+g+6]5s"4CGqMS Wordr8,*+
6p
5+^]5so[
{
%&'
"3K"
2
G#
(6K?
vJo[,
'c
D &'A9D`P=
@4$5!&'9o[Z)*+
.D
TH>z^3K"L)+
M
8 (Y -'
,^D &'A9}
p
"%&'t,", {(t,Lp
$$&'Lp
/Lo[p
T3K"9p
-ZF#' _Q
G*+
.
{
p
- F6dp
-JK4C"LZF'
p
-
+YGc>m$+?
4/g'p
-JK72/ p
8V'#'m$&'p
^u
_b
p
F#'
CG P)0 o['
O
87/'0)+
M +"4NA'"1- L)+
M4NA)'9
^u
"G%&'"h(W
W
Wh"2U-+^4{
P,
-0
(#'`a?
U-+
KD6,'C V'A!
9,C
-!,8^4{
P,
-%&'#')!, "m$&'p
Gm$&'
,
-?
JKGqMS Wordr8,6
c?
Fx'0#'L
+[p
-Zd: ) _f
Z0
(#'L?
x'0 )"Gc2"+V'9p
-0
(#'"'
Wp
-^'w`a
%~
G4'A+g+6?
4C"5P#'G'
-"(B!@X5P}+"g9h(p
-
!
j
jLp,
j
jLp
-8V'j
jL z'j
jT3KL4/6x+K
C
YD
AFYA+7/'*+
.
G*+
.
{
p
- FuVcY"
8 (
"
#
$
#
&
$
%
'()
3
#'"G=
@3, 4$56#:!ZF'9o[Z<
F^v'`P*+
.Aj
3K"
h(1
'\}+"#
%&'89o[ #'G*+
.
{
p
- F+
JK^1$@
G;JCp
-8V'j
j"pVj
jh(1
'\/
CG
,^8N
8 (j
j
)p
- F67d"qMS Excelr4AC2F,"+p
-F#'j
JK1[c+
#
GO
,CJ9M
)9
G;J!
@8~("A9ZFp
4 )"%&'t,L, {t,4 )
[c+/$
G)+C"Y)+m$UJw1 )gk7YD &'A9Z'
C
p,
-)
m$&'LUz\L!, L/ Lo[p
+)9y,
[c+#'
%#
G'
-}+"X5P"qMS Wordr8,g+h(p
-JK0
(}+"G'
W
G
:)+j
-+"V-C4/4+
)'c2*+
.D
AFYZ"G*+
.
{
p
-7d,
-3K"
&
F6[p
+)97dp
-8V'j
j"Gp
- F+o[p
JcI
8 (j
j" z'j
0
Gp
- F6p
+)94 )'Dp,
j
juVcY"Gp
-
"++*,$
+
T
:+no)+ )^v' Dd'AGD
'c2"ZF'6,/'^
v'=
'
"Gde
c2")
i P('"8!" _Q
*++*+
)
(#'`P
:
(^+
)
&j2^O
5
k+u :!)
GqMail Merger4
*+8de
(#'"'C
9
GD
Y P)0 ('A
C`P) _b
GqD
Y rO[O
'F"JcI
6F ' _f
TH>
d'
4k0Yp0"" op8
5W @
_R
4
ZF'6,/'8!"D G 6+ &'A9,"28 g$53
O
C` P#$
G
-.!Cg$5P"D
'c2"
GF 6
"Q
(#'`P)
F '4'G)64C
+8!"D "'
)0p
-*+
.#'"Lg$p$'cF 'O
P
G*+
.
)0+ CI' )
Gp
- F+p
-%&'6"90*+
.
_l
_
_
_ -./
46qMS Visual Basic 5rl;A1N0*+
D &'¡ 0G*+
.
(65'*+ D &'¡
)+
M
"G[p
-F6qMS Excel 97rS4AC2*+
D &'¢
CG
("*+
.
p
- F
qMS Access 97r£AC2*+
D &'"GqMS Word 97rS8,D &'¡
:X5P"
Visual Basic forp
-';A1N0D &'¡
CG+[p
+[)'\"1" M#$"*+
.
{
G¤)-
:k)Z+
A*+.y6Application (VBA)
*+
.DG78
)9"1"'- :0;9)+
<
('D*+
,
-
(*+
G*+
.{
cp
F6p
-1
c8("M
)+}+"4ACYg++o[p
}+"G¥o[Z^v'
F+#
6?
vJo[0
C,
'c
D &'A9D
G
:'M
)+"9p
-0
CF8,6
(#'
5
Bilingual Graduation Certificate System
The system is a certificate generator program. The main idea of the program is to take student
information from an excel sheet and produce an appropriate certificate. The style and the content of the
certificate vary depending on many criteria. For e
college and major. Moreover, the certificate must reflect the student status by printing appropriate
message for honor student. The system will take the information and create the certificate in Microsoft
Word.
and system designing and it will end up with a conclusion. It will include also three appendices; they
are Input & Output Samples, Installation Instructions and User Manual.
Project Planning:
shows both the estimated and the actual number of hours for each activity along with the project
milestones. The project activities are explained below along with the estimated number of hours. Then,
the project plan will be followed.
Activity
Description
# hours
Training
The needed time for Visual Basic 5.0 and Power Point self-study. It
includes both learning and practicing the two packages.
Requirements
Information gathering about the project and contacting the system users
to come up with the formal functional and non-functional requirements.
Design
Dividing the project into different subsystems and then deal with each
subsystem independently. Each subsystem can be further divided into
models and functions.
Code
Programming the modules and writing the source code for each model in
MS Visual Basic.
Plan/Scheduling Divide the project work along
milestones.
Write
Writing the needed documents and reports. This includes writing project
plan, requirement document, design document, project final report with
both an Installation Instructions and a User Manual.
Meeting
Regular meeting with the project coordinator to follow the project
progress and achievements.
Debug/ Test
Run the program in a test environment and monitor its performance and
accuracy. This includes also fixing any errors if any.
Demo
Present the project in its development time. And demonstrates the
project progress and achievement.
Presentation
Present the final project with required documents. And present the
project using MS Power Point.
6
29
9
14
24
8
20
7
23
7
6
Requirements
Document
Prototype
Package
Design
Document
Project Plan
Actual
139
7
3
3
4
4
2
5
3
1
3
1
0
2
4
5
1
2
2
1
1
4
8
4
11.5
6
3.5
7.5
8.5
4
6.5
10
5.5
9.5
8.5
6
7.5
12.5
13.5
8
14.5
6
8.5
22.5
22.5
12
14.5
1
3
1
2
Total
1
3
0
1
152
1
2
Estimated
2
18.5
4
4
12.5
2
0
Actual
2
Week 15
5
0
2
24
9
12
33
9
20
18
3
7
4
0
11.5
4
Estimated
2
29
9
14
24
8
25
23
7
7
6
2
14.5
3
2
Actual
4
1
Week 14
3
1
Estimated
2
Actual
4
Week 13
3
Estimated
1
Actual
6
Estimated
Actual
Estimated
Actual
5
Week 12
Week 11
Week 10
2
Estimated
1
Actual
0
0
0
0
Week 9
1
Estimated
3
3
2
Actual
2
4
Week 8
2
2
Estimated
1
3
4
Actual
4
Week 7
4
Estimated
Actual
0
0
2
1
0
Week 6
5
2
1
1
3
Estimated
1
1
5
Actual
0
Week 5
1
2
2
3
Estimated
2
5
3
1
3
Actual
2
5
9
6
Week 4
8
7
Estimated
3
5
Actual
4
Estimated
4
3
Actual
Total
7
Week 3
Week 2
Estimated
Training
Req
Design
Code
Plan/Sch.
Write
Deb./ Test
Meeting
Demo
Present.
Requirements Gathering:
The second step after project planning is requirements gathering. This phase includes meeting
that will show a step by step procure to achieve a specific function. It will also result with an initial
thinking of the user interface. Moreover, It will come up with formal functional and non-functional
requirements along with platform specifications and risk analysis.
The Scenarios:
Four scenarios are provided below. These scenarios show the mechanism of achieving some of
the basic functions. These functions are Manual Selection, Special Selection, Select All and Updating
7
Manual Selection & Print certificates Scenario
Main Program Entry
•
•
•
Manual Selection
•
The program will start
by showing a Main
Form that has the
system title and a list of
all
the
graduated
students.
None of the students
will
be
selected
initially.
There will be three
ways of selecting the
students.
•
Print
•
The user can manually
select any number of
students by just clicking
on the needed one.
The user can also
deselect any student by
just
re-clicking the
selected name again.
After selecting the
required students, the
user can print the
certificates
by just
clicking
the
Print
Command Button.
Select All & Print
Main Program Entry
•
•
•
The program will start
by showing a Main
Form that has the
system title and a list of
all
the
graduated
students.
None of the students
will
be
selected
initially.
There will be three
ways of selecting the
students.
Select All
•
•
The user can select all
the students by click on
select All Button.
The user can reset the
list
to
its initial
unselected condition by
click on the Reset
Button.
Print
•
After selecting the
required students, the
user can print the
certificates
by just
clicking
the
Print
Command Button.
Select by Certain Range & Print
Main Program Entry
•
•
•
The program will start
by showing a Main
Form that has the
system title and a list of
all
the
graduated
students.
None of the students
will
be
selected
initially.
There will be three
ways of selecting the
students.
Special Select
•
•
The user can specify
the range of the student
IDs by requiring that
each student to have a
certain range for their
IDs.
After
specify the
Range, the program will
select every student that
satisfy that range.
8
Print
•
After selecting the
required students, the
user can print the
certificates
by just
clicking
the
Print
Command Button.
Configuration menu
•
•
Modify the dean
•
The user can go to the
Configuration Screen
from the Main Form by
clicking
on
the
Configuration Button.
A list with all the
majors along with their
corresponding
deans
will be shown.
•
The user can modify
the dean name by
clicking on it.
The user can type the
new dean name in a text
box.
Storyboarding:
Below, there are two tentative initial shots of a possible user interface. The first one is the
Main Form, which contains all the students to chose from. The user can chose the needed
students and then print the corresponding certificates. The second form is the configuration
The Configuration screen
The Main form of the program
9
Functional Requirements:
Functional requirements are the services that must be provided by the system for the end users.
below.
1. Import from MS Excel: the system should allow the user to import the student information
from an Excel sheet.
2. Different ways of selection: the user should have the ability to select the students by
different methods, they are:
• Manual Selection: the user must be able to select and deselect any student from the
list by simple method.
• Select by certain criteria: the user should have the ability to select the students by
specifying certain condition on them. For example, the user may want to select all the
students with ID between 880000 and 919999.
• Select all: there should be a simple method to select all the students in the list.
3. The configuration must be modifiable: the dean for some majors/colleges may change
from time to time. So, we need to be able to modify the corresponding dean whenever there
is a change. This also applies to registrar, dean of Admissions & Registration, and rector of
the university because they may be changed also.
4. Add majors/colleges: the user must be able to add new majors or college, as it may be
needed. Since, it is possible to open new colleges or majors in the future.
5. Delete majors/ colleges: it is also necessary to delete some majors or colleges from the
system.
6. Creation in MS Word: the certificates should be generated and saved in MS Word.
Non- Functional Requirements:
Non-functional requirements specify constraints on the system. They include the required
operating system; software packages and other needed hardware. The following are the required nonfunctional requirements.
•
MS Arabic Windows 95 or 98 is required. Since, the certificate is written in both Arabic and
English languages.
• MS Arabic Word 97 and MS Arabic Excel 97 are also needed. Since, the input to the program is
an Excel sheet and the output is a Word document.
• The certificate has a specific format and certain font.
• A printer is required to print the generated certificates.
• The system should be user friendly.
• The creation of the certificates should be both fast and reliable.
Platform Specifications:
This section specifies the required machine along with its operating system. It also specifies the
programming language for the project development.
• Target Platform
PC (at least 486) Pentium is recommended.
•
Arabic Windows 95 or 98.
•
• Development platform
• MS Visual Basic 5.0.
10
Risk Analysis:
This section indicates possible risks within the project period. These risks show some
uncertainty with project development. Three risks are specified below:
Formatting the text: it may cause a problem to fit the text exactly in its right position.
Moreover, there may be a problem also with letting the some fields occupying two lines.
Application Communication: there are some difficulties in reading the Excel sheet from VB.
Also, this type of difficulty appears in communicating with MS Word with in VB.
User Input Validation: the program must prevent the user from carrying an invalid command.
For example, there is no point in deleting the rector or adding a second rector.
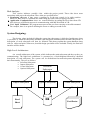
System Designing:
The design phase includes dividing the system into subsystems. A high-level architecture chart
is provided to show the subsystems and how each subsystem communicates with other subsystems. A
description of each subsystem will then be followed. This phase explains the system database along
with its tables and quires. Moreover, detailed design speciation will be included. Finally, the final user
interface will be shown.
High-Level Architecture:
An overall architecture of the system, which indicates the main subsystem and the way they are
communicating. The high-level architecture is presented as a block diagram followed by a detailed
description of each subsystem. The system can be divided into four main subsystems depending on
their functionality. They are as follows:
• Selection Subsystem
• Import Subsystem
• Create Subsystem
Selection
• Options Subsystem
Subsystem
Import Subsystem
Excel
Sheet
Options Subsystem
11
Create Subsystem
Certificates
Selection Subsystem:
It is the main starting subsystem. It will include the system title in both Arabic and English. It
will include also the necessary links to all other subsystems. This subsystem will provide the user with
a complete list of all graduated students for the current academic term. The system will provide the user
get populated with the graduated students in the chosen term. This student list is obtained from the
system database.
The user can select the students by three ways, they are:
1. Manual Selection: the user can select any student by clicking on his ID from the list and deselect by
re-clicking it again.
2. Special Selection: the user can also select the students depending on certain search. The system will
allow the user to specify a range of values for the student ID. Then, the system will select all those
students with their ID satisfying that range. For example, the user may want to select all the
students with ID between 940000 to 949999.
3. Select All: the user can select all the students by clicking on Select-All-Button.
The user can also deselect all the students by clicking on Select-None Button. Moreover, the
subsystem will provide the user with total number of students and the number of the selected students.
After selecting the required students, the user can create the certificates by clicking on the print button.
Import Subsystem:
This subsystem provides the user with the ability of importing the data from an Excel Sheet and
storing the data in the system database. It will start by opening the Excel sheet and then count the
number of stored student in that sheet. Then, it will read the Excel sheet row by row. It will process
each row before storing it in the system database. It will have a timer that will provide the user with the
total time of the import operation. Moreover, it will indicate the operation progress by showing the total
number of student and current number of the imported students. The control will be returned back to
the Selection Subsystem after finishing the import operation.
Create Subsystem:
This subsystem is responsible for creating and printing the certificates. It will loop for the
students in the List and process the selected students only. It will get the complete student information
from the system database and then will start creating the certificate. Creating the certificate begins by
opening an empty document in MS Word from a certain template. Then, it fetishes the required data
from the database, processes it and then places it probably in the created document. The required data
e information and signature information. The
data placement mechanism is done by inserting a bookmark in the MS Word template for each field
needed in the certificate. Then, the subsystem will move to this bookmark and then place the required
information. After placing all the need information in the document, the certificate will be saved in a
temporary directory.
The subsystem will show the creation progress by showing both the total number of required
certificates and the total number of generated certificates. Moreover, it will count the time for the create
operation. It will also show the current processed student. The control will be returned back to the
Selection Subsystem after creating all the certificates for all the selected students.
12
Options Subsystem:
The system needs some customization to get running in highly changing requirements. So, this
subsystem is responsible for providing the necessary options. It will interact with the system database
in order to customize the system functioanlity. The following are included in the Options Subsystem:
Item
Update Colleges
Update High Studies
Update Majors
Update Signatures
Graduation Date
Issuing Date
File Locations
Description
Adding, deleting and modifying the colleges. The college code, name and the
college dean must be prvided For each college.
Modifying the university high studies degrees. Each degree has a code, a
name and a dean associated with it and they must be provided.
Adding, deleting and modifying the majors along with their assoicated
college. The major code, name and college must be provided.
The Registrar, dean of Admission and Rector can also be modified. The date
must be provided in both Arabic and English.
The official Graduation date can be modified. The date must be provided in
both Arabic and English.
The certificate issuing date is also modifiable. The date must be provided in
both Arabic and English.
This includes the location of the Excel sheet, Ms word template and the
temporary locations. The user can enter the complete path or he can browse
for the target location.
Database Design:
inserted into the database via the Import Subsystem. The database will be updated via the Options
Subsystem. Moreover, the database will be accessed and used to create the certificates in the Create
Subsystem. The database consists of 7 tables and several queries. The tables are as follows:
• Colleges Table:
It includes all the Colleges information with college code
as a primary key. It includes the Arabic & English Dean
title and name. Moreover, the Arabic & English college
name is also included.
• Students Table:
The Student ID, Arabic & English Name, College,
Major, Degree, Graduation Term, Honor, Birth Date are
sorted in this table. The Student ID is the primary key.
The College is a foreign key to the College table. The
Major is a foreign key to Major table. Finally, the Degree
is a foreign key to High Study Table.
13
• Majors Table:
It includes all the Majors information with Major Code as
a primary key. It includes the Arabic & English Major
Name. Moreover, it contains the corresponding college as
foreign key to the College Table.
• High Study Table:
This table conations all the academic degrees (BS, MS,
MBA, PhD) along with their Arabic & English dean
name and title. The dean information for the BS students
will be taken from the college table not from this table.
The Degree field is the primary key.
• Signature Table:
There are all four signatures for the certificates. They are
the Reactor, Registrar, Dean of Admission and College
Dean. The first three are stored in this table. The table
includes Arabic & English dean name and title.
• Dates Table:
It includes all the needed dates for the certificates. These
are Issue date and the Graduation date.
• Locations Table:
It includes the file locations for the Excel Sheet and the
Word Template. Moreover, it includes the temporary
directory for the creating the certificates.
The system database uses one important query or view. This main query is called All-StudentFull, which presents each graduated student with all the releted information. This query will pressent
each student with following fields:
•
•
•
•
•
Student ID
College Code
Degree
Major Code
Honor
•
•
•
•
•
Student Arabic Name
Arabic Major Name
Birth Date
•
•
•
•
•
Student English Name
Arabic College Dean Name
English College Dean Name
English Major Code
Graduation Term
This query can be built by dividing the students into two groups: BS student and Non-BS
students. Then, take the BS-Students and link them to the related college and major. On other hand, the
Non-BS-Students will get joined with the related High-Study college and major. After that, the two
14
groups will be mixed to get all the students with all the necessary information. This procedure is
illustrated using Relational Algebra below.
BS-Students σ
Non-BS-Students σ
(Student Table)
(Student Table)
BS-Students-Full-InfoBS-Students ∞Major =Code Majors ∞College =Code Colleges
Non-BS-Students-Full-Info Non-BS-Students ∞Major = Code Majors ∞Degree =Degree High-Studies-Table
All-Student-Full BS-Students-Full-Info ∪ Non-BS-Students-Full-Info
The All-Student-Full query will provid most of the needed information for certifacte ceration.
Date Table. Also, the signaturs information will be taken from the Signature Table.
Design Specification:
This section explains some of the system models and techniques, which are used in the system
functionality. It will include some Visual Basic code to show how to implement it. It will start by
shown how to do database access, how to process the date & name, how to read from MS Excel and
how to work with MS Word.
Database Access:
Database Access is used heavily in all subsystems. It is possible to manipulate the database
using SQL (Structure Query Language). There are two types of SQL statements: Singleton and nonsingleton. Singleton statements will return zero or one record, like the Delete Command that will delete
on record in the database. On the other hand, the non-singleton statements will return more then one
record. The non-singleton statements need a record set to hold the resulted records. The
implementation of Singleton will be explained first, then it will be followed by the non-singleton.
Finally, record set manipulation will be discussed.
Singleton SQL Statements:
• Declare a Database object.
Dim DbObj as DataBase
• Open the database file.
Set DbObj = OpenDatabase (database file)
• Execute any singleton SQL statements
DbObj.Execute Singleton-SQL-Statement
• Close the Database
DbObj.close
Set DB = Nothing
Non-Singleton SQL Statements:
• Declare a Database object.
Dim DbObj as DataBase
• Declare a Record Set Object
Dim RsObj as RecordSet
15
•
•
•
Open the database file.
Set DbObj = OpenDatabase (database file)
Run a non-singleton SQL statements and get the result in the record set
Set RsObj = DbObj.OpenRecordset(Non-Singleton-SQL-Statement)
Close the Record Set and the Database
RsObj.close
DbObj.close
Set RsObj = Nothing
Set DbObj = Nothing
Record Set Operations:
After executing a non-singleton SQL statement the result will be stored in a record set. This
record set has many properties and methods. The needed properties and methods will be mentioned,
then a complete example of working with a record set will be explained.
Properties:
EOF: it stands for End Of File, it will indicate if we are at the end of the record set.
Fields (Field-Name): It will take the field name and it will return its value.
Methods:
MoveFirst: move to the beginning of the record set.
MoveNext: move to the next record in the record set.
MoveLast: move to the last record of the record set.
Record Set Example:
•
•
•
•
•
•
•
Declare a Database object.
Dim DbObj as DataBase
Declare a Record Set Object
Dim RsObj as RecordSet
Open the database file.
Set DbObj = OpenDatabase (database file)
Run a non-singleton SQL statements and get the result in the record set
Set RsObj = DbObj.OpenRecordset(Non-Singleton-SQL-Statement)
Go to first record
RsObj.MoveFirst
Loop for all the records and get a specific field.
Do While ( Not RsObj.EOF)
RsObj.Fields (specific-filed-name)
RsObj.MoveNext
Loop
Close the Record Set and the Database
RsObj.close
DbObj.close
Set RsObj = Nothing
Set DbObj = Nothing
16
Date Processing:
This model is responsible for reading the date and change it to the standard format
DD/MM/YYYY. It is used in the Import Subsystem to convert the input dates to the standard format.
This is done by scanning the date and recognizes the day field, month field and year field. After that,
we build the date in the standard format by concatenating the three fields in day/month/year order and
Name Processing:
The name of the imported students must not be in opposite form( Family name then first name).
This model will convert the opposite form name to the required form (First name then the family
name does not contain a
separator then the name is in the required form. Otherwise, we delete the separator and then split the
name into two strings and then switch the two strings.
Reading from MS Excel:
The program must read the student information from an Excel file. This is done by the following
procedure:
•
•
•
•
•
Declare a MS Excel Object
Dim ExcelObj as Object
Set the MS Excel Object for a specific Excel sheet
Set ExcelObj = GetObject ( ExcelFile, "Excel.Sheet.8")
Set the first sheet in the file to be visible
ExcelObj.Parent.Windows(1).Visible = True
To read a specific cell at certain column and row
ExcelObj.Application.Cells( RowNumber, CoulmnNumber).Value
Quit the MS Excel
ExcelObj.Application.Quit
Set ExcelObj = Nothing
Writing to MS Word:
The certificates will be created in MS Word. The Create Subsystem needs to access the MS Word to
build the certificate. Working with MS Word can be done in the following procedure:
•
•
•
•
Declare a MS Word Object
Dim WordDoc As Object
Create the Word Object
Set WordDoc = CreateObject("Word.application")
Open the
template
WordDoc.Documents.Add Template:= TemplateFile, NewTemplate:=False
Using the Place function, we will add the needed fields to the Word file.
(This function is explained below)
Place "English-Student-ID-Tag", TheActualStudentID
17
•
•
•
•
After adding all the fields, we save the certificate in a Temporary folder
WordDoc.ChangeFileOpenDirectory TempDir
WordDoc.ActiveDocument.SaveAs filename:= " target-file.doc", FileFormat:= _
wdFormatDocument, LockComments:=False, Password:="", AddToRecentFiles:= _
True, WritePassword:="", ReadOnlyRecommended:=False, EmbedTrueTypeFonts:= _
False, SaveNativePictureFormat:=False, SaveFormsData:=False, _
SaveAsAOCELetter:=False
Print the certificate if it is needed.
WordDoc.ActiveDocument.PrintOut
Close the generated Document
WordDoc.ActiveDocument.Close
Close the MS Word Application
WordDoc.Application.Quit
Set WordDoc = Nothing
The place function will take two parameters: field location and Actual field. The code of the function is
as follows:
Public Sub place(Field-Location As String, Actual-Field As String)
WordDoc.Selection.GoTo What:=wdGoToBookmark, Name:= Field-Location
WordDoc.Selection.Find.ClearFormatting
With WordDoc.Selection.Find
.Text = ""
.Replacement.Text = ""
.Forward = True
.Wrap = wdFindContinue
.Format = False
.MatchCase = False
.MatchWholeWord = False
.MatchWildcards = False
.MatchSoundsLike = False
.MatchAllWordForms = False
.MatchKashida = False
.MatchDiacritics = False
.MatchAlefHamza = False
.MatchControl = False
End With
WordDoc.Selection.TypeText Text:= Actual-Field
End Sub
18
User Interface:
The following are snap shots of the final user interface.
The About Screen
The Options Screen
19
The Select Screen
The Import Screen
20
The Create Screen
Conclusion:
The system is a certificate generator program. It has been developed as a senior project with in
Information and Computer Science Department at King Fahd University of Petroleum and Minerals.
The system will get the student information from an Excel sheet. Then, it will process the information
and store it in the system database. The user will be presented with a list containing all the graduated
students to select from. After selecting the required students, the system will create the certificates
using MS Word.
21
Appendix 1
Input & Output Samples:
Below is the input Excel sheet sample.
ID
NAME
COL MAJOR
DEG
921387
AL-MUSLEM, HASAN
ABDALLAH
MUHAMMAD
AL-YAHYA, ALI
ABDRABBARRASOU
L ALI
AL-SUWAII, BADER
ABDUL-AZIZ
MUHAMMAD
AL-JUHANI, KHALED
SALEM SALIM ALFAYEDI
AL-YAHYA, FAISAL
IBRAHIM SAAD
ABALHARETH,
MUHAMMAD SALEM
MESFER MEAJEB
AL-KHALEDI,
THAMER HUMOUD
FARHAN ALAMMOUR
AL-SHAMMARI,
AREF MUHAMMAD
HAMDAN ABDUH
AL-ZAHRANI,
MUHAMMAD SALEH
ABDALLAH ALHARIRI
ZAATARI, GHASSAN
MUHAAMMAD TAHA
AL-HADDAD, TURKI
NASER BASEM HADI
AE
ACE
BS
981
AE
ACE
BS
981
AE
ACHE
BS
982 1
AE
ACHE
BS
981
AE
ACHE
BS
983
AE
ACHE
BS
982
AL-ZAHRANI, JAMAN
AHMAD ALI ALBAKHIT
AL-THUNAIYAN,
KHALED SALEH
MUHAMMAD
BUSHAH, WAIL ADLI
AHMAD
AL-DOSARI,
MUHAMMAD SALEM
MUHAMMAD ALHAWASHELAH
AL-SADAT, MAJED
HASAN HASAN
MUBARKI, YOUSEF
ALI AHMAD
HAMMAD, MUNIR
SALEH ABDALLAH
AL-ASIRI, MAJED
MUHAMMAD HASAN
AL-ARAR
AL-SHAUWOUSH,
ANWAR SALEH
MUHAMMAD
935069
880726
885846
903198
904503
910946
914293
916590
920173
920897
921596
921794
924951
926457
926721
927204
928079
928723
929604
AE
ACHE
BS
TERM
Honor
Date
1416/6/21
1997/5/6
!"
#
%
981
BS
983
&
AE
ACHE
BS
982
(
BS
981 2
AE
ACHE
BS
983
AE
ACHE
BS
982
AE
ACHE
BS
981
AE
ACHE
BS
983
AE
ACHE
BS
982
6/9/1400
$3/1/1970
ACHE
ACHE
3/4/1416
3/1/1411
AE
AE
3/1/1411
3/4/1416
'
%
)*
%
+
%
(
$3/1/1970
1416/6/21
,
1997/5/6
-.
1946/9/6
/0
)1
6/9/1400
1946/8/21
1984/5/30
)12
AE
ACHE
BS
981
3
AE
ACHE
BS
983
4
5
AE
ACHE
BS
982
(
1977/6/12
AE
ACHE
BS
981
3
3/1/1412
AE
ACHE
BS
983
(
22
1931/11/6
1980/10/17
3/4/1417
)#6
KHALIFAH
Below is the Output Word document (Certificate)
KQRQS7
k+,+QlT, {t,
Issue Date: Decmeber 21, 1998
Graduation Certificate
:
31o, - s A
T8[+t,
"LQT3)+
MF,"
)
1$z9p,9Z¦
N¡Y FLKQR
-' 9 6D,
/!,8^
QRQS7
k+,+bt,
';~"L
WU-
GDQSS V-A8+b09K
This is to certify that MR. MUHAMMAD
ABD RAB AL-RASOAL ALI FAMILY,
Student ID # 777771, born 1400H, has
completed all formal and academic
requirements for the Degree Of Bachalore
Of science in Applied Civil Engineering.
The Degree is conferred with Second Honor
by King Fahd University of Petroleum &
Minerals effective Decmeber 21, 1998.
Registrar
'
Ahmed A. Al-Dharrab
okdd) - §Y
Dean, Admissions & Registration
''%+
,
N% s¦" ¨
Mamdouh M. Najjar
Dean, College of Applied Engineering
(Acting)
Mohammad O, Budair
0
1+*2(
s
Rector of the University
4c © -dd) -
Abdulaziz A. Al-Dukhayil
23
24
Appendix 2
Installation Instructions:
%
3(
0"/
+"8,"0"/
+8!"*+
.?'"G)J0ª4)"G¨FY),Y+*+
.7/'
TH2Z-*+
.?C'G4AC
h(?K~q?'/9x+r-/
:!+}F24)+6*+
.+1"2ZG)J04j_Q
GqAr
G?C'*+
4'SETUPg+^O
!"8d+uYG1"268!9p
59
F;:X'_b
\OK,^yYG?Pj
j;:X'?C'*+
4,
'c )_f
EXIT SETUP"Y?C'1
/'
G?C'
«
GChange Directory^yk*+
.?C48V;/G*+
.ZF+ j
j;:X';~ )_R
G?C',^?C'1
/';/"Y
+*+
.ZF+V;/G*+
.3'0\ZF9;xj
j;:X'Change Directory,^yk _l
GCancel,ZF9V7"8B!GOK,?
9ZF9,
'c Gj
JK1[c
Z+t
A6D '-A;-j
j;:X'Go9ZF9h(p
59tAY -¬ZF+,
'c )_
G
:&A#'np
59
|Yx
G=
'1
c8(+?=
@+
:'\ )_
ykZ+G:' F*+
.?C7Y;-
,;:X'4+
/
p
59tA"F24C+1
/' )_ G4',
$'c
(#'"*+
.?C3:'OK,^
25
Appendix 3
User Guide:
'#
p
'
b
*+
.J-
b
,
'c\j
j
b
p
+)98V'j
j
b
(j
j
b
p,
j
j
b *+
.1Pj
j
26
,&4
¥o[^v'w4ACYg+*+
.D"G78
)9"1"'- :0;9)+
!6%&'
"
®D*+
.
G?$^ ¯6ª9
5a*+
.D}G
,"kp
+)94CZ+
5*$
,
'°7YD &'A9Z'AG¥o[ZD
F,I
F^j
JKv'GD &'A:X'nAj
3K
T5'[Wo[
#'
ykN"G
68!93)+
MF,08No[vY,
'cD &'A9Z'AT@,
'c\_Q
G,
'c\
(
'C}G
+C?
<m
c6±82 @
'C3)+
M#F1
¯ z'D &'A9DT
,
'c\_b
ZJo[Z,
'c
*+
.D`a,08N"Gh(C?
<m
c6^$F2 @
G8 1
¬6#:+
F,Y
G4/,
'c,08No[Z,
'cD &'A9Z'AT4/,
'c_f
0
o[ZM,
'c37YD &'A9Z'A
3/8 ))*+
.D
CG3j\,
'c,
);
JCG,
'&9o[8 "
6o[
Go[3, 4$5*+
.
%#
$67%/+
8492:
;5*$
,<#<
#
849%+
27
,='()>,
;
&
./5*,
%
.(#
849?
@9#@,45*
;A %+'B
%
$
CB*
%
D%+E!5*
!<
<$6F+
$6F+
%B*
2:
9;<B*<
!G
%
%$
2:D
%
H
@IJ!+%3"
K,
#$%./L/
B %./+%:M"F"
;
A N
$
28
$
,<$
<$6F+
$
./OE!B*
GB %G
$G
(.9;
!PF$
E%(;5*
849./
O/%
849;
MB %Q$%G
KK
$G
(R
S4"/
T,E
(D
(;
)
;*+/
KK
'%"
F'K"E!B*
@K,&4
2./OK&$%K+
$
,
F
;5*
29
30