1
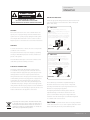
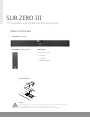
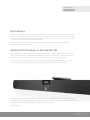
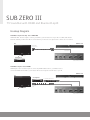
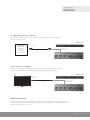
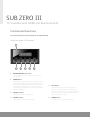
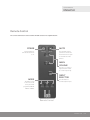
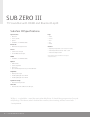
“I think cinema, movies, and magic have always been closely associated.
The very earliest people who made film were magicians.”
- Francis Ford Coppola
Sub Zero III
''
TV Soundbar with HDMI and Bluetooth aptX
Turn it up.
''
2 | Roth SUB ZERO III User Manual
User Manual
English
Sub Zero III
TV Soundbar with HDMI and Bluetooth aptX
CONTENTS
Important safety instructions.. ................................. . . . . . . . . . . . . . . . . . . . . . . . 4-5
What’s In The Box................................................. . . . . . . . . . . . . . . . . . . . . . . . . . 6
Key features.......................................................... . . . . . . . . . . . . . . . . . . . . . . . . 7
Wall mounting...................................................... . . . . . . . . . . . . . . . . . . . . . . . . . 8
Trouble shooting.................................................... . . . . . . . . . . . . . . . . . . . . . . . . 9
Setup instructions (hookup guide)............................ . . . . . . . . . . . . . . . . . . . 10-11
Controls and functions.. ........................................... . . . . . . . . . . . . . . . . . . . . . . . 12
Remote control.. .................................................... . . . . . . . . . . . . . . . . . . . . . . . . 13
Specifications....................................................... . . . . . . . . . . . . . . . . . . . . . . . . 14
Thank you...
...for choosing the Roth Audio Sub Zero III Soundbar.
Please read these instructions carefully – we’re using some quite complex technology and there may be a few changes to your
current system set-up that you’ll have to make to get the best performance possible.
Turn It Up.
rothaudio.co.uk | 3
Sub Zero III
TV Soundbar with HDMI and Bluetooth aptX
READ BEFORE USING THE Sub Zero III SOUNDBAR
Follow all warnings and instructions
8.
marked on the Sub Zero III Soundbar.
The system is designed to comply with the
recommended safety standards for tilt and stability.
Do not apply excessive pulling force to the front, or
1.
Do not use this soundbar near water.
2.
Clean only with a dry cloth.
3.
Do not block any ventilation openings. Install in
accordance with the instructions in this user guide.
4.
produce heat.
Do not try to bypass the polarized or grounding type
plug. A polarized plug has two blades with one wider
than the other. A grounding type plug has two blades
and a third grounding prong. The wide blade or the third
prong is provided for your safety. If the provided plug
does not fit into your outlet, consult an electrician for
replacement of the obsolete outlet.
6.
overturn resulting in soundbar damage and/or personal
injury.
9.
Follow instructions for wall, shelf or ceiling mounting as
recommended in this user guide.
Do not install near any heat sources such as radiators,
stoves or other apparatus [including amplifiers] that
5.
top, of the cabinet which could cause the soundbar to
Unplug the soundbar from the mains supply during
Power Sources
This audio system is designed to operate on 230
volts 50Hz, AC current. The main plug is used as the
disconnect device and should remain readily accessible.
To prevent electric shock, do not use the soundbar’s
mains cable with an extension cord, receptacle, or other
outlet unless the blades and ground terminal can be fully
inserted to prevent blade exposure. Never connect the
audio system to 60 Hz DC, or anything other than the
specified voltage.
lightning storms or when unused for long periods of
time.
7.
Refer all servicing to qualified service personnel.
Servicing is required when the soundbar has been
damaged in any way, such as if the power-supply cord
or plug is damaged, liquid has been spilled or objects
have fallen into the soundbar, or the soundbar has been
exposed to rain or moisture, does not operate normally,
or has been dropped.
Disposal
In the EU, electronic devices cannot be disposed of
with regular household waste. Please use the return
or collections systems of the retailer from whom you
purchased the soundbar. Please dispose of batteries in
an environmentally friendly manner. Do not dispose of
batteries with regular household waste. Please use the
return or collections systems of the retailer from whom
you purchased the soundbar.
The exclamation point within an equilateral
triangle, is intended to alert the user to
the presence of important operating and
maintenance (servicing) instructions in the
literature accompanying the appliance.
4 | Roth SUB ZERO III User Manual
The lightning flash with arrowhead symbol, within an
equilateral triangle, is intended to alert the user to the
presence of uninsulated “dangerous voltage” within the
product’s enclosure that may be of a sufficient magnitude
to constitute a risk of electric shock to a person.
User Manual
English
Caution
risk of electric shock
do not open
to prevent the risk of electric shock.
do not open this product.
No user- serviceable parts inside.
Refer servicing to qualified service personnel.
Wiring Instructions
Follow the appropriate wiring instructions given below. In both
cases ensure that the outer sheath of the cable is firmly held
by the cable clamp.
2 - Core plug
Caution
Never remove the back covers of the soundbar as this can
expose you to very high voltages and other hazards. If the
system does not operate properly, unplug the audio system
and call your authorised dealer or service centre for advice.
This symbol indicates that this 2-core
appliance is Class II and does not require an
earth connection.
The wire coloured blue must be connected to the
terminal marked with the letter N or coloured black.
The wire coloured brown must be connected to the
terminal marked with the letter L or coloured red.
Fuse
Adjust only those controls that are covered in the instructions.
Warning
To reduce the risk of fire or electric shock, do not expose this
soundbar to rain or moisture.
Blue
(Neutral)
Brown
(Live)
Warning!
Do not connect either wire to the earth terminal.
The system should not be exposed to dripping or splashing
and objects filled with liquids, such as vases, should not be
placed on the system.
This soundbar should only be connected to a mains socket
outlet with a protective earthing connection.
Electrical Information
This system is fitted with a BS1363/A 13 amp plug. If it
is not suitable for your supply sockets it must be removed
and replaced with an appropriate plug. If the plug becomes
damaged and/or needs to be replaced please follow the
wiring instructions below. The plug removed must be disposed
of immediately. It must not be plugged into a supply socket
3 - Core plug
The wire coloured green and yellow must be
connected to the terminal marked with the letter
or coloured green or
E, or by the earth symbol
green and yellow.
The wire coloured blue must be connected to the
terminal marked with the letter N or coloured black.
The wire coloured brown must be connected to the
terminal marked with the letter L or coloured red.
Green &
Yellow
(Earth)
Blue
(Neutral)
Fuse
Brown
(Live)
Warning! This appliance must be earthed.
as this will be an electrical hazard. If the fuse needs to be
replaced it must be of the same rating and ASTA approved
to BS1362. If the plug is changed, a fuse of the appropriate
rating must be fitted in the plug, adapter or at the distribution
board. If the fuse in a moulded plug is replaced, the fuse cover
must be refitted before the appliance can be used.
The exclamation point within an equilateral triangle is
intended to alert the user to the presence of important
operating and maintenance (servicing) instructions in the
literature accompanying the appliance.
The lightning flash with arrowhead symbol, within an
equilateral triangle, is intended to alert the user to the
presence of uninsulated “dangerous voltage” within the
soundbar’s enclosure that may be of a sufficient magnitude
to constitute a risk of electric shock.
Proper disposal of this product. This label indicates that,
in the EU, electronic devices cannot be disposed of
with regular household waste. Please use the return or
collections systems of your municipality or contact the
seller where you purchased this product
CAUTION To prevent electric shock do not plug a cable into
a wall outlet, extension cord, or other receptacle unless the metal
blades can be fully inserted to prevent blade exposure.
rothaudio.co.uk | 5
Sub Zero III
TV Soundbar with HDMI and Bluetooth aptX
What’s In The Box
Sub Zero III Soundbar
Sub Zero III Remote Control
Accessories
• 3.5mm Stereo Cable
• Wall Fixings
• User Manual
• 1x 90° HDMI adaptor
Battery Installation
Caution
- Do not insert battery with ‘+’ and ‘-’ polarities reversed as this may cause the battery to swell or rupture resulting in leakage.
- Remove the battery if the remote control is not going to be used for an extended period of time.
- Do not put the battery in the general household rubbish. Dispose of the battery according to applicable laws.
6 | Roth SUB ZERO III User Manual
User Manual
English
Key Features
The Sub Zero III is designed to provide a high quality alternative to the loudspeakers in your flat-panel TV. To this end it has
HDMI inputs, optical digital, analogue, and Bluetooth aptX inputs. The Bluetooth input allows you to stream music content
direct from your mobile, laptop or tablet wirelessly, straight to the Sub Zero III. The Sub Zero III is designed to mount either
on a desktop or on a wall with the supplied wall mount fixings.
The Sub Zero III is best used with TV’s from 32” up to 47” where its compact size and styling should unobtrusively
complement your TV and the room décor.
Advanced Technologies in the Sub Zero III
Wider Sound Stage: The Sub Zero III features an acoustic design utilising 2x 2.5 inch base drivers, 2x 2.5 inch broadband
drivers and 2x passive membranes. Allied with the Roth MA DSP, it provides for 3x DSP presets of Movie, Music and Voice,
each tailored to provide what we believe to be the best possible performance in each programme category.
The inputs available on the Sub Zero III should accommodate all TVs currently available, with HDMI inputs (2 in, 1 out),
analogue (3.5mm stereo input), optical (Toslink/Stereo) input and Bluetooth aptX (for wireless connectivity).
“The directing of a picture involves coming out of your individual loneliness and taking a
controlling part in putting together a small world. A picture is made. You put a frame around it
and move on. And one day you die. That is all there is to it. ”
- John Huston
rothaudio.co.uk | 7
Sub Zero III
TV Soundbar with HDMI and Bluetooth aptX
Wall Mounting
Determine how you want to set up your Sub Zero III Soundbar.
The Sub Zero III Soundbar comes with wall fixings to be used with a wall mounted TV. The input jacks and power cord are designed
to allow a flush mount.
Follow these steps to mount the Sub Zero III Soundbar on a wall:
1.
2.
3.
4.
5.
6.
7.
Measure the width of the TV - the Sub Zero III should be
mounted so it is centered with the TV. Divide the TV width
measurement by 2 - that will be the centerline distance from
the edges of the TV.
If the Sub Zero III is to be mounted below the TV, measure
from the TV edge to the centerline distance on the open wall
below the TV. Mark the distance with a pencil 38mm or more
below the bottom of the TV.
Make a pencil mark 230 mm on each side of the centerline.
Make sure the mark is the same distance down from the TV
on each side.
Drill a hole in the wall at either of the two pencil
marks.
Hammer the 2 wall mount anchors into the holes the anchors should be flush with the wall.
Now, using a Phillips screwdriver, screw the wall
screws into the anchors.
Tilting the bottom of the Sub Zero III slightly away
from the wall, guide the brackets into the matching
holes on the back of Sub Zero III. The Sub Zero III
is now securely wall mounted.
X”
X/2”
X/2”
1. Find centerline
of TV.
+
38mm
or more
2. Make a pencil mark 38mm
or more below the bottom
of TV.
38mm
or more
4. Make another pencil mark on
each side of centerline.
+
230 mm
+
+
230 mm
+
+
230 mm
3. Make a pencil
mark on each side of
centerline.
30mm
230 mm
NOTES
The supplied wall fixings can be used for typical drywall construction. Mounting to wood, concrete, brick or other
types of wall construction will require different hardware. Roth AV recommends seeking professional assistance for
such installations. The instructions on this page and the supplied wall mount kit are only for the vertical wall mount.
Professional assistance is required for other mounting or installation orientations (e.g., horizontal, tilted).
8 | Roth SUB ZERO III User Manual
User Manual
English
Trouble Shooting
If your encounter problems when using the Sub Zero IIII Soundbar, check the following points before requesting
service.
In order to keep the warranty valid, please DO NOT try to repair the system yourself.
NOTE: DUE TO EEC REGULATIONS THIS PRODUCT WILL SWITCH TO STANDBY MODE AS FOLLOWS
The Subzero III switches to standby mode in the following situation:
• The device is idle for 30mins when powered by AC supply;
• The L/R Audio in or 3.5mm jack is disconnected or when there is no input signal or the input signal is too low.
If using the 3.5mm jack input to Subzero III, we recommend to default the output volume at 50% or above on
the external devices to ensure that it does not automatically go into standby mode.
1. No power
1-1. Make sure power cords are securely connected to the AC output.
1-2. Make sure that there is power at the AC output.
1-3. Press the power button on the remote control or the front of the Sub Zero III.
2. No sound
2-1. Press the Volume + (Up) button on the remote control or the front of the Sub Zero III.
2-2. Make sure that you selected correct input (Input 1, Input 2, or Input 3).
2-3. Press MUTE on the remote to make sure the Sub Zero III is not muted.
2-4. Make sure audio cables are securely connected at the terminals of the Sub Zero III and the external devices.
3. Buzzing or humming noise
3-1. Make sure audio cables are securely connected at the terminals of the Sub Zero III and the external devices.
3-2. Test on an alternate device or replace the audio cable.
3-3. Test the device and cable on an alternate input on the Sub Zero III.
4. The remote control does not work
4-1. Aim the remote control directly at the sensor on the front of the Sub Zero III.
4-2. Reduce the distance between the remote control and the Sub Zero III.
4-3. Make sure that the battery is inserted with its polarities (+/– signs) aligned as indicated.
4-4. Replace the battery.
5. The buttons on both the remote control and front panel do not work
5-1. Unplug the power cord from the AC output, and plug back in after a few seconds.
rothaudio.co.uk | 9
Sub Zero III
TV Soundbar with HDMI and Bluetooth aptX
Hookup Diagram
TV/DVD/Set Top Box Hookup - Case 1 HDMI ARC
HDMI with ARC - Use this output to connect your SZIII to your TV. Please note if your TV is not ARC (Audio Return
Channel) enabled you will not be able to connect this way - if this is the case, please refer to either case 2 or 3 below.
Sub Zero III
TV
To HDMI (ARC)
connection of TV
HDMI Cable
To HDMI (ARC) connection
of Sub Zero III
Set Top Box
Sub Zero III Rear Connectors
TV/DVD/Set Top Box - Case 2 HDMI
HDMI Inputs 1 & 2 - Use these inputs to connect any HDMI enabled device - you will also have to
connect an HDMI lead via ARC to you TV as this will act as an output to stream video to your TV.
Sub Zero III
TV
Set Top Box
To any HDMI enabled device
HDMI Cable
To HDMI (ARC)
connection
of TV
HDMI Cable
To HDMI inputs of Sub Zero III
To HDMI (ARC) connection of Sub Zero III
Sub Zero III Rear Connectors
10 | Roth SUB ZERO III User Manual
User Manual
English
TV or Other Device Hookup - Case 3 Optical
Optical Input – Use this input to connect a TV (as above) or any other device such as a DVD or
CD player or games console.
Sub Zero III
Other Device
Blu-ray Players
DVD Players
CD Players
Home Video
Game Systems
To Audio Output
Optical Cable
To Input 3 (Optical)
of Sub Zero III
TV Audio Hookup - Case 4 Auxiliary
If your TV has a headphone output, plug a 3.5 mm mini stereo cable into the headphone output
from your TV and plug the other end to the Input 2 jack on the back of your Sub Zero III.
TV
Sub Zero III
To Headphone
output of TV
3.5 mm Mini Stereo Cable
(Supplied)
To Input 2 (Mini Stereo
jack) of Sub Zero III
Sub Zero III Rear Connectors
IMPORTANT SET UP NOTE
If you are using Hookup Case 3, you will need to change the output signal from the source device - this will
be accessed in the sources menu and will need to be changed to either Stereo, 2.1 or PCM dependant on the
terminology used in the source device.
rothaudio.co.uk | 11
Sub Zero III
TV Soundbar with HDMI and Bluetooth aptX
Controls and Functions
The controls and functions of the Sub Zero III are explained below.
Front Panel Controls / LED Indicators
1
6
1.
5
4
3
2
REMOTE CONTROL Sensor Area
Point your remote control at this area when you use the
remote control.
2.
POWER Button
Plug the power cord into the AC outlet. The Sub Zero III goes
to the standby mode. Press this button to turn the Sub Zero
III on; this Power indicator will turn off to indicate the Sub
Zero III is on. If the input becomes inactive the Sub Zero
III will change to standby mode to conserve power and this
indicator will illuminate.
3.
5.
Press this button to select DSP mode for Movies or
Music. Choose whichever mode sounds right to you people have different tastes so we do not assume that
just because we like to watch movies with the Movie
mode switched-on, you will too.
VOLUME + Button
Adjust the main volume up respectively.
4.
VOLUME - Button
Adjust the main volume down respectively.
12 | Roth SUB
Sub Zero
ZEROIII
IIIUser
UserManual
Manual
Mode Button
6.
SOURCE Button
Press this button to scroll through the inputs.
User Manual
English
Remote Control
The controls and functions of the Sub Zero III Remote Control are explained below.
POWER
MUTE
Press this button to
turn the Sub Zero III on
or off.
Press this button when
you want to activate the
audio mute. Press it again
to deactivate the mute
function.
MAIN
VOLUME
Press the + or - button to
adjust the main volume
up or down respectively.
INPUT
SELECTOR
mode
Press this button to
scroll through the inputs
This button is used
to select one of the
three presets DSP
programmes, MOVIE,
MUSIC or VOICE.
Remote Control
rothaudio.co.uk | 13
Sub Zero III
TV Soundbar with HDMI and Bluetooth aptX
Sub Zero III Specifications
Input Sources
Keys
• Bluetooth
• Power
• Line-in (3.5mm)
• Source
• Optical
• Vol+
• 2x HDMI In, 1 x HDMI Out (ARC)
• Vol-
Bluetooth
• A2DP audio using aptX decoder
Line-in
• 3.5mm stereo mini-jack
• Mode
General
• Operating Temperature: 5˚C - 40˚C (32°F ~ 104°F)
• Power Requirements: AC 230 - 240V ~ 50Hz
• Power Consumption: 65W
• 500 mV RMS full scale input
HDMI
All specifications, features and dimensions are subject to
change without notice.
• 2x HDMI In, 1 x HDMI Out (ARC)
Optical
• SPDIF format
• Toslink compatible
• Stereo only
• Up to 96 KHz sample rate at up to 24 bit PCM data
Amplifiers
• Class-D power-stages
• 2x15W capability@<10% THD+N
• 2x30W capability@<10% THD+N
Signal Processing
• NCPA 110P AE Engine DSP
AC Power
• External 19V 3.42A (65W) 220/110 AC input
“A film is - or should be - more like music than like fiction. It should be a progression of moods
and feelings. The theme, what’s behind the emotion, the meaning, all that comes later. ”
- Stanley Kubrick
14 | Roth SUB ZERO III User Manual
User Manual
English
NOTES
rothaudio.co.uk | 15
Service
Please contact your local authorised dealer or reseller.
Email: [email protected]
In accordance with our policy of continuous development, we reserve the right to change specifications without notice.
Photographs are for illustration only and actual product may vary. E&OE.
Find us on Facebook.
Just search for Roth AV.
rothaudio.co.uk