1
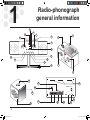
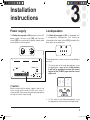
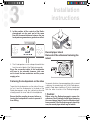
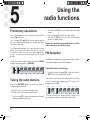
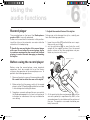
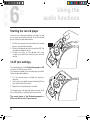
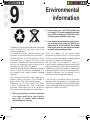
RR-226_UK.indd 1
21-11-2008 12:09:51
1
Radio-phonograph
general information
9
8
10
7
1
6
11
2
5
18
17
12
16
13
15
3
14
4
19
27
26
rr- 2 26
28
MODELLO DEPOSITATO
radiofonografo
MADE IN ITALY
ANTENNA
IN
AUX 1
PRE OUT
AUX 2
SUB
CUFFIE
DX
DIFFUSORI
SX
20
INTERRUTTORE
GENERALE
0
0
1
ALIMENTAZIONE
230V 50Hz
I
25
21
22
29
23
24
2
RR-226_UK.indd 2
21-11-2008 12:09:53
i
The Radio-phonograph rr-226 is a high-fidelity stereo system with stereo record player.
It is composed of a central part which contains the radio receiver, amplifier, record player, CD MP3 player,
control panel and connection panel, and 2 compression loudspeakers that can be fixed to the central part
or arranged in the best position to improve the stereo effect.
1
Record player cover
2
CD - MP3 Player
3
AM-FM Radio frequency scale
4
AM-FM Radio stored station scale
5
Loudspeakers
6
Record player
7
Stored station selection knob
8
Red stored radio station LED
9
Green power LED
10
Sound level indicator
11
Radio station selection knob
12
ON/OFF - Volume Level knob
13
Bass adjustment knob
14
Support stand
15
Middle tones adjustment knob
16
Treble adjustment knob
17
Audio balance adjustment knob
18
Control push-button panel
19
Loudspeaker carrying handle
20
Loudspeaker side fastening bracket
21
Audio outlet holes
22
Auxiliary audio inputs (AUX1 - AUX2)
23
Loudspeaker connections panel
24
Main switch
25
Mains socket
26
Central unit ventilation holes
27
Audio connection for external subwoofer
28
Pre-Out audio output
29
Headphone socket
3
RR-226_UK.indd 3
21-11-2008 12:09:55
2
Important safety
rules
Danger of electrical shock
Do not open the appliance
Always refer to the documentation
or a service centre
•
•
•
• Carefully read and follow the instructions provided.
• Clean the product using only a damp cloth.
• Transport the product using the appropriate protective
packaging.
• Keep the original packaging of the product in case
repairs are required.
• Do not connect the appliance to the mains electricity if
the plug and/or cable [19] are damaged, but contact
your nearest Technical Service Centre.
• Do not leave the appliance connected to the mains
electricity when you are away for long periods.
• The appliance should be positioned near the power
outlet, and the power supply cable [19] should
be easily accessible to facilitate disconnection if
necessary. Arrange the power supply cable [19] so
that nobody will trip over it.
• Do not insert objects inside the appliance.
•
• Do not remove the back cover of the appliance; the highvoltage current inside may cause electrical shocks.
• Do not position the appliance in damp areas or areas
where it may be exposed to vapours or water splashes.
• Do not place the appliance near sources of heat such
as radiators, stoves or appliances that produce heat.
• Do not place the appliance in a confined location, but
ensure that there is sufficient space (minimum 10 cm)
•
•
all around it for ventilation. The air vents must be left
free in order to allow cooling of the internal electronics.
Do not have checks or repairs carried out by nonspecialized personnel, but always use the Brionvega
authorized Technical Service Centres.
No naked flame source, such as candles, should be
placed on the apparatus.
No object filled with liquid, such as vases, shall be
placed on the apparatus.
An excessive sound pressure from earphones and
Headphones can ‘cause loss of hearing.
230 Vac, tolerance + / - 10% (48 to 62 Hz); Net absorption:
(can ‘be the current 300mA or the power 30 W).
•
Carefully read all the chapters of this manual before
operating the product. This manual provides the
basic instructions for operating the rr-226 system.
The installation, preliminary adjustments and
procedures that require opening the units and
contact with the electrical parts must be carried out
by qualified personnel. To ensure safe and reliable
operation over time, use only the power supply
cables supplied by the manufacturer. Observe all
the precautions and warnings.
•
Consult the environmental standards at the end of
the instructions booklet for more information on
the disposal of the product and protection of the
environment.
4
RR-226_UK.indd 4
21-11-2008 12:09:56
3
Installation
instructions
Power supply
Loudspeakers
The Radio-phonograph rr-226 operates with an AC
power supply. The main switch [24] and the mains
socket [25] for connecting the power supply cable
are located on the back panel.
The Radio-phonograph rr-226 is equipped with
2 compression loudspeakers that should be
connected to the audio sockets [23], located on the
back panel of the appliance.
0
1
+
+
The loudspeakers can be located in three different
positions:
rr- 2 26
MODELLO DEPOSITATO
radiofonografo
MADE IN ITALY
ANTENNA
IN
AUX 1
PRE OUT
AUX 2
SUB
CUFFIE
DX
DIFFUSORI
SX
INTERRUTTORE
GENERALE
0
0
1
ALIMENTAZIONE
230V 50Hz
I
1. On the top part of the radio-phonograph, using
the appropriate support guides. In this position
it will not be possible to access the control
keypad of the CD-MP3 player and the record
player unit.
! Caution:
Before connecting the power supply cable to the
mains socket, make certain that the main switch is
in position (0). Then power the radio-phonograph by
moving the switch to position (I).
2. On the sides of the Radio-phonograph, using
the appropriate interlocking fastening brackets.
5
RR-226_UK.indd 5
21-11-2008 12:09:57
3
Installation
instructions
3. In this position, all the controls of the Radiophonograph can be used and at the same
time the increased distance between the two
loudspeakers guarantees a good stereo effect.
Record player island
Removal of the adhesives fastening the
island
1
4. The 2 loudspeakers can also be positioned further
from the central body of the Radio-phonograph.
Since the connection cable of the loudspeaker
will have to be extended, however, take care
not to invert the two conductors and the power
supply poles.
01
15:10
3
2
Fastening the loudspeakers on the sides
To prevent vibrations from propagating while a record
To position the loudspeakers on the sides of the cen- is playing, the record player unit of the Radio-phonotral unit, hook the loudspeaker to the body of the graph is fixed above a platform (3) which is detached
Radio-phonograph using the interlocking bracket from the entire structure of the Radio-phonograph.
already present on inner side of the loudspeaker.
! Caution:
Ensure that the coupling is secure before releasing the loudspeaker in order to prevent it
from falling.
Before using the Radio-phonograph, remove the
adhesives 1 and 2 (indicated in the figure) fastening
the record player island. Once the adhesives have
been removed, if the Radio-phonograph should tip
over, the record player island may be mobile.
6
RR-226_UK.indd 6
21-11-2008 12:09:59
4
Connections
panel
Audio Connections
Pre-Out Output
The Radio-phonograph rr-226 is equipped, on the
back, with an audio connections panel.
Using the Pre-Out audio output [28] an external
amplification device can be connected to the
Radio-phonograph.
If an external amplifier is connected, the loudspeakers
of the Radio-phonograph will continue to sound.
To disable them, it will be necessary to disconnect
the loudspeakers from the audio connections panel
[23] located on the back of the Radio-phonograph
(see page 5).
The volume control knob will have no control
over the signal level coming out of the Pre-Out
connection [28].
AUX 1
PRE OUT
AUX 2
SUB
CUFFIE
Aux 1-2 Input
RADIO
AM-FM
AST
PHONO
Headphone Socket
CD
AUX1
AUX2
LOUD
Using the Aux 1-2 input [22], an external audio
reproduction device can be connected to the
Radio-phonograph, using the Radio-phonograph
as an amplification system.
In order to be able to listen to the external audio
source, it will be necessary to activate the specific
function on the front push-button control panel
(push button AUX1 or AUX2). In addition to the
volume adjustment, the knobs for the audio level
adjustments will also remain functional.
Using the Headphone Socket [29], a pair of
headphones or earphones can be connected
to the Radio-phonograph. When the connection
jack is inserted, the audio of the loudspeakers will
automatically be disabled.
Sub Output
Using the Sub audio output [27], a supplementary
preamplified subwoofer can be connected to the
Radio-phonograph.
7
RR-226_UK.indd 7
21-11-2008 12:10:00
5
Using the
radio functions
2. Turn the knob [11] until you find the desired radio
station.
3.
Press the knob [7] to store the radio station.
Turn on the appliance by turning the volume control
4.
The red LED [8] will flash to confirm that the radio
knob [12] clockwise.
station has been stored.
The 2 needles [3 and 4] will remain positioned on
the last radio stationed tuned in at the time the appliRepeat the operations described above for all the
ance was turned off.
other stations you would like to store.
Preliminary operations
The Radio-phonograph has a push-button control
panel on the front that allows the user to manage
the various audio sources and radio frequencies
as well as make some adjustments on the sound
quality.
Using the control keypad, select the function RADIO
and the desired frequency [AM-FM].
RADIO
AM-FM
AST
PHONO
CD
AUX1
AUX2
FM Reception
In addition to the previous station search mode, another
two modes are possible for FM reception:
LOUD
Automatic search and storage:
1. Using the control keypad [18], select the function
AST to activate the automatic search.
Tuning the radio stations
Press the [AM-FM] button to select the type of
reception/band desired
The system searches for the radio stations and automatically stores them in programmes 13 to 24 on the
programme scale [3].
RADIO
AM-FM
AST
PHONO
CD
AUX1
AUX2
LOUD
- FM allows the user to store 24 programmes
- AM allows the user to store 5 programmes
1. Use the knob [7] to select the programme number
to be assigned to the station.
- The search occurs in several passes, tuning in first
the strongest stations and then the weaker ones.
8
RR-226_UK.indd 8
21-11-2008 12:10:00
Using the
radio functions
5
! - The automatic storage reserves programmes 1
to 12 for your favourite stations.
Semiautomatic search:
1. Press the knob [11] for about 2 seconds: the tuning system activates and stops at the first station it
finds.
If the station is already stored, the red LED [8] on the
front of the Radio-phonograph becomes steady-on.
If the station has not be stored previously, the red LED
flashes.
2. To store the station, select the programme number
on the scale [4] with the knob [7] and then press
the knob [7].
Continue in this manner to find and store the other stations.
Once these tuning operations have been completed,
you can turn the knob [7] to select the programme associated with your preferred radio station and begin
listening to it.
Turning off the radio
To turn the radio off, turn the knob [12] anticlockwise
until a click is heard and the reference mark is positioned on OFF.
9
RR-226_UK.indd 9
21-11-2008 12:10:01
6
Using the
audio functions
Record Player - CD/MP3 Player
The Radio-phonograph rr-226 is equipped, on the
top, with a CD-MP3 player [2] and a record player
[6] able to play 33 and 45 rpm records.
CD
01 15:10
Turn on the appliance by turning the volume control
knob [12] clockwise.
Using the control keypad [18], select the function
CD or the function PHONO in order to listen to the
desired audio sources.
RADIO
AM-FM
AST
PHONO
CD
AUX1
AUX2
LOUD
CD / MP3 Player
The CD-MP3 player [2] of the Radio-phonograph rr226 is a “Slot Loading” player.
To insert the CD, just let it slide into the slot and the
player will independently position the CD in the playing position.
The CD/MP3 player automatically recognizes if the
CD that has been inserted is an audio CD or an MP3
CD.
On the top left part of the display the text CD or MP3
will appear depending on the type of disc being
played.
1
2
3
4
5
6
7
8
9
10
1
CD ejection button
Pressing this button automatically ejects the CD
contained inside.
2
CD-MP3 option. Indicates the type of CD
inside the player.
3
CD player multifunction display.
4
Slot for inserting the CD.
5
Play Button (to start playing the CD)
6
Stop Button (to stop playing the CD)
7
Back Button (to go back to the previous soundtrack)
8
Fast Back Button (to go back within the soundtrack)
9
Fast Forward Button (to advance within the soundtrack)
10 Forward Button (to advance to the next soundtrack)
If the MP3 CD is divided into several folders, the
display will show the number of the folder to which
the soundtrack currently being played belongs. To
move from folder to folder, use the button [7] of the
CD player. After the last soundtrack of each folder,
the player will automatically jump to the first soundtrack of the next folder.
10
RR-226_UK.indd 10
21-11-2008 12:10:01
6
Using the
audio functions
Record player
1. Adjust the contact force of the stylus:
The record player on the top of the Radio-phono- Taking care not to damage the stylus, carefully pergraph rr-226 is manually operated.
form the following operations:
It does not have either the automatic initial positioning of the stylus or the automatic arm return after the 1. lower the arm lifter [C] and hold the arm in equirecord has finished playing.
librium with your finger.
2. set the antiskating [A] to zero (take the small
Handle the arm and stylus of the record player
weight off the support and rest it on the record
with care. Do not allow the record player stylus
player surface so that the weight does not proto continue moving after the record has finished
duce any tension on the arm).
playing, in order to avoid damaging or breaking
the stylus.
!
Reference notch
Before using the record player
[B]
Before using the record player, some important
operations must be carried out to set the forces
acting on the operation of the record player arm. To
perform the following operations:
[C]
1. Remove the plastic cover of the record player [1].
Be careful not to strike the arm or the stylus.
2. Make certain that the power switch of the record
player is in the OFF position (0) and that the turntable
is not rotating when setting the forces.
[A]
3. To perform a correct setting of the arm, ensure that
the Radio-phonograph is on a level surface free of 3. At this point rotate the counterweight [B] until the
inclinations or unevenness that may invalidate the
arm rests perfectly in equilibrium by itself, in the
arm setting.
space between the turntable and the retainer of
the arm. The position assumed should be perfectly horizontal.
11
RR-226_UK.indd 11
21-11-2008 12:10:01
6
Using the
audio functions
4. Rotate the numbered ring nut of the counterweight until the zero lines up with the reference
mark on the stick of the arm.
Value [0] of the ring nut
aligned with the reference
notch
pending on the state of wear of the head (the newer
it is, the greater the weight necessary, at least initially), the room temperature and the type of sound
you would like to obtain. It should be remembered
that very low contact forces produce more damage than larger contact forces. In fact, the smaller
the contact force is, the more free the stylus will be
to skip about among the grooves, destroying them.
In terms of sound quality, a larger weight increases
the bass tones and softens the sound while a lower
weight shifts the timbre balance upwards, increasing
the sensation of fast and dynamic sound.
2. Adjust the antiskating force:
Now it will be possible to set the antiskating force, normally of the same value as the contact force, but this is
also highly variable and should be evaluated by ear.
The antiskating force opposes the centripetal force
that tends to attract the head towards the centre of
the record. A correct setting of the antiskating force is
achieved when, observing the stylus while reading the
Now it is possible to correctly set the contact force grooves, the stylus remains in axis with the body of the
required for the head being used.
head without being pulled either inward or outward.
! With the standard head, it is recommended that
you set the contact force to the value of 17.5 mN
(1.75g).
The reference ratio for calculating the contact
force and then the antiskating force is the following: 1mN= (= 0.1g / 0.1 Pond).
i
Remember that the force indicated by the head
manufacturer is, in fact, only indicative, and the actual value may differ by plus or minus 0.5 grams de-
To set the antiskating
force correctly, proceed
as follows:
1. Reposition
the
weight and respective string inside the
appropriate guide.
12
RR-226_UK.indd 12
21-11-2008 12:10:01
6
Using the
audio functions
2. Set the antiskating force by changing the contact point of the string on the appropriate graduated pin.
wires in order to limit the propagation of vibrations
and guarantee an ideal tension on the drive belt.
During shipping, however, the motor is anchored to
the structure by 2 screws.
It is recommended that you save the 2 clamping
screws for future use in case of the Radiophonograph rr-226 must be transported again.
For best use of the record player, the 2 screws should
be removed following the procedure below:
1. Lift the record player turntable by pulling it upwards.
2. Unscrew the 2 screws indicated in the figure so
that the motor is free to oscillate.
3. Return the record player turntable to its initial
position.
The simple table below shows the antiskating force
setting corresponding to the contact force applied.
Vertical contact force
Antiskating force
10mN - 14mN (1g - 1.4g)
Position 1
15mN - 19mN (1.5g - 1.9g)
Position 2
20mN or greater (2g - >g)
Position 3
1
2
! With the standard head, it is recommended that
you set the antiskating force on position 2, i.e.,
with the following values: 15mN - 19mN (1.5g 1.9g).
3. Releasing the motor
Before starting the record player turntable, the motor
must be released from its clamping supports.
The motor of the Radio-phonograph rr-226 record
player is supported by a system of elastic tension
Be careful not to damage the surrounding
structures with the screwdriver while removing
the clamping screws.
13
RR-226_UK.indd 13
21-11-2008 12:10:02
6
Using the
audio functions
Starting the record player
Once the arm setting procedure has been carried
out, you can start playing a record. To start the record
player, follow the procedure below:
1. Position the record on the turntable of the record
player using the felt provided.
2. Move the record player switch to position (1). The
turntable will begin to rotate.
3. Position the stylus on the desired track and,
using the arm lifter lever, lower the stylus onto the
record.
33-45 rpm settings
The record player of the Radio-phonograph rr-226
can play 33 and 45 rpm records.
To change the speed of the record player turntable,
follow the procedure below:
1. Lift the record player turntable by pulling it
upwards.
2. Use the key (included) to move the drive belt from
one motor pulley to the other.
3. Reposition the record player turntable.
The larger pulley is for playing 45 rpm records, while
the smaller pulley is for playing 33 rpm records.
The record player of the Radio-phonograph rr226 is not able to play 78 rpm records.
14
RR-226_UK.indd 14
21-11-2008 12:10:02
7
Adjusting the
Sound levels
Adjusting the sound
The sound level controls are located in the centre of
the front panel on the Radio-phonograph rr-226.
The following levels can be adjusted by the user:
1. Volume Level [12]
The listening volume can be increased or decreased
using the knob [12]. Rotating the knob completely
in the anticlockwise direction will turn the Radiophonograph rr-226 off.
4. Loudness [PUSH-BUTTON PANEL 18]
The button to activate the Loudness function is
located on the push-button control panel.
RADIO
AM-FM
AST
PHONO
CD
AUX1
AUX2
LOUD
The Loudness function has the purpose of
compensating the weaker sensitivity of the ear,
especially to low frequencies, when the system is
used at a low volume. Its function increases the
frequency response of the amplifier.
2. Bass - Middle Tones - Treble Level [13] [15] [16]
The levels of these three sound frequencies can be
controlled using the knobs [13], [15] and [16]. Rotate
the knob clockwise to increase the corresponding
frequency value or anticlockwise to reduce its intensity.
Treble Level:
Middle Tones Level:
Bass Level:
standard levels >3 kHz
standard levels <1 kHz>
standard levels <300 Hz
3. Audio Balance [17]
The audio signal to the two loudspeakers can be
decreased or increased using the knob [17].
If the knob is turned completely to one side, the
loudspeaker on the opposite side will not reproduce
any audio signal.
15
RR-226_UK.indd 15
21-11-2008 12:10:02
8
Radio-phonograph:
Stand:
Technical
specifications
Unit constructed in MDF wood, lacquered and hand polished
White with tobacco-coloured inserts.
Control panel:
- aluminium push-button panel (8 buttons)
- aluminium knobs (5 + 2)
- vu-meter and tuning indicators.
Single block in cast aluminium, brushed, painted and hand polished.
CD player:
Supports CD/CD-R/CD-RW (Audio and MP3/WMA)
SLOT IN insertion
Automatic and manual soundtrack advancement
Alphanumeric display
Record player:
Pro-Ject manual record player with dual rotation speed (33, 45 rpm)
Drive belt
Pro-Ject 8.6 pickup arm
ORTOFON head
Steel turntable with anti-slip felt
Record player uncoupled from the rest of the unit in order to completely
eliminate vibrations
Polycarbonate cover
Radio:
- AST System:
automatic search of all radio stations carried out with two passes and subsequent automatic storage of the same.
- Manual system:
manual search for a single radio station and manual storage
of the same.
- Automatic system:
automatic search for a single radio station, before or after
the station currently tuned in, and manual storage of the same.
- Stored programmes:
Total No.: 29
No. in FM: 24 (graduated scale with 24 notches)
No. in AM: 5 (graduated scale with 5 notches)
16
RR-226_UK.indd 16
21-11-2008 12:10:02
Technical
specifications
8
Amplification:
Integrated stereo amplifier 2x30W
Control of: Bass, middle tones, treble, loudness, volume and balance
Connections:
2 RCA audio inputs for external sources
1 RCA audio output for connection to an external amplification system
1 RCA audio output for connection to an external subwoofer
1 preamplified 3.5 mm jack output for headphones
Loudspeakers:
Compression type (pneumatic)
Each composed of 1 woofer with aluminium basket and 1 suspended tweeter, with adjustable position and configuration according to various solutions
Weight: 40,5 kg
Dimensions (W x H x D): 61 x 28 x 36.5 cm (central unit)
30.5 x 28 x 36.5 cm (loudspeakers)
59.5 x 38 x 34 cm (stand)
17
RR-226_UK.indd 17
21-11-2008 12:10:02
9
Environmental
information
2. In some cases, your “end of life” product may
be “traded in” for credit towards the purchase
of new BV S.r.l equipment. Call BV S.r.l to see
if this program is available in your area.
The product you have purchased contains extracted
natural resources that have been used in the
manufacturing process.
This product may contain substances known to be
hazardous to the environment or to human health.
To prevent releases of harmful substances into the
environment and to maximize the use of natural
resources, BV provides the following information on
how you can responsibly recycle or reuse most of
the materials in your ”end of life” product.
Waste Electrical and Electronic Equipment (commonly
known as WEE) should never be disposed of in
the municipal waste stream (residential garbage
collection).
The “crossed-out Waste Bin” label affixed to this
product, shown to the side, is your reminder to
dispose of your “End of Life” product properly.
Substances such as glass, plastic, and certain
chemical compounds are highly recoverable,
recyclable, and reusable. You can do your part for
the environment by following these simple steps:
3. If you need further assistance in recycling, reusing, or trading in your “end of life” product, you
may contact us at the Customer Care number
listed in your product's user manual and we will
be glad to help you with your effort.
Finally, we suggest that you practice other
environmentally friendly actions such as recycling
the inner and outer packaging (including shipping
containers) this product was delivered in.
With your help, we can reduce the amount of
natural resources needed to produce electrical and
electronic equipment, minimize the use of landfills for
the disposal of “end of life” products, and generally
improve our quality of life by ensuring that potentially
hazardous substances are not released into the
environment and are disposed of properly.
If the user fails to handle the "end of life" product
properly or does not dispose of it according to the
instructions provided above, the user may be subject
to the fines provided for by the national environmental
regulations in force in his country.
1. When your electrical or electronic equipment
is no longer useful to you, take it back to
your local or regional waste collection
administration for recycling.
18
RR-226_UK.indd 18
21-11-2008 12:10:03
RR-226_UK.indd 19
21-11-2008 12:10:03
BV s.r.l
V.le Lino Zanussi, 11
33170 Pordenone - Italy
Numero Verde 800 238891
E-mail: [email protected]
Sito internet: www.brionvega.it
RR-226_UK.indd 20
21-11-2008 12:10:03