1
1-Port USB Print Server
Hardware User’s Guide
Rev. 01 (July, 2002)
Made In Taiwan
RECYCLABLE
Wireless USB Print Server
Web Configuration User’s Manual
Rev.01 (October, 2002)
Made In Taiwan
RECYCLABLE
TABLE OF CONTENTS
WEB CONFIGURATION ............................................................3
CONFIGURING THE PRINT SERVER ....................................4
MANAGEMENT...........................................................................5
SYSTEM STATUS...........................................................................5
PRINTER STATUS ..........................................................................6
CONFIGURATION ......................................................................7
SERVER DEVICE ............................................................................7
TCP/IP P ROTOCOL .......................................................................9
NETBEUI PROTOCOL .................................................................10
APPLETALK PROTOCOL..............................................................11
TOOLS .........................................................................................12
RESET .........................................................................................12
FACTORY RESET .........................................................................13
HELP ............................................................................................14
ABOUT ........................................................................................14
2
Web Configuration
This manual describes the use of the Web Configuration for
controlling and configuring print servers.
Note: The figures listed in this manual are for your reference; the
actual settings showed may be different on your system because of
different network environment.
3
Configuring the Print Server
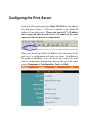
Open your web browser and type http://192.168.0.1 in the address
box, and press <Enter>. This set of number is the default IP
address of your print server. Please note that the PC’s IP address
must correspond with the print server’s IP address in the same
segment for the two devices to communicate.
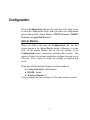
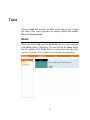
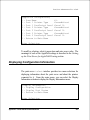
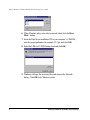
When you entered the default IP address, the main screen of the
print server’s configuration will appear as below. In addition to
the product information, you can access and control the print
server’s configuration through four links on the top of this main
screen: Management, Configuration, Tools, and Help.
4
Management
Click on Management link from the tools bar of the main screen
to enter the Management Table, and it provides information of the
print server’s System Status and Printer Status.
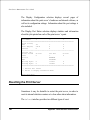
System Status
When you choose and enter the Management link, the first screen
appears is the System Status option. (Otherwise, you can click on
the System Status link in the left column of the Management
screen to return here from the other screens.) This option will
show you the system information as below, providing general
information regarding the print server. Click on the <Refresh>
button below to capture the most updated information.
5
Printer Status
Click on the Printer Status link in the left column of the
Management screen to enter the Printer Status option. This
option will show you the information regarding the printer’s status.
Click on the <Refresh> button below to capture the most updated
information. Once the print server is connected to a printer, the
Printer Status in the table will show [Online].
6
Configuration
Click on Configuration link from the tools bar of the main screen
to enter the Configuration Table, and it provides the configuration
optio ns that include Server Device, TCP/IP Protocol, NetBEUI
Protocol, and AppleTalk Protocol.
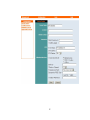
Server Device
When you choose and enter the Configuration link, the first
screen appears is the Server Device option. (Otherwise, you can
click on the Server Device link in the left column of the
Configuration screen to return here from the other screens.) This
option will show you settings required to configure the print server.
Click the <Save> button to ensure the settings are updated and
saved.
Please note that the default settings of wireless mode are:
♦ Connection Mode : Infrastructure
♦ ESS-ID : default
♦ Wireless Channel : 11
You can change the three settings to fit for your wireless network.
7
8
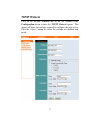
TCP/IP Protocol
Click on the TCP/IP Protocol link in the left column of the
Configuration screen to enter the TCP/IP Protocol option. This
option will show you settings required to configure the print server.
Click the <Save> button to ensure the settings are updated and
saved.
9
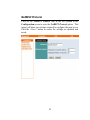
NetBEUI Protocol
Click on the NetBEUI Protocol link in the left column of the
Configuration screen to enter the NetBEUI Protocol option. This
option will show you settings required to configure the print server.
Click the <Save> button to ensure the settings are updated and
saved.
10
AppleTalk Protocol
Click on the AppleTalk Protocol link in the left column of the
Configuration screen to enter the AppleTalk Protocol option.
This option will show you settings required to configure the print
server. Click the <Save> button to ensure the settings are updated
and saved.
11
Tools
Click on Tools link from the tools bar of the main screen to enter
the Tools Table, and it provides the control options that include
Reset and Factory Reset.
Reset
When you choose and enter the Tools link, the first screen appears
is the Reset option. (Otherwise, you can click on the Reset link in
the left column of the Tools screen to return here from the other
screen.) Click the <Yes> button to activate the reset procedure.
12
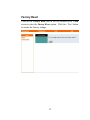
Factory Reset
Click on the Factory Reset link in the left column of the Tools
screen to enter the Factory Reset option. Click the <Yes> button
to resume the factory settings.
13
Help
Click on Help link from the tools bar of the main screen to enter
the Help Table, and it provides general information about the print
server.
About
When you choose and enter the Help link, the screen appears is the
About option. This option will show you the system information
as below, providing general information regarding the print server.
14
Wireless USB Print Server
Hardware User’s Guide
Rev. 01 (July, 2002)
Made In Taiwan
RECYCLABLE
TABLE OF C ONTENTS
ABOUT THIS GUIDE.................................................................................................3
INTRODUCTION .......................................................................................................4
PACKAGE CONTENTS.............................................................................................. 4
GENERAL FEATURES............................................................................................... 5
SERVICE FEATURES................................................................................................. 5
EXTERNAL FEATURES............................................................................................ 7
Front View............................................................................................................. 7
Rear View............................................................................................................... 8
INSTALLATION ......................................................................................................10
INSTALLING THE PRINT SERVER........................................................................ 10
POWER-UP AND SELF-TEST ................................................................................. 11
LED Test Series .................................................................................................. 11
Component Test Series ..................................................................................... 12
PRODUCT SPECIFICATIONS..............................................................................13
-2-
0 A BOUT THIS G UIDE
This manual describes the Wireless USB Print Server, including full
description of its features, detailed installation procedures, and product
specification.
This Wireless USB Print Server package also includes important software
components and additional user’s manuals. The software components, the
procedures for installation and setup of the software are covered in the PS
Admin User’s Guide.
-3-
1
1 INTRODUCTION
Congratulations on purchasing your Wireless USB Print Server, the easiest
and fastest way to deploy printers on your network.
This compact pocket-sized print server can connect your network through an
Access Point under the infrastructure mode, or can be used in ad-hoc mo de
for direct communication between PC/Notebook and print server anywhere
you wish to locate wireless printer services. It manages the flow of print
files from your workstation or file server to its connected printers, delivering
print jobs to high-performance printers much faster than a file server or a PC
acting as a print server can.
Package Contents
Carefully remove all items from the package.
User’s Guide, be certain that you have:
In addition to this Hardware
♦ One Wireless USB Print Server
♦ One AC Power adapter suitable for your country’s electric power service
♦ One Wireless USB Print Server Installation CD-ROM
♦ One Quick Installation Guide
If any item is missing, or if you find any damage or mismatch, promptly
contact your dealer for assistance.
-4-
General Features
♦ Compact pocket size
♦ Compliant with USB 1.1
♦ Fast 11Mbps WLAN connectivity based on IEEE 802.11b wireless highspeed standard
♦ Equipped one 10Base-T/100BASE-TX LAN port
♦ Multi protocol support is ideal for shared printing in mixed-LAN
environments
♦ Bi-directional communication allows collection of information for attached
printer's status
♦ Windows-based administrative program makes it possible to set up in a
few minutes
♦ Latest MIB-II (RFC 1213) for SNMP standard management
♦ Offer LPR program for Windows 95/98/Me TCP/IP printing
♦ IP assignment support for DHCP, BOOTP and RARP
♦ Support Web configuration
♦ Provide Flash memory for easy firmware upgrade
Service Features
This Wireless USB Print Server can improve network-printing services of your
network in three ways:
♦ It picks up the workload of managing print file traffic to its connected
printers. This provides workload relief to your file servers, and allows
the file servers' full capacity to be used for file access or other direct
services to network users. On peer-to-peer networks, workstations can
print directly to this print server without increasing the load of another
workstation or server.
♦ This print server’s USB interface can transmit to a high-speed laser printer
with USB port much faster than a PC's parallel port. A high-speed laser
printer can be driven at its full capacity.
-5-
♦ Because this Wireless USB Print Server is very portable (pocket-sized) and
inexpensive compared to a PC-based print server, and because it connects
to your file servers through the network, the printer can be stationed at the
location of maximum convenience to users.
This Wireless USB Print Server offers extraordinary flexibility, operating with
all major network operating systems and protocols:
♦ TCP/IP
UNIX lpr/lpd (HP-UX, SunOS, Solaris, SCO, UnixWare, IBM AIX)
Windows NT/2000/XP, Windows 95/98/Me
NetWare 5.x NDPS LPR Remote Printing
♦ NetBEUI
Windows NT/2000/XP, Windows 95/98/Me, Windows for Workgroups,
Microsoft LAN Manager, IBM LAN Server
♦ AppleTalk
MacOS EtherTalk
Your Wireless USB Print Server’s package includes PS Admin, a Windowsbased setup and administration program, making configuration and
management of your print servers quickly and easily in a Windows
environment. This print server also has a Telnet interface for management
communications. If Windows is not available on the station you choose for
print server administration, then all configuration and management commands
may be issued to this print server, and all console messages and management
report information will be returned, via Telnet.
-6-
External Features
This section describes the external features of your Wireless USB Print
Server.
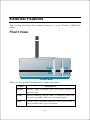
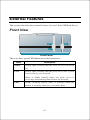
Front View
Front Panel
There are four green LED indicators on the front panel:
LEDs
Descripti on
Power
Steady light confirms that the Print Server is
powered on.
USB
Steady blinking (briefly dark) is initiated when the
printer is printing, otherwise, it remains dark.
LAN
Steady light confirms that the print server has a
good connection to your network.
-7-
When it blinks (briefly dark), the print server is
receiving/ transmitting data from/to the network.
WLAN
Steady light confirms that the print server has a
good connection to your wireless network.
When it blinks (briefly dark), the print server is
receiving/ transmitting data from/to the wireless
network.
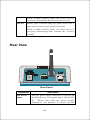
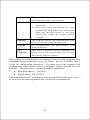
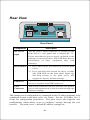
Rear View
Rear Panel
Component
DC Power
Input
Description
The DC power input connector is located on
the Print Server’s rear panel and is labeled DC
5V.
Please note that the power supply
included in the package is correct for this
-8-
Wireless USB Print Server; s ubstitution of
other equipment may void warranty.
Reset Button
1.) Press and release this button to reset the
print server.
2.) Press and hold this button for three
seconds (the USB LED on the front panel
lights up) and then release it, the print
server will resume the factory default
settings.
USB Port
The USB port allows you connecting the print
server to a printer with USB connector.
Antenna
To accept/transmit the data from/to your
wireless network.
LAN
Connector
This LAN connector (RJ-45) provides the
printer server with connection to the network
through the Ethernet cabling.
This printer port is configurable by commands in the PS Admin program, or by
commands issued to the print server via Telnet. See the PS Admin User’s
Guide for configuration procedures. The print server also supports web
configuration, which allows users to configure settings through the web
browser. The print server’s default IP address settings are:
♦
♦
Default IP address – 192.168.0.1
Subnet Mask – 255.255.255.0
Please note that the PC’s IP address must correspond with the print server’s
IP address in the same segment for the two devices to communicate.
-9-
2
2 INSTALLATION
This chapter explains how to install your print server and connect it to the
network. It also describes the automatic power-on-self-test (POST).
Installing the Print Server
Follow these steps for a trouble-free start of print server operations with your
Wireless USB Print Server. Please take particular notice that the network
connection should be made before supplying power to the print server.
WARNING: Configuration problems may result if the print server is
powered up without first establishing its network connection. Please
follow this procedure to avoid complications at the configuration stage.
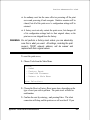
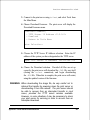
1. Confirm proper operation of each of the printers to be connected to the
print server.
2. When you have confirmed proper operation of the printer, switch its
power off.
3. Confirm that your network is operating normally.
4. Connect the print server to the network through the RJ-45 connector of
the print server.
5. While the printer is powered off, connect the print server through the
cable to the printer’s USB port.
6. Turn on the printer’s power.
- 10 -
7. Connect the DC end of the AC Power adapter to the DC power input
socket of the print server and the AC end to the wall outlet. This will
supply power to the print server, and the POST routines will proceed
automatically.
Note: This print server is built with a default IP setting. To prevent
from any conflict in your network, it is recommended to use the PS Admin
program to change the IP setting when there is some other device’s IP
address is the same as the print server’s default IP.
If it is necessary to set up the wireless networking:
8. Confirm that your wireless network is operating normally.
9. Use the Web browser to configure the settings of your wireless network.
For the detail operation, please refer to the Web Configuration manual.
The default settings of wireless mode are:
♦
♦
♦
Connection Mode : Infrastructure
ESS-ID : default
Wireless Channel : 11
Power-up and Self-Test
Whenever the print server is powered up, two kinds of testing procedures
follow automatically. The first procedure is just a programmed series of LED
flashes, to confirm proper operation of the three LED indicators. The second
procedure comprises programmed tests of each of the print server's major
components.
LED Test Series
Immediately upon power-up, all four of the LED indicators will show steady
green for a few seconds. Then the USB indicator will flash three times while
the Power LED remains steady. Irregularity of any of the LEDs during this
LED test series indicates that there is a problem with the LEDs themselves.
Contact your dealer for correction of any LED problems before proceeding.
- 11 -
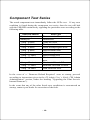
Component Test Series
The actual component tests immediately follow the LEDs test. If any error
condition is found during the component test series, then the test will halt
with the USB LED continuously signaling the particular error according to the
following table.
USB LED Pattern
Flash slowly
Steady on
1 long - 2 short
1 long - 3 short
1 long - 5 short
1 long - 6 short
1 long - 7 short
1 long - 11 short
1 long - 15 short
1 long - 16 short
1 long - 17 short
1 long - 18 short
Error Type
Firmware reload required
DRAM error
Timer INT error
Flash protected
Flash erase/program error
LAN controller error
LAN memory error
LAN I/O base error
Wireless LAN card detect
error
Wireless LAN card CIS error
Wireless LAN card I/O error
USB controller error
In the event of a ‘Firmware Reload Required’ error at startup, proceed
according to instructions given in the PS Admin User’s Guide ("PS Admin
Administration" section, under the heading "Upgrading the Print Server's
Internal Firmware").
In the event that any of the other listed error conditions is encountered on
startup, contact your dealer for correction of the fault.
- 12 -
A
3 P RODUCT
S PECIFICATIONS
Printer Connection
Printer Interface: One USB port, compliant with USB 1.1 standard
Network Connection
Wireless Network
Network Standards : Wireless LAN standard IEEE 802.11b
Network Data Transfer Rate: 11Mbps with fallback to 5.5Mbps, 2Mbps and
1Mbps
Network Mode: Through ad-hoc or infrastructure mode
Wired Network
Network Interface: One 10Base-T/100BASE-TX shielded port (RJ-45
connector)
Network Standards : IEEE 802.3 10Base-T Ethernet, IEEE 802.3u
100BASE-TX Fast Ethernet
Network Data Transfer Rate: 10/100 Mbps (megabits per second)
- 13 -
Network Protocol Support
Transport Protocols: TCP/IP, NetBEUI, AppleTalk/EtherTalk
TCP/IP Protocols Supported: BOOTP, SNMP, Telnet, TFTP, FTP, LPD,
RARP, DHCP
Operating System Support
Windows 95/98/Me, Windows NT/2000/XP; NetWare 5.x (NDPS LPR remote
printing); HP-UX UNIX, Sun OS, Solaris, SCO UNIX, AIX, Unixware and
Linux; Mac OS
Management
Standard: SNMP
MIBs: MIB-II (RFC 1213)
LEDs
PW, LAN, USB, WLAN
Environmental and Physical
Power Supply: External power supply providing 5VDC
input
Operating Temperature: 0°C to 50°C
Storage Temperature: -25°C to 55°C
Humidity: 5% to 95%, non-condensing at 30°C
EMI Compliance
FCC Class B, CE Class B
- 14 -
1-Port USB Print Server
Web Configuration User’s Manual
Rev.01 (July, 2002)
Made In Taiwan
RECYCLABLE
TABLE OF CONTENTS
WEB CONFIGURATION ............................................................3
CONFIGURING THE PRINT SERVER ....................................4
MANAGEMENT...........................................................................5
SYSTEM STATUS...........................................................................5
PRINTER STATUS ..........................................................................6
CONFIGURATION ......................................................................7
SERVER DEVICE ............................................................................7
TCP/IP P ROTOCOL .......................................................................8
NETBEUI PROTOCOL ...................................................................9
APPLETALK PROTOCOL..............................................................10
TOOLS .........................................................................................11
RESET .........................................................................................11
FACTORY RESET .........................................................................12
HELP ............................................................................................13
ABOUT ........................................................................................13
2
Web Configuration
This manual describes the use of the Web Configuration for
controlling and configuring print servers.
Note: The figures listed in this manual are for your reference; the
actual settings showed may be different on your system because of
different network environment.
3
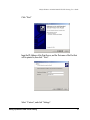
Configuring the Print Server
Open your web browser and type http://192.168.0.1 in the address
box, and press <Enter>. This set of number is the default IP
address of your print server. Please note that the PC’s IP address
must correspond with the print server’s IP address in the same
segment for the two devices to communicate.
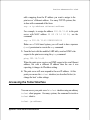
When you entered the default IP address, the main screen of the
print server’s configuration will appear as below. In addition to
the product information, you can access and control the print
server’s configuration through four links on the top of this main
screen: Management, Configuration, Tools, and Help.
4
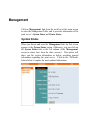
Management
Click on Management link from the tools bar of the main screen
to enter the Management Table, and it provides information of the
print server’s System Status and Printer Status.
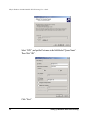
System Status
When you choose and enter the Management link, the first screen
appears is the System Status option. (Otherwise, you can click on
the System Status link in the left column of the Management
screen to return here from the other screens.) This option will
show you the system information as below, providing general
information regarding the print server. Click on the <Refresh>
button below to capture the most updated information.
5
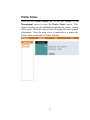
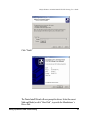
Printer Status
Click on the Printer Status link in the left column of the
Management screen to enter the Printer Status option. This
option will show you the information regarding the printer’s status.
Click on the <Refresh> button below to capture the most updated
information. Once the print server is connected to a printer, the
Printer Status in the table will show [Online].
6
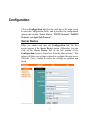
Configuration
Click on Configuration link from the tools bar of the main screen
to enter the Configuration Table, and it provides the configuration
optio ns that include Server Device, TCP/IP Protocol, NetBEUI
Protocol, and AppleTalk Protocol.
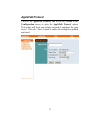
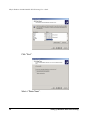
Server Device
When you choose and enter the Configuration link, the first
screen appears is the Server Device option. (Otherwise, you can
click on the Server Device link in the left column of the
Configuration screen to return here from the other screens.) This
option will show you settings required to configure the print server.
Click the <Save> button to ensure the settings are updated and
saved.
7
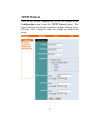
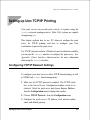
TCP/IP Protocol
Click on the TCP/IP Protocol link in the left column of the
Configuration screen to enter the TCP/IP Protocol option. This
option will show you settings required to configure the print server.
Click the <Save> button to ensure the settings are updated and
saved.
8
NetBEUI Protocol
Click on the NetBEUI Protocol link in the left column of the
Configuration screen to enter the NetBEUI Protocol option. This
option will show you settings required to configure the print server.
Click the <Save> button to ensure the settings are updated and
saved.
9
AppleTalk Protocol
Click on the AppleTalk Protocol link in the left column of the
Configuration screen to enter the AppleTalk Protocol option.
This option will show you settings required to configure the print
server. Click the <Save> button to ensure the settings are updated
and saved.
10
Tools
Click on Tools link from the tools bar of the main screen to enter
the Tools Table, and it provides the control options that include
Reset and Factory Reset.
Reset
When you choose and enter the Tools link, the first screen appears
is the Reset option. (Otherwise, you can click on the Reset link in
the left column of the Tools screen to return here from the other
screen.) Click the <Yes> button to activate the reset procedure.
11
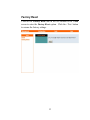
Factory Reset
Click on the Factory Reset link in the left column of the Tools
screen to enter the Factory Reset option. Click the <Yes> button
to resume the factory settings.
12
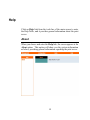
Help
Click on Help link from the tools bar of the main screen to enter
the Help Table, and it provides general information about the print
server.
About
When you choose and enter the Help link, the screen appears is the
About option. This option will show you the system information
as below, providing general information regarding the print server.
13
PS Admin program
User’s Guide
Rev. 02 (February, 2003)
Print Server Administration User’s Guide
Copyright Statement
Copyright ©1997
No part of this publication may be reproduced in any form or by any means or used
to make any derivative such as translation, transformation, or adaptation without
permission from the authors, as stipulated by the United States Copyright Act of
1976.
Trademarks
All trademarks belong to their respective owners.
Limited Warranty
The software and reference material are provided “as are,” without warranty as to
their performance, merchantability or fitness for any particular purpose. The
authors reserve the right to revise this publication and to make changes to its
contents at any time, without obligation to notify any person or entity of such
revisions or changes.
ii
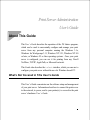
About This Guide
Print Server Administration User’s Guide
Table of Contents
ABOUT THIS GUIDE ...........................................................................................1
What’s Not Covered in This User’s Guide.....................................................................................1
Contents of the User’s Guide ...........................................................................................................2
INTRODUCTION...................................................................................................3
Background on Print Servers ..........................................................................................................3
Print Server Administration Features............................................................................................5
INSTALLING AND STARTING THE PS ADMIN PROGRAM ..................................7
System Requirements.........................................................................................................................7
Installing PS Admin...........................................................................................................................9
Starting PS Admin .............................................................................................................................9
PRINT SERVER WIRELESS SETTING IN PS ADMIN PROGRAM ............ 11
Ad-Hoc Mode:.................................................................................................................................. 12
Infrastructure Mode:...................................................................................................................... 16
WEP Encryption Key...................................................................................................................... 20
GETTING STARTED SETTING UP YOUR PRINT SERVER.................................22
Choosing a Name for Your Print Server..................................................................................... 22
Setting a Password for Your Print Server .................................................................................. 24
Changing Print Server Port Settings.......................................................................................... 25
Testing Your Print Server.............................................................................................................. 29
About This Guide
iii
Print Server Administration User’s Guide
SETTING UP NOVELL NETWARE 3.X PRINTING.............................................30
Introduction to Novell NetWare Printing .................................................................................. 30
Setting up as a NetWare Print Server ......................................................................................... 34
Setting up as a NetWare Remote Printer.................................................................................... 36
Printing from Client Workstations.............................................................................................. 37
Windows 95 (and later) Client Workstations...................................................................................38
Windows NT 4.0 (and later) Client Workstations ...........................................................................40
Windows NT 3.51 Client Workstations...........................................................................................42
Windows 3.x and Windows for Workgroups 3.11 Workstations.....................................................44
M S-DOS/PC-DOS Workstations.....................................................................................................45
NetWare Settings............................................................................................................................. 46
SETTING UP NOVELL NETWARE 4.X PRINTING.............................................49
NetWare Directory Services.......................................................................................................... 49
Setting up as a NetWare Print Server ......................................................................................... 50
Setting up as a NetWare Remote Printer.................................................................................... 55
Printing from Client Workstations.............................................................................................. 56
Windows 95 (and later) Workstations..............................................................................................57
Windows NT 4.0 (and later) Client Workstations ...........................................................................57
Windows 3.1 and Windows for Workgroups 3.11 Workstations ....................................................59
M S-DOS/PC-DOS Workstations.....................................................................................................61
SETTING UP MICROSOFT NETWORK PRINTING .............................................62
Setting up the Print Server for Microsoft Networking............................................................. 62
Printing from Client Workstations.............................................................................................. 64
Windows 95 (and later) Client Workstations...................................................................................64
Windows NT 4.0 (and later) Client Workstations ...........................................................................67
Windows NT 3.51 Client Workstations...........................................................................................69
Windows for Workgroups Client Workstations...............................................................................71
M S-DOS/PC-DOS Workstations.....................................................................................................74
Keeping the Print Queue on a Windows NT Server.................................................................. 75
iv
About This Guide
Print Server Administration User’s Guide
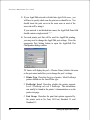
SETTING UP APPLETALK PRINTING ...............................................................78
Setting up the Print Server for AppleTalk Printing ................................................................. 78
Printing from MacOS Client Workstations................................................................................ 80
SETTING UP UNIX TCP/IP PRINTING.............................................................82
Configuring TCP/IP Network Settings....................................................................................... 82
Printing Text Files from Unix ....................................................................................................... 83
Printing from BSD Unix Versions................................................................................................ 84
Printing from SCO Unix System V/386 ....................................................................................... 86
Printing from Solaris...................................................................................................................... 88
Printing from Windows NT............................................................................................................ 89
Printing using TFTP....................................................................................................................... 91
Printing using FTP......................................................................................................................... 92
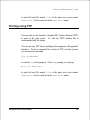
PS ADMIN ADMINISTRATION ..........................................................................93
The PS Admin Main Window ........................................................................................................ 93
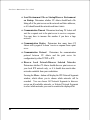
Filtering the List of Print Servers ................................................................................................ 94
Working with Environment Files and Preferences................................................................... 95
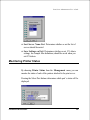
Monitoring Printer Status............................................................................................................. 98
Checking NetWare Print Jobs...................................................................................................... 99
Configuring NetWare Print Services.........................................................................................101
Managing Print Queues ..................................................................................................................101
Managing Printers...........................................................................................................................104
Managing Print Servers...................................................................................................................105
Resetting the Print Server ...........................................................................................................108
Upgrading the Print Server’s Internal Firmware...................................................................109
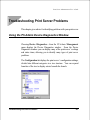
TROUBLESHOOTING PRINT SERVER PROBLEMS........................................ 111
About This Guide
v
Print Server Administration User’s Guide
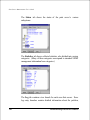
Using the PS Admin Device Diagnostics Window ..................................................................111
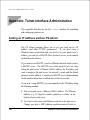
APPENDIX: TELNET INTERFACE ADMINISTRATION ..................................... 114
Setting an IP Address without PS Admin .................................................................................114
Accessing the Telnet Interface....................................................................................................115
Changing TCP/IP Settings..........................................................................................................116
Changing Server Settings ...........................................................................................................117
Changing the Print Server Password .......................................................................................119
Changing Port Settings...............................................................................................................120
Changing AppleTalk Settings....................................................................................................122
Displaying Configuration Information.....................................................................................123
Resetting the Print Server ...........................................................................................................124
Upgrading Print Server Firmware ............................................................................................125
vi
About This Guide
Print Server Administration
User’s Guide
About This Guide
This User’s Guide describes the operation of the PS Admin program,
which can be used to conveniently configure and manage your print
server from any personal computer running the Windows 3.1x,
Windows for Workgroups 3.11, Windows NT 3.51, Windows NT 4.0
or later, or Windows 95 or later operating systems. Once your print
server is configured, you can use it for printing from any Novell
NetWare, TCP/IP, AppleTalk, or Microsoft network.
This Guide also describes the telnet interface, which you can use to
configure your print server without the use of a Windows-based PC.
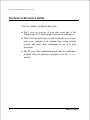
What’s Not Covered in This User’s Guide
This User’s Guide concentrates on the software setup and management
of your print server. Information about how to connect the print server
to the network, to power, and to your printer(s), is covered in the print
server’s hardware User’s Guide.
Print Server Administration User’s Guide
Contents of the User’s Guide
This User’s Guide is divided into three parts:
♦ Part I gives an overview of your print server and of the
Windows-based PS Admin program you can use to manage it.
♦ Part II covers the initial steps you will need to take to set up your
print server, configure it for printing from various network
systems, and allow client workstations to use it to print
documents.
♦ Part III covers daily administration tasks, how to troubleshoot
problems with your print server, and how to use the telnet
interface.
2
About This Guide
Print Server Administration User’s Guide
Introduction
This chapter introduces the printing and administration features of the
print server products, and of the PS Admin program that you can use
to set up and administer print server.
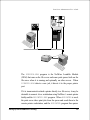
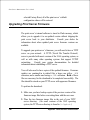
Background on Print Servers
Before personal computer networking became common, users who
wanted to print from their personal computers needed to have a
directly-connected printer. As laser printers became common, it
became too expensive for each user to have a dedicated printer, and
some form of print sharing became even more necessary.
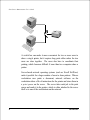
The simplest form of print sharing involves a switch box:
Introduction
3
Print Server Administration User’s Guide
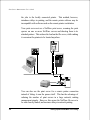
A switch box can make it more convenient for two or more users to
share a single printer, but it requires long print cables unless the two
users are close together. The users also have to coordinate their
printing, which becomes difficult if more than two computers share a
printer.
Server-based network operating systems (such as Novell NetWare)
make it possible for a larger number of users to share printers. When a
workstation user prints a document, network software on the
workstation takes a file of instructions for the printer and stores them in
a print queue on the server. The server takes each job in the print
queue and sends it to the printer, which is either attached to the server
itself or to one of the workstations on the network.
4
Introduction
Print Server Administration User’s Guide
This arrangement allows a large number of people to share printers, and
makes it possible to centrally manage the printers and their print queues.
This method has several disadvantages, however:
♦ It increases the load on the file server.
♦ The file server has a limited number of printer ports available.
♦ If printers are attached to the file server, then they have to be
located near the server instead of near the users, which may be
inconvenient.
♦ If printers are attached to user workstations, then print jobs will
be delayed or printed more slowly as they are sent to the
workstation.
The remote printer software used on the
workstation may also be incompatible with other software used
on the workstation.
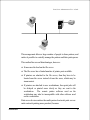
Print server devices such as the multi-protocol network print servers
make network printing more practical, because:
Introduction
5
Print Server Administration User’s Guide
♦ Network print servers can be located anywhere on the network,
making it easy to place printers near the people who will be using
them.
♦ It is easy to centrally manage network print servers.
♦ The load on network servers is reduced.
♦ Multi-protocol print servers make it possible for printers to be
shared by people using different network operating systems.
Print Server Administration Features
The print servers can be centrally administered using the PS Admin
program, making it convenient to manage all of your print servers from
a single Windows-based interface. PS Admin features include:
♦ Allows setup and modification of parameters for the server’s
printer ports, the server itself and for the NetWare (IPX/SPX),
Microsoft Networking (NetBEUI), TCP/IP, and AppleTalk
protocols.
♦ Allows administrators to view the status of each of the server’s
printer ports, including the printer status display if the printer
supports PJL (Printer Job Language).
♦ Can display server statistics and status for troubleshooting
purposes.
♦ Provides a convenient interface for setting up Novell NetWare
5.x servers (Native NDS).
♦ Allows the print server’s internal software to be conveniently
upgraded to a new version.
6
Introduction
Print Server Administration User’s Guide
In addition to PS Admin server based administration, print servers also
support a telnet-based interface for networks that do not use
Windows-based personal computers. This interface supports viewing
and modifying all server, port, TCP/IP, and AppleTalk-related settings.
Network administrators using the industry-standard SNMP network
management protocol can also monitor the print server from any
network management console.
Introduction
7
Print Server Administration User’s Guide
Installing and Starting the PS Admin Program
This chapter lists the requirements that your computer system should
meet before you can install PS Admin, tells how to install the program,
and how to start it.
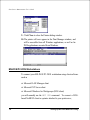
System Requirements
We recommend that your system meet the following requirements to be
able to use the PS Admin program:
♦ A PC-compatible computer with a 486 or faster processor
♦ One of the following Windows operating systems:
◊ Microsoft Windows version 3.1x
◊ Microsoft Windows for Workgroups version 3.11
◊ Microsoft Windows 95 or later
◊ Microsoft Windows NT 3.51, 4.0 or later.
♦ 8 megabytes of main memory (RAM)
♦ At least 16 megabytes of free hard disk space
♦ A Windows-compatible mouse or other pointing device
♦ An Ethernet/Fast Ethernet network card with appropriate drivers
(either NDIS or ODI)
You should also check your computer’s settings:
8
Installing and Starting the PS Admin Program
Print Server Administration User’s Guide
♦ If you are using a screen resolution larger than 640 x 480
(standard VGA), the PS Admin display will look best if you use
a “Small Fonts” setting.
♦ You need to have the IPX network protocol and the Novell
NetWare client services enabled or TCP/IP network protocol
enabled. PS Admin uses the IPX and/or TCP/IP protocol for
communicating with the print server.
You only need to have one workstation that meets the above
requirements. It is not necessary to run the PS Admin program on
every workstation. Ordinary network stations will still be able to print
to your print server.
If you will only be using TCP/IP (UNIX) and/or AppleTalk protocols,
you can use the telnet interface instead of the Windows-based PS
Admin. For more information about using the telnet interface, see
the Appendix: Telnet Interface Administration section.
Installing and Starting the PS Admin Program
9
Print Server Administration User’s Guide
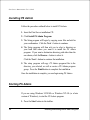
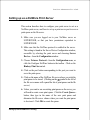
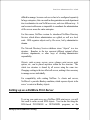
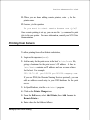
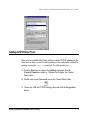
Installing PS Admin
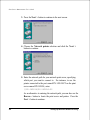
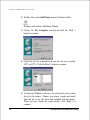
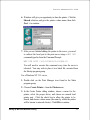
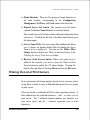
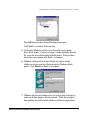
Follow the procedure outlined below to install PS Admin:
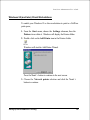
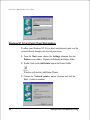
1. Insert the Print Server installation CD
2. Click Install PS Admin Program
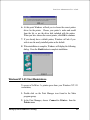
3. The Setup program will begin by copying some files and ask for
your confirmation. Click the Next > button to continue.
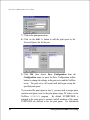
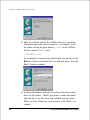
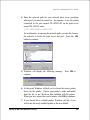
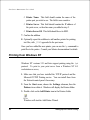
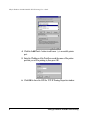
4. The Setup program will then ask you to select a directory on
your hard disk where you want it to install the PS Admin
program. If you want a destination directory path other than the
one shown, click the Browse... button to select it.
Click the Next > button to continue the installation.
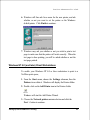
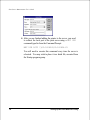
5. The setup program will copy PS Admin program files to the
directory you selected, as well as create a PS Admin program
group. Press the Finish button to complete the installation.
Once the installation is complete, you can begin using PS Admin.
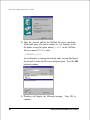
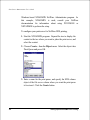
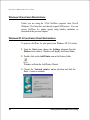
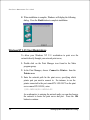
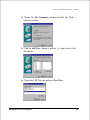
Starting PS Admin
If you are using Windows 95/98/Me or Windows NT 4.0 (or a later
version of Windows), to start the PS Admin program:
1. Press the Start button in the taskbar.
10
Installing and Starting the PS Admin Program
Print Server Administration User’s Guide
2. Within the Programs menu, select PS Admin.
3. Select the PS Admin program.
For Windows 3.1, Windows for Workgroups 3.1x, or Windows NT
3.51,
1. In the Program Manager, double-click on the PS Admin program
group icon to open it.
2. Double-click the PS Admin program icon.
The PS Admin program will then be ready for use.
Instructions for using PS Admin to perform network print server “initial
setup” tasks are found in the next chapter, Getting Started Setting up
Your Print Server. For information about using PS Admin for other
types of print server administration, see the PS Admin Administration
chapter.
Installing and Starting the PS Admin Program
11
Print Server Administration User’s Guide
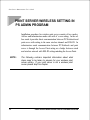
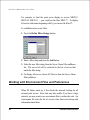
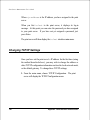
PRINT SERVER WIRELESS SETTING IN
PS ADMIN PROGRAM
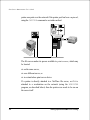
Installation procedure for wireless print server consists of two modes.
Ad-hoc and infrastructure mode each with it’s own setting. In the adhoc mode it provides direct communication between PC/Notebook and
print server with setting to the same wireless channel and ESS-ID. In
infrastructure mode communication between PC/Notebook and print
server is through the Access Point acting as a bridge between wired
and wireless network with ESS-ID setting matching the Access Point.
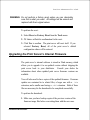
NOTE:
12
The following contains important information about what
steps need to be taken to prepare for your wireless print
server setting. If your print server is not a wireless print
server please skip this chapter.
PRINT SERVER WIRELESS SETTING IN PS ADMIN PROGRAM
Print Server Administration User’s Guide
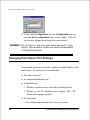
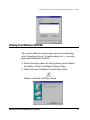
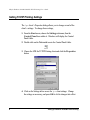
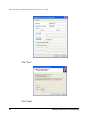
Ad-Hoc Mode:
u
u
Before initiating set-up procedure for the print server make
sure your print server has setup already in your LAN
environment.
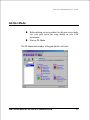
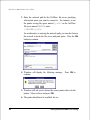
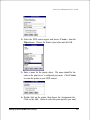
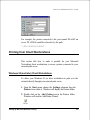
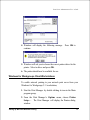
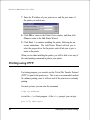
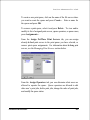
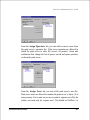
Start-up PS Admin
The PS Admin main window will appear like the one below.
PRINT SERVER WIRELESS SETTING IN PS ADMIN PROGRAM
13
Print Server Administration User’s Guide
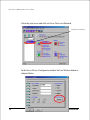
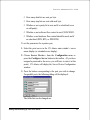
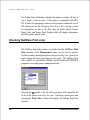
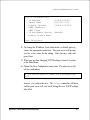
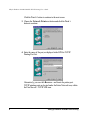
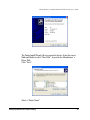
Select the print server and click on Server Device as illustrated.
Print server selection
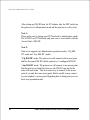
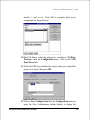
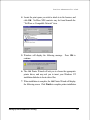
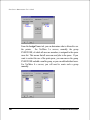
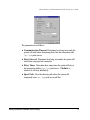
In the Server Device Configuration window click on Wireless button as
indicated below.
14
PRINT SERVER WIRELESS SETTING IN PS ADMIN PROGRAM
Print Server Administration User’s Guide
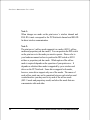
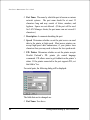
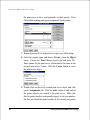
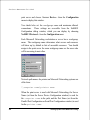
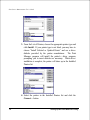
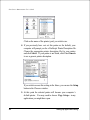
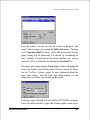
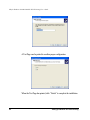
The Wireless Configuration window will appear. The default wireless
channel is set to 11 and ESS-ID is set as ‘default’. You can alter the
channel and ESS-ID setting to your requirement, however keep in mind
the PC/Notebook must also be set to the same channel and ESS-ID.
Press the OK button to return to the PS Admin main window.
Click on Save Configuration to store your setting.
PRINT SERVER WIRELESS SETTING IN PS ADMIN PROGRAM
15
Print Server Administration User’s Guide
Note 1:
When changes are made on the print server’s wireless channel and
ESS-ID it must correspond to the PC/Notebook channel and ESS-ID
for direct wireless communication.
Note 2:
The print server’s ad-hoc mode supports two modes (802.11 ad-hoc
mode and proprietary ad-hoc mode). You can position the DIP switch
on the print server to the mode you want to operate. Please refer to
your hardware manual on how to position the DIP switch as 802.11
ad-hoc or proprietary ad-hoc mode. Which option of the ad-hoc
mode is required depends on the operation of your print server. It
depends on which ad-hoc mode is supported by your wireless card
driver on the PC/Notebook. Some driver supports both modes,
however, some driver support only one of the modes. The names of
each ad-hoc mode may not be consistent between each wireless card
vendor therefore you may need to try each of the ad-hoc mode
(802.11 mode and proprietary mode) and select the mode that can
communicate with each other.
16
PRINT SERVER WIRELESS SETTING IN PS ADMIN PROGRAM
Print Server Administration User’s Guide
Infrastructure Mode:
u
u
Before initiating set-up procedure for the print server make
sure your print server has setup already in your LAN
environment.
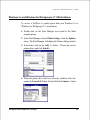
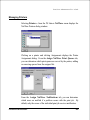
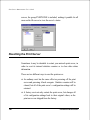
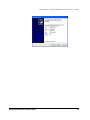
Start-up PS Admin
The PS Admin main window will appear like the one below.
PRINT SERVER WIRELESS SETTING IN PS ADMIN PROGRAM
17
Print Server Administration User’s Guide
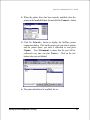
Select the print server and click on Server Device as illustrated.
Print server selection
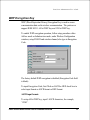
In the Server Device Configuration window click on Wireless button as
indicated below.
18
PRINT SERVER WIRELESS SETTING IN PS ADMIN PROGRAM
Print Server Administration User’s Guide
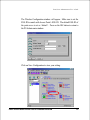
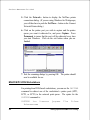
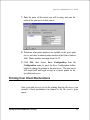
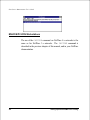
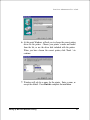
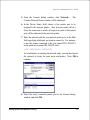
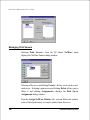
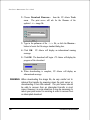
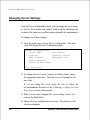
The Wireless Configuration window will appear. Make sure to set the
ESS-ID to match with Access Point’s ESS-ID. The default ESS-ID of
the print server is set as ‘default’. Press on the OK button to return to
the PS Admin main window.
Click on Save Configuration to store your setting.
PRINT SERVER WIRELESS SETTING IN PS ADMIN PROGRAM
19
Print Server Administration User’s Guide
After setting up ESS-ID from the PS Admin, alter the DIP switch on
the print server to infrastructure mode and the print server will re-start.
Note 1:
Please make sure to change your PC/Notebook to infrastructure mode.
The ESS-ID on PC/Notebook and print server must match with the
Access Point’s ESS-ID.
Note 2:
Print server supports two Infrastructure operation modes (‘Cfg ESSID’ mode and ‘Any ESS-ID’ mode).
‘Cfg ESS-ID’ mode: The print server will connect to the access point
that has the same ESS-ID with the print server’s configured ESS-ID.
‘Any ESS-ID’ mode: The print server will connect to any access point
that the print server finds first, however, the ESS-ID may not be the
same with each other. This is an easier way to connect to the access
point if you only have one access point. But be careful, it may connect
to your neighbor’s access point. Regarding how to setup print server to
these two operation modes.
20
PRINT SERVER WIRELESS SETTING IN PS ADMIN PROGRAM
Print Server Administration User’s Guide
WEP Encryption Key
WEP (Wired Equivalent Privacy) Encryption Key is used to secure
communication data on the wireless communication. The print server
support IEEE 802.11 64 bit WEP key and 128 bit WEP key.
To enable WEP encryption operation, follow setup procedure either
Ad-hoc mode or Infrastructure mode, under Wireless Configuration
windows, setup ESS-ID and wireless channel, also type in Encryption
Code.
The factory default WEP encryption is disabled (Encryption Code field
is blank).
To input Encryption Code, first Click on ASCII or HEX check box to
select input format as ASCII format or HEX format.
ASCII input format:
To setup 64 bit WEP key, input 5 ASCII characters, for example,
‘12345’.
PRINT SERVER WIRELESS SETTING IN PS ADMIN PROGRAM
21
Print Server Administration User’s Guide
To setup 128 bit WEP key, input 13 ASCII characters, for example,
‘1234567890123’.
HEX input format:
To setup 64 bit WEP key, input 10 HEX code, for example,
‘3132333435’, this is the same with ASCII input ‘12345’.
To setup 128 bit WEP key, input 26 HEX code, for example,
‘31323334353637383930313233’, this is the same with ASCII input
‘1234567890123’.
On Confirm WEP Key field, input the same string input on the
Encryption Code field.
Make sure the Encryption Code is the same with the access point’s
encryption code that the print server is to be connected under
Infrastructure mode. Your PC/Notebook’s encryption code also needs
to be setup the same with the print server’s encryption code under
either Infrastructure mode or Ad-hoc mode.
Note:
Carefully input Encryption Code, any error setting will cause
communication link to fail. If failure occurs, please reset to factoryreset for the print server and follow the setup procedure (Ad-hoc or
Infrastructure mode) again.
22
PRINT SERVER WIRELESS SETTING IN PS ADMIN PROGRAM
Print Server Administration User’s Guide
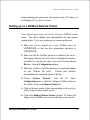
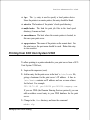
Getting Started Setting up Your Print Server
Before you can print over the network using your print server, you may
need to perform some basic setup tasks. These include:
♦ Choosing a name for your print server.
♦ Setting a password to protect your print server’s settings from
unauthorized modifications.
♦ Choosing names for the print server’s individual printer ports, and
changing the port settings.
♦ Testing the operation of the print server and checking that the
print server is connected properly.
Once you have finished with these tasks, you can proceed to set up
network printing for Novell NetWare, Microsoft Networks, AppleTalk
networks, and UNIX TCP/IP systems. Information about setting up
printing on these network types is covered in the following chapters.
Choosing a Name for Your Print Server
Each network print server has a server name. When the print server is
shipped from the factory, it has a default name of the form PSxxxxxx, where xxxxxx represents the last six digits of the Ethernet
address found on the print server’s underside sticker.
You can choose any name you like for your print servers, provided that:
Getting Started Setting up Your Print Server
23
Print Server Administration User’s Guide
♦ The server name is less than 15 characters long.
♦ The server does not have the same name as any Novell NetWare
fileserver on your network.
♦ The server does not have the same name as any of the print
servers configured for your Novell network.
♦ The server does not have the same name as any Microsoft
Networking client or server.
Uppercase and lowercase letters are not distinguished in print server
names.
It is recommended that you limit your print server name to 15
characters, chosen from the letters A to Z, the digits 0 to 9, and the
hyphen (“-”) character. Names that violate this recommendation may
not be usable with some networks.
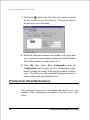
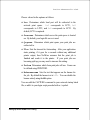
To change your print server’s name,
1. Select the print server in the PS Admin main window’s server
name display (or extended server display).
2. Choose Server Device... from the Configuration menu, or
press the Configure Server button in the toolbar. (If you have
already assigned a password to the server, you will have to enter
it at this point.) PS Admin will display the Server Device
Configuration window.
3. In the Server Name field, enter the name you have chosen for
the server, and press OK.
24
Getting Started Setting up Your Print Server
Print Server Administration User’s Guide
4. Choose Save Configuration from the Configuration menu, or
press the Save Configuration button on the toolbar. This will
store the new settings into the print server and restart it.
Your print server will now be accessible under the new name.
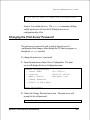
Setting a Password for Your Print Server
Unless you set a password, anyone on your network will be able to
change your print server’s settings. If your local network is connected
to the Internet, then it may be possible to change your print server’s
configuration from anywhere in the world using the telnet interface.
To protect your print server’s integrity, you should set a password for
your print server, and record it in a safe place.
To set the print server’s password,
1. Select the print server in the PS Admin main window’s server
name display (or extended server display).
2. Choose Server Device... from the Configuration menu, or
press the Configure Server button in the toolbar. (If you have
already assigned a password to the server, you will have to enter
it at this point.) PS Admin will display the Server Device
Configuration window.
3. In the Password field, enter the password you have chosen for
the server, and press OK.
4. PS Admin will ask you to confirm your new password. Enter the
password a second time and press OK.
Getting Started Setting up Your Print Server
25
Print Server Administration User’s Guide
5. Choose Save Configuration from the Configuration menu, or
press the Save Configuration button on the toolbar. This will
store the new settings into the print server and restart it.
WARNING: Do not forget or lose your print server password. If you
forget it, you will have to contact your service representative
to change the password.
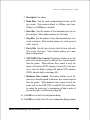
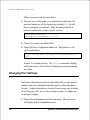
Changing Print Server Port Settings
Your network print server provides a number of parallel and/or serial
printer ports. For each port, you can determine:
♦ The name of the port
♦ A comment describing the port
♦ For parallel ports,
◊ Whether or not data can be sent to the port at high speed
◊ Whether or not the attached printer supports HP’s PJL
(Printer Job Language) protocol.
♦ For serial ports,
◊ The serial port speed (baud rate), in bits per second.
26
Getting Started Setting up Your Print Server
Print Server Administration User’s Guide
◊ How many data bits are sent per byte
◊ How many stop bits are sent with each byte
◊ Whether or not a parity bit is sent, and if so what kind (even
or odd parity)
◊ Whether or not software flow control is used (XON/XOFF)
◊ Whether or not hardware flow control should be used, and if
so what kind (DTR, RTS, or DTR/RTS).
To set the parameters for a printer port,
1. Select the print server in the PS Admin main window’s server
name display (or extended server display).
2. Choose Server Device... from the Configuration menu, or
press the Configure Server button in the toolbar. (If you have
assigned a password to the server, you will have to enter it at this
point.) PS Admin will display the Server Device Configuration
window.
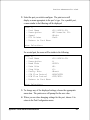
3. Press the button corresponding to the port you wish to change.
For parallel ports, the following dialog will be displayed:
The fields that can be changed are:
Getting Started Setting up Your Print Server
27
Print Server Administration User’s Guide
◊ Port Name The name by which the port is known on various
network systems. The port name should be at most 32
characters long and may consist of letters, numbers, and
hyphens. Spaces are not allowed. (If the port will be used
for LAN Manager clients, the port name can not exceed 8
characters.)
◊ Description A comment describing the port.
◊ Speed Determines whether or not the print server can send
data to the printer at high speed. Most newer printers can
accept high-speed data transmission; if your printer loses
characters then you may need to choose the low-speed mode.
◊ PJL Printer Determines whether or not the printer accepts
Hewlett Packard’s PJL printer job control language
commands. PJL allows users to get feedback on the printer’s
status. If the printer connected to the port supports PJL, set
this field to Yes.
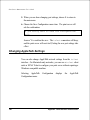
For serial ports, the following dialog will be displayed:
The fields that can be changed are:
◊ Port Name See above.
28
Getting Started Setting up Your Print Server
Print Server Administration User’s Guide
◊ Description See above.
◊ Baud Rate Sets the serial communications bit rate, in bits
per second. Most printers default to 9600bps; rates from
300bps to 115200bps are available.
◊ Data Bits Sets the number of bits transmitted per byte on
the serial port. Most modern printers use 8-bit data.
◊ Stop Bits Sets the number of stop bits transmitted per byte
on the serial port. Most modern printers use serial protocol
with 1 stop bit.
◊ Parity Bits Sets the type of parity check bit sent with each
byte on the serial port. Most modern printers use a nonparity serial protocol.
◊ XON/XOFF Flow Control Determines whether or not the
print server should respond to software flow control requests
from the printer. When software flow control is used, the
printer will send an XOFF character (Control-S) to the print
server when its buffer is getting full, and an XON character
(XON) when the buffer is no longer full.
◊ Hardware Flow Control Determines whether or not the
print server should respond to hardware flow control requests
from the printer. When hardware flow control is used, the
printer will use the DTR, RTS, or both RS-232 control lines
to control the print server’s transmission of data in order to
prevent the printer’s buffers from getting full.
4. Click OK to exit the Port Configuration dialog.
5. Click OK to exit the Server Device Configuration dialog window.
Getting Started Setting up Your Print Server
29
Print Server Administration User’s Guide
6. Choose Save Configuration from the Configuration menu, or
press the Save Configuration button on the toolbar. This will
store the new settings into the print server and restart it.
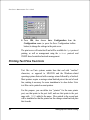
Testing Your Print Server
Once you have set all of the necessary parameters, and have finished
connecting your printer(s) to the print server, you should test each of
the printer ports using the Print Test function.
For each port you wish to test,
1. Select the print server in the PS Admin main window’s server
name display (or extended server display).
2. Choose Print Test... in the Tools menu. PS Admin will prompt
you for which port you wish to test.
3. Choose a port and click OK. The print server should print out a
“Print Server Test Page.”
4. Repeat this procedure for each printer port with an attached
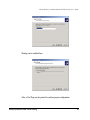
printer.
NOTE:
30
The Print Test function may not work with PostScript printers
that do not accept plain text files.
Getting Started Setting up Your Print Server
Print Server Administration User’s Guide
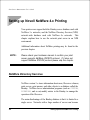
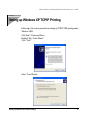
Setting up Novell NetWare 3.x Printing
This chapter explains how you can set up your print server so that
clients of your Novell NetWare 3.x server can print to attached printers.
This chapter also applies if any workstations on your network are using
a Novell NetWare 4.x server in bindery emulation mode. For
information on setting up your print server for use with NetWare 4.x
servers in NDS (NetWare Directory Services) mode, see the next
chapter, Setting up Novell NetWare 4.x Printing.
NOTE:
Please check your hardware manual to confirm your print
server supports NetWare IPX/SPX protocol. If it does not
support NetWare IPX/SPX protocol please skip this chapter.
Introduction to Novell NetWare Printing
On Novell NetWare networks, when a workstation user wants to print
a document, the workstation network software sends a file containing
commands for the printer to the NetWare file server, which places it in
a print queue.
Some software may be written to send print jobs directly to NetWare
print queues; Windows 3.1 using the NetWare network driver is an
example of this type of software. Software written to print to a local
Setting up Novell NetWare 3.x Printing
31
Print Server Administration User’s Guide
printer can print over the network if the printer port has been captured,
using the CAPTURE command or a similar method.
The file server makes its queues available to print servers, which may
be located:
♦ on the same server,
♦ on a different server, or
♦ in a stand-alone print server device.
If a printer is directly attached to a NetWare file server, or if it is
attached to a workstation on the network (using the RPRINTER
program, as described below) then the print server needs to be run on
the server itself.
32
Setting up Novell NetWare 3.x Printing
Print Server Administration User’s Guide
The PSERVER.NLM program is the NetWare Loadable Module
(NLM) that runs on the file server and scans print queues both on the
file server where it is running, and optionally on other servers. When
PSERVER.NLM detects a new job, it directs it to the proper printer
port.
If it is inconvenient to attach a printer directly to a file server, it may be
desirable to connect it to a workstation using NetWare’s remote printer
facility and the RPRINTER.EXE program. When RPRINTER is used,
the print server takes print jobs from the queue and sends them to the
remote printer workstation, and the RPRINTER program then passes
Setting up Novell NetWare 3.x Printing
33
Print Server Administration User’s Guide
the jobs to the locally connected printer. This method, however,
introduces delays in printing, and the remote printer software may be
incompatible with software used on the remote printer workstation.
Your print server acts as a NetWare print server, scanning the print
queues on one or more NetWare servers and directing them to its
attached printers. This reduces the load on the file server, while making
it convenient for printers to be located anywhere.
You can also use the print server for a remote printer connection
instead of letting it scan the queues itself. This has the advantage of
reducing the number of print servers in a large network, making
management simpler. However, this causes the NetWare file server to
be more heavily loaded, and increases delays in network printing.
34
Setting up Novell NetWare 3.x Printing
Print Server Administration User’s Guide
Setting up as a NetWare Print Server
This section describes how to configure your print server to act as a
NetWare print server, and how to set up a print server port to serve a
print queue on the file server.
1. Make sure you are logged on to your NetWare server as
SUPERVISOR, or that you have permissions equivalent to
SUPERVISOR.
2. Make sure that the NetWare protocol is enabled in the server.
This setting is found in the Server Device Configuration window,
accessible by selecting the print server and choosing Server
Device... from the Configuration window.
3. Choose Netware Protocol... from the Configuration menu, or
click the Configure NetWare button in the toolbar. Click on the
Bindery Print Server tab.
4. Click on the port button corresponding to the port you want to
serve the print queue.
5. Click on the name of the NetWare file server where you wish the
print queue to be stored. (Clicking on the symbol to the left of
the file server name will expand the list of print queues on the file
server.)
6. Unless you want to use an existing print queue on the server, you
will need to create a new print queue. Click the Create Queue...
button, then type in the name of the new print queue and
determine the file server volume where you want the print queue
to be stored. Click OK to create the queue.
Setting up Novell NetWare 3.x Printing
35
Print Server Administration User’s Guide
7. Click on the print queue name.
8. Click on the Add >> button to add the print queue to the
Serviced Queues list for the port.
9. Click OK, then choose Save Configuration from the
Configuration menu (or press the Save Configuration toolbar
button) to change the settings in the print server and the NetWare
server. The print server will restart itself and begin serving the
specified print queue.
If you created the print queue in step 6, you may need to assign queue
operators and queue users to the print queue using PS Admin or the
NetWare PCONSOLE program. By default, SUPERVISOR is
assigned as the print queue’s operator, and all members of the group
EVERYONE are allowed to use the print queue. For information
36
Setting up Novell NetWare 3.x Printing
Print Server Administration User’s Guide
about assigning print queue users and operators using PS Admin, see
the Managing Print Queues section.
Setting up as a NetWare Remote Printer
Your network print server can also be set up as NetWare remote
printer. This allows slightly easier administration, but may increase
printing delays. To set up a printer port as a remote printer port,
1. Make sure you are logged on to your NetWare server as
SUPERVISOR, or that you have permissions equivalent to
SUPERVISOR.
2. Make sure that the NetWare protocol is enabled in the server.
This setting is found in the Server Device Configuration window,
accessible by selecting the print server and choosing Server
Device... from the Configuration window.
3. Make sure you have a NetWare print server created and running
on your NetWare file server.
Consult your NetWare
documentation for instruction on how to do this.
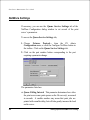
4. Choose Netware Protocol... from the PS Admin
Configuration menu, or click the Configure NetWare button in
the toolbar. Click on the Remote Printer tab.
5. Click on the port number button corresponding to the port you
will be using for remote printer service.
6. Click on the Bindery Remote Printer selection. PS Admin will
display a list of NetWare servers accessible from your network.
Setting up Novell NetWare 3.x Printing
37
Print Server Administration User’s Guide
7. Click on the symbol to the left of the server name to expand
the list of print servers on the file server. Click on the name of
the print server you will be using.
8. Determine what printer numbers are available on the given print
server, and enter an unused printer number in the Printer Number
field. Printer numbers can range from 0 to 15.
9. Click OK, then choose Save Configuration from the
Configuration menu (or press the Save Configuration toolbar
button) to change the settings in the print server and the NetWare
server. The print server will restart itself and begin serving as a
remote printer for the specified print server.
Printing from Client Workstations
Once your print server is set up for printing from the file server, your
network’s client workstations can connect to the file server’s print
queue.
38
Setting up Novell NetWare 3.x Printing
Print Server Administration User’s Guide
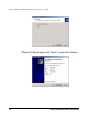
Windows 95 (and later) Client Workstations
To enable your Windows 95 or later workstation to print to a NetWare
print queue,
1. From the Start menu, choose the Settings submenu, then the
Printers item within it. Windows will display the Printers folder.
2. Double-click on the Add Printer icon in the Printers folder.
Windows will start the Add Printer Wizard.
Press the Next > button to continue to the next screen.
3. Choose the Network printer selection and click the Next >
button to continue.
Setting up Novell NetWare 3.x Printing
39
Print Server Administration User’s Guide
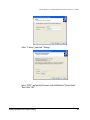
4. Enter the network path for the NetWare file server, specifying
which print queue you want to connect to. For instance, to use
the printer serving the queue named Q-LJ5L on the NetWare
file server named SERVER, enter:
\\SERVER\Q-LJ5L
As an alternative to entering the network path, you can also use the
Browse... button to locate the file server and print queue. Press the
Next > button to continue.
5. At this point Windows will ask you to choose the correct printer
driver for the printer. Choose your printer’s make and model
from the list, or use the driver disk included with the printer.
When you have chosen the correct printer, click Next > to
continue.
40
Setting up Novell NetWare 3.x Printing
Print Server Administration User’s Guide
6. Windows will then ask for a name for the new printer, and ask
whether or not you want to set the printer as the Windows
default printer. Click Finish to continue.
7. Windows may ask you whether or not you wish to print a test
page to make sure that the printer will work correctly. When the
test page is done printing, you will be asked whether or not the
test page printed.
Windows NT 4.0 (and later) Client Workstations
To enable your Windows NT 4.0 or later workstation to print to a
NetWare print queue,
1. From the Start menu, choose the Settings submenu, then the
Printers item within it. Windows will display the Printers folder.
2. Double-click on the Add Printer icon in the Printers folder.
Windows will start the Add Printer Wizard.
3. Choose the Network printer server selection and click the
Next > button to continue.
Setting up Novell NetWare 3.x Printing
41
Print Server Administration User’s Guide
4. Enter the network path for the NetWare file server, specifying
which print queue you want to connect to. For instance, to use
the printer serving the queue named Q-LJ5L on the NetWare
file server named SERVER, enter:
\\SERVER\Q-LJ5L
As an alternative to entering the network path, you can also browse
the network to locate the file server and print queue. Press the OK
button to continue.
5. Windows will display the following message.
continue.
42
Press OK to
Setting up Novell NetWare 3.x Printing
Print Server Administration User’s Guide
6. At this point Windows will ask you to choose the correct printer
driver for the printer. Choose your printer’s make and model
from the list, or use the driver disk included with the printer.
When you have chosen the correct printer, click OK to continue.
7. If you already have a default printer, Windows will ask if you
wish to use the newly installed printer as the default.
8. When installation is complete, Windows will display the following
dialog. Press the Finish button to complete installation.
Windows NT 3.51 Client Workstations
To access a NetWare 3.x printer queue from your Windows NT 3.51
workstation,
1. Double-click on the Print Manager icon found in the Main
program group.
2. In the Print Manager, choose Connect to Printer... from the
Printer menu.
Setting up Novell NetWare 3.x Printing
43
Print Server Administration User’s Guide
3. Enter the network path for the NetWare file server, specifying
which print queue you want to connect to. For instance, to use
the printer serving the queue named Q-LJ5L on the NetWare
file server named SERVER, enter:
\\SERVER\Q-LJ5L
As an alternative to entering the network path, you can also browse
the network to locate the file server and print queue. Press the OK
button to continue.
4. Windows will display the following message.
continue.
Press OK to
5. Windows will ask you to choose the correct printer driver for the
printer. Select a driver and press OK.
6. The printer should now be available for use.
44
Setting up Novell NetWare 3.x Printing
Print Server Administration User’s Guide
Windows 3.x and Windows for Workgroups 3.11 Workstations
To access a NetWare 3.x printer queue from your Windows 3.x or
Windows for Workgroups 3.11 workstation,
1. Double-click on the Print Manager icon found in the Main
program group.
2. In the Print Manager, choose Printer Setup... from the Options
menu. The Print Manager will display the Printers dialog window.
3. If necessary, click on the Add >> button. Choose the correct
printer driver, and click Install....
4. When the printer driver has been correctly installed, select the
printer in the Installed Printers list and click the Connect... button.
Setting up Novell NetWare 3.x Printing
45
Print Server Administration User’s Guide
5. Click the Network... button to display the NetWare printer
connections dialog. (If you are using Windows for Workgroups,
you will also have to push the NetWare... button in the Connect
Network Printer dialog.)
6. Click on the printer port you wish to capture and the printer
queue you want it redirected to, and press Capture. Press
Permanent to insure that the port will be redirected every time
you start Windows. Click on the exit button when you are
finished.
7. Exit the remaining dialogs by pressing OK. The printer should
now be available for use.
MS-DOS/PC-DOS Workstations
For printing from DOS-based workstations, you can use the CAPTURE
command to redirect one of the workstation’s printer ports (LPT1,
LPT2, or LPT3) to the network print queue. The syntax for the
CAPTURE command is:
CAPTURE
L=n
S=server
B=bannername
46
Q=queue
TI=n
F=form
Setting up Novell NetWare 3.x Printing
Print Server Administration User’s Guide
Choose values for the options as follows:
♦ L=n Determines which local port will be redirected to the
network print queue. L=1 corresponds to LPT1, L=2
corresponds to LPT2, and L=3 corresponds to LPT3. By
default, LPT1 is captured.
♦ S=server Determines which server the print queue is located
on. By default, your login file server is used.
♦ Q=queue Determines which print queue your print jobs are
redirected to.
♦ TI=n Sets the timeout for Autoendcap. After your application
starts printing, if it goes for n seconds without any additional
printer output, then NetWare assumes that the print job is
finished and sends it to the printer. If your print jobs are
becoming split up you may need to increase this setting.
♦ F=form Determines which form print jobs will use. Forms can
be defined using PRINTDEF.
♦ B=bannername Sets the text that appears on the banner for
the job. By default the banner text is LST:. You can disable the
banner entirely using the NB option.
You can add the CAPTURE command to your network startup batch
file, or add it to your login script preceded with a # symbol.
Setting up Novel l NetWare 3.x Printing
47
Print Server Administration User’s Guide
NetWare Settings
If necessary, you can use the Queue Service Settings tab of the
NetWare Configuration dialog window to set several of the print
server’s parameters.
To access the Queue Service Settings tab,
1. Choose Netware Protocol... from the PS Admin
Configuration menu, or click the Configure NetWare button in
the toolbar. Click on the Queue Service Settings tab.
2. Click on the port number button corresponding to the port
requiring a parameter change.
The parameters listed are:
♦ Queue Polling Interval This parameter determines how often
the print server scans print queues on the file server(s), measured
in seconds. A smaller number may mean that print jobs are
printed with a smaller delay, but will also greatly increase the load
on the server.
48
Setting up Novell NetWare 3.x Printing
Print Server Administration User’s Guide
♦ Form Type Service This parameter, along with the queue
service mode described below, determines how the print server
handles forms when it is serving print queues.
Using the PCONSOLE program, you can define different forms,
which identify the different types of paper that the printer can use
(e.g., plain, letterhead, legal, A4, B4, etc.). Print jobs may specify
what print form they wish to use. If a job requests a form that isn’t
currently loaded, it may be necessary for the printer operator to
manually change forms before printing can continue.
If the form type service is set to All Forms, then the print server
ignores the job’s form and immediately prints all jobs sent to it. If it
is set to Current Form, then the printer uses the Queue Service
Mode parameter to determine how to handle form changes.
♦ Queue Service Mode Determines how the printer responds to
changes in the current printing form:
◊ Change as needed Serves print jobs in order, stopping to
allow a forms change every time it becomes necessary.
◊ Minimize form changes within print queues Reorders
jobs within an individual print queue in order to minimize the
number of form changes required. When a forms change is
required, printing will stop to allow the change.
◊ Service only currently mounted forms Only services
printer queue jobs that use a form that the printer already has.
Jobs using other forms will be left in the queue to be served by
other printers.
◊ Minimize form changes across print queues Reorders
jobs across all of the print queues the printer serves in order
to minimize the number of form changes required.
Setting up Novell NetWare 3.x Printing
49
Print Server Administration User’s Guide
Setting up Novell NetWare 4.x Printing
Your print servers support both the Bindery server database used with
NetWare 3.x networks, and the NetWare Directory Services (NDS)
network-wide database used with NetWare 4.x networks. This
chapter explains how to use the network print server in an NDS
environment.
Additional information about NetWare printing may be found in the
previous chapter.
NOTE:
Please check your hardware manual to confirm your print
server supports NetWare IPX/SPX protocol. If it does not
support NetWare IPX/SPX protocol please skip this chapter.
NetWare Directory Services
NetWare version 3.x stores information about users, file server volumes,
print servers, print queues, and other objects in a database called the
Bindery. NetWare server administration programs (such as SYSCON,
PCONSOLE, and so on) modify entries in the Bindery to manage the
operation of the file server.
The main disadvantage of the Bindery database is that it is limited to a
single server. Networks with a large number of servers can become
50
Setting up Novell NetWare 4.x Printing
Print Server Administration User’s Guide
difficult to manage, because each server has to be configured separately.
In large enterprises, this can result in disorganization as each department
tries to administer its own NetWare servers, each in a different way. It
can become troublesome or impossible to coordinate the administration
of file servers across the entire enterprise.
For this reason, NetWare version 4.x introduced NetWare Directory
Services, which allows administration on a global, as well as a local
scale. NDS organizes objects not by file server, but by administrative
domain.
The Network Directory Services database stores “objects” in a tree
structure. Branches in the tree represent different regional offices,
divisions, departments, or other ways of dividing administrative
responsibility.
Objects, such as users, servers, server volumes, print servers, print
queues, etc., can be placed anywhere within the tree structure. The
whole tree structure is shared by all servers using the same tree.
Changing a setting in the tree affects all servers, making it less necessary
to manage servers individually.
For compatibility with existing NetWare 3.x clients and servers,
NetWare 4.x provides Bindery emulation, which exposes objects in the
server’s context as Bindery objects.
Setting up as a NetWare Print Server
To set up your print server as a NetWare NDS print server, you will
first need to create several NDS objects. You can do this using the
DOS-based PCONSOLE or NETADMIN programs, or the
Setting up Novell NetWare 4.x Printing
51
Print Server Administration User’s Guide
Windows-based NWADMIN NetWare Administrator program. In
this example, NWADMIN is used; consult your NetWare
documentation for information about using PCONSOLE or
NETADMIN to perform the setup.
To configure your print server for NetWare NDS printing,
1. Start the NWADMIN program. Expand the tree to display the
context in the tree where you want to place the print server, and
select the context.
2. Choose Create... from the Object menu. Select the object class
Print Queue and press OK.
3. Enter a name for the print queue, and specify the NDS volume
object of the file server volume where you want the print queue
to be stored. Click the Create button.
52
Setting up Novell NetWare 4.x Printing
Print Server Administration User’s Guide
4. Select the NDS context again, and choose Create... from the
Object menu. Choose the Printer object class and click OK.
5. Enter a name for the printer object. The name should be the
same as the print server’s configured port name. Click Create
to create the printer in your NDS context.
6. Double-click on the printer, then choose the Assignments tab.
Click on the Add... button to select the print queue(s) you want
Setting up Novell NetWare 4.x Printing
53
Print Server Administration User’s Guide
the print server to serve, and optionally set their priority. Press
OK to finish making print queue assignments for the printer.
7. Repeat from step 4 for each print server port you will be using.
8. Select the context again, and choose Create... from the Object
menu. Choose the Print Server object type and press OK.
Enter a name for the print server, which must be the same as the
network print server’s name. Click the Create button to create
the print server object.
9. Double-click on the newly created print server object, and click
on the Assignments tab. Click the Add... button to add each of
the printer objects you created to the print server. Make sure
that the printer number corresponds properly to the port number;
the first port should be printer number 0, the second port printer
54
Setting up Novell NetWare 4.x Printing
Print Server Administration User’s Guide
number 1, and so on. Press OK to complete print server
assignments for the print server.
10.Start PS Admin, select the print server, and choose NetWare
Protocol... from the Configuration menu. Click on the NDS
Print Server tab.
11.Select the NDS tree and enter the context where you created the
print server object, then press OK.
12.Choose Save Configuration from the Configuration menu (or
press the Save Configuration toolbar button) to change the
Setting up Novell NetWare 4.x Printing
55
Print Server Administration User’s Guide
settings in the print server. The print server will restart itself and
begin serving the print queues assigned to its printer ports.
For more information about configuring print servers, printers, and print
queues, consult your NetWare documentation.
Setting up as a NetWare Remote Printer
Your network print server can also be set up as NetWare remote
printer. This allows slightly easier administration, but may increase
printing delays. To set up a printer port as a remote printer port,
1. Make sure you are logged on to your NetWare server as Admin,
or that you have permissions equivalent to Admin.
2. Make sure that the NetWare protocol is enabled in the server.
This setting is found in the Server Device Configuration window,
accessible by selecting the print server and choosing Server
Device... from the Configuration window.
3. Make sure you have a NetWare print server created and running
on your NetWare file server.
Consult your NetWare
documentation for instruction on how to do this.
4. Choose NetWare Protocol... from the PS Admin
Configuration menu, or click the Configure NetWare button in
the toolbar. Click on the Remote Printer tab.
5. Click on the port number button corresponding to the port you
will be using for remote printer service.
6. Click on the NDS Remote Printer selection. PS Admin will
display the tree structure of the NetWare NDS contexts
accessible from your network.
56
Setting up Novell NetWare 4.x Printing
Print Server Administration User’s Guide
7. Enter the name of the context you will be using, and enter the
name of the print server in that context.
8. Determine what printer numbers are available on the given print
server, and enter an unused printer number in the Printer Number
field. Printer numbers can range from 0 to 15.
9. Click OK, then choose Save Configuration from the
Configuration menu (or press the Save Configuration toolbar
button) to change the settings in the print server. The print server
will restart itself and begin serving as a remote printer for the
specified print server.
Printing from Client Workstations
Once your print server is set up for printing from the file server, your
network’s client workstations can connect to the file server’s print
queue.
Setting up Novell NetWare 4.x Printing
57
Print Server Administration User’s Guide
Windows 95 (and later) Workstations
Unless you are using the 32-bit NetWare requester from Novell,
Windows 95 or later does not directly support NDS access. You can
access NetWare 4.x printer queues using bindery emulation, as
described in the previous chapter.
Windows NT 4.0 (and later) Client Workstations
To print to a NetWare 4.x print queue from Windows NT 4.0 or later,
1. From the Start menu, choose the Settings submenu, then the
Printers item within it. Windows will display the Printers folder.
2. Double-click on the Add Printer icon in the Printers folder.
Windows will start the Add Printer Wizard.
3. Choose the Network printer server selection and click the
Next > button to continue.
58
Setting up Novell NetWare 4.x Printing
Print Server Administration User’s Guide
4. Locate the print queue you wish to attach to in the browser, and
click OK. NetWare NDS contexts may be found beneath the
“NetWare or Compatible Network” item.
5. Windows will display the following message.
continue.
Press OK to
6. The Add Printer Wizard will ask you to choose the appropriate
printer driver, and may ask you to insert your Windows NT
installation diskettes to locate driver files.
7. When installation is complete, the Add Printer Wizard will display
the following screen. Click Finish to complete printer installation.
Setting up Novell NetWare 4.x Printing
59
Print Server Administration User’s Guide
Windows 3.1 and Windows for Workgroups 3.11 Workstations
To access a NetWare 4.x printer queue from your Windows 3.1 or
Windows for Workgroups 3.11 workstation,
1. Double-click on the Print Manager icon found in the Main
program group.
2. In the Print Manager, choose Printer Setup... from the Options
menu. Print Manager will display the Printers dialog window.
3. If necessary, click on the Add >> button. Choose the correct
printer driver, and click Install....
60
Setting up Novell NetWare 4.x Printing
Print Server Administration User’s Guide
4. When the printer driver has been correctly installed, select the
printer in the Installed Printers list and click the Connect... button.
5. Click the Network... button to display the NetWare printer
connections dialog. Click on the printer port you wish to capture
and the printer queue you want it redirected to, and press
Capture. Press Permanent to insure that the port will be
redirected every time you start Windows. Click on the exit
button when you are finished.
6. The printer should now be available for use.
Setting up Novell NetWare 4.x Printing
61
Print Server Administration User’s Guide
MS-DOS/PC-DOS Workstations
The use of the CAPTURE command on NetWare 4.x networks is the
same as for NetWare 3.x networks. The CAPTURE command is
described in the previous chapter of this manual, and in your NetWare
documentation.
62
Setting up Novell NetWare 4.x Printing
Print Server Administration User’s Guide
Setting up Microsoft Network Printing
Microsoft Networking services, based on the NetBEUI protocol,
provide network users with peer-to-peer network services. In addition
to accessing files and printers on a central server, any workstation can
share its file directories and printer ports, making them accessible to
other workstations.
Your print servers are also capable of making attached printers
accessible to Microsoft Networking workstations running network
operating systems such as:
♦ Microsoft Windows for Workgroups 3.x
♦ Microsoft Windows 95 (or later)
♦ Microsoft Windows NT 3.51, 4.0 or later
♦ Microsoft LAN Manager
♦ IBM LAN Server
To improve printing efficiency, Microsoft Networking services clients
can choose to print to a print queue stored on a Windows NT server,
which can then forward the print jobs to the print server.
Setting up the Print Server for Microsoft Networking
Little additional setup is necessary for the print server to be usable from
Microsoft Networking clients. First, the NetBEUI check box in the
Server Device Configuration window needs to be checked. Select the
Setting up Microsoft Network Printing
63
Print Server Administration User’s Guide
print server and choose Server Device... from the Configuration
menu to display this window.
You should also set the workgroup name and maximum allowed
connections. These settings are accessible from the NetBEUI
Configuration dialog window, which you can display by choosing
NetBEUI Protocol... from the Configuration menu.
Each Microsoft Networking workstation or server has a workgroup
name. The workgroup name determines what servers and resources
will show up by default in lists of accessible resources. You should
assign to the print server the same workgroup name as the users who
will be accessing it most often.
Network path names for printers on Microsoft Networking systems are
of the form:
\\computer name\printer name
When the print server is used with Microsoft Networking, the Server
Name (set from the Server Device Configuration window) is used for
the computer name in the path, and the Port Name (set from the
Parallel Port Configuration or Serial Port Configuration window) is used
for the printer name.
64
Setting up Microsoft Network Printing
Print Server Administration User’s Guide
For example, the printer connected to the port named DJ-660C on
server PS-142634 would be referred to by the path:
\\PS-142634\DJ-660C
Printing from Client Workstations
This section tells how to make it possible for your Microsoft
Networking client workstations to access printers connected to your
network print server.
Windows 95 (and later) Client Workstations
To allow your Windows 95 (or later) workstation to print over the
network directly through your network print server,
1. From the Start menu, choose the Settings submenu, then the
Printers item within it. Windows will display the Printers folder.
2. Double-click on the Add Printer icon in the Printers folder.
Windows will start the Add Printer Wizard.
Setting up Microsoft Network Printing
65
Print Server Administration User’s Guide
3. Press the Next > button to continue to the next screen.
4. Choose the Network printer selection and click the Next >
button to continue.
5. Enter the network path for your network print server, specifying
which port you want to connect to. For instance, to use the
printer connected to the port named PS-142634-P2 on the print
server named PS-142634, enter:
\\PS-142634\PS-142634-P2
As an alternative to entering the network path, you can also use the
Browse... button to locate the print server and printer. Press the
Next > button to continue.
66
Setting up Microsoft Network Printing
Print Server Administration User’s Guide
6. At this point Windows will ask you to choose the correct printer
driver for the printer. Choose your printer’s make and model
from the list, or use the driver disk included with the printer.
When you have chosen the correct printer, click Next > to
continue.
7. Windows will ask for a name for the printer. Enter a name, or
accept the default. Press Finish to complete the installation.
Setting up Microsoft Network Printing
67
Print Server Administration User’s Guide
Windows NT 4.0 (and later) Client Workstations
To allow your Windows NT 4.0 (or later) workstation to print over the
network directly through your network print server,
1. From the Start menu, choose the Settings submenu, then the
Printers item within it. Windows will display the Printers folder.
2. Double-click on the Add Printer icon in the Printers folder.
Windows will start the Add Printer Wizard.
3. Choose the Network printer server selection and click the
Next > button to continue.
68
Setting up Microsoft Network Printing
Print Server Administration User’s Guide
4. Enter the network path for your network print server, specifying
which port you want to connect to. For instance, to use the printer
connected to the port named PS-142634-P2 on the print server
named PS-142634, enter:
\\PS-142634\PS-142634-P2
As an alternative to entering the network path, you can also browse
the network to locate the print server and port. Press the OK
button to continue.
5. Windows will display the following message.
continue.
Press OK to
6. At this point Windows will ask you to choose the correct printer
driver for the printer. Choose your printer’s make and model
from the list, or use the driver disk included with the printer.
When you have chosen the correct printer, click OK to continue.
7. If you already have a default printer, Windows will ask if you
wish to use the newly installed printer as the new default.
Setting up Microsoft Network Printing
69
Print Server Administration User’s Guide
8. When installation is complete, Windows will display the following
dialog. Press the Finish button to complete installation.
Windows NT 3.51 Client Workstations
To allow your Windows NT 3.51 workstation to print over the
network directly through your network print server,
1. Double-click on the Print Manager icon found in the Main
program group.
2. In the Print Manager, choose Connect to Printer... from the
Printer menu.
3. Enter the network path for the print server, specifying which
printer port you want to connect to. For instance, to use the
printer connected to the port named PS-142634-P2 on the print
server named PS-142634, enter:
\\PS-142634\PS-142634-P2
As an alternative to entering the network path, you can also browse
the network to locate the print server and port. Press the OK
button to continue.
70
Setting up Microsoft Network Printing
Print Server Administration User’s Guide
4. Windows will display the following message.
continue.
Press OK to
5. Windows will ask you to choose the correct printer driver for the
printer. Select a driver and press OK.
6. The printer should now be available for use.
Windows for Workgroups Client Workstations
To enable network printing to your network print server from your
Windows for Workgroups 3.11 workstation,
1. Start the Print Manager by double-clicking its icon in the Main
program group.
2. From the Print Manager’s Options menu, choose Printer
Setup… . The Print Manager will display the Printers dialog
window.
Setting up Microsoft Network Printing
71
Print Server Administration User’s Guide
3. From the List of Printers, choose the appropriate printer type and
click Install. If your printer type is not listed, you may have to
choose “Install Unlisted or Updated Printer” and use a driver
diskette provided by the printer manufacturer. The Print
Manager program will install the printer’s driver program,
prompting you to insert diskettes as necessary. When driver
installation is complete, the printer will show up in the Installed
Printers list.
4. Select the printer in the Installed Printers list and click the
Connect... button.
72
Setting up Microsoft Network Printing
Print Server Administration User’s Guide
5. From the Connect dialog window, click Network....
Connect Network Printer window will be displayed.
The
6. In the Device Name field, choose a free printer port to be
assigned to the network printer. (Any free port name will do.)
Once the connection is made, all requests to print to that printer
port will be redirected to the network printer.
7. Enter the network path for your network print server in the Path
field, specifying which port you want to connect to. For instance,
to use the printer connected to the port named PS-142634-P1
on the print server named PS-142634, enter:
\\PS-142634\PS-142634-P1
As an alternative to entering the network path, you can also browse
the network to locate the print server and printer. Press OK to
continue.
8. Select the newly connected printer port in the Connect dialog
window, and click OK.
Setting up Microsoft Network Printing
73
Print Server Administration User’s Guide
9. Click Close to close the Printers dialog window.
10.The printer will now appear in the Print Manager window, and
will be accessible from all Windows applications, as well as for
DOS applications executed from Windows.
MS-DOS/PC-DOS Workstations
To connect your MS-DOS/PC-DOS workstation using client software
such as
♦ Microsoft LAN Manager client
♦ Microsoft NT Server client
♦ Microsoft Windows for Workgroups (DOS client)
you will normally use the NET USE command. To connect a DOSbased NetBEUI client to a printer attached to your print server,
74
Setting up Microsoft Network Printing
Print Server Administration User’s Guide
1. Choose a free printer port (LPT1, LPT2, or LPT3) not being
used on the workstation. If you never connect a printer directly
to the workstation’s physical printer port, you should probably
choose LPT1.
2. Type the command
NET USE port \\computer name\printer name
where port is the name of the free printer port, computer name
is the name of the print server, and printer name is the name of
the print server’s port. For example, to connect LPT1 to the printer
on port PS-142634-P1 on the print server PS-142634, use the
command:
NET USE LPT1 \\PS-142634\PS-142634-P1
3. You can add the above line to your AUTOEXEC.BAT file if you
always wish to be connected to the printer.
Keeping the Print Queue on a Windows NT Server
Because Microsoft Windows Networking is a peer-to-peer network, it
is possible for clients workstations to connect directly to the network
print server. However, because the print server’s memory is limited, a
client may have to wait for large print jobs to complete instead of letting
the print server queue the entire job.
To reduce wait times for clients, you may wish to store the print queue
on a Windows NT Server. For a Windows NT 4.0 server,
1. From the Start menu, choose the Settings submenu, then the
Printers item within it. Windows will display the Printers folder.
Setting up Microsoft Network Printing
75
Print Server Administration User’s Guide
2. Double-click on the Add Printer icon in the Printers folder.
Windows will start the Add Printer Wizard.
3. Choose the My Computer selection and click the Next >
button to continue.
4. Check the box for an unused local port on your server, usually
LPT2 or LPT3. Click the Next > button to continue.
5. At this point Windows will ask you to choose the correct printer
driver for the printer. Choose your printer’s make and model
from the list, or use the driver disk included with the printer.
When you have chosen the correct printer, click Next > to
continue.
76
Setting up Microsoft Network Printing
Print Server Administration User’s Guide
6. Windows will give you opportunity to share the printer. Click the
Shared selection, and give the printer a share name, then click
Next > to continue.
7. After you are finished adding the printer to the server, you need
to redirect the local port to the print server using a NET USE
command typed in from the Command Prompt:
NET USE LPT2 \\PS-142634\PS-142634-P1
You will need to execute this command every time the server is
rebooted. You may wish to place it in a batch file, executed from
the Startup program group.
For a Windows NT 3.51 server,
1. Double-click on the Print Manager icon found in the Main
program group.
2. Choose Create Printer... from the Printer menu.
3. In the Create Printer dialog window, choose a name for the
printer, select the proper driver, and choose an unused local
printer port. Click the check box to allow the printer to be
shared, and choose a share name (the name by which the printer
will be known to network clients). Click OK to continue.
Setting up Microsoft Network Printing
77
Print Server Administration User’s Guide
4. After you are finished adding the printer to the server, you need
to redirect the local port to the print server using a NET USE
command typed in from the Command Prompt:
NET USE LPT2 \\PS-142634\PS-142634-P1
You will need to execute this command every time the server is
rebooted. You may wish to place it in a batch file, executed from
the Startup program group.
78
Setting up Microsoft Network Printing
Print Server Administration User’s Guide
Setting up AppleTalk Printing
The AppleTalk network protocol is used with computers using the
MacOS operating system. It can be used for network communications
over standard Ethernet or Fast Ethernet using the EtherTalk transport,
or over a proprietary low-speed LocalTalk transport.
Your print server can be used for network printing to PostScript
printers. You can print from any MacOS computer connected to your
Ethernet network, either directly using an EtherTalk connection, or
indirectly through a LocalTalk-to-EtherTalk router.
NOTE:
The Chooser name of a printer connected to one of the print
server’s ports is the same as its port name. If you are using
AppleTalk printing, you will need to make sure that every
port name is unique among all of the network printers in your
AppleTalk zone.
Setting up the Print Server for AppleTalk Printing
To set up your print server so that it can be used for AppleTalk printing:
1. Make sure the AppleTalk protocol is enabled. The AppleTalk
check box in the Server Device Configuration window needs to
be checked. Select the print server and choose Server
Device... from the Configuration menu to display this window.
2. Choose AppleTalk Protocol... from the Configuration menu.
Setting up AppleTalk Printing
79
Print Server Administration User’s Guide
3. If your AppleTalk network is divided into AppleTalk zones, you
will have to specify which zone the print server should be in. You
should locate the print server in the same zone as most of the
users who will be using it.
If your network is not divided into zones, the AppleTalk Zone field
should contain a single asterisk “*”.
4. For each printer port that will be used for AppleTalk printing,
you may need to change the AppleTalk port settings. Press the
appropriate Port Setting button to open the AppleTalk Port
Configuration dialog window.
PS Admin will display the port’s Chooser Name (which is the same
as the port name) and allow you to change the port’s settings:
◊ Printer Type Describes the type of printer. Most PostScript
printers should use the LaserWriter type.
◊ PostScript Level Describes whether the printer supports
Level 1 PostScript or Level 2 PostScript. This information
can usually be found in the printer’s documentation or on the
printer test page.
◊ Font Group Describes the print font options supported by
the printer such as No Font, All Font, Standard 35, and
Standard 13.
80
Setting up AppleTalk Printing
Print Server Administration User’s Guide
5. Press OK to return to the AppleTalk Configuration dialog.
Repeat these steps for as many ports as necessary.
6. Press OK, then choose Save Configuration from the
Configuration menu (or press the Save Configuration toolbar
button) to change the settings in the print server. The print server
will restart itself and begin serving print jobs.
Printing from MacOS Client Workstations
The exact procedure for selecting a PostScript printer connected to
your print server may vary slightly, depending on what printer driver
version you are using. The procedure described below assumes you
are using the LaserWriter 8 print driver, included with recent versions of
the MacOS operating system.
To choose a printer connected to your print server as your MacOS
workstation’s default printer,
1. Open the Chooser by selecting Chooser from the Apple menu.
2. Select the LaserWriter 8 icon on the left.
AppleTalk is set to Active.
Make sure that
3. A list of all networked PostScript printers will be displayed:
Setting up AppleTalk Printing
81
Print Server Administration User’s Guide
Click on the name of the printer (port) you wish to use.
4. If you previously have not set this printer as the default, your
computer will prompt you for a PostScript Printer Description file.
Choose the appropriate printer description file for your printer
and click Select. If your printer is not listed, click Use Generic
to use a generic printer description.
If you wish to access this setting in the future, you can use the Setup
button in the Chooser window.
5. At this point the selected printer will become your computer’s
default printer. You may need to choose Page Setup... in any
applications you might have open.
82
Setting up AppleTalk Printing
Print Server Administration User’s Guide
Setting up UNIX TCP/IP Printing
Your print servers can provide print services to systems using the
lpr/lpd network printing protocol. Most UNIX systems are capable
of supporting lpd.
This chapter explains how to use PS Admin to configure the print
server for TCP/IP printing, and how to configure your Unix
workstations to print to the print server.
For TCP/IP networks without a Windows-based workstation available,
you can use the telnet interface to configure the print server. See
Appendix: Telnet Interface Administration for more information
about using the telnet interface.
Configuring TCP/IP Network Settings
To configure your print server to allow TCP/IP-based printing, as well
as SNMP and telnet-based management,
1. Make sure the TCP/IP protocol is enabled. The TCP/IP check
box in the Server Device Configuration window needs to be
checked. Select the print server and choose Server Device...
from the Configuration menu to display this window.
2. Choose TCP/IP Protocol... from the Configuration menu.
3. Configure the print server’s IP address, local network subnet
mask, and default gateway.
Setting up Unix TCP/IP Printing
83
Print Server Administration User’s Guide
4. Press OK, then choose Save Configuration from the
Configuration menu (or press the Save Configuration toolbar
button) to change the settings in the print server.
The print server will restart itself and will be available for lpd-protocol
printing, as well as management using the telnet protocol and
SNMP-based centralized network management.
Printing Text Files from Unix
Text files on Unix systems contain lines that end with “newline”
characters, as opposed to MS-DOS and the Windows-related
operating systems that end with a carriage return followed by a linefeed.
Most printers require a carriage return/linefeed pair at the end of each
line, making it necessary for some translation to be done before Unix
text files can be printed on most printers.
For this purpose, you can define two “printers” for the same printer
port, one that prints to the port itself, and one that prints to the port
name with _TEXT added to the name. Files printed to the second port
will be translated so that the printer has the carriage return/linefeed pairs
that it needs.
84
Setting up Unix TCP/IP Printing
Print Server Administration User’s Guide
For example, you could define a printer hp5l that prints to port PS142634-P1, and a printer hp5lt that prints to port PS-142634P1_TEXT. Your graphics files could then be printed to the hp5l
printer, and “raw” text files could be printed to the hp5lt printer.
Printing from BSD Unix Versions
For “flavors” of the Unix operating system derived from or related to
the BSD releases, such as SunOS 4.x, Linux, BSD/OS, FreeBSD, or
NetBSD, you can use the following procedure to enable users to print
to a printer connected to your print server:
1. Log in as the superuser (root).
2. Add an entry for the print server in the host’s /etc/hosts file,
giving a hostname for the print server’s IP address. A line in
/etc/hosts contains an IP address and one or more aliases
for the host. For example:
202.39.74.40
ps-142634 ps-142634.company.com
If you use DNS (the Domain Naming Services protocol), you can
add an address record entry to your DNS database for the print
server.
3. Create a spool directory for the printer:
◊ On SunOS systems, create the directory as a subdirectory of
/var/spool, with the same name as the printer (e.g.,
/var/spool/hp5l).
◊ On Linux systems, create the directory as a subdirectory of
/usr/spool/lp.
Setting up Unix TCP/IP Printing
85
Print Server Administration User’s Guide
◊ On BSD/OS, FreeBSD, or NetBSD systems, create the
directory as a subdirectory of /var/spool.
4. Change the owner and permissions of the directory so that it is
owned and writable by group daemon, using the following
commands:
chown bin.daemon /var/spool/hp5l
chmod 775 /var/spool/hp5l
5. Add an entry for the printer to /etc/printcap, similar to the
following:
hp5l:\
:lp=:sd=/var/spool/hp5l:mx#0:\
:rm=ps-142634:rp=PS-142634-P1:
The meaning of each of the entries is described below. The
directory path in the sd spool directory entry should match the
directory name you created above. If your entry requires more than
one line you can escape the newline with a backslash.
6. Issue the command
lpc start hp5l
to start a spool daemon for the printer. The printer will now be
available for use.
7. Optionally, add another printcap entry (and issue another lpc
start command) for a second printer, using the port_TEXT
port. This second printer name can be used for printing text files.
Entries in /etc/printcap begin with a name for the printer or a list
of names, separated by | (a vertical bar). The entries used above are:
86
Setting up Unix TCP/IP Printing
Print Server Administration User’s Guide
♦ lp= The lp entry is used to specify a local printer device.
Since the printer is a remote printer, this entry should be blank.
♦ sd=dir The location of the printer’s local spool directory.
♦ mx#blocks The limit for print job files in the local spool
directory; 0 means no limit.
♦ rm=address The host where the remote printer is located, in
this case your print server.
♦ rp=printer The name of the printer on the remote host. For
the print server, the port name should be used. Note: this entry
is case-sensitive.
Printing from SCO Unix System V/386
To allow printing to a printer attached to your print server from a SCO
Unix System V/386 host,
1. Login as the superuser (root).
2. Add an entry for the print server in the host’s /etc/hosts file,
giving a hostname for the print server’s IP address. A line in
/etc/hosts contains an IP address and one or more aliases
for the host. For example:
202.39.74.40
ps-142634 ps-142634.company.com
If you use DNS (the Domain Naming Services protocol), you can
add an address record entry to your DNS database for the print
server.
3. Change to the /dev directory, and issue the command
mkdev rlp
Setting up Unix TCP/IP Printing
87
Print Server Administration User’s Guide
4. The script will ask:
Do you want to
printing (i/d/q)?
install
or
delete
remote
Answer i and press Enter to continue.
5. The script will ask:
Do you want to change the remote
description file /etc/printcap(y/n)?
printer
Answer y and press Enter to continue.
6. The script will ask:
Please enter the printer name (q to quit):
Enter an alias for the printer on the local machine and press Enter.
This name should be the same as the destination port name.
7. Answer r (remote printer) to the question
Is printer a
printer (r/l)?
remote
printer
or
a
local
8. When prompted with the question:
Please enter the name of the remote host that
printer is attached to:
then enter the address of the print server. You can use the name
you added to /etc/hosts in the step above.
9. Confirm that your entries are correct.
Is this correct? (y/n)
10.Answer the question:
Would you like this to be the system default
printer? (y/n)
88
Setting up Unix TCP/IP Printing
Print Server Administration User’s Guide
11.When you are done adding remote printers, enter q for the
printer name.
12.Answer y to the question
Do you want to start remote daemon now (y/n)?
Once remote printing is set up, you can use the lp command to print
jobs to the new printer. For more information, consult your SCO Unix
documentation.
Printing from Solaris
To allow printing from a Sun Solaris workstation,
1. Login as the superuser (root).
2. Add an entry for the print server in the host’s /etc/hosts file,
giving a hostname for the print server’s IP address. A line in
/etc/hosts contains an IP address and one or more aliases
for the host. For example:
202.39.74.40
ps-142634 ps-142634.company.com
If you use DNS (the Domain Naming Services protocol), you can
add an address record entry to your DNS database for the print
server.
3. In OpenWindows, start the admintool program.
4. Click on the Printer Manger icon.
5. From the Edit menu, select Add Printer, then Add Access to
Remote Printer...
6. Enter values for the fields as follows:
Setting up Unix TCP/IP Printing
89
Print Server Administration User’s Guide
◊ Printer Name This field should contain the name of the
printer port you wish to use. The field is case-sensitive.
◊ Printer Server This field should contain the IP address of
the print server, or the alias name you added in step 2.
◊ Printer Server OS This field should be set to BSD.
7. Confirm the addition.
8. Optionally repeat the addition to add another printer for printing
text files, with _TEXT appended to the port name.
Once you have added the new printer, you can use the lp command to
print files to the printer. Consult your Solaris documentation for details.
Printing from Windows NT
Windows NT versions 3.51 and later support printing using the lpd
protocol. To print to your print server from a Windows NT 4.0
workstation or server,
1. Make sure that you have installed the TCP/IP protocol and the
Microsoft TCP/IP Printing service. You can install these from
the Network control panel if necessary.
2. From the Start menu, choose the Settings submenu, then the
Printers item within it. Windows will display the Printers folder.
3. Double-click on the Add Printer icon in the Printers folder.
Windows will start the Add Printer Wizard.
90
Setting up Unix TCP/IP Printing
Print Server Administration User’s Guide
4. Choose the My Computer selection and click the Next >
button to continue.
5. Click the Add Port... button to add the lpd print server to the
list of ports.
6. Choose the LPR Port type and press New Port....
Setting up Unix TCP/IP Printing
91
Print Server Administration User’s Guide
7. Enter the IP address of your print server, and the port name of
the printer you wish to use.
8. Click OK to return to the Printer Ports window, and then click
Close to return to the Add Printer Wizard.
9. Click Next > to continue installing the printer, following the onscreen instructions. The Add Printer Wizard will ask you to
select the proper driver for the printer, and will ask you to give a
name to the printer.
When you are done installing the printer, you will be able to use any of
the usual printing commands to print to your printer.
Printing using TFTP
For testing purposes, you can also use the Trivial File Transfer Protocol
(TFTP) to print to the print server. This is not a recommended method
for ordinary printing, since it will not work if the print server is already
printing.
On most systems, you can enter the command
tftp ip-address
to start the tftp client program. At the tftp prompt, you can type
put file dest-port
92
Setting up Unix TCP/IP Printing
Print Server Administration User’s Guide
to print the local file named file to the print server port named
dest-port. (Case is sensitive in the dest-port name.)
Printing using FTP
You can also use the Internet’s standard File Transfer Protocol (FTP)
to print to the print server. As with the TFTP method, this is
recommended only for testing.
You can use any FTP client, including client programs with graphical
interfaces. To use a command line version of FTP, on most systems
you can enter the command
ftp ip-address
to start the ftp client program. At the ftp prompt, you can type
put file dest-port
to print the local file named file to the print server port named
dest-port. (Case is sensitive in the dest-port name.)
Setting up Unix TCP/IP Printing
93
Print Server Administration User’s Guide
PS Admin Administration
This chapter explains the PS Admin main window display, and tells
how you can use PS Admin to perform common print server
administration tasks, including:
♦ Monitoring the status of printers connected to the print server’s
ports.
♦ Checking the status of NetWare print jobs.
♦ Configuring NetWare print services, including print servers, print
queues, and printers.
♦ Resetting the print server.
♦ Upgrading the print server’s internal flash memory using an
updated flash memory file.
The PS Admin Main Window
The main window of the PS Admin contains the following elements:
♦ Toolbar buttons The toolbar buttons are shortcuts for their
corresponding menu choices. The buttons on the toolbar are,
from left to right: Configure Server, Configure NetWare,
Configure TCP/IP, Configure NetBEUI, Configure AppleTalk,
Save Configuration, Printer Status, and Device Diagnostics.
94
PS Admin Administration
Print Server Administration User’s Guide
♦ Menu Shortcuts There are four groups of menu shortcuts on
the main window, corresponding to the Configuration,
Management, NetWare , and Tools menus in the menu bar.
♦ Expand Server List button The expand server list button
expands the Server Name List into an extended format.
The extended server list format contains additional information about
each server. To shrink the list back to the abbreviated format, press
the button again.
♦ Server Name Filter The server name filter pulldown list allows
you to choose an already-defined filter for limiting the Server
Name List to a smaller set. You can use the Define Filter
Strings button to define new filters, as described below in the
Filtering the List of Print Servers section.
♦ Discover Print Servers button When a new print server is
added to the network, you need to press the Discover Print
Servers button to update the PS Admin display. Pressing this
button is the equivalent of choosing Discover from the File menu.
Filtering the List of Print Servers
In an environment with a large number of print servers, you may wish to
set up filters to make it easier to find individual print servers or groups
of print servers.
Filters are similar to wildcards in DOS or other operating systems. A
filter wildcard uses the wildcard characters * and ? to select a set of
print servers. The ? wildcard character matches any character in a
print server name, and the * character represents zero or more
characters.
PS Admin Administration
95
Print Server Administration User’s Guide
For example, to limit the print server display to servers MKT-01,
MKT-02, MKT-03, ..., you could use the filter MKT-??. To display
all servers with names beginning with S, you can use the filter S*.
To establish and use a new filter:
1. Press the Define Filter Strings button.
2. Enter a filter string and press the Add button.
3. Select the new filter string from the Server Name Filter pulldown
list. The server list will be restricted to the list of servers that
match the filter string.
4. To display all servers, choose All Devices from the Server Name
Filter pulldown.
Working with Environment Files and Preferences
When PS Admin starts up, it first checks the network, looking for all
network print servers. Since this may take awhile if you have a large
network, you may want to use environment files to reduce the wait. An
environment file stores the list of servers it has discovered, along with
information about them.
96
PS Admin Administration
Print Server Administration User’s Guide
To save an environment file,
1. Make sure that PS Admin’s list of servers is up-to-date. Press
the Discover Print Servers button to update the list if necessary.
2. Choose Save As... from the File menu. Choose a file name for
the file. By default the file will have a .ENV extension.
To tell PS Admin to open the environment file when it starts up instead
of trying to discover all of the devices on the network,
1. Choose Preferences... from the File menu.
2. Click on the Load Environment File on Startup selection. Type
in a filename, or use the Browse... button to locate the file on
your hard disk.
3. Click OK.
The settings accessible from the PS Admin Preferences dialog window
are:
PS Admin Administration
97
Print Server Administration User’s Guide
♦ Load Environment File on Startup/Discover Environment
on Startup Determines whether PS Admin should load a file
listing all of the print servers on the network and their addresses,
or if it should search the network each time it starts.
♦ Communication Timeout Determines how long PS Admin will
wait for a request sent to the print server to receive a response.
You may have to increase this number if you have a large
network.
♦ Communication Retries Determines how many times PS
Admin will try again if it doesn’t receive a response from a print
sever.
♦ Communication Protocol
Determines the communication
protocol between PS Admin and the print server for
configuration by either TCP/IP or IPX.
♦ Discover Local Network/Discover Selected Networks
Determines whether PS Admin should discover print servers on
your local IPX network only, or if it should also search other
networks reachable from your workstation.
Pressing the More... button will display the IPX Network Segments
window, which allows you to choose which networks will be
searched. You can choose All Network Segments to discover
servers on all reachable networks, or Selected Network Segments
to select which networks you want to search in the displayed list.
98
PS Admin Administration
Print Server Administration User’s Guide
♦ Sort Server Name List Determines whether or not the list of
servers should be sorted.
♦ Save Settings on Exit Determines whether or not PS Admin
settings, for example filter definitions, should be saved when you
exit PS Admin.
Monitoring Printer Status
By choosing Printer Status from the Management menu, you can
monitor the status of each of the printers attached to the print server.
Pressing the Select Port buttons determines which port’s status will be
displayed.
PS Admin Administration
99
Print Server Administration User’s Guide
The Printer Status field shows whether the printer is on line, off line, is
out of paper, or has an error. If the printer is compatible with HP’s
PJL (Printer Job Lanaguage) protocol, and you have enabled the use of
PJL on the port (see the Changing Print Server Port Settings section
for instructions on how to do this), then the Printer Model, Printer
Status Code, and Printer Panel Display fields will display information
about the printer and its status.
Checking NetWare Print Jobs
The NetWare Print Jobs window, accessible from the NetWare Print
Jobs selection of the Management menu, can be used to monitor
NetWare bindery-based print queues being served by your print server,
and to change the form type being used on a port. The NetWare Print
Jobs window is a convenient substitute for the NetWare PCONSOLE
program for everyday queue-management tasks.
Selecting the symbol to the left of the port name will expand the list
of all of the queues served by the port. Selecting a print queue and
pressing the Print Jobs... button will display the Manage Print Jobs
window:
100
PS Admin Administration
Print Server Administration User’s Guide
From this window you can view the list of jobs for the queue, and
remove jobs if necessary by pressing the Delete Job button. Checking
a job’s Operator Hold box allows you to hold up the job in the print
queue, leaving it in the queue until it is released (by un-checking the
box). Similarly, if a print job user has placed a hold on a job, you can
release the job to be printed by un-checking the User Hold box.
Selecting a port and pressing the Form Type... button will display the
Form Type window, provided the port is not set to service All Forms
(see the NetWare Settings section for more information about the
Form Type setting). From the Form Type dialog window, you can
change the current form type available on the printer.
Form types can be defined with the NetWare PCONSOLE program.
Each of the different kinds of paper that a printer might contain can be
PS Admin Administration
101
Print Server Administration User’s Guide
assigned a different form type, and print jobs can be configured to
request the type of form they need. For more information about form
types, consult your NetWare documentation.
Configuring NetWare Print Services
For convenience, the PS Admin program provides many of the same
NetWare print services administration features as NetWare’s
PCONSOLE or the NetWare Windows-based administration tools.
The PS Admin program allows you to conveniently manage NetWare
Bindery-based print queues, printers, and print servers on any of your
NetWare file servers.
Note that for managing print services on servers using NDS (NetWare
Directory Services), you will need to use Novell-provided
administration programs.
Managing Print Queues
Selecting Print Queues... from the PS Admin NetWare menu
displays the NetWare Print Queues dialog window.
102
PS Admin Administration
Print Server Administration User’s Guide
To create a new print queue, click on the name of the file server where
you want to create the queue and press Create.... Enter a name for
the queue and press OK.
To remove a print queue, select it and press Delete. To view and/or
modify its list of assigned print servers, queue operators, or queue users,
press Assignments....
From the Assign NetWare Print Servers tab, you can assign
already-defined print servers to the print queue you have selected, or
remove print queue assignments. For information about defining print
servers, see the Managing Print Servers section below.
From the Assign Operators tab, you can determine what users are
allowed to operate the queue. Queue operators are allowed to edit
other user’s print jobs, delete print jobs, change the order of print jobs,
and modify the queue status.
PS Admin Administration
103
Print Server Administration User’s Guide
From the Assign Users tab, you can determine who is allowed to use
the printer.
For NetWare 3.x servers, normally the group
EVERYONE, of which all users are members, is assigned to the queue
users list. This means that all users can send jobs to the queue. If you
want to restrict the use of the print queue, you can remove the group
EVERYONE and add a smaller group, or you can add individual users.
For NetWare 4.x servers, you will need to create such a group
manually.
104
PS Admin Administration
Print Server Administration User’s Guide
Managing Printers
Selecting Printers... from the PS Admin NetWare menu displays the
NetWare Printers dialog window.
Clicking on a printer and clicking Assignments displays the Printer
Assignments dialog. From the Assign NetWare Print Queues tab,
you can determine which print queues are served by the printer, adding
or removing queues from the assigned list.
From the Assign NetWare Notifications tab, you can determine
which users are notified if a problem occurs with the print job. By
default, only the owner of the individual print job receives notification.
PS Admin Administration
105
Print Server Administration User’s Guide
Managing Print Servers
Selecting Print Servers... from the PS Admin NetWare menu
displays the NetWare Printers dialog window.
Selecting a file server and clicking Create... allows you to create a new
print server. Selecting a print server and clicking Delete allows you to
delete it, and clicking Assignments... displays the Print Server
Assignments dialog window.
From the Assign NetWare Printers tab, you can define new printers
in the selected print server, or remove printers from the server.
106
PS Admin Administration
Print Server Administration User’s Guide
From the Assign Operators tab, you can add or remove users from
the print server’s operators list. Print server operators are allowed to
attach the print server to other file servers, set printers’ forms and
notification lists, change the list of queues served and queue priorities,
or down the print server.
From the Assign Users tab, you can set the print server’s user list.
Print server users are allowed to monitor the print server’s status. (It is
not necessary to be a print server user to print to a queue served by the
printer; one need only be a queue user.) By default on NetWare 3.x
PS Admin Administration
107
Print Server Administration User’s Guide
servers, the group EVERYONE is included, making it possible for all
users on the file server to view the server’s status.
Resetting the Print Server
Sometimes it may be desirable to restart your network print server, in
order to reset its internal statistics counters or to clear other status
information.
There are two different ways to reset the print server:
♦ An ordinary reset has the same effect as powering off the print
server and powering it back on again. Statistics counters will be
cleared, but all of the print server’s configuration settings will be
retained.
♦ A factory reset not only restarts the print server, but changes all
of its configuration settings back to their original values, as the
print server was shipped from the factory.
108
PS Admin Administration
Print Server Administration User’s Guide
WARNING: Do not perform a factory reset unless you are absolutely
sure this is what you want. All settings will be erased and
replaced with their original values.
To perform the reset:
1. Select Reset or Factory Reset from the Tools menu.
2. PS Admin will ask for confirmation for the reset.
3. Click Yes to confirm. The print server will reset itself. If you
selected Factory Reset, all of the print server’s default
configuration values will be restored.
Upgrading the Print Server’s Internal Firmware
The print server’s internal software is stored in Flash memory, which
allows you to upgrade it to an updated version without shipping the
print server back to your distributor. Consult your dealer for
information about when updated print server firmware versions are
available.
You will also need to have copies of the updated firmware. Firmware
updates are contained in to related files, a larger one with a .bin
extension, and a smaller one having a .dwl extension. Both of these
files are necessary for the download to be completed successfully.
To perform the download:
1. Make sure you have backup copies of the previous version of the
firmware image files before overwriting them with the new ones.
PS Admin Administration
109
Print Server Administration User’s Guide
2. Choose Download Firmware... from the PS Admin Tools
menu. The print server will ask for the filename of the
updated .bin image file.
3. Type in the pathname of the .bin file, or click the Browse...
button to locate the file using a standard dialog box.
4. Click OK.
message.
PS Admin will display an informational warning
5. Click OK. The download will begin. PS Admin will display the
progress of the download.
6. When downloading is complete, PS Admin will display an
informational message.
WARNING: When downloading the image file, be very careful not to
interrupt the transfer by powering down the print server or
disconnecting it from the network. The print server should
be able to recover from an interrupted transfer in most
cases, However, in some situations it may be necessary to
return your print server for servicing in order to recover from
an interrupted download.
110
PS Admin Administration
Print Server Administration User’s Guide
Troubleshooting Print Server Problems
This chapter gives advice for identifying problems with your print server.
Using the PS Admin Device Diagnostics Window
Choosing Device Diagnostics... from the PS Admin Management
menu displays the Device Diagnostics window. From the Device
Diagnostics window you can display many of the print server’s settings
and status items, allowing you to identify many types of print server
problems.
The Configuration tab displays the print server’s configuration settings,
divided into different categories in a tree structure. You can expand
branches of the tree to display entries beneath the branch.
Troubleshooting Print Server Problems
111
Print Server Administration User’s Guide
The Status tab shows the status of the print server’s various
subsystems.
The Statistics tab shows collected statistics, also divided into various
categories. (Many of these categories correspond to standard SNMP
management information base categories.)
The Log tab contains a tree branch for each error that occurs. Error
log entry branches contain detailed information about the problem,
112
Troubleshooting Print Server Problems
Print Server Administration User’s Guide
which should be able to assist your or technical support representative
to locate the problem.
The Save to File... button at the bottom of the dialog window allows
you to save a text file listing all of the entries in the Device Diagnostic
window. You can use this function to keep a record of your print
server’s settings for future reference. The contents of this file may also
be useful to your technical support representative if you encounter
problems you are unable to resolve.
Troubleshooting Print Server Problems
113
Print Server Administration User’s Guide
Appendix: Telnet Interface Administration
This appendix describes the use the telnet interface for controlling
and configuring print servers.
Setting an IP Address without PS Admin
The PS Admin program allows you to set your print server’s IP
address (and other TCP/IP parameters). If you don’t have a
Windows-based workstation and you need to set your print server’s
address, you can use a BOOTP (Boot Protocol) server, or the manual
method described below.
If you want to use BOOTP, your local Ethernet network needs to have
a BOOTP server. The BOOTP server table needs to have an entry
listing the print server’s Ethernet (MAC) address, the IP address you
want to assign to the print server, the network’s mask, and the default
gateway (router) address. Consult your BOOTP server documentation
for information about how to add an entry to the server table.
If you aren’t using BOOTP, you can manually set the IP address using
the following method:
1. Note your print server’s Ethernet (MAC) address. The Ethernet
address is a 12-digit hex number printed on a sticker on the
bottom of your print server.
2. Use a host on the same local Ethernet network as the print server.
Change your host’s ARP (address resolution protocol) table to
114
Appendix: Telnet Interface Administration
Print Server Administration User’s Guide
add a mapping from the IP address you want to assign to the
print server’s Ethernet address. For many TCP/IP systems, this
is done with a command of the form:
arp -s ip-address ethernet-address
For example, to assign the address 202.39.74.40 to the print
server with MAC address 00 80 C8 14 26 34, use the
command:
arp -s 202.39.74.40 0080C8142634
Note: on a UNIX-based system, you will need to have superuser
(root) permission to execute the arp command.
3. From the host with the modified ARP table, send an ICMP echo
request to the print server using the ping command:
ping 202.39.74.40
When the print server receives an ICMP request at its own Ethernet
address, but with a different IP address than the one it was
expecting, it changes its IP address setting.
4. The print server will now respond to the new IP address. At this
point you can use the telnet interface (as described below) to
change the host’s other settings.
Accessing the Telnet Interface
You can access your print server’s telnet interface using an ordinary
telnet client program. On many systems, the command to invoke a
telnet client is:
telnet ip-address
Appendix: Telnet Interface Administration
115
Print Server Administration User’s Guide
Where ip-address is the IP address you have assigned to the print
server.
When you first telnet to the print server, it displays its log-in
message. At this point you can enter the password you have assigned
to your print server. If you have not yet assigned a password, just
press Enter.
The print server will then display the telnet interface main menu.
Changing TCP/IP Settings
Once you have set the print server’s IP address for the first time (using
the method described above), you may wish to change the address or
other TCP/IP configuration information such as the local network mask,
or the default gateway. To change these TCP/IP settings,
1. From the main menu, choose TCP/IP Configuration. The print
server will display the TCP/IP Configuration menu.
116
Appendix: Telnet Interface Administration
Print Server Administration User’s Guide
[TCP/IP Configuration]
1 - IP Address
2 - Subnet Mask
3 - Default Gateway
4 - SNMP Community
5 - SNMP Traps
6 - IP Assignment Method
0 - Return to Main Menu
<168.8.100.52>
<255.255.0.0>
<168.8.100.254>
<Manual>
Enter Selection:
2. To change the IP address, local subnet mask, or default gateway,
choose the appropriate menu item. The print server will prompt
you for a new value for the setting. Enter the new value and
press Enter.
3. When you are done changing TCP/IP settings, choose 0 to return
to the Main Menu.
4. Choose the Save Configuration menu item. The print server will
ask for confirmation:
Do you really want to save the configuration?
(y/n)
Answer y to confirm the save. The telnet connection will drop,
and the print server will reset itself, letting the new TCP/IP settings
take effect.
Appendix: Telnet Interface Administration
117
Print Server Administration User’s Guide
Changing Server Settings
From the Server Configuration menu, you can change the server name,
as well as the Location and Contact fields (used for identifying the
location of the print server and the person responsible for maintaining it).
To change one of these settings,
1. From the main menu, choose Server Configuration. The print
server will display the Server Configuration menu.
[Server Configuration]
1 - Server Name
<PS-142634>
2 - Location
<Central office>
3 - Admin Contact
<Benjamin Lin>
4 - Change Password
0 - Return to Main Menu
Enter Selection:
2. To change the server name, location, or admin contact, choose
the appropriate menu item. The print server will prompt for the
new value.
If you are setting the server name, be sure to follow the
recommendations described in the Choosing a Name for Your
Print Server section of this manual.
3. When you are done changing the server settings, choose 0 to
return to the Main Menu.
4. Choose the Save Configuration menu item. The print server will
ask for confirmation:
118
Appendix: Telnet Interface Administration
Print Server Administration User’s Guide
Do you really want to save the configuration?
(y/n)
Answer Y to confirm the save. The telnet connection will drop,
and the print server will reset itself, letting the new server
configuration take effect.
Changing the Print Server Password
The print server password is used to protect the print server’s
configuration from changes, either through the PS Admin program, or
through the telnet interface.
To change the print server’s password,
1. From the main menu, choose Server Configuration. The print
server will display the Server Configuration menu.
[Server Configuration]
1 - Server Name
<PS-142634>
2 - Location
<Central office>
3 - Admin Contact
<Benjamin Lin>
4 - Change Password
0 - Return to Main Menu
Enter Selection:
2. Choose the Change Password menu item. The print server will
prompt for the old password:
Input Old Password
Appendix: Telnet Interface Administration
:
119
Print Server Administration User’s Guide
If there is no password, just press Enter.
3. The print server will prompt you to enter the new password. All
password characters will be displayed as asterisks (*). You will
then be prompted a second time. Enter the same password as
before to confirm that you have typed it correctly.
Input New Password : *******
Confirm New Password: *******
4. Choose 0 to return to the Main Menu.
5. Choose the Save Configuration menu item. The print server will
ask for confirmation:
Do you really want to save the configuration?
(y/n)
Answer Y to confirm the save. The telnet connection will drop,
and the print server will reset itself, letting the new password setting
take effect.
Changing Port Settings
Each port on the print server has several settings that you may need to
change to suit your configuration and the printer you have attached to
the port. Complete descriptions of each of these settings may be found
in the Changing Print Server Port Settings section. To change one
or more port settings,
1. Choose Port Configuration from the main menu. The print server
will display the Port Configuration menu.
120
Appendix: Telnet Interface Administration
Print Server Administration User’s Guide
2. Select the port you wish to configure. The print server will
display a menu appropriate to the port’s type. For a parallel port,
a menu similar to the following will be displayed:
[Port 1]
1 - Port Name
2 - Description
3 - Speed
4 - PJL Printer
0 - Return to Port Menu
<PS-142634-P1>
<HP LaserJet 5L>
<High>
<Yes>
Enter Selection:
For a serial port, the menu will be similar to the following:
[Port 3]
1 - Port Name
2 - Description
3 - Baud Rate
4 - Data Bits
5 - Stop Bits
6 - Parity Bits
7 - S/W Flow Control
8 - H/W Flow Control
0 - Return to Port Menu
<PS-142634-S3>
<>
<9600>
<8>
<1>
<None>
<XON/XOFF>
<DTR/RTS>
Enter Selection:
3. To change any of the displayed settings, choose the appropriate
menu item. The print server will prompt for the new value.
4. When you are done changing settings for the port, choose 0 to
return to the Port Configuration menu.
Appendix: Telnet Interface Administration
121
Print Server Administration User’s Guide
5. When you are done changing port settings, choose 0 to return to
the main menu.
6. Choose the Save Configuration menu item. The print server will
ask for confirmation:
Do you really want to save the configuration?
(y/n)
Answer Y to confirm the save. The telnet connection will drop,
and the print server will reset itself, letting the new port settings take
effect.
Changing AppleTalk Settings
You can also change AppleTalk network settings from the telnet
interface. On Macintosh-only networks, you can use a telnet client
such as NCSA Telnet to configure your print server without requiring a
Windows-compatible machine.
Selecting AppleTalk
Configuration menu:
122
Configuration
displays
the
AppleTalk
Appendix: Telnet Interface Administration
Print Server Administration User’s Guide
[AppleTalk Configuration]
1 - Zone Name
2 - Port 1 Printer Type
3 - Port 1 PostScript Level
4 - Port 2 Printer Type
5 - Port 2 PostScript Level
6 - Port 3 Printer Type
7 - Port 3 PostScript Level
0 - Return to Main Menu
<*>
<LaserWriter>
<Level 2>
<LaserWriter>
<Level 2>
<LaserWriter>
<Level 2>
Enter Selection:
To modify a selection, select its menu item and enter a new value. The
meanings of each of the AppleTalk settings is described in the Setting
up the Print Server for AppleTalk Printing section.
Displaying Configuration Information
The print server telnet interface provides two menu selections for
displaying information about the print server and about the printers
connected to it. From the main menu, you can select the Display
Information selection to display the Display Information menu:
[Display Information]
1 - Display Configuration
2 - Display Port Status
0 - Return to Main Menu
Enter Selection:
Appendix: Telnet Interface Administration
123
Print Server Administration User’s Guide
The Display Configuration selection displays several pages of
information about the print server’s hardware and internal software, as
well as its configuration settings. Information about the port settings is
also included.
The Display Port Status selection displays statistics and information
about the jobs printed on each of the print server’s ports.
Port Number
1
2
3
==============================================================
[Total Status]
Jobs
45
1
0
Sizes (KBytes)
23179
0
0
Timeouts
0
0
0
-------------------------------------------------------------[Current Job]
Printer Status
On Line
Off Line
On Line
Index
0
1
0
Protocol
NETWARE
Name
00C60001
Spooling Bytes
0
172032
0
Printing Bytes
0
153600
0
==============================================================
1 - Refresh Port Status
0 - Return to Display Information Menu
Enter Selection:
Resetting the Print Server
Sometimes it may be desirable to restart the print server, in order to
reset its internal statistics counters or to clear other status information.
The telnet interface provides two different types of reset:
124
Appendix: Telnet Interface Administration
Print Server Administration User’s Guide
♦ An ordinary reset has the same effect as powering off the print
server and powering it back on again. Statistics counters will be
cleared, but all of the print server’s configuration settings will be
retained.
♦ A factory reset not only restarts the print server, but changes all
of its configuration settings back to their original values, as the
print server was shipped from the factory.
WARNING: Do not perform a factory reset unless you are absolutely
sure this is what you want. All settings, including the print
server’s TCP/IP network address, will be erased and
replaced with their original values.
To reset the print server,
1. Choose Tools from the Main Menu.
[Tools]
1 - Reset
2 - Factory Reset
3 - Download Firmware
0 - Return to Main Menu
Enter Selection:
2. Choose the Reset or Factory Reset menu item, depending on the
type of reset you wish to perform. The print server will ask for
confirmation.
3. Confirm the reset by entering y and pressing Enter. The telnet
connection will drop, and the print server will reset itself. If you
Appendix: Telnet Interface Administrati on
125
Print Server Administration User’s Guide
selected Factory Reset, all of the print server’s default
configuration values will be restored.
Upgrading Print Server Firmware
The print server’s internal software is stored in Flash memory, which
allows you to upgrade it to an updated version without shipping the
print server back to your distributor. Consult your dealer for
information about when updated print server firmware versions are
available.
To upgrade your print server’s firmware, you will need to have a TFTP
server on your network. A TFTP (Trivial File Transfer Protocol)
server is provided with most versions of the UNIX operating system, as
well as with many other operating systems that support TCP/IP
networking.
Consult your system documentation for detailed
information about establishing a TFTP server.
You will also need to have copies of the updated firmware. Firmware
updates are contained in to related files, a larger one with a .BIN
extension, and a smaller one having a .DWL extension. Both of these
files are necessary for the download to be completed successfully. The
files should be stored on your TFTP server with uppercase filenames.
To perform the download:
1. Make sure you have backup copies of the previous version of the
firmware image files before overwriting them with the new ones.
2. Place the two firmware image files in the root of your TFTP
server directory. (On some versions of the UNIX operating
system, the TFTP server directory is found in /tftpboot.)
126
Appendix: Telnet Interface Administration
Print Server Administration User’s Guide
3. Connect to the print server using telnet, and select Tools from
the Main Menu.
4. Choose Download Firmware. The print server will display the
Download Firmware menu.
[Download Firmware]
1 - TFTP Server IP Address <0.0.0.0>
2 - Download
0 - Return to Tools Menu
Enter Selection:
5. Choose the TFTP Server IP Address selection. Enter the IP
address of the system you have designated as the TFTP server.
Input TFTP Server IP Address: 203.69.140.234
6. Choose the Download selection. Provided all files are set up
correctly, the print server will download the .DWL file, reset itself
(closing the telnet connection), and begin downloading
the .BIN file. When this is complete, the print server will restart,
using the updated version of the firmware.
WARNING: When downloading the image file, be very careful not to
interrupt the transfer by powering down the print server or
disconnecting it from the network. The print server should
be able to recover from an interrupted transfer in most
cases, provided the TFTP server remains available.
However, in some situations it may be necessary to return
your print server for servicing in order to recover from an
interrupted download.
Appendix: Telnet Interface Administration
127
LPRfor Windows
95/98/Me/2000/XP
TCP/IP Printing
User’s Guide
Rev. 03 (November, 2001)
Copyright Statement
Copyright ©1997
No part of this publication may be reproduced in any form or by any means
or used to make any derivative such as translation, transformation, or
adaptation without permission from the authors, as stipulated by the United
States Copyright Act of 1976.
Trademarks
All trademarks are the property of their respective owners.
Setting up Windows 95/98/Me TCP/IP Printing
The Print Server can provide print services to TCP/IP networks using the
lpr/lpd network printing protocol. Most UNIX systems are capable of
supporting lpd, as is Windows NT/2000.
This LPR for TCP/IP Printing client gives Windows 95/98/Me workstations
the ability to print using the lpr/lpd printing protocol. Though it is
possible to print to Print Servers from Windows 95/98/Me, this capability is
useful if primarily administer your network from UNIX systems, or if you
want to print from workstations that are only accessible through IP routing.
Installing the LPR for TCP/IP Printing Client
Before your Windows 95/98/Me workstation can print using the lpr
protocol, you will need to install the client program, as follows:
1. Make sure that you have installed the TCP/IP protocol, and have
properly configured the Windows 95/98/Me TCP/IP settings. You
can install the protocol from the Network control panel if necessary.
2. From the Start menu, choose the Settings submenu, then the
Control Panel item within it. Windows will display the Control
Panel folder.
3. Double-click on the Network icon in the Control Panel folder.
4. Click on the Add... button on the Configuration tab.
5. Windows will ask for the type of component to add. Select Client
and click Add... to continue.
LPR for Windows 95/98/Me/2000/XP TCP/IP Printing User’s Guide
6. When Windows asks you to select a network client, click the Have
Disk... button.
7. Insert the Print Server installation CD in your computer’s CD-ROM ,
enter the proper pathname (for example , D:\ lpr), and click OK.
8. Select the LPR for TCP/IP Printing client and click OK.
9. Windows will copy the necessary files, and return to the Network
dialog. Click OK to let Windows restart.
2
Setting up Windows 95/98/Me TCP/IP Printing
LPR for Windows 95/98/Me/2000/XP TCP/IP Printing User’s Guide
Adding LPR Printer Ports
Once you have installed the client, and have enabled TCP/IP printing for the
Print Servers, then you need to add a printer port for each printer you will be
printing to using the lpr/lpd protocol. To add a printer port,
1. From the Start menu, choose the Settings submenu, then the
Control Panel item within it. Windows will display the Control
Panel folder.
2. Double-click on the Network icon in the Control Panel folder.
3. Choose the LPR for TCP/IP Printing client and click the Properties
button.
Setting up Windows 95/98/Me TCP/IP Printing
3
LPR for Windows 95/98/Me/2000/XP TCP/IP Printing User’s Guide
4. Click the Add Port... button to add a new lpd-accessible printer
port.
5. Enter the IP address of the Print Server and the name of the printer
port that you will be printing to, then press OK.
6. Click OK to leave the LPR for TCP/IP Printing Properties window.
4
Setting up Windows 95/98/Me TCP/IP Printing
LPR for Windows 95/98/Me/2000/XP TCP/IP Printing User’s Guide
Printing from Windows 95/98/Me
After you have added the necessary printer ports, you can add a printer
device for printing to the port. To enable printing to an lpr-accessible
printer port from Windows 95/98/Me,
1. From the Start menu, choose the Settings submenu, then the Printers
item within it. Windows will display the Printers folder.
2. Double-click on the Add Printer icon in the Printers folder.
Windows will start the Add Printer Wizard.
Setting up Windows 95/98/Me TCP/IP Printing
5
LPR for Windows 95/98/Me/2000/XP TCP/IP Printing User’s Guide
Click the Next > button to continue to the next screen.
3. Choose the Network Printer selection and click the Next >
button to continue.
4. Enter the name of the port, as displayed in the LPR for TCP/IP
Printing Port List.
Alternatively, you can click Browse... and locate the printer port.
TCP/IP printing ports are located under the Entire Network icon, within
the Print Servers - TCP/IP LPR icon.
6
Setting up Windows 95/98/Me TCP/IP Printing
LPR for Windows 95/98/Me/2000/XP TCP/IP Printing User’s Guide
Press OK when you have located the proper printer port.
Click Next > to continue to the next step.
5. At this point Windows will ask you to choose the correct printer
driver for the printer. Choose you printer’s make and model from the
list, or use the driver disk included with the printer. When you have
chosen the correct printer, click Next > to continue.
6. Windows will then ask for a name for the new printer, and ask
whether or not you want to set the printer as the Windows default
printer. Click Finish (or Next >) to continue.
7. Windows may ask you whether or not you wish to print a test page to
make sure that the printer will work correctly. When the test page is
done printing, you will be asked whether or not the test page printed.
Setting up Windows 95/98/Me TCP/IP Printing
7
LPR for Windows 95/98/Me/2000/XP TCP/IP Printing User’s Guide
Setting TCP/IP Printing Settings
The lpr client’s Properties dialog allows you to change several of the
client’s settings. To change these settings,
1. From the Start menu, choose the Settings submenu, then the
Control Panel item within it. Windows will display the Control
Panel folder.
2. Double-click on the Network icon in the Control Panel folder.
3. Choose the LPR for TCP/IP Printing client and click the Properties
button.
4. Click on the Settings tab to access the lpr client settings. Change
the settings as necessary, and press OK to let the changes take effect.
8
Setting up Windows 95/98/Me TCP/IP Printing
LPR for Windows 95/98/Me/2000/XP TCP/IP Printing User’s Guide
The parameters are as follows:
♦ Communication Timeout Determines how long, in seconds, the
system will wait before determining that it has lost connection with
lpr/lpd print servers.
♦ Retry Interval Determines how long, in seconds, the system will
wait before retrying a lost connection.
♦ Retry Times Determines how many times the system will retry a
lost connection with an lpr/lpd print server. If Infinite is
checked, it will retry indefinitely.
♦ Spool Path Gives the directory path where the system will
temporarily store lpr/lpd print server job files.
Setting up Windows 95/98/Me TCP/IP Printing
9
LPR for Windows 95/98/Me/2000/XP TCP/IP Printing User’s Guide
Setting up Windows 2000 TCP/IP Printing
Following is the correct procedure for setting up TCP/IP LPR printing under
Windows 2000.
Click Start > Settings > Printers.
Double Click “Add Printer”
Select “Local Printer”
Create a new “Standard TCP/IP Port”
10
Setting up Windows 2000 TCP/IP Printing
LPR for Windows 95/98/Me/2000/XP TCP/IP Printing User’s Guide
Click “Next”
Input the IP Address of the Print Server, and the Port name of the Port that
will be printed to, then click “Next”.
Select “Custom”, and click “Settings”.
Setting up Windows 2000 TCP/IP Printing
11
LPR for Windows 95/98/Me/2000/XP TCP/IP Printing User’s Guide
Select “LPR”, and put the Port name in the field labeled “Queue Name”.
Then Click “OK”.
Click “Next”.
12
Setting up Windows 2000 TCP/IP Printing
LPR for Windows 95/98/Me/2000/XP TCP/IP Printing User’s Guide
Click “Finish”
The Printer Install Wizard will now prompt for drivers. Select the correct
Make and Model, or click “Have Disk”, to provide the Manufacturer’s
Driver Disk.
Setting up Windows 2000 TCP/IP Printing
13
LPR for Windows 95/98/Me/2000/XP TCP/IP Printing User’s Guide
Click “Next”.
Select a “Printer Name”.
14
Setting up Windows 2000 TCP/IP Printing
LPR for Windows 95/98/Me/2000/XP TCP/IP Printing User’s Guide
Sharing can be enabled here.
Also, a Test Page can be printed to confirm proper configuration.
Setting up Windows 2000 TCP/IP Printing
15
LPR for Windows 95/98/Me/2000/XP TCP/IP Printing User’s Guide
When the Test Page has printed, click “Finish” to complete the installation.
16
Setting up Windows 2000 TCP/IP Printing
LPR for Windows 95/98/Me/2000/XP TCP/IP Printing User’s Guide
Setting up Windows XP TCP/IP Printing
Following is the correct procedure for setting up TCP/IP LPR printing under
Windows 2000.
Click Start > Printer and Faxes
Double Click “Add a Printer”
Click “Next”
Select “Local Printer”
Setting up Windows XP TCP/IP Printing
17
LPR for Windows 95/98/Me/2000/XP TCP/IP Printing User’s Guide
Create a new “Standard TCP/IP Port”
Click “Next”
Input the IP Address of the Print Server, and the Port name of the Port that
will be printed to, then click “Next”.
18
Setting up Windows XP TCP/IP Printing
LPR for Windows 95/98/Me/2000/XP TCP/IP Printing User’s Guide
Select “Custom”, and click “Settings”.
Select “LPR”, and put the Port name in the field labeled “Queue Name”.
Then Click “OK”.
Setting up Windows XP TCP/IP Printing
19
LPR for Windows 95/98/Me/2000/XP TCP/IP Printing User’s Guide
Click “Next”.
Click “Finish”
20
Setting up Windows XP TCP/IP Printing
LPR for Windows 95/98/Me/2000/XP TCP/IP Printing User’s Guide
The Printer Install Wizard will now prompt for drivers. Select the correct
Make and Model, or click “Have Disk”, to provide the Manufacturer’s
Driver Disk.
Click “Next”.
Select a “Printer Name”.
Setting up Windows XP TCP/IP Printing
21
LPR for Windows 95/98/Me/2000/XP TCP/IP Printing User’s Guide
A Test Page can be printed to confirm proper configuration.
When the Test Page has printed, click “Finish” to complete the installation.
22
Setting up Windows XP TCP/IP Printing
LPR for Windows 95/98/Me/2000/XP TCP/IP Printing User’s Guide
Setting up Windows XP TCP/IP Printing
23
TABLE OF C ONTENTS
ABOUT THIS GUIDE.................................................................................................3
INTRODUCTION .......................................................................................................4
PACKAGE CONTENTS.............................................................................................. 4
GENERAL FEATURES............................................................................................... 5
SERVICE FEATURES................................................................................................. 5
EXTERNAL FEATURES............................................................................................ 7
Front View............................................................................................................. 7
Rear View............................................................................................................... 8
INSTALLATION ......................................................................................................10
INSTALLING THE PRINT SERVER........................................................................ 10
POWER-UP AND SELF-TEST ................................................................................. 11
LED Test Series .................................................................................................. 11
Component Test Series ..................................................................................... 11
PRODUCT SPECIFICATIONS..............................................................................13
-2-
0 A BOUT THIS G UIDE
This manual describes the 1-Port USB Print Server, including full descriptions
of its features, detailed installation procedures, and product specification.
This 1-Port USB Print Server package also includes important software
components and additional user’s manuals. The software components, the
procedures for installation and setup of the software are covered in the PS
Admin User’s Guide.
-3-
1
1 INTRODUCTION
Congratulations on purchasing your 1-Port USB Print Server, the easiest and
fastest way to deploy printers on your network.
This compact pocket-sized print server can connect your Ethernet network
directly to your printer, wherever it is. It manages the flow of print files from
your workstation or file server to its connected printers, delivering print jobs
to high-performance printers much faster than a file server or a PC acting as a
print server can.
Package Contents
Carefully remove all items from the package.
User’s Guide, be certain that you have:
In addition to this Hardware
♦ One 1-Port USB Print Server
♦ One AC Power adapter suitable for your country’s electric power service
♦ One 1-Port USB Print Server Installation CD-ROM
♦ One Quick Installation Guide
If any item is missing, or if you find any damage or mismatch, promptly
contact your dealer for assistance.
-4-
General Features
♦
♦
♦
♦
♦
♦
♦
♦
♦
♦
♦
Compact pocket size
Compliant with USB 1.1
Equipped one 10Base-T/100BASE-TX LAN port
Multi protocol support is ideal for shared printing in mixed-LAN
environments
Bi-directional communication allows collection of information for attached
printer's status
Windows-based administrative program makes it possible to set up in a
few minutes
Latest MIB-II (RFC 1213) for SNMP standard management
Offer LPR program for Windows 95/98/Me TCP/IP printing
IP assignment support for DHCP, BOOTP and RARP
Support Web configuration
Provide Flash memory for easy firmware upgrade
Service Features
This 1-Port USB Print Server can improve network-printing services of your
network in three ways:
♦ It picks up the workload of managing print file traffic to its connected
printers. This provides workload relief to your file servers, and allows
the file servers' full capacity to be used for file access or other direct
services to network users. On peer-to-peer networks, workstations can
print directly to this print server without increasing the load of another
workstation or server.
♦ This print server’s USB interface can transmit to a high-speed laser printer
with USB port much faster than a PC's parallel port. A high-speed laser
printer can be driven at its full capacity.
♦ Because this 1-Port USB Print Server is very portable (pocket-sized) and
inexpensive compared to a PC-based print server, and because it connects
-5-
to your file servers through the network, the printer can be stationed at the
location of maximum convenience to users.
This 1-Port USB Print Server offers extraordinary flexibility, operating with all
major network operating systems and protocols:
♦ TCP/IP
UNIX lpr/lpd (HP-UX, SunOS, Solaris, SCO, UnixWare, IBM AIX)
Windows NT/2000/XP, Windows 95/98/Me
NetWare 5.x NDPS LPR remote printing
♦ NetBEUI
Windows NT/2000/XP, Windows 95/98/Me, Windows for Workgroups,
Microsoft LAN Manager, IBM LAN Server
♦ AppleTalk
MacOS EtherTalk
Your 1-Port USB Print Server’s package includes PS Admin, a Windowsbased setup and administration program, making configuration and
management of your print servers quickly and easily in a Windows
environment. This print server also has a Telnet interface for management
communications. If Windows is not available on the station you choose for
print server administration, then all configuration and management commands
may be issued to this print server, and all console messages and management
report information will be returned, via Telnet.
-6-
External Features
This section describes the external features of your 1-Port USB Print Server.
Front View
Front Panel
There are three green LED indicators on the front panel:
LEDs
Description
Power
Steady light confirms that the Print Server is powered
on.
LAN
Steady light confirms that the print server has a good
connection to your network.
When it blinks (briefly dark), the print server is
receiving/ transmitting data from/to the network.
USB
Steady blinking (briefly dark) is initiated when the
printer is printing, otherwise, it remains dark.
-7-
Rear View
Rear Panel
Component
DC Power
Input
Description
The DC power input connector is located on the
Print Server’s rear panel and is labeled DC 5V.
Please note that the power supply included in the
package is correct for this 1-Port USB Print Server;
s ubstitution of other equipment may void
warranty.
Reset Button 1.) Press and release this button to reset the print
server.
2.) Press and hold this button for three seconds
(the USB LED on the front panel lights up)
and then release it, the print server will
resume the factory default settings.
USB Port
The USB port allows you connecting the print
server to a printer with USB connector.
LAN
Connector
This LAN connector (RJ-45) provides the printer
server with connection to the network through the
Ethernet cabling.
This printer port is configurable by commands in the PS Admin program, or by
commands issued to the print server via Telnet. See the PS Admin User’s
Guide for configuration procedures. The print server also supports web
configuration, which allows users to configure settings through the web
browser. The print server’s default IP address settings are:
-8-
♦
♦
Default IP address – 192.168.0.1
Subnet Mask – 255.255.255.0
Please note that the PC’s IP address must correspond with the print server’s
IP address in the same segment for the two devices to communicate.
-9-
2
2 INSTALLATION
This chapter explains how to install your print server and connect it to the
network. It also describes the automatic power-on-self-test (POST).
Installing the Print Server
Follow these steps for a trouble-free start of print server operations with your
1-Port USB Print Server. Please take particular notice of the warning in step
4: the network connection should be made before supplying power to the
print server.
1. Confirm proper operation of the printer to be connected to the print server.
2. When you have confirmed proper operation of the printer, turn off the
power.
3. Confirm that your network is operating normally.
4. Connect the print server to the network (through the RJ-45 connector of
the print server).
WARNING: Configuration problems may result if the print server is
powered up without first establishing its network connection. Please
follow this procedure to avoid complications at the configuration stage.
5. While the printer is powered off, connect the print server through the
cable to the printer’s USB port.
6. Turn on the printer’s power.
- 10 -
7. Connect the DC end of the AC Power adapter to the DC power input
socket of the print server and the AC end to the wall outlet. This will
supply power to the print server, and the POST routines will proceed
automatically.
Note: This print server is built with a default IP setting. To prevent
from any conflict in your network, it is recommended to use the PS Admin
program to change the IP setting when there is some other device’s IP
address is the same as the print server’s default IP.
Power-up and Self-Test
Whenever the print server is powered up, two kinds of testing procedures
follow automatically. The first procedure is just a programmed series of LED
flashes, to confirm proper operation of the three LED indicators. The second
procedure comprises programmed tests of each of the print server's major
components.
LED Test Series
Immediately upon power-up, all three of the LED indicators will show steady
green/amber for a few seconds. Then the USB indicator will flash three times
while the Power LED remains steady. Irregularity of any of the LEDs during
this LED test series indicates that there is a problem with the LEDs
themselves. Contact your dealer for correction of any LED problems before
proceeding.
Component Test Series
The actual component tests immediately follow the LEDs test. If any error
condition is found during the component test series, then the test will halt
with the USB LED continuously signaling the particular error according to the
following table.
- 11 -
USB LED Pattern
Flash slowly
Steady on
1 long - 2 short
1 long - 3 short
1 long - 5 short
1 long - 6 short
1 long - 7 short
1 long - 11 short
1 long - 18 short
Error Type
Firmware reload required
DRAM error
Timer INT error
Flash protected
Flash erase/program error
LAN controller error
LAN memory error
LAN I/O base error
USB controller error
In the event of a ‘Firmware Reload Required’ error at startup, proceed
according to instructions given in the PS Admin User’s Guide ("PS Admin
Administration" section, under the heading "Upgrading the Print Server's
Internal Firmware").
In the event that any of the other listed error conditions is encountered on
startup, contact your dealer for correction of the fault.
- 12 -
A
3 P RODUCT
S PECIFICATIONS
Printer Connection
Printer Interface: One USB port, compliant with USB 1.1 standard
Network Connection
Network Interface: One 10Base-T/100BASE-TX shielded port (RJ-45
connector)
Network Standards : IEEE 802.3 10Base-T Ethernet, IEEE 802.3u 100BASE-TX
Fast Ethernet
Network Data Transfer Rate: 10/100 Mbps (megabits per second)
Network Protocol Support
Ethernet Frame Types: 802.2, 802.3, Ethernet II, SNAP (auto-switching)
Transport Protocols: TCP/IP, NetBEUI, AppleTalk/EtherTalk
TCP/IP Protocols Supported: BOOTP, SNMP, Telnet, TFTP, FTP, LPD,
RARP, DHCP
- 13 -
Operating System Support
Windows 95/98/Me, Windows NT/2000/XP; NetWare 5.x (NDPS LPR remote
printing); HP-UX UNIX, Sun OS, Solaris, SCO UNIX, AIX, Unixware and
Linux; Mac OS, Appletalk
Management
Standard: SNMP
MIBs: MIB-II (RFC 1213)
LEDs
PW, LAN, USB
Environmental and Physical
Power Supply: External power supply providing 5VDC
input
Operating Temperature: 0°C to 50°C
Storage Temperature: -25°C to 55°C
Humidity: 5% to 95%, non-condensing at 30°C
EMI Compliance
FCC Class B, CE Class B
- 14 -