1
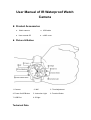
User Manual of IR Waterproof Watch Camera Product Accessories ● Watch camera ● ● ● a MIC cover User manual CD USB cable Picture & Button 1. Camera 2. MIC 4. Power On/Off Button 5. Instruction Light 7. USB Port 8. IR light Technical Data 3. Time Adjustment 6. Function Button 1) Main functions:video recording, IR night vision waterproof function, watch, USB drive 2) Video format:AVI, 1920*1080 resolutions 3) Internal memory:2GB/4GB/8GB,Max 32GB 4) USB port: 2.0(Hs) 5) Charging:about 3-4 hours 6) Battery use time:built-in Li battery, can work about 2 hours 7) Operation systems: don’t need to install the driver if the operation system is Windows ME / 2000 / XP / vista or above. (except Windows98) Operation Switch on / Video Recording Press the power-on/off button for few seconds, the blue light and red light will be both on for 10 seconds, then the blue light will flash three times as it enters video recording mode. During the recording, press the function button once, the blue light will continue flashing, press it again during the blue light flashing period. The blue light will remain lighting. The video file will be saved and the device entering the standby mode. Shortly press the function button again to restart recording. Quick know steps: 1) switch on / starting the video recording Long press button④ Blue & Red light lighting 10 second Blue light Flash 3 times Video recording started 2) save the file / entering standby mode / restart the recording (During the recording) Shortly press button⑥ twice Blue light Keeps lighting Shortly press button⑥ once The file will be saved & entering the standby mode The recording restarted Attention: 1. In order to confirm the file’s safety, the system will save the files automatically very 20 minutes during the recording. 2. In order to save the power, the instruction light turns off during the recording. To confirm the recording mode just shortly press function button to light up the instruction light. IR light Under the video recording mode, press the function button for few seconds, the red light will flash 3 times as it enters the IR light recording mode. Quick know steps: 1) switch on IR light recording mode (During the recording) Long press button⑥ Red light Flash 3 times IR light recording mode Attention: The IR light recording mode only can be turned on under the video recording condition and be turned off under power off. Charging Under the power off mode, connect the device to computer with a USB cable. The blue light and red light will both keep lighting while charging. When the blue light turns off and red light keeps lighting, this signifies the camera is fully charged. Reset Press the power on/off button and function button at the same time to reset when the camera cannot work normally. Attention: if user reset directly during video recording, the file will not be saved. Playback video Turn off the camera after the files being saved, connect the device to computer with a USB cable, then click the removable disk and play the video on the computer. Please make sure the player software has been installation in the computer before connecting. Remark: To make sure the video plays smoothly, we suggest you to copy the files to your computer then play back it. Switch off Press the power on/off button for few seconds, the red will flash 3 times, then the power will turn off. (The device can be switched off under any mode.) Attention: the file will be saved automatically before the power turns off. Setting time The recording date and time can be displayed on the video and photo. When using the device for the first time, you can set the time of video as follows: 1. Plug the camera into the computer via USB cable 2. Insert the CD and open the file named “Time.txt” 3. Change to desired date and time, format as 2012.07.13 14: 56:12 Y 4. Save file to the device directory 5. Close the window and turn off the product. The camera should then have the correct date and time next time a file is recorded. Note: In order for the time and date to work correctly, the date must be entered as YYYY.MM.DD and the time must be entered as HH:MM:SS. Attention 1) When taking video continually, the system will automatically generate a new video file after each operation. 2) If the device cannot be turned on, please check whether the power is low. While the device in the low power, the red light flashes 10 times. Then, the file will be saved automatically and the device turns off. 3) In order to ensure the sound effect better, please use the MIC cover while recording. Besides, the device is attached IR light camera lens and 4 IR lights. User can choose to turn on the IR light mode according to the condition to make the night vision better. 4) Connect to computer: There is a slight difference in time for different computers to identify the hardware. Please wait patiently during the period. If the computer can’t identify the hardware, please make sure your operating system, drivers and USB interface cable work and connect properly. Then, connect the device to computer again. 5) The devices memory function uses a built-in high-capacity polymer lithium battery. Please charge the battery fully after user have used out the battery first five times. By doing so, user can enlighten the maximum capacity of the battery, reaching the standard working hours. 6) When the memory capacity isn’t enough, the blue light and red light both flashing for 5 seconds at the same time. The device will save the file automatically, then switch off. If user needs to continue the record, please spare some capacity first.