1
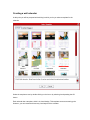
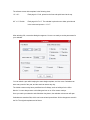
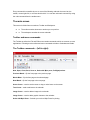
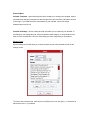
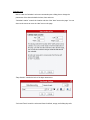
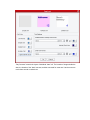
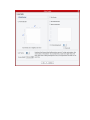
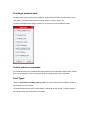
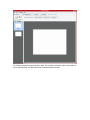
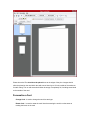
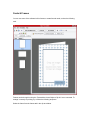
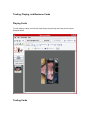
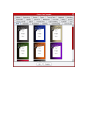
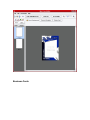
Getting Started When starting the software, you will need to select between four options. • Opening a saved file, either a calendar or a card project. • Creating a new Calendar project. • Creating a new Card project. • Creating a FastTrack project. Select the option that fits your need. Go to the “New Calendar” or the “New Card” sections for more information about the specific projects. Creating a wall calendar At this point you will be prompted with a dialog in which you let you select a template for the calendar. Select the template to use by double-clicking on the icon or by selecting it and pressing the OK button. Each calendar has a template, which is its visual design. This template serves as a starting point. However, you can customize almost any visual aspect of the calendar. The software comes with templates in the following sizes: 12” x 18”: Each page is 12”x18, printed on the front and spiral bound at the top. 8.5” x 11” Double: Each page is 8.5”x11” The calendar is printed on two sides, spiral bound in the center and opens to 11”x17”. After selecting OK, a customize dialog box appears. You are now ready to set the parameters for your calendar. You can switch a year while keeping the same design template, and vise versa. Calendars can start at any month of the year, and the week can start at any day. The visible events overlay has a predefined set of holidays, such as holidays for the US or Mexico. You can always return to this dialog and turn on or off its events overlays. Once you made your selection and clicked the okay button, the calendar main screen will open. Calendars are stored as files, which can be saved and opened later. All the changes are saved in the file. The original templates are left intact. Every command is accessible by one or more of the following methods: the menu bar, the toolbar, mouse right-click, or a mouse double-click. You can also undo each command by using the undo command from the toolbar menu. The main screen This screen is divided into two sections: Toolbar and Workspace. The toolbar contains shortcuts to actions you can perform. The workspace contains the current calendar. Toolbar and menu commands The Toolbar as well as the File and Edit menus contain commands, which are common to most applications. Following are the toolbar and menu commands relevant to Calendars and Cards. The Toolbar commands – (left to right): New, Open, Close, Save, Save as, Order with Mpix press, Preflight/preview. Previous Month – flip the front page to the previous page. Month Menu – flip the front page to the selected page. Next Month – flip the front page to the next page. Arrow Cursor – used to set the curser to drag or resize items on the screen. Text Cursor – used to add text to the calendar. Image Cursor – used to add an image to the calendar. Image Cursor – used to add a graphic element to the calendar. Order with Mpix Press – Submits your order to Mpix Press for printing. Following are the available menu commands: File Menu: New – New Calendar Project, New Greeting Cards Project, New Playing Cards Project, New Trader Card Project. Open Close Save Save as Order with Mpix Press Preflight/Preview Exit Edit Menu: Global Font Change Use this tool to change font, style, color, and size across the calendar. Layout Control the order on page of visible elements. Bring them to the front; send them to the back, etc. Grid Define Grid – A grid can be displayed on the screen to make the design easier. The grid is not printed on the final page. Show Grid – Show/Hide the grid. Snap To Grid – When dragging or resizing, snap the item to the nearest grid. This is used mostly for aligning items on the same line. Personal Menu: Calendar Templates - Opens a dialog box that will enable you to change your template. Keep in mind that when changing a template you also change fonts, color schemes, and location of items on the page. If you made extensive customization to your calendar, some of its design Characteristics may be lost. Calendar & Holidays - Opens a dialog box that will enable you to customize your calendar. In this dialog you can change the year, select the default weekend day(s), or set the default event layer to use in the calendar. This is the same dialog you were using when you first started. Manage Events Opens a dialog box that will allow you to insert personal events to the calendar as well as edit existing events. To insert a new personal event, make sure the top field on the list on the right (“<<< Select this to add a new event>>>”) is selected. A national holiday cannot be changed or deleted. However, a predefined holiday an be hidden by selecting the ‘Hide’ button. On the right hand side of the dialog, where new or existing events are modified you can also do the following: Show/Hide Event – Have an existing event be shown or hidden. Month/Day menu – select the date of the event. Recurring button – Set events to recur on a regular basis. Text Description and Text Style – Create the description of the event as it will appear on the calendar (example “My Birthday”). Modify font, size, style, or color can be modified by the Text Style button. Browse Button – Allows for an image to be added to an event. You can either select “None” for no image, “Custom” for your own image from a file, or one of the predefined images. Images allowed for the custom options can be gif or jpg formats. The center buttons are used to “Add” events defined to the list, “Update” existing events with changes, or “Delete” events from the list. Note that you cannot delete predefined events (such as national holidays). If you wish those events not to show, use the “Hide” option to hide them. Insert Event Selecting this option will open a dialog that will allow you to insert a single personal event to the calendar. Month/Day menu – select the date of the event. Recurring button – set events to recur on a regular basis. Text Description and Text Style – write the description of the event, as it will appear in the calendar (such as “My Birthday”). You can modify font, size, style or color by clicking the Text Style button. Cell Color – Sets a background color to this cell Browse –adds clip-art or an image to the event. This image will be displayed in the same day of the event. Select “None” for no image, “Custom” for your own image from a file, or one of the predefined images. Images allowed for the custom options can be gif or jpg formats. To edit existing events or to delete existing events, see the Manage Events section. Insert Month Thumbnail Used to insert a month thumbnail on the page. It can be this month, the next month, or the previous month. The month thumbnail can be dragged or resized using the mouse. See “Month Thumbnail Settings” for more information. Calendar Look Menus under the Calendar Look menu commands open a dialog box to change the placements of the dates the default colors, fonts and more. “Calendar Location” controls the location and size of the “date” area on the page. You can also use the mouse to move the “date” area on the page. “Days Header” controls the look of the days names area: “Color and Fonts” control the colors and fonts for default, empty, and holiday day cells: “Day Contents” controls the layout of individual “date” cell. The location of images inside the date, the location of the “date” text area, and the area used for event text. Use the mouse to move them around or resize them. “Day Style” controls the look of the frame itself. The frame can be any color. It can be solid or partial. It can be rectangular shape, diamond shape, or have rounded corners. Localize… You can change the text of the calendar to your own language. You can use any language as long as it is supported by your computers operating system. Use the Days and Month text fields to replace the days and month names. You can always toggle the calendar between localized names (using your local names) or the English name using the Localization check box (on the bottom-right of the dialog). Secondary calendar allows you to use a secondary calendar overlay (such as a Jewish calendar) on top of the default Gregorian calendar. Under the second calendar you can select which language to use (“Use Local” for the locale language or English), and should it show the secondary calendar automatically (“Auto Show”) or only on demand. See the Using Text Tags section for more information. If you choose to use a secondary calendar, make sure date cells have enough space to display the secondary date. Refer to the Calendar Look section for more information regarding controlling individual cell layout. Object Settings In the dialog box, you can select the following options: Frame – to use or not use a frame, as well as the frame width and frame color. Background – to use or not use a background fill color for the object, as well as the background color. If the selected item is a picture, this option will be dimmed. Location – exact location and size of the object on the screen. Rotation – rotating the object (for images only). Frame Round Corner – select the size of the roundness of the item corners, from square to completely round. Insert Object This menu will allow you to insert additional text objects, images, clip-art, or basic graphics to the page. Once the object is part of the page, you can move or resize it to its exact desired position and setting. You can also perform the same task by selecting one of the cursor icons from the tool bar and dragging the mouse over the window. Load Picture If the selected item is a picture, it enables you to load a different picture to replace the original default one. Pictures can be on of the following formats: jpeg/jpg, tiif/tif, gif, pict, bmp and png. Change Text If the selected item is a text object, it will enable the editing of the text as well as setting its font, color, size, style, and justification. You can enter accents, (such as á or û) by selecting the US-international keyboard layout under Windows 2000/XP. See your Windows 98/NT/2000/XP user manual for details. You can control the font, size, style, color, and justification of the text. Crop Image Use the mouse to select the area of the image to crop. Once cropped, the cropped image cannot expand back. The crop uses a copy of the original. The original image will remain intact. Fade Image Images can become faded for artistic effect. The original image does not change. If you use transparent images, they will loose their transparency once faded. User Interactions Mouse Right-Click Placing the mouse on an object (or anywhere in the calendar space itself) and right clicking will open a context sensitive menu. This menu will include the commands that are relevant for the mouse locations. Those menu commands have the same functionality as the above described menu commands. They also include Copy, Paste, Cut, Rotate, as applicable. Dragging & Resizing You can move any object on the page by clicking the mouse left button and dragging the mouse. You can also select the object first and then use the mouse “hand” cursor (with left click) to move the object. You can resize an object by selecting it, and placing the mouse on the border or corner of the object until you get the resize tool. Be aware that pictures can also be resized, but are forced to maintain their original width/height proportion while resizing and after. Creating a personal card The Mpix press cards uses the same metaphors as the calendars. Refer to those sections in the user guide if you need to learn about the toolbar, menus, using the mouse, etc. You will be prompted with a dialog in which you can select one of seven different cards. Toolbar and menu commands The toolbar and the menu commands are almost identical to the Calendar window toolbar. Please refer to those sections for more information about the toolbar and the menu commands. Card Types There are postcards and folding greeting cards. The main window will look different, based on the card type you have chosen. The postcard type has two sides, front and back. Its window will look similar. To switch between the front and back, use the buttons on the toolbar. The Folding Greeting Card type has three sides. The card font, card back, and the card inside. Its screen will reflect this. Use the toolbar keys to switch between the sides. Please know that Text should not be placed close to the edges of the print. Images should either be placed on the card within the safe area or bleed up to 1/8 inch outside of the card area for safe cutting. The un-safe area should either be empty of completely full, including some bleed to the outside of the card. Personalize a Card Change Card - is used to change the card size and type. Rotate Card – is used to rotate the card. Note that rotating the card is not the same as rotating the items on the card. All other menu and mouse commends, text and image management, etc are similar to the cards application. Please refer to the relevant sections above for more information on those subjects. Cards & Frames You can use some of the software built in frames to create framed cards, such as the following card. Frames can be brought in using the “Personalize->Insert Object->Clip Art” menu command. To arrange it correctly for printing, try to follow the following sequence. Select the frame from the frames tab in the clip art window. Resize the frame to fit the page. The best way to resize the frame is by selecting it and using the menu command “Personalize->Image commands->Resize Image to Fill” (or right-click on the frame and select the resize menu command). Resizing the frame this way will ensure full bleed printing for better quality. Import the image you wish to place in the frame. Resize it. Note that at this point the image is above the frame. Send the image behind the frame by using the “Edit->Layout” menu. Trading, Playing, and Business Cards Playing Cards To order playing, trading, and business cards simply drag and drop the image onto the layout. Examples below. Trading Cards Business Cards Important information on sizing Bleed is a term used to describe when image that runs all the way to the edge of a trimmed page. If your design calls for image to extend to the edge of the paper your image or color is "bleeding" off the page, and you need to build a bleed into your document. Can't you just print to the edge of the paper? No, a printing press cannot run ink to the very edge of the paper. If your design calls for image to run to the edge of the paper, we have to print the piece on a sheet of paper that's larger than the actual size of the finished page. We then trim the larger sheet of paper down to actual trim size. You need to build a bleed into your document that extends beyond the final page size. Bleed ensures that no slivers of white show at paper's edge on the final product. How do I build a bleed into my document? There is no "standard" bleed size it varies by process and equipment. We use 1/8” as our bleed size, that’s 1/8th of an inch all around the finished trim edge. For demonstration purposes, let's say you're designing a postcard that is 5" x 7" at final size. You should set up your image to be 5.25” x 7.25”, this allows for .125” all the way around. If you have any images or color that go to the edge of your page, you need to extend the image and or color to the image edge, realizing that approximately 1/8” of an inch will be trimmed off in the final document. It may be helpful to bring guides into your file, each placed .125" inside the outer edges of the page. Your ultimate "bleed size" will be 5.25" x 7.25". Your "trim size" is 5" x 7".