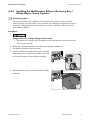
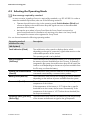
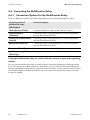
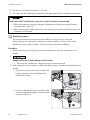
1
Installation Manual
MULTIFUNCTION RELAY
MFR-NR-IA-en-22 | Version 2.2
ENGLISH
Legal Provisions
SMA Solar Technology AG
Legal Provisions
The information contained in these documents is the property of SMA Solar Technology AG.
Any publication, whether in whole or in part, requires prior written approval by
SMA Solar Technology AG. Internal reproduction used solely for the purpose of product evaluation
or other proper use is allowed and does not require prior approval.
SMA Warranty
You can download the current warranty conditions from the Internet at www.SMA-Solar.com.
Trademarks
All trademarks are recognized, even if not explicitly identified as such. Missing designations do not
mean that a product or brand is not a registered trademark.
The BLUETOOTH® word mark and logos are registered trademarks owned by Bluetooth SIG, Inc.
and any use of these marks by SMA Solar technology AG is under license.
Modbus® is a registered trademark of Schneider Electric and is licensed by the Modbus
Organization, Inc.
QR Code is a registered trademark of DENSO WAVE INCORPORATED.
Phillips® and Pozidriv® are registered trademarks of Phillips Screw Company.
Torx® is a registered trademark of Acument Global Technologies, Inc.
SMA Solar Technology AG
Sonnenallee 1
34266 Niestetal
Germany
Tel. +49 561 9522-0
Fax +49 561 9522-100
www.SMA.de
E-mail: [email protected]
© 2004 until 2015 SMA Solar Technology AG. All rights reserved.
2
MFR-NR-IA-en-22
Installation Manual
SMA Solar Technology AG
Table of Contents
Table of Contents
1 Information on this Document. . . . . . . . . . . . . . . . . . . . . . . . . . . 5
1.1
1.2
1.3
1.4
1.5
1.6
Validity. . . . . . . . . . . . . . . . . . . . . . . . . . . . . . . . . . . . . . . . . . . . . . . . .
Target Group . . . . . . . . . . . . . . . . . . . . . . . . . . . . . . . . . . . . . . . . . . . .
Symbols . . . . . . . . . . . . . . . . . . . . . . . . . . . . . . . . . . . . . . . . . . . . . . . .
Typographies. . . . . . . . . . . . . . . . . . . . . . . . . . . . . . . . . . . . . . . . . . . .
Nomenclature . . . . . . . . . . . . . . . . . . . . . . . . . . . . . . . . . . . . . . . . . . .
Display of Parameters . . . . . . . . . . . . . . . . . . . . . . . . . . . . . . . . . . . . .
5
5
5
6
6
6
2 Safety . . . . . . . . . . . . . . . . . . . . . . . . . . . . . . . . . . . . . . . . . . . . . . 7
2.1 Intended Use . . . . . . . . . . . . . . . . . . . . . . . . . . . . . . . . . . . . . . . . . . . . 7
2.2 Safety Information . . . . . . . . . . . . . . . . . . . . . . . . . . . . . . . . . . . . . . . . 8
2.3 Symbol on the Product. . . . . . . . . . . . . . . . . . . . . . . . . . . . . . . . . . . . . 8
3 Scope of Delivery . . . . . . . . . . . . . . . . . . . . . . . . . . . . . . . . . . . . . 9
4 Electrical Connection . . . . . . . . . . . . . . . . . . . . . . . . . . . . . . . . . 10
4.1
4.2
4.3
4.4
Safety during Electrical Connection. . . . . . . . . . . . . . . . . . . . . . . . . .
Electrical Connection Procedure . . . . . . . . . . . . . . . . . . . . . . . . . . . .
Overview of the Connection Area . . . . . . . . . . . . . . . . . . . . . . . . . . .
Installing the Multifunction Relay . . . . . . . . . . . . . . . . . . . . . . . . . . . .
10
10
11
12
4.4.1 Mounting Position and Cable Route . . . . . . . . . . . . . . . . . . . . . . . . 12
4.4.2 Installing the Multifunction Relay in the Sunny Boy Smart Energy . . 15
4.4.3 Installing the Multifunction Relay in the Sunny Boy / Windy Boy or
Sunny Tripower . . . . . . . . . . . . . . . . . . . . . . . . . . . . . . . . . . . . . . . . 17
4.5 Selecting the Operating Mode . . . . . . . . . . . . . . . . . . . . . . . . . . . . . 19
4.6 Connecting the Multifunction Relay . . . . . . . . . . . . . . . . . . . . . . . . . . 20
4.6.1 Connection Options for the Multifunction Relay . . . . . . . . . . . . . . . 20
4.6.2 Connecting to the Multifunction Relay . . . . . . . . . . . . . . . . . . . . . . . 23
5 Changing the Operating Mode of the Multifunction Relay . . 26
6 Technical Data . . . . . . . . . . . . . . . . . . . . . . . . . . . . . . . . . . . . . . 27
7 Contact . . . . . . . . . . . . . . . . . . . . . . . . . . . . . . . . . . . . . . . . . . . . 28
8 EC Declaration of Conformity . . . . . . . . . . . . . . . . . . . . . . . . . . 30
Installation Manual
MFR-NR-IA-en-22
3
Table of Contents
4
MFR-NR-IA-en-22
SMA Solar Technology AG
Installation Manual
SMA Solar Technology AG
1 Information on this Document
1 Information on this Document
1.1 Validity
This document is valid for device type "MFR01-10".
1.2 Target Group
The activities described in this document must only be performed by qualified persons.
Qualified persons must have the following skills:
• Knowledge of how an inverter works and is operated
• Training in how to deal with the dangers and risks associated with installing and using electrical
devices and installations
• Training in the installation and commissioning of electrical devices and installations
• Knowledge of the applicable standards and directives
• Knowledge of and compliance with this document and all safety information
1.3 Symbols
Symbol
Explanation
Indicates a hazardous situation that, if not avoided, will result in
death or serious injury
Indicates a hazardous situation that, if not avoided, can result in
death or serious injury
Indicates a hazardous situation that, if not avoided, can result in
minor or moderate injury
Indicates a situation that, if not avoided, can result in property
damage
Indicates that the following section contains tasks that must be
performed by qualified persons only
Information that is important for a specific topic or goal but is not
safety-relevant
☐
Indicates a requirement for meeting a specific goal
☑
Desired result
✖
A problem that might occur
Installation Manual
MFR-NR-IA-en-22
5
1 Information on this Document
SMA Solar Technology AG
1.4 Typographies
Typography
bold
Application
Example
• Parameters
• Elements to be selected
• Elements to be entered
• Select the parameter
Operating mode of
multifunction relay or
Mlt.OpMode and set
the desired operating
mode.
1.5 Nomenclature
Complete designation
Designation in this document
Multifunction relay
Multifunction relay, product
Sunny Boy, Windy Boy, Sunny Tripower,
Sunny Boy Smart Energy
Inverter
PV system, small wind turbine system
System
1.6 Display of Parameters
Depending on the type of communication, (e.g. RS485, BLUETOOTH or Speedwire/Webconnect)
the parameters and messages are displayed differently on the communication products.
This document uses both methods of displaying parameters.
Example: Display of the parameter for setting the operating mode of the multifunction
relay
• For communication via RS485: parameter Mlt.OpMode
• For communication via BLUETOOTH or Speedwire/Webconnect: parameter Operating
mode of multifunction relay
6
MFR-NR-IA-en-22
Installation Manual
SMA Solar Technology AG
2 Safety
2 Safety
2.1 Intended Use
The multifunction relay is a multifunctional interface that can be configured for the operating mode
used by a particular system (see Section 4.5 "Selecting the Operating Mode", page 19).
The multifunction relay can be retrofitted or installed in the inverter at the factory if specified in the
order.
The multifunction relay is suitable for use in the following SMA inverters:
• SB 3000TL-21, SB 3600TL-21, SB 4000TL-21, SB 5000TL-21
• SB 3600SE-10, SB 5000SE-10
• WB 3000TL-21, WB 3600TL-21, WB 4000TL-21, WB 5000TL-21
• SB 2500TLST-21, SB 3000TLST-21
• STP 8000TL-10, STP 10000TL-10, STP 12000TL-10, STP 15000TL-10, STP 17000TL-10
• STP 15000TLHE-10, STP 20000TLHE-10, STP 15000TLEE-10, STP 20000TLEE-10
• STP 20000TL-30, STP 25000TL-30
Use this product only in accordance with the information provided in the enclosed documentation and
with the locally applicable standards and directives. Any other application may cause personal injury
or property damage.
For safety reasons, it is not allowed to modify the product or install components that are not explicitly
recommended or distributed by SMA Solar Technology AG for the product. Unauthorized changes
and modifications will void all warranty claims and the operating permission.
Any use of the product other than that described in the Intended Use section does not qualify as the
intended use.
The enclosed documentation is an integral part of this product. Keep the documentation in a
convenient place for future reference and observe all instructions contained therein.
Installation Manual
MFR-NR-IA-en-22
7
2 Safety
SMA Solar Technology AG
2.2 Safety Information
This section contains safety information that must be observed at all times during work on or with the
product.
To prevent personal injury and property damage and to ensure long-term operation of the product,
read this section carefully and observe all safety information at all times.
Danger to life due to high voltages of the PV array
When exposed to sunlight, the PV array generates dangerous DC voltage which is present in the
DC conductors and the live components of the inverter. Touching the DC conductors or the live
components can lead to lethal electric shocks.
• All work on the inverter must be carried out by qualified persons only.
• Prior to performing any work on the inverter, always disconnect the inverter from all voltage
sources (see the inverter manual).
• Do not touch any live components of the inverter.
Risk of burns due to hot inverter enclosure parts
Some parts of the inverter enclosure can get hot during operation.
• Do not touch any parts other than the lower enclosure lid of the inverter during operation.
Damage to the inverter due to electrostatic discharge
Touching electronic components can cause damage to or destroy the inverter through electrostatic
discharge.
• Ground yourself before touching any component.
2.3 Symbol on the Product
Symbol
Explanation
Danger to life due to electric shock
The product operates at high voltages. All work on the product must be
carried out by qualified persons only.
8
MFR-NR-IA-en-22
Installation Manual
SMA Solar Technology AG
3 Scope of Delivery
3 Scope of Delivery
Check the scope of delivery for completeness and any externally visible damage. Contact your
distributor if the scope of delivery is incomplete or damaged.
Figure 1:
Components included in the scope of delivery
Position
Quantity
Description
A
1
Multifunction relay*
B
1
M20x1.5 cable gland*
C
1
Installation manual
D
1
M4x8 cylindrical screw*
E
1
Washer M4*
* This component is not included if the multifunction relay is installed upon delivery.
Installation Manual
MFR-NR-IA-en-22
9
4 Electrical Connection
SMA Solar Technology AG
4 Electrical Connection
4.1 Safety during Electrical Connection
Danger to life due to high voltages of the PV array
When exposed to sunlight, the PV array generates dangerous DC voltage which is present in the
DC conductors and the live components of the inverter. Touching the DC conductors or the live
components can lead to lethal electric shocks.
• All work on the inverter must be carried out by qualified persons only.
• Prior to performing any work on the inverter, always disconnect the inverter from all voltage
sources (see the inverter manual).
• Do not touch any live components of the inverter.
Damage to the inverter due to electrostatic discharge
Touching electronic components can cause damage to or destroy the inverter through electrostatic
discharge.
• Ground yourself before touching any component.
4.2 Electrical Connection Procedure
Procedure
See
1. Installation of the multifunction relay: Install the multifunction relay in Section 4.4, page 12
the inverter if it is not installed in the inverter upon delivery.
2. Selection of the operating mode: Select the operating mode in
which you want to use the multifunction relay.
Section 4.5, page 19
3. Connection of the multifunction relay: Connect the multifunction
relay based on the operating mode and the corresponding wiring
diagram.
Section 4.6, page 20
4. Change of the operating mode: Change the operating mode of the Section 5, page 26
multifunction relay if you do not want to operate the multifunction
relay in the operating mode Fault indication (FltInd) and do not
plan to connect a display to the multifunction relay.
10
MFR-NR-IA-en-22
Installation Manual
SMA Solar Technology AG
4 Electrical Connection
4.3 Overview of the Connection Area
Figure 2:
Design of the multifunction relay
Position
Description
A
Connecting terminal plate for the connection to the multifunction relay
B
Ribbon cable for the connection in the inverter
C
Hole for attaching the multifunction relay in the inverter
Installation Manual
MFR-NR-IA-en-22
11
4 Electrical Connection
SMA Solar Technology AG
4.4 Installing the Multifunction Relay
4.4.1 Mounting Position and Cable Route
Mounting Position and Cable Route in the Sunny Tripower
Figure 3:
Installation area and cable route in the Sunny Tripower with the lower enclosure lid open and the
display assembly flipped up
Position
Description
A
Inverter display assembly
B
Installation location of the multifunction relay
C
Cable route for the connection to the multifunction relay
D
M20x1.5 cable gland
12
MFR-NR-IA-en-22
Installation Manual
SMA Solar Technology AG
4 Electrical Connection
Mounting Position and Cable Route in the Sunny Boy Smart Energy
Figure 4:
Installation area and cable route in the Sunny Boy Smart Energy with the enclosure lid open and the
display flipped up
Position
Description
A
Inverter display
B
Installation location of the multifunction relay
C
Cable route for the connection to the multifunction relay
D
M20x1.5 cable gland
Installation Manual
MFR-NR-IA-en-22
13
4 Electrical Connection
SMA Solar Technology AG
Mounting Position and Cable Route in the Sunny Boy / Windy Boy
Figure 5:
Installation area and cable route in the Sunny Boy/Windy Boy with the lower enclosure lid open and
the display assembly flipped up
Position
Description
A
Inverter display assembly
B
Installation location of the multifunction relay
C
Cable route for the connection to the multifunction relay
D
M20x1.5 cable gland
14
MFR-NR-IA-en-22
Installation Manual
SMA Solar Technology AG
4 Electrical Connection
4.4.2 Installing the Multifunction Relay in the
Sunny Boy Smart Energy
1.
Danger to life due to high voltages in the inverter
• Disconnect the inverter from voltage sources and open the enclosure lid (see inverter
manual).
2. Removing the display:
• Flip the display up.
• Remove the plug of the display ribbon cable
from the pin connector on the display
assembly.
• Flip the display down.
• Press the right-hand retainer outwards.
• Pull the display out of the right-hand retainer.
• Pull the display out of the left-hand retainer.
• Set the display aside in a safe place.
Installation Manual
MFR-NR-IA-en-22
15
4 Electrical Connection
SMA Solar Technology AG
3. Insert the ribbon cable of the multifunction relay into
the pin connector on the display assembly.
4. Insert the multifunction relay in the inverter. Lead the
left-hand key on the multifunction relay into the hole
in the plastic retainer for the display assembly.
5. Fasten the multifunction relay using the washer and
the cylindrical screw (torque: 1.5 Nm). Use an
Allen key (AF 3).
6. Install the display:
• Plug the ribbon cable plug into the pin
connector on the display assembly.
• Lead the display into the right-hand retainer.
• Lead the display into the left-hand retainer.
16
MFR-NR-IA-en-22
Installation Manual
SMA Solar Technology AG
4 Electrical Connection
4.4.3 Installing the Multifunction Relay in the Sunny Boy /
Windy Boy or Sunny Tripower
Displayed graphics
This section describes the installation of the multifunction relay, but only shows the
Sunny Tripower in the illustrations. The procedure for installing the multifunction relay in
Sunny Boy / Windy Boy and Sunny Tripower inverters is identical. Only the inverter
environment is different.
Procedure:
1.
Danger to life due to high voltages in the inverter
• Disconnect the inverter from all voltage sources and open the lower enclosure lid
(see inverter manual).
2. Release the display assembly screw and flip the display assembly up.
3. The display assembly snaps into place.
4. Insert the multifunction relay in the inverter. Lead the
left-hand key on the multifunction relay into the hole
in the plastic retainer for the display assembly.
5. Lead the ribbon cable upwards behind the display
assembly.
Installation Manual
MFR-NR-IA-en-22
17
4 Electrical Connection
SMA Solar Technology AG
6. Fasten the multifunction relay using the washer and
the cylindrical screw (torque: 1.5 Nm). Use an
Allen key (AF 3).
7. Flip the display assembly down.
8. Tighten the screw of the display assembly.
9. Insert the plug from the multifunction relay ribbon
cable into the left-hand pin connector on the display
assembly. You have to press apart the lock hooks
on the pin connector in order to insert the plug.
☑ After inserting the plug, the lock hooks close.
18
MFR-NR-IA-en-22
Installation Manual
SMA Solar Technology AG
4 Electrical Connection
4.5 Selecting the Operating Mode
Error message required by standard
In some countries, signaling of errors is required by standards, e.g. IEC 62109-2. In order to
meet the standard requirement, take one of the following measures:
• Operate the multifunction relay in the operating mode Fault indication (FltInd) and
connect a display to the multifunction relay that signals an error or the undisturbed
operation of the inverter.
• Activate the error alarm in Sunny Portal (see the Sunny Portal user manual at
www.SunnyPortal.com for information on receiving error alarms via Sunny Portal).
This requires the inverter to be registered in Sunny Portal.
You can choose between the following operating modes:
Operating mode of
multifunction relay
(Mlt.OpMod)
Description
Fault indication (FltInd)
The multifunction relay controls a display device which,
depending on the type of connection, signals either an error or the
undisturbed operation of the inverter.
This operating mode is set by default.
Self-consumption
(SelfCsmp)
The multifunction relay switches the loads on or off depending on
the amount of power available from the PV array. If a battery is
integrated in the system, the multifunction relay will still switch the
loads on or off depending on the amount of power available from
the PV array, not from the battery.
Control via communication
(ComCtl)
The multifunction relay switches loads on or off according to
commands transmitted by a communication product.
Battery bank (BatCha)
The multifunction relay controls the charging of external batteries
depending on the amount of power available from the system.
Fan control (FanCtl)
The multifunction relay controls an external fan depending on the
temperature of the inverter.
If the temperature of the inverter is 5°C higher than a specific
threshold set in the inverter, the fan starts automatically. If the
temperature of the inverter is 10°C below the set threshold, the
fan stops automatically.
Switching status grid relay
(GriSwCpy)
Installation Manual
The multifunction relay switches simultaneously with the grid relay
of the inverter and transmits a signal to the grid operator.
MFR-NR-IA-en-22
19
4 Electrical Connection
SMA Solar Technology AG
4.6 Connecting the Multifunction Relay
4.6.1 Connection Options for the Multifunction Relay
There is a different connection procedure depending on which operating mode you select.
Operating mode of
multifunction relay
(Mlt.OpMod)
Connection option
Fault indication (FltInd)
Using the multifunction relay as fault indicator contact
Self-consumption
(SelfCsmp)
Controlling loads or charging batteries in a power-dependent
way via the multifunction relay
Control via communication
(ComCtl)
Controlling loads or charging batteries in a power-dependent
way via the multifunction relay
Battery bank (BatCha)
Controlling loads or charging batteries in a power-dependent
way via the multifunction relay
Fan control (FanCtl)
Connecting the external fan (see fan documentation)
Switching status grid relay
(GriSwCpy)
Reporting the Switching Status of the Grid Relay
Using the multifunction relay as a fault indicator contact or operation signaling
contact
You can use the multifunction relay as a fault indicator contact for displaying or reporting inverter
errors. This requires a parallel connection. Alternatively, you can choose to have the undisturbed
operation displayed or reported. This requires a series connection. You can connect several inverters
to one fault indicator or operation indicator. You must connect the multifunction relays of several
inverters in parallel.
20
MFR-NR-IA-en-22
Installation Manual
SMA Solar Technology AG
Figure 6:
4 Electrical Connection
Wiring diagram with several inverters for connection of an operation signaling contact and wiring
diagram for connection of a fault indicator contact (example)
Installation Manual
MFR-NR-IA-en-22
21
4 Electrical Connection
SMA Solar Technology AG
Controlling loads or charging external batteries in a power-dependent way via
the multifunction relay
Loads can be controlled and external batteries charged in a power-dependent way via the
multifunction relay. To enable this function, a contactor (K1) must be connected to the multifunction
relay. The contactor (K1) switches the operating current for the load on or off. If you want external
batteries to be charged depending on the available power, the contactor serves to activate or
deactivate the charging of the batteries.
Figure 7:
22
Wiring diagram for connection to control a load or for the power-dependent charging of the batteries
MFR-NR-IA-en-22
Installation Manual
SMA Solar Technology AG
4 Electrical Connection
Reporting the switching status of the grid relay
The multifunction relay can trip a signal to the grid operator as soon as the inverter connects to the
utility grid. To enable this function, the multifunction relays of all inverters must be connected in
parallel.
Figure 8:
Wiring diagram for reporting the switching status of the grid relay (example)
4.6.2 Connecting to the Multifunction Relay
Requirements:
☐ The technical requirements of the multifunction relay must be met (see Section 6 "Technical
Data", page 27).
Cable requirements:
☐ The cable must be double-insulated.
☐ External diameter: 5 mm to 12 mm
Installation Manual
MFR-NR-IA-en-22
23
4 Electrical Connection
SMA Solar Technology AG
☐ Conductor cross-section: 0.08 mm² to 2.5 mm²
☐ The cable type and cable-laying method must be appropriate for the installation and location.
Destruction of the multifunction relay as a result of excessive contact load
• Observe the maximum switching voltage and maximum switching current (see Section 6
"Technical Data", page 27).
• When connecting the multifunction relay to the utility grid, protect the multifunction relay with
a separate circuit breaker.
Displayed graphics
This section describes the connection to the multifunction relay, but only shows the
Sunny Tripower in the illustrations. However, the same method is used to connect to the
multifunction relay in all the inverters. Only the inverter environment is different.
Procedure:
1. When connecting to the utility grid, protect the multifunction relay with a separate circuit
breaker.
2.
Danger to life due to high voltages in the inverter
• Disconnect the inverter from voltage sources (see inverter manual).
3. If the cable gland on the inverter is installed inside the inverter, insert the cable gland from the
outside:
• Unscrew the counter nut from the outside of the
inverter and remove the cable gland from
inside of the inverter.
• Insert the cable gland from the outside into the
enclosure opening and tighten it from the inside
using the counter nut.
24
MFR-NR-IA-en-22
Installation Manual
SMA Solar Technology AG
4 Electrical Connection
4. Slightly loosen the swivel nut of the cable gland and remove the sealing plug.
5. If the diameter of the connection cable is more than 8 mm, remove the internal seal insert from
the cable gland.
6. Route the cable into the inverter through the cable gland.
7. Dismantle the cable by no more than 15 mm.
8. Strip off the conductor insulation by max. 8 mm.
9. Depending on the intended use (operating mode),
connect the cable to the connecting terminal plate
for connecting to the multifunction relay in
accordance with the wiring diagram.
10. Tighten the swivel nut of the cable gland.
11. Flip the display down.
12. For Sunny Tripower or Sunny Boy / Windy Boy
inverters: Tighten the screw of the display assembly.
13. Recommission the inverter (see inverter manual).
Installation Manual
MFR-NR-IA-en-22
25
5 Changing the Operating Mode of the Multifunction Relay
SMA Solar Technology AG
5 Changing the Operating Mode of the Multifunction
Relay
The default operating mode of the multifunction relay is Fault indication (FltInd). If you decide to
use another operating mode and have established the correct electrical connection for this operating
mode, you will have to change the operating mode of the multifunction relay and make other settings,
if necessary (see the communication product manual for more information on changing parameters).
Requirements:
☐ The inverter must be connected to a communication product via BLUETOOTH or Speedwire/
Webconnect.
Procedure:
1. Call up the user interface of the communication product or Sunny Explorer and log in as
Installer.
2. Select the parameter Operating mode of multifunction relay/Mlt.OpMode and set the
desired operating mode.
3. Once you have set the operating mode Self-consumption, make the following additional
settings:
• Select the parameter Minimum On power for MFR self-consumption/Mlt.MinOnPwr
and set the desired value. This determines the power threshold at which a load is switched
on.
• Select the parameter Minimum power On time, MFR self-consumption/
Mlt.MinOnPwrTmm and set the desired value. This determines the minimum time for
which the power must exceed the minimum switch-on power threshold before the load is
switched on.
• Select the parameter Minimum On time for MFR self-consumption/Mlt.MinOnTmm
and set the desired value. This determines the minimum time for which the load remains
switched on.
4. If you have set the operating mode Control via communication, select the parameter Status
of MFR with control via communication/MltComCtl.Sw and set the desired value. This
determines the status used when the multifunction relay is controlled via a communication
product.
5. If you have set the operating mode Battery bank, make the following additional settings:
• Select the parameter Minimum On power for MFR battery bank/Blt.BatCha.Pwr
and set the desired value. This determines the power threshold at which the battery is
supposed to be charged.
• Select the parameter Minimum time before reconnection of MFR battery bank/
Blt.BatCha.Tmm and set the desired value. This sets the minimum time which must elapse
after charging the battery before battery charging can resume.
26
MFR-NR-IA-en-22
Installation Manual
SMA Solar Technology AG
6 Technical Data
6 Technical Data
Maximum AC switching voltage
240 V
Maximum DC switching voltage
30 V
Maximum AC switching current
1.0 A
Maximum DC switching current
1.0 A
Minimum electrical endurance when the
maximum switching voltage and maximum
switching current are complied with*
1,000,000 switching cycles
* Corresponds to 20 years at 12 switching operations per day
Installation Manual
MFR-NR-IA-en-22
27
7 Contact
SMA Solar Technology AG
7 Contact
If you have technical problems with our products, please contact the SMA Service Line.
We require the following information in order to provide you with the necessary assistance:
• Inverter device type
• Inverter serial number
• Inverter firmware version
• Special country-specific settings of the inverter (if applicable)
• Type and number of PV modules connected
• Mounting location and altitude of the inverter
• Inverter message
• Optional equipment, e.g. communication products
• Application (operating mode) of the multifunction relay
Danmark
SMA Solar Technology AG
Belgium
SMA Benelux BVBA/SPRL
Germany
Niestetal (Germany)
Belgique
Mechelen
Austria
SMA Online Service Center:
www.SMA.de/Service
België
+32 15 286 730
Sunny Boy, Sunny Mini Central,
Sunny Tripower:
+49 561 9522-1499
Luxembourg
Switzerland
Monitoring Systems
(communication products): +49
561 9522-2499
Luxemburg
The
Netherlands
SMA Central & Eastern
Magyarország Europe s.r.o.
Praha
Fuel Save Controller (photovoltaic Polska
diesel hybrid systems):
+420 235 010 417
România
+49 561 9522-3199
Slovensko
Sunny Island, Sunny Backup,
SMA Hellas AE
Hydro Boy: +49 561 9522-399 Ελλάδα
Κύπρος
Αθήνα
Sunny Central:
+49 561 9522-299
+30 210 9856666
España
Portugal
SMA Ibérica Tecnología Solar,
S.L.U.
Barcelona
Česko
France
SMA France S.A.S.
Lyon
+33 472 22 97 00
+34 935 63 50 99
28
MFR-NR-IA-en-22
Installation Manual
SMA Solar Technology AG
Italia
SMA Italia S.r.l.
United Kingdom SMA Solar UK Ltd.
Milano
Milton Keynes
+39 02 8934-7299
+44 1908 304899
United Arab SMA Middle East LLC
Emirates
Abu Dhabi
대한민국
7 Contact
India
SMA Solar India Pvt. Ltd.
Mumbai
+971 2 234-6177
+91 22 61713888
SMA Technology Korea Co., Ltd.
SMA Solar (Thailand) Co., Ltd.
서울
+82-2-520-2666
+66 2 670 6999
Argentina
SMA South America SPA
Brazil
Santiago
Cape Town
Chile
+562 2820 2101
08600SUNNY (78669)
Perú
South Africa SMA Solar Technology
South Africa Pty Ltd.
International:
+27 (0)21 826 0600
Australia
SMA Australia Pty. Ltd.
Other countries International SMA Service Line
Sydney
Niestetal (Germany)
Toll free for Australia: 1800 SMA
AUS
(1800 762 287)
Toll free worldwide:
00800 SMA SERVICE
(+800 762 7378423)
International: +61 2 9491 4200
Installation Manual
MFR-NR-IA-en-22
29
8 EC Declaration of Conformity
SMA Solar Technology AG
8 EC Declaration of Conformity
within the meaning of the EC directives
• 2004/108/EC (electromagnetic compatibility, EMC)
• 2006/95/EC (Low voltage, LVD)
• 1999/5/EU (Radio and Telecommunications Terminal Equipment, R&TTE)
SMA Solar Technology AG hereby declares that the assembly described in this document is in
compliance with the essential requirements and other relevant provisions of the aforementioned
directives when used as intended with inverters from the Sunny Boy and Sunny Tripower device
families. The complete EC Declaration of Conformity can be found at www.SMA-Solar.com.
30
MFR-NR-IA-en-22
Installation Manual
SMA Solar Technology
www.SMA-Solar.com