1
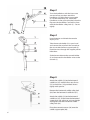
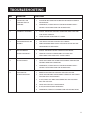
S-Belt Bike™
USER MANUAL
Please read the User Manual carefully before using this product and retain for future
reference. If you misplace the manual, you can download it from the Salus Sports website
CONTENTS
Technical Specs.............................................................................................................................................................................1
Product Features...........................................................................................................................................................................1
Safety Instructions.......................................................................................................................................................................2
What’s in the Box..........................................................................................................................................................................3
Components..................................................................................................................................................................................3
Tool Kit..............................................................................................................................................................................................4
Assembly Instructions................................................................................................................................................................5
Operating Instructions...............................................................................................................................................................8
Maintenance..................................................................................................................................................................................10
Troubleshooting...........................................................................................................................................................................11
TECHNICAL SPECS
Product Dimensions
106(H)* 51(W)*90(L)CM
Gross Weight
12KG
Packaging Dimensions 49.5(H)* 25(W)*65(L)CM Max User Weight
100KG
Net Weight
11KG
Belt
LCD Display
Scan, Time, Speed, Distance, Total Distance, Pulse, Calories
UK/EU Standards
CE Certified
Drive System
PRODUCT FEATURES
•
Brand: Salus Sports
•
Model: S-Belt Bike™
•
LCD display (batteries included)
•
Grey gloss frame and support poles
•
Black saddle (PU leather) with foam insert
•
Fully adjustable saddle (up/down/
forwards/backwards)
•
Adjustable handlebars
•
Heart rate sensors
•
Tension control (resistance)
•
Steel pedals with plastic footstraps
•
Tool kit: handlebar safety lock, bolts/
washers, spanner and Allen key
•
CE certified
•
1 Year Warranty on Frame & Parts (keep
PayPal receipt as proof of purchase)
•
Exercise Bike and Fitness e-book
•
Salus Sports Health & Fitness e-newsletters
including mini workouts, fat-burning
workouts you can do anywhere, anytime
and motivational tips
1
SAFETY INSTRUCTIONS
Please read carefully prior to using this product.
You should consult a physician before beginning any exercise program including a program involving
the use of the S-Belt Bike™ – this is especially important if you are pregnant, sick, injured or have a preexisting medical condition.
If whilst using the S-Belt Bike™ you feel dizzy, faint, short of breath, or any pain STOP using the bike
immediately and consult a physician.
When using fitness equipment, you should follow normal safety procedures, especially if there are
children or pets around.
1. It is important to read the entire manual before assembling and using this product. Safe and
efficient use can only be achieved if the equipment is assembled, maintained and used properly.
It is the user’s responsibility to adhere to all warnings and precautions prior to using the bike.
2. Always place the bike on the ground in a dry clean area.
3. Avoid placing the bike on thick carpet – it should be placed on a flat clean surface.
4. In the event the S-Belt Bike™ malfunctions STOP immediately and contact the Customer Care
team for further instructions.
5. The maximum user weight for the S-Belt Bike™ is 100KG.
6. When adjusting the saddle and handlebars check they are secure to avoid injury.
7. Prior to use, tighten the nuts and bolts on parts such as the saddle, pedals and handlebars to
avoid injury.
8. Always use proper lifting techniques and/or assistance when lifting or moving the bike to avoid
injury.
9. The S-Belt Bike™ is not suitable for children under 14 years of age or for people with physical
conditions unless supervised by an adult.
10. The S-Belt Bike™ is designed for home use only and should only be used indoors in a clean dry
area.
2
WHAT’S IN THE BOX
Remove all the components from the packaging – please save the packaging until you have fully
assembled and tested the S-Belt Bike™ as you may have to return it. Note, all items must be returned in
the original packaging for safety reasons.
If any of the components are missing, damaged in transit or simply don’t work, please contact the
Customer Care team immediately for further instructions. Please do not try to resolve any issues yourself
as this could lead to further damage or injury.
All the components are available in our UK warehouse and can be shipped to you the next day. We like
to make things easy for you at Salus Sports and our dedicated Customer Care team are available during
business hours to assist with returns, exchanges and resolve issues quickly.
COMPONENTS
•
Frame
•
Console (with batteries)
•
Support Poles
•
Handlebars with heart
sensors
•
Front and Back Stabilizers
•
Concertina cover
•
Saddle
•
Pedals
DESCRIPTION
QTY
DESCRIPTION
QTY
1
Main Frame
1
11
Lower Sensor Wire
1
2
Front Support Pole
1
12
Tension Control
1
3
Front Stabilizer
1
13
Saddle
1
4
Back Stabilizer
1
14
Horizontal Saddle Bar
1
5
Console
1
15
Saddle Support Pole
1
6
Console Holder
1
16
Concertina Cover
1
7
Handlebars
1
17
1
8
Handlebar Safety Lock
1
Horizontal Saddle Adjustment
Lock
9
Tension Control Wire
1
18
Saddle Height Adjustment Lock
1
10
Upper Sensor Wire
1
19
Crank Arms (Right & Left)
2
20
Pedals (Right & Left)
2
3
TOOL KIT
•
Allen Key x 1
•
Spanner x 1
•
Handlebar safety lock x 1
•
Various nuts, bolts and washers
•
User Manual
4
Nylock Nut
(M8)
Domed Nut
(M8)
Key Head Bolt
(M8x60mmL)
Fixing Bolt
(M8x16mmL)
Washer
(Ø20xØ 8.2x1.5t)
Spring Washer
M8
Fixing Screw
(M5x12mmL)
Washer
(Ø20xØ8.2x1.5t)
ASSEMBLY INSTRUCTIONS
7 easy steps to assemble then you’re ready to workout – it takes approx 30 mins to assemble.
Step 1
Attach the front (17) and back (19)
stabilizers to the main frame (25) with
the domed nuts, washers (12 and
20) and key-head bolts (21 and 18)
provided.
Tip: Ensure the warning label is
facing you before attaching the back
stabilizer.
Step 2
30
32
26
Inside the main frame, you will see a red
plastic rectangle. Pull it towards you to
loosen it from its current position.
26
8
10
Tip: This will make it easier for you to do
the next step.
Take the front support pole (5) and
connect the upper (8) and lower (10)
sensor wires (see insert).
Turn the tension control (30) to the left
until it stops.
Hook the tension control wire (26) into
the red plastic (32) inside the main frame
(25). To do this you must pull the tension
control wire (26) to full length by pulling
upwards on the front support pole (5).
Tip: for better leverage do this whilst
standing.
Fix the 4 sets of fixing bolts (11) and
washers (12) provided to the front
support pole (5).
Tip: Tape the tension wire onto the
support pole so it doesn’t fall inside.
5
Step 3
Turn the handlebars with the heart rate
sensors to face you then attach the
handlebars (4) to the front support pole
(5). Lift the metal flap (29), centre the
handlebars in the space provided, close the
flap over the handlebars and lock in place
with the handlebar safety lock (3) – secure
tightly.
Step 4
Insert batteries and check the console
display is on.
Take the console holder (2) in your hand
and connect the wire from the console to
the wire inside the front support pole (5).
Feed the wires through the support pole to
hide them.
Slide the console onto the console holder
(2) and connect the handlebar wires to the
console (1).
Step 5
Attach the saddle (13) to the horizontal
saddle bar (27) with the four sets of nuts
(15) and washers (14) provided. Secure
tightly with spanner.
Remove the horizontal saddle safety lock
(29) from the horizontal saddle bar (27).
Attach the saddle (13) to the horizontal
saddle bar (27). Slide it into the horizontal
support bar (28), adjust to suit your height
and tighten with the horizontal saddle
safety lock (29).
Place the concertina cover (16) over the
saddle support pole (20).
6
Step 6
Remove the saddle height adjustment lock
(24) from the main frame.
Insert the saddle support pole (20) into the
main frame (25).
Push the concertina up and adjust to suit
your height.
Lock into place with the saddle height
adjustment lock (24).
Step 7
Firmly attach the left pedal (22L) to the
left crank arm (23) in a counter-clockwise
direction using the spanner provided
until tight.
Now firmly attach the right pedal (22R)
to the right crank arm (23) in a clockwise
direction using the spanner provided
until tight.
Tip: Do this by turning the nut, not the
pedal.
7
OPERATING INSTRUCTIONS
Adjusting the saddle
The height and length of the saddle can easily be adjusted to accommodate a range of heights.
To adjust the saddle up or down – remove the saddle height adjustment lock, hold the saddle in your
hands and slide it up or down the saddle support pole, find the correct level for your height, insert the
lock in the hole and tighten.
To adjust the saddle forwards or backwards – loosen the horizontal saddle adjustment lock, slide the
saddle forwards or backwards and lock in place.
Adjusting the tension
-
+
The tension control allows you to alter the resistance of the pedals. A high resistance makes it harder to
pedal, and a low resistance makes it easier.
For the best results set the tension when you are on the bike by turn the tension control to the left
(easier) or right (harder).
8
Using the console
Insert the batteries provided.
To turn on the display - press the MODE button or start pedalling.
To turn off the display – stop pedalling and it will automatically turn off after 4 minutes.
MODE – Press to select a function, or hold for 4 seconds to reset.
SCAN – Scans all functions: TIME, SPEED, DISTANCE, CALORIES, HEART RATE.
TIME – Displays the time.
SPEED – Displays the speed in KM/h.
DISTANCE – Displays the distance in KM/h.
CALORIES – Displays the calories burned.
PULSE – Displays your heart rate - place your thumbs on the heart rate sensors first.
9
MAINTENANCE
Regular maintenance will prolong the life of your bike and prevent injury. We strongly recommend that
you do the following on a regular basis –
1.
Clean the bike after use with a soft cloth and cleanser - then dry it.
2.
Clean the Console display with a soft cloth and anti-static computer spray to remove dust or finger
prints. Note, harsh chemicals will destroy the protective coating on the Console and cause a static
build up inside the Console that could damage the components.
3.
Check the front and back stabilizers each time you use the bike to ensure the bike is stable and level
with the floor.
4.
Check and tighten loose nuts/bolts, the saddle adjustment locks, pedals, and handlebars to ensure
they are secure each time you use the bike to avoid injury.
5.
For replacement parts, contact Customer Care.
10
TROUBLESHOOTING
REF
1
PROBLEM
THE PEDALS ARE
SOLUTION
1.
SPINNING OUT OF
CONTROL
ADD MORE RESISTANCE BY TURNING THE TENSION CONTROL
TO THE RIGHT.
2.
OTHERWISE, IT COULD BE AN ISSUE WITH THE BELT DRIVE –
CONTACT CUSTOMER CARE FOR INSTRUCTIONS.
2
THE BIKE IS UNSTABLE
1.
ADJUST THE FRONT AND BACK STABILISERS UNTIL THEY ARE
FLAT ON THE SURFACE.
3
2.
SHAKE THE BIKE TO ENSURE IT’S STABLE.
THE HANDLEBARS ARE
1.
STOP PEDALLING AND AND GET OFF THE BIKE.
WOBBLY
2.
TURN THE HANDLEBAR SAFETY LOCK UNTIL TIGHT AND THE
HANDLEBARS DO NOT MOVE.
4
MY FEET BARELY
1.
ADJUST THE HEIGHT OF THE SADDLE TO HIP HEIGHT.
TOUCH THE PEDALS
2.
YOUR FEET SHOULD COMFORTABLY SIT INSIDE THE
FOOTSTRAPS WITH YOUR LEGS SLIGHTLY BENT.
5
NO RESISTANCE
1.
CHECK THE UPPER AND LOWER SENSOR WIRES AND TENSION
CONTROL WIRE ARE CONNECTED.
2.
OTHERWISE, IT COULD BE AN ISSUE WITH THE BELT DRIVE –
CONTACT CUSTOMER CARE FOR INSTRUCTIONS.
6
THE CONSOLE
1.
REMOVE THE CONSOLE FROM THE CONSOLE HOLDER.
DOESN’T RESPOND
2.
CHECK THE BATTERIES ARE INSERTED CORRECTLY AND CHECK
THE CONSOLE IS RESPONDING.
3.
IF NOT, CHECK ALL WIRES ARE CONNECTED AND PLUGGED
INTO THE CONSOLE.
4.
CHECK THE CONSOLE IS RESPONDING.
5.
IF NOT, TRY REPLACING THE BATTERY.
6.
OTHERWISE, CONTACT CUSTOMER CARE FOR INSTRUCTIONS.
11